javascriptTips2
Must Watch!
MustWatch
How to Use Dynamic Variable Names?
In JavaScript, dynamic variable names are rarely utilized to update the names of variables in programs.
The dynamic variable is not assigned by providing any value.
Its value is changed/updated dynamically.
This strategy has its own importance in advanced or complex programming to implement real-world problems.
Like the PHP language, JavaScript faces difficulty implementing variable names dynamically.
However, the same output can be achieved through multiple strategies.
Now, users do not need to hard code the variable name for dynamic purposes.
Two auto-generated strategies are introduced, which dynamically modify the variable names during the execution of a program known as eval() and window object.
In this post, a demonstrated overview is provided of how to use dynamic variable names.
The outcomes of this post are listed below:
Using the eval() Method for Dynamic Variable Names
Using the window Object for Dynamic Variable Names
Method 1: Using the eval() Method for Dynamic Variable Names
The dynamic variable names mean that the names of variables are modified randomly or are user-defined.
The eval() method is specifically utilized to evaluate the JavaScript code in a string format.
The method takes a string as input in the format of a JavaScript expression.
After that, the method evaluates the expression.
The developers utilize the for loop to dynamically update the multiple variable names with the eval() method.
Example
An example is provided to implement the eval() method for dynamic variable names.
The code is as below.
Code
console.log('An example to implement eval() method');
var a = 'Welcome to JavaScript';
var b = 'a';
console.log(eval(b));
The description of the code is as follows:
In this code, the eval() method is utilized to dynamically update the variable name from a to b.
The console.log() method is used to get the specific values.
![]() Output
Output
![]() The output returns the above executable code and displays the dynamic variable names with the eval() method.
The output returns the above executable code and displays the dynamic variable names with the eval() method.
Method 2: Using the Window Object for Dynamic Variable Names
In JavaScript, a window object is basically a global object.
The object can access any method or global variable code.
Moreover, the user can make the dynamic variable with the help of a formatted string.
The window object is employed to access global variables or functions code.
This strategy is important if the user creates a global variable.
Example
The code is written below to implement the window object for dynamic variable names.
Code
console.log('Another example to implement window object method');
var n1 = 1,
n2 = 2,
n3 = 3;
var x1 = window.n1;
var x2 = window['n1'];
console.log("Welcome to JavaScript");
console.log(x1);
console.log("Welcome to JavaScript World");
console.log(x2);
The description of the above code is listed here.
The variable n1 is initialized with 1.
After that, assign the value of n1 to x1 using the dot operator, such as a window.n1 object.
Similarly, access the value of n2 to x2 using the square bracket [ ].
Finally, execute the code to display the dynamic variable names.
Output
![]() The output shows the dynamic variable names x1 and x2 are utilized by employing the window object.
The output shows the dynamic variable names x1 and x2 are utilized by employing the window object.
Conclusion
Two strategies, the eval() method and window object, are employed to use dynamic variable names.
The eval() method takes a string of JavaScript expressions as input and evaluates them.
The window object is utilized to access any method and global variables for dynamically updating the variable names.
You have learned here to use dynamic variable names using JavaScript.
For further understanding, we have provided a set of examples to implement the problem by following eval() and the window object strategy in JavaScript.
How to Toggle an Element Class?
The word “toggle” means to switch between options.
Toggling an element class refers to switching a class with another class.
For this purpose, the toggle() method is employed to add or remove a class.
It is useful for displaying content on web pages.
It returns a true value if a class is added to it.
Whereas it returns a false value for removing a class.
Moreover, users can utilize add(), contain(), and remove() methods to toggle an element class.
In today’s guide, you will learn to toggle an element class in the following ways:
Using the toggle() method
Using the add(), remove() and contain() methods
How to Toggle an Element Class?
Like other programming languages, JavaScript provides a variety of features for displaying content on web pages.
For visibility of the website’s content, it utilizes a feature of the toggle() method.
The method takes an input of the name of the class and toggles it with the help of HTML elements.
Syntax
element.classList.toggle(className)
JavaScript can toggle the element’s class className by employing the classList property.
The property has updated data if the class is removed or added.
Utilizing the HTML element, users can explore the toggle() method.
Method 1: Using the toggle() Method
An example is demonstrated by utilizing the toggle() method.
Code
<html><head><style>
.style {
width: 150%;
background-color: yellow;
color: black;
font-size: 25px;
box-sizing: border-box;}</style></head><h2>An example of Toggle an Element Class </h2><button onclick="myFunction()">Press the button </button><div id="DIV"> Welcome to JavaScript World.</div><script>
function myFunction() {
var element = document.getElementById("DIV");
element.classList.toggle("style");}</script></body></html>
The description of the above code is here:
A button named “Press the button” is attached with a myFunction() method.
In this method, a toggle() method is utilized by passing the properties of “style”.
After pressing the button, the toggle() method is called and applies the style properties to the message “Welcome to JavaScript World”.
![]() Output
Before pressing the button:
Output
Before pressing the button:
![]() After executing the above code, the output displays a button “Press the button”.
Moreover, a message is displayed here “Welcome to JavaScript World”.
After pressing the button:
After executing the above code, the output displays a button “Press the button”.
Moreover, a message is displayed here “Welcome to JavaScript World”.
After pressing the button:
![]() After pressing the button, the JavaScript code is executed on the backend and toggles the div element to “style”.
After that, it is observed that various styles are included in the div.
After pressing the button, the JavaScript code is executed on the backend and toggles the div element to “style”.
After that, it is observed that various styles are included in the div.
Method 2: Using add(), remove() and contain() Methods
Another example is adapted by utilizing the contain(), remove() and add() methods.
Code
<html lang="en"><head><h2>Another example of toggle a class element</h2><style>#Button {
margin-top: 15px;}
.uClass {
font-size: 20px;
color: green;}</style><body><button id="Please Press Button" onclick="u_Method()">
Click Me </button><p id="p">
Welcome to JavaScript World</p></body><script> function u_Method() {
var p = document.getElementById("p");if(p.classList.contains("uClass")) {
p.classList.remove("uClass");}else {p.classList.add("uClass");}}</script></head></html>
![]() The description of the code is as below.
In this code, u_method() is used to get the HTML element in the p variable.
After that, the contain() method is utilized to evaluate whether the method is triggered or not.
If it contains the event, then use the remove() method to disable the event.
Otherwise, the add() method is used to add the toggle event.
Output
Before pressing the button:
The description of the code is as below.
In this code, u_method() is used to get the HTML element in the p variable.
After that, the contain() method is utilized to evaluate whether the method is triggered or not.
If it contains the event, then use the remove() method to disable the event.
Otherwise, the add() method is used to add the toggle event.
Output
Before pressing the button:
![]() After pressing the button “Please Press Button”, a class element is toggled using the add(), remove(), and contain() methods.
After pressing the button:
After pressing the button “Please Press Button”, a class element is toggled using the add(), remove(), and contain() methods.
After pressing the button:
![]() By clicking the “Please Press Button” button, a message “Welcome to JavaScript World” is displayed using the add(), remove(), and contain() methods.
By clicking the “Please Press Button” button, a message “Welcome to JavaScript World” is displayed using the add(), remove(), and contain() methods.
Conclusion
Toggling an element class is a process of adding or removing a class by utilizing the elements.
To toggle an element class, you can use the toggle() method or utilize add(), remove(), and contain() methods.
The class contains a set of properties that are applied to elements.
How to Shuffle an Array Using JavaScript?
JavaScript is a programming-based language that provides interactive websites to its clients using built-in functions.
Shuffling is the concept of rearranging the elements of any sorted/sequence order.
It has various applications in gaming, cryptography, statistics, etc.
In JavaScript, the shuffle() method is utilized to conduct the shuffling tasks.
The method takes input as an array and returns a new array by exchanging the positions of elements in the array.
This post demonstrates the built-in method of JavaScript.
How to Shuffle an Array?
In JavaScript, the shuffle() method is adapted to change the location of elements in an array.
It does not modify/edit the array elements.
However, it reorders the elements present in the array at each array.sort() call.
An array.sort() is employed to sort the elements in the array.
It randomly changes the positions of elements in the array.
The shuffle() method takes the list or array as input.
After that, it performs a mathematical operation on it and returns the element of the list to rearrange the order.
Example 1: Using the shuffle() Method
An example is employed to shuffle an array using JavaScript.
The code is given below:
Code
// An example of shuffle an array
let numbers = [1, 2, 3, 4, 5];
let letters = ["a", "b", "c", "d", "e"];
functionshuffle(array){return array.sort(() =>Math.random() - 0.5);
}
console.log(shuffle(numbers));
console.log(shuffle(letters));
The description of the code is as follows in the listed format:
Firstly, two arrays, “numbers” and “letters” are used in which five elements are defined.
After that, a shuffle() method is employed by passing the array of five elements.
In the shuffle() method, the array.sort() is used to return the new array by switching the locations of array elements.
In the end, shuffled arrays are displayed using the console.log() method by passing the numbers and letters arrays.
![]() Output
Output
![]() The code returns the two arrays of numbers and letters by changing the position of the elements of each array.
The code returns the two arrays of numbers and letters by changing the position of the elements of each array.
Example 2: Shuffle an Array Using for Loop
An example is considered for shuffling an array using a for loop.
For instance, the code is given below.
Code
// Another example of shuffle an array
let array = [1, 2, 3, 4, 5]for(let x = array.length - 1; x >= 1; x--) {
let y = Math.floor(Math.random() * (x + 1));
let t = array[y];
array[y] = array[x];
array[x] = t;}
console.log(array);
In this code:
An array is created with the name of the array having five values.
After that, a for loop is initialized with the length of elements.
After that, the loop is executed until the value is reached or greater than 1.
After that, Math.random() method is employed to generate a number randomly between 1 and 5.
Finally, display the array using the console.log() method.
![]() Output
Output
![]() The output shows the execution of the above code and returns the shuffled array using JavaScript.
The output shows the execution of the above code and returns the shuffled array using JavaScript.
Conclusion
In JavaScript, the shuffle() method is employed to exchange the positions of elements in an array.
The random positioning phenomenon shuffles the elements of the array.
The method does not edit the element’s value.
It returns a new array in an unsorted order by utilizing the array.sort() method.
Here, you have learned to shuffle an array using JavaScript.
For a better understanding, we have explained the working of the shuffle() method as well.
What is Type Coercion ?
JavaScript provides different data types to store data, such as numbers, booleans, strings, etc.
The conversion of one data type value to another is known as type coercion.
Generally, type coercion is divided into two categories: implicit and explicit.
In implicit type coercion, the value of a data type is transformed into other data types without any interference.
In explicit coercion, the conversion of one data type into another data type by the developer interference.
This post provides detailed information on the type coercion with the following learning outcomes:
How Does Type Coercion Work?
Converting Number to String Using Implicit and Explicit type Coercion
Converting any datatype to Boolean via type Coercion?
Converting any datatype to Number via type Coercion?
How Does Type Coercion Work?
As discussed above, the conversion in the implicit coercion is carried out automatically, whereas the explicit type of coercion is assisted by the developers.
The following conversion falls under the type of coercion phenomenon:
To string conversion
To Boolean conversion
To number conversion
In the upcoming sections, these conversions are explained with examples.
How to Convert Any Datatype to String Using Type Coercion
Using type coercion, you can convert any data type to a string type.
A set of examples is provided to convert various data types to strings via type coercion.
Example 1: Converting Number to String Using Implicit Coercion
An example is demonstrated to convert the data type of one value to another data type by utilizing type coercion.
The code is given below:
Code
var a = 10;
console.log("DataType before coercion: " + typeof a);
var a = a + '';
console.log("DataType after coercion: " + typeof a);
In the above code:
A number is initialized and its type is printed before coercion.
The numeric value is added as 10.
Again, the type of the variable is obtained using the type of operator.
Output
![]() The output represents that the data type before coercion was “number”.
After the coercion, the data type is changed to “string”.
The output represents that the data type before coercion was “number”.
After the coercion, the data type is changed to “string”.
Example 2: Converting Number to String Using Explicit Coercion
An example is provided to convert the data type of one value to another data type by utilizing explicit type coercion.
For this purpose, the code of explicit type coercion is as follows.
Code
var a= 10;
console.log("Before coercion: " + typeof a)
var a = String(a);
console.log("After coercion: " + typeof a);
In the above code:
A variable is initialized as a number and its type is printed before coercion.
The string () method is applied to that variable for explicit coercion.
Lastly, the type of the variable is again retrieved after coercion.
Output
![]() The output represents that the datatype is a “number” before the coercion.
However, after coercion, the data type is transformed to “string”.
The output represents that the datatype is a “number” before the coercion.
However, after coercion, the data type is transformed to “string”.
How to Convert Any Datatype to Boolean Via Type Coercion?
As in the above examples, the number-to-string conversion is carried out via implicit as well as explicit type coercion.
The following example code enables you to understand the implicit/explicit type coercion from number to Boolean.
Code
var x = 10;
console.log("type of x before coercion: " + typeof x)//explicit type coercion from number to boolean
console.log("type of x after coercion: " + typeof Boolean(x))
In the above code:
A variable x is initialized as a number and its type is printed before the coercion.
Boolean() method is applied to that variable for explicit coercion.
Lastly, the type of the variable is again retrieved after coercion.
![]() Output
Output
![]() The output illustrates that the datatype is a “number” before the coercion.
However, after coercion, the data type is converted to “boolean”.
The output illustrates that the datatype is a “number” before the coercion.
However, after coercion, the data type is converted to “boolean”.
How to Convert Any Datatype to Number Via Type Coercion?
The string-to-number transformation is carried out here.
The following example code enables you to understand the implicit/explicit type coercion from string to number.
Code
let result1;
let result2;
result1 = '324';
console.log("type of x before coercion: " + typeof (result1))
result2 = Number(324);
console.log("type of x after coercion: " + typeof (result2))
In the above code:
A variable result1 is initialized as a string and its type is printed before coercion.
Number() method is applied to that variable for explicit coercion.
Lastly, the type of the variable is again retrieved after coercion.
![]() Output
Output
![]() The output represents that the datatype is “string” before the coercion.
However, after coercion, the data type is converted to “number”.
The output represents that the datatype is “string” before the coercion.
However, after coercion, the data type is converted to “number”.
Conclusion
The type coercion is the phenomenon of converting any datatype to a string, boolean, or number.
The type of coercion can be either explicit or implicit.
The implicit is the coercion type, which is carried out automatically, while the explicit depends on the needs of the developer.
This article gives a detailed description of the type coercion concept.
We have illustrated the implicit/explicit coercion of various data types to string, boolean, and number.
What is Currying Function?
JavaScript supports a variety of mathematical programming functions to optimize operations during web development.
These programming functions are utilized in complex problems such as currying.
Most websites utilize the currying function to switch complex tasks to simpler ones.
Like other programming languages, JavaScript supports the currying function to resolve different problems.
The content of the article is enlisted here to discuss the currying function.
What is Currying?
Difference between currying and traditional function
How to use currying function
What is Currying?
Currying is the modern concept of a programming language.
Basically, it breaks down the function having multiple arguments and returns a sequence of functions.
These functions accept only a single argument at a time.
It is very useful to avoid passing the same variables repeatedly.
Additionally, there are various advantages to utilizing the currying function.
Some of them are as follows:
Division of a complex function into smaller/modular functions.
Reduce the errors by the clarity of the code.
Restrict passing of the same variables repeatedly.
It is useful to create a high-order function.
Difference Between Currying and Traditional Function
The syntax of a currying function is utilized from a traditional function to a modern function strategy.
The purpose of this example is to differentiate between them in JavaScript.
The syntax for utilizing the simple function in JavaScript is as follows.
Syntax of tradition function
function run(argument1, argument2, argument3) {
// write the code here}
In the traditional function, all the arguments are predefined and are used at once while declaring the function.
Currying function.
functionrun(argument1) {return (argument2) => {return (argument3) => {return run(argument1, argument2, argument3)
}
}}
Currying is creating the nested functions based on the number of arguments.
In the above syntax, each function returns the argument.
How to Use Currying Function?
In this example, a simple addition operation is performed between three variables, x, y, and z, by utilizing the currying function.
// An example of using the Currying functionconst addition =(x) => {return (y)=>{return (z)=>{return x+y+z
}
}}
console.log(addition(12)(10)(5))
The description of the above code is outlined below:
An addition function is defined that takes one argument, x.
After that, it returns a function that requires an argument, y.
The same procedure is repeated with the z argument and returns the sum of these three variables.
In this way, the function is not completed until it accepts all the arguments that are passed to it.
![]() Output
Output
![]() The output displays the execution of the above code and returns “27”, which is the sum of 12, 10, and 5 values.
The output displays the execution of the above code and returns “27”, which is the sum of 12, 10, and 5 values.
Conclusion
The currying function allows you to break the function into multiple modules to serve one purpose.
This strategy makes a currying function more effective than traditional functions.
Here, you have learned the working and usage of the Currying function.
A simple example and the advantages of the currying function are provided for understanding this function.
Synchronous and Asynchronous
JavaScript is a scripting-based programming language that is executed on the web browser by providing interactive webpages to the users.
JavaScript has two types of code execution.
One is known as synchronous, and the second is asynchronous.
Synchronous programming refers to the execution of the code in a series.
While the asynchronous execution represents the parallel execution of the JavaScript code.
This post provides a deep insight into the synchronous and asynchronous terms.
What is Synchronous?
By default, the JavaScript code is executed in a synchronous/series-like manner.
In a synchronous way, only one line of code is executed, and then the compiler proceeds to the next line.
It executes one line and waits until the first line is executed properly.
Example
An example of synchronous programming is given in the following JavaScript code.
Code
// An example of Synchronousconst message= 'JavaScript World';const greeting = `I Love ${message}`;
console.log(greeting);
The description of the above code is provided here:
In the first line of code, the string “JavaScript World” is stored in the message variable.
After that, the greeting variable is utilized to store a complete message, “I Love JavaScript World.”
In the end, the complete string is displayed using the console.log() method.
![]() Output
Output
![]() The output shows the message “I Love JavaScript World” by the synchronous method in JavaScript.
The output shows the message “I Love JavaScript World” by the synchronous method in JavaScript.
What is Asynchronous?
The asynchronous strategy is utilized in programming languages that execute multiple processes/lines of code simultaneously.
The asynchronous strategy is quite helpful when the execution is blocked indefinitely.
The asynchronous functionality does not affect the responsiveness or the user experience.
Example
An example is provided by utilizing the asynchronous strategy.
Code
// An example of Asynchronous
functionstart() {
console.log('Welcome to JavaScript World');
}
functionend() {
console.log('Are you ready for execution?');
}
setTimeout(start, 5000); // 5000 milliseconds are set
end();
Firstly, a start() method is defined in which a message is displayed, “Welcome to JavaScript World”.
After that, the end() method is utilized with the message “Are you ready for execution?”.
In the end, the output that is returned from the start() method is passed to the setTimeout() method and assigned 5000 milliseconds.
![]() Output
Output
![]() The display returns the asynchronous output.
In this code, first, write the start() method but execute the statement of the end() method and display a message asking, “Are you ready for execution?”.
After that, pause the execution for 5000 milliseconds.
Finally, the start() method is executed and shows the message “Welcome to JavaScript World.”
The display returns the asynchronous output.
In this code, first, write the start() method but execute the statement of the end() method and display a message asking, “Are you ready for execution?”.
After that, pause the execution for 5000 milliseconds.
Finally, the start() method is executed and shows the message “Welcome to JavaScript World.”
Conclusion
JavaScript provides both synchronous and asynchronous types of execution according to developer needs.
In the synchronous strategy, the code is executed in a series or a sequential order.
On the other hand, users can perform multiple tasks at the same time by utilizing the asynchronous strategy.
You have learned to understand and use both synchronous and asynchronous terms.
Random Quote Generator Using HTML, CSS and JavaScript
In modern website development, quotations are observed on any side of the web page.
These random quotations are generated with the help of a random quote generator.
The random quote generator is created with the help of HTML, CSS, and JavaScript.
The quotations are used to get the users more focused and with a stick-to-content mind.
Keeping in view the importance of quotations on web pages, today’s guide will help you to create a random quotation generator using HTML, CSS, and JavaScript.
How to Create a Random Quote Generator?
It is best practice to use the random quote generator on your web page.
The workings of a random quote generator are simple to understand.
It extracts a quote randomly every time by pressing a click and presenting it in the browser window.
Moreover, users can retrieve/extract quotes from different sources, such as arrays, databases, or APIs.
Example
An example is adapted to generate a random quote generator by utilizing the HTML, CSS, and JavaScript.
For better understanding, we have explicitly explained the HTML, CSS, and JavaScript codes.
HTML
The following example code refers to the HTML part of the random quote generator.
<html lang="en"><head><meta name="viewport" content="width=device-width, initial-scale=1" /><title>Random Quote Generator</title><linkhref="https://fonts.googleapis.com/css2?family=Poppins:wght@400;600&display=swap"rel="stylesheet"/><link rel="stylesheet" href="style.css" /></head><body> <div class="wrapper"><div class="container"><p id="quote"> </p><h3 id="author"></h3><button id="btn"> Press Button</button></div></div><script src="script.js"></script></body></html>
In this code, the description is listed here:
First of all, Google fonts are imported and a link to an external style sheet (whose code is explained below) is also placed.
An area/container is specified to display the random quote by <div> tags.
After that, the paragraph <p> tag is used to pass the quote as a value to id.
The <h3> and <p> tags are associated id’s “author” and “quote”.
A button named “Press Button” is created.
Lastly, the “.js” (whose code is explained below) is linked with this HTML file.
Using CSS
The purpose of adding a CSS file is to give an attractive and appealing look to the interface.
* {padding: 2;margin: 3;box-sizing: border-box;font-family: "Poppins", sans-serif;}.container button {background-color: #ffffff;border: none;padding: 15px 45px;border-radius: 5px;font-size: 18px;font-weight: 600;color: green;cursor: pointer;}
body {background-color: white;}
The description of the code is as follows:
The padding, margin, box-sizing, and font family are utilized for all the HTML elements.
After that, some properties are assigned to the button such as font size, color, background color, etc.
Finally, the background color of the body is selected to be white for visibility to the users.
JavaScript
The JavaScript code associated with the HTML file is provided below:
let quote = document.getElementById("quote");
let author = document.getElementById("author");
let btn = document.getElementById("btn");const url = "https://api.quotable.io/random";
let getQ = () => {
fetch(url)
.then((data) => data.json())
.then((item) => {
quote.innerText = item.content;
author.innerText = item.author;
});};
window.addEventListener("load", getQ);
btn.addEventListener("click", getQ);
The description of the code is mentioned below:
Firstly, three variables (quote, author and btn) are utilized to link with HTML elements.
After that, an API is imported for representing random quotes.
Furthermore, the getW() method is used to fetch the content of a quote with an author’s name.
Finally, the addEventListener property is employed by passing a click value as an argument.
Output
![]() The output shows the random quotes in the browser by employing HTML, CSS, and JavaScript.
By pressing each time, a new random quote is generated in the browser.
The output shows the random quotes in the browser by employing HTML, CSS, and JavaScript.
By pressing each time, a new random quote is generated in the browser.
Conclusion
A random quote generator is developed by utilizing HTML, CSS, and JavaScript.
The HTML file provides the specific area/container to display a quote.
The role of a CSS file is to give styling properties such as font color, background color, text size, etc.
to make the generator attractive/appealing to the users.
Furthermore, JavaScript provides the logic operations to extract the random quote.
Here, you have learned that all these steps are given in a sorted order.
Rock, Paper and Scissor Game Using JavaScript
Rock, Paper, and Scissor is a well-known game around the globe that almost everyone has played in their childhood.
To normal people, it’s a good childhood memory, but for programmers, it is a good coding practice.
Beginner programmers should always look for interesting and easy-to-implement problems.
And this is one of them.
This article will demonstrate the implementation of the RPS game with JavaScript.
Step 1: Set up HTML Webpage
Start by creating a new HTML webpage, and in that webpage, Do the following things:
Greet the user or Challenge them
Include a start button that starts the game
To do these, use the following lines inside the HTML document:
<center><h3>Let's play A Game of Rock Paper Scissors</h3>
<br />
<b>Type 0 for Rock , 1 For Paper, 2 for Scissors</b>
<br />
<br />
<button onclick="startGame()">Start</button>
</center>
In the above lines, the user is also being notified that the 0 means Rock, 1 means Paper and 2 means Scissors.
These are also the rules which will be implemented to determine the winner.
Also, the button has an onclick property set to the startGame() method, which will start the game once the user clicks it.
Load the HTML in the browsers, and it will display the following webpage:
![]() Everything is placed o=in the center of the webpage thanks to the <center> tag
Everything is placed o=in the center of the webpage thanks to the <center> tag
Step 2: JavaScript Code for the Functionality of the Game
Start by creating the function startGame() which will be called on every button press:
function startGame() {//The upcoming code goes inside here}
After that generate the computer’s move, Remember there are only 3 different options, 0,1 and 2.
0 stands for Rock, 1 stand for Paper and 2 stands for Scissors:
cm = Math.floor(Math.random() * 3);
This provides a random value from 0 to 2 and stores it inside the variable cm standing for the computer’s move.
After that, use a prompt to tell the user to enter his choice, store that choice in a variable and then convert it into int by using the parseInt() method and store the final value in the variable “pm”:
input = prompt("Enter your Choice!");
pm = parseInt(input);
After that, write the rules for deciding the winner of the game by using the following rules:
Rock beats Scissor
Scissor beats Paper
Paper beats Rock
Same sign => Tie
These rules are implemented with simple if-else if statements with the following lines:
if (cm == 0&& pm == 1) {
alert("You beat Computer with Paper against Rock");
} elseif ((cm = 0&& pm == 2)) {
alert("Computer Beat you with Rock");
} elseif ((cm = 1&& pm == 0)) {
alert("Computer Beat you With Paper");
} elseif ((cm = 1&& pm == 2)) {
alert("You beat Computer with Scissor against Paper");
} elseif ((cm = 2&& pm == 0)) {
alert("You beat Computer with Rock against Scissor");
} elseif ((cm = 2&& pm == 1)) {
alert("Computer Beat you With Scissor");
} else {
alert("It's a tie");
}
After that simply close down the ending bracket of the startGame() and the JavaScript part is done.
The complete JavaScript Snippet is as follows:
function startGame() {
cm = Math.floor(Math.random() * 3);
input = prompt("Enter your Choice!");
pm = parseInt(input);if (cm == 0&& pm == 1) {
alert("You beat Computer with Paper against Rock");
} elseif ((cm = 0&& pm == 2)) {
alert("Computer Beat you with Rock");
} elseif ((cm = 1&& pm == 0)) {
alert("Computer Beat you With Paper");
} elseif ((cm = 1&& pm == 2)) {
alert("You beat computer with Scissor against Paper");
} elseif ((cm = 2&& pm == 0)) {
alert("You beat computer with Rock against Scissor");
} elseif ((cm = 2&& pm == 1)) {
alert("Computer Beat you With Scissor");
} else {
alert("It's a tie");
}}
Step 3: Playing the Game
Launch the HTML document and click on the start button and start playing the game like:
![]() With that, the Rock, Paper, and Scissor is fully functioning, ENJOY!
With that, the Rock, Paper, and Scissor is fully functioning, ENJOY!
Wrap-up
Rock, Paper, and Scissor is not only a childhood game for many but also a great programming exercise for new programmers.
Such exercises are not only fun to implement, but they also sharpen the skill of a newbie programmer.
In this article, a full working Rock, Paper, and Scissor game was implemented, and every step was explained one by one.
Prototypal Inheritance using __proto__
JavaScript does not utilize the classical inheritance, but it utilizes the prototypal inheritance.
Prototypal inheritance means methods and objects can be sharable, copied, and extended.
It is a very efficient strategy that reduces the time and effort of developers by sharing properties.
For this purpose, the user can easily access the object properties of another object through prototypal inheritance.
How Does Prototypal Inheritance Work?
It is the type of inheritance that refers to an object’s ability to access the properties and methods of other objects., each object has an internal property that can be accessed using the __proto__ property of prototypal inheritance.
The syntax of using the property __proto__ of Prototypal Inheritance is as follows.
Syntax
newObject.__proto__ = existingObject
In this syntax, the __proto__ property is utilized to share the properties of existingObject with the newObject.
Example
An example is demonstrated using the __proto__ property.
Code
// An example of Prototypal Inheritance using __proto__
let Car = {
name: "Honda", // A property is a "name" that assign a value "Honda"};
let Color= {
color: "Red", // A property is a "color" that assign a value "Red"};
Car.__proto__ = Color;
console.log("It is a " + Car.color + " " + Car.name);
In the above code:
First, an object is defined as Car.
A property name is used in this object, and its name is set to “Honda”
Another object named Color is created in which the value “Red” is assigned to the color property.
Finally, the properties of the Color object are shared with the Car object using the __proto__ keyword.
![]() In JavaScript code, the property of __proto__ is used under prototypal inheritance.
Output
The output of the above executable code is here.
In JavaScript code, the property of __proto__ is used under prototypal inheritance.
Output
The output of the above executable code is here.
![]() The execution of JavaScript code is performed in the web browser.
The output represents that the properties are shared between the objects of Car and Color using the __proto__ keyword.
The execution of JavaScript code is performed in the web browser.
The output represents that the properties are shared between the objects of Car and Color using the __proto__ keyword.
Conclusion
In JavaScript, the “__proto__” keyword is used to set or get the prototype of an object.
The prototypal inheritance is the phenomenon of adding the methods and properties to an object.
In this method, properties are shared from one object to another object with a type of inheritance.
Here, you have learned to apply the “__proto__” keyword to carry out Prototypal Inheritance.
The objective of employing this property is to reduce the time and effort of developers using shared properties from another object.
Primitive and Non-Primitive Data Types
Data types are generally known as one of the building blocks of any programming language.
That is why knowing data types in a programming language is essential and crucial for becoming a professional programmer.
The data types have been categorized into two different categories.
This article will display the difference between these two different categories with the help of examples.
Additional Note: Everything is known to be an Object, every data type may it be primitive or non-primitive, it is an Object of JavaScript.
Primitive Data types
By definition, primitive data types are those data types that have been put into JavaScript by the developers of JavaScript.
Or, in much simpler words, these data types have been predefined into JavaScript.
The list of primitive data types of JavaScript includes the following:
string
number
bigint
boolean
undefined
symbol
null
All of the data types mentioned in the above list have specific constraints.
These constraints include the type of value they can store inside their variable, the maximum limit of that value and the maximum size of memory they can consume.
To demonstrate the working of some of the following types, look at the following examples below:
1: Strings
To create a string, simple create a variable and set it equal to a string enclosed inside the double quotation marks like:
stringVar = "Welcome To LinuxHint";
Display it on the terminal using the console log function:
console.log(stringVar);
And the terminal will show the following:
![]() The string has been printed on the terminal, The constraint of defining a string can be the encapsulation with a double quotation mark.
The string has been printed on the terminal, The constraint of defining a string can be the encapsulation with a double quotation mark.
2: Numbers
To create a variable of the numbers data type, simply set its value equal to an integer or a floating point like so:
num1 = 50;
num2 = 20.33;
console.log(num1);
console.log(num2);
Executing the following gives the following output on the terminal:
![]() The constraint for creating a number is that it cannot contain any other value than numeric characters and a decimal point.
The constraint for creating a number is that it cannot contain any other value than numeric characters and a decimal point.
3: Undefined
Undefined is a data type not found in many programming languages.
This data type simply defines the variable’s memory as assigned, but no value is placed inside that memory.
To demonstrate this, use:
var x = undefined;
var y;
console.log(x);
console.log(y
One variable is set to the keyword undefined, and the other is simply created and not given any value.
Upon execution of the code, the terminal shows:
![]() Both of the variables returned undefined on the terminal.
Both of the variables returned undefined on the terminal.
4: Booleans & null
Booleans can be defined by creating a variable and setting them equal to the keyword true or false, and null variables can be defined by setting the value equal to the key null.
Use the following lines to demonstrate both of these data types:
var x = true;
var y = null;
console.log(x);
console.log(y);
Upon running the above lines of code, the terminal displays:
![]()
Non-Primitive Data Types
These are the data types that the programmer defines under a particular name while writing a JavaScript program.
The key point of these data types is that their size is not defined, and they can store values from almost all primitive data types.
The non-primitive Data types are as follows:
Objects (User – defined)
Arrays
Let’s go over the working of the non-primitive data types one by one
1: Objects
To create an object, there are two different ways, one includes the use of the “new Object()” constructor and the other is known as the literal notation.
For the new Object() constructor, take the following lines:
var obj1 = new Object();
obj1.stringVal = "String inside the object";
obj1.intVal = 14;
console.log(obj1);
In the above lines:
The variable obj1 has been created using the new Object() constructor
Obj1 has been given 2 values stringVal and intVal, stringVal is a string data type value while the intVal is a number data type value.
The console log function is used to display the output on the terminal
Executing the above code provides the following result on the terminal:
![]() The variable obj was displayed on the terminal in the object notation.
The other way of creating an object variable is by using literal notation.
To demonstrate this, use the following lines:
var obj1 = {
stringVal: "String inside the object",
intVal: 14,};
console.log(obj1);
As it is clear from the code snippet above, to use the literal notation for object definition, simply use the curly brackets as the value of the variable and inside the curly brackets, pass the key-value pairs.
Running the above lines of code provides the following output:
The variable obj was displayed on the terminal in the object notation.
The other way of creating an object variable is by using literal notation.
To demonstrate this, use the following lines:
var obj1 = {
stringVal: "String inside the object",
intVal: 14,};
console.log(obj1);
As it is clear from the code snippet above, to use the literal notation for object definition, simply use the curly brackets as the value of the variable and inside the curly brackets, pass the key-value pairs.
Running the above lines of code provides the following output:
![]() The output is the object’s key-value pairs in literal notation
The output is the object’s key-value pairs in literal notation
2: Arrays
Arrays are also considered a primitive data type language.
And the reason for this is the fact that the size of arrays is not defined, plus they can store values from primitive data types.
Use the following lines as an example of array definition:
var array1 = [1, 2, true, "Google", undefined, null];
After that, pass this array variable “array1” to the console log function as:
console.log(array1);
And the result on the terminal will be:
![]() The array1 variable with almost all primitive data types was printed on the terminal
The array1 variable with almost all primitive data types was printed on the terminal
Wrap up
Primitive data types are those data types that are predefined, have a constraint about how to define them and the values they can store, and last, they have a limited size.
While the non-primitive data types include Object and Array.
The non-primitive data types don’t have a constraint on the type of value they can store.
Similarly, they do not have a maximum size limit on them.
JavaScript SyntaxError – Unexpected Token
JavaScript is a widely used scripting language.
Apart from its popularity, some challenges are raised while working with this scripting language.
One of them is “SyntaxError – Unexpected token”.
This error relates to the syntax error categories.
In this post, the possible reasons for SyntaxError – Unexpected token are discussed.
Furthermore, suitable guidelines are also provided to avoid this error.
How Does “SyntaxError – Unexpected Token” Occur?
There are a number of reasons behind this “syntax error – unexpected token”; some of them are listed below with examples.
Error 1: Extra Parenthesis
An error is given below in which a SyntaxError – Unexpected token has occurred.
function sum(x, y) {
return x + y;}}
In the above code, the function closing contains an extra parenthesis.
![]() Output
Output
![]() The output shows that the “SyntaxError: Unexpected token” is thrown because of the extra parenthesis.
The output shows that the “SyntaxError: Unexpected token” is thrown because of the extra parenthesis.
Error 2: Extra Colon
Another error is discussed here regarding a SyntaxError – Unexpected token and how to resolve the error.
const obj = {
name:: "Java",}
In the above code, the constant obj is initialized with name property.
A Java value is assigned to this property.
![]() Output
Output
![]() The “SyntaxError: Unexpected token” is thrown because of the extra colon.
The “SyntaxError: Unexpected token” is thrown because of the extra colon.
How to Resolve “SyntaxError – Unexpected Token”?
In JavaScript, most programmers fix the errors by checking the mistakes in the code using the debugging method.
In this method, you execute the chunks of code and finally resolve the errors.
Furthermore, developers as well as users must be familiar with the latest version of the programming language to fix the problems.
For instance, ES2015 refers to the latest version of JavaScript.
Solution of SyntaxError is provided here.
const obj = {
name: "Java",
}
console.log(obj.name)
The script is ready for execution after removing the colon at the end of the property name.
![]() The script is ready for execution after removing the colon.
The script is ready for execution after removing the colon.
![]() The output shows the SyntaxError – Unexpected Token is resolved.
It is concluded that the “SyntaxError: Unexpected token” can be resolved using the proper notations.
The output shows the SyntaxError – Unexpected Token is resolved.
It is concluded that the “SyntaxError: Unexpected token” can be resolved using the proper notations.
Conclusion
In JavaScript, a SyntaxError occurs due to ignorance of programming guidelines.
Like, if you add extra brackets or forget to close the function/method properly.
These issues can be resolved by using the proper guidelines supported by ES2015(the latest version of JavaScript).
This post demonstrates the reasons for occurrences of the JavaScript SyntaxError – Unexpected token with the help of suitable examples.
JavaScript ReferenceError – Variable is not Defined
Working with a programming language often causes one to encounter errors frequently, but knowing how to find the error and how to fix the error is nothing less than skill.
JavaScript Reference error is quite a common error that people encounter (especially beginners).
This error simply means that there exists such a line in the code that is telling the compiler to access a variable or an object that has no memory address or location.
Such a scenario happens when the variable in focus here is not yet initialized or declared at all.
If the variable is not declared, then it will not take up a memory location or address.
By this statement, it is easy to conclude that this “ReferenceError – Variable is not Defined” occurs when the variable that the programmer is trying to access has not been previously declared prior to the statement that caused the error.
Error Message of “ReferenceError – Variable is not Defined”
The error message of the reference message, at first glance, seems very daunting because it looks something like this:
![]() The error message contains around 10 different lines, and all of these lines tell a different story on why the error was caused.
Now, if the programmer were to visit the files linked in these 10 lines and try to figure out the error, he would find himself in a maze.
The error message contains around 10 different lines, and all of these lines tell a different story on why the error was caused.
Now, if the programmer were to visit the files linked in these 10 lines and try to figure out the error, he would find himself in a maze.
Breaking Down the Error Message of “ReferenceError – Variable is not Defined”
Take a look at the following screenshot of the same error message that was used in the previous section:
![]() Let’s explain the markings that are done on the screenshot:
1: This is the JavaScript statement that has caused the error
2: This is the variable whose reference the compiler couldn’t find
3: The file name and the line number of the statement which caused the error
4: Files of the environment that led to error (Ignore these lines)
Let’s explain the markings that are done on the screenshot:
1: This is the JavaScript statement that has caused the error
2: This is the variable whose reference the compiler couldn’t find
3: The file name and the line number of the statement which caused the error
4: Files of the environment that led to error (Ignore these lines)
Fixing the “JavaScript ReferenceError – Variable is not Defined”
Fixing this error is quite simple, go to the line that has been mentioned in the error message and use a variable name that has been declared prior to that statement.
To demonstrate this, take the following code:
functionaddNums(num1, num2) {
returnnum1 + num2;}
result = addNums(5 , 6);
console.log(results);
The above lines do the following:
Create a function addNums which returns the sum of two number passed inside its arguments
Use the function to calculate the sum of 5 and 6, and store the return value in the result variable
Print the result using the results variable
Executing the code produces the following error message:
![]() It says the “results” variable couldn’t be referenced and points to the line number 6.
Now, compare line 6 and line 4:
result = addNums(5 + 6); // Line Number 4
console.log(results); // Line number 6
It is clear that the error is caused due to the misspelling of the name of the variable in line number 6.
Correct the spelling of the identifier which has the return value of the function to:
result = addNums(5 + 6); // Line Number 4
console.log(result); // Line number 6
After that, execute the program and observe the following output:
It says the “results” variable couldn’t be referenced and points to the line number 6.
Now, compare line 6 and line 4:
result = addNums(5 + 6); // Line Number 4
console.log(results); // Line number 6
It is clear that the error is caused due to the misspelling of the name of the variable in line number 6.
Correct the spelling of the identifier which has the return value of the function to:
result = addNums(5 + 6); // Line Number 4
console.log(result); // Line number 6
After that, execute the program and observe the following output:
![]() The output shows that the program is now working without any errors
The output shows that the program is now working without any errors
Conclusion
The JavaScript ReferenceError – Variable is not Defined is trying to access a variable using its identifier which has not been declared prior to that statement.
This can be caused by misspelling or by simply missing a whole statement in which the programmer was supposed to declare the variable.
The way to fix this method is to go to the line number mentioned in the error message and fix the name of the variable or declare the variable prior to that statement.
JavaScript ReferenceError – Invalid Assignment Left-Hand Side
In JavaScript or any programming language, encountering errors is not a big deal if you know how to fix them.
Finding and fixing errors is a crucial skill that one must acquire actually to become a pro in that programming language.
This article will explain the error “JavaScript ReferenceError – Invalid Assignment Left-Hand Side” in detail with its causes and the solution on how to resolve it.
So let’s get started.
The Invalid Assignment Left-Hand Side Error Explained
The name of this error indicates that this error is caused by a faulty or buggy assignment statement.
The “left-hand side error” part of this error means that the value at the left-hand side of the assignment operator was not a value that could have been set equal to something using the assignment operator.
However, this error is not caused due to the assignment operator, and it is actually caused by the misuse of the assignment operator where the actual intention was to use the “==” or the “===” operator.
Creating the ReferenceError – Invalid Assignment Left-Hand Side Error
To create the error in focus using the following lines:
if (Math.PI + 8 = 3 || Math.PI + 6 = 4) {
console.log('Impossible');}
Executing the program will show an error in the terminal.
Take a look at the error message of the “ReferenceError – Invalid Assignment Left-Hand Side”:
![]() It is pretty clear from the above image that the error message doesn’t really help the user that much apart from highlighting the line that has caused the error.
It is pretty clear from the above image that the error message doesn’t really help the user that much apart from highlighting the line that has caused the error.
Debugging the ReferenceError – Invalid Assignment Left-Hand Side Error
To debug the error take a look at the code again:
if (Math.PI + 8 = 3 || Math.PI + 6 = 4) {
console.log('Impossible');}
In this code snippet:
The user is trying to add a value to Math.PI, which is actually a constant, meaning that its value cannot be changed not by using the “+” operator or even by the assignment operator.
Now, to fix this error, one must be clear about what to do or what was the real intention of the statement.
If the task was to compare the values, then simply changing the “=” operator to “==” will fix the error.
But if the assignment was the actual task, then simply change the constant in focus to a variable by using a keyword var.
In the above, the solution is to change the assignment operator to an equality “==” operator like this:
if (Math.PI + 8 == 3 || Math.PI + 6 == 4) {
console.log("True");} else {
console.log(false);}
If the program is executed now, it will produce the following result:
![]() The program didn’t crash and the result was printed on the terminal
The program didn’t crash and the result was printed on the terminal
Wrap-up
The JavaScript ReferenceError – Invalid Assignment Left-Hand Side is caused by the wrong use of assignment operator.
Now this wrong use can belong in two different scenarios.
Either trying to change the value of a constant by using the assignment operator or by mistaking it for the equality “==” operator.
This article has explained the error at focus in detail and explained its solution as well.
JavaScript Promise reject() Method
The promise reject() method is used to display the reason for the error, either specified by the backend or front-end., the method is employed to resolve or reject something.
Therefore, it returns the rejected message in the promise object.
It is mainly used for specific error-catching and debugging purposes.
All the famous browsers, including Firefox, Opera, Chrome, etc., support the Promise.reject() method.
This post explains the usage and working of the JavaScript promise.reject() method.
How to Use the Promise.reject() Method?
The promise object is specifically used for asynchronous calls which are resolved or rejected.
For this purpose, the catch() method is utilized to capture and hold the rejected message and forward it to the user console.
The method returns the promise object that contains the rejected message, specifying the reason.
The syntax of the JavaScript Promise.reject() method is provided below:
Syntax
Promise.reject(reason)
reason: The reason for rejecting the promise.
Example 1
An example is considered using the reject method, the following example code is executed.
Code
// An example of use promise reject() method
console.log("An example of use promise reject() method");const prom = newPromise((resolve, reject) => {
setTimeout(() => {
reject('The promise return fail');
}, 3000);});// use catch() method
prom.catch(er => {
console.log(er);});
The description of the above code is provided here:
A message is displayed “An example of use promise reject() method” using the console.log() method.
After that, the Promise object is created with a new keyword.
Another method, the setTimeout() is utilized in which a reject method is called that displays the message after 3000 milliseconds.
![]() Output
Output
![]() The outcome shows that the message “The promise return fail” is displayed using the reject() method.
Moreover, it is displayed after 3 seconds by utilizing the setTimeout() method.
The outcome shows that the message “The promise return fail” is displayed using the reject() method.
Moreover, it is displayed after 3 seconds by utilizing the setTimeout() method.
Example 2
An example is considered using the promise reject() method by utilizing the if and else statements.
Code
functionmet1() {
returnnewPromise((resolve, reject) => {
console.log("Welcome to JavaScript");
console.log("Welcome to Linuxhint");if (Math.random() >.5) {
resolve("SUCCESS")
} else {
reject("FAILURE")
}
})}const promise = met1();
![]() In this code:
A user-defined met1() method is created that returns the output of the Promise object.
After that, two parameters, resolve and reject are passed to this method.
In this method, two messages are displayed using the console.log() method.
After that, check the condition, if the Math.random() method returns a value greater than.5, then the resolve() method is called.
Otherwise, the reject() method is executed.
At the end of the code, an object promise is initialized to call the met1() method.
Output
In this code:
A user-defined met1() method is created that returns the output of the Promise object.
After that, two parameters, resolve and reject are passed to this method.
In this method, two messages are displayed using the console.log() method.
After that, check the condition, if the Math.random() method returns a value greater than.5, then the resolve() method is called.
Otherwise, the reject() method is executed.
At the end of the code, an object promise is initialized to call the met1() method.
Output
![]() The output returns the executable code by displaying the messages in the console window.
The output returns the executable code by displaying the messages in the console window.
Conclusion
The Promise.reject() method is employed to display the reason for the error, either specified by the backend or front-end.
The method is utilized for asynchronous operations.
In this article, an overview is demonstrated by providing the syntax.
Moreover, an example is adapted to better understand the concept of the Promise.reject() method in JavaScript.
The method is specifically used for debugging purposes.
JavaScript Delete Operator
The delete operator is utilized to remove an existing property of any object.
It is only effective on the properties of the object.
The delete operator has its own importance for deleting a specific property in a complex data structure.
Moreover, the property does not affect the function names or variables.
In this article, the working and usage of the delete operator in different scenarios are demonstrated.
How to Utilize the Delete Operator?
The delete operator is used to delete the properties of objects.
The operator returns the true value after completing the action; otherwise, it returns false.
It is useful to access the specific property of an object and remove it from the existing property.
However, the performance of the delete operator varies from one scenario to another.
If the property does not exist and the user utilizes the delete operator to delete it, the operator returns the true value.
A property declared with the var keyword cannot be deleted from the method or global scope.
If a property is declared with const or let keywords, users are unable to delete it from the scope in which they are defined.
The built-in object properties such as Array, Math, and Object cannot be deleted.
Syntax
delete object.property;
Or
delete object["property"];
Parameters:
The parameters of the above syntaxes are provided below:
property: specify the property to be deleted.
object: represents the object name whose property is deleted.
Example 1
An example is adapted to delete the property by employing the delete operator.
Code
// An example of using the delete operator in // An example of using the delete operator
var Teacher = {
name: 'John',
age: 34,
designation: 'professor'
}
console.log(delete Teacher.designation);
console.log(delete Teacher.name);
console.log(delete Teacher.salary);
The description of the code is given below:
An object is created with the name of Teacher.
After that, different properties are utilized, such as name, age, and designation.
Different values, including “John”, “34” and “professor” are assigned to the above-mentioned keys.
Furthermore, the delete operator is utilized with the delete keyword inside of the console.log() method.
Finally, delete the designation property by accessing “delete Teacher.designation”.
Similarly, name and salary properties are deleted with this operator.
![]() Output
Output
![]() The output returns the true value that represents that the delete operator successfully deleted the name, age, and designation properties.
The output returns the true value that represents that the delete operator successfully deleted the name, age, and designation properties.
Example 2: Access and Delete the Property With Delete Operator
Another example is adapted to utilize the delete operator.
For this purpose, the code is as follows:
Code
// An example of using the delete operatorconst car = {
model: 'BMW',
color: 'Honda'
}
console.log( car.model)
delete car.model
console.log( car.model)
console.log( car.color)
delete car['color']
console.log( car.color)
The description of the code is given below:
First, a car object is created and different properties like model and color are defined in it.
After that, BMW and Honda values are assigned to these properties.
Furthermore, the model property of the car object is accessed and deleted using the delete car.model.
The same procedure is repeated for the color property.
![]() Output
Output
![]() The outcome of the code represents that the model and color properties of the object car are deleted and returned undefined.
The outcome of the code represents that the model and color properties of the object car are deleted and returned undefined.
Conclusion
The delete operator is utilized to delete the existing property of an object.
In this article, an overview of the delete operator is demonstrated with different scenarios.
Moreover, various examples are provided to practically implement the delete operator in JavaScript.
The operator is mostly used to delete a specific property in a complex data structure.
Switch Case
There are two main conditional statements in the JavaScript programming language, one known as the Switch-Case statements.
The switch case statements are pretty easy to understand, as their work is pretty straightforward.
The switch checks for an expression and then compares the value of that expression with the cases defined underneath.
If the value of expressions matches the value defined in any case statements, then the respective block is executed.
Otherwise, the body of the default clause is executed.
Structure of Switch Case Statements
To understand this better, take a look at the structure of the switch case statements:
switch (expression/Condition) {
case a:
// Code to be executed if value is a
break;
case b:
// Code to be executed if value is b
break;
default:
// Code to be executed if value doesn’t match any case}
There are a few things that to consider from this structure, these are:
The condition or expressions is passed inside the argument of the switch statement.
There can be an infinite number of case statements for each switch case.
The case statements end with a colon “:”.
Each case must include a break statement at the end of the case.
After the case statements there must be a default clause which will be executed if no cases match the expression’s value.
It would be better to simply demonstrate the working of the case statement with the help of an example.
Example 1: Weekday Calculator Using Switch Case Statements
The goal of this example is going to take an integer value, and based on that integer value, we are going to display a day of the week with the following criteria:
1= Monday, 2 = Tuesday, 3 = Wednesday, and so on.
Start by creating the integer value and set it equal to 6 with the following line:
numericValue = 6;
After that, apply the switch on the numericValue like so:
switch (numericValue) {// Case statements go inside here}
Within the curly brackets of this switch, simply define seven different cases for seven different days of the week with the help of the following lines:
case 1:
console.log("The day is Monday");
break;
case 2:
console.log("The day is Tuesday");
break;
case 3:
console.log("The day is Wednesday");
break;
case 4:
console.log("The day is Thursday");
break;
case 5:
console.log("The day is Friday");
break;
case 6:
console.log("The day is Saturday");
break;
case 7:
console.log("The day is Sunday");
break;
At the end, add a default clause to manage invalid inputs with the following lines:
default:
console.log("Invalid Input");
The complete code snippet is as:
numericValue = 6;
switch (numericValue) {
case 1:
console.log("The day is Monday");
break;
case 2:
console.log("The day is Tuesday");
break;
case 3:
console.log("The day is Wednesday");
break;
case 4:
console.log("The day is Thursday");
break;
case 5:
console.log("The day is Friday");
break;
case 6:
console.log("The day is Saturday");
break;
case 7:
console.log("The day is Sunday");
break;
default:
console.log("Invalid Input");}
Upon executing the code snippet above, the following result is displayed onto the terminal:
![]() It is clear from the output that the program is working perfectly fine and deciding the day of the week from the integer value correctly.
Example 2: Trying the Default Clause With a Non-Matching Expression
To demonstrate the working of the default clause, simply take the code snippet from example 1, and in that example, simply modify the value of numericValue to a string value like:
numericValue = "Google";
Now, this can be considered to be an invalid input to our program.
Executing the code with this value would result in the following output:
It is clear from the output that the program is working perfectly fine and deciding the day of the week from the integer value correctly.
Example 2: Trying the Default Clause With a Non-Matching Expression
To demonstrate the working of the default clause, simply take the code snippet from example 1, and in that example, simply modify the value of numericValue to a string value like:
numericValue = "Google";
Now, this can be considered to be an invalid input to our program.
Executing the code with this value would result in the following output:
![]() From this output, it is easy to conclude that the default clause is executed when none of the cases match the expression.
From this output, it is easy to conclude that the default clause is executed when none of the cases match the expression.
Wrap up
The Switch Case statements implement conditional verification upon a specific expression.
All of the possible values that the expression that the user wants to have an output for are placed in the case statements, and the block of code to be executed on that particular match is also placed inside that case statement.
The remaining possible values that do not require an output or processing are placed in the default clause.
The default clause is executed only when none of the values defined in the case statements match the value of the expressions.
It is important to note that every case ends on a colon (:), and at the end of the body, it must contain a break statement.
Split an Array Into Chunks
Two methods divide an array into smaller equal chunks.
These two methods use splice() and slice(), respectively.
This article will display these methods for splitting an array into smaller chunks.
Let’s start with the first one.
Method 1: Slice() for Dividing an Array Into Chunks
To demonstrate this, first, create an array of integers with the following line of code:
my_array = [1, 2, 3, 4, 5, 6, 7, 8, 9, 10];
Then, define the size of each chunk that is to be derived from the original array:
chunkSize = 2;
Afterwards, simply use the for loop to iterate through the array and create an array variable chunk with the help of slice() method with the following lines of code:
for (i = 0; i < my_array.length; i += chunkSize) {
let chunk;
chunk = my_array.slice(i, i + chunkSize);
console.log(chunk);}
In this code snippet:
for loop is used to iterate through the original array, and for every iteration, the value of the iterator variable (i) is increased by the chunk size to avoid rereading the same chunk.
Inside the for loop, a new array variable is created named chunk
my_array.slice() cuts a chunk from the array based on the arguments and stores that in the chunk variable
At the end, the console log function prints out the chunk onto the terminal.
The complete code snippet is as:
my_array = [1, 2, 3, 4, 5, 6, 7, 8, 9, 10];
chunkSize = 2;for (i = 0; i < my_array.length; i += chunkSize) {
let chunk;
chunk = my_array.slice(i, i + chunkSize);
console.log(chunk);}
Upon execution, the above code snippet produces the following results:
![]() The output displays the array converted into smaller chunks each of size 2.
The output displays the array converted into smaller chunks each of size 2.
Method 2: Using Splice() for Dividing an Array Into Smaller Chunks
To showcase the use of the splice() method, first create a new array with the following lines of code:
my_array = [1, 2, 3, 4, 5, 6, 7, 8, 9, 10, 11, 12];
Define the size of chunk just like in the first method using the following line:
chunkSize = 4;
Afterwards, a while() loop is used in combination with splice() to iterate through the array:
while (my_array.length > 0) {
let chunk;
chunk = my_array.splice(0, chunkSize);
console.log(chunk);}
In this code snippet:
A while loop is used to iterate through the array with the condition that while the array length is greater than 0 because using splice() reduces the original array’s size.
Inside the while loop, a chunk variable is created to store each chunk.
Then, the chunk variable is set equal to my_array.splice() method, which returns the chunk from the array starting from the 0th index to the index decided by the chunkSize
Lastly, print out the chunk on the terminal using the console log function
The complete code snippet is as:
my_array = [1, 2, 3, 4, 5, 6, 7, 8, 9, 10, 11, 12];
chunkSize = 4;while (my_array.length > 0) {
let chunk;
chunk = my_array.splice(0, chunkSize);
console.log(chunk);}
Executing this code gives the following output:
![]() It is clear from the output that the splice() method splits the array into chunks each of size 4.
It is clear from the output that the splice() method splits the array into chunks each of size 4.
Conclusion
In JavaScript, the programmer can use two methods to split or divide an array into smaller yet equal chunks.
These methods include using the slice() method and the splice() method in combination with for loop and while loop.
This article has displayed the working of both methods with the help of two examples.
Random String Generator Using JavaScript
In JavaScript, you can easily create a random string generator with the help of the Math random() method.
There are two approaches to creating a random string generator with Math random, one uses this method in combination with Math floor, and the other uses this with the toString() method.
This article will focus on both of these methods one by one.
Method 1: Creating a Random String Generator Using the Math Floor() and Math random()
To start, first, create a string variable with all the possible characters your randomly generated string can have.
For example, if you want to create a random string with the character’s possibilities being “a-z”, “A-Z”, “0-9” and a few special characters like “!@#$%^&*”.
To do this, use the following line:
string =
"123456789ABCDEFGHIJKLMNOPQRSTUVWXYZabcdefghijklmnopqrstuvwxyz!@#$%^&*";
After that, you want to get the length of this string variable by using the length property:
length = string.length;
After that, create an empty string variable which is going to store our randomly generated string:
var resultString = "";
And then create a for loop, and the number of iterations of the for loop are going to define the number of characters the randomly generated string is going to have.
For now, let’s set the number of iterations to 5 with the following lines:
for (i = 1; i<=5; i++) {
// Next lines are going to come in here}
Inside this for loop, you are going to select a character from our characters to string randomly and then append that character onto the resultString variable with the following line:
resultString += string.charAt(Math.floor(Math.random() * length));
Let’s break this line down and see what is actually happening in here:
Math random() is used to generate a random floating point value between 0 and 1
The result from Math Random is multiplied by the length variable in which we have the total number of possibilities for each character
After that multiplication, it is still a floating-point value.
Therefore, we are rounding the number down to an integer value
We are using this integer value as the index value from our string which contains all the possible characters
Lastly, we are simply appending the character fetched at that particular index to our resultString
Afterwards, come out of the for loop and simply pass the resultString to the console log function to print the result on the terminal:
console.log(resultString);
The complete code snippet is as:
string =
"123456789ABCDEFGHIJKLMNOPQRSTUVWXYZabcdefghijklmnopqrstuvwxyz!@#$%^&*";
length = string.length;
var resultString = "";for (i = 1; i <= 5; i++) {
resultString += string.charAt(Math.floor(Math.random() * length));}
console.log(resultString);
Upon multiple execution this code produces the following outcome on the terminal:
![]() As you can see, for every execution we are generating a new random string of length 5.
As you can see, for every execution we are generating a new random string of length 5.
Method 2: Generating Random Strings With the Math random() and the toString() Method
This time around, we are going to be using the argument inside the toString() method to define the base of the string to be parsed.
This might seem confusing but it’s all going to go away with an example.
Start of by creating a result string like this:
const resultString = Math.random().toString(36).substring(2, 7);
Now, let’s explore this statement part by part:
Math random() creates a random floating point number between 0 and 1
After that, we convert that number into string using toString() method and set the base as 36
Values greater than 10 would be given Alphabetic values just like the working of a hexadecimal number system.
After that, we are only picking a substring from index value 2 to 7
After that, we can simply pass the resultString in the console log function to print it onto the terminal:
console.log(resultString);
Execute the program a couple of times and observe the output to be following:
![]() As you can observe in the output, we were able to generate a random string with a length of 5.
However, method 1 is a little longer but it is much better because it allows you to define the possibility of the characters that can be placed in the string which is far greater than the 26 lower case alphabets and the 10 numbers that we get with method 2.
As you can observe in the output, we were able to generate a random string with a length of 5.
However, method 1 is a little longer but it is much better because it allows you to define the possibility of the characters that can be placed in the string which is far greater than the 26 lower case alphabets and the 10 numbers that we get with method 2.
Conclusion
A random string generator can easily be created in two different manners.
Both of these methods essentially use the Math random() as its core, but the difference comes with one using the Math floor() method and the other using the toString() method.
This article has shown both of the methods along with their examples to generate random strings with the length set to 5.
What are the differences between JavaScript and PHP
There are many different languages being used for the objective of developing web applications such as HTML and CSS.
JavaScript and PHP are two others that are often compared with each other due to their similar yet so different nature.
In this article let us have a look at what similarities these languages have as well as what sets them both apart from each other.
How does JavaScript Differ from PHP?
Below are a few of the numerous differences that exist between between these two web development languages.
| JavaScript | PHP |
|---|
| This language can be combined with many others such as AJAX, HTML, and XML. | This language can only be incorporated with HTML and no other language. |
| The files of this language are saved with “.js”. | The files of this language are saved with “.PHP”. |
| The JavaScript language was developed in 1995. | In 1994 the PHP language was inventeded. |
| This language only does client-side scripting. | This language only does server-side scripting. |
| JS is commonly in use to implement back-end as well as front-end of a website. | PHP is commonly used only to implement the back-end of any web application.
|
| It can run on the majority of the supported browsers. | It only runs on a server. |
| This language is not very secure. | This language is extremely secure. |
| The performance of this language is very fast. | The performance of this language is a little slow as compared to JS. |
| This language is case-sensitive in functions. | This language is not case-sensitive in functions. |
| This language does not update any files on the server. | This language can easily update files on the server. |
| This language can not be supported by any database. | This language supports the use of databases. |
Similarities between JavaScript and PHP
Even though it is not a fair comparison to be made between JavaScript and PHP since these two are fundamentally different programming languages, we will show you why they are more similar than you think.
Web development
Both of these languages were developed and are being used for the purpose of web development even though they perform different functions.
Object-oriented
Both of these languages are object-oriented.
What this means is that any sort of programming that is done in these languages is based on the fundamental concept of an object.
An object contains a combination of all the relevant data related to that object.
Needs HTTP
Both PHP and JavaScript require the existence of HTML.
To properly execute they both need proper relevant HTML code to be present.
Open source
Both of these languages are open source.
This means that their core code has not been protected and is open for the public to access, use and change as they desire.
Exceptional handling
Both PHP and JavaScript provide plenty of features in their syntax for the purpose of exception handling.
Exception handling is the method of handling any sort of error that occurs while executing the language.
Conclusion
PHP is the language used on the server side for creating and editing the functionality of a server according to the needs of the user.
JavaScript on the other hand is a programming language designed for the client side that helps the user implement functionality to their frontend HTML/CSS code.
In this article, you have seen how these languages stand against each other but still are so similar to each other.
What are the advantages and disadvantages of JavaScript
No programming language is perfect.
That is why a new language rises in popularity every few years to meet that era’s demands.
For example, during the 90s C language was the standout language with not much competition against it for a while.
Later, as time changed and the needs of the community changed, Python rises in popularity, thanks to its overwhelming advantages over C.
In this article, we will look at the advantages and disadvantages of another language that has only increased in popularity over the years.
Advantages of JavaScript
Let’s start off with what makes JavaScript much superior to other programming languages and why someone would prefer this.
Popularity
This is one of the most commonly used languages that is used in web development.
It is a major part of every functioning website.
JavaScript is seen as a very powerful tool that even the biggest websites in the world utilize; for example, Amazon and Google.
Due to its ever-rising popularity, it is easier than ever to learn this language online through various courses.
Reduces load on the server
Since the language is clientside-based and not server-side, this means that the server does not have to deal with a load of running JavaScript.
Once this load is reduced, the server can run faster and focus itself on performing its other functionalities such as data management.
Versatile
The most valuable feature of JavaScript is its versatility.
There are countless methods in which it can be implemented into your website.
Not only can it create and complete the front-end of the website but it can also deal with the backend(thanks to Node.js) since it works well with MongoDB and MySQL.
Easy to use
JavaScript is one of the simpler languages to learn, especially for web development.
It has been developed to be comfortable to learn and implement for web developers.
This helps the web companies save a lot of money on development since harder languages have fewer developers and hence require a bigger budget.
Speed
Another major factor for any web development language is how fast it can run on any supporting browser.
Luckily, JavaScript is a client-side language which means that for the page to load and run, the system does not have to ping the server.
Instead, the client already has access to all the scripting that is required to run the webpage.
Disadvantages of JavaScript
The use of JavaScript for creating web applications is not always ideal.
There are many situations in which JavaScript may not perform as well as some of the other languages.
In this section, some light has been shed on the problems surrounding JavaScript.
Not well supported
Even though JS is used worldwide, every browser runs it differently.
This means that whenever the script is run, it will be interpreted differently depending on which browser is in use.
Render issue
JavaScript can be a sensitive language when it comes to rendering a webpage.
What this implies is that even the smallest errors in the script will cause the entire page to crash and not render at all.
Security
Being a client-side language, access to this code is very straightforward.
This means that anyone can see and copy the code that is implemented behind the webpage.
This makes the language significantly unsafe.
JavaScript disabled Issue
Due to security concerns, many people tend to disable JavaScript on their systems.
This causes many of the web pages built using JS to completely crash and not load again.
Conclusion
JavaScript has several benefits such as being fast, easy to learn, and bearing much less load on the server.
Similarly, there are a few downsides to the use of JS as well for example less security, browser support issues, and rendering troubles.
In this article, the ups and downs of using JavaScript for your web page have been elaborated on.
JSON Objects | Explained
Data does not always exist as individual values.
In numerous cases, data needs to exist as a group.
In situations like this, an idea like “objects” is utilized.
An object is a collection of data related to the same class.
For example, the object “person” will have various types of data and variables stored within it such as name, age, gender, etc.
In this article, an in-depth explanation will be given of the concept of objects within JSON code.
Properties of Object in JSON
These are some of the basic properties of an object in JSON.
Declaration
In JSON, an object is declared using the “{ }” brackets.
Check out the example below:
var person = {}
Object Literal
Within an object, there can be several object literals.
These literals are written in a “key: value” format.
Refer to the example below:
var person = {
"name" : "Harris"}
In this example, the “name” string is the key and the corresponding data “Harris” is the value.
Multiple Object Literals
To add multiple object literals, commas can be used as shown in the example below:
var person = {
"name" : "Harris",
"age" : 22,
"gender" : "M"}
How to access Object values JSON?
To retrieve data from within an object, you need to use the “.” symbol to access objects as shown in the example below:
var sample = person.name;
The “.” in this code specifies the property of the object that we need to refer.
See the snippet below for further clarification.
![]() In using this method, not only can the value be accessed and displayed, but also assigned to variables.
In using this method, not only can the value be accessed and displayed, but also assigned to variables.
How to Delete Object Values?
Deleting a value from within an object is very simple.
We will utilize the “delete” keyword to perform the deletion functions.
Its syntax is shown below:
delete person.name;
How to Update Object values?
To update any values inside an object the value first needs to be accessed and then a new value will be assigned.
We have already learned above how values can be accessed.
The code below applies this and updates the value:
person.name = "Anees";
In the sample snippet below we see how the value of the “name” attribute is being changed:
![]()
Conclusion
A JSON Object is a group of data that can contain a collection of keys and their values.
It is declared using the curly braces and actions such as updating and deletion can be performed on its values after they are accessed using the “.” symbol.
This article has equipped you with all the important
JSON Arrays Explained
Every database in the world makes use of various data structures to manage and manipulate its data.
Behind these databases are different programming languages that make up their structure.
Arrays are a very prominent example of a data structure.
JSON is a format through which various JavaScript-affiliated data is passed between the server and the website.
Arrays are one of the data that can be sent and received between these two nodes.
In this article let us take a look at how JSON and the data stored within an array interact with each other.
| JSON Array Datatypes |
|---|
| String |
| Number |
| Boolean |
| Object |
| Null |
| Array |
JSON Array Structure
The structure of a JSON array is very similar to the structure of a JavaScript array.
These are a few structural properties for a JSON array.
Declaration
To declare a JSON array, the “[ ]” brackets are used, with the items being stored inside the brackets.
See the example below:
["item1"];
Indexes
Much like JavaScript, JSON arrays also utilize the index feature to access items within it starting from the first item whose index is 0.
Below is an example of this:
jsonArray[0];
Adding multiple items
To add multiple items into the array, “, ” is used between the two items which will separate them from each other.
Check out the example below:
["item1", "item2", "item3", "item4"];
Multiple datatypes
Different from many other languages, a single JSON array can contain elements of many different datatypes as shown below:
["item1", 5, true, "hi"];
JSON Document
Inside a JSON document, many different operations can be performed on the array.
Take a look at the sample JSON document below:
{
"name" : "Harris",
"gender" : "M",
"age" : 22,
"hobbies" : [ "cricket", "painting", "gaming" ]}
Get Value
To retrieve a value from a JSON array, follow this syntax and store into a variable:
value = sample.hobbies[2];
Delete Value
To perform deletion on any value in a JSON array, use the “delete” keyword as the sample below suggests:
delete sample.hobbies[2];
Update Value
To update any current value of the array, simply use the index number and assign it a new value as shown below:
sample.hobbies[1] = "boxing";
These are the most important properties of a JSON array.
This article is a useful manual on how to use arrays inside JSON code.
Conclusion
JSON arrays are very similar to the arrays.
They are declared the same way using square brackets and can contain multiple types of items within the same array.
In this article, the majority of the crucial knowledge has been provided about the JSON arrays.
How to get tomorrow’s date in String format
Importing and assigning dates is an extremely significant characteristic of any web page.
Its use can range from assigning dates of when a product is to be shipped to predicting the weather forecast of certain dates.
The use of dates is not always limited to the current day and time but a user may require tomorrow’s date in many cases.
In this article, the necessary knowledge to import tomorrow’s date or even more days after that will be provided.
How do you obtain Tomorrow’s Date in a String Format?
The manner in which tomorrow’s date is calculated is very straightforward.
This section will thoroughly explain how this function can be implemented using JavaScript.
Step 1: Using Date()
The first step of this process is to get today’s date as shown below:
var dateToday = new Date();
console.log("Today's date is: ",dateToday);
Date() is a constructor that lets you access various properties of a date.
In this instance, the constructor is being used to access the current date and time from your system.
That data is then stored into a variable named “dateToday”.
Check out the example that has been provided below:
![]() Step 2: Get and Set Date
The “setDate()” and “getDate()” functions are being utilized in this section to assign tomorrow’s date, as we see in the following code:
let dateTomorrow = new Date();
dateTomorrow.setDate(dateToday.getDate() + 1);
console.log("Tomorrow's date is: ",dateTomorrow);
Firstly, another variable named “dateTomorrow” is declared.
Next, the “setDate()” function is used to set the date in the variable.
To assign tomorrow’s date, the “getDate()” method is used to access the date value from the “dateToday” variable and add 1 to it.
This assigns tomorrow’s date to the “dateTomorrow” variable.
Below is an example of this:
Step 2: Get and Set Date
The “setDate()” and “getDate()” functions are being utilized in this section to assign tomorrow’s date, as we see in the following code:
let dateTomorrow = new Date();
dateTomorrow.setDate(dateToday.getDate() + 1);
console.log("Tomorrow's date is: ",dateTomorrow);
Firstly, another variable named “dateTomorrow” is declared.
Next, the “setDate()” function is used to set the date in the variable.
To assign tomorrow’s date, the “getDate()” method is used to access the date value from the “dateToday” variable and add 1 to it.
This assigns tomorrow’s date to the “dateTomorrow” variable.
Below is an example of this:
![]() Step 3: Convert the variable to a String
The final step is to convert the variable “dateTomorrow” into a String.
Below are two statements that you can use to achieve that depending on the format you prefer.
The “toDateString” format
The sample below demonstrates how to implement “toDateString()” function and what the output will look like:
dateTomorrow.toDateString();
Step 3: Convert the variable to a String
The final step is to convert the variable “dateTomorrow” into a String.
Below are two statements that you can use to achieve that depending on the format you prefer.
The “toDateString” format
The sample below demonstrates how to implement “toDateString()” function and what the output will look like:
dateTomorrow.toDateString();
![]() The “toLocaleDateString” format
Below an example is given of how the “toLocaleDateString()” function works and it’s corresponding output:
dateTomorrow.toLocaleDateString();
The “toLocaleDateString” format
Below an example is given of how the “toLocaleDateString()” function works and it’s corresponding output:
dateTomorrow.toLocaleDateString();
![]() Following these 3 simple steps will provide the desired output which in this case is tomorrow’s date.
Following these 3 simple steps will provide the desired output which in this case is tomorrow’s date.
Conclusion
The best way to calculate tomorrow’s date is to use the “getDate()” function which will return today’s date and then increment that value by 1 using the “setDate()” function.
In this article, the methods and their functionality are explained in detail as well as how to format the date into various string formats.
What is the purpose of setTimeout() function
When writing a program, it is not always necessary that the program runs immediately or keeps running infinitely.
There are many occasions where a delay before executing a portion of the code can prove to be valuable.
Similarly, ending a chunk of code at just the right time can also be ideal in many scenarios.
To fulfill these needs, JavaScript has a special feature named “setTimeout()”.
In this article, all the details behind the concept and working of the function “setTimeout()” are explained.
What is the objective behind setTimeout()?
Everyone in their lives has made use of a gadget called a timer.
Timers or an alarm are used for many various procedures.
A timer provides the functionality of knowing when to stop or start certain actions in your daily life.
Much like that, the “setTimeout()” function will provide this feature to your code.
Using this function will provide delays before any user-defined functions can be executed.
Let’s take an example of this.
In a video game, the enemy has to respawn exactly 20 seconds after it is killed.
The “setTimeout()” function will be implemented into the original code which is responsible for running the videogame.
This function is what will cause the enemy to have a 20-second delay before it spawns again.
In the same game, this function can be used for something very contrasting.
Suppose an item has appeared for the player.
But the game developer does not want that item to linger around for infinity.
This is where the “setTimeout()” will step in and give a limited time for that item to linger.
How does the setTimeout() function work?
This syntax is very basic and easy to understand.
It takes two parameters within its brackets.
The first parameter is the user-defined function that is to be executed.
We will take another parameter which is the time of the delay(milliseconds) that will occur before the user-defined function is executed.
Below is a sample code for this execution:
function sampleFunction() {
alert("Timer has run out!");}
setTimeout(sampleFunction, 5000);
In this example, the function “sampleFunction” will be executed 5 seconds(5000 milliseconds) after the code is run.
Refer to the snippet below:
![]() There are a few other details to note about this code as well.
The default delay time is 0.
The function returns will return the id of the timer.
Additional functions can also be passed in versions after “IE9”
There are a few other details to note about this code as well.
The default delay time is 0.
The function returns will return the id of the timer.
Additional functions can also be passed in versions after “IE9”
Conclusion
A “setTimeout()” function is used to provide a delay before the execution of any user-defined function.
The function can prove useful when executing or terminating certain chunks of code within a program.
In this article, a detailed explanation has been provided on what the “setTimeout()” function is and how it can be used.
JavaScript Date getTime() Method
The JavaScript Date.getTime() method extracts the numerical number in milliseconds since January 1st, 1970.
The method always utilizes the Universal Time Coordinated (UTC) format to represent the time.
If you are not familiar with the getTime() method, it is the best place to learn and understand this method.
We have compiled this guide to provide a brief overview of the working and usage of the Date.getTime() method.
How to Use the Date getTime() Method?
The getTime() returns the milliseconds based on the local time for a specified date.
Users can use the date object to call the getTime() method in JavaScript.
Moreover, users can utilize it to assign the time and date to another date object.
The syntax of the getTime() method is as follows:
Syntax
Date.getTime()
The Date is the object that saves information about the time and date.
The getTime() method will not accept parameters and returns the integer value, which is equal to the number of milliseconds.
Example 1: Retrieve the Time From a Specific Date/Time
In the example code, we are using the Date.getTime() method to retrieve the time from the user-defined time in milliseconds.
Code
<script>
// An example for using the getTime() method
// While creating Date object
var date1 = new Date('December 24, 2000 04:25:52');
// The information for milliseconds is
// extracted using getTime()
var date2 = date1.getTime();
// Display time in milliseconds.
document.write(date2);</script>
In the above code:
The date1 is the variable that stores the date/time information.
After that, the getTime() method is used to extract the milliseconds that are stored in the date1 variable.
The extracted time is stored in the date2 object.
Finally, the value stored in the date2 object is displayed using the document.write() method.
![]() Output
After executing the code, the display represents the output in milliseconds using the getTime() method.
Output
After executing the code, the display represents the output in milliseconds using the getTime() method.
Example 2: To Get the Time From User Defined getTime() Method
In this example, the date is taken from the user and then the getTime() method will be applied to it.
Let’s see how it works:
Code
<script>
// An example for using the getTime() method
// While creating Date object
const input = prompt("What's your Birthday Date?");
alert(`Your Birthday Date is ${input}`);
var date1 = new Date(input);
// The information for milliseconds is
// extracted using getTime()
var date2 = date1.getTime();
// Display time in milliseconds.
document.write(date2);
</script>
The description of the above code is enlisted here:
Firstly, store the date of birth in a variable named input.
After that, an alert box is generated for that prompt.
Extract the information every millisecond using the getTime() method.
Finally, display the information using the date2 variable.
![]() Output
Upon executing the code, the following interface is observed:
Output
Upon executing the code, the following interface is observed:
![]() After the execution of the code, the user must input the date of birth, as we entered March 10, 1994. Click on OK to proceed further:
After the execution of the code, the user must input the date of birth, as we entered March 10, 1994. Click on OK to proceed further:
![]() A prompt message is generated for confirmation of the data provided through the user input:
A prompt message is generated for confirmation of the data provided through the user input:
![]() In the end, the milliseconds that have passed since January 1st, 1970, are displayed.
In the end, the milliseconds that have passed since January 1st, 1970, are displayed.
Conclusion
JavaScript is useful for extracting information in milliseconds using the Date.getTime() method.
The date object is used to call this method, and it retrieves the values in milliseconds that have passed since January 1st, 1970.
This method’s output can be obtained on various modern browsers such as Firefox, Safari, Edge, and Opera.
You have learned the working of the getTime() method.
How to Get the Value of Text Input Field Using JavaScript?
JavaScript can interact with different web pages to provide server as well as client-side services.
The purpose of JavaScript is to provide interactive elements on web pages to engage users.
These interactive elements include dynamic styling, inputting the value, getting value from forms, etc.
In this post, a practical implementation of how to get the value of text from input fields is performed using JavaScript.
There are different ways to acquire the value from the input field by utilizing JavaScript.
Keeping those in view, the outcomes of the post are:
Using the getElementById
Using getElementsByClassName
Method 1: Using the getElementById
In JavaScript, the getElementById method is utilized to get the input text box value with an ID attribute.
This method is employed to return an output by a specified value.
It returns the null value if the element is not present here.
Most users utilize it to read and modify HTML elements.
The syntax of the getElementById is as follows:
Syntax
document.getElementById("inputId").value;
In this syntax, the getElementById method extracts the value by passing the same ID attribute “inputId”.
Code
<center><h2>An example of getting the value of input text field.</h2><input type="text" placeholder="Type " id="inputId"><br></br><script>
function getInputValue() { // A method is used to get input value
let value = document.getElementById("inputId").value;
alert(value); // Display the value
}
</script><button type="button" onclick="getInputValue();">Press button</button></center>
In the above code:
First, the input field is used to take the input from the user.
After that, the getInputValue() function is used to acquire the value property using getElementById.value.
A new button is created which has the getInputValue() function on its onclick event.
![]() Output
After executing the code, a text box and a button will appear.
When you write some word in the text box and the button is pressed, an alert box will appear that contains the word/text written in the text box earlier.
The alert pop-up would be as shown below:
Output
After executing the code, a text box and a button will appear.
When you write some word in the text box and the button is pressed, an alert box will appear that contains the word/text written in the text box earlier.
The alert pop-up would be as shown below:
![]()
Method 2: Using the getElementsByClassName
In JavaScript, another method known as getElementsByClassName is used to get the value of the text input field.
It returns the set of elements specified by the class name.
The getElementsByClassName() method is called using the element of document.
It searches the whole document and gives the output of all child elements present in the document.
The syntax to use this method is provided below:
document.getElementsByClassName("inputClass")[0].value;
The syntax is described as:
inputClass: represents the name of the class.
[0]: It represents that if no matching element is present here, then return undefined.
Code
<p>Using the getElementsByClassName method and display it.</p><input type="text" placeholder="Type " id="inputId" class="inputClass"><button type="button" onclick="getInputValue();">Get Value</button><script>
function getInputValue() {
// Select input element and get its value
let inputVal = document.getElementsByClassName("inputClass")[0].value;
// Display the value
alert(inputVal);
}</script>
The above code represents that inputClass is specified as a class name of the text field.
After that, the getInputValue() function is used, in which getElementsByClassName() is called using the document element by specifying the class name “inputClass“.
![]() Output
In the above display, the value “Minhal” is placed inside the text filed.
Output
In the above display, the value “Minhal” is placed inside the text filed.
![]() After pressing the Get Value button, the value is stored and displayed as an alert message in the pop-up window.
In this way, the getElementsByClassName() method can be used to get the value of the text input field using JavaScript.
After pressing the Get Value button, the value is stored and displayed as an alert message in the pop-up window.
In this way, the getElementsByClassName() method can be used to get the value of the text input field using JavaScript.
Conclusion
In JavaScript, the getElementById() and getElementsByClassName() methods are utilized to get the value of the text input field.
In the getElementById() method, the input text box value is extracted with an ID attribute.
Whereas the getElementsByClassName() method returns the set of elements that are specified by the class name.
Both these methods are supported by advanced browsers, which include Chrome, Opera, Safari, etc.
You have learned to extract the value of the text input field with JavaScript.
How to Detect Browser or Tab Closing?
JavaScript can fulfill the users/developers’ needs through a bundle of events and methods.
It generates a pop-up/alert message for confirmation of the closing of a tab or browser.
JavaScript functionality can be extended to detect some events in the browser or in the tab.
For instance, it can be used to detect a tab or browser closing by utilizing JavaScript.
For this purpose, the beforeunload event of JavaScript is used.
The beforeunload event is suitable for transactions or paying bills, or during the filling of any online form where data loss may occur.
This post guides you to apply the beforeunload event to check a tab or browser closing.
How to Detect a Tab or Browser Closing?
An event beforeunload is triggered to detect the closing of the tab or browser.
It generates a pop-up or alert message according to the user’s needs.
This event is also triggered while refreshing the webpage.
Using this event, users prevent the loss of their unsaved data when they mistakenly navigate away from the current tab.
Example
An example is provided by employing the beforeunload event in JavaScript.
The event is just triggered before the page closes the tab or web browser.
Code
<html><head><h2> An example of detect browser or tab closing using JavaScript</h2></head> <body> <p>A "beforeunload event" is utilized to detect browser or tab closing.</p> <form><input placeholder = "Please write something...."/></form> <script type="text/javascript">
window.addEventListener('beforeunload', function (e) {
e.preventDefault();
e.returnValue = '';});</script></body></html>
The description of the code is as follows:
An input field is added to interact with the user by writing something.
The beforeunload event is employed to check the tab closing event or browser.
An addEventListener() is employed to cancel the event of closing the tab or web browser.
![]() Note: Some browsers do not support the beforeunload event without first writing some information in the text field.
The above display demonstrates how the beforeunload event detects the browser or tab closing.
Moreover, this event also detects the page reload as well.
Note: Some browsers do not support the beforeunload event without first writing some information in the text field.
The above display demonstrates how the beforeunload event detects the browser or tab closing.
Moreover, this event also detects the page reload as well.
Conclusion
The beforeunload event of JavaScript can be used to detect a browser or tab closing.
This event creates a pop-up/alert whenever the tab or browser is being closed/refreshed.
This article explains the usage and working of the beforeunload event to detect the closing of the tab or browser.
The latest web browsers support the beforeunload event to detect the closing of a particular tab or browser.
Most of the usage of the beforeunload event is in educational, e-commerce sites, payment methods to prevent the data loss.
How to Check if a Variable Is Not Null?
There are multiple scenarios where you would generally want to look for the null variable because it can and will crash your whole application.
Now that is something that we don’t want to happen., you can easily check for a null variable with the help of a basic if-else statement.
This article will demonstrate this with the help of examples.
Note: Most people confuse null variables with undefined and empty variables for being the same.
Example 1: Checking for Null variable with if – else statement
Simply start by creating a variable and setting its value equal to the keyword null with the following line:
var x = null;
Create another variable with some value in it with the help of the following line:
var y = "Some value";
After that, we are going to create a function that will check variables for a null variable:
function checkNull(ourVar) {
if (ourVar !== null) {
console.log("Not a Null variable");
} else {
console.log("Null variables Detected");
}}
This function simply uses an if-else statement.
After that, we are going to pass both our variables one by one to the function checkNull():
checkNull(x);
checkNull(y);
Executing this program will provide us with the following result:
![]() The first line in the output is for the variable “x” and from the output we can determine that it is a null variable.
The second line is for the variable “y”; from the output, we can determine that it is not a null variable.
The first line in the output is for the variable “x” and from the output we can determine that it is a null variable.
The second line is for the variable “y”; from the output, we can determine that it is not a null variable.
Example 2: Checking for other falsy values
The null value is known as a falsy value, and there are other falsy values.
These falsy values include:
NaN
“” (an empty string)
undefined
false
And a few more.
However, they cannot be detected as null, and thus if-else statements cannot determine these variables as null.
To demonstrate this, create a few variables with these falsy values with the following lines of code:
var a = undefined;
var b = "";
var c = NaN;
var d = false;
var e = 0;
After that, simply pass these variables one by one to the checkNull() function that we created in the previous example:
checkNull(a);
checkNull(b);
checkNull(c);
checkNull(d);
checkNull(e);
Executing the code will give the following output on the terminal:
![]() All of these variables were considered to be non-null even though all belong to the same family which is “falsy values”.
All of these variables were considered to be non-null even though all belong to the same family which is “falsy values”.
Conclusion
In JavaScript, if-else statements can be used to determine whether a variable is a null variable or not.
For this, we simply set the condition inside the if-else statement as (varName !== null), where varName is the variable identifier, we are checking.
In this article, we created a function named checkNull() that determines whether the variable passed inside its argument is a null variable or not.
How to Check a Key Exists in a JavaScript Object?
There are multiple ways of checking the existing keys in a JavaScript object.
Most of the ways include using methods from other packages.
To do that, one generally has to first install that package and then work with the methods written inside it.
But in this article, we will be working with the methods that come as default.
So, let’s start with the first method.
Method 1: Using the “in” Operator to Find the Existence of a Key
We can use the “in” operator to check for a particular key in an object, just like we can use it to find the existence of a particular character in a string.
To demonstrate this, we are going to need an object there create an object with the following lines of code:
var personObject = {
firstName: "John",
lastName: "Doe",
age: 18,
salary: 2200}
As you can see, this object is about a person and includes details like the first name, last name, age, and salary.
Suppose that we want to check whether or not the key “age” is present in our personObject.
In that case, search for age in personObject and set the return value in a new variable:
existence = "age" in personObject;
After that, we can simply print the value inside the existence variable on the terminal using the console log function like:
console.log(existence);
After that, simply execute the program and observe the following result on the terminal:
![]() The true value in the terminal means that the key age does exist in the object personObject.
After that, we also want to check for a key that is not present in the personObject.
For this, we are going to use the in operator to find the key “martialStatus” in the personObject like:
existence = "martialStatus" in personObject;
And then again, we can simply pass this existence variable to the console log function to print the result on the terminal like:
console.log(existence);
Execute the program and observe the following result from the terminal:
The true value in the terminal means that the key age does exist in the object personObject.
After that, we also want to check for a key that is not present in the personObject.
For this, we are going to use the in operator to find the key “martialStatus” in the personObject like:
existence = "martialStatus" in personObject;
And then again, we can simply pass this existence variable to the console log function to print the result on the terminal like:
console.log(existence);
Execute the program and observe the following result from the terminal:
![]() As you can see, the result was false meaning that there is no such key as martialStatus inside our personObject.
As you can see, the result was false meaning that there is no such key as martialStatus inside our personObject.
Method 2: Using the “hasOwnProperty()” Method With the Object
In JavaScript, every object has some of the methods from its prototype.
One such method is known as the hasOwnProperty().
This method takes in the key you want to search for in its argument and returns true or false depending upon the presence of the key in that object.
To demonstrate hasOwnProperty(), create an object using the following lines of code:
var car = {
model: "2015",
make: "Porsche",
price: 328000,
reviews: 4.8,};
As you can already tell, the above lines are to create an object of a car.
What we want to find is the presence of the key “make” in the object “car”.
For this, apply the hasOwnProperty() method on the car object with the help of a dot operator and pass in the key “make” in its argument like:
existence = car.hasOwnProperty("make");
After that, simply pass the existence variable in the console log function to display the result on the terminal like:
console.log(existence);
Execute the program for the following outcome:
![]() The output on the terminal is true, which means the car object contains the key make.
After that, let’s check for the existence of the key “mileage” in our car object.
For this, simply pass the key as mileage in the hasOwnProperty() method’s argument:
existence = car.hasOwnProperty("mileage");
To show the result on the terminal, simply pass the variable “existence” in the console log function:
console.log(existence);
Execute the program and observe the following output:
The output on the terminal is true, which means the car object contains the key make.
After that, let’s check for the existence of the key “mileage” in our car object.
For this, simply pass the key as mileage in the hasOwnProperty() method’s argument:
existence = car.hasOwnProperty("mileage");
To show the result on the terminal, simply pass the variable “existence” in the console log function:
console.log(existence);
Execute the program and observe the following output:
![]() The output shows that there is no such key as mileage in the object car.
The output shows that there is no such key as mileage in the object car.
Conclusion
In JavaScript, we can quickly check the existence of a specific key inside an object with two different methods.
The first methods include the use of the in operator, and it returns true if the existence is found otherwise, it returns false.
The second method includes the use of a method of the JavaScript Object, which is the hasOwnProperty().
In its argument, you simply pass in the key you want to search for, and it returns true if the key is found in the object.
Otherwise, it returns false.
Convert String Into a Date Using JavaScript
A Date variable can easily be constructed by following two different ways.
Both ways essentially include making a call to the new Date() constructor provided by the JavaScript Date Object.
This article will look at how to convert a date string into a date variable.
Acceptable Notations of a Date String
Before constructing date variables from Date strings, we must know the acceptable formats of Date strings, which help the user run their code without encountering any errors.
Well, the best notations for the Date strings are the ones set up by the ISO, which is an abbreviation for International Organization for Standardization.
Date ISO format and the JavaScript Date object function are the most pleasing string formats for string parsing.
ISO format examples include YYYY-MM-DD and YYYY-MM-DDTHH:MM:SS.
Method 1: Passing an ISO Date String directly Into the Date Constructor
To demonstrate this method, simply create a new date String with the following line:
dateString = "2005 FEB 25";
After that, simply create a new variable and then set that variable equal to the Date constructor by using the keyword “new”, and in the constructor pass in the dateString as:
date1 = new Date(string);
Then simply pass this date1 variable to the console log function to display it on the terminal and also to verify that this is now a date variable constructed from a string:
console.log(date1);
Execute the code and observe the following output on the terminal:
![]() It is clear from the result in the terminal that date1 is actually a date variable constructed from a string.
To demonstrate the use of an invalid date string, set the variable dateString equal to an invalid format like:
dateString = "2005 FEB 25th";
Afterwards, do the same steps, pass this in the Date() constructor and show the result on the terminal using the console log function:
date1 = new Date(dateString);
console.log(date1);
Upon execution of this, the terminal shows the following outcome:
It is clear from the result in the terminal that date1 is actually a date variable constructed from a string.
To demonstrate the use of an invalid date string, set the variable dateString equal to an invalid format like:
dateString = "2005 FEB 25th";
Afterwards, do the same steps, pass this in the Date() constructor and show the result on the terminal using the console log function:
date1 = new Date(dateString);
console.log(date1);
Upon execution of this, the terminal shows the following outcome:
![]() The result is as “Invalid Date”, which means that not every string can be interpreted into a date variable.
That is why following the format for the date string is essential.
The result is as “Invalid Date”, which means that not every string can be interpreted into a date variable.
That is why following the format for the date string is essential.
Method 2: Use the Date parse() Method to Parse the String First
In this second method, simply start by creating a new date string with the following line:
dateString2 = "1997 Jun 05";
Now, simply pass this string inside the Date parse() to get the time elapsed from 1st January 1970, till the date represented in the string in the form of milliseconds:
milli = Date.parse(dateString2);
Afterwards, we can use these milliseconds to construct a new Date variable by passing them in the Date constructor like:
date2 = new Date(milli);
Afterwards, simply display the value of the date2 variable on the terminal by using the console log function:
console.log(date2);
Execute the program, and the terminal will display the following outcome:
![]() It is clear from the output that this is a date variable constructed from the given string.
However, if you notice the value on the output that the Date of the month part is one less than the value we passed in the String.
It should be the 5th of June, but rather it is the 4th of June in the output.
The reason is that in the Date object or date variables, the “date of the month” part starts from 0 instead of 1.
Therefore, the 5th of June 1997 is represented by “1997-06-04”.
It is clear from the output that this is a date variable constructed from the given string.
However, if you notice the value on the output that the Date of the month part is one less than the value we passed in the String.
It should be the 5th of June, but rather it is the 4th of June in the output.
The reason is that in the Date object or date variables, the “date of the month” part starts from 0 instead of 1.
Therefore, the 5th of June 1997 is represented by “1997-06-04”.
Conclusion
We can easily convert a string into a date by using the new Date() constructor, which comes as a default object.
The only thing to notice is that not every string can be converted into a date.
A proper format setup by ISO must be followed for the date string.
The two methods include making a direct call to the new Date() constructor, and the other includes first converting or parsing the string into milliseconds and then making the call to the new Date() constructor.
Call Multiple JavaScript Functions in onclick Event
In JavaScript, the onclick event of the button is used to associate any JavaScript function with it.
Whenever the user presses the button, the attached function will be triggered.
JavaScript provides built-in features such as addevent listener and onclick events to execute multiple functions with a single click.
This event supports all the famous web browsers.
In this article, you will learn how to call multiple JavaScript functions with an onclick event.
How to Call Multiple JavaScript Functions With an onclick Event?
The onclick event executes multiple methods in sequential order with a single click and supports multiple browsers.
The onclick event makes the script clear and understandable by separating the functions with a semicolon for the users.
The following example refers to the practical implementation of the onclick event.
Example
An example is provided of calling multiple functions by using the onclick event.
For this purpose, the code is written as below:
Code
<html><head><h2>An example of using multiple methods by onclick event </h2><script>// An example of using multiple methods by onclick event
document.write("<br>");function method1() {
document.write ("First Method is called");
document.write("<br>");
document.write ("Welcome to JavaScript World");
document.write("<br>");
document.write("<br>");}function method2() {
document.write ("Second Method is called");
document.write("<br>");
document.write (" Welcome to Linuxhint");}</script></head><body><p>Press magic button to call the multiple functions</p><form><input type="button" onclick = "method1(); method2()" value = "Press the Magic Button" ></form></body></html>
The description of the code is as follows:
Two functions named method1() and method2() are defined that are to be called after the onclick event.
After that, a button is created using the <form> tag.
On the onclick event of the button, the methods method1() and method2() will be triggered.
![]() Output
Output
![]() A button named “Press the Magic Button” is utilized to execute the multiple methods by its onclick event.
After pressing the button, method1 and method2 are called to display the information present in it.
A button named “Press the Magic Button” is utilized to execute the multiple methods by its onclick event.
After pressing the button, method1 and method2 are called to display the information present in it.
![]() After pressing the button, two methods are called and display messages “Welcome to JavaScript World” and “Welcome to Linuxhint”.
After pressing the button, two methods are called and display messages “Welcome to JavaScript World” and “Welcome to Linuxhint”.
Conclusion
In JavaScript, an onclick event is employed to call multiple functions with a single click.
These functions are placed in the onclick event of the button type.
This post demonstrates the usage of the onclick event to call multiple functions.
For a better understanding, we have demonstrated an example that shows how multiple functions are called with a single click.
JavaScript | Window scrollTo() Method
The window scrollTo method is used to scroll the browser window to a specific coordinate.
This method is named the scrollTo() while the window is the Window Object.
A browser window that is open is represented by the window object.
To better understand this method, quickly go over the syntax given below:
Syntax of the scrollTo() Method
window.scrollTo(X-coordinate, Y-coordinate);
In this syntax:
window is the browser’s window Object.
X-coordinate is the horizontal displacement to the browser’s window at.
Y-coordinate is the vertical displacement to pan the browser’s window at.
Demonstration of the Window scrollTo() Method
To demonstrate the working of the scrollTo method, start by creating an HTML file with the following lines:
<center>
<b class="scrolled">I am Placed at 4000px Vertically</b>
<button onclick="clicked()">Click me to scroll down</button></center>
In this above HTML code snippet,
A bold tag was created with some text inside it with the class being scrolled.
This class will be used to place this tag at 4000px with the help of CSS.
A button was created which calls the clicked() function in the JavaScript file.
After that is done, we want to add the following lines to the CSS of our webpage:
body {
height: 7000px;}
.scrolled {
position: absolute;
top: 4000px;}
In the above CSS snippet:
The height of the body tag is set to 7000px so the webpage becomes scrollable even without having more elements on it.
The bold tag with the class scrolled has been placed at 4000px.
Executing the webpage now provides us the following output on the browser’s window:
![]() As you can see from the output, to visit the bold tag, one must manually scroll the browser’s window.
To add functionality to the button so that it scrolls us directly on the bold tag with text, write the following lines in the script file:
function clicked() {
window.scrollTo(0, 4000);}
In these lines, the function clicked() is created, which is called upon pressing the button, and in this function, we are simply passing the Y-coordinate as 4000px to the window scrollTo() method.
This provides the following outcome on the HTML webpage:
As you can see from the output, to visit the bold tag, one must manually scroll the browser’s window.
To add functionality to the button so that it scrolls us directly on the bold tag with text, write the following lines in the script file:
function clicked() {
window.scrollTo(0, 4000);}
In these lines, the function clicked() is created, which is called upon pressing the button, and in this function, we are simply passing the Y-coordinate as 4000px to the window scrollTo() method.
This provides the following outcome on the HTML webpage:
![]() As it is clearly shown in the output, pressing the button pans the browser’s window to 4000px vertically.
As it is clearly shown in the output, pressing the button pans the browser’s window to 4000px vertically.
Wrap up
The window scrollTo() method is used to call the browser’s window object and then pan the browser’s window to a specific position by passing in the x and y coordinates in its arguments.
This article demonstrated the working of the window scrollTo() method with the help of an example.
JavaScript | Focus()
In JavaScript, the Focus() method is used to set focus on any element of the HTML webpage, which means that it sets that element as the active element.
The key point here is that it only focuses on the elements which “can” be focused on.
In simple words, not all the elements can be focused on.
To better understand the focus() method, look at its syntax below:
element.Focus(options);
In this syntax:
element: it is the reference of an HTML element inside JavaScript.
options: it is not a required parameter.
Example 1: Focusing on a Text Field Using the focus() Method
Start by creating a new HTML document, and in that document, create an input field and a button with the following lines:
<center>
<input type="text" id="TF1" placeholder="I am a textField" />
<button id="btn1" onclick="buttonClicked()">
Focus on the text field
</button></center>
In the above lines:
Input tag has been given the id as “TF1”
Button has the id as “btn1” and an onclick attribute set equal to “buttonClicked()”
Running this HTML document displays the following on the browser:
![]() The text field and button are both displayed on the webpage.
Now to add the functionality upon button press, add the following lines in the JavaScript file:
function buttonClicked() {
tf = document.getElementById("TF1");
tf.focus();}
In the above JavaScript lines:
First create a function named as buttonClicked()
In that function, get the reference of the text field by using its Id and store that reference in the “tf” variable
After that, simply call the focus() method with the “tf” variable with the help of the dot operator
At this point, webpage produces the following outcome:
The text field and button are both displayed on the webpage.
Now to add the functionality upon button press, add the following lines in the JavaScript file:
function buttonClicked() {
tf = document.getElementById("TF1");
tf.focus();}
In the above JavaScript lines:
First create a function named as buttonClicked()
In that function, get the reference of the text field by using its Id and store that reference in the “tf” variable
After that, simply call the focus() method with the “tf” variable with the help of the dot operator
At this point, webpage produces the following outcome:
![]() It is observable in the output, that pressing the putting puts the text field as active or “in focus”.
Example 2: Focusing on an Element With “options” Arguments
In this example, the main goal is to have an element at a scrollable position.
After that, the button should not only focus on that element but also bring that element into view from the document.
Start by creating an HTML document, and just like in the first example, create a text field and a button with the following lines:
<center>
<input
type="text"
id="TF1"
class="scrolled"
placeholder="I am a textField"
/>
<button id="btn1" onclick="buttonClicked()">
Focus on the text field
</button>
</center>
In these lines the only difference is:
The input that now has a class “scrolled”, which will be used to place this input tag at a scrollable position in the document
After that, add the following lines to the CSS file or in the <style> tag:
body {
height: 7000px;}
.scrolled {
position: absolute;
top: 4000px;}
In the lines mentioned above:
The <body> of the document has been a height of 7000px so that the document becomes scrollable
After that, we are setting the element with the scrolled class to an absolute position of 4000px from the top
Running this HTML document give the following webpage on the browser:
It is observable in the output, that pressing the putting puts the text field as active or “in focus”.
Example 2: Focusing on an Element With “options” Arguments
In this example, the main goal is to have an element at a scrollable position.
After that, the button should not only focus on that element but also bring that element into view from the document.
Start by creating an HTML document, and just like in the first example, create a text field and a button with the following lines:
<center>
<input
type="text"
id="TF1"
class="scrolled"
placeholder="I am a textField"
/>
<button id="btn1" onclick="buttonClicked()">
Focus on the text field
</button>
</center>
In these lines the only difference is:
The input that now has a class “scrolled”, which will be used to place this input tag at a scrollable position in the document
After that, add the following lines to the CSS file or in the <style> tag:
body {
height: 7000px;}
.scrolled {
position: absolute;
top: 4000px;}
In the lines mentioned above:
The <body> of the document has been a height of 7000px so that the document becomes scrollable
After that, we are setting the element with the scrolled class to an absolute position of 4000px from the top
Running this HTML document give the following webpage on the browser:
![]() From the output, it is clear that the text field is now placed at a position of 4000px from the top.
After that, we are going to add the following lines of JavaScript:
function buttonClicked() {
tf = document.getElementById("TF1");
tf.focus({ preventScroll: false });}
In these lines:
A function buttonClicked() is made
In that function, a reference to the text field is made by using its ID and stored inside the variable “tf”.
After that, apply the focus() method on the text field and in its argument pass {preventScroll:false}.
This will bring the element in focus and scroll the document to bring that element in view.
Run the HTML document, and you will get the following result upon clicking the button:
From the output, it is clear that the text field is now placed at a position of 4000px from the top.
After that, we are going to add the following lines of JavaScript:
function buttonClicked() {
tf = document.getElementById("TF1");
tf.focus({ preventScroll: false });}
In these lines:
A function buttonClicked() is made
In that function, a reference to the text field is made by using its ID and stored inside the variable “tf”.
After that, apply the focus() method on the text field and in its argument pass {preventScroll:false}.
This will bring the element in focus and scroll the document to bring that element in view.
Run the HTML document, and you will get the following result upon clicking the button:
![]() It is observable from the output that upon clicking the button, the text field is brought into the view of the browser by scrolling the document.
Moreover, the text field is now being focused on.
It is observable from the output that upon clicking the button, the text field is brought into the view of the browser by scrolling the document.
Moreover, the text field is now being focused on.
Conclusion
This article throws light on the purpose and the working of the focus() method.
This method is used to bring an element of the HTML document into focus, or in much simpler words, it sets their active property as true.
To apply this method, simply use it with the reference of the HTML element with a dot operator.
This focus method can also take in an optional argument which has been demonstrated above.
JavaScript | clearTimeout() & clearInterval() Method
JavaScript offers numerous methods to fulfill the requirements of programmers by executing the block of code.
For scheduling a timeout, JavaScript provides methods including setInterval(), setTimeout, clearTimeout(), and clearInterval().
It provides a timeout functionality that allows users to perform any operation after a specific time interval.
Moreover, the piece of code is repeated after a set interval of time.
These methods are useful for sensitive websites such as banking websites and e-commerce sites.
This post demonstrates the working and usage of clearTimeout() and clearInterval() methods:
How to Utilize clearTimeout() Method
How to Utilize clearInterval() Method
JavaScript clearTimeout() and clearInterval() Methods
In JavaScript, the clearTimeout() and clearInterval() methods are used to clear the timer that was initialized using the setInterval() and setTimeout() methods, respectively.
The clearTimeout() method cancels the timeout that was earlier set by the setTimeout().
The same procedure is applied using clearInterval() to cancel the time interval fixed by setInterval().
How to Utilize the clearTimeout() Method?
The clearInterval() method is utilized to stop the execution that started with the setTimeout() method.
The method takes the same variable name that was returned by the setTimeout() method.
The syntax of the clearTimeout() method is provided here:
Syntax
clearTimeout(timeoutID);
The timeoutID is the value of the timer set by the setTimeout() method.
It is a mandatory field.
Example
An example is explained with the usage of the clearTimeout() method.
Code
<html>
<body>
<h2> An example of using the clearTimeout() method</h2>
<button onclick="startCount()">Press Button to Start counter</button>
<input type="text" id="txt">
<button onclick="stopCount()">Press Button to Stop counter</button>
<script>
var timer = 0;
var time;
var counter = 0;
function timedCount() {
document.getElementById("txt").value = counter;
counter = counter + 1;
time = setTimeout(timedCount, 1000);}
function startCount() {
if (!timer) {
timer = 1;
timedCount();}}
function stopCount() {
clearTimeout(time);
timer = 0;}
</script>
</body></html>
In the above code, the clearTimeout() method is utilized with the setTimeout() method to differentiate the working process between them.
The description is provided in the listed format:
Firstly, a button “Press Button to Start counter” is attached with a startCount() method.
Another button is associated with the stopCount() method to stop the execution of the above method.
After pressing the button, the counter variable is initialized and incremented by one every 1000 milliseconds.
These values are stored in the time variable that is utilized to stop the counter by passing it to the clearTimeout() method.
The screenshot of the above code is as follows:
![]() Output
Output
![]() It is observed that the counter starts after pressing the “Press Button to Start counter” button.
The counter increments the value by adding one.
The process is continued until the “Press Button to Stop counter” button is pressed.
It is observed that the counter starts after pressing the “Press Button to Start counter” button.
The counter increments the value by adding one.
The process is continued until the “Press Button to Stop counter” button is pressed.
How to Utilize the clearInterval() Method?
This method clears the schedule created by the setInterval() method.
The execution of the created timer is finished by passing the same variable that was returned from the setInterval() method.
The following syntax refers to the setInterval() method.
Syntax
clearInterval(intervalID)
In this syntax, the intervalID is the passing variable that utilizes the same value as the setInterval() method.
Example
The example code written below refers to the clearTimeout() method in JavaScript.
Code
<h2> An example of using the clearInterval() method</h2><p>Press Button to start an interval that prints a message.
</p><button id="btn" onclick="Result()">Press Button to Start Interval</button><button id="cancel">Press Button to cancel interval</button><div id="output"></div><script>function Result() {
document.getElementById('cancel').addEventListener('click', () => { cancelInterval() })
const intervalID = setInterval(() => {
document.getElementById('output').textContent += "Is JavaScript a Scripting Language ? ";},500);function cancelInterval() {
clearInterval(intervalID);
document.getElementById('output').textContent = " Cancelled Interval !";}}</script>
The code is described as:
Two buttons are associated with the methods.
The Result() method is employed with a button “Press Button to Start Interval”.
First, the interval is set by the setInterval() method.
After that, a message asking, “Is JavaScript a scripting language?” is displayed every 500 milliseconds.
In the end, the clearInterval() method is used by passing the same variable returned by the setInterval() method.
![]() Output
Output
![]() In the output, the message “Is JavaScript a scripting language?” is displayed repeatedly by pressing the Start Interval button.
After that, the clearInterval() method is utilized to stop the execution and display a message “Canceled Interval”.
In the output, the message “Is JavaScript a scripting language?” is displayed repeatedly by pressing the Start Interval button.
After that, the clearInterval() method is utilized to stop the execution and display a message “Canceled Interval”.
Conclusion
JavaScript provides functionality to stop the execution of code by utilizing the clearTimeout() and clearInterval() methods.
The clearTimeout() method is employed to clear the timer value set by the setTimeout() method.
On the other hand, the clearInterval() method stops the interval by passing the same value set by the setInterval() method.
Here, you have learned to understand the clearTimeout() and clearInterval() methods in JavaScript.
How to Submit a Form by Clicking a Link?
An HTML form can easily be submitted by clicking on any HTML element with the help of JavaScript.
The form element has a submit() method, and invoking this method with an external call will submit the form.
This article is going to focus on submitting a form upon pressing a link.
To showcase this, a form will be created which is going to take in the sign-up details from the user, and upon the submission of the form, it is going to simply print out the name of the user onto the console.
Step 1: Setup the HTML Elements
Create a new HTML document, and in that document, create a form with a particular ID, and within that form, create the input field for username and password.
After that, instead of the submit button, create a new link by using the <a> tag and use the onclick attribute and set it equal to linkPress() function:
<center>
<form id="form">
<p>Please Type Your Username</p>
<input id="name" type="text" placeholder="Name" />
<br />
<p>Please type your password</p>
<input id="password" type="password" placeholder="Password" />
<br />
<br />
<a href="" onclick="linkPress()">Link for Submission</a>
</form></center>
At this point, this HTML document produces the following webpage:
![]() Our webpage includes two input fields and a link that has an onclick() attribute set to it.
Step 2: Making the Form “submit” on Link Press
Every form element in the HTML contains the submit() method.
To submit a form, it must be referenced in the JavaScript, and then the submit() method must be called using that reference.
In the script file, create the function linkPress() and add the functionality using the following lines:
function linkPress() {
form = document.getElementById("form");
form.submit();}
First line gets the reference of our form tag and stores it inside the variable “form”.
The second line uses that reference and then calls the submit() of the form.
Running this HTML document gives the following result:
Our webpage includes two input fields and a link that has an onclick() attribute set to it.
Step 2: Making the Form “submit” on Link Press
Every form element in the HTML contains the submit() method.
To submit a form, it must be referenced in the JavaScript, and then the submit() method must be called using that reference.
In the script file, create the function linkPress() and add the functionality using the following lines:
function linkPress() {
form = document.getElementById("form");
form.submit();}
First line gets the reference of our form tag and stores it inside the variable “form”.
The second line uses that reference and then calls the submit() of the form.
Running this HTML document gives the following result:
![]() Pressing the link submits the form, but since there is no backend file connected to receive the form, therefore it just resets the field.
Step 3: Prompt the “username” Upon Form Submission
You want to add a function ready() upon the complete loading of the webpage; therefore, add the property of “onload” on the <body> tag like:
<body onload="ready()">
And then in the script file, add the following lines:
function ready() {
form = document.getElementById("form");
form.addEventListener("submit", function (event) {
event.preventDefault();
name = document.getElementById("name").value;
alert("Welcome " + name);
});}
When the HTML document is completely loaded:
An Event listener is added onto the form element by using its reference.
This event listener listens to the submit event
Upon submission, it prevents the form’s default behavior (stop the redirection).
At the end, it greets the user using its username.
If the webpage is loaded now, it gives the following output:
Pressing the link submits the form, but since there is no backend file connected to receive the form, therefore it just resets the field.
Step 3: Prompt the “username” Upon Form Submission
You want to add a function ready() upon the complete loading of the webpage; therefore, add the property of “onload” on the <body> tag like:
<body onload="ready()">
And then in the script file, add the following lines:
function ready() {
form = document.getElementById("form");
form.addEventListener("submit", function (event) {
event.preventDefault();
name = document.getElementById("name").value;
alert("Welcome " + name);
});}
When the HTML document is completely loaded:
An Event listener is added onto the form element by using its reference.
This event listener listens to the submit event
Upon submission, it prevents the form’s default behavior (stop the redirection).
At the end, it greets the user using its username.
If the webpage is loaded now, it gives the following output:
![]() As you can see, the form was submitted, and by preventing the default behavior, we were able to avoid the need for a backend to manage the data from the fields.
As you can see, the form was submitted, and by preventing the default behavior, we were able to avoid the need for a backend to manage the data from the fields.
Conclusion
It is really easy to submit a form by clicking a link with the help of JavaScript.
The form element of an HTML document has this method called submit().
To submit the form, you only have to make an explicit call to this method, which we have done in this article.
How to Stop Browser Back Button Using JavaScript?
There are numerous different ways of disabling the back button or at least messing with the working of the back button so that the browsers cannot go to the previous page.
However, fully disabling the browser’s back button is not a good option, plus client-side applications don’t have that many privileges or rights to do so due to security reasons.
In this article, we will implement a simple logic through JavaScript, which stops the browsers from going to the previous page using the window object.
The window.history.forward() Method
In this article, we will stop the normal working of the back button of the web browser by using the window Object.
And to be precise, we will head inside the window object’s history and move it “forward” when the browser tries to revisit the previous page.
Demonstration of Window.history.forward() Method
To start, we need two different HTML pages.
The first page is called the home.html, and it contains the following lines:
<center>
<a href="secondPage.html">Click me to visit the next page</a></center>
As you can see, we are simply creating an <a> in which we are simply referring to the secondPage.html.
After that, simply create the second HTML with the exact name secondPage.html.
And in this HTML document, you want to add the following lines:
<center>
<b>This is the second page</b></center>
This second page only contains text that tells the user that this is the second page.
Running the home webpage will give the following result on the browser:
![]() As you can see, clicking the link takes us to the second page, and from the second page, you can press the back button to again come to the home.html
Now in the home.html document, you are going to add in the following script lines inside the script tag:
<script>
window.history.forward();</script>
In these lines, we are accessing the history of the browser’s window object and then calling the forward() method to move the browser back to the second page.
Thus messing with the normal flow of the back button of the browser.
As you can see, clicking the link takes us to the second page, and from the second page, you can press the back button to again come to the home.html
Now in the home.html document, you are going to add in the following script lines inside the script tag:
<script>
window.history.forward();</script>
In these lines, we are accessing the history of the browser’s window object and then calling the forward() method to move the browser back to the second page.
Thus messing with the normal flow of the back button of the browser.
Key-point
This script will only work when history has some onward entry to go to.
This means that the first-time loading of the webpage will never be affected by this.
After this, simply open the home webpage, click the link to go to the second webpage, and then try clicking the back button of the browser, and you will get the following output:
![]() As you can see, clicking the back button on the browser’s doesn’t take us back to the home.html rather it takes us again on the secondPage.html
As you can see, clicking the back button on the browser’s doesn’t take us back to the home.html rather it takes us again on the secondPage.html
Conclusion
To stop the working of the browser’s back button with the help of JavaScript.
You can simply call the forward() method on the history of the web browser once the webpage has loaded.
Now to get access to this history, we must use the window object.
This article has demonstrated the working of the window.history.forward() method to stop the working of the back button of the browser.
JavaScript Array isArray() Method
The Array.isArray() was released with the release of ECMAScript5 JavaScript.
This method simply checks whether the argument passed to its arguments is an array or not.
This article will explain this Array isArray() method by explaining its syntax and then showcasing some examples.
We will start by going over the syntax of the Array isArray() method.
Syntax
Observe the syntax of the Array isArray() below:
Array.isArray(Object)
In this syntax:
Array is the default JavaScript Array Object
Object is the argument, the one we want to determine as an array or not
Return Type
Boolean: Returns true if the object passed to this method was actually an array otherwise it would return false
Additional Information
Since this is a method of the default JavaScript Array Object, therefore it is also known as the static property of this Array Object.
Example 1: Passing an Array to Array.isArray() Method
To demonstrate the working of this method, first create an array of the same types of values with the help of the following line:
my_object = [1, 2, 3, 4, 5, 6, 7, 8, 9];
After that, pass this array to the Array.isArray() method and store the return value in a new variable named as the result:
result = Array.isArray(my_object);
After that, simply display the value inside the result variable on the terminal using the console log function:
console.log(result);
Execute the code, and observe the output to be:
![]() The output shows that the object passed to this method was actually an array.
The output shows that the object passed to this method was actually an array.
Example 2: Passing an Array With Different Data Type Values
To check whether this method works with an array containing values of different data types, create an array using the following line:
my_object = [1, 2, "Google", 4, true, 6, "7", 8.673, 9];
Pass this object into the Array.isArray() method and store the result in a result variable:
result = Array.isArray(my_object);
Afterwards, simply print the result from the result variable onto the terminal using the console log() function:
console.log(result);
Execute the code and observe the following output:
![]() From the output, it is conclusive that the type of data stored inside the array doesn’t matter.
It only checks whether the object is an array or not, which in this case was true.
From the output, it is conclusive that the type of data stored inside the array doesn’t matter.
It only checks whether the object is an array or not, which in this case was true.
Example 3: Passing a String Object in Array.isArray() Method
To demonstrate what happens when a non-array object is passed to the Array isArray() method, create a new string variable with the help of the following line:
string_var = "Hello World";
Pass this string value into the arguments of the Array.isArray() method and store the outcome in a new variable:
result_var = Array.isArray(string_var);
Print the value inside the result_var on the terminal using the console log() function:
console.log(result_var);
Execute the program and get the following output on the terminal:
![]() It returns that the object passed into its argument was not an array.
It returns that the object passed into its argument was not an array.
Conclusion
The Array.isArray() method is pretty simple.
It simply checks whether the object in its argument is an array or not and returns true or false to the caller.
If an array is being passed, the values or even the data types of its values don’t matter.
In this article, we have learned about the different outcomes of the Array.isArray() method with the help of different examples.
How to Store a Key => Value Arrays?
There are multiple ways of storing key => value arrays.
However, the tricky part is storing the keys and values from two different arrays into a single element.
And to add to its trickiness, key and value are to be stored in such a scheme that fetching a key with its respective value is easy.
This cuts down the number of methods to achieve the task at hand to only two.
The two most promising methods include the use of Objects and Maps.
This article will go through both of these methods one by one.
Note: This article will assume that keys and values are stored in different arrays, and the objective is to store them together and have them formatted as “key => value” while fetching.
Method 1: Using Objects to Store Key => Value Arrays
To demonstrate this method, first create a key array and a value array with the following lines:
var keysArray = ["China", "England", "Egypt", "Finland", "Greece"];
var valuesArray = ["Beijing", "London", "Cairo", "Helsinki", "Athens"];
After that, create an empty JavaScript object with the following line:
resultObj = { };
After that, simply copy the keys and values from their array and add them in the object using the following lines:
for (var i = 0; i < keysArray.length; i++) {
resultObj[keysArray[i]] = valuesArray[i];}
In this above code snippet:
A for loop is run and its iterations are equal to the number of elements inside the keys array.
In each iteration, a new attribute of property of the object is created, and it is given the name equal to the element inside the key array and its respective value from the value array by using the same index values.
After that, pass the resultObj to the console log function to print it out on the terminal:
console.log(resultObj);
Executing the code will provide the following output:
![]() The keys and values are stored together, but they are still not in the “key => format”
To display them in the correct format, use the following lines of code:
for (x of Object.keys(resultObj)) {
console.log(x + " => " + resultObj[x]);}
In this code snippet:
Object.keys() method returns the keys of the object in its argument one by one.
The keys are getting stored inside the variable “x”
String concatenation is used to format the output of the console log as “keys=> values”
Executing the program now produces the following result:
The keys and values are stored together, but they are still not in the “key => format”
To display them in the correct format, use the following lines of code:
for (x of Object.keys(resultObj)) {
console.log(x + " => " + resultObj[x]);}
In this code snippet:
Object.keys() method returns the keys of the object in its argument one by one.
The keys are getting stored inside the variable “x”
String concatenation is used to format the output of the console log as “keys=> values”
Executing the program now produces the following result:
![]() The output shows that the keys are not only stored together but also formatted in the correct way.
The output shows that the keys are not only stored together but also formatted in the correct way.
Method 2: Using Maps to Store Key => Value Arrays
To demonstrate the usage of maps for storing keys and their respective values, create two arrays with keys and values with the following lines of code:
var keysArray = ["China", "England", "Egypt", "Finland", "Greece"];
var valuesArray = ["Beijing", "London", "Cairo", "Helsinki", "Athens"];
The next step is to create a map, for this create a variable and set it equal to the new Map() constructor like:
resultMap = new map();
To add values to a Map variable, there is this method mapVar.set().
Use this function to add keys and their respective values:
for (i = 0; i < keysArray.length; i++) {
resultMap.set(keysArray[i], valuesArray[i]);}
In the code snippet mentioned above:
A for loop is used to iterate through the keysArray and the valuesArray using the length of the keysArray.
In each iteration, resultMap.set() method is used to store the key and value pair in the map.
After this, simply pass the resultMap variable onto the terminal by using the console log function:
console.log(resultMap);
This code will produce the following output:
![]() It is sort of in the right format, but it includes a little extra information.
To correctly format it, use the following lines:
for (key of resultMap.keys()) {
console.log(key + " => " + resultMap.get(key));}
In this code snippet:
resultMap.keys() method returns the keys of the map one by one to the key variable.
resultMap.get() method is used to get the value of a specific key.
And in the console log function, string concatenation is used to correctly format the output.
Executing the code now produces the following output on the terminal:
It is sort of in the right format, but it includes a little extra information.
To correctly format it, use the following lines:
for (key of resultMap.keys()) {
console.log(key + " => " + resultMap.get(key));}
In this code snippet:
resultMap.keys() method returns the keys of the map one by one to the key variable.
resultMap.get() method is used to get the value of a specific key.
And in the console log function, string concatenation is used to correctly format the output.
Executing the code now produces the following output on the terminal:
![]() The output shows that the keys are not only stored together but also formatted in the correct way.
The output shows that the keys are not only stored together but also formatted in the correct way.
Conclusion
In JavaScript, Objects and Maps are the two elements that are most suited to store keys and value pairs, even if the task at hand is to take keys and values from individual arrays and place them inside a single entity.
Afterward, whenever the user is trying to get keys and their respective values, they can be easily formatted in “key => value” format by using simple string concatenation.
How to Select a Random Element From Array?
There are multiple ways of writing a program that selects a random element from an Array, but the best-suited method is to use a combination of Math.random() and Math.floor() methods.
Math.random() method provides the user with a random floating-point value between 0 and 1.
While the Math.floor() method simply takes in a floating-point value and rounds down the value to make it an integer.
Method 1: Random element from an Array Using Math.random() & Math.floor()
First, create an array with the following line:
my_arr = ["Paris", "London", "Bangkok", "New York", "Los Angeles", "Dubai"];
This array represents a list of cities to choose from at random.
After this, simply create a new function that takes in the array as a parameter like:
function elemenet_Selector(arr) {
}
Within this function, the very first thing is to get the length of the array passed to it inside a separate variable:
array_length = arr.length;
Then, simply call the Math.random() method to get a floating-point value and then multiply that number with the length of the array to get the range between 0 and array length:
value = Math.random() * array_length;
This line will return floating point values, but they are no good when it comes to being the index of an array.
Confirm this by simply wrapping this line into the console log and observing the output:
console.log(value)
The output on the terminal is as:
![]() To change these values into an integer, simply pass the value variable into the Math.floor() method and remove the console.log(value) line:
indexValue = Math.floor(value)
At the end of the function, use a return statement and return the element at the indexValue of the array:
return arr[indexValue];
After that, come out of the function element_Selector, and make a call to this function and wrap that call inside a console log function to print out the randomly selected element:
console.log(elemenet_Selector(my_arr));
The complete code snippet is as:
my_arr = ["Paris", "London", "Bangkok", "New York", "Los Angeles", "Dubai"];function elemenet_Selector(arr) {
array_length = arr.length;
value = Math.random() * array_length;
indexValue = Math.floor(value);
return arr[indexValue];}
console.log(elemenet_Selector(my_arr));
Execute this program and observe the following result:
To change these values into an integer, simply pass the value variable into the Math.floor() method and remove the console.log(value) line:
indexValue = Math.floor(value)
At the end of the function, use a return statement and return the element at the indexValue of the array:
return arr[indexValue];
After that, come out of the function element_Selector, and make a call to this function and wrap that call inside a console log function to print out the randomly selected element:
console.log(elemenet_Selector(my_arr));
The complete code snippet is as:
my_arr = ["Paris", "London", "Bangkok", "New York", "Los Angeles", "Dubai"];function elemenet_Selector(arr) {
array_length = arr.length;
value = Math.random() * array_length;
indexValue = Math.floor(value);
return arr[indexValue];}
console.log(elemenet_Selector(my_arr));
Execute this program and observe the following result:
![]() It is clear from the output that random elements are selected from the array.
It is clear from the output that random elements are selected from the array.
Method 2: Using Double NOT Bitwise Operator
Start by creating an array just like in method 1 with the help of the following line:
my_arr = ["Paris", "London", "Bangkok", "New York", "Los Angeles", "Dubai"];
Afterwards, call Math.random() and multiple it with the length of our array to get a range from 0 to the length:
value = Math.random() * my_arr.length;
This time around, to convert this value into an integer representing the index of the array, simply apply the double NOT Bitwise operator, which is the double tilde operator (~~), and fetch the value from the array as:
var item = my_arr[~~value];
Last, simply print out the randomly selected element onto the terminal with the help of console log function:
console.log(item);
Complete code snippet for method 2 is as:
my_arr = ["Paris", "London", "Bangkok", "New York", "Los Angeles", "Dubai"];
value = Math.random() * my_arr.length;
var item = my_arr[~~value];
console.log(item);
Execute this program and observe the following result:
![]() It is clear from the output that a random element is being selected from the array
It is clear from the output that a random element is being selected from the array
Conclusion
In JavaScript, we can utilize the Math.random() function with either the Math.floor() function or the double NOT Bitwise operator to fetch a random item from an array.
Math.random(), when multiplied by the length of the array, provides a range value of index between zero and the array’s length.
However, this range value is in floating point, therefore, use Math.floor() or NOT Bitwise operators to convert it into an integer to be used as the array index.
This article has explained both of these methods along with an example
How to Pretty Print JSON String?
JavaScript Object Notation (JSON) is basically a lightweight standard text format that transports data from the server to the webpage.
It is supported in most languages, such as Python, C#, C++, Java, PHP, etc.
The pretty print provides a stylish format that can be easily readable and understandable for humans.
Most web browsers support the JSON.stringify() method to stylish/pretty print the JSON string.
This article will briefly describe how to pretty print JSON string.
How to Pretty Print JSON String?
In JavaScript, the JSON.stringify() method prints a pretty JSON string/text in a well-organized format.
This method is utilized to convert the JavaScript based value to a string.
It provides the serialization facility for objects, numbers, arrays, Booleans, strings, etc.
Syntax
The syntax for printing a JSON.stringify() method is as follows:
JSON.stringify(value, replacer, space)
In the syntax:
value: specifies the value that converts into a string for pretty print.
replacer: represents the function, an array of strings, or numbers.
space: denotes the number or string object that inserts the white spaces.
Example 1: Pretty Print an Object
In this example, the JSON.stringify() method is used to print a pretty JSON string.
Code
// Example of Pretty print an informationlet x = {
Name: "Ali",
Age: 20,
Address: {
street: "32, Royal Avenue Street",
city: "Islamabad"
}
}
console.log(JSON.stringify(x, null, 4))
In the code, an object named “x” is created that contains the information of a person, i.e., Name, Age, and its Address.
![]() Output
Output
![]() The output is displayed in the console window in which a JSON object is presented in a pretty way using JavaScript.
Example 2: Pretty Print a Date
Another example is adapted for printing data in an efficient manner with JavaScript.
Let’s head over to the code to practice this example:
Code
// Another example is using the pretty print
console.log("Display the date in pretty print")
console.log(JSON.stringify(new Date(2022, 2, 10, 9, 3, 2)));
In the above code, the workings of different methods are as follows:
Firstly, the console.log() method is used to display a message.
After that, the Date() method is passed to the JSON.stringify() method for displaying the pretty message.
The screenshot of the code is as follows:
The output is displayed in the console window in which a JSON object is presented in a pretty way using JavaScript.
Example 2: Pretty Print a Date
Another example is adapted for printing data in an efficient manner with JavaScript.
Let’s head over to the code to practice this example:
Code
// Another example is using the pretty print
console.log("Display the date in pretty print")
console.log(JSON.stringify(new Date(2022, 2, 10, 9, 3, 2)));
In the above code, the workings of different methods are as follows:
Firstly, the console.log() method is used to display a message.
After that, the Date() method is passed to the JSON.stringify() method for displaying the pretty message.
The screenshot of the code is as follows:
![]() Output
Output
![]() The above output shows the pretty print of JSON strings by utilizing JavaScript’s JSON.stringify() method.
The JSON.stringify() method displays the date information in an efficient way for better understanding.
The above output shows the pretty print of JSON strings by utilizing JavaScript’s JSON.stringify() method.
The JSON.stringify() method displays the date information in an efficient way for better understanding.
Conclusion
The JSON.stringify() method is used to pretty print the JSON string.
An object variable or the object’s value can directly be passed to the JSON.stringify() method for printing the JSON string.
You have learned to pretty print JSON string.
For a better understanding, we have demonstrated the usage of stringify() method with suitable examples.
How to Parse Float With Two Decimal Places?
JavaScript provides an inbuilt function parseFloat() that can be used to parse floating point values from a string.
The user can use it combined with the toFixed() method to restrict the parsed value to two decimal points.
Let’s start by going over the syntax of the parseFloat() variable.
Syntax of parseFloat() Method
The syntax of the parseFloat() method can easily be defined as:
returnVar = parseFloat( string );
In this syntax:
returnVar is the variable in which the return value from the parseFloat() method is stored
string: It is the string that is to be parsed into a floating-point value
Working of parseFloat() Method
The parseFloat() working is quite simple.
It checks the string character by point.
If they are numbers, they are parsed as numbers.
If numbers follow a full stop, it parses them as the decimal point followed by numbers.
However, if the string’s first character is a non-numeric value, then it would simply return a NaN.
The important thing to note here is that if there are even ten decimal places, it will parse those ten decimal places.
That is why restricting a parsed value to a fixed number of decimal places is not possible with the parseFloat() method alone.
The toFixed() method
The toFixed() method (as mentioned above) is also a built-in method of JavaScript whose working is very straightforward.
It reduces the number of decimal places from a floating-point value to a fixed amount.
The number of decimal places is passed inside its arguments.
However, it doesn’t change the original value.
Therefore, you need to store the return value in a variable.
Parsing a Value to Two Decimal Points
To perform the task at hand, start by creating a string value that contains a floating-point value with more than two decimal places with the following line:
stringValue = "9544.365912"
After that, simply pass this variable stringValue parseFloat() variable and store the return value in a new variable:
parsedValue = parseFloat(stringValue);
At this point, if this parsedValue is printed on the terminal using the console log function like:
console.log(parsedValue);
The result would be:
![]() This is not what is required.
Therefore, apply the toFixed() method on this parsedValue variable with the help of a dot operator and set the argument equal to 2 as:
result = parsedValue.toFixed(2);
After that, simply pass this result variable to the console log function:
console.log(result);
Executing the program will show the following result on the terminal:
This is not what is required.
Therefore, apply the toFixed() method on this parsedValue variable with the help of a dot operator and set the argument equal to 2 as:
result = parsedValue.toFixed(2);
After that, simply pass this result variable to the console log function:
console.log(result);
Executing the program will show the following result on the terminal:
![]() It is clear that the number has been parsed with only two decimal places.
Also, there is one more thing, you can apply the parseFloat() method and the toFixed() in a single statement like:
result = parseFloat(stringValue).toFixed(2);
The output will be:
It is clear that the number has been parsed with only two decimal places.
Also, there is one more thing, you can apply the parseFloat() method and the toFixed() in a single statement like:
result = parseFloat(stringValue).toFixed(2);
The output will be:
![]() It produced the same result with fixed two decimal places.
It produced the same result with fixed two decimal places.
Wrap-up
JavaScript provides two built-in methods which are the parseFloat() and the toFixed().
Users can use these methods in combination with each other to restrict the parsed value to two decimal places.
This article has explained the working of both to achieve the task at hand with the help of an example.
How to Create Previous and Next Button and Non-Working on End Position Using JavaScript
Creating a previous button and a next button with the non-working on both positions is really easy to implement on HTML elements with the help of JavaScript.
This article is going to go through the process step by step.
To implement the non-working of the buttons, we are going to play with the “disabled” property of the HTML elements.
Let’s get started.
Step 1: Set-up the HTML document
In the HTML document, create a center tag, and in that tag, create a <p> tag that is going to display the current value, and then create two buttons with different ids with the following lines:
<center>
<p id="number">1</p>
<button id="back" onclick="back()">Back</button>
<button id="next" onclick="next()">Next</button></center>
There are a few things to note over here:
<p> tag contains the value 1, because the value range for this example is going to be from 1 to 7 and those are also going to be the end position.
Upon the press of the next button, the next() function is being called from the script
Upon the press of the back button, the back() function is being called from the script
For referencing, all three elements have separate IDs assigned to them
After that, the webpage loads with the default value set to “1” therefore the back button should be disabled from the start of the webpage.
For this, simply include an “onload” property on the <body> tag and set it equal to the ready() function from the script file as:
<body onload="ready()">
<!-- above code is written inside the body tag --></body>
The basic HTML template is set up, executing this HTML file is going to provide the following outcome on the browser:
![]() The browser shows up the two buttons and the <p> tag is displaying the current value.
The browser shows up the two buttons and the <p> tag is displaying the current value.
Step 2: Disabling Back Button on Webpage’s Complete Load
As mentioned before, the back button should be disabled when the webpage is loaded because the value is at 1, which is an end-position.
Therefore, inside the script file, reference the 3 elements of the HTML webpage using their IDs and store their reference in separate variables.
backButton = document.getElementById("back");
nextButton = document.getElementById("next");
number = document.getElementById("number");
Also, create a new variable and set its value equal to 1.
This variable is going to be showcasing the value of the <p> tag for the script file:
var i = 1;
After that, create the function ready(), which will be called upon the complete loading of the webpage, and in that function simple disable the back button using the following lines:
function ready() {
backButton.disabled = true;}
At this point, the HTML looks like the following when loaded:
![]()
Step 3: Adding functionality to the next button
To add a function to the HTML webpage, create the next() function that is going to be called upon clicking the next button and the full working functionality with the following lines:
function next() {
i++;
if (i == 7) {
nextButton.disabled = true;
}
backButton.disabled = false;
number.innerHTML = i;}
In this code snippet, the following things are happening:
Firstly, increase the value of the “i” variable by 1 because if the next button is not disabled, then that means the end position has not been reached yet
Then check if increasing the value of the “i” variable has caused it to reach the end position value (which in this case is set at 7), if yes, then disable the “nextButton” by setting the disabled property to true
If the next button was clicked that means the value is no longer at one, meaning that the back button must be enabled, therefore, set its disabled property to false
At the end, change the value inside our <p> tag by setting its innerHTML value to “i”
At this point, the HTML webpage will give the following output:
![]() It is clear from the output that when the value changes from 1(lower end position) the back button is enabled.
And also, when the value reaches 7 (maximum end position), the next button is enabled.
It is clear from the output that when the value changes from 1(lower end position) the back button is enabled.
And also, when the value reaches 7 (maximum end position), the next button is enabled.
Step 4: Adding Functionality to the Back Button
Create the back() function that is going to be called upon clicking the back button and implement the full working functionality with the following lines:
function back() {
i--;
if (i == 1) {
backButton.disabled = true;
}
nextButton.disabled = false;
number.innerHTML = i;}
The following things are happening in this code snippet:
Firstly, decrease the value of the “i” variable by 1 because if the back button is not disabled, then that means the lower end position has not been reached yet
Then check if increasing the value of the “i” variable has caused it to reach the lower end position value (which in this case is set at 1), if yes, then disable the “backButton” by setting the disabled property to true
If the back button was clicked that means the value is no longer at 7, meaning that the next button must be enabled, therefore, set its disabled property to false
At the end, change the value inside our <p> tag by setting its innerHTML value to “i”
At this point, the HTML has complete functionality as displayed below:
![]() It is clear from the output that both of the buttons are working perfectly and the non-working on end position is also working.
It is clear from the output that both of the buttons are working perfectly and the non-working on end position is also working.
Conclusion
This article has explained how to create two buttons on an HTML webpage and implement their working.
And also, implement a non-working logic to disable the button when the end position is reached.
To implement the non-working buttons, simply set the disabled property of the HTML element using the JavaScript
How to Change the Background Color After Clicking the Button?
JavaScript is used with the HTML elements to build interactive web applications.
A script is added with the HTML elements to generate pop-up messages, form validation, dropdown menu, etc.
JavaScript allows users to change the background color of HTML elements.
This action can be associated with the click event of the button to provide the functionality whenever the user wants it.
This post provides deep insight to guide you on how to change the background color by pressing the HTML button.
How does Background Color Change by Clicking Button?
JavaScript acts as a catalyst with HTML and CSS to provide an interactive interface for a web page.
This section demonstrates the JavaScript code to transform the background color after clicking a button.
The syntax for changing the background color is as follows:
Syntax
document.getElementById('id').style.backgroundColor = 'color';
The syntax is described as:
backgroundColor represents the property to change the background color.
getElementById specifies that you read and edit the specific HTML element.
color denotes the user-defined color for display.
An example is given to convert the background color by pressing/clicking the button.
Code
<html><head><style>
#DIV {
width: 400px;
height: 300px;
background-color: green;
color: black;}</style></head><body><h3>Example to change the background color with JavaScript</h3><div id="DIV">
<h1>Welcome to JavaScript World</h1></div><button onclick="colorFunction()">Press it</button><script>function colorFunction() {
document.getElementById("DIV").style.backgroundColor = "orange";}</script></body></html>
The code is explained here:
The div of the HTML document for the background color has a width and height of 400px and 300px respectively.
After that, a message is displayed saying “Welcome to JavaScript World” in the specified section.
An HTML button is attached with a button tag that is associated with the colorFunction() method.
Using this method, the color is changed after pressing the “Press it” button.
After the click event of the button is called, the color changes to “orange”.
![]() Output before clicking on the button:
Output before clicking on the button:
![]() In the output, green is present in the background of the text “Welcome to JavaScript World”.
Moreover, an HTML button “Press it” is attached.
Output after clicking on the button:
In the output, green is present in the background of the text “Welcome to JavaScript World”.
Moreover, an HTML button “Press it” is attached.
Output after clicking on the button:
![]() When the button is pressed, the green color changes to orange as can be seen in the above image.
When the button is pressed, the green color changes to orange as can be seen in the above image.
Conclusion
In JavaScript, the background color is changed using the built-in property of the date object.
This property can be linked with an event onclick of the button.
Upon clicking the button, the background color will be changed.
Here you have learned how the background color is changed after clicking a button in JavaScript.
Difference Between var and let
The var and let are keywords used to define or initialize a variable.
However, they both have different scopes., two different variables scoping are available, which are the global scope and the local \ block scope.
This article will differentiate the let and var keywords with the help of scopes.
var and Global Scope
Whenever we create a new variable with the help of the var keyword, it defines two properties for the variable.
The first one is that the value of this variable can be changed at any time, and the second is that this variable can be accessed from any part of the program, thus making it a globally available variable within that JavaScript file.
To demonstrate this, we are going to take the following example:
Example of var Keyword
Simply create a variable with the help of the var keyword with the following line:
var string = "Google";
After that, simply try accessing this variable from within an if the state, a for loop, and from within a function as well with the help of the following lines:
var string = "Google";
console.log(string + " from the JavaScript file");if (true) {
console.log(string + " from the if Statement");}for (i = 0; i < 1; i++) {
console.log(string + " from the for Loop");}function printString() {
console.log(string + " from the function");}
printString();
Upon the execution of the code mentioned above snippet, the following result is displayed onto the terminal:
![]() It is clear from the output that the compiler was able to access the variable string from the JavaScript file outside of any enclosements, from within the if statement, from within the for loop, and last from within a function.
This makes this variable a globally available variable throughout this JavaScript file.
It is clear from the output that the compiler was able to access the variable string from the JavaScript file outside of any enclosements, from within the if statement, from within the for loop, and last from within a function.
This makes this variable a globally available variable throughout this JavaScript file.
let and Block Scope
Whenever a variable is initialized with the let keyword, the scope of that variable is set to block scope.
A block scope restricts the accessing or the referencing of the variable from outside the curly bracket {} in which it was initialized.
Therefore, we can say that a block scope exists between each pair of curly brackets.
Example of let Keyword
First, create a variable in the JavaScript with the help of the let keyword inside an if statement:
if (true) {
let x = "Hello";}
And then, try calling this x variable outside of this if statement with the help of the following lines:
console.log(x);
Executing the program will give the following output onto the terminal:
![]() The output shows a reference error that x is not defined meaning that the scope of the variable x was enclosed inside the if Statement.
But to demonstrate that the block scope exists between a pair of curly brackets regardless of the statement used with it.
Simply create the variable x inside curly brackets like:
{
let x = "Hello";}
And try accessing the variable x outside of these curly brackets using the console log function:
console.log(x);
The whole code snippet will look like this:
{
let x = "Hello";}
console.log(x);
Executing this populates the terminal with the following result:
The output shows a reference error that x is not defined meaning that the scope of the variable x was enclosed inside the if Statement.
But to demonstrate that the block scope exists between a pair of curly brackets regardless of the statement used with it.
Simply create the variable x inside curly brackets like:
{
let x = "Hello";}
And try accessing the variable x outside of these curly brackets using the console log function:
console.log(x);
The whole code snippet will look like this:
{
let x = "Hello";}
console.log(x);
Executing this populates the terminal with the following result:
![]() From the output and the error in the output, it is easily conclusive that the let keyword bounds the scope of the variable at hand within the curly bracket {} in which it is initialized.
From the output and the error in the output, it is easily conclusive that the let keyword bounds the scope of the variable at hand within the curly bracket {} in which it is initialized.
Conclusion
The significant difference between the var keyword and the let keyword is that the var keyword binds the variable scope to global while the let keyword bounds the variable scope to block.
The global scope needs no explanation.
The variable is accessible from any part of that JavaScript file.
In contrast, block scope means that the variable is only accessible within the block of code enclosed with curly brackets in which it was created.
Difference Between Methods and Functions
In JavaScript, functions and methods can easily be mixed and mistakenly considered the same.
However, the reality is far from it.
To summarize, a function is a block of code written to serve a particular purpose.
Functions are not bound to any specific object.
On the other hand, methods are functions bound to an object.
Let’s go over each one by one.
Functions
As mentioned above, a function is nothing but a block of code enclosed inside curly brackets and used to fulfill a specific role or perform a particular task.
Working with a function generally consists of two parts, the first is the function definition, and the second is the function call.
In the function definition, a function is created with the function keyword, given a name and a block of code to perform a task like:
function greetUser() {
// Block of code goes here}
This above code snippet is to create a function which is named as greetUser().
The second part of working with function is the function call.
The function call is essentially the line where we call the function using its name to perform the task written inside it:
greetUser();
This function call does not require any special keyword.
An example of the function would be:
function greetUser() {
console.log("Hello and Welcome to LinuxHint!");}
greetUser();
Upon execution of this code snippet, you’ll get the following output onto the terminal:
![]() The greeting was printed onto the terminal
The greeting was printed onto the terminal
Methods
Methods are functions, they are written to uptake a specific purpose, and they also have two parts which include the function definition and the function call (called method definition and method call).
However, methods are defined inside an Object, which differentiates them from normal functions.
Take the following lines to showcase the method definition:
var siteBot = {
greetUser: function () {
console.log("Hello and Welcome to LinuxHint!");
},};
In this code snippet, there is an object named as siteBot which contains an attribute greetUser which is set to a function() with some tasks inside it.
Now, this greetUser is called a method of the siteBot object.
To call a method, the call must use a dot operator with their object’s name, and then at the end, you place the parenthesis like
siteBot.greetUser();
The complete code snippet is as:
var siteBot = {
greetUser: function () {
console.log("Hello and Welcome to LinuxHint!");
},};
siteBot.greetUser();
Upon executing the code snippet mentioned above, the following output is displayed on the terminal:
![]() As you can see, siteBot object printed the greetings on the terminal.
Now, try to call this greetUser() method like you would call a normal function using the dot operator or the object’s name:
greetUser();
You will get the following output in the terminal:
As you can see, siteBot object printed the greetings on the terminal.
Now, try to call this greetUser() method like you would call a normal function using the dot operator or the object’s name:
greetUser();
You will get the following output in the terminal:
![]() From this output, it is clear that you cannot call methods like you would call a normal function.
From this output, it is clear that you cannot call methods like you would call a normal function.
Conclusion
Functions and methods are quite different in their working because functions are not bound by any object, whereas methods are bound by the object in which they are defined.
Methods are essentially functions bounded to a specific object.
Function calls require no special keyword or operator, whereas method calls require the object’s name and the dot operator.
Both of them are written to perform a particular purpose.
The Tf.Reverse() Function in TensorFlow.Js
In the TensorFlow.js library, tf.reverse() function is used to reverse the elements in a tensor.
tf.reverse() Function – 1D Tensor
If the input tensor is one-dimensional, it doesn’t take any parameters.
Syntax:
tensor.reverse()
Example 1
Create a 1D tensor with 4 integers and reverse them using the tf.reverse() function.
<html><!-- CDN Link that delivers the Tensorflow.js framework --><script src="https://cdn.jsdelivr.net/npm/@tensorflow/tfjs"></script>
<body><script>
//tensor
let tensor = tf.tensor1d([45,67,1,2]);
document.write("<b>Actual Tensor:</b> ",tensor);
document.write("<br>");//reverse the tensor
document.write("<b>Reversed elements in a Tensor: </b> "+tensor.reverse());</script></body></html>
Output:
![]() Elements in a tensor are reversed.
Elements in a tensor are reversed.
Example 2
Create a 1D tensor with 10 integers and reverse them using tf.reverse().
<html><!-- CDN Link that delivers the Tensorflow.js framework --><script src="https://cdn.jsdelivr.net/npm/@tensorflow/tfjs"></script>
<body><script>
//tensor
let tensor = tf.tensor1d([1,2,3,4,5,6,7,8,9,10]);
document.write("<b>Actual Tensor:</b> ",tensor);
document.write("<br>");//reverse the tensor
document.write("<b>Reversed elements in a Tensor: </b> "+tensor.reverse());</script></body></html>
Output:
![]() Elements in a tensor are reversed.
Elements in a tensor are reversed.
tf.reverse() Function – 2D Tensor
If the input tensor is two-dimensional, then the syntax is shown below:
Syntax:
tensor.reverse(axis)
Parameter:
It takes an optional parameter axis.
It takes two possible values, 0 and 1.
If axis=0, then rows will be reversed and if axis=0, then columns will be reversed.
If both are not specified, then both are not specified, and elements are reversed in a linear fashion.
Example 1
Create a 2D tensor with 5 rows and 2 columns and reverse the rows of the tensor.
<html><!-- CDN Link that delivers the Tensorflow.js framework --><script src="https://cdn.jsdelivr.net/npm/@tensorflow/tfjs"></script>
<body><script>
//tensor
let tensor = tf.tensor2d([10,2,30,4,5,6,100,8,9,10],[5,2]);
document.write("<b>Actual Tensor:</b> ",tensor);
document.write("<br>");//reverse the rows of a tensor
document.write("<b>Reversed elements in a Tensor: </b> "+tensor.reverse(0));</script></body></html>
Output:
![]() Rows in a tensor are reversed.
Rows in a tensor are reversed.
Example 2
Create a 2D tensor with 5 rows and 2 columns and reverse the columns of the tensor.
<html><!-- CDN Link that delivers the Tensorflow.js framework --><script src="https://cdn.jsdelivr.net/npm/@tensorflow/tfjs"></script>
<body><script>
//tensor
let tensor = tf.tensor2d([10,2,30,4,5,6,100,8,9,10],[5,2]);
document.write("<b>Actual Tensor:</b> ",tensor);
document.write("<br>");//reverse the columns of a tensor
document.write("<b>Reversed elements in a Tensor: </b> "+tensor.reverse(1));</script></body></html>
Output:
![]() Columns in a tensor are reversed.
Columns in a tensor are reversed.
Example 3
Create a 2D tensor with 5 rows and 2 columns and reverse the elements in a tensor.
<html><!-- CDN Link that delivers the Tensorflow.js framework --><script src="https://cdn.jsdelivr.net/npm/@tensorflow/tfjs"></script>
<body><script>
//tensor
let tensor = tf.tensor2d([10,2,30,4,5,6,100,8,9,10],[5,2]);
document.write("<b>Actual Tensor:</b> ",tensor);
document.write("<br>");//reverse the elements of a tensor
document.write("<b>Reversed elements in a Tensor: </b> "+tensor.reverse());</script></body></html>
Output:
![]() Here, the axis parameter is not specified.
So, elements are reversed in a linear fashion.
Here, the axis parameter is not specified.
So, elements are reversed in a linear fashion.
Conclusion
In this tutorial, we saw how to reverse elements in one/two-dimensional tensors with the TensorFlow.js library.
If the input tensor is one-dimensional, then tf.reverse() won’t take any parameters and simply reverse in a linear fashion.
It is possible to reverse rows and columns in a two-dimensional tensor using the axis parameter.
If it is not specified, elements are reversed in a linear fashion.
tf.util.encodeString() and tf.util.decodeString() Functions in Tensorflow.js
If you want to encode the string into bytes and vice versa in the Tensorflow.js library, then the tf.encodeString() and tf.decodeString() functions are used.
In this article, we will explore different ways to encode and decode the string using the tf.encodeString() and tf.decodeString().
Tensorflow.js – tf.util.encodeString() Function
tf.encodeString() is used to encode all the characters present in the string into bytes using an encoding format.
By default, it encodes using utf-8 encoding format.
UTF- 8 follows the ASCII table, so it encodes each character to its ASCII Values.
Syntax
tf.util.encodeString(actual_string,endoding_format)
It takes two parameters.
Parameters
The actual_string is the string
The encding_format is the format in which the string is encoded.
By default, it is utf-8.
Example 1We will encode the string: ‘Linux Hint’ with utf-8 encoding technique.
<html><!-- CDN Link that delivers the Tensorflow.js framework --><script src="https://cdn.jsdelivr.net/npm/@tensorflow/tfjs"></script><body><center><h1>Tensorflow.js - tf.util.encodeString()</h1></center><script>//create a string
let actual_string = 'Linux Hint';//actual tensor
document.write("<b>Actual String: </b>",actual_string);
document.write("<br>");//encode the string
document.write("<b>Encoded String: </b>"+tf.util.encodeString(actual_string,'utf-8'));</script></body></html>
Output
![]() A string is encoded using the utf-8 format.
Example 2We will encode the string: ‘Linux Hint hold java and other tutorials’ with utf-8 encoding technique.
<html><!-- CDN Link that delivers the Tensorflow.js framework --><script src="https://cdn.jsdelivr.net/npm/@tensorflow/tfjs"></script><body><center><h1>Tensorflow.js - tf.util.encodeString()</h1></center><script>//create a string
let actual_string = 'Linux Hint hold java and other tutorials';//actual tensor
document.write("<b>Actual String: </b>",actual_string);
document.write("<br>");//encode the string
document.write("<b>Encoded String: </b>"+tf.util.encodeString(actual_string,'utf-8'));</script></body></html>
Output
A string is encoded using the utf-8 format.
Example 2We will encode the string: ‘Linux Hint hold java and other tutorials’ with utf-8 encoding technique.
<html><!-- CDN Link that delivers the Tensorflow.js framework --><script src="https://cdn.jsdelivr.net/npm/@tensorflow/tfjs"></script><body><center><h1>Tensorflow.js - tf.util.encodeString()</h1></center><script>//create a string
let actual_string = 'Linux Hint hold java and other tutorials';//actual tensor
document.write("<b>Actual String: </b>",actual_string);
document.write("<br>");//encode the string
document.write("<b>Encoded String: </b>"+tf.util.encodeString(actual_string,'utf-8'));</script></body></html>
Output
![]() A string is encoded using the utf-8 format.
A string is encoded using the utf-8 format.
Tensorflow.js – tf.util.decodeString() Function
The tf.decodeString() is used to decode the byte into character using the decoding in ASCII format.
Syntax
tf.util.decodeString(actual_byte,’ASCII’)
It takes two parameters.
Parameters
The actual_byte is the byte.
ASCII converts the byte into a character as an ASCII value.
We need to create an array buffer to store bytes.
Example 1We will decode the byte – 65 with the tf.util.decodeString() function.
<html><!-- CDN Link that delivers the Tensorflow.js framework --><script src="https://cdn.jsdelivr.net/npm/@tensorflow/tfjs"></script><body><center><h1>Tensorflow.js - tf.util.decodeString()</h1></center><script>//create a buffer with size 1
let store = new ArrayBuffer(1);// specify the bytes into the buffer store
let value = new Uint8Array(store);//add byte
value[0] = 65;//decode the byte
document.write("Decoded: "+ tf.util.decodeString(value, "ASCII"));</script></body></html>
Output
![]() The 65 bytes character is A.
Example 2We will decode the bytes, 67 and 68, with the tf.util.decodeString() function.
<html><!-- CDN Link that delivers the Tensorflow.js framework --><script src="https://cdn.jsdelivr.net/npm/@tensorflow/tfjs"></script><body><center><h1>Tensorflow.js - tf.util.decodeString()</h1></center><script>//create a buffer with size 2
let store = new ArrayBuffer(2);// specify the bytes into the buffer store
let value = new Uint8Array(store);//add byte
value[0] = 67;
value[1] = 68;//decode the byte
document.write("Decoded: "+ tf.util.decodeString(value, "ASCII"));</script></body></html>
Output
The 65 bytes character is A.
Example 2We will decode the bytes, 67 and 68, with the tf.util.decodeString() function.
<html><!-- CDN Link that delivers the Tensorflow.js framework --><script src="https://cdn.jsdelivr.net/npm/@tensorflow/tfjs"></script><body><center><h1>Tensorflow.js - tf.util.decodeString()</h1></center><script>//create a buffer with size 2
let store = new ArrayBuffer(2);// specify the bytes into the buffer store
let value = new Uint8Array(store);//add byte
value[0] = 67;
value[1] = 68;//decode the byte
document.write("Decoded: "+ tf.util.decodeString(value, "ASCII"));</script></body></html>
Output
![]() The 67 bytes character is C, and 68 is converted to D.
The 67 bytes character is C, and 68 is converted to D.
Conclusion
In this article, we saw how to encode and decode the string using the tf.util.encodeString() and tf.util.decodeString() functions in Tensorflow.js.
The tf.uitl.encodeString() takes the utf-8 encoding technique that converts to bytes per ASCII values and tf.uitl.decodeString() takes the ASCII decoding technique that converts to string/character per ASCII values.
Make sure you use an array buffer to store bytes for decoding.
The Tf.Stack() Function in TensorFlow.Js
In the TensorFlow.js library, the tf.stack() function is used to join two or more tensors.
Syntax:
tf.stack([tensor1,tensor2,.............],axis)
Parameters:
It takes two or more tensors as a parameter that can be one-dimensional as the first parameter.
The axis takes two possible values (0 and 1).
If specified 0, tf.stack() joins tensors one after another by returning a new tensor.
If specified 1, tf.stack() joins element by element in a row by returning a new tensor.
Example 1
Create two 1D tensors with integers and stack two tensors by setting axis-0.
<html><!-- CDN Link that delivers the Tensorflow.js framework --><script src="https://cdn.jsdelivr.net/npm/@tensorflow/tfjs"></script>
<body><script>
//tensor1
let tensor1 = tf.tensor1d([10,20,30,30]);//tensor2
let tensor2 = tf.tensor1d([40,50,60,60]);
document.write("<b>Tensor-1:</b> ",tensor1);
document.write("<br>");
document.write("<b>Tensor-2:</b> ",tensor2);
document.write("<br>");//stack the tensors at a time
document.write("<b>Stacked Tensors: </b> ",tf.stack([tensor1,tensor2],0));
document.write("<br>");</script></body></html>
Output:
![]() Tensor1 and Tensor2 are stacked one after another.
Tensor1 and Tensor2 are stacked one after another.
Example 2
Create two 1D tensors with integers and stack two tensors by setting axis-1.
<html><!-- CDN Link that delivers the Tensorflow.js framework --><script src="https://cdn.jsdelivr.net/npm/@tensorflow/tfjs"></script>
<body><script>
//tensor1
let tensor1 = tf.tensor1d([10,20,30,30]);//tensor2
let tensor2 = tf.tensor1d([40,50,60,60]);
document.write("<b>Tensor-1:</b> ",tensor1);
document.write("<br>");
document.write("<b>Tensor-2:</b> ",tensor2);
document.write("<br>");//stack the tensors element by element
document.write("<b>Stacked Tensors: </b> ",tf.stack([tensor1,tensor2],1));
document.write("<br>");</script></body></html>
Output:
![]() Tensor1 and Tensor2 are stacked element by element in both tensors, and returned tensor has stacked elements placed in separate rows.
Tensor1 and Tensor2 are stacked element by element in both tensors, and returned tensor has stacked elements placed in separate rows.
Example 3
Create four 1D tensors with integers and stack them by setting axis-1 and axis-0 separately.
<html><!-- CDN Link that delivers the Tensorflow.js framework --><script src="https://cdn.jsdelivr.net/npm/@tensorflow/tfjs"></script>
<body><script>
//tensor1
let tensor1 = tf.tensor1d([10,20,30,30]);//tensor2
let tensor2 = tf.tensor1d([40,50,60,60]);//tensor3
let tensor3 = tf.tensor1d([12,10,45,67]);//tensor4
let tensor4 = tf.tensor1d([40,12,34,56]);
document.write("<b>Tensor-1:</b> ",tensor1);
document.write("<br>");
document.write("<b>Tensor-2:</b> ",tensor2);
document.write("<br>");
document.write("<b>Tensor-3:</b> ",tensor3);
document.write("<br>");
document.write("<b>Tensor-4:</b> ",tensor4);
document.write("<br>");//stack the tensors element by element
document.write("<b>Stacked Tensors element by element: </b> ",tf.stack([tensor1,tensor2,tensor3,tensor4],1));
document.write("<br>");//stack the tensors at a time
document.write("<b>Stacked Tensors at a time: </b> ",tf.stack([tensor1,tensor2,tensor3,tensor4],0));
document.write("<br>");</script></body></html>
Output:
![]() In the first output, four tensors are stacked element by element, and in the second output, tensors are stacked at a time.
In the first output, four tensors are stacked element by element, and in the second output, tensors are stacked at a time.
Conclusion
In this TensorFlow.js tutorial, we saw how to stack two or more tensors using the tf.stack() function.
If the axis is specified as 0, tf.stack() joins tensors one after another by returning a new tensor.
If specified as 1, tf.stack() joins element by element in a row by returning a new tensor.
Ensure you understand all the examples discussed and get the difference between axis-0/1 parameters.
The Tf.Tile() Function in TensorFlow.Js
In the TensorFlow.js library, the tf.tile() function is used to create a new tensor by duplicating the elements in the existing tensor.
It takes two parameters.
Syntax:
tf.tile(tensor,[n])
Parameters:
The tensor is the input tensor with elements.
The n is an integer in which the elements in a tensor are duplicated.
Example 1
Create a 1D tensor with 4 integers and duplicate 4 times using tf.tile().
<html><!-- CDN Link that delivers the Tensorflow.js framework --><script src="https://cdn.jsdelivr.net/npm/@tensorflow/tfjs"></script><body><script>//tensor
let tensor = tf.tensor1d([10,20,30,30]);
document.write("<b>Tensor:</b> ",tensor);
document.write("<br>");//duplicate the elements 4 times in a tensor
document.write("<b>Duplicated Tensor: </b> "+tf.tile(tensor,[4]));</script></body></html>
Output:
![]() Elements in a tensor are duplicated 4 times.
Elements in a tensor are duplicated 4 times.
Example 2
Create a 1D tensor with 2 integers and duplicate 2 times using tf.tile().
<html><!-- CDN Link that delivers the Tensorflow.js framework --><script src="https://cdn.jsdelivr.net/npm/@tensorflow/tfjs"></script><body><script>
//tensor
let tensor = tf.tensor1d([45,67]);
document.write("<b>Tensor:</b> ",tensor);
document.write("<br>");//duplicate the elements 2 times in a tensor
document.write("<b>Duplicated Tensor: </b> "+tf.tile(tensor,[2]));</script></body></html>
Output:
![]() Elements in a tensor are duplicated 2 times.
If you want to duplicate elements in a two-dimensional tensor, then you have to specify the duplicate values for the row and column.
Elements in a tensor are duplicated 2 times.
If you want to duplicate elements in a two-dimensional tensor, then you have to specify the duplicate values for the row and column.
Syntax:
tf.tile(tensor,[r,c])
r – duplicates the rows r times.
c – duplicates the elements in each row c times.
Example
Let’s create a two-dimensional tensor with 2 rows and 2 columns and duplicate the rows 2 times and each value in a row three times.
<html><!-- CDN Link that delivers the Tensorflow.js framework --><script src="https://cdn.jsdelivr.net/npm/@tensorflow/tfjs"></script>
<body><script>
//tensor
let tensor = tf.tensor2d([45,67,1,2],[2,2]);
document.write("<b>Tensor:</b> ",tensor);
document.write("<br>");//duplicate the elements in each row 2 times and each column 3 times
document.write("<b>Duplicated Tensor: </b> "+tf.tile(tensor,[2,3]));</script></body></html>
Output:
![]() We can see that the rows are duplicated two times, and, in each row, each value is duplicated three times.
We can see that the rows are duplicated two times, and, in each row, each value is duplicated three times.
Conclusion
This guide discussed how to duplicate elements in a tensor with the TensorFlow.js library.
It takes an integer value that is used to duplicate the “n” number of times.
If you want to duplicate elements in a two-dimensional tensor, then you have to specify the duplicate values for the rows and columns.
The Tf.Concat() Function in TensorFlow.Js
In the Tensorflow.js library, the tf.concat() function is used to join two or more tensors.
Concatenating 1D Tensors
In this case, the tensors are appended at the end of the first tensor.
Syntax:
tf.concat([tensor1,tensor2,.............])
Parameter:
It takes two or more tensors as a parameter that can be one-dimensional.
Example 1
Create two 1D tensors with integers and concatenate two tensors.
<html><!-- CDN Link that delivers the Tensorflow.js framework --><script src="https://cdn.jsdelivr.net/npm/@tensorflow/tfjs"></script>
<body><script>
//tensor1
let tensor1 = tf.tensor1d([10,20,30,30]);//tensor2
let tensor2 = tf.tensor1d([40,50,60,60]);
document.write("<b>Tensor-1:</b> ",tensor1);
document.write("<br>");
document.write("<b>Tensor-2:</b> ",tensor2);
document.write("<br>");
document.write("<b>Combined Tensors:</b> ",tf.concat([tensor1,tensor2]));
</script></body></html>
Output:
![]() Values in Tensor-2 are appended to Tensor-1.
Values in Tensor-2 are appended to Tensor-1.
Example 2
Create four 1D tensors with integers and concatenate four tensors.
<html><!-- CDN Link that delivers the Tensorflow.js framework --><script src="https://cdn.jsdelivr.net/npm/@tensorflow/tfjs"></script>
<body><script>
//tensor1
let tensor1 = tf.tensor1d([10,20,30,30]);//tensor2
let tensor2 = tf.tensor1d([40,50,60,60]);//tensor3
let tensor3 = tf.tensor1d([70,80]);//tensor4
let tensor4 = tf.tensor1d([90,100,110]);
document.write("<b>Tensor-1:</b> ",tensor1);
document.write("<br>");
document.write("<b>Tensor-2:</b> ",tensor2);
document.write("<br>");
document.write("<b>Tensor-3:</b> ",tensor3);
document.write("<br>");
document.write("<b>Tensor-4:</b> ",tensor4);
document.write("<br>");
document.write("<b>Combined Tensors:</b> ",tf.concat([tensor1,tensor2,tensor3,tensor4]));
</script></body></html>
Output:
![]() Values in Tensor-2, Tensor-3, and Tensor-4 are appended to Tensor-1.
Values in Tensor-2, Tensor-3, and Tensor-4 are appended to Tensor-1.
Concatenating 2D Tensors
In this case, we will concatenate tensors that have two dimensions.
The tf.concat() function takes one optional axis parameter and the IE integer values.
If we specify 0, then all the rows in remaining tensors are appended one after another to the first tensor.
If we specify 1, then row by row in all tensors are concatenated one after another.
By default, it is 0.
Syntax:
tf.concat([tensor1,tensor2,......],axis)
Parameter:
It takes two or more tensors as a parameter that can be two-dimensional.
Example 1
Create two 2D tensors with 2 rows and 2 columns and concatenate two tensors by specifying axis as 0.
<html><!-- CDN Link that delivers the Tensorflow.js framework --><script src="https://cdn.jsdelivr.net/npm/@tensorflow/tfjs"></script>
<body><script>
//tensor1
let tensor1 = tf.tensor2d([10,20,30,30],[2,2]);//tensor2
let tensor2 = tf.tensor2d([40,50,60,60],[2,2]);
document.write("<b>Tensor-1:</b> ",tensor1);
document.write("<br>");
document.write("<b>Tensor-2:</b> ",tensor2);
document.write("<br>");//concatenate tensors
document.write("<b>Combined Tensors:</b> ",tf.concat([tensor1,tensor2],0));
</script></body></html>
Output:
![]() Values in Tensor-2 are appended to Tensor-1.
Values in Tensor-2 are appended to Tensor-1.
Example 2
Create two 2D tensors with two rows and two columns and concatenate two tensors by specifying axis as 1.
<html><!-- CDN Link that delivers the Tensorflow.js framework --><script src="https://cdn.jsdelivr.net/npm/@tensorflow/tfjs"></script>
<body><script>
//tensor1
let tensor1 = tf.tensor2d([10,20,30,30],[2,2]);//tensor2
let tensor2 = tf.tensor2d([40,50,60,60],[2,2]);
document.write("<b>Tensor-1:</b> ",tensor1);
document.write("<br>");
document.write("<b>Tensor-2:</b> ",tensor2);
document.write("<br>");//concatenate tensors
document.write("<b>Combined Tensors:</b> ",tf.concat([tensor1,tensor2],1));
</script></body></html>
Output:
![]() The first row values in Tensor-2 are appended to first row values in Tensor-1.
Similarly, second row values in Tensor-2 are appended to second row values in Tensor-1.
The first row values in Tensor-2 are appended to first row values in Tensor-1.
Similarly, second row values in Tensor-2 are appended to second row values in Tensor-1.
Example 3
Create three 2D tensors with two rows and two columns and concatenate three tensors.
<html><!-- CDN Link that delivers the Tensorflow.js framework --><script src="https://cdn.jsdelivr.net/npm/@tensorflow/tfjs"></script>
<body><script>
//tensor1
let tensor1 = tf.tensor2d([10,20,30,30],[2,2]);//tensor2
let tensor2 = tf.tensor2d([40,50,60,60],[2,2]);//tensor3
let tensor3 = tf.tensor2d([90,78,89,87],[2,2]);
document.write("<b>Tensor-1:</b> ",tensor1);
document.write("<br>");
document.write("<b>Tensor-2:</b> ",tensor2);
document.write("<br>");
document.write("<b>Tensor-3:</b> ",tensor3);
document.write("<br>");//concatenate tensors at a time
document.write("<b>Combined Tensors at a time:</b> ",tf.concat([tensor1,tensor2,tensor3],1));
document.write("<br>");
//concatenate tensors row by row
document.write("<b>Combined Tensors row by row:</b> ",tf.concat([tensor1,tensor2,tensor3],1));</script></body></html>
Output:
![]() In the first output, three tensors are concatenated.
In the second output, row by row in all the tensors are concatenated.
In the first output, three tensors are concatenated.
In the second output, row by row in all the tensors are concatenated.
Conclusion
In this Tensorflow.js article, we saw how to concatenate two or more tensors using the tf.concat() function.
Make sure that you understand all the examples discussed and get the difference between axis-0/1 parameters.
Based on your requirement, you can set the parameter to 0 or 1.
The Tf.Transpose() Function in TensorFlow.Js
If you need to transpose a matrix in TensorFlow.js, then you can use the tf.transpose() function.
It is possible to create a matrix using a tensor.
It shuffles rows as columns and columns as rows.
Syntax:
tf.transpose(tensor)
Parameter:
It takes a tensor as a parameter that has to be two-dimensional.
Example 1
Create a 2D-Boolean tensor with two rows and two columns and apply tf.transpose().
<html><!-- CDN Link that delivers the Tensorflow.js framework --><script src="https://cdn.jsdelivr.net/npm/@tensorflow/tfjs"></script><body><script>
//tensor
let values = tf.tensor2d([10,20,30,40],[2,2]);
document.write("<b>Actual Tensor:</b> ",values);
</script><h3>Tensorflow.js - tf.transpose(tensor) </h3>
<script>//tf.transpose(values)
document.write("<b>Transpose: </b>",tf.transpose(values));</script></body></html>
Output:
![]() Actual tensor matrix is:
[10 2030 40]
Transposed Matrix is:
[10 3020 40]
Actual tensor matrix is:
[10 2030 40]
Transposed Matrix is:
[10 3020 40]
Example 2
Create a 2D-Boolean tensor with four rows and two columns and apply the tf.transpose() function.
<html><!-- CDN Link that delivers the Tensorflow.js framework --><script src="https://cdn.jsdelivr.net/npm/@tensorflow/tfjs"></script>
<body><script>
//tensor
let values = tf.tensor2d([1,2,3,4,5,6,7,8],[4,2]);
document.write("<b>Actual Tensor:</b> ",values);
</script><h3>Tensorflow.js - tf.transpose(tensor) </h3>
<script>//tf.transpose(values)
document.write("<b>Transpose: </b>",tf.transpose(values));</script></body></html>
Output:
![]() Actual tensor matrix is:
[1 23 45 67 8]
Here is the Transposed Matrix:
[1 3 5 72 4 6 8]
Actual tensor matrix is:
[1 23 45 67 8]
Here is the Transposed Matrix:
[1 3 5 72 4 6 8]
Example 3
Create a 2D-Boolean tensor with three rows and three columns and apply the tf.transpose() function.
<html><!-- CDN Link that delivers the Tensorflow.js framework <script s”c="https://cdn.jsdelivr.net/npm/@tensorflow/t”js"></script>
<body><script>
//tensor
let values = tf.tensor2d([1.23,5.67,5.3,6.7,8.9,1,3,5,8],[3,3]);
document.wri“e("<b>Actual Tensor:</“> ",values);
</script><h3>Tensorflow.–s - tf.transpose(tensor) </h3>
<script>//tf.transpose(values)
document.wri“e("<b>Transpose: <”b>",tf.transpose(values));</script></body></html>
Output:
![]()
Conclusion
This article shows how the tf.transpose() function in the TensorFlow.js library is used to transpose a tensor matrix.
It shuffles rows as columns and columns as rows.
Make sure that the tensor is two-dimensional.
With the help of content delivery Network Link, we include the TensorFlow.js library.
The Tf.All() Function in TensorFlow.Js
Do you want to check if all of the values in a tensor are true, then TensorFlow.js() supports the tf.all() function.
Let’s look into it.
TensorFlow.js – tf.all() Function
The tf.all() function is implemented on a tensor/scalar that has Boolean values.
It returns true if the values are true, otherwise false is returned.
Scalar will store only one value.
But it returns a tensor.
Syntax:
tf.all(tensor)
Parameter:
It takes a tensor as a parameter that holds Boolean values.
Example 1
Create a 2D-Boolean tensor with two rows and two columns and apply the tf.all() function to check for all true values.
<html><!-- CDN Link that delivers the Tensorflow.js framework --><script src="https://cdn.jsdelivr.net/npm/@tensorflow/tfjs"></script>
<body><script>
//tensor
let values = tf.tensor2d([true,false,false,false],[2,2]);
document.write("<b>Actual Tensor:</b> ",values);
</script><h3>Tensorflow.js - tf.all(tensor) </h3>
<script>//tf.all(values)
document.write(tf.all(values));</script></body></html>
Output:
![]() We can see that false is present in a tensor.
So, all are not true.
We can see that false is present in a tensor.
So, all are not true.
Example 2
Create a 1D-Boolean tensor with four elements and apply the tf.all() function to check for all true values.
<html><!-- CDN Link that delivers the Tensorflow.js framework --><script src="https://cdn.jsdelivr.net/npm/@tensorflow/tfjs"></script>
<body><script>
//tensor
let values = tf.tensor1d([true,true,true,true]);
document.write("<b>Actual Tensor:</b> ",values);
</script><h3>Tensorflow.js - tf.all(tensor) </h3>
<script>//tf.all(values)
document.write(tf.all(values));</script></body></html>
Output:
![]() We can see that all the values are true.
So, it returned true.
We can see that all the values are true.
So, it returned true.
Example 3
Let’s create a scalar that holds false (Boolean value) and apply the tf.all() function on it.
<html><!-- CDN Link that delivers the Tensorflow.js framework --><script src="https://cdn.jsdelivr.net/npm/@tensorflow/tfjs"></script>
<body><script>
//scalar
let value = tf.scalar(false);
document.write("<b>Actual Tensor:</b> ",value);
</script><h3>Tensorflow.js - tf.all(scalar) </h3>
<script>//tf.all(value)
document.write(tf.all(value));</script></body></html>
Output:
![]()
Conclusion
This article discussed how the tf.all() function in the TensorFlow.js library is used to check if all of the values in a tensor are true.
It returns true if all the values are true.
Otherwise false is returned.
We discussed three different examples, using tensors, one and two dimensions, and a scalar.
The Tf.Any() Function in TensorFlow.Js
Do you want to check if any of the values in a tensor are true, then TensorFlow.js() supports the tf.any() function.
Let’s look into it.
TensorFlow.js – tf.any() Function
The tf.any() function is implemented on a tensor that has Boolean values.
It returns true if the Boolean value – true exists at least once, otherwise false is returned.
Scalar will store only one value.
But it returns a tensor.
Syntax:
tf.any(tensor)
Parameter:
It takes a tensor as a parameter that holds Boolean values.
Example 1
Create a 2D-boolean tensor with two rows and two columns and apply the tf.any() function to check if there is any true value.
<html><!-- CDN Link that delivers the Tensorflow.js framework --><script src="https://cdn.jsdelivr.net/npm/@tensorflow/tfjs"></script>
<body><script>
//tensor
let values = tf.tensor2d([true,false,false,false],[2,2]);
document.write("<b>Actual Tensor:</b> ",values);
</script><h3>Tensorflow.js - tf.any(tensor) </h3>
<script>//tf.any(values)
document.write(tf.any(values));</script></body></html>
Output:
![]() We can see that true is present in a tensor.
So, it returned true.
We can see that true is present in a tensor.
So, it returned true.
Example 2
Create a 1D-Boolean tensor with four elements and apply tf.any() to check if there is any true value.
<html><!-- CDN Link that delivers the Tensorflow.js framework --><script src="https://cdn.jsdelivr.net/npm/@tensorflow/tfjs"></script>
<body><script>
//tensor
let values = tf.tensor1d([true,false,false,false]);
document.write("<b>Actual Tensor:</b> ",values);
</script><h3>Tensorflow.js - tf.any(tensor) </h3>
<script>//tf.any(values)
document.write(tf.any(values));</script></body></html>
Output:
![]() We can see that true is present in a tensor.
So, it returned true.
We can see that true is present in a tensor.
So, it returned true.
Example 3
Let’s create a scalar that holds false (Boolean value) and apply the tf.any() on it.
<html><!-- CDN Link that delivers the Tensorflow.js framework --><script src="https://cdn.jsdelivr.net/npm/@tensorflow/tfjs"></script>
<body><script>
//scalar
let value = tf.scalar(false);
document.write("<b>Actual Tensor:</b> ",value);
</script><h3>Tensorflow.js - tf.any(scalar) </h3>
<script>//tf.any(value)
document.write(tf.any(value));</script></body></html>
Output:
![]()
Conclusion
In this article, the tf.any() function in TensorFlow.js is used to check if any of the values in a tensor are true.
It returns true if the Boolean value – true exists at least once.
Otherwise, false is returned.
We discussed three different examples, using tensors one and two dimensions, and a scalar.
The Tf.Maximum() Function in TensorFlow.Js
The tf.maximum() function returns maximum values element-wise from two tensors/scalars.
Scalar will store only one value.
But it returns a tensor.
Syntax:
tf.maximum(tensor1,tensor2)
tf.maximum(scalar1,scalar2)
It is also possible to implement the maximum() method as shown below:
Syntax:
tensor1.maximum(tensor2)
scalar1.maximum(scalar2)
Parameters:
The tensor1 and tensor2 are the tensors that can be single or multi-dimensional.
The scalar1 and scalar2 are the tensors that can take only one value as a parameter.
Example 1
Create two one-dimensional tensors with integer elements and apply the tf.maximum() function to return maximum values among two tensors.
<html><!-- CDN Link that delivers the Tensorflow.js framework --><script src="https://cdn.jsdelivr.net/npm/@tensorflow/tfjs"></script>
<body><script>//tensor1
let values1 = tf.tensor1d([100,200,300,500]);//tensor2
let values2 = tf.tensor1d([50,345,675,120]);
document.write("Tensor-1: ",values1);
document.write("<br>");
document.write("<br>");
document.write("Tensor-2: ",values2);</script><h3>Tensorflow.js - tf.maximum(tensor1,tensor2) </h3>
<script>//tf.maximum(values1,values2)
document.write(tf.maximum(values1,values2));</script>
<h3>Tensorflow.js - tensor1.maximum(tensor2) </h3><script>
//values1.maximum(values2)
document.write(values1.maximum(values2));
</script></body></html>
Output:
![]()
Working:
maximum([100, 200, 300, 500],[50, 345, 675, 120] )
100,50 – 100
200,345 – 345
300,675 – 675
500,120 – 500
Example 2
Create two values using scalar() and apply the tf.maximum() function to return the maximum value from two scalars.
<html><!-- CDN Link that delivers the Tensorflow.js framework --><script src="https://cdn.jsdelivr.net/npm/@tensorflow/tfjs"></script>
<body><script>//scalar1
let value1 = tf.scalar(34);
//scalar2
let value2 = tf.scalar(23);
document.write("Scalar-1: ",value1);
document.write("<br>");
document.write("<br>");
document.write("Scalar-2: ",value2);</script><h3>Tensorflow.js - tf.maximum(scalar1,scalar2) </h3>
<script>//tf.maximum(value1,value2)
document.write(tf.maximum(value1,value2));</script>
<h3>Tensorflow.js - scalar1.maximum(scalar2) </h3><script>
//value1.maximum(value2)
document.write(value1.maximum(value2));
</script></body></html>
Output:
![]() 34 is the maximum.
34 is the maximum.
Example 3
Create two two-dimensional tensors with two rows and two columns and apply the tf.maximum() function to return maximum values (element-wise) from both the tensors.
<html><!-- CDN Link that delivers the Tensorflow.js framework --><script src="https://cdn.jsdelivr.net/npm/@tensorflow/tfjs"></script>
<body><script>//tensor1
let values1 = tf.tensor2d([90,56,78,12],[2,2]);
//tensor2
let values2 = tf.tensor2d([10,56,34,45],[2,2]);
document.write("Tensor-1: ",values1);
document.write("<br>");
document.write("<br>");
document.write("Tensor-2: ",values2);</script><h3>Tensorflow.js - tf.maximum(tensor1,tensor2) </h3>
<script>//tf.maximum(values1,values2)
document.write(tf.maximum(values1,values2));</script>
<h3>Tensorflow.js - tensor1.maximum(tensor2) </h3><script>
//values1.maximum(values2)
document.write(values1.maximum(values2));
</script></body></html>
Output:
![]()
Working:
maximum(90,10)- 90
maximum(56,56)- 56
maximum(78,34)- 78
maximum(12,45)- 45
Conclusion
This article discussed how the tf.maximum() function in TensorFlow.js is used to compare the elements and return the maximum.
It is also possible to implement the tf.maximum() method in two ways.
We discussed three examples, using tensors, one and two dimensions, and scalars.
Tensorflow.js – tf.cosh()
In some scenarios, we need to convert numeric values present in a tensor to Hyperbolic Cosine values.
There is a built-in method that converts into hyperbolic cosine.
Hyperbolic Cosine is used to find angles in many construction applications like to find the angles with respect to room corners.
While predicting house prices through Tensorflow in Machine Learning, we must convert normal values to store values.
T hen, apply machine learning models.
So, we will see how to apply tf.cosh() function to the existing values to get Hyperbolic Cosine values.
Tensorflow.js is a framework that supports the tf.cosh() function that converts all numeric values to Hyperbolic Cosine values present in a tensor.
Tensor
A tensor in tensorflow.js acts as an array that stores elements in single or multiple dimensions.
If we want to create a tensor with one dimension, tf.tensor1d() is used.
Syntax:
tf.tensor1d([elements])
Parameter:
It takes an array that has elements separated by a comma.
To create a tensor with two dimensions (rows and columns), tf.tensor2d() is used.
Syntax:
tf.tensor2d([[elements],.........,[elements]])
tf.cosh()
tf.cosh() is used to return hyperbolic cosine values from a given tensor.
So, it takes only one parameter: IE tensor which has numbers.
Syntax:
tf.cosh(tensor_input)
Parameter:
tensor_input is a tensor that has numbers.
It can be 1or 2-dimensional.
Let’s explore different examples of this method.
Example 1:
Let’s create a one- dimensional tensor in js that has some values and return hyperbolic cosine values.
<html><!-- CDN Link that delivers the Tensorflow.js framework --><script src="https://cdn.jsdelivr.net/npm/@tensorflow/tfjs"></script><body><center><h1>Tensorflow.js - tf.cosh() </h1></center><script>
let values = tf.tensor1d([30,45,60,90,180]);//actual tensor
document.write("Actual Tensor: ",values);
document.write("<br>");
document.write("<br>");//apply cosh() on the above tensor
document.write("Tensor with Hyperbolic Cosine Values: "+tf.cosh(values));</script></body></html>
Output:
![]() Hyperbolic Cosine values were returned from the above one- dimensional tensor.
Hyperbolic Cosine values were returned from the above one- dimensional tensor.
Example 2:
Let’s create a tensor that has 2 dimensions in js with 5 rows and 2 columns and return Hyperbolic Cosine values.
<html><!-- CDN Link that delivers the Tensorflow.js framework --><script src="https://cdn.jsdelivr.net/npm/@tensorflow/tfjs"></script><body><center><h1>Tensorflow.js - tf.cosh() </h1></center><script>
let values = tf.tensor2d([[40,60],[10,20],[45,82],[34,56],[67,43]]);//actual tensor
document.write("Actual Tensor: ",values);
document.write("<br>");
document.write("<br>");//apply cosh() on the above tensor
document.write("Tensor with Hyperbolic Cosine Values: "+tf.cosh(values));</script></body></html>
Output:
![]() Hyperbolic Cosine values were returned from the above one- dimensional tensor.
Hyperbolic Cosine values were returned from the above one- dimensional tensor.
Example 3:
In this case, we will consider the decimal values.
Let’s create a tensor that has 2 dimensions in js with 5 rows and 2 columns and return Hyperbolic Cosine values .
<html><!-- CDN Link that delivers the Tensorflow.js framework --><script src="https://cdn.jsdelivr.net/npm/@tensorflow/tfjs"></script><body><center><h1>Tensorflow.js - tf.cosh() </h1></center><script>
let values = tf.tensor2d([[4.80,6.340],[45.10,2.0],[46.785,8.2],[31.4,5.6],[6.87,43.76]]);//actual tensor
document.write("Actual Tensor: ",values);
document.write("<br>");
document.write("<br>");//apply cosh() on the above tensor
document.write("Tensor with Hyperbolic Cosine Values: "+tf.cosh(values));</script></body></html>
Output:
![]() Hyperbolic Cosine values were returned from the above one- dimensional tensor.
Hyperbolic Cosine values were returned from the above one- dimensional tensor.
Conclusion
In this Tensorflow.js tutorial, we saw how to return Hyperbolic Cosine values from actual values using the tf.cosh() function present in one or two-dimensional tensors with three examples.
Make sure that CDN Link is provided inside the script tag in every code.
Tensorflow.js – tf.sinh()
In some scenarios, we need to convert numeric values present in a tensor to Hyperbolic Sine values.
There is a built-in method that converts into hyperbolic sine.
Hyperbolic Sine is used to find angles in many construction applications, like to find the angles with respect to room corners.
While predicting the house prices through Tensorflow in Machine Learning, we must convert normal values to store values and then apply machine learning models.
So, we will see how to apply tf.sinh() function on the existing values to get Hyperbolic Sine values.
Tensorflow.js is a framework that supports the tf.sinh() function that converts all numeric values to Hyperbolic Sine values present in a tensor.
What is a tensor?
A tensor in tensorflow.js acts as an array that stores elements in single or multiple dimensions.
If we want to create a tensor with one dimension, tf.tensor1d() is used.
Syntax:
tf.tensor1d([elements])
Parameter:
It takes an array that has elements separated by a comma.
To create a tensor with two dimensions (rows and columns), tf.tensor2d() is used.
Syntax:
tf.tensor2d([[elements],.........,[elements]])
tf.sinh()
tf.sinh() is used to return hyperbolic sine values from a given tensor.
So, it takes only one parameter: IE tensor that has numbers.
Syntax:
tf.sinh(tensor_input)
Parameter:
tensor_input is a tensor that has numbers.
It can be 1or 2 dimensional.
Let’s explore different examples of this method.
Example :
Let’s create a one-dimensional tensor in js that has some values and return hyperbolic sine values.
<html><!-- CDN Link that delivers the Tensorflow.js framework --><script src="https://cdn.jsdelivr.net/npm/@tensorflow/tfjs"></script><body><center><h1>Tensorflow.js - tf.sinh() </h1></center><script>
let values = tf.tensor1d([30,45,60,90,180]);//actual tensor
document.write("Actual Tensor: ",values);
document.write("<br>");//apply sinh() on the above tensor
document.write("Tensor with Hyperbolic Sine Values: "+tf.sinh(values));</script></body></html>
Output:
![]() Hyperbolic Sine values were returned from the above one-dimensional tensor.
Hyperbolic Sine values were returned from the above one-dimensional tensor.
Example 2:
Let’s create a tensor that has 2 dimensions in js with 5 rows and 2 columns and return Hyperbolic Sine values.
<html><!-- CDN Link that delivers the Tensorflow.js framework --><script src="https://cdn.jsdelivr.net/npm/@tensorflow/tfjs"></script><body><center><h1>Tensorflow.js - tf.sinh() </h1></center><script>
let values = tf.tensor2d([[40,60],[10,20],[45,82],[34,56],[67,43]]);//actual tensor
document.write("Actual Tensor: ",values);
document.write("<br>");//apply sinh() on the above tensor
document.write("Tensor with Hyperbolic Sine Values: "+tf.sinh(values));</script></body></html>
Output:
![]() Hyperbolic Sine values were returned from the above one-dimensional tensor.
Hyperbolic Sine values were returned from the above one-dimensional tensor.
Example 3:
In this case, we will consider the decimal values.
Let’s create a tensor that has 2 dimensions in js with 5 rows and 2 columns and return Hyperbolic Sine values.
<html><!-- CDN Link that delivers the Tensorflow.js framework --><script src="https://cdn.jsdelivr.net/npm/@tensorflow/tfjs"></script><body><center><h1>Tensorflow.js - tf.sinh() </h1></center><script>
let values = tf.tensor2d([[4.80,6.340],[45.10,2.0],[46.785,8.2],[31.4,5.6],[6.87,43.76]]);//actual tensor
document.write("Actual Tensor: ",values);
document.write("<br>");
document.write("<br>");//apply sinh() on the above tensor
document.write("Tensor with Hyperbolic Sine Values: "+tf.sinh(values));</script></body></html>
Output:
![]() Hyperbolic Sine values were returned from the above one-dimensional tensor.
Hyperbolic Sine values were returned from the above one-dimensional tensor.
Conclusion
In this Tensorflow.js tutorial, we saw how to return Hyperbolic Sine values from actual values using the tf.sinh() function present in one or two-dimensional tensors with three examples.
Make sure that CDN Link is provided inside the script tag in every code.
The Tf.Minimum() Function in TensorFlow.Js
The tf.minimum() function returns minimum values element-wise from two tensors/scalars.
Scalar will store only one value.
But it returns a tensor.
Syntax:
tf.minimum(tensor1,tensor2)
tf.minimum(scalar1,scalar2)
It is also possible to implement the minimum() method as shown below:
Syntax:
tensor1.minimum(tensor2)
scalar1.minimum(scalar2)
Parameters:
The tensor1 and tensor2 are the tensors that can be single-dimensional or multi-dimensional.
The scalar1 and scalar2 are the tensors that can take only one value as a parameter.
Example 1
Create two one-dimensional tensors with integer elements and apply tf.minimum() to return minimum values among two tensors.
<html><!-- CDN Link that delivers the Tensorflow.js framework --><script src="https://cdn.jsdelivr.net/npm/@tensorflow/tfjs"></script>
<body><script>//tensor1
let values1 = tf.tensor1d([100,200,300,500]);//tensor2
let values2 = tf.tensor1d([50,345,675,120]);
document.write("Tensor-1: ",values1);
document.write("<br>");
document.write("<br>");
document.write("Tensor-2: ",values2);</script><h3>Tensorflow.js - tf.minimum(tensor1,tensor2) </h3>
<script>//tf.minimum(values1,values2)
document.write(tf.minimum(values1,values2));</script>
<h3>Tensorflow.js - tensor1.minimum(tensor2) </h3><script>
//values1.minimum(values2)
document.write(values1.minimum(values2));
</script></body></html>
Output:
![]()
Working:
minimum([100, 200, 300, 500],[50, 345, 675, 120] )
100,50 – 50
200,345 – 200
300,675 – 300
500,120 – 120.
Example 2
Create two values using scalar() and apply the tf.minimum() function to return the minimum value from two scalars.
<html><!-- CDN Link that delivers the Tensorflow.js framework --><script src="https://cdn.jsdelivr.net/npm/@tensorflow/tfjs"></script>
<body><script>//scalar1
let value1 = tf.scalar(34);
//scalar2
let value2 = tf.scalar(23);
document.write("Scalar-1: ",value1);
document.write("<br>");
document.write("<br>");
document.write("Scalar-2: ",value2);</script><h3>Tensorflow.js - tf.minimum(scalar1,scalar2) </h3>
<script>//tf.minimum(value1,value2)
document.write(tf.minimum(value1,value2));</script>
<h3>Tensorflow.js - scalar1.minimum(scalar2) </h3><script>
//value1.minimum(value2)
document.write(value1.minimum(value2));
</script></body></html>
Output:
![]() 23 is the minimum.
23 is the minimum.
Example 3
Create two two-dimensional tensors with two rows and two columns and apply the tf.minimum() function to return minimum values (element wise) from both tensors.
<html><!-- CDN Link that delivers the Tensorflow.js framework --><script src="https://cdn.jsdelivr.net/npm/@tensorflow/tfjs"></script>
<body><script>//tensor1
let values1 = tf.tensor2d([90,56,78,12],[2,2]);
//tensor2
let values2 = tf.tensor2d([10,56,34,45],[2,2]);
document.write("Tensor-1: ",values1);
document.write("<br>");
document.write("<br>");
document.write("Tensor-2: ",values2);</script><h3>Tensorflow.js - tf.minimum(tensor1,tensor2) </h3>
<script>//tf.minimum(values1,values2)
document.write(tf.minimum(values1,values2));</script>
<h3>Tensorflow.js - tensor1.minimum(tensor2) </h3><script>
//values1.minimum(values2)
document.write(values1.minimum(values2));
</script></body></html>
Output:
![]()
Working:
minimum(90,10)- 10
minimum(56,56)- 56
minimum(78,34)- 34
minimum(12,45)- 12
Conclusion
The article discussed how the tf.minimum() function in TensorFlow.js is used to compare the elements and return the minimum.
It is also possible to implement the tf.minimum() method in two ways.
We discussed three different examples, using tensors, one and two dimensions, and scalars.
Tensorflow.js – tf.argMax()
“tf.argMax() in tensorflow.js returns the index of the maximum element from the set of elements in a tensor.
If the tensor is two-dimensional, it can be possible to return an index of maximum values across rows and columns.”
In a tensor, the index starts with 0.
Syntax
tf.argMax(tensor_input,axis)
Parameters
1.
tensor_input is a tensor that has numeric elements.
It can be 1or 2 dimensional.
2.
If the tensor is two-dimensional, then it is possible to specify the axis to get an index of maximum values in rows or columns.
If axis=0, the index of maximum values is returned across column-wise, and If axis=1, the index of maximum values is returned across row-wise.
If the axis is not specified, it will return the index of maximum values column-wise.
ReturnReturn a Tensor with the maximum value indices.
Example 1Let’s create a one dimensional tensor in js that has integer values and return a maximum value index.
<html><!-- CDN Link that delivers the Tensorflow.js framework --><script src="https://cdn.jsdelivr.net/npm/@tensorflow/tfjs"></script><body><center><h2>Tensorflow.js - tf.argMax() </h2></center><script>
let values = tf.tensor1d([34,56,78,90]);//actual tensor
document.write("Actual Tensor: ",values);
document.write("<br>");
document.write("<br>");//apply argMax() on the above tensor
document.write("Maximum value Position:- "+tf.argMax(values));</script></body></html>
Output
![]() 90 is the maximum among all the elements and is present in the 4th position.
Index is 3.
So 3 is returned.
Example 2Let’s create a tensor that has 2 dimensions with 4 rows and 2 columns that has integer values and return maximum value indices across columns.
<html><!-- CDN Link that delivers the Tensorflow.js framework --><script src="https://cdn.jsdelivr.net/npm/@tensorflow/tfjs"></script><body><center><h2>Tensorflow.js - tf.argMax() </h2></center><script>
let values = tf.tensor2d([10,13,15,6,67,5,10,2],[4,2]);//actual tensor
document.write("Actual Tensor: ",values);
document.write("<br>");
document.write("<br>");//apply argMax() on the above tensor
document.write("Maximum value Positions across columns:- "+tf.argMax(values,0));</script></body></html>
Output
90 is the maximum among all the elements and is present in the 4th position.
Index is 3.
So 3 is returned.
Example 2Let’s create a tensor that has 2 dimensions with 4 rows and 2 columns that has integer values and return maximum value indices across columns.
<html><!-- CDN Link that delivers the Tensorflow.js framework --><script src="https://cdn.jsdelivr.net/npm/@tensorflow/tfjs"></script><body><center><h2>Tensorflow.js - tf.argMax() </h2></center><script>
let values = tf.tensor2d([10,13,15,6,67,5,10,2],[4,2]);//actual tensor
document.write("Actual Tensor: ",values);
document.write("<br>");
document.write("<br>");//apply argMax() on the above tensor
document.write("Maximum value Positions across columns:- "+tf.argMax(values,0));</script></body></html>
Output
![]() WorkingTensor Tensor [[10, 13], [15, 6 ], [67, 5 ], [10, 2 ]]
Maximum value among (10,15,67,10) is 67 and (13,6,5,2) is 13.
Index positions 67 and 13 are 2 and 0.
Example 3Let’s create a tensor with 2 dimensions in js with 4 rows and 2 columns with integer values and return maximum value indices across rows.
<html><!-- CDN Link that delivers the Tensorflow.js framework --><script src="https://cdn.jsdelivr.net/npm/@tensorflow/tfjs"></script><body><center><h2>Tensorflow.js - tf.argMax() </h2></center><script>
let values = tf.tensor2d([10,13,15,6,67,5,10,2],[4,2]);//actual tensor
document.write("Actual Tensor: ",values);
document.write("<br>");
document.write("<br>");//apply argMax() on the above tensor
document.write("Maximum value Positions across rows:- "+tf.argMax(values,1));</script></body></html>
Output
WorkingTensor Tensor [[10, 13], [15, 6 ], [67, 5 ], [10, 2 ]]
Maximum value among (10,15,67,10) is 67 and (13,6,5,2) is 13.
Index positions 67 and 13 are 2 and 0.
Example 3Let’s create a tensor with 2 dimensions in js with 4 rows and 2 columns with integer values and return maximum value indices across rows.
<html><!-- CDN Link that delivers the Tensorflow.js framework --><script src="https://cdn.jsdelivr.net/npm/@tensorflow/tfjs"></script><body><center><h2>Tensorflow.js - tf.argMax() </h2></center><script>
let values = tf.tensor2d([10,13,15,6,67,5,10,2],[4,2]);//actual tensor
document.write("Actual Tensor: ",values);
document.write("<br>");
document.write("<br>");//apply argMax() on the above tensor
document.write("Maximum value Positions across rows:- "+tf.argMax(values,1));</script></body></html>
Output
![]() Working[[10, 13], [15, 6 ], [67, 5 ], [10, 2 ]]
Maximum values among [10,13] is 13, [15, 6] is 15, [67, 5] is 67 and [10, 2 ] is 10.
Index positions of 13 is 1, 15 is 0, 67 is 0 and 10 is 0.
Example 4Let’s create a tensor with 2 dimensions in js with 4 rows and 2 columns with integer values and return the indices of the maximum values.
<html><!-- CDN Link that delivers the Tensorflow.js framework --><script src="https://cdn.jsdelivr.net/npm/@tensorflow/tfjs"></script><body><center><h2>Tensorflow.js - tf.argMax() </h2></center><script>
let values = tf.tensor2d([1,2,3,4,5,6,7,8],[4,2]);//actual tensor
document.write("Actual Tensor: ",values);
document.write("<br>");
document.write("<br>");//apply argMax() on the above tensor
document.write("Maximum value index:- "+tf.argMax(values));</script></body></html>
Output
Working[[10, 13], [15, 6 ], [67, 5 ], [10, 2 ]]
Maximum values among [10,13] is 13, [15, 6] is 15, [67, 5] is 67 and [10, 2 ] is 10.
Index positions of 13 is 1, 15 is 0, 67 is 0 and 10 is 0.
Example 4Let’s create a tensor with 2 dimensions in js with 4 rows and 2 columns with integer values and return the indices of the maximum values.
<html><!-- CDN Link that delivers the Tensorflow.js framework --><script src="https://cdn.jsdelivr.net/npm/@tensorflow/tfjs"></script><body><center><h2>Tensorflow.js - tf.argMax() </h2></center><script>
let values = tf.tensor2d([1,2,3,4,5,6,7,8],[4,2]);//actual tensor
document.write("Actual Tensor: ",values);
document.write("<br>");
document.write("<br>");//apply argMax() on the above tensor
document.write("Maximum value index:- "+tf.argMax(values));</script></body></html>
Output
![]() WorkingTensor [[1,2], [3,4], [5,6 ], [7,8 ]]
Maximum value in the [1,3,5,7] column is 7, and its index is 3.
Maximum value in the [2,4,6,8] column is 8, and its index is 3.
WorkingTensor [[1,2], [3,4], [5,6 ], [7,8 ]]
Maximum value in the [1,3,5,7] column is 7, and its index is 3.
Maximum value in the [2,4,6,8] column is 8, and its index is 3.
Conclusion
In this Tensorflow.js tutorial, we have seen how to return the index of maximum elements present in a tensor using the tf.argMax() method.
In a 2D tensor, If axis=0, the index of maximum values is returned across column-wise, and If axis=1, the index of maximum values is returned across row-wise.
By default, it will return the index of maximum values column-wise.
Tensorflow.js – tf.greaterEqual()
“tf.greaterEqual() returns true if the element in the first tensor is greater than or equal to the element in the second tensor.
It takes two tensors as parameters that have the same number of values; otherwise, an error is thrown.
Scalar will store only one value.
But anyway, it returns a tensor.”
Syntax
tf.greaterEqual(tensor1,tensor2)
tf.greaterEqual(scalar1,scalar2)
It is also possible to implement the greaterEqual() method, as shown below.
Syntax
tensor1.greaterEqual(tensor2)
scalar1.greaterEqual(scalar2)
Parameterstensor1 and tensor2 are the tensors that can be single or multi-dimensional.
scalar1 and scalar2 are the tensors that can take only one value as a parameter.
ReturnReturn a Boolean Tensor.
Example 1Create two one-dimensional tensors with integer elements and apply tf.greaterEqual() to check if the elements in the first tensor are greater than or equal to the elements in the second tensor.
<html><!-- CDN Link that delivers the Tensorflow.js framework --><script src="https://cdn.jsdelivr.net/npm/@tensorflow/tfjs"></script><body><script>//tensor1
let values1 = tf.tensor1d([100,200,300,500]);//tensor2
let values2 = tf.tensor1d([50,200,675,120]);
document.write("Tensor-1: ",values1);
document.write("<br>");
document.write("<br>");
document.write("Tensor-2: ",values2);</script><h3>Tensorflow.js - tf.greaterEqual(tensor1,tensor2) </h3><script>//tf.greaterEqual(values1,values2)
document.write(tf.greaterEqual(values1,values2));</script><h3>Tensorflow.js - tensor1.greaterEqual(tensor2) </h3><script>//values1.greaterEqual(values2)
document.write(values1.greaterEqual(values2));</script></body></html>
Output
![]() WorkingTensor-1: Tensor [100, 200, 300, 500]
Tensor-2: Tensor [50, 200, 675, 120]
Element wise comparison:
100>=50 – true
200>=200 – true
300>=675 – false
500>=120 – true
Example 2Create two values using scalar() and apply tf.greaterEqual() to check if the value is greater than or equal to the value present in the second scalar.
<html><!-- CDN Link that delivers the Tensorflow.js framework --><script src="https://cdn.jsdelivr.net/npm/@tensorflow/tfjs"></script><body><script>//scalar1
let value1 = tf.scalar(34);//scalar2
let value2 = tf.scalar(23);
document.write("Scalar-1: ",value1);
document.write("<br>");
document.write("<br>");
document.write("Scalar-2: ",value2);</script><h3>Tensorflow.js - tf.greaterEqual(scalar1,scalar2) </h3><script>//tf.greaterEqual(value1,value2)
document.write(tf.greaterEqual(value1,value2));</script><h3>Tensorflow.js - scalar1.greaterEqual(scalar2) </h3><script>//value1.greaterEqual(value2)
document.write(value1.greaterEqual(value2));</script></body></html>
Output
WorkingTensor-1: Tensor [100, 200, 300, 500]
Tensor-2: Tensor [50, 200, 675, 120]
Element wise comparison:
100>=50 – true
200>=200 – true
300>=675 – false
500>=120 – true
Example 2Create two values using scalar() and apply tf.greaterEqual() to check if the value is greater than or equal to the value present in the second scalar.
<html><!-- CDN Link that delivers the Tensorflow.js framework --><script src="https://cdn.jsdelivr.net/npm/@tensorflow/tfjs"></script><body><script>//scalar1
let value1 = tf.scalar(34);//scalar2
let value2 = tf.scalar(23);
document.write("Scalar-1: ",value1);
document.write("<br>");
document.write("<br>");
document.write("Scalar-2: ",value2);</script><h3>Tensorflow.js - tf.greaterEqual(scalar1,scalar2) </h3><script>//tf.greaterEqual(value1,value2)
document.write(tf.greaterEqual(value1,value2));</script><h3>Tensorflow.js - scalar1.greaterEqual(scalar2) </h3><script>//value1.greaterEqual(value2)
document.write(value1.greaterEqual(value2));</script></body></html>
Output
![]() 34 is greater than 23.
So It returned true.
Example 3Create 2 two-dimensional tensors with 2 rows and 2 columns and apply tf.greaterEqual() to check if the elements in the first tensor are greater than or equal to the elements in the second tensor.
<html><!-- CDN Link that delivers the Tensorflow.js framework --><script src="https://cdn.jsdelivr.net/npm/@tensorflow/tfjs"></script><body><script>//tensor1
let values1 = tf.tensor2d([90,56,78,12],[2,2]);//tensor2
let values2 = tf.tensor2d([10,56,34,45],[2,2]);
document.write("Tensor-1: ",values1);
document.write("<br>");
document.write("<br>");
document.write("Tensor-2: ",values2);</script><h3>Tensorflow.js - tf.greaterEqual(tensor1,tensor2) </h3><script>//tf.greaterEqual(values1,values2)
document.write(tf.greaterEqual(values1,values2));</script><h3>Tensorflow.js - tensor1.greaterEqual(tensor2) </h3><script>//values1.greaterEqual(values2)
document.write(values1.greaterEqual(values2));</script></body></html>
Output
34 is greater than 23.
So It returned true.
Example 3Create 2 two-dimensional tensors with 2 rows and 2 columns and apply tf.greaterEqual() to check if the elements in the first tensor are greater than or equal to the elements in the second tensor.
<html><!-- CDN Link that delivers the Tensorflow.js framework --><script src="https://cdn.jsdelivr.net/npm/@tensorflow/tfjs"></script><body><script>//tensor1
let values1 = tf.tensor2d([90,56,78,12],[2,2]);//tensor2
let values2 = tf.tensor2d([10,56,34,45],[2,2]);
document.write("Tensor-1: ",values1);
document.write("<br>");
document.write("<br>");
document.write("Tensor-2: ",values2);</script><h3>Tensorflow.js - tf.greaterEqual(tensor1,tensor2) </h3><script>//tf.greaterEqual(values1,values2)
document.write(tf.greaterEqual(values1,values2));</script><h3>Tensorflow.js - tensor1.greaterEqual(tensor2) </h3><script>//values1.greaterEqual(values2)
document.write(values1.greaterEqual(values2));</script></body></html>
Output
![]() WorkingTensor-1: Tensor [[90, 56], [78, 12]]
Tensor-2: Tensor [[10, 56], [34, 45]]
Element wise comparison:
90>=10 – true
56>=56 – true
78>=34 – true
12>=45 – false
WorkingTensor-1: Tensor [[90, 56], [78, 12]]
Tensor-2: Tensor [[10, 56], [34, 45]]
Element wise comparison:
90>=10 – true
56>=56 – true
78>=34 – true
12>=45 – false
Conclusion
tf.greaterEqual() in Tensorflow.js is used to compare the elements that return true if the element in the first tensor is greater than or equal to the element in the second tensor.
It is also possible to implement the greaterEqual() method in two ways.
We discussed three different examples, using tensors one and two dimensions and scalars.
Difference Between Array and Array of Objects
In JavaScript, Arrays and Objects are two entirely different elements.
However, the intriguing factor about both is that they can include the other counterpart in their elements.
This means that an array can consist of various objects, and objects can contain various arrays.
This article will answer this long-awaited question about the difference between arrays and arrays of objects by first tapping into the general description of arrays, objects, and arrays of objects, highlighting the difference between all three of these.
Arrays | A brief revisit
Arrays are nothing but named memory locations just like standard variables, except having the ability to store more than one value under the same identifier.
Unlike other programming languages, JavaScript has an exciting factor associated with array data structure: the ability to store various types of values inside an array.
An array is represented as elements enclosed within square brackets “[ ],” and the elements of an array are accessed using their index values which start from 0 for the first element and go up in number for every next element in the array.
Example of an Array
Simple create a variable and set it equal to multiple values separated by a comma and enclosed with a pair of square brackets like
var person1 = ["John", "Doe", 22, 15000];
You can see, the array person1 is storing information about a person about his first name, last name, age, and salary.
Another thing is also pretty visible: there is no easy way to determine which value is.
Therefore, objects come into play.
Objects | A brief revisit
Objects are non-sequential memory locations initialized under one identifier that can store all types of values.
Objects have properties defined by key-value pairs instead of elements.
A comma separates each key-value pair, and all the key-value pairs or the complete object is wrapped with a pair of curly brackets “{ }”.
The value of the objects is accessed by using the key of the object property.
Example of an Object
To create an object about the same person as above, use the following lines of code:
var obj = {
firstName: "John",
lastName: "Doe",
age: 22,
salary: 15000,};
It is pretty clear from the code snippet above, that objects are much more readable to the user.
And fetching a specific value can be done using the “key”.
An array of Objects | What is it?
An array of objects merely refers to various objects stored in the memory in sequential order.
Imagine the scenario where one must store information about 100 people, and the information includes firstName, lastName, age, and salary.
To store information of different types, objects are surely better.
However, iterating through 100 objects is a big hurdle.
To tackle this, we have something as Arrays of objects; each element of an array is a reference to an object.
This, in our example, eases the struggle of iterating over the information of 100 people.
Example of Array of objects
Create two objects with information about two different persons, and then in the elements of an array, simply pass in the identifiers of the objects as:
var obj1 = {
firstName: "John",
lastName: "Doe",
age: 22,
salary: 15000,};
var obj2 = {
firstName: "Hanibal",
lastName: "Smith",
age: 23,
salary: 17500,};
var arrOfObj = [obj1, obj2];
To fetch values from an array of objects, you need to address the objects using the indexes and then the values of each object using the key of the key-value pairs.
Arrays vs.
Arrays of Objects | When to use which?
From the above examples, arrays are the best to use when working with the same types of variables or values.
But if you are working with information about multiple elements of the real world with varying properties, the Arrays of objects are best to use.
Wrap Up
Arrays are nothing like an ordered list of values enclosed in square brackets.
Whereas, just like the name suggests, arrays of objects and arrays whose every element is an individual reference to an object.
Arrays are best for storing values of the same data type because of the ability to iterate through them easily.
But when storing information about multiple real-world objects, Arrays of objects are the preferred choice.
JavaScript parseInt() Function
The parseInt() function in the JavaScript takes up a string containing any numeric characters and returns an integer equivalent to that string.
Another feature of the parseInt() function is the option to define the base or “radix” of the number system of the given string.
To understand the parseInt() in javascript, observe its syntax.
Syntax of parseInt() method
The syntax of the parseInt() is given as
var1 = parseInt( stringWithInteger, base)
The details of the syntax are defined as:
var1: The variable in which javascript will store the output from the parseInt() function
stringWithInteger: The string from which the integer value is to be fetched
base: The base defining the number system of the values inside the string (default is 10).
Return Type
The return value from the parseInt() function is an integer value or a NaN in case of an invalid argument.
Additional Information
Some key points must be kept in mind when working with the parseInt() function.
These are as follows:
If the string contains blank spaces on either end of the numeric characters, then these spaces are ignored
If the first character inside the string is not a numeric value or a numeric character, then a NaN is returned to the caller
If there are multiple values with spaces in between them, then only the first one would be returned
If the base value is smaller than 2 or larger than 32, then a NaN is returned
If a string starts with “0x” then it would automatically be taken as a hexadecimal value
Example 1: Passing a valid string, without the radix argument
Create a new string value containing a valid input and pass that to the parseInt() method using the following lines:
var str1 = "174";
let resultValue = parseInt(str1);
Then pass the resultValue variable to the console log function:
console.log(resultValue);
After executing the lines mentioned above, the output will look like this:
![]() The result on the terminal shows that the parseInt() method fetched the integer value 174 from the given string.
The result on the terminal shows that the parseInt() method fetched the integer value 174 from the given string.
Example 2: Giving Float values in the string
To test the result of the parseInt() method with some decimal point in the string, create a new string with the following lines
var str1 = "123.456";
Pass this string into the parseInt() and store the result in a new variable
let resultValue = parseInt(str1);
At the end, pass this variable to console log function to display the output on the terminal
console.log(resultValue);
The result on the terminal will look like the following screenshot
![]() After observing the output, it is clear that only the integer part inside the string value is converted.
At the point where the parseInt() discovers the first non-integer value, it stops.
After observing the output, it is clear that only the integer part inside the string value is converted.
At the point where the parseInt() discovers the first non-integer value, it stops.
Example 3: Defining the base of the string value as binary
To define the radix or the base of the number of the values inside the string, first, create a new string in binary format like
var str1 = "111";
After that, pass this string variable to the parseInt() method and pass the value 2 in the second argument like
let resultValue = parseInt(str1, 2);
Finally, use the console log function to display the result as:
console.log(resultValue);
The terminal will look like this
![]() As the output shows, the value 111 in binary is equivalent to 7 in the decimal number system.
As the output shows, the value 111 in binary is equivalent to 7 in the decimal number system.
Example 4: Blank spaces on either end of the value
Simply create a new string variable and have leading and trailing spaces around the integer value like
var str1 = " 542 ";
Pass this variable to parseInt(), store the result in a new variable, and then pass that variable to the console log function
let resultValue = parseInt(str1);
console.log(resultValue);
Executing the program gives the following result
![]() It is clear from the screenshot above, that the parseInt() method ignores the blank spaces on either end of the numeric value.
It is clear from the screenshot above, that the parseInt() method ignores the blank spaces on either end of the numeric value.
Wrap up
JavaScript’s parseInt() function takes in a string argument and an optional base argument and then fetches the integer value from the string and returns it as the output.
The base argument defines the number system of the value contained inside the string, and the string is always converted into a decimal number system.
Multiple scenarios can happen in the case of string variations, and all of these have been shown above.
JavaScript | Date.parse()
The date.parse() method converts a string containing a date to a numeric value by representing that date in the form of milliseconds since 1970.
The working of the parse() is the same as passing a string as an argument to the constructor of the Date variable class.
Well, in reality, when a string is passed as an argument, an indirect call is made to the date parse() method.
Syntax of date.parse()
The syntax of the date parse() method is rather simple; it is defined as
Date.parse(String)
Note: Here, the String contains a date value inside it.
Now, the user can give this representation in various formats.
Return Value:
The return value from the date parse() method is a numeric value that represents the amount of time elapsed in the form of milliseconds since January 1st, 1970.
A NaN is returned as the outcome if the argument equals an invalid date.
Example 1: Passing a string in the parse() method
For this example, create a new string variable, and write a valid date inside that variable like
dateInString = "5 June 1997";
Then, pass this variable in the argument of the parse() method and set it equal to a new variable dateInMs:
const dateInMs = Date.parse(dateInString);
Finally, print out the result stored inside the dateInMs variable onto the terminal using the console log function:
console.log(dateInMs);
These lines are going to yield the following outcome when executed:
![]() From the screenshot, observe that the output is a numeric value representing time in the form of milliseconds.
From the screenshot, observe that the output is a numeric value representing time in the form of milliseconds.
Example 2: Calculating the Years from the result of the parse() method
Create a new string with the following value inside it:
dateInString = "1 Jan 2010";
Pass it to the Date.parse() method and then print the result onto the console using the console log function:
const dateInMs = Date.parse(dateInString);
console.log(dateInMs);
Since, the result is going to be the amount of time elapsed since January 1st, 1970.
We can calculate the years passed since 1970 using the following lines:
var yearsPassed = Math.round(dateInMs / (365 * 24 * 60 * 60 * 1000));
console.log(yearsPassed);
The equation (365*24*60*60*1000) is simply calculating the number of milliseconds inside a whole year.
After that, divide the result of the parse() method by that number and then display it onto the console using the console log function:
![]() The years passed since 1970 were printed onto the terminal.
The years passed since 1970 were printed onto the terminal.
Example: Passing Invalid Date to Date.parse() method
To demonstrate this, create a new string containing an invalid date as
dateInString = "31 2 2022";
The date represented by this string is the 31st of February, 2022, which is an invalid date.
Pass this dateInString variable in the argument of the parse() method and pass the result to the console log function as
const dateInMs = Date.parse(dateInString);
console.log(dateInMs);
After executing this program, the following result would be displayed onto the terminal:
![]() The result was NaN meaning depicting that the string contained an invalid date.
The result was NaN meaning depicting that the string contained an invalid date.
Conclusion
The Date.parse() method simply takes a string representing a specific date.
Afterward, it returns the number of milliseconds elapsed since January 1970 according to the date in the string.
In case there are wrong \ invalid dates in the string, the result would be a NaN value.
Besides, whenever a new Date variable is created using the new Date() constructor, an indirect call is made to the Date.parse() method.
Tensorflow.js – tf.tanh()
In some scenarios, we need to convert numeric values present in a tensor to Hyperbolic Tangent values.
There is a built-in method that converts into hyperbolic tangent.
Tensorflow.js is a framework that supports the tf.tanh() function that converts all numeric values to Hyperbolic Tangent values present in a tensor.
tf.tanh()
tf.tanh() is used to return hyperbolic tangent values from a given tensor.
So, it takes only one parameter: IE tensor that has numbers.
Syntax:
tf.tanh(tensor_input)
Parameter:
tensor_inputis a tensor that has numbers.
It can be 1 or 2 dimensional.
Let’s explore different examples of this method.
Example 1:
Let’s create a one-dimensional tensor in js that has some values and return hyperbolic tangent values.
<html><!-- CDN Link that delivers the Tensorflow.js framework --><script src="https://cdn.jsdelivr.net/npm/@tensorflow/tfjs"></script><body><center><h1>Tensorflow.js - tf.tanh() </h1></center><script>
let values = tf.tensor1d([30,45,60,90,180]);//actual tensor
document.write("Actual Tensor: ",values);
document.write("<br>");
document.write("<br>");//apply tanh() on the above tensor
document.write("Tensor with Hyperbolic Tangent Values: "+tf.tanh(values));</script></body></html>
Output:
![]() Hyperbolic Tangent values were returned from the above one-dimensional tensor.
Hyperbolic Tangent values were returned from the above one-dimensional tensor.
Example 2:
Let’s create a tensor that has 2 dimensions in js with 5 rows and 2 columns and return Hyperbolic Tangent values.
<html><!-- CDN Link that delivers the Tensorflow.js framework --><script src="https://cdn.jsdelivr.net/npm/@tensorflow/tfjs"></script><body><center><h1>Tensorflow.js - tf.tanh() </h1></center><script>
let values = tf.tensor2d([[0,null],[10,NaN],[45,82],[34,undefined],[67,43]]);//actual tensor
document.write("Actual Tensor: ",values);
document.write("<br>");
document.write("<br>");//apply tanh() on the above tensor
document.write("Tensor with Hyperbolic Tangent Values: "+tf.tanh(values));</script></body></html>
Output:
![]() Hyperbolic Tangent values were returned from the above one-dimensional tensor.
We observed that for null.NaN and undefined, it returned 0.
Hyperbolic Tangent values were returned from the above one-dimensional tensor.
We observed that for null.NaN and undefined, it returned 0.
Example 3:
In this case, we will consider the decimal values.
Let’s create a tensor that has 2 dimensions in js with 5 rows and 2 columns and return Hyperbolic Tangent values.
<html><!-- CDN Link that delivers the Tensorflow.js framework --><script src="https://cdn.jsdelivr.net/npm/@tensorflow/tfjs"></script><body><center><h1>Tensorflow.js - tf.tanh() </h1></center><script>
let values = tf.tensor2d([[4.80,0],[45.10,null],[46.785,8.2],[31.4,5.6],[6.87,43.76]]);//actual tensor
document.write("Actual Tensor: ",values);
document.write("<br>");
document.write("<br>");//apply tanh() on the above tensor
document.write("Tensor with Hyperbolic Tangent Values: "+tf.tanh(values));</script></body></html>
Output:
![]() Hyperbolic Tangent values were returned from the above one-dimensional tensor.
Hyperbolic Tangent values were returned from the above one-dimensional tensor.
Conclusion
In this Tensorflow.js tutorial, we saw how to return Hyperbolic Tangent values from actual values using the tf.tanh() function present in one or two-dimensional tensors with three examples.
Make sure that CDN Link is provided inside the script tag in every code.
We observed that for the values – null,0,NaN and undefined the tanh() function returns 0.
Tensorflow.js – tf.sub()
“If you want to remove the hidden layers from a deep learning model or if you perform filtering on the images, then you may need to subtract the pixels from an image.
So by using the tf.sub() function, it is possible to subtract two pixels.
We can store the pixels of an image in a scalar or a tensor.
In this tutorial, Let’s explore this function by considering different scenarios.”
tf.sub()
tf.sub() in tensorflow.js is used to subtract the values element wise in two tensors/scalars.
Scenario-1: Work With Scalar
Scalar will store only one value.
But anyway, it returns a tensor.
Syntax
tf.sub(scalar1,scalar2)
Parameters
scalar1 and scalar2 are the tensors that can take only one value as a parameter.
Return
Return difference of two scalar values.
Example
Create two scalars and perform subtraction on two scalars.
<html><!-- CDN Link that delivers the Tensorflow.js framework --><script src="https://cdn.jsdelivr.net/npm/@tensorflow/tfjs"></script><body><script>//scalar1
let value1 = tf.scalar(30);//scalar2
let value2 = tf.scalar(70);
document.write("Scalar-1: ",value1);
document.write("<br>");
document.write("<br>");
document.write("Scalar-2: ",value2);</script><h3>Tensorflow.js - tf.sub() </h3><script>//tf.sub(value1,value2)
document.write(tf.sub(value1,value2));</script></body></html>
Output:
![]() Working:
The difference between 30 and 70 is -40.
Working:
The difference between 30 and 70 is -40.
Scenario-2: Work With Tensor
A tensor can store multiple values; it can be single or multi-dimensional.
Syntax
tf.sub(tensor1,tensor2)
Parameters
tensor1 and tensor2 are the tensors that can take only single or multiple values as a parameter.
Return
Return difference of two tensors with respect to each element.
We must notice that the total number of elements in both the tensors must be equal.
Example 1
Create two one-dimensional tensors and return the difference using tf.sub().
<html><!-- CDN Link that delivers the Tensorflow.js framework --><script src="https://cdn.jsdelivr.net/npm/@tensorflow/tfjs"></script><body><script>//tensor1
let values1 = tf.tensor1d([10,20,30,40,50]);//tensor2
let values2 = tf.tensor1d([1,2,3,4,5]);
document.write("Tensor-1: ",values1);
document.write("<br>");
document.write("<br>");
document.write("Tensor-2: ",values2);</script><h3>Tensorflow.js - tf.sub() </h3><script>//tf.sub(values1,values2)
document.write(tf.sub(values1,values2));</script></body></html>
Output:
![]() Working:
[10-1,20-2,30-3,40-4,50-5] => [9, 18, 27, 36, 45].
Working:
[10-1,20-2,30-3,40-4,50-5] => [9, 18, 27, 36, 45].
Example 2
Create 2 two-dimensional tensors with 2 rows and 3 columns and apply tf.sub().
<html><!-- CDN Link that delivers the Tensorflow.js framework --><script src="https://cdn.jsdelivr.net/npm/@tensorflow/tfjs"></script><body><script>//tensor1
let values1 = tf.tensor2d([1,2,3,4,5,6],[2,3]);//tensor2
let values2 = tf.tensor2d([34,10,20,30,40,50],[2,3]);
document.write("Tensor-1: ",values1);
document.write("<br>");
document.write("<br>");
document.write("Tensor-2: ",values2);</script><h3>Tensorflow.js - tf.sub() </h3><script>//tf.sub(values1,values2)
document.write(tf.sub(values1,values2));</script></body></html>
Output:
![]() Working:
[[1-34,2-10,3-20],[4-30,5-40,6-50]] => [[-33, -8 , -17], [-26, -35, -44]].
Working:
[[1-34,2-10,3-20],[4-30,5-40,6-50]] => [[-33, -8 , -17], [-26, -35, -44]].
Scenario-3: Work With Tensor & Scalar
It can be possible to subtract each element from a tensor with a scalar.
Syntax
tf.sub(tensor,scalar)
Example
Create a one-dimensional tensor and a scalar and perform subtraction using tf.sub().
<html><!-- CDN Link that delivers the Tensorflow.js framework --><script src="https://cdn.jsdelivr.net/npm/@tensorflow/tfjs"></script><body><script>//tensor
let values1 = tf.tensor1d([10,20,30,4,5,6]);//scalar
let value2 = tf.scalar(1);
document.write("Tensor: ",values1);
document.write("<br>");
document.write("<br>");
document.write("Scalar: ",value2);</script><h3>Tensorflow.js - tf.sub() </h3><script>//tf.sub(values1,value2)
document.write(tf.sub(values1,value2));</script></body></html>
Output:
![]() Working:
[10-1, 20-1, 30-1, 4-1, 5-1, 6-1] => [9, 19, 29, 3, 4, 5].
Working:
[10-1, 20-1, 30-1, 4-1, 5-1, 6-1] => [9, 19, 29, 3, 4, 5].
Conclusion
So we came to the end of the lesson.
tf.sub() in tensorflow.js is used to subtract two tensors/scalars.
We discussed three scenarios to subtract a tensor from a scalar.
Also, we noticed that scalar will store only one value and returns a tensor.
Tensorflow.js – tf.sin()
In some scenarios, we need to convert numeric values present in a tensor to Sine values.
There is a built-in method that converts into sine.
Sine is used to find angles in many construction applications, like to find the angles with respect to room corners.
While predicting the house prices through Tensorflow in Machine Learning, we must convert normal values to store values and then apply machine learning models.
So, we will see how to apply tf.sin() function on the existing values to get Sine values.
Tensorflow.js is a framework that supports the tf.sin() function that converts all numeric values to Sine values present in a tensor.
Make sure that the input range is -inf to +inf (-inf,inf) and output range will be 1 to +1(-1,1).
What is a tensor?
A tensor in tensorflow.js acts as an array that stores elements in single or multiple dimensions.
If we want to create a tensor with one dimension, then tf.tensor1d() is used.
Syntax:
tf.tensor1d([elements])
Parameter:
It takes an array that has elements separated by a comma.
To create a tensor with two dimensions (rows and columns), tf.tensor2d() is used.
Syntax:
tf.tensor2d([[elements],.........,[elements]])
tf.sin()
tf.sin() is used to return sine values from a given tensor.
So, it takes only one parameter: IE tensor that has numbers.
Syntax:
tf.sin(tensor_input)
Parameter:
tensor_input is a tensor that has numbers.
It can be 1or 2 dimensional.
Let’s explore different examples of this method.
Example 1:
Let’s create a one-dimensional tensor in js that has some values.
<html><!-- CDN Link that delivers the Tensorflow.js framework --><script src="https://cdn.jsdelivr.net/npm/@tensorflow/tfjs"></script><body><center><h1>Tensorflow.js - tf.sin() </h1></center><script>
let values = tf.tensor1d([30,45,60,90,180]);//actual tensor
document.write("Actual Tensor: ",values);
document.write("<br>");//apply sin() on the above tensor
document.write("Tensor with Sine Values: "+tf.sin(values));</script></body></html>
Output:
![]() Sine values were returned from the above one-dimensional tensor.
Sine values were returned from the above one-dimensional tensor.
Example 2:
Let’s create a tensor that has 2 dimensions in js with 5 rows and 2 columns.
<html><!-- CDN Link that delivers the Tensorflow.js framework --><script src="https://cdn.jsdelivr.net/npm/@tensorflow/tfjs"></script><body><center><h1>Tensorflow.js - tf.sin() </h1></center><script>
let values = tf.tensor2d([[40,60],[10,20],[45,82],[34,56],[67,43]]);//actual tensor
document.write("Actual Tensor: ",values);
document.write("<br>");//apply sin() on the above tensor
document.write("Final Tensor with Sine Values: "+tf.sin(values));</script></body></html>
Output:
![]() Sine values were returned from the above one-dimensional tensor.
Sine values were returned from the above one-dimensional tensor.
Example 3:
In this case, we will consider the decimal values.
Let’s create a tensor that has 2 dimensions in js with 5 rows and 2 columns.
<html><!-- CDN Link that delivers the Tensorflow.js framework --><script src="https://cdn.jsdelivr.net/npm/@tensorflow/tfjs"></script><body><center><h1>Tensorflow.js - tf.sin() </h1></center><script>
let values = tf.tensor2d([[4.80,6.340],[45.10,2.0],[46.785,8.2],[31.4,5.6],[6.87,43.76]]);//actual tensor
document.write("Actual Tensor: ",values);
document.write("<br>");//apply sin() on the above tensor
document.write("Final Tensor with Sine Values: "+tf.sin(values));</script></body></html>
Output:
![]() Sine values were returned from the above one-dimensional tensor.
Sine values were returned from the above one-dimensional tensor.
Conclusion
In this Tensorflow.js tutorial, we saw how to return Sine values from actual values using the tf.sin() function present in one or two-dimensional tensors with three examples.
Make sure that CDN Link is provided inside the script tag.
Tensorflow.js – tf.cos()
Prediction models that include smart constructions, weather forecasting, healthcare, etc.
will use Cosine Pulses that record the patient’s heartbeats.
We need to convert numeric values present in a tensor to Cosine values.
There is a built-in method that converts into Cosine.
Tensorflow.js is a framework that supports the tf.cos() function that converts all numeric values to Cosine values present in a tensor.
tf.cos()
tf.cos() is used to return Cosine values from a given tensor.
So, it takes only one parameter: IE tensor which has numbers.
Syntax:
tf.cos(tensor_input)
Parameter:
tensor_input is a tensor that has numbers.
It can be 1or 2-dimensional.
Let’s explore different examples of this method.
Example 1:
Let’s create a one-dimensional tensor in js that has some values and return Cosine values.
<html><!-- CDN Link that delivers the Tensorflow.js framework --><script src="https://cdn.jsdelivr.net/npm/@tensorflow/tfjs"></script><body><center><h1>Tensorflow.js - tf.cos() </h1></center><script>
let values = tf.tensor1d([78,54,67,90,21,45,67,89,0,1]);//actual tensor
document.write("Actual Tensor: ",values);
document.write("<br>");
document.write("<br>");//apply cos() on the above tensor
document.write("Tensor with Cosine Values: "+tf.cos(values));</script></body></html>
Output:
![]() Cosine values were returned from the above one-dimensional tensor.
Cosine values were returned from the above one-dimensional tensor.
Example 2-
Let’s create a tensor that has 2 dimensions in js with 5 rows and 2 columns and return Cosine values.
<html><!-- CDN Link that delivers the Tensorflow.js framework --><script src="https://cdn.jsdelivr.net/npm/@tensorflow/tfjs"></script><body><center><h1>Tensorflow.js - tf.cos() </h1></center><script>
let values = tf.tensor2d([[0,null],[10,NaN],[45,82],[34,undefined],[67,43]]);//actual tensor
document.write("Actual Tensor: ",values);
document.write("<br>");
document.write("<br>");//apply cos() on the above tensor
document.write("Tensor with Cosine Values: "+tf.cos(values));</script></body></html>
Output:
![]() Cosine values were returned from the above one-dimensional tensor.
We observed that for null.NaN and undefined, it returned 1.
Cosine values were returned from the above one-dimensional tensor.
We observed that for null.NaN and undefined, it returned 1.
Example 3:
In this case, we will consider the decimal values.
Let’s create a tensor that has 2 dimensions in js with 5 rows and 2 columns and return Cosine values.
<html><!-- CDN Link that delivers the Tensorflow.js framework --><script src="https://cdn.jsdelivr.net/npm/@tensorflow/tfjs"></script><body><center><h1>Tensorflow.js - tf.cos() </h1></center><script>
let values = tf.tensor2d([[4.80,0],[45.10,null],[46.785,8.2],[31.4,5.6],[6.87,43.76]]);//actual tensor
document.write("Actual Tensor: ",values);
document.write("<br>");
document.write("<br>");//apply cos() on the above tensor
document.write("Tensor with Cosine Values: "+tf.cos(values));</script></body></html>
Output:
![]() Cosine values were returned from the above one-dimensional tensor.
Cosine values were returned from the above one-dimensional tensor.
Conclusion
In this Tensorflow.js tutorial, we saw how to return Cosine values from actual values using the tf.cos() function present in one or two-dimensional tensors with three examples.
Make sure that CDN Link is provided inside the script tag in every code.
We observed that for the values – null,0,NaN and undefined the cos() function returns 1.
Tensorflow.js – tf.add()
“If you want to add hidden layers in a deep learning model or if you perform filtering on the images, then you may need to add the pixels in an image.
So by using the tf.add() function, it is possible to add two pixels.
We can store the pixels of an image in a scalar or in a tensor.
In this tutorial, Let’s explore this function by considering different scenarios.”
tf.add()
tf.add() in tensorflow.js is used to add two tensors/scalars.
Scenario-1: Work With Scalar
Scalar will store only one value.
But anyway, it returns a tensor.
Syntax
tf.add(scalar1,scalar2)
Parameters
scalar1 and scalar2 are the tensors that can take only one value as a parameter.
Return
Return the sum of two scalar values.
Example
Create two scalars and add them using tf.add().
<html><!-- CDN Link that delivers the Tensorflow.js framework --><script src="https://cdn.jsdelivr.net/npm/@tensorflow/tfjs"></script><body><script>//scalar1
let value1 = tf.scalar(30);//scalar2
let value2 = tf.scalar(70);
document.write("Scalar-1: ",value1);
document.write("<br>");
document.write("<br>");
document.write("Scalar-2: ",value2);</script><h3>Tensorflow.js - tf.add() </h3><script>//tf.add(value1,value2)
document.write(tf.add(value1,value2));</script></body></html>
Output:
![]() Working:
The Sum of 30 and 70 is 100.
Working:
The Sum of 30 and 70 is 100.
Scenario-2: Work With Tensor
A tensor can store multiple values; it can be single or multi-dimensional.
Syntax
tf.add(tensor1,tensor2)
Parameters
tensor1 and tensor2 are the tensors that can take only single or multiple values as a parameter.
Return
Return the sum of two tensors with respect to each element.
We have to notice that the total number of elements in both the tensors must be equal.
Example 1
Create two one-dimensional tensors and add them using tf.add().
<html><!-- CDN Link that delivers the Tensorflow.js framework --><script src="https://cdn.jsdelivr.net/npm/@tensorflow/tfjs"></script><body><script>//tensor1
let values1 = tf.tensor1d([1,2,3,4,5]);//tensor2
let values2 = tf.tensor1d([10,20,30,40,50]);
document.write("Tensor-1: ",values1);
document.write("<br>");
document.write("<br>");
document.write("Tensor-2: ",values2);</script><h3>Tensorflow.js - tf.add() </h3><script>//tf.add(values1,values2)
document.write(tf.add(values1,values2));</script></body></html>
Output:
![]() Working:
[1+10,2+20,3+30,4+40,5+50] => [11, 22, 33, 44, 55].
Working:
[1+10,2+20,3+30,4+40,5+50] => [11, 22, 33, 44, 55].
Example 2
Create 2 two-dimensional tensors with 2 rows and 3 columns and add them using tf.add().
<html><!-- CDN Link that delivers the Tensorflow.js framework --><script src="https://cdn.jsdelivr.net/npm/@tensorflow/tfjs"></script><body><script>//tensor1
let values1 = tf.tensor2d([1,2,3,4,5,6],[2,3]);//tensor2
let values2 = tf.tensor2d([34,10,20,30,40,50],[2,3]);
document.write("Tensor-1: ",values1);
document.write("<br>");
document.write("<br>");
document.write("Tensor-2: ",values2);</script><h3>Tensorflow.js - tf.add() </h3><script>//tf.add(values1,values2)
document.write(tf.add(values1,values2));</script></body></html>
Output:
![]() Working:
[[1+34,2+10,3+20],[4+30,5+40,6+50]] => [[35, 12, 23], [34, 45, 56]].
Working:
[[1+34,2+10,3+20],[4+30,5+40,6+50]] => [[35, 12, 23], [34, 45, 56]].
Scenario-3: Work With Tensor & Scalar
It can be possible to add each element in a tensor with a scalar.
Syntax:
tf.add(tensor,scalar)
Example
Create a one-dimensional tensor, a scalar, and add them using tf.add().
<html><!-- CDN Link that delivers the Tensorflow.js framework --><script src="https://cdn.jsdelivr.net/npm/@tensorflow/tfjs"></script><body><script>//tensor
let values1 = tf.tensor1d([1,2,3,4,5,6]);//scalar
let value2 = tf.scalar(10);
document.write("Tensor: ",values1);
document.write("<br>");
document.write("<br>");
document.write("Scalar: ",value2);</script><h3>Tensorflow.js - tf.add() </h3><script>//tf.add(values1,value2)
document.write(tf.add(values1,value2));</script></body></html>
Output:
![]() Working:
[1+10, 2+10, 3+10, 4+10, 5+10, 6+10] => [11, 12, 13, 14, 15, 16].
Working:
[1+10, 2+10, 3+10, 4+10, 5+10, 6+10] => [11, 12, 13, 14, 15, 16].
Conclusion
So we came to the end of the lesson.
tf.add() in tensorflow.js is used to add two tensors/scalars.
We discussed three scenarios to add tensors, scalars, and scalars with a tensor with examples.
Also, we noticed that scalar will store only one value and returns a tensor.
Tensorflow.js – tf.abs()
Machine Learning with Tensorflow.js is one of the best options to implement.
In this case, we will see negative values.
To overcome these values, or to get accurate results, we will convert them into positive values.
So how will they be converted?
Tensorflow.js is a framework that supports the tf.abs() function that converts all negative values to positive present in a tensor.
Introduction
A tensor in tensorflow.js acts as an array that stores elements in single or multiple dimensions.
If we want to create a tensor with one dimension, tf.tensor1d() is used.
Syntax:
tf.tensor1d([elements])
Parameter:
It takes an array that has elements separated by a comma.
To create a tensor with two dimensions (rows and columns), tf.tensor2d() is used.
Syntax:
tf.tensor2d([[elements],.........,[elements]])
tf.abs()
tf.abs() is used to return positive values from a given tensor.
So, it takes only one parameter: IE tensor that has numbers.
Syntax:
tf.abs(tensor_input)
Parameter:
tensor_input is a tensor that has numbers.
It can be 1 or 2-dimensional.
Let’s explore different examples of this method.
Example 1:
Here, we will create a one-dimensional tensor that has some negative values.
<html><!-- CDN Link that delivers the Tensorflow.js framework --><script src="https://cdn.jsdelivr.net/npm/@tensorflow/tfjs"></script><body><center><h1>Tensorflow.js - tf.abs() </h1></center><script>//create a one dimensional tensor with 5 elements
let values = tf.tensor1d([-45,-12,5,95,-67]);//actual tensor
document.write("Actual Tensor: ",values);
document.write("<br>");//apply abs() on the above tensor
document.write("Final Tensor: "+tf.abs(values));</script></body></html>
Output:
![]() There are three negative values present in the above tensor.
-45, -12, and -67 are converted to positive but 5 and 95 remain the same.
There are three negative values present in the above tensor.
-45, -12, and -67 are converted to positive but 5 and 95 remain the same.
Example 2:
Here, we will create a two-dimensional tensor with 3 rows and 2 columns that have some negative values.
<html><!-- CDN Link that delivers the Tensorflow.js framework --><script src="https://cdn.jsdelivr.net/npm/@tensorflow/tfjs"></script><body><center><h1>Tensorflow.js - tf.abs() </h1></center><script>//create a two dimensional tensor with 3 rows and 2 columns
let values = tf.tensor2d([[-45,-12],[34,56],[67,-43]]);//actual tensor
document.write("Actual Tensor: ",values);
document.write("<br>");//apply abs() on the above tensor
document.write("Final Tensor: "+tf.abs(values));</script></body></html>
Output:
![]() There are three negative values present in the above tensor.
-45, -12, and -43 are converted to positive but 34, 56, and 67 remain the same.
There are three negative values present in the above tensor.
-45, -12, and -43 are converted to positive but 34, 56, and 67 remain the same.
Example 3:
In this case, we will consider the decimal values.
Here, we will create a two-dimensional tensor with 3 rows and 2 columns that has some negative values.
<html><!-- CDN Link that delivers the Tensorflow.js framework --><script src="https://cdn.jsdelivr.net/npm/@tensorflow/tfjs"></script><body><center><h1>Tensorflow.js - tf.abs() </h1></center><script>//create a two dimensional tensor with 3 rows and 2 columns
let values = tf.tensor2d([[-0.56,-0.45],[4.56,-9.45],[4.56,8.90]]);//actual tensor
document.write("Actual Tensor: ",values);
document.write("<br>");//apply abs() on the above tensor
document.write("Final Tensor: "+tf.abs(values));</script></body></html>
Output:
![]() There are three negative values present in the above tensor.
-0.56, -0.45, and -9.4499998 are converted to positive but 4.5599999,4.5599999 and 8.8999996 remain the same.
There are three negative values present in the above tensor.
-0.56, -0.45, and -9.4499998 are converted to positive but 4.5599999,4.5599999 and 8.8999996 remain the same.
Conclusion
In this Tensorflow.js tutorial, we saw how to convert negative values to positive using the tf.abs() function present in one /two dimensional tensors with three examples.
Make sure that CDN Link is provided inside the script tag.
Tensorflow.js – tf.lessEqual()
“tf.lessEqual() returns true if the element in the first tensor is less than or equal to the element in the second tensor.
It takes two tensors as parameters that have the same number of values; otherwise, an error is thrown.
Scalar will store only one value.
But anyway, it returns a tensor.”
Syntax
tf.lessEqual(tensor1,tensor2)
tf.lessEqual(scalar1,scalar2)
It is also possible to implement the lessEqual() method, as shown below.
Syntax
tensor1.lessEqual(tensor2)
scalar1.lessEqual(scalar2)
Parameters
tensor1 and tensor2 are the tensors that can be single or multi-dimensional.
scalar1 and scalar2 are the tensors that can take only one value as a parameter.
ReturnReturn a Boolean Tensor.
Example 1Create two one-dimensional tensors with integer elements and apply tf.lessEqual() to check if the elements in the first tensor are less than or equal to the elements in the second tensor.
<html><!-- CDN Link that delivers the Tensorflow.js framework --><script src="https://cdn.jsdelivr.net/npm/@tensorflow/tfjs"></script><body><script>//tensor1
let values1 = tf.tensor1d([100,200,300,500]);//tensor2
let values2 = tf.tensor1d([50,345,675,120]);
document.write("Tensor-1: ",values1);
document.write("<br>");
document.write("<br>");
document.write("Tensor-2: ",values2);</script><h3>Tensorflow.js - tf.lessEqual(tensor1,tensor2) </h3><script>//tf.lessEqual(values1,values2)
document.write(tf.lessEqual(values1,values2));</script><h3>Tensorflow.js - tensor1.lessEqual(tensor2) </h3><script>//values1.lessEqual(values2)
document.write(values1.lessEqual(values2));</script></body></html>
Output
![]() WorkingTensor-1: Tensor [100, 200, 300, 500]
Tensor-2: Tensor [50, 345, 675, 120]
Element-wise comparison:
100<=50 – false
200<=345 – true
300<=675 – true
500<=120 – false
Example 2Create two values using scalar() and apply tf.lessEqual() to check if the value is less than or equal to the value present in the second scalar.
<html><!-- CDN Link that delivers the Tensorflow.js framework --><script src="https://cdn.jsdelivr.net/npm/@tensorflow/tfjs"></script><body><script>//scalar1
let value1 = tf.scalar(34);//scalar2
let value2 = tf.scalar(23);
document.write("Scalar-1: ",value1);
document.write("<br>");
document.write("<br>");
document.write("Scalar-2: ",value2);</script><h3>Tensorflow.js - tf.lessEqual(scalar1,scalar2) </h3><script>//tf.lessEqual(value1,value2)
document.write(tf.lessEqual(value1,value2));</script><h3>Tensorflow.js - scalar1.lessEqual(scalar2) </h3><script>//value1.lessEqual(value2)
document.write(value1.lessEqual(value2));</script></body></html>
Output
WorkingTensor-1: Tensor [100, 200, 300, 500]
Tensor-2: Tensor [50, 345, 675, 120]
Element-wise comparison:
100<=50 – false
200<=345 – true
300<=675 – true
500<=120 – false
Example 2Create two values using scalar() and apply tf.lessEqual() to check if the value is less than or equal to the value present in the second scalar.
<html><!-- CDN Link that delivers the Tensorflow.js framework --><script src="https://cdn.jsdelivr.net/npm/@tensorflow/tfjs"></script><body><script>//scalar1
let value1 = tf.scalar(34);//scalar2
let value2 = tf.scalar(23);
document.write("Scalar-1: ",value1);
document.write("<br>");
document.write("<br>");
document.write("Scalar-2: ",value2);</script><h3>Tensorflow.js - tf.lessEqual(scalar1,scalar2) </h3><script>//tf.lessEqual(value1,value2)
document.write(tf.lessEqual(value1,value2));</script><h3>Tensorflow.js - scalar1.lessEqual(scalar2) </h3><script>//value1.lessEqual(value2)
document.write(value1.lessEqual(value2));</script></body></html>
Output
![]() 34 is not less than or equal to 23.
So It returned false.
Example 3Create 2 two-dimensional tensors with 2 rows and 2 columns and apply tf.lessEqual() to check if the elements in the first tensor are less than or equal to the elements in the second tensor.
<html><!-- CDN Link that delivers the Tensorflow.js framework --><script src="https://cdn.jsdelivr.net/npm/@tensorflow/tfjs"></script><body><script>//tensor1
let values1 = tf.tensor2d([90,56,78,12],[2,2]);//tensor2
let values2 = tf.tensor2d([10,56,34,45],[2,2]);
document.write("Tensor-1: ",values1);
document.write("<br>");
document.write("<br>");
document.write("Tensor-2: ",values2);</script><h3>Tensorflow.js - tf.lessEqual(tensor1,tensor2) </h3><script>//tf.lessEqual(values1,values2)
document.write(tf.lessEqual(values1,values2));</script><h3>Tensorflow.js - tensor1.lessEqual(tensor2) </h3><script>//values1.lessEqual(values2)
document.write(values1.lessEqual(values2));</script></body></html>
Output
34 is not less than or equal to 23.
So It returned false.
Example 3Create 2 two-dimensional tensors with 2 rows and 2 columns and apply tf.lessEqual() to check if the elements in the first tensor are less than or equal to the elements in the second tensor.
<html><!-- CDN Link that delivers the Tensorflow.js framework --><script src="https://cdn.jsdelivr.net/npm/@tensorflow/tfjs"></script><body><script>//tensor1
let values1 = tf.tensor2d([90,56,78,12],[2,2]);//tensor2
let values2 = tf.tensor2d([10,56,34,45],[2,2]);
document.write("Tensor-1: ",values1);
document.write("<br>");
document.write("<br>");
document.write("Tensor-2: ",values2);</script><h3>Tensorflow.js - tf.lessEqual(tensor1,tensor2) </h3><script>//tf.lessEqual(values1,values2)
document.write(tf.lessEqual(values1,values2));</script><h3>Tensorflow.js - tensor1.lessEqual(tensor2) </h3><script>//values1.lessEqual(values2)
document.write(values1.lessEqual(values2));</script></body></html>
Output
![]() WorkingTensor-1: Tensor [[90, 56], [78, 12]]
Tensor-2: Tensor [[10, 56], [34, 45]]
Element-wise comparison:
90<=10 – false
56<=56 – true
78<=34 – false
12<=45 – true
WorkingTensor-1: Tensor [[90, 56], [78, 12]]
Tensor-2: Tensor [[10, 56], [34, 45]]
Element-wise comparison:
90<=10 – false
56<=56 – true
78<=34 – false
12<=45 – true
Conclusion
tf.lessEqual() in Tensorflow.js is used to compare the elements that return true if the element in the first tensor is less than or equal to the element in the second tensor.
It is also possible to implement the lessEqual() method in two ways.
We discussed three different examples, using tensors one and two dimensions and scalars.
Tensorflow.js – tf.notEqual()
“tf.notEqual() returns true if both the elements are not equal; otherwise false is returned.
It takes two tensors as parameters that have the same number of values; otherwise, an error is thrown.
Scalar will store only one value.
But anyway, it returns a tensor.”
Syntax
tf.notEqual(tensor1,tensor2)
tf.notEqual(scalar1,scalar2)
It is also possible to implement the notEqual() method, as shown below.
Syntax
tensor1.notEqual(tensor2)
scalar1.notEqual(scalar2)
Parameterstensor1 and tensor2 are the tensors that can be single or multi-dimensional.
scalar1 and scalar2 are the tensors that can take only one value as a parameter.
ReturnReturn a Boolean Tensor.
Example 1Create two one-dimensional tensors with integer elements and apply tf.notEqual() to check if the elements are not the same.
<html><!-- CDN Link that delivers the Tensorflow.js framework --><script src="https://cdn.jsdelivr.net/npm/@tensorflow/tfjs"></script><body><script>//tensor1
let values1 = tf.tensor1d([34,12,34,11,10,34]);//tensor2
let values2 = tf.tensor1d([34,12,2,3,10,23]);
document.write("Tensor-1: ",values1);
document.write("<br>");
document.write("<br>");
document.write("Tensor-2: ",values2);</script><h3>Tensorflow.js - tf.notEqual(tensor1,tensor2) </h3><script>//tf.notEqual(values1,values2)
document.write(tf.notEqual(values1,values2));</script><h3>Tensorflow.js - tensor1.notEqual(tensor2) </h3><script>//values1.notEqual(values2)
document.write(values1.notEqual(values2));</script></body></html>
Output
![]() WorkingTensor-1: Tensor [34, 12, 34, 11, 10, 34]
Tensor-2: Tensor [34, 12, 2, 3, 10, 23]
Element wise comparison:
34!=34 – false
12!=12 – false
34!=2 – true
11!=3 – true
10!=10 – false
34!=23 – true
Example 2Create two values using scalar() and apply tf.notEqual() to check if the values are the same or not.
<html><!-- CDN Link that delivers the Tensorflow.js framework --><script src="https://cdn.jsdelivr.net/npm/@tensorflow/tfjs"></script><body><script>//scalar1
let value1 = tf.scalar(34);//scalar2
let value2 = tf.scalar(23);
document.write("Scalar-1: ",value1);
document.write("<br>");
document.write("<br>");
document.write("Scalar-2: ",value2);</script><h3>Tensorflow.js - tf.notEqual(scalar1,scalar2) </h3><script>//tf.notEqual(value1,value2)
document.write(tf.notEqual(value1,value2));</script><h3>Tensorflow.js - scalar1.notEqual(scalar2) </h3><script>//value1.notEqual(value2)
document.write(value1.notEqual(value2));</script></body></html>
Output
WorkingTensor-1: Tensor [34, 12, 34, 11, 10, 34]
Tensor-2: Tensor [34, 12, 2, 3, 10, 23]
Element wise comparison:
34!=34 – false
12!=12 – false
34!=2 – true
11!=3 – true
10!=10 – false
34!=23 – true
Example 2Create two values using scalar() and apply tf.notEqual() to check if the values are the same or not.
<html><!-- CDN Link that delivers the Tensorflow.js framework --><script src="https://cdn.jsdelivr.net/npm/@tensorflow/tfjs"></script><body><script>//scalar1
let value1 = tf.scalar(34);//scalar2
let value2 = tf.scalar(23);
document.write("Scalar-1: ",value1);
document.write("<br>");
document.write("<br>");
document.write("Scalar-2: ",value2);</script><h3>Tensorflow.js - tf.notEqual(scalar1,scalar2) </h3><script>//tf.notEqual(value1,value2)
document.write(tf.notEqual(value1,value2));</script><h3>Tensorflow.js - scalar1.notEqual(scalar2) </h3><script>//value1.notEqual(value2)
document.write(value1.notEqual(value2));</script></body></html>
Output
![]() 34 is not equal to 23.
So It returned true.
Example 3Create 2 two-dimensional tensors with 2 rows and 2 columns and apply tf.notEqual() to check if the elements are the same or not.
<html><!-- CDN Link that delivers the Tensorflow.js framework --><script src="https://cdn.jsdelivr.net/npm/@tensorflow/tfjs"></script><body><script>//tensor1
let values1 = tf.tensor2d([90,56,78,12],[2,2]);//tensor2
let values2 = tf.tensor2d([90,56,34,45],[2,2]);
document.write("Tensor-1: ",values1);
document.write("<br>");
document.write("<br>");
document.write("Tensor-2: ",values2);</script><h3>Tensorflow.js - tf.notEqual(tensor1,tensor2) </h3><script>//tf.notEqual(values1,values2)
document.write(tf.notEqual(values1,values2));</script><h3>Tensorflow.js - tensor1.notEqual(tensor2) </h3><script>//values1.notEqual(values2)
document.write(values1.notEqual(values2));</script></body></html>
Output
34 is not equal to 23.
So It returned true.
Example 3Create 2 two-dimensional tensors with 2 rows and 2 columns and apply tf.notEqual() to check if the elements are the same or not.
<html><!-- CDN Link that delivers the Tensorflow.js framework --><script src="https://cdn.jsdelivr.net/npm/@tensorflow/tfjs"></script><body><script>//tensor1
let values1 = tf.tensor2d([90,56,78,12],[2,2]);//tensor2
let values2 = tf.tensor2d([90,56,34,45],[2,2]);
document.write("Tensor-1: ",values1);
document.write("<br>");
document.write("<br>");
document.write("Tensor-2: ",values2);</script><h3>Tensorflow.js - tf.notEqual(tensor1,tensor2) </h3><script>//tf.notEqual(values1,values2)
document.write(tf.notEqual(values1,values2));</script><h3>Tensorflow.js - tensor1.notEqual(tensor2) </h3><script>//values1.notEqual(values2)
document.write(values1.notEqual(values2));</script></body></html>
Output
![]() Working
Tensor-1: Tensor [[90, 56], [78, 12]]
Tensor-2: Tensor [[90, 56], [34, 45]]
Element wise comparison:
90!=90 – false
56!=56 – false
78!=34 – true
12!=45 – true
Working
Tensor-1: Tensor [[90, 56], [78, 12]]
Tensor-2: Tensor [[90, 56], [34, 45]]
Element wise comparison:
90!=90 – false
56!=56 – false
78!=34 – true
12!=45 – true
Conclusion
tf.notEqual() in Tensorflow.js is used to compare the elements that return true; if both the elements are not equal, otherwise false is returned.
It takes two tensors as parameters that have the same number of values; otherwise, an error is thrown.
It is also possible to implement the notEqual() method in two ways.
We discussed three different examples, using tensors one and two dimensions and scalars.
Javascript Inline If
Conditional statements are one of the major building blocks of programming.
They allow developers to add conditional logic and check for various parameters.
When working with conditional logic, you will need to check for specific conditions and act if it’s either true or false.
In this tutorial, we will look at how we can create a minimal if check using various techniques.
JavaScript Inline if using Ternary Operators
The most common and best practice for introducing an inline if statement is using a ternary operator.
The ternary operator uses a colon and a question mark to introduce logic and action.
Let us illustrate how we can use ternary operator to create an inline if statement.
Suppose we have two numbers, and we want to get the largest value.
Without ternary operator, we would write the code as shown:
let a = 10
let b = 2if (a > b) {
console.log(a)
}
else {
console.log(b)
}
However, using inline if statement, we can minimize the above code into a single line as shown in the code below:
let a = 10
let b = 2
console.log(a>b ? a : b);
In this case, we use the ternary operator to compare the condition we wish to check.
If a is greater than b, we console.log(a) otherwise console.log(b).
Running the code above should return a result as shown:
$ node inline.js10
As you can see, using the ternary operator, we are able to minimize the if else statement into a single statement.
JavaScript Inline If Using Logical Operators
The second method you can use is the logical and operator.
It allows us to combine the condition we wish to check and the execution block in a single line as shown:
let a = 10
let b = 2
console.log(a>b && a || b)
Here, we can see the logical and in practice.
We start by specifying the condition we wish to check on the left side of the operator.
If true, the execution block is run.
Otherwise, run the right-side operation.
JavaScript Inline if (Multiple Conditions) Using the Ternary Operator
You may ask, what happens if I have a nested condition such as multiple if..else blocks? We can implement them using the ternary operator as shown:
let a = 10
let b = 2
console.log(a>b ? a : a<b ? b: "NaN");
In the example above, we have multiple conditions.
If a is greater than b, print a, if a is less than b, print b, otherwise NaN.
Closing
In this article, we discussed how to implement inline if statements using ternary and logical and operator.
Tensorflow.js – tf.less()
“tf.less() returns true if the element in the first tensor is less than the element in the second tensor.
It takes two tensors as parameters that have the same number of values; otherwise, an error is thrown.
Scalar will store only one value.
But anyway, it returns a tensor.”
Syntax
tf.less(tensor1,tensor2)
tf.less(scalar1,scalar2)
It is also possible to implement the less() method, as shown below.
Syntax
tensor1.less(tensor2)
scalar1.less(scalar2)
Parameterstensor1 and tensor2 are the tensors that can be single or multi-dimensional.
scalar1 and scalar2 are the tensors that can take only one value as a parameter.
ReturnReturn a Boolean Tensor.
Example 1Create two one-dimensional tensors with integer elements and apply tf.less() to check if the elements in the first tensor are less than the elements in the second tensor.
<html><!-- CDN Link that delivers the Tensorflow.js framework --><script src="https://cdn.jsdelivr.net/npm/@tensorflow/tfjs"></script><body><script>//tensor1
let values1 = tf.tensor1d([100,200,300,500]);//tensor2
let values2 = tf.tensor1d([50,345,675,120]);
document.write("Tensor-1: ",values1);
document.write("<br>");
document.write("<br>");
document.write("Tensor-2: ",values2);</script><h3>Tensorflow.js - tf.less(tensor1,tensor2) </h3><script>//tf.less(values1,values2)
document.write(tf.less(values1,values2));</script><h3>Tensorflow.js - tensor1.less(tensor2) </h3><script>//values1.less(values2)
document.write(values1.less(values2));</script></body></html>
Output
![]() WorkingTensor-1: Tensor [100, 200, 300, 500]
Tensor-2: Tensor [50, 345, 675, 120]
Element-wise comparison:
100<50 – false
200<345 – true
300<675 – true
500<120 – false
Example 2Create two values using scalar() and apply tf.less() to check if the value is less than the value present in the second scalar.
<html><!-- CDN Link that delivers the Tensorflow.js framework --><script src="https://cdn.jsdelivr.net/npm/@tensorflow/tfjs"></script><body><script>//scalar1
let value1 = tf.scalar(34);//scalar2
let value2 = tf.scalar(23);
document.write("Scalar-1: ",value1);
document.write("<br>");
document.write("<br>");
document.write("Scalar-2: ",value2);</script><h3>Tensorflow.js - tf.less(scalar1,scalar2) </h3><script>//tf.less(value1,value2)
document.write(tf.less(value1,value2));</script><h3>Tensorflow.js - scalar1.less(scalar2) </h3><script>//value1.less(value2)
document.write(value1.less(value2));</script></body></html>
Output
WorkingTensor-1: Tensor [100, 200, 300, 500]
Tensor-2: Tensor [50, 345, 675, 120]
Element-wise comparison:
100<50 – false
200<345 – true
300<675 – true
500<120 – false
Example 2Create two values using scalar() and apply tf.less() to check if the value is less than the value present in the second scalar.
<html><!-- CDN Link that delivers the Tensorflow.js framework --><script src="https://cdn.jsdelivr.net/npm/@tensorflow/tfjs"></script><body><script>//scalar1
let value1 = tf.scalar(34);//scalar2
let value2 = tf.scalar(23);
document.write("Scalar-1: ",value1);
document.write("<br>");
document.write("<br>");
document.write("Scalar-2: ",value2);</script><h3>Tensorflow.js - tf.less(scalar1,scalar2) </h3><script>//tf.less(value1,value2)
document.write(tf.less(value1,value2));</script><h3>Tensorflow.js - scalar1.less(scalar2) </h3><script>//value1.less(value2)
document.write(value1.less(value2));</script></body></html>
Output
![]() 34 is not less than 23.
So It returned false.
Example 3Create 2 two-dimensional tensors with 2 rows and 2 columns and apply tf.less() to check if the elements in the first tensor are less than the elements in the second tensor.
<html><!-- CDN Link that delivers the Tensorflow.js framework --><script src="https://cdn.jsdelivr.net/npm/@tensorflow/tfjs"></script><body><script>//tensor1
let values1 = tf.tensor2d([90,56,78,12],[2,2]);//tensor2
let values2 = tf.tensor2d([10,56,34,45],[2,2]);
document.write("Tensor-1: ",values1);
document.write("<br>");
document.write("<br>");
document.write("Tensor-2: ",values2);</script><h3>Tensorflow.js - tf.less(tensor1,tensor2) </h3><script>//tf.less(values1,values2)
document.write(tf.less(values1,values2));</script><h3>Tensorflow.js - tensor1.less(tensor2) </h3><script>//values1.less(values2)
document.write(values1.less(values2));</script></body></html>
Output
34 is not less than 23.
So It returned false.
Example 3Create 2 two-dimensional tensors with 2 rows and 2 columns and apply tf.less() to check if the elements in the first tensor are less than the elements in the second tensor.
<html><!-- CDN Link that delivers the Tensorflow.js framework --><script src="https://cdn.jsdelivr.net/npm/@tensorflow/tfjs"></script><body><script>//tensor1
let values1 = tf.tensor2d([90,56,78,12],[2,2]);//tensor2
let values2 = tf.tensor2d([10,56,34,45],[2,2]);
document.write("Tensor-1: ",values1);
document.write("<br>");
document.write("<br>");
document.write("Tensor-2: ",values2);</script><h3>Tensorflow.js - tf.less(tensor1,tensor2) </h3><script>//tf.less(values1,values2)
document.write(tf.less(values1,values2));</script><h3>Tensorflow.js - tensor1.less(tensor2) </h3><script>//values1.less(values2)
document.write(values1.less(values2));</script></body></html>
Output
![]() WorkingTensor-1: Tensor [[90, 56], [78, 12]]
Tensor-2: Tensor [[10, 56], [34, 45]]
Element-wise comparison:
90<10 – false
56<56 – false
78<34 – false
12<45 – true
WorkingTensor-1: Tensor [[90, 56], [78, 12]]
Tensor-2: Tensor [[10, 56], [34, 45]]
Element-wise comparison:
90<10 – false
56<56 – false
78<34 – false
12<45 – true
Conclusion
tf.less() in Tensorflow.js is used to compare the elements that return true if the element in the first tensor is less than the element in the second tensor.
It is also possible to implement the less() method in two ways.
We discussed three different examples, using tensors one and two dimensions and scalars.
Tensorflow.js – tf.greater()
“tf.greater() returns true if the element in the first tensor is greater than the element in the second tensor.
It takes two tensors as parameters that have the same number of values; otherwise, an error is thrown.
Scalar will store only one value.
But anyway, it returns a tensor.”
Syntax
tf.greater(tensor1,tensor2)
tf.greater(scalar1,scalar2)
It is also possible to implement the greater() method, as shown below.
Syntax
tensor1.greater(tensor2)
scalar1.greater(scalar2)
Parameterstensor1 and tensor2 are the tensors that can be single or multi-dimensional.
scalar1 and scalar2 are the tensors that can take only one value as a parameter.
ReturnReturn a Boolean Tensor.
Example 1Create two one-dimensional tensors with integer elements and apply tf.greater() to check if the elements in the first tensor are greater than the elements in the second tensor.
<html><!-- CDN Link that delivers the Tensorflow.js framework --><script src="https://cdn.jsdelivr.net/npm/@tensorflow/tfjs"></script><body><script>//tensor1
let values1 = tf.tensor1d([100,200,300,500]);//tensor2
let values2 = tf.tensor1d([50,345,675,120]);
document.write("Tensor-1: ",values1);
document.write("<br>");
document.write("<br>");
document.write("Tensor-2: ",values2);</script><h3>Tensorflow.js - tf.greater(tensor1,tensor2) </h3><script>//tf.greater(values1,values2)
document.write(tf.greater(values1,values2));</script><h3>Tensorflow.js - tensor1.greater(tensor2) </h3><script>//values1.greater(values2)
document.write(values1.greater(values2));</script></body></html>
Output
![]() WorkingTensor-1: Tensor [100, 200, 300, 500]
Tensor-2: Tensor [50, 345, 675, 120]
Element-wise comparison:
100>50 – true
200>345 – false
300>675 – false
500>120 – true
Example 2Create two values using scalar() and apply tf.greater() to check if the value is greater than the value present in the second scalar.
<html><!-- CDN Link that delivers the Tensorflow.js framework --><script src="https://cdn.jsdelivr.net/npm/@tensorflow/tfjs"></script><body><script>//scalar1
let value1 = tf.scalar(34);//scalar2
let value2 = tf.scalar(23);
document.write("Scalar-1: ",value1);
document.write("<br>");
document.write("<br>");
document.write("Scalar-2: ",value2);</script><h3>Tensorflow.js - tf.greater(scalar1,scalar2) </h3><script>//tf.greater(value1,value2)
document.write(tf.greater(value1,value2));</script><h3>Tensorflow.js - scalar1.greater(scalar2) </h3><script>//value1.greater(value2)
document.write(value1.greater(value2));</script></body></html>
Output
WorkingTensor-1: Tensor [100, 200, 300, 500]
Tensor-2: Tensor [50, 345, 675, 120]
Element-wise comparison:
100>50 – true
200>345 – false
300>675 – false
500>120 – true
Example 2Create two values using scalar() and apply tf.greater() to check if the value is greater than the value present in the second scalar.
<html><!-- CDN Link that delivers the Tensorflow.js framework --><script src="https://cdn.jsdelivr.net/npm/@tensorflow/tfjs"></script><body><script>//scalar1
let value1 = tf.scalar(34);//scalar2
let value2 = tf.scalar(23);
document.write("Scalar-1: ",value1);
document.write("<br>");
document.write("<br>");
document.write("Scalar-2: ",value2);</script><h3>Tensorflow.js - tf.greater(scalar1,scalar2) </h3><script>//tf.greater(value1,value2)
document.write(tf.greater(value1,value2));</script><h3>Tensorflow.js - scalar1.greater(scalar2) </h3><script>//value1.greater(value2)
document.write(value1.greater(value2));</script></body></html>
Output
![]() 34 is greater than 23.
So It returned true.
Example 3Create 2 two-dimensional tensors with 2 rows and 2 columns and apply tf.greater() to check if the elements in the first tensor are greater than the elements in the second tensor.
<html><!-- CDN Link that delivers the Tensorflow.js framework --><script src="https://cdn.jsdelivr.net/npm/@tensorflow/tfjs"></script><body><script>//tensor1
let values1 = tf.tensor2d([90,56,78,12],[2,2]);//tensor2
let values2 = tf.tensor2d([10,56,34,45],[2,2]);
document.write("Tensor-1: ",values1);
document.write("<br>");
document.write("<br>");
document.write("Tensor-2: ",values2);</script><h3>Tensorflow.js - tf.greater(tensor1,tensor2) </h3><script>//tf.greater(values1,values2)
document.write(tf.greater(values1,values2));</script><h3>Tensorflow.js - tensor1.greater(tensor2) </h3><script>//values1.greater(values2)
document.write(values1.greater(values2));</script></body></html>
Output
34 is greater than 23.
So It returned true.
Example 3Create 2 two-dimensional tensors with 2 rows and 2 columns and apply tf.greater() to check if the elements in the first tensor are greater than the elements in the second tensor.
<html><!-- CDN Link that delivers the Tensorflow.js framework --><script src="https://cdn.jsdelivr.net/npm/@tensorflow/tfjs"></script><body><script>//tensor1
let values1 = tf.tensor2d([90,56,78,12],[2,2]);//tensor2
let values2 = tf.tensor2d([10,56,34,45],[2,2]);
document.write("Tensor-1: ",values1);
document.write("<br>");
document.write("<br>");
document.write("Tensor-2: ",values2);</script><h3>Tensorflow.js - tf.greater(tensor1,tensor2) </h3><script>//tf.greater(values1,values2)
document.write(tf.greater(values1,values2));</script><h3>Tensorflow.js - tensor1.greater(tensor2) </h3><script>//values1.greater(values2)
document.write(values1.greater(values2));</script></body></html>
Output
![]() WorkingTensor-1: Tensor [[90, 56], [78, 12]]
Tensor-2: Tensor [[10, 56], [34, 45]]
Element-wise comparison:
90>10 – true
56>56 – false
78>34 – true
12>45 – false
WorkingTensor-1: Tensor [[90, 56], [78, 12]]
Tensor-2: Tensor [[10, 56], [34, 45]]
Element-wise comparison:
90>10 – true
56>56 – false
78>34 – true
12>45 – false
Conclusion
tf.greater() in Tensorflow.js is used to compare the elements that return true if the element in the first tensor is greater than the element in the second tensor.
It is also possible to implement the greater() method in two ways.
We discussed three different examples, using tensors one and two dimensions and scalars.
Tensorflow.js – tf.div()
“tf.div() in tensorflow.js is used to perform element wise division on two tensors/scalars.”
Scenario 1: Work With Scalar
Scalar will store only one value.
But anyway, it returns a tensor.
Syntax
tf.div(scalar1,scalar2)
Parametersscalar1 and scalar2 are the tensors that can take only one value as a parameter.
ReturnReturn quotient of two scalar values.
ExampleCreate two scalars and perform a division of two scalars.
<html><!-- CDN Link that delivers the Tensorflow.js framework --><script src="https://cdn.jsdelivr.net/npm/@tensorflow/tfjs"></script><body><script>//scalar1
let value1 = tf.scalar(30);//scalar2
let value2 = tf.scalar(70);
document.write("Scalar-1: ",value1);
document.write("<br>");
document.write("<br>");
document.write("Scalar-2: ",value2);</script><h3>Tensorflow.js - tf.div() </h3><script>//tf.div(value1,value2)
document.write(tf.div(value1,value2));</script></body></html>
Output
![]() Working30/70 = 0.4285714030265808.
Working30/70 = 0.4285714030265808.
Scenario 2: Work With Tensor
A tensor can store multiple values; it can be single or multi-dimensional.
Syntax
tf.div(tensor1,tensor2)
Parameterstensor1 and tensor2 are the tensors that can take only single or multiple values as a parameter.
ReturnReturn quotient of two tensors concerning each element.
We must notice that the total number of elements in both the tensors must be equal.
Example 1Create two one-dimensional tensors and return the quotient using tf.div().
<html><!-- CDN Link that delivers the Tensorflow.js framework --><script src="https://cdn.jsdelivr.net/npm/@tensorflow/tfjs"></script><body><script>//tensor1
let values1 = tf.tensor1d([10,20,30,40,50]);//tensor2
let values2 = tf.tensor1d([1,2,3,4,5]);
document.write("Tensor-1: ",values1);
document.write("<br>");
document.write("<br>");
document.write("Tensor-2: ",values2);</script><h3>Tensorflow.js - tf.div() </h3><script>//tf.div(values1,values2)
document.write(tf.div(values1,values2));</script></body></html>
Output
![]() Working[10/1,20/2,30/3,40/4,50/5] => Tensor [10, 10, 10, 10, 10].
Example 2Create 2 two-dimensional tensors with 2 rows and 3 columns and apply tf.div().
<html><!-- CDN Link that delivers the Tensorflow.js framework --><script src="https://cdn.jsdelivr.net/npm/@tensorflow/tfjs"></script><body><script>//tensor1
let values1 = tf.tensor2d([1,2,3,4,5,6],[2,3]);//tensor2
let values2 = tf.tensor2d([34,10,20,30,40,50],[2,3]);
document.write("Tensor-1: ",values1);
document.write("<br>");
document.write("<br>");
document.write("Tensor-2: ",values2);</script><h3>Tensorflow.js - tf.div() </h3><script>//tf.div(values1,values2)
document.write(tf.div(values1,values2));</script></body></html>
Output
Working[10/1,20/2,30/3,40/4,50/5] => Tensor [10, 10, 10, 10, 10].
Example 2Create 2 two-dimensional tensors with 2 rows and 3 columns and apply tf.div().
<html><!-- CDN Link that delivers the Tensorflow.js framework --><script src="https://cdn.jsdelivr.net/npm/@tensorflow/tfjs"></script><body><script>//tensor1
let values1 = tf.tensor2d([1,2,3,4,5,6],[2,3]);//tensor2
let values2 = tf.tensor2d([34,10,20,30,40,50],[2,3]);
document.write("Tensor-1: ",values1);
document.write("<br>");
document.write("<br>");
document.write("Tensor-2: ",values2);</script><h3>Tensorflow.js - tf.div() </h3><script>//tf.div(values1,values2)
document.write(tf.div(values1,values2));</script></body></html>
Output
![]() Working[[1/34,2/10,3/20],[4/30,5/40,6/50]] => [[0.0294118, 0.2 , 0.15], [0.1333333, 0.125, 0.12]].
Working[[1/34,2/10,3/20],[4/30,5/40,6/50]] => [[0.0294118, 0.2 , 0.15], [0.1333333, 0.125, 0.12]].
Scenario 3: Work With Tensor & Scalar
It can be possible to divide each element in a tensor by a scalar.
Syntax
tf.div(tensor,scalar)
ExampleCreate a one-dimensional tensor and a scalar and perform division using tf.div().
<html><!-- CDN Link that delivers the Tensorflow.js framework --><script src="https://cdn.jsdelivr.net/npm/@tensorflow/tfjs"></script><body><script>//tensor
let values1 = tf.tensor1d([10,20,30,4,5,6]);//scalar
let value2 = tf.scalar(10);
document.write("Tensor: ",values1);
document.write("<br>");
document.write("<br>");
document.write("Scalar: ",value2);</script><h3>Tensorflow.js - tf.div() </h3><script>//tf.div(values1,value2)
document.write(tf.div(values1,value2));</script></body></html>
Output
![]() Working[10/10, 20/10, 30/10, 4/10, 5/10, 6/10] => [1, 2, 3, 0.4, 0.5, 0.6].
Working[10/10, 20/10, 30/10, 4/10, 5/10, 6/10] => [1, 2, 3, 0.4, 0.5, 0.6].
Conclusion
tf.div() in tensorflow.js is used to perform division and return element-wise quotients.
We discussed three scenarios to divide a tensor by a scalar.
Also, we noticed that scalar will store only one value and returns a tensor.
While performing tf.div() on two tensors, ensure that the number of elements in two tensors must be the same.
Tensorflow.js – tf.slice()
We already know how to create a tensor in the tensorflow.js library and display all the values from it.
Now, the task is to return only some portion/range of elements from a tensor.
How do you do that?
The answer is quite simple.
Tensorflow.js library supports the tf.slice() function which returns the elements based on the index.
The index starts with 0.
Let’s see how to get the elements from a tensor.
Tensorflow.js – tf.slice()
The tf.slice() function is used to return elements from a tensor within the range and return those range of elements in a new tensor.
It takes three parameters.
Syntax:
tf.slice(tensor.start,size)
Parameters:
Tensor can be single or two-dimensional.
Start specifies the index position in which the starting range is specified.
Size takes an integer that returns the elements from the starting range.
Example 1:
Create a one-dimensional tensor with 10 integer values and get the following range of values:
From index-0 to index-6 (start should be 0 and size is 7)
From index-0 to index-8 (start should be 0 and size is 9)
From index-3 to index-8 (start should be 3 and size is 6)
From index-4 to index-9 (start should be 4 and size is 6)
<html><!-- CDN Link that delivers the Tensorflow.js framework --><script src="https://cdn.jsdelivr.net/npm/@tensorflow/tfjs"></script>
<body><center><h2>Tensorflow.js - tf.slice() </h2></center><script>
//create a tensorlet values = tf.tensor1d([1,2,3,4,5,6,7,8,9,10]);//actual tensor
document.write("<b>Actual Scalar: </b>",values);
document.write("<br>");
// index-0 to index-6
document.write("<b>Elements from index-0 to index-6: </b> "+tf.slice(values,[0],7));
document.write("<br>");// index-0 to index-8
document.write("<b>Elements from index-0 to index-8: </b> "+tf.slice(values,[0],9));
document.write("<br>");// index-3 to index-8
document.write("<b>Elements from index-3 to index-8: </b> "+tf.slice(values,[3],6));
document.write("<br>");// index-4 to index-9
document.write("<b>Elements from index-4 to index-9: </b> "+tf.slice(values,[4],6));
document.write("<br>");</script>
</body></html>
Output:
![]() We got the elements from index-0 to index-6.
The total number of elements is 7.
Hence, we specified the size as 7.
Similarly:
We got the elements from index-0 to index-6.
The total number of elements is 7.
Hence, we specified the size as 7.
Similarly:
From index-0 to index-8, the size is 9.
From index-3 to index-8, the size is 6.
From index-4 to index-9, the size is 6.
Example 2:
Create a one-dimensional tensor with 5 integer values and get the following range of values:
From index-0 to index-3 (start should be 0 and size is 4)
From index-3 to index-4 (start should be 3 and size is 1)
<html><!-- CDN Link that delivers the Tensorflow.js framework --><script src="https://cdn.jsdelivr.net/npm/@tensorflow/tfjs"></script>
<body><center><h2>Tensorflow.js - tf.slice() </h2></center><script>
//create a tensorlet values = tf.tensor1d([1,2,3,4,5]);//actual tensor
document.write("<b>Actual Scalar: </b>",values);
document.write("<br>");
// index-0 to index-3
document.write("<b>Elements from index-0 to index-3: </b> "+tf.slice(values,[0],4));
document.write("<br>");// index-3 to index-4
document.write("<b>Elements from index-3 to index-4: </b> "+tf.slice(values,[3],1));</script>
</body></html>
Output:
![]()
Example 3:
Create a two-dimensional tensor with 5 rows and 4 columns (20 elements) and get the range of values from the row-index2 to row-index3.
<html><!-- CDN Link that delivers the Tensorflow.js framework --><script src="https://cdn.jsdelivr.net/npm/@tensorflow/tfjs"></script>
<body><center><h2>Tensorflow.js - tf.slice() </h2></center><script>
//create a tensorlet values = tf.tensor2d([1,2,3,4,5,6,7,8,9,10,11,12,13,14,15,16,17,18,19,20],[5,4]);//actual tensor
document.write("<b>Actual Scalar: </b>",values);
document.write("<br>");
// row index-2 to row index-3
document.write("<b>Elements from row index-2 to row index-3: </b> "+tf.slice(values,[2],2));
document.write("<br>");</script>
</body></html>
Output:
![]() Row index-2 => [9, 10, 11, 12] and Row index-3 => [13, 14, 15, 16].
Row index-2 => [9, 10, 11, 12] and Row index-3 => [13, 14, 15, 16].
Conclusion
At the end of this article, we learned that using the tf.slice()can be possible to get a range of elements from a tensor.
We specified the three different examples to understand this concept better.
In the Deep Learning using the Tensorflow.js library, we will use this technique to get the image pixels from a particular position.
Tensorflow.js – tf.pow()
“tf.pow() in tensorflow.js is used to raise power with respect to the values in another tensor.”
Scenario 1: Work With Scalar
Scalar will store only one value.
But anyway, it returns a tensor.
Syntax
tf.pow(scalar1,scalar2)
Parametersscalar1 and scalar2 are the tensors that can take only one value as a parameter.
ReturnReturn remainder of two scalar values.
ExampleCreate two scalars and raise the power to value present in the second scalar.
<html><!-- CDN Link that delivers the Tensorflow.js framework --><script src="https://cdn.jsdelivr.net/npm/@tensorflow/tfjs"></script><body><script>//scalar1
let value1 = tf.scalar(3);//scalar2
let value2 = tf.scalar(4);
document.write("Scalar-1: ",value1);
document.write("<br>");
document.write("<br>");
document.write("Scalar-2: ",value2);</script><h3>Tensorflow.js - tf.pow() </h3><script>//tf.pow(value1,value2)
document.write(tf.pow(value1,value2));</script></body></html>
Output
![]() Working
3 to the power of 4 => 3*3*3*3 = 81.
Working
3 to the power of 4 => 3*3*3*3 = 81.
Scenario 2: Work With Tensor
A tensor can store multiple values; it can be single or multi-dimensional.
Syntax
tf.pow(tensor1,tensor2)
Parameterstensor1 and tensor2 are the tensors that can take only single or multiple values as a parameter.
ReturnPower of values.
We must notice that the total number of elements in both the tensors must be equal.
Example 1Create two one-dimensional tensors and return the power of elements in a first tensor concerning values in a second tensor.
<html><!-- CDN Link that delivers the Tensorflow.js framework --><script src="https://cdn.jsdelivr.net/npm/@tensorflow/tfjs"></script><body><script>//tensor1
let values1 = tf.tensor1d([2,3,4]);//tensor2
let values2 = tf.tensor1d([1,2,3]);
document.write("Tensor-1: ",values1);
document.write("<br>");
document.write("<br>");
document.write("Tensor-2: ",values2);</script><h3>Tensorflow.js - tf.pow() </h3><script>//tf.pow(values1,values2)
document.write(tf.pow(values1,values2));</script></body></html>
Output
![]() Working
[2 power 1,3 power 2,4 power 3,] => Tensor [2,9,64].
Example 2Create 2 two-dimensional tensors with 2 rows and 3 columns and apply tf.pow().
<html><!-- CDN Link that delivers the Tensorflow.js framework --><script src="https://cdn.jsdelivr.net/npm/@tensorflow/tfjs"></script><body><script>//tensor1
let values1 = tf.tensor2d([1,2,3,4,5,6],[2,3]);//tensor2
let values2 = tf.tensor2d([2,2,2,2,2,2],[2,3]);
document.write("Tensor-1: ",values1);
document.write("<br>");
document.write("<br>");
document.write("Tensor-2: ",values2);</script><h3>Tensorflow.js - tf.pow() </h3><script>//tf.pow(values1,values2)
document.write(tf.pow(values1,values2));</script></body></html>
Output
Working
[2 power 1,3 power 2,4 power 3,] => Tensor [2,9,64].
Example 2Create 2 two-dimensional tensors with 2 rows and 3 columns and apply tf.pow().
<html><!-- CDN Link that delivers the Tensorflow.js framework --><script src="https://cdn.jsdelivr.net/npm/@tensorflow/tfjs"></script><body><script>//tensor1
let values1 = tf.tensor2d([1,2,3,4,5,6],[2,3]);//tensor2
let values2 = tf.tensor2d([2,2,2,2,2,2],[2,3]);
document.write("Tensor-1: ",values1);
document.write("<br>");
document.write("<br>");
document.write("Tensor-2: ",values2);</script><h3>Tensorflow.js - tf.pow() </h3><script>//tf.pow(values1,values2)
document.write(tf.pow(values1,values2));</script></body></html>
Output
![]()
Scenario 3: Work With Tensor & Scalar
It can be possible to raise the power of each element in a tensor by a scalar.
Syntax
tf.pow(tensor,scalar)
ExampleCreate a one-dimensional tensor, a scalar, and raise each element in a tensor to a scalar value.
<html><!-- CDN Link that delivers the Tensorflow.js framework --><script src="https://cdn.jsdelivr.net/npm/@tensorflow/tfjs"></script><body><script>//tensor
let values1 = tf.tensor1d([10,20,30,4,5,6]);//scalar
let value2 = tf.scalar(2);
document.write("Tensor: ",values1);
document.write("<br>");
document.write("<br>");
document.write("Scalar: ",value2);</script><h3>Tensorflow.js - tf.pow() </h3><script>//tf.pow(values1,value2)
document.write(tf.pow(values1,value2));</script></body></html>
Output
![]()
Conclusion
tf.pow() in tensorflow.js is used to raise power with respect to the values in another tensor.
Also, we noticed that scalar will store only one value and returns a tensor.
While performing tf.pow() on two tensors, ensure that the number of elements in two tensors must be the same.
The TensorFlow.js – tf.fill() Method
In Deep Learning, we have to fill the pixels of an image in an array or in a matrix.
To accomplish this, TensorFlow.js supports the tf.fill() function.
It is used to set the same value in the tensor array or tensor matrix.
tf.fill() Meethod
The tf.fill() function is used to set the element in a tensor with specified value.
We can fill that value more than one time in a tensor.
Syntax:
tf.fill(shape,value,dtype)
It takes three parameters.
Parameters:
The shape is used to set the value n times.
If it is a two-dimensional tensor, we can specify the number of rows and number of columns.
The value is the numeric or string element that is filled in a tensor.
The dtype is used to specify the element type.
Example 1
Create a 1D tensor with numeric value -2 ,10 times in a tensor.
<html><!-- CDN Link that delivers the Tensorflow.js framework --><script src="https://cdn.jsdelivr.net/npm/@tensorflow/tfjs"></script>
<body><center><h1>Linux Hint</h1></center><center><h2>Tensorflow.js - tf.fill() </h2></center><script>
//create a tensor with value-2 and fill 10 times.let values = tf.fill(shape = [10],value = 2)//actual tensor
document.write("Tensor: ",values);
</script>
</body></html>
Output:
![]() 2 is added 10 times to a tensor.
2 is added 10 times to a tensor.
Example 2
Create a 1D tensor with string value, ‘Linux Hint’, 4 times in a tensor.
<html><!-- CDN Link that delivers the Tensorflow.js framework --><script src="https://cdn.jsdelivr.net/npm/@tensorflow/tfjs"></script>
<body><center><h1>Linux Hint</h1></center><center><h2>Tensorflow.js - tf.fill() </h2></center><script>
//create a tensor with element-'Linux Hint' and fill 4 times.let values = tf.fill(shape = [4],value='Linux Hint',dtype='string')//actual tensor
document.write("Tensor: "+values);
</script>
</body></html>
Output:
![]() ‘Linux Hint’ is added 4 times to a tensor with string data type.
‘Linux Hint’ is added 4 times to a tensor with string data type.
Example 3
Create a 2D tensor with numeric value – 20, 6 (2 rows and 3 columns) times using tf.fill().
<html><!-- CDN Link that delivers the Tensorflow.js framework --><script src="https://cdn.jsdelivr.net/npm/@tensorflow/tfjs"></script>
<body><center><h1>Linux Hint</h1></center><center><h2>Tensorflow.js - tf.fill() </h2></center><script>
//create a tensor with element-'Linux Hint' and fill 5 times.let values = tf.fill(shape = [2,3],value=20)//actual tensor
document.write("Tensor: "+values);
</script>
</body></html>
Output:
![]() The value, 20, is added in tensor with shape 2 rows and 3 columns.
The value, 20, is added in tensor with shape 2 rows and 3 columns.
Conclusion
We saw how to fill values in a tensor using the fill() method.
Using this method, we can specify the datatype of the element and we can create a tensor with multiple dimensions.
This article discussed three different examples with string and integer data types.
How to Remove an HTML Element Using JavaScript?
JavaScript DOM manipulations allow a user to delete any element from the HTML webpage using the remove() method.
However, a reference to its node is required to remove an element.
Only with that reference can an element be removed from the webpage.
The remove() method removes the HTML element from the document object model of the webpage by taking the element as a node.
Let’s look at the syntax of the remove() method available to all HTML page elements.
Syntax of the remove() method
The syntax of the remove method is given as
elemRefference.remove();
From the syntax above, it is evident that you only need to apply the remove() on an element or on a node to remove it, and no additional parameters are required.
Example: Remove an element from an HTML webpage
To demonstrate the use of the remove() method, create an HTML webpage with some text and a button using the lines of code inside the <body> tag:
<center>
<p id="myText">You want to remove me!</p>
<br />
<button onclick="buttonClicked()">Click me to remove</button></center>
Notice that an onclick() attribute has been added with the button that is going to look for the buttonClicked() method inside the script file.
And the paragraph to remove has the id as “myText”
Execute the HTML web page.
You will see the following screen on your browser:
![]() To add functionality on the button click, head over to the script file and create the buttonClicked() function with the following lines of code:
function buttonClicked() {
// Upcoming lines are to be placed over inside here}
Inside this function, the very first step is to get a reference to the paragraph to be removed by using the getElementById() method like
var elem = document.getElementById("myText");
The reference has been stored inside the elem variable.
Use the remove() method on this elem variable with the help of the dot operator
elem.remove();
The whole script code snippet is will be like the following:
function buttonClicked() {
var elem = document.getElementById("myText");
elem.remove();}
Execute the web page and click on the button to remove the paragraph tag with the id “myText”:
To add functionality on the button click, head over to the script file and create the buttonClicked() function with the following lines of code:
function buttonClicked() {
// Upcoming lines are to be placed over inside here}
Inside this function, the very first step is to get a reference to the paragraph to be removed by using the getElementById() method like
var elem = document.getElementById("myText");
The reference has been stored inside the elem variable.
Use the remove() method on this elem variable with the help of the dot operator
elem.remove();
The whole script code snippet is will be like the following:
function buttonClicked() {
var elem = document.getElementById("myText");
elem.remove();}
Execute the web page and click on the button to remove the paragraph tag with the id “myText”:
![]() And the element has been removed from the HTML webpage and the DOM as well.
And the element has been removed from the HTML webpage and the DOM as well.
Conclusion
With every HTML element, there is a built-in function that comes with ES6 JavaScript that eradicates the element from the HTML webpage and the DOM.
This method is named the remove() method and is applied to the element using a dot operator.
The remove() method requires no arguments and does not return any value.
This article demonstrated the working of the remove() method.
Tensorflow.js – tf.sum()
“In tensorflow.js, if you want to return the sum of elements in a tensor, then you should know about the tf.sum() method.”
tf.sum()
tf.sum() in tensorflow.js returns the total sum of elements.
Syntax:
tf.sum(tensor_input,axis)
Parameter:
1.
tensor_input is a tensor that has numeric elements.
It can be 1or 2 dimensional.
2.
If the tensor is two-dimensional, then it is possible to specify the axis to get a sum across rows or columns.
If axis=0, the total sum is returned column-wise, and if axis=1, the total sum is returned row-wise.
If the axis is not specified, then it will return the sum of all elements.
Return:
Return a Tensor with the total sum.
Example 1:
Let’s create a one-dimensional tensor in js that has integer values and return the total sum.
<html><!-- CDN Link that delivers the Tensorflow.js framework --><script src="https://cdn.jsdelivr.net/npm/@tensorflow/tfjs"></script><body><center><h1>Linux Hint</h1></center><center><h2>Tensorflow.js - tf.sum() </h2></center><script>let values = tf.tensor1d([34,56,78,90]);//actual tensor
document.write("Actual Tensor: ",values);
document.write("<br>");
document.write("<br>");//apply sum() on the above tensor
document.write("Total Sum:- "+tf.sum(values));</script></body></html>
Output:
![]() Working:
34+56+78+90 = 258.
Working:
34+56+78+90 = 258.
Example 2:
Let’s create a tensor that has 2 dimensions in js with 4 rows and 2 columns that has integer values and return sum across columns.
<html><!-- CDN Link that delivers the Tensorflow.js framework --><script src="https://cdn.jsdelivr.net/npm/@tensorflow/tfjs"></script><body><center><h1>Linux Hint</h1></center><center><h2>Tensorflow.js - tf.sum() </h2></center><script>let values = tf.tensor2d([34,56,78,90,1,0,3,4],[4,2]);//actual tensor
document.write("Actual Tensor: ",values);
document.write("<br>");
document.write("<br>");//apply sum() on the above tensor
document.write("Total Sum across columns:- "+tf.sum(values,0));</script></body></html>
Output:
![]() Working:
Tensor [[34, 56], [78, 90], [1 , 0 ], [3 , 4 ]]
=>34+78+1+0 = 11656+90+0+4=150.
Working:
Tensor [[34, 56], [78, 90], [1 , 0 ], [3 , 4 ]]
=>34+78+1+0 = 11656+90+0+4=150.
Example 3:
Let’s create a tensor that has 2 dimensions in js with 2 rows and 2 columns that has integer values and return sum across rows.
<html><!-- CDN Link that delivers the Tensorflow.js framework --><script src="https://cdn.jsdelivr.net/npm/@tensorflow/tfjs"></script><body><center><h1>Linux Hint</h1></center><center><h2>Tensorflow.js - tf.sum() </h2></center><script>let values = tf.tensor2d([[1,0],[3,4]]);//actual tensor
document.write("Actual Tensor: ",values);
document.write("<br>");
document.write("<br>");//apply sum() on the above tensor
document.write("Total Sum across rows:- "+tf.sum(values,1));</script></body></html>
Output:
![]() Working:
Tensor [[1, 0], [3, 4]]
=>1+0 = 13+4=7.
Working:
Tensor [[1, 0], [3, 4]]
=>1+0 = 13+4=7.
Example 4:
Let’s create a tensor that has 2 dimensions in js with 4 rows and 2 columns that have integer values and return the total sum in all rows and columns.
<html><!-- CDN Link that delivers the Tensorflow.js framework --><script src="https://cdn.jsdelivr.net/npm/@tensorflow/tfjs"></script><body><center><h1>Linux Hint</h1></center><center><h2>Tensorflow.js - tf.sum() </h2></center><script>let values = tf.tensor2d([34,56,78,90,1,0,3,4],[4,2]);//actual tensor
document.write("Actual Tensor: ",values);
document.write("<br>");
document.write("<br>");//apply sum() on the above tensor
document.write("Total Sum across rows and columns:- "+tf.sum(values));</script></body></html>
Output:
![]() Working:
Tensor [[34, 56], [78, 90], [1 , 0 ], [3 , 4 ]]
=>34+56+78+90+1+0+3+4=266.
Working:
Tensor [[34, 56], [78, 90], [1 , 0 ], [3 , 4 ]]
=>34+56+78+90+1+0+3+4=266.
Conclusion
In this Tensorflow.js tutorial, we have seen how to return the total sum of elements present in a tensor using the tf.sum() method.
In a 2D tensor, if axis=0, the total sum is returned column-wise, and if axis=1, the total sum is returned row-wise.
By default, it will return the sum of all elements across rows and columns.
Tensorflow.js – tf.reciprocal()
Tf.reciprocal() Function
The tf.reciprocal() function in tensorflow.js returns the reciprocal values for the given decimal values in a tensor.
Syntax:
tf.reciprocal(tensor_input)
Parameter:
Tensor_input is a tensor that has numeric elements.
It can be one or two-dimensional.
Computation:
1/x where x refers to each element in a tensor.
Example 1:
Let’s create a one-dimensional tensor in js that has decimal values and apply the reciprocal() function.
<html><!-- CDN Link that delivers the Tensorflow.js framework --><script src="https://cdn.jsdelivr.net/npm/@tensorflow/tfjs"></script><body><center><h1>Linux Hint</h1></center><center><h2>Tensorflow.js - tf.reciprocal() </h2></center><script>let values = tf.tensor1d([8.56,3.45,7.89,8.32,9.03,1.00,45.6]);//actual tensor
document.write("Actual Tensor: ",values);
document.write("<br>");
document.write("<br>");//apply reciprocal() on the above tensor
document.write("Tensor with Reciprocal values:- "+tf.reciprocal(values));</script></body></html>
Output:
![]() Working:
[1/8.56,1/3.45,1/7.89,1/8.32,1/9.03,1/1.00,1/45.6] => [0.1168224, 0.2898551, 0.1267427, 0.1201923, 0.110742, 1, 0.0219298]
Working:
[1/8.56,1/3.45,1/7.89,1/8.32,1/9.03,1/1.00,1/45.6] => [0.1168224, 0.2898551, 0.1267427, 0.1201923, 0.110742, 1, 0.0219298]
Example 2:
Let’s create a tensor that has two dimensions in js with 2 rows and 2 columns that has integer values and get the reciprocal values.
<html><!-- CDN Link that delivers the Tensorflow.js framework --><script src="https://cdn.jsdelivr.net/npm/@tensorflow/tfjs"></script><body><center><h1>Linux Hint</h1></center><center><h2>Tensorflow.js - tf.reciprocal() </h2></center><script>let values = tf.tensor2d([[3,4],[2,3]]);//actual tensor
document.write("Actual Tensor: ",values);
document.write("<br>");
document.write("<br>");//apply reciprocal() on the above tensor
document.write("Tensor with Reciprocal values:- "+tf.reciprocal(values));</script></body></html>
Output:
![]() Working:
[[1/3, 1/4], [1/2, 1/3]], => [[0.3333333, 0.25 ], [0.5 , 0.3333333]]
Working:
[[1/3, 1/4], [1/2, 1/3]], => [[0.3333333, 0.25 ], [0.5 , 0.3333333]]
Example 3:
Let’s create a tensor that has two dimensions in js with 2 rows and 2 columns that has exponent values and get the reciprocal values.
<html><!-- CDN Link that delivers the Tensorflow.js framework --><script src="https://cdn.jsdelivr.net/npm/@tensorflow/tfjs"></script><body><center><h1>Linux Hint</h1></center><center><h2>Tensorflow.js - tf.reciprocal() </h2></center><script>let values = tf.tensor2d([[Math.E,Math.E-1],[Math.E+1,Math.E*9]]);//actual tensor
document.write("Actual Tensor: ",values);
document.write("<br>");
document.write("<br>");//apply reciprocal() on the above tensor
document.write("Tensor with Reciprocal values:- "+tf.reciprocal(values));</script></body></html>
Output:
![]() Working:
[[1/2.7182817,1/ 1.7182819 ], [1/3.7182817, 1/24.4645367]] => [[0.3678795, 0.5819767], [0.2689414, 0.0408755]]
Working:
[[1/2.7182817,1/ 1.7182819 ], [1/3.7182817, 1/24.4645367]] => [[0.3678795, 0.5819767], [0.2689414, 0.0408755]]
Conclusion
In this Tensorflow.js tutorial, we learned how to get the reciprocal values using the tf.reciprocal() function with three different examples.
It computes with the formula – 1/x.
Tensorflow.js – tf.outerProduct()
The tf.outerProduct() in Tensorflow.js is used to return an outer product performed on two tensor objects.
Computation:
Each element in the first tensor is multiplied with all the elements in the second tensor.
Consider the tensors – [1,2,3] and [2,3,4]:
1* [2,3,4]=> [2, 3, 4 ]2* [2,3,4]=> [4, 6, 8 ]3* [2,3,4]=> [6, 9, 12]
Syntax:
tf.outerProduct(tensor1,tensor2)
Parameter:
Tensor1 is the first tensor with numeric values.
Tensor2 is the first tensor with numeric values.
Example 1:
Create two tensors with 4 elements each and return the outer product.
<html><!-- CDN Link that delivers the Tensorflow.js framework --><script src="https://cdn.jsdelivr.net/npm/@tensorflow/tfjs"></script><body><center><h2>Tensorflow.js - tf.outerProduct()</h2></center><script>//create two tensorslet tensor1 = tf.tensor1d([10,20,30,40]);let tensor2 = tf.tensor1d([1,2,3,4]);//actual tensor
document.write("<br>Actual Tensor-1:</br> ",tensor1);
document.write("<br>");
document.write("<br>Actual Tensor-2:</br> ",tensor2);
document.write("<br>");
document.write("<br>Outer Product:</br>
",tf.outerProduct(tensor1,tensor2));</script></body></html>
Output:
![]() Working:
Working:
| 1234
|
10* [1,2,3,4] => [10, 20, 30, 40 ]20* [1,2,3,4] => [20, 40, 60, 80 ]30* [1,2,3,4] => [30, 60, 90, 120]40* [1,2,3,4] => [40, 80, 120, 160].
|
Example 2:
Create two tensors with 8 elements each and return the outer product.
<html><!-- CDN Link that delivers the Tensorflow.js framework --><script src="https://cdn.jsdelivr.net/npm/@tensorflow/tfjs"></script><body><center><h2>Tensorflow.js - tf.outerProduct()</h2></center><script>//create two tensorslet tensor1 = tf.tensor1d([10,21,34,56,78,90,43,5]);let tensor2 = tf.tensor1d([0,-1,2,3,4,5,6,7]);//actual tensor
document.write("<br>Actual Tensor-1:</br> ",tensor1);
document.write("<br>");
document.write("<br>Actual Tensor-2:</br> ",tensor2);
document.write("<br>");
document.write("<br>Outer Product:</br>
",tf.outerProduct(tensor1,tensor2));</script></body></html>
Output:
![]() Working:
Working:
| 12345678
|
10 * [0, -1, 2, 3, 4, 5, 6, 7] => [0, -10, 20 , 30 , 40 , 50 , 60 , 70 ]21 * [0, -1, 2, 3, 4, 5, 6, 7] => [0, -21, 42 , 63 , 84 , 105, 126, 147]34 * [0, -1, 2, 3, 4, 5, 6, 7] => [0, -34, 68 , 102, 136, 170, 204, 238]56 * [0, -1, 2, 3, 4, 5, 6, 7] => [0, -56, 112, 168, 224, 280, 336, 392]78 * [0, -1, 2, 3, 4, 5, 6, 7] => [0, -78, 156, 234, 312, 390, 468, 546]90 * [0, -1, 2, 3, 4, 5, 6, 7] => [0, -90, 180, 270, 360, 450, 540, 630]43 * [0, -1, 2, 3, 4, 5, 6, 7] => [0, -43, 86 , 129, 172, 215, 258, 301]5 * [0, -1, 2, 3, 4, 5, 6, 7] => [0, -5 , 10 , 15 , 20 , 25 , 30 , 35 ]
|
Conclusion
In this Tensorflow.js tutorial, we learned how to perform the outer product operation on tensors using the tf.outerProduct() function.
Each element in the first tensor is multiplied with all the elements in the second tensor.
Make sure that both tensors have equal number of elements.
Otherwise, the computation is not performed.
Tensorflow.js – tf.min()
“tf.min() in tensorflow.js returns the minimum element from the set of elements.”
Syntax:
tf.min(tensor_input,axis)
Parameter:
1.
tensor_input is a tensor that has numeric elements.
It can be 1or 2 dimensional.
2.
If the tensor is two-dimensional, then it is possible to specify the axis to get minimum values in rows or columns.
If axis=0, minimum values are returned across column-wise, and If axis=1, minimum values are returned across row-wise.
If the axis is not specified, then it will return the minimum value among all elements.
Return
Return a Tensor with the minimum value/s.
Example 1:
Let’s create a one-dimensional tensor in js that has integer values and return average.
<html><!-- CDN Link that delivers the Tensorflow.js framework --><script src="https://cdn.jsdelivr.net/npm/@tensorflow/tfjs"></script><body><center><h2>Tensorflow.js - tf.min() </h2></center><script>let values = tf.tensor1d([34,56,78,90]);//actual tensor
document.write("Actual Tensor: ",values);
document.write("<br>");
document.write("<br>");//apply min() on the above tensor
document.write("Minimum value:- "+tf.min(values));</script></body></html>
Output:
![]() 34 is the minimum among all the elements.
34 is the minimum among all the elements.
Example 2:
Let’s create a tensor that has 2 dimensions with 4 rows and 2 columns that has integer values and return minimum values across columns.
<html><!-- CDN Link that delivers the Tensorflow.js framework --><script src="https://cdn.jsdelivr.net/npm/@tensorflow/tfjs"></script><body><center><h2>Tensorflow.js - tf.min() </h2></center><script>let values = tf.tensor2d([1,2,3,4,5,6,7,8],[4,2]);//actual tensor
document.write("Actual Tensor: ",values);
document.write("<br>");
document.write("<br>");//apply min() on the above tensor
document.write("Minimum values across columns:- "+tf.min(values,0));</script></body></html>
Output:
![]() Working:
Tensor [[1,2], [3,4], [5,6 ], [7,8 ]]
Minimum values among (1,3,5,7) is 1 and (2,4,6,8) is 2.
Working:
Tensor [[1,2], [3,4], [5,6 ], [7,8 ]]
Minimum values among (1,3,5,7) is 1 and (2,4,6,8) is 2.
Example 3:
Let’s create a tensor that has 2 dimensions in js with 4 rows and 2 columns that has integer values and return minimum values across rows.
<html><!-- CDN Link that delivers the Tensorflow.js framework --><script src="https://cdn.jsdelivr.net/npm/@tensorflow/tfjs"></script><body><center><h2>Tensorflow.js - tf.min() </h2></center><script>let values = tf.tensor2d([1,2,3,4,5,6,7,8],[4,2]);//actual tensor
document.write("Actual Tensor: ",values);
document.write("<br>");
document.write("<br>");//apply min() on the above tensor
document.write("Minimum values across rows:- "+tf.min(values,1));</script></body></html>
Output:
![]() Working:
Tensor [[1, 2], [3, 4], [5, 6], [7, 8]]
Minimum values among [1, 2] is 1, [3, 4] is 3, [5, 6] is 5 and [7, 8] is 7.
Working:
Tensor [[1, 2], [3, 4], [5, 6], [7, 8]]
Minimum values among [1, 2] is 1, [3, 4] is 3, [5, 6] is 5 and [7, 8] is 7.
Example 4:
Let’s create a tensor that has 2 dimensions in js with 4 rows and 2 columns that have integer values and return the minimum value.
<html><!-- CDN Link that delivers the Tensorflow.js framework --><script src="https://cdn.jsdelivr.net/npm/@tensorflow/tfjs"></script><body><center><h2>Tensorflow.js - tf.min() </h2></center><script>let values = tf.tensor2d([1,2,3,4,5,6,7,8],[4,2]);//actual tensor
document.write("Actual Tensor: ",values);
document.write("<br>");
document.write("<br>");//apply min() on the above tensor
document.write("Minimum value:- "+tf.min(values));</script></body></html>
Output:
![]() Working:
Tensor [[1, 2], [3, 4], [5, 6], [7, 8]]
The minimum value is 1.
Working:
Tensor [[1, 2], [3, 4], [5, 6], [7, 8]]
The minimum value is 1.
Conclusion
In this Tensorflow.js tutorial, we have seen how to return the minimum of elements present in a tensor using the tf.min() method.
In a 2D tensor, if axis=0, minimum values are returned across column-wise, and If axis=1, minimum values are returned across row-wise.
By default, it will return the minimum of all elements across rows and columns.
Tensorflow.js – tf.mean()
“tf.mean() in tensorflow.js returns the total average of elements.”
Syntax:
tf.mean(tensor_input,axis)
Parameter:
1.
tensor_input is a tensor that has numeric elements.
It can be 1or 2 dimensional.
2.
If the tensor is two-dimensional, then it is possible to specify the axis to get the average across rows or columns.
If axis=0, the total average is returned column-wise, and if axis=1, the total average is returned row-wise.
If the axis is not specified, then it will return the average of all elements.
Return
Return a Tensor with the average.
Example 1:
Let’s create a one-dimensional tensor in js that has integer values and return average.
<html><!-- CDN Link that delivers the Tensorflow.js framework --><script src="https://cdn.jsdelivr.net/npm/@tensorflow/tfjs"></script><body><center><h1>Linux Hint</h1></center><center><h2>Tensorflow.js - tf.mean() </h2></center><script>let values = tf.tensor1d([34,56,78,90]);//actual tensor
document.write("Actual Tensor: ",values);
document.write("<br>");
document.write("<br>");//apply mean() on the above tensor
document.write("Total Average:- "+tf.mean(values));</script></body></html>
Output:
![]() Working:
(34+56+78+90)/4 = 64.5
Working:
(34+56+78+90)/4 = 64.5
Example 2:
Let’s create a tensor that has 2 dimensions in js with 4 rows and 2 columns that has integer values and return average across columns.
<html><!-- CDN Link that delivers the Tensorflow.js framework --><script src="https://cdn.jsdelivr.net/npm/@tensorflow/tfjs"></script><body><center><h1>Linux Hint</h1></center><center><h2>Tensorflow.js - tf.mean() </h2></center><script>let values = tf.tensor2d([1,2,3,4,5,6,7,8],[4,2]);//actual tensor
document.write("Actual Tensor: ",values);
document.write("<br>");
document.write("<br>");//apply mean() on the above tensor
document.write("Total Average across columns:- "+tf.mean(values,0));</script></body></html>
Output:
![]() Working:
Tensor [[1,2], [3,4], [5,6 ], [7,8 ]]
=>(1+3+5+7)/4 => 16/4 = 4(2+4+6+8)/4 => 20/4 = 5
Working:
Tensor [[1,2], [3,4], [5,6 ], [7,8 ]]
=>(1+3+5+7)/4 => 16/4 = 4(2+4+6+8)/4 => 20/4 = 5
Example 3:
Let’s create a tensor that has 2 dimensions in js with 1 row and 2 columns that have integer values and return average across rows.
<html><!-- CDN Link that delivers the Tensorflow.js framework --><script src="https://cdn.jsdelivr.net/npm/@tensorflow/tfjs"></script><body><center><h1>Linux Hint</h1></center><center><h2>Tensorflow.js - tf.mean() </h2></center><script>let values = tf.tensor2d([[1],[3]]);//actual tensor
document.write("Actual Tensor: ",values);
document.write("<br>");
document.write("<br>");//apply mean() on the above tensor
document.write("Total Average across rows:- "+tf.mean(values,1));</script></body></html>
Output:
![]() Working:
Tensor [[1], [3]]
=>13.
Since there is only one element in each row, it itself returns.
Working:
Tensor [[1], [3]]
=>13.
Since there is only one element in each row, it itself returns.
Example 4:
Let’s create a tensor that has 2 dimensions in js with 4 rows and 2 columns that have integer values and return the total average in all rows and columns.
<html><!-- CDN Link that delivers the Tensorflow.js framework --><script src="https://cdn.jsdelivr.net/npm/@tensorflow/tfjs"></script><body><center><h1>Linux Hint</h1></center><center><h2>Tensorflow.js - tf.mean() </h2></center><script>let values = tf.tensor2d([34,56,78,90,1,0,3,4],[4,2]);//actual tensor
document.write("Actual Tensor: ",values);
document.write("<br>");
document.write("<br>");//apply mean() on the above tensor
document.write("Total Average across rows and columns:- "+tf.mean(values));</script></body></html>
Output:
![]() Working:
Tensor [[34, 56], [78, 90], [1, 0], [3, 4]]
=>(34+56+78+90+1+0+3+4)/8=33.25.
Working:
Tensor [[34, 56], [78, 90], [1, 0], [3, 4]]
=>(34+56+78+90+1+0+3+4)/8=33.25.
Conclusion
In this Tensorflow.js tutorial, we have seen how to return the total average of elements present in a tensor using the tf.mean() method.
In a 2D tensor, if axis=0, the total average is returned column-wise, and If axis=1, the total average is returned row-wise.
By default, it will return the average of all elements across rows and columns.
Tensorflow.js – tf.max()
“tf.max() in tensorflow.js returns the maximum element from the set of elements.”
Syntax:
tf.max(tensor_input,axis)
Parameter:
1.
tensor_input is a tensor that has numeric elements.
It can be 1or 2 dimensional.
2.
If the tensor is two-dimensional, then it is possible to specify the axis to get maximum values in rows or columns.
If axis=0, maximum values are returned across column-wise, and if axis=1, maximum values are returned across row-wise.
If the axis is not specified, then it will return the maximum value among all elements.
Return
Return a Tensor with the maximum value/s.
Example 1:
Let’s create a one-dimensional tensor in js that has integer values and return maximum.
<html><!-- CDN Link that delivers the Tensorflow.js framework --><script src="https://cdn.jsdelivr.net/npm/@tensorflow/tfjs"></script><body><center><h2>Tensorflow.js - tf.max() </h2></center><script>let values = tf.tensor1d([34,56,78,90]);//actual tensor
document.write("Actual Tensor: ",values);
document.write("<br>");
document.write("<br>");//apply max() on the above tensor
document.write("Maximum value:- "+tf.max(values));</script></body></html>
Output:
![]() 90 is the maximum among all the elements.
90 is the maximum among all the elements.
Example 2:
Let’s create a tensor that has 2 dimensions with 4 rows and 2 columns that has integer values and return maximum values across columns.
<html><!-- CDN Link that delivers the Tensorflow.js framework --><script src="https://cdn.jsdelivr.net/npm/@tensorflow/tfjs"></script><body><center><h2>Tensorflow.js - tf.max() </h2></center><script>let values = tf.tensor2d([1,2,3,4,5,6,7,8],[4,2]);//actual tensor
document.write("Actual Tensor: ",values);
document.write("<br>");
document.write("<br>");//apply max() on the above tensor
document.write("Maximum values across columns:- "+tf.max(values,0));</script></body></html>
Output:
![]() Working:
Tensor [[1,2], [3,4], [5,6 ], [7,8 ]]
Maximum values among (1,3,5,7) is 7 and (2,4,6,8) is 8.
Working:
Tensor [[1,2], [3,4], [5,6 ], [7,8 ]]
Maximum values among (1,3,5,7) is 7 and (2,4,6,8) is 8.
Example 3:
Let’s create a tensor that has 2 dimensions in js with 4 rows and 2 columns that has integer values and return maximum values across rows.
<html><!-- CDN Link that delivers the Tensorflow.js framework --><script src="https://cdn.jsdelivr.net/npm/@tensorflow/tfjs"></script><body><center><h2>Tensorflow.js - tf.max() </h2></center><script>let values = tf.tensor2d([1,2,3,4,5,6,7,8],[4,2]);//actual tensor
document.write("Actual Tensor: ",values);
document.write("<br>");
document.write("<br>");//apply max() on the above tensor
document.write("Maximum values across rows:- "+tf.max(values,1));</script></body></html>
Output:
![]() Working:
Tensor [[1, 2], [3, 4], [5, 6], [7, 8]]
Maximum values among [1, 2] is 2, [3, 4] is 4, [5, 6] is 6 and [7, 8] is 8.
Working:
Tensor [[1, 2], [3, 4], [5, 6], [7, 8]]
Maximum values among [1, 2] is 2, [3, 4] is 4, [5, 6] is 6 and [7, 8] is 8.
Example 4:
Let’s create a tensor that has 2 dimensions in js with 4 rows and 2 columns that have integer values and return the maximum value.
<html><!-- CDN Link that delivers the Tensorflow.js framework --><script src="https://cdn.jsdelivr.net/npm/@tensorflow/tfjs"></script><body><center><h2>Tensorflow.js - tf.max() </h2></center><script>let values = tf.tensor2d([1,2,3,4,5,6,7,8],[4,2]);//actual tensor
document.write("Actual Tensor: ",values);
document.write("<br>");
document.write("<br>");//apply max() on the above tensor
document.write("Maximum value:- "+tf.max(values));</script></body></html>
Output:
![]() Working:
Tensor [[1,2], [3,4], [5,6 ], [7,8 ]]
The maximum value is 8.
Working:
Tensor [[1,2], [3,4], [5,6 ], [7,8 ]]
The maximum value is 8.
Conclusion
In this Tensorflow.js tutorial, we have seen how to return the maximum of elements present in a tensor using the tf.max() method.
In a 2D tensor, if axis=0, maximum values are returned across column-wise, and If axis=1, maximum values are returned across row-wise.
By default, it will return the maximum of all elements across rows and columns.
Tensorflow.js – tf.equal()
“In Machine Learning using Tensorflow.js, if you want to compare two data points or two attributes in a dataset, then tf.equal() method is used.
In this article, we will see how to check if each value in two tensors/scalars is equal or not using the tf.equal() method.”
tf.equal()
tf.equal() returns true if both the elements are equal; otherwise, false is returned.
It takes two tensors as parameters that have the same number of values; otherwise, an error is thrown.
Scalar will store only one value.
But anyway, it returns a tensor.
Syntax:
tf.equal(tensor1,tensor2)
tf.equal(scalar1,scalar2)
It is also possible to implement the equal() method, as shown below.
Syntax:
tensor1.equal(tensor2)
scalar1.equal(scalar2)
Parameter:
tensor1 and tensor2 are the tensors that can be single or multi-dimensional.
scalar1 and scalar2 are the tensors that can take only one value as a parameter.
Return
Return a Boolean Tensor.
Example 1:
Create two one-dimensional tensors with integer elements and apply tf.equal() to check if the elements are the same or not.
<html><!-- CDN Link that delivers the Tensorflow.js framework --><script src="https://cdn.jsdelivr.net/npm/@tensorflow/tfjs"></script><body><script>//tensor1let values1 = tf.tensor1d([34,12,34,11,10,34]);//tensor2let values2 = tf.tensor1d([34,12,2,3,10,23]);
document.write("Tensor-1: ",values1);
document.write("<br>");
document.write("<br>");
document.write("Tensor-2: ",values2);</script>
;<h3>Tensorflow.js - tf.equal(tensor1,tensor2) </h3><<script>//tf.equal(values1,values2)
document.write("Are the elements Equal ?");
document.write("<br>");
document.write(tf.equal(values1,values2));</script>
;<h3>Tensorflow.js - tensor1.equal(tensor2) </h3><<script>//values1.equal(values2)
document.write("Are the elements Equal ?");
document.write("<br>");
document.write(values1.equal(values2));</script></body></html>
Output:
![]() Working:
Tensor-1: Tensor [34, 12, 34, 11, 10, 34]
Tensor-2: Tensor [34, 12, 2, 3, 10, 23]
Element-wise comparison:
34==34 - true12==12 - false34==2 - false11==3 - false10==10 - true34==23 - false
Working:
Tensor-1: Tensor [34, 12, 34, 11, 10, 34]
Tensor-2: Tensor [34, 12, 2, 3, 10, 23]
Element-wise comparison:
34==34 - true12==12 - false34==2 - false11==3 - false10==10 - true34==23 - false
Example 2:
Create two values using scalar() and apply tf.equal() to check if the values are the same or not.
<html><!-- CDN Link that delivers the Tensorflow.js framework --><script src="https://cdn.jsdelivr.net/npm/@tensorflow/tfjs"></script><body><script>//scalar1let value1 = tf.scalar(34);//scalar2let value2 = tf.scalar(23);
document.write("Scalar-1: ",value1);
document.write("<br>");
document.write("<br>");
document.write("Scalar-2: ",value2);</script>
;<h3>Tensorflow.js - tf.equal(scalar1,scalar2) </h3><<script>//tf.equal(value1,value2)
document.write("Is the element Equal ?");
document.write("<br>");
document.write(tf.equal(value1,value2));</script>
;<h3>Tensorflow.js - scalar1.equal(scalar2) </h3><<script>//value1.equal(value2)
document.write("Is the element Equal ?");
document.write("<br>");
document.write(value1.equal(value2));</script></body></html>
Output:
![]() 34 is not equal to 23.
So It returned false.
34 is not equal to 23.
So It returned false.
Example 3:
Create 2 two-dimensional tensors with 2 rows and 2 columns and apply tf.equal() to check if the elements are the same or not.
<html><!-- CDN Link that delivers the Tensorflow.js framework --><script src="https://cdn.jsdelivr.net/npm/@tensorflow/tfjs"></script><body><script>//tensor1let values1 = tf.tensor2d([90,56,78,12],[2,2]);//tensor2let values2 = tf.tensor2d([90,56,34,45],[2,2]);
document.write("Tensor-1: ",values1);
document.write("<br>");
document.write("<br>");
document.write("Tensor-2: ",values2);</script>
;<h3>Tensorflow.js - tf.equal(tensor1,tensor2) </h3><<script>//tf.equal(values1,values2)
document.write("Are the elements Equal ?");
document.write("<br>");
document.write(tf.equal(values1,values2));</script>
;<h3>Tensorflow.js - tensor1.equal(tensor2) </h3><<script>//values1.equal(values2)
document.write("Are the elements Equal ?");
document.write("<br>");
document.write(values1.equal(values2));</script></body></html>
Output:
![]() Working:
Tensor-1: Tensor [[90, 56], [78, 12]]
Tensor-2: Tensor [[90, 56], [34, 45]]
Element-wise comparison:
Working:
Tensor-1: Tensor [[90, 56], [78, 12]]
Tensor-2: Tensor [[90, 56], [34, 45]]
Element-wise comparison:
| 1234
|
90==90 - TRUE56==56 - TRUE78==34 - FALSE12==45 - FALSE
|
Conclusion
tf.equal() in Tensorflow.js is used to compare the elements that return true; if both the elements are equal, otherwise false is returned.
It is also possible to implement the equal() method in two ways.
We discussed three different examples, using tensors in one and two dimensions and scalars.
Tensorflow.js – tf.cumsum()
“tf.cumsum() in tensorflow.js returns the cumulative sum of elements present in a tensor.”
Syntax:
tf.cumsum(tensor_input,axis)
Parameter:
1.
tensor_input is a tensor that has numeric elements.
It can be 1or 2 dimensional.
2.
If the tensor is two-dimensional, then it is possible to specify the axis to get a cumulative product of values in rows or columns.
If axis=0, the cumulative sum of values is returned column-wise, and if axis=1, the cumulative sum of values is returned row-wise.
If the axis is not specified, then it will return the cumulative sum across each column.
Return
Return a Tensor with the cumulative sum of values.
Example 1:
Let’s create a one-dimensional tensor in js that has integer values and return the cumulative sum.
<html><!-- CDN Link that delivers the Tensorflow.js framework --><script src="https://cdn.jsdelivr.net/npm/@tensorflow/tfjs"></script><body><center><h2>Tensorflow.js - tf.cumsum() </h2></center><script>let values = tf.tensor1d([34,56,78,90]);//actual tensor
document.write("Actual Tensor: ",values);
document.write("<br>");
document.write("<br>");//apply cumcum() on the above tensor
document.write("Cumulative Sum:- "+tf.cumsum(values));</script></body></html>
Output:
![]() Working:
Working:
| 1234
|
3434+56=9034+56+78=16834+56+78+90=258
|
Example 2:
Let’s create a tensor that has 2 dimensions with 3 rows and 2 columns that has integer values and return the cumulative sum of values across columns.
<html><!-- CDN Link that delivers the Tensorflow.js framework --><script src="https://cdn.jsdelivr.net/npm/@tensorflow/tfjs"></script><body><center><h2>Tensorflow.js - tf.cumsum() </h2></center><script>let values = tf.tensor2d([1,2,3,4,5,6],[3,2]);//actual tensor
document.write("Actual Tensor: ",values);
document.write("<br>");
document.write("<br>");//apply cumsum() on the above tensor
document.write("Cumulative sum across columns:- "+tf.cumsum(values,0));</script></body></html>
Output:
![]() Working:
Tensor [[1, 2], [3, 4], [5, 6]]
Column values:-
Column 1: [1,1+3,1+3+5]=>[1,4,9]
Column 1: [2,2+4,2+4+6]=>[2,6,12]
Working:
Tensor [[1, 2], [3, 4], [5, 6]]
Column values:-
Column 1: [1,1+3,1+3+5]=>[1,4,9]
Column 1: [2,2+4,2+4+6]=>[2,6,12]
Example 3:
Let’s create a tensor that has 2 dimensions in js with 4 rows and 2 columns that has integer values and return the cumulative sum of values across rows.
<html><!-- CDN Link that delivers the Tensorflow.js framework --><script src="https://cdn.jsdelivr.net/npm/@tensorflow/tfjs"></script><body><center><h2>Tensorflow.js - tf.cumsum() </h2></center><script>let values = tf.tensor2d([1,2,3,4,5,6,7,8],[4,2]);//actual tensor
document.write("Actual Tensor: ",values);
document.write("<br>");
document.write("<br>");//apply cumsum() on the above tensor
document.write("Cumulative Sum of values across rows:- "+tf.cumsum(values,1));</script></body></html>
Output:
![]() Working:
Tensor [[1, 2], [3, 4], [5, 6], [7, 8]]
Row values:-
Working:
Tensor [[1, 2], [3, 4], [5, 6], [7, 8]]
Row values:-
| 1234
|
1,1+2 => [1, 3 ]3,3+4 => [3, 7 ]5,5+6 => [5, 11]7,7+8 => [7, 15]
|
Example 4:
Let’s create a tensor that has 2 dimensions in js with 4 rows and 2 columns that have integer values and return the cumulative sum.
<html><!-- CDN Link that delivers the Tensorflow.js framework --><script src="https://cdn.jsdelivr.net/npm/@tensorflow/tfjs"></script><body><center><h2>Tensorflow.js - tf.cumsum() </h2></center><script>let values = tf.tensor2d([1,2,3,4,5,6,7,8],[4,2]);//actual tensor
document.write("Actual Tensor: ",values);
document.write("<br>");
document.write("<br>");//apply cumsum() on the above tensor
document.write("Cumulative Sum of values:- "+tf.cumsum(values));</script></body></html>
Output:
![]() Working:
Tensor [[1, 2], [3, 4], [5, 6], [7, 8]]
Column values:-
Column 1: [1,1+3,1+3+5,1+3+5+7]=>[1,4,9,16]
Column 1: [2,2+4,2+4+6,2+4+6+8]=>[2,6,12,20]
Working:
Tensor [[1, 2], [3, 4], [5, 6], [7, 8]]
Column values:-
Column 1: [1,1+3,1+3+5,1+3+5+7]=>[1,4,9,16]
Column 1: [2,2+4,2+4+6,2+4+6+8]=>[2,6,12,20]
Conclusion
In this Tensorflow.js tutorial, we have seen how to return the cumulative sum of elements present in a tensor using the tf.cumsum() method.
In a 2D tensor, If axis=0, the cumulative sum of values is returned column-wise, and if axis=1, the cumulative sum of values is returned across row-wise.
By default, it will return the cumulative sum across each column.
Tensorflow.js – tf.cumprod()
“tf.cumprod() in tensorflow.js returns the cumulative product of elements present in a tensor.”
Syntax:
tf.cumprod(tensor_input,axis)
Parameter:
1.
tensor_input is a tensor that has numeric elements.
It can be 1or 2 dimensional.
2.
If the tensor is two-dimensional, then it is possible to specify the axis to get a cumulative product of values in rows or columns.
If axis=0, a cumulative product of values is returned across column-wise, and if axis=1, a cumulative product of values is returned across row-wise.
If the axis is not specified, then it will return the cumulative product across each column.
Return
Return a Tensor with the cumulative product of values.
Example 1:
Let’s create a one-dimensional tensor in js that has integer values and return the cumulative product.
<html><!-- CDN Link that delivers the Tensorflow.js framework --><script src="https://cdn.jsdelivr.net/npm/@tensorflow/tfjs"></script><body><center><h2>Tensorflow.js - tf.cumprod() </h2></center><script>let values = tf.tensor1d([34,56,78,90]);//actual tensor
document.write("Actual Tensor: ",values);
document.write("<br>");
document.write("<br>");//apply cumprod() on the above tensor
document.write("Cumulative Product:- "+tf.cumprod(values));</script></body></html>
Output:
![]() Working:
Working:
| 1234
|
3434*56=190434*56*78=14851234*56*78*90=13366080
|
Example 2:
Let’s create a tensor that has 2 dimensions with 3 rows and 2 columns that has integer values and return the cumulative product of values across columns.
<html><!-- CDN Link that delivers the Tensorflow.js framework --><script src="https://cdn.jsdelivr.net/npm/@tensorflow/tfjs"></script><body><center><h2>Tensorflow.js - tf.cumprod() </h2></center><script>let values = tf.tensor2d([1,2,3,4,5,6],[3,2]);//actual tensor
document.write("Actual Tensor: ",values);
document.write("<br>");
document.write("<br>");//apply cumprod() on the above tensor
document.write("Cumulative Product across columns:- "+tf.cumprod(values,0));</script></body></html>
Output:
![]() Working:
Tensor [[1, 2], [3, 4], [5, 6]]
Column values:-
Column 1: [1,1*3,1*3*5]=>[1,3,15]
Column 1: [2,2*4,2*4*6]=>[2,8,48]
Working:
Tensor [[1, 2], [3, 4], [5, 6]]
Column values:-
Column 1: [1,1*3,1*3*5]=>[1,3,15]
Column 1: [2,2*4,2*4*6]=>[2,8,48]
Example 3:
Let’s create a tensor that has 2 dimensions in js with 4 rows and 2 columns that has integer values and return the cumulative product of values across rows.
<html><!-- CDN Link that delivers the Tensorflow.js framework --><script src="https://cdn.jsdelivr.net/npm/@tensorflow/tfjs"></script><body><center><h2>Tensorflow.js - tf.cumprod() </h2></center><script>let values = tf.tensor2d([1,2,3,4,5,6,7,8],[4,2]);//actual tensor
document.write("Actual Tensor: ",values);
document.write("<br>");
document.write("<br>");//apply cumprod() on the above tensor
document.write("Cumulative Product of values across rows:- "+tf.cumprod(values,1));</script></body></html>
Output:
![]() Working:
Tensor [[1, 2], [3, 4], [5, 6], [7, 8]]
Row values:-
Working:
Tensor [[1, 2], [3, 4], [5, 6], [7, 8]]
Row values:-
| 1234
|
1,1*2 => [1, 2 ]3,3*4 => [3, 12 ]5,5*6 => [5, 30]7,7*8 => [7, 56]
|
Example 4:
Let’s create a tensor that has 2 dimensions in js with 4 rows and 2 columns that have integer values and return the cumulative product.
<html><!-- CDN Link that delivers the Tensorflow.js framework --><script src="https://cdn.jsdelivr.net/npm/@tensorflow/tfjs"></script><body><center><h2>Tensorflow.js - tf.cumprod() </h2></center><script>let values = tf.tensor2d([1,2,3,4,5,6,7,8],[4,2]);//actual tensor
document.write("Actual Tensor: ",values);
document.write("<br>");
document.write("<br>");//apply cumprod() on the above tensor
document.write("Cumulative Product of values:- "+tf.cumprod(values));</script></body></html>
Output:
![]() Working:
Tensor [[1, 2], [3, 4], [5, 6], [7, 8]]
Column values:-
Column 1: [1,1*3,1*3*5,1*3,1*3*5*7]=>[1,3,15,105]
Column 1: [2,2*4,2*4*6,2*4*6*8]=>[2,8,48,384]
Working:
Tensor [[1, 2], [3, 4], [5, 6], [7, 8]]
Column values:-
Column 1: [1,1*3,1*3*5,1*3,1*3*5*7]=>[1,3,15,105]
Column 1: [2,2*4,2*4*6,2*4*6*8]=>[2,8,48,384]
Conclusion
In this Tensorflow.js tutorial, we have seen how to return the cumulative product of elements present in a tensor using the tf.cumprod() method.
In a 2D tensor, if axis=0, a cumulative product of values is returned column-wise, and if axis=1, a cumulative product of values is returned across row-wise.
By default, it will return the cumulative product across each column.
Tensorflow.js – tf.argMin()
“tf.argMin() in tensorflow.js returns the index of the minimum element from the set of elements in a tensor.
If the tensor is two-dimensional, then it can be possible to return an index of minimum values across rows and columns.”
In a tensor, the index starts with 0.
Syntax:
tf.argMin(tensor_input,axis)
Parameter:
1.
tensor_input is a tensor that has numeric elements.
It can be 1or 2 dimensional.
2.
If the tensor is two-dimensional, then it is possible to specify the axis to get an index of minimum values in rows or columns.
If axis=0, the index of minimum values is returned across column-wise, and if axis=1, the index of minimum values is returned across row-wise.
If the axis is not specified, then it will return the index of minimum values column-wise.
Return
Return a Tensor with the minimum value indices.
Example 1:
Let’s create a one-dimensional tensor in js that has integer values and return a minimum value index.
<html><!-- CDN Link that delivers the Tensorflow.js framework --><script src="https://cdn.jsdelivr.net/npm/@tensorflow/tfjs"></script><body><center><h2>Tensorflow.js - tf.argMin() </h2></center><script>let values = tf.tensor1d([34,56,78,90]);//actual tensor
document.write("Actual Tensor: ",values);
document.write("<br>");
document.write("<br>");//apply argMin() on the above tensor
document.write("Minimum value Position:- "+tf.argMin(values));</script></body></html>
Output:
![]() 34 is the minimum among all the elements, and it is present in the 1st position.
An index is 0.
So 0 is returned.
34 is the minimum among all the elements, and it is present in the 1st position.
An index is 0.
So 0 is returned.
Example 2:
Let’s create a tensor that has 2 dimensions with 4 rows and 2 columns that has integer values and return minimum value indices across columns.
<html><!-- CDN Link that delivers the Tensorflow.js framework --><script src="https://cdn.jsdelivr.net/npm/@tensorflow/tfjs"></script><body><center><h2>Tensorflow.js - tf.argMin() </h2></center><script>let values = tf.tensor2d([10,13,15,6,67,5,10,2],[4,2]);//actual tensor
document.write("Actual Tensor: ",values);
document.write("<br>");
document.write("<br>");//apply argMin() on the above tensor
document.write("Minimum value Positions across columns:- "+tf.argMin(values,0));</script></body></html>
Output:
![]() Working:
Tensor Tensor [[10, 13], [15, 6 ], [67, 5 ], [10, 2 ]]
Minimum value among (10,15,67,10) is 10 and (13,6,5,2) is 2.
Index positions of 10 and 2 are 0 and 3.
Working:
Tensor Tensor [[10, 13], [15, 6 ], [67, 5 ], [10, 2 ]]
Minimum value among (10,15,67,10) is 10 and (13,6,5,2) is 2.
Index positions of 10 and 2 are 0 and 3.
Example 3:
Let’s create a tensor that has 2 dimensions in js with 4 rows and 2 columns that has integer values and return minimum value indices across rows.
<html><!-- CDN Link that delivers the Tensorflow.js framework --><script src="https://cdn.jsdelivr.net/npm/@tensorflow/tfjs"></script><body><center><h2>Tensorflow.js - tf.argMin() </h2></center><script>let values = tf.tensor2d([10,13,15,6,67,5,10,2],[4,2]);//actual tensor
document.write("Actual Tensor: ",values);
document.write("<br>");
document.write("<br>");//apply argMin() on the above tensor
document.write("Minimum value Positions across rows:- "+tf.argMin(values,1));</script></body></html>
Output:
![]() Working:
[[10, 13], [15, 6 ], [67, 5 ], [10, 2 ]]
Minimum values among [10,13] is 10, [15, 6] is 6, [67, 5] is 5 and [10, 2 ] is 2.
Index positions of the above minimum values are – 0,1,1,1.
Working:
[[10, 13], [15, 6 ], [67, 5 ], [10, 2 ]]
Minimum values among [10,13] is 10, [15, 6] is 6, [67, 5] is 5 and [10, 2 ] is 2.
Index positions of the above minimum values are – 0,1,1,1.
Example 4:
Let’s create a tensor that has 2 dimensions in js with 4 rows and 2 columns that have integer values and return the indices of the minimum values.
<html><!-- CDN Link that delivers the Tensorflow.js framework --><script src="https://cdn.jsdelivr.net/npm/@tensorflow/tfjs"></script><body><center><h2>Tensorflow.js - tf.argMin() </h2></center><script>let values = tf.tensor2d([1,2,3,4,5,6,7,8],[4,2]);//actual tensor
document.write("Actual Tensor: ",values);
document.write("<br>");
document.write("<br>");//apply argMin() on the above tensor
document.write("Minimum value index:- "+tf.argMin(values));</script></body></html>
Output:
![]() Working:
Tensor [[1,2], [3,4], [5,6 ], [7,8 ]]
Minimum value in the [1,3,5,7] column is 1, and its index is 0.
Minimum value in the [2,4,6,8] column is 2, and its index is 0.
Working:
Tensor [[1,2], [3,4], [5,6 ], [7,8 ]]
Minimum value in the [1,3,5,7] column is 1, and its index is 0.
Minimum value in the [2,4,6,8] column is 2, and its index is 0.
Conclusion
In this Tensorflow.js tutorial, we have seen how to return the index of minimum elements present in a tensor using the tf.argMin() method.
In a 2D tensor, if axis=0, the index of minimum values is returned column-wise, and if axis=1, the index of minimum values is returned across row-wise.
By default, it will return the index of minimum values column-wise.
JavaScript Map forEach() Method
The Map forEach() method is used to go through a map’s items and execute a function for every item in the map.
An item in the map is nothing but a key-value pair.
From this, it is easy to conclude that forEach() runs a function for every key-value pair.
The forEach() method is applied to a map variable with the help of a dot operator.
First, observe the syntax of the forEach() method.
Syntax of forEach() method
The syntax of the forEach() method is given as :
mapVar.forEach(callbackFunction, key, value, this)
mapVar: The map variable on which the forEach() is applied
callbackFunction: The callback function to be executed for every entry inside the map
key: The key of the key-value pairs inside the map variable for the call back function to use
value: The value of the key-value pairs inside the map variable for the call back function to use
this: It is used to set the “this” reference for the callback function
Return Value
The return value of the forEach() method is always undefined
Example 1: Printing the keys values of the map on the terminal
To demonstrate the working of the forEach() method, first create a new map by using the following lines of code
let mapVar = new Map();
mapVar.set("Paris", 1);
mapVar.set("Rome", 2);
mapVar.set("London", 3);
mapVar.set("Rio", 4);
In the code mentioned above, a map was created using the first line and then mapVar.set() function populated the map with key and value pairs.
After that, simply apply the forEach() method on the mapVar and print out the key-value pairs onto the terminal using the following line of code
mapVar.forEach((keys, values) => {
console.log("\n" + keys + " " + values);});
After that, simply execute the code and observe the following output onto the terminal
![]() The keys and the respective values were printed onto the terminal.
The keys and the respective values were printed onto the terminal.
Example 2: Filter a specific value from the forEach() callback function.
The user can easily apply a filter to the key-value pair inside the forEach() method to stop the execution of the call-back function for a specific key or value.
For this, simply wrap the statements of the callback function with the if condition.
Create a map using the same lines of code as the previous example
let mapVar = new Map();
mapVar.set("Paris", 1);
mapVar.set("Rome", 2);
mapVar.set("London", 3);
mapVar.set("Rio", 4);
After that, apply the forEach() function onto the mapVar using the following lines of code
mapVar.forEach((keys, values) => {
//Coming lines will be places here});
After that, inside the callback function, use an if-condition to filter the value Paris from the output and print all other values onto the terminal
if (values !== "Paris") {
console.log("\n" + keys + " " + values);
}
The whole code snippet for applying the forEach() method will look like this
mapVar.forEach((keys, values) => {
if (values !== "Paris") {
console.log("\n" + keys + " " + values);
}});
Executing this program, will yield the following output on the terminal
![]() It is clear from the output, that the “Paris” value was excluded or filtered out from the output.
It is clear from the output, that the “Paris” value was excluded or filtered out from the output.
Example 3: Checking the return value of the forEach() method
For this, simply take a map from the previous example like
let mapVar = new Map();
mapVar.set("Paris", 1);
mapVar.set("Rome", 2);
mapVar.set("London", 3);
mapVar.set("Rio", 4);
After that, apply the forEach() method to the mapVar assign the whole statement to a new variable
var resultValue = mapVar.forEach((keys, values) => {
console.log(keys, values);});
After this, print out the value inside the resultValue variable by using the console log function
console.log("\nThe return value from forEach() is as : " + resultValue);
Execute the program and observe the output as
![]() It is crystal clear from the result on the terminal that the forEach() method returns undefined
It is crystal clear from the result on the terminal that the forEach() method returns undefined
Conclusion
The Map forEach() method goes through every key-pair value pair in a map variable and executes a callback function for every key-value pair.
With the help of if-else statements, a check can be applied to not perform a function upon encountering a specific value or key.
To use the forEach() method, you need to apply it to a map object by using a dot operator.
And after its complete execution, it returns an undefined value to the caller (if there is one).
How to Return Square and Squareroots in Tensorflow.js
In this Tensorflow.js tutorial, we will see how to return the square and square roots of values present in a tensor/scalar.
Scalar is also a tensor but it stores only one value.
Tf.square() Function
This function returns a square of the given values in a tensor/scalar.
Computation:
x*x => x refers to an element in a tensor/scalar.
Syntax:tf.square(tensor)
Parameter:
It takes tensor/scalar as a parameter.
Example 1:
We get the squares of the numbers in a tensor with five integers.
<html><!-- CDN Link that delivers the Tensorflow.js framework --><script src="https://cdn.jsdelivr.net/npm/@tensorflow/tfjs"></script>
<body><center><h1>Linux Hint</h1></center><center><h2>Tensorflow.js - tf.square() </h2></center><script>
let values = tf.tensor1d([2,3,4,5,6]);//actual tensor
document.write("Actual Tensor: ",values);
document.write("<br>");
document.write("<br>");
//apply square() on the above tensor
document.write("Square values:- "+tf.square(values));</script>
</body></html>
Output:
![]() [2*2, 3*3, 4*4, 5*5, 6*6] => [4, 9, 16, 25, 36]
Example 2:
We get the square of the number that is stored in a scalar.
<html><!-- CDN Link that delivers the Tensorflow.js framework --><script src="https://cdn.jsdelivr.net/npm/@tensorflow/tfjs"></script>
<body><center><h1>Linux Hint</h1></center><center><h2>Tensorflow.js - tf.square() </h2></center><script>
let value = tf.scalar(20);//actual Scalar
document.write("Actual Scalar: ",value);
document.write("<br>");
document.write("<br>");
//apply square() on the above Scalar
document.write("Square value:- "+tf.square(value));</script>
</body></html>
Output:
[2*2, 3*3, 4*4, 5*5, 6*6] => [4, 9, 16, 25, 36]
Example 2:
We get the square of the number that is stored in a scalar.
<html><!-- CDN Link that delivers the Tensorflow.js framework --><script src="https://cdn.jsdelivr.net/npm/@tensorflow/tfjs"></script>
<body><center><h1>Linux Hint</h1></center><center><h2>Tensorflow.js - tf.square() </h2></center><script>
let value = tf.scalar(20);//actual Scalar
document.write("Actual Scalar: ",value);
document.write("<br>");
document.write("<br>");
//apply square() on the above Scalar
document.write("Square value:- "+tf.square(value));</script>
</body></html>
Output:
![]() 20*20 = 400.
20*20 = 400.
Tf.sqrt() Function
This function returns the square roots from the given values in a tensor/scalar.
Computation:
√ x => x refers to an element in a tensor/scalar.
Syntax:tf.sqrt(tensor)
Parameter:
It takes tensor/scalar as a parameter.
Example 1:
We get the square roots of the numbers in a tensor with five integers.
<html><!-- CDN Link that delivers the Tensorflow.js framework --><script src="https://cdn.jsdelivr.net/npm/@tensorflow/tfjs"></script>
<body><center><h1>Linux Hint</h1></center><center><h2>Tensorflow.js - tf.sqrt() </h2></center><script>
let values = tf.tensor1d([4,9,16,400,100]);//actual tensor
document.write("Actual Tensor: ",values);
document.write("<br>");
document.write("<br>");
//apply sqrt() on the above tensor
document.write("Squareroot values:- "+tf.sqrt(values));</script>
</body></html>
Output:
![]() [√4, √9, √16, √400, √100] => [2, 3, 4, 20, 10]
Example 2:
We get the square root of the number that is stored in a scalar.
<html><!-- CDN Link that delivers the Tensorflow.js framework --><script src="https://cdn.jsdelivr.net/npm/@tensorflow/tfjs"></script>
<body><center><h1>Linux Hint</h1></center><center><h2>Tensorflow.js - tf.sqrt() </h2></center><script>
let value = tf.scalar(400);//actual Scalar
document.write("Actual Scalar: ",value);
document.write("<br>");
document.write("<br>");
//apply sqrt() on the above Scalar
document.write("Squareroot:- "+tf.sqrt(value));</script>
</body></html>
Output:
[√4, √9, √16, √400, √100] => [2, 3, 4, 20, 10]
Example 2:
We get the square root of the number that is stored in a scalar.
<html><!-- CDN Link that delivers the Tensorflow.js framework --><script src="https://cdn.jsdelivr.net/npm/@tensorflow/tfjs"></script>
<body><center><h1>Linux Hint</h1></center><center><h2>Tensorflow.js - tf.sqrt() </h2></center><script>
let value = tf.scalar(400);//actual Scalar
document.write("Actual Scalar: ",value);
document.write("<br>");
document.write("<br>");
//apply sqrt() on the above Scalar
document.write("Squareroot:- "+tf.sqrt(value));</script>
</body></html>
Output:
![]() √400 =20
√400 =20
Conclusion
In this article, we learned how to return the square and square roots in Tensorflow.js.
The tf.square() returns the square root by taking tensor or scalar as a parameter and tf.sqrt() returns the square roots from the values in a given tensor or scalar.
Make sure to specify the CDN link that delivers the Tensorflow.js library while using the HTML in Tensorflow.js.
How to Run a Function When the Page is Loaded?
To execute a JavaScript function when a web page has been completely loaded is rather easy.
There are multiple ways of achieving this task, some of which include adding lines in the HTML element tags, and some include using DOM functions and state variables in our script code snippet.
This article will use the following methods to achieve the task at hand:
Using onload event on the windows interface variable
Putting an onload attribute inside the <body> tag
Defining a custom event listener on the window interface variable
Using document.onreadystatechange attribute
Let’s start with the first one.
Method 1: Window onload event
The onload () event can be used with any element of an HTML page, and it will perform the actions given inside it after that element has been fully loaded.
To run a function only after the whole “window” has been loaded, use the “window.onload” property in the script file and set it equal to a function as
window.onload = function () {
alert("Page has been loaded");};
In the function, an alert is being sent that says “Page has been loaded”.
Execute the HTML webpage and observe the following results:
![]() It is clear from the output that the function was executed after the browser fully loaded the webpage’s “window”.
It is clear from the output that the function was executed after the browser fully loaded the webpage’s “window”.
Method 2: Using the onload attribute with the body tag
As the body tag includes all of that data that is displayed on the web browser, therefore putting an onload attribute and setting it equal to a function in that tag would essentially mean executing the function after everything on the webpage has been fully loaded.
For example, create an HTML Webpage with these lines:
<body onload="fullyLoaded()">
<div class="container">
<div class="flex-box">
<div class="flex-item1">
<img src="https://linuxhint.com/wp-content/uploads/2019/11/Logo-final.png"
/>
</div>
<div class="flex-item2">
<p class="sec">
How to run a function when the page is loaded ?
</p>
</div>
</div>
</div>
<br />
<!-- Start Coding From Here! -->
<center>
<p>This is an example of body onload attribute</p>
</center>
</body>
The key point here is that in the body that we have used the attribute onload = “fullyLoaded()”.
This will cause the webpage to look for a “fullyLoaded()” function in the script after all the elements inside the webpage’s <body> have been loaded.
Head inside the script file, and add in the following lines:
function fullyLoaded() {
alert("The webpage has been completely Loaded!");}
Execute the HTML, and the output on the browser will look like this:
![]() The user is prompted after the body tag, and all the elements inside the body tag have been fully loaded.
The user is prompted after the body tag, and all the elements inside the body tag have been fully loaded.
Method 3: Adding an event listener on the “window” interface variable
One of the oldest methods yet still effective.
In the JavaScript file, simply add an event listener using the dot operator with our “window” interface variable.
The state inside the event listener will be “load” and upon that state change, define a function to be executed.
All this is achieved by using the following lines:
window.addEventListener("load", function () {
alert("It's loaded!");});
After that, simply load up the HTML webpage in the browser, and observe the following output:
![]() The user is prompted as soon as the window is fully loaded.
However, notice that this alert appears when the “window” is loaded.
This means the user might get the alert before all elements completely load.
The user is prompted as soon as the window is fully loaded.
However, notice that this alert appears when the “window” is loaded.
This means the user might get the alert before all elements completely load.
Method 4: Using the document’s onreadystatechange attribute,
DOM has this one attribute called the “onreadystatechange” which is fired up every time the state of the document is changed.
This can be used to execute a function, but the only problem is that this variable or attribute can contain different states like loading, pending, processing, and complete.
This is because this attribute is most used for XML or HTML requests.
A check must be induced to execute a function only when the document is fully loaded.
Use the following lines inside the JavaScript file:
document.onreadystatechange = function () {
if (document.readyState == "complete") {
alert("Yahoo!");
}};
In the above code snippet, a check has been placed to look for a specific state “complete” only then the user is being alerted.
Fire up the HTML webpage and observe the output:
![]() The user was alerted after the document’s ready state was “complete”.
The user was alerted after the document’s ready state was “complete”.
Wrap up
There are quite a few ways to execute a JavaScript function as soon as the webpage has completely loaded.
To demonstrate this, in this article, in every method, you have used an alert function to show an alert depicting that the webpage executed the JavaScript function after the complete loading of that webpage.
How to Get Time Zone Offset Using JavaScript?
To get the local time zone offset with the help of JavaScript, you will have to look no further than the built-in methods of the ES6 release of JavaScript.
That is because the ES6 JavaScript provides a function named “getTimezoneOffset()” which returns the local timezone offset of the user.
The getTimeZoneOffset() method
As mentioned above, this method returns the local timezone offset of the user in the form of minutes.
If you have any idea what time zone, then it is the difference of minutes between your local time zone and the UTC, which stands for Coordinated Universal Time.
To use this method, you need to have a variable of the Date object.
Syntax of the getTimeZoneOffset() method
The syntax is given as:
varOffset = dateObj.getTimeZoneOffset()
dateObj: A date variable on which the getTimeZoneOffset() method is applied
varrOffset: A variable in which the return value is stored
Return Value
The timezone offset of the user’s local solar time against the Coordinated Universal Time in minutes.
Addition Note
Even though the getTimeZoneOffset() method is applied only on a date variable, the value of the date variable has nothing to do with the return value of this method.
The output of the getTimeZoneOffset() is a NaN only when the date variables are given a wrong value to be initialized upon.
Example 1: Fetching the timezone with a date variable
For this, simply create a new Date variable using the following line of code:
var date = new Date();
No arguments have been given to the constructor of the Date object
Afterward, simply apply the getTimeZoneOffset() method and store the result in a new variable named as offsetVar as:
var offestVar = date.getTimezoneOffset();
Pass this offsetVar to the console log function to display the output on to the terminal:
console.log(offestVar);
Execute the program, and the outcome on the terminal will be:
![]() The timezone offset is -300.
The timezone offset is -300.
Example 2: Passing Values in the Date constructor
This time around, create two different date variables as dateVar1 and dateVar2.
For one of these, pass a valid date string inside the Date() constructor, and for the second one, pass an invalid Date string inside the Date() constructor:
var dateVar1 = new Date("5 6 2020");var dateVar2 = new Date("45 2 2020");
The second date variable has been initialized on an invalid value in the constructor.
Now, apply the getTimeZoneOffset() and wrap them in a console log function to get the output straight to the terminal:
console.log(
"The timezone offset using dateVar1 : ",
dateVar1.getTimezoneOffset());
console.log(
"The timezone offset using dateVar2 : ",
dateVar2.getTimezoneOffset());
After that, execute the program and observe the output to be:
![]() Two things are evident from the output screenshot above:
Two things are evident from the output screenshot above:
The value inside the date constructor doesn’t affect the timezone offset as long as it is valid.
If the value passed to the Date constructor is invalid, getTImeZoneOffset() will return the timezone offset as NaN.
That’s it for this article.
Wrap up
In JavaScript, the built-in function getTimeZoneOffset() returns the local timezone difference of the user from the standard UTC (Coordinated Universal Time).
The getTimeZoneOffset() function can only be applied on a date variable.
However, the value of the date variable doesn’t affect the timezone offset as the timezone offset is of the user and not the date variable.
In the case of a NaN value in the date variable, the timezone offset is returned as NaN.
How to Make the First Letter of a String Uppercase?
There are two different ways to make the first letter of a string value using JavaScript.
The first method includes using the toUpperCase() along with the slice() method and string concatenation.
The second method uses a regular expression in the replace() method.
Both of these methods are going to be demonstrated in this article.
Method 1: Using a combination of toUpperCase() and slice()
First of all, create a new string value and store it inside a variable with the help of the following line:
var string = "hello world!";
After that, treat this string like an array and fetch the character at the zero indexes and use the toUpperCase() function to make it capitalized:
string.charAt(0).toUpperCase();
Make sure to store the return value in a separate variable.
Otherwise, it won’t work.
var char1 = string.charAt(0).toUpperCase();
After that, verify that the character stored inside the char1 variable is capitalized by passing it to the console log function:
console.log(char1);
You will see the following result on the terminal:
![]() It is clear from the output that the first character has been extracted and capitalized.
But the original string is yet to be restored.
For that, use the slice method with the argument as 1 to slice the string from index 1 to the very end like
var remainingString = string.slice(1);
After that, simply create a new variable and call it as resultString and concatenate char1 and remainingString inside it using the following line:
var resultString = char1 + remainingString;
Pass this variable resultString to the console log function to see the outcome:
console.log(resultString);
Executing the program will produce the following output on the terminal:
It is clear from the output that the first character has been extracted and capitalized.
But the original string is yet to be restored.
For that, use the slice method with the argument as 1 to slice the string from index 1 to the very end like
var remainingString = string.slice(1);
After that, simply create a new variable and call it as resultString and concatenate char1 and remainingString inside it using the following line:
var resultString = char1 + remainingString;
Pass this variable resultString to the console log function to see the outcome:
console.log(resultString);
Executing the program will produce the following output on the terminal:
![]() The final string has the first letter capitalized.
The final string has the first letter capitalized.
Method 2: Using regex with replace() method and toUpperCase() method
To demonstrate this, create a new string with the following line:
var string = "google is the most widely used search engine";
Afterwards, define a regex inside a variable for matching the first character of any string
var regExpression = /^./;
Here the pattern /^./ defines the first character of any string value
After that, simply use this regExpression in the replace() method.
For the second argument, use the same method of fetching the first character and converting it into the uppercase using the toUpperCase() method like
const finalString = string.replace(regExpression, string[0].toUpperCase());
At the end, pass the finalString variable inside the console log function to get the result on the terminal:
console.log(finalString);
Upon execution, this program will produce the following results:
![]() The first character of the string has been successfully capitalized.
The first character of the string has been successfully capitalized.
Wrap up
To capitalize the first character of any string value, use combinations of string manipulation functions.
You can apply two methods.
In the first method, toUpperCase() is used to capitalize the first character after it has been fetched from the string and stored inside a new variable.
Afterward, the slice() method is used to fetch the remaining string and concatenate the first character and the capitalized first character.
In the second method, a regular expression is used to match the string’s first character, and then toUpperCase() is used to capitalize that character.
fetch() Method | Explained
The fetch() method is mainly connected to the use of web technology (known as AJAX) which exchanges data with web servers asynchronously in the background.
To insert AJAX into the website easily we use jQuery.
Although this process is easy and reduces the code lines.
However, this may result in an extra load of 100KB on the website.
Developers use XMLHttpRequest to include AJAX with the help of pure JavaScript.
However, it also has a disadvantage, that we need to code some unnecessary things that are also not good.
To eliminate all these disadvantages, the JavaScript ES6 version introduced the fetch() method.
In other words, the fetch() method can be referred to as the replacement of the AJAX.
Keeping in view the importance of fetch() method, this post aims to serve the following outcomes:
How fetch() method works?
How to use fetch() method?
How fetch() Method Works?
The JavaScript fetch() method provides us with all the functionalities that AJAX has.
The fetch() method can be used to Create, Retrieve, Update, and Delete operations with the server.
In this method, the coding is very less, and it is also fast as compared to XMLHttpRequest.
Another important thing is that this method works on a live server.
Syntax
The detailed working flow of the fetch() method is explained below.
fetch(file/URL)
The fetch () method takes file path as a parameter.
When this method executes, it returns a promise (a promise is just like a state), a promise is either successful or failed.
fetch(file/URL).then()
If the promise is successful, we use the then() function with the fetch() method.
fetch(file/URL).then(function(resp_variable){return resp_variable.data;})
After that, we create a function in which we get a response from the server as a parameter inside the function.
The server sends a data file which is then sent as a response.
fetch(file/URL).then(function(resp_variable){return resp_variable.data;}).then()
The first then() function also returns a promise, and this promise is used in the second then() function.
fetch(file/URL).then(function(resp_variable){return resp_variable.data;}).then(function(res_variable){
console.log(res_variable);})
The result from the server is displayed inside the second then() function’s body.
Here res_variable represents the variable that contains an actual result that is displayed to the user.
fetch(file/URL).then(function(resp_variable){
return resp_variable.data;}).then(function(res_variable){
console.log(res_variable);}).catch(function(err_variable){
console.log(err_variable);});
In the above syntax, file/URL represents the path of the server-side language file.
The resp_variable denotes the response of the server when the fetch method requests the path.
The res_variable represents the variable that stores the final response after the resp_variable function is executed and the err_variable represents the variable that stores an error if it occurs.
The catch() function is used to handle errors when the server is not responding or the file, we are sending contains errors.
How to Use the fetch() Method?
In JavaScript, the fetch() method takes a file path as a parameter and uses the function to return the server response.
After that, the server response is sent again to the server which will return the result.
Let’s understand the usage of the fetch() method through a practical example.
Code
fetch("fet/read.txt").then(function(r){
return r.text();}).then(function(res){
console.log(res);});
In this code fetch method requests a read.txt file after that then() function gets the server response and returns it to the server again.
Lastly, we again use the then() function to display the result.
Output
![]() The above output shows that the fetch() method requests a read.txt file and gets a fulfilled promise in return.
After that the then() function uses this promise and gets the server response and uses it inside its body to return the response along with the text() method.
Lastly, the second then() method gets the result and displays the content of the read.txt file.
That is all the information regarding the fetch() method.
You have understood the working and usage of the fetch() method.
The above output shows that the fetch() method requests a read.txt file and gets a fulfilled promise in return.
After that the then() function uses this promise and gets the server response and uses it inside its body to return the response along with the text() method.
Lastly, the second then() method gets the result and displays the content of the read.txt file.
That is all the information regarding the fetch() method.
You have understood the working and usage of the fetch() method.
Conclusion
In JavaScript, the fetch() method is used to perform CRUD operations like insertion, upgradation, reading and deleting of data from the server.
To do so, the fetch() method makes a request to the server, and the required data is loaded on the webpage on the approval of request.
This descriptive manual provides detailed information of the working and usage of the fetch() method.
Converting JSON Text to JavaScript Object
A JSON text can easily be interchanged into an object by passing it in the arguments of the JSON prase() method.
The ES6 release of JavaScript included the JSON parse() method as part of the JSON object module.
Before trying to understand the working of the JSON parse(), the reason for its use must be apparent.
Reason for Converting JSON text into a JavaScript object
JavaScript is a language mostly used for creating webpages, client-side applications, and web servers.
When talking about multiple web servers and clients, the data is transferred in the form of strings.
String operations can be a massive delay in the processing speed of the webservers.
Therefore, JSON was invented.
However, JSON cannot be transferred over the network as it is.
It is converted into a JSON text string before sending the data over the network.
When this JSON text is received on the server and the client-side application, it must be converted back to either a JSON object or a JavaScript Object to be processed.
Transforming JSON text/string into a JavaScript object
This is the JSON text that is to be converted into an object of JavaScript:
'{"firstName": "John", "lastName": "Doe", "age": 18, "profession": "Goldsmith", "Salary":"18000", "ownsAHouse": true}';
The above JSON text contains data about a person.
To convert it into a JavaScript object, the very first step is going to be storing this JSON string inside a new variable which is going to be named as person1:
const person1 = '{"firstName": "John", "lastName": "Doe", "age": 18, "profession": "Goldsmith", "Salary":"18000", "ownsAHouse": true}';
After that, we are going to pass this person1 variable into a JSON parse() method and store the result inside a new variable named as jsonObj:
var jsonObj = JSON.parse(person1);
After that, we are simply going to print out the content of the jsonObj variable onto the terminal using the console log function:
console.log(jsonObj);
Executing the program will display the following outcome onto the terminal:
![]() From the output, you can conclude that the JSON.parse() method successfully converted the JSON text into a JavaScript-Object.
From the output, you can conclude that the JSON.parse() method successfully converted the JSON text into a JavaScript-Object.
Converting JavaScript Object back to a JSON string
To send the data back over the network, the program must convert the JavaScript back to a JSON string.
For this, we have the method JSON stringify().
Take the jsonObj variable from the previous example, pass it to the stringify() method, and store the result in a new variable named jsonString as
var jsonString = JSON.stringify(jsonObj);
Then display the content inside the jsonString variable onto the terminal using the console log function:
console.log(
"The content inside the jsonString variable is as \n",
jsonString);
Upon execution, the following result is displayed onto the terminal:
![]() The JavaScript object was successfully converted into a JSON text using the stringify() method
The JavaScript object was successfully converted into a JSON text using the stringify() method
Conclusion
The JSON parse() method is used for the conversion of a JSON text into a JavaScript object and to convert it back into the JSON text, the JSON stringify() method is used.
The parse() method belongs to the JSON object module and is released with ES6 JavaScript.
Simply take a JSON string, pass it as the argument to the JSON parse() method, and save the returned value in a new variable.
In that variable, you will have your JavaScript object.
Optimum Way to Compare Strings
JavaScript has many methods that help a user compare two or more strings.
But out of all the other methods available, the localeCompare() method is the most optimal for comparing strings.
The localeCompare() method is applied to a string using a dot operator, and the other string is passed inside its argument.
Syntax of localeCompare() method
To understand the localeCompare() method, take a look at its syntax:
str1.localeCompare(str2);
str1: The first string to be compared, which can also be called the reference string
str2: The second string to be compared, which can also be called the compare string
Return Value
The localeCompare() method will return a numeric value with the following different scenarios:
Returns 0 in case both of the strings are totally equal and identical to each other
Returns 1 if the str1 comes before the str2 in numeric equivalence
Returns -1 if the str2 comes before the str1 in numeric equivalence
Example 1: localeCompare() method to compare two identical strings
First create two identical strings and store them in different variables like:
var str1 = "Hello";var str2 = "Hello";
After that, apply the localeCompare() method on str1 and pass in the str2 as an argument, and then wrap this whole state inside a console log function to print the result onto the terminal:
console.log(str1.localeCompare(str2));
Upon execution, the result on the terminal looks like this:
![]() However, the above output isn’t really that user-friendly, therefore, remove the console log function and wrap the localeCompare() statement inside an if-else condition like:
if (str1.localeCompare(str2) == 0) {
console.log("Both the strings are identical");} else {
console.log("Both the strings are different");}
Re-execute the program and the following result shows in the terminal:
However, the above output isn’t really that user-friendly, therefore, remove the console log function and wrap the localeCompare() statement inside an if-else condition like:
if (str1.localeCompare(str2) == 0) {
console.log("Both the strings are identical");} else {
console.log("Both the strings are different");}
Re-execute the program and the following result shows in the terminal:
![]() The above-code snippet basically creates an identical-string checker, to verify this, change the values inside the string variables like:
var str1 = "Hello";var str2 = "World";
Re-executing the program will provide the following result:
The above-code snippet basically creates an identical-string checker, to verify this, change the values inside the string variables like:
var str1 = "Hello";var str2 = "World";
Re-executing the program will provide the following result:
![]() It is clear from the output that the strings are not identical to each other.
It is clear from the output that the strings are not identical to each other.
Example 2: Different strings yielding different return values
To check out the different return values that can occur with the localeCompare() method, create the following strings:
var str1 = "Romania";var str2 = "romania";
Both the strings contain the same word, but are in different case-sensitivity.
Apply localeCompare() on str1 and pass str2 in its argument like:
console.log(str1.localeCompare(str2));
Executing the program will give the following result on the terminal:
![]() From the output, it is clear that both the strings are different.
But the more interesting part is that the str1 > str2 in numeric equivalence.
To showcase a negative return value from the localeComapre() method, simply switch the reference string and the compare string with each other in the localeCompare() statement like:
console.log(str2.localeCompare(str1));
Executing the program will now yield the following outcome:
From the output, it is clear that both the strings are different.
But the more interesting part is that the str1 > str2 in numeric equivalence.
To showcase a negative return value from the localeComapre() method, simply switch the reference string and the compare string with each other in the localeCompare() statement like:
console.log(str2.localeCompare(str1));
Executing the program will now yield the following outcome:
![]() The output on the terminal depicts that str2 > str1 in numeric equivalence.
The output on the terminal depicts that str2 > str1 in numeric equivalence.
Example 3: Implementing Case-insensitivity in localeCompare() method
The localeCompare() method can take two additional arguments apart from the compare string.
These are locales (can be used to define the local or base language) and options.
If you choose a locale (for example, ‘en’) and in the third argument, you pass in “sensitivity = base”, then, in that case, the localeCompare() method is going to compare strings irrespective of their case sensitivity.
For example, take the following strings again:
var str1 = "Romania";var str2 = "romania";
Afterwards, use the localeCompare() method with the second argument as “en” and the third argument as {sensitivity = base} and wrap the whole statement in a console log function:
console.log(str2.localeCompare(str1, "en", { sensitivity: "base" }));
The result upon execution will be:
![]() As you can see, we got the output as “0” meaning that both of the strings are considered to be equal to each other.
As you can see, we got the output as “0” meaning that both of the strings are considered to be equal to each other.
Wrap up
The localeCompare() method is considered the most optimal and efficient string comparison method.
The localCompare() is applied to a string using a dot operator, and that string is known as the reference string.
The second string is called the compare string, which is passed inside the argument of the localeCompare() method.
If both strings are equal and identical, then the numeric value “0” is returned; otherwise, a non-zero value is returned.
Tensorflow.js – tf.mul()
“tf.mul() in tensorflow.js is used to perform element wise multiplication on two tensors/scalars.”
Scenario 1: Work With Scalar
Scalar will store only one value.
But anyway, it returns a tensor.
Syntax
tf.mul(scalar1,scalar2)
Parametersscalar1 and scalar2 are the tensors that can take only one value as a parameter.
ReturnReturn product of two scalar values.
ExampleCreate two scalars and perform the multiplication of two scalars.
<html><!-- CDN Link that delivers the Tensorflow.js framework --><script src="https://cdn.jsdelivr.net/npm/@tensorflow/tfjs"></script><body><script>//scalar1
let value1 = tf.scalar(30);//scalar2
let value2 = tf.scalar(70);
document.write("Scalar-1: ",value1);
document.write("<br>");
document.write("<br>");
document.write("Scalar-2: ",value2);</script><h3>Tensorflow.js - tf.mul() </h3><script>//tf.mul(value1,value2)
document.write(tf.mul(value1,value2));</script></body></html>
Output
![]() WorkingThe product of 30 and 70 is 2100.
WorkingThe product of 30 and 70 is 2100.
Scenario 2: Work With Tensor
A tensor can store multiple values; it can be single or multi-dimensional.
Syntax
tf.mul(tensor1,tensor2)
Parameterstensor1 and tensor2 are the tensors that can take only single or multiple values as a parameter.
ReturnReturn product of two tensors concerning each element.
We must notice that the total number of elements in both the tensors must be equal.
Example 1Create two one-dimensional tensors and return the product using tf.mul().
<html><!-- CDN Link that delivers the Tensorflow.js framework --><script src="https://cdn.jsdelivr.net/npm/@tensorflow/tfjs"></script><body><script>//tensor1
let values1 = tf.tensor1d([10,20,30,40,50]);//tensor2
let values2 = tf.tensor1d([1,2,3,4,5]);
document.write("Tensor-1: ",values1);
document.write("<br>");
document.write("<br>");
document.write("Tensor-2: ",values2);</script><h3>Tensorflow.js - tf.mul() </h3><script>//tf.mul(values1,values2)
document.write(tf.mul(values1,values2));</script></body></html>
Output
![]() Working[10*1,20*2,30*3,40*4,50*5] => [10, 40, 90, 160, 250].
Example 2Create 2 two-dimensional tensors with 2 rows and 3 columns and apply tf.mul().
<html><!-- CDN Link that delivers the Tensorflow.js framework --><script src="https://cdn.jsdelivr.net/npm/@tensorflow/tfjs"></script><body><script>//tensor1
let values1 = tf.tensor2d([1,2,3,4,5,6],[2,3]);//tensor2
let values2 = tf.tensor2d([34,10,20,30,40,50],[2,3]);
document.write("Tensor-1: ",values1);
document.write("<br>");
document.write("<br>");
document.write("Tensor-2: ",values2);</script><h3>Tensorflow.js - tf.mul() </h3><script>//tf.mul(values1,values2)
document.write(tf.mul(values1,values2));</script></body></html>
Output
Working[10*1,20*2,30*3,40*4,50*5] => [10, 40, 90, 160, 250].
Example 2Create 2 two-dimensional tensors with 2 rows and 3 columns and apply tf.mul().
<html><!-- CDN Link that delivers the Tensorflow.js framework --><script src="https://cdn.jsdelivr.net/npm/@tensorflow/tfjs"></script><body><script>//tensor1
let values1 = tf.tensor2d([1,2,3,4,5,6],[2,3]);//tensor2
let values2 = tf.tensor2d([34,10,20,30,40,50],[2,3]);
document.write("Tensor-1: ",values1);
document.write("<br>");
document.write("<br>");
document.write("Tensor-2: ",values2);</script><h3>Tensorflow.js - tf.mul() </h3><script>//tf.mul(values1,values2)
document.write(tf.mul(values1,values2));</script></body></html>
Output
![]() Working[[1*34,2*10,3*20],[4*30,5*40,6*50]] => [[34 , 20 , 60 ], [120, 200, 300]].
Working[[1*34,2*10,3*20],[4*30,5*40,6*50]] => [[34 , 20 , 60 ], [120, 200, 300]].
Scenario 3: Work With Tensor & Scalar
Multiplying each element from a tensor with a scalar can be possible.
Syntax
tf.mul(tensor,scalar)
ExampleCreate a one-dimensional tensor and a scalar and perform multiplication using tf.mul().
<html><!-- CDN Link that delivers the Tensorflow.js framework --><script src="https://cdn.jsdelivr.net/npm/@tensorflow/tfjs"></script><body><script>//tensor
let values1 = tf.tensor1d([10,20,30,4,5,6]);//scalar
let value2 = tf.scalar(1);
document.write("Tensor: ",values1);
document.write("<br>");
document.write("<br>");
document.write("Scalar: ",value2);</script><h3>Tensorflow.js - tf.mul() </h3><script>//tf.mul(values1,value2)
document.write(tf.mul(values1,value2));</script></body></html>
Output
![]() Working[10*1, 20*1, 30*1, 4*1, 5*1, 6*1] => [10, 20, 30, 4, 5, 6].
Working[10*1, 20*1, 30*1, 4*1, 5*1, 6*1] => [10, 20, 30, 4, 5, 6].
Conclusion
So we came to the end of the lesson.
tf.mul() in tensorflow.js is used to return element-wise products.
We discussed three scenarios to multiply a tensor from a scalar.
Also, we noticed that scalar will store only one value and returns a tensor.
While performing tf.mul() on two tensors, ensure that the number of elements in two tensors must be the same.
Tensorflow.js – tf.mod()
“tf.mod() in tensorflow.js is used to perform element-wise division on two tensors/scalars and return the remainder.”
Scenario 1: Work With Scalar
Scalar will store only one value.
But anyway, it returns a tensor.
Syntax
tf.mod(scalar1,scalar2)
Parametersscalar1 and scalar2 are the tensors that can take only one value as a parameter.
ReturnReturn remainder of two scalar values.
ExampleCreate two scalars and perform a division of two scalars to return the remainder.
<html><!-- CDN Link that delivers the Tensorflow.js framework --><script src="https://cdn.jsdelivr.net/npm/@tensorflow/tfjs"></script><body><script>//scalar1
let value1 = tf.scalar(30);//scalar2
let value2 = tf.scalar(70);
document.write("Scalar-1: ",value1);
document.write("<br>");
document.write("<br>");
document.write("Scalar-2: ",value2);</script><h3>Tensorflow.js - tf.mod() </h3><script>//tf.mod(value1,value2)
document.write(tf.mod(value1,value2));</script></body></html>
Output
![]() Working
30%70 = 30.
Working
30%70 = 30.
Scenario 2: Work With Tensor
A tensor can store multiple values; it can be single or multi-dimensional.
Syntax
tf.mod(tensor1,tensor2)
Parameterstensor1 and tensor2 are the tensors that can take only single or multiple values as a parameter.
ReturnReturn remainder of two tensors concerning each element.
We must notice that the total number of elements in both the tensors must be equal.
Example 1Create two one-dimensional tensors and return the remainder using tf.mod().
<html><!-- CDN Link that delivers the Tensorflow.js framework --><script src="https://cdn.jsdelivr.net/npm/@tensorflow/tfjs"></script><body><script>//tensor1
let values1 = tf.tensor1d([10,20,30,40,50]);//tensor2
let values2 = tf.tensor1d([1,2,3,4,5]);
document.write("Tensor-1: ",values1);
document.write("<br>");
document.write("<br>");
document.write("Tensor-2: ",values2);</script><h3>Tensorflow.js - tf.mod() </h3><script>//tf.mod(values1,values2)
document.write(tf.mod(values1,values2));</script></body></html>
Output
![]() Working
[10%1,20%2,30%3,40%4,50%5] => Tensor [0,0,0,0,0].
Example 2Create 2 two-dimensional tensors with 2 rows and 3 columns and apply tf.mod().
<html><!-- CDN Link that delivers the Tensorflow.js framework --><script src="https://cdn.jsdelivr.net/npm/@tensorflow/tfjs"></script><body><script>//tensor1
let values1 = tf.tensor2d([1,2,3,4,5,6],[2,3]);//tensor2
let values2 = tf.tensor2d([34,10,20,30,40,50],[2,3]);
document.write("Tensor-1: ",values1);
document.write("<br>");
document.write("<br>");
document.write("Tensor-2: ",values2);</script><h3>Tensorflow.js - tf.mod() </h3><script>//tf.mod(values1,values2)
document.write(tf.mod(values1,values2));</script></body></html>
Output
Working
[10%1,20%2,30%3,40%4,50%5] => Tensor [0,0,0,0,0].
Example 2Create 2 two-dimensional tensors with 2 rows and 3 columns and apply tf.mod().
<html><!-- CDN Link that delivers the Tensorflow.js framework --><script src="https://cdn.jsdelivr.net/npm/@tensorflow/tfjs"></script><body><script>//tensor1
let values1 = tf.tensor2d([1,2,3,4,5,6],[2,3]);//tensor2
let values2 = tf.tensor2d([34,10,20,30,40,50],[2,3]);
document.write("Tensor-1: ",values1);
document.write("<br>");
document.write("<br>");
document.write("Tensor-2: ",values2);</script><h3>Tensorflow.js - tf.mod() </h3><script>//tf.mod(values1,values2)
document.write(tf.mod(values1,values2));</script></body></html>
Output
![]() Working
[[1%34,2%10,3%20],[4%30,5%40,6%50]] => [[1, 2, 3], [4, 5, 6]].
Working
[[1%34,2%10,3%20],[4%30,5%40,6%50]] => [[1, 2, 3], [4, 5, 6]].
Scenario 3: Work With Tensor & Scalar
It can be possible to divide each element in a tensor by a scalar to return the remainder.
Syntax
tf.mod(tensor,scalar)
ExampleCreate a one-dimensional tensor and a scalar and perform division to return the remainder using tf.mod().
<html><!-- CDN Link that delivers the Tensorflow.js framework --><script src="https://cdn.jsdelivr.net/npm/@tensorflow/tfjs"></script><body><script>//tensor
let values1 = tf.tensor1d([10,20,30,4,5,6]);//scalar
let value2 = tf.scalar(10);
document.write("Tensor: ",values1);
document.write("<br>");
document.write("<br>");
document.write("Scalar: ",value2);</script><h3>Tensorflow.js - tf.mod() </h3><script>//tf.mod(values1,value2)
document.write(tf.mod(values1,value2));</script></body></html>
Output
![]() Working
[10%10, 20%10, 30%10, 4%10, 5%10, 6%10] => [0, 0, 0, 4, 5, 6].
Working
[10%10, 20%10, 30%10, 4%10, 5%10, 6%10] => [0, 0, 0, 4, 5, 6].
Conclusion
tf.mod() in tensorflow.js is used to perform division and return element-wise remainders.
We discussed three scenarios to divide a tensor by a scalar.
Also, we noticed that scalar will store only one value and returns a tensor.
While performing tf.mod() on two tensors, ensure that the number of elements in two tensors must be the same.
Tensorflow.js – tf.logicalOr()
“tf.logicalOr() in tensorflow.js is applied on two tensors/scalars with boolean values, which performs element-wise computation.
It returns true if any elements are true; otherwise, false is returned.”
Scenario 1: Work With Scalar
Scalar will store only one value.
But anyway, it returns a tensor.
Syntax
tf.logicalOr(scalar1,scalar2)
Parametersscalar1 and scalar2 are the tensors that can take only one value as a parameter.
ExampleCreate three scalars with boolean values and apply logicalOr() on two scalars simultaneously.
<html><!-- CDN Link that delivers the Tensorflow.js framework --><script src="https://cdn.jsdelivr.net/npm/@tensorflow/tfjs"></script><body><script>//scalar1
let value1 = tf.scalar(false);//scalar2
let value2 = tf.scalar(false);//scalar3
let value3 = tf.scalar(true);
document.write("Scalar-1: ",value1);
document.write("<br>");
document.write("<br>");
document.write("Scalar-2: ",value2);
document.write("<br>");
document.write("<br>");
document.write("Scalar-3: ",value3);</script><h3>Tensorflow.js - tf.logicalOr() </h3><script>//tf.logicalOr(value1,value2)
document.write("Scalar-1 logicalOr Scalar-2: "+tf.logicalOr(value1,value2));
document.write("<br>");
document.write("<br>");//tf.logicalOr(value1,value3)
document.write("Scalar-1 logicalOr Scalar-3: "+tf.logicalOr(value1,value3));</script></body></html>
Output
![]() WorkingOutput 1: false logicalOr false – false
Output 2: false logicalOr true – true
WorkingOutput 1: false logicalOr false – false
Output 2: false logicalOr true – true
Scenario 2: Work With Tensor
Tensor can store multiple values; they can be single or multi-dimensional.
Syntax
tf.logicalOr(tensor1,tensor2)
Parameterstensor1 and tensor2 are the tensors that can take only single or multiple values as a parameter.
ExampleCreate two one-dimensional tensors and perform a logicalOr() operation.
<html><!-- CDN Link that delivers the Tensorflow.js framework --><script src="https://cdn.jsdelivr.net/npm/@tensorflow/tfjs"></script><body><script>//tensor1
let values1 = tf.tensor1d([true,false,true,true]);//tensor2
let values2 = tf.tensor1d([false,false,true,true]);
document.write("Tensor-1: ",values1);
document.write("<br>");
document.write("<br>");
document.write("Tensor-2: ",values2);
document.write("<br>");
document.write("<br>");//tf.logicalOr(values1,values2)
document.write("<b>logicalOr() operation on two Tensors:</b> "+tf.logicalOr(values1,values2));</script></body></html>
Output
![]() Working[true, false, true, true] logicalOr [false, false, true, true] => [true, false, true, true]
Working[true, false, true, true] logicalOr [false, false, true, true] => [true, false, true, true]
Scenario 3: Work With Tensor & Scalar
It can be possible to perform logicalOr() on each element in a tensor with a scalar.
Syntax
tf.logicalOr(tensor,scalar)
ExampleCreate a one-dimensional tensor, a scalar, and perform logicalOr().
<html><!-- CDN Link that delivers the Tensorflow.js framework --><script src="https://cdn.jsdelivr.net/npm/@tensorflow/tfjs"></script><body><script>//tensor
let values1 = tf.tensor1d([true,false,true]);//scalar
let value2 = tf.scalar(false);
document.write("Tensor: ",values1);
document.write("<br>");
document.write("<br>");
document.write("Scalar: ",value2);
document.write("<br>");
document.write("<br>");//tf.logicalOr(values1,value2)
document.write("<b>logicalOr on tensor and scalar:</b> ",tf.logicalOr(values1,value2));</script></body></html>
Output
![]() Workingtrue logicalOr false – true
false logicalOr false – false
true logicalOr false – true
Workingtrue logicalOr false – true
false logicalOr false – false
true logicalOr false – true
Conclusion
tf.logicalOr() in tensorflow.js returns true if any of the elements are true; otherwise, false is returned.
While performing tf.logicalOr() on two tensors, ensure that the number of elements in two tensors must be the same.
We discussed three different scenarios to explain logicalOr() operation.
Tensorflow.js – tf.logicalAnd()
“tf.logicalAnd() in tensorflow.js is applied on two tensors/scalars with boolean values, which performs element-wise computation.
It returns true if both the elements are true; otherwise false.”
Scenario 1: Work With Scalar
Scalar will store only one value.
But anyway, it returns a tensor.
Syntax
tf.logicalAnd(scalar1,scalar2)
Parametersscalar1 and scalar2 are the tensors that can take only one value as a parameter.
ExampleCreate three scalars with boolean values and apply logicalAnd() on two scalars simultaneously.
<html><!-- CDN Link that delivers the Tensorflow.js framework --><script src="https://cdn.jsdelivr.net/npm/@tensorflow/tfjs"></script><body><script>//scalar1
let value1 = tf.scalar(true);//scalar2
let value2 = tf.scalar(false);//scalar3
let value3 = tf.scalar(true);
document.write("Scalar-1: ",value1);
document.write("<br>");
document.write("<br>");
document.write("Scalar-2: ",value2);
document.write("<br>");
document.write("<br>");
document.write("Scalar-3: ",value3);</script><h3>Tensorflow.js - tf.logicalAnd() </h3><script>//tf.logicalAnd(value1,value2)
document.write("Scalar-1 logicalAnd Scalar-2: "+tf.logicalAnd(value1,value2));
document.write("<br>");
document.write("<br>");//tf.logicalAnd(value1,value3)
document.write("Scalar-1 logicalAnd Scalar-3: "+tf.logicalAnd(value1,value3));</script></body></html>
Output
![]() Working
Output 1: true logicalAnd false – false
Output 2: true logicalAnd true – true
Working
Output 1: true logicalAnd false – false
Output 2: true logicalAnd true – true
Scenario 2: Work With Tensor
Tensor can store multiple values; they can be single or multi-dimensional.
Syntax
tf.logicalAnd (tensor1,tensor2)
Parameterstensor1 and tensor2 are the tensors that can take only single or multiple values as a parameter.
ExampleCreate two one-dimensional tensors and perform logicalAnd() operation.
<html><!-- CDN Link that delivers the Tensorflow.js framework --><script src="https://cdn.jsdelivr.net/npm/@tensorflow/tfjs"></script><body><script>//tensor1
let values1 = tf.tensor1d([true,false,true,true]);//tensor2
let values2 = tf.tensor1d([false,true,true,true]);
document.write("Tensor-1: ",values1);
document.write("<br>");
document.write("<br>");
document.write("Tensor-2: ",values2);
document.write("<br>");
document.write("<br>");//tf.logicalAnd(values1,values2)
document.write("<b>logicalAnd() operation on two Tensors:</b> "+tf.logicalAnd(values1,values2));</script></body></html>
Output
![]() Working
[true, false, true, true] logicalAnd [false, true, true, true] => [false, false, true, true]
Working
[true, false, true, true] logicalAnd [false, true, true, true] => [false, false, true, true]
Scenario 3: Work With Tensor & Scalar
It can be possible to perform logicalAnd() on each element in a tensor with a scalar.
Syntax
tf.logicalAnd(tensor,scalar)
ExampleCreate a one-dimensional tensor and a scalar and perform logicalAnd().
<html><!-- CDN Link that delivers the Tensorflow.js framework --><script src="https://cdn.jsdelivr.net/npm/@tensorflow/tfjs"></script><body><script>//tensor
let values1 = tf.tensor1d([true,false,true]);//scalar
let value2 = tf.scalar(true);
document.write("Tensor: ",values1);
document.write("<br>");
document.write("<br>");
document.write("Scalar: ",value2);
document.write("<br>");
document.write("<br>");//tf.logicalAnd(values1,value2)
document.write("<b>logicalAnd on tensor and scalar:</b> ",tf.logicalAnd(values1,value2));</script></body></html>
Output
![]()
Conclusion
tf.logicalAnd() in tensorflow.js returns true if both the elements are true; otherwise, false.
While performing tf.logicalAnd() on two tensors, ensure that the number of elements in two tensors must be the same.
We discussed three different scenarios to explain logicalAnd() operation.
Tensorflow.js – tf.logicalNot()
“tf.logicalNot() in tensorflow.js is applied on a single tensor/scalar that has boolean values which return true when the element is false and false when the element is true.”
Scenario 1: Work With Scalar
Scalar will store only one value.
But anyway, it returns a tensor.
Syntax
tf.logicalNot(scalar)
ParametersScalar is a tensor that can take only one value as a parameter.
ExampleCreate two scalars with boolean and apply logicalNot() separately.
<html><!-- CDN Link that delivers the Tensorflow.js framework --><script src="https://cdn.jsdelivr.net/npm/@tensorflow/tfjs"></script><body><script>//scalars
let value1 = tf.scalar(false);
let value2 = tf.scalar(true);
document.write("Scalar 1: ",value1);
document.write("<br>");
document.write("Scalar 2: ",value2);</script><h3>Tensorflow.js - tf.logicalNot() </h3><script>//tf.logicalNot(value1)
document.write("<b>logicalNot on Scalar-1:</b>"+tf.logicalNot(value1));
document.write("<br>");//tf.logicalNot(value2)
document.write("<b>logicalNot on Scalar-2:</b>"+tf.logicalNot(value2));</script></body></html>
Output
![]() Working
Output 1: logicalNot false – true
Output 2: logicalNot true – false
Working
Output 1: logicalNot false – true
Output 2: logicalNot true – false
Scenario 2: Work With Tensor
Tensor can store multiple values; they can be single or multi-dimensional.
Syntax
tf.logicalNot(tensor)
Parameterstensor takes single or multiple values as a parameter.
ExampleCreate a one-dimensional tensor and perform logicalNot() operation.
<html><!-- CDN Link that delivers the Tensorflow.js framework --><script src="https://cdn.jsdelivr.net/npm/@tensorflow/tfjs"></script><body><script>//tensor
let values = tf.tensor1d([true,false,true,true]);
document.write("Tensor: ",values);
document.write("<br>");
document.write("<br>");//tf.logicalNot(values)
document.write("<b>logicalNot() operation on two Tensors:</b> "+tf.logicalNot(values));</script></body></html>
Output
![]() Working
logicalNot [true, false, true, true] => [false, true, false, false].
Working
logicalNot [true, false, true, true] => [false, true, false, false].
Conclusion
tf.logicalNot() in tensorflow.js returns true when the element is false and false when the element is true.
We discussed two different scenarios to explain logicalNot() operation.
Tensorflow.js – tf.logicalXor()
“tf.logicalXor() in tensorflow.js is applied on two tensors/scalars with boolean values, which perform element-wise computation.
It returns false if both the elements are true or false (when both the elements are the same); otherwise true.”
Scenario 1: Work With Scalar
Scalar will store only one value.
But anyway, it returns a tensor.
Syntax
tf.logicalXor(scalar1,scalar2)
Parametersscalar1 and scalar2 are the tensors that can take only one value as a parameter.
ExampleCreate three scalars with boolean values and apply logicalXor() on two scalars simultaneously.
<html><!-- CDN Link that delivers the Tensorflow.js framework --><script src="https://cdn.jsdelivr.net/npm/@tensorflow/tfjs"></script><body><script>//scalar1
let value1 = tf.scalar(true);//scalar2
let value2 = tf.scalar(false);//scalar3
let value3 = tf.scalar(true);
document.write("Scalar-1: ",value1);
document.write("<br>");
document.write("<br>");
document.write("Scalar-2: ",value2);
document.write("<br>");
document.write("<br>");
document.write("Scalar-3: ",value3);</script><h3>Tensorflow.js - tf.logicalXor() </h3><script>//tf.logicalXor(value1,value2)
document.write("Scalar-1 logicalXor Scalar-2: "+tf.logicalXor(value1,value2));
document.write("<br>");
document.write("<br>");//tf.logicalXor(value1,value3)
document.write("Scalar-1 logicalXor Scalar-3: "+tf.logicalXor(value1,value3));</script></body></html>
Output
![]() Working
Output 1: true logicalXor false – true
Output 2: true logicalXor true – false
Working
Output 1: true logicalXor false – true
Output 2: true logicalXor true – false
Scenario 2: Work With Tensor
Tensor can store multiple values; they can be single or multi-dimensional.
Syntax
tf.logicalXor(tensor1,tensor2)
Parameterstensor1 and tensor2 are the tensors that can take only single or multiple values as a parameter.
Example
Create two one-dimensional tensors and perform the logicalXor() operation.
<html><!-- CDN Link that delivers the Tensorflow.js framework --><script src="https://cdn.jsdelivr.net/npm/@tensorflow/tfjs"></script><body><script>//tensor1
let values1 = tf.tensor1d([true,false,true,true]);//tensor2
let values2 = tf.tensor1d([false,true,true,true]);
document.write("Tensor-1: ",values1);
document.write("<br>");
document.write("<br>");
document.write("Tensor-2: ",values2);
document.write("<br>");
document.write("<br>");//tf.logicalXor(values1,values2)
document.write("<b>logicalXor() operation on two Tensors:</b> "+tf.logicalXor(values1,values2));</script></body></html>
Output
![]() Working
[true, false, true, true] logicalXor [false, true, true, true] => [true, true, false, false]
Working
[true, false, true, true] logicalXor [false, true, true, true] => [true, true, false, false]
Scenario 3: Work With Tensor & Scalar
It can be possible to perform logicalXor() on each element in a tensor with a scalar.
Syntax
tf.logicalXor(tensor,scalar)
ExampleCreate a one-dimensional tensor, a scalar, and perform logicalXor().
<html><!-- CDN Link that delivers the Tensorflow.js framework --><script src="https://cdn.jsdelivr.net/npm/@tensorflow/tfjs"></script><body><script>//tensor
let values1 = tf.tensor1d([true,false,true]);//scalar
let value2 = tf.scalar(true);
document.write("Tensor: ",values1);
document.write("<br>");
document.write("<br>");
document.write("Scalar: ",value2);
document.write("<br>");
document.write("<br>");//tf.logicalXor(values1,value2)
document.write("<b>logicalXor on tensor and scalar:</b> ",tf.logicalXor(values1,value2));</script></body></html>
Output
![]() Working
true logicalXor true – false
false logicalXor true – true
true logicalXor true – false
Working
true logicalXor true – false
false logicalXor true – true
true logicalXor true – false
Conclusion
tf.logicalXor() in tensorflow.js returns false if both the elements are the same; otherwise, true is returned.
While performing tf.logicalXor() on two tensors, ensure that the number of elements in two tensors must be the same.
We discussed three different scenarios to explain the logicalXor() operation.
Tensorflow.js – tf.logSigmoid()
In Machine Learning, Log Sigmoid function means logarithmic value of a sigmoid function.
The Sigmoid function acts as an activation function that adds the non-linearity to a model.
Simply, the Sigmoid function is used to make a non-linear model.
The mathematical formula is 1 / (1 + exp(-x)).
Tf.logSigmoid() Function
Syntax:
tf.logSigmoid(tensor_input)
Parameter:
The tensor_input is a tensor that has numbers.
It can be one or two-dimensional.
Example 1:
Let’s create a one-dimensional tensor in js that has null, undefined, and NaN values and return the logSigmoid values.
<html><!-- CDN Link that delivers the Tensorflow.js framework --><script src="https://cdn.jsdelivr.net/npm/@tensorflow/tfjs"></script><body><center><h1>Linux Hint</h1></center><center><h2>Tensorflow.js - tf.logSigmoid() </h2></center><script>let values = tf.tensor1d([0,1,null,undefined,NaN]);//actual tensor
document.write("Actual Tensor: ",values);
document.write("<br>");
document.write("<br>");//apply logSigmoid() on the above tensor
document.write("Tensor with logSigmoid Values: "+tf.logSigmoid(values));</script></body></html>
Output:
![]() Tensor takes null as 0 and the undefined and NaN as NaN value.
Tensor takes null as 0 and the undefined and NaN as NaN value.
logSigmoid(0) => -0.6931472
logSigmoid(1)=> -0.3132616
logSigmoid(0)=> -0.6931472
logSigmoid(NaN)=> -0.6931472
logSigmoid(NaN)=> -0.6931472
We observed that if the input is 0, NaN, null and undefined, the logSigmoid value is -0.6931472.
Example 2:
Let’s create a tensor that has two dimensions in js with 2 rows and 2 columns that has decimal values and return the logSigmoid values.
<html><!-- CDN Link that delivers the Tensorflow.js framework --><script src="https://cdn.jsdelivr.net/npm/@tensorflow/tfjs"></script><body><center><h1>Linux Hint</h1></center><center><h2>Tensorflow.js - tf.logSigmoid() </h2></center><script>let values = tf.tensor2d([[1.23,4.56],[-0.45,7.89]]);//actual tensor
document.write("Actual Tensor: ",values);
document.write("<br>");
document.write("<br>");//apply logSigmoid() on the above tensor
document.write("Tensor with logSigmoid Values: "+tf.logSigmoid(values));</script></body></html>
Output:
![]()
logSigmoid(1.23) =>-0.2564178
logSigmoid(4.5599999) =>-0.0104076
logSigmoid(-0.45) =>-0.9432489
logSigmoid(7.8899999) => -0.0003744
Example 3:
Let’s create a tensor that has two dimensions in js with 2 rows and 2 columns that has exponent values and return the logSigmoid values.
<html><!-- CDN Link that delivers the Tensorflow.js framework --><script src="https://cdn.jsdelivr.net/npm/@tensorflow/tfjs"></script><body><center><h1>Linux Hint</h1></center><center><h2>Tensorflow.js - tf.logSigmoid() </h2></center><script>let values = tf.tensor2d([[Math.E,Math.E+1],[Math.E-1,Math.E+0.45]]);//actual tensor
document.write("Actual Tensor: ",values);
document.write("<br>");
document.write("<br>");//apply logSigmoid() on the above tensor
document.write("Tensor with logSigmoid Values: "+tf.logSigmoid(values));</script></body></html>
Output:
![]()
logSigmoid(2.7182817) => -0.0639022
logSigmoid(3.7182817) => -0.0239857
logSigmoid(1.7182819) => -0.1649839
logSigmoid(3.1682818) => -0.0412147
Conclusion
In this Tensorflow.js tutorial, we learned how to return the natural logarithmic Sigmoid values using the tf.logSigmoid() function with three different examples.
We observed that if the input is 0, NaN, null, and undefined, the log sigmoid value is -0.6931472.
Tensorflow.js – tf.log1p()
Tf.log1p() Function
The tf.log1p() in Tensorflow.js is used to return the natural logarithmic values from a given values in a tensor.
It takes only one parameter, the tensor, that has numbers.
Mathematically, it can be referred as log(1+x).
Syntax:
tf.log1p(tensor_input)
Parameter:
The tensor_input is a tensor that has numbers.
It can be one or two-dimensional.
Example 1:
Let’s create a one-dimensional tensor in js that has null, undefined, and NaN values and return the natural logarithmic values.
<html><!-- CDN Link that delivers the Tensorflow.js framework --><script src="https://cdn.jsdelivr.net/npm/@tensorflow/tfjs"></script><body><center><h1>Linux Hint</h1></center><center><h2>Tensorflow.js - tf.log1p() </h2></center><script>let values = tf.tensor1d([0,1,null,undefined,NaN]);//actual tensor
document.write("Actual Tensor: ",values);
document.write("<br>");
document.write("<br>");//apply log1p() on the above tensor
document.write("Tensor with Log Values: "+tf.log1p(values));</script></body></html>
Output:
![]() Tensor takes null as 0 and the undefined and NaN as NaN value.
Tensor takes null as 0 and the undefined and NaN as NaN value.
log1p(0) => 0
log1p(1)=> 1
log1p(0)=> 0
log1p(NaN)=> NaN
log1p(NaN)=> NaN
We observed that if the input is 0, NaN, null and undefined, the logarithmic value is 0.
Example 2:
Let’s create a tensor that has two dimensions in js with 2 rows and 2 columns that has decimal values and return the natural logarithmic values.
<html><!-- CDN Link that delivers the Tensorflow.js framework --><script src="https://cdn.jsdelivr.net/npm/@tensorflow/tfjs"></script><body><center><h1>Linux Hint</h1></center><center><h2>Tensorflow.js - tf.log1p() </h2></center><script>let values = tf.tensor2d([[1.23,4.56],[-0.45,7.89]]);//actual tensor
document.write("Actual Tensor: ",values);
document.write("<br>");
document.write("<br>");//apply log1p() on the above tensor
document.write("Tensor with Log Values: "+tf.log1p(values));</script></body></html>
Output:
![]()
log1p(1.23) =>0.8020017
log1p(4.5599999) => 1.7155979
log1p(-0.45) =>-0.597837
log1p(7.8899999) => 2.184927
Example 3:
Let’s create a tensor that has two dimensions in js with 2 rows and 2 columns that has exponent values and return the natural logarithmic values.
<html><!-- CDN Link that delivers the Tensorflow.js framework --><script src="https://cdn.jsdelivr.net/npm/@tensorflow/tfjs"></script><body><center><h1>Linux Hint</h1></center><center><h2>Tensorflow.js - tf.log1p() </h2></center><script>let values = tf.tensor2d([[Math.E,Math.E+1],[Math.E-1,Math.E+0.45]]);//actual tensor
document.write("Actual Tensor: ",values);
document.write("<br>");
document.write("<br>");//apply log1p() on the above tensor
document.write("Tensor with Log Values: "+tf.log1p(values));</script></body></html>
Output:
![]()
log1p(2.7182817) => 1.3132617
log1p(3.7182817) => 1.5514446
log1p(1.7182819) => 0.9999998
log1p(3.1682818) => 1.4275037
Conclusion
In this Tensorflow.js tutorial, we learned how to return the natural logarithmic values using the tf.log1p() function with three different examples.
We observed that if the input is 0, NaN, null, and undefined, the logarithmic value is 0.
The tf.onesLike() and tf-zerosLike() in TensorFlow.js
In Deep Learning, you are working with images.
For simplicity, you need to convert the colored images to 0 and all the gray images to 1.
Using TensorFlow.js, how can you do that?
It is possible to convert all elements in a tensor to 1’s and 0’s using tf.onesLike() and tf.zerosLike().
Let’s discuss them one by one in detail.
TensorFlow.js – tf.onesLike() Function
The tf.onesLike() is used to replace all the existing elements with 1.
Syntax:
tf.onesLike(tensor)
Parameter:
It takes a tensor as a parameter that has numeric values.
Example 1:
Create a 1D tensor that has some integers.
Now, we will replace all with 1.
<html><!-- CDN Link that delivers the Tensorflow.js framework --><script src="https://cdn.jsdelivr.net/npm/@tensorflow/tfjs"></script><body><script>
//create tensorlet values = tf.tensor1d([12,34,56,77,78])//display
document.write("<br>Actual Tensor:</b> "+values);
document.write("<br>");
document.write("<b>Final Tensor with all 1's: </b> "+tf.onesLike(values));
document.write("<br>");</script></body></html>
Output:
![]() All elements are replaced with 1.
All elements are replaced with 1.
Example 2:
Create a 2D tensor that has some integers.
Now, we will replace all with 1.
<html><!-- CDN Link that delivers the Tensorflow.js framework --><script src="https://cdn.jsdelivr.net/npm/@tensorflow/tfjs"></script><body><script>
//create tensorlet values = tf.tensor2d([12,34,56,77,78,100],[3,2])//display
document.write("<b>Actual Tensor:</“> "+values);
document.write("<”r>");
document.write("<b>Final Tensor with al’ 1's:</“> "tf.onesLike(values));
document.write("<”r>");</script></body></html>
Output:
![]() All elements are replaced with 1.
All elements are replaced with 1.
TensorFlow.js – tf.zerosLike() Function
tf.zerosLike() is used to replace all the existing elements with 0.
Syntax:
tf.zerosLike(tensor)
Parameter:
It takes a tensor as a parameter that has numeric values.
Example 1:
Create a 1D tensor that has some integers.
Now, we will replace all with 0.
<html><!-- CDN Link that delivers the Tensorflow.js framework --><script src="https://cdn.jsdelivr.net/npm/@tensorflow/tfjs"></script><body><script>
//create tensorlet values = tf.tensor1d([12,34,56,77,78])//display
document.write("<b>Actual Tensor:</b> "+values);
document.write("<br>");
document.write("<b>Final Tensor with all 0's:</b> ""+tf.zerosLike(values));
document.write("<br>");
</script>
</body>
</html>
Output:
![]() All elements are replaced with 0.
All elements are replaced with 0.
Example 2:
Create a 2D tensor that has some integers.
Now, we will replace all with 0.
<html><!-- CDN Link that delivers the Tensorflow.js framework --><script src="https://cdn.jsdelivr.net/npm/@tensorflow/tfjs"></script><body><script>//create tensorlet values = tf.tensor2d([12,34,56,77,78,100],[3,2])//display
document.write("<b>Actual Tensor:</b> "+values);
document.write("<br>");
document.write("<b>Final Tensor with all 0's:</b> ""+tf.zerosLike(values));
document.write("<br>");
</script>
</body>
</html>
Output:
![]() All elements are replaced with 0.
All elements are replaced with 0.
Conclusion
In this TensorFlow.js tutorial, we have seen how to convert all elements in a tensor to 1 using tf.onesLike() and all elements in a tensor to 0 using tf.erosLike() with two examples.
These functions are very much helpful in converting images to binary so that memory is reduced.
We hope this article provides a better way to learn.
Tensorflow.js – tf.log()
Tf.log() Function
The tf.log() in Tensorflow.js is used to return the logarithmic values from a given values in a tensor.
It takes only one parameter – tensor – that has numbers.
Syntax:
tf.log(tensor_input)
Parameter:
The tensor_input is a tensor that has numbers.
It can be one or two-dimensional.
Example 1:
Let’s create a one-dimensional tensor in js that has null, undefined, and NaN values and return the logarithmic values.
<html><!-- CDN Link that delivers the Tensorflow.js framework --><script src="https://cdn.jsdelivr.net/npm/@tensorflow/tfjs"></script><body><center><h1>Linux Hint</h1></center><center><h2>Tensorflow.js - tf.log() </h2></center><script>let values = tf.tensor1d([0,1,null,undefined,NaN]);//actual tensor
document.write("Actual Tensor: ",values);
document.write("<br>");
document.write("<br>");//apply log() on the above tensor
document.write("Tensor with Log Values: "+tf.log(values));</script></body></html>
Output:
![]() Tensor takes null as 0 and the undefined and NaN as NaN value.
Tensor takes null as 0 and the undefined and NaN as NaN value.
log(0) => -Infinity
log(1) => 0
log(0) => -Infinity
log(NaN) => NaN
log(NaN) => NaN
We observed that if the input is NaN or undefined, the logarithm is also NaN and returns the -Infinity when the values are 0 or null.
Example 2:
Let’s create a tensor that has two dimensions in js with 2 rows and 2 columns that has decimal values and return the logarithmic values.
<html><!-- CDN Link that delivers the Tensorflow.js framework --><script src="https://cdn.jsdelivr.net/npm/@tensorflow/tfjs"></script><body><center><h1>Linux Hint</h1></center><center><h2>Tensorflow.js - tf.log() </h2></center><script>let values = tf.tensor2d([[1.23,4.56],[-0.45,7.89]]);//actual tensor
document.write("Actual Tensor: ",values);
document.write("<br>");
document.write("<br>");//apply log() on the above tensor
document.write("Tensor with Log Values: "+tf.log(values));</script></body></html>
Output:
![]()
log(1.23) =>0.2070142
log(4.5599999) => 1.5173227
log(-0.45) => NaN
log(7.8899999) => 2.0655961
For the negative values, it returns NaN.
Example 3:
Let’s create a tensor that has two dimensions in js with 2 rows and 2 columns that has exponent values and return the logarithmic values.
<html><!-- CDN Link that delivers the Tensorflow.js framework --><script src="https://cdn.jsdelivr.net/npm/@tensorflow/tfjs"></script><body><center><h1>Linux Hint</h1></center><center><h2>Tensorflow.js - tf.log() </h2></center><script>let values = tf.tensor2d([[Math.E,Math.E+1],[Math.E-1,Math.E+0.45]]);//actual tensor
document.write("Actual Tensor: ",values);
document.write("<br>");
document.write("<br>");//apply log() on the above tensor
document.write("Tensor with Log Values: "+tf.log(values));</script></body></html>
Output:
![]()
log(2.7182817) => 0.9999999
log(3.7182817) => 1.3132616
log(1.7182819) => 0.5413249
log(3.1682818) => 1.1531894
Conclusion
In this Tensorflow.js tutorial, we learned how to return the logarithmic values using the tf.log() function with three different examples.
We observed that if the input is NaN or undefined, the logarithm is also NaN and returns the -Infinity when the values are 0 or null.
The tf.ones() and tf.zeros() Functions in Tensorflow.js
In Deep Learning, you are working with images.
For simplicity, you need to convert the colored images to 0 and all the gray images to 1.
By using TensorFlow.js, how can you do that?
It is possible using tf.ones() and tf.zeros().
Let’s discuss them one by one in detail.
TensorFlow.js – tf.ones() Function
The tf.ones() is used to create 1’s.
It takes two parameters.
Syntax:
tf.ones([size],datatype)
Parameter:
The size represents the number of 1’s to be created in a tensor.
It is an integer value.
The datatype is used to set the datatype to the tensor.
Example 1:
In this example, we will create four 1’s in a one-dimensional tensor using tf.ones() function with integer and float types.
<html><!-- CDN Link that delivers the Tensorflow.js framework --><script src="https://cdn.jsdelivr.net/npm/@tensorflow/tfjs"></script><body><script>
//create one's with integer-32 type
let values1 = tf.ones([4], tf.int32)
//create one's with float-32 typelet values2 = tf.ones([4], tf.float32)//display
document.write("<br>Tensor with 1's of Integer32: </b> "+values1);
document.write("<br>");
document.write("<br>Tensor with 1's of Float32: </b> "+values2);</script></body></html>
Output:
![]() 1s would be created with integer32 and float32 types.
We can specify the number of rows and columns inside the size parameter.
1s would be created with integer32 and float32 types.
We can specify the number of rows and columns inside the size parameter.
Example 2:
In this example, we will create 1’s in a two-dimensional tensor using tf.ones() function with integer and float types.
<html><!-- CDN Link that delivers the Tensorflow.js framework --><script src="https://cdn.jsdelivr.net/npm/@tensorflow/tfjs"></script><body><script>//create one's with integer-32 type in 4 rows and 2 columns
let values1 = tf.ones([4,2], tf.int32)
//create one's with float-32 type in 2 rows and 3 columnslet values2 = tf.ones([2,3], tf.float32)//display
document.write("<br>Tensor with 1's of Integer32: </b> "+values1);
document.write("<br>");
document.write("<br>Tensor with 1's of Float32: </b> "+values2);</script></body></html>
Output:
![]() In the first tensor, 1’s are created in 4 rows and 2 columns.
In the second tensor, 1’s are created in 2 rows and 3 columns.
In the first tensor, 1’s are created in 4 rows and 2 columns.
In the second tensor, 1’s are created in 2 rows and 3 columns.
TensorFlow.js – tf.zeros() Function
tf.zeros() is used to create 0’s.
It takes two parameters.
Syntax:
tf.zeros([size],datatype)
Parameter:
The size represents the number of 0’s to be created in a tensor.
It is an integer value.
The datatype is used to set the datatype to the tensor.
Example 1:
In this example, we will create four 0’s in a one dimensional tensor using tf.zeros() function with integer and float types.
<html><!-- CDN Link that delivers the Tensorflow.js framework --><script src="https://cdn.jsdelivr.net/npm/@tensorflow/tfjs"></script><body><script>
//create zeros with integer-32 typelet values1 = tf.zeros([4], tf.int32)
//create zeros with float-32 typelet values2 = tf.zeros([4], tf.float32)//display
document.write("<br>Tensor with 0's of Integer32: </b> "+values1);
document.write("<br>");
document.write("<br>Tensor with 0's of Float32: </b> "+values2);</script></body></html>
Output:
![]() 0’s are created with integer32 and float32 types.
We can specify the number of rows and columns inside the size parameter.
0’s are created with integer32 and float32 types.
We can specify the number of rows and columns inside the size parameter.
Example 2:
In this example, we will create 0’s in a two-dimensional tensor using tf.zeros() function with integer and float types.
<html><!-- CDN Link that delivers the Tensorflow.js framework --><script src="https://cdn.jsdelivr.net/npm/@tensorflow/tfjs"></script><body><script>
//create zeros with integer-32 type in 4 rows and 2 columnslet values1 = tf.zeros([4,2], tf.int32)
//create zeros with float-32 type in 2 rows and 3 columnslet values2 = tf.zeros([2,3], tf.float32)//display
document.write("<br>Tensor with 0's of Integer32: </b> "+values1);
document.write("<br>");
document.write("<br>Tensor with 0's of Float32: </b> "+values2);</script></body></html>
Output:
![]() In the first tensor, 0’s are created in 4 rows and 2 columns with integer type.
In the second tensor, 0’s are created in 2 rows and 3 columns with float type.
In the first tensor, 0’s are created in 4 rows and 2 columns with integer type.
In the second tensor, 0’s are created in 2 rows and 3 columns with float type.
Conclusion
In this article, we discussed how to create 1s using tf.ones() and 0s using tf.zeros() functions in the TensorFlow.js library.
It is possible to create 1’s or 0’s with our data types.
Here, we created 0’s and 1’s with Integer and floated with 32-byte data types.
Tensorflow.js – tf.islnf()
While you are training a model in machine learning using the Tensorflow.js, you may overcome with Infinite values in your dataset.
If you include these values in your dataset, you didn’t get the training accuracy for the model.
It is necessary to remove the Infinites from your data.
First, we have to check that all the elements present in the dataset are not Infinites.
Then, only you have to proceed to train and work on the model.
To check if the data contains Infinite values or not, we use the tf.isinf() function.
Tf.isinf() Function
The tf.isinf() is used to check if the element is Infinity or Infinity.
It returns the Boolean values.
If the value is -Infinity or Infinity, it returns true.
Otherwise, it returns false.
Syntax:
tf.isinf(tensor_input)
Parameter:
The tensor_input is a tensor that has numbers.
It can be one or two-dimensional.
Example 1:
Let’s create a one-dimensional tensor in js that has positive and negative Infinities and apply the isInf() function.
<html><!-- CDN Link that delivers the Tensorflow.js framework --><script src="https://cdn.jsdelivr.net/npm/@tensorflow/tfjs"></script><body><center><h1>Linux Hint</h1></center><center><h2>Tensorflow.js - tf.isInf() </h2></center><script>
let values = tf.tensor1d([Infinity,-Infinity]);//actual tensor
document.write("Actual Tensor: ",values);
document.write("<br>");
document.write("<br>");//apply isInf() on the above tensor
document.write("Infinity?:- "+tf.isInf(values));</script></body></html>
Output:
![]() We can see that it returns true for the Infinity values (both positive and negative).
We can see that it returns true for the Infinity values (both positive and negative).
Example 2:
Let’s create a one-dimensional tensor in js that has 0, null, NaN, and undefined values and apply the isInf() function.
<html><!-- CDN Link that delivers the Tensorflow.js framework --><script src="https://cdn.jsdelivr.net/npm/@tensorflow/tfjs"></script><body><center><h1>Linux Hint</h1></center><center><h2>Tensorflow.js - tf.isInf() </h2></center><script>
let values = tf.tensor1d([0,null,NaN,undefined]);//actual tensor
document.write("Actual Tensor: ",values);
document.write("<br>");
document.write("<br>");//apply isInf() on the above tensor
document.write("Infinity?:- "+tf.isInf(values));</script></body></html>
Output:
![]() Since they are not related to Infinite values, false is returned.
Since they are not related to Infinite values, false is returned.
Example 3:
Let’s create a tensor that has two dimensions in js with 2 rows and 2 columns that has decimal values with Infinites and check for Infinites.
<html><!-- CDN Link that delivers the Tensorflow.js framework --><script src="https://cdn.jsdelivr.net/npm/@tensorflow/tfjs"></script><body><center><h1>Linux Hint</h1></center><center><h2>Tensorflow.js - tf.isInf() </h2></center><script>let values = tf.tensor2d([[Infinity,4.56],[-Infinity,7.89]]);//actual tensor
document.write("Actual Tensor: ",values);
document.write("<br>");
document.write("<br>");//apply isInf() on the above tensor
document.write("Infinity?:- "+tf.isInf(values));</script></body></html>
Output:
![]() There are two Infinities present in the previous tensor.
Hence, for those values, true is returned.
There are two Infinities present in the previous tensor.
Hence, for those values, true is returned.
Conclusion
In this Tensorflow.js tutorial, we learned how to check the Infinite values in a tensor using the tf.isInf() function with three different examples.
In the JavaScript, we can create an Infinite value using Infinity or -Infinity.
The null, 0, undefined, and NaN doesn’t come under the Infinite values.
Tensorflow.js – tf.tan()
Tensorflow.js is a framework that supports the tf.tan() function that converts all the numeric values to tangent values present in a tensor.
This conversion might help us in predicting the machine learning models through tensorflow.js that includes the construction,Retail, etc.
Instead of using the mathematical formulas, we can simply use this built-in method to get the tangent values in lesser time.
Tf.tan() Function
The tf.tan() function is used to return the tangent values from a given tensor.
It takes only one parameter, i.e.
tensor, that has numbers.
Syntax:
tf.tan(tensor_input)
Parameter:
The tensor_input is a tensor that has numbers.
It can be 1or 2 dimensional.
Let’s explore the different examples of this method.
Example 1:
Let’s create a one dimensional tensor in js that has some values and return the tangent values.
<html><!-- CDN Link that delivers the Tensorflow.js framework --><script src="https://cdn.jsdelivr.net/npm/@tensorflow/tfjs"></script><body><center><h1>Tensorflow.js - tf.tan() </h1></center><script>let values = tf.tensor1d([78,54,67,90,21,45,67,89,0,1]);//actual tensor
document.write("Actual Tensor: ",values);
document.write("<br>");
document.write("<br>");//apply exp() on the above tensor
document.write("Tensor with Tangent Values: "+tf.tan(values));</script></body></html>
Output:
![]() The tangent values were returned from the given one dimensional tensor.
The tangent values were returned from the given one dimensional tensor.
Example 2:
Let’s create a tensor that has 2 dimensions in js with 5 rows and 2 columns and return the tangent values.
<html><!-- CDN Link that delivers the Tensorflow.js framework --><script src="https://cdn.jsdelivr.net/npm/@tensorflow/tfjs"></script><body><center><h1>Tensorflow.js - tf.tan() </h1></center><script>let values = tf.tensor2d([[0,null],[10,NaN],[45,82],[34,undefined],[67,43]]);//actual tensor
document.write("Actual Tensor: ",values);
document.write("<br>");
document.write("<br>");
document.write("Tensor with Tangent Values: "+tf.tan(values));</script></body></html>
Output:
![]() The tangent values were returned from the given one dimensional tensor.
We observed that for the null, NaN, and undefined values, it returned 0.
The tangent values were returned from the given one dimensional tensor.
We observed that for the null, NaN, and undefined values, it returned 0.
Example 3:
In this case, we will consider the decimal values.
Let’s create a tensor that has 2 dimensions in js with 5 rows and 2 columns and return the tangent values.
<html><!-- CDN Link that delivers the Tensorflow.js framework --><script src="https://cdn.jsdelivr.net/npm/@tensorflow/tfjs"></script><body><center><h1>Tensorflow.js - tf.tan() </h1></center><script>let values = tf.tensor2d([[4.80,0],[45.10,null],[46.785,8.2],[31.4,5.6],[6.87,43.76]]);//actual tensor
document.write("Actual Tensor: ",values);
document.write("<br>");
document.write("<br>");
document.write("Tensor with Tangent Values: "+tf.tan(values));</script></body></html>
Output:
![]() The tangent values were returned from the given one dimensional tensor.
The tangent values were returned from the given one dimensional tensor.
Conclusion
In this Tensorflow.js tutorial, we learned how to return the tangent values from the actual values using the tf.tan() function present in one/two dimensional tensors with three examples.
Make sure that the CDN Link is provided inside the script tag in each and every code.
We observed that for the values null, 0, NaN, and undefined, the tan() function returns 0.
Tensorflow.js – tf.isFinite()
What Are Finite Values?
If you are working on a project using Machine Learning with Tensorflow.js library, if you only want to collect the Finite values from your dataset, you have to check for the Finite values first.
Finite values are the values which are not Infinite.
Simply, we can say that except for -Infinity and Infinity, all are Finite.
So, to check if the data contains Finite values or not, we can use the tf.isFinite() function.
Tf.isFinite() Function
The tf.isFinite() is used to check if the element is Finite or not.
It returns the Boolean values.
If the value is -Infinity or Infinity, it returns false.
Otherwise, it returns true.
Syntax:
tf.isFinite(tensor_input)
Parameter:
The tensor_input is a tensor that has numbers.
It can be one or two-dimensional.
Example 1:
Let’s create a one-dimensional tensor in js that has positive and negative Infinities and apply the isFinite() function.
<html><!-- CDN Link that delivers the Tensorflow.js framework --><script src="https://cdn.jsdelivr.net/npm/@tensorflow/tfjs"></script><body><center><h1>Linux Hint</h1></center><center><h2>Tensorflow.js - tf.isFinite() </h2></center><script>let values = tf.tensor1d([Infinity,-Infinity]);//actual tensor
document.write("Actual Tensor: ",values);
document.write("<br>");
document.write("<br>");//apply isFinite() on the above tensor
document.write("Finite?:- "+tf.isFinite(values));</script></body></html>
Output:
![]() We can see that false is returned for the Infinity values (both positive and negative).
We can see that false is returned for the Infinity values (both positive and negative).
Example 2:
Let’s create a one-dimensional tensor in js that has 0, null, NaN, and undefined values and apply the isFinite() function.
<html><!-- CDN Link that delivers the Tensorflow.js framework --><script src="https://cdn.jsdelivr.net/npm/@tensorflow/tfjs"></script><body><center><h1>Linux Hint</h1></center><center><h2>Tensorflow.js - tf.isFinite() </h2></center><script>let values = tf.tensor1d([0,null,NaN,undefined]);//actual tensor
document.write("Actual Tensor: ",values);
document.write("<br>");
document.write("<br>");//apply isFinite() on the above tensor
document.write("Finite?:- "+tf.isFinite(values));</script></body></html>
Output:
![]() Since they are related to the Finite values, it returns true.
Since they are related to the Finite values, it returns true.
Example 3:
Let’s create a tensor that has two dimensions in js with 2 rows and 2 columns that has decimal values with Infinites and check for Finites.
<html><!-- CDN Link that delivers the Tensorflow.js framework --><script src="https://cdn.jsdelivr.net/npm/@tensorflow/tfjs"></script><body><center><h1>Linux Hint</h1></center><center><h2>Tensorflow.js - tf.isFinite() </h2></center><script>let values = tf.tensor2d([[Infinity,4.56],[-Infinity,7.89]]);//actual tensor
document.write("Actual Tensor: ",values);
document.write("<br>");
document.write("<br>");//apply isFinite() on the above tensor
document.write("Finite?:- "+tf.isFinite(values));</script></body></html>
Output:
![]() There are two Infinities present in the previous tensor.
Hence, for those values, false is returned while the rest of the values are returned true.
There are two Infinities present in the previous tensor.
Hence, for those values, false is returned while the rest of the values are returned true.
Conclusion
In this Tensorflow.js tutorial, we learned how to check the Finite values in a tensor using the tf.isFinite() function with three different examples.
There are only two Infinite values in the JavaScript: Infinity and -Infinity.
Null, 0, undefined, and NaN come under the Finite values.
Tensorflow.js – tf.sigmoid()
In this article, we will see how to round-off the values in tensorflow.js framework in the JavaScript.
The advantages of rounding is we can represent the values in an integer format without any decimal points.
In machine learning, the Sigmoid function acts as an activation function that adds the non-linearity to a model.
Simply, Sigmoid function is used to make a non-linear model.
The mathematical formula is 1 / (1 + exp(-x)).
We will see how it is applied on tensor elements.
Tf.sigmoid() Function
The tf.sigmoid() is used to return the Sigmoid values from a given value in a tensor.
It takes only one parameter, the tensor,that has numbers.
According to the formula, x represents each element in a tensor.
Finally, the value is computed and results in a Sigmoid value.
Syntax:
tf.sigmoid(tensor_input)
Parameter:
The tensor_input is a tensor that has numbers.
It can be one or two-dimensional.
Example 1:
Let’s create a one-dimensional tensor in js that has null, undefined, and NaN values and return the Sigmoid values.
<html><!-- CDN Link that delivers the Tensorflow.js framework --><script src="https://cdn.jsdelivr.net/npm/@tensorflow/tfjs"></script><body><center><h1>Linux Hint</h1></center><center><h2>Tensorflow.js - tf.sigmoid() </h2></center><script>let values = tf.tensor1d([0,1,null,undefined,NaN]);//actual tensor
document.write("Actual Tensor: ",values);
document.write("<br>");
document.write("<br>");//apply exp() on the above tensor
document.write("Tensor with Sigmoid Values: "+tf.sigmoid(values));</script></body></html>
Output:
![]()
1 / (1 + exp(-0)) => 0
1 / (1 + exp(-1)) => 0.7310586
1 / (1 + exp(-0)) => 0.5
1 / (1 + exp(-NaN)) => NaN
1 / (1 + exp(-NaN)) => NaN
We observed that if the input is NaN or undefined, the sigmoid is also NaN.
Example 2:
Let’s create a tensor that has two dimensions in js with 2 rows and 2 columns that has decimal values and return the Sigmoid values.
<html><!-- CDN Link that delivers the Tensorflow.js framework --><script src="https://cdn.jsdelivr.net/npm/@tensorflow/tfjs"></script><body><center><h1>Linux Hint</h1></center><center><h2>Tensorflow.js - tf.sigmoid() </h2></center><script>let values = tf.tensor2d([[1.23,4.56],[-0.45,7.89]]);//actual tensor
document.write("Actual Tensor: ",values);
document.write("<br>");
document.write("<br>");
document.write("Tensor with Sigmoid Values: "+tf.sigmoid(values));</script></body></html>
Output:
![]()
1 / (1 + exp(-1.23)) => 0.7738186
1 / (1 + exp(-4.5599999)) => 0.9896463
1 / (1 + exp(0.45)) => 0.3893608
1 / (1 + exp(-7.8899999)) => 0.9996257
Example 3:
Let’s create a tensor that has two dimensions in js with 2 rows and 2 columns that has exponent values and return the Sigmoid values.
<html><!-- CDN Link that delivers the Tensorflow.js framework --><script src="https://cdn.jsdelivr.net/npm/@tensorflow/tfjs"></script><body><center><h1>Linux Hint</h1></center><center><h2>Tensorflow.js - tf.sigmoid() </h2></center><script>let values = tf.tensor2d([[Math.E,Math.E+1],[Math.E-1,Math.E+0.45]]);//actual tensor
document.write("Actual Tensor: ",values);
document.write("<br>");
document.write("<br>");
document.write("Tensor with Sigmoid Values: "+tf.sigmoid(values));</script></body></html>
Output:
![]()
1 / (1 + exp(-2.7182817)) => 0.9380968
1 / (1 + exp(-3.7182817)) => 0.9762997
1 / (1 + exp(-1.7182819)) => 0.8479074
1 / (1 + exp(-3.1682818)) => 0.959623
Conclusion
In this Tensorflow.js tutorial, we learned how to return the Sigmoid values using the tf.sigmoid() function with three different examples.
The formula for the Sigmoid function is – 1 / (1 + exp(-x)).
We observed that if the input is NaN or undefined, the Sigmoid is also NaN.
Tensorflow.js – tf.round()
In this article, we will see how to round-off the values in tensorflow.js framework in the JavaScript.
The advantages of rounding is we can represent the values in an integer format without any decimal points.
In Machine Learning, it is very simple to train a machine learning model if the input contains the integer values.
It is very important to get only the integers from the decimal values and achieve the transformation (scaling) using this method.
Each decimal value scales to an integer.
Tf.round() Function
The tf.exp() in Tensorflow.js returns the exponential values in a tensor.
Mathematically, “e” is raised to the power of “x”.
Syntax:
tf.round(tensor_input)
Parameter:
The tensor_input is a tensor that has numbers.
It can be one or two-dimensional.
Example 1:
Let’s create a one-dimensional tensor in js that has some values and return the Rounded values.
<html><!-- CDN Link that delivers the Tensorflow.js framework --><script src="https://cdn.jsdelivr.net/npm/@tensorflow/tfjs"></script><body><center><h1>Linux Hint</h1></center><center><h2>Tensorflow.js - tf.round() </h2></center><script>let values = tf.tensor1d([0.45,0.98,0.12,9.03,-0.343]);//actual tensor
document.write("Actual Tensor: ",values);
document.write("<br>");
document.write("<br>");//apply exp() on the above tensor
document.write("Tensor with Rounded Values: "+tf.round(values));</script></body></html>
Output:
![]()
0.45 Rounds to 0
0.98 rounds to 1
0.12 rounds to 0
9.02 rounds to 9 and
-0.343 rounds to 0
Example 2:
Let’s create a tensor that has two dimensions in js with 2 rows and 2 columns that has 0, null, Nan, and undefined values and return the Rounded values.
<html><!-- CDN Link that delivers the Tensorflow.js framework --><script src="https://cdn.jsdelivr.net/npm/@tensorflow/tfjs"></script><body><center><h1>Linux Hint</h1></center><center><h2>Tensorflow.js - tf.round() </h2></center><script>let values = tf.tensor2d([[0,null],[undefined,NaN]]);//actual tensor
document.write("Actual Tensor: ",values);
document.write("<br>");
document.write("<br>");
document.write("Tensor with Rounded Values: "+tf.round(values));</script></body></html>
Output:
![]() We can notice that for the values 0, null, NaN, and undefined, the rounded values is 0.
We can notice that for the values 0, null, NaN, and undefined, the rounded values is 0.
Example 3:
In this case, we will consider the Integer values.
Let’s create a tensor that has two dimensions in js with 2 rows and 2 columns and return the Rounded values.
<html><!-- CDN Link that delivers the Tensorflow.js framework --><script src="https://cdn.jsdelivr.net/npm/@tensorflow/tfjs"></script><body><center><h1>Linux Hint</h1></center><center><h2>Tensorflow.js - tf.round() </h2></center><script>let values = tf.tensor2d([[23,45],[11,22]]);//actual tensor
document.write("Actual Tensor: ",values);
document.write("<br>");
document.write("<br>");
document.write("Tensor with Rounded Values: "+tf.round(values));</script></body></html>
Output:
![]() The rounded values is the same as the integers.
The rounded values is the same as the integers.
Conclusion
In this Tensorflow.js tutorial, we learned how to return the nearest values using the tf.round() function.
If the input element is in 0, null, undefined, or NaN, it returns 0.
For the integer values, it returns integer.
We learned the three different examples on tf.round() function.
Tensorflkow.js – tf.floor()
Transformation in Machine Learning is the technique that scales the values to the nearest integer.
To implement this task, Tensorflow.js provides the tf.floor() function which scales the decimal value to the nearest floor value.
Tf.floor() Function
The tf.floor() in Tensorflow.js returns the floor values for the given decimal values in a tensor.
Syntax:
tf.floor(tensor_input)
Parameter:
The tensor_input is a tensor that has numeric elements.
It can be one or two-dimensional.
Example 1:
Let’s create a one-dimensional tensor in js that has decimal values and apply the floor() function.
<html><!-- CDN Link that delivers the Tensorflow.js framework --><script src="https://cdn.jsdelivr.net/npm/@tensorflow/tfjs"></script><body><center><h1>Linux Hint</h1></center><center><h2>Tensorflow.js - tf.floor() </h2></center><script>let values = tf.tensor1d([8.56,3.45,7.89,8.32,9.03,1.00,45.6]);//actual tensor
document.write("Actual Tensor: ",values);
document.write("<br>");
document.write("<br>");//apply floor() on the above tensor
document.write("Tensor with Floor Values:- "+tf.floor(values));</script></body></html>
Output:
![]() The floor values were returned that are lower to the decimal values.
The floor values were returned that are lower to the decimal values.
Example 2:
Let’s create a tensor that has two dimensions in js with 2 rows and 2 columns that has decimal values and get the floor values.
<html><!-- CDN Link that delivers the Tensorflow.js framework --><script src="https://cdn.jsdelivr.net/npm/@tensorflow/tfjs"></script><body><center><h1>Linux Hint</h1></center><center><h2>Tensorflow.js - tf.floor() </h2></center><script>let values = tf.tensor2d([[-34.4,4.56],[4.5,7.89]]);//actual tensor
document.write("Actual Tensor: ",values);
document.write("<br>");
document.write("<br>");//apply floor() on the above tensor
document.write("Tensor with Floor Values:- "+tf.floor(values));</script></body></html>
Output:
![]() The floor values were returned that are lower to the decimal values.
The floor values were returned that are lower to the decimal values.
Example 3:
Let’s create a tensor that has two dimensions in js with 2 rows and 2 columns that has integer values and get the floor values.
<html><!-- CDN Link that delivers the Tensorflow.js framework --><script src="https://cdn.jsdelivr.net/npm/@tensorflow/tfjs"></script><body><center><h1>Linux Hint</h1></center><center><h2>Tensorflow.js - tf.floor() </h2></center><script>let values = tf.tensor2d([[-4,5],[8,-45]]);//actual tensor
document.write("Actual Tensor: ",values);
document.write("<br>");
document.write("<br>");//apply floor() on the above tensor
document.write("Tensor with Floor Values:- "+tf.floor(values));</script></body></html>
Output:
![]() The floor values were returned that are the same as the integer values.
The floor values were returned that are the same as the integer values.
Conclusion
In this Tensorflow.js tutorial, we learned how to get the floor values using the tf.floor() function with three different examples.
The tf.floor() function returns the floor values that are lower than the given decimal values.
Tensorflow.js – tf.real()
When you are working with the complex numbers in tensorflow.js, in some cases, you need only real numbers from the complex numbers.
Is it possible to get it? The answer is Yes.
Let’s see how to return the real number part from the given set of complex numbers.
As we know, the complex number is the form a+ib, where a refers to the real part and b refers to the imaginary part.
Tensorflow.js is a framework which is used to run the Machine Learning models in the browser directly.
Using this library, we can train and test the model and achieve the accuracy of the model.
In tensorflow.js, we can create a data using tensor.
It can hold multiple elements separated by comma.
We will run the Tensorflow.js framework inside the HTML Tags.
It is very important to use the Content Delivery Network Link inside the script tag.
This framework can be implemented inside the tag.
This script tag can be placed inside the <head> or <body> tag.
Structure:
<script src="https://cdn.jsdelivr.net/npm/@tensorflow/tfjs"></script>
It is possible to create the multiple imaginary numbers in a tensor using the tf.complex() method.
Syntax:
tf.complex([real_parts],[imaginary_parts])
Note:
It takes two arrays as parameters.
The first array takes the real part and the second array takes the imaginary parts.
Parameters:
Tf.real() Function
Tensorflow.js supports the tf.real() method that can return only the real number part from the complex number in a tensor.
It takes only one parameter, i.e.
tensor, that has complex numbers.
Syntax:
tf.real(complex_tensor)
Parameter:
The complex_tensor is a tensor that has complex numbers.
Without any delay, let’s create a tensor that has 5 complex numbers and return the real numbers from them.
Example 1:
Here, we will create a complex tensor that has numeric values.
<html><!-- CDN Link that delivers the Tensorflow.js framework --><script src="https://cdn.jsdelivr.net/npm/@tensorflow/tfjs"></script><body><center><h1>Linux Hint</h1></center><center><h2>Tensorflow.js - tf.real() </h2></center><script>//create a tensor that store 5 complex numberslet complex_numbers = tf.complex([34,56,78,45,0], [12,34,56,89,66]);//actual tensor
document.write("Actual Tensor: ",values);
document.write("<br>");//return only real part from the above complex_numbers
document.write("Tensor with real numbers: "+tf.real(complex_numbers));</script></body></html>
Output:
![]() We can observe that only the real numbers were returned from the complex numbers:
34 + 12j =>3456 + 34j =>5678 + 56j =>7845 + 89j =>450 + 66j =>0
We can observe that only the real numbers were returned from the complex numbers:
34 + 12j =>3456 + 34j =>5678 + 56j =>7845 + 89j =>450 + 66j =>0
Example 2:
Here, we will create a complex tensor that has null, undefined, and NaN values.
It considers the null value as 0 and the undefined and NaN values as NaN(Not a Number).
<html><!-- CDN Link that delivers the Tensorflow.js framework --><script src="https://cdn.jsdelivr.net/npm/@tensorflow/tfjs"></script><body><center><h1>Linux Hint</h1></center><center><h2>Tensorflow.js - tf.real() </h2></center><script>//create a tensor that store 3 complex numbers with null,NaN and undefinedlet complex_numbers = tf.complex([null,undefined,NaN,], [null,undefined,NaN]);//actual tensor
document.write("Actual Tensor: ",complex_numbers);
document.write("<br>");//return only real part from the above complex_numbers
document.write("Tensor with real numbers: "+tf.real(complex_numbers));</script></body></html>
Output:
![]() Working:
Tensor [[1,2], [3,4], [5,6 ], [7,8 ]]
=>1*3*5*7 = 1052*4*6*8=384
We can observe that the null value is taken as 0 while the NaN and undefined values are taken as NaN.
Finally, they were returned.
Working:
Tensor [[1,2], [3,4], [5,6 ], [7,8 ]]
=>1*3*5*7 = 1052*4*6*8=384
We can observe that the null value is taken as 0 while the NaN and undefined values are taken as NaN.
Finally, they were returned.
Conclusion
In this Tensorflow.js tutorial, we learned how to return the real part from the complex number using the tf.real() function.
If the tensor has null, undefined, or NaN values, it considers the null value as 0 and the undefined and NaN values as NaN.
Make sure that the CDN Link is provided inside the script tag.
Tensorflow.js – tf.prod()
In tensorflow.js, if you want to return the product of elements in a tensor, you should know about the tf.prod() method.
Tf.prod() Function
The tf.prod() in Tensorflow.js returns the total product of elements.
Syntax:
tf.prod(tensor_input,axis)
Parameter:
1.
The tensor_input is a tensor that has numeric elements.
It can be one or two-dimensional.
2.
If the tensor is two-dimensional, it is possible to specify the axis to get a product across the rows or columns.
If axis=0, the total product is returned across the column wise.
If the axis=1, the total product is returned across the row wise.
If the axis is not specified, it returns the product of all elements.
Return:
Returns a Tensor with the product.
Example 1:
Let’s create a one-dimensional tensor in js that has integer values and return the product.
<html><!-- CDN Link that delivers the Tensorflow.js framework --><script src="https://cdn.jsdelivr.net/npm/@tensorflow/tfjs"></script><body><center><h1>Linux Hint</h1></center><center><h2>Tensorflow.js - tf.prod() </h2></center><script>let values = tf.tensor1d([34,56,78,90]);//actual tensor
document.write("Actual Tensor: ",values);
document.write("<br>");
document.write("<br>");//apply exp() on the above tensor
document.write("Total Product:- "+tf.prod(values));</script></body></html>
Output:
![]() Working:
34*56*78*90 = 13366080.
If the values are already negative, the results are positive.
Working:
34*56*78*90 = 13366080.
If the values are already negative, the results are positive.
Example 2:
Let’s create a tensor that has two dimensions in js with 4 rows and 2 columns that has integer values and return the product across the columns.
<html><!-- CDN Link that delivers the Tensorflow.js framework --><script src="https://cdn.jsdelivr.net/npm/@tensorflow/tfjs"></script><body><center><h1>Linux Hint</h1></center><center><h2>Tensorflow.js - tf.prod() </h2></center><script>let values = tf.tensor2d([1,2,3,4,5,6,7,8],[4,2]);//actual tensor
document.write("Actual Tensor: ",values);
document.write("<br>");
document.write("<br>");
document.write("Total Product across columns:- "+tf.prod(values,0));</script></body></html>
Output:
![]() Working:
Tensor [[1,2], [3,4], [5,6 ], [7,8 ]]
=>1*3*5*7 = 1052*4*6*8=384
Working:
Tensor [[1,2], [3,4], [5,6 ], [7,8 ]]
=>1*3*5*7 = 1052*4*6*8=384
Example 3:
Let’s create a tensor that has two dimensions in js with 1 row and 2 columns that has integer values and return the product across the rows.
<html><!-- CDN Link that delivers the Tensorflow.js framework --><script src="https://cdn.jsdelivr.net/npm/@tensorflow/tfjs"></script><body><center><h1>Linux Hint</h1></center><center><h2>Tensorflow.js - tf.prod() </h2></center><script>let values = tf.tensor2d([[1],[3]]);//actual tensor
document.write("Actual Tensor: ",values);
document.write("<br>");
document.write("<br>");
document.write("Total Product across rows:- "+tf.prod(values,1));</script></body></html>
Output:
![]() Working:
Tensor [[1], [3]]
=>13.
Since there is only one element in each row, it returns itself.
Working:
Tensor [[1], [3]]
=>13.
Since there is only one element in each row, it returns itself.
Example 4:
Let’s create a tensor that has two dimensions in js with 4 rows and 2 columns that have integer values and return the total product in all rows and columns.
<html><!-- CDN Link that delivers the Tensorflow.js framework --><script src="https://cdn.jsdelivr.net/npm/@tensorflow/tfjs"></script><body><center><h1>Linux Hint</h1></center><center><h2>Tensorflow.js - tf.prod() </h2></center><script>let values = tf.tensor2d([34,56,78,90,1,0,3,4],[4,2]);//actual tensor
document.write("Actual Tensor: ",values);
document.write("<br>");
document.write("<br>");
document.write("Total Product across rows:- "+tf.prod(values,1));</script></body></html>
Output:
![]() Working:
Tensor [[34, 56], [78, 90], [1 , 0 ], [3 , 4 ]]
=>34*56*78*90*1*0*3*4=0..
Working:
Tensor [[34, 56], [78, 90], [1 , 0 ], [3 , 4 ]]
=>34*56*78*90*1*0*3*4=0..
Conclusion
In this Tensorflow.js tutorial, we learned how to return the total product of elements present in a tensor using the tf.prod() method.
In a 2D tensor, if axis=0, total product is returned across the column wise.
If axis=1, the total product is returned across the row wise.
By default, it returns the product of all elements across the rows and columns.
Tensorflow.js – tf.neg()
In tensorflow.js, if you want to convert the existing values present in a tensor to numeric values, the tf.neg() function is used.
It converts each value in a tensor to negative by multiplying each value with -1.
Tf.neg() Function
The tf.neg() in Tensorflow.js converts all the values in a tensor to negative.
Syntax:
tf.neg(tensor_input)
Parameter:
The tensor_input is a tensor that has numeric elements.
It can be one or two-dimensional.
Example 1:
Let’s create a one-dimensional tensor in js that has decimal values and convert them into negative values.
<html><!-- CDN Link that delivers the Tensorflow.js framework --><script src="https://cdn.jsdelivr.net/npm/@tensorflow/tfjs"></script><body><center><h1>Linux Hint</h1></center><center><h2>Tensorflow.js - tf.neg() </h2></center><script>let values = tf.tensor1d([8.56,3.45,7.89,8.32]);//actual tensor
document.write("Actual Tensor: ",values);
document.write("<br>");
document.write("<br>");//apply exp() on the above tensor
document.write("Tensor with Negative Values:- "+tf.neg(values));</script></body></html>
Output:
![]() Working:
Tensor [8.5600004*-1, 3.45*-1, 7.8899999*-1, 8.3199997*-1]
If the values are already negative, the results are positive.
Working:
Tensor [8.5600004*-1, 3.45*-1, 7.8899999*-1, 8.3199997*-1]
If the values are already negative, the results are positive.
Example 2:
Let’s create a one-dimensional tensor in js that has negative decimal values and convert them into positive values with the neg() function.
<html><!-- CDN Link that delivers the Tensorflow.js framework --><script src="https://cdn.jsdelivr.net/npm/@tensorflow/tfjs"></script><body><center><h1>Linux Hint</h1></center><center><h2>Tensorflow.js - tf.neg() </h2></center><script>let values = tf.tensor1d([-8.56,-3.45,-7.89,-8.32]);//actual tensor
document.write("Actual Tensor: ",values);
document.write("<br>");
document.write("<br>");
document.write("Tensor with Negative Values:- "+tf.neg(values));</script></body></html>
Output:
![]() The positive values were returned with respect to the given negative values.
Working:
Tensor [-8.5600004*-1, -3.45*-1, -7.8899999*-1, -8.3199997*-1]
The positive values were returned with respect to the given negative values.
Working:
Tensor [-8.5600004*-1, -3.45*-1, -7.8899999*-1, -8.3199997*-1]
Example 3:
Let’s create a tensor that has two dimensions in js with 2 rows and 2 columns that has integer values.
<html><!-- CDN Link that delivers the Tensorflow.js framework --><script src="https://cdn.jsdelivr.net/npm/@tensorflow/tfjs"></script><body><center><h1>Linux Hint</h1></center><center><h2>Tensorflow.js - tf.neg() </h2></center><script>let values = tf.tensor2d([-34,4,41,7],[2,2]);//actual tensor
document.write("Actual Tensor: ",values);
document.write("<br>");
document.write("<br>");
document.write("Tensor with Negative Values:- "+tf.neg(values));</script></body></html>
Output:
![]() Working:
Tensor [[-34*-1, 4*-1], [41*-1 , 7*-1]]
Working:
Tensor [[-34*-1, 4*-1], [41*-1 , 7*-1]]
Conclusion
In this Tensorflow.js tutorial, we learned how to get the negative values from a tensor using the tf.neg() function with three different examples.
If the values are already negative, the results will be positive.
Tensorflow.js – tf.exp()
We will discuss how to return the exponential values from a tensor using the tf.exp() function in the Tensorflow.js library.
Tf.exp() Function
The tf.exp() in Tensorflow.js returns the exponential values in a tensor.
Mathematically, “e” is raised to the power of “x”.
Syntax:
tf.exp(tensor_input)
Parameter:
The tensor_input is a tensor that has numbers.
It can be one or two-dimensional.
Example 1:
Let’s create a one-dimensional tensor in js that has positive and negative Infinities and apply the exp() function.
<html><!-- CDN Link that delivers the Tensorflow.js framework --><script src="https://cdn.jsdelivr.net/npm/@tensorflow/tfjs"></script><body><center><h1>Linux Hint</h1></center><center><h2>Tensorflow.js - tf.exp() </h2></center><script>let values = tf.tensor1d([Infinity,-Infinity]);//actual tensor
document.write("Actual Tensor: ",values);
document.write("<br>");
document.write("<br>");//apply exp() on the above tensor
document.write("Tensor with Exponential Values:- "+tf.exp(values));</script></body></html>
Output:
![]()
exp(Infinity) – Infinity
exp(-Infinity) – 0
Example 2:
Let’s create a one-dimensional tensor in js that has 0, null, NaN, and undefined values and return the exponential values.
<html><!-- CDN Link that delivers the Tensorflow.js framework --><script src="https://cdn.jsdelivr.net/npm/@tensorflow/tfjs"></script><body><center><h1>Linux Hint</h1></center><center><h2>Tensorflow.js - tf.exp() </h2></center><script>let values = tf.tensor1d([0,null,NaN,undefined]);//actual tensor
document.write("Actual Tensor: ",values);
document.write("<br>");
document.write("<br>");
document.write("Tensor with Exponential Values:- "+tf.exp(values));</script></body></html>
Output:
![]() Tensor takes null as 0 and undefined as NaN.
Tensor takes null as 0 and undefined as NaN.
exp(0) – 1
exp(0) – 1
exp(NaN) – NaN
exp(NaN) – NaN
Example 3:
Let’s create a tensor that has two dimensions in js with 2 rows and 2 columns that has decimal values and raise the exponential values.
<html><!-- CDN Link that delivers the Tensorflow.js framework --><script src="https://cdn.jsdelivr.net/npm/@tensorflow/tfjs"></script><body><center><h1>Linux Hint</h1></center><center><h2>Tensorflow.js - tf.exp() </h2></center><script>let values = tf.tensor2d([[-34.4,4.56],[4.5,7.89]]);//actual tensor
document.write("Actual Tensor: ",values);
document.write("<br>");
document.write("<br>");
document.write("Tensor with Exponential Values:- "+tf.exp(values));</script></body></html>
Output:
![]()
exp(-34.4000015) – 0
exp( 4.5599999) – 95.5834732
exp(4.5) – 90.017128
exp(7.8899999) – 2670.4436035
Example 4:
Let’s create a tensor that has two dimensions in js with 2 rows and 2 columns that has integer values and raise the exponential values.
<html><!-- CDN Link that delivers the Tensorflow.js framework --><script src="https://cdn.jsdelivr.net/npm/@tensorflow/tfjs"></script><body><center><h1>Linux Hint</h1></center><center><h2>Tensorflow.js - tf.exp() </h2></center><script>let values = tf.tensor2d([[-4,5],[8,-45]]);//actual tensor
document.write("Actual Tensor: ",values);
document.write("<br>");
document.write("<br>");
document.write("Tensor with Exponential Values:- "+tf.exp(values));</script></body></html>
Output:
![]()
exp(-4) – 0
exp(5) – 148.4131622
exp(8) – 2980.9580078
exp(-45) – 0
Conclusion
In this Tensorflow.js tutorial, we learned how to get the exponential values using the tf.exp() function with four different examples.
We noticed that for the negative values, the exponent values is 0.
Tensorflow.js – tf.ceil()
Transformation in Machine Learning is the technique that scales the values to the nearest integer.
To implement this task, Tensorflow.js provides the tf.ceil() function which scales the decimal value to the nearest ceil value.
Tf.ceil() Function
The tf.ceil() function in tensorflow.js returns the ceil values for the given decimal values in a tensor.
Syntax:
tf.ceil(tensor_input)
Parameter:
The tensor_input is a tensor that has numeric elements.
It can be one or two-dimensional.
Example 1:
Let’s create a one-dimensional tensor in js that has decimal values and apply the ceil() function.
<html><!-- CDN Link that delivers the Tensorflow.js framework --><script src="https://cdn.jsdelivr.net/npm/@tensorflow/tfjs"></script><body><center><h1>Linux Hint</h1></center><center><h2>Tensorflow.js - tf.ceil() </h2></center><script>let values = tf.tensor1d([8.56,3.45,7.89,8.32,9.03,1.00,45.6]);//actual tensor
document.write("Actual Tensor: ",values);
document.write("<br>");
document.write("<br>");//apply ceil() on the above tensor
document.write("Tensor with Ceil Values:- "+tf.ceil(values));</script></body></html>
Output:
![]() The ceil values were returned that are higher than the decimal values.
The ceil values were returned that are higher than the decimal values.
Example 2:
Let’s create a tensor that has two dimensions in js with 2 rows and 2 columns that has decimal values and get the ceil values.
<html><!-- CDN Link that delivers the Tensorflow.js framework --><script src="https://cdn.jsdelivr.net/npm/@tensorflow/tfjs"></script><body><center><h1>Linux Hint</h1></center><center><h2>Tensorflow.js - tf.ceil() </h2></center><script>let values = tf.tensor2d([[-34.4,4.56],[4.5,7.89]]);//actual tensor
document.write("Actual Tensor: ",values);
document.write("<br>");
document.write("<br>");//apply ceil() on the above tensor
document.write("Tensor with Ceil Values:- "+tf.ceil(values));</script></body></html>
Output:
![]()
Example 3:
Let’s create a tensor that has two dimensions in js with 2 rows and 2 columns that has integer values and get the ceil/top values.
<html><!-- CDN Link that delivers the Tensorflow.js framework --><script src="https://cdn.jsdelivr.net/npm/@tensorflow/tfjs"></script><body><center><h1>Linux Hint</h1></center><center><h2>Tensorflow.js - tf.ceil() </h2></center><script>let values = tf.tensor2d([[-4,5],[8,-45]]);//actual tensor
document.write("Actual Tensor: ",values);
document.write("<br>");
document.write("<br>");//apply ceil() on the above tensor
document.write("Tensor with Ceil Values:- "+tf.ceil(values));</script></body></html>
Output:
![]() The ceil values were returned that are the same as the integer values.
The ceil values were returned that are the same as the integer values.
Conclusion
In this Tensorflow.js tutorial, we learned how to get the ceil values using the tf.ceil() function with three different examples.
The tf.ceil() function returns the top values that are higher than the given decimal values.
The tf.expm1() Function in TensorFlow.js
We will discuss how to return the exponential values differed by 1 from a tensor using the tf.expm1() function in the TensorFlow.js library.
tf.expm1() Function
The tf.expm1() in TensorFlow.js returns the exponential values minus 1 in a tensor.
Mathematically, it is represented as (e^x)-1.
Syntax:
tf.expm1(tensor_input)
Parameter:
tensor_input is a tensor that has numbers.
It can be one-dimensional or two-dimensional.
Example 1
Let’s create a one-dimensional tensor in TensorFlow.js with positive and negative Infinities and apply the expm1() function.
<html><!-- CDN Link that delivers the Tensorflow.js framework --><script src="https://cdn.jsdelivr.net/npm/@tensorflow/tfjs"></script><body><center><h1>Linux Hint</h1></center><center><h2>Tensorflow.js - tf.expm1() </h2></center><script>let values = tf.tensor1d([Infinity,-Infinity]);//actual tensor
document.write("Actual Tensor: ",values);
document.write("<br>");
document.write("<br>");//apply expm1() on the above tensor
document.write("Tensor with Exponential Values minus 1:- "+tf.expm1(values));</script></body></html>
Output:
![]()
exp(Infinity)-1 => Infinity
exp(-Infinity)-1 => -1.
Example 2
Let’s create a one-dimensional tensor in TensorFlow.js that has 0, null, NaN, and undefined values and return exponential values differed by 1.
<html><!-- CDN Link that delivers the Tensorflow.js framework --><script src="https://cdn.jsdelivr.net/npm/@tensorflow/tfjs"></script>
<body><center><h1>Linux Hint</h1></center><center><h2>Tensorflow.js - tf.expm1() </h2></center><script>
let values = tf.tensor1d([0,null,NaN,undefined]);//actual tensor
document.write("Actual Tensor: ",values);
document.write("<br>");
document.write("<br>");
//apply expm1() on the above tensor
document.write("Tensor with Exponential Values differed by 1:- "+tf.expm1(values));</script>
</body></html>
Output:
![]() Tensor takes null as 0 and undefined as NaN.
Tensor takes null as 0 and undefined as NaN.
exp(0)-1 => 0
exp(0)-1 => 0
exp(NaN)-1 => NaN
exp(NaN)-1 => NaN
Example 3
Let’s create a tensor that has two dimensions in TensorFlow.js with 2 rows and 2 columns that has decimal values and raise the exponential values differed by 1.
<html><!-- CDN Link that delivers the Tensorflow.js framework --><script src="https://cdn.jsdelivr.net/npm/@tensorflow/tfjs"></script>
<body><center><h1>Linux Hint</h1></center><center><h2>Tensorflow.js - tf.expm1() </h2></center><script>
let values = tf.tensor2d([[-34.4,4.56],[4.5,7.89]]);//actual tensor
document.write("Actual Tensor: ",values);
document.write("<br>");
document.write("<br>");
//apply expm1() on the above tensor
document.write("Tensor with Exponential Values differed by 1:- "+tf.expm1(values));</script>
</body></html>
Output:
![]()
exp(-34.4000015)-1 => -1
exp( 4.5599999)-1 => 94.5834732
exp(4.5)-1 => 89.017128
exp(7.8899999)-1 => 2669.4436035
Example 4
Let’s create a tensor that has two dimensions in TensorFlow.js with 2 rows and 2 columns that has integer values and raise the exponential values differed by 1.
<html><!-- CDN Link that delivers the Tensorflow.js framework --><script src="https://cdn.jsdelivr.net/npm/@tensorflow/tfjs"></script>
<body><center><h1>Linux Hint</h1></center><center><h2>Tensorflow.js - tf.expm1() </h2></center><script>
let values = tf.tensor2d([[-4,5],[8,-45]]);//actual tensor
document.write("Actual Tensor: ",values);
document.write("<br>");
document.write("<br>");
//apply expm1() on the above tensor
document.write("Tensor with Exponential Values differed by 1:- "+tf.expm1(values));</script>
</body></html>
Output:
![]()
exp(-4)-1 => -0.9816844
exp(5)-1 => 147.4131622
exp(8)-1 =>2979.9580078
exp(-45)-1 =>-1.
Conclusion
In this TensorFlow.js tutorial, we saw how to get the exponential values differed by 1 using the tf.expm1() function with four different examples.
It is very similar to exp(), but the result differed by 1.
The tf.squaredDifference() Function in TensorFlow.js
In the Tensorflow.js library, the tf.squaredDifference() function is used to return the square difference of each element present in two tensors/scalars.
Computation
(i-j)*(i-j)
Where “i” is the element in the first tensor, and “j” is the element in the second tensor.
Syntax:
tensor.squaredDifference()
Return:
It returns a positive integer even if the result is negative.
Example 1
Create two 1D tensors with 4 integers and get the squared difference.
<html><!-- CDN Link that delivers the Tensorflow.js framework --><script src="https://cdn.jsdelivr.net/npm/@tensorflow/tfjs"></script>
<body><script>
//tensor1
let values1 = tf.tensor1d([0,1,2,3]);
//tensor2
let values2 = tf.tensor1d([1,4,1,5]);//display
document.write("<b>Tensor-1: </b> "+values1);
document.write("<br>");
document.write("<b>Tensor-2: </b> "+values2);
document.write("<br>");//return the squared difference
document.write("<b>Squared Difference: </b> "+values1.squaredDifference(values2));</body></html>
Output:
![]() Working:
(0-1)*(0-1) = 1
(1-4)*(1-4)=9
(2-1)*(2-1)=1
(3-5)*(3-5)=4
Working:
(0-1)*(0-1) = 1
(1-4)*(1-4)=9
(2-1)*(2-1)=1
(3-5)*(3-5)=4
Example 2
Create two 1D tensors with 5 integers and get the squared difference.
<html><!-- CDN Link that delivers the Tensorflow.js framework --><script src="https://cdn.jsdelivr.net/npm/@tensorflow/tfjs"></script>
<body><script>
//tensor1
let values1 = tf.tensor1d([12,34,56,78,90]);
//tensor2
let values2 = tf.tensor1d([12,34,56,78,90]);//display
document.write("<b>Tensor-1: </b> "+values1);
document.write("<br>");
document.write("<b>Tensor-2: </b> "+values2);
document.write("<br>");//return the squared difference
document.write("<b>Squared Difference: </b> "+values1.squaredDifference(values2));</script></body></html>
Output:
![]() If the values in a tensor are the same, then the squared difference is 0.
It is also possible to get the squared difference with a tensor and a scalar.
If the values in a tensor are the same, then the squared difference is 0.
It is also possible to get the squared difference with a tensor and a scalar.
Example 3
Create a1D tensor with 5 integers, a scalar with a value of 2 and get the squared difference.
<html><!-- CDN Link that delivers the Tensorflow.js framework --><script src="https://cdn.jsdelivr.net/npm/@tensorflow/tfjs"></script>
<body><script>
//tensor
let values = tf.tensor1d([12,34,56,78,90]);
//scalar
let value = tf.scalar(2);//display
document.write("<b>Tensor: </b> "+values);
document.write("<br>");
document.write("<b>Scalar: </b> "+value);
document.write("<br>");//return the squared difference
document.write("<b>Squared Difference: </b> "+values.squaredDifference(value));</script></body></html>
Output:
![]() Working:
Working:
(12-2)*(12-2)=100
(34-2)*(34-2)=1024
(56-2)*(56-2)=2916
(78-2)*(78-2)=5776
(90-2)*(90-2)=7744
Conclusion
In this article, we saw how to return the square difference of elements in tensors using tf.squaredDifference().
It performs computation using the formula (i-j)*(i-j), where “i” is the element in the first tensor and “j” is the element in the second tensor.
Also, we discussed the different examples with different cases
Tensorflow.js – tf.asinh()
Tensorflow.js is a framework that supports the tf.asinh() function that converts all the numeric values to inverse hyperbolic sine values present in a tensor.
Tf.asinh() Function
The tf.asinh() is used to return the inverse hyperbolic sine values from a given tensor.
It takes only one parameter, i.e.
tensor, that has numbers.
Syntax:tf.asinh(tensor_input)
Parameter:
The tensor_input is a tensor that has numbers.
It can be 1or 2 dimensional.
Let’s explore the different examples of this method.
Example 1:
Let’s create a one-dimensional tensor in js that has some values and return the inverse hyperbolic sine values.
<html><!-- CDN Link that delivers the Tensorflow.js framework --><script src="https://cdn.jsdelivr.net/npm/@tensorflow/tfjs"></script><body><center><h1>Tensorflow.js - tf.asinh() </h1></center><script>
let values = tf.tensor1d([23,45,0,45]);//actual tensor
document.write("Actual Tensor: ",values);
document.write("<br>");
document.write("<br>");//apply asinh() on the above tensor
document.write("Tensor with Inverse Hyperbolic Sine Values: "+tf.asinh(values));</script></body></html>
Output:
![]() The inverse hyperbolic sine values were returned from the given one-dimensional tensor.
Example 2:
Let’s create a tensor that has 2 dimensions in js with 5 rows and 2 columns and return the inverse hyperbolic cosine values.
<html><!-- CDN Link that delivers the Tensorflow.js framework --><script src="https://cdn.jsdelivr.net/npm/@tensorflow/tfjs"></script><body><center><h1>Tensorflow.js - tf.asinh() </h1></center><script>
let values = tf.tensor2d([[0,null],[10,NaN],[45,82],[34,undefined],[67,43]]);//actual tensor
document.write("Actual Tensor: ",values);
document.write("<br>");
document.write("<br>");//apply asinh() on the above tensor
document.write("Tensor with Inverse Hyperbolic Sine Values: "+tf.asinh(values));</script></body></html>
Output:
The inverse hyperbolic sine values were returned from the given one-dimensional tensor.
Example 2:
Let’s create a tensor that has 2 dimensions in js with 5 rows and 2 columns and return the inverse hyperbolic cosine values.
<html><!-- CDN Link that delivers the Tensorflow.js framework --><script src="https://cdn.jsdelivr.net/npm/@tensorflow/tfjs"></script><body><center><h1>Tensorflow.js - tf.asinh() </h1></center><script>
let values = tf.tensor2d([[0,null],[10,NaN],[45,82],[34,undefined],[67,43]]);//actual tensor
document.write("Actual Tensor: ",values);
document.write("<br>");
document.write("<br>");//apply asinh() on the above tensor
document.write("Tensor with Inverse Hyperbolic Sine Values: "+tf.asinh(values));</script></body></html>
Output:
![]() The inverse hyperbolic sine values were returned from the given one-dimensional tensor.
Example 3:
In this case, we will consider the decimal values.
Let’s create a tensor that has 2 dimensions in js with 5 rows and 2 columns and return the inverse hyperbolic sine values.
<html><!-- CDN Link that delivers the Tensorflow.js framework --><script src="https://cdn.jsdelivr.net/npm/@tensorflow/tfjs"></script><body><center><h1>Tensorflow.js - tf.asinh() </h1></center><script>
let values = tf.tensor2d([[4.80,0],[45.10,null],[46.785,8.2],[31.4,5.6],[6.87,43.76]]);//actual tensor
document.write("Actual Tensor: ",values);
document.write("<br>");
document.write("<br>");//apply asinh() on the above tensor
document.write("Tensor with Inverse Hyperbolic Sine Values: "+tf.asinh(values));</script></body></html>
Output:
The inverse hyperbolic sine values were returned from the given one-dimensional tensor.
Example 3:
In this case, we will consider the decimal values.
Let’s create a tensor that has 2 dimensions in js with 5 rows and 2 columns and return the inverse hyperbolic sine values.
<html><!-- CDN Link that delivers the Tensorflow.js framework --><script src="https://cdn.jsdelivr.net/npm/@tensorflow/tfjs"></script><body><center><h1>Tensorflow.js - tf.asinh() </h1></center><script>
let values = tf.tensor2d([[4.80,0],[45.10,null],[46.785,8.2],[31.4,5.6],[6.87,43.76]]);//actual tensor
document.write("Actual Tensor: ",values);
document.write("<br>");
document.write("<br>");//apply asinh() on the above tensor
document.write("Tensor with Inverse Hyperbolic Sine Values: "+tf.asinh(values));</script></body></html>
Output:
![]() The inverse hyperbolic sine values were returned from the given one-dimensional tensor.
The inverse hyperbolic sine values were returned from the given one-dimensional tensor.
Conclusion
In this Tensorflow.js tutorial, we learned how to return the values from the actual values using the tf.asinh() function present in one/two dimensional tensors with three examples.
Make sure that the CDN Link is provided inside the script tag in each and every code.
Tensorflow.js – tf.acosh()
Tensorflow.js is a framework that supports the tf.acosh() function that converts all the numeric values to inverse hyperbolic cosine values present in a tensor.
Tf.acosh() Function
The tf.acosh() function is used to return the inverse hyperbolic cosine values from a given tensor.
It takes only one parameter, i.e.
tensor, that has numbers.
Syntax:
tf.acosh(tensor_input)
Parameter:
The tensor_input is a tensor that has numbers.
It can be 1 or 2 dimensional.
Let’s explore the different examples of this method.
Example 1:
Let’s create a one-dimensional tensor in js that has some values and return the inverse hyperbolic cosine values.
<html><!-- CDN Link that delivers the Tensorflow.js framework --><script src="https://cdn.jsdelivr.net/npm/@tensorflow/tfjs"></script><body><center><h1>Tensorflow.js - tf.acosh() </h1></center><script>
let values = tf.tensor1d([78,54,67,90,21,45,67,89,0,1]);//actual tensor
document.write("Actual Tensor: ",values);
document.write("<br>");
document.write("<br>");//apply acosh() on the above tensor
document.write("Tensor with Inverse Hyperbolic Cosine Values: "+tf.acosh(values));</script></body></html>
Output:
![]() The inverse hyperbolic cosine values were returned from the given one-dimensional tensor.
Example 2:
Let’s create a tensor that has 2 dimensions in js with 5 rows and 2 columns and return the inverse hyperbolic cosinevalues.
<html><!-- CDN Link that delivers the Tensorflow.js framework --><script src="https://cdn.jsdelivr.net/npm/@tensorflow/tfjs"></script><body><center><h1>Tensorflow.js - tf.acosh() </h1></center><script>
let values = tf.tensor2d([[0,null],[10,NaN],[45,82],[34,undefined],[67,43]]);//actual tensor
document.write("Actual Tensor: ",values);
document.write("<br>");
document.write("<br>");//apply acosh() on the above tensor
document.write("Tensor with Inverse Hyperbolic Cosine Values: "+tf.acosh(values));</script></body></html>
Output:
The inverse hyperbolic cosine values were returned from the given one-dimensional tensor.
Example 2:
Let’s create a tensor that has 2 dimensions in js with 5 rows and 2 columns and return the inverse hyperbolic cosinevalues.
<html><!-- CDN Link that delivers the Tensorflow.js framework --><script src="https://cdn.jsdelivr.net/npm/@tensorflow/tfjs"></script><body><center><h1>Tensorflow.js - tf.acosh() </h1></center><script>
let values = tf.tensor2d([[0,null],[10,NaN],[45,82],[34,undefined],[67,43]]);//actual tensor
document.write("Actual Tensor: ",values);
document.write("<br>");
document.write("<br>");//apply acosh() on the above tensor
document.write("Tensor with Inverse Hyperbolic Cosine Values: "+tf.acosh(values));</script></body></html>
Output:
![]() The inverse hyperbolic cosine values were returned from the given one-dimensional tensor.
Example 3:
In this case, we will consider the decimal values.
Let’s create a tensor that has 2 dimensions in js with 5 rows and 2 columns and return the inverse hyperbolic cosine values.
<html><!-- CDN Link that delivers the Tensorflow.js framework --><script src="https://cdn.jsdelivr.net/npm/@tensorflow/tfjs"></script><body><center><h1>Tensorflow.js - tf.acosh() </h1></center><script>
let values = tf.tensor2d([[4.80,0],[45.10,null],[46.785,8.2],[31.4,5.6],[6.87,43.76]]);//actual tensor
document.write("Actual Tensor: ",values);
document.write("<br>");
document.write("<br>");//apply acosh() on the above tensor
document.write("Tensor with Inverse Hyperbolic Cosine Values: "+tf.acosh(values));</script></body></html>
Output:
The inverse hyperbolic cosine values were returned from the given one-dimensional tensor.
Example 3:
In this case, we will consider the decimal values.
Let’s create a tensor that has 2 dimensions in js with 5 rows and 2 columns and return the inverse hyperbolic cosine values.
<html><!-- CDN Link that delivers the Tensorflow.js framework --><script src="https://cdn.jsdelivr.net/npm/@tensorflow/tfjs"></script><body><center><h1>Tensorflow.js - tf.acosh() </h1></center><script>
let values = tf.tensor2d([[4.80,0],[45.10,null],[46.785,8.2],[31.4,5.6],[6.87,43.76]]);//actual tensor
document.write("Actual Tensor: ",values);
document.write("<br>");
document.write("<br>");//apply acosh() on the above tensor
document.write("Tensor with Inverse Hyperbolic Cosine Values: "+tf.acosh(values));</script></body></html>
Output:
![]() The inverse hyperbolic cosine values were returned from the given one-dimensional tensor.
The inverse hyperbolic cosine values were returned from the given one-dimensional tensor.
Conclusion
In this Tensorflow.js tutorial, we learned how to return the inverse hyperbolic cosine values from the actual values using the tf.acosh() function present in one/two dimensional tensors with three examples.
Make sure that the CDN Link is provided inside the script tag in each and every code.
Tensorflow.js – tf.acos()
Tensorflow.js is a framework that supports the tf.acos() function (arc cosine) that converts all the numeric values to inverse cosine values present in a tensor.
Tf.acos() Function
The tf.acos() function is used to return the inverse cosine values from a given tensor.
It takes only one parameter, i.e.
tensor, that has numbers.
Syntax:
tf.acos(tensor_input)
Parameter:
The tensor_input is a tensor that has numbers.
It can be 1 or 2 dimensional.
Let’s explore the different examples of this method.
Example 1:
Let’s create a one-dimensional tensor in js that has some values and return the inverse cosine values.
<html><!-- CDN Link that delivers the Tensorflow.js framework --><script src="https://cdn.jsdelivr.net/npm/@tensorflow/tfjs"></script><body><center><h1>Tensorflow.js - tf.acos() </h1></center><script>
let values = tf.tensor1d([78,54,67,90,21,45,67,89,0,1]);//actual tensor
document.write("Actual Tensor: ",values);
document.write("<br>");
document.write("<br>");//apply acos() on the above tensor
document.write("Tensor with Inverse Cosine Values: "+tf.acos(values));</script></body></html>
Output:
![]() The inverse cosine values were returned from the given one-dimensional tensor.
Example 2:
Let’s create a tensor that has 2 dimensions in js with 5 rows and 2 columns and return the inverse cosine values.
<html><!-- CDN Link that delivers the Tensorflow.js framework --><script src="https://cdn.jsdelivr.net/npm/@tensorflow/tfjs"></script><body><center><h1>Tensorflow.js - tf.acos() </h1></center><script>
let values = tf.tensor2d([[0,null],[10,NaN],[45,82],[34,undefined],[67,43]]);//actual tensor
document.write("Actual Tensor: ",values);
document.write("<br>");
document.write("<br>");//apply acos() on the above tensor
document.write("Tensor with Inverse Cosine Values: "+tf.acos(values));</script></body></html>
Output:
The inverse cosine values were returned from the given one-dimensional tensor.
Example 2:
Let’s create a tensor that has 2 dimensions in js with 5 rows and 2 columns and return the inverse cosine values.
<html><!-- CDN Link that delivers the Tensorflow.js framework --><script src="https://cdn.jsdelivr.net/npm/@tensorflow/tfjs"></script><body><center><h1>Tensorflow.js - tf.acos() </h1></center><script>
let values = tf.tensor2d([[0,null],[10,NaN],[45,82],[34,undefined],[67,43]]);//actual tensor
document.write("Actual Tensor: ",values);
document.write("<br>");
document.write("<br>");//apply acos() on the above tensor
document.write("Tensor with Inverse Cosine Values: "+tf.acos(values));</script></body></html>
Output:
![]() The Inverse cosine values were returned from the previous one-dimensional tensor.
Example 3:
In this case, we will consider the decimal values.
Let’s create a tensor that has 2 dimensions in js with 5 rows and 2 columns and return the inverse cosine values.
<html><!-- CDN Link that delivers the Tensorflow.js framework --><script src="https://cdn.jsdelivr.net/npm/@tensorflow/tfjs"></script><body><center><h1>Tensorflow.js - tf.acos() </h1></center><script>
let values = tf.tensor2d([[4.80,0],[45.10,null],[46.785,8.2],[31.4,5.6],[6.87,43.76]]);//actual tensor
document.write("Actual Tensor: ",values);
document.write("<br>");
document.write("<br>");//apply acos() on the above tensor
document.write("Tensor with Inverse Cosine Values: "+tf.acos(values));</script></body></html>
Output:
The Inverse cosine values were returned from the previous one-dimensional tensor.
Example 3:
In this case, we will consider the decimal values.
Let’s create a tensor that has 2 dimensions in js with 5 rows and 2 columns and return the inverse cosine values.
<html><!-- CDN Link that delivers the Tensorflow.js framework --><script src="https://cdn.jsdelivr.net/npm/@tensorflow/tfjs"></script><body><center><h1>Tensorflow.js - tf.acos() </h1></center><script>
let values = tf.tensor2d([[4.80,0],[45.10,null],[46.785,8.2],[31.4,5.6],[6.87,43.76]]);//actual tensor
document.write("Actual Tensor: ",values);
document.write("<br>");
document.write("<br>");//apply acos() on the above tensor
document.write("Tensor with Inverse Cosine Values: "+tf.acos(values));</script></body></html>
Output:
![]() The inverse cosine values were returned from the given one-dimensional tensor.
The inverse cosine values were returned from the given one-dimensional tensor.
Conclusion
In this Tensorflow.js tutorial, we saw how to return the inverse cosine values from the actual values using the tf.acos() function present in one/two dimensional tensors with three examples.
Make sure that the CDN Link is provided inside the script tag in each and every code.
Tensorflow.js – tf.asin()
Tensorflow.js is a framework that supports the tf.asin() function (arc sine) that converts all the numeric values to inverse sine values present in a tensor.
Tf.asin() Function
The tf.asin() is used to return the inverse sine values from a given tensor.
It takes only one parameter, i.e.
tensor, that has numbers.
Syntax:
tf.asin(tensor_input)
Parameter:
The tensor_input is a tensor that has numbers.
It can be 1or 2 dimensional.
Let’s explore the different examples of this method.
Example 1:
Let’s create a one-dimensional tensor in js that has some values and return the inverse sine values.
<html><!-- CDN Link that delivers the Tensorflow.js framework --><script src="https://cdn.jsdelivr.net/npm/@tensorflow/tfjs"></script><body><center><h1>Tensorflow.js - tf.asin() </h1></center><script>
let values = tf.tensor1d([78,54,67,90,21,45,67,89,0,1]);//actual tensor
document.write("Actual Tensor: ",values);
document.write("<br>");
document.write("<br>");//apply asin() on the above tensor
document.write("Tensor with Inverse Sine Values: "+tf.asin(values));</script></body></html>
Output:
![]() The inverse sine values were returned from the given one-dimensional tensor.
Example 2:
Let’s create a tensor that has 2 dimensions in js with 5 rows and 2 columns and return the inverse sine values.
<html><!-- CDN Link that delivers the Tensorflow.js framework --><script src="https://cdn.jsdelivr.net/npm/@tensorflow/tfjs"></script><body><center><h1>Tensorflow.js - tf.asin() </h1></center><script>
let values = tf.tensor2d([[0,null],[10,NaN],[45,82],[34,undefined],[67,43]]);//actual tensor
document.write("Actual Tensor: ",values);
document.write("<br>");
document.write("<br>");//apply asin() on the above tensor
document.write("Tensor with Inverse Sine Values: "+tf.asin(values));</script></body></html>
Output:
The inverse sine values were returned from the given one-dimensional tensor.
Example 2:
Let’s create a tensor that has 2 dimensions in js with 5 rows and 2 columns and return the inverse sine values.
<html><!-- CDN Link that delivers the Tensorflow.js framework --><script src="https://cdn.jsdelivr.net/npm/@tensorflow/tfjs"></script><body><center><h1>Tensorflow.js - tf.asin() </h1></center><script>
let values = tf.tensor2d([[0,null],[10,NaN],[45,82],[34,undefined],[67,43]]);//actual tensor
document.write("Actual Tensor: ",values);
document.write("<br>");
document.write("<br>");//apply asin() on the above tensor
document.write("Tensor with Inverse Sine Values: "+tf.asin(values));</script></body></html>
Output:
![]() The inverse sine values were returned from the given one-dimensional tensor.
Example 3:
In this case, we will consider the decimal values.
Let’s create a tensor that has 2 dimensions in js with 5 rows and 2 columns and return the sine values.
<html><!-- CDN Link that delivers the Tensorflow.js framework --><script src="https://cdn.jsdelivr.net/npm/@tensorflow/tfjs"></script><body><center><h1>Tensorflow.js - tf.asin() </h1></center><script>
let values = tf.tensor2d([[4.80,0],[45.10,null],[46.785,8.2],[31.4,5.6],[6.87,43.76]]);//actual tensor
document.write("Actual Tensor: ",values);
document.write("<br>");
document.write("<br>");//apply asin() on the above tensor
document.write("Tensor with Inverse Sine Values: "+tf.asin(values));</script></body></html>
Output:
The inverse sine values were returned from the given one-dimensional tensor.
Example 3:
In this case, we will consider the decimal values.
Let’s create a tensor that has 2 dimensions in js with 5 rows and 2 columns and return the sine values.
<html><!-- CDN Link that delivers the Tensorflow.js framework --><script src="https://cdn.jsdelivr.net/npm/@tensorflow/tfjs"></script><body><center><h1>Tensorflow.js - tf.asin() </h1></center><script>
let values = tf.tensor2d([[4.80,0],[45.10,null],[46.785,8.2],[31.4,5.6],[6.87,43.76]]);//actual tensor
document.write("Actual Tensor: ",values);
document.write("<br>");
document.write("<br>");//apply asin() on the above tensor
document.write("Tensor with Inverse Sine Values: "+tf.asin(values));</script></body></html>
Output:
![]() The inverse sine values were returned from the given one-dimensional tensor.
The inverse sine values were returned from the given one-dimensional tensor.
Conclusion
In this Tensorflow.js tutorial, we learned how to return the inverse sine values from the actual values using the tf.asin() function present in one/two dimensional tensors with three examples.
Make sure that the CDN Link is provided inside the script tag in each and every code.
Tensorflow.js – tf.atan()
Tensorflow.js is a framework that supports the tf.atan() function (arc tangent) that converts all the numeric values to inverse tangent values present in a tensor.
Tf.atan() Function
The tf.atan() function is used to return inverse tangent values from a given tensor.
It takes only one parameter, i.e.
tensor, that has numbers.
Syntax:tf.atan(tensor_input)
Parameter:
The tensor_input is a tensor that has numbers.
It can be 1or 2 dimensional.
Let’s explore the different examples of this method.
Example 1:
Let’s create a one-dimensional tensor in js that has some values and return the inverse tangent values.
<html><!-- CDN Link that delivers the Tensorflow.js framework --><script src="https://cdn.jsdelivr.net/npm/@tensorflow/tfjs"></script><body><centerv<h1>Tensorflow.js - tf.atan() </h1></center><script>
let values = tf.tensor1d([78,54,67,90,21,45,67,89,0,1]);//actual tensor
document.write("Actual Tensor: ",values);
document.write("<br>");
document.write("<br>");//apply atan() on the above tensor
document.write("Tensor with Inverse Tangent Values: "+tf.atan(values));</script></body></html>
Output:
![]() The inverse tangent values were returned from the given one-dimensional tensor.
The inverse tangent values were returned from the given one-dimensional tensor.
Example 2:
Let’s create a tensor that has 2 dimensions in js with 5 rows and 2 columns and return the inverse tangent values.
<html><!-- CDN Link that delivers the Tensorflow.js framework --><script src="https://cdn.jsdelivr.net/npm/@tensorflow/tfjs"></script><body><center><h1>Tensorflow.js - tf.atan() </h1></center><script>
let values = tf.tensor2d([[0,null], [10,NaN], [45,82], [34,undefined], [67,43]]);//actual tensor
document.write("Actual Tensor: ",values);
document.write("<br>");
document.write("<br>");//apply atan() on the above tensor
document.write("Tensor with Inverse Tangent Values: "+tf.atan(values));</script></body></html>
Output:
![]() The inverse tangent values were returned from the given one-dimensional tensor.
We observed that for null.NaN and undefined values, it returned 0.
The inverse tangent values were returned from the given one-dimensional tensor.
We observed that for null.NaN and undefined values, it returned 0.
Example 3:
In this case, we will consider the decimal values.
Let’s create a tensor that has 2 dimensions in js with 5 rows and 2 columns and return the tangent values.
<html><!-- CDN Link that delivers the Tensorflow.js framework --><script src="https://cdn.jsdelivr.net/npm/@tensorflow/tfjs"></script><body><center><h1>Tensorflow.js - tf.atan() </h1></center><script>
let values = tf.tensor2d([[4.80,0], [45.10,null], [46.785,8.2], [31.4,5.6], [6.87,43.76]]);//actual tensor
document.write("Actual Tensor: ",values);
document.write("<br>");
document.write("<br>");//apply atan() on the above tensor
document.write("Tensor with Inverse tangent Values: "+tf.atan(values));</script></body></html>
Output:
![]() The inverse tangent values were returned from the given one-dimensional tensor.
The inverse tangent values were returned from the given one-dimensional tensor.
Conclusion
In this Tensorflow.js tutorial, we learned how to return the inverse tangent values from the actual values using the tf.atan() function present in one/two dimensional tensors with three examples.
Make sure that the CDN Link is provided inside the script tag in each and every code.
We observed that for the values null, 0, NaN, and undefined, the atan() function returns 0.
Tensorflow.js – tfd.atanh()
Tensorflow.js is a framework that supports the tf.atanh() function that converts all the numeric values to inverse hyperbolic tangent values present in a tensor.
Tf.atanh() Function
The tf.atanh() is used to return the inverse hyperbolic tangent values from a given tensor.
It takes only one parameter, i.e.
tensor, that has numbers.
Syntax:tf.atanh(tensor_input)
Parameter:
The tensor_input is a tensor that has numbers.
It can be 1or 2 dimensional.
Let’s explore the different examples of this method.
Example 1:
Let’s create a one-dimensional tensor in js that has some values and return the inverse hyperbolic tangent values.
<html><!-- CDN Link that delivers the Tensorflow.js framework --><script src="https://cdn.jsdelivr.net/npm/@tensorflow/tfjs"></script><body><center><h1>Tensorflow.js - tf.atanh() </h1></center><script>
let values = tf.tensor1d([23,45,0,45]);//actual tensor
document.write("Actual Tensor: ",values);
document.write("<br>");
document.write("<br>");//apply atanh() on the above tensor
document.write("Tensor with Inverse Hyperbolic Tangent Values: "+tf.atanh(values));</script></body></html>
Output:
![]() The inverse hyperbolic tangent values were returned from the given one-dimensional tensor.
The inverse hyperbolic tangent values were returned from the given one-dimensional tensor.
Example 2:
Let’s create a tensor that has 2 dimensions in js with 5 rows and 2 columns and return the inverse hyperbolic tangent values.
<html><!-- CDN Link that delivers the Tensorflow.js framework --><script src="https://cdn.jsdelivr.net/npm/@tensorflow/tfjs"></script><body><center><h1>Tensorflow.js - tf.atanh() </h1></center><script>
let values = tf.tensor2d([[0,null],[10,NaN],[45,82],[34,undefined],[67,43]]);
//actual tensor
document.write("Actual Tensor: ",values);
document.write("<br>");
document.write("<br>");
//apply atanh() on the above tensor
document.write("Tensor with Inverse Hyperbolic Tangent Values: "+tf.atanh(values));</script></body></html>
Output:
![]() The inverse hyperbolic tangent values were returned from the given one-dimensional tensor.
The inverse hyperbolic tangent values were returned from the given one-dimensional tensor.
Example 3:
In this case, we will consider the decimal values.
Let’s create a tensor that has 2 dimensions in js with 5 rows and 2 columns and return the inverse hyperbolic tangent values.
<html><!-- CDN Link that delivers the Tensorflow.js framework --><script src="https://cdn.jsdelivr.net/npm/@tensorflow/tfjs"></script><body><center><h1>Tensorflow.js - tf.atanh() </h1></center>
let values = tf.tensor2d([[4.80,0], [45.10,null], [46.785,8.2], [31.4,5.6], [6.87,43.76]]);//actual tensor
document.write("Actual Tensor: ",values);
document.write("<br>");
document.write("<br>");//apply atanh() on the above tensor
document.write("Tensor with Inverse Hyperbolic Tangent Values: "+tf.atanh(values));</script></body></html>
Output:
![]() The inverse hyperbolic tangent values were returned from the given one-dimensional tensor.
The inverse hyperbolic tangent values were returned from the given one-dimensional tensor.
Conclusion
In this Tensorflow.js tutorial, we learned how to return the inverse hyperbolic tangent values from the actual values using the tf.atanh() function present in one/two dimensional tensors with three examples.
Make sure that the CDN Link is provided inside the script tag in each and every code.
Tensforflow.js – tf.imag()
In this tensor.js tutorial, we will see how to return the imaginary part from the given set of complex numbers.
As we know, complex number is the form a+ib where a refers to the real part and b refers to the imaginary part.
Tensorflow.js is a framework which is used to run the Machine Learning models in the browser directly.
Using this library, we can train and test the model and achieve the accuracy of the model.
In Tensorflow.js, we can create a data using tensor.
It can hold multiple elements separated by comma.
We will run the tensorflow.js framework inside the HTML tags.
It is very important to use the Content Delivery Network Link inside the script tag.
This framework can be implemented inside the <script> tag.
This script tag can be placed inside the <head> or <body> tag.
Structure:<script src=”https://cdn.jsdelivr.net/npm/@tensorflow/tfjs”></script>
It is possible to create multiple imaginary numbers in a tensor using the tf.complex() method.
Syntax:tf.complex([real_parts],[imaginary_parts])
Parameters:
It takes two arrays as parameters.
The first array takes the real part and the second array takes the imaginary parts.
Note:
The elements in the two arrays must be equal.
Otherwise, an error is thrown.
Tf.imag() Function
Tensorflow.js supports the tf.imag() method that returns only the imaginary number from the complex number in a tensor.
It takes only one parameter, i.e.
tensor, that has complex numbers.
Syntax:tf.imag(complex_tensor)
Parameter:
The complex_tensor is a tensor that has complex numbers.
Without any delay, let’s create a tensor that has 5 complex numbers and return the imaginary numbers from them.
Example 1:
Here, we will create a complex tensor that has numeric values.
<html><!-- CDN Link that delivers the Tensorflow.js framework --><script src="https://cdn.jsdelivr.net/npm/@tensorflow/tfjs"></script><body><center><h1>Tensorflow.js - tf.imag() </h1></center><script>//create a tensor that store 5 complex numbers
let complex_numbers = tf.complex([34,56,78,45,0], [12,34,56,89,66]);//actual tensor
document.write("Actual Tensor: ",complex_numbers);
document.write("<br>");//return only imaginary part from the above complex_numbers
document.write("Tensor with imaginary numbers:"+tf.imag(complex_numbers));</script></body></html>
Output:
![]() We can observe that only the imaginary numbers were returned from the complex numbers:
34 + 12j =>1256 + 34j =>3478 + 56j =>5645 + 89j =>890 + 66j =>66
Example 2:
Here, we will create a complex tensor that has null, undefined, and NaN values for the complex part.
It considers the null value as 0 and the undefined and NaN values as NaN(Not a Number).
<html><!-- CDN Link that delivers the Tensorflow.js framework --><script src="https://cdn.jsdelivr.net/npm/@tensorflow/tfjs"></script><body><center><h1>Tensorflow.js - tf.imag() </h1></center><script>//create a tensor that store 3 complex numbers with null,NaN and undefined
let complex_numbers = tf.complex([null,undefined,NaN,], [null,undefined,NaN]);//actual tensor
document.write("Actual Tensor: ",complex_numbers);
document.write("<br>");//return only complex part from the above complex_numbers
document.write("Tensor with complex numbers: "+tf.imag(complex_numbers));</script></body></html>
Output:
We can observe that only the imaginary numbers were returned from the complex numbers:
34 + 12j =>1256 + 34j =>3478 + 56j =>5645 + 89j =>890 + 66j =>66
Example 2:
Here, we will create a complex tensor that has null, undefined, and NaN values for the complex part.
It considers the null value as 0 and the undefined and NaN values as NaN(Not a Number).
<html><!-- CDN Link that delivers the Tensorflow.js framework --><script src="https://cdn.jsdelivr.net/npm/@tensorflow/tfjs"></script><body><center><h1>Tensorflow.js - tf.imag() </h1></center><script>//create a tensor that store 3 complex numbers with null,NaN and undefined
let complex_numbers = tf.complex([null,undefined,NaN,], [null,undefined,NaN]);//actual tensor
document.write("Actual Tensor: ",complex_numbers);
document.write("<br>");//return only complex part from the above complex_numbers
document.write("Tensor with complex numbers: "+tf.imag(complex_numbers));</script></body></html>
Output:
![]() We can observe that the null value is taken as 0 while the NaN and undefined values are taken as NaN.
Finally, they were returned.
We can observe that the null value is taken as 0 while the NaN and undefined values are taken as NaN.
Finally, they were returned.
Conclusion
In this Tensorflow.js tutorial, we learned how to return the imaginary part from the complex number using the tf.imag() function.
If the tensor has null, undefined or NaN values, it considers the null value as 0 and the undefined and NaN values as NaN.
Make sure that the CDN Link is provided inside the script tag.
Backbone.js collection.length() Method
In this Backbone.js framework tutorial, we will discuss the length() method in the collection class.
Introduction
Backbone js is a framework that is used to build web applications that follow the style of JavaScript.
It supports models, events, collections, views, and utilities.
Using any of the previous functionalities, we can create and perform different operations on the given data in a web application.
Points to Remember
1.
It is used with JavaScript.
2.
We can implement the framework inside the <script> tag.
3.
This framework supports JavaScript methods and functions like output and reading input.
4.
<script> tag is placed inside <head> tag or in <body> tag.
5.
It is important to have Content Delivery Network (CDN) links to run the web application on the server.
Let’s See the Structure To Place the Code
<html><head><script>
You can use Backbone.js framework here</script></head><body><script>
You can also use Backbone.js framework here</script></body></html>
CDN Links are placed with the src attribute of the script tag.
CDN Links
<script src="https://cdnjs.cloudflare.com/ajax/libs/underscore.js/1.8.2/underscore-min.js" ></script><script src="https://cdnjs.cloudflare.com/ajax/libs/backbone.js/1.1.2/backbone-min.js" ></script>
The length() method in Backbone.js collection returns the total number of model instances or array of model instances from the Backbone collection.
Syntax:
collection_object.length
Approach
1.
Create a Backbone model using the extend() method.
Syntax:
var ModelClass = Backbone.Model.extend();
2.
Create a Backbone collection using extend() method and pass the model class.
Syntax:
var CollectionClass = Backbone.Collection.extend({
model: ModelClass});
3.
Create an object or instance for the collection class.
Syntax:
var collection_instance = new CollectionClass();
4.
Explore the length method in the Backbone.js collection.
Let’s discuss some examples of the Backbone.js collection length() method.
Example 1
In this example, we will create a Modal class named – Flowers and create a FlowerCollection collection class.
We will pass our model class (Flowers) inside it.
After that, we have to create an instance for the Flowers model with three attributes(flower_name,flower_sepals,flower_petals).
We will create a flower_collection which is an instance of the FlowerCollection collection.
And we will add the instance of the Flower model to the collection instance using the add() method.
Now, we will apply the length() method to return the total number of model instances.
<html><head><script src="https://code.jquery.com/jquery-2.1.3.min.js" ></script>
<script src="https://cdnjs.cloudflare.com/ajax/libs/underscore.js/1.8.2/underscore-min.js" ></script><script src="https://cdnjs.cloudflare.com/ajax/libs/backbone.js/1.1.2/backbone-min.js" ></script>
</head><body><center><h1>Linux Hint</h1></center><script>
//create Model named Flowers using extend()
var Flowers = Backbone.Model.extend();
//create collection – FlowerCollection and and pass Flowers model
var FlowerCollection = Backbone.Collection.extend({
model: Flowers});
//create 1 instance for the Flowers model
var flower1 = new Flowers({flower_name: “lotus”, flower_sepals:3,flower_petals:7});
//create flower_collection
var flower_collection = new FlowerCollection();
//add the above model instance to the flower_collection instance using add(() method.
Flower_collection.add(flower1);
//display the flowers present in the collection
document.write('<strong>Existing: </strong> ' + JSON.stringify(flower_collection.toJSON()));
document.write("<br>");
//dget the length of the collection
document.write('<strong>Number of modal instances: </strong> ' + JSON.stringify(flower_collection.length));
</script></body></html>
Output:
![]() Run the application in your browser by saving the code in the file with .html as an extension.
Here, we can see the length() method returns an integer value 1 that represents there is only a model instance in the previous collection.
Run the application in your browser by saving the code in the file with .html as an extension.
Here, we can see the length() method returns an integer value 1 that represents there is only a model instance in the previous collection.
Example 2
In this example, we will create a Modal class named – Flowers and create a FlowerCollection collection class.
We will pass our model class (Flowers) inside it.
After that, we have to create an instance for the Flowers model with three attributes(flower_name,flower_sepals,flower_petals).
We will create a flower_collection which is an instance of the FlowerCollection collection.
And we will add three instances of the Flower model to the collection instance using the add() method.
Now, we will apply the length() method to the collection.
<html><head><script src="https://code.jquery.com/jquery-2.1.3.min.js" ></script>
<script src="https://cdnjs.cloudflare.com/ajax/libs/underscore.js/1.8.2/underscore-min.js" ></script><script src="https://cdnjs.cloudflare.com/ajax/libs/backbone.js/1.1.2/backbone-min.js" ></script>
</head><body><center><h1>Linux Hint</h1></center><script>
//create Model named Flowers using extend()
var Flowers = Backbone.Model.extend();
//create collection - FlowerCollection and and pass Flowers model
var FlowerCollection = Backbone.Collection.extend({
model: Flowers});
//create 3 instances for the Flowers model
var flower1 = new Flowers({flower_name: "lotus", flower_sepals:3,flower_petals:7});
var flower2 = new Flowers({flower_name: "lilly", flower_sepals:10,flower_petals:17});
var flower3 = new Flowers({flower_name: "rose", flower_sepals:3,flower_petals:1});
//create flower_collection
var flower_collection = new FlowerCollection();
//add the above model instances to the flower_collection instance using add(() method.
flower_collection.add([flower1,flower2,flower3]);
//display the flowers present in the collection
document.write('<strong>Existing: </strong> ' + JSON.stringify(flower_collection.toJSON()));
document.write("<br>");
//dget the length of the collection
document.write('<strong>Number of modal instances: </strong> ' + JSON.stringify(flower_collection.length));
</script></body></html>
Output:
![]() Run the application in your browser by saving the code in the file with .html as an extension.
Here, we can see the length() method returned 3.
Run the application in your browser by saving the code in the file with .html as an extension.
Here, we can see the length() method returned 3.
Conclusion
In this Backbone.js tutorial, we discussed the length() method in collection.
It will return the total number of model instances in a collection.
In addition, it won’t take any parameters.
Backbone.Js Collection.FindWhere() Method
In this Backbone.js framework tutorial, we will discuss the findWhere() method in the collection class.
Introduction
Backbone.js is a framework that is used to build web applications that follow the style of JavaScript.
It supports models, events, collections, views, and utilities.
By using any of the previousapplication functionalities, we can create and perform different operations on the given data in a web .
Points to Remember:
It is used with JavaScript.
We can implement the framework inside the <script> tag.
This framework supports JavaScript methods and functions like output and reading input.
<script> tag is placed inside <head> tag or in <body> tag.
It is important to have Content Delivery Network (CDN) links to run the web application on the server.
Let’s See The Structure To Place the Code
<html>
<head>
<script>
You can use Backbone.js framework here
</script>
</head>
<body>
<script>
You can also use Backbone.js framework here
</script>
</body></html>
CDN Links are placed with the src attribute of the script tag.
CDN Links
<script src="https://cdnjs.cloudflare.com/ajax/libs/underscore.js/1.8.2/underscore-min.js" ></script><script src="https://cdnjs.cloudflare.com/ajax/libs/backbone.js/1.1.2/backbone-min.js" ></script>
The findWhere() method in Backbone.js collection is used to return only the first model instance from a collection based on the attribute specified in it.
It takes attribute as a parameter.
Syntax:
collection_object.findWhere(attribute)
It takes one parameter.
The attribute is the model’s property in which the findWhere() method will return only the first model instance based on the attribute provided.
If the attribute is not there, it will return undefined.
Approach
1.
Create a Backbone model using the extend() method.
Syntax:
var ModelClass = Backbone.Model.extend();
2.
Create a Backbone collection using the extend() method and pass the model class.
Syntax:
var CollectionClass = Backbone.Collection.extend({
model: ModelClass
});
3.
Create an object or instance for the collection class.
Syntax:
var collection_instance = new CollectionClass();
4.
Explore the findWhere() method in the Backbone.js collection.
Let’s discuss several examples of the Backbone.js collection findWhere() method.
Example 1: Return the First Model Instance Based on Attribute Using findWhere()
In this example, we will create a Modal class named – Flowers and create a FlowerCollection collection class.
We will pass our model class (Flowers) inside it.
After that, we have to create five instances for the Flowers model with three attributes(flower_name,flower_sepals,flower_petals).
We will create a flower_collection, which is an instance of the FlowerCollection collection.
And we will add the instances of the Flower model to the collection instance using the add() method.
Now, we will specify some attributes of the model instance to return them using findWhere() through JSON.stringify().
Get only the first model instance where flower_petals is 9.
Get only the first model instance where flower_name is “lilly”
<html>
<head>
<script src="https://code.jquery.com/jquery-2.1.3.min.js" ></script>
<script src="https://cdnjs.cloudflare.com/ajax/libs/underscore.js/1.8.2/underscore-min.js" ></script>
<script src="https://cdnjs.cloudflare.com/ajax/libs/backbone.js/1.1.2/backbone-min.js" ></script>
</head>
<body>
<center>
<h1>Linux Hint</h1>
</center>
<script>
//create Model named Flowers using extend()
var Flowers = Backbone.Model.extend();
//create collection - FlowerCollection and and pass Flowers model
var FlowerCollection = Backbone.Collection.extend({
model: Flowers
});
//create 5 instances for the Flowers model
var flower1 = new Flowers({flower_name: "lilly", flower_sepals:3,flower_petals:9});
var flower2 = new Flowers({flower_name: "lilly", flower_sepals:10,flower_petals:17});
var flower3 = new Flowers({flower_name: "rose", flower_sepals:2,flower_petals:8});
var flower4 = new Flowers({flower_name: "lilly", flower_sepals:3,flower_petals:9});
var flower5 = new Flowers({flower_name: "tulip", flower_sepals:7,flower_petals:10});
//create flower_collection
var flower_collection = new FlowerCollection();
//add the above model instances to the flower_collection instance using add(() method.
flower_collection.add([flower1,flower2,flower3,flower4,flower5]);
//display the flowers present in the collection
document.write('<strong>Existing: </strong> ' + JSON.stringify(flower_collection));
document.write("<br>");
document.write("<br>");
//get the model First instance where flower_petals is 9.
document.write('<strong>First flower_petals equal to 9: </strong> ' + JSON.stringify(flower_collection.findWhere({flower_petals: 9})));
document.write("<br>");
document.write("<br>");
//get theFirst model instance where flower_name is lilly.
document.write('<strong>First flower_name equal to lilly: </strong> ' + JSON.stringify(flower_collection.findWhere({flower_name: 'lilly'})));
</script>
</body></html>
Output:
![]() Run the application in your browser by saving the code in the file with .html as an extension.
Here, we can see that there are two model instances that match with flower_petals equal to 9.
But findWhere() will return only the first model instance.
There are three model instances that match with flower_name equal to “lilly”, But findWhere() will return only the first model instance.
Run the application in your browser by saving the code in the file with .html as an extension.
Here, we can see that there are two model instances that match with flower_petals equal to 9.
But findWhere() will return only the first model instance.
There are three model instances that match with flower_name equal to “lilly”, But findWhere() will return only the first model instance.
Example 2: Return First Model Instance Based on Attribute Using findWhere()
In this example, we will create a Modal class named – Flowers and create a FlowerCollection collection class.
We will pass our model class (Flowers) inside it.
After that, we have to create five instances for the Flowers model with three attributes(flower_name,flower_sepals,flower_petals).
We will create a flower_collection, which is an instance to the FlowerCollection collection.
And we will add the instances of the Flower model to the collection instance using add() method.
Now, we will specify some attributes of the model instance to return them using the findWhere() method through JSON.stringify().
Get only the first model instance where flower_petals is 90.
<html>
<head>
<script src="https://code.jquery.com/jquery-2.1.3.min.js" ></script>
<script src="https://cdnjs.cloudflare.com/ajax/libs/underscore.js/1.8.2/underscore-min.js" ></script>
<script src="https://cdnjs.cloudflare.com/ajax/libs/backbone.js/1.1.2/backbone-min.js" ></script>
</head>
<body>
<center>
<h1>Linux Hint</h1>
</center>
<script>
//create Model named Flowers using extend()
var Flowers = Backbone.Model.extend();
//create collection - FlowerCollection and and pass Flowers model
var FlowerCollection = Backbone.Collection.extend({
model: Flowers
});
//create 5 instances for the Flowers model
var flower1 = new Flowers({flower_name: "lilly", flower_sepals:3,flower_petals:9});
var flower2 = new Flowers({flower_name: "lilly", flower_sepals:10,flower_petals:17});
var flower3 = new Flowers({flower_name: "rose", flower_sepals:2,flower_petals:8});
var flower4 = new Flowers({flower_name: "lilly", flower_sepals:3,flower_petals:9});
var flower5 = new Flowers({flower_name: "tulip", flower_sepals:7,flower_petals:10});
//create flower_collection
var flower_collection = new FlowerCollection();
//add the above model instances to the flower_collection instance using add(() method.
flower_collection.add([flower1,flower2,flower3,flower4,flower5]);
//display the flowers present in the collection
document.write('<strong>Existing: </strong> ' + JSON.stringify(flower_collection));
document.write("<br>");
document.write("<br>");
//get the model First instance where flower_petals is 9.
document.write('<strong>First flower_petals equal to 90: </strong> ' + JSON.stringify(flower_collection.findWhere({flower_petals: 90})));
</script>
</body></html>
Output:
![]() The undefined is returned for the attribute flower_petals = 90 since it does not exist.
The undefined is returned for the attribute flower_petals = 90 since it does not exist.
Conclusion
In this Backbone.js tutorial, we discussed the findWhere() method in the collection.
It selects only the first model instance from a collection using the attribute specified inside it.
We used the findWhere() method with JSON.stringify() to display the model instances in a collection.
Backbone.Js Collection.Create() Collection
In this Backbone.js framework tutorial, we will discuss how to create a collection class with the extend() method.
Introduction
Backbone.js is a framework that is used to build web applications which follow the style of JavaScript.
It supports models, events, collections, views, and utilities.
By using any of the previous functionalities, we can create and perform different operations on the given data in a web application.
Points to Remember
It is used with JavaScript.
We can implement the framework inside the <script> tag.
This framework supports JavaScript methods and functions like output and reading input.
<script> tag is placed inside <head> tag or in <body> tag.
It is important to have Content Delivery Network (CDN) links to run the web application on the server.
Let’s See the Structure To Place the Code
<html>
<head>
<script>
You can use Backbone.js framework here
</script>
</head>
<body>
<script>
You can also use Backbone.js framework here
</script>
</body></html>
CDN Links are placed with the src attribute of the script tag.
CDN Links
<script src="https://cdnjs.cloudflare.com/ajax/libs/underscore.js/1.8.2/underscore-min.js" ></script><script src="https://cdnjs.cloudflare.com/ajax/libs/backbone.js/1.1.2/backbone-min.js" ></script>
The extend() method is used to create our own collection by extending the collection class.
Syntax:
Backbone.Collection.extend(properties, classProperties)
Parameters:
1.
properties parameter is used to provide instance properties for the created collection class.
2.
classProperties: class properties are attached to the created collection constructor function.
Approach
1.
Create a Backbone model using the extend() method.
Syntax:
var ModelClass = Backbone.Model.extend();
2.
Create a Backbone collection using the extend() method and pass the model class.
Syntax:
var CollectionClass = Backbone.Collection.extend({
model: ModelClass
});
3.
Create an object or instance for the collection class.
Syntax:
var collection_instance = new CollectionClass();
Example
In this example, we will create a Modal class named – Flowers and create a FlowerCollection collection class.
We will pass our model class (Flowers) inside it.
After that, we have to create five instances for the Flowers model with three attributes(flower_name,flower_sepals,flower_petals).
We will create a flower_collection which is an instance to the FlowerCollection collection.
And we will add the instances of the Flower model to the collection instance using the add() method.
Now, we will get all the attributes using the pluck() method in a collection.
<html>
<head>
<script src="https://code.jquery.com/jquery-2.1.3.min.js" ></script>
<script src="https://cdnjs.cloudflare.com/ajax/libs/underscore.js/1.8.2/underscore-min.js" ></script>
<script src="https://cdnjs.cloudflare.com/ajax/libs/backbone.js/1.1.2/backbone-min.js" ></script>
</head>
<body>
<center>
<h1>Linux Hint</h1>
</center>
<script>
//create Model named Flowers using extend()
var Flowers = Backbone.Model.extend();
//create collection - FlowerCollection and and pass Flowers model
var FlowerCollection = Backbone.Collection.extend({
model: Flowers
});
//create 5 instances for the Flowers model
var flower1 = new Flowers({flower_name: "lilly", flower_sepals:3,flower_petals:9});
var flower2 = new Flowers({flower_name: "lilly", flower_sepals:10,flower_petals:17});
var flower3 = new Flowers({flower_name: "rose", flower_sepals:2,flower_petals:8});
var flower4 = new Flowers({flower_name: "lilly", flower_sepals:3,flower_petals:9});
var flower5 = new Flowers({flower_name: "tulip", flower_sepals:7,flower_petals:10});
//create flower_collection
var flower_collection = new FlowerCollection();
//add the above model instances to the flower_collection instance using add(() method.
flower_collection.add([flower1,flower2,flower3,flower4,flower5]);
//display the flowers present in the collection
document.write('<strong>Existing: </strong> ' + JSON.stringify(flower_collection));
document.write("<br>");
document.write("<br>");
//return the flower_name attribute
document.write('<strong>flower_name: </strong> ' + flower_collection.pluck('flower_name'));
document.write("<br>");
document.write("<br>");
//return the flower_sepals attribute
document.write('<strong>flower_sepals: </strong> ' + flower_collection.pluck('flower_sepals'));
document.write("<br>");
document.write("<br>");
//return the flower_petals attribute
document.write('<strong>flower_petals: </strong> ' + flower_collection.pluck('flower_petals'));
document.write("<br>");
document.write("<br>");
</script>
</body></html>
Output:
![]() Run the application in your browser by saving the code in the file with .html as an extension.
Here, we created FlowerCollection by extension of the collection.after that we passed the Flowers model to it.
Run the application in your browser by saving the code in the file with .html as an extension.
Here, we created FlowerCollection by extension of the collection.after that we passed the Flowers model to it.
Conclusion
In this Backbone.js tutorial, we discussed how to create a collection and how to pass the model instances to the collection object.
After that, we simply displayed the attributes using the pluck() function.
Backbone.jc Collection remove() Method
This Backbone.js framework tutorial will discuss the remove() method in the collection class.
Introduction
Backbone.js is a framework used to build web applications that follow the style of JavaScript.
It supports models, events, collections, views, and utilities.
Using any of the previous functionalities, we can create and perform different operations on the given data in a web application.
Points to Remember
1.
It is used with JavaScript.
2.
We can implement the framework inside the <script> tag.
3.
This framework supports JavaScript methods and functions like output and reading input.
4.
<script> tag is placed inside <head> tag or in <body> tag.
5.
It is important to have Content Delivery Network (CDN) links to run the web application on the server.
Let’s see the structure to place the code:
<html><head><script>
You can use Backbone.js framework here</script></head><body><script>
You can also use Backbone.js framework here</script></body></html>
CDN Links are placed with the src attribute of the script tag.
CDN Links
<script src="https://cdnjs.cloudflare.com/ajax/libs/underscore.js/1.8.2/underscore-min.js" ></script><script src="https://cdnjs.cloudflare.com/ajax/libs/backbone.js/1.1.2/backbone-min.js" ></script>
The remove() method in Backbone.js collection removes the model from the collection.
It is possible to remove a single model (single instance) or an array of models (more than one instance through an array) from the collection.
Syntax:
collection_object.remove(model,options)
It takes two parameters.
The model is an instance that will be removed from the collection.
The options parameter is used to specify whether it is a model or an array of models to be removed.
Model – collection_object.remove(model_instance1)
Array of Models – collection_object.remove([model_instance1,model_instance2,………..])
Approach
1.
Create a Backbone model using extend() method.
Syntax:
var ModelClass = Backbone.Model.extend();
2.
Create a Backbone collection using extend() method and pass the model class.
Syntax:
var CollectionClass = Backbone.Collection.extend({
model: ModelClass});
3.
Create an object or instance for the collection class.
Syntax:
var collection_instance = new CollectionClass();
4.
Explore the remove() method in the Backbone.js collection.
Let’s discuss several examples of the Backbone.js collection remove() method.
Example 1: Remove a Single Model From the Collection
In this example, we will create a Modal class named – Flowers and create a FlowerCollection collection class.
We will pass our model class (Flowers) inside it.
After that, we have to create an instance for the Flowers model with three attributes(flower_name,flower_sepals,flower_petals).
We will create a flower_collection, which is an instance of the FlowerCollection collection.
And we will add the example of the Flower model to the collection instance using the add() method.
Now, we will remove this added model instance from the collection using the remove() method.
Finally, we are displaying the collection using the toJSON() method.
<html><head><script src="https://code.jquery.com/jquery-2.1.3.min.js" ></script>
<script src="https://cdnjs.cloudflare.com/ajax/libs/underscore.js/1.8.2/underscore-min.js" ></script><script src="https://cdnjs.cloudflare.com/ajax/libs/backbone.js/1.1.2/backbone-min.js" ></script>
</head><body><center><h1>Linux Hint</h1></center><script>
//create Model named Flowers using extend()
var Flowers = Backbone.Model.extend();
//create collection - FlowerCollection and and pass Flowers model
var FlowerCollection = Backbone.Collection.extend({
model: Flowers});
//create 1 instance for the Flowers model
var flower1 = new Flowers({flower_name: "lotus", flower_sepals:3,flower_petals:7});
//create flower_collection
var flower_collection = new FlowerCollection();
//add the above model instance to the flower_collection instance using add(() method.
flower_collection.add(flower1);
//display the flowers present in the collection
document.write('<strong> Flowers:</strong> ' + JSON.stringify(flower_collection.toJSON()));
document.write("<br>");
//remove flower1 from collection
flower_collection.remove(flower1);
//display the flowers present in the collection
document.write('<strong>After Removing flower1 from Flowers:</strong> ' + JSON.stringify(flower_collection.toJSON()));
</script></body></html>
Output:
![]() Run the application in your browser by saving the code in the file with .html as an extension.
Here, the remove() method removes the instance from the collection.
Run the application in your browser by saving the code in the file with .html as an extension.
Here, the remove() method removes the instance from the collection.
Example 2: Remove the Array of Models From the Collection
In this example, we will create a Modal class named – Flowers and create a FlowerCollection collection class.
We will pass our model class (Flowers) inside it.
After that, we have to create an instance for the Flowers model with three attributes(flower_name,flower_sepals,flower_petals).
We will create a flower_collection which is an instance of the FlowerCollection collection.
And we will add three instances of the Flower model to the collection instance using the add() method.
Now, we will remove any two of the added model instances from the collection using the remove() method.
Finally, we display the collection using the toJSON() method.
<html><head><script src="https://code.jquery.com/jquery-2.1.3.min.js" ></script>
<script src="https://cdnjs.cloudflare.com/ajax/libs/underscore.js/1.8.2/underscore-min.js" ></script><script src="https://cdnjs.cloudflare.com/ajax/libs/backbone.js/1.1.2/backbone-min.js" ></script>
</head><body><center><h1>Linux Hint</h1></center><script>
//create Model named Flowers using extend()
var Flowers = Backbone.Model.extend();
//create collection - FlowerCollection and and pass Flowers model
var FlowerCollection = Backbone.Collection.extend({
model: Flowers});
//create 3 instances for the Flowers model
var flower1 = new Flowers({flower_name: "lotus", flower_sepals:3,flower_petals:7});
var flower2 = new Flowers({flower_name: "lilly", flower_sepals:10,flower_petals:17});
var flower3 = new Flowers({flower_name: "rose", flower_sepals:3,flower_petals:1});
//create flower_collection
var flower_collection = new FlowerCollection();
//add the above model instances to the flower_collection instance using add(() method.
flower_collection.add([flower1,flower2,flower3]);
//display the flowers present in the collection
document.write('<strong>Flowers:</strong> ' + JSON.stringify(flower_collection.toJSON()));
document.write("<br>");//remove flower1 and flower2 from collection.
flower_collection.remove([flower1,flower2]);
//display the flowers present in the collection
document.write('<strong>After removing flower1 and flower2 from Flowers:</strong> ' + JSON.stringify(flower_collection.toJSON()));
document.write("<br>");</script></body></html>
Output:
![]() Run the application in your browser by saving the code in the file with .html as an extension.
Here, we can see the remove() method removes the flower1 and flower2 from the collection, and in the remaining instance, flower3 is displayed.
Run the application in your browser by saving the code in the file with .html as an extension.
Here, we can see the remove() method removes the flower1 and flower2 from the collection, and in the remaining instance, flower3 is displayed.
Conclusion
In this Backbone.js tutorial, we discussed the remove() method in the collection.
It is used to remove a model from the collection.
If there is more than one instance of a model to be removed, then you can use an array inside the remove() method and pass models to the remove() method through the array.
Backbone.js Collection push() Method
In this Backbone.js framework tutorial, we will discuss the push() method in the collection class.
Introduction
Backbone.js is a framework that is used to build web applications that follow the style of JavaScript.
It supports models, events, collections, views, and utilities.
Using any of the previous functionalities, we can create and perform different operations on the given data in a web application.
Points to Remember
1.
It is used with JavaScript.
2.
We can implement the framework inside the <script> tag.
3.
This framework supports JavaScript methods and functions like output and reading input.
4.
<script> tag is placed inside <head> tag or in <body> tag.
5.
It is important to have Content Delivery Network (CDN) links to run the web application on the server.
Let’s See the Structure To Place the Code
<html><head><script>
You can use Backbone.js framework here</script></head><body><script>
You can also use Backbone.js framework here</script></body></html>
CDN Links are placed with the src attribute of the script tag.
CDN Links
<script src="https://cdnjs.cloudflare.com/ajax/libs/underscore.js/1.8.2/underscore-min.js" ></script><script src="https://cdnjs.cloudflare.com/ajax/libs/backbone.js/1.1.2/backbone-min.js" ></script>
The push() method in the Backbone.js collection adds a model to the collection at the end.
It is possible to add a single model (single instance) or an array of models (more than one instance through an array) to the collection.
Syntax:
collection_object.push(model,options)
It takes two parameters.
model is an instance that will be added at the end of the collection.
options parameter is used to specify whether it is a model or an array of models to be added at the end.
Model – collection_object.push(model_instance1)
Array of Models – collection_object.push([model_instance1,model_instance2,………..])
Approach
1.
Create a Backbone model using extend() method.
Syntax:
var ModelClass = Backbone.Model.extend();
2.
Create a Backbone collection using extend() method and pass the model class.
Syntax:
var CollectionClass = Backbone.Collection.extend({
model: ModelClass});
3.
Create an object or instance for the collection class.
Syntax:
var collection_instance = new CollectionClass();
4.
Explore the push() method in the Backbone.js collection.
Let’s discuss several examples of the Backbone.js collection push() method.
Example 1: Push a Single model into the Collection
In this example, we will create a Modal class named – Flowers and create a FlowerCollection collection class.
We will pass our model class (Flowers) inside it.
After that, we have to create an instance for the Flowers model with three attributes(flower_name,flower_sepals,flower_petals).
We will create a flower_collection, which is an instance of the FlowerCollection collection.
And we will add the instance of the Flower model to the collection instance using the add() method.
Now, we will push a new model instance to the collection using the push() method.
Finally, we are displaying the collection using the toJSON() method.
<html><head><script src="https://code.jquery.com/jquery-2.1.3.min.js" ></script>
<script src="https://cdnjs.cloudflare.com/ajax/libs/underscore.js/1.8.2/underscore-min.js" ></script><script src="https://cdnjs.cloudflare.com/ajax/libs/backbone.js/1.1.2/backbone-min.js" ></script>
</head><body><center><h1>Linux Hint</h1></center><script>
//create Model named Flowers using extend()
var Flowers = Backbone.Model.extend();
//create collection - FlowerCollection and and pass Flowers model
var FlowerCollection = Backbone.Collection.extend({
model: Flowers});
//create 1 instance for the Flowers model
var flower1 = new Flowers({flower_name: "lotus", flower_sepals:3,flower_petals:7});
//create flower_collection
var flower_collection = new FlowerCollection();
//add the above model instance to the flower_collection instance using add(() method.
flower_collection.add(flower1);
//display the flowers present in the collection
document.write('<strong> Flowers:</strong> ' + JSON.stringify(flower_collection.toJSON()));
document.write("<br>");
//create 1 instance for the Flowers model
var flower2 = new Flowers({flower_name: "lilly", flower_sepals:13,flower_petals:10});
//push flower2 to the collection
flower_collection.push(flower2);
//display the flowers present in the collection
document.write('<strong>After Pushing flower2 to Flowers:</strong> ' + JSON.stringify(flower_collection.toJSON()));
</script></body></html>
Output:
![]() Run the application in your browser by saving the code in the file with .html as an extension.
Here, the push() method adds the flower2 instance to flower_collection at the end.
Run the application in your browser by saving the code in the file with .html as an extension.
Here, the push() method adds the flower2 instance to flower_collection at the end.
Example 2: Push Array of Models to the Collection
In this example, we will create a Modal class named – Flowers and create a FlowerCollection collection class.
We will pass our model class (Flowers) inside it.
After that, we have to create an instance for the Flowers model with three attributes(flower_name,flower_sepals,flower_petals).
We will create a flower_collection, which is an instance to the FlowerCollection collection.
And we will add three instances of the Flower model to the collection instance using the add() method.
Now, we will push two model instances to the collection using the push() method.
Finally, we are displaying the collection using the toJSON() method.
<html><head><script src="https://code.jquery.com/jquery-2.1.3.min.js" ></script>
<script src="https://cdnjs.cloudflare.com/ajax/libs/underscore.js/1.8.2/underscore-min.js" ></script><script src="https://cdnjs.cloudflare.com/ajax/libs/backbone.js/1.1.2/backbone-min.js" ></script>
</head><body><center><h1>Linux Hint</h1></center><script>
//create Model named Flowers using extend()
var Flowers = Backbone.Model.extend();
//create collection - FlowerCollection and and pass Flowers model
var FlowerCollection = Backbone.Collection.extend({
model: Flowers});
//create 3 instances for the Flowers model
var flower1 = new Flowers({flower_name: "lotus", flower_sepals:3,flower_petals:7});
var flower2 = new Flowers({flower_name: "lilly", flower_sepals:10,flower_petals:17});
var flower3 = new Flowers({flower_name: "rose", flower_sepals:3,flower_petals:1});
//create flower_collection
var flower_collection = new FlowerCollection();
//add the above flower1 instance to the flower_collection instance using add(() method.
flower_collection.add(flower1);
//display the flowers present in the collection
document.write('<strong>Existing:</strong> ' + JSON.stringify(flower_collection.toJSON()));
document.write("<br>");//push flower2 and flower3 to the collection.
flower_collection.push([flower2,flower3]);
//display the flowers present in the collection
document.write('<strong>After pushing flower2 and flower3:</strong> ' + JSON.stringify(flower_collection.toJSON()));
document.write("<br>");</script></body></html>
Output:
![]() Run the application in your browser by saving the code in the file with .html as an extension.
Here, we can see the push() method added the flower2 and flower3 to the collection at the end.
Run the application in your browser by saving the code in the file with .html as an extension.
Here, we can see the push() method added the flower2 and flower3 to the collection at the end.
Conclusion
In this Backbone.js tutorial, we discussed the push() method in collection.
It is used to add models to the collection at the end.
If there are more than one instance of a model to be pushed, then you can use an array inside the push() method and pass models to the push() method through the array.
Backbone.js Collection pop() Method
This Backbone.js framework tutorial will discuss the pop() method in the collection class.
Introduction
Backbone.js is a framework that is used to build web applications that follow the style of JavaScript.
It supports models, events, collections, views, and utilities.
Using any of the previous functionalities, we can create and perform different operations on the given data in a web application.
Points to Remember
1.
It is used with JavaScript.
2.
We can implement the framework inside the <script> tag.
3.
This framework supports JavaScript methods and functions like output and reading input.
4.
<script> tag is placed inside <head> tag or in <body> tag.
5.
It is important to have Content Delivery Network (CDN) links to run the web application on the server.
Let’s See the Structure To Place the Code
<html><head><script>
You can use Backbone.js framework here</script></head><body><script>
You can also use Backbone.js framework here</script></body></html>
CDN Links are placed with the src attribute of the script tag.
CDN Links
<script src="https://cdnjs.cloudflare.com/ajax/libs/underscore.js/1.8.2/underscore-min.js" ></script><script src="https://cdnjs.cloudflare.com/ajax/libs/backbone.js/1.1.2/backbone-min.js" ></script>
The pop() method in Backbone.js collection removes the last instance of model from the collection.
Syntax:
collection_object.remove(options)
It takes one parameter.
The options parameter is to specify the model type.
Model – collection_object.pop()
Approach
1.
Create a Backbone model using the extend() method.
Syntax:
var ModelClass = Backbone.Model.extend();
2.
Create a Backbone collection using the extend() method and pass the model class.
Syntax:
var CollectionClass = Backbone.Collection.extend({
model: ModelClass});
3.
Create an object or instance for the collection class.
Syntax:
var collection_instance = new CollectionClass();
4.
Explore the pop() method in the Backbone.js collection.
Let’s discuss several examples of the Backbone.js collection pop() method.
Example 1: Pop Last Instance Model From a Single Model to the Collection
In this example, we will create a Modal class named – Flowers and create a FlowerCollection collection class.
We will pass our model class (Flowers) inside it.
After that, we have to create an instance for the Flowers model with three attributes(flower_name,flower_sepals,flower_petals).
We will create a flower_collection, which is an instance of the FlowerCollection collection.
And we will add the instance of the Flower model to the collection instance using the add() method.
Now, we will remove this added model instance from the collection using the pop() method.
Finally, we are displaying the collection using the toJSON() method.
<html><head><script src="https://code.jquery.com/jquery-2.1.3.min.js" ></script>
<script src="https://cdnjs.cloudflare.com/ajax/libs/underscore.js/1.8.2/underscore-min.js" ></script><script src="https://cdnjs.cloudflare.com/ajax/libs/backbone.js/1.1.2/backbone-min.js" ></script>
</head><body><center><h1>Linux Hint</h1></center><script>
//create Model named Flowers using extend()
var Flowers = Backbone.Model.extend();
//create collection - FlowerCollection and and pass Flowers model
var FlowerCollection = Backbone.Collection.extend({
model: Flowers});
//create 1 instance for the Flowers model
var flower1 = new Flowers({flower_name: "lotus", flower_sepals:3,flower_petals:7});//create flower_collection
var flower_collection = new FlowerCollection();
//add the above model instance to the flower_collection instance using add(() method.
flower_collection.add(flower1);
//display the flowers present in the collection
document.write('<strong> Flowers:</strong> ' + JSON.stringify(flower_collection.toJSON()));
document.write("<br>");
//remove flower1 from collection
flower_collection.pop(flower1);
//display the flowers present in the collection
document.write('<strong>After popping flower1 from Flowers:</strong> ' + JSON.stringify(flower_collection.toJSON()));
</script></body></html>
Output:
![]() Run the application in your browser by saving the code in the file with .html as an extension.
Here, the pop() method removes the last instance from the collection.
Run the application in your browser by saving the code in the file with .html as an extension.
Here, the pop() method removes the last instance from the collection.
Example 2: Pop Last Instance Model From Array of Models to the Collection
In this example, we will create a Modal class named – Flowers and create a FlowerCollection collection class.
We will pass our model class (Flowers) inside it.
After that we have to create an instance for the Flowers model with three attributes(flower_name,flower_sepals,flower_petals).
We will create a flower_collection which is an instance of the FlowerCollection collection.
And we will add three instances of the Flower model to the collection instance using the add() method.
Now, we will remove the last added model instance using the pop() method.
Finally, we are displaying the collection using the toJSON() method.
<html><head><script src="https://code.jquery.com/jquery-2.1.3.min.js" ></script>
<script src="https://cdnjs.cloudflare.com/ajax/libs/underscore.js/1.8.2/underscore-min.js" ></script><script src="https://cdnjs.cloudflare.com/ajax/libs/backbone.js/1.1.2/backbone-min.js" ></script>
</head><body><center><h1>Linux Hint</h1></center><script>
//create Model named Flowers using extend()
var Flowers = Backbone.Model.extend();
//create collection - FlowerCollection and and pass Flowers model
var FlowerCollection = Backbone.Collection.extend({
model: Flowers});
//create 3 instances for the Flowers model
var flower1 = new Flowers({flower_name: "lotus", flower_sepals:3,flower_petals:7});
var flower2 = new Flowers({flower_name: "lilly", flower_sepals:10,flower_petals:17});
var flower3 = new Flowers({flower_name: "rose", flower_sepals:3,flower_petals:1});
//create flower_collection
var flower_collection = new FlowerCollection();
//add the above model instances to the flower_collection instance using add(() method.
flower_collection.add([flower1,flower2,flower3]);
//display the flowers present in the collection
document.write('<strong>Existing:</strong> ' + JSON.stringify(flower_collection.toJSON()));
document.write("<br>");
//remove flower3
flower_collection.pop();
//display the flowers present in the collection
document.write('<strong>After popping flower3 from Flowers:</strong> ' + JSON.stringify(flower_collection.toJSON()));
document.write("<br>");</script></body></html>
Output:
![]() Run the application in your browser by saving the code in the file with .html as an extension.
Here, we can see the pop() method removes flower3 from the collection, and the remaining instances, flower1 and flower2, are displayed.
Run the application in your browser by saving the code in the file with .html as an extension.
Here, we can see the pop() method removes flower3 from the collection, and the remaining instances, flower1 and flower2, are displayed.
Conclusion
In this Backbone.js tutorial, we discussed the pop() method in collection.
It is used to remove the last instance model from the collection.
It is similar to the remove() method, but it won’t take any model instance as a parameter.
It simply removes the last instance model.
Backbone.js collection.where() Method
In this Backbone.js framework tutorial, we will discuss the where() method in the collection class.
Backbone.js is a framework used to build web applications that follow the style of JavaScript.
It supports models, events, collections, views, and utilities.
By using any of the previous functionalities, we can create and perform different operations on the given data in a web application.
Points to Remember
It is used with JavaScript
We can implement the framework inside the <script> tag.
This framework supports JavaScript methods and functions like output and reading input.
<script> tag is placed inside <head> tag or in <body> tag.
It is important to have Content Delivery Network (CDN) links to run the web application on the server.
Let’s See the Structure To Place the Code
<html>
<head>
<script>
You can use Backbone.js framework here
</script>
</head>
<body>
<script>
You can also use Backbone.js framework here
</script>
</body></html>
CDN Links are placed with the src attribute of the script tag.
CDN Links
<script src="https://cdnjs.cloudflare.com/ajax/libs/underscore.js/1.8.2/underscore-min.js" ></script>
<script src="https://cdnjs.cloudflare.com/ajax/libs/backbone.js/1.1.2/backbone-min.js" ></script>
The where() method in the Backbone.js collection used to return the model instance from a collection based on the attribute specified in it.
It takes attribute as a parameter.
Syntax:
collection_object.where(attribute)
It takes one parameter.
The attribute parameter is the model’s property in which where() will return the model instance based on the attribute provided.
Approach
Create a Backbone model using the extend() method.Syntax:
var ModelClass = Backbone.Model.extend();
Create a Backbone collection using the extend() method and pass the model class.Syntax:
var CollectionClass = Backbone.Collection.extend({
model: ModelClass
});
Create an object or instance for the collection class.Syntax:
var collection_instance = new CollectionClass();
Explore the where() method in the Backbone.js collection.
Let’s discuss several examples of the Backbone.js collection where() method.
Example 1: Return Model Instances Based on Attribute Using where()
In this example, we will create a Modal class named – Flowers and create a FlowerCollection collection class.
We will pass our model class (Flowers) inside it.
After that, we have to create five instances for the Flowers model with three attributes(flower_name,flower_sepals,flower_petals).
We will create a flower_collection, which is an instance of the FlowerCollection collection.
And we will add the instances of the Flower model to the collection instance using the add() method.
Now, we will specify some attributes of the model instance to return them using where() through JSON.stringify().
Get the model instance where flower_petals is 9.
Get the model instance where flower_name is “lilly”.
<html>
<head>
<script src="https://code.jquery.com/jquery-2.1.3.min.js" ></script>
<script src="https://cdnjs.cloudflare.com/ajax/libs/underscore.js/1.8.2/underscore-min.js" ></script>
<script src="https://cdnjs.cloudflare.com/ajax/libs/backbone.js/1.1.2/backbone-min.js" ></script>
</head>
<body>
<center>
<h1>Linux Hint</h1>
</center>
<script>
//create Model named Flowers using extend()
var Flowers = Backbone.Model.extend();
//create collection - FlowerCollection and and pass Flowers model
var FlowerCollection = Backbone.Collection.extend({
model: Flowers
});
//create 5 instances for the Flowers model
var flower1 = new Flowers({flower_name: "lilly", flower_sepals:3,flower_petals:9});
var flower2 = new Flowers({flower_name: "lilly", flower_sepals:10,flower_petals:17});
var flower3 = new Flowers({flower_name: "rose", flower_sepals:2,flower_petals:8});
var flower4 = new Flowers({flower_name: "lilly", flower_sepals:3,flower_petals:9});
var flower5 = new Flowers({flower_name: "tulip", flower_sepals:7,flower_petals:10});
//create flower_collection
var flower_collection = new FlowerCollection();
//add the above model instances to the flower_collection instance using add(() method.
flower_collection.add([flower1,flower2,flower3,flower4,flower5]);
//display the flowers present in the collection
document.write('<strong>Existing: </strong> ' + JSON.stringify(flower_collection));
document.write("<br>");
document.write("<br>");
//get the model instance where flower_petals is 9.
document.write('<strong>flower_petals equal to 9: </strong> ' + JSON.stringify(flower_collection.where({flower_petals: 9})));
document.write("<br>");
document.write("<br>");
//get the model instance where flower_name is lilly.
document.write('<strong>flower_name equal to lilly: </strong> ' + JSON.stringify(flower_collection.where({flower_name: 'lilly'})));
</script>
</body> </html>
Output:
![]() Run the application in your browser by saving the code in the file with .html as an extension.
Here, we can see that model instances were returned based on the attribute specified in the where() method.
Run the application in your browser by saving the code in the file with .html as an extension.
Here, we can see that model instances were returned based on the attribute specified in the where() method.
Example 2: Return the Total Model Instances Based on Attribute Using where()
In this example, we will create a Modal class named – Flowers and create a FlowerCollection collection class.
We will pass our model class (Flowers) inside it.
After that, we have to create five instances for the Flowers model with three attributes(flower_name,flower_sepals,flower_petals).
We will create a flower_collection, which is an instance of the FlowerCollection collection.
And we will add the instances of the Flower model to the collection instance using the add() method.
Now, we will specify some attributes of the model instance to return the total count using where() through the length method:
Get the total model instances where flower_petals is 9.
Get the total model instances where flower_name is “lilly”.
<html>
<head>
<script src="https://code.jquery.com/jquery-2.1.3.min.js" ></script>
<script src="https://cdnjs.cloudflare.com/ajax/libs/underscore.js/1.8.2/underscore-min.js" ></script>
<script src="https://cdnjs.cloudflare.com/ajax/libs/backbone.js/1.1.2/backbone-min.js" ></script>
</head>
<body>
<center>
<h1>Linux Hint</h1>
</center>
<script>
//create Model named Flowers using extend()
var Flowers = Backbone.Model.extend();
//create collection - FlowerCollection and and pass Flowers model
var FlowerCollection = Backbone.Collection.extend({
model: Flowers
});
//create 5 instances for the Flowers model
var flower1 = new Flowers({flower_name: "lilly", flower_sepals:3,flower_petals:9});
var flower2 = new Flowers({flower_name: "lilly", flower_sepals:10,flower_petals:17});
var flower3 = new Flowers({flower_name: "rose", flower_sepals:2,flower_petals:8});
var flower4 = new Flowers({flower_name: "lilly", flower_sepals:3,flower_petals:9});
var flower5 = new Flowers({flower_name: "tulip", flower_sepals:7,flower_petals:10});
//create flower_collection
var flower_collection = new FlowerCollection();
//add the above model instances to the flower_collection instance using add(() method.
flower_collection.add([flower1,flower2,flower3,flower4,flower5]);
//display the flowers present in the collection
document.write('<strong>Existing: </strong> ' + JSON.stringify(flower_collection));
document.write("<br>");
document.write("<br>");
//get the total model instances where flower_petals is 9.
document.write('<strong>Total flower_petals equal to 9: </strong> ' + flower_collection.where({flower_petals: 9}).length);
document.write("<br>");
document.write("<br>");
//get the total model instances where flower_name is lilly.
document.write('<strong>Total flower_name equal to lilly: </strong> ' + flower_collection.where({flower_name: 'lilly'}).length);
</script>
</body> </html>
Output:
![]() Run the application in your browser by saving the code in the file with .html as an extension.
Here, we can see that the total model instances were returned based on the attribute specified in the where() method.
Run the application in your browser by saving the code in the file with .html as an extension.
Here, we can see that the total model instances were returned based on the attribute specified in the where() method.
Conclusion
In this Backbone.js tutorial, we discussed the where() method in the collection.
It is used to select the model instances from a collection using the specified attribute inside it.
We used the where() method with JSON.stringify() to display the model instances and length to return the total number of model instances in a collection.
Backbone.js collection.unshift() Method
In this Backbone.js framework tutorial, we will discuss the unshift() method in the collection class.
Backbone.js is a framework used to build web applications that follow the style of JavaScript.
It supports models, events, collections, views, and utilities.
By using any of the previous functionalities, we can create and perform different operations on the given data in a web application.
Points to Remember
It is used with JavaScript.
We can implement the framework inside the <script> tag.
This framework supports JavaScript methods and functions like output and reading input.
<script> tag is placed inside <head> tag or in <body> tag.
It is important to have Content Delivery Network (CDN) links to run the web application on the server.
Let’s See the Structure To Place the Code
<html>
<head>
<script>
You can use Backbone.js framework here
</script>
</head>
<body>
<script>
You can also use Backbone.js framework here
</script>
</body></html>
CDN Links are placed with the src attribute of the script tag.
CDN Links
<script src="https://cdnjs.cloudflare.com/ajax/libs/underscore.js/1.8.2/underscore-min.js" ></script>
<script src="https://cdnjs.cloudflare.com/ajax/libs/backbone.js/1.1.2/backbone-min.js" ></script>
The unshift() method in Backbone.js collection adds a model to the collection at the beginning.
It is possible to add a single model (single instance) or an array of models (more than one instance through an array) to the collection.
Syntax:
collection_object.unshift(model,options)
It takes two parameters.
model is an instance that will be added at the beginning of the collection.
The options parameter is used to specify whether it is a model or an array of models to be added at the end.
Model – collection_object.unshift(model_instance1)
Array of Models – collection_object.unshift([model_instance1,model_instance2,………..])
Approach
Create a Backbone model using the extend() method.Syntax:
var ModelClass = Backbone.Model.extend();
Create a Backbone collection using the extend() method and pass the model class.Syntax:
var CollectionClass = Backbone.Collection.extend({
model: ModelClass
});
Create an object or instance for the collection class.Syntax:
var collection_instance = new CollectionClass();
Explore the unshift() method in the Backbone.js collection.
Let’s discuss several examples of the Backbone.js collection unshift() method.
Example 1: Add a Single Model at the Beginning of the Collection
In this example, we will create a Modal class named – Flowers and create a FlowerCollection collection class.
We will pass our model class (Flowers) inside it.
After that, we have to create an instance for the Flowers model with three attributes(flower_name,flower_sepals,flower_petals).
We will create a flower_collection, which is an instance of the FlowerCollection collection.
And we will add the instance of the Flower model to the collection instance using the add() method.
Now, we will add a new model instance to the collection using the unshift() method.
Finally, we are displaying the collection using the JSON.stringify() method.
<html>
<head>
<script src=”https://code.jquery.com/jquery-2.1.3.min.js” ></script>
<script src=”https://cdnjs.cloudflare.com/ajax/libs/underscore.js/1.8.2/underscore-min.js” ></script>
<script src=”https://cdnjs.cloudflare.com/ajax/libs/backbone.js/1.1.2/backbone-min.js” ></script>
</head>
<body>
<center>
<h1>Linux Hint</h1>
</center>
<script>
//create Model named Flowers using extend()
var Flowers = Backbone.Model.extend();
//create collection - FlowerCollection and and pass Flowers model
var FlowerCollection = Backbone.Collection.extend({
model: Flowers
});
//create 1 instance for the Flowers model
var flower1 = new Flowers({flower_name: “lotus”, flower_sepals:3,flower_petals:7});
//create flower_collection
var flower_collection = new FlowerCollection();
//add the above model instance to the flower_collection instance using add(() method.
Flower_collection.add(flower1);
//display the flowers present in the collection
document.write(‘<strong> Flowers:</strong> ‘ + JSON.stringify(flower_collection.toJSON()));
document.write(“<br>”);
//create 1 instance for the Flowers model
var flower2 = new Flowers({flower_name: “lilly”, flower_sepals:13,flower_petals:10});
//add flower2 at beginning of the collection
flower_collection.unshift(flower2);
//display the flowers present in the collection
document.write(‘<strong>After adding flower2 at beginning using unshift():</strong> ‘ + JSON.stringify(flower_collection.toJSON()));
</script>
</body> </html>
Output:
![]() Run the application in your browser by saving the code in the file with .html as an extension.
Here, we can see the unshift() method adds the flower2 instance to the flower_collection at the beginning.
Run the application in your browser by saving the code in the file with .html as an extension.
Here, we can see the unshift() method adds the flower2 instance to the flower_collection at the beginning.
Example 2: Add Array of Models at the Beginning in a Collection
In this example, we will create a Modal class named – Flowers and create a FlowerCollection collection class.
We will pass our model class (Flowers) inside it.
After that, we have to create an instance for the Flowers model with three attributes(flower_name,flower_sepals,flower_petals).
We will create a flower_collection, which is an instance to the FlowerCollection collection.
And we will add three instances of the Flower model to the collection instance using the add() method.
Now, we will add two model instances at the beginning of the collection using the unshift() method.
Finally, we are displaying the collection using the JSON.stringify() method.
<html>
<head>
<script src="https://code.jquery.com/jquery-2.1.3.min.js" ></script>
<script src="https://cdnjs.cloudflare.com/ajax/libs/underscore.js/1.8.2/underscore-min.js" ></script>
<script src="https://cdnjs.cloudflare.com/ajax/libs/backbone.js/1.1.2/backbone-min.js" ></script>
</head>
<body>
<center>
<h1>Linux Hint</h1>
</center>
<script>
//create Model named Flowers using extend()
var Flowers = Backbone.Model.extend();
//create collection - FlowerCollection and and pass Flowers model
var FlowerCollection = Backbone.Collection.extend({
model: Flowers
});
//create 3 instances for the Flowers model
var flower1 = new Flowers({flower_name: "lotus", flower_sepals:3,flower_petals:7});
var flower2 = new Flowers({flower_name: "lilly", flower_sepals:10,flower_petals:17});
var flower3 = new Flowers({flower_name: "rose", flower_sepals:3,flower_petals:1});
//create flower_collection
var flower_collection = new FlowerCollection();
//add the above flower1 instance to the flower_collection instance using add(() method.
Flower_collection.add(flower1);
//display the flowers present in the collection
document.write('<strong>Existing:</strong> ' + JSON.stringify(flower_collection.toJSON()));
document.write("<br>");
//add flower2 and flower3 at the beginning in the collection.
Flower_collection.unshift([flower2,flower3]);
//display the flowers present in the collection
document.write('<strong>After adding flower2 and flower3 at beginning:</strong> ' + JSON.stringify(flower_collection.toJSON()));
document.write("<br>");
</script>
</body> </html>
Output:
![]() Run the application in your browser by saving the code in the file with .html as an extension.
Here, we can see the unshift( )method added the flower2 and flower3 to the collection at the beginning
Run the application in your browser by saving the code in the file with .html as an extension.
Here, we can see the unshift( )method added the flower2 and flower3 to the collection at the beginning
Conclusion
In this Backbone.js tutorial, we discussed the unshift() method in the collection.
It is used to add models to the collection at the beginning.
If there are more than one instance of a model to be unshifted, then you can use an array inside the unshift() method and pass models to the unshift() method through the array.
Backbone.js collection.slice() Method
In this Backbone.js framework tutorial, we will discuss the slice() method in the collection class.
Backbone.js is a framework used to build web applications that follow the style of JavaScript.
It supports models, events, collections, views, and utilities.
By using any of the previous functionalities, we can create and perform different operations on the given data in a web application.
Points to Remember
It is used with JavaScript.
We can implement the framework inside the <script> tag.
This framework supports JavaScript methods and functions like output and reading input.
<script> tag is placed inside <head> tag or in <body> tag.
It is important to have Content Delivery Network (CDN) links to run the web application on the server.
Let’s See the Structure To Place the Code
<html>
<head>
<script>
You can use Backbone.js framework here
</script>
</head>
<body>
<script>
You can also use Backbone.js framework here
</script>
</body></html>
CDN Links are placed with the src attribute of the script tag.
CDN Links
<script src="https://cdnjs.cloudflare.com/ajax/libs/underscore.js/1.8.2/underscore-min.js" ></script>
<script src="https://cdnjs.cloudflare.com/ajax/libs/backbone.js/1.1.2/backbone-min.js" ></script>
The slice() method in Backbone.js collection returns model instances within a given range, we can specify range by specifying two parameters: first and last.
Syntax:
collection_object.slice(first,last)
It takes two parameters.
first specifies the model instance index position in which the search starts.
last specifies the model instance index position in which the search ends.
Index position starts with 0.
Approach
Create a Backbone model using the extend() method.Syntax:
var ModelClass = Backbone.Model.extend();
Create a Backbone collection using the extend() method and pass the model class.Syntax:
var CollectionClass = Backbone.Collection.extend({
model: ModelClass
});
Create an object or instance for the collection class.Syntax:
var collection_instance = new CollectionClass();
Explore the slice() method in Backbone.js collection.
Let’s discuss several examples on Backbone.js collection slice() method.
Example 1: Return Model Instances From 0 to 2 Indices in a Collection
In this example, we will create a Modal class named – Flowers and create a FlowerCollection collection class.
We will pass our model class (Flowers) inside it.
After that, we have to create five instances for the Flowers model with three attributes(flower_name,flower_sepals,flower_petals).
We will create a flower_collection, which is an instance to the FlowerCollection collection.
And we will add the instances of the Flower model to the collection instance using the add() method.
Now, we will specify first as 0 and last as 2 in the slice() method to return the model instances within this range.
<html>
<head>
<script src="https://code.jquery.com/jquery-2.1.3.min.js" ></script>
<script src="https://cdnjs.cloudflare.com/ajax/libs/underscore.js/1.8.2/underscore-min.js" ></script>
<script src="https://cdnjs.cloudflare.com/ajax/libs/backbone.js/1.1.2/backbone-min.js" ></script>
</head>
<body>
<center>
<h1>Linux Hint</h1>
</center>
<script>
//create Model named Flowers using extend()
var Flowers = Backbone.Model.extend();
//create collection - FlowerCollection and and pass Flowers model
var FlowerCollection = Backbone.Collection.extend({
model: Flowers
});
//create 5 instances for the Flowers model
var flower1 = new Flowers({flower_name: "lotus", flower_sepals:3,flower_petals:7});
var flower2 = new Flowers({flower_name: "lilly", flower_sepals:10,flower_petals:17});
var flower3 = new Flowers({flower_name: "rose", flower_sepals:2,flower_petals:8});
var flower4 = new Flowers({flower_name: "jasmine", flower_sepals:3,flower_petals:9});
var flower5 = new Flowers({flower_name: "tulip", flower_sepals:7,flower_petals:10});
//create flower_collection
var flower_collection = new FlowerCollection();
//add the above model instances to the flower_collection instance using add(() method.
flower_collection.add([flower1,flower2,flower3,flower4,flower5]);
//display the flowers present in the collection
document.write('<strong>Existing: </strong> ' + JSON.stringify(flower_collection));
document.write("<br>");
document.write("<br>");
//get the 1st model instance to second model instance from collection
document.write('<strong>Index-0 to Index-2 :</strong> ' + JSON.stringify(flower_collection.slice(0,2)));
</script>
</body> </html>
Output:
![]() Run the application in your browser by saving the code in the file with .html as an extension.
Here, we can see that model instances were returned from 0 to 2.
Run the application in your browser by saving the code in the file with .html as an extension.
Here, we can see that model instances were returned from 0 to 2.
Example 2: Return Model Instances From 1 to 4 Indices in the Collection
In this example, we will create a Modal class named – Flowers and create a FlowerCollection collection class.
We will pass our model class (Flowers) inside it.
After that, we have to create five instances for the Flowers model with three attributes(flower_name,flower_sepals,flower_petals).
We will create a flower_collection, which is an instance to the FlowerCollection collection.
And we will add the instances of the Flower model to the collection instance using the add() method.
Now, we will specify first as 1 and last as 4 in the slice() method to return the model instances within this range.
<html>
<head>
<script src="https://code.jquery.com/jquery-2.1.3.min.js" ></script>
<script src="https://cdnjs.cloudflare.com/ajax/libs/underscore.js/1.8.2/underscore-min.js" ></script>
<script src="https://cdnjs.cloudflare.com/ajax/libs/backbone.js/1.1.2/backbone-min.js" ></script>
</head>
<body>
<center>
<h1>Linux Hint</h1>
</center>
<script>
//create Model named Flowers using extend()
var Flowers = Backbone.Model.extend();
//create collection - FlowerCollection and and pass Flowers model
var FlowerCollection = Backbone.Collection.extend({
model: Flowers
});
//create 5 instances for the Flowers model
var flower1 = new Flowers({flower_name: "lotus", flower_sepals:3,flower_petals:7});
var flower2 = new Flowers({flower_name: "lilly", flower_sepals:10,flower_petals:17});
var flower3 = new Flowers({flower_name: "rose", flower_sepals:2,flower_petals:8});
var flower4 = new Flowers({flower_name: "jasmine", flower_sepals:3,flower_petals:9});
var flower5 = new Flowers({flower_name: "tulip", flower_sepals:7,flower_petals:10});
//create flower_collection
var flower_collection = new FlowerCollection();
//add the above model instances to the flower_collection instance using add(() method.
flower_collection.add([flower1,flower2,flower3,flower4,flower5]);
//display the flowers present in the collection
document.write('<strong>Existing: </strong> ' + JSON.stringify(flower_collection));
document.write("<br>");
document.write("<br>");
//get the 1st model instance to second model instance from collection
document.write('<strong>Index-1 to Index-4 :</strong> ' + JSON.stringify(flower_collection.slice(1,4)));
</script>
</body> </html>
Output:
![]() Run the application in your browser by saving the code in the file with .html as extension.
Here, we can see that model instances were returned from 1 to 4.
Run the application in your browser by saving the code in the file with .html as extension.
Here, we can see that model instances were returned from 1 to 4.
Conclusion
In this Backbone.js tutorial, we discussed the slice() method in collection.
It is used to select the model instances from a collection using the index positions specified as range with first and last parameters.
Backbone.js collection.shift() Method
In this Backbone.js framework tutorial, we will discuss the shift() method in the collection class.
Backbone.js is a framework used to build web applications that follow the style of JavaScript.
It supports models, events, collections, views, and utilities.
By using any of the previous functionalities, we can create and perform different operations on the given data in a web application.
Points to Remember
It is used with JavaScript.
We can implement the framework inside the <script> tag.
This framework supports JavaScript methods and functions like output and reading input.
<script> tag is placed inside <head> tag or in <body> tag.
It is important to have Content Delivery Network (CDN) links to run the web application on the server.
Let’s See the Structure To Place the Code
<html>
<head>
<script>
You can use Backbone.js framework here
</script>
</head>
<body>
<script>
You can also use Backbone.js framework here
</script>
</body></html>
CDN Links are placed with the src attribute of the script tag.
CDN Links
<script src="https://cdnjs.cloudflare.com/ajax/libs/underscore.js/1.8.2/underscore-min.js" ></script>
<script src="https://cdnjs.cloudflare.com/ajax/libs/backbone.js/1.1.2/backbone-min.js" ></script>
The shift() method in Backbone.js collection removes the first instance of model from the collection.
Syntax:
collection_object.shift(options)
It takes one parameter.
The options parameter is to specify the model type.
Model – collection_object.shift()
Approach
Create a Backbone model using the extend() method.
Syntax:
var ModelClass = Backbone.Model.extend();
Create a Backbone collection using the extend() method and pass the model class.
Syntax:
var CollectionClass = Backbone.Collection.extend({
model: ModelClass
});
Create an object or instance for the collection class.
Syntax:
var collection_instance = new CollectionClass();
Explore the shift() method in the Backbone.js collection.
Let’s discuss several examples of the Backbone.js collection shift() method.
Example 1: Remove First Instance Model From a Single Model to the Collection
In this example, we will create a Modal class named – Flowers and create a FlowerCollection collection class.
We will pass our model class (Flowers) inside it.
After that, we have to create an instance for the Flowers model with three attributes(flower_name,flower_sepals,flower_petals).
We will create a flower_collection, which is an instance of the FlowerCollection collection.
And we will add the instance of the Flower model to the collection instance using the add() method.
Now, we will remove this added model instance from the collection using the shift() method.
Finally, we are displaying the collection using the JSON.stringify() method.
<html>
<head>
<script src="https://code.jquery.com/jquery-2.1.3.min.js" ></script>
<script src="https://cdnjs.cloudflare.com/ajax/libs/underscore.js/1.8.2/underscore-min.js" ></script>
<script src="https://cdnjs.cloudflare.com/ajax/libs/backbone.js/1.1.2/backbone-min.js" ></script>
</head>
<body>
<center>
<h1>Linux Hint</h1>
</center>
<script>
//create Model named Flowers using extend()
var Flowers = Backbone.Model.extend();
//create collection - FlowerCollection and and pass Flowers model
var FlowerCollection = Backbone.Collection.extend({
model: Flowers
});
//create 1 instance for the Flowers model
var flower1 = new Flowers({flower_name: "lotus", flower_sepals:3,flower_petals:7});
//create flower_collection
var flower_collection = new FlowerCollection();
//add the above model instance to the flower_collection instance using add(() method.
flower_collection.add(flower1);
//display the flowers present in the collection
document.write('<strong> Existing:</strong> ' + JSON.stringify(flower_collection.toJSON()));
document.write("<br>");
//remove flower1 from collection
flower_collection.shift(flower1);
//display the flowers present in the collection
document.write('<strong>After remving flower1 using shift():</strong> ' + JSON.stringify(flower_collection.toJSON()));
</script>
</body> </html>
Output:
![]() Run the application in your browser by saving the code in the file with .html as an extension.
Here, we can see the shift() method removes the first instance from the collection.
Run the application in your browser by saving the code in the file with .html as an extension.
Here, we can see the shift() method removes the first instance from the collection.
Example 2: Remove First Instance Model From the Array of Models to the Collection
In this example, we will create a Modal class named – Flowers and create a FlowerCollection collection class.
We will pass our model class (Flowers) inside it.
After that, we have to create an instance for the Flowers model with three attributes(flower_name,flower_sepals,flower_petals).
We will create a flower_collection, which is an instance to the FlowerCollection collection.
And we will add three instances of the Flower model to the collection instance using the add() method.
Now, we will remove the first model instance using shift().
Finally, we are displaying the collection using the JSON.stringify() method.
<html>
<head>
<script src="https://code.jquery.com/jquery-2.1.3.min.js" ></script>
<script src="https://cdnjs.cloudflare.com/ajax/libs/underscore.js/1.8.2/underscore-min.js" ></script>
<script src="https://cdnjs.cloudflare.com/ajax/libs/backbone.js/1.1.2/backbone-min.js" ></script>
</head>
<body>
<center>
<h1>Linux Hint</h1>
</center>
<script>
//create Model named Flowers using extend()
var Flowers = Backbone.Model.extend();
//create collection - FlowerCollection and and pass Flowers model
var FlowerCollection = Backbone.Collection.extend({
model: Flowers
});
//create 3 instances for the Flowers model
var flower1 = new Flowers({flower_name: "lotus", flower_sepals:3,flower_petals:7});
var flower2 = new Flowers({flower_name: "lilly", flower_sepals:10,flower_petals:17});
var flower3 = new Flowers({flower_name: "rose", flower_sepals:3,flower_petals:1});
//create flower_collection
var flower_collection = new FlowerCollection();
//add the above model instances to the flower_collection instance using add(() method.
flower_collection.add([flower1,flower2,flower3]);
//display the flowers present in the collection
document.write('<strong>Existing:</strong> ' + JSON.stringify(flower_collection.toJSON()));
document.write("<br>");
//remove flower1
flower_collection.shift();
//display the flowers present in the collection
document.write('<strong>After removing flower1 using shift():</strong> ' + JSON.stringify(flower_collection.toJSON()));
document.write("<br>");
</script>
</body> </html>
Output:
![]() Run the application in your browser by saving the code in the file with .html as an extension.
Here, we can see the shift() method removes the flower1 from the collection, and the remaining instances flower2 and flower3 are displayed.
Run the application in your browser by saving the code in the file with .html as an extension.
Here, we can see the shift() method removes the flower1 from the collection, and the remaining instances flower2 and flower3 are displayed.
Conclusion
In this Backbone.js tutorial, we discussed the shift() method in the collection.
It is used to remove a first instance model from the collection.
It is similar to remove(), but it won’t take any model instance as a parameter.
It simply removes the first instance model.
Backbone.js collection.set() Method
In this Backbone.js framework tutorial, we will discuss the set() method in the collection class.
Backbone.js is a framework used to build web applications that follow the style of JavaScript.
It supports models, events, collections, views, and utilities.
By using any of the previous functionalities, we can create and perform different operations on the given data in a web application.
Points to Remember
It is used with JavaScript.
We can implement the framework inside the <script> tag.
This framework supports JavaScript methods and functions like output and reading input.
<script> tag is placed inside <head> tag or in <body> tag.
It is important to have Content Delivery Network (CDN) links to run the web application on the server.
Let’s See the Structure To Place the Code
<html>
<head>
<script>
You can use Backbone.js framework here
</script>
</head>
<body>
<script>
You can also use Backbone.js framework here
</script>
</body></html>
CDN Links are placed with the src attribute of the script tag.
CDN Links
<script src="https://cdnjs.cloudflare.com/ajax/libs/underscore.js/1.8.2/underscore-min.js" ></script>
<script src="https://cdnjs.cloudflare.com/ajax/libs/backbone.js/1.1.2/backbone-min.js" ></script>
The set() method in the Backbone.js collection updates the instance of a model in the collection.
It will return the previous model instance as well as the modified instance.
If the model does not exist in the collection, it will add this model to the collection.
Syntax:
collection_object.set(model,options)
It takes two parameters.
model is an instance/new instance that will update the model instance.
options parameter is used to set the updated value into a collection.
Approach
Create a Backbone model using the extend() method.
Syntax:
var ModelClass = Backbone.Model.extend();
Create a Backbone collection using the extend() method and pass the model class.
Syntax:
var CollectionClass = Backbone.Collection.extend({
model: ModelClass
});
Create an object or instance for the collection class.
Syntax:
var collection_instance = new CollectionClass();
Explore the set() method in the Backbone.js collection.
Let’s discuss some examples of the Backbone.js collection set() method.
Example 1: Update the Model Instance in the Collection Using set()
In this example, we will create a Modal class named – Flowers and create a FlowerCollection collection class.
We will pass our model class (Flowers) inside it.
After that, we have to create one instance for the Flowers model with three attributes(flower_name,flower_sepals,flower_petals).
We will create a flower_collection, which is an instance of the FlowerCollection collection.
And we will add the instance of the Flower model to the collection instance using the add() method.
Now, we will update the added model instance with another instance.
Finally, we are displaying the collection using the JSON.stringify() method.
<html>
<head>
<script src="https://code.jquery.com/jquery-2.1.3.min.js" ></script>
<script src="https://cdnjs.cloudflare.com/ajax/libs/underscore.js/1.8.2/underscore-min.js" ></script>
<script src="https://cdnjs.cloudflare.com/ajax/libs/backbone.js/1.1.2/backbone-min.js" ></script>
</head>
<body>
<center>
<h1>Linux Hint</h1>
</center>
<script>
//create Model named Flowers using extend()
var Flowers = Backbone.Model.extend();
//create collection - FlowerCollection and and pass Flowers model
var FlowerCollection = Backbone.Collection.extend({
model: Flowers
});
//create 1 instance for the Flowers model
var flower1 = new Flowers({flower_name: "lilly", flower_sepals:3,flower_petals:9});
//create flower_collection
var flower_collection = new FlowerCollection();
//add the above model instance to the flower_collection instance using add(() method.
flower_collection.add(flower1);
//display the flowers present in the collection
document.write('<strong>Existing: </strong> ' + JSON.stringify(flower_collection));
document.write("<br>");
document.write("<br>");
//update flower1 model instance
flower_collection.set([flower1, {flower_name: "marigold", flower_sepals:30,flower_petals:90}]);
//display
document.write('<strong>After Setting: </strong> ' + JSON.stringify(flower_collection));
</script>
</body> </html>
Output:
![]() Run the application in your browser by saving the code in the file with .html as an extension.
Here, we can see the set() method updated the old instance with a new instance model in a collection and returned both instances.
Run the application in your browser by saving the code in the file with .html as an extension.
Here, we can see the set() method updated the old instance with a new instance model in a collection and returned both instances.
Example 2: Add the New Model Instance in the Collection Using set()
In this example, we will create a Modal class named – Flowers and create a FlowerCollection collection class.
We will pass our model class (Flowers) inside it.
After that, we have to create one instance for the Flowers model with three attributes(flower_name,flower_sepals,flower_petals).
We will create a flower_collection, which is an instance to the FlowerCollection collection.
And we will add the instance of the Flower model to the collection instance using the add() method.
Now, we will create a new model instance with attributes.
Finally, we are displaying the collection using the JSON.stringify() method.
<html>
<head>
<script src="https://code.jquery.com/jquery-2.1.3.min.js" ></script>
<script src="https://cdnjs.cloudflare.com/ajax/libs/underscore.js/1.8.2/underscore-min.js" ></script>
<script src="https://cdnjs.cloudflare.com/ajax/libs/backbone.js/1.1.2/backbone-min.js" ></script>
</head>
<body>
<center>
<h1>Linux Hint</h1>
</center>
<script>
//create Model named Flowers using extend()
var Flowers = Backbone.Model.extend();
//create collection - FlowerCollection and and pass Flowers model
var FlowerCollection = Backbone.Collection.extend({
model: Flowers
});
//create 1 instance for the Flowers model
var flower1 = new Flowers({flower_name: "lilly", flower_sepals:3,flower_petals:9});
//create flower_collection
var flower_collection = new FlowerCollection();
//add the above model instance to the flower_collection instance using add(() method.
flower_collection.add(flower1);
//display the flowers present in the collection
document.write('<strong>Existing: </strong> ' + JSON.stringify(flower_collection));
document.write("<br>");
document.write("<br>");
//define flower model instance
var flower2= new Flowers();
//create flower2 model instance
flower_collection.set([flower2, {flower_name: "marigold", flower_sepals:30,flower_petals:90}]);
//display
document.write('<strong>After Setting: </strong> ' + JSON.stringify(flower_collection));
</script>
</body> </html>
Output:
![]() Run the application in your browser by saving the code in the file with .html as an extension.
Here, we can see the set() method adds a new instance model – flower2 to a collection.
Run the application in your browser by saving the code in the file with .html as an extension.
Here, we can see the set() method adds a new instance model – flower2 to a collection.
Conclusion
In this Backbone.js tutorial, we discussed the set() method in the collection.
It is used to update the model instances in a collection.
If the model instance is not present, it will add that model to the collection.
To accomplish this, ensure you just defined an instance.
Backbone.js model.isNew() Method
In this Backbone.js framework tutorial, we will discuss the isNew() method in the model class.
Backbone.js is a framework that is used to build web applications which follow the style of JavaScript.
It supports models, events, collections, views, and utilities.
By using any of the previous functionalities, we can create and perform different operations on the given data in a web application.
Points to Remember
It is used with JavaScript.
We can implement the framework inside the <script> tag.
This framework supports JavaScript methods and functions like output and reading input.
<script> tag is placed inside <head> tag or in <body> tag.
It is important to have Content Delivery Network (CDN) links to run the web application on the server.
Let’s See the Structure To Place the Code
<html>
<head>
<script>
You can use Backbone.js framework here
</script>
</head>
<body>
<script>
You can also use Backbone.js framework here
</script>
</body></html>
CDN Links are placed with the src attribute of the script tag.
CDN Links
<script src="https://cdnjs.cloudflare.com/ajax/libs/underscore.js/1.8.2/underscore-min.js" ></script>
<script src="https://cdnjs.cloudflare.com/ajax/libs/backbone.js/1.1.2/backbone-min.js" ></script>
The isNew() method in Backbone.js model returns true, if the model is not saved to the server, otherwise it will return false.
Syntax:
model_object.isNew()
Approach
Create a Backbone model using the extend() method.
Syntax:
var ModelClass = Backbone.Model.extend();
Create a model object from the above method using a new keyword.
Syntax:
var model_object = new ModelClass ();
Explore the isNew() method in Backbone.js.
Let’s discuss several examples of the Backbone.js model isNew() method.
Example
In this example, we will create a Modal class named – Flowers and create a model object – flower from it.
After that, we used the set() method to create three attributes – (flower_name,flower_sepals,flower_petals) with values.
Finally, we used the isNew() method to check if the model is new or not.
We are implementing this entire functionality inside the <body> tag.
<html>
<head>
<script src=”https://code.jquery.com/jquery-2.1.3.min.js” ></script>
<script src=”https://cdnjs.cloudflare.com/ajax/libs/underscore.js/1.8.2/underscore-min.js” ></script>
<script src=”https://cdnjs.cloudflare.com/ajax/libs/backbone.js/1.1.2/backbone-min.js” ></script>
</head>
<body>
<center>
<h1>Linux Hint</h1>
</center>
<script>
//create Model named Flowers using extend()
var Flowers = Backbone.Model.extend();
// create a variable named flower using the above model.
Var flower = new Flowers();
//create flower_name attribute and set to "lotus"
//create flower_sepals attribute and set to 2
//create flower_petals attribute and set to 5
flower.set({ flower_name:"lotus",flower_sepals: 2, flower_petals:5});
//display the flower model
document.write("<strong>Flower Details: </strong> "+ JSON.stringify(flower));
document.write("<br>");
//check the flower model is new
document.write("flower model new?: "+flower.isNew());
</script>
</body> </html>
Output:
![]() Run the application in your browser by saving the code in the file with .html as an extension.
Here, we can see that the isNew() method returns True.
Run the application in your browser by saving the code in the file with .html as an extension.
Here, we can see that the isNew() method returns True.
Conclusion
In this Backbone.js tutorial, we discussed that the isNew() returns true.
In addition, if the model is not saved to the server, it will return false.
Backbone.js model.has() Method
In this Backbone.js framework tutorial, we will discuss the has() method in the model class.
Backbone.js is a framework used to build web applications that follow the style of JavaScript.
It supports models, events, collections, views, and utilities.
By using any of the previous functionalities, we can create and perform different operations on the given data in a web application.
Points to Remember
It is used with JavaScript.
We can implement the framework inside the <script> tag.
This framework supports JavaScript methods and functions like output and reading input.
<script> tag is placed inside <head> tag or in <body> tag.
It is important to have Content Delivery Network (CDN) links to run the web application on the server.
Let’s See the Structure To Place the Code
<html>
<head>
<script>
You can use Backbone.js framework here
</script>
</head>
<body>
<script>
You can also use Backbone.js framework here
</script>
</body></html>
CDN Links are placed with the src attribute of the script tag.
CDN Links
<script src="https://cdnjs.cloudflare.com/ajax/libs/underscore.js/1.8.2/underscore-min.js" ></script>
<script src="https://cdnjs.cloudflare.com/ajax/libs/backbone.js/1.1.2/backbone-min.js" ></script>
The has() method in Backbone.js model will return true, if the attribute has non-null or undefined value.
Attribute stores values in a model.
For a model, there can be any number of attributes.
Syntax:
model_object.has(attribute)
Parameter:It takes only one parameter.
The attribute parameter refers to the property which a model has.
Return:
It returns a Boolean value.
If the value is null or undefined, it will return false.
Otherwise, it will return true.
Approach
Create a Backbone model using the extend() method.
Syntax:
var ModelClass = Backbone.Model.extend();
Create a model object from the previous method using a new keyword.
Syntax:
var model_object = new ModelClass ();
Explore the has() method in Backbone.js
Let’s discuss some examples of the Backbone.js model has() method.
Example 1
In this example, we will create a Modal class named – Flowers and create a model object – flower from it.
After that we used the set() method to create three attributes – (flower_name,flower_sepals,flower_petals) with values.
Finally, we used the has() method to check attribute values and display them using the document.write() method.
We are implementing this entire functionality inside the <body> tag.
<html>
<head>
<script src="https://code.jquery.com/jquery-2.1.3.min.js" ></script>
<script src="https://cdnjs.cloudflare.com/ajax/libs/underscore.js/1.8.2/underscore-min.js" ></script>
<script src="https://cdnjs.cloudflare.com/ajax/libs/backbone.js/1.1.2/backbone-min.js" ></script>
</head>
<body>
<center>
<h1>Linux Hint</h1>
</center>
<script>
//create Model named Flowers using extend()
var Flowers = Backbone.Model.extend();
// create a variable named flower using the above model.
var flower = new Flowers();
//create flower_name attribute and set to "lotus"
//create flower_sepals attribute and set to null
//create flower_petals attribute and set to 5
flower.set({ flower_name:"lotus",flower_sepals: null, flower_petals:5});
//check the flower_sepals has non-null value or not?
document.write("<strong>Does flower has flower sepals ? </strong> "+ flower.has('flower_sepals'));
document.write("<br>");
//check the flower_petals has non-null value or not?
document.write("<strong>Does flower has flower petals ? </strong> "+ flower.has('flower_petals'));
document.write("<br>");
</script>
</body> </html>
Output:
![]() Run the application in your browser by saving the code in the file with .html as an extension.
Here, we assigned flower_sepals to null.
So this attribute has() returned false because it has a null value.
Example 2
In this example, we will create a Modal class named – Flowers and create a model object – flower from it.
After that we used the set() method to create three attributes – (flower_name,flower_sepals,flower_petals) with values.
Finally, we used the has() method to check the attribute values and display them using document.write() method.
We are implementing this entire functionality inside the <body> tag.
<html>
<head>
<script src="https://code.jquery.com/jquery-2.1.3.min.js" ></script>
<script src="https://cdnjs.cloudflare.com/ajax/libs/underscore.js/1.8.2/underscore-min.js" ></script>
<script src="https://cdnjs.cloudflare.com/ajax/libs/backbone.js/1.1.2/backbone-min.js" ></script>
</head>
<body>
<center>
<h1>Linux Hint</h1>
</center>
<script>
//create Model named Flowers using extend()
var Flowers = Backbone.Model.extend();
// create a variable named flower using the above model.
var flower = new Flowers();
//create flower_name attribute and set to "lotus"
//create flower_sepals attribute and set to undefined
//create flower_petals attribute and set to 5
flower.set({ flower_name:"lotus",flower_sepals: undefined, flower_petals:5});
//check the flower_sepals has non-undefined value or not?
document.write("<strong>Does flower has flower sepals ? </strong> "+ flower.has('flower_sepals'));
document.write("<br>");
//check the flower_petals has non-undefined value or not?
document.write("<strong>Does flower has flower petals ? </strong> "+ flower.has('flower_petals'));
document.write("<br>");
</script>
</body> </html>
Output:
Run the application in your browser by saving the code in the file with .html as an extension.
Here, we assigned flower_sepals to null.
So this attribute has() returned false because it has a null value.
Example 2
In this example, we will create a Modal class named – Flowers and create a model object – flower from it.
After that we used the set() method to create three attributes – (flower_name,flower_sepals,flower_petals) with values.
Finally, we used the has() method to check the attribute values and display them using document.write() method.
We are implementing this entire functionality inside the <body> tag.
<html>
<head>
<script src="https://code.jquery.com/jquery-2.1.3.min.js" ></script>
<script src="https://cdnjs.cloudflare.com/ajax/libs/underscore.js/1.8.2/underscore-min.js" ></script>
<script src="https://cdnjs.cloudflare.com/ajax/libs/backbone.js/1.1.2/backbone-min.js" ></script>
</head>
<body>
<center>
<h1>Linux Hint</h1>
</center>
<script>
//create Model named Flowers using extend()
var Flowers = Backbone.Model.extend();
// create a variable named flower using the above model.
var flower = new Flowers();
//create flower_name attribute and set to "lotus"
//create flower_sepals attribute and set to undefined
//create flower_petals attribute and set to 5
flower.set({ flower_name:"lotus",flower_sepals: undefined, flower_petals:5});
//check the flower_sepals has non-undefined value or not?
document.write("<strong>Does flower has flower sepals ? </strong> "+ flower.has('flower_sepals'));
document.write("<br>");
//check the flower_petals has non-undefined value or not?
document.write("<strong>Does flower has flower petals ? </strong> "+ flower.has('flower_petals'));
document.write("<br>");
</script>
</body> </html>
Output:
![]() Run the application in your browser by saving the code in the file with .html as an extension.
Here, we assigned flower_sepals to null.
So this attribute has() returned false because it has an undefined value.
Run the application in your browser by saving the code in the file with .html as an extension.
Here, we assigned flower_sepals to null.
So this attribute has() returned false because it has an undefined value.
Conclusion
In this Backbone.js tutorial, we discussed how to check the non-null and non-undefined values using the has() method.
Also, we discussed two different approaches to implementing this method by setting the attribute values to null and undefined.
We came to know that the method returns false if it is null or undefined.
Otherwise, it returns true.
Backbone.js model.get() Method
In this Backbone.js framework tutorial, we will discuss the get() method in the model class.
Backbone.js is a framework used to build web applications that follow the style of JavaScript.
It supports models, events, collections, views, and utilities.
By using any of the previous functionalities, we can create and perform different operations on the given data in a web application.
Points to Remember
It is used with JavaScript.
We can implement the framework inside the <script> tag.
This framework supports JavaScript methods and functions like output and reading input.
<script> tag is placed inside <head> tag or in <body> tag.
It is important to have Content Delivery Network (CDN) links to run the web application on the server.
Let’s See the Structure To Place the Code
<html>
<head>
<script>
You can use Backbone.js framework here
</script>
</head>
<body>
<script>
You can also use Backbone.js framework here
</script>
</body></html>
CDN Links are placed with the src attribute of the script tag.
CDN Links
<script src="https://cdnjs.cloudflare.com/ajax/libs/underscore.js/1.8.2/underscore-min.js" ></script>
<script src="https://cdnjs.cloudflare.com/ajax/libs/backbone.js/1.1.2/backbone-min.js" ></script>
The get() method in the Backbone.js model will return the value associated with a model’s attribute.
Attribute stores values in a model.
For a model, there can be any number of attributes.
If the attribute is not found in a model, then it will return “undefined”.
Syntax:
model_object.get(attribute)
Parameter:
It takes only one parameter.
The attribute parameter refers to the property which a model has.
Return:
It returns the value with respect to the property.
If the attribute is not found, it returns undefined.
Approach
Create a Backbone model using extend() method.
Syntax:
var ModelClass = Backbone.Model.extend();
Create a model object from the previous method using a new keyword.
Syntax:
var model_object = new ModelClass ();
Explore the get() method in Backbone.js
Let’s discuss several examples of the Backbone.js model get() method.
Example 1
In this example, we will create a Modal class named – Flowers and create a model object – flower from it.
After that, we used the set() method to create three attributes – (flower_name,flower_sepals,flower_petals) with values.
Finally, we used the get() method to return attribute values and display them using the document.write() method.
We are implementing this entire functionality inside the <body> tag.
<html>
<head>
<script src="https://code.jquery.com/jquery-2.1.3.min.js" ></script>
<script src="https://cdnjs.cloudflare.com/ajax/libs/underscore.js/1.8.2/underscore-min.js" ></script>
<script src="https://cdnjs.cloudflare.com/ajax/libs/backbone.js/1.1.2/backbone-min.js" ></script>
</head>
<body>
<center>
<h1>Linux Hint</h1>
</center>
<script>
//create Model named Flowers using extend()
var Flowers = Backbone.Model.extend();
// create a variable named flower using the above model.
var flower = new Flowers();
//create flower_name attribute and set to "lotus"
//create flower_sepals attribute and set to 4
//create flower_petals attribute and set to 5
flower.set({ flower_name:"lotus",flower_sepals: 4, flower_petals:5});
//get the flower_name
document.write("<strong>Flower Name: </strong> "+ flower.get('flower_name'));
document.write("<br>");
//get the flower_sepals
document.write("<strong>Flower Sepals: </strong> "+ flower.get('flower_sepals'));
document.write("<br>");
//get the flower_petals
document.write("<strong>Flower Petals: </strong> "+ flower.get('flower_petals'));
</script>
</body> </html>
Output:
Run the application in your browser by saving the code in the file with .html as an extension.
![]() The get() method returned attribute values.
Example 2
In this example, we will create a Modal class named – Flowers and create a model object – flower from it.
After that we used the set() method to create three attributes – (flower_name,flower_sepals,flower_petals) with values.
Finally, we used the get() method to return attribute values and display them using the document.write() method.
We are implementing this entire functionality inside the <head> tag.
<html>
<head>
<script src="https://code.jquery.com/jquery-2.1.3.min.js" ></script>
<script src="https://cdnjs.cloudflare.com/ajax/libs/underscore.js/1.8.2/underscore-min.js" ></script>
<script src="https://cdnjs.cloudflare.com/ajax/libs/backbone.js/1.1.2/backbone-min.js" ></script>
<script>
//create Model named Flowers using extend()
var Flowers = Backbone.Model.extend();
// create a variable named flower using the above model.
var flower = new Flowers();
//create flower_name attribute and set to "lotus"
//create flower_sepals attribute and set to 4
//create flower_petals attribute and set to 5
flower.set({ flower_name:"lotus",flower_sepals: 4, flower_petals:5});
//get the flower_name
document.write("<strong>Flower Name: </strong> "+ flower.get('flower_name'));
document.write("<br>");
//get the flower_sepals
document.write("<strong>Flower Sepals: </strong> "+ flower.get('flower_sepals'));
document.write("<br>");
//get the flower_petals
document.write("<strong>Flower Petals: </strong> "+ flower.get('flower_petals'));
</script>
</head>
<body>
<center>
<h1>Linux Hint</h1>
</center>
</body> </html>
Output:
Run the application in your browser by saving the code in the file with .html as an extension.
The get() method returned attribute values.
Example 2
In this example, we will create a Modal class named – Flowers and create a model object – flower from it.
After that we used the set() method to create three attributes – (flower_name,flower_sepals,flower_petals) with values.
Finally, we used the get() method to return attribute values and display them using the document.write() method.
We are implementing this entire functionality inside the <head> tag.
<html>
<head>
<script src="https://code.jquery.com/jquery-2.1.3.min.js" ></script>
<script src="https://cdnjs.cloudflare.com/ajax/libs/underscore.js/1.8.2/underscore-min.js" ></script>
<script src="https://cdnjs.cloudflare.com/ajax/libs/backbone.js/1.1.2/backbone-min.js" ></script>
<script>
//create Model named Flowers using extend()
var Flowers = Backbone.Model.extend();
// create a variable named flower using the above model.
var flower = new Flowers();
//create flower_name attribute and set to "lotus"
//create flower_sepals attribute and set to 4
//create flower_petals attribute and set to 5
flower.set({ flower_name:"lotus",flower_sepals: 4, flower_petals:5});
//get the flower_name
document.write("<strong>Flower Name: </strong> "+ flower.get('flower_name'));
document.write("<br>");
//get the flower_sepals
document.write("<strong>Flower Sepals: </strong> "+ flower.get('flower_sepals'));
document.write("<br>");
//get the flower_petals
document.write("<strong>Flower Petals: </strong> "+ flower.get('flower_petals'));
</script>
</head>
<body>
<center>
<h1>Linux Hint</h1>
</center>
</body> </html>
Output:
Run the application in your browser by saving the code in the file with .html as an extension.
![]() The get() method returned attribute values.
Example 3:
Let’s check if we get the value of the nonexistent attribute.
<html>
<head>
<script src="https://code.jquery.com/jquery-2.1.3.min.js" ></script>
<script src="https://cdnjs.cloudflare.com/ajax/libs/underscore.js/1.8.2/underscore-min.js" ></script>
<script src="https://cdnjs.cloudflare.com/ajax/libs/backbone.js/1.1.2/backbone-min.js" ></script>
<script>
//create Model named Flowers using extend()
var Flowers = Backbone.Model.extend();
// create a variable named flower using the above model.
var flower = new Flowers();
//create flower_name attribute and set to "lotus"
//create flower_sepals attribute and set to 4
//create flower_petals attribute and set to 5
flower.set({ flower_name:"lotus",flower_sepals: 4, flower_petals:5});
//get the flower_size that is not existing
document.write("<strong>Flower Size: </strong> "+ flower.get('flower_size'));
document.write("<br>");
</script>
</head>
<body>
<center>
<h1>Linux Hint</h1>
</center>
</body> </html>
Output:
The get() method returned attribute values.
Example 3:
Let’s check if we get the value of the nonexistent attribute.
<html>
<head>
<script src="https://code.jquery.com/jquery-2.1.3.min.js" ></script>
<script src="https://cdnjs.cloudflare.com/ajax/libs/underscore.js/1.8.2/underscore-min.js" ></script>
<script src="https://cdnjs.cloudflare.com/ajax/libs/backbone.js/1.1.2/backbone-min.js" ></script>
<script>
//create Model named Flowers using extend()
var Flowers = Backbone.Model.extend();
// create a variable named flower using the above model.
var flower = new Flowers();
//create flower_name attribute and set to "lotus"
//create flower_sepals attribute and set to 4
//create flower_petals attribute and set to 5
flower.set({ flower_name:"lotus",flower_sepals: 4, flower_petals:5});
//get the flower_size that is not existing
document.write("<strong>Flower Size: </strong> "+ flower.get('flower_size'));
document.write("<br>");
</script>
</head>
<body>
<center>
<h1>Linux Hint</h1>
</center>
</body> </html>
Output:
![]() We can see the output is undefined since the flower_size attribute does not exist in the flower model.
We can see the output is undefined since the flower_size attribute does not exist in the flower model.
Conclusion
In this Backbone.js tutorial, we discussed how to get the attribute values using the get() method in Backbone.js Model.
Also, we discussed two different approaches to implementing this method.
We came to know that the method returns undefined when the attribute doesn’t exist.
Backbone.js model.Escape() Method
In this Backbone.js framework tutorial, we will discuss the Escape() method in the model class.
Backbone.js is a framework used to build web applications that follow the style of JavaScript.
It supports models, events, collections, views, and utilities.
By using any of the previous functionalities, we can create and perform different operations on the given data in a web application.
Points to Remember
It is used with JavaScript.
We can implement the framework inside the <script> tag.
This framework supports JavaScript methods and functions like output and reading input.
<script> tag is placed inside <head> tag or in <body> tag.
It is important to have Content Delivery Network (CDN) links to run the web application on the server.
Let’s See the Structure To Place the Code
<html>
<head>
<script>
You can use Backbone.js framework here
</script>
</head>
<body>
<script>
You can also use Backbone.js framework here
</script>
</body></html>
CDN Links are placed with the src attribute of the script tag.
CDN Links
<script src="https://cdnjs.cloudflare.com/ajax/libs/underscore.js/1.8.2/underscore-min.js" ></script>
<script src="https://cdnjs.cloudflare.com/ajax/libs/backbone.js/1.1.2/backbone-min.js" ></script>
The Escape() method in the Backbone.js model will return the value associated with a model’s attribute.
It will return an HTML escaped version of the attribute specified inside it.
Attribute stores values in a model.
For a model, there can be any number of attributes.
If the attribute is not found in a model, then it will return nothing (empty).
Syntax:
model_object.Escape(attribute)
Parameter:It takes only one parameter.
The attribute parameter refers to the property which a model has.
Return:
It returns the value with respect to the property.
If the attribute is not found, it returns empty.
Approach
Create a Backbone model using the extend() method.
Syntax:
var ModelClass = Backbone.Model.extend();
Create a model object from the previous method using a new keyword.
Syntax:
var model_object = new ModelClass ();
Explore Escape() method in Backbone.js
Let’s discuss several examples of the Backbone.js model Escape() method.
Example 1
In this example, we will create a Modal class named – Flowers and create a model object – flower from it.
After that, we used the set() method to create three attributes – (flower_name,flower_sepals,flower_petals) with values.
Finally, we used the Escape() method to return attribute values and display them using the document.write() method.
We are implementing this entire functionality inside the <body> tag.
<html>
<head>
<script src="https://code.jquery.com/jquery-2.1.3.min.js" ></script>
<script src="https://cdnjs.cloudflare.com/ajax/libs/underscore.js/1.8.2/underscore-min.js" ></script>
<script src="https://cdnjs.cloudflare.com/ajax/libs/backbone.js/1.1.2/backbone-min.js" ></script>
</head>
<body>
<center>
<h1>Linux Hint</h1>
</center>
<script>
//create Model named Flowers using extend()
var Flowers = Backbone.Model.extend();
// create a variable named flower using the above model.
var flower = new Flowers();
//create flower_name attribute and set to "lotus"
//create flower_sepals attribute and set to 4
//create flower_petals attribute and set to 5
flower.set({ flower_name:"lotus",flower_sepals: 4, flower_petals:5});
//get the flower_name
document.write("<strong>Flower Name: </strong> "+ flower.escape('flower_name'));
document.write("<br>");
//get the flower_sepals
document.write("<strong>Flower Sepals: </strong> "+ flower.escape('flower_sepals'));
document.write("<br>");
//get the flower_petals
document.write("<strong>Flower Petals: </strong> "+ flower.escape('flower_petals'));
</script>
</body> </html>
Output:
![]() Run the application in your browser by saving the code in the file with .html as an extension.
The Escape() method returned attribute values.
Example 2
In this example, we will create a Modal class named – Flowers and create a model object – flower from it.
After that we used the set() method to create three attributes – (flower_name,flower_sepals,flower_petals) with values.
Finally, we used the Escape() method to return the attribute values and display them using the document.write() method.
We are implementing this entire functionality inside the tag.
<html>
<head>
<script src="https://code.jquery.com/jquery-2.1.3.min.js" ></script>
<script src="https://cdnjs.cloudflare.com/ajax/libs/underscore.js/1.8.2/underscore-min.js" ></script>
<script src="https://cdnjs.cloudflare.com/ajax/libs/backbone.js/1.1.2/backbone-min.js" ></script>
<script>
//create Model named Flowers using extend()
var Flowers = Backbone.Model.extend();
// create a variable named flower using the above model.
var flower = new Flowers();
//create flower_name attribute and set to "lotus"
//create flower_sepals attribute and set to 4
//create flower_petals attribute and set to 5
flower.set({ flower_name:"lotus",flower_sepals: 4, flower_petals:5});
//get the flower_name
document.write("<strong>Flower Name: </strong> "+ flower.escape('flower_name'));
document.write("<br>");
//get the flower_sepals
document.write("<strong>Flower Sepals: </strong> "+ flower.escape('flower_sepals'));
document.write("<br>");
//get the flower_petals
document.write("<strong>Flower Petals: </strong> "+ flower.escape('flower_petals'));
</script>
</head>
<body>
<center>
<h1>Linux Hint</h1>
</center>
</body> </html>
Output:
Run the application in your browser by saving the code in the file with .html as an extension.
The Escape() method returned attribute values.
Example 2
In this example, we will create a Modal class named – Flowers and create a model object – flower from it.
After that we used the set() method to create three attributes – (flower_name,flower_sepals,flower_petals) with values.
Finally, we used the Escape() method to return the attribute values and display them using the document.write() method.
We are implementing this entire functionality inside the tag.
<html>
<head>
<script src="https://code.jquery.com/jquery-2.1.3.min.js" ></script>
<script src="https://cdnjs.cloudflare.com/ajax/libs/underscore.js/1.8.2/underscore-min.js" ></script>
<script src="https://cdnjs.cloudflare.com/ajax/libs/backbone.js/1.1.2/backbone-min.js" ></script>
<script>
//create Model named Flowers using extend()
var Flowers = Backbone.Model.extend();
// create a variable named flower using the above model.
var flower = new Flowers();
//create flower_name attribute and set to "lotus"
//create flower_sepals attribute and set to 4
//create flower_petals attribute and set to 5
flower.set({ flower_name:"lotus",flower_sepals: 4, flower_petals:5});
//get the flower_name
document.write("<strong>Flower Name: </strong> "+ flower.escape('flower_name'));
document.write("<br>");
//get the flower_sepals
document.write("<strong>Flower Sepals: </strong> "+ flower.escape('flower_sepals'));
document.write("<br>");
//get the flower_petals
document.write("<strong>Flower Petals: </strong> "+ flower.escape('flower_petals'));
</script>
</head>
<body>
<center>
<h1>Linux Hint</h1>
</center>
</body> </html>
Output:
![]() Run the application in your browser by saving the code in the file with .html as an extension.
The Escape() method returned attribute values.
Example 3
Let’s check if we get the value of the nonexistent attribute.
<html>
<head>
<script src="https://code.jquery.com/jquery-2.1.3.min.js" ></script>
<script src="https://cdnjs.cloudflare.com/ajax/libs/underscore.js/1.8.2/underscore-min.js" ></script>
<script src="https://cdnjs.cloudflare.com/ajax/libs/backbone.js/1.1.2/backbone-min.js" ></script>
<script>
//create Model named Flowers using extend()
var Flowers = Backbone.Model.extend();
// create a variable named flower using the above model.
var flower = new Flowers();
//create flower_name attribute and set to "lotus"
//create flower_sepals attribute and set to 4
//create flower_petals attribute and set to 5
flower.set({ flower_name:"lotus",flower_sepals: 4, flower_petals:5});
//get the flower_size that is not existing
document.write("<strong>Flower Size: </strong> "+ flower.escape('flower_size'));
document.write("<br>");
</script>
</head>
<body>
<center>
<h1>Linux Hint</h1>
</center>
</body> </html>
Output:
Run the application in your browser by saving the code in the file with .html as an extension.
The Escape() method returned attribute values.
Example 3
Let’s check if we get the value of the nonexistent attribute.
<html>
<head>
<script src="https://code.jquery.com/jquery-2.1.3.min.js" ></script>
<script src="https://cdnjs.cloudflare.com/ajax/libs/underscore.js/1.8.2/underscore-min.js" ></script>
<script src="https://cdnjs.cloudflare.com/ajax/libs/backbone.js/1.1.2/backbone-min.js" ></script>
<script>
//create Model named Flowers using extend()
var Flowers = Backbone.Model.extend();
// create a variable named flower using the above model.
var flower = new Flowers();
//create flower_name attribute and set to "lotus"
//create flower_sepals attribute and set to 4
//create flower_petals attribute and set to 5
flower.set({ flower_name:"lotus",flower_sepals: 4, flower_petals:5});
//get the flower_size that is not existing
document.write("<strong>Flower Size: </strong> "+ flower.escape('flower_size'));
document.write("<br>");
</script>
</head>
<body>
<center>
<h1>Linux Hint</h1>
</center>
</body> </html>
Output:
![]() We can see the output is empty since the flower_size attribute does not exist in the flower model.
We can see the output is empty since the flower_size attribute does not exist in the flower model.
Conclusion
In this Backbone.js tutorial, we discussed how to get the attribute values in HTML escaped version using the Escape() method in Backbone.js Model.
Also, we discussed two different approaches to implement this method.
We learned that the method returns empty (nothing) when the attribute doesn’t exist.
Backbone.js Model.set() Method
In this Backbone.js framework tutorial, we will discuss the set() method in the model class.
Backbone.js is a framework that is used to build web applications which follow the style of JavaScript.
It supports models, events, collections, views, and utilities.
By using any of the previous functionalities, we can create and perform different operations on the given data in a web application.
Points to Remember
It is used with JavaScript.
We can implement the framework inside the <script> tag.
This framework supports JavaScript methods and functions like output and reading input.
<script> tag is placed inside <head> tag or in <body> tag.
It is important to have Content Delivery Network (CDN) links to run the web application on the server.
Let’s See the Structure To Place the Code
<html>
<head>
<script>
You can use Backbone.js framework here
</script>
</head>
<body>
<script>
You can also use Backbone.js framework here
</script>
</body></html>
CDN Links are placed with the src attribute of the script tag.
CDN Links
<script src="https://cdnjs.cloudflare.com/ajax/libs/underscore.js/1.8.2/underscore-min.js" ></script><script src="https://cdnjs.cloudflare.com/ajax/libs/backbone.js/1.1.2/backbone-min.js" ></script>
The set() method in the Backbone.js model will set the value to the model’s attribute.
Attribute stores values in a model.
For a model, there can be any number of attributes.
If the attribute is not found in a model, then it will return “undefined”.
Syntax:
model_object.set(attribute)
Parameter:
It takes only one parameter.
The attribute parameter refers to the property which a model has.
It takes value in the format – {attribute:value,….}
Approach
1.
Create a Backbone model using the extend() method.
Syntax:
var ModelClass = Backbone.Model.extend();
2.
Create a model object from the previous method using a new keyword.
Syntax:
var model_object = new ModelClass ();
3.
Explore the set() method in Backbone.js.
Let’s discuss several examples of the Backbone.js model set() method.
Example 1
In this example, we will create a Modal class named – Flowers and create a model object – flower from it.
After that, we used the set() method to create three attributes – (flower_name,flower_sepals,flower_petals) with values.
Finally, we used the get() method to return all attribute values using JSON.stringify() through document.write() method.
We are implementing this entire functionality inside the <script> tag.
<html>
<head>
<script src="https://code.jquery.com/jquery-2.1.3.min.js" ></script>
<script src="https://cdnjs.cloudflare.com/ajax/libs/underscore.js/1.8.2/underscore-min.js" ></script>
<script src="https://cdnjs.cloudflare.com/ajax/libs/backbone.js/1.1.2/backbone-min.js" ></script>
<script>
//create Model named Flowers using extend()
var Flowers = Backbone.Model.extend();
// create a variable named flower using the above model.
var flower = new Flowers();
//create flower_name attribute and set to "lotus"
//create flower_sepals attribute and set to 4
//create flower_petals attribute and set to 5
flower.set({ flower_name:"lotus",flower_sepals: 4, flower_petals:5});
//display the flower model attributes
document.write("<strong>Flower Data: </strong>",JSON.stringify(flower))
</script>
</head>
<body>
<center>
<h1>Linux Hint</h1>
</center>
</body></html>
Output:
Run the application in your browser by saving the code in the file with .html as an extension.
![]() We can see that all the attributes along with values were returned in JSON Format.
We can see that all the attributes along with values were returned in JSON Format.
Example 2
In this example, we will create a Modal class named – Flowers and create a model object – flower from it.
After that we used the set() method to create three attributes – (flower_name,flower_sepals,flower_petals) with values.
Finally, we used the get() method to return all the attribute values using JSON.stringify() through the document.write() method.
We are implementing this entire functionality inside the <body> tag.
<html>
<head>
<script src="https://code.jquery.com/jquery-2.1.3.min.js" ></script>
<script src="https://cdnjs.cloudflare.com/ajax/libs/underscore.js/1.8.2/underscore-min.js" ></script>
<script src="https://cdnjs.cloudflare.com/ajax/libs/backbone.js/1.1.2/backbone-min.js" ></script>
</head>
<body>
<center>
<h1>Linux Hint</h1>
</center>
<script>
//create Model named Flowers using extend()
var Flowers = Backbone.Model.extend();
// create a variable named flower using the above model.
var flower = new Flowers();
//create flower_name attribute and set to "lotus"
//create flower_sepals attribute and set to 4
//create flower_petals attribute and set to 5
flower.set({ flower_name:"lotus",flower_sepals: 4, flower_petals:5});
//display the flower model attributes
document.write("<strong>Flower Data: </strong>",JSON.stringify(flower))
</script>
</body></html>
Output:
Run the application in your browser by saving the code in the file with .html as an extension.
![]() We can see that all the attributes along with values were returned in JSON Format.
We can see that all the attributes along with values were returned in JSON Format.
Example 3
It is also possible to display each attribute using the get() method after setting the values using the set() method.
<html>
<head>
<script src="https://code.jquery.com/jquery-2.1.3.min.js" ></script>
<script src="https://cdnjs.cloudflare.com/ajax/libs/underscore.js/1.8.2/underscore-min.js" ></script>
<script src="https://cdnjs.cloudflare.com/ajax/libs/backbone.js/1.1.2/backbone-min.js" ></script>
<script>
//create Model named Flowers using extend()
var Flowers = Backbone.Model.extend();
// create a variable named flower using the above model.
var flower = new Flowers();
//create flower_name attribute and set to "lotus"
//create flower_sepals attribute and set to 4
//create flower_petals attribute and set to 5
flower.set({ flower_name:"lotus",flower_sepals: 4, flower_petals:5});
//get the flower_name that is not existing
document.write("<strong>Flower Name: </strong> "+ flower.get('flower_name'));
document.write("<br>");
//get the flower_sepals that is not existing
document.write("<strong>Flower Sepals: </strong> "+ flower.get('flower_sepals'));
document.write("<br>");
//get the flower_petals that is not existing
document.write("<strong>Flower Petals: </strong> "+ flower.get('flower_petals'));
</script>
</head>
<body>
<center>
<h1>Linux Hint</h1>
</center>
</body></html>
Output:
![]()
Conclusion
In this Backbone.js tutorial, we discussed how to set the attribute values using set() in Backbone.js model.
Also, we discussed two different approaches to implementing this method.
We used the JSON.stringify() method to display the entire model object in JSON Format and the get() method to display each attribute.
Backbone.js Model.PreviousAttributes() Method
In this Backbone.js framework tutorial, we will discuss the previousAttributes() method in the model class.
Backbone.js is a framework that is used to build web applications which follow the style of JavaScript.
It supports models, events, collections, views, and utilities.
By using any of the previous functionalities, we can create and perform different operations on the given data in a web application.
Points to Remember
It is used with JavaScript.
We can implement the framework inside the <script> tag.
This framework supports JavaScript methods and functions like output and reading input.
<script> tag is placed inside <head> tag or in <body> tag.
It is important to have Content Delivery Network (CDN) links to run the web application on the server.
Let’s See the Structure To Place the Code
<html>
<head>
<script>
You can use Backbone.js framework here
</script>
</head>
<body>
<script>
You can also use Backbone.js framework here
</script>
</body></html>
CDN Links are placed with the src attribute of the script tag.
CDN Links
<script src="https://cdnjs.cloudflare.com/ajax/libs/underscore.js/1.8.2/underscore-min.js" ></script><script src="https://cdnjs.cloudflare.com/ajax/libs/backbone.js/1.1.2/backbone-min.js" ></script>
The previousAttributes() method in Backbone.js model returns the previous attributes, even the attributes are modified.
Syntax:
model_object.previousAttributes()
Approach
1.
Create a Backbone model using the extend() method.
Syntax:
var ModelClass = Backbone.Model.extend();
2.
Create a model object from the above method using a new keyword.
Syntax:
var model_object = new ModelClass ();
3.
Explore previousAttributes() method in Backbone.js.
Let’s discuss some examples of the Backbone.js model previousAttributes() method.
Example 1
In this example, we will create a Modal class named – Flowers and create a model object – flower from it.
After that, we used the set() method to create three attributes – (flower_name,flower_sepals,flower_petals) with values.
Update the flower_name attribute using the set() method.
Finally, we used the previousAttributes() method to return the previous attributes.
We are implementing this entire functionality inside the <body> tag.
<html>
<head>
<script src="https://code.jquery.com/jquery-2.1.3.min.js" ></script>
<script src="https://cdnjs.cloudflare.com/ajax/libs/underscore.js/1.8.2/underscore-min.js" ></script>
<script src="https://cdnjs.cloudflare.com/ajax/libs/backbone.js/1.1.2/backbone-min.js" ></script>
</head>
<body>
<center>
<h1>Linux Hint</h1>
</center>
<script>
//create Model named Flowers using extend()
var Flowers = Backbone.Model.extend();
// create a variable named flower using the above model.
Var flower = new Flowers();
//create flower_name attribute and set to "lotus"
//create flower_sepals attribute and set to 2
//create flower_petals attribute and set to 5
flower.set({ flower_name:"lotus",flower_sepals: 2, flower_petals:5});
//display the flower model
document.write("<strong>Actual Flowers: </strong> "+ JSON.stringify(flower));
document.write("<br>");
//update the flower_name to lilly
flower.set({ 'flower_name':'lilly'});
//display the flower model
document.write("<strong>After updating flowername to lilly: </strong> "+ JSON.stringify(flower));
document.write("<br>");
//get the previous attributes
document.write("<strong>After previousAttributes() : </strong> "+ JSON.stringify(flower.previousAttributes()));
document.write("<br>");
</script>
</body></html>
Output:
![]() Run the application in your browser by saving the code in the file with .html as an extension.
Here, we can see when we display the previousAttributes(), “lotus” is returned for flower_name instead of “lilly” because we are returning previous attributes.
Run the application in your browser by saving the code in the file with .html as an extension.
Here, we can see when we display the previousAttributes(), “lotus” is returned for flower_name instead of “lilly” because we are returning previous attributes.
Example 2
In this example, we will create a Modal class named – Flowers and create a model object – flower from it.
After that, we used the set() method to create three attributes – (flower_name,flower_sepals,flower_petals) with values.
Update all the attributes using the set() method.
Finally, we used the previousAttributes() method to return the previous attributes.
We are implementing this entire functionality inside the <body> tag.
<html>
<head>
<script src="https://code.jquery.com/jquery-2.1.3.min.js" ></script>
<script src="https://cdnjs.cloudflare.com/ajax/libs/underscore.js/1.8.2/underscore-min.js" ></script>
<script src="https://cdnjs.cloudflare.com/ajax/libs/backbone.js/1.1.2/backbone-min.js" ></script>
</head>
<body>
<center>
<h1>Linux Hint</h1>
</center>
<script>
//create Model named Flowers using extend()
var Flowers = Backbone.Model.extend();
// create a variable named flower using the above model.
Var flower = new Flowers();
//create flower_name attribute and set to "lotus"
//create flower_sepals attribute and set to 2
//create flower_petals attribute and set to 5
flower.set({ flower_name:"lotus",flower_sepals: 2, flower_petals:5});
//display the flower model
document.write("<strong>Actual Flowers: </strong> "+ JSON.stringify(flower));
document.write("<br>");
//update the flower_name to lilly
flower.set({ 'flower_name':'lilly'});
//display the flower model
document.write("<strong>After updating flower: </strong> "+ JSON.stringify(flower));
document.write("<br>");
//get the previous attributes
document.write("<strong>After previousAttributes() : </strong> "+ JSON.stringify(flower.previousAttributes()));
document.write("<br>");
</script>
</body></html>
Output:
![]() Run the application in your browser by saving the code in the file with .html as an extension.
Here, we can see when we display the previousAttributes(), “lotus” is returned for flower_name instead of “lilly”, 2 is returned instead of 10, and 5 is retired instead of 20 because we are returning previous attributes.
Run the application in your browser by saving the code in the file with .html as an extension.
Here, we can see when we display the previousAttributes(), “lotus” is returned for flower_name instead of “lilly”, 2 is returned instead of 10, and 5 is retired instead of 20 because we are returning previous attributes.
Conclusion
In this Backbone.js tutorial, we discussed previousAttributes() that will return previous attributes even if the attributes are updated.
Using the set() method, we updated previous attributes.
Backbone.js Collection.at() Method
In this Backbone.js framework tutorial, we will discuss the at() method in the collection class.
Backbone.js is a framework that is used to build web applications that follow the style of JavaScript.
It supports models, events, collections, views, and utilities.
By using any of the above functionalities, we can create and perform different operations on the given data in a web application.
Points to Remember
It is used with JavaScript.
We can implement the framework inside the <script> tag.
This framework supports JavaScript methods and functions like output and reading input.
<script> tag is placed inside <head> tag or in <body> tag.
It is important to have Content Delivery Network (CDN) links to run the web application on the server.
Let’s See the Structure To Place the Code
<html>
<head>
<script>
You can use Backbone.js framework here
</script>
</head>
<body>
<script>
You can also use Backbone.js framework here
</script>
</body></html>
CDN Links are placed with the src attribute of the script tag.
CDN Links
<script src="https://cdnjs.cloudflare.com/ajax/libs/underscore.js/1.8.2/underscore-min.js" ></script><script src="https://cdnjs.cloudflare.com/ajax/libs/backbone.js/1.1.2/backbone-min.js" ></script>
The at() method in Backbone.js collection is used to return the model instance from the collection using index.
Initial model instance starts with 0 (index).
Syntax:
collection_object.at(index)
It takes the index position as a parameter.
If the index is not found, it will return undefined.
Approach
1.
Create a Backbone model using the extend() method.
Syntax:
var ModelClass = Backbone.Model.extend();
2.
Create a Backbone collection using the extend() method and pass the model class.
Syntax:
var CollectionClass = Backbone.Collection.extend({
model: ModelClass
});
3.
Create an object or instance for the collection class.
Syntax:
var collection_instance = new CollectionClass();
4.
Explore the at() method in the Backbone.js collection.
Let’s discuss some examples of the Backbone.js collection at() method.
Example 1
In this example, we will create a Modal class named – Flowers and create a FlowerCollection collection class.
We will pass our model class (Flowers) inside it.
After that, we have to create five instances for the Flowers model with three attributes(flower_name,flower_sepals,flower_petals).
We will create a flower_collection, which is an instance of the FlowerCollection collection.
And we will add the instances of the Flower model to the collection instance using the add() method.
Finally, we will return the model instances using at() through an index.
<html>
<head>
<script src="https://code.jquery.com/jquery-2.1.3.min.js" ></script>
<script src="https://cdnjs.cloudflare.com/ajax/libs/underscore.js/1.8.2/underscore-min.js" ></script>
<script src="https://cdnjs.cloudflare.com/ajax/libs/backbone.js/1.1.2/backbone-min.js" ></script>
</head>
<body>
<center>
<h1>Linux Hint</h1>
</center>
<script>
//create Model named Flowers using extend()
var Flowers = Backbone.Model.extend();
//create collection - FlowerCollection and and pass Flowers model
var FlowerCollection = Backbone.Collection.extend({
model: Flowers
});
//create 5 instances for the Flowers model
var flower1 = new Flowers({flower_name: "lilly", flower_sepals:3,flower_petals:9});
var flower2 = new Flowers({flower_name: "lilly", flower_sepals:10,flower_petals:17});
var flower3 = new Flowers({flower_name: "rose", flower_sepals:2,flower_petals:8});
var flower4 = new Flowers({flower_name: "lilly", flower_sepals:3,flower_petals:9});
var flower5 = new Flowers({flower_name: "tulip", flower_sepals:7,flower_petals:10});
//create flower_collection
var flower_collection = new FlowerCollection();
//add the above model instances to the flower_collection instance using add(() method.
flower_collection.add([flower1,flower2,flower3,flower4,flower5]);
//display the flowers present in the collection
document.write('<strong>Existing: </strong> ' + JSON.stringify(flower_collection));
document.write("<br>");
document.write("<br>");
//get the model instance in a collection at index-0
document.write('<strong>Index-0: </strong> ' + JSON.stringify(flower_collection.at(0)));
document.write("<br>");
//get the model instance in a collection at index-3
document.write('<strong>Index-3: </strong> ' + JSON.stringify(flower_collection.at(3)));
document.write("<br>");
//get the model instance in a collection at index-4
document.write('<strong>Index-4: </strong> ' + JSON.stringify(flower_collection.at(4)));
document.write("<br>");
</script>
</body></html>
Output:
![]() Run the application in your browser by saving the code in the file with .html as an extension.
Here, we can see that at() returns the model instances using the indices – 0, 3, and 4.
Run the application in your browser by saving the code in the file with .html as an extension.
Here, we can see that at() returns the model instances using the indices – 0, 3, and 4.
Example 2
In this example, we will create a Modal class named – Flowers and create a FlowerCollection collection class.
We will pass our model class (Flowers) inside it.
After that we have to create five instances for the Flowers model with three attributes(flower_name,flower_sepals,flower_petals).
We will create a flower_collection, which is an instance to the FlowerCollection collection.
And we will add the instances of the Flower model to the collection instance using the add() method.
Finally, we will return the model instances using at() through index.
<html>
<head>
<script src="https://code.jquery.com/jquery-2.1.3.min.js" ></script>
<script src="https://cdnjs.cloudflare.com/ajax/libs/underscore.js/1.8.2/underscore-min.js" ></script>
<script src="https://cdnjs.cloudflare.com/ajax/libs/backbone.js/1.1.2/backbone-min.js" ></script>
</head>
<body>
<center>
<h1>Linux Hint</h1>
</center>
<script>
//create Model named Flowers using extend()
var Flowers = Backbone.Model.extend();
//create collection - FlowerCollection and and pass Flowers model
var FlowerCollection = Backbone.Collection.extend({
model: Flowers
});
//create 5 instances for the Flowers model
var flower1 = new Flowers({flower_name: "lilly", flower_sepals:3,flower_petals:9});
var flower2 = new Flowers({flower_name: "lilly", flower_sepals:10,flower_petals:17});
var flower3 = new Flowers({flower_name: "rose", flower_sepals:2,flower_petals:8});
var flower4 = new Flowers({flower_name: "lilly", flower_sepals:3,flower_petals:9});
var flower5 = new Flowers({flower_name: "tulip", flower_sepals:7,flower_petals:10});
//create flower_collection
var flower_collection = new FlowerCollection();
//add the above model instances to the flower_collection instance using add(() method.
flower_collection.add([flower1,flower2,flower3,flower4,flower5]);
//display the flowers present in the collection
document.write('<strong>Existing: </strong> ' + JSON.stringify(flower_collection));
document.write("<br>");
document.write("<br>");
//get the model instance in a collection at index-5
document.write('<strong>Index-5: </strong> ' + JSON.stringify(flower_collection.at(5)));
document.write("<br>");
</script>
</body></html>
Output:
![]() Run the application in your browser by saving the code in the file with .html as an extension.
Here, we can see that at() returns undefined since the model instance at index-5 doesn’t exist in a collection.
Run the application in your browser by saving the code in the file with .html as an extension.
Here, we can see that at() returns undefined since the model instance at index-5 doesn’t exist in a collection.
Conclusion
In this Backbone.js tutorial, we discussed the at() method in collection.
It is used to return the model instance from a collection using the index position.
If the model instance is not found in the collection.
It will return undefined.
Backbone.js Collection.add() Method
In this Backbone.js framework tutorial, we will discuss the add() method in the collection class.
Backbone js is a framework that is used to build web applications that follow the style of JavaScript.
It supports models, events, collections, views, and utilities.
By using any of the previous functionalities, we can create and perform different operations on the given data in a web application.
Points to Remember
It is used with JavaScript.
We can implement the framework inside the <script> tag.
This framework supports JavaScript methods and functions like output and reading input.
<script> tag is placed inside <head> tag or in <body> tag.
It is important to have Content Delivery Network (CDN) links to run the web application on the server.
Let’s See the Structure To Place the Code
<html>
<head>
<script>
You can use Backbone.js framework here
</script>
</head>
<body>
<script>
You can also use Backbone.js framework here
</script>
</body></html>
CDN Links are placed with the src attribute of the script tag.
CDN Links
<script src="https://cdnjs.cloudflare.com/ajax/libs/underscore.js/1.8.2/underscore-min.js" ></script>
<script src="https://cdnjs.cloudflare.com/ajax/libs/backbone.js/1.1.2/backbone-min.js" ></script>
The add() method in Backbone.js collection adds the model to the collection.
It is possible to add a model (single instance) or an array of models (more than one instance through an array).
Syntax:
collection_object.add(model,options)
It takes two parameters.
model will add to the collection.
It holds the collection instances (collection object).
options parameter is used to specify whether it is a model or an array of models.
Model – collection_object.add(model_instance1)
Array of Models – collection_object.add([model_instance1,model_instance2,………..])
Approach
Create a Backbone model using the extend() method.
Syntax:
var ModelClass = Backbone.Model.extend();
Create a Backbone collection using the extend() method and pass the model class.
Syntax:
var CollectionClass = Backbone.Collection.extend({
model: ModelClass
});
Create an object or instance for the collection class.
Syntax:
var collection_instance = new CollectionClass();
Explore add() method in Backbone.js collection.
Let’s discuss some examples of the Backbone.js collection add() method.
Example 1: Add Single Model to the Collection
In this example, we will create a Modal class named – Flowers and create a FlowerCollection collection class.
We will pass our model class (Flowers) inside it.
After that, we have to create an instance for the Flowers model with three attributes(flower_name,flower_sepals,flower_petals).
We will create a flower_collection, which is an instance of the FlowerCollection collection.
And we will add the instance of the Flower model to the collection instance using the add() method.
Finally, we are displaying the collection using the JSON.stringify() method.
<html>
<head>
<script src="https://code.jquery.com/jquery-2.1.3.min.js" ></script>
<script src="https://cdnjs.cloudflare.com/ajax/libs/underscore.js/1.8.2/underscore-min.js" ></script>
<script src="https://cdnjs.cloudflare.com/ajax/libs/backbone.js/1.1.2/backbone-min.js" ></script>
</head>
<body>
<center>
<h1>Linux Hint</h1>
</center>
<script>
//create Model named Flowers using extend()
var Flowers = Backbone.Model.extend();
//create collection - FlowerCollection and and pass Flowers model
var FlowerCollection = Backbone.Collection.extend({
model: Flowers
});
//create 1 instance for the Flowers model
var flower1 = new Flowers({flower_name: "lotus", flower_sepals:3,flower_petals:7});
//create flower_collection
var flower_collection = new FlowerCollection();
//add the above model instance to the flower_collection instance using add(() method.
flower_collection.add(flower1);
//display the flowers present in the collection
document.write('<strong>Flowers:</strong> ' + JSON.stringify(flower_collection.toJSON()));
</script>
</body> </html>
Output:
![]() Run the application in your browser by saving the code in the file with .html as an extension.
Here, we can see the add() method added the model instance to the collection.
Run the application in your browser by saving the code in the file with .html as an extension.
Here, we can see the add() method added the model instance to the collection.
Example 2: Add Array of Models to the Collection
In this example, we will create a Modal class named – Flowers and create a FlowerCollection collection class.
We will pass our model class (Flowers) inside it.
After that, we have to create an instance for the Flowers model with three attributes(flower_name,flower_sepals,flower_petals).
We will create a flower_collection, which is an instance of the FlowerCollection collection.
And we will add three instances of the Flower model to the collection instance using add() method.
Finally, we are displaying the collection using the JSON.stringify() method.
<html>
<head>
<script src="https://code.jquery.com/jquery-2.1.3.min.js" ></script>
<script src="https://cdnjs.cloudflare.com/ajax/libs/underscore.js/1.8.2/underscore-min.js" ></script>
<script src="https://cdnjs.cloudflare.com/ajax/libs/backbone.js/1.1.2/backbone-min.js" ></script>
</head>
<body>
<center>
<h1>Linux Hint</h1>
</center>
<script>
//create Model named Flowers using extend()
var Flowers = Backbone.Model.extend();
//create collection - FlowerCollection and and pass Flowers model
var FlowerCollection = Backbone.Collection.extend({
model: Flowers
});
//create 3 instances for the Flowers model
var flower1 = new Flowers({flower_name: "lotus", flower_sepals:3,flower_petals:7});
var flower2 = new Flowers({flower_name: "lilly", flower_sepals:10,flower_petals:17});
var flower3 = new Flowers({flower_name: "rose", flower_sepals:3,flower_petals:1});
//create flower_collection
var flower_collection = new FlowerCollection();
//add the above model instances to the flower_collection instance using add(() method.
flower_collection.add([flower1,flower2,flower3]);
//display the flowers present in the collection
document.write('<strong>Flowers:</strong> ' + JSON.stringify(flower_collection.toJSON()));
</script>
</body> </html>
Output:
![]() Run the application in your browser by saving the code in the file with .html as an extension.
Here, we can see the add() method added the array of models (3) to the collection.
Run the application in your browser by saving the code in the file with .html as an extension.
Here, we can see the add() method added the array of models (3) to the collection.
Conclusion
In this Backbone.js tutorial, we discussed the add() method in the collection.
It is used to add a model to the collection.
If there are more than one instance to a model, then you can use an array inside the add() method and pass models to the add() method through the array.
Backbone.js Collection.pluck() Method
In this Backbone.js framework tutorial, we will discuss the pluck() method in the collection class.
Introduction
Backbone.js is a framework that is used to build web applications that follow the style of JavaScript.
It supports models, events, collections, views, and utilities.
Using any of the previous functionalities, we can create and perform different operations on the given data in a web application.
Points to Remember
It is used with JavaScript.
We can implement the framework inside the <script> tag.
This framework supports JavaScript methods and functions like output and reading input.
<script> tag is placed inside <head> tag or in <body> tag.
It is important to have Content Delivery Network (CDN) links to run the web application on the server.
Let’s See the Structure To Place the Code
| 1234567891011121314
|
<html>
<head>
<script>
You can use Backbone.js framework here
</script>
</head>
<body>
<script>
You can also use Backbone.js framework here
</script>
</body></html>
|
CDN Links are placed with the src attribute of the script tag.
CDN Links
| 123
|
<script src="https://cdnjs.cloudflare.com/ajax/libs/underscore.js/1.8.2/underscore-min.js" ></script><script src="https://cdnjs.cloudflare.com/ajax/libs/backbone.js/1.1.2/backbone-min.js" ></script>
|
The pluck() method in Backbone.js collection used to return the attribute from the given model instance in a collection.
Syntax:
| 1
| collection_object.pluck(attribute)
|
It takes one parameter.
The attribute parameter is the model’s property.
Approach
1.
Create a Backbone model using the extend() method.
Syntax:
| 1
|
var ModelClass = Backbone.Model.extend();
|
2.
Create a Backbone collection using the extend() method and pass the model class.
Syntax:
| 12345
|
var CollectionClass = Backbone.Collection.extend({
model: ModelClass
});
|
3.
Create an object or instance for the collection class.
Syntax:
| 1
|
var collection_instance = new CollectionClass();
|
4.
Explore the pluck() method in the Backbone.js collection.
Let’s discuss several examples of the Backbone.js collection pluck() method.
Example 1: Return Attribute Using the pluck() Method
In this example, we will create a Modal class named – Flowers and create a FlowerCollection collection class.
We will pass our model class (Flowers) inside it.
After that, we have to create five instances for the Flowers model with three attributes(flower_name,flower_sepals,flower_petals).
We will create a flower_collection which is an instance of the FlowerCollection collection.
And we will add the instances of the Flower model to the collection instance using the add() method.
Now, we will get all the attributes using pluck() in a collection.
| 123456789101112131415161718192021222324252627282930313233343536373839404142434445464748495051525354555657585960616263
|
<html>
<head>
<script src="https://code.jquery.com/jquery-2.1.3.min.js" ></script>
<script src="https://cdnjs.cloudflare.com/ajax/libs/underscore.js/1.8.2/underscore-min.js" ></script>
<script src="https://cdnjs.cloudflare.com/ajax/libs/backbone.js/1.1.2/backbone-min.js" ></script>
</head>
<body>
<center>
<h1>Linux Hint</h1>
</center>
<script>
//create Model named Flowers using extend()
var Flowers = Backbone.Model.extend();
//create collection - FlowerCollection and and pass Flowers model
var FlowerCollection = Backbone.Collection.extend({
model: Flowers
});
//create 5 instances for the Flowers model
var flower1 = new Flowers({flower_name: "lilly", flower_sepals:3,flower_petals:9});
var flower2 = new Flowers({flower_name: "lilly", flower_sepals:10,flower_petals:17});
var flower3 = new Flowers({flower_name: "rose", flower_sepals:2,flower_petals:8});
var flower4 = new Flowers({flower_name: "lilly", flower_sepals:3,flower_petals:9});
var flower5 = new Flowers({flower_name: "tulip", flower_sepals:7,flower_petals:10});
//create flower_collection
var flower_collection = new FlowerCollection();
//add the above model instances to the flower_collection instance using add(() method.
flower_collection.add([flower1,flower2,flower3,flower4,flower5]);
//display the flowers present in the collection
document.write('<strong>Existing: </strong> ' + JSON.stringify(flower_collection));
document.write("<br>");
document.write("<br>");
//return the flower_name attribute
document.write('<strong>flower_name: </strong> ' + flower_collection.pluck('flower_name'));
document.write("<br>");
document.write("<br>");
//return the flower_sepals attribute
document.write('<strong>flower_sepals: </strong> ' + flower_collection.pluck('flower_sepals'));
document.write("<br>");
document.write("<br>");
//return the flower_petals attribute
document.write('<strong>flower_petals: </strong> ' + flower_collection.pluck('flower_petals'));
document.write("<br>");
document.write("<br>");
</script>
</body> </html>
|
Output:
![]() Run the application in your browser by saving the code in the file with .html as an extension.
Here, we returned all the attributes using the pluck() method.
Run the application in your browser by saving the code in the file with .html as an extension.
Here, we returned all the attributes using the pluck() method.
Example 2: Return Attribute Using the pluck() Method
In this example, we will create a Modal class named – Flowers and create a FlowerCollection collection class.
We will pass our model class (Flowers) inside it.
After that, we have to create one instance for the Flowers model with three attributes(flower_name,flower_sepals,flower_petals).
We will create a flower_collection, which is an instance of the FlowerCollection collection.
And we will add the instance of the Flower model to the collection instance using the add() method.
Now, we will get all the attributes using the pluck() method in a collection.
| 123456789101112131415161718192021222324252627282930313233343536373839404142434445464748495051525354555657585960
|
<html>
<head>
<script src="https://code.jquery.com/jquery-2.1.3.min.js" ></script>
<script src="https://cdnjs.cloudflare.com/ajax/libs/underscore.js/1.8.2/underscore-min.js" ></script>
<script src="https://cdnjs.cloudflare.com/ajax/libs/backbone.js/1.1.2/backbone-min.js" ></script>
</head>
<body>
<center>
<h1>Linux Hint</h1>
</center>
<script>
//create Model named Flowers using extend()
var Flowers = Backbone.Model.extend();
//create collection – FlowerCollection and and pass Flowers model
var FlowerCollection = Backbone.Collection.extend({
model: Flowers
});
//create 1 instance for the Flowers model
var flower1 = new Flowers({flower_name: "lilly", flower_sepals:3,flower_petals:9});
//create flower_collection
var flower_collection = new FlowerCollection();
//add the above model instance to the flower_collection instance using add(() method.
Flower_collection.add(flower1);
//display the flowers present in the collection
document.write('<strong>Existing: </strong> ' + JSON.stringify(flower_collection));
document.write("<br>");
document.write("<br>");
//return the flower_name attribute
document.write('<strong>flower_name: </strong> ' + flower_collection.pluck('flower_name'));
document.write("<br>");
document.write("<br>");
//return the flower_sepals attribute
document.write('<strong>flower_sepals: </strong> ' + flower_collection.pluck('flower_sepals'));
document.write("<br>");
document.write("<br>");
//return the flower_petals attribute
document.write('<strong>flower_petals: </strong> ' + flower_collection.pluck('flower_petals'));
document.write("<br>");
document.write("<br>");
</script>
</body></html>
|
Output:
![]() Run the application in your browser by saving the code in the file with .html as extension.
Here, we returned all the attributes using the pluck() method.
Run the application in your browser by saving the code in the file with .html as extension.
Here, we returned all the attributes using the pluck() method.
Conclusion
In this Backbone.js tutorial, we discussed the pluck() method in a collection.
It is used to select the attributes.
If there are multiple model instances in a collection, then they will be returned separated by a comma.
Backbone.js Collection.toJSON() Method
In this Backbone.js framework tutorial, we will discuss the toJSON() method in the collection class.
Introduction
Backbone.js is a framework that is used to build web applications that follow the style of JavaScript.
It supports models, events, collections, views, and utilities.
By using any of the previous functionalities, we can create and perform different operations on the given data in a web application.
Points to Remember
It is used with JavaScript.
We can implement the framework inside the <script> tag.
This framework supports JavaScript methods and functions like output and reading input.
<script> tag is placed inside <head> tag or in <body> tag.
It is important to have Content Delivery Network (CDN) links to run the web application on the server.
Let’s See the Structure To Place the Code
| 123456789101112131415
|
<html>
<head>
<script>
You can use Backbone.js framework here
</script>
</head>
</body>
<script>
You can also use Backbone.js framework here
</script>
</body></html>
|
CDN Links are placed with the src attribute of the script tag.
CDN Links
| 123
|
<script src="https://cdnjs.cloudflare.com/ajax/libs/underscore.js/1.8.2/underscore-min.js" ></script><script src="https://cdnjs.cloudflare.com/ajax/libs/backbone.js/1.1.2/backbone-min.js" ></script>
|
The toJSON() method in Backbone.js collection is used to return the collection in JSON Format.
It can be used with JSON.stringify().
Syntax:
| 1
| JSON.stringify(collection_object.toJSON() )
|
It takes no parameters.
Approach
1.
Create a Backbone model using the extend() method.
Syntax:
| 1
|
var ModelClass = Backbone.Model.extend();
|
2.
Create a Backbone collection using the extend() method and pass the model class.
Syntax:
| 12345
|
var CollectionClass = Backbone.Collection.extend({
model: ModelClass
});
|
3.
Create an object or instance for the collection class.
Syntax:
| 1
|
var collection_instance = new CollectionClass();
|
4.
Explore toJSON() method in Backbone.js collection.
Example
In this example, we will create a Modal class named – Flowers and create a FlowerCollection collection class.
We will pass our model class (Flowers) inside it.
After that, we have to create five instances for the Flowers model with three attributes(flower_name,flower_sepals,flower_petals).
We will create a flower_collection, which is an instance of the FlowerCollection collection.
And we will add the instances of the Flower model to the collection instance using the add() method.
Finally, we will display the collection using the toJSON() method.
| 12345678910111213141516171819202122232425262728293031323334353637383940414243444546474849505152
|
<html>
<head>
<script src="https://code.jquery.com/jquery-2.1.3.min.js" ></script>
<script src="https://cdnjs.cloudflare.com/ajax/libs/underscore.js/1.8.2/underscore-min.js" ></script>
<script src="https://cdnjs.cloudflare.com/ajax/libs/backbone.js/1.1.2/backbone-min.js" ></script>
</head>
<body>
<center>
<h1>Linux Hint</h1>
</center>
<script>
//create Model named Flowers using extend()
var Flowers = Backbone.Model.extend();
//create collection - FlowerCollection and and pass Flowers model
var FlowerCollection = Backbone.Collection.extend({
model: Flowers
});
//create 5 instances for the Flowers model
var flower1 = new Flowers({flower_name: "lilly", flower_sepals:3,flower_petals:9});
var flower2 = new Flowers({flower_name: "lilly", flower_sepals:10,flower_petals:17});
var flower3 = new Flowers({flower_name: "rose", flower_sepals:2,flower_petals:8});
var flower4 = new Flowers({flower_name: "lilly", flower_sepals:3,flower_petals:9});
var flower5 = new Flowers({flower_name: "tulip", flower_sepals:7,flower_petals:10});
//create flower_collection
var flower_collection = new FlowerCollection();
//add the above model instances to the flower_collection instance using add(() method.
flower_collection.add([flower1,flower2,flower3,flower4,flower5]);
//display the flowers present in the collection
document.write('<strong>Existing: </strong> ' + JSON.stringify(flower_collection.toJSON()));
document.write("<br>");
document.write("<br>");
document.write("<br>");
</script>
</body></html>
|
Output:
![]() Run the application in your browser by saving the code in the file with .html as an extension.
Here, we can see that the entire collection is displayed in JSON Format.
Run the application in your browser by saving the code in the file with .html as an extension.
Here, we can see that the entire collection is displayed in JSON Format.
Conclusion
In this Backbone.js tutorial, we discussed the toJSON() method.
It is used to display the entire Backbone.js collection in JSON format.
Finally, it used JSON.stringify() to return in JSON format.
Backbone.js Model.clear() Method
In this Backbone.js framework tutorial, we will discuss the clear() method in the model class.
Introduction
Backbone.js is a framework used to build web applications that follow the style of JavaScript.
It supports models, events, collections, views, and utilities.
By using any of the previous functionalities, we can create and perform different operations on the given data in a web application.
Points to Remember
It is used with JavaScript.
We can implement the framework inside the <script> tag.
This framework supports JavaScript methods and functions like output and reading input.
<script> tag is placed inside <head> tag or in <body> tag.
It is important to have Content Delivery Network (CDN) links to run the web application on the server.
Let’s See the Structure To Place the Code
| 123456789101112131415
|
<html>
<head>
<script>
You can use Backbone.js framework here
</script>
</head>
<body>
<script>
You can also use Backbone.js framework here
</script>
</body></html>
|
CDN Links are placed with the src attribute of the script tag.
CDN Links
| 123
|
<script src="https://cdnjs.cloudflare.com/ajax/libs/underscore.js/1.8.2/underscore-min.js" ></script>[<script src="https://cdnjs.cloudflare.com/ajax/libs/backbone.js/1.1.2/backbone-min.js" ></script>
|
The clear() method in Backbone.js model is used to remove all the attributes from the given model object including id.
Attribute stores values in a model.
For a model, there can be any number of attributes.
Syntax:
| 1
| model_object.clear(options)
|
Parameter:
It takes only one parameter.
The options parameter refers to id attributes to be removed from the model.
After clearing the mode, if we get the attribute using the get() method, it will return undefined.
If we display the entire model using JSON.stringify(), it returns an empty model.
Approach
1.
Create a Backbone model using the extend() method.
Syntax:
| 1
|
var ModelClass = Backbone.Model.extend();
|
2.
Create a model object from the above method using a new keyword.
Syntax:
| 1
|
var model_object = new ModelClass ();
|
3.
Explore the clear() method in Backbone.js.
Let’s discuss several examples of the Backbone.js model clear() method.
Example 1
In this example, we will create a Modal class named – Flowers and create a model object – flower from it.
After that, we used the set() method to create three attributes – (flower_name,flower_sepals,flower_petals) with values.
Finally, we used the clear() method to remove all attributes and display the model using the JSON.stringify() method.
We are implementing this entire functionality inside the <body> tag.
| 12345678910111213141516171819202122232425262728293031323334353637383940414243
|
<html>
<head>
<script src="https://code.jquery.com/jquery-2.1.3.min.js" ></script>
<script src="https://cdnjs.cloudflare.com/ajax/libs/underscore.js/1.8.2/underscore-min.js" ></script>
<script src="https://cdnjs.cloudflare.com/ajax/libs/backbone.js/1.1.2/backbone-min.js" ></script>
</head>
<body>
<center>
<h1>Linux Hint</h1>
</center>
<script>
//create Model named Flowers using extend()
var Flowers = Backbone.Model.extend();
// create a variable named flower using the above model.
var flower = new Flowers();
//create flower_name attribute and set to "lotus"
//create flower_sepals attribute and set to 2
//create flower_petals attribute and set to 5
flower.set({ flower_name:"lotus",flower_sepals: 2, flower_petals:5});
//display the flower model
document.write("<strong>Flower Details: </strong> "+ JSON.stringify(flower));
document.write("<br>");
//clear all the attributes
flower.clear();
//display the flower model
document.write("<strong>Cleared flower Details: </strong> "+ JSON.stringify(flower));
</script>
</body></html>
|
Output:
![]() Run the application in your browser by saving the code in the file with .html as an extension.
Here, we can see that after clearing the entire model, JSON.stringify() returns an empty model.
Run the application in your browser by saving the code in the file with .html as an extension.
Here, we can see that after clearing the entire model, JSON.stringify() returns an empty model.
Example 2
In this example, we will create a Modal class named – Flowers and create a model object – flower from it.
After that we used the set() method to create three attributes – (flower_name,flower_sepals,flower_petals) with values.
Finally, we used the clear() method to remove all attributes and display all the attributes in the model using the get() method.
We are implementing this entire functionality inside the <body> tag.
| 1234567891011121314151617181920212223242526272829303132333435363738394041424344454647
|
<html>
<head>
<script src="https://code.jquery.com/jquery-2.1.3.min.js" ></script>
<script src="https://cdnjs.cloudflare.com/ajax/libs/underscore.js/1.8.2/underscore-min.js" ></script>
<script src="https://cdnjs.cloudflare.com/ajax/libs/backbone.js/1.1.2/backbone-min.js" ></script>
</head>
<body>
<center>
<h1>Linux Hint</h1>
</center>
<script>
//create Model named Flowers using extend()
var Flowers = Backbone.Model.extend();
// create a variable named flower using the above model.
var flower = new Flowers();
//create flower_name attribute and set to "lotus"
//create flower_sepals attribute and set to 2
//create flower_petals attribute and set to 5
flower.set({ flower_name:"lotus",flower_sepals: 2, flower_petals:5});
//display the flower model
document.write("<strong>Flower Details: </strong> "+ JSON.stringify(flower));
document.write("<br>");
//clear all the attributes
flower.clear();
//display the flower model attributes
document.write("<strong>flower_name: </strong> "+ flower.get('flower_name'));
document.write("<br>");
document.write("<strong>flower_sepals: </strong> "+ flower.get('flower_sepals'));
document.write("<br>");
document.write("<strong>flower_petals: </strong> "+ flower.get('flower_petals'));
</script>
</body></html>
|
Output:
![]() Run the application in your browser by saving the code in the file with .html as an extension.
Here, we can see that after clearing the entire model, get() returns undefined for attributes.
Run the application in your browser by saving the code in the file with .html as an extension.
Here, we can see that after clearing the entire model, get() returns undefined for attributes.
Conclusion
In this Backbone.js tutorial, we discussed how to remove all the attributes along with the id attribute.
We discussed two examples by displaying the cleared model using get() and JSON.stringify() methods.
Backbone.js Collection.models() Method
In this Backbone.js framework tutorial, we will discuss the models() method in the collection class.
Introduction
Backbone.js is a framework used to build web applications that follow the style of JavaScript.
It supports models, events, collections, views, and utilities.
By using any of the previous functionalities, we can create and perform different operations on the given data in a web application.
Points to Remember
It is used with JavaScript.
We can implement the framework inside the <script> tag.
This framework supports JavaScript methods and functions like output and reading input.
<script> tag is placed inside <head> tag or in <body> tag.
It is important to have Content Delivery Network (CDN) links to run the web application on the server.
Let’s See the Structure To Place the Code
| 123456789101112131415
|
<html>
<head>
<script>
You can use Backbone.js framework here
</script>
</head>
<body>
<script>
You can also use Backbone.js framework here
</script>
</body></html>
|
CDN Links are placed with the src attribute of the script tag.
CDN Links
| 123
| <script src="https://cdnjs.cloudflare.com/ajax/libs/underscore.js/1.8.2/underscore-min.js" ></script>
<script src="https://cdnjs.cloudflare.com/ajax/libs/backbone.js/1.1.2/backbone-min.js" ></script> |
The Backbone.js collection models() method is used to display the models existing in the given collection.
It takes no parameters.
Syntax:
| 1
| collection_object.models |
Approach
1.
Create a Backbone model using the extend() method.
Syntax:
| 1
| var ModelClass = Backbone.Model.extend(); |
2.
Create a Backbone collection using the extend() method and pass the model class.
Syntax:
| 12345
| var CollectionClass = Backbone.Collection.extend({
model: ModelClass
}); |
3.
Create an object or instance for the collection class.
Syntax:
| 1
| var collection_instance = new CollectionClass(); |
Example
In this example, we will create a Modal class named – Flowers and create a FlowerCollection collection class.
We will pass our model class (Flowers) inside it.
After that, we have to create five instances for the Flowers model with three attributes(flower_name,flower_sepals,flower_petals).
We will create a flower_collection, which is an instance of the FlowerCollection collection.
And we will add the instances of the Flower model to the collection instance using the add() method.
Finally, we will display the models from a collection using the models through the toJSON() method.
| 123456789101112131415161718192021222324252627282930313233343536373839404142434445464748495051
|
<html>
<head>
<script src="https://code.jquery.com/jquery-2.1.3.min.js" ></script>
<script src="https://cdnjs.cloudflare.com/ajax/libs/underscore.js/1.8.2/underscore-min.js" ></script>
<script src="https://cdnjs.cloudflare.com/ajax/libs/backbone.js/1.1.2/backbone-min.js" ></script>
</head>
<body>
<center>
<h1>Linux Hint</h1>
</center>
<script>
//create Model named Flowers using extend()
var Flowers = Backbone.Model.extend();
//create collection - FlowerCollection and and pass Flowers model
var FlowerCollection = Backbone.Collection.extend({
model: Flowers
});
//create 5 instances for the Flowers model
var flower1 = new Flowers({flower_name: "lilly", flower_sepals:3,flower_petals:9});
var flower2 = new Flowers({flower_name: "lilly", flower_sepals:10,flower_petals:17});
var flower3 = new Flowers({flower_name: "rose", flower_sepals:2,flower_petals:8});
var flower4 = new Flowers({flower_name: "lilly", flower_sepals:3,flower_petals:9});
var flower5 = new Flowers({flower_name: "tulip", flower_sepals:7,flower_petals:10});
//create flower_collection
var flower_collection = new FlowerCollection();
//add the above model instances to the flower_collection instance using add(() method.
flower_collection.add([flower1,flower2,flower3,flower4,flower5]);
//display the models present in the collection
document.write('<strong>Existing Models: </strong> ' + JSON.stringify(flower_collection.models));
document.write("<br>");
document.write("<br>");
document.write("<br>");
</script>
</body></html>
|
Output:
![]() Run the application in your browser by saving the code in the file with .html as an extension.
Here, we can see that models are returned from the collection using the models() method.
Run the application in your browser by saving the code in the file with .html as an extension.
Here, we can see that models are returned from the collection using the models() method.
Conclusion
In this Backbone.js tutorial, we discussed the models() method used to get all the model instances from a collection.
We used the JSON.stringify() method to return models in JSON format.
ParseFloat() Function | Explained
The parseFloat() function converts a string into a float equivalent by fetching the numeric values inside that string.
Now, you may wonder why that is even helpful.
Well, most of the applications take inputs in the form of strings as they are easy to encrypt and decrypt for security purposes.
So, when we want to perform some operation on these inputs, we first need to convert the string into the float or integer equivalent.
Syntax of parseFloat() function
varFloat = parseFloat(String)
varFloat: This is the variable in which the program would store the returned float value
String: Mandatory argument, from which the float values are fetched
Return value
The return value from the parseFloat() function is of the float data type
Additional Information
The parseFloat() will only convert the numeric values from a string
parseFloat only returns the number up to the first non-numeric character in the string
If the string starts with a blank space then those blank spaces would be ignored
Examples of the ParseFloat() function
Let’s have a look at a few different examples and their outputs of the parseFloat() function.
A string containing only numeric values inside it
So, let’s create a string to work with the following line:
var str1 = "123"
Then pass this string to the parseFloat() function in the console log to get the output directly onto the terminal as:
console.log(parseFloat(str1));
Upon execution, we get the following result on our terminal:
![]() As you can see, we got the absolute numeric value onto our terminal.
A string containing a floating-point numeric value
This time around, we are going to create a string that contains a decimal point with the following line:
var str2 = "123.22";
Then, we are going to parse this string and store the return value inside another variable, and then we are going to pass that to console log function as
var output = parseFloat(str2);
console.log(output);
We get the following result on the terminal:
As you can see, we got the absolute numeric value onto our terminal.
A string containing a floating-point numeric value
This time around, we are going to create a string that contains a decimal point with the following line:
var str2 = "123.22";
Then, we are going to parse this string and store the return value inside another variable, and then we are going to pass that to console log function as
var output = parseFloat(str2);
console.log(output);
We get the following result on the terminal:
![]() As you can see, we got the total floating-point value in our variable output.
A string with a floating-point value but zero at the end
For this example, we will create the following string
var str3 = "99.100";
As you can see, inside the string, the value ends on two zeroes.
Now, we are going to convert this string into a float and store it inside a new variable as
var output = parseFloat(str3);
After that, we can use the console log function to print out the value from this variable output:
console.log(output);
Upon execution, we get the following output:
As you can see, we got the total floating-point value in our variable output.
A string with a floating-point value but zero at the end
For this example, we will create the following string
var str3 = "99.100";
As you can see, inside the string, the value ends on two zeroes.
Now, we are going to convert this string into a float and store it inside a new variable as
var output = parseFloat(str3);
After that, we can use the console log function to print out the value from this variable output:
console.log(output);
Upon execution, we get the following output:
![]() As you can see, the parseFloat() function removed the ending zeroes from the numeric value as they don’t mean anything.
A string with spaces and multiple numbers
For this example, we are going to create a new string that is going to include multiple numbers but with spaces between them like
var str4 = "50 60 112 342";
Now, we are going to parse inside the parseFloat() function and then store the return value into a variable like
var output = parseFloat(str4);
Now, we get the display using the console log function like:
console.log(output);
Upon execution, we get the following result on our terminal:
As you can see, the parseFloat() function removed the ending zeroes from the numeric value as they don’t mean anything.
A string with spaces and multiple numbers
For this example, we are going to create a new string that is going to include multiple numbers but with spaces between them like
var str4 = "50 60 112 342";
Now, we are going to parse inside the parseFloat() function and then store the return value into a variable like
var output = parseFloat(str4);
Now, we get the display using the console log function like:
console.log(output);
Upon execution, we get the following result on our terminal:
![]() As you can observe, upon encountering a character other than a number or a decimal point, the parseFloat() ignores the upcoming characters in the string and only returns us the number before the first blank space.
A string with a single number between spaces
Now, we are going to work with another example including spaces, this time around, we are going to work with the following string:
var str5 = " 333 ";
As you can see, the above string contains the number between blank spaces on both ends.
Now we are going to pass it into our parseFloat() function, and then we are going to console log the output onto the terminal using:
var output = parseFloat(str5);
console.log(output);
We get the following result onto our terminal:
As you can observe, upon encountering a character other than a number or a decimal point, the parseFloat() ignores the upcoming characters in the string and only returns us the number before the first blank space.
A string with a single number between spaces
Now, we are going to work with another example including spaces, this time around, we are going to work with the following string:
var str5 = " 333 ";
As you can see, the above string contains the number between blank spaces on both ends.
Now we are going to pass it into our parseFloat() function, and then we are going to console log the output onto the terminal using:
var output = parseFloat(str5);
console.log(output);
We get the following result onto our terminal:
![]() As you can see, the spaces were ignored, and only the number was taken and converted into floating-point value.
As you can see, the spaces were ignored, and only the number was taken and converted into floating-point value.
Wrap-up
The parseFloat() function is a built-in JavaScript function that came with the release of ES6.
This function has only one job: to take a string, fetch the numeric or floating-point values, and return that floating-point value into a variable.
In this post, we have taken multiple examples of the parseFloat() function to demonstrate some of the cases that can occur.
JavaScript Math floor() Method
JavaScript is a well-known scripting language that supports a variety of mathematical methods.
One of them is a Math.floor() method that returns the closest small integer value of the floating-point number.
It can be applied to integers.
However, the best use of the Math.floor() method is on floating-point numbers.
This descriptive post demonstrates the Math.floor() method of JavaScript with the following outcomes:
Syntax of Math.floor() method
Round off a positive floating-point number
Round off a negative floating-point number
What is the syntax of the floor() method?
In JavaScript’s Math.floor() method, Math is a placeholder object having a range of mathematical functions.
One of them is the floor() function, the syntax of the Math.floor() method is as follows.
Math.floor(value)
In the above syntax code, value is used as a parameter that passes through the Math.floor() method.
The passing input can be an integer or floating type.
It returns the nearby smaller value of the floating-point number.
A value may be positive or negative.
Example 1: How to round off a positive float number using the Math.floor() method?
The example code to round a positive floating number is explained below.
Code:
// Using floor method to display a float value
console.log(Math.floor(15.35));
In the above code, 15.35 is used and passed through the Math.floor() method.
Output:
![]() Using the Math.floor() method, the output number 15 is displayed in the above figure.
It shows that the float value (15.35) is rounded off to the nearest small value(integer/whole-number).
Using the Math.floor() method, the output number 15 is displayed in the above figure.
It shows that the float value (15.35) is rounded off to the nearest small value(integer/whole-number).
Example 2: How to round off a negative float number using the Math.floor() method
The example to convert the negative float number using the Math.floor() method is as follows:
Code:
// Using floor method to display a negative float value
console.log(Math.floor(-47.45));
In the above code, the Math.floor() method is used to convert a negative float number “-47.45” to the smallest or equal to the specific passing number.
Output:
![]() The Math.floor() method has returned -48, as it is the nearest small value to “-47.45‘.
Note: For a negative number, the larger negative number (“-48” is smaller than “-47.45”.
Congratulations! You have learned various ways to apply the Math.floor() method.
The Math.floor() method has returned -48, as it is the nearest small value to “-47.45‘.
Note: For a negative number, the larger negative number (“-48” is smaller than “-47.45”.
Congratulations! You have learned various ways to apply the Math.floor() method.
Conclusion
In JavaScript, the Math.floor() method can be used to get the nearby small value of a floating-point number.
This blog describes the working and usage/functionality of the Math.floor() method.
In addition, different examples are provided to better understand the usage of the Math.floor() method.
JavaScript Map get( ) Method
In JavaScript, the Map object is a collection of elements used to store key-value pairs.
It is also referred to as a “dictionary” or an “Associative array”.
You can utilize the JavaScript Map object to store any kind of data in the form of key-value pairs.
As the Map objects always know the position of the stored keys and their related values.
In order to retrieve or get the value of a specific key, Map get() method can be used in a program.
In this article, we will learn about the JavaScript Map get() Method with the help of a suitable example.
Let’s get started!
How to use the JavaScript Map get() Method?
In order to use the JavaScript Map get() method, follow the below-given syntax.
Syntax
The syntax of the JavaScript Map get() method is
map.get("key");
Here, we will invoke the get() method with the “map” JavaScript Map object and pass “key” as an argument, within the double quotations.
The “map.get()” method will print out the “value” of the specified “key”.
Now, let’s check out an example related to the usage of the JavaScript Map get() method.
Example
Firstly, we will create a JavaScript Map object named “Gadgets”:
let Gadgets = new Map();
In the next step, we will add three “key-value” pairs to our “Gadgets” Map object using the “set()” method:
Gadgets.set("Mobile", 25000);
Gadgets.set("Laptop", 59000);
Gadgets.set("Computer", 90000);
Lastly, to retrieve the “value” of any of the added “keys”, utilize the JavaScript Map get() method.
For instance, we will now try to fetch the value of the “Computer” key of the “Gadgets” Map object:
Gadgets.get("Computer");
Execute the above-given program in the console and view the output:
![]() As you can see, we have successfully retrieved “90000” as the value of the “Computer” key with the help of the JavaScript get() method.
In case, if you try to get a value from the Map object that does not exist in any of its “key-value” pairs, then “undefined” will be displayed as output.
For instance, we have not added a “Server” key in our “Gadgets” Map object.
So, passing “Server” as a key argument to the JavaScript get() method will print out “undefined” on the console:
Gadgets.get("Server");
Output
As you can see, we have successfully retrieved “90000” as the value of the “Computer” key with the help of the JavaScript get() method.
In case, if you try to get a value from the Map object that does not exist in any of its “key-value” pairs, then “undefined” will be displayed as output.
For instance, we have not added a “Server” key in our “Gadgets” Map object.
So, passing “Server” as a key argument to the JavaScript get() method will print out “undefined” on the console:
Gadgets.get("Server");
Output
![]() We have compiled the information related to the usage of the JavaScript Map get() method.
We have compiled the information related to the usage of the JavaScript Map get() method.
Conclusion
JavaScript Map get() method is utilized to retrieve or fetch the value of a specific key stored in a Map object.
To use the Map get() method, you have to pass the “key” as an argument to the get() method as “map.get(“key”)”.
This method will print out the “value” of the specified “key.
In case of accessing a key-value pair that does not exist in the Map object, “undefined” will be set as its return case.
This article demonstrates the procedure to utilize JavaScript Map get() method with the help of a suitable example.
JavaScript | String Methods
Working with strings is one of the core features that a programming language can bring to the table.
There are multiple methods available that allow us to perform various kinds of string manipulations.
In this post, we are going to perform string manipulations using the following string methods
The toLowerCase() method
The toUpperCase() method
The concat() method
The trim() method
The padStart() & padEnd() methods
The slice() method
The substring() method
The substr() method
The length property
The replace() method
Let’s get started with the first one
Converting a string to lower-case using toLowerCase()
Using the toLowerCase() method we can convert all the alphabetical characters inside a string to lowercase.
However, special characters and numbers are not affected.
To demonstrate this, we will create a new string using the following line
var myString = "Hello, This Is LinuxHint!";
After that, we will use the toLowerCase() function with the help of the dot-operator.
And then, we are going to store the return value in a new variable, and then we will print out the result using the console log function like
var resultString = myString.toLowerCase();
console.log(resultString);
Upon Execution, we get the following output on our terminal
![]() As you can easily observe, toLowerCase() changed all the alphabetical characters to lowercase characters, and the special character “!” was not affected.
As you can easily observe, toLowerCase() changed all the alphabetical characters to lowercase characters, and the special character “!” was not affected.
Converting a string to upper-case using toUpperCase()
With the help of the toUpperCase() function, we can easily convert any string into all upper-case alphabetical characters.
Let’s take an example
var myString = "Hello, This Is LinuxHint!";
After that, we will use the toUpperCase() method with the help of dot-operator.
And we are going to store the result in a new variable and print the new variable out onto the terminal using the console log function like
var resultString = myString.toUpperCase();
console.log(resultString);
Upon executing the code mentioned above, we get the following output on the terminal
![]() We were able to convert a string into an all-uppercase string
We were able to convert a string into an all-uppercase string
Concatenating strings using the concat() method
Normally,, we use the plus “+” operator string when we want to concatenate strings.
Still, there is a much more professional way of concatenating strings using the concat() function.
The concat() method is applied through a dot operator.
And all the strings we want to concatenate are given inside the arguments of the concat() function.
Let’s review an example to understand this better; first, we will need some strings, use the following code:
var string1 = "Hello,";var string2 = "This is Amazing!!";
We want to concatenate string2 with string1 and store the concatenated string inside the resultString variable.
We also want to put a blank space between the two strings.
For all of this, we use the following line
var resultString = string1.concat(" ", string2);
And finally, we can print the resultString out onto the terminal using the console log function
console.log(resultString);
The output on the terminal is as
![]() Both the strings have been concatenated with each other and even a blank space has been placed in between them.
Both the strings have been concatenated with each other and even a blank space has been placed in between them.
Removing blank Spaces using the trim() method
If we have a string in our program which has blank spaces on both ends, then, in that case, we can easily remove those spaces using the trim() method.
To demonstrate this, let’s create a new string with the following line
var stringWithSpaces = " FOO ";
Then, we are going to use the trim() method on this string with the help of the dot operator and store the return value in a new string variable like
var finalString = stringWithSpaces.trim();
Then, we can display the output onto the terminal using the console log function
console.log(finalString);
The result on the terminal is as follows
![]() The blank spaces have been successfully removed from both the ends of the string
The blank spaces have been successfully removed from both the ends of the string
Padding a string with a character using padStart() & padEnd()
Padding a string essentially means to fill up the remaining length of the string with a specific character.
Imagine that we have a string that says “Loading” a word with seven characters.
And we want to show this string on a placeHolder which requires 13 characters.
For that purpose, we would add padding to the string.
Let’s go over an example; first, create a new string with the following line
let string = "Loading";
Then, we are going to use the padStart() method to add the padding in the start and store the result inside a new string variable
let padAtStart = string.padStart(13, "-");
We are also going to create another string, in which we are going to add the padding at the end using the padEnd() method like
let padAtEnd = string.padEnd(13, "-");
After that, we are going to use the console log function to display both of our padded strings
console.log(padAtStart);
console.log(padAtEnd);
We can observe the following result on our terminal
![]() First, we have the string with padding in the start.
And then, we have the string with padding at the end.
If we want to have the padding at both sides we have to use a combination of padStart() and padEnd() functions like
\
let string = "Loading";
let padded = string.padStart(10, "-");
padded = padded.padEnd(13, "-");
console.log(padded);
Upon execution, we can see the following output on our terminal
First, we have the string with padding in the start.
And then, we have the string with padding at the end.
If we want to have the padding at both sides we have to use a combination of padStart() and padEnd() functions like
\
let string = "Loading";
let padded = string.padStart(10, "-");
padded = padded.padEnd(13, "-");
console.log(padded);
Upon execution, we can see the following output on our terminal
![]() The padding has been successfully added on both ends of the string.
The padding has been successfully added on both ends of the string.
Cropping a string with the help of the slice() method
If we want to create a substring from a string variable, then we can use the slice method.
This slice() method is applied through the dot operator and takes two arguments.
The first argument defines the starting index and the second argument defines the ending index of the substring that we are going to extract
Let’s see it in action, and for that, we are going to create a new string using the following line:
let string = "Welcome to Mars!";
Let’s try to extract the word “Welcome” from our string, so the word starts at index 0 and ends at index 7.
Use the following line to extract the substring and store it inside another string
let resultString = string.slice(0, 7);
After that, use the console log function to display the result onto the terminal
console.log(resultString);
We have the following result on the terminal
![]() Only the word “Welcome” was extracted as a substring, and printed onto the terminal.
Only the word “Welcome” was extracted as a substring, and printed onto the terminal.
Cropping a string with the help of the substring() method
We have another method to take a part of the string and place it inside another variable called the substring() method.
The working of the substring method is almost identical to the slice() method.
But the difference is that we can even pass negative values in the arguments of the substring() method.
These negative values are treated as zero, and if you remove the second argument entirely, it will take it as the last index of the string.
Let’s create a string for this example
let string = "As above so below";
And then, we are going to apply the substring() method to it, but in the first argument, we are going to pass in “-1” like
let resultString = string.substring(-1, 12);
After that, we use the console log function to print out the result
console.log(resultString);
And we get the following output on the terminal
![]() As you can see, the substring() method took the negative value as 0 and sliced the string from the starting index.
Now, let’s try not giving it an ending argument like
let string = "As above so below";
let resultString = string.substring(7);
console.log(resultString);
Upon execution of the code mentioned above we get the following output
As you can see, the substring() method took the negative value as 0 and sliced the string from the starting index.
Now, let’s try not giving it an ending argument like
let string = "As above so below";
let resultString = string.substring(7);
console.log(resultString);
Upon execution of the code mentioned above we get the following output
![]() It is clear from the output, that the substring() method sliced the string till the last character when the ending argument was missing.
It is clear from the output, that the substring() method sliced the string till the last character when the ending argument was missing.
Cropping a string with the help of the substr() method
We have yet another method to take a part of a string and place it inside another variable which is known as the substr() method.
This method is different from both the slice() method and the substring() method as the second argument of this substr() defines the length of the extracted string and not the ending point.
For example, let’s create a new string using the following line
let string = "The Holy Grail!";
And then, we are going to apply the substr() method using the dot operator, and we are going to pass in the starting index as 4 and the length as 4 like
let resultString = string.substr(4, 4);
And then we display the output onto the terminal using the console log function
console.log(resultString);
Upon running we get the following result
![]() As you can see, it parted the string from the 4th index and the length of the parted string was 4 characters.
As you can see, it parted the string from the 4th index and the length of the parted string was 4 characters.
Determining the length using the length property
To find the length of a given string we have something known as the length attribute\property.
To demonstrate this, create a new string with the following line
let string = "Try Finding My Length";
Then we can simply, print out the length of this string by using the dot operator and the length property inside the console log function
console.log("The length of the string is as: ", string.length);
When executed we get:
![]() As you can see, we got the length of our string like “21” characters long along with blank spaces.
As you can see, we got the length of our string like “21” characters long along with blank spaces.
Replacing data inside the string using the replace() method
With the help of the replace(), we can easily replace some words or characters with other words and characters.
This replace() method takes in two arguments, the first is a word that we want to look for in the string (can be a string or character).
Second, is the word that we are going to place (can be a string or character).
To show the working of the replace() function we create a new string using
let string = "Welcome to Mars!";
Now, we want to change the word “Mars” with the word “Pluto”, so we use
let newString = string.replace("Mars", "Pluto");
console.log(newString);
Upon execution, we get the following output
![]() As you can see, the replace() method replaced the word “Mars” with the word “Pluto”.
As you can see, the replace() method replaced the word “Mars” with the word “Pluto”.
Wrap-up
Javascript provides many methods that help us manipulate string variables according to our needs.
In this post, we have included some of the methods that come as default with the ESMAv6 release of Javascript.
We have covered: converting cases of the string, slicing a string, finding the length of a string, and replacing text inside the string.
Number toString() Method | Explained
The toString() method was introduced with the release of ES1 JavaScript; however, that method was only able to perform string.toString() operations.
But with the newer release, the programmer can now use the toString function with numbers to convert that number into a string.
When used with a number, one fantastic feature of this function is that we can convert the number into a specific base before converting the number into a string.
Syntax of the number toString() function
Below is the syntax of the toString() method with the number:
number.toString(baseToBeConvertedIn)
number: This is the number that the toString() function would convert into the string
baseToBeConvertedIn: This defines the base of the number to be converted before converting it into the string.
Return Value
The return value of the toString() method is a string
Examples of toString function with number
The toString() function can be used with a number variable by using a dot-operator, so let’s create a number variable with the following statement:
var numValue = 15;
Now, we are going to perform the toString function but with different arguments depicting different base values for the converted number
Example 1: Converting a number into a string without changing its base
We can easily change a numeric value into a string value without changing its base, and to do that we don’t pass any arguments into the toString() function.
We will use the toString() function with our variable numValue and then pass that to the console log function so that we get the result onto our console log function:
var str = numValue.toString();
console.log(str);
After running this code, we get the following output onto our terminal:
![]() As you can see, the toString() converted the number into the string without changing its base.
As you can see, the toString() converted the number into the string without changing its base.
Example 2: Converting a number to binary using the toString function
We can use the toString function with a number to convert it into a binary number and then into a string by passing the argument as “2”
var str = numValue.toString(2);
After that, we can display the result onto the terminal by simply passing the variable str into the console log function as:
console.log(str);
Upon the execution of the code, we get the following output on our terminal:
![]() As you can see, the result was “1111” which is equivalent to 15 but in binary or base 2.
As you can see, the result was “1111” which is equivalent to 15 but in binary or base 2.
Example 3: Converting a number into Octal and then into a string
To convert a number from the base 10 to octal or base 8, we need to simply pass in the value “8” in the argument of the toString() function like
var str = numValue.toString(8);
console.log(str);
If we execute this program, you get the following output:
![]() The output “17” in octal is equivalent to 15 in the base 10.
The output “17” in octal is equivalent to 15 in the base 10.
Example 4: Converting a number into Hexadecimal using toString
Converting a number into a hexadecimal number or base 16 is quite simple.
You simply pass in the value 16 in the arguments of the toString() function like
var str = numValue.toString(16);
console.log(str);
The output of the code-snippet mentioned above is as:
![]() As you can easily observe, we get the output as “f” which is equivalent to 15 in the decimal base.
As you can easily observe, we get the output as “f” which is equivalent to 15 in the decimal base.
Example 5: Converting a number into a user-defined base using toString
One exciting feature of the toString() method is to convert the number into a user-defined base value.
To showcase, we will convert our “numValue” into base 6.
We do that by using the following lines:
var str = numValue.toString(6);
console.log(str);
Execute the program and you will get the following result on your terminal:
![]() As you can easily observe that the value 15 when converted from the decimal base (10) into base 6, it results in the value 23.
As you can easily observe that the value 15 when converted from the decimal base (10) into base 6, it results in the value 23.
Wrap-up
The number toString() function comes as one of the default packages.
It is used to convert a number into a string with the option of changing its base before the conversion.
If you want to convert the numeric value into a string without any base conversion, then you don’t have to pass any argument to the toString() function.
Moreover, if you want to convert the numeric value from a decimal base (10) into some other base value, then you must pass the base number as an argument to the toString() function.
Backbone.js model.unset() Method
In this Backbone.js framework tutorial, we will discuss the unset() method in the model class.
Backbone.js is a framework that is used to build web applications which follow the style of JavaScript.
It supports models, events, collections, views, and utilities.
By using any of the previous functionalities, we can create and perform different operations on the given data in a web application.
Points to Remember
It is used with JavaScript.
We can implement the framework inside the <script> tag.
This framework supports JavaScript methods and functions like output and reading input.
<script> tag is placed inside <head> tag or in <body> tag.
It is important to have Content Delivery Network (CDN) links to run the web application on the server.
Let’s See the Structure To Place the Code
<html>
<head>
<script>
You can use Backbone.js framework here
</script>
</head>
<body>
<script>
You can also use Backbone.js framework here
</script>
</body></html>
CDN Links are placed with the src attribute of the script tag.
CDN Links
<script src="https://cdnjs.cloudflare.com/ajax/libs/underscore.js/1.8.2/underscore-min.js" ></script><script src="https://cdnjs.cloudflare.com/ajax/libs/backbone.js/1.1.2/backbone-min.js" ></script>
The unset() method in Backbone.js model is used to unset or remove the attribute from the given model object.
Attribute stores values in a model.
For a model, there can be any number of attributes.
Syntax
model_object.has(attribute)
ParameterIt takes only one parameter.
The attribute parameter refers to the property to be removed.
Approach
1.
Create a Backbone model using the extend() method.
Syntax
var ModelClass = Backbone.Model.extend();
2.
Create a model object from the above method using a new keyword.
Syntax
var ModelClass = Backbone.Model.extend();var model_object = new ModelClass ();
3.
Explore unset() method in Backbone.js
Let’s discuss some examples of the Backbone.js model unset() method.
Example 1In this example, we will create a Modal class named – Flowers and create a model object – flower from it.
After that we used the set() method to create three attributes – (flower_name,flower_sepals,flower_petals) with values.
Finally, we used the unset() method to unset the flower_name attribute.
We are implementing this entire functionality inside the <body> tag.
<html>
<head>
<script src="https://code.jquery.com/jquery-2.1.3.min.js" ></script>
<script src="https://cdnjs.cloudflare.com/ajax/libs/underscore.js/1.8.2/underscore-min.js" ></script>
<script src="https://cdnjs.cloudflare.com/ajax/libs/backbone.js/1.1.2/backbone-min.js" ></script>
</head>
<body>
<center>
<h1>Linux Hint</h1>
</center>
<script>
//create Model named Flowers using extend()
var Flowers = Backbone.Model.extend();
// create a variable named flower using the above model.
var flower = new Flowers();
//create flower_name attribute and set to "lotus"
//create flower_sepals attribute and set to 2
//create flower_petals attribute and set to 5
flower.set({ flower_name:"lotus",flower_sepals: 2, flower_petals:5});
//display the flower model
document.write("<strong>Flower Details: </strong> "+ JSON.stringify(flower));
document.write("<br>");
//unset the flower_name attribute.
flower.unset('flower_name');
//display the flower model
document.write("<strong>Flower Details after unsetting flower_name attribute: </strong> "+ JSON.stringify(flower));
document.write("<br>");
</script>
</body></html>
Output
![]() Run the application in your browser by saving the code in the file with .html as an extension.
Here, we can see that it is removed after unsetting the flower_name attribute, and the remaining attributes are displayed.
Example 2In this example, we will create a Modal class named – Flowers and create a model object – flower from it.
After that, we used the set() method to create three attributes – (flower_name,flower_sepals,flower_petals) with values.
Finally, we used the unset() method to unset the flower_sepals and flower_petals attributes.
We are implementing this entire functionality inside the <body> tag.
<html>
<head>
<script src="https://code.jquery.com/jquery-2.1.3.min.js" ></script>
<script src="https://cdnjs.cloudflare.com/ajax/libs/underscore.js/1.8.2/underscore-min.js" ></script>
<script src="https://cdnjs.cloudflare.com/ajax/libs/backbone.js/1.1.2/backbone-min.js" ></script>
</head>
<body>
<center>
<h1>Linux Hint</h1>
</center>
<script>
//create Model named Flowers using extend()
var Flowers = Backbone.Model.extend();
// create a variable named flower using the above model.
var flower = new Flowers();
//create flower_name attribute and set to "lotus"
//create flower_sepals attribute and set to 2
//create flower_petals attribute and set to 5
flower.set({ flower_name:"lotus",flower_sepals: 2, flower_petals:5});
//display the flower model
document.write("<strong>Flower Details: </strong> "+ JSON.stringify(flower));
document.write("<br>");
//unset the flower_sepals and flower_petals attribute.
flower.unset('flower_sepals');
flower.unset('flower_petals');
//display the flower model
document.write("<strong>Flower Details after unsetting flower_sepals and flower_petals attributes: </strong> "+ JSON.stringify(flower));
document.write("<br>");
</script>
</body></html>
Output
Run the application in your browser by saving the code in the file with .html as an extension.
Here, we can see that it is removed after unsetting the flower_name attribute, and the remaining attributes are displayed.
Example 2In this example, we will create a Modal class named – Flowers and create a model object – flower from it.
After that, we used the set() method to create three attributes – (flower_name,flower_sepals,flower_petals) with values.
Finally, we used the unset() method to unset the flower_sepals and flower_petals attributes.
We are implementing this entire functionality inside the <body> tag.
<html>
<head>
<script src="https://code.jquery.com/jquery-2.1.3.min.js" ></script>
<script src="https://cdnjs.cloudflare.com/ajax/libs/underscore.js/1.8.2/underscore-min.js" ></script>
<script src="https://cdnjs.cloudflare.com/ajax/libs/backbone.js/1.1.2/backbone-min.js" ></script>
</head>
<body>
<center>
<h1>Linux Hint</h1>
</center>
<script>
//create Model named Flowers using extend()
var Flowers = Backbone.Model.extend();
// create a variable named flower using the above model.
var flower = new Flowers();
//create flower_name attribute and set to "lotus"
//create flower_sepals attribute and set to 2
//create flower_petals attribute and set to 5
flower.set({ flower_name:"lotus",flower_sepals: 2, flower_petals:5});
//display the flower model
document.write("<strong>Flower Details: </strong> "+ JSON.stringify(flower));
document.write("<br>");
//unset the flower_sepals and flower_petals attribute.
flower.unset('flower_sepals');
flower.unset('flower_petals');
//display the flower model
document.write("<strong>Flower Details after unsetting flower_sepals and flower_petals attributes: </strong> "+ JSON.stringify(flower));
document.write("<br>");
</script>
</body></html>
Output
![]() Run the application in your browser by saving the code in the file with .html as an extension.
Here, we can see that after unsetting the flower_sepals and flower_petals attributes, they are removed, and the remaining attribute is displayed.
Run the application in your browser by saving the code in the file with .html as an extension.
Here, we can see that after unsetting the flower_sepals and flower_petals attributes, they are removed, and the remaining attribute is displayed.
Conclusion
In this Backbone.js tutorial, we discussed how to remove a particular attribute from a model using the unset() method.
It takes an attribute to be removed as a parameter and removes the attribute from the Backbone.js model.
Backbone.js Collection.reset()
In this Backbone.js framework tutorial, we will discuss the reset() method in the collection class.
Introduction
Backbone.js is a framework that is used to build web applications that follow the style of JavaScript.
It supports models, events, collections, views, and utilities.
Using any of the above functionalities, we can create and perform different operations on the given data in a web application.
Points to Remember
It is used with JavaScript.
We can implement the framework inside the <script> tag.
This framework supports JavaScript methods and functions like output and reading input.
The <script> tag is placed inside <head> tag or in <body> tag.
It is important to have Content Delivery Network (CDN) links to run the web application on the server.
The Structure to Place the Code
<html>
<head>
<script>
You can use Backbone.js framework here
</script>
</head>
<body>
<script>
You can also use Backbone.js framework here
</script>
</body></html>
CDN Links are placed with the src attribute of the script tag.
CDN Links:
<script src="https://cdnjs.cloudflare.com/ajax/libs/underscore.js/1.8.2/underscore-min.js" ></script>
<script src="https://cdnjs.cloudflare.com/ajax/libs/backbone.js/1.1.2/backbone-min.js" ></script>
reset() method in Backbone.js collection is used to reset or remove the model instances from a collection.
It also resets the existing collection with new model instances in a collection.
Syntax:
collection_object.reset(model,options)
It takes two parameters.
Model is an instance that will be reset from a collection.
Options are used to specify null when we reset the collection.
To remove: collection_object.reset()
For new model model instance resetting: collection_object.reset(model_instance)
Approach
1.
Create a Backbone model using extend() method.
Syntax:
var ModelClass = Backbone.Model.extend();
2.
Create a Backbone collection using extend() method and pass the model class.
Syntax:
var CollectionClass = Backbone.Collection.extend({
model: ModelClass
});
3.
Create an object or instance for the collection class.
Syntax:
var collection_instance = new CollectionClass();
4.
Explore the reset() method in the Backbone.js collection.
Let’s discuss some examples of the Backbone.js collection reset() method.
Example 1: Update the New Model Instance in the Collection Using reset()
In this example, we will create a Modal class named “Flowers” and a “FlowerCollection” collection class.
We will pass our model class, “Flowers”, inside it.
After that, we have to create five instances for the “Flowers” model with three attributes: (flower_name,flower_sepals,flower_petals).
We will create a “flower_collection”, an instance of the “FlowerCollection” collection.
Then, we will add the instance of the “Flower model” to the collection instance using add() method.
We will reset these five model instances and place a new model instance with two attributes.
Finally, we display the collection using the JSON.stringify() method.
<html>
<head>
<script src="https://code.jquery.com/jquery-2.1.3.min.js" ></script>
<script src="https://cdnjs.cloudflare.com/ajax/libs/underscore.js/1.8.2/underscore-min.js" ></script>
<script src="https://cdnjs.cloudflare.com/ajax/libs/backbone.js/1.1.2/backbone-min.js" ></script>
</head>
<body>
<center>
<h1>Linux Hint</h1>
</center>
<script>
//create Model named Flowers using extend()
var Flowers = Backbone.Model.extend();
//create collection - FlowerCollection and and pass Flowers model
var FlowerCollection = Backbone.Collection.extend({
model: Flowers
});
//create 5 instances for the Flowers model
var flower1 = new Flowers({flower_name: "lilly", flower_sepals:3,flower_petals:9});
var flower2 = new Flowers({flower_name: "lilly", flower_sepals:10,flower_petals:17});
var flower3 = new Flowers({flower_name: "rose", flower_sepals:2,flower_petals:8});
var flower4 = new Flowers({flower_name: "lilly", flower_sepals:3,flower_petals:9});
var flower5 = new Flowers({flower_name: "tulip", flower_sepals:7,flower_petals:10});
//create flower_collection
var flower_collection = new FlowerCollection();
//add the above model instances to the flower_collection instance using add(() method.
flower_collection.add([flower1,flower2,flower3,flower4,flower5]);
//display the flowers present in the collection
document.write('<strong>Existing: </strong> ' + JSON.stringify(flower_collection));
document.write("<br>");
document.write("<br>");
//reset the collection with below attributes
flower_collection.reset({plant_name: "cucumber", plant_city:'USA'});
//return the flower_collection
document.write('<strong>After Resetting: </strong> ' + JSON.stringify(flower_collection));
</script>
</body></html>
Output:
![]() Run the application in your browser by saving the code in the file with .html as an extension.
Here, we can see the reset() method reset the old instances in a collection with a new instance.
Run the application in your browser by saving the code in the file with .html as an extension.
Here, we can see the reset() method reset the old instances in a collection with a new instance.
Example 2: Remove Model Instances From the Collection Using reset()
In this example, we will create a Modal class named “Flowers” and a “FlowerCollection” collection class.
We will pass our model class, “Flowers”, inside it.
After that, we have to create five instances for the “Flowers” model with three attributes: (flower_name,flower_sepals,flower_petals).
We will create a “flower_collection”, an instance of the “FlowerCollection” collection.
And we will add the instance of the “Flower” model to the collection instance using add() method.
Now, we will remove all the existing model instances using reset().
Finally, we are displaying the collection using the JSON.stringify() method.
<html>
<head>
<script src="https://code.jquery.com/jquery-2.1.3.min.js" ></script>
<script src="https://cdnjs.cloudflare.com/ajax/libs/underscore.js/1.8.2/underscore-min.js" ></script>
<script src="https://cdnjs.cloudflare.com/ajax/libs/backbone.js/1.1.2/backbone-min.js" ></script>
</head>
<body>
<center>
<h1>Linux Hint</h1>
</center>
<script>
//create Model named Flowers using extend()
var Flowers = Backbone.Model.extend();
//create collection - FlowerCollection and and pass Flowers model
var FlowerCollection = Backbone.Collection.extend({
model: Flowers
});
//create 5 instances for the Flowers model
var flower1 = new Flowers({flower_name: "lilly", flower_sepals:3,flower_petals:9});
var flower2 = new Flowers({flower_name: "lilly", flower_sepals:10,flower_petals:17});
var flower3 = new Flowers({flower_name: "rose", flower_sepals:2,flower_petals:8});
var flower4 = new Flowers({flower_name: "lilly", flower_sepals:3,flower_petals:9});
var flower5 = new Flowers({flower_name: "tulip", flower_sepals:7,flower_petals:10});
//create flower_collection
var flower_collection = new FlowerCollection();
//add the above model instances to the flower_collection instance using add(() method.
flower_collection.add([flower1,flower2,flower3,flower4,flower5]);
//display the flowers present in the collection
document.write('<strong>Existing: </strong> ' + JSON.stringify(flower_collection));
document.write("<br>");
document.write("<br>");
//remove the model instances.
flower_collection.reset();
//display
document.write('<strong>After Resetting: </strong> ' + JSON.stringify(flower_collection));
</script>
</body></html>
Output:
![]() Run the application in your browser by saving the code in the file with .html as an extension.
Here, the reset() method removes all the old model instances in a collection.
Run the application in your browser by saving the code in the file with .html as an extension.
Here, the reset() method removes all the old model instances in a collection.
Conclusion
In this Backbone.js tutorial, we discussed the reset() method in the collection.
It would reset the old model instances and set them with new instances if we didn’t specify any instance.
It will remove the entire model instances from a collection.
Print the content of a div element using JavaScript
Have you ever encountered a situation where you need to print the content of some specific HTML and save it for future use? For instance, it is required to store the cooking recipes or designing ideas from the respective websites and use this information while working offline.
In such scenarios, it is important for you to know how to print the content of any element of HTML.
In this blog, we will learn the procedure for printing the div element’s content with the help of Javascript.
Print the content of a div element using JavaScript
With the help of the below-given example; we will demonstrate the procedure for printing the content of a “div” element.
So, the following section comprises the HTML code and its description.
HTML code
Firstly, we will use a div element and set its “id” as “divCon” which will help to get its content.
In the next step, we will set “lightyellow” as the “background-color” of the added “div” element.
Inside the “div” element, we will now add a heading and a paragraph with “<h2>” and “<p>” respective HTML tags.
<div id="divCon" style="background-color: lightyellow;">
<h2>Print the content of a div element using JavaScript</h2>
<p>
Now we will print the content of a div element using JavaScript in a new window.
Press the below button and see the result.
</p>
</div>
Then we will add a button which calls the “printDivContent()” Javascript function on its “Onclick” event:
<button style="background-color: skyblue;" onclick="printDivContent()">Print</button>
Javascript code
To print the content of an HTML element such as “div”, you need to store its data in a variable.
Now, we will perform the following steps while coding:
First, we will create a function named “printDivContent()”.
Then, define variables named “contentOfDiv” and “newWin” inside the “printDivContent()” function.
By using the “divCon” id, we will get the content of the “div” HTML element and store it in the variable “contentOfDiv”.
Variable “newWin” will be used to open the print window as a popup.
Then we will use the “newWin” variable to call the JavaScript method “document.write()”.
In this method, we will pass the tags of the HTML elements that are added inside “div”, which in return get the content of the specified elements.
Here is the complete code for the above-given example:
function printDivContent() {
var contentOfDiv = document.getElementById("divCon").innerHTML;
var newWin = window.open('', '', 'height=650, width=650');
newWin.document.write('');
newWin.document.write('<title>Print Content of Div element by using Javascript</title>');
newWin.document.write(' <h1>Content of Div element: <br>');
newWin.document.write(contentOfDiv);
newWin.document.write('');
newWin.document.close();
newWin.print();}
After running above HTML code, the resultant output on browser will be:
![]() Clicking the “Print” button will call the JavaScript “printDivContent()” function and the following window will appear on the screen:
Clicking the “Print” button will call the JavaScript “printDivContent()” function and the following window will appear on the screen:
![]() As you can see, we have successfully accessed the content of the added “div” element:
As you can see, we have successfully accessed the content of the added “div” element:
![]() We have provided all the necessary information about printing the content of a “div” element using Javascript.
We have provided all the necessary information about printing the content of a “div” element using Javascript.
Conclusion
To print the content of a “div” element, firstly, you need to assign an “id” in HTML, then store its data in a variable by accessing the specified “id” code.
While programming, there come situations where it is required to print a particular segment of a web page.
In such cases, our provided method can help you out.
This blog discussed the procedure of printing the div element’s content with the help of JavaScript.
How to set the value of an input field?
DOM Manipulations using JavaScript allows the programmer to change the elements or even the attributes of the elements of an HTML webpage.
Changing the value of the input field is no different.
There are two approaches to changing the value of an input field using JavaScript.
These are:
Assigning the value attribute of an element some value using the assignment operator “=”
By using the SetAttribute() function.
Let’s just jump inside the demonstration of both these methods, but before that, we need an HTML template to work with.
Setting Up an HTML Webpage
In the HTML file, simply add the following lines to create a new text input field with the id “textFeild1”
<input type=" text" id="textField1" />
When we execute the program, we are going to the following output on our browser:
![]() We can see our input field on the screen.
We can see our input field on the screen.
Method 1: Assign the value attribute some value directly
For this, we are first going to add the following lines in our HTML file:
<br />
<button onclick="changeValue()">Change Value</button>
This will add a new button beneath our text field.
And we have attached a function upon the click on this button named as changeValue():
![]() In the script file, we are going to add the following functionality to make this button work:
function changeValue() {
textField = document.getElementById("textField1");
textField.value = "Method 1";}
We are first getting a reference to our text field using the document.getElementbyId().
After that, we use the dot operator to get the value attribute and directly assign it a string value.
Upon clicking this button, we get the following output:
In the script file, we are going to add the following functionality to make this button work:
function changeValue() {
textField = document.getElementById("textField1");
textField.value = "Method 1";}
We are first getting a reference to our text field using the document.getElementbyId().
After that, we use the dot operator to get the value attribute and directly assign it a string value.
Upon clicking this button, we get the following output:
![]() As you can see, we were able to change the input field’s value using the dot-operator and the value attribute.
As you can see, we were able to change the input field’s value using the dot-operator and the value attribute.
Method 2: Using the setAttribute() function
For this, we are going to add a new button right beneath the previous button using the following lines in the HTML file:
<br />
<button onclick="setAttributeChange()">Change by setAttribute()</button>
As you can see, we have attached this button with a function named as setAttributeChange().
Upon loading this HTML, we get the following web-page on our browser:
![]() Then we head inside the script file, and define this setAttributeChange() change function as follows:
function setAttributeChange() {
textField = document.getElementById("textField1");
textField.setAttribute("value", "Method 2");}
In the first line, we are getting a reference to the text field using the document.getElementById() function.
After that, we are using the dot-operator and the setAttribute() function to choose the attribute “value” and then give it a string value as “Method 2”.
Upon clicking the button, we get the following output:
Then we head inside the script file, and define this setAttributeChange() change function as follows:
function setAttributeChange() {
textField = document.getElementById("textField1");
textField.setAttribute("value", "Method 2");}
In the first line, we are getting a reference to the text field using the document.getElementById() function.
After that, we are using the dot-operator and the setAttribute() function to choose the attribute “value” and then give it a string value as “Method 2”.
Upon clicking the button, we get the following output:
![]() As you can see, we were able to change the value of the input field using the setAttribute() function.
As you can see, we were able to change the value of the input field using the setAttribute() function.
Conclusion
With the help of DOM manipulations, Javascript allows us to easily change the value attribute of an input field inside an HTML webpage.
For this, we have two different approaches that lead us to the same result.
We have the element.setAttribute() function that allows us to choose an attribute and give it some value of our choice.
Secondly, we have the option to select the attribute using the “dot operator” and then assign that attribute any value using the assignment operator “=.”
How to read a local text file using JavaScript?
In Javascript, multiple packages and APIs are available that allow the user to read data from a locally placed file.
Two of the most famous of these libraries are
File System Package: Allows javascript programs to read files from the system
FileReaderWeb API: Allows the work with files from an HTML webpage.
As you can see, both work differently; one works for an HTML webpage and the other for local Javascript programs.
File System Package for reading files on your desktop
The file system package comes with the default node environment for locally hosted JavaScript programs.
However, you still need to include the File system package into your javascript code using the required keyword.
After that, the function readFile() included in this package allows you to read data from a file.
Syntax of readFile() method
The syntax of the readFile() method is given as:
FileSystemVar.readFile( PathToTheFile, Options, CallbackFunction);
The details of this syntax are as:
FileSystamVar: This is the variable that has been set equal require filesystem package
PathToTheFile: This is the path to the file that you want to read
Options: These are the optional options that can filter encoding and other attributes of the file
CallbackFunction: A callback function that will be executed upon a successful read of the file
Example 1: Reading a file with File System Package
Start off by creating a new text file on your computer and place some text inside it like
![]() After that, head inside your javascript file and include the file system package using the require keyword:
const fs = require("fs");
Then use the following lines:
fs.readFile("demo.txt", (err, data) => {
if (err) throw err;
console.log(data.toString());});
The following steps are being performed in the code mentioned above:
Read the file “demo.txt”
If there is an error, then throw that error message onto the terminal
In case of no error, store the data read from the file in the data variable
Print the content of the data variable after converting it to string using the toString() method
Upon execution of the code, you will observe the following output on your terminal:
After that, head inside your javascript file and include the file system package using the require keyword:
const fs = require("fs");
Then use the following lines:
fs.readFile("demo.txt", (err, data) => {
if (err) throw err;
console.log(data.toString());});
The following steps are being performed in the code mentioned above:
Read the file “demo.txt”
If there is an error, then throw that error message onto the terminal
In case of no error, store the data read from the file in the data variable
Print the content of the data variable after converting it to string using the toString() method
Upon execution of the code, you will observe the following output on your terminal:
![]() The data from the file has been printed onto the terminal.
The data from the file has been printed onto the terminal.
FileReader Web API for reading files on an HTML webpage
File reader API only works with HTML web pages, and one of the restrictions of this API is that it works on the files that have been read by <input type= “file”> tag.
It has multiple functions that allow the user to read the file in different encodings.
Example 2: Reading a local text file from an HTML webpage
Start by setting up an HTML webpage, for that use the following lines:
<center>
<input type="file" name="inputFileToRead" id="inputFileToRead" />
<br /></center>
You will get the following webpage on your browser:
![]() After that, head over to the javascript file and write down the following lines of code:
document.getElementById("inputFileToRead")
.addEventListener("change", function () {
var fr = new FileReader();
fr.readAsText(this.files[0]);
fr.onload = function () {
console.log(fr.result);
};
});
The following steps are being performed in the code mentioned above:
An action listener is being applied on your <input> with the id “inputFileToRead”
Then a object of file reader (fr) has been created using the FileReader() constructor
Then the first file on the <input> is being read as a text using the fr variable
Upon successful read of the file that data is being printed onto the console
To demonstrate this, select the same file that was selected in the first example and you will get the following result on the console of your browser:
After that, head over to the javascript file and write down the following lines of code:
document.getElementById("inputFileToRead")
.addEventListener("change", function () {
var fr = new FileReader();
fr.readAsText(this.files[0]);
fr.onload = function () {
console.log(fr.result);
};
});
The following steps are being performed in the code mentioned above:
An action listener is being applied on your <input> with the id “inputFileToRead”
Then a object of file reader (fr) has been created using the FileReader() constructor
Then the first file on the <input> is being read as a text using the fr variable
Upon successful read of the file that data is being printed onto the console
To demonstrate this, select the same file that was selected in the first example and you will get the following result on the console of your browser:
![]() The result shows that the file has been successfully read by the HTML webpage.
The result shows that the file has been successfully read by the HTML webpage.
Conclusion
To read a locally placed text file, we have two options: to load the file in HTML or to read that file in your desktop javascript program.
For this, you have File Reader Web API for web pages and a file system package for desktop JavaScript.
Essentially, both of these perform the same operation: reading a text file.
In this tutorial, you have used the readFile() function from the File system package and readFileAsText() from the File Reader Web API.
Sets
Sets were introduced with the ECMAv6 release of Javascript.
Sets are nothing but a unique collection of elements.
These elements can belong to any category, whether variables, objects, or values.
Sets can be considered as lists that are in an ordered manner and can be iterated.
Creating a Set
To work with sets you need first to create them, for that, use the new keyword and the Set() constructor.
The syntax for creating a set can be defined as
var var1 = new Set()
You can even pass in arrays, variables, or direct values in the constructor of the set.
Take the following lines to create a set in three different ways
var arr = [1, 2, 3, 4, 5, 6, 7, 8, 9];var set1 = new Set(arr);var v1 = 34;var v2 = 87;var v3 = 23;var set2 = new Set([v1, v2, v3]);var set3 = new Set(["Hello", "World", "This", "is", "Linux", "Hint"]);
The following steps are being performed in the code mentioned above:
Create a new array with the name arr,then pass the array to the set() to create a new set named as set1
Create three different variables and pass these variables after eclosing them with square brackets into the Set() constructor
Create a new set as set3 by directly passing values enclosed by square brackets into the set() constructor
To print the details of any set, we can pass that set into the console log function like:
console.log(set1);
console.log(set2);
console.log(set3);
Executing this code will give you the following output
![]() First, the size of the set is printed onto the terminal, and then the values of the set are enclosed with curly brackets.
First, the size of the set is printed onto the terminal, and then the values of the set are enclosed with curly brackets.
Adding Values to a set
Use the add() to add the values inside a set after it has been created.
To demonstrate this, create an empty set with the following line
var mySet = new Set();
Then add a few values using the following lines:
mySet.add(1);
mySet.add(3);
mySet.add(4);
mySet.add(5);
mySet.add(3);
mySet.add(3);
mySet.add(6);
mySet.add(8);
mySet.add(7);
Display the set onto the console using the following line:
console.log(mySet);
After execution, you will get the following output:
![]() Observe the output as it has the following things:
It is in ascending order because sets are ordered lists
It doesn’t contain duplicated items (more precisely the value 3) as JavaScript removed them to make the elements of the set unique
Observe the output as it has the following things:
It is in ascending order because sets are ordered lists
It doesn’t contain duplicated items (more precisely the value 3) as JavaScript removed them to make the elements of the set unique
Remove elements from the set
In Javascript, the delete() method is to remove an element from the set.
Create a new set with the following line:
var mySet = new Set([55, 22, 33, 66, 77, 11]);
To delete the value “66” from the set, use the line:
mySet.delete(66);
Display the set onto the terminal using the console log function:
console.log(mySet);
You will get the following output:
![]() The value 66 was successfully removed from the set.
The value 66 was successfully removed from the set.
Checking for a specific element inside a set
The has() function is used to check whether an element or a value exists inside a particular set or not.
The function returns true upon the successful find of the element.
Otherwise, it returns false.
Take the following set:
var mySet = new Set([55, 22, 33, 66, 77, 11]);
Check for the presence of the value 22 in this set by using the following line:
console.log(mySet.has(22));
You will get this as your output on the terminal
![]() This means that the value 22 is present inside the set.
Look for the value 75 in the set with the following line:
console.log(mySet.has(75));
You will see the following on the terminal
This means that the value 22 is present inside the set.
Look for the value 75 in the set with the following line:
console.log(mySet.has(75));
You will see the following on the terminal
![]() The output is “false”, therefore, you can conclude that the value 75 is not present in our set.
The output is “false”, therefore, you can conclude that the value 75 is not present in our set.
Purging a set of all elements
To remove or clear all the values of the set, simply use the clear() method.
Take a set:
var mySet = new Set(["Moscow", "Paris", "Dubai", "London"]);
To clear this, use the following line:
mySet.clear();
To display the details of the set, use the console.log like:
console.log(mySet);
You will see the following on your terminal:
![]() From the output, it is easy to conclude that the clear() method has removed all the values from the set.
From the output, it is easy to conclude that the clear() method has removed all the values from the set.
Conclusion
Sets can be defined as a list of unique elements ordered in an ascending manner stored in the form of an array.
The elements of a set can belong to any category whether it may be an object, variable, array, maps, or even direct values.
In this post, you have learned the basics about sets and some of the functions that allow you to work with sets.
Shallow freeze vs Deep freeze
In JavaScript, the shallow freeze and deep freeze approaches make an object immutable/non-modifiable.
But why should someone use shallow freeze or deep freeze? Well!, everything is an object, and we all know that the objects are mutable(modifiable).
But what if someone wants to make objects immutable(non-modifiable)?
There are multiple ways to make an object immutable, such as using the “const” keyword, shallow freeze, and deep freeze.
This write-up aims to present a clear understanding of the following concepts:
What is the need for shallow freeze?
What does shallow freeze mean?
What is the need for deep freeze?
What does deep freeze mean?
Practical implementation of the deep freeze.
We will understand each of the concepts mentioned above through practical examples.
So, let’s get started!
What is the need for a shallow freeze?
The below-listed reasons compel us to implement the shallow freeze or deep freeze:
Everything revolves around the objects.
Objects are mutable(modifiable).
One way to make an object immutable is using the “const” keyword.
An object declared with the “const” keyword can not be modified/reassigned.
However, its properties can be modified/reassigned.
So, what if someone wants to lock/freeze an object completely?
Well! The concept of shallow freeze can be used in such cases.
Example: Problem Identification
This program will identify why the “const” keyword is not a good approach for making objects immutable.
const empDetails = { first: "Alex", second: "John", third: "Mike", fourth: "Joe", fifth: "Seth" };
console.log("Original Object values: ", empDetails);
empDetails.third = "Ambrose";
console.log("Modified Object values: ", empDetails);
Firstly, we created an object using “const” keyword and assigned it some key-value pairs.
Next, we printed the original values of the object.
Afterward, we modified the value of the “third” key.
Finally, we printed the modified object values using the “console.log()”.
![]() The output verified that the “const” keyword failed to prevent an object from being modified.
The shallow freeze approach can be used to resolve/fix this problem.
The output verified that the “const” keyword failed to prevent an object from being modified.
The shallow freeze approach can be used to resolve/fix this problem.
What does shallow freeze mean?
The Object.freeze() method can completely freeze an object.
The Object.freeze() method restricts a user from adding, deleting, or modifying the object.
Moreover, It restricts the users from accessing an object’s existing methods/properties.
Example: Implementation of Object.freeze() method
Let’s consider the below-given code to get a basic understanding of the Object.freeze() method:
const empDetails = {first: "Alex", second: "John", third: "Mike", fourth: "Joe", fifth: "Seth"};
console.log("Original Object values: ", empDetails);Object.freeze(empDetails);
empDetails.third = "Ambrose";delete empDetails;
console.log("Modified Object values: ", empDetails);
We used the Object.freeze() method to freeze the “empDetails” object.
Next, we printed the original values of the object “empDetails”.
Afterward, we tried to update the “third” property of the “empDetails” object..
Next, we utilized the delete operator to delete the “third” property.
Finally, we printed both the “Modified object values” using the console.log() method.
![]() The output clarified that the Object.freeze() method doesn’t allow modifications to the object.
The output clarified that the Object.freeze() method doesn’t allow modifications to the object.
What is the need for the deep freeze?
The above example shows that the shallow freeze approach successfully prevents the object from modifying.
Still, it is not considered the best approach.
This is because the shallow freeze approach only freezes the given object.
However, if the object contains some nested objects or arrays, then in such situations, the nested objects can still be updated.
So, How to deal with nested objects? Well! In such a case, we can use the concept of the deep freeze.
What does deep freeze mean?
You must follow the below-listed steps to apply the deep freeze to an object:
We have to freeze every property recursively.
To do that, firstly, check whether the value of any property is an object or not.
If the value of any property is an object, then check if it’s frozen.
If the value of any property is an object and still it’s not frozen, then invoke the freeze method on that property recursively.
In this way, you can create an immutable object.
Practical implementation of the deep freeze
The below-given program will let you understand how to deep freeze an object:
const empDetails = {
first: "Alex",
second: "John",
third: "Mike",
fourth: ["Joe", "Dean"],
fifth: "Seth" };const deepF = (empDetails) => {
Object.keys(empDetails).forEach((objProp) => {
if (
typeof empDetails[objProp] === "object" &&
!Object.isFrozen(empDetails[objProp])
)
deepF(empDetails[objProp]);
});
return Object.freeze(empDetails);
};
deepF(empDetails);
console.log("Original Object values: ", empDetails);
Object.freeze(empDetails);
empDetails.fourth[0] = "Ambrose";
console.log("Modified Object values: ", empDetails);
In this program, we adopted the recursive approach to freeze every object’s property.
To do so, initially, we checked whether the value of any property is an object or not.
When we found that a property is an object, then we checked whether it’s frozen or not.
If the value of any property is an object and still it’s not frozen, then we invoke the Object.freeze() method on that property recursively.
![]() From the above-given output, it is clear that the deep freeze approach prevents the object from being modified.
From the above-given output, it is clear that the deep freeze approach prevents the object from being modified.
Conclusion
In JavaScript, the shallow freeze and deep freeze approaches make an object immutable/non-modifiable.
The difference between shallow freeze and deep freeze is that the shallow freeze doesn’t deal with the nested objects/arrays.
On the other hand, the deep freeze approach can be used to freeze an object completely including the nested objects/arrays.
This write-up explained the working of shallow freeze and deep freeze with the help of suitable examples.
String substr() Method | Explained
The substr() method is used to extract a substring from a given string depending on a starting index value and length without modifying the actual string.
However, defining the length while applying this substr() is not a mandatory argument.
The substr() method is always used on a string variable with the help of a dot operator.
Syntax of the substr() method
The syntax of the substr() method is defined as
string.substr(startingIndex,lengthOfSubstring)
The syntax contains the following items:
string: The string variable from which substr() would extract the substring
startingIndex: The index value from where the substring would start
lengthOfSubstring: Defines the length of the substring in characters (Optional Parameter)
Additional Notes:
Some interesting information that you must keep in mind regarding the substr() method is as:
If the starting index is passed a negative value then this function would return an empty string
If the length argument is not provided, then it would create a substring till the last index
If the starting index is bigger than the length of the string, then it would return an empty string
To understand the working of the substr() method, perform examples given below.
Example 1: Providing starting index and length
Create a new string variable and give it some value; use the following line:
var string = "Hello, Welcome to LinuxHint!";
Extract a substring from the word “Welcome” or from the index “7” and the length of the substring will be ten characters:
var resultString = string.substr(7, 10);
Finally, display the resultString by using the console log function:
console.log(resultString);
You will get the following result on your console:
![]() You can see that the resultString contains a substring that is 10 characters long (including blank spaces) extracted from our original string.
To verify that substr() method did not modify the original string, print the original string using the console log function as well:
console.log(string);
Executing this code, give the following output:
You can see that the resultString contains a substring that is 10 characters long (including blank spaces) extracted from our original string.
To verify that substr() method did not modify the original string, print the original string using the console log function as well:
console.log(string);
Executing this code, give the following output:
![]() As you can see, the original string is not modified.
As you can see, the original string is not modified.
Example 2: Extracting a substring without passing the length
To see what happens when you don’t provide the length parameter in the substr() method, create a string with the following line:
var string = "This is Amazing!!!";
Then use the substr() method and store the return value in a new string variable:
var resultString = string.substr(4);
After that, pass the resultString in the console log function to display the result on the terminal:
console.log(resultString);
You will observe the following result on the terminal:
![]() As it is clear from the output, if the length parameter is not given, then the substr() method would extract the substring till the last index of the original string.
As it is clear from the output, if the length parameter is not given, then the substr() method would extract the substring till the last index of the original string.
Example 3: Passing negative values in the arguments
To observe the behavior of the substr() method with negative values in its arguments, make a new string using the following line:
var string = "You are enough! ";
After that, use substr() method twice, once with a negative index value and once with a negative length value and store the result in two different variables:
var resultString1 = string.substr(4, -1);var resultString2 = string.substr(-1);
Display the output of the two variables by using the console log function:
console.log( "The substring from negative length argument is as" + resultString1);
console.log( "The substring from negative index argument is as" + resultString2);
Execute the program and observe the outcome on the terminal to be:
![]() It is clear from the result, that when negative values are passed in either of the arguments of the substr() method, the result is always an empty string.
It is clear from the result, that when negative values are passed in either of the arguments of the substr() method, the result is always an empty string.
Conclusion
The substr() javascript method creates a substring out of a string variable or literal base on a starting index value and length.
However, the length parameter is optional.
With this post, you have performed all the different types of outcomes that you can get by changing the values of the arguments of the substr() method.
string.replace() Method | Explained
The string.replace() method, as the name suggests, is used to replace a part of the string with some substring.
The replace() method checks the string for a specific substring, character, or a regular expression.
Upon a successful match, it replaces the string with the provided substring and returns the new string with the replaced part.
It means that the actual string on which the replace() method is not affected by it.
Syntax of replace() method
The syntax of the replace method is given below:
var newString = string.replace(stringToBeReplaced, stringToBePlaced)
string: This is our original string on which you are applying the replace() method
newString: This is the string in which the return value would be stored
stringToBeReplaced: This is the substring or the regular expressions to look for and to replace
stringToBePlaced: This is the substring that will be placed in the returned string of the replace() method.
Return Value
The return value of the replace() method is a string containing the replaced substring.
Example 1: Replacing a normal substring from a string variable
First, create a new string variable by using the line given below:
var string = "Hello and Welcome to Andromeda Galaxy";
After that, replace the word “Andromeda” with “Milky Way” and store the result in a new variable by using this line:
var newString = string.replace("Andromeda", "Milky Way");
Display the newString on the terminal by using the console log function like:
console.log(newString);
You will observe the following result on your terminal:
![]() To verify that the original string is unscathed, print the original string variable using the console log function as well:
console.log(string);
You will observe the following result on your terminal:
To verify that the original string is unscathed, print the original string variable using the console log function as well:
console.log(string);
You will observe the following result on your terminal:
![]() You can observe that the original string is not modified.
You can observe that the original string is not modified.
Example 2: Replacing a substring using a regular expression
To remove any substring that matches a specific pattern specified by a regular expression, simply pass the regular expressions in the first argument of the replace() method.
First, let’s create a string with two consecutive numbers:
var string = "Remove the two Numbers :: 64";
Define a regular expression for the pattern of two consecutive numbers:
var regEx = /\d{2}/;
Replace the two consecutive numbers using the regular expression and save the resulting string a new variable with the following line:
var resultString = string.replace(regEx, "Done!");
Finally, print out the resultString variable onto the terminal using the console log function:
console.log(resultString);
You will get the following result on your terminal:
![]() You were able to match the pattern of two consecutive numbers and remove them from our string.
You were able to match the pattern of two consecutive numbers and remove them from our string.
Example 3: Case-sensitivity of the replace method
The replace() method is case-sensitive, meaning that for a substring to be replaced, it must match with condition character by character.
To showcase this, create a string with the following line:
var string = "HELLO hello Hello";
To remove the “HELLO” with all capital characters, use the following condition in the replace() method()
var resultString = string.replace("HELLO", "REPLACED");
Display the resultString onto the terminal by using the console log function:
console.log(resultString);
You will observe the following output on your terminal:
![]() You can see that, even though all the words in the string spelled “hello”, still only the one with all capital letters was replaced.
Showing that the replace() is indeed case sensitive.
You can see that, even though all the words in the string spelled “hello”, still only the one with all capital letters was replaced.
Showing that the replace() is indeed case sensitive.
Wrap up
The string replace() method is used to perform the “match and change” operation on the desired string.
For this, a substring is provided to the replace() method, and if the match is successful, that substring is removed from the string, and the newString is placed in its position.
However, one noticeable feature of the replace method is that the original string is never modified.
This is because the new string is returned as a result of replace() method, which can be stored inside a new variable.
How to get value of selected radio button using JavaScript?
Radio buttons are one of the most crucial elements of HTML when trying to build a form.
The radio buttons offer the user some options from which he can only choose a single option.
Normally, when we want to get the value of an element from an HTML webpage, we simply use the value property of that element.
But we can’t do that with radio buttons.
The reason is that it is not a good practice to fetch the values of individual radio buttons.
Therefore, we only want one value and that is of the selected radio button
The process of fetching the value of a selected radio button includes the following steps:
First: Get a reference to the group of radio buttons
Second: From the list of radio buttons, filter the one with the “checked” property
Third: Get the value attribute of the filtered radio button
Let’s create an example to showcase these steps.
Step 1: Set-up an HTML webpage
Create an HTML webpage with the following lines inside it:
<center>
<div id="demoRadio">
<p>What would you like to learn?</p>
<div>
<input type="radio" id="Guitar" name="instrument" value="Guitar" />
<label for="Guitar">Guitar</label>
<input type="radio" id="Violin" name="instrument" value="Violin" />
<label for="Violin">Violin</label>
<input type="radio" id="Cajon" name="instrument" value="Cajon" />
<label for="Cajon">Cajon</label>
</div>
<button id="learn">Learn</button>
</div>
</center>
The following things are happening in the code mentioned above:
We are creating a container in which we will put our radio buttons and the “Learn” button
Then we are asking the user about the instrument he wants to learn
The choices are given in the form of radio buttons
Each radio button has its own unique id and value but the same name to group them
Then a <label> tag is added for each radio button
A button has been added in the webpage, for submitting the user’s choice.
Fire up the HTML webpage, and you will get this output on your browser.
![]() We have radio buttons, and our learn button in the middle of the webpage.
We have radio buttons, and our learn button in the middle of the webpage.
Step 2: Write Javascript code to display the user’s choice
We want to execute a function in the script file upon clicking the “Learn” button.
Therefore, we add the following lines:
document.getElementById("learn").onclick = function () {
// Next code would come inside her};
Inside this function, get the DOM reference of our radio buttons group by using the following line
var radioButtonGroup = document.getElementsByName("instrument");
After that, filter this group of radio buttons to find the one that is checked and store it inside another variable using the following line
var checkedRadio = Array.from(radioButtonGroup).find((radio) => radio.checked);
Lastly, prompt the user about the instrument he\she wants to learn using the alert function
alert("You have selected : " + checkedRadio.value);
The complete script file looks like this
document.getElementById("learn").onclick = function () {
var radioButtonGroup = document.getElementsByName("instrument");
var checkedRadio = Array.from(radioButtonGroup).find(
(radio) => radio.checked
);
alert("You have selected : " + checkedRadio.value);};
Step 3: Testing the script
Refresh the webpage, select a radio button and then click on the button that says “Learn”.
You should get the following output:
![]() You have successfully fetched the value from a checked radio button and alerted the user about his choice.
You have successfully fetched the value from a checked radio button and alerted the user about his choice.
Wrap-up
To get the value of a selected radio button, we have to follow a set of steps.
First step is to get a javascript reference to radio buttons with the same name.
After that, we want to filter the radio button that has the checked property marked.
After that, use the store radio button to get the value using the value attribute of the HTML element.
Then you can work with the fetched value.
How to get the date in dd/mm/yyyy format?
Working with Dates is one of the most common hurdles to face as a programmer, and JavaScript is no different.
Different applications or programs require us to format the Date value differently.
But thanks to JavaScript being so easy and programmer-friendly, we can easily format the Date using the built-in functions of JavaScript.
In this tutorial, we are going to format the Date variable into “dd/mm/yyyy” using these built-in methods:
getFullYear(): Returns as the full year in four-digit format
getMonth(): Returns the month from a Date variable, remember that the month starts from 0 for January, so you need to add 1 to avoid confusion
getDate(): Returns us the date of the month from a Date variable
Creating a new Date Variable
To start, we first need a date for that we are simply going to use the Date object to get the current date, and we are going to store that inside a variable “currentDate”.
For this, use the following line:
var currentDate = new Date();
Now, we can get the current format of this newly created Date variable by using console log:
![]() This is not the format, so we are going to work on this now step by step.
This is not the format, so we are going to work on this now step by step.
Getting month in the correct “mm” format
Let’s first get the month from this date by using the getMonth() function as
var month = currentDate.getMonth() + 1;
We have added 1 to our month because the month in the date variable starts from 0.
After that, we need to make sure that the month is not in single-digit, so we induce the following check on it:
if (month < 10) month = "0" + month;
This would change the single-digit month into two digits, or we can in the format “mm”.
Getting Date in the correct “dd” format
We are going to fetch the date of the month using the getDate() function:
var dateOfMonth = currentDate.getDate();
Then we check for a single-digit date and convert it into two digits using the following line:
if (dateOfMonth < 10) dateOfMonth = "0" + dateOfMonth;
Now we have our date into the correct format as well.
Getting year in the correct “yyyy” format
Finally, we get our year from the Date variable using the getFullYear() method as
var year = currentDate.getFullYear();
getFullYear() returns the year in the “yyyy” format.
Therefore, we don’t need to put a check on it.
Compiling the complete Date in the correct format
Finally, we need to put all these 3 components of our “date” together into a new variable using the following line of code:
var formattedDate = dateOfMonth + "/" + month + "/" + year;
At the end, use the console log function to print out the “formattedDate” onto the console as:
console.log(formattedDate);
The complete code snippet is as follows:
var currentDate = new Date();
console.log(currentDate);var month = currentDate.getMonth();if (month < 10) month = "0" + month;var dateOfMonth = currentDate.getDate();if (dateOfMonth < 10) dateOfMonth = "0" + dateOfMonth;var year = currentDate.getFullYear();var formattedDate = dateOfMonth + "/" + month + "/" + year;
console.log(formattedDate);
Upon execution you will get the following output on your screen:
![]()
Conclusion
Converting a date variable into a specific format may seem very daunting at first.
But date formatting can very easily be achieved by using the built-in function that comes with ES6 JavaScript.
In this tutorial post, we learned how to format a date in dd/mm/yyyy format using the three basic functions: getMonth (), getDate and getFullYear().
How to generate random numbers in a given range using JavaScript?
A Random number is an arbitrary number that is generated by the computer.
Randomization is mostly used in games, and for testing purposes., a random number can be generated by using two methods.
“Math.random()” and “Math.floor()”.
The “Math.random()” method returns a number in floating points while the “Math.floor()” method returns the whole number according to the specified range.
This blog will demonstrate the procedure of generating a random number in a given range with the help of a JavaScript program.
Let’s get started!
Using Math.random() method to generate random numbers in a given range
In order to use the “Math.random()” method for generating a random number in a specific range, check out the given syntax.
Syntax
The below syntax can be used for generating a random number using the “Math.random()” method:
Math.random();
For the purpose of generating a random number in a given range, we will utilize the following syntax:
Math.random() * (max_number-min_number) + min_number;
Here, “max_number” represents the maximum number, and “min_number” denotes the minimum number of the given range.
Now, have a look at some examples related to the usage of the “Math.random()” method for the specified purpose.
Example 1
If you want to get a random number in a range like 0 to 100 then check out the below-given program.
Here, “100” represents the “max_number” and “0” denotes the “min_number” of the given range:
Math.random() * (100-0) + 0;Math.random() * 100;
After putting these values in the formula, the output will be a random decimal number “42.72769582760376” using “Math.random()” method:
![]() Example 2
We will now create a function named “getRandomNumber()” and pass two arguments “min_number” and “max_number” to it.
This function will call the “Math.random()” method for generating a floating-point random number between the specified range:
function getRandomNumber(min_number, max_number){
return Math.random()* (max_number - min_number) + min_number;}
Next, we will call the function “getRandomNumber()” by passing “25” as “min_number” and “80” as “max_number”:
getRandomNumber(25,80);
Now we will execute the above-given program in the console and view the output:
Example 2
We will now create a function named “getRandomNumber()” and pass two arguments “min_number” and “max_number” to it.
This function will call the “Math.random()” method for generating a floating-point random number between the specified range:
function getRandomNumber(min_number, max_number){
return Math.random()* (max_number - min_number) + min_number;}
Next, we will call the function “getRandomNumber()” by passing “25” as “min_number” and “80” as “max_number”:
getRandomNumber(25,80);
Now we will execute the above-given program in the console and view the output:
![]() As you can see, the given program generated the decimal random number “38.48177131797334”.
In case, if you want to generate a whole number, then check out the below-given procedure.
As you can see, the given program generated the decimal random number “38.48177131797334”.
In case, if you want to generate a whole number, then check out the below-given procedure.
Using Math.floor() method to generate random numbers in a given range
In JavaScript programming, mostly we deal with the whole number instead of floating points.
Though for converting float into integer numbers, we use the method “Math.floor()”.
Syntax
First check out the basic syntax of the “Math.floor()” method:
Math.floor(Math.random() * (max_number-min_number +1) + min_number);
In the above-given syntax, we will call the method “Math.random()” in the “Math.floor()”.
The “Math.floor()” method rounds off the floating-point number returned by the “Math.random()” method.
Now, let’s try some examples for generating a random number with the help of the “Math.floor()” method.
Example 1
If you want to get a random number between a range like 1 to 100, execute the provided code in the console:
Math.floor(Math.random() * (100-1 +1) + 1);Math.floor(Math.random() * 101);
Here, 1 is the “min_number” and 100 is the “max_number” in the given range.
After putting these values in the formula, the output will print out a random number “52”:
![]() Example 2
First of all, we will create a function named “getRandomNumber()” and pass two arguments “min_num” and “max_num”.
As we discussed above, the “max_num” is the maximum number and “min_num” represents the minimum number of the given range.
The function “getRandomNumber()” will call the method “Math.random()” in the “Math.floor()” method for rounding off the resultant random number:
function GetRandomNumber (min_num, max_num){
return Math.floor(Math.random()* (max_num - min_num) + min_num);}
In the next step, we will invoke the function “getRandomNumber()” by passing values “25” as “min_num” and “80” as “max_num”:
GetRandomNumber(25,80);
Executing the above-given program in the console will display “63” as an integer random number:
Example 2
First of all, we will create a function named “getRandomNumber()” and pass two arguments “min_num” and “max_num”.
As we discussed above, the “max_num” is the maximum number and “min_num” represents the minimum number of the given range.
The function “getRandomNumber()” will call the method “Math.random()” in the “Math.floor()” method for rounding off the resultant random number:
function GetRandomNumber (min_num, max_num){
return Math.floor(Math.random()* (max_num - min_num) + min_num);}
In the next step, we will invoke the function “getRandomNumber()” by passing values “25” as “min_num” and “80” as “max_num”:
GetRandomNumber(25,80);
Executing the above-given program in the console will display “63” as an integer random number:
![]() We have provided essential information related to generating a random number.
We have provided essential information related to generating a random number.
Conclusion
For generating a random number, you can use two JavaScript methods: “Math.random()” and “Math.floor()”.
“Math.random()” is used to generate a floating-point random number and “Math.floor()” utilizes the “Math.random()” method to round off the resultant floating-point random value into an integer or whole number.
Both of these methods accept “min_number” and “max_number” as their arguments.
This blog demonstrated the procedure of generating a random number in a given range with the help of a JavaScript program.
What Does Javascript:void(0) Mean?
In JavaScript, any expression/statement that is evaluated with the void keyword will return an undefined value.
An operand 0 can be used with the void keyword which tells the browser to “do nothing”.
Maybe you have seen “javascript:void(0)” in any html document.
But did you know What exactly javascript:void(0) is? If no! Then this write-up is going to help you in this regard.
This article will provide a brief overview of the following concepts:
What is javascript:void(0)?
Working of javascript:void(0)
Practical implementation of javascript:void(0)
So, let’s get started!
What is javascript:void(0)?
The “javascript:void(0)” is a combination of two things i.e., “javascript:” and “void(0)”.
The below-listed points will assist you in understanding what exactly “javascript:void(0)” is?
The term “javascript:” can be stated as a Pseudo Uniform Resource Locator (URL).
Void is a unary operator that returns undefined.
If we talk about the void(0), it directs the browser to “do nothing”.
There are two implementations of 0 operator i.e.
void(0) and void 0.
Working of javascript:void(0)
Combinedly the term “javascript:void(0)” works as follows:
The “javascript:” allows us to run a code without changing the current page while void(0) directs the browser to “do nothing”, do not reload/refresh the page, don’t run the code.
So, all in all the “javascript:void(0)” stops the browser from refreshing, navigating or reloading a page.
Practical implementation of javascript:void(0)
Let’s consider some examples to understand the working of javascript:void(0).
Example: basic understanding of void(0)
In this example, we will pass a link “linuxhint.com” and javascript:void(0) to the href attribute of the <a> tag:
| 1
|
<a href="javascript:void(0);https://www.linuxhint.com/"> Click on the link to understand the working of void 0 </a>
|
In this program we defined a link, however we utilized the void(0) therefore Clicking on the link wouldn’t perform any action:
![]() The output verified the working of javascript:void(0).
The output verified the working of javascript:void(0).
Example: a comparative example
In this program, we will create two links, one with void(0) and the second one without void(0):
| 123
|
<a href="javascript:void(0);https://www.linuxhint.com/">Link with void(0)</a><br><a href="https://www.linuxhint.com/">Link without void(0)</a>
|
The below given gif will assist you to understand the working of void(0) in a better way:
![]() The output verified that the link with void(0) didn’t perform any task while the link without void(0) directed us to the specified link.
This is how the javascript:void(0) prevents a page from reloading/navigating/refreshing.
The output verified that the link with void(0) didn’t perform any task while the link without void(0) directed us to the specified link.
This is how the javascript:void(0) prevents a page from reloading/navigating/refreshing.
Conclusion
The “javascript:” allows us to run a code without changing the current page while void(0) directs the browser to “do nothing”, do not reload/refresh the page, don’t run the code.
So, combinedly, we can say that the “javascript:void(0)” stops the browser from refreshing, navigating or reloading a page.
This write-up explained what does javascript:void(0) mean using a couple of examples.
Understanding JavaScript Pass-By-Value
In JavaScript, data is passed either by reference or by values.
The primary conflict is that the pass-by-value makes a copy of your data while the pass-by-reference doesn’t create a copy., the arrays and objects will always be passed by reference while anything else such as float, strings, int, etc.
will be passed by value.
So, all in all, we can say that pass-by-value means passing a copy of the data while pass-by-reference means passing the actual reference of the variable in the memory.
In this write-up we will understand the below-listed aspects of pass-by-value:
What is Pass-by-value and how does it work
What is Pass-by-reference how does it work
So, let’s get started!
What is Pass-by-value and how does it work?
Let’s consider the below code snippet to understand what exactly pass-by-value is and how pass-by-value works:
| 123456789101112131415
|
function examplePBV(number1, number2) {
number1 = 50;
number2 = 100;
console.log("Variable's value within examplePBV Method");
console.log(" number1 = " + number1 +" number2 = " +number2);}
let number1 = 172;
let number2 = 72;
console.log("Variable's value Before Calling examplePBV Method");
console.log(" number1 = " + number1 +" number2 = " +number2);
examplePBV(number1, number2);
console.log("Variable's value after Calling examplePBV Method");
console.log(" number1 = " + number1 +" number2 = " +number2);
|
In this example program, we performed the following tasks:
Created a couple of variables and a function examplePBR().
Printed the value of the variables before calling the method, within the method, and after calling the method.
![]() As we have mentioned earlier, pass-by-value creates a copy of data therefore, it doesn’t change the original values of the variables.
This is how the pass-by-value works.
As we have mentioned earlier, pass-by-value creates a copy of data therefore, it doesn’t change the original values of the variables.
This is how the pass-by-value works.
What is Pass-by-reference how does it work?
This section will consider a couple of examples to show what exactly pass-by-reference is and how it works?
| 1234567891011121314
|
function examplePBR(obj) {
obj.value = 172;
console.log("Object value inside examplePBR function:", obj);
}
var obj = {
value: 72
};
console.log("Object's value Before Calling examplePBR Method");
console.log(obj);
examplePBR(obj);
console.log("Object's value after Calling examplePBR Method");
console.log(obj);
|
In this example program, we performed the following tasks:
Created an object “obj”, a function examplePBR().
Printed the value of the object before calling the method, within the method, and after calling the method.
![]() As we have mentioned earlier, pass-by-reference doesn’t create a copy of data, therefore, modifications made in the examplePBR() function affect the original value.
As we have mentioned earlier, pass-by-reference doesn’t create a copy of data, therefore, modifications made in the examplePBR() function affect the original value.
Conclusion
In JavaScript, data can be passed in two ways i.e., by reference or by values., pass-by-value creates the copy of data, on the other hand, pass-by-reference doesn’t create any copy.
This post considered some appropriate examples to explain how pass-by-value and pass-by-reference work.
Map Object | Explained
In JavaScript, different data structures like arrays and objects are used to store the collections of data., key-value pairs can be stored in the objects.
ECMAScript 2015 offers a new iterable object named maps that provides more flexibility by means of storing the elements as key-value pairs.
This post will present a detailed overview of the Map object and it will be organized as follows:
What is a Map object?
How to create a map object?
Map object Methods.
How to delete map elements?
How to get the key’s value in a map?
How to get number of map elements?
How to retrieve keys from a map object?
What is a Map object?
The below listed points will assist you to understand the concept of map object:
It is a collection of items/elements.
It can hold/store the key-value pairs.
It maintains the insertion order of the key-value pair.
Keys in a Map object can be of any data type such as numbers, strings, objects, etc.
How to create a map object?
A map object can be created either using a new map() constructor or the set() method.
We will understand the working of each method one by one.
How to create a map object using the New map() constructor?
In JavaScript, we can create a map object using a new map() constructor.
To do so, we have to pass an array of elements to the new map() method:
| 12345678
|
var stdDetails = new Map([
[1, "Alex"],
[2, "Ambrose"],
[3, "John"],
[4, "Clarke"],
[5, "Jones"]
]);
console.log(stdDetails);
|
Now, let’s execute the above code to see what will be the resultant output:
![]() This is how the new map() method works.
This is how the new map() method works.
How to create a map object using the set() method?
Another way of creating a map object is set() method that allows us to add elements to a map.
| 1234567
|
var stdDetails = new Map()
stdDetails.set(1, "Alex"),
stdDetails.set(2, "Dean"),
stdDetails.set(3, "Joanes"),
stdDetails.set(4, "John"),
stdDetails.set(5, "Joe"),
console.log(stdDetails);
|
The above given piece of code will produce the below given result:
![]() The output clarified that the map object with five elements had been created successfully.
The output clarified that the map object with five elements had been created successfully.
Map object Methods
The below-given table will illustrate the map methods and their working:
| Method | Description |
|---|
| new Map() | It is used to create a new map object. |
| set() | The set() method sets the key’s value in a Map. |
| get() | This method is used to get a value linked with a specific key in the Map. |
| delete() | It deletes a Map element associated with some specific key. |
| clear() | It deletes/clears all the map elements. |
| forEach() | It invokes a callback for every single key/value pair present in the Map |
| has() | It is used to check if a specific key exists in the Map. |
| keys() | This method is used to get the Map keys. |
| entries() | It returns an iterator object that consists of a [key, value] pair present in a Map. |
| values() | This method returns an iterator object containing all Map values. |
Once the map object is created, you can use any of the above-mentioned methods to achieve various functionalities.
How to delete map elements?
In JavaScript, the delete method can be used to remove map element as shown in the following code snippet:
| 123456789
|
var stdDetails = new Map([
[1, "Alex"],
[2, "Ambrose"],
[3, "John"],
[4, "Clarke"],
[5, "Jones"]
]);
stdDetails.delete(3);
console.log(stdDetails);
|
In this example, we passed 3 to the delete() method, which will remove the map element that has id 3:
![]() This is how we can delete a specific map element, however,, the clear() method can be used to delete all map elements:
This is how we can delete a specific map element, however,, the clear() method can be used to delete all map elements:
| 123456789
|
var stdDetails = new Map([
[1, "Alex"],
[2, "Ambrose"],
[3, "John"],
[4, "Clarke"],
[5, "Jones"]
]);
stdDetails.clear();
console.log(stdDetails);
|
Here is the output for the clear() method:
![]()
How to get the value of a key in a map?
In JavaScript, the get() method can be used to get a value associated with a key in the Map as shown in the below-given code snippet:
| 12345678
|
var stdDetails = new Map([
[1, "Alex"],
[2, "Ambrose"],
[3, "John"],
[4, "Clarke"],
[5, "Jones"]
]);
console.log(stdDetails.get(5));
|
The get() method will produce the following output:
![]()
How to get the size/number of map elements?
In JavaScript, the map object has a property named size that can be used to get the number of elements in a map.
| 12345678
|
var stdDetails = new Map([
[1, "Alex"],
[2, "Ambrose"],
[3, "John"],
[4, "Clarke"],
[5, "Jones"]
]);
console.log(stdDetails.size);
|
The size property will generate the following output:
![]() This is how you can get the size of a map.
This is how you can get the size of a map.
How to retrieve keys from a map object?
In JavaScript, the key() method can be used to get the keys of a map object:
| 12345678910111213
|
var stdDetails = new Map([
[1, "Alex"],
[2, "Ambrose"],
[3, "John"],
[4, "Clarke"],
[5, "Jones"]
]);var string = "";for (var items of stdDetails.keys()) {
string += items + "\n";}
console.log(string);
|
Now, let’s execute the above code to see what will be the resultant output:
![]() This is how we can utilize any map() object method to achieve different functionalities.
This is how we can utilize any map() object method to achieve different functionalities.
Conclusion
Map object is a collection of elements that can hold/store the key-value pairs.
Keys in a Map object can be of any data type such as numbers, strings, objects, etc.
The Map object maintains the order of the key-value pair.
The map object offers numerous methods that are used for various purposes.
This post explained what exactly the map object is and how to use the map object methods to achieve different functionalities.
Different Ways to Iterate Over an Array
In JavaScript, iterating over an array is very crucial and can be achieved using different built-in methods, and loops.
JavaScript looping structures, as well as built-in array methods, iterate over every single array element.
Traditional loops such as for-loop and while-loop are the simplest and easiest way to iterate over an array while the array methods such as filter(), map(), etc.
are used to traverse as well as to serve various functionalities on the array elements.
This article will cover the below-listed ways to iterate over an array:
How to iterate over an array using traditional for-loop
How to iterate over an array using JavaScript forEach() method
How to iterate over an array using While loop
How to use for…of statements to iterate array elements
How to iterate array elements using map() function
So, let’s get started!
How to iterate over an array using traditional for-loop?
In any programming language including JavaScript, the most popularly used way to iterate over an array is for-loop.
The below snippet will assist you to understand the syntax of the for-loop:
for (initialization; condition; increment/decrement) {
//code}
Here,
“initialization” specifies where to start the loop.
“condition” specifies the termination criteria for the loop.
Increment and decrement operator increases or decreases the value of the given variable.
Example: Iterating over an array using for-loopIn this program, we have an array of student names and we will iterate it using for-loop:
stdNames = ["Seth", "Mike", "Daniel", "John", "Bryn"];
for (i = 0; i < stdNames.length; i++) {
console.log("At index", i , stdNames[i]);}
In this program we performed the following tasks:
Firstly, we created an array that consists of five elements.
Next, we utilized the for loop to iterate all the elements of the given array.
Within the for-loop, we utilized the length property to find the array’s length.
Finally, we utilized the console.log() method to print each element of the given array.
![]() This is how we can utilize the for loop to iterate array elements.
This is how we can utilize the for loop to iterate array elements.
How to iterate over an array using JavaScript forEach() method
The forEach() method invokes a callback function for every single element of the given array.
The below snippet will assist you to get started with the forEach() method:
arrayName.forEach((item) => { //code});
Example: Iterating over an array using forEach() methodLet’s have look at the below given code block to understand how to use the forEach() method to iterate over an array:
var stdAge = [15, 18, 20, 16, 17];var string = "";
stdAge.forEach(printAge);
function printAge(age) {
string = string + age + "\n";
}
console.log("Student's Age: ");
console.log(string);
Firstly, create an array and an empty string.
Next, utilize the forEach() method along with the given array.
The forEach() method invoked the “printAge()” function for every single array element.
The “printAge” function stored the student age in the string variable.
Finally, printed the student’s age on the console.
![]() This is how the forEach() method works.
This is how the forEach() method works.
How to iterate over an array using While loop?
In JavaScript, a while loop can be used to iterate through an array.
To do that, we have to follow the below syntax:
initialization;
while(condition){//code
increment/decrement;}
Example: Iterating over an array using while loop
In this program, we will iterate the array using while loop:
stdNames = ["Seth", "Mike", "Daniel", "John", "Bryn"];
i = 0;
while (i < stdNames.length) {
console.log("At index", i, stdNames[i]);
i++
}
The above program performed the following tasks:
Created an array.
Utilized the while loop.
Initialized the loop with 0.
Iterated over every single element of the array.
Printed the current index and its respective value.
Finally, incremented the variable.
Output verified the working of the while loop.
![]()
How to use for…of statements to iterate array elements?
The for…of loop/statement is a new addition introduced in the latest versions of the ES6.
It enables us to loop/iterate over the iterable objects such as arrays, strings, sets, and so on.
Consider the below snippet to understand the syntax of for…of statements:
for (variable of iterable) {
// code}
Example: Iterating over an array using for…of statementsThis example program will provide you a profound understanding of the for…of statements:
var stdAge = [16, 18, 19, 16, 17];var string = "";
for (var age of stdAge) {
string = string + age + "\n";
}
console.log("Student's Age: ");
console.log(string);
The above program served the below-listed functionalities:
Created an array and an empty string.
Utilized the for…of statements.
Iterated over every single array element.
Stored the student age in the string variable.
Finally, printed the student’s age on the console.
![]() The output verified the working of the for…of statements.
The output verified the working of the for…of statements.
How to iterate array elements using map() function?
In JavaScript, the map() function can be used to get a new array of mapped elements.
The map() method invokes a function for every single array element.
Following will be the syntax for the array map() method:
arrayName.map(functionaName);
Example: Iterating over an array using map methodIn this program, we will utilize the map method to iterate over the array:
var stdAge = [15, 20, 17, 16, 19];var doubleAge = stdAge.map(twiceAge)
function twiceAge(result) {
return result * 2;
}
console.log("Original Array: ", stdAge);
console.log("Resultant Array: ", doubleAge);
The above code snippet performed the below listed functions:
Created an array.
Utilized the map() function to iterate over the given array.
map() method multiplied each element by 2 and returned it.
![]() The output clarified that the map() method iterated over each array element and multiplied the array elements by 2.
Similarly, we can utilize some other well-known built-in array methods to iterate over an array for example “array.filter()”, “array.some()”, “array.every()”, and so on.
The output clarified that the map() method iterated over each array element and multiplied the array elements by 2.
Similarly, we can utilize some other well-known built-in array methods to iterate over an array for example “array.filter()”, “array.some()”, “array.every()”, and so on.
Conclusion
JavaScript offers multiple ways such as loops and some built-in array methods to iterate over an array., the array iteration functions such as the forEach(), map(), filter(), etc.
operate on each array element.
This write-up explained five commonly used ways to iterate array elements.
For a profound understanding of the concepts, it explained each iteration method using the best suitable examples.
Explain the difference between “undefined” and “not defined”
Knowing the difference between “undefined” and “not defined” is considered an essential concept for learning JavaScript programming language., “undefined” and “not defined” are the two separate terms related to memory space.
The keyword “undefined” means there is a variable that is defined and contains space in memory without assigning value.
While “not defined” means the variable is not yet defined.
In this article, we will learn the difference between undefined and not defined with the help of examples.
So, let’s get started!
What is the “undefined” keyword?
The keyword “undefined” indicates that the accessed variable is declared in the program; however, we have not assigned any value to it.
When a JavaScript program is executed, memory is allocated to the declared or defined variables according to the execution context.
For instance, in the following example, when the variable “emp_name” is defined in the program, it gets space in memory.
let emp_name;
console.log(emp_name);
As no value is assigned to the variable “emp_name”, the program will print “undefined” on the console
![]() Now, we will assign the value “John” to the variable “emp_name” and try to display the specified value as output:
emp_name= "John";
console.log(emp_name);
Hence “emp_name” is no longer “undefined”, so the “console.log()” method will print “John” as its value:
Now, we will assign the value “John” to the variable “emp_name” and try to display the specified value as output:
emp_name= "John";
console.log(emp_name);
Hence “emp_name” is no longer “undefined”, so the “console.log()” method will print “John” as its value:
![]() Now, let’s move ahead to know about the “not defined” keyword.
Now, let’s move ahead to know about the “not defined” keyword.
What is the “not defined” keyword?
The keyword “not defined” indicates that the accessed variable does not exist in the memory.
So, when we access a variable that is not declared in the program, it will print “not defined” on the console.
For instance, in the following example, we will access the variable “emp_age” that is not declared in the program:
console.log(emp_age);
The program will print “not defined” on the console:
![]() We have provided essential information related to “undefined” and “not defined” JavaScript keywords.
We have provided essential information related to “undefined” and “not defined” JavaScript keywords.
Conclusion
In JavaScript, the main difference between “undefined” and “not defined” is declaration and initialization.
The keyword “undefined” means the variable is declared but not assigned or initialized any value.
While the keyword “not defined” means the variable is not yet declared.
This blog discussed the difference between undefined and not defined JavaScript keywords with examples.
How to Remove Duplicate Elements From JavaScript Array?
In JavaScript, we can perform various tasks on arrays such as popping/pushing array elements, removing duplicate elements, concatenating array elements, and so on.
Removing duplicate elements from an array is a very simple but very crucial task in the programmer’s life.
Therefore, JavaScript offers numerous approaches for removing duplicate elements from an array such as the use of JavaScript Set, indexOf() method, filter() method, and so on.
This post will explain the below-given methods to delete the duplicate array elements:
How to use Set to remove duplicate array elements?
How to remove duplicate array elements using indexOf() method
How to remove duplicate array elements using filter() method
So, without a further delay, let’s get started!
How to use Set to remove duplicate array elements?
A Set allows us to store the unique elements of any data type such as primitive, or object references.
This means each value will occur only once in a collection.
Example: Remove Duplicate elements using Set
Let’s consider the below code snippet where we have an array named “languages” that consists of some duplicate elements.
The task is to remove those duplicate elements using JavaScript Set:
| 1234
|
var languages = ["Java", "JavaScript", "Java", "C++", "C", "Java", "C++", "JavaScript", "C++", "Java"];
console.log("Original Array: ", languages);var uniqueLanguages = [new Set(languages)];
console.log("Filtered Array: ", uniqueLanguages);
|
In this program, we performed the following functionalities:
Created an array that contains duplicate elements.
Utilized console.log() method to print original array elements.
Created a Set using the new Set() method named “uniqueLanguages”, and passed it an array i.e.
“languages”.
Consequently, the “uniqueLanguages” Set removed the duplicated languages and returned only unique elements:
![]() In this way, we can utilize the JavaScript Set to remove duplicate elements from an array.
In this way, we can utilize the JavaScript Set to remove duplicate elements from an array.
How to remove duplicate array elements using indexOf() method?
It is a predefined function that is used to get first occurrence of an array element.
It is a case-sensitive method and it returns -1 if it fails to identify a specific value., we can use the indexOf() method along with the push() method to remove the duplicate elements from an array.
Example: Remove duplicate elements using indexOf() method
In this example we will utilize the indexOf() method along with the push() method to delete the duplicate elements from the given array:
| 12345678910111213
|
var languages = ["Java", "JavaScript", "Java", "C++", "C", "Java", "C++", "JavaScript", "C++", "Java"];
function findUniqueElements(languages) {
var uniqueLanguages = [];
for(i=0; i< languages.length; i++)
{
if(uniqueLanguages.indexOf(languages[i]) === -1) {
uniqueLanguages.push(languages[i]);
}
}
return uniqueLanguages;
}
console.log("Resultant Array: ", findUniqueElements(languages));
|
This example program will serve the below-given functionalities:
Firstly, we created an array named “languages” that consists of duplicate elements.
Next, we created a function named “findUniqueElements” and we passed the “languages” array to the “findUniqueElements” function as an argument.
Next, we created an empty array and named it “uniqueLanguages”.
Afterward, we utilized the for loop to traverse through the “languages” array.
Next, we utilized the indexOf() method within the if-statement.
Within if-statement, the indexOf() method will check whether the value present at the current index of the “languages” array is already there in the “uniqueLanguages” array or not.
If yes, then the body of the if-statement doesn’t get executed.
While if the value present at the current index of the “languages” array doesn’t exist in the “uniqueLanguages” array then the body of the if-Statement will execute in such a case.
Within the body of the if-statement, we utilized the push() method to add the unique elements in the “uniqueLanguages” array.
Finally, we utilized the console.log() method to print the array of unique elements:
![]() This is how we can get an array of unique elements using the indexOf() and Push() methods.
This is how we can get an array of unique elements using the indexOf() and Push() methods.
How to remove duplicate elements using JavaScript filter() method?
The filter() method creates a new array of only those elements that pass a specific test.
Example: Remove duplicate elements using the filter() method
In this program, we will utilize the filter() method along with the indexOf() method to remove the duplicate elements from an array:
| 123456
|
var languages = ["Java", "JavaScript", "Java", "C++", "C", "Java", "C++", "JavaScript", "C++", "Java"];function findUniqueElements(languages) {
return languages.filter((element, position) => languages.indexOf(element) === position);}
console.log("Resultant Array: ", findUniqueElements(languages));
|
The above program will perform the following functionalities:
Firstly, created an array of duplicate elements.
Next, we created a function named finduniqueElements, and passed it the given array i.e., languages.
Within the function, we utilized the filter method along with the indexOf() method to get an array of unique elements.
Finally, we utilized the console.log() method to print the filtered array on the console as shown in the below-given array:
![]() This is how we can remove the duplicate elements from an array using the filter method.
This is how we can remove the duplicate elements from an array using the filter method.
Conclusion
In JavaScript, several methods can be used to remove duplicate array elements for example, the instanceOf(), filter(), and new Set().
For example, A Set allows us to store the unique elements of any data type such as primitive, or object references.
So, we can use the JavaScript Set() to delete the duplicate array elements.
Similarly, the filter() method creates a new array of only those elements that pass a specific test.
So, the filter() method can be used to get an array of unique elements.
This article explained different methods to remove duplicate elements from an array using some suitable examples.
How to Prevent Modification of Objects
JavaScript offers multiple methods to prevent modification of objects such as Object.preventExtensions(), Object.seal(), and Object.freeze().
All these methods make sure that no one can modify the functionality of an object intentionally or accidentally.
This post will describe the below-listed methods to prevent modifications of an object:
Object.preventExtensions()
Object.seal()
Object.freeze()
So, let’s get started!
Object.preventExtensions()
The below-listed points will explain what exactly the preventExtensions() method is:
The preventExtensions() method restricts a user to add new methods or properties.
It allows the user to delete the existing methods and properties
It permits the users to access the existing methods/properties.
Here is the syntax of Object.preventExtensions() method:
| 1
|
Object.preventExtensions(obj);
|
Let’s consider the below code block to understand how does preventExtensions() method work:
| 12345678910
|
const empObj = {
empName: "Dean"
};
Object.preventExtensions(empObj);
empObj.empName = "Dean Jones";
empObj.empId = 12;
console.log("Employee Name: ", empObj.empName);
console.log("Employee Id: ", empObj.empId);
|
In this program,
Initially, we created an object named “empObj”.
The “empObj” object has one property i.e., “empName”.
Next, we utilized the Object.preventExtensions() method to lock the “empObj”.
In the next line, we modified the empName property i.e., we assigned it a new value “Dean Jones”.
Afterward, we tried to add a new property name “empId” to the empObj.
Finally, we printed both the properties using the console.log() method.
![]() The output verified that the existing property modified successfully however, new property can’t be added to the restricted/locked object.
The output verified that the existing property modified successfully however, new property can’t be added to the restricted/locked object.
Object.seal()
Consider the below-given points to get the basic understanding of Object.seal() method:
The Object.seal() method restricts a user to add new methods or properties.
It restricts the user to delete the existing methods and properties
It permits the users to access the existing methods/properties.
Here is the syntax of Object.preventExtensions() method:
The below-given code block will explain the working of Object.seal():
| 12345678
|
const empObj = {
empName: "Dean"
};delete empObj.empName;
empObj.empId = 12;
console.log("Employee Name: ", empObj.empName);
console.log("Employee Id: ", empObj.empId);
|
We utilized the Object.seal() method to lock the “empObj”.
In the next line, we tried to delete the empName property.
Afterward, we tried to add a new property name “empId” to the empObj.
Finally, we printed both the properties using the console.log() method.
The output verified the working of seal() method.
Object.freeze()
The freeze() method completely freezes the object.
The below point will provide you more clarity about the freeze() method:
The Object.freeze() method restricts a user to add new methods/properties.
It restricts the user to delete the existing methods and properties
It restricts the users to access the existing methods/properties.
The syntax of Object.preventExtensions() method will be something like this:
Let’s have a look at the below code block to get the basic understanding of Object.freeze() method:
| 1234567891011
|
const empObj = {
empName: "Dean"
};
Object.freeze(empObj);
delete empObj.empName;
empObj.empName = "Dean Jones";
empObj.empId = 12;
console.log("Employee Name: ", empObj.empName);
console.log("Employee Id: ", empObj.empId);
|
We utilized the Object.freeze() method to lock the “empObj”.
Next, we tried to delete the empName property.
Next, we tried to modify the existing property i.e., empName.
Afterward, we tried to add a new property name “empId” to the empObj.
Finally, we printed both the properties using the console.log() method.
The output verified that the freeze() method didn’t delete the empName property.
It returned the original property value instead of modified value.
Moreover, It didn’t add the new property “empId”.
Conclusion
JavaScript provides some built- in methods that make sure that no one can modify the functionality of an object intentionally or accidentally.
For example, the Object.preventExtensions(), Object.seal() methods prevent an object from partial modifications.
However, the freeze() method completely freezes the object.
This write-up explained three different methods to prevent modifications of objects.
JavaScript Undefined Type | Explained
JavaScript provides some primitive as well as non-primitive data types.
For example “null”, “boolean”, “undefined”, etc.
belong to the primitive data type while “arrays”, and “objects” are non-primitive or complex data types., any variable that is not assigned with any value has a default value of “undefined”.
This write-up will explain different use cases of the “undefined” type and it will be organized as follows:
What is undefined?
Syntax
How to use undefined?
So, let’s get started!
What is undefined?
The undefined type belongs to the primitive data types that can have only one value i.e.
undefined.
A variable that is declared/created but not assigned with a value anywhere in the program has a default value of “undefined”.
Syntax
Here is the basic syntax for the JavaScript undefined type:
How to use undefined?
Let’s consider some use cases of JavaScript undefined type:
Example1: variable declared but not defined
In this example, we will check the type of a variable that is declared but not defined anywhere in the program:
| 12
| var x;
console.log(typeof(x));
|
In this example:
We declared/created a variable “x” and didn’t assign it a value.
Next, we utilized the “typeof” operator to find the type of “x”.
Consequently, we get the below-given result:
![]() The typeof operator returned undefined which verified that an unassigned variable has a default value of “undefined”.
The typeof operator returned undefined which verified that an unassigned variable has a default value of “undefined”.
Example2: type of an empty string
Let’s consider we have an empty string as shown in the below snippet:
The task is to check the type and value of an empty string:
| 123
| var x = "";
console.log(x);
console.log(typeof(x));
|
The above snippet utilized the console.log() method:
To print the value of x.
To print the data type of x.
As a result, we get the below-given output:
![]() The output verified that an empty string and an undefined variable are two different things.
The undefined variable has a data type “undefined” while an empty string has a data type “string”.
The output verified that an empty string and an undefined variable are two different things.
The undefined variable has a data type “undefined” while an empty string has a data type “string”.
Example3: check if a variable is defined or not
In this example program, we will check whether a specific variable is defined or not.
If the program does not define the variable, display the message “variable not defined!”.
Else show the message “variable defined”:
| 12345678
| var x;
if (typeof x === "undefined") {
message = "variable not defined!";
console.log(message);
} else {
message = "variable defined!";
console.log(message);}
|
The above code served the below given functionalities:
Declared a variable “x”.
Next, compared the value of “x” with the “undefined” type.
Printed “variable not defined” if the program does not define the variable.
Else displayed the message “variable defined”:
![]() This is how the undefined type works.
This is how the undefined type works.
Conclusion
In JavaScript, the undefined is a primitive type and has only one value “undefined”.
A variable that is declared/created but not assigned with a value anywhere in the program has a default value of “undefined”.
This write-up explained what exactly an undefined type is? It’s syntax and use-cases with the help of examples.
How to Scroll to the Top of the Page Using JavaScript/jQuery
The scroll bar or scrolling feature determines the position in which the scrolling takes place.
A scroll bar can move horizontally as well as vertically.
The horizontal scroll bar allows us to scroll the content horizontally i.e., left or right.
While the vertical scroll bar allows us to scroll the content vertically i.e., up or down.
Now to question is how to enable vertical scrolling or jQuery so that whenever a user clicks on a button, the page scrolls to the topmost position? Well! We have a couple of approaches that can be used to accomplish this task.
This post will explain the working of the below-listed approaches to scroll the page to the topmost position:
How to scroll a page to the topmost position using JavaScript?
How to scroll a page to the topmost position using jQuery?
So, let’s get started!
How to scroll a page to the topmost position using JavaScript?
In JavaScript, the window interface provides a built-in method named scrollTo() that can be used to scroll to some particular position on the page.
Syntax
You to follow the below syntax in order to work with the scrollTo() method:
| 1
| window.scrollTo(x-coordinate, y-coordinate);
|
The above snippet shows that the window.scrollTo() method accepts x-coordinate and y-coordinate as parameters.
If we specify both coordinates as “0” then the scrollTo() method will move/scroll the page to the topmost point.
Example: how to use window.scrollTo() method?
| 1234567891011121314151617181920212223242526272829303132
|
<html><body>
<style>
p {
background-color: antiquewhite;
}
</style>
<h1 style="background-color: black; color: white; text-align: center;">
Welcome to linuxhint
</h1>
<h3 style="background-color: coral; color: white; text-align: center;">
Anees Asghar
</h3>
<p>
How to scroll to the top of the page using JavaScript/jQuery
</p>
<p style="height: 500px;">
Click on the "Click here!" button to scroll back on the top of the page using JavaScript
</p>
<button onclick="topFun()">
Scrollback to the top!
</button>
<script src="https://code.jquery.com/jquery-3.3.1.min.js">
</script>
<script>
function topFun() {
window.scrollTo(0, 0);
}
</script></body></html>
|
The above program performed the below-given tasks:
Created <h1> and <h3> tags to add headings and applied inline CSS to style them.
Created a couple of paragraphs using <p> element.
Created a button named “Scrollback to the top!”.
Clicking on the “Scrollback to the top!” button will invoke the “topFun()” method.
Within topFun() method, we utilized the window.scrollTo() method.
We set both coordinates as 0, consequently, clicking on the “Scrollback to the top!” button will scroll the page to the topmost position.
![]() The output verified that clicking the button scrolled the page to the topmost position.
The output verified that clicking the button scrolled the page to the topmost position.
How to scroll a page to the topmost position using jQuery?
Jquery provides a method named “scrollTop()” that is used to return/set the vertical scrollbar position for the targeted element.
Position 0 represents that the scrollbar is on the top.
So, we have to pass “0” as an argument to the “scrollTop()” method in order to scroll back to the top of the page.
Syntax
Follow the below-given syntax to get the vertical scrollbar position:
| 1
| $(selector).scrollTop();
|
Follow the below-given syntax to set the vertical scrollbar position:
| 1
| $(selector).scrollTop(position);
|
Example: how to use scrollTop() method?
Let’s consider the following code block to understand the working of the scrollTop() method:
| 12345678910111213141516171819202122232425262728293031
|
<html><body>
<style>
p {
background-color: antiquewhite;
}
</style>
<h1 style="background-color: black; color: white; text-align: center;">
Welcome to linuxhint
</h1>
<h3 style="background-color: coral; color: white; text-align: center;">
Anees Asghar
</h3>
</h3><p>
How to scroll to the top of the page using JavaScript/jQuery
</p>
<p style="height: 500px;"> Click on the "Click here!" button to scroll back on the
top of the page using jQuery
</p>
<button onclick="topFun()">
Click Here!
</button>
<script src="https://code.jquery.com/jquery-3.3.1.min.js"> </script>
<script>
function topFun() {
$(window).scrollTop(0);
}
</script></body></html>
|
The above code block performed the following functionalities:
Created <h1> and <h3> tags to add headings and applied inline CSS to style them.
Created a couple of paragraphs using <p> element.
Created a button named “Click Here!”.
Clicking on the “Click Here!” button will invoke the “topFun()” method.
Within topFun() method, we utilized the scrollTop() method.
We passed “0” as a position to the scrollTop() method.
Consequently, clicking on the “Click Here!” button will scroll the page to the topmost position.
![]() This is how the scrollTop() method works in jQuery
This is how the scrollTop() method works in jQuery
Conclusion
In JavaScript, passing “0, 0” as parameter to the window.scrollTo() method will scroll the page to the topmost position.
In jQuery passing “0” as an argument to the “scrollTop()” method will scroll the page to the topmost position.
This post considered a couple of examples to provide a detailed knowledge about the window.scrollTo() and scrollTop() methods.
How to Add Class Name to the HTML Element Through JavaScript?
JavaScript provides a couple of approaches for adding the class name to an HTML element such as the “.add()” method and the “.className” property.
Class name can be added to elements using the CSS(cascading style sheet) and JavaScript.
The main purpose of adding class name to an HTML element is to achieve different functionalities on the selected element using the specified class name.
The below-listed JavaScript approaches can be used to add the class name to an HTML element:
What is “.add()”?
How does the “.add()” method work?
What is “.className”?
How does the “.className” property work?
So, let’s get started!
What is “.add()”?
“.add()” is a built-in method of the classList property that can be used to add the class name to any specific HTML element.
The below snippet will let you understand how to use the “.add” method:
element.classList.add("class_Name");
How does the “.add()” method work?
This section will present a step-by-step guide to understand how to add the class name to an HTML element using JavaScript.
In this program we will create three files an “html” file, a “CSS” file, and a “JavaScript” file:
HTML
<h2>How to add class name to the HTML element through javaScript? </h2><button onClick="classNameFun()"> Click Me! </button><h3> clicking on the "Click Me!" button will add the class name to the following p element </h3><p id="addClass">
Welcome to linuxhint.com!!</p>
In the above snippet we performed the following functionalities:
We utilized the <h2> tag to add a heading.
Next, we utilized <button> tag to create a button and named it as “Click Me!”.
Invoked the “classNameFun()” whenever the user clicked on the button.
Next, we created an <h3> element.
Finally, we created a paragraph using <p> element and assigned it an id “addClass”.
CSS
.style {
text-align: center;
font-style: italic;
background-color: black;
color: white;}
The CSS file served the following functions:
Align the text in the center using the “text-align” property.
Set the italic font style using “font-style” property.
Set the black background color using “background-color” property.
Finally, set the white text color using the “color” property.
JavaScript
function classNameFun() {
let para= document.getElementById("addClass");
para.classList.add("style");}
The .js or JavaScript file served the below-listed functionalities:
Created a function named “classNameFun()”.
Utilized the getElementByid() method to read/edit an HTML element having an id “addClass”.
Finally, utilized the add method to add the name to the <p> element.
OutputOn successful execution of the code, initially, we will get the following output:
![]() Clicking on “Click Me!” button will generate the below-given output:
Clicking on “Click Me!” button will generate the below-given output:
![]() This is how the “.add()” method work.
This is how the “.add()” method work.
What is “.className”?
The “.className” is a property that sets/returns the class attributes of an HTML element.
It can be used to add/specify the class name to any HTML tag.
The following snippet will show the basic syntax of the “.className” property:
element.className = class_Name;
Here, the “class_Name” represents the name of the class.
In case of multiple classes, we can specify the classes name using comma separated syntax.
How does the “.className” property work?
Let’s consider the below given example to get the basic understanding of the “.className” property.
HTML
<h3>How to add class name to the HTML element through javaScript? </h3><button onClick="classNameFun()"> Click Me! </button><h4 id="addClass"> clicking on the "Click Me!" button will add the class name to this element </h4>
The HTML class performed the following tasks:
Utilized the <h3> element to add a heading.
Utilized <button> tag to create a button and named it as “Click Me!”.
Invoked the “classNameFun()” whenever the user clicked on the button.
finally, created an <h4> and assigned it an id “addClass”.
CSS
The CSS file will remain the same as in the previous example.
JavaScript
function classNameFun() {
let hElement = document.getElementById("addClass");
hElement.className = "style"; }
In the JavaScript file, we utilized the getElementById() method to read/edit an HTML element having an id “.addClass”.
Afterward, we utilized the add method to add the name to the <p> element.
OutputWhen we run the above-given program, initially, this program will produce the below-given output:
![]() After clicking on the “Click Me!” button, the classNameFun() will be invoked, consequently, we will get the following output:
After clicking on the “Click Me!” button, the classNameFun() will be invoked, consequently, we will get the following output:
![]() The output clarifies that the class name has been added successfully to the <h4> element.
The output clarifies that the class name has been added successfully to the <h4> element.
Conclusion
In JavaScript, the “.add()” method and “.className” property are used to add the class name to any HTML element.
This write-up explained all the basics for adding class names to any HTML element.
This post explained how to use the “.add()” method and “.className” property with the help of some suitable examples.
How to Get Character Array From String
JavaScript allows us to perform different functionalities on the arrays for example splitting the arrays into subarrays, concatenating multiple arrays, removing array elements, and so on.
Splitting/converting a string into an array of characters is very common.
Therefore, JavaScript offers multiple methods to get a character array from a string such as array.split() function, array.from() function, spread operator, and so on.
This post will present a comprehensive overview of the below-listed methods to get a character array from a string:
split() function.
substring() function.
from() function.
So, let’s begin!
string.split() function
split() is a built-in function that splits/breaks a string into substrings(words or characters).
It produces a new modified array without affecting the given array.
SyntaxThe below snippet will assist you to understand the syntax of the array.split() method:
string.split(separator, limit);
Both separator and limit are optional parameters.
A string/regular expression can be passed as a separator to the split() method.
If we didn’t specify any parameter then the split() method will return the original string.
Example: Get a character array using the split() methodIn this example program, we will understand how to use the split() method to get an array of characters from the given string:
var originalString = "Welcome to linuxhint";var resultantArray = originalString.split("");
console.log("Resultant Array: ", resultantArray);
In this program, we passed “” as a separator to the split method.
Consequently, the split() method will break the given string into characters and it will return an array of characters as shown in the below-given snippet:
![]() This is how we can get a character array from a string using the split method.
This is how we can get a character array from a string using the split method.
substring() function
The substring() method is used to extract a certain number of characters/letters from the given string.
The substring() function extracts the characters between two positions and returns a new modified array without affecting the original array.
SyntaxThe below snippet will explain the basic syntax of the substring() method:
substring(initial_index, final_index);
Here, the initial_index is a required parameter that specifies the starting position while the final_index is an optional parameter that specifies the end position.
Omitting the second parameter, i.e.
final_index will return the rest of the string.
Example: Get a character array using the substring() methodIn this program, we will learn how to use the substring() function to get an array of characters from the given string:
var originalString = "linuxhint";var newArray = [];for (i = 0; i < originalString.length; i++) {
newArray[i] = originalString.substring(i, i + 1);}
console.log("Resultant Array: ", newArray);
In this program, we utilized the substring() method to get the characters from the given string and store them in an array:
![]() In this way, we can utilize the substring() method to get the array from the given string.
In this way, we can utilize the substring() method to get the array from the given string.
substring() function
It is a built-in static method that returns a new array from any iterable object.
In simple words, the from() method enables us to create a new array from iterable objects or array-like objects.
SyntaxThe basic syntax of the from() method will be something like this:
array.from(object, mapFun, thisArg);
Here, the object parameter represents an object to be converted to an array.
The mapFun parameter represents a call-back function that will be invoked on each element while thisArg is a value that is used as this value for the map function.
The object is a compulsory parameter while mapFun and thisArg are optional parameters.
Example: Get a character array using the from() methodIn this program, we will learn how to use the substring() function to get an array of characters from the given string:
var originalString = "Welcome";var newArray = Array.from(originalString);
console.log("Resultant Array: ", newArray);
In this example, we passed the “originalString” to the “Array.from()” method to get a character array from the given string:
![]() This is how the Array.from() method works.
This is how the Array.from() method works.
Conclusion
In JavaScript, different methods such as Array.from(), string.substring(), string.split() etc.
are used to get an array of characters from the given string.
The split() method splits the given string into substrings, the substring() function extracts a specific number of characters from the given string, and from() method returns a new array from any iterable object.
This post explained different methods to get an array of characters from the given string.
Difference Between JavaScript and JScript
JavaScript and JScript are both scripting languages that come under different trademarks.
JavaScript is owned by the oracle corporation while JScript is owned by Microsoft.
Both these languages have numerous similarities and dissimilarities.
Both JavaScript and JScript came up with the same goal i.e.
to develop dynamic and attractive web pages.
The objective of this article is to present a detailed understanding of the below-mentioned concepts:
What is JavaScript?
What is JScript?
Comparison based on Similarities?
Comparison based on differences?
So, let’s get started!
What is JavaScript?
It is an ECMAScript-based scripting language.
It has some additional features other than ECMAScript.
JavaScript is most commonly used for web development along with HTML and CSS.
So, collectively, JavaScript, HTML, and CSS are used to create interactive web pages.
What is JScript?
It is a scripting language developed by Microsoft and it is very much similar to JavaScript.
JScript is popularly used to create dynamic and attractive web pages.
Comparison based on Similarities?
The below-given table will present a comparison between JavaScript and JScript based on similarities:
| Metrics |
Comparison |
|---|
| Type |
Both are scripting languages. |
| Syntax |
Both follow the same syntax. |
| Performance |
Both are fast. |
| Client/Server |
Usually, both are used on the client side. |
| Objective |
Both are designed to make dynamic and interactive web pages. |
Comparison based on differences?
The below-given table will present a comparison between JavaScript and JScript based on Differences:
| Metrics |
JavaScript |
JScript |
|---|
| Trademark/Owned By |
Oracle Corporation. |
Microsoft |
| Developed in |
1995 |
1996 |
| Based on |
ECMAScript |
Microsoft’s ECMAScript standard |
| Compatibility |
Compatibility must be maintained on multiple browsers. |
Only Microsoft Internet Explorer. |
| Code Compilation |
Code can be compiled in any web browser |
Code compiled only in a Microsoft browser. |
| Content Creation |
Doesn’t support active content creation. |
Supports active online content for “www” |
| Object Access |
Can’t access browsers objects |
Can access objects of MS Internet Explorer. |
| Execution scope |
Can execute in any browser. |
Limited to internet explorer only. |
That was all the necessary information that is needed to understand before getting started with JavaScript or JScript.
Conclusion
JavaScript and JScript both are scripting languages owned by Oracle Corporation and Microsoft respectively.
JavaScript’s code can be compiled in any web browser however, JScript’s code can be compiled only in a Microsoft browser.
JavaScript doesn’t support active content creation while JScript
Supports active online content for “www”.
JavaScript can’t access the browser’s objects while JScript can access objects of MS Internet Explorer.
This post presented a precise overview of JavaScript and JScript based on their similarities and differences.
Array pop() Method | Explained
Arrays are one of the most used elements in any programming language.
Arrays are used for multiple purposes to implement the “Queue” data structure and the “Stack” data structure.
ES6, multiple methods are available that help us work with arrays, and one of them is the pop() method.
In this post, we will focus on this pop() method and explore every minute detail to grasp the working of this method correctly.
Purpose of the pop() method
Let’s start with the purpose of the array.pop() method.
This method is used to remove the very last element or item from an array.
But coming with a twist, this method doesn’t only remove the last element; it even returns the popped element to its caller.
Syntax of the array.pop() method
Let’s start with the basics; by basics, we mean the syntax.
The syntax is as follows:
arr.pop()
The syntax mentioned above is only used to remove the last element from the array, but in case you want to fetch that value as well, then you would use the following syntax:
var item = arr.pop()
In the syntax, we can see:
arr: Is the name of the array on which we are using the pop() method
item: is the name of the variable in which we are storing the return value from this pop() method.
Return Value
The return value of the pop() method can be a number, string, or any object depending upon the type of element removed from the array.
Examples
To better understand the working of this method, we are going to go over some examples of this method.
Example 1: Removing Element using pop() method
First off, we need a new array which we can create using the following line of code:
arrayOfPlaces = ["Paris", "Rome", "Prague", "Munich", "Amsterdam"]
To remove the last city from this list we are going to call the pop() method using the following line of code:
arrayOfPlaces.pop()
And finally, to see the result onto the terminal, we are going to call the console log function:
console.log(`The cities present in the array are as: `, arrayOfPlaces);
After executing this program, you’ll get the following result on your terminal:
![]() As you can see in the output, the city “Amsterdam” has been removed from this array.
As you can see in the output, the city “Amsterdam” has been removed from this array.
Example 2: How to perform the fetch and delete using the pop() method?
Instead of directly calling the pop() method to remove the element, let’s store the popped element in a separate variable and print that variable out onto the terminal.
So, our initial array is:
arrayOfPlaces = ["Paris", "Rome", "Prague", "Munich", "Amsterdam"]
Create a variable and call the pop() method:
visitiedCity = arrayOfPlaces.pop()
To print the array and the “visitedCity” variable, use the following lines of code:
console.log(`The cities present in the array are as: `, arrayOfPlaces);
console.log("The city visited is as: ", visitiedCity);
You’ll get the following output onto the terminal:
![]() As you can observe, we didn’t only remove the last element “Amsterdam” from the array, and we were also able to print it after placing it in another variable.
As you can observe, we didn’t only remove the last element “Amsterdam” from the array, and we were also able to print it after placing it in another variable.
Wrap up
The pop() was released with the ECMA6 version of JavaScript.
This method belongs to the family of methods that help us work with arrays while implementing different data structures.
This method is mainly used to eradicate the last element from the array but can also perform fetch and delete operations on the last item.
To perform a fetch and delete operation, you will require a different variable to store the return value of the pop() method.
What is export default?
One of the best things a programming language can bring to the table is its ability to provide the programmer with the freedom of modularity.
Modularity is essentially the process of dividing a seemingly massive problem into smaller and manageable chunks.
And precisely, that is what JavaScript provides with the help of exports.
In the ESMAv6 release of JavaScript, two different types of exports are available to the programmer.
One is known as the named exports, and the other is known as the export default, and we will focus on the latter.
What is export default used for?
Export defaults are used to export a single module, variable, expression, or function from a JavaScript file so that it can be used in any other file of either the same program or even in an entirely different program.
To get that exported element in the other file or program, we use an import statement, but the thing with export default is that while importing, we don’t have to worry about the name used in the export file.
How to export a single function using export default?
To demonstrate this, we are going to create two different files, one is going to be a demo file, and the other is going to be an export file like so:
![]() In the export.js file, we are going to create a new function that is going to print us the area of a square using the length of its side as
function areaOfSquare(length) {
return length * length;}
Now at the end of this file, we are going to use the export default keyword to export this function like
export default areaOfSquare;
Inside the demo.js file, we are going to first of import this function in our program as areaFunction like:
import areaFunction from "./export.js";
After that, we are going to create a length variable, and we are going to define the length of a square:
var length = 4;
Then we can simply print out the of the square using the following console log function as:
console.log("Area of the square is as " + areaFunction(length));
After executing only the demo.js file, we get the following output on our terminal:
In the export.js file, we are going to create a new function that is going to print us the area of a square using the length of its side as
function areaOfSquare(length) {
return length * length;}
Now at the end of this file, we are going to use the export default keyword to export this function like
export default areaOfSquare;
Inside the demo.js file, we are going to first of import this function in our program as areaFunction like:
import areaFunction from "./export.js";
After that, we are going to create a length variable, and we are going to define the length of a square:
var length = 4;
Then we can simply print out the of the square using the following console log function as:
console.log("Area of the square is as " + areaFunction(length));
After executing only the demo.js file, we get the following output on our terminal:
![]() You were able to use the function that was exported from the other file.
You were able to use the function that was exported from the other file.
How to export a variable using export default?
In the export.js file, simply create a new variable named as radiusOfCircle like
var radiusOfCircle = 12;
At the end of the file, simply export this variable using the command:
export default radiusOfCircle;
Now, in the demo.js file, lets first create a function that is going to find us the area of a circle using its radius with the following lines:
function areaOfCircle(radius) {
return 3.1415 * (radius * radius);}
Now, let’s import the radius from the export.js file with the following line:
import radiusOfCircle from "./export.js";
Finally, let’s print the are of the circle using the following line:
console.log("The area of circle is as : " + areaOfCircle(radiusOfCircle));
After executing, we get the following result on our terminal:
![]() As you can see, we were able to print the area of the circle by using the radius which was defined in the other file.
As you can see, we were able to print the area of the circle by using the radius which was defined in the other file.
Conclusion
JavaScript provides two different types of exports that allow the programmer to export a module, expression, string, or literal from one file to another.
Export default is used when there is only one export to be made from a particular file and when importing this one element, we don’t have to worry about giving the same name to our import.
This combination of export and import allows us to implement modularity.
Array sort() Method | Explained
Arrays are the fundamentals of a programming language as they allow us to use a set of elements of the same data types.
It’s true that these arrays contain numerous amounts of data.
Still, it is not sequential, which eventually causes an increase in loading time, and even it makes searching for elements in an array complex for the compiler.
In order to avoid this problem, JavaScript provides a built-in array method.
In this write-up, we are going to discuss the array sort() method and focus on the following outcomes
What is the array sort() method?
How do we use the sort() method for numerical order?
How do we sort an array of strings?
What is the array sort() method?
This JavaScript method by default sorts an array in ascending order.
We can also customize the sorting order by using customized functions as parameters.
The most important thing is that while arranging the elements, this method focuses on the very first digit or a character of that number or a word that needs to be arranged.
This method returns a new array as output after changing the original array.
Syntax:
array_name.sort()
In the above syntax, array_name represents the array variable.
We can use the sort() method with or without arguments.
Code:
var pos=[30,150,42,81,20,21,35,23]
console.log(pos.sort())
In this code we take an array of unsequenced numbers and then we apply JavaScript built-in array sort() method on it to sort the array in a sequence.
Here the sort() method compares the very first digit of all the numbers and arranges them accordingly.
Output:
![]() As we can see in the above output, 150 is placed before every element as it is greater than every element in the array but here as sort() method focuses on the very first digit of a number so 1 < 2 that's why the compiler placed it at the start of the array.
As we can see in the above output, 150 is placed before every element as it is greater than every element in the array but here as sort() method focuses on the very first digit of a number so 1 < 2 that's why the compiler placed it at the start of the array.
How do we use the sort() method for numerical order?
We can also use the sort() method to arrange elements numerically in ascending or descending order.
In order to arrange elements numerically, the sort() method compares the digits according to the given condition.
Code:
var pos=[30,150,42,81,20,21,35,23]
arrn = (m,n) => m-n
console.log(pos.sort(arrn))
In this code we create an array of un-arranged numbers.
Then we create a function with the help of the arrow function to arrange elements in ascending order.
Whereas the elements of the array are represented by m and n.
Output:
![]() The output clearly shows that now each element is placed in numerically ascending order.
Note: To place elements in descending order just use n-m at the place of m-n.
The output clearly shows that now each element is placed in numerically ascending order.
Note: To place elements in descending order just use n-m at the place of m-n.
How do we sort an array of string elements?
We can also arrange elements according to their length in an array by using the sort() method.
In order to do that we need to find the length of elements first and then use the sort() method to sort the array.
Code:
var pos=["grapes","watermelon","fig","peach","plum"]
arrn = pos.map(x => x.length)
res = (m , n) => m-n
console.log(arrn.sort(res))
In this code, we create an array of strings which comprises fruits.
After that, we use the map method along with a function as a parameter to find the length of the array elements.
Lastly, we create a function to place the elements at their right place and use it as a parameter in the sort() method which eventually arranges the elements in ascending order.
Output:
![]() The output clearly shows that the array is sorted according to the length of elements in the array.
The output clearly shows that the array is sorted according to the length of elements in the array.
Conclusion
In JavaScript, the array sort() method by default arranges the array elements in ascending order.
This method can also arrange elements in customized order with the help of user-defined functions.
In this article, we have discussed JavaScript’s built-in array sort() method and arranged elements numerically as well as according to the element’s length.
Console
In JavaScript, the console object gives access to the browser to allow for debugging.
It is used for different objectives, including displaying messages, alerts, and errors on the browser console.
Therefore, it is very useful for debugging purposes.
Most popular web browsers, including Firefox, Google Chrome, Safari, etc., provide a set of developer tools that consists of a debugger, console, inspect element, and network activity analyzer.
Through these tools, it has become easier to perform any tasks according to the requirements.
In this post, the console in JavaScript is briefly explained with the following learning outcomes:
How to use the console object
How various console methods work
How to use the console object?
In JavaScript, a console is an object combined with different methods to perform various functions and get the output on the browser.
Some of the console methods in JavaScript are as follows:
console.log() method: Output the message to the web console.
console.Info(): output an informational message to the web console
console.error(): Displays an error message on the console.
console.Clear(): Removes everything from the console.
console.warn(): Displays a warning message.
console.assert(): Return an error message if the assertion fails.
console.count(): Return the number of counts called.
console.table(): Returns data in a tabular format.
console.Group(): Creates a group inline in the console.
console.GroupEnd(): End the current group in the console.
console.Time(): Starts a timer for the console view.
console.timeEnd(): End the timer and return the result to the console.
In order to provide a better understanding, a few examples are provided.
How does the console.log() method work?
The console.log() method displays the output to the console.
Users can input any type inside the log(), such as strings, booleans, arrays, objects, etc.
The example code of the console.log() method is given below.
Code:
// console.log() method
console.log("welcome to JavaScript") // string
console.log(1); // boolean
console.log([1, 2, 3]); // array inside log
console.log(true); // boolean
console.log(null);
In the above code, the console.log() method is used to print the string, a boolean and an array on the console.
Output:
![]() It is observed that the string, boolean, and array values are printed on the console.
It is observed that the string, boolean, and array values are printed on the console.
How does the console.info() work?
The console.info() method displays the key information regarding the user in accordance with the needs.
Most of the developers used this method for displaying permanent information.
Code:
// console.info() method
console.info("This is an information message");
In the above code, a string is passed using the console.info() method.
Output:
![]() In the console window, string output is displayed by using console.info() method.
In the console window, string output is displayed by using console.info() method.
How does the console.error() method work?
To display the error message, the console.error() method is used.
Most of the developers used it for troubleshooting purposes.
The example code of the console.error() method is given as follows.
Code:
// console.error() method
console.error('This is a simple error');
The console.error() method executed in the console browser is marked as a string input in the below figure.
Output:
![]() By passing a single argument of string type, the error message is displayed on the console.
By passing a single argument of string type, the error message is displayed on the console.
How does the console.clear() method work?
The console.clear() method is used for removing all the information from the console browser.
Most of the time, it is used at the start of the code to remove all previous information or to display a clean output.
Code:
// console.clear() method
console.clear();
The console.clear() method is used as input in the console browser.
Output:
Let’s look at the state of the console before applying the console.clear() method.
![]() Now, observe the console after applying the clear() method.
Now, observe the console after applying the clear() method.
![]() The output figure shows a clear display in the console window using the console.clear() method.
The output figure shows a clear display in the console window using the console.clear() method.
How does the console.warn() method work?
The console.warn() method is used to show the warning message to the console browser.
It requires only one argument to display the message.
The JavaScript code is as below:
Code:
// console.warn() method
console.warn('This is a warning.');
A simple warning message is being printed using the warn() method.
Output:
![]() The output shows a warning symbol and the message you entered in the console.warn() method.
The output shows a warning symbol and the message you entered in the console.warn() method.
How does the console.count() method work?
The console.count() method shows how many times a method has been called.
Below is the code for the console.count() method.
Code:
// console.count() methodfor(let i=1;i<6;i++){
console.count(i);}
In the above code, the console.count() method is used to count the methods within a loop.
Output:
![]() The figure shows that five counts are called in a for loop using the console.count() method.
The figure shows that five counts are called in a for loop using the console.count() method.
How does the console.table() method work?
The console.table() method is used to display objects in the form of a table on the browser console.
We made use of the following code to show the usage of the console.table() method.
Code:
console.table({'a':1, 'b':2,'c':3,'d':4});
The console.table() method is used to represent the data in a tabular form.
Output:
![]() The below figure shows a table in which values are stored by assigning indexes.
The below figure shows a table in which values are stored by assigning indexes.
How does the console.time() and console.timeEnd() methods work?
The console.time() method is used to start calculating the execution time of a specific portion of code.
Moreover, at the end of the code, you can use console.timeend() to get the execution time.
The following example code implements the console.time() and console.timeend() methods.
Code:
// console.time() and console.timeEnd() method
console.time('Welcome to JavaScript');
let fun_sit = function(){
console.log('fun_sit is running');}
let fun_stand = function(){
console.log('fun_stand is running..');}
fun_sit(); // calling fun_sit();
fun_stand(); // calling fun_stand();
console.timeEnd('Welcome to JavaScript');
In the above code,
The console.time() method is used at the
After that, two functions are created.
Later, these functions are
Lastly, we used the console.timeend() method to return the total execution time of the code (that is placed in between the console.time() and console.timeEnd() methods).
Output:
![]() It is observed from the output that the code written between the console.time() and console.timeEnd() methods took 8.96 ms to execute.
It is observed from the output that the code written between the console.time() and console.timeEnd() methods took 8.96 ms to execute.
How does the console.group() method work?
The console.group() method is used to make a group of messages on the console.
Additionally, the console.groupEnd() method is used to terminate that group.
The example code that exercises console.group() and console.groupEnd() methods is written below.
Code:
// console.group() and console.groupEnd() method
console.group('simple');
console.warn('alert!');
console.error('error notification');
console.log('Welcome to JavaScript');
console.groupEnd('simple');
console.log('new section');
In above code,
console.group() method is used.
After that, the warn(), error(), and log() methods are used for displaying messages in the group.
At the end, console.groupEnd() is used to end the messages of the group.
Output:
![]() The output illustrates the group of messages in which errors and warning notifications are displayed.
whereas the statement ‘new section’ is displayed outside of the group.
Here it is! You have learned to understand and apply console objects and their methods.
The output illustrates the group of messages in which errors and warning notifications are displayed.
whereas the statement ‘new section’ is displayed outside of the group.
Here it is! You have learned to understand and apply console objects and their methods.
Conclusion
In JavaScript, the console object comprises various methods that can be used to get the output on the browser’s console. This post demonstrates the functionality of the console in JavaScript.
You have learned to access the console of various browsers.
Additionally, we have provided an overview of all the methods supported by the console object in JavaScript.
Find the length of a JavaScript object
The popularity of JavaScript among different scripting languages is because of the objects.
Due to the unavailability of the length feature in objects, it is hard to determine the length of a JavaScript object.
To counter that, JavaScript is equipped with a large set of methods that can be used to compute the length.
Alternatively, the strings and arrays have the length feature to compute the length of JavaScript objects.
In this article, we have demonstrated various possible methods to find the length of the objects.
For finding the length of JavaScript object you can:
Use the Object.entries() method
Use the Object.keys() method
Use the Object.values() method
Use For loop
Method 1: Use the Object.keys() method for finding the length of a JavaScript object
The most common method used for finding the length of a JavaScript object is based on the Object.keys() method.
The size of a JavaScript object is determined by the length feature of the Object.keys() method in JavaScript.
The following example code is exercised to make use of the Object.keys() method to find the length.
Code:
// Find the length of object using keys method
let subjectResult = {
english: 45,
mathematics: 60,
computer: 80,
physics: 67,
chemistry: 97
statistics: 55};
let objLength = Object.keys(subjectResult).length;
console.log(objLength);
In the above code, marks for six different subjects are stored in the subjectResult object.
To find the length of the subjectResult object, the length feature of an Object.keys() method is used.
Output:
![]() The output in the console returns the length of objLength, which is 6.
It represents the total number of subjects that are stored in objLength using the length property of the Object.keys() method.
The output in the console returns the length of objLength, which is 6.
It represents the total number of subjects that are stored in objLength using the length property of the Object.keys() method.
Method 2: Use the Object.values() method for finding the length of a JavaScript object
In JavaScript, another method that is used to determine the length of an object is the Object.values() method.
It returns the values of the objects that are stored in it.
Users can use the length property to calculate the length of a specific object in JavaScript.
An example that exercises Object.values() method is provided below:
Code:
// Find the length of object using values method
let subjectResult = {
english: 45,
mathematics: 60,
computer: 80,
physics: 67,
chemistry: 97,
statistics: 55};
let objectLength = Object.values(subjectResult).length;
console.log(objectLength);
In the above JavaScript code, subjectResult is passed as an argument to the Object.values() method that returns the value of an JavaScript object.
Output:
![]() The output shows the length of an object utilizing the method of Object.values().
The output shows the length of an object utilizing the method of Object.values().
Method 3: Use the Object.entries() method for finding the length of a JavaScript object
In JavaScript, one method is named Object.entries() to calculate the length of a JavaScript object.
It gives the key-value pair of an object.
The length is utilized to return the number of elements.
The code is given below:
Code:
// Find the length of object using entries method
let subjectResult = {
english: 45,
mathematics: 60,
computer: 80,
physics: 67,
chemistry: 97,
statistics: 55};
let objectLength = Object.entries(subjectResult).length;
console.log(objectLength);
The key-value pairs are passed as an argument to the Object.entries() method named as subjectResult.
After that, it returns the number of entities that are stored in it.
Output:
![]() The output represents the number of key-value pairs stored in the objectLength variable.
The output represents the number of key-value pairs stored in the objectLength variable.
Method 4: Use For Loop for finding the length of a JavaScript object
For loop basically iterates over the number of elements defined in the looping condition.
Here, the for loop is iterated on an object’s keys and values to get the length of an object.
Let’s practice this via the following example.
Code:
// Find the length of object using for loop
let subjectResult = {
english: 45,
mathematics: 60,
computer: 80,
physics: 67,
chemistry: 97,
statistics: 55};
let objLength = 0;for (let key in subjectResult) {
objLength++;}
console.log(objLength);
In the above code, the objLength variable is initialized with zero.
After that, start a for loop which is executed till the number of elements that are stored in subjectResult.
At each iteration, the objLength variable is incremented by “1”.
In the end, it is displayed as output using the console.log() method.
Output:
![]() The output represents the number of iterations that are executed in a for-loop, which is 6.
Congratulations! In this post, you have learned to determine the length of an object in JavaScript with the help of four different methods.
The output represents the number of iterations that are executed in a for-loop, which is 6.
Congratulations! In this post, you have learned to determine the length of an object in JavaScript with the help of four different methods.
Conclusion
The three static methods of JavaScript are named Object.keys(), Object.values(), and Object.entries() to find the length of an object.
Moreover, you can make use of the For loop to get the length of the object.
This post describes methods to determine the length of a JavaScript object.
The three static methods and a For loop are explained with the help of an example to find the length of a JavaScript object.
jQuery Disable Button
“jQuery is one of the most useful and popular JavaScript libraries.
It’s a free and open-source lightweight JavaScript that revolutionized front-end development to a whole new level.
You can forget about Angular and React.
However, like most things in the world, it does have some drawbacks.
One of them is that it lacks a direct method of disabling a button.
That does not mean it’s undoable.
And in this tutorial, we will discuss how we can disable a button using jQuery.”
jQuery Prop Method
Added in jQuery version 1.6 and above, jQuery allows you to disable a button using the prop() method.
You can learn more about the origin of the function in the resource below:
https://api.jquery.com/prop/
For now, we will focus on how to use this method to disable a button.
Let us look at the syntax of the function and how we can use it.
Like all jQuery methods, the prop() function is applied to a selected element.
In our example, we are using a simple button.
Hence, let us start by creating a simple button.
<button id="id">
Submit</button>
The example above shows a very simple button that has an id of id.
We can then use the id to select the button and apply the prop function.
The syntax is as shown below:
<button id="id">
Submit</button><script>
$("#id").prop("disabled", true)</script>
In the example above, we open the script tag and add our JavaScript from the jQuery library.
We start by selecting the element that we wish to disable using its id.
Once selected, use the prop method and set the disabled property to true.
Keep in mind that the prop function accepts the target attribute as the first parameter in string form.
The second parameter is the value of the attribute in Boolean form.
Example
To illustrate, let us start by importing the jQuery library into our html file.
<script src="https://code.jquery.com/jquery-3.6.0.min.js"></script>
We can then create the button and disable it as shown in the sample code below:
<!DOCTYPE html><html lang="en"><head><meta charset="UTF-8"><meta http-equiv="X-UA-Compatible" content="IE=edge"><meta name="viewport" content="width=device-width, initial-scale=1.0"><title>jQuery Disable Button</title><script src="https://code.jquery.com/jquery-3.6.0.min.js"></script></head><body><button id="#id">
Submit</button><script>
$("id").prop("disabled", true)</script></body></html>
If we open the file in the browser, we should see that the button is disabled.
![]()
Enable Button With jQuery
The opposite is true.
We can enable and disable the button by setting the disabled attribute to false in the prop function.
For example:
<body><button id="id" disabled>
Submit</button><script>
$("#id").prop("disabled", false)</script></body>
In the example above, we can see the button is disabled by default by setting the HTML disabled property.
We can then enable it using jQuery, as shown above.
Closing
This short tutorial covers the basics of disabling and enabling a button in jQuery using the prop function.
If you are using jQuery version 1.6 and lower, you can use the attr function that works similarly.
Happy coding!!
How to declare variables in different ways?
JavaScript is a popular scripting language that is used worldwide., a variable is used to store the value of data that can be modified in the future.
There are different ways that are adapted to declare variables in JavaScript.
In this blog, we will use the most common methods to declare variables using keywords such as var, let, and const.
Each keyword has its own functionality that varies according to the requirements.
This post serves the following learning outcomes:
Using the var keyword to declare a variable
Using the let keyword to declare a variable
Using the const keyword to declare a variable
What is the key difference between var, const and let keywords?
As mentioned earlier, the var const, and the let keywords can be used for declaring variables.
Before starting the article, the user must familiarize the key difference between the above keywords.
Var keyword is used globally and can be retrieved anywhere in the code.
It provides the redeclaration and updates features that cause bugs.
To overcome the problem, let and const keywords have been introduced.
The let keyword gives local access and provides an update feature, but does not give the re-declaration.
The const keyword gives local access like the let keyword but does not provide the update and declaration features.
Method 1: Using the var keyword to declare variables
The keyword var is mostly used to declare variables that can be reassigned in JavaScript.
Basically, the main purpose of the var keyword is to access the variable globally.
If you declare a variable with the var keyword, it can be used globally and also provide a facility to change its value in code.
The syntax of the var keyword is written below.
Syntax
var var_Name = "var_Value;
In the above syntax, the var is the keyword where the var_Name is the user-defined name for the variable.
The var_Value denotes the value that will be stored in the variable named as var_Name.
Example Code:
// declare variable using var keywordvar var_Name = "Welcome to JavaScript";
console.log(var_Name);
In the above JavaScript code, var_Name is used to declare the variable that stores a string “Welcome to JavaScript”.
In the next line, var_Name is displayed using the console.log() method.
Output:
![]() In the input part, the var_Name is declared in the 1st line of the script.
After that, information that is stored in var_Name is displayed using the console.log() method.
In the output part, the “Welcome to JavaScript” message is displayed as output in the browser console.
In the input part, the var_Name is declared in the 1st line of the script.
After that, information that is stored in var_Name is displayed using the console.log() method.
In the output part, the “Welcome to JavaScript” message is displayed as output in the browser console.
Method 2: Using the let keyword to declare variables
One of the declaration methods is using the let keyword.
It is the updated form of the var keyword.
The let keyword has limited scope.
The usage of this keyword is briefly discussed in this section to declare variables in JavaScript.
The syntax of the let keyword is given below.
Syntax:
let var_Name = "var_Value";
In the above JavaScript syntax, the let is used as a keyword, and var_Name is the variable that stores the value of “var_Value”.
Example Code:
// declare variable using let keyword
let var_Name = "Welcome to JavaScript";
console.log(var_Name);
In the above JavaScript code, the let keyword is used to declare the variable that stores a string “Welcome to JavaScript”.
Furthermore, var_Name is displayed using the console.log() method.
Output:
![]() The message “Welcome to JavaScript” is displayed as output in the browser console using the let keyword in JavaScript.
The message “Welcome to JavaScript” is displayed as output in the browser console using the let keyword in JavaScript.
Method 3: Using the const keyword to declare variables
The keyword const is used to declare a variable but once the value is assigned, it can not be changed later in JavaScript.
The let keyword has limited scope.
The syntax of the const keyword is given below.
Syntax:
const var_Name = "var_Value";
The const is used as a keyword that stores the value “var_Value” in the var_Name variable.
Let’s use the const keyword to declare a variable.
Example Code:
// declare variable using const keywordconst var_Name = "Welcome to JavaScript";
console.log(var_Name);
In the above JavaScript code, var_Name is used as a variable based on the const keyword.
It stores a string “Welcome to JavaScript” that is displayed as output using the console.log() method.
Output:
![]() The output displayed in the above figure shows:
the var_Name variable is declared in the first line using the const keyword, and the string “Welcome to JavaScript” is stored in var_Name.
At the end, the string is displayed using the console.log() method.
In this post, you learned three different methods for declaring variables in JavaScript.
The output displayed in the above figure shows:
the var_Name variable is declared in the first line using the const keyword, and the string “Welcome to JavaScript” is stored in var_Name.
At the end, the string is displayed using the console.log() method.
In this post, you learned three different methods for declaring variables in JavaScript.
Conclusion
JavaScript offers the let, const, and var keywords for declaring variables.
All these keywords differ in scope.
This post demonstrates all the possible methods which are utilized for declaring variables.
Each method refers to one keyword that contains its syntax and an example.
For better understanding, we have also provided differences between the var, let, and const keywords.
How to convert Set to an Array?
There is no doubt that sets are one of the most crucial elements of the ES6 release of JavaScript as they provide the quality of uniqueness by only having one occurrence of every element at max.
But as much help as they are, you may still need to convert a set into an array to perform different operations that a set cannot perform on a set.
This conversion may seem daunting to you at first but worry not, as there are multiple ways of converting a set into an array in the Javascript.
In this post, you will work with the following methods:
Using the Array.from() method to form a new array.
Using the forEach() function to push elements into an array.
Using the spread operator to assign elements to an array.
So let’s start with the first one.
But before that, we will initialize a set that we will be converting into an array throughout this post.
For that, use:
var mySet = new Set(["Chicago", "Moscow", "Berlin", "Tokyo", "Paris"]);
As you can see, our set consists of some of the famous cities of the world.
Using Array.from() method for a set into an array conversion
The first way of getting the desired output is by using a built-in package Array and then using the method “from” from within that package.
The syntax of Array.from() method can be defined as:
arr = Array.from(element)
element: Element can be anything from a string to an object and, in our case, the set.
arr: arr is the variable in which we will store the return value of our Array.from function.
Return Value:
The Array.from method returns an array to the caller.
To use this method with our set, we would have to pass in our set in the argument of this method, as this line of code:
var myarray = Array.from(mySet);
We are returning the array and storing it inside the variable “myarray”, and we can confirm the output by using the console log function as:
console.log(myarray);
The output of this program looks like this:
![]() It is clear from the output that our set has been successfully converted into an array.
It is clear from the output that our set has been successfully converted into an array.
Using forEach Function for a set to an array conversion
In Javascript, everything is considered an object, and every object has this property known as the prototype; this prototype provides access to some of the basic functions of all objects.
One of such functions is the forEach() function.
The forEach() function is used to iterate through every element on which this function is called, whether a string, an object, a map, or a set.
The following is the syntax this method:
obj.forEach((x) => //Statements for every element//);
x: is the value for every element in each iteration of forEach() function.
obj: Object whose items are being iterated; can be string, object, map, or even a set.
To use this with our set, use the following lines of code:
var myarray = [];
mySet.forEach((x) => myarray.push(x));
console.log(myarray)
We are creating a new array with the name “myarray” and setting it equal to a blank array.
After that, we call the forEach() function on our set and then push each element of the set into our newly created array.
Upon executing, we get the following output:
![]() The output consists of an array created from our set.
The output consists of an array created from our set.
Using the spread operator for a set into an array conversion
The spread operator is, as we know, used to spread the elements of an iterable object over some arguments or a list.
But we don’t know that we can even use the spread operator to convert sets into arrays.
To use the spread operator, simply create an array and set it equal to the spread arguments of the set.
Look at the line of code below to better understand this concept:
var myarray = [...mySet];
We created an array named as myarray and set its element equal to its spread arguments; now we can console log the out using the line:
console.log(myarray);
When executed, you are going to get the following output:
![]() As you can see, we were able to successfully convert our set into an array using the spread operator.
As you can see, we were able to successfully convert our set into an array using the spread operator.
Wrap-up
Javascript comes with three main ways of converting a set into an array.
The method includes using the spread operator, using the forEach() function, and using the “Array.from()” method.
Other ways are also available, but they require some external libraries or packages.
That is why we have only used the ones that come as default in the ES6 release of Javascript.
Ultimately, using any of the methods given in this post gets us our desired output.
How to append HTML code to a div using JavaScript?
As we all know that JavaScript is a scripting language that performs different actions on a website with the help of HTML.
Although we use JavaScript hand-in-hand with HTML to make sure that it works properly, this thing makes the code complicated for the developer as if the person wants to add something to a div in HTML he has to go to the HTML code to add or update the changes.
Now let’s think if there is any chance that the person doesn’t have to go to HTML code to append something in it and will do it by using JavaScript, wouldn’t it be more convenient?
In this write-up, we will tell you
How to append HTML code to a div using JavaScript?
How to append HTML code using innerHTML?
How to append HTML code using insertAdjacentHTML?
How to append HTML code to a div using JavaScript?
In JavaScript, there are two ways to append HTML code to a div.
These ways are as follows
Append by using innerHTML
Append by using insertAdjacentHTML
Let’s try to understand the above two methods of appending HTML to a div with proper examples and explanations.
How to append HTML code using innerHTML?
The innerHTML property is used to change the content inside a div or any HTML tag.
It totally replaces the existing div content with the new content but to use this property a div must be assigned with a unique id and id should always be unique.
Code:
<!DOCTYPE html><html lang="en"><head>
<title>Append</title></head><body>
<h1 style="text-align: center;">Process to append HTML code using JavaScript</h1>
<div id="check"></div>
<script>
document.getElementById("check").innerHTML = '<em style="font-size:30px;">This is a paragraph</em>'
</script></body></html>
In this code, we create a simple HTML document having a heading tag and an empty div tag with a unique id check.
Then we use JavaScript innerHTML property to append HTML code inside the empty div.
Output:
![]() The output clearly shows that we append HTML <em> tag with some content and styling inside the empty div tag using innerHTML through JavaScript.
The output clearly shows that we append HTML <em> tag with some content and styling inside the empty div tag using innerHTML through JavaScript.
How to append by using insertAdjacentHTML?
In JavaScript, insertAdjacentHTML is another method that is used to append HTML code into a div through JavaScript.
This method takes 2 arguments, The first argument specifies the position of the content in a div and the second argument is the actual HTML code that you want to append in a div.
This method uses four positions to append the HTML content in a div:
beforebegin
beforehand
afterbegin
afterend
Let’s go through all these positions one by one.
beforebegin
In the following code, this attribute will place the HTML code before the check id div.
Code:
<!DOCTYPE html>
<html lang="en">
<head>
<title>Append</title>
</head>
<body>
<h1 style="text-align: center;">Process to append HTML code using JavaScript</h1>
<div id="check">
<p>This paragraph is written to demonstrate the process of appending HTML code in a div using JavaScript.</p>
</div>
<script>
document.getElementById("check").insertAdjacentHTML("beforebegin","<h3>A Simple Paragraph</h3>")
</script>
</body>
</html>
In this code, we create a simple HTML document with <h1> tag and a <div> having unique id check.
Inside this div a paragraph is written using <p>.
Now we append HTML <h3> tag using insertAdjacentHTML method and use beforebegin position to append this HTML code on a specific position.
Output:
![]() The output clearly shows that insertAdjacentHTML method appends HTML code before the targeted div because we use its beforebegin attribute to position our appended HTML code.
beforeend
In the following code, this attribute will place the HTML code inside the check id div but after the <p> tag.
Code:
<!DOCTYPE html>
<html lang="en">
<head>
<title>Append</title>
</head>
<body>
<h1 style="text-align: center;">Process to append HTML code using JavaScript</h1>
<div id="check">
<p>This paragraph is written to demonstrate the process of appending HTML code in a div using JavaScript.</p>
</div>
<script>
document.getElementById("check").insertAdjacentHTML("beforeend","<h3>A Simple Paragraph</h3>")
</script>
</body>
</html>
In this code, we create a simple HTML document with <h1> tag and a <div> having unique id check.
Inside this div a paragraph is written using <p>.
Now we append HTML <h3> tag using insertAdjacentHTML method and use beforeend position to append this HTML code on a specific position.
Output:
The output clearly shows that insertAdjacentHTML method appends HTML code before the targeted div because we use its beforebegin attribute to position our appended HTML code.
beforeend
In the following code, this attribute will place the HTML code inside the check id div but after the <p> tag.
Code:
<!DOCTYPE html>
<html lang="en">
<head>
<title>Append</title>
</head>
<body>
<h1 style="text-align: center;">Process to append HTML code using JavaScript</h1>
<div id="check">
<p>This paragraph is written to demonstrate the process of appending HTML code in a div using JavaScript.</p>
</div>
<script>
document.getElementById("check").insertAdjacentHTML("beforeend","<h3>A Simple Paragraph</h3>")
</script>
</body>
</html>
In this code, we create a simple HTML document with <h1> tag and a <div> having unique id check.
Inside this div a paragraph is written using <p>.
Now we append HTML <h3> tag using insertAdjacentHTML method and use beforeend position to append this HTML code on a specific position.
Output:
![]() The output clearly shows that insertAdjacentHTML method appends HTML code after the <p> tag inside the targeted div because we use its beforeend attribute to position our appended HTML code.
afterbegin
In the following code, this attribute will place the HTML code inside the check id div but just before the <p> tag.
Code:
<!DOCTYPE html>
<html lang="en">
<head>
<title>Append</title>
</head>
<body>
<h1 style="text-align: center;">Process to append HTML code using JavaScript</h1>
<div id="check">
<p>This paragraph is written to demonstrate the process of appending HTML code in a div using JavaScript.</p>
</div>
<script>
document.getElementById("check").insertAdjacentHTML("afterbegin","<h3>A Simple Paragraph</h3>")
</script>
</body>
</html>
In this code, we create a simple HTML document with <h1> tag and a <div> having unique id check.
Inside this div a paragraph is written using <p>.
Now we append HTML <h3> tag using insertAdjacentHTML method and use afterbegin position to append this HTML code on a specific position.
Output:
The output clearly shows that insertAdjacentHTML method appends HTML code after the <p> tag inside the targeted div because we use its beforeend attribute to position our appended HTML code.
afterbegin
In the following code, this attribute will place the HTML code inside the check id div but just before the <p> tag.
Code:
<!DOCTYPE html>
<html lang="en">
<head>
<title>Append</title>
</head>
<body>
<h1 style="text-align: center;">Process to append HTML code using JavaScript</h1>
<div id="check">
<p>This paragraph is written to demonstrate the process of appending HTML code in a div using JavaScript.</p>
</div>
<script>
document.getElementById("check").insertAdjacentHTML("afterbegin","<h3>A Simple Paragraph</h3>")
</script>
</body>
</html>
In this code, we create a simple HTML document with <h1> tag and a <div> having unique id check.
Inside this div a paragraph is written using <p>.
Now we append HTML <h3> tag using insertAdjacentHTML method and use afterbegin position to append this HTML code on a specific position.
Output:
![]() The output clearly shows that insertAdjacentHTML method appends HTML code inside the targeted div but just before the <p> tag because we use its afterbegin attribute to position our appended HTML code.
afterend
In the following code, this attribute will place the HTML code after the check id div.
Code:
<!DOCTYPE html>
<html lang="en">
<head>
<title>Append</title>
</head>
<body>
<h1 style="text-align: center;">Process to append HTML code using JavaScript</h1>
<div id="check">
<p>This paragraph is written to demonstrate the process of appending HTML code in a div using JavaScript.</p>
</div>
<script>
document.getElementById("check").insertAdjacentHTML("afterend","<h3>A Simple Paragraph</h3>")
</script>
</body>
</html>
In this code, we create a simple HTML document with <h1> tag and a <div> having a unique id check.
Inside this div a paragraph is written using <p>.
Now we append HTML <h3> tag using insertAdjacentHTML method and use afterend position to append this HTML code on a specific position.
Output:
The output clearly shows that insertAdjacentHTML method appends HTML code inside the targeted div but just before the <p> tag because we use its afterbegin attribute to position our appended HTML code.
afterend
In the following code, this attribute will place the HTML code after the check id div.
Code:
<!DOCTYPE html>
<html lang="en">
<head>
<title>Append</title>
</head>
<body>
<h1 style="text-align: center;">Process to append HTML code using JavaScript</h1>
<div id="check">
<p>This paragraph is written to demonstrate the process of appending HTML code in a div using JavaScript.</p>
</div>
<script>
document.getElementById("check").insertAdjacentHTML("afterend","<h3>A Simple Paragraph</h3>")
</script>
</body>
</html>
In this code, we create a simple HTML document with <h1> tag and a <div> having a unique id check.
Inside this div a paragraph is written using <p>.
Now we append HTML <h3> tag using insertAdjacentHTML method and use afterend position to append this HTML code on a specific position.
Output:
![]() The output clearly shows that insertAdjacentHTML method appends HTML code after the targeted div because we use its afterend attribute to position our appended HTML code.
The output clearly shows that insertAdjacentHTML method appends HTML code after the targeted div because we use its afterend attribute to position our appended HTML code.
Conclusion
In JavaScript, we can append HTML code to a div using innerHTML and insertAdjacentHTML.
InnerHTML appends HTML code by replacing the current content in a div with new content whereas insertAdjacentHTML appends HTML code by positioning, using beforebegin, afterbegin, beforeend and afterend attributes.
In this article, we have learned about the process of appending HTML code to a div using JavaScript.
How to loop through HTML elements without using forEach() loop?
Whenever we think about looping through HTML elements, our minds divert towards the forEach() loop.
But what if we have to loop through the HTML elements without using for-each loop? Do we have any other approach for looping through HTML elements?
Well! Looping through HTML elements is a very common task so, JavaScript offers multiple approaches that can be used for this purpose(i.e.
Loop through elements).
This write-up will explain how to loop through HTML elements without using forEach() loop and in this regard it will cover the below-listed approaches:
Looping through HTML elements using JavaScript for-loop
Looping through HTML elements using JavaScript for-of loop/statements
Looping through HTML elements using JavaScript while loop
So, let’s get started!
Looping through HTML elements using JavaScript for-loop
In JavaScript, one of the most frequently used approaches to loop through HTML elements is for-loop.
Example: Loop through <label> element
In this program, we will loop through HTML label elements using JavaScript for-loop:
HTML
<label>First Name:<input type="text" id="txtName"></label><br><br><label>Last Name:<input type="text" id="txtName"></label><br><br><button type="submit">Ok</button>
Here is the summary of the HTML file:
Created two “label” tags i.e.
First Name and Last Name.
Utilized the <br> tags to add line breaks.
Created two input fields and a button.
JavaScript
var traverse_Element = document.getElementsByTagName("label");for (var i = 0; i < traverse_Element.length; i++) {
console.log("Current Element", traverse_Element[i]);}
The JavaScript file executed the following tasks:
Utilized the “getElementsByTagName” method to get the collection of the specified element (i.e.
label element in our case).
Utilized the for-loop to iterate the HTML elements.
Utilized the length property to get the number of HTML elements to be iterated/traversed.
Printed the current element using the console.log() method.
Output:
![]() The output clarified that the for-loop traversed through all <label> elements.
The output clarified that the for-loop traversed through all <label> elements.
Looping through HTML elements using JavaScript for-of loop/statements
The for-of loop is a new addition introduced in the latest versions of the ES6.
It allows us to iterate over the iterable objects such as arrays, strings, sets, and so on.
Example: Loop through <button> element
In this program, we will loop through HTML button elements using JavaScript for-of loop:
HTML
HTML files will remain the same as in the previous example.
JavaScript
var traverse_Element = document.getElementsByTagName("button");for (element of traverse_Element) {
console.log(element);}
This time we utilized the for-of statements to loop through the all <button> elements:
![]() This is how the for-of loop is used to traverse HTML elements.
This is how the for-of loop is used to traverse HTML elements.
Looping through HTML elements using JavaScript while loop
We can use the JavaScript while loop to iterate through the HTML elements.
The below-given example will guide you on how to use the “while” loop to iterate through the HTML elements:
Example: Loop through all the elements
In this program, we will loop through all the HTML elements using JavaScript while loop:
var traverse_Element = document.getElementsByTagName("*");
var counter = 0;while (counter < traverse_Element.length) {
console.log(traverse_Element[i]);
counter++;}
In this example program, we passed the “*” to the “getElementByTagName()” method to iterate through all the HTML elements.
Next, we utilized the length property within the while loop to get the number of HTML elements to be iterated/traversed.
![]() This is how we can loop through HTML elements without using the forEach() method.
This is how we can loop through HTML elements without using the forEach() method.
Conclusion
JavaScript offers multiple approaches other than forEach loop that can be used to loop through HTML elements such as for loop, for-of loop, and while loop.
While looping through HTML elements, the “getElementsByTagName” method can be used to get the collection of the specified element.
This post explained the working of several approaches to loop through HTML elements.
NPM Command Not Found
NPM or Node Package Manager is a fantastic tool that helps JavaScript developers download, install, uninstall, and update packages.
NPM holds one of the largest JavaScript registries that helps you easily search and manage packages.
This tutorial will go over the solutions you can try when you encounter the “NPM command not found” error.
What causes this error?
In most cases, this type of error occurs when the system cannot find the path where npm or NodeJS is installed.
This could be because you don’t have npm or NodeJS installed on your system or haven’t configured the PATH to binaries.
Ensure npm is installed
The first step to resolving this type of error is to ensure that you have npm installed on your system.
You only need to install NodeJS as it comes packaged in most cases.
To check if NodeJS is installed, run the command:
$ node -v
If NodeJS is installed on your system, the command above should produce the installed Node version.
If you get an error, you do not have it installed on your system.
Installing NodeJS and NPM on Windows
To install npm and NodeJS on your windows system, open your browser and navigate to the resource below:
https://nodejs.org/en/download/
Select the installer for your system and download it.
![]() Launch the installer package once the download is complete and follow along with the setup wizard.
Under “Custom Setup,” select Add to PATH and set it to “Entire feature will be installed on the local hard drive.”
Launch the installer package once the download is complete and follow along with the setup wizard.
Under “Custom Setup,” select Add to PATH and set it to “Entire feature will be installed on the local hard drive.”
![]() Follow the following steps, click install a begin the installation process.
Follow the following steps, click install a begin the installation process.
Check Node and NPM versions.
Once the installation is complete, open your terminal window and run the commands:
$ node -v
The command above should return the installed Node Version
$ npm -v
The above should print the installed npm version.
![]()
Windows Manually Add Node and NPM to Path
On Windows, you may face the “npm command not found” error if the path to nodejs and npm are not added to your path variable.
To fix this, locate the path to nodejs and npm binaries.
By default, NodeJS is installed inC:\Program Files\nodejs
Open the command prompt and run the command below to add it to your path
$ set PATH=%PATH%;"C:\Program Files\nodejs"
The command above should add the specified directory to the path variable.
Installing NodeJS and NPM on Linux
On Linux, you can use your package manager to install nodejs and npm as shown:
$ sudo apt-get update
$ sudo apt-get install nodejs npm -y
Once completed, verify nodejs and npm are accessible by checking the versions.
![]()
Fix “npm command not found” error – Permissions
In some instances, you may face the “npm command not found” error due to directory permissions.
On Linux, you can fix it by running the commands:
$ sudo chown -R $(whoami):root $(npm root -g)
The command above should change the permissions of the npm global package location to the current user.
On macOS, you can run the command:
$ sudo chown -R $(whoami):admin $(npm root -g)
Conclusion
This article explored various possible causes of the “npm command not found” error.
We also dove into details on different methods and techniques you can use to fix it.
Math.ceil() Method | Explained
If you want to be a good programmer, you need to have a good grip on mathematics.
To assist the developers, JavaScript provides various methods that are based on mathematics.
Sometimes we need exact values in order to perform some actions on the behalf of the result that why we use Math.ceil() method.
The JavaScript math library contains all the methods to perform arithmetic operations on data from basic to complex.
This learning guide provides a detailed overview of Math.ceil() method with the following learning outcomes:
What is math.ceil() method?
How to round off a number using the Math.ceil() method?
What is the Math.ceil() method?
In JavaScript, the math.ceil() method is used to round off any decimal point number and returns the whole number (the next greater whole number as compared to the floating-point number) as an output.
Syntax:
Math.ceil(number/decimal number)
In the above syntax, any number whether it is an integer or a floating number can be given as a parameter and if the input number is a whole number, then it returns as it is.
How to round off a number using the Math.ceil() method
In JavaScript, the Math.ceil() method takes a number as a parameter.
If the number has a decimal point, then it is rounded off to the nearest larger number to that input.
Code:
var b = Math.ceil(3.1)
console.log(b)
In this code, the Math.ceil() method is applied on a value ‘3.1’.
Output:
![]() In this output, it is clearly seen that we use ceil() method to round off 3.1 into an exact value and ceil() method round it off to 4 instead of 3.
In this output, it is clearly seen that we use ceil() method to round off 3.1 into an exact value and ceil() method round it off to 4 instead of 3.
How Math.ceil() method works with whole numbers?
Usually, Math.ceil() method refers to the decimal/floating point numbers.
In this example, we are going to see what will happen when 0 or NaN are used with the Math.ceil() method.
Code:
var b = Math.ceil(0)
console.log(b)
var d = Math.ceil(NaN)
console.log(d)
In this code, we have passed 0 and NaN to the Math.ceil() method.
Output:
![]() The output clearly shows that 0 and NaN are returned without any change.
You are now able to apply the Math.ceil() method to get the whole number (which comes next to the decimal point number).
The output clearly shows that 0 and NaN are returned without any change.
You are now able to apply the Math.ceil() method to get the whole number (which comes next to the decimal point number).
Conclusion
In JavaScript, the Math.ceil() method is used to round off the floating-point number to the nearest greater integer as compared to the given input.
This article provides the working and usage of the Math.ceil() method.
Moreover, if an integer or ‘NaN’ value is passed to Math.ceil() method, it will return the same number as output.
How to search for a substring using a Regular Expression
In JavaScript, we can perform various operations on the strings and among them searching a substring in a given string is very common.
But the real concern is how to search a substring using a regular expression? Well! String.search() is one of the most popularly used methods to search a substring using regular expression.
This post will elaborate on how to search a substring using regular expression, and in this regard, this post will explain the below-listed learning objectives:
How to search for a Substring using Regular Expression?
What is the search() method?
Basic Syntax
How does the search() method work?
So, let’s start!
How to search for a Substring using Regular Expression?
In JavaScript, a built-in method named search() is used to search a specific substring within a given string using regular expressions.
What is the search() method?
The below-listed concepts will let you understand the fundamentals of the search() method:
The search() is a built-in string method that is used to search a substring in a given string.
The search() function is case-sensitive so it will search for the perfect math only.
This means the search() method will consider “Java” and “java” two different strings.
If the perfect match is found in the given string then the search() method will return the index of the targeted substring.
If the targeted substring occurs more than one time in the given string then the search() method will return the index of only the first occurrence.
If the targeted substring is not found in the given string then the search() method will return -1.
Basic Syntax
The below snippet will present the basic syntax of the search method:
givenString.search(searchingValue);
How does the search() method work?
It’s time to implement the search() method practically.
To do that, we will utilize the search() method in different examples.
Example 1: Successful Search
In this example program, we will pass a regular expression to the search() method to locate a numeric value:
var regex = /[0-9]/;var givenString = "linuxhint12345";var result = givenString.search(regex);
console.log(result);
In the given string the first numeric value occurs at the 9th index so the output will be “9” as shown in the below snippet:
![]() The output verified that the search() method returns the appropriate index.
Example 2: Case sensitive
In this example, we will search for a substring “javascript” using the search method:
var regex = /javascript/;var givenString = "JavaScript, Java, PHP, C++, javascript";var result = givenString.search(regex);
console.log(result);
In the given string JavaScript occurs two times firstly at the 0th index and secondly at the 28th index:
The output verified that the search() method returns the appropriate index.
Example 2: Case sensitive
In this example, we will search for a substring “javascript” using the search method:
var regex = /javascript/;var givenString = "JavaScript, Java, PHP, C++, javascript";var result = givenString.search(regex);
console.log(result);
In the given string JavaScript occurs two times firstly at the 0th index and secondly at the 28th index:
![]() The output shows that the search() method returns “28” instead of “0”.
This shows that the search() method is case-sensitive.
Example 3: Case insensitive search
We can use the “i” in the regex to search a substring irrespective of the case sensitivity.
var regex = /javascript/i;var givenString = "JavaScript, Java, PHP, C++, javascript";var result = givenString.search(regex);
console.log(result);
Now the search() method will search for the substring irrespective of the uppercase or lowercase:
The output shows that the search() method returns “28” instead of “0”.
This shows that the search() method is case-sensitive.
Example 3: Case insensitive search
We can use the “i” in the regex to search a substring irrespective of the case sensitivity.
var regex = /javascript/i;var givenString = "JavaScript, Java, PHP, C++, javascript";var result = givenString.search(regex);
console.log(result);
Now the search() method will search for the substring irrespective of the uppercase or lowercase:
![]() This time the search() method returned the 0th index.
Example 4: Unsuccessful Search
Let’s search for a substring that doesn’t exist in the given string:
var regex = /Python/;var givenString = "JavaScript, Java, PHP, C++";var result = givenString.search(regex);
console.log(result);
When we searched for “Python” within the given string, consequently, the search method will return the following output:
This time the search() method returned the 0th index.
Example 4: Unsuccessful Search
Let’s search for a substring that doesn’t exist in the given string:
var regex = /Python/;var givenString = "JavaScript, Java, PHP, C++";var result = givenString.search(regex);
console.log(result);
When we searched for “Python” within the given string, consequently, the search method will return the following output:
![]() The above snippet verified that the search() method returned -1, when it doesn’t find a perfect match.
The above snippet verified that the search() method returned -1, when it doesn’t find a perfect match.
Conclusion
In JavaScript, the search() method gets a regex as an argument and returns the index of the first match found in the targeted string.
If the match isn’t found in the given string then the search() method will return -1.
In this write-up we considered various examples to understand how to search for a substring using a Regular Expression.
Date now() Method | Explained
In JavaScript, the Date object is used to work with time and date, for instance, getting or setting the year, month, hour, minutes, etc., the date object can be created using the “new” keyword.
Once the “date” object is created, a wide range of methods can be used to get the date, and time, in various formats.
The Date.now() is an inbuilt static method that is used to return the current date and time in milliseconds(a numeric value) elapsed since the epoch.
In this write-up, we will cover the below-listed learning outcomes of the Date.now() method:
What is Date.now()?
Basic Syntax
How does the Date.now() method work?
How to format a Date?
So, let’s begin!
What is Date.now()?
The below-listed steps will assist you to understand the concept of the Date.now() method in a better way:
The Date.now() is a built-in static method of the Date object that returns the time in milliseconds.
The internal clock begins from January 1st, 1970.
The now() method of the Date object computes the date and time from January 1st, 1970.
The Date.now() function will return the time from January 1, 1970, to date.
The Date.now() method will return the date and time in milliseconds, so, the returned date and time will be a numeric value.
The time returned in milliseconds can be converted into a readable format using the Date object.
Basic Syntax
The Date.now() method doesn’t take any parameter:
Date.now();
How does the Date.now() method work?
Let’s have a look at the below snippet to understand how the Date.now() method works.
var timeDate = Date.now();
console.log("Current Date and Time: ", timeDate);
The above program will return the date and time in milliseconds, so it will be a numeric value as shown in the below snippet:
![]() The output shows that the Date.now() method returns the date and time in milliseconds.
But the returned time is not understandable/readable.
So, how to convert it into a human-readable format?
The output shows that the Date.now() method returns the date and time in milliseconds.
But the returned time is not understandable/readable.
So, how to convert it into a human-readable format?
How to format Date/Time?
We can utilize the Date object to convert milliseconds to a human-readable/understandable format.
To do that, we will perform the following tasks:
Firstly, we will create a date object using a new keyword.
Afterward, we will pass the milliseconds returned by the Date.now() method to the “date” object as shown in the below code snippet:
var timeDate = Date.now();var currentDateTime = new Date(timeDate);
console.log("Current Date and Time: ", currentDateTime);
This time we will get the date and time in a human-readable format as shown in the below-given output:
![]() This is how we can get the date and time in a human-readable format.
This is how we can get the date and time in a human-readable format.
Conclusion
In JavaScript, Date.now() is one of the most commonly used methods of the Date object.
Date.now() is a static method that returns the time in milliseconds elapsed since the epoch, so, the returned date and time will be a numeric value., the time returned in milliseconds can be converted into a readable format using the Date object.
This write-up explained what is date.now(), what it returns, and how to convert the date and time into a human-readable format.
Array Methods
Arrays are the most important part of a programming language as they store a set of values in a single variable.
Creating an array is not a problem but managing an array and using it for different purposes is something you need to think of.
So here JavaScript array methods come in to ease us in using arrays and perform different functionalities with them according to the requirement.
There are many JavaScript methods that are used in order to ease us to apply different functionalities to a website.
This write-up aims to acknowledge us regarding JavaScript array methods:
Methods to find and alter the array length
Methods to change array elements
Methods to find the elements in the array
Methods to map and flat the array
Methods to convert string or object into an array
Methods to check the array elements
Methods to find the index number of an element
Methods to check an array
Methods to concatenate the arrays
Methods to add or remove elements from the array
Methods to convert an array into a string
Methods to reverse and sort an array
Array Methods
JavaScript uses different methods to perform various functionalities on an array which helps a programmer to use an array in a more efficient way.
Following are the array methods used by JavaScript:
Methods to find and alter the array length
The following JavaScript methods are used to find the size of an array and to alter the size of an array
How to find the length of an array using the length method?
This JavaScript length method finds out the length of an array.
This method can also change the size of the array.
Syntax:
array_name.length
The array_name is the name of the array whose length will be returned.
Code:
var fruits=['Apple','Pineapple','Watermelon'];
console.log(fruits.length);
In the above code we create an array and add three elements.
Then we use the JavaScript length() method to find the length of the array.
Output:
![]() Output clearly shows that the program returns 3 as the length of the given array because there are only three elements in the given array.
How to change an array size using the length method?
The length method can also be used for changing the array size as shown in the following code.
Code:
var fruits=['Apple','Pineapple','Watermelon']
fruits.length = 4
console.log(fruits)
In the above code, we create an array with three elements in it.
Then we set the array length to “4” using the length method.
Output:
Output clearly shows that the program returns 3 as the length of the given array because there are only three elements in the given array.
How to change an array size using the length method?
The length method can also be used for changing the array size as shown in the following code.
Code:
var fruits=['Apple','Pineapple','Watermelon']
fruits.length = 4
console.log(fruits)
In the above code, we create an array with three elements in it.
Then we set the array length to “4” using the length method.
Output:
![]() The fruit array had three three elements.
However, the length is set to 4 using the length method.
Resultantly, another element (empty) was added to the array to reach the length=4.
The fruit array had three three elements.
However, the length is set to 4 using the length method.
Resultantly, another element (empty) was added to the array to reach the length=4.
Methods to change array elements
The following JavaScript methods are used to change or replace the elements in an array.
Fill() method
This JavaScript method is used to replace the current elements of the array with the given value.
Syntax:
array_name.fill(value,starting_index, ending_index)
In the above syntax fill accepts three parameters:
value is denoted by the element you want to place in the array.
starting_index represents the index from where you start placing elements.
It’s optional, if you skip the starting index the entire array is changed with the given value.
ending_index represents the index where you want to end placing elements.
It’s optional too if you skip the ending index whole array from the starting index to the ending index filled with the given value.
Code:
//Specify the value onlyvar fruits=['Apple','Pineapple','Watermelon']
console.log(fruits.fill('strawberry'))//Specify the value and the stating indexvar veggies=['Carrot','Cucumber','Spinach']
console.log(veggies.fill('Potato',1))//Specify the value, starting index, Ending Indexvar dry_fruits=['Almonds','Hazelnut','Peanut']
console.log(dry_fruits.fill('Walnut',0,1))
Here we create three arrays: fruits, veggies and dry_fruits.
Then we initialize each array with three elements.
After that, we use the fill() method on every array.
Output:
![]() The above output is described as:
In the fruits array, all the elements are replaced with strawberry because we didn’t specify the starting and ending indexes.
In the veggies array, all the elements starting from the starting index(1) have been replaced with a potato.
Lastly, in the dry_fruits array, only the element on the 0th index is replaced with walnut.
copyWithin() method
This JavaScript array method is used to copy array elements from one index to another index in an array.
Syntax:
array_name.copyWithin(target_index, copy_index)
In the above syntax
copy_index is the index number of the element which will be copied
target_index is the index number where the element (copy_index) is copied
Code:
var fruits=["Grapes", "Pineapple", "Mango"]
console.log(fruits.copyWithin(2,0))
In this code we create an array of fruits with three elements in it, then we use the copyWithin() array method to copy the data from the 0th index and replace it with the data on the 2nd index of the array.
Output:
The above output is described as:
In the fruits array, all the elements are replaced with strawberry because we didn’t specify the starting and ending indexes.
In the veggies array, all the elements starting from the starting index(1) have been replaced with a potato.
Lastly, in the dry_fruits array, only the element on the 0th index is replaced with walnut.
copyWithin() method
This JavaScript array method is used to copy array elements from one index to another index in an array.
Syntax:
array_name.copyWithin(target_index, copy_index)
In the above syntax
copy_index is the index number of the element which will be copied
target_index is the index number where the element (copy_index) is copied
Code:
var fruits=["Grapes", "Pineapple", "Mango"]
console.log(fruits.copyWithin(2,0))
In this code we create an array of fruits with three elements in it, then we use the copyWithin() array method to copy the data from the 0th index and replace it with the data on the 2nd index of the array.
Output:
![]() Above output shows the copyWithin() array method copies Grapes from the 0th index of the array and replaces it with the Mango which is the element placed at index-2.
Above output shows the copyWithin() array method copies Grapes from the 0th index of the array and replaces it with the Mango which is the element placed at index-2.
Methods to find the elements in an array
In JavaScript the following methods are useful in finding the elements in an array.
find() method
This JavaScript method finds and returns the first element in an array according to the given condition.
Syntax:
array_name.find(function_name)
In the above syntax,function_name represents the function that is created to find the first elements according to the given condition.
Code:
var num=[11,12,13,14,15,16,20,21,23,27,29]function check(num){
if (num % 2 == 0)
{
return true
}}
console.log(num.find(check))
In this code, we create an array of numbers, then we create a function that checks if the array has even numbers or not.
Lastly, we use the JavaScript find() method to find and return the first even element if any exists in a given array.
Output:
![]() In the above output, it is seen that the output is 12 because the condition was to find the even elements in a given array so the JavaScript find() method returns the first even element that it finds in an array.
findIndex() method
This JavaScript method finds and returns the first element’s index number that is found according to the given condition in an array.
Syntax:
array_name.findIndex(function_name)
In the above syntax function_name represents the function to check the condition.
Code:
var pos=[-9,-30,-13,14,15,16,20,21,23,27,29]function check(pos){
if (pos > 0)
{
return true
}}
console.log(pos.findIndex(check))
In the code above, we create an array of positive and negative integers and then we create a function to check the positive integer in an array.
Lastly, we use the findIndex() method to return the index number of the positive integers that is found first in an array.
Output:
In the above output, it is seen that the output is 12 because the condition was to find the even elements in a given array so the JavaScript find() method returns the first even element that it finds in an array.
findIndex() method
This JavaScript method finds and returns the first element’s index number that is found according to the given condition in an array.
Syntax:
array_name.findIndex(function_name)
In the above syntax function_name represents the function to check the condition.
Code:
var pos=[-9,-30,-13,14,15,16,20,21,23,27,29]function check(pos){
if (pos > 0)
{
return true
}}
console.log(pos.findIndex(check))
In the code above, we create an array of positive and negative integers and then we create a function to check the positive integer in an array.
Lastly, we use the findIndex() method to return the index number of the positive integers that is found first in an array.
Output:
![]() In this output, it is clearly shown that the findIndex() method returns the index number of the first positive integers found by the compiler in an array.
In this output, it is clearly shown that the findIndex() method returns the index number of the first positive integers found by the compiler in an array.
Methods to map and flat the array
The following JavaScript methods are used to flat and map the elements in an array.
Flat() method
This JavaScript method merges the nested arrays and converts them into a new single array.
Syntax:
array_name.flat()
This syntax shows that the flat() array method does not take any parameter.
Code:
var num=[1,[2,3],4,5,[6,7]]
console.log(num.flat())
In this code we create an array which contains two nested arrays.
Lastly, we use the JavaScript flat() method to flatten the array.
Output:
![]() In the above output, it is seen that a nested array is given as the input and the flat() method merges the nested array into a new single array.
Map() method
This JavaScript method is used to create a new array by applying the functionality of the given function to every element of the array.
Syntax:
array_name.map((variable => functionality))
In above syntax functionality represents the operation to be performed on the array.
Code:
var num=[1,2,3,4,5,6,7]
console.log(num.map((x => x*2)))
In this code, we create an array and then we apply a map function on the array which will create a new array of the numbers after multiplying by 2.
Output:
In the above output, it is seen that a nested array is given as the input and the flat() method merges the nested array into a new single array.
Map() method
This JavaScript method is used to create a new array by applying the functionality of the given function to every element of the array.
Syntax:
array_name.map((variable => functionality))
In above syntax functionality represents the operation to be performed on the array.
Code:
var num=[1,2,3,4,5,6,7]
console.log(num.map((x => x*2)))
In this code, we create an array and then we apply a map function on the array which will create a new array of the numbers after multiplying by 2.
Output:
![]() The above output clearly shows that the map() method creates a new array of numbers after multiplying each element in the array by 2.
flatMap() method
This JavaScript method is the combination of JavaScript’s flat() and map() methods.
This method first maps each element of the array and then flattens the array which results in creating a new array.
Syntax:
array_name.flatMap((variable => functionality))
In above syntax functionality represents the operation to be performed on the array.
Code:
var pos=[-9,-30,-13,14,15,16,20,21,23,27,29]
fm=pos.flatMap((em) => em * 0)
console.log(fm)
In this code we create an array then we use the flatMap() method to multiply each element of the array with zero.
Output:
The above output clearly shows that the map() method creates a new array of numbers after multiplying each element in the array by 2.
flatMap() method
This JavaScript method is the combination of JavaScript’s flat() and map() methods.
This method first maps each element of the array and then flattens the array which results in creating a new array.
Syntax:
array_name.flatMap((variable => functionality))
In above syntax functionality represents the operation to be performed on the array.
Code:
var pos=[-9,-30,-13,14,15,16,20,21,23,27,29]
fm=pos.flatMap((em) => em * 0)
console.log(fm)
In this code we create an array then we use the flatMap() method to multiply each element of the array with zero.
Output:
![]() The above output shows that the flatMap() method multiplies each array element with zero and returns a new array of 0’s as an output.
forEach() method
In JavaScript, this array method is used to apply some functionality to each element of the array.
Syntax:
array_name.forEach(function_name)
In the above syntax function_name represents the function that is to be applied to each element of the array.
Code:
var num=[1,2,5,6,7]function square(x){
console.log(x*x)}
num.forEach(square)
In this code, we create an array of numbers, then we create a function square() which will print the square of all the elements in an array, and lastly, we use the forEach() array method to apply the functionality of the square function on each element of the array.
Output:
The above output shows that the flatMap() method multiplies each array element with zero and returns a new array of 0’s as an output.
forEach() method
In JavaScript, this array method is used to apply some functionality to each element of the array.
Syntax:
array_name.forEach(function_name)
In the above syntax function_name represents the function that is to be applied to each element of the array.
Code:
var num=[1,2,5,6,7]function square(x){
console.log(x*x)}
num.forEach(square)
In this code, we create an array of numbers, then we create a function square() which will print the square of all the elements in an array, and lastly, we use the forEach() array method to apply the functionality of the square function on each element of the array.
Output:
![]() The above output shows that the square() method is applied to each element of the array.
The above output shows that the square() method is applied to each element of the array.
Methods to convert a string or object into an array
The following JavaScript methods are responsible for creating a new array from a string or object.
from() method
This JavaScriptJavaScriptmethod is used to create a new array from a string or an array-like object.
Syntax:
Array.from("Any_String or word")
In the above syntax, from() method takes a word or string as a parameter.
Code:
console.log(Array.from('Grapes'))
In the above code from() array method creates a new array from the given word Grapes.
Output:
![]() Output shows that we give Grapes as an input and this word is broken down into a series of characters to create a new array.
of() method
This JavaScript method is used to create a new array from the set of objects.
Syntax:
Array.of("element 1", "element 2", ......., "element N")
In this syntax, of() method takes elements as the parameter for that you want to create an array.
Code:
fruits = Array.of("Mango", "Apple", "Apricot")
console.log(fruits)
In this code, we take a variable fruits and assign it with the of() method having three words as parameters.
Output:
Output shows that we give Grapes as an input and this word is broken down into a series of characters to create a new array.
of() method
This JavaScript method is used to create a new array from the set of objects.
Syntax:
Array.of("element 1", "element 2", ......., "element N")
In this syntax, of() method takes elements as the parameter for that you want to create an array.
Code:
fruits = Array.of("Mango", "Apple", "Apricot")
console.log(fruits)
In this code, we take a variable fruits and assign it with the of() method having three words as parameters.
Output:
![]() The output shows that the of() method has created an array of the words that were passed to the of() method.
The output shows that the of() method has created an array of the words that were passed to the of() method.
Methods to check elements in an array
The following JavaScript methods are used to check whether a specific element is present in an array or not.
includes() method
This array method is used to check whether the required element is present in an array or not.
It returns true or false as output.
Syntax:
array_name.includes(elements)
method is used with array names and takes an element as input that is to be searched.
It returns a Boolean value (True/False).
Code:
var fruits=["Grapes", "Pineapple", "Mango"]var test = fruits.includes("Mango")
console.log(test)
In the above code we take an array of fruits that contain three elements.
Then we take another variable test and use the includes() method with the fruits array.
Output:
![]() The output shows that the include() method checks whether Mango is present in the fruits array and has returned ‘true’
filter() method
This JavaScript method returns a new array by picking the elements from the current array depending on the given condition.
Syntax:
array_name.filter(function_name)
The function_name is passed to the filter() method as a parameter.
Code:
var num=[11,12,13,14,15,16,20,21,23,27,29]function check(num){
if (num % 2 == 0)
{
return true
}}
console.log(num.filter(check))
In this code, we create an array of numbers, then we create a function that checks if the array has even numbers or not.
Lastly, we use the JavaScript filter() method to create a separate array of even numbers if any exist in a given array.
Output:
The output shows that the include() method checks whether Mango is present in the fruits array and has returned ‘true’
filter() method
This JavaScript method returns a new array by picking the elements from the current array depending on the given condition.
Syntax:
array_name.filter(function_name)
The function_name is passed to the filter() method as a parameter.
Code:
var num=[11,12,13,14,15,16,20,21,23,27,29]function check(num){
if (num % 2 == 0)
{
return true
}}
console.log(num.filter(check))
In this code, we create an array of numbers, then we create a function that checks if the array has even numbers or not.
Lastly, we use the JavaScript filter() method to create a separate array of even numbers if any exist in a given array.
Output:
![]() The above example shows that we give an array of random numbers and the filter() method gives us a new array containing even numbers only.
The above example shows that we give an array of random numbers and the filter() method gives us a new array containing even numbers only.
Methods to find the index number of an element
In JavaScript, the following methods find the index number of an element in an array.
indexOf() method
This JavaScript method is used to check the index number of the element on which the given input element is present in an array.
It returns -1 if the given input element is not present in the array.
Syntax:
array_name.indexOf(elements)
This syntax shows that this method is used with array names and takes an element as input that index number is to be searched.
Code:
var fruits=["Grapes", "Pineapple", "Mango"]var test = fruits.indexOf("Pineapple")
console.log(test)
In the above code we take an array of fruits that contain three elements.
Then we take another variable test and use the indexOf() method with the fruit array to search the index number of a specific array element.
Output:
![]() The output clearly shows that the indexOf() method checks the index number of pineapple in the fruits array and returns the index number.
keys() method
This JavaScript method uses a for loop to return the index numbers of the elements present in an array.
It also takes spaces as an array element.
This method takes no parameter.
Syntax:
variable = array_name.keys()for(var new_variable of variable)
console.log(new_variable)
In the above syntax, variable represents the first variable and array_name represents the array that contains elements.
The new_variable represents the second variable.
Code:
var js=["This", "write-up", "is", "about", "JavaScript"]var test = js.keys()for(var check of test)
console.log(check)
In the code above, we take an array (js) and two variables (test & check).
Then we apply the keys() method on the js array and the resulting value is stored in the test variable.
Lastly, we create a check variable in for look and use the test variable with it.
Output:
The output clearly shows that the indexOf() method checks the index number of pineapple in the fruits array and returns the index number.
keys() method
This JavaScript method uses a for loop to return the index numbers of the elements present in an array.
It also takes spaces as an array element.
This method takes no parameter.
Syntax:
variable = array_name.keys()for(var new_variable of variable)
console.log(new_variable)
In the above syntax, variable represents the first variable and array_name represents the array that contains elements.
The new_variable represents the second variable.
Code:
var js=["This", "write-up", "is", "about", "JavaScript"]var test = js.keys()for(var check of test)
console.log(check)
In the code above, we take an array (js) and two variables (test & check).
Then we apply the keys() method on the js array and the resulting value is stored in the test variable.
Lastly, we create a check variable in for look and use the test variable with it.
Output:
![]() The output shows that the keys() method returns the index numbers of the elements of the array using a for loop.
lastIndexOf() method
This JavaScript method is used to return the last index number of a number (which occurs multiple times in an array).
Syntax:
array_name.lastIndexOf(element)
In this syntax, element represents an array’s element whose last index is to be searched.
Code:
var fruits=["Grapes", "Pineapple", "Mango", "Apple", "Apricot", "Mango"]var test = fruits.lastIndexOf("Mango")
console.log(test)
In this code, we take a fruit array and apply the lastIndexof() method on it to get the index of last occurrence of “Mango”.
Output:
The output shows that the keys() method returns the index numbers of the elements of the array using a for loop.
lastIndexOf() method
This JavaScript method is used to return the last index number of a number (which occurs multiple times in an array).
Syntax:
array_name.lastIndexOf(element)
In this syntax, element represents an array’s element whose last index is to be searched.
Code:
var fruits=["Grapes", "Pineapple", "Mango", "Apple", "Apricot", "Mango"]var test = fruits.lastIndexOf("Mango")
console.log(test)
In this code, we take a fruit array and apply the lastIndexof() method on it to get the index of last occurrence of “Mango”.
Output:
![]() The output shows that the program returns 5 as an output because Mango occurs twice in an array and the index number of last occurrence is 5.
The output shows that the program returns 5 as an output because Mango occurs twice in an array and the index number of last occurrence is 5.
Methods to check if the given input is an array
The following JavaScript methods are useful when we need to check whether the given input is an array or not.
isArray() method
This JavaScript method is used to check if the given input is in an array or not.
It returns true or false as output.
Syntax:
Array.isArray(variable_name)
In this syntax, variable_name represents the variable that needs to be checked whether it contains an array or not.
Code:
//Stringvar sen="My name is Alexander John"var test = Array.isArray(sen)
console.log(test)//Arrayvar fruits=["Grapes", "Pineapple", "Mango"]var test = Array.isArray(fruits)
console.log(test)
In this code we take a string sen and an array name fruits.
Then we use the is Array() method on string and array.
Output:
![]() The above output clearly shows that we give a string and an array as an input.
Then we get false for string input and true for fruit output.
The above output clearly shows that we give a string and an array as an input.
Then we get false for string input and true for fruit output.
Methods to concatenate the arrays
The following JavaScript methods are used to concatenate the elements in an array or two arrays.
join() method
This JavaScript method concatenates all the elements in an array.
It also considers the spaces as elements and places them as they are in an array.
This method takes parameters but it’s optional.
Anything given as a parameter is placed between the elements while concatenating and if no parameter is given, commas are placed between the elements automatically by the compiler.
Syntax:
array_name.join(“ ”)
As it is understandable from the above syntax that join method takes anything as a parameter and that thing has a direct impact on the output.
Let’s understand it with the example below.
Code:
//With Parametervar js=["This", "write-up", "is", "about", "JavaScript"]var test = js.join(" ")
console.log(test)//Without Parametervar num=["1","2","3","4","5","6","7","8","9"]var test = num.join()
console.log(test)
In this code we take an array js, then we use join() method on js to concatenate its elements.
The “ ” parameter states that all the elements will be joined and separated with a space.
When the join() method is applied on the num array, it will simply merge all the elements separated by commas.
Output:
![]() The output shows that we take two arrays js and num.
In the Js array module we use join() method with a parameter (empty space) and in the num array module we use join() method without any parameter.
Because of that we get two different results.
Concat() method
This JavaScript method is used to join two arrays and return a new array which is the union of two arrays.
Syntax:
first_array_name.concat(second_array_name)
The syntax shows that it takes the first array then uses the concat() method and takes the second array as a parameter.
Code:
var fruits=['Apple','Pineapple','Watermelon']var veggies=['Carrot','Cucumber','Spinach']
console.log(fruits.concat(veggies))
Here we created two arrays, fruits and veggies.
The elements in both arrays are joined using the concat() method.
Output:
The output shows that we take two arrays js and num.
In the Js array module we use join() method with a parameter (empty space) and in the num array module we use join() method without any parameter.
Because of that we get two different results.
Concat() method
This JavaScript method is used to join two arrays and return a new array which is the union of two arrays.
Syntax:
first_array_name.concat(second_array_name)
The syntax shows that it takes the first array then uses the concat() method and takes the second array as a parameter.
Code:
var fruits=['Apple','Pineapple','Watermelon']var veggies=['Carrot','Cucumber','Spinach']
console.log(fruits.concat(veggies))
Here we created two arrays, fruits and veggies.
The elements in both arrays are joined using the concat() method.
Output:
![]() Output clearly shows that the two arrays “fruits” and “veggies” are we create two arrays and then join them into a single array by using the JavaScript concat() method.
Output clearly shows that the two arrays “fruits” and “veggies” are we create two arrays and then join them into a single array by using the JavaScript concat() method.
Methods to add and remove array elements
The following JavaScript methods are used to add and remove the elements from an array.
pop() method
This JavaScript method removes the last elements of an array and returns it as an output.
Also, no parameter is taken by this method.
Syntax:
array_name.pop()
In the above syntax array_name represents the array.
Also, if an array contains no elements, you will get undefined output.
Code:
fruits = ["Mango", "Apple", "Apricot"]
console.log(fruits.pop())
In this code, an array is initialized that contains three elements.
The pop() method is applied on the array.
Output:
![]() The above output shows that pop() method removes “Apricot” from the array and displays it.
push() method
This JavaScript method adds one element at a time but at the end position in an array.
This method takes an element, adds that element at the end of the array and returns the size of an array.
Syntax:
array_name.push("Element")
In the above syntax, Element represents the element that you want to insert in the array.
Code:
//Returns number of array elements
fruits = ["Mango", "Apple", "Apricot"]
console.log(fruits.push("Pineapple"))// Returns an array
fruits = ["Mango", "Apple", "Apricot"]
fruits.push("Pineapple")
console.log(fruits)
In the above code, we applied the push() method on an array named fruits.
The push() method adds the pineapple keyword at the end position in the array.
In the first part, the number of elements will be printed while the second part shows the updated array.
Output:
The above output shows that pop() method removes “Apricot” from the array and displays it.
push() method
This JavaScript method adds one element at a time but at the end position in an array.
This method takes an element, adds that element at the end of the array and returns the size of an array.
Syntax:
array_name.push("Element")
In the above syntax, Element represents the element that you want to insert in the array.
Code:
//Returns number of array elements
fruits = ["Mango", "Apple", "Apricot"]
console.log(fruits.push("Pineapple"))// Returns an array
fruits = ["Mango", "Apple", "Apricot"]
fruits.push("Pineapple")
console.log(fruits)
In the above code, we applied the push() method on an array named fruits.
The push() method adds the pineapple keyword at the end position in the array.
In the first part, the number of elements will be printed while the second part shows the updated array.
Output:
![]() The first output has returned the number of elements after adding “Pineapple” whereas the second output prints the updated array.
slice() method
This JavaScript method is used to separate or cut a specific set of elements from an array and returns that set as a new array.
It takes two parameters, a starting index and an ending index.
Syntax:
array_name.slice(start, end)
In this syntax, start and end represent the starting and ending indexes of an array.
Code:
fruits = ["Mango", "Apple", "Apricot","Cherry", "Gava", "Lychee"]var cut=fruits.slice(1,4)
console.log(cut)
In the above code, we have created an array of fruits.
The slice() method is applied on the fruits array which will slice the elements from 1st to 4th index.
The result of the slice() method is stored in the variable named cut.
Output:
The first output has returned the number of elements after adding “Pineapple” whereas the second output prints the updated array.
slice() method
This JavaScript method is used to separate or cut a specific set of elements from an array and returns that set as a new array.
It takes two parameters, a starting index and an ending index.
Syntax:
array_name.slice(start, end)
In this syntax, start and end represent the starting and ending indexes of an array.
Code:
fruits = ["Mango", "Apple", "Apricot","Cherry", "Gava", "Lychee"]var cut=fruits.slice(1,4)
console.log(cut)
In the above code, we have created an array of fruits.
The slice() method is applied on the fruits array which will slice the elements from 1st to 4th index.
The result of the slice() method is stored in the variable named cut.
Output:
![]() The above output shows that the slice method returns the elements from index 1 till index 4 and displays an array which contains these elements.
shift() method
This JavaScript method is just like the pop() method but the difference is this method removes the element from the start of an array and displays it.
This method takes no parameters.
Syntax:
array_name.shift()
In this syntax array_name represents the array while the shift() method removes the elements from the array.
Code:
fruits = ["Mango", "Apple", "Apricot","Cheery", "Gava", "Lychee"]var rem=fruits.shift()
console.log(rem)
In this code we create an array and apply the shift() method that removes the first element from an array.
The output of the shift() method is stored in “rem”.
Output:
The above output shows that the slice method returns the elements from index 1 till index 4 and displays an array which contains these elements.
shift() method
This JavaScript method is just like the pop() method but the difference is this method removes the element from the start of an array and displays it.
This method takes no parameters.
Syntax:
array_name.shift()
In this syntax array_name represents the array while the shift() method removes the elements from the array.
Code:
fruits = ["Mango", "Apple", "Apricot","Cheery", "Gava", "Lychee"]var rem=fruits.shift()
console.log(rem)
In this code we create an array and apply the shift() method that removes the first element from an array.
The output of the shift() method is stored in “rem”.
Output:
![]() The output shows that the Mango is removed from the array and is printed on the console.
unshift() method
This JavaScript method is just like the push() method but the difference is it adds one or more than one element at the start of the array.
This method takes elements as a parameter that we want to add.
Syntax:
array_name.unshift(Elements)
In the above syntax, Elements represent those elements that we want to add in an array.
Code:
fruits = ["Mango", "Apple", "Apricot","Cheery", "Gava", "Lychee"]
fruits.unshift("Banana")
console.log(fruits)
In the above code, we create an array and alter the array by adding Banana in the array using the unshift method.
Output:
The output shows that the Mango is removed from the array and is printed on the console.
unshift() method
This JavaScript method is just like the push() method but the difference is it adds one or more than one element at the start of the array.
This method takes elements as a parameter that we want to add.
Syntax:
array_name.unshift(Elements)
In the above syntax, Elements represent those elements that we want to add in an array.
Code:
fruits = ["Mango", "Apple", "Apricot","Cheery", "Gava", "Lychee"]
fruits.unshift("Banana")
console.log(fruits)
In the above code, we create an array and alter the array by adding Banana in the array using the unshift method.
Output:
![]() As we can see in the above output, the unshift() method adds Banana at the start of the array.
splice() method
This JavaScript method is also used to remove and add specific elements from the array.
It takes three values as parameters.
This method() returns the removed element as an output.
Syntax:
array_name.splice(index_number, elements_number, value)
In the above syntax, index_number represents the starting index of the removing part.
The element_number represents the ending index of the removing part.
Lastly, the value represents the new element that replaces the removed part.
Code:
fruits = ["Mango", "Apple", "Apricot","Cheery", "Gava", "Lychee"]
fruits.splice(1,1,"Watermelon")
console.log(fruits)
In this code, we create an array and then we use the splice() method having three parameters which will eventually remove the element and add a new element at the place of the removed element.
Output:
As we can see in the above output, the unshift() method adds Banana at the start of the array.
splice() method
This JavaScript method is also used to remove and add specific elements from the array.
It takes three values as parameters.
This method() returns the removed element as an output.
Syntax:
array_name.splice(index_number, elements_number, value)
In the above syntax, index_number represents the starting index of the removing part.
The element_number represents the ending index of the removing part.
Lastly, the value represents the new element that replaces the removed part.
Code:
fruits = ["Mango", "Apple", "Apricot","Cheery", "Gava", "Lychee"]
fruits.splice(1,1,"Watermelon")
console.log(fruits)
In this code, we create an array and then we use the splice() method having three parameters which will eventually remove the element and add a new element at the place of the removed element.
Output:
![]() The above output shows that we remove the apple from the first index and replace it with the watermelon with the help of the splice method.
The above output shows that we remove the apple from the first index and replace it with the watermelon with the help of the splice method.
Methods to convert an array into string
The following JavaScript methods are used to convert an array into string.
toString() method
This JavaScript method combines all the elements in an array and converts it into a string of elements.
Syntax:
array_name.toString()
With the help of above syntax, we can convert an array into a string of elements.
Now lets convert an array using this syntax.
Code:
fruits = ["Mango", "Apple", "Apricot","Cheery", "Gava", "Lychee"]var st=fruits.toString()
console.log(typeof(st))
In this syntax, we create an array and use the toString() method to convert it into string.
Then we use the typeof() method to check whether it is changed to string or not.
Output:
![]() The above output clearly shows that the toString() method converts the fruits array into string.
toLocaleString() method
This JavaScript method is also used to convert an array into a string of elements but in a specific format.
Syntax:
array_name.toLocaleString()
With the help of above syntax, we can convert an array into a string of elements in a specific format.
Now let’s convert an array using this syntax.
Code:
fruits = ["Mango", 120]var st=fruits.toLocaleString()
console.log(st)
In the above code we take an array with two different values, a word and a number.
Now the toLocaleString() method converts it into a string.
Output:
The above output clearly shows that the toString() method converts the fruits array into string.
toLocaleString() method
This JavaScript method is also used to convert an array into a string of elements but in a specific format.
Syntax:
array_name.toLocaleString()
With the help of above syntax, we can convert an array into a string of elements in a specific format.
Now let’s convert an array using this syntax.
Code:
fruits = ["Mango", 120]var st=fruits.toLocaleString()
console.log(st)
In the above code we take an array with two different values, a word and a number.
Now the toLocaleString() method converts it into a string.
Output:
![]() The above output shows that the toLocaleString() method converts the array elements into a string.
The above output shows that the toLocaleString() method converts the array elements into a string.
Methods to reverse and sort an array
The following JavaScript methods are used to reverse and sort the arrays.
reverse() method
This JavaScript method simply reverses the array’s order.
It does not take any parameters.
After changing the array order it returns a new array as an output.
Code:
fruits = ["Mango", "Apple", "Apricot","Cherry", "Gava", "Lychee"]
console.log(fruits.reverse())
In this code, we create an array of fruits.
Then we use the reverse() method on it, which reverses the array’s order.
Output:
![]() The above output shows that the reverse() method changes the order of the elements in an array and returns a new array.
sort() method
This JavaScript method sorts the array elements in a specified order whether it is ascending or descending.
We can use functions as parameters in order to sort an array in a specific format.
By default, this method sorts an array in ascending order.
Code:
fruits = ["Mango", "Apple", "Apricot","Cherry", "Gava", "Lychee"]
console.log(fruits.sort())
In this code we create an array of six elements which are not in any sequence.
Then we use the sort() method to sort the array.
Output:
The above output shows that the reverse() method changes the order of the elements in an array and returns a new array.
sort() method
This JavaScript method sorts the array elements in a specified order whether it is ascending or descending.
We can use functions as parameters in order to sort an array in a specific format.
By default, this method sorts an array in ascending order.
Code:
fruits = ["Mango", "Apple", "Apricot","Cherry", "Gava", "Lychee"]
console.log(fruits.sort())
In this code we create an array of six elements which are not in any sequence.
Then we use the sort() method to sort the array.
Output:
![]() This output shows that sort() method sequence the elements in the array alphabetically or in other words we can say in ascending order.
Probably, you are now able to apply various array methods to manipulate/manage arrays.
This output shows that sort() method sequence the elements in the array alphabetically or in other words we can say in ascending order.
Probably, you are now able to apply various array methods to manipulate/manage arrays.
Conclusion
When working with complex data, JavaScript array methods are very useful in managing/manipulating the data.
In this article we have talked about JavaScript array methods that include: sort, reverse, map, flat, concatenate, convert string into array, convert array into string, check array elements, check array, to alter array size, add or remove array elements with detailed examples and code.
Array shift() Method | Explained
JavaScript is a very popular programming language for the web which is used to alter the functionalities of HTML and CSS, or we can say help in implementing the complex functionalities over the web.
While we are talking about the programming language, how do we forget about arrays? As arrays help in storing the collection of data of the same type but how do we add or remove data inside the arrays? For this purpose, JavaScript provides us with the built-in array shift() method in order to remove array elements easily.
In this write-up, we are specifically going to focus on the Array shift() method with the following results.
What is the shift() method?
How to use the shift() method?
What is the shift() method ?
In JavaScript, the shift() method removes array elements from the beginning and displays them.
This method takes no parameters.
When the element is removed from the start of the array using this method, all the remaining elements move to the start of the array, and the size of the array changes.
This method removes one element at a time.
Syntax:
array_name.shift()
In this syntax array_name represents the array and the shift() method removes the elements from the 0th index of the array.
Let’s understand the working of shift() method by using the following code.
Code:
bikes = ["Norton V4","Agusta Brutale","Suzuki GSX","Honda Fireblade"]var rem=bikes.shift()
console.log(rem)
In this code we create an array and variable.
Then we applied the shift() method to remove the element from the 0th index of an array.
Output:
![]() As we can see in the above output the shift() method removes Norton V4 from the array and returns it as an output.
As we can see in the above output the shift() method removes Norton V4 from the array and returns it as an output.
How to remove multiple array elements using the shift() method?
We can also remove elements from the array at once by using the shift() method with the help of for loop.
Code:
bikes = ["Norton V4","Agusta Brutale","Suzuki GSX","Honda Fireblade"]for( var a=0; a<=bikes.length; a++){var rem=bikes.shift()
console.log(bikes)}
In this code we have created an array.
Then we use the shift() method inside the loop to remove and display elements one by one.
Output:
![]() The above output clearly shows that the shift() method removes array elements one by one from the start of the array.
The above output clearly shows that the shift() method removes array elements one by one from the start of the array.
How array shift() method works with an empty array?
In this example, we see what will happen if the array contains no element.
Code:
bikes = []for( var a=0; a<=bikes.length; a++){var rem=bikes.shift()
console.log(rem)}
In this code we have created an empty array.
Then we use the shift() method inside the loop to remove elements.
Output:
![]() The above output clearly shows that the shift() method tries to remove elements from an empty array and gets undefined as output.
The above output clearly shows that the shift() method tries to remove elements from an empty array and gets undefined as output.
Conclusion
In JavaScript, the array shift() method is used to remove an element from the 0th index of the array and display that removed as an output.
In this article, we have talked about the JavaScript array shift() method and how to use it with for loop in detail.
The information this article contains surely helps to understand the array shift() method in a better way.
Array push() Method | Explained
JavaScript has become very popular in recent years as it is very deeply used in the development of web applications.
While talking about programming, how can we forget about arrays? As they are most likely used by almost every programming language in order to manage large piles of data easily.
But creating an array and entering elements in it every time, you have to write manually which is time taking and hectic.
So here the JavaScript push() method saves us from a lot of trouble.
JavaScript push() method allows us to add elements in an array.
This write-up is mainly focused on the following outcomes:
What is the array push() method
How to add elements in the array using the push() method
How to add elements in an empty array using the push() method
What is the array push() method
In JavaScript, the array push() method is used to add one or more elements at the end of the array.
This method changes the array size and a new array is returned as an output.
The elements it takes as a parameter are directly added to the array.
We can use this method to append numerous elements to an array.
Syntax:
array.push("element1,element2,element3,.....,elementN,")
With the help of the above syntax, we can add elements in an array.
Now let’s understand the push() method using the above syntax.
Code:
cars = ["BMW 760", "Audi S8", "Bugatti","Lemborgini"]
add=cars.push("Roll Royce","Ford Mustang")
console.log(add)
In this code we create an array of cars and add two more elements Roll Royce and Ford Mustang to it using the push() method.
Output:
![]() The above output shows that the push() method adds Roll Royce and Ford mustang at the end of the array which eventually changes the original array size and returns a new array as an output.
The above output shows that the push() method adds Roll Royce and Ford mustang at the end of the array which eventually changes the original array size and returns a new array as an output.
How to add elements in an array using the push() method?
We can also add elements in an array at once so we don’t have to write them one by one as parameters while using the push() method.
Code:
cars = ["BMW 760", "Audi S8", "Bugatti","Lemborgini"]for (var a=1; a<=5; a++)
cars.push(a)
console.log(cars)
In this code we create an array of cars having 4 elements in it.
Then we use a push() method inside a for loop in order to add numbers into the array.
Output:
![]() This output shows that elements are added at the end of the array using a for loop which changes the original array size and returns a new array as output.
This output shows that elements are added at the end of the array using a for loop which changes the original array size and returns a new array as output.
How to add elements in an empty array using the push() method?
We can also add elements to an empty array at once so we don’t have to write them one by one as parameters while using the push() method.
Code:
nums = []for (var a=1; a<=10; a++)
cars.push(a)
console.log(nums)
In this code we create an array having no element in it.
Then we use a push() method inside a for loop in order to add numbers into the array.
Output:
![]() This output shows that the array was empty and then we use a for loop to add elements.
Here you go! You can now append or fill elements to a non-empty or empty array respectively.
This output shows that the array was empty and then we use a for loop to add elements.
Here you go! You can now append or fill elements to a non-empty or empty array respectively.
Conclusion
JavaScript array push() method adds elements in an array at the end position.
The push() method takes the elements as a parameter and then adds them at the end.
In this article, we have briefly described the working and usage of the array push() method.
We hope you will like our information regarding the JavaScript array push() method.
Top 5 JavaScript User Authentication Libraries for 2022
Let’s say when a user tries to access a system, device, or network, its authentication needs to be done in order to see if it is a valid person that requests access.
So, the process of checking the user validation is known as user authentication.
In JavaScript, we use different user authentication libraries to protect sensitive data from unauthorized entities.
To do so, a lot of JavaScript authentication libraries are used.
So, in this article, we are going to discuss the top 5 JavaScript user authentication libraries for 2022 which are:
Auth0
Passport
Keycloak
NextAuth
Passport-oauth2
Auth0
Auth0 is user authentication and authorization platform that serves as a front door to our application.
Historically, the most common method is email and password authentication.
An interface was needed that collects the credentials.
Those credentials were passed off to a server and database to store on the backend for future use.
So auth0 is a universal solution that handles all these concerns.
It provides an appealing login that can be used in any web or mobile app while providing the structure to store that data securely.
Think of it as a universal translator for your front-end, back-end, and other third-party tools that manage your users’ identities.
Auth0 handles authentication methods like:
Open ID Connect: It is like an identification layer used by third-party applications in order to identify the user information and get its profile information.
Multi-factor Authentication: is a process to authenticate a user by using two or more ways.
Biometric or face recognition: is also an authentication process that uses the user’s face and thumb or fingerprint expression in order to authenticate a person.
Passport
Passport js is an extremely flexible JavaScript user authentication library for Node.js.
This library can be included in any Express-based application without any restriction.
This library uses various strategies to authenticate a user.
Those authentication strategies are:
Username and Password: This means a unique username and a password is needed to sign in just like a traditional login option.
Google account allows you to login into the application by using your Google account information.
Facebook account allows you to login into the application by using your Facebook account information.
Twitter account login to the application by using your Twitter account information.
Passport.js also uses sessions which makes user authentication more effective and secure.
Keycloak
This authentication library is an open-source I.A.M (Identity & Access Management) system.
It is a JavaScript authentication library for node.js.
Authentication and authorization are performed by this library for the latest technology applications and services.
Keycloak was released, back in 2014 and became popular in 2015.
Keycloak uses a separate server to configure and secure applications.
Keycloak uses standard protocols like Open ID connect, 0Auth 2.0, and SAML to make sure that the application is secure.
This library uses single login and logout which means applications redirect the user to the keycloak server where they enter their credentials in order to get access to all their connected accounts at once.
This authentication library uses tokens (user’s digital identity card) to store users’ sensitive information like username, password, email, address, and other personal data.
Then these tokens are used for the authentication and authorization process.
Distinctive Features of Keycloak
Keycloak offers the following features:
Single-sign which means you can log in once for multiple application access.
Centralized management for admins and users which means a separate server manages everything.
Use different adapters/tokens to make applications and services secure.
It provides high performance because it is lightweight, scalable, and fast.
Use clustering techniques for scalability and availability.
It is extensible and flexible which means it is customizable with the help of coding.
It also provides us with customizable password policies which means we can use different login formats.
NextAuth
NextAuth is an open-source JavaScript authentication library for next.js.
This library uses protocols like Auth0, OpenID connect, and Auth0 2.0.
It provides built-in support for countless signing-in services.
It also uses LDAP and active directory to allow stateless authentication for any backend which states that it uses session information that is stored on the client-side.
The best part is that NextAuth js is a serverless library that allows JWT (JSON Web Token) for authentication.
NextAuth library allows email and passwordless authentication.
We can use this library with or without a database which means that a user can use this library with any database or bring its own database.
It supports databases like MySQL, SQLserver, SQLite, PostgreSQL, MariaDB, and MongoDB.
Passport-oauth2
Passport-oauth2 library is an authentication module that uses OAuth (Open Authentication) protocol in a passport js library in order to authenticate Node.js applications.
This library also allows authentication for express.js applications.
In this library, a third-party account is combined with OAuth 2.0 tokens in order to authenticate a user.
Following are the distinctive features of passport-oauth2:
Registration for web-based client apps which means it registers users’ devices in order to enable some special services.
It generates access tokens, authorizations codes, and refresh tokens to authenticate the user.
It uses JWT (JSON Web Token) in order to transfer security information between server and client.
Conclusion
JavaScript uses authentication libraries in order to secure users’ sensitive information from being hacked/misused.
These libraries use different services and approaches to secure the information.
In this article, we have talked about the top 5 JavaScript libraries for JavaScript which include Auth0, passport, keycloak, NextAuth, and passport-oauth2.
We hope that this article proves to be the best help for you to get a detailed knowledge of JavaScript authentication libraries.
String replaceAll() Method | Explained
JavaScript provides a couple of methods that are used to replace a specific substring with some other string such as the replace() method and the replaceAll() method., the replaceAll() function can be used to replace all the occurrences of a string or regex while the replace() function can be used to replace only the initial occurrence of the searched string/regex.
In this write-up, we will cover the below-listed aspects of the replaceAll() method:
What is replaceAll()?
Basic Syntax
What does the replaceAll() method return?
How does the replaceAll() method work?
So, let’s begin!
What is replaceAll()?
replaceAll() is a string method that takes a regex/regular expression as an argument and replaces all the characters that correspond to the regex pattern.
Basic Syntax
Here is the basic syntax of the replaceAll() method:
replaceAll(String regex, String replacement);
In the above snippet, regex is a pattern to search for a specific value while the replacement represents a substring (sequence of characters) that will replace the specific substring.
What does the replaceAll() method return?
The replaceAll method will find all the targeted substrings and replace them with the specified replacement.
Finally, it will return a new replaced/modified string.
How does the replaceAll() method work?
In this section, we will figure out how the replaceAll() method works with the help of some examples.
Example 1: Replace a single character
In this example we will utilize the replaceAll() method to replace all the “i” characters with “u”:
var givenString = "This is linuxhint.com";var result = givenString.replaceAll("i", "u");
console.log("Original String: ", givenString);
console.log("Replaced String: ", result);
In this program, initially, we have a string “This is linuxhint.com”.
We will utilize the replaceAll() method to replace all “i” characters with the “u” character:
![]() The output shows that the replaceAll() method replaced all the occurrences of “i” with “u”.
Example 2: Replace a word
Let’s consider the below snippet to understand how to use the replaceAll() method to replace all the occurrences of a word with another word:
var givenString = "this is linuxhint.com, this is an example of replaceAll() method";var result = givenString.replaceAll("this", "it");
console.log("Original String: ", givenString);
console.log("Replaced String: ", result);
In the above-given program, we utilized the replaceAll() method to replace all the occurrences of the “this” with the “it”:
The output shows that the replaceAll() method replaced all the occurrences of “i” with “u”.
Example 2: Replace a word
Let’s consider the below snippet to understand how to use the replaceAll() method to replace all the occurrences of a word with another word:
var givenString = "this is linuxhint.com, this is an example of replaceAll() method";var result = givenString.replaceAll("this", "it");
console.log("Original String: ", givenString);
console.log("Replaced String: ", result);
In the above-given program, we utilized the replaceAll() method to replace all the occurrences of the “this” with the “it”:
![]() This is how we can utilize the replaceAll() method to replace all the occurrences of a specific word.
Example 3: Replace a special character
Using the replaceAll() method we can replace a special character as shown in the below snippet:
var givenString = "Good Morning! Welcome to linuxhint.com!";var result = givenString.replaceAll("!", ";");
console.log("Original String: ", givenString);
console.log("Replaced String: ", result);
In this example program, we will replace the “!” sign with the “;” using replaceAll() method:
This is how we can utilize the replaceAll() method to replace all the occurrences of a specific word.
Example 3: Replace a special character
Using the replaceAll() method we can replace a special character as shown in the below snippet:
var givenString = "Good Morning! Welcome to linuxhint.com!";var result = givenString.replaceAll("!", ";");
console.log("Original String: ", givenString);
console.log("Replaced String: ", result);
In this example program, we will replace the “!” sign with the “;” using replaceAll() method:
![]() This is how the replaceAll() method works.
This is how the replaceAll() method works.
Conclusion
In JavaScript, the replaceAll() is a string method that gets a regex/regular expression as an argument and replaces all the characters that correspond to the specified regex pattern.
The replaceAll() method will find all the targeted substrings and replace them with the specified replacement.
Finally, it will return a new replaced/modified string.
This write-up explained all the basics of the replaceAll() method with the help of some suitable examples.
Nodemon Command Not Found
“Nodemon is a fantastic utility for Node.js developers.
It allows developers to focus on writing code without worrying about refreshing the changes.
It works by restarting the application any time the files and directories in the application are modified.
This makes the developer workflow much easier and smooth.
Yes, you’ve got enough bugs to worry about.
However, when you are getting started with Node.js development, you may encounter the “Nodemon command not found” error.
And in this tutorial, we aim to help you understand why this error occurs and give you a quick and easy method to fix it.”
Let’s get started.
“Nodemon Command Not Found” Error – Cause
The following are some of the causes of the “Nodemon command not found” error.
Nodemon is not installed.
Nodemon is available in a different path.
The Nodemon utility is not installed globally.
The above are some of the major causes of the “Nodemon command not found” error.
Let us discuss each cause of the error and its corresponding possible fix.
Nodemon is Not Installed
As you are getting started, you might think that Nodemon is part of the Node.JS package.
However, this is not the case; although it does provide some highly needed features by Node.js developers, it needs to be installed manually.
Hence, even if you have Node.js installed, it does not mean Nodemon is as well.
To resolve this issue, you can simply install Nodemon as shown in the commands below:
$ sudo nmp install -g nodemon
The command uses the Node Package Manager to download and install the Nodemon utility on a global level.
If you had previously installed Nodemon without the -g flag, you can re-install it by running the command:
$ sudo npm uninstall nodemon
$ sudo npm uninstall -g nodemon
And with that, you should have the Nodemon command available in your system.
Nodemon Utility is Installed on a Different Path
Unix systems have a set of directories that will be checked when you invoke a command from the terminal.
Popular directories include /bin, /usr/bin /sbin, /usr/local/bin, /usr/sbin, etc.
Therefore, if Nodemon is installed in a different directory that is not available in the system’s path environment variable, the command will fail.
By default, Nodemon is installed in the /usr/local/bin/Nodemon directory.
If Nodemon is in a different location, you can create a symbolic link to the target directory.
sudo ln -s /target/ /where/nodejs/is/installed
Ensure that the target directory is part of the path.
Nodemon is Not Installed Globally
Nodemon needs to be installed on a global level so that you can import it to any project.
Therefore, if you installed it without the -g flag, it will only be accessible in that project.
You can resolve this by uninstalling it and installing it as a global package:
$ sudo nmp uninstall nodemon
$ sudo nmp install -g nodemon
Ensure to run the command with root privileges to avoid any errors that may arise from insufficient permissions.
You can also fix incorrect permission by running the command:
$ sudo chown -R $USER:$(id -gn $USER) /Users/username/.config
Finally, you can verify that nodemon is working by checking the version:
![]() Congratulations, you now have the nodemon command available.
Congratulations, you now have the nodemon command available.
Conclusion
In this tutorial, we covered the various causes of the “nodemon command not found” error and how to fix it.
Thanks for reading!!
Array map() method | Explained
In JavaScript, a built-in method named array.map() is used to create a new modified array; to do that, it traverses an array and invokes a function for each element of the array.
It is very useful in a scenario where we have to implement some procedures/actions on each array element.
For example, multiplying each array element with some specific number, or finding the square root of each array element, and so on.
In this write-up, we will cover the below-listed learning outcomes of the array.map() method:
What is array.map()?
Basic Syntax
What does array.map() method return?
How array.map() method works?
So, let’s get started!
What is array.map()?
Array map() is a built-in array function that creates a new modified array based on some specific criteria.
The array.map() method invokes a callback function for each element of the array and creates a new modified array that contains the modified elements that are returned by the call-back function.
Basic Syntax
Here is the syntax of array.map() method:
array.map(function(current_Element, index, arr), thisValue)
The syntax shows the array.map() function can take multiple parameters, however, all these parameters are not mandatory:
function() parameter better known as the call back function is mandatory, and it will be called for every single element of the array.
current_Element is a required parameter that keeps the value of the current element.
index is an optional parameter that keeps the index of the currentElement.
arr is an optional parameter that keeps the current array.
thisValue is also an optional parameter whose default value is undefined and it utilizes the value passed to the function as “this” value.
What does array.map() method return?
In JavaScript, the array.map() method returns the result of the call-back function for every single array element.
How array.map() method works?
So far, we have learned the theoretical concepts of the map() method, now we will implement these concepts practically.
Task 1: Add 50 to each array element
In this example program, we will learn how to use array.map() method to add “50” to every single element of the given array:
var originalArray = [12, 16, 32, 27, -31, 17];
var result = originalArray.map(addValue);
function addValue(values){return values + 50;}
console.log("Resultant Array: " , result);
The above program performed the below-listed tasks:
Firstly, we created an array named “originalArray” that includes some positive as well as negative numbers.
Next, we utilized the array.map() method to add 50 to each element of the array.
To do so, we created a function named “addValue()” which will add 50 to the current element of the array, and afterward, it will return the modified element.
Finally, we utilized the console() method to print the array of modified elements:
![]() The output proved that the array.map() method returned an array of modified elements (i.e., each element is incremented by 50).
The output proved that the array.map() method returned an array of modified elements (i.e., each element is incremented by 50).
Task 2: How to use array.map() method with an array of objects
In the following code block, we will learn how to use the array.map() method to join the empName and id:
var employees = [{empName : "Mike", id: 12},{empName : "Seth", id: 15},];
var empDetails = employees.map(function(value){return `${value.empName} ${value.id}`;})
console.log("Employee Details: ", empDetails);
In this program, we utilized the array.map() method to traverse the array and combine the employee name and employee id:
![]() This is how the array.map() method works with an array of objects.
This is how the array.map() method works with an array of objects.
Task 3: how to use built-in methods with array.map() method
In this example we will learn how to use an inbuilt method to find the square of the array elements:
var originalArray = [3, 2, 5, 9, 7];
var resultantArray = originalArray.map(sqrValue);
function sqrValue(values){return Math.pow(values, 2);}
console.log("Employee Details: ", resultantArray);
In this example program, we utilized the Math.pow() function to find the square of an element.
We utilized the array.map() method to traverse through each array element and return the square of every single element of the given array.
![]() This is how we can utilize any built in method along with array.map() method to achieve different functionalities.
This is how we can utilize any built in method along with array.map() method to achieve different functionalities.
Conclusion
In JavaScript, array.map() is a built-in array function that creates a new modified array based on some specific criteria.
The array.map() method invokes a callback function for each element of the array and creates a new modified array that contains the modified elements that are returned by the call-back function.
This write-up described what exactly array.map() method is? and how it works using some relevant examples.
Array filter() method | Explained
JavaScript provides a variety of built-in functions to perform different functionalities on arrays such as array.splice(), array.includes(), array.filter(), etc.
All these array methods are used to achieve different functionalities.
For instance, the filter() method returns an array of filtered elements based on some condition, and it doesn’t affect the original/given array.
This post will present a thorough understanding of the below-listed aspects related to array.filter() method:
What is array.filter()?
Basic Syntax
How does array.filter() method work?
So, let’s get started!
What is array.filter()?
It is a built-in array function that creates a new array of filtered elements based on particular criteria.
The array.filter() method returns the array of only those elements that satisfy the condition of the argument function.
Syntax of array.filter()
The below snippet will assist you to understand the basic syntax of the array.filter() method:
array.filter(function(current_Element, index, arr), thisValue)
The array.filter() function can take multiple parameters, some of them are mandatory and others are optional:
function() parameter is mandatory and it will be invoked for every single element of the array.
current_Element is a mandatory parameter that keeps the value of the current item.
index is an optional parameter that keeps the index of the currentElement.
arr is an optional parameter that keeps the current array.
thisValue is also an optional parameter whose default value is undefined and it utilizes the value passed to the function as “this” value.
How does array.filter() method work?
Now, we will understand the working of array.filter() method using some relevant examples.
How to use array.filter() method to get an array of negative numbers only?
The below snippet will explain the working of filter() method:
var numberArray = [12, -26, 32, 14, 27, -31, -17, 0, -1, 10];
var result = numberArray.filter(testFunction);
function testFunction(values){return values < 0;}
console.log("Array of Negative Numbers: " , result);
The above program performed the following functionalities:
Firstly, we created an array named “numberArray” that consists of different positive as well as negative values.
Next, we utilized the array.filter() method to get an array of negative elements.
To do so, we created a function named “testFunction()” which will return only those values that are less than 0.
Finally, we utilized the console() method to print the array of negative values:
![]() The output authenticates the working of array.filter() method as it returns only negative values.
The output authenticates the working of array.filter() method as it returns only negative values.
How to use array.filter() method to get an array of employees older than 24?
In this program, we have an array of employee object where each object has a couple of properties i.e.
empName, and empAge as shown in the below code snippet:
let empDetails = [{empName: 'Alex', age: 25},{empName: 'Ambrose', age: 23},{empName: 'Joe', age: 32},{empName: 'John', age: 22},{empName: 'Seth', age: 26}];
let older = empDetails.filter(function (a) {return a.age > 24;});
console.log(older);
The task is to filter the array based on employees age i.e., age > 24:
![]() The output shows that there are three employees in the array whose age is greater than 25 and the array.filter() method filters them successfully.
The output shows that there are three employees in the array whose age is greater than 25 and the array.filter() method filters them successfully.
Conclusion
In JavaScript, array.filter() is a built-in array function that creates a new array of filtered elements based on some particular criteria.
It returns the array of only those elements that satisfy the condition of the argument function.
The array.filter() method doesn’t affect the original/given array.
This write-up described what exactly array filter() method is? and how it works using some relevant examples.
Array slice() Method | Explained
JavaScript offers numerous built-in functions to work with arrays like array.splice(), array.includes(), array.push(), array.slice(), etc.
All these functions come up with different functionalities.
For example, the push() method inserts a new element at the end of an array, the splice() method adds a new element in the array, and so on.
Now if we talk about the array.slice() method then we will come to know that it is used to slice out a subpart of an array.
This post will explore the below-listed aspects of array.slice() method:
What is array.slice()?
Syntax of array.slice()
How to use array.slice() method?
So, let’s begin!
What is array.slice()?
It is a built-in array function that returns a new array of selected/extracted elements from a given array.
The array.slice() method doesn’t affect the original array, instead it returns a new array of extracted elements.
It can take two optional parameters to specify the starting and ending position.
By default, the starting position is “0” while the end position is the last element of the array.
It means if we didn’t specify any parameter then the slice() method will return
Syntax of array.slice()
The below snippet will assist you to understand the basic syntax of the array.slice() method:
array.slice(starting_position, end_position);
The array.slice() method will extract the elements from the given array between the starting_position (included) and end_position(excluded).
How to use array.slice() method?
Let’s consider the below-given example to understand how array.slice() method work:
const languages = ["Python", "C#", "C++", "HTML", "CSS", "PHP", "Java"];const frontend = languages.slice(3, 5);
console.log("Original Array: " , languages);
console.log("Resultant Array: ", frontend);
In the example program, firstly, we created an array named “languages” that consists of different programming languages.
Next, we utilized the array.slice() method to extract the elements present between the third and fifth index.
Finally, we utilized the console() method to print the original array and extracted array:
![]() The output verified that the array.slice() method returned a new array of selected elements only.
The output verified that the array.slice() method returned a new array of selected elements only.
What will happen if we didn’t specify any parameter in the array.slice() method:
const languages = ["Python", "C#", "C++", "HTML", "CSS", "PHP", "Java"];const frontend = languages.slice();
console.log("Original Array: " , languages);
console.log("Resultant Array: ", frontend);
The following will be the output for the above-given program:
![]() The output shows that If we didn’t specify the starting and end position then the array.slice() method will return a complete array.
The output shows that If we didn’t specify the starting and end position then the array.slice() method will return a complete array.
Task is to pass the negative value as a parameter to the array.slice() method:
In the slice() method, we can also pass the negative values as parameters; in such cases, the index of the element placed at the last index will be -1, the index of the second-last element will be -2, the index of the third-last element will be -3 and so on while the index of the first element will be 0.
const languages = ["Python", "C#", "C++", "HTML", "CSS", "PHP", "Java"];const frontend = languages.slice(-4, -2);
console.log("Original Array: " , languages);
console.log("Resultant Array: ", frontend);
In this example, the array element “HTML” is present at index “-4”, and “CSS” is present at index “-3”, so following will be the output for above program:
![]() This is how the array.slice() method works with the negative indices.
This is how the array.slice() method works with the negative indices.
Conclusion
In JavaScript, array.slice() is a built-in function that returns a new array of selected/extracted elements from a given array.
The array.slice() method doesn’t affect the original array, instead it returns a new array of extracted elements.
This write-up explained various aspects of array.slice method using some suitable examples.
Array splice() Method | Explained
JavaScript provides a very handy array method named array.splice() that serves multiple functionalities.
For example, the array.splice() method can be used to add new elements to an array, delete existing array elements, and replace existing array elements.
Using the array.splice() method, we can add and delete various elements in one go.
This post will present a comprehensive overview of the below-listed learning outcomes regarding array.splice() method:
What is array.splice()?
Syntax of array.splice()
How to use array.splice() method?
So, let’s begin!
What is array.splice()?
It is a built-in array function that modifies an array by adding new elements to it or removing/replacing the existing elements from it.
The array.splice() method first modifies the original array and then returns a new array of removed elements.
Syntax of array.splice()
The below snippet will help you to understand the basic syntax of the array.splice() method:
array.splice(index_number, delete_count, newElements)
The listed points will provide you with detailed information about the parameters of array.splice() method:
The array.splice() method must take a parameter “index_number” that specifies the position to add or remove elements.
The splice() method can take two optional parameters, “delete_count” which specifies the number of elements to be removed, and the second parameter is to add new elements to the array.
How to use array.splice() method?
In this section, we will understand the working of the array.splice() method with the help of some relevant examples.
The task is to delete the array elements using array.splice() method:
In this program, firstly, we will create an array named “countriesName” and will assign it some country’s names.
Next, we will utilize the array.splice() method and we will pass it “3” as a parameter:
const countriesName = ["Argentina", "Australia", "Pakistan", "Brazil", "Denmark", "England"];const deletedElements = countriesName.splice(3);
console.log("Original Array: " , countriesName);
console.log("Array of Deleted Elements: ", deletedElements);
The splice() method will delete the elements from the third index till the last index of the array and it will return an array of deleted elements:
![]() The output shows the array.splice() method returns an array of deleted countries.
The output shows the array.splice() method returns an array of deleted countries.
The task is to delete the array elements from the user-specified position using array.splice() method:
const countriesName = ["Argentina", "Australia", "Pakistan", "Brazil", "Denmark", "England"];const deletedElements = countriesName.splice(3,1);
console.log("Original Array: " , countriesName);
console.log("Array of Deleted Elements: ", deletedElements);
In this example, we passed two parameters to the array.splice() method i.e.
3 and 1.
Here, “3” represents the position of the element to be deleted and “1” represent a total number of elements to be deleted:
![]() The output verified that this time the splice() method deleted the element from the user-specified position.
The output verified that this time the splice() method deleted the element from the user-specified position.
The task is to delete “one” element present at index “3” and add two new elements
In this example, we will delete the “Brazil” from the array and will add two elements “Srilanka” and “Italy” using array.splice() method:
onst countriesName = ["Argentina", "Australia", "Pakistan", "Brazil", "Denmark", "England"];const deletedElements = countriesName.splice(3, 1, "Srilanka", "Italy");
console.log("Original Array: " , countriesName);
console.log("Array of Deleted Elements: ", deletedElements);
The above program will produce the following output on successful execution:
![]() This is how we can add and delete elements in an array using the array.splice() method.
This is how we can add and delete elements in an array using the array.splice() method.
The task is to insert a new element without deleting any other array element:
const countriesName = ["Argentina", "Australia", "Pakistan", "Brazil", "Denmark", "England"];const deletedElements = countriesName.splice(3, 0, "Srilanka", "Italy");
console.log("Original Array: " , countriesName);
console.log("Array of Deleted Elements: ", deletedElements);
If we have to add new elements without deleting any existing array element then we have to pass 0 to the delete-count parameter:
![]() The output shows that the new elements are added to the array without deleting the existing array elements.
The output shows that the new elements are added to the array without deleting the existing array elements.
Conclusion
In JavaScript, array.splice() is a built-in function that modifies an array by adding new elements to it or removing/replacing the existing elements from it.
The array.splice() method first modifies the original array, and after that, it returns a new array of removed elements.
This write-up explained what array.splice() is and how it works.
Difference between window.location.href and window.location.assign | Explained
In the programming world a developer can face a situation where he/she needs to redirect from one page to another page.
So, dealing with such a situation can be proved a real concern for developers.
So, how to tackle such situations? Well! JavaScript provides multiple ways to redirect from one page to another such as window.location.href, window.location.assign, window.location.replace.
All these properties/methods perform the same functionality i.e., redirecting one page to another, however, each of them has a different effect on the browser’s history.
What is window.location?
What is window.location.href?
What is window.location.assign?
Difference between window.location.href and window.location.assign.
Comparison Based on Similarities
What is window.location?
The window.location is an object that can be used to get the url/address of the current page/document.
The window.location object redirects a browser to a new url/webpage.
We can skip the window prefix from the window.location i.e.
we can use only location with any property or method.
What is window.location.href?
It is a property that returns the URL/address of the current page/document.
If we pass the url/address of some other page to the window.location.href property then consequently it will redirect us to the specified address/URL.
The below-given snippet will let you understand the working of window.location.href in a better way:
<html><head></head><button onclick="hrefFunction()">Click Me!</button><body><script>
function hrefFunction() {
window.location.href = "https://www.linuxhint.com/";}</script></body></html>
If you run the above-given code on your system, you will get the following output:
![]() Clicking on the button will lead us to the given URL.
Clicking on the button will lead us to the given URL.
![]() This is how location.href property works.
This is how location.href property works.
What is window.location.assign?
It is a built-in method used to redirect to a new page/url.
The location.assign method doesn’t delete the url of the original page/document from the history therefore we can navigate back to the original page.
The below program will provide you with more clarity about the location.assign method:
<html><button onclick="assignFunction()">Click Me!</button><body><script>
function assignFunction() {
location.assign("https://www.linuxhint.com/");}</script></body></html>
In the above given-program, firstly, we created a button labeled as “Click Me!”.
Next, we specified www.linuxhint.com in the location.assign() method and the assignFunction() will be invoked whenever the user clicks on the button:
![]() When we clicked on the button “Click Me!”, it directs us to the following window:
When we clicked on the button “Click Me!”, it directs us to the following window:
![]() We can observe that both location.href and location.assign produced the same result.
We can observe that both location.href and location.assign produced the same result.
Difference between location.href and location.assign
The key differences between location.href and location.assign are listed below:
The windows.location.href is a property while the windows.location.assign is a method.
The location.href is used for storing the URL/address of the current page while location.assign doesn’t show the current location of the page.
The windows.location.href returns the address/URL of the current document/page on the other hand the windows.location.assign loads a new document.
The location.href is faster as compared to the location.assign while the location.assign is more secure as compared to the location.href.
Comparison Based on Similarities
There are a couple of similarities between location.href and location.assign as described below:
Both have the same goal i.e., navigating to the new page/URL.
Both of them add a new record to the history.
Both location.href and location.assign doesn’t delete the current url from the history and hence we can navigate back to the original URL/page.
Conclusion
In JavaScript, window.location.href property and window.location.assign method is used to redirect to a new page/url.
However, there exist some major differences between location.href and location.assign e.g.
The location.href returns the URL/address of the current page/document while the location.assign loads a new document, the location.href is faster as compared to the location.assign, the location.assign is more secure as compared to the location.href, and so on.
How to convert a string into an Integer
In JavaScript, there are multiple functions to convert String data into numeric data, for example, the Number() function, parseInt() function, parseFloat() function and so on.
Now if we specifically talk about converting string data type into integer data type, it can be achieved using the JavaScript parseInt() function.
Mostly, we convert the string data type into integer conversion when we have to perform some mathematical tasks over the strings containing numeric values.
This post will explore the below-listed aspects to understand how to convert string-type data to integer-type data:
What is parseInt() function?
Syntax of parseInt()
How to use parseInt() function?
So, let’s begin!
What is parseInt() function?
In JavaScript, parseInt() is a built-in function that converts/parses the string-type data to integer-type data.
The parseInt() function takes a string value as a parameter and parses it into the integer value.
Syntax of parseInt()
Let’s have a look at the below piece of code for a profound understanding of the parseInt() function:
parseInt(value, radix);
Here, the radix is an optional parameter that shows which number system will be used, i.e., binary, hexadecimal, etc.
How to use parseInt() function?
Let’s consider the below-given example to understand how parseInt() function work:
var value = "112";
console.log("Original Value" , value);
console.log("type of original value: " , typeof (value));
convertedValue = parseInt(value);
console.log("Converted Value" , convertedValue);
console.log("type of converted value: ", typeof (convertedValue));
In the example program, firstly, we printed the original value and its data type, afterward we utilized the parseInt() function to parse/convert the string type data to integer.
Finally, we printed the converted value and type of converted value using typeof operator:
![]() The output verified that initially, the variable’s type is a string; however, the parseInt() function converted the string into an integer.
The output verified that initially, the variable’s type is a string; however, the parseInt() function converted the string into an integer.
The below-given code snippet will provide you with more clarity about the parseInt() function:
var value1 = "112";
var value2 = 12;
console.log("First Value: " , value1);
console.log("Second Value: " , value2);
console.log("Add original values: " , value1 + value2);
convertedValue = parseInt(value1);
console.log("Add Converted Values: " , value2 + convertedValue);
The above example performed the following tasks:
Initially, we printed the original values on the browser’s console,
Next, we performed addition on the original values.
Afterward, we converted the first value using the parseInt() function.
Finally, we printed the addition of the second value and the converted value on the browser’s console:
![]() From the above snippet, we observed that both values got concatenated when we performed addition on the original values.
When we performed addition on the converted values, we got the desired result, i.e., the sum of both values.
From the above snippet, we observed that both values got concatenated when we performed addition on the original values.
When we performed addition on the converted values, we got the desired result, i.e., the sum of both values.
Conclusion
In JavaScript, parseInt() is a built-in function that converts/parses the string-type data to integer-type data.
The parseInt() function takes a string value as a parameter and parses it into the integer value.
This post presented a comprehensive guide on how to convert a string into an integer using some suitable examples.
How to Copy/Paste Text into Clipboard Using JavaScript
We are living in a technology era where everything is influenced by technology.
Technology has provided many advanced solutions and has overcome many manual efforts.
So, in this technology era, manually selecting text and copying it using “ctrl + c” seems old-fashioned and takes a bit of time.
So how to automate it?
Well, Thanks to JavaScript! It offers some built-in clipboard properties that allow us to copy/paste the text into the clipboard using a single button click.
In this write-up we will learn how to copy text into a clipboard using HTML and JavaScript:
How To Copy/Paste Text Into Clipboard Using JavaScript
Practical Demonstration of Copy/Paste Text Into Clipboard
So let’s begin!
How To Copy/Paste Text Into Clipboard Using JavaScript
The below-given example program will provide you a detailed understanding of how to copy text into clipboard using JavaScript:
CopyPaste.html
<input type="text" value="Welcome to LinuxHint" id="inputText"><br><br><button onclick="copyFunction()">Copy</button><br><br><p id = "ptext"></p>
In this example, we created an input field and a button, on clicking the button the text will be copied to the clipboard.
Next, we created an <p> element and assign it an id “ptext”.
CopyPaste.js
function copyFunction() {
var copyData = document.getElementById("inputText");
var showText = document.getElementById("ptext");
copyData.select();
navigator.clipboard.writeText(copyData.value);
showText.innerHTML = "Text Copied:" + copyData.value;}
The above snippet serves the below-listed functionalities:
We created a function named “copyFunction()” which will be invoked when someone clicks on the “Copy” button.
Within copyFunction(), we utilized the getElementById() method to read HTML elements.
Next, we utilized the select() method to select the text field.
Afterward, we utilized the navigator.clipboard.writeText() to copy text into the clipboard.
Finally, we utilized the innerHTML property to set the name and age on the <p> element.
On successful execution of the program, initially, we will get the below-given output:
![]() If everything goes fine, then clicking on the “Copy” button will show a message “Text copied” alongwith the copied text:
If everything goes fine, then clicking on the “Copy” button will show a message “Text copied” alongwith the copied text:
![]() The output authenticates that our program is working perfectly fine.
The output authenticates that our program is working perfectly fine.
Practical demonstration
In this section, we will show you the practical demonstration of the above-given program.
![]() The above snippet shows how to copy/paste the text into the clipboard using JavaScript.
The above snippet shows how to copy/paste the text into the clipboard using JavaScript.
Conclusion
JavaScript offers some built-in clipboard properties that allow us to copy/paste the text into the clipboard using a single button click., the navigator.clipboard is used to get access to the clipboard while writeText() property is used to copy the text into the clipboard.
This write-up presents a comprehensive guide on how to copy/paste the text into the clipboard using JavaScript.
Object.keys() method | Explained
In JavaScript, the Object.keys() is one of the widely used static methods that belongs to the Object class.
An object is an entity that can have different properties, these properties show the characteristics of an object.
Various methods can be used to perform different functionalities on the objects, the Object.keys() method is one of them that is used to get the keys of the given object.
This write-up will present an in-depth overview of the below-listed concepts:
What is a JavaScript Object?
What is Object.keys()?
Syntax of Object.keys() method
How to use Object.keys()?
So, let’s begin!
What is a JavaScript Object?
The Object is a class that can store different key-value pairs or keyed collections.
It can store complex entities as well., the Object class offers several built-in methods that can be used to achieve different functionalities.
What is Object.keys()?
Object.keys() is a built-in static method of the Object class.
It takes an object from the user as a parameter and returns an array of strings that consists of all the enumerable properties’ names of the given/user-specified object.
Note: Don’t get confused by the term “enumerable properties”, because,, every property created using a property initializer or created by a simple assignment is by default enumerable.
The enumerable properties can be seen using the Object.Keys() function.
Syntax of Object.keys() method
Here is the basic syntax of the Object.keys() method:
Object.keys(objectName);
In the above snippet, objectName is a user-specified object whose enumerable properties will be returned by the Object.keys() method.
How to use Object.keys()?
As of now, we have understood all the fundamentals of the Object.keys() method, now it’s time to implement these concepts practically.
Example: How to get keys of an object using the Object.keys() method
In this example, we will utilize the Object.keys() method to get all the “keys” of a user-specified object named “empDetails”:
var empDetails = {
empName: "Joe",
empId: 13,
empAge: 27,
gmailAddress: "Joe@example.com",};
var getEmpkeys = Object.keys(empDetails);
console.log("All keys of 'empDetails' object: ", getEmpkeys);
In the above-given program, we performed the following tasks:
Firstly, we created an object named empDetails and assigned it some properties and values.
Afterward, we utilized the Object.keys() method and we passed an object named “empDetails” to it.
Consequently, we will get the below-given output:
![]() The output verified that the Object.keys() returned an array of Strings that consists of all the keys of the “empDetails” object.
The output verified that the Object.keys() returned an array of Strings that consists of all the keys of the “empDetails” object.
Example: How to get keys of the randomly ordered objects using the Object.keys() method
In this program, we will consider a scenario where each key is assigned with a random numeric value:
var empData = { 13: "Joe", 1: "Seth", 42: "Ambrose", 35: "Mike" };
var result = Object.keys(empData);
console.log(result);
In the above-given program, firstly, we created an object named “empData” and assigned it some properties and values.
Next, we utilized the Object.keys() method and passed it “empData” as a parameter:
![]() The output verified that the Object.keys() method returned an array of keys.
The output verified that the Object.keys() method returned an array of keys.
Conclusion
The Object.keys() is one of the built-in static methods of the Object class that takes an object from the user as a parameter and returns an array of strings.
The returned array consists of all the enumerable properties’ names of the given/user-specified object.
All in all, the Object.keys() method takes an object from the user and returns all the keys of that object., the enumerable properties can be seen with the help of the Object.Keys() function.
This write-up explained different aspects of the Object.Keys() method using a couple of examples.
Object.entries() method | Explained
In JavaScript, the Object.entries() is one of the widely used static methods that belong to the Object class.
Object is a class that can store different key-value pairs or keyed collections.
It can store complex entities as well., the Object class offers several built-in methods that can be used to achieve different functionalities.
For instance Object.entries(), Object.keys(), and so on.
In this write-up you will learn the below-listed learning outcomes of the Object.entries() method:
What is Object.entries()?
Syntax of Object.entries() method
How to use Object.entries()
So, let’s begin!
What is Object.entries()?
Object.entries() is a built-in static method of the Object class.
It takes an object from the user as a parameter and returns an array of enumerable property[key-value] pairs of the given/user-specified object.
Syntax of Object.entries() method
Here is the basic syntax of the Object.entries() method:
Object.entries(objectName);
In the above snippet, objectName is a user-specified object whose enumerable properties will be returned by the Object.entries() method.
How to use Object.entries()?
As of now, we have understood the basics of the Object.entries() method, now it’s time to implement these concepts practically.
Example: How to get entries of an object using the Object.entries() method.
In this example, we will utilize the Object.entries() method to get all the “entries” of the user-specified object named “stdDetails”:
var stdDetails = {
stdName: "Mike",
rollNo: 13,
stdAge: 27,};
var getStdEntries = Object.entries(stdDetails);
console.log("All entries of 'stdDetails' object: ", getStdEntries);
Initially, we created an object named stdDetails and assigned it some properties and values.
Next, we utilized the Object.entries() method and we passed an object named “stdDetails” to it:
![]() The output shows that the Object.entries() method returns an array of Strings that consists of all the entries of the given object.
The output shows that the Object.entries() method returns an array of Strings that consists of all the entries of the given object.
Example: How to get entries of the randomly ordered objects using the Object.entries() method:
In this program, we will assume that each key is assigned with a random numeric value:
var stdDetails = { 10: "Ambrose", 1: "Clarke", 24: "Micheal" };
var resultantValue = Object.entries(stdDetails);
console.log(resultantValue);
In this example initially, we created an object named “stdDetails” and assigned it some properties and values.
Afterward, we utilized the Object.entries() method and passed it “stdDetails” as a parameter.
Consequently, the Object.entries method will show the following output:
![]() This is how the Object.entries() method works.
This is how the Object.entries() method works.
Example: How to get entries of a string using the Object.entries() method:
In this example program, we will utilize the Object.entries() method to understand how it works with the strings:
var message= "Welcome";
var resultantValue = Object.entries(message);
console.log(resultantValue);
![]() The output shows that the Object.entries() method returned the array of key-value pairs.
The output shows that the Object.entries() method returned the array of key-value pairs.
Conclusion
In JavaScript, the Object.entries() is a built-in static method of the Object class that takes an object as a parameter and returns an array of object’s enumerable properties[key-value] pairs.
The returned array consists of all the enumerable properties’ names of the given/user-specified object.
All in all, the Object.entries() method takes an object from the user and returns all the entries of that object.
This write-up explained different aspects of the Object.entries() method using some appropriate examples.
String split() Method | Explained
In JavaScript, String methods are used to achieve different functionalities.
For example, getting an array of substrings from a string, extracting a part of a string, replacing some specific value in a string, and so on.
Among these String methods, a widely used method is the String.split() method that breaks a string into an array of substrings.
In this write-up, we will learn all the fundamentals of the String.split() method with the help of appropriate examples.
This post will present a thorough understanding of the below-listed aspects related to the String.split() method:
What is String.split()?
Syntax of String.split()
What does the String.split() method return?
How String.split() method work?
So, let’s begin!
What is String.split()?
The String.split() is a built-in method that breaks the given string into an array of substrings based on the parameter/separator.
Syntax of String.split()
The String.split() method can take zero, one, or two parameters.
Syntax of String.split() method without any parameter:
The basic syntax of String.split() method with no parameter is shown in the below snippet:
string.split();
Syntax of String.split() method with separator parameter:
The separator parameter specifies from where the string will be split.
We can pass a simple string or a regex as a separator.
For example, if we pass “.” as a separator, then the string will break/split whenever the ‘.’ occurred in the given string:
string.split(separator);
Syntax of String.split() method with separator and limit parameter:
We can specify any non-negative number as a limit parameter that specifies how many substrings will be added to the array:
string.split(separator, limit);
What does the String.split() method return?
In JavaScript, the String.split() method returns a new array of substrings without affecting/changing the original string.
How String.split() method work?
We will consider some examples to understand the working of the String.split() method.
Example 1: Omitting parameter
If we didn’t specify any parameter in the String.split() method, then the original string will be returned as an array:
const stringExample = "Welcome to Linuxhint.com";
console.log(stringExample.split());
In this example program, we didn’t pass any parameter to the string.split() method, consequently, we will get the below-given output:
![]() Output verified that the split() method returned an array of only one string, i.e., the original string.
Output verified that the split() method returned an array of only one string, i.e., the original string.
Example 2: Pass space as Separator parameter
In this example, we will pass the space “ ” as a separator to the String.split() method:
const stringExample = "Welcome to Linuxhint.com";
console.log(stringExample.split(" "));
In this program, we utilized the split() method and passed it “ ” as a parameter, consequently, it will break the string whenever a space occurs in the string.
Finally, it will return a complete array of substrings:
![]() In this program, space occurred two times so the whole string broke into three substrings.
In this program, space occurred two times so the whole string broke into three substrings.
Example 3: Split every single letter/character
In the below-given program, we will utilize the String.split() method to split every single character of the string including spaces:
const stringExample = "Welcome to Linuxhint.com";
result = stringExample.split("");
console.log(result);
In the above code block, we passed “” as a separator to the split() method, as a result, the String.split() method will return an array of characters as shown in the below-given snippet:
![]() The output verified that the String.split() method returned an array of characters including spaces.
The output verified that the String.split() method returned an array of characters including spaces.
Example 4: return only two substrings
In this program, we will pass two parameters to the string.split() method i.e.
a “space” and “2”:
const stringExample = "Welcome to Linuxhint.com";
result = stringExample.split(" ", 2);
console.log(result);
We specified space as a separator in the above program and 2 as a limit.
Consequently, the string will break whenever a space occurs in the given string.
As we pass 2 as a limit, so the returned array will contain only two substrings:
![]() This is how the limit parameter works in the string.split() method.
This is how the limit parameter works in the string.split() method.
Conclusion
The String.split() is a built-in method that breaks the given string into an array of substrings based on the parameter/separator.
It can take zero, one, or two parameters, and it returns a new array of substrings without changing/affecting the original string.
This write-up explained the working of the String.split() method with the help of some suitable examples.
Math.trunc() Method | Explained
In JavaScript, the Math object provides several methods and properties that are used to perform different mathematical tasks.
Math is a static object so it allows us to use any of its methods directly without creating the Math object.
Math object offers four commonly used methods for rounding a numeric value into an integer value such as Math.trunc(), Math.floor(), Math.ceil(), and Math.round().
In this write-up, we will discuss all the basics of the Math.trunc() method with the help of some examples.
This post will present an in-depth overview of the below-listed concepts:
What is Math.trunc()?
How does the Math.trunc() work?
Syntax of Math.trunc() method
How to use Math.trunc()?
So, let’s begin!
What is Math.trunc()?
Math.trunc() is an in-built method that simply cuts the fractional part from a number.
The Math.trunc() method takes a numeric value as an argument, cuts off its fractional part, and returns the integer part of the numeric value.
How does the Math.trunc() work?
The Math.trunc() method has nothing to do with the rounding up or rounding down of a number.
Instead, it will simply skip the fractional part of the given value and return the integer part.
Syntax of Math.trunc() method
The below snippet will assist you to understand the basic syntax of the Math.trunc() method:
Math.trunc(userSpecifiedValue);
How to use Math.trunc()?
This section will present a couple of examples to describe the working of the Math.trunc() method.
Example 1
Let’s have a look at the below snippet to understand how to use Math.trunc method:
var firstValue= Math.trunc(72.63);
var secondValue= Math.round(38.38);
console.log("Resultant value for 72.63: " , firstValue);
console.log("Resultant value for 38.38: ", secondValue);
The Math.trunc() method will generate the following output for the above-given program:
![]() The output verifies that for the Math.trunc() method, it doesn’t matter whether the decimal value is greater than .5 or less than .5.
It will simply trim the fractional/decimal value.
The output verifies that for the Math.trunc() method, it doesn’t matter whether the decimal value is greater than .5 or less than .5.
It will simply trim the fractional/decimal value.
Example 2
In this program, we will understand how the Math.trunc() method deals with negative values?
var firstValue= Math.trunc(-72.63);
var secondValue= Math.round(-38.38);
console.log("Resultant value for -72.63: " , firstValue);
console.log("Resultant value for -38.38: ", secondValue);
On successful execution of the code, we will get the following output:
![]() The output proved that Math.trunc() method skipped the decimal value and returned the remaining integer part of the given value.
The output proved that Math.trunc() method skipped the decimal value and returned the remaining integer part of the given value.
Conclusion
In JavaScript, trunc() is a built-in method that belongs to the Math object and is used to cut the fractional part of a number.
The Math.trunc() method takes a numeric value as an argument, cuts off its fractional part, and returns the integer part of the numeric value.
This write-up explained different aspects of the Math.trunc() method such as What exactly Math.trunc() is? It’s syntax and how to use Math.trunc().
Math.round() Method | Explained
In JavaScript, there are multiple methods used to round off a number, for example, Math.round(), Math.ceil(), Math.floor(), and Math.trunc().
Although all these methods have the same goal of cutting off the fractional point value, however, each method utilizes a different algorithm and hence produces different results.
In this write-up, we will learn all the fundamentals of the Math.round() method.
This post will assist you to understand the below-listed aspects of math.round() method:
What is Math?
What is Math.round()?
How does the Math.round() work?
Syntax of Math.round() method
How to use Math.round()?
So, let’s start!
What is Math?
In JavaScrip, Math is an inbuilt static object and it has no constructor.
It offers a wide range of methods and properties such as Math.round(), Math.floor(), Math.PI, Math.SQRT, etc.
As we have discussed earlier, the Math object is static, so, there is no need to create the Math object first, instead, we can use it directly.
Now you can understand the concept of Math.round() in a better way.
So, without a further delay, let’s understand what exactly Math.round() is?
What is Math.round()?
Math.round() is a built-in method that cuts off the floating-point value and returns an integer.
Now if you are thinking the Math.round() method only cuts off the fractional part blindly? Then you are wrong! The Math.round() method follows a proper formula to convert a floating-point value to its nearest integer.
How does the Math.round() work?
The below-listed points will assist you to understand how the Math.round() method works:
The Math.round() firstly checks if the floating-point value is greater than 0.5 or less than 0.5.
If the decimal part of the given number is greater than “.50”, then the Math.round() function will round the number upward i.e.
towards positive infinity.
Didn’t understand the whole concept? No worries! The below-given example will let you understand this concept in a better way.
For example, if the value is 54.50, then the Math.round() function will round it up to “55”.
On the other hand, if the decimal part is less than “.50”, then in such a case the Math.round() function will round the given value towards negative infinity.
For example, the Math.round() method will round “54.49” to “54”.
Syntax of Math.round() method
The Math.round() function can take any number as an argument and will convert it to the nearest integer.
The basic syntax of the Math.round() method will be:
Math.random(userSpecifiedValue);
How to use Math.round()?
In this section, we will understand how to use the Math.round() method with the help of some suitable examples.
Task 1: Round the floating-point values to the nearest integers using the Math.round() method:
var firstValue= Math.round(54.50);
var secondValue= Math.round(54.49);
console.log("54.50 rounds up to: " , firstValue);
console.log("54.49 rounds down to: ", secondValue);
We utilized the Math.round() function to round a couple of values to the nearest integer values:
![]() The output verified that the Math.round() function successfully converted the given values to the nearest integers.
The output verified that the Math.round() function successfully converted the given values to the nearest integers.
Task 2: Round off the negative floating-point values to the nearest integers using the Math.round() method:
var firstValue= Math.round(-24.60);
var secondValue= Math.round(-24.29);
console.log("-24.60 rounds up to: " , firstValue);
console.log("-24.29 rounds down to: ", secondValue);
The below snippet will show the resultant output for the above given example program:
![]() This is how the Math.round() works.
This is how the Math.round() works.
Conclusion
Math.round() is a built-in method that cuts off the floating-point value and returns an integer.
The Math.round() method follows a proper formula to convert a floating-point value to its nearest integer.
It checks whether the fractional/decimal part of the given number is greater than 0.5 or less than 0.5.
If the decimal part is greater than “.5”, then the Math.round() method will round the given value upward else downward.
This write-up demonstrated a thorough overview of the Math.round() method using a couple of relevant examples.
JavaScript string.includes() method | Explained
In JavaScript, the string.includes() method is a searching algorithm and is mostly used to search whether or not a particular substring is there in the targeted/given string.
If the substring is found in the targeted string then the string.includes() method will return the result as “true” else “false”.
It is a case-sensitive method, which means the includes() method will consider “linuxhint” and “Linuxhint” two different words.
So, it will return the value accordingly.
This post will explore the below-listed aspects string.includes method:
What is a string.includes()?
Syntax of string.includes()
How to use string.includes() function?
So, let’s begin!
What is a string.includes()?
String.includes() is a built-in function that is used to find a substring within a string.
The string.includes() method takes the targeted string as a parameter and compares it with the substring if the perfect match is found in the targeted string then it will return a boolean value “true” else “false”.
The string.includes() method is a case-sensitive method so it will return true only if the perfect match is found in the string.
Syntax of string.includes()
Let’s have a look at the below piece of code to get a profound understanding of the string.includes() method:
string.includes(searching_String, starting_Index);
Here, the starting_Index is an optional parameter that shows where to start the search.
How to use string.includes() function?
In this section, we will understand the working of string.includes() function using some examples:
Find a substring “linux” in the string “Welcome to linuxhint.com”:
var string = "Welcome to linuxhint.com";
var matchString = string.includes("linux");
console.log("Result: ", matchString);
In the above example, we utilized the includes() method to find a substring “linux”, consequently, we will get the below-given output on successful execution of the program:
![]() The output shows “true”, it authenticates that the word “linux” is present in the string.
The output shows “true”, it authenticates that the word “linux” is present in the string.
Task is to check whether includes() method is case-sensitive or not:
var string = "Welcome to linuxhint.com";
var matchString = string.includes("welcome");
console.log("Result: ", matchString);
In this example we are looking for a word “welcome” in the string “Welcome to linuxhint.com”
![]() The word “welcome” is present in the string “Welcome to linuxhint.com”, but still, we get the result “false”.
This is because in the string, the first letter of the searching string is capital, i.e., “Welcome”, while we searched for the substring “welcome”, whose first letter is in lower case.
Hence we get the result “false”, it proves that the string.includes() is case-sensitive.
The word “welcome” is present in the string “Welcome to linuxhint.com”, but still, we get the result “false”.
This is because in the string, the first letter of the searching string is capital, i.e., “Welcome”, while we searched for the substring “welcome”, whose first letter is in lower case.
Hence we get the result “false”, it proves that the string.includes() is case-sensitive.
Task is to search a substring “Welcome” but search must be start from the user-specified index:
var string = "Welcome to linuxhint.com";
var matchString = string.includes("Welcome", 8);
console.log("Result: ", matchString);
In this program, we start the search from the 8th index:
![]() The substring “Welcome” is present in the string, but still, the result is false.
Why? This is because we started the search from the 8th index while the starting index of the “Welcome” is 0, therefore we get the result “false”.
The substring “Welcome” is present in the string, but still, the result is false.
Why? This is because we started the search from the 8th index while the starting index of the “Welcome” is 0, therefore we get the result “false”.
Conclusion
In JavaScript, the string.includes() method is used to search a substring in some particular string.
The string.includes() method takes the targeted string as a parameter and compares it with the substring if the perfect match is found in the targeted string then it will return a boolean value “true” else “false”.
This article presents a thorough overview of the string.includes() method with the help of some appropriate examples.
JavaScript Math.abs() method | Explained
In JavaScript, the Math object provides a Math.abs() method that is used to get an absolute value of a given number.
Math.abs() is a static method of the Math object and hence can be invoked directly with the Math object without creating the Math object.
It can take a value or an expression as a parameter and consequently, it returns an absolute value for the specified value/expression.
In this write-up you will learn the below-listed learning outcomes of the Math.abs() method:
What is Math?
What is Math.abs()?
Syntax of Math.abs()
What does Math.abs() return?
How to use Math.abs() method?
So, let’s start!
What is Math?
In JavaScript() Math is an inbuilt object that offers multiple methods and properties to perform the mathematical tasks.
For instance, Math.abs() is used to get an absolute value, Math.random() returns a random value, the Math.round() method returns the nearest integer value, and so on.
What is Math.abs()?
In JavaScript, the abs() acronym of absolute is a built-in static method of the Math object.
It takes a user-specified number as a parameter and returns an absolute value for the given number.
Syntax of Math.abs()
In JavaScript, the Math.abs() method can be used as follows:
Math.abs(number);
What does Math.abs() return?
As the name itself suggests, the Math.abs() method returns an absolute value of the specified number regardless of the sign associated with that number/value.
It will return 0 if the given value is “null” or an empty string/array and it will return “NaN” for the non-numeric values.
How to use Math.abs() method?
In this section, we will learn how to use Math.abs() method with the help of some appropriate examples.
Task: Pass numeric values to the Math.abs() method
In this example program, we will pass a positive and a negative numeric value to the Math.abs() method as shown in the below-given code block:
var number1 = Math.abs(25.72);
var number2 = Math.abs(-25.72);
console.log("25.72 converted to: ", number1);
console.log("-25.72 converted to: ", number2);
![]() The output verified that the Math.abs() method returned the absolute value of the given number.
The output verified that the Math.abs() method returned the absolute value of the given number.
Task: Pass non-numeric values to the Math.abs() method
In this program, we will pass non-numeric values to the Math.abs() method:
var number1 = Math.abs(null);
var number2 = Math.abs("welcome to linuxhint.com");
console.log("null converted to: ", number1);
console.log("string converted to: ", number2);
![]() The output verified that the Math.abs() method returned 0 for null and NaN for string/non-numeric values.
The output verified that the Math.abs() method returned 0 for null and NaN for string/non-numeric values.
Task: Pass an expression to the Math.abs() method
The below given example will guide you on how the Math.abs() method deals with an expression:
var number1 = 12;
var number2 = -14;
console.log(Math.abs(number1 - number2));
console.log(Math.abs(number1 + number2));
![]() The output verified that the Math.abs() method calculated the given expression and returned an absolute value.
The output verified that the Math.abs() method calculated the given expression and returned an absolute value.
Conclusion
In JavaScript, Math.abs() is a built-in function of the Math object that takes a user-specified number as a parameter and returns an absolute value for the given number.
The Math.abs() method returns an absolute value of the specified number regardless of the sign associated with that number/value.
It will return 0 if the given value is “null” or an empty string/array and it will return “NaN” for the non-numeric values.
This write-up explained different aspects of the Math.abs() method with the help of some relevant examples.
What is JavaScript Animation
JavaScript animations are created by making incremental programming changes in the element’s style.
These animations have the ability to perform the task that CSS can not do on its own.
DOM is known as Document Object Model and the whole HTML document is represented by a document object.
According to the logical equation or function, you can move several DOM elements across the page using JavaScript.
In this post, you will learn about the basics related to JavaScript animation utilizing the simple example.
So, let’s start!
Functions used for creating JavaScript Animation
In JavaScript, there are three functions are commonly used for creating animation.These are:
setTimeout (function, duration): The global setTimeout() function sets a timer which executes a function or specified piece of code after some delay or duration.
clearTimeout (setTimeout_variable): The clearTimeout() function is used to clear the timer that has been set by the setTimeout().
setInterval (function, duration): The setInterval() function sets a timer which repeatedly executes a function or piece of code according to the specified duration.
Let’s take a simple example of creating JavaScript animation to understand how it works.
How to create a JavaScript Animation
In this example, we will create a JavaScript animation web page using HTML.
To do so, first of all, we will create a HTML file named “Animation_JS.html”.
In this HTML file, we will add a button named “Move” and add two containers named “container” and “javascriptAnimation”.
For the first “container”, we will set its properties such as height, width, position, background, border-radius, and display.
Moreover, we will set its “position” as “relative” which indicates that this container is positioned normally.
Similarly, we will specify the values for the width, height, and background-color properties of the “javascriptAnimation” container, while setting its “position” as “absolute”.
Upon doing so, this container will be positioned to its nearest ancestor:
| 12345678910111213141516171819202122232425262728293031
|
</html><!DOCTYPE html><html>
<head>
<title>What is JavaScript Animation</title>
</head><style>
#container {
width: 420px;
height: 420px;
position: relative;
background: purple;
border-radius: 50%;
display: inline-block;
}
#javascriptAnimation {
width: 55px;
height: 55px;
position: absolute;
background-color: orange;
} </style><body><p><button onclick="animation()">Move</button></p><div id ="container"><div id ="javascriptAnimation"></div></div></body></html>
|
Next, inside the <script> tag, we will define an “animation()” function that will be called when the user clicks the “Move” button.
This “animation()” function will first fetch the “javascriptAnimation” HTML element.
Then, we will assign an “id” to the “clearInterval()” function, which invokes the “frame()” function after “5” milliseconds.
In the “frame()” function, the number of frames will be set per second.
If the position of element reaches 305px, then the “clearInterval()” function clears it Otherwise the fetched HTML “javascriptAnimation” element will moves top and moves according to the “position” value:
| 123456789101112131415161718
|
<script>var id = null;function animation() {var elem = document.getElementById("javascriptAnimation");
var position = 0;
clearInterval(id);
id = setInterval(frame, 5);
function frame() {
if (position == 305) {
clearInterval(id);
} else {
position++;
elem.style.top = position + 'px';
elem.style.left = position + 'px';
}
}}</script>
|
Here is the snippet of the script code:
![]() Execution of the above-given JavaScript program will show the following output:
Execution of the above-given JavaScript program will show the following output:
![]() Then click on “Move” button to view the created JavaScript animation:
Then click on “Move” button to view the created JavaScript animation:
![]() That was all essential information related to JavaScript animation.
You can further explore as required.
That was all essential information related to JavaScript animation.
You can further explore as required.
Conclusion
Animation is known as simulation of movement made by the series of Images.
JavaScript animations are created by making small programming modifications to the style of an element., you can create animations using the three most commonly used functions named setTimeout(), setInterval() and clearTimeout(). In this post, we have discussed JavaScript animation and its related functions with the help of a simple example.
JavaScript Try…Catch…Finally Statement
Exceptions are handled in JavaScript with the help of the try…catch…finally statement. While programming, If a try block finds an error, it will throw an exception and execute the code written in the catch block.
In this statement, the finally block will execute in both cases, if an error occurs or when the code runs successfully.
Before moving towards the implementation of the try…catch…finally statement, you must have some knowledge about Errors, so, let’s have a quick look at the types of JavaScript Errors.
What are the types of JavaScript Errors
Errors programming are of two types: Syntax Error and Runtime Error.
Syntax Error: Syntax error occurs when a user makes a mistake related to the programming syntax.
For example, if the user omits or uses wrong spelling:
consle.log('hello world');
Here, “o” is missing from the “console” syntax which states that it is a Syntax error.
Runtime Error: A Runtime Error occurs when the program is executed.
For instance, if an invalid variable and function are called that is not declared or defined.
This operation will cause a Runtime Error.
Now, let’s get started with the implementation of JavaScript try..catch Statement.
How to implement JavaScript try…catch Statement
try…catch statement is used for handling exceptions.
The general syntax of try…catch statement is given below:
try {
// try_statement } catch(error) {
// catch_statement }
In the above-given syntax, the try block contains the main code.
If an error encounters while the execution of the added try block, the compiler will throw an exception and then move toward the execution of the catch block, otherwise, the catch block will be skipped.
Now, check out the following example of the try…catch statement.
Example
Here, we will implement an example to check how the try…catch statement works in JavaScript.
In this example, we will try to print an undeclared variable “x” inside the try block:
const msg = 'Hi, this is linuxhint.com';try {
console.log(msg);
console.log(x);}catch (error) {
console.log('An error is encountered!');
console.log('Encountered error: ' + error); }
As you can see, we have not define the variable “x” in our program.
Therefore, when the try block in the above-given program will execute, it will check the variable “x” definition and executes the “catch()” block.
As a result of it, the type of the encountered error will be displayed on the console:
![]()
JavaScript try…catch…finally Statement
While programming, you can also utilize try…catch…finally statement for handling exceptions.
finally block execute the try and catch blocks, if an error occurs or when the code is executed successfully.
The general syntax of try…catch…finally statement is given below:
try {
// try_statement }catch(error) {
// catch_statement}finally() {
// finally_statement}
Example
Let’s take the previous example to check how try…catch…finally statement works for it:
const msg = 'Hi, this is linuxhint.com';try {
console.log(msg);
console.log(x);}catch (error) {
console.log('An error is encountered!');
console.log('Encountered error: ' + error); }finally {
console.log('Finally block is executed');}
However, we still have not defined “x” variable in our JavaScript program.
In this scenario, when the try block will access the “x” variable and not find its definition, the execution control will move towards the catch block and print the added error messages on the console window.
However, the finally block will be executed in both cases, if an error occurs or when the code is executed successfully:
![]() That was all essential information about JavaScript try…catch…finally. Go for further research if required.
That was all essential information about JavaScript try…catch…finally. Go for further research if required.
Conclusion
To handle the exceptions JavaScript try…catch…finally statement is used., If the try block finds an error, the statements added to the catch block will execute.
However, the finally block will be executed in both cases, if an error occurs or when the code is executed successfully.
In this article, we have briefly discussed the JavaScript try…catch…finally statement, and its working with the help of a suitable example.
JavaScript String lastIndexOf() Method
The String lastIndexOf() method is a built-in searching function of JavaScript.
It is used to explore the index of a particular string or character in a given sequence of characters.
It looks like the indexof() method.
However, it starts searching for elements from the last position of the given string.
In the specified string, the index position starts with 0.
It returns -1 if there is no element present.
JavaScript String lastIndex() method is a case sensitive function.
All the latest browsers support this function as it belongs to ECMAScript1 features.
This guide graps a piece of descriptive knowledge of the following outcomes.
How does the String lastIndexOf() method work
How to use the String lastIndexOf() method
How does the String lastIndexOf() method work
The JavaScript String lastIndexOf() method works in backward order as it explores the string from the end to the beginning position..
Let’s have a look at the syntax of the string lastIndexOf() method.
string.lastIndexOf(searchvalue, start)
Here, the ‘searchvalue’ is a substring that is used to find for within a string.
The ‘start’ is a parameter that represents the index from where the searching will start.
The String lastIndexOf() method retrieves the index of the last value in a string.
How to use the String lastIndexOf() method
The lastIndexOf() method starts searching from end to beginning pattern.
This section explains the usage of the lastIndexOf() method with the help of examples.
Example: How to find the index of a specific character in a stringThe string lastindexOf() method helps in finding a particular character in the sequence of characters.
In the following example, we will show you how it works.
string = "LinuxHint helps in programming";
output = string.lastIndexOf('H');
console.log(output);
In this code, a string “LinuxHint helps in programming” is initialised.
‘H’ is a particular character in the string that is to be searched.
When the function calls it finds and returns the index position of the specified character.
![]() The returned output showed that the specified character ‘H’ is located at the index position ‘5’ in the string.
Example: How String lastIndexOf() method behaves when a substring is not foundThe lasIndexOf() method retrieves the index position of a specified character in a given string.
This example explains how this function works with the null string.
string = "LinuxHint helps in programming";
output = string.lastIndexOf('Talha Saif Inc');
console.log(output);
In this example, a string “LinuxHint helps in programming” is passed to an object.
We use the substring “Talha Saif Inc” that is to be searched.
When a function calls, it returns the location of the specified substring.
The returned output showed that the specified character ‘H’ is located at the index position ‘5’ in the string.
Example: How String lastIndexOf() method behaves when a substring is not foundThe lasIndexOf() method retrieves the index position of a specified character in a given string.
This example explains how this function works with the null string.
string = "LinuxHint helps in programming";
output = string.lastIndexOf('Talha Saif Inc');
console.log(output);
In this example, a string “LinuxHint helps in programming” is passed to an object.
We use the substring “Talha Saif Inc” that is to be searched.
When a function calls, it returns the location of the specified substring.
![]() The returned output showed that the specified substring is not located in the given string.
Therefore the function returned -1.
Example: How the String lastIndexOf() method works with defined start parameterThe lastIndexOf() method works in the backward order.
However if the start parameter is defined, it will work in a different scenario.
Let’s have a look at how it works.
string = "LinuxHint is a Linux-based content provider";
output = string.lastIndexOf('n', 4);
console.log(output);
In this example, the starting index of the given string is defined with the index position ‘4’.
When the function calls, it will not search the specified index throughout the whole string.
But it will only search in the defined index point.
The returned output showed that the specified substring is not located in the given string.
Therefore the function returned -1.
Example: How the String lastIndexOf() method works with defined start parameterThe lastIndexOf() method works in the backward order.
However if the start parameter is defined, it will work in a different scenario.
Let’s have a look at how it works.
string = "LinuxHint is a Linux-based content provider";
output = string.lastIndexOf('n', 4);
console.log(output);
In this example, the starting index of the given string is defined with the index position ‘4’.
When the function calls, it will not search the specified index throughout the whole string.
But it will only search in the defined index point.
![]() The returned output showed that the specified character ‘n’ is present at the index ‘2’ with a defined start parameter.
Example: How the String lastIndexOf() method reacts in a case insensitive matchingThe lastIndexOf() method has a case insensitive property.
This example checks how the String lastIndexOf() method reacts in a case-insensitive matching.
string = "LinuxHint helps in programming";
output = string.lastIndexOf('P');
console.log(output);
In this example, a string “LinuxHint helps in programming” is passed to an object.
However, there is a case sensitivity in the substring ‘P’.
The returned output showed that the specified character ‘n’ is present at the index ‘2’ with a defined start parameter.
Example: How the String lastIndexOf() method reacts in a case insensitive matchingThe lastIndexOf() method has a case insensitive property.
This example checks how the String lastIndexOf() method reacts in a case-insensitive matching.
string = "LinuxHint helps in programming";
output = string.lastIndexOf('P');
console.log(output);
In this example, a string “LinuxHint helps in programming” is passed to an object.
However, there is a case sensitivity in the substring ‘P’.
![]() The output showed that in the case-insensitivity scenario, the function returned the ‘-1’ output.
The output showed that in the case-insensitivity scenario, the function returned the ‘-1’ output.
Conclusion
JavaScript String lastIndexOf() method is used to find the indexof a particular string or character in a given sequence of characters.
This short guide provides you with a complete guide about the String lastIndexOf() method.
Furthermore, we also illustrated the working of the lastIndexOf() method with its syntax and usage along with suitable examples.
How to Create Range
In documents, the range is a random part of the content that starts and ends at any point., the range is a function that inputs the beginning and ending index and returns the list of all the integers.
It represents the difference between the lowest and highest values.
The range function helps in sorting all the numbers between starting and ending points.
It could be set by using the For loop.
This tutorial demonstrates possible way to create a range with the following outcomes:
How does the Range() function work
How to use the Range() function
How to create a range
The range() is a function used to create a range from beginning to end index and create the list of all integers.
This section demonstrate the working and usage of range() function to create a range.
How the range() function worksThe range() function takes the starting and ending index as an input and returns a new range of the specified object.
SyntaxThe syntax of the range() function is given as follows:
function range(start, end)
Start represents the beginning point in the index while the end represents the ending point in the list..
It returns the created range of the specified object.
How to use the range() functionThe range() function creates the range of specified objects and sets the boundary before using its methods.
This section provides a detailed direction on how to use the range() method to create a range.
Example: How to create a range of characters using the range() functionThe range() function creates the difference between the lower and upper value in an index.
The range() function works with a for loop and returns the range of characters.
This example explains how this function works.
function* iterate(x, y) {
for (j = x; j String.fromCharCode(n));
console.log(output);
}}
range('S', 'Z');
In this example, For loop is used to iterate over the given parameters.
Moreover, We select the range from ‘S’ to ‘Z’.
When a function is called, it returns the created range between the specified characters.
![]() The returned output showed that the function Range() created a range of specified charters that represented the “[ ‘S’, ‘T’, ‘U’, ‘V’, ‘W’, ‘X’, ‘Y’, ‘Z’ ]”.
Example: How to create a range of integers using the Range() functionThe range() function creates the range and difference between the starting and ending points of an index.
The index values may be characters and integers.
This example shows how the range() function creates the range for integers.
function* iterate(x, y) {
for (j = x; j String.fromCharCode(n));
console.log(output);
}}
range('3', '7');
The range() function mostly used the For loop to iterate.
In the given list of integers ‘3-7’, the range functions create all the possible values that start from minimum to maximum value.
When the function calls, it returns the created range between the specified integers.
The returned output showed that the function Range() created a range of specified charters that represented the “[ ‘S’, ‘T’, ‘U’, ‘V’, ‘W’, ‘X’, ‘Y’, ‘Z’ ]”.
Example: How to create a range of integers using the Range() functionThe range() function creates the range and difference between the starting and ending points of an index.
The index values may be characters and integers.
This example shows how the range() function creates the range for integers.
function* iterate(x, y) {
for (j = x; j String.fromCharCode(n));
console.log(output);
}}
range('3', '7');
The range() function mostly used the For loop to iterate.
In the given list of integers ‘3-7’, the range functions create all the possible values that start from minimum to maximum value.
When the function calls, it returns the created range between the specified integers.
![]() The output shows that the range is created between the passed arguments that are ‘3’ and ‘7’.
Finally, you can now create a range of characters as well as range of integers.
The output shows that the range is created between the passed arguments that are ‘3’ and ‘7’.
Finally, you can now create a range of characters as well as range of integers.
Conclusion
The range() function is used to create the range of characters and numbers.
This article explains how to create a range.
To emphasise the knowledge, we also provide working of this function along with its syntax.
We illustrated the usage of the range() function with suitable examples.
Javascript Object.entries() Method
In JavaScript, the objects behave like a datatype, and store the data such as values, keys, etc.
Object.entries() method is a built-in function of JavaScript.
It is used to return the new array with the elements having the corresponding attributes to countable string-keyed properties.
However, this method doesn’t convert the original array.
In the JavaScript Object.entries() method, the arrangement of the properties is the same as if you looped over the values manually.
All the modern browsers support the object.entries() method except for Internet Explorer as it is the feature of ECMA 6.
This article will provide you with a descriptive knowledge of the following outcomes:
How Object.entries() method works
How to use the Object.entries() method
How JavaScript Object.entries() method works
The JavaScript Object.entries() method accesses the properties and returns specified keys as a string in an object.
Any specified key can be attained using the index of an array.
SyntaxThe JavaScript Object.entries() method works on the following syntax.
Object.entries(obj)
Here, ‘obj’ is a parameter whose countable property pairs are to be returned.
The Object.entries() method returns all enumerable property pairs [keys, values] as a string.
If the entered key does not belong to the data in the object, the Object.entries() does not return the value.
The Object.entries method is also applied on arrays as array is also a data type.
How to use Object.entries() method
The JavaScript Object.entries() method takes an argument as an input and outputs an array of the object’s countable pair of properties.
This section represents the usage of the Object.entries() method with examples.
Example: How Object.entries() method converts the object into enumerable array propertyThe Object.entries() method takes an object and converts it into the countable array property.
In this example, we will learn how to convert the object using the Object.entries() method.
employee = {
'TalhaSaif Inc': 60,
'LinuxHint': 100,
'Comsats': 360 };
console.log(Object.entries(employee));
In this example, an object ‘employee’ is created with the values passed in a specified order.
When the Object.entries() function calls, it will return the array with the countable properties.
![]() The returned output showed that the object ‘employee’ has countable string-keyed properties in an array form.
Example: How Object.entries() access a specific property objectThe Object.entries() method can also access the specified property in the given array using the index number.
In this example, you will learn how this function gets a specified property.
employee = {
'TalhaSaif Inc': 60,
'LinuxHint': 100,
'Comsats': 360 };
console.log(Object.entries(employee)[1]);
In this code, an object ‘employee’ is created with the values in specified order.
Here, [1] represents the index number of an array.
When a function is called, it will return the specified property of the given index number in an array.
The returned output showed that the object ‘employee’ has countable string-keyed properties in an array form.
Example: How Object.entries() access a specific property objectThe Object.entries() method can also access the specified property in the given array using the index number.
In this example, you will learn how this function gets a specified property.
employee = {
'TalhaSaif Inc': 60,
'LinuxHint': 100,
'Comsats': 360 };
console.log(Object.entries(employee)[1]);
In this code, an object ‘employee’ is created with the values in specified order.
Here, [1] represents the index number of an array.
When a function is called, it will return the specified property of the given index number in an array.
![]() The returned output showed the countable property ‘’[‘LinuxHint’, 100]” of the specified index of an array.
The returned output showed the countable property ‘’[‘LinuxHint’, 100]” of the specified index of an array.
Conclusion
Object.entries() method is a built-in function of JavaScript that returns the new array with the elements having the corresponding attributes to countable string-keyed properties.
This tutorial provided a complete guide about JavaScript Object.entries() method.
For better understanding, we illustrated the working, properties, and usage of the Object.entries() method using suitable examples.
How to Get Object Keys
In JavaScript, an object comprises keys and values which are known as properties.
To deal with the keys and values of an object, JavaScript provides various methods.
These methods retrieve the enumerable properties in an array form.
.
The Object.keys() method is employed to access the keys of an object.
The ordering in the Object.keys() method is the same as the standard loop.
This tutorial will illustrate how to get Object keys using the Object.keys() method.
The outcomes of this article are given as follows:
How does Object.keys() method works
How to use JavaScript Object.keys() method
How to get object keys
The Object keys can be attained using the Object.keys() method., the Object.keys() method returns an array containing all the object’s own enumerable property names.
The working mechanism and functionality of the Object.keys() method are provided in the upcoming sections.
How does JavaScript Object.keys() method workThe Object.keys() method retrieves the countable property values of an object and returns the output in an array form.
The syntax of the JavaScript Object.keys() method is given as follows:
Object.keys(obj);
Here, ‘obj’ is a parameter whose keys are to be returned
JavaScript Object.keys() method returns the array of a string to represent the countable keys upon a specified object.
In JavaScript, there are two properties of Object keys that are mentioned in the following.
Enumerable: A countable property of an object that is set to be “True”.
Non-Enumerable: The uncountable property of an object that is set to be “False”.
How to use JavaScript Object.keys() methodThe Object.keys() method accepts the arguments as an input and returns an array with unique keys.
An object can be a number, a symbol, or a string.
It could not be null or undefined.
In this section, you will learn how to get the Object keys using the Object.keys() method with examples.
Example: How to get Object keys of enumerable propertiesIn Javascript, the Object.keys() method is used to get the Object keys of the array object.
In this example, we will show you how to get the object keys of an object:
Student = {
name: "ALI",
age: 26,
marks: 85,
};
// get all keys of Student
std = Object.keys(Student);
console.log(std);
In this code, an object “Student” contains three keys and three values.
The Object.keys() method is applied on the “Student” object to retrieve the keys.
![]() After applying the Object.keys() method, the keys of an object ‘student’ are displayed on the console.
Example: How to get Object keys of Non-enumerable propertiesIn JavaScript, the Object.keys() method returns only enumerable properties of the object.
Let’s refer to the following code to get the keys of uncountable properties of an object.
keys = Object.create({}, {
getName: {
value: function () { return this.name; }
}});
keys.name = 'LinuxHint';
console.log(Object.keys(keys));
This code narrates that an object is created in which the function has a null value.
However, there must be a value to an object.
Otherwise, it will not return the property key.
The example shows that if the called function is empty, it will simply return the name only.
After applying the Object.keys() method, the keys of an object ‘student’ are displayed on the console.
Example: How to get Object keys of Non-enumerable propertiesIn JavaScript, the Object.keys() method returns only enumerable properties of the object.
Let’s refer to the following code to get the keys of uncountable properties of an object.
keys = Object.create({}, {
getName: {
value: function () { return this.name; }
}});
keys.name = 'LinuxHint';
console.log(Object.keys(keys));
This code narrates that an object is created in which the function has a null value.
However, there must be a value to an object.
Otherwise, it will not return the property key.
The example shows that if the called function is empty, it will simply return the name only.
![]() The returned output showed that when a null or undefined value is passed the function only returns the “[‘name’]”.
The returned output showed that when a null or undefined value is passed the function only returns the “[‘name’]”.
Conclusion
Object.keys() method is a built-in function of the JavaScript that is utilised to access the Object keys.
This method returns an array of strings.
This article provides a deep knowledge of how to get object keys.
For a better understanding, we have illustrated the working and usage of Object.entries() method with suitable examples.
Beginner’s Guide to JavaScript Default Parameters
In JavaScript, the default values of function parameters are undefined.
If a function is called without a parameter, its missing values are called undefined.
The default parameters help in setting the default value in the function’s parameter to nullify the undefined value.
This is a new feature of the ES6 version.
In this article, you will learn a beginner’s guide to default parameters.
The outcomes of this tutorial are given as follows.
How the default parameters work
How to use the default parameters
How the default parameters works
The default parameters set a value for the function initialising parameters with a default value if an undefined or null value is passed in the function.
This section explains the working of the default parameters with the help of syntax.
SyntaxThe syntax of default parameters is given in the following.
function function-name(P1 = DV1, P2 = -DV2, P3=DV3,......)){
function-body}
In the above syntax,
The function-name refers to the name of the function where P and DV represent the parameters and their default values respectively.
The default value could be an integer, an expression, or a function value.
How to use the default parameters
The default parameters give permission to the named functions to get started with a default value when an undefined value is passed.
These are produced when a function is called.
This section helps you in learning on how to default parameters with examples.
Example: How to set default values using default parametersThe default parameters set the default values in the function.
There could be one or more parameters in the function.
This example explains how default parameters set the default values.
function printValue(x=3, y) {
console.log("x = " + x + " and y = " + y);}
printValue();
printValue(9);
printValue(9, 7);
In the above example, the two parameters ‘x’ and ‘y’ are passed.The default value of ‘x’ is defined whereas ‘y’ is not defined.
The function body refers to the code which prints the values of x and y.
The function is called in three different ways :
“printValue();” statement will print the default values of ‘x’ and ‘y’ (either defined or not in the function)
“printValue(9);” statement will set the value of ‘x’ to 9 while the default value of ‘y’ is considered
“printValue(9, 7);” will pass the value 9 to ‘x’ and value 7 to ‘y’.
![]() It is concluded from the output that:
When printValue() is called without arguments, the default values are printed i.e., ‘x=3’ and ‘y=undefined’
When printValue() is called with only one argument (that is 3) then that value will be assigned to the first parameter(x)
When printValue() is called with two arguments (9 and 7) then the default values of x and y are replaced with 9 and 7 respectively.
Example: How the function works without default parametersThere can be more than one parameter in an object.
In the following code, we will check how the function behaves without default values.
function printValue(x, y) {
console.log("x = " + x + " and y = " + y);}
printValue(3);
In this example, two parameters ‘x‘ and ‘y’ are passed as an argument without any default value.The function body refers to the code which prints the values of x and y.
The “Value(3);” statement will set the value of ‘x’ to 3.
It is concluded from the output that:
When printValue() is called without arguments, the default values are printed i.e., ‘x=3’ and ‘y=undefined’
When printValue() is called with only one argument (that is 3) then that value will be assigned to the first parameter(x)
When printValue() is called with two arguments (9 and 7) then the default values of x and y are replaced with 9 and 7 respectively.
Example: How the function works without default parametersThere can be more than one parameter in an object.
In the following code, we will check how the function behaves without default values.
function printValue(x, y) {
console.log("x = " + x + " and y = " + y);}
printValue(3);
In this example, two parameters ‘x‘ and ‘y’ are passed as an argument without any default value.The function body refers to the code which prints the values of x and y.
The “Value(3);” statement will set the value of ‘x’ to 3.
![]() When printValue() is called with only argument ‘3’, then the default values are printed as ‘x=3’ and ‘y=undefined’.
When printValue() is called with only argument ‘3’, then the default values are printed as ‘x=3’ and ‘y=undefined’.
Conclusion
In JavaScript, the default parameters are used to set the default value for the function’s parameters.
The default parameters are quite helpful when the parameters contain null or undefined value.
This guide helps in providing detailed knowledge on how to use the JavaScript default parameters.
We have provided a detailed overview of default parameters and their importance is highlighted by demonstrating a set of examples.
How to Check for Null
In JavaScript null parameter is used to declare a variable without assigning a value.
On a Web page, these simple null variables are used for declaring objects that can be defined afterwards.
JavaScript also offers null as an initial type that contains a “null” value.
Also, If the expected object is not created then a function or a variable will return null.
Null values cause problems in the calculation or the manipulation of an object.
However, If you declare variables in your code and check for null values before execution, then there exists less chance of encountering errors.
In this post we will learn about how to check for null with the help of a suitable example.
So, let’s start!
How to check for null
Now we will implement an example in JavaScript to check out the null value.
For this purpose, we will define a function named “info()” that checks the passed argument “arg” for the null value with the help of the “if” statement:
function info(arg) {
if(arg == null) {
console.log('Passed argument is null');
}
else {
console.log ('Passed argument is not null');
} }
In case, if the value of the passed argument “arg” is null, “if” statement will execute and display the specified message “Passed argument is null”, otherwise the control will move towards the “else” statement.
We will now invoke the “info()” function three times while passing the values: “linuxhint”, “94”, and “null”:
info('linuxhint');
info(94);
info(null);
As the passed first two values are not of null type, the message added in the “else” block of the “info()” function will be displayed on the console window.
Whereas, when “null” is passed as “arg”, you will see a message stating that “Passed argument is null”:
![]() The above-given output signifies that our created “info()” function is successfully checking for the null values.
The above-given output signifies that our created “info()” function is successfully checking for the null values.
Conclusion
In JavaScript, the condition “arg == null” can be used to check passed arguments for null values.
In your program, you can create a function named “info()” that accepts any values as an argument.
Then add an “if” statement and specify “arg == null” as its condition.
The added condition will be executed if the passed value is null otherwise, the execution control will move towards the “else” statement.
This post discussed the method to check for null.
JavaScript Object.values() Method
In JavaScript, Object.values() is a function that returns an array containing all the object’s own enumerable property values.
The enumerable properties are the values having the internal countable true flags.
It accepts the value list of an object and returns an array having the elements of countable property values found on the object.
In the object.values() method, the arrangement of the properties is the same as if you loop over the values manually.
This guide offers a detailed overview of the Object.values() method and serves the following learning outcomes:
How does the Object.values() method work
How to use the Object.values() method
How does the Object.values() method work
The Object.values() method retrieves an array whose elements have the enumerable property values.
Being a static method, it is called using the object class name.
SyntaxThe syntax of the JavaScript Object.values() method is given as follows:
Object.values(obj)
Here, ‘obj’ is a parameter which refers to an object.
JavaScript Object.values() method returns an array consisting of all the enumerable property values of an object.
In JavaScript, the numbers, Booleans, and strings may be objects.
However, the date, regular expression, functions, and arrays are always objects.
How to use Object.values() method
The JavaScript Object.values() method does not only return the enumerable property values of a simple array but is also used to retrieve the enumerable property values of the array object with the random ordering.
This section elaborates on how a user can use the JavaScript Object.values() method with examples.
Example 1: How to get the enumerable properties of an objectThe Object.values() method creates the countable property values as array-like objects.
The following code is exercised to get the enumerable properties of an object:
var obj = { 15: "X", 25: "Y", 77: "Z" };
console.log(Object.values(obj));
In this example, an ‘obj’ is created passing the three properties that contain three keys and three values.
![]() The Object.values() method has returned the countable values of the ‘obj’ as can be seen in the output.
Example 2: How to access the enumerable properties of an objectThe Object.values() method can be used to access the enumerable property of an object.
student = { name: 'NAEEM', education: 'MS CS', age: '26' };
console.log(Object.values(student));
In this code, the object ‘student’ has the three-parameter values with the enumerable properties ‘name’, ‘education’ and ‘age’.
When the function calls the object, it returns countable properties of a specified object.
The Object.values() method has returned the countable values of the ‘obj’ as can be seen in the output.
Example 2: How to access the enumerable properties of an objectThe Object.values() method can be used to access the enumerable property of an object.
student = { name: 'NAEEM', education: 'MS CS', age: '26' };
console.log(Object.values(student));
In this code, the object ‘student’ has the three-parameter values with the enumerable properties ‘name’, ‘education’ and ‘age’.
When the function calls the object, it returns countable properties of a specified object.
![]() From the output, it is observed that the enumerable properties of an object ‘student’ are [‘NAEEM’, ‘MS CS’, ’26’].
From the output, it is observed that the enumerable properties of an object ‘student’ are [‘NAEEM’, ‘MS CS’, ’26’].
Conclusion
The JavaScript Object.values() returns an array consisting of all the object’s own countable property values.
The Object.values() method refers to an object therefore the arrays, regular expressions, dates, strings, and numbers can also be passed to the Object.values() method.
This post provides a detailed description of the Object.values() method.
For a better understanding, we have provided a set of examples to illustrate the functionality of the Object.values() method.
How to implement JavaScript AutoComplete feature
You must have seen the autocomplete searches before, for example, while searching something on Google, YouTube, etc.
Maybe you have observed before that when we typed a letter in any search engine a filtered list showed against that particular single character.
How does it happen? It’s the autocomplete feature that makes it all possible.
Multiple approaches can be adopted to implement the auto-complete feature.
In this write-up, we will learn a very basic method to implement the autocomplete feature, and the write-up will be organized as follows:
What does autocomplete mean?
Practical implementation of autocomplete feature
So let’s get started!
What does autocomplete mean?
The autocomplete feature gives relevant suggestions when someone starts typing in the text field.
For example, if a user types the character “c” the autocomplete feature will show a filtered list of all the words containing the “c” letter.
How to use autocomplete feature
In this section, we learn all the key aspects that are necessary to implement the JavaScript autocomplete feature.
So, let’s begin with the HTML:
HTML
<html><head>
<title>Auto Complete</title></head><body>
<div>
<label for="subjectList">Enter Subject Name: </label>
<input type="text" id="com" name ="subjectList" placeholder="Enter Subject Name">
<ul></ul>
</div>
<script src="autoComplete.js"></script></body></html>
In the above snippet we performed the following functions:
We utilized the label tag to specify the label for the text field.
Next, we utilized the input tag to create an input field.
Afterward we utilized the <ul> tag to define an unordered list.
Finally, in the script tag, we specify the address of the JavaScript file.
JavaScript
const subjects = ['Java', 'JavaScript', 'PHP', 'C++', 'C', 'Python', 'C#', 'HTML & CSS', 'R', 'Swift'];
document.getElementById('com').addEventListener('input', (eve) => {
let subjectsArray = [];
if(eve.target.value){
subjectsArray = subjects.filter(sub => sub.toLocaleLowerCase().includes(eve.target.value));
subjectsArray = subjectsArray.map(sub => `<li>${sub}</li>`)
}
displaySubjectsArray(subjectsArray);
});
function displaySubjectsArray(subjectsArray){
const html = !subjectsArray.length ? '' : subjectsArray.join('');
document.querySelector('ul').innerHTML = html;
}
The above code block serves the below listed functionalities:
Firstly, we created an array named “subjects”.
Next, we added an event listener to the <input> element that we created in the HTML file.
To do that we utilized the getElementById() and passed it the id of the <input> element.
Next, we created an empty array named subjectsArray.
To get the value of “input” we have to utilize the target.value property.
Next, we utilized the filter() method to create an array of filtered items.
Next, we utilized the map() method to put the filtered elements in the unordered list.
Afterward, we created a function named displaySubjectsArray() to show the elements of the list.
In the displaySubjectsArray(), we first utilize the length property to check the length of the subjectArray, if it returns false then we wouldn’t show anything otherwise just join the array.
Below snippet will show the output generated by the above-given example program:
![]() The above snippet verified that when the user entered the letter “c”, consequently, the autocomplete feature showed the filtered list of relevant words.
The above snippet verified that when the user entered the letter “c”, consequently, the autocomplete feature showed the filtered list of relevant words.
Conclusion
The autocomplete feature gives relevant suggestions when someone starts typing in the text field.
For instance, if a user types the character “j” the autocomplete feature will show a filtered list of all the words containing the “j” letter.
In this write-up, we have learned all the basics of the autocomplete feature with the help of suitable examples.
JavaScript forms | Explained
JavaScript serves a wide range of functionalities, for example, we can create web and mobile applications using JavaScript, JavaScript assists us in creating special effects, etc.
Another useful feature of JavaScript is that it helps us to enhance the HTML forms.
We can create the forms using the tag however, JavaScript can be used for form processing, form validation, etc.
JavaScript allows us to process the forms without calling/invoking the server.
Moreover, JavaScript offers multiple properties and methods that are used to work with forms.
For example, we can use the getElementById() method to read various HTML elements, using the innerHTML property we can set the form’s content, and so on.
In this write-up, we will understand the basics of JavaScript forms, and to do that, we will cover the below-listed learning outcomes:
What are forms?
How to Create a form using JavaScript?
So, let’s get started!
What are forms?
A form is a container/holder that can hold several elements., the concept of forms is used to collect user’s input using different elements such as input fields, buttons, labels, fieldsets, text fields, and so on.
JavaScript can be used to interact with the forms, to validate the forms, to process the forms, etc.
How to Create a form using JavaScript?
Let’s consider the below-given example to understand how to create a form using JavaScript:
HTML
<body>
<p id="details"> </p>
<form>
Name: <input type="text" id="name"/>
<br><br>
Age: <input type="text" id="age"/>
<br><br>
<input type="button" value="Show Details" onclick="showDetails()"/>
</form></body>
The above program serves the following functionalities:
Firstly, we utilized the <p> tag to define a paragraph, and assign it an id = “details”.
Afterward we created a form using the <form> tag, and within form tag we created two input fields and a button.
JavaScript
function showDetails()
{
var empDetails = document.getElementById('details');
var empName = document.getElementById('name');
var empAge = document.getElementById('age');
empDetails.innerHTML = "Name: " + empName.value + "<br>" + " Age: " + empAge.value;
}
In JavaScript file i.e.
form.js, we utilized the getElementById() method to read HTML elements.
Next, we utilized the innerHTML property to set the name and age on the <p> element.
On successful execution of the program, initially, we will get the below-given output:
![]() Now, we will enter some data in the input fields, and afterward, we will click on the “Show Details” button.
After clicking on the button, we will get the following output:
Now, we will enter some data in the input fields, and afterward, we will click on the “Show Details” button.
After clicking on the button, we will get the following output:
![]() This is how you can get started with the JavaScript forms.
This is how you can get started with the JavaScript forms.
Conclusion
In JavaScript, the forms are used to collect user’s input using different elements such as input fields, check boxes, buttons, text fields, and so on.
JavaScript makes it possible to process the forms without calling the server.
JavaScript provides several properties and methods to work with forms such as getElementById() method to read various HTML elements, the innerHTML property to set the form’s content, and so on.
This write-up provides the basic understanding of JavaScript forms with the help of suitable examples.
Top Trending JavaScript Frameworks of 2022
Are you planning to grow in the world of JavaScript programming? Then Keep in mind it’s not possible without stepping in into the JavaScript frameworks.
In any programming language, frameworks provide a set of libraries that assist the programmers in coding effectively.
In the past few years, many JavaScript frameworks have been released, and choosing one among them can be a challenging task.
So, if you are confused and don’t know which framework you should choose or which framework is best for you, then this write-up is going to assist you in this regard.
This post will explain some top trending JavaScript frameworks, and in this regard, it will cover the following aspects of JavaScript frameworks:
Getting Started guide to JavaScript Framework
Why Someone Should Use a Framework?
Top Trending JavaScript Frameworks.
At the end of this write-up, you will be able to decide which JavaScript framework suited you the best.
So, let’s begin!
Getting Started guide to JavaScript Framework
The JavaScript framework is a set of libraries that assist the developers with pre-written(tried and tested) code.
These libraries can be utilized to perform various programming tasks.
So, all in all, the JavaScript frameworks allow the developers to create scalable and interactive websites/web applications.
Why Someone Should Use a Framework?
JavaScript frameworks are becoming more complex and more powerful with each passing year.
These frameworks offer numerous features/benefits that grab the programmer’s intentions and force them to use these frameworks.
Some remarkable features of JavaScript frameworks are listed below:
Saves a lot of time.
Gives maximum Productivity.
Accelerates product development time.
Provides predefined functions.
Top Trending JavaScript Frameworks
There are numerous frameworks and libraries available for the JavaScript developers, among them we have shortlisted the five most frequently used and top-rated JavaScript frameworks.
React JS
Node JS
Angular JS
Ember JS
Svelte JS
React JS
It is a JavaScript library that offers different services to build interactive and fast user interfaces.
It is an open-source and component-based JavaScript library developed at Facebook in 2011.
Advantages of React JS
Below is a list of some notable advantages of React JS:
Simplified scripting.
Easy to learn.
Ease of maintenance.
It enhances the performance of web applications via Virtual DOM.
Building dynamic web applications with react js is easy.
Faster rendering.
Reusable components.
SEO friendly.
Provides stable coding structures.
It supports handy tools
Disadvantages of React JS
Some commonly faced disadvantages of React JS are listed below:
The high development pace is a key disadvantage of React JS.
Another disadvantage of react js is poor documentation which is directly associated with a high development pace(developing/updating at a very fast rate, no time for appropriate documentation).
The main focus of React js is on the view section, so while developing large applications we have to include some other libraries as well to handle the other parts of the application.
Node JS
Node.js is a great way of building web apps, and it’s not too hard to get started.
Node is an open-source runtime environment based on chrome’s v8 engine and is used to develop real-time network applications.
Node.js allows the programs written to be executed on the server.
Advantages of Node JS
Because of its tremendous features, Node js has become the first choice for various industries such as IT, healthcare, etc.
Easy to learn.
Node js improves the application’s performance.
Google Chrome V8 supports node Js.
Code reusability.
Good for microservices.
Scalable.
Node js enables programmers to develop server-side and front-end code with simplicity.
Simultaneous request handling.
Efficient for real-time applications.
Disadvantages of Node JS
Some frequently encountered disadvantages of Node JS are listed below:
API doesn’t remain stable.
Code maintenance is not easy.
Changes take place frequently.
Immature tools.
Heavy computations can affect the efficiency of Node Js.
Lack of library support.
Angular JS
It is an open-source framework developed by google developers in 2010.
Angular js is a leading framework for building single-page web applications.
The single-page apps load the whole content of a website on a single page.
It means once the main page is loaded, then after that, if we click on the link, then instead of reloading the whole page it will simply update the sections within the page itself.
Advantages of Angular JS
We have listed down some key features of angular js:
Powerful JavaScript-based framework.
Very useful to develop single-page applications.
Two-way data binding is a key advantage of angular js.
Dynamic, rich, and fast.
Neat and Clean code.
Fast and efficient.
Unit testable.
Disadvantages of Angular JS
Below is the list of commonly faced disadvantages of Angular JS:
It doesn’t work if javascript is disabled.
Older browsers don’t support Angular.
Security risks.
Memory leaks can affect the browser’s speed.
Ember.JS
It is an open-source JavaScript front-end web framework used to develop modern web applications.
It is designed for large web applications but can be applied to small projects as well.
It utilizes the component-service pattern.
Ember js enables us to develop single-page scalable web applications.
Advantages of Ember JS
Some notable advantages of Ember.js are listed below:
Minimal need for configuration.
It has a built-in data layer that makes ember super simple to keep the user interface in sync with the backend.
Ember js has a built-in router.
Stability without stagnation is a remarkable feature of Ember js.
Giant ecosystem.
Disadvantages of Ember JS
Some key disadvantages of Ember.js are listed below:
Sluggishness in popularity.
It’s not easy to learn as a beginner.
Too large for small projects.
Svelte JS
It is an open-source front-end framework that compiles into tiny standalone JavaScript modules and is used to create fast and lean static web applications.
It is a modern framework developed by Rich Haris and first released in 2016.
Advantages of Svelte JS
The key advantages of the svelte js are listed below:
It is very easy for beginners.
Lightweight.
The ability to compile code without virtual DOM.
Efficient.
Very fast.
Automatic update.
Reactivity.
Disadvantages of Svelte JS
Some commonly faced disadvantages of the svelte js are listed below:
It doesn’t have many dev tools.
Stands without major support.
Small community.
Routing issues.
Conclusion
The JavaScript framework is a set of libraries that assist the developers with pre-written(tried and tested) code.
These JavaScript frameworks allow the developers to create scalable and interactive websites/web applications.
JavaScript frameworks offer numerous features such as time-saving, maximum productivity, accelerating product development time, and so on.
In this post, we explained some top trending javascript frameworks of 2022 along with their advantages and disadvantages.
How does Refresh Page Works
You must have seen before while entering the data in a web form like a signup form, the page gets refreshed/reloaded to fetch the updated data.
How does this happen? Well!, there are numerous built-in functions and objects that are used for various purposes.
location.reload is one of them which is used to refresh a current resource.
This write-up will provide a thorough understanding of the below-listed learning outcomes:
What is location.reload and how does it work?
How does Refresh Page Works?
How to refresh a page automatically?
So let’s begin!
What is location.reload and how does it work?
Location.reload is a built-in method that is used to reload/refresh a page or current resource.
We can optionally specify true or false within the reload method.
The basic syntax of the reload method will be like this:
location.reload()
If we specify true within the reload method then it represents that the webpage will be reloaded from the server while if we specify a false value then the webpage will be reloaded from the browser’s cache.
How does Refresh Page Works?
As we have discussed earlier, to refresh a page, the location.reload method is used.
But how does the refresh page works? Well, the answer is very simple, it works exactly the same way as pressing the “RELOAD” button does in any browser.
How to refresh a page?
In this section, we will consider some examples to understand how to refresh a page:
<html><head>
<script type="text/JavaScript">
function refresh(){
location.reload();
}
</script></head><body>
<form>
<input type="button" value="Reload" onclick="refresh()" />
<br><br>
</form></body></html>
In the above snippet, we created a button and assigned it a value “Reload”.
The refresh() function will be invoked when someone clicks on that button.
Within the refresh() function we utilized the location.reload method to refresh the current resource.
The above JavaScript program will generate the below-given output:
![]() This is how the location.reload method works.
This is how the location.reload method works.
Reload the page from the webserver
In this example, we will pass true to the reload method:
location.reload(true);
In the above snippet, we passed the true value which means the page will be reloaded from the webserver.
Reload the page from the cache
In this example, we will pass true to the reload method as shown in the below snippet:
location.reload(false);
This time we passed false to the location.reload method, as a result, the current page/resource will be reloaded from the browser’s cache.
How to refresh a page automatically?
In this example program, we utilized the setTimeout method which will set a time.
Within setTimeout method, we utilized the reload method, so, collectively both these methods will refresh the current page after a specified time duration:
<script type="text/JavaScript">
setTimeout("location.reload(true);", 2000);</script>
In the above snippet, we passed the time duration as 2000 which means the webpage will be refreshed after every two seconds.
Conclusion
Location.reload is a built-in method that is used to reload/refresh a page or current resource.
We can optionally specify true or false within the reload method.
Specifying “true” within the reload method will reload the page from the web server while specifying false in the reload method will reload the current resource from the browser’s cache.
This write-up presented a comprehensive guide on how to refresh a page with the help of some examples.
Errors
Errors are a very common thing in a programmer’s life.
No matter how strong a programmer is, errors are consistent companions of the programmers.
With time, a good programmer keeps growing and getting better at debugging errors and resolving them, and in this regard, programming languages including JavaScript assist the programmers by offering them multiple error handling techniques.
This post will present a complete guide for the below-listed concepts related to Errors:
What are errors?
Types of Errors
How to Handle Errors?
So, let’s begin!
What are errors?
In programmatic terms, a prohibited action made by the user that makes the behavior of a program abnormal is known as an error.
In simple words, we can say that anything that stops the normal flow of the program is referred to as an error.
Errors can be of different types and they appear because of several reasons.
Types of Errors
There are three major types of errors in any programming language including JavaScript which are listed below:
Syntactical Errors
Logical Errors
Runtime Errors
Syntactical Errors
In javascript, the errors that occur because of the syntax are known as syntactical or syntax errors.
The syntax errors are also known as the parsing errors.
In traditional computer languages like Java, C++, etc.
the syntax errors occur at compile time however, the syntax errors occur at the interpreted time.
Examples of Syntax errors:
Some of the commonly occurred syntax errors are listed below:
In JavaScript, a syntax error can occur because of misspelling a keyword such as typing “console” instead of the “console”:
consle.log();
A syntax error can occur because of missing a parenthesis:
Document.write(;
Neglecting a curly bracket while working with a function will result in a syntax error:
function exampleFunction(x, y) {
return x * y;
In the above snippet, the closing bracket “}” is missing which will trigger a syntax error.
![]() This is how a runtime error occurs.
This is how a runtime error occurs.
How to handle Syntax Errors
The syntax errors can be resolved by correcting the syntax such as correcting the spellings, putting the missing parenthesis, etc.
In the below snippet we put the closing bracket “}” that will resolve the syntax error:
function exampleFunction(x, y) {
return x * y;}
![]() The output verified that putting the closing curly “}” bracket successfully resolved the syntax error.
The output verified that putting the closing curly “}” bracket successfully resolved the syntax error.
Logical Errors
In JavaScript, logical errors occur when the code is syntactically correct and the program runs successfully but produces faulty results.
Logical errors are very difficult to handle as compared to syntactical errors.
Runtime Errors
In JavaScript, the runtime errors/exceptions after the compilation or interpretation of the code.
Undefined Variable
The below-given piece of code will throw a runtime error:
<script>
console.log(z);</script>
In the above snippet we tried to print the value of variable “z”, but “z” is not defined anywhere in the program, as a result, we will encounter the following runtime error:
![]() This is how runtime errors occur.
This is how runtime errors occur.
How to Handle Runtime Errors?
JavaScript offers different statements like Try, catch, finally, and throw, to handle the runtime errors.
We will discuss each of them one by one:
Try-catch: Main code to run will be specified within the try block while the exception statement will be specified within the catch block.
The “finally” statement can be used optionally with the try-catch statements which will execute regardless of the exceptions.
Throw: The throw keyword is used to throw a user-defined explicit exception.
How to resolve a runtime error using try-catch, and finally statements:
The below code block will explore how to handle exceptions using try-catch and finally statements:
<script>
var x = 100, y = 25;
var z;
z = x - y;
try {
document.write("Resultant value: ", z);
document.write("<br>");
}
catch (excep) {
document.write("An Error Occurred: ", excep);
document.write("<br>");
}
finally {
document.write(" Finally block");
}</script>
In this example program, we specified the main code in the try block, the error message in the catch block, and a dummy message in the finally block.
The code specified within the “try” block will execute if the code is error-free, the “catch” block will execute in case of any error, and the “finally” block will execute regardless of the exceptions:
![]() The output verified that the catch block didn’t execute because the code was error-free.
The output verified that the catch block didn’t execute because the code was error-free.
Conclusion
In JavaScript, a prohibited action made by the user or programmer that makes the behavior of a program abnormal is known as an error.
Errors can be of different types such as syntax, runtime, and logical errors.
The syntax errors can be resolved by correcting the syntax, logical errors are difficult to resolve(can be resolved by correcting the logic), and runtime errors can be tackled using try, catch, finally, and throw keywords.
This write-up explained the different types of errors, and how to handle them.
Different methods to redirect to a new page
The majority of websites use javascript to do a variety of things, such as populating forms, redirecting to a new window/page, and so on.
Specifically, if we talk about page redirection, JavaScript offers different methods and properties to redirect from one page to another.
Among them the most frequently used methods and properties include location.replace(), location.assign(), and location.href.
This write-up will explain the working of the below-listed methods of redirecting to a new page:
What is location.replace() method and how it works?
What is location.href method and how it works?
What is location.assign() method and how it works?
So, let’s begin!
What is location.replace() method and how it works?
As we have discussed earlier location.replace() is among the frequently used page redirection methods.
The location.replace() method takes a specific URL as a parameter and replaces the current webpage with the specified address.
The below given code block will provide you more clarity about this concept:
<html><body>
<button onclick="ReplaceFun()">Let’s Go!</button>
<script>
function ReplaceFun() {
window.location.replace("https://www.linuxhint.com/");
}
</script></body></html>
One of the drawback of using location.replace() method is that it deletes the URL of current page from the history and hence we can’t navigate back to the original webpage as shown in the below-given GIF:
![]() Output verified that location.replace()method replaced the current webpage with the specified URL.
Output verified that location.replace()method replaced the current webpage with the specified URL.
What is location.href method and how it works?
Location.href is a JavaScript property that is found in most browsers and is used to specify the URL of a link.
It sets/returns the complete URL of the current page.
The below-given example program will provide you better assistance in this regard:
<html><body>
<button onclick="hrefFun()">>Let’s Go!</button>
<script>
function hrefFun() {
window.location.href = "https://www.linuxhint.com/";
}
</script></body></html>
Clicking on “Let’s Go!” button will redirect us to the “linuxhint.com” as shown in the below given GIF:
![]() The above-given GIF shows that location.href property redirects us to the specified link.
Using location.href property we can navigate back to the previous/original webpage.
The above-given GIF shows that location.href property redirects us to the specified link.
Using location.href property we can navigate back to the previous/original webpage.
What is location.assign() method and how it works?
The location.assign() method takes the reference of the new page as a parameter and displays it at the specified address.
Moreover, it allows us to navigate back to the original/previous webpage.
<html><body>
<button onclick="assignFun()">Let’s Go!</button>
<script>
function assignFun() {
window.location.assign("https://www.google.com/");
}
</script></body>></html>
Clicking on “Let’s Go!” button will redirect us to the specified link i.e.
“google.com”:
![]() The above GIF verified that the location.assign method redirects us to the specified link (i.e.
google.com).
Moreover, it confirmed that the back button is enabled which means we can navigate back to the previous page/link.
The above GIF verified that the location.assign method redirects us to the specified link (i.e.
google.com).
Moreover, it confirmed that the back button is enabled which means we can navigate back to the previous page/link.
Conclusion
JavaScript offers multiple methods to redirect to a new page such as location.assign(), location.replace(), and location.href.
All these methods come up with the same purpose however location.href property and location.assign() method allow us to navigate back to the previous/original webpage however, location.replace() deletes the URL of current page from the history and hence we can’t navigate back to the original webpage.
This write-up explained different methods that assist us to understand how to redirect to a new page.
Breadth-First Search Traversal
In this modern technological world, we are required to use techniques for traversing the trees programmatically, even though our computer has a user-friendly interface for browsing across our file tree, for this purpose Breadth-first search (BFS) is the most useful algorithm.
Breadth-first search is a traversing algorithm that is used for searching or traversing the tree or graph data structure layer by layer.
Before moving on to the children node of the next depth level, it visits each node that exists at the current depth.
This article will explain how to run the Breadth-first search Algorithm using an appropriate example.
So, let’s start
How Breadth-first search Algorithm works
The working of the Breadth-first search Algorithm comprises the following steps:
Choose a node and create a queue with all of its neighbor nodes.
Remove those nodes from the queue that are visited and mark them.
Add all of its neighbor nodes in the queue.
Repeat until the queue becomes empty or you reach your objective.
If a node is revisited before it was not marked as visited, then the program will be stopped.
hence, mark nodes as visited and then it will not be searched again.
Implementation of Breadth-first search traversal Algorithm
Breadth-first search traverses trees from left to right, then moves from top to bottom (parent node to child node).
ensuring that all the nodes that are present on current depth are visited.
Now, let’s have a look at a small example to understand the BFS traversal works.
Here, the given undirected graph has 5 nodes “0”, “1”, “2”, “3”, and “4”:
![]() We will now use this traversal algorithm on the specified graph.
We will now use this traversal algorithm on the specified graph.
Step 1: Initialization of the queue
First of all, we have to initialize the queue “q”:
![]()
Step 2: Choose starting node
Next, we will choose the starting node.
For this purpose, we will select “0” as starting node and mark it as visited:
![]()
Step 3: Unvisited adjacent nodes of starting node
Starting node is visited and marked; now, we will check its adjacent nodes.
In the below illustration, starting node “0” has three unvisited adjacent nodes “1”, “2”, and “3”; however, we will choose node “1” because of the sequence of counting.
Then, mark it as visited and add it to the queue:
![]() Now, the unvisited node of “0” is “2”, which is also marked as visited and added to the queue:
Now, the unvisited node of “0” is “2”, which is also marked as visited and added to the queue:
![]() Then, we will visit the last unvisited adjacent node, which is “3”, marked it as visited and enqueue it:
Then, we will visit the last unvisited adjacent node, which is “3”, marked it as visited and enqueue it:
![]()
Step 4: Dequeue the starting node
Now our selected starting node “0” does not have any unvisited adjacent nodes, So we will remove the queue and search for the node “1”:
![]()
Step 5: Check the unvisited adjacent of node “1”
At this point, node “1” have node “4” as its unvisited adjacent:
![]() Node “4” is now marked as visited and added to the queue.
Now, we have no more unvisited nodes.
However, according to the algorithm, we will obtain all unvisited nodes and continue to remove the node from the queue as per the procedure.
The program will end when the queue becomes empty.
Let’s implement an example to check how Breadth-first Search works in JavaScript.
Node “4” is now marked as visited and added to the queue.
Now, we have no more unvisited nodes.
However, according to the algorithm, we will obtain all unvisited nodes and continue to remove the node from the queue as per the procedure.
The program will end when the queue becomes empty.
Let’s implement an example to check how Breadth-first Search works in JavaScript.
How to implement Breadth-first Search Traversal
To implement Breadth-first Search Traversal, first of all we will create a graph:
let graph;
The above-given graph which is used to illustrate the breadth-first search has “5” nodes.
So, here we will define “5” nodes:
const nodes = 5;
Now, create a “visited[ ]” array that will be used to store visited nodes and the length of this array will be set according to the number of nodes:
let visited = new Array(nodes);
Next, we will define the “createGraph()” function for the purpose of creating a graph and adding nodes to it.
Then the “for” loop will execute till the length of the graph.
Inside the loop, there is a two-dimensional array that is use to represent the graph edges initialized with “0”:
const createGraph = (nodes) => {
graph = new Array(nodes);for (let i = 0; i < graph.length; i++) {
graph[i] = new Array(nodes);}for (let i = 0; i < graph.length; i++) {for (let j = 0; j < graph[i].length; j++) {
graph[i][j] = 0;}}};
Then, we will define the “addEdge()” function that accepts two arguments “a” and “b”. This function will check the edge between two nodes.
If an edge is found between two nodes, then the “addEdge()” function will replace the “0” entry with “1” in the created graph(two-dimensional array).
Also, adding “1” indicates that the passed nodes argument have an edge in between them:
const addEdge = (a, b) => {for (let i = 0; i < graph.length; i++) {for (let j = 0; j < graph[i].length; j++) {if (i === a && j === b) {
graph[i][j] = 1;
graph[j][i] = 1;}}}}
Now, we will define the “breadthFirstSearch()” function.
First, we will create an empty “queue”.
At start, all of the nodes are unvisited so they are marked as false with a “visited[i] = false” statement.
Then, we will select the starting “node” that is passed as argument to the “breadthFirstSearch()” function and mark it visited.
The “queue.push()” method will push the “node” to the queue then the “while” loop will execute till the length of the queue.
This loop will check the edges of the “currentNode” with the remaining node.
Inside the “for” loop, the added “if” condition “[currentNode][j] === 1” will check the edges between the “currentNode” and the remaining “j” nodes.
In case, if both nodes have an edge between them and the corresponding “j” node is not visited yet, then it will be marked as “visited” and pushed to the “queue”:
const breadthFirstSearch = (node) => {const queue = [];for (let i = 0; i < visited.length; i++) {
visited[i] = false;}visited[node] = true;
queue.push(node);
while (queue.length) {
let currentNode = queue.shift();
console.log(`visiting ${currentNode}`);for (let j = 0; j < graph[currentNode].length; j++) {if (graph[currentNode][j] === 1 && visited[j] === false) {
visited[j] = true;
queue.push(j);}}}};
Next, we will call the “createGraph()” function and pass the “nodes” as argument:
createGraph(nodes);
After doing so, specify the edges of node “0, 1, 2, 3” with the “addEdge()” function, as demonstrated in the above-given diagram:
addEdge(0, 1);
addEdge(0, 2);
addEdge(0, 3);
addEdge(1, 0);
addEdge(1, 4);
addEdge(2, 0);
addEdge(2, 4);
addEdge(3, 0);
addEdge(3, 4);
Here, “0” is passed as starting node to the BFS() function which will perform the further operation:
breadthFirstSearch(0);
BFS() method will traverse the graph nodes and output the visited nodes on console:
![]() That was all useful information about Breadth-first search traversal algorithm.
Go for further research if required.
That was all useful information about Breadth-first search traversal algorithm.
Go for further research if required.
Conclusion
Breadth-first search (BFS) is a traversing algorithm that is used for searching or traversing the tree or graph data structure layer by layer.
Before moving on to the children node of the next depth level, it visits each node that exists at the current depth.
In this article, we have briefly discussed the Breadth-first search traversal JavaScript algorithm and its working with the help of a suitable example.
A Practical Guide to JavaScript Debugging
In JavaScript, if you made some basic syntactic mistakes, such errors/mistakes will be detected by any text editor.
However, some errors can’t be detected or debugged by any text editor such as misspelling a keyword, missing an operator between two values, etc.
In such cases, we would not get any output or error, and from the text editor, there is no way to find what exactly has happened? Now you must be wondering how to debug an error? No worries! This write-up will resolve all your concerns.
This post will provide a practical guide to debug an error and it will be organized as follows:
A simple JavaScript program to concatenate two values
Error Program
How to Debug Error?
A Practical Guide to Debug an error
So let’s get started!
A simple JavaScript program to concatenate two values
To understand the concept of JavaScript debugging, we will consider a very basic example.
<html>
<head>
<script type="text/javascript">function concat(){
var value1 = document.getElementById("val1").value;
var value2 = document.getElementById("val2").value;
document.getElementById("con").innerHTML="Concatenated Value = "+(value1 + value2);}
<input id = "val1" type="text" placeholder="enter a value"/>
<br><br><br>
<input id = "val2" type="text" placeholder="enter a value"/>
<br><br><br>
<button onclick="concat()" id="btnConcat">Concat</button>
<h2 id="con"> Concatenated Value = </h2></body></html>
We created a very simple program that will concatenate the two values on clicking the button.
Following window will appear on successful execution of the code:
![]() The user entered two values i.e.
“MR.
” in the first text field and “Java” in the second text field.
Clicking on the “Concat” button will produce the following output:
The user entered two values i.e.
“MR.
” in the first text field and “Java” in the second text field.
Clicking on the “Concat” button will produce the following output:
![]() The output verified that our program is running perfectly fine.
The output verified that our program is running perfectly fine.
Error Program
Let’s say we forget to utilize the concatenation operator “+” in our code:
document.getElementById("con").innerHTML="Concatenated Value = "+(value1value2);
Such type of error can’t be detected by the text editors:
![]() Now this time when we run the code, we will get the following output:
Now this time when we run the code, we will get the following output:
![]() Clicking on the button doesn’t perform any action, it shows that something went wrong with our code.
Clicking on the button doesn’t perform any action, it shows that something went wrong with our code.
How to Debug Error
In the above example, we observed that there is an error in the program.
But what exactly is the error and how to debug it? Well! All the modern browsers come with developer tools and a console where we can perform the debugging.
In most modern browsers, “F12” is the short key to open the developer tools.
Pressing the “F12” key will open the following window:
![]() At the top, you will find the different tabs, for example, the first tab is the “Elements” tab, and clicking on the Elements tab will show us the complete code/tags.
The second tab is the “Console” tab where we can perform the debugging, and so on.
JavaScript provides a method named console() that can take some values/expressions and print the result on the browser console., the console.log() method is usually used for debugging purposes.
At the top, you will find the different tabs, for example, the first tab is the “Elements” tab, and clicking on the Elements tab will show us the complete code/tags.
The second tab is the “Console” tab where we can perform the debugging, and so on.
JavaScript provides a method named console() that can take some values/expressions and print the result on the browser console., the console.log() method is usually used for debugging purposes.
A Practical Guide to Debug an error
As of now we have learned what is an error and how to debug it? In this section, we will provide a practical guide to demonstrate how to debug an error:
In this example program, we will utilize the browser’s developer tools to debug the error:
document.getElementById("con").innerHTML="Concatenated Value = "+(value1value2);
![]() In the above snippet, we missed the “+” operator between value1 and value2, consequently, our program wouldn’t work appropriately:
In the above snippet, we missed the “+” operator between value1 and value2, consequently, our program wouldn’t work appropriately:
![]() The output verifies that the error is debugged in the console window and it provides complete details about the error i.e.
what kind of error it is? Which line causes the error etc.
In this example program, we will utilize the console.log() method to debug the error:
console.log(value1value2);
The output verifies that the error is debugged in the console window and it provides complete details about the error i.e.
what kind of error it is? Which line causes the error etc.
In this example program, we will utilize the console.log() method to debug the error:
console.log(value1value2);
![]() In the above program, value1value2 is not defined anywhere in the program.
But still, the text editor didn’t show any kind of error, however, it will be debugged in the browser’s console:
In the above program, value1value2 is not defined anywhere in the program.
But still, the text editor didn’t show any kind of error, however, it will be debugged in the browser’s console:
![]() The above snippet explained that value1value2 is not defined in our code, the error occurred because of line 7, and the error occurred when we clicked on the button.
The above snippet explained that value1value2 is not defined in our code, the error occurred because of line 7, and the error occurred when we clicked on the button.
Conclusion
In JavaScript, a text editor can’t debug some errors.
However,, the browser’s developer tools and console.log() method can be used to debug the errors.
In most modern browsers, “F12” is the short key to open the developer tools.
This write-up presented a complete practical guide to debug errors.
Difference between every() and some() methods
JavaScript has many useful methods that can work easily with the arrays.
Some of these are map(), pop(), filter() and push().
JavaScript also has some() and every() methods.
The main difference between the mentioned methods is that the some() method is used for finding at least one or more than one value in the array according to the passed condition, whereas the every() method checks whether all elements of an array are satisfying the given condition or not.
This post will practically demonstrate the difference between every() and some() method using appropriate examples.
So, let’s start!
every() Method
every() method in JavaScript is used to check whether all elements of an array are satisfying the given condition or not.
If even a single value does not satisfy the element the output will be false otherwise it will return true.
It is opposed to some() method.
Syntax
The general syntax of every() method is:
array.every(callback(currentvalue, index, arr), thisArg)
In JavaScript, every() method returns a Boolean value (true/false) as output.
Parameters
“callback” is a function that will test the condition.
“currentvalue” shows the current element of the array and it is required.
“index” represents the index of the current element of the array and it is optional.
“arr” is an optional parameter and demonstrates the array where the current element belongs.
“thisArg” is an optional parameter and its value is used while executing the callback function.
Now, let’s check out an example for understanding the usage of every() method.
How to use every() method
In this section, we will demonstrate the usage of every() method in JavaScript.
For this purpose, consider the following array of integer values:
let arr = [1, 2, 3, 4, 5, 6, 7, 8 ];
We will now use every() method to check whether the given array has a positive value or not:
arr.every((value)=> {return (value > 0);});
The given array that we passed to the every() method has positive values so the condition is satisfied and the output will be true otherwise it will return false as an output if the given condition is not satisfied:
![]()
some() Method
The some() method is used with arrays in JavaScript.
It accepts the Boolean expression (true/false) and is used to check if at least one or more than one element in the array satisfies the passed condition or not.
Syntax
The general syntax of some() method is:
array.some(function(value, index, arr), this)
In JavaScript, some() method also returns a Boolean value (true/false) as output.
Parameters
“function” executes for every element of the array.
“value” shows the current element of the array and it is required.
“index” refers to the index of the current array element and is an optional parameter.
“arr” refers to the array where the current element belongs and it is also an optional parameter.
These parameters are optional and the boolean expression that it accepts is as follows:
(element) => Boolean
The “element” denotes the current element in the array that is being checked.
The “boolean” returns the Boolean value either true or false.
How to use some() method
Now, consider the following array of integer values:
let arr =[ 2, 3, 4, 5, 6, 7, 8];
Next, we will check if there is at least or more than one even element is in the array by using the some() method:
arr.some((value) => { return (value%2 == 0); });
The some() method will find at least or more than one even element from a given array and the output will be true because the given list has four even elements that are divisible by 2:
![]() We have disscussed the difference between some() and every() method, their syntax and example.
We have disscussed the difference between some() and every() method, their syntax and example.
Conclusion
In JavaScript, main difference between the every() and some() methods is that the some() method is used for finding at least one or more than one value in the array according to the passed condition, whereas, the every() method check whether all elements of an array are satisfying the given condition or not.
This post illustrates the difference between every() and some() methods, its syntax with examples.
JavaScript exec() Method | Explained
In JavaScript, the regular expressions are utilised for searching and pattern matching purposes.
JavaScript exec() method is a part of a regular expression object.
JavaScript exec() method is used to search for a matching string in a certain string.
The exec() method returns the output in an array form if the matching string exists else returns the null.
This descriptive article will provide a piece of deep knowledge about the JavaScript exec() method with the following outcomes.
– How does the JavaScript exec() method work
– How to use the JavaScript exec() method
How does the JavaScript exec() method work
The JavaScript exec() method searches to find the match of a string in a particular string.
Syntax
The syntax of the exec() method is given as follows:
RegExpObject.exec(string)
Here, ‘string’ is a parameter that specifies the string to be searched.
The exec() returns the matching string or null value.
How to use the JavaScript exec() method
The JavaScript exec() method is used with the aim of searching for a matching string in a specified string.
This section provides a direction to use the exec() method with examples.
Example: How to search a string using the exec() method
The exec() method searches for matching strings and returns the output in an array form.
string = "LinuxHint is a programming website";
object = newRegExp( "LinuxHint");
output = object.exec(string);
console.log("Returned value : " + output);
object = newRegExp( "website");
output= object.exec(string);
console.log("Returned value : " + output);
In this example, a string “LinuxHint is a programming website” is passed to an object.
The regular expressions are used as objects to search the string.
When the function calls, it checks whether the matching string is present or not.
If the function finds a matching string it will return the first one(original) or a null value.
![]() The returned output showed that there is a matching string in a function.
Therefore the function returned the original strings as ‘LinuxHint’ and ‘website’.
The returned output showed that there is a matching string in a function.
Therefore the function returned the original strings as ‘LinuxHint’ and ‘website’.
Example: How the exec() method behaves if the string does not match
The exec() method either returns the matching string or the null value.
The following code tries to match the characters with the string.
string = "LinuxHint is a programming website";
object = RegExp( "language");
output = object.exec(string);
console.log("Returned value : " + output);
In the above code, the string “language” is passed to the RegExp object.
It will check if the matching string is present or not.
In the object, the parameter value is ‘language’.
When the function is call, it will return the output.
![]() The output showed there is not a matching string in the string of the specified object.
Therefore the function returned the ‘null’ value.
The output showed there is not a matching string in the string of the specified object.
Therefore the function returned the ‘null’ value.
Conclusion
The exec() method returns the output in an array form if the matching string exists else returns the null.
The exec() method is applied on the RegExp object’s output.
In this descriptive article, we explained the exec() method.
For better understanding, we provided the usage and functionality of the exec() method along with examples.
How to find absolute value
The JavaScript Maths.abs() method provides a utility to attain the absolute value of a number.
The abs() method is an absolute function of maths and therefore, it is used as the Math.abs() method.
Absolute value is a positive value or a value without negation.
Math.abs() method belongs to ECMAScript1 and is supported by all the browsers.
This guide will describe the detailed knowledge of the JavaScript Math.abs() method with the following outcomes.
– How does JavaScript Math.abs() method works
– How to use the JavaScript Math.abs() method
How does JavaScript Math.abs() method works
Math.abs() is a static function of JavaScript and returns the absolute value.
Let’s refer to the following syntax of the Math.abs() method.
Math.abs(n)
Here, ‘n’ is a parameter and Math.abs() retrieves the absolute value of ‘n’.
Math.abs() method returns the same output if the ‘n’ is positive or zero.
However, if the given number is negative then it removes the negation and returns a positive number.
How to use the JavaScript Math.abs() method
Javascript Math.abs() function is commonly used to acquire the absolute value of a given number.
It refers to its distance from the minimum value on the number line without any direction.
How to use the Math.abs() method with the positive number
Here, we’ll show you how Math.abs() method behaves when a positive number is passed to it.
value = Math.abs(37);
console.log(value);
In the above code, a positive value ‘37’ is passed to the Math.abs() method and the result of the Math.abs() method is stored in a variable.
![]() The output showed that the function returned the same value as an output because the Math.abs() function returns the absolute values only.
Therefore, the returned output number is ‘37’.
The output showed that the function returned the same value as an output because the Math.abs() function returns the absolute values only.
Therefore, the returned output number is ‘37’.
How to use the Math.abs() method with the negative number
This example demonstrates the working of the Math.abs() method if a negative number is passed to it.
value = Math.abs(-18);
console.log(value);
In this code, the negative value ‘-18’ is passed as a parameter to the Math.abs() function.
![]() The output showed that the function returned the positive value of the ‘18’.
We know that the Math.abs() function only returns the absolute values.With the negative values, this function removes the negation sign and converts them into positive values.
The output showed that the function returned the positive value of the ‘18’.
We know that the Math.abs() function only returns the absolute values.With the negative values, this function removes the negation sign and converts them into positive values.
How to use the Math.abs() method with the null value
The following code is practised to understand the working of Math.abs() in presence of a null value.
value = Math.abs(null);
console.log(value)
In the above code, a null value is passed to the Math.abs() function.
![]() The output showed that the Math.abs() function returned the ‘0’ when a null value is passed to a parameter.
It is the property of Math.abs() method that the function returns the ‘0’ for an empty string.
The output showed that the Math.abs() function returned the ‘0’ when a null value is passed to a parameter.
It is the property of Math.abs() method that the function returns the ‘0’ for an empty string.
Conclusion
In JavaScript, the Math.abs() function is used to obtain the absolute value of a number.
Math.abs() changes the sign of negative number.
However, it returns the same number in case of a positive number or zero value.
This post demonstrates the working and usage of the Math.abs() method.
Top 7 Best JavaScript Minification Tools
Minifying is a well-known code minimization or code compression technique.
Minification tools are used to minimize the code by eliminating the unnecessary white space character, newline characters, and comments without affecting the functionality of your web pages.
JavaScript has many minification tools that are used to remove the unnecessary characters, which could be anything that will not affect the functionality and execution of code after removing.
Here is the list of the top 7 JavaScript minification tools:
JSCompress
JS Min
Uglify JS
GRUNT JS
Ajax Minify
JS Packer
Minify
This write-up will discuss the above-mentioned top 7 JavaScript minification tools in detail.
So, let’s start!
JSCompress
JavaScript Compress or JSCompress is the online compressing tool that allows the users to compress or shrink the JavaScript file.
Features of JSCompress
Here is the list of some of the fantastic features of JSCompress tool:
JSCompress helps to minimize the execution time.
It reduces the size of the file by eliminating the whitespace characters and comments that are unnecessary.
It decreases the bandwidth use of your website and makes downloading time faster for users.
![]()
JSMin
JSMin is an online compressing tool that is used to eliminate the whitespace and unnecessary comments from JavaScript and jQuery files.
It performs the specified operation without taking much time; as a result the downloading becomes faster.
JSMin follows a programming style and removes clean, literate self–documentation downloads.
Features of JSMin
Some of the significant features of JSMin tool are listed below:
JSMin provides an API to minify your JavaScript code.
It eliminates the whitespace and unnecessary comments from JavaScript and jQuery files quickly.
It usually compresses the file size and makes downloading rapidly.
![]()
UglifyJS
UglifyJS is the JavaScript online tool that helps to implement a generic JavaScript compressor, parser, and beautifier toolkit.
Features of UglifyJS
UglifyJS tool provides multiple features.
Some of them are listed below:
UglifyJS is developed on NodeJs but it works properly on any type of JavaScript platform that supports the CommonJS module system.
If the platform that you choose is not supporting CommonJs then remove the exports.* lines from UglifyJS sources or you can implement it easily.
![]()
GRUNT JS
GRUNT is a command–line build tool and you can use it for the code minimization of all types of JavaScript projects.
Features of GRUNT JS
GRUNT JS tool has multiple features.
Some of them are:
GRUNT JS is a task-based command-line tool that is used to concatenate the files.
It validates the files with JSHint.
It used UglifyJS to minify the files and run the unit test with the node unit.
![]()
Ajax Minify
Ajax Minify is a Windows-based application.
You can run Microsoft Ajax Minifier without using the Command line or Visual Studio by using this tool.
Features of Ajax Minify
Some well-known features of Ajax Minify are listed below:
It minifies all the JavaScript files into the folder as well as in subfolders.
Ajax Minify even shrinks all individual JavaScript files.
![]()
JS Packer
JS Packer is a most commonly used JavaScript compressed tool that creates a compressed version of your code automatically.
To use this tool, paste code in the box and press the pack button to get the compressed code.
Features of JS Packer
Here is the list of some features of JS Packer:
JS Packer minifies the JavaScript and CSS files that can easily update dependencies.
It can spot the errors at build time.
![]()
Minify
Minify is an online JavaScript and CSS minifier.
It is used for minifying the JavaScript and CSS code and makes your website super-fast.
To use Minify, paste the JavaScript or CSS code, select the language and hit the minify button.
Features of Minify
Some fantastic features of Minify tool are listed below:
Minify is used to eliminate the whitespaces.
It combines the files, strips comments and shortens some programming patterns.
![]() We have compiled the top 7 best JavaScript minification tools for you.
Go for further research as required.
We have compiled the top 7 best JavaScript minification tools for you.
Go for further research as required.
Conclusion
Top 7 best JavaScript Minification Tools are: JSCompress, JSMin, UglifyJS, GRUNT JS, Ajax Minify, JS Packer and Minify tool.
These tools are used to minimize the code by eliminating the unnecessary white space character, newline characters, and comments without affecting the functionality of your web pages and enhance the performance of web pages.
This write-up discussed the top 7 best JavaScript minification tools and its features.
JavaScript test() Method | Explained
In JavaScript, the regular expressions are treated as a built-in object that helps in matching the patterns with the text.
JavaScript test() method is used to test for matching the regular expression within the string.
JavaScript exec() method searches for a match between a particular string and a regular expression.
All the modern browsers support the test() method as it is the feature of ECMAS1.
This article will provide you with a descriptive knowledge of the following outcomes.
– How does the JavaScript test() method work
– How to use JavaScript test() method
How does the JavaScript test() method work
The JavaScript test() method works the same as the exec() method.
The test() and exec() method differ in the return type as the test() method returns a Boolean value and the exec() method returns the array.
Syntax
The syntax of the JavaScript test() method is given as follows:
RegExpObject.test(string)
Here, ‘string’ is a parameter that specifies the text to be searched.
The test() method returns the true if the string is matched otherwise the output would be false.
How to use the JavaScript test() method
The test() method is case-sensitive as it starts to search for a matching string from left to right in the string.
This section provides a detailed direction on how to use the JavaScript test() method.
Example: How to test a true match using the JavaScript test() method
The test() method is used to test a matching between a string and a regular expression.
The following code is used to check the usage of the test() method where the expression matches the string.
string = "LinuxHint is a Website";
object = RegExp( "LinuxHint");
output = object.test(string);
console.log(output);
A string variable is initialised and the RegExp object matches the substring in the string variable.
This matching is passed to the test() method to test whether the match is present or not.
![]() As the characters “LinuxHint” are present in the string variable therefore the test() method has returned true.
As the characters “LinuxHint” are present in the string variable therefore the test() method has returned true.
Example: How to test a false match using the JavaScript test() method
The test() method tests the matching in the string of an object.
This example shows you how this method works.
string = "LinuxHint is a Website";
object = RegExp( "Programming");
output = object.test(string);
console.log(output);
In this code, the string is initialised which contains the characters “LinuxHint is a Website”.
A sequence of characters “Programming” are passed to the RegExp object to match it with the string.
Lastly, the tes() method is applied on the output of the RegExp object to test the match.
![]() The output showed that there is no matching string in a particular string.
Therefore the test() method returned the output ‘false’.
The output showed that there is no matching string in a particular string.
Therefore the test() method returned the output ‘false’.
Example: How the JavaScript test() method behaves in a case insensitive matching
As discussed earlier, the test() method is case sensitive.
Let’s try to match the case insensitive pattern via the following code.
string = "linuxhint is a Website";
object = RegExp( "LinuxHint");
output = object.test(string);
console.log(output);
In this example, the string “linuxhint is a Website” is passed to the object.
The RegExp object is used to match the “LinuxHint” pattern.
The test() method is then applied on the output of the RegExp object.
![]() The letter-case of the pattern and the string did not match therefore the test() method has returned false.
The letter-case of the pattern and the string did not match therefore the test() method has returned false.
Conclusion
The test() method is used to test for matching between a particular string and a regular expression.
If the function finds a match, it returns true or else false.
This article provided a complete guide about the JavaScript test() method.
For comprehensive knowledge, we also provided the working and usage of the test() method along with suitable examples.
JavaScript hasOwnProperty() method | Explained
In programming, objects have either their own properties or some inherited.
Unlike the other programming languages, JavaScript has its own specific property set.
The hasOwnProperty() method is used to check whether the specified properties of an object are its own or inherited.
This guide will provide a comprehensive knowledge about the hasOwnproperty() method.
The outcomes of this tutorial are given as follows:
– How does the hasOwnProperty() method work
– How to use hasOwnProperty() method
How does the hasOwnproperty() method work
The hasOwnProperty() method only accepts the object’s own property.
This function ignores the inherited properties of objects.
Let’s refer to the syntax of the hasOwnProperty() method given in the following:
obj.hasOwnProperty(propertyname)
Here, ‘obj’ refers to an object and the ‘propertyname’ is a string that is set to test.
The hasOwnproperty() function returns the true if the given object has its own property, otherwise false.
How to use the hasOwnProperty() method
In JavaScript, this function can be initialised as an argument using the string with any object.
it works effectively like a pancake when it comes to looping by using an object.
This section shows how to use the hasOwnproperty() method.
Example: How to check the object’s property using the hasOwnProperty() method
This example demonstrates the usage of the hasOwnProperty() method to check the property of an object.
person = {
name: "seemab",
age: 25,};
console.log(person.hasOwnProperty("name"));
console.log(person.hasOwnProperty("gender"));
In the above code, an object is initialised with the two keys ‘name’ and ‘age’.
These are the own properties of an object.
The hasOwnProperty() method is applied on both the keys of an object.
![]() The output showed that ‘name’ is the own property of the specified object.
The method returns ‘true’ when the ‘name’ is passed to it.
However, ‘gender’ is not the own property of an object in this case, therefore the function returns the ‘false’.
The output showed that ‘name’ is the own property of the specified object.
The method returns ‘true’ when the ‘name’ is passed to it.
However, ‘gender’ is not the own property of an object in this case, therefore the function returns the ‘false’.
Example: How hasOwnproperty() method uses Null or undefined values
This example illustrates that the hasOwnProperty() method not only accepts the own property but also accepts the null or undefined value as well.
x = Object();
x.property1 = null;
x.hasOwnProperty('property1')
x.property2 = undefined;
x.hasOwnProperty('property2')
In this code, the two values ‘null’ and ‘undefined’ are passed to the object with property1 and property2 as arguments.
![]() The output showed that the function accepted the ‘null’ and ‘undefined’ values as its own property values and returned the ‘true’.
The output showed that the function accepted the ‘null’ and ‘undefined’ values as its own property values and returned the ‘true’.
Conclusion
The hasOwnProperty() method is a function that checks whether the object has its own property or is inherited.
It returns the output in boolean value and rejects the inherited properties.
This short guide provided a deep knowledge about the hasOwnProperty() method.
The examples of hasOwnProperty() method illustrates its usage to check the properties of an object and how hasOwnProperty() works in case of null/undefined values.
Types of Popup Boxes
JavaScript provides multiple predefined functions that are used to demonstrate messages for different purposes., the popup boxes are used to display simple notifications, to get the user’s input or confirmation, etc.
All in all the pop up boxes are used to alert, notify, or warn the users.
Once a pop-up box appears, you wouldn’t be able to perform any other operation until you close that pop-up., Alert Box, Prompt Box, and Confirm Box are the three types of the popup boxes.
In this write-up we will understand the below-listed aspects of Pop-up boxes:
What is an Alert Box and how to use it?
What is a Prompt Box and how it works?
What is a Confirm Box and how it works?
So, let’s begin!
What is an Alert Box and how to use it?
It is a type of popup box that is used to display a warning/alert notification to the user.
An alert box appears in the top center of the visual interface.
Once an alert box appears, it stops the execution of other parts of the program until the user clicks on the “OK” button.
The basic syntax of the alert box is shown in the below-given snippet:
alert("alert notification");
The above snippet shows that we have to pass the alert/warning notification to the alert method.
ExampleThe below code snippet will assist you to understand how alert boxes work:
<!DOCTYPE html><html><head>
<title>Alert Box Example</title></head><body>
<button onclick="alertFunction()"> CLICK ME </button>
<script>
function alertFunction() {
alert("Welcome to linuxhint.com");
}
</script></body></html>
In this program, we utilized the alert() method and passed it a message “Welcome to linuxhint.com”.
As a result, we will get the following output:
![]() The above “GIF” shows that when we clicked on the button “CLICK ME”, consequently it generates a pop-up box that shows the user specified notification.
The above “GIF” shows that when we clicked on the button “CLICK ME”, consequently it generates a pop-up box that shows the user specified notification.
What is a Prompt Box and how it works?
In JavaScript, the prompt box is a type of popup box that is used to get the user’s input.
A prompt box appears in the top center of the visual interface.
Following will be the syntax for the prompt box:
prompt("Prompt Notification");
ExampleThe below-given program will guide you to understand how prompt boxes work:
<!DOCTYPE html><html><head>
<title>Prompt Box Example</title></head><body>
<button onclick="promptFunction()"> CLICK ME </button>
<script>
function promptFunction() {
prompt("Enter Password: ");
}
</script></body></html>
In this example, we utilized the prompt() method and passed it a notification “Enter Password”.
Consequently, we will get the following output:
![]() The above “GIF” shows that when we click on the button “CLICK ME”, consequently it generates a pop up box that asks the user to “Enter Password”.
The above “GIF” shows that when we click on the button “CLICK ME”, consequently it generates a pop up box that asks the user to “Enter Password”.
What is a Confirm Box and how it works
Confirm Box is a type of popup box used to take the user’s permission/authorization.
The below snippet shows how to use the Confirm box:
confirm("Confirmation Notification");
ExampleThe below-given code snippet will help you to understand how the confirm box works:
<!DOCTYPE html><html><head>
<title>Confirm Box Example</title></head><body>
<button onclick="confirmFunction()"> CLICK ME </button>
<script>
function confirmFunction() {
var validate;
if (confirm("Press OK if you are Above 18!") == true) {
validate = "OK pressed!";
} else {
validate = "Cancel!";
}
document.write(validate);
}</script></body></html>
In the above code block, we utilized the confirm() to confirm the user’s age:
![]() The above snippet shows the appropriateness of the confirm box.
The above snippet shows the appropriateness of the confirm box.
Conclusion
In JavaScript, there are three types of popup boxes that are used to display simple notifications, to get the user’s input or user’s confirmation, etc.
In simple words the pop-up boxes are used to alert, notify, or warn the users.
This write-up provided a detailed guide on the various types of the popup boxes.
Types of JavaScript Literals
In JavaScript, literals are a way to represent values in a program.
Let’s take a look at a scenario where you need to use some code that provides the same functionality everywhere in a program like a template.
Here JavaScript literals come into the picture which provides the user with predefined functionalities when they use it.
This article is a complete guide and occupied with the detailed knowledge about
What are JavaScript literals
Types of JavaScript literals
Template Literals
Object Literals
String Literals
Numeric Literals
Boolean Literals
Floating-Point Literals
Regular expression Literals
What are JavaScript Literals
JavaScript Literals are the fixed values that are used to represent data in a program.
These literals are used to represent data like integer, string, boolean, and array.
We do not need any specific keyword to write these literals.
Types Of JavaScript Literals
Following are the types of literals that are supported by JavaScript:
Array Literals
Boolean Literals
Floating-point Literals
Numeric Literals
Object Literals
Regular Expression Literals
String Literals
Template Literals
Array Literals
A collection of elements wrapped between the pair of square brackets [ ] represent an array literal.
These literals are initialized by the specific values added between square brackets.
The size of the array literal is specified by the number of elements between square brackets.
Array literal may contain zero or more elements according to the programmer’s requirement.
Code
// Array Literal with 0 elementvar fruit3 = ['Mango','Watermelon','Pineapple'];
console.log(fruit1);// Array Literal with elementsvar fruit3 = ['Mango','Watermelon','Pineapple'];
console.log(fruit2);// Array Literal with extra comma between elementsvar fruit3 = ['Mango',,'Watermelon','Pineapple'];
console.log(fruit3);
Here we create three array literals.
Output
![]() In the above example, we create three arrays fruit1, fruit2, and fruit3 using an array literal.
We add no elements in the first array which is considered as an array but with no element.
In the second array, we add three elements that initialize the array as string type due to the elements in it, and its size is specified as 3 because of the number of elements in it as shown in the above output.
In the third array, we also add three elements but put an extra comma between the elements due to which the compiler considers the length of the array to be 4 but with one empty index as shown in the above output.
Note: If we put a comma at the start of the elements or between the elements, the compiler considers it as an index but if we put a comma at the end of the elements, the compiler ignores it completely.
In the above example, we create three arrays fruit1, fruit2, and fruit3 using an array literal.
We add no elements in the first array which is considered as an array but with no element.
In the second array, we add three elements that initialize the array as string type due to the elements in it, and its size is specified as 3 because of the number of elements in it as shown in the above output.
In the third array, we also add three elements but put an extra comma between the elements due to which the compiler considers the length of the array to be 4 but with one empty index as shown in the above output.
Note: If we put a comma at the start of the elements or between the elements, the compiler considers it as an index but if we put a comma at the end of the elements, the compiler ignores it completely.
Boolean Literals
In JavaScript boolean literal works with comparison operators like <, >, <=, >=, ==, != etc.
The functionality of these literals is predefined as these literals only return true or false.
Code
var check = (20>43);
console.log(`20 > 43 = ${check}`);var comp = (7>3);
console.log(` 7 > 3 = ${comp}`);
Here we take two variables, check and comp and compare different values in both variables which will return only true or false as an output because both variables are using boolean literal.
Output
![]() As in the above output it is clearly shown that the check variable returns a false value and the comp variable returns a true value as they both used boolean literals.
As in the above output it is clearly shown that the check variable returns a false value and the comp variable returns a true value as they both used boolean literals.
Floating-point Literals
These literals represent the values with a decimal point.
Floating-point literals can be a decimal point number, a decimal point integer, or an exponent.
Code
var dec = 3.5;
console.log(`This variable represent decimal number ${dec}`);var fra = -30.6;
console.log(`This variable represent fractional number ${fra}`);var exp = 12e6;
console.log(`This variable represent exponent of number ${exp}`);
Here we take three variables dec, fra and exp.
Then assign a positive decimal point value to dec, negative decimal point value to fra, and exponent value to exp.
Output
![]() The above output clearly shows that the dec variable prints a positive decimal point value.
The decimal point value is always positive.
The fra variable print decimal point integer value which means floating-point literal can be a positive or negative number with a decimal point.
The exp variable print exponent of a number which means floating-point literal can be used to represent an exponent of a number.
The above output clearly shows that the dec variable prints a positive decimal point value.
The decimal point value is always positive.
The fra variable print decimal point integer value which means floating-point literal can be a positive or negative number with a decimal point.
The exp variable print exponent of a number which means floating-point literal can be used to represent an exponent of a number.
Numeric Literals
Numeric literals are basically the series of digits/numbers.
Numeric literals can be represented in:
Base 10: decimal (which contains digits from 0 to 9)
Base 8: octal (which contains digits from 0 to 7)
Base 16: hexadecimal (which contains digits from 0 to 9 and the letters from A/a to F/f)
Code
var dec = 35;
console.log(`This variable is a decimal number ${dec}`);var oct = 062;
console.log(`This variable is an octal number ${oct}`);var hex = 0X8b;
console.log(`This variable is a hexadecimal number ${hex}`);
Here we take three variables dec, oct and hex, then we assign a decimal value to dec, octal to oct, and hexadecimal value hex.
Output
![]() In the above output it is clearly seen that the dec variable prints the decimal number.
The oct variable takes an octal number and prints the value after converting it into a decimal number.
The hex variable takes a hexadecimal number and prints the value after converting it into a decimal number.
In the above output it is clearly seen that the dec variable prints the decimal number.
The oct variable takes an octal number and prints the value after converting it into a decimal number.
The hex variable takes a hexadecimal number and prints the value after converting it into a decimal number.
Object Literals
Object literal is basically a list of 0 or more pairs of property names and associated values of an object wrapped inside a pair of { } curly brackets.
Code
var info = {name:"Alex", roll no:"35", marks:"85"};
console.log (`${info.name} got ${info.marks} marks.`);
Here we create a variable info and assign a list with name, roll number and marks to it.
Then we access names and marks from the list with help of a (.) and print the result.
Output
![]() As above, the output shows that we get the expected output with the help of object literal.
As above, the output shows that we get the expected output with the help of object literal.
Regular Expression Literals
Regular expression literals are mainly used to quickly search long information in long strings.
These literals are used with forward slashes (//).
The word that is to be searched in a string wrote between forward slashes as shown below
Code
var str ="This is alex from abc company"var str2= /from/;var search = str.match(str2);
console.log(search);
Here we take three variables str, str2, and search.
Then we assign a string to str, str2 is assigned with regular expression literal, and search is assigned with a JavaScript match() function and gives str2 as a parameter.
Lastly, we display the result.
Output
![]() Above output clearly shows that we search (from) word from the given string with the help of regular expression literal and it displays the word that is searched, the index number where that word is placed, and the string from which that word is searched.
Above output clearly shows that we search (from) word from the given string with the help of regular expression literal and it displays the word that is searched, the index number where that word is placed, and the string from which that word is searched.
String Literals
A string literal is basically a string made up of characters between (“”) double or (‘’) single quotation marks.
Following are the special characters used string literals.
| Characters |
Explanation |
|---|
| \n |
Add a new line in a string. |
| \f |
Add form feed in a string. |
| \b |
Add backspace in a string. |
| \t |
Add a tab in a string. |
| \r |
Used for carriage return in a string |
| \\ |
Add backslash (\) inside a string. |
| \” |
Add double quote (“) in a string. |
| \’ |
Add double quote (‘) in a string. |
Code
var str ="This is alex \n from abc company."
console.log(str);var str ='This is alex \t from abc company.'
console.log(str);
Here we take two strings.
The first one is represented with double quotes string literal and \n special character, the second one is represented with single quotes string literal and \t special character.
Output
![]() Above output clearly shows that both string literals, double and single quote print strings but \n starts a new line while \t adds a tab in a string.
Above output clearly shows that both string literals, double and single quote print strings but \n starts a new line while \t adds a tab in a string.
Template Literals
String and variables combined together between the pair of backticks (“) are defined as template literals.
These literals are used to combine strings and variables without making the code messy.
String interpolation is also performed using template literals.
Code
a = 5;var str =`${a} is an odd number.`
console.log(str);
Here we take a variable a and str, then we assign 5 to variable a and use template literal on variable str.
Then we simply display the str variable.
Output
![]() Above output clearly shows that we get the required output using template literals.
Above output clearly shows that we get the required output using template literals.
Conclusion
JavaScript literals are the fixed values that are assigned to variables to represent different data.
This article explains the types of JavaScript literals, like an array, string, floating-point, object, template, and numeric literals in detail.
Set Object Methods
Set Objects are very much similar to the arrays the major difference between these two is that the set objects can’t hold the duplicate values however arrays can., the set objects allow us to store only unique values in them.
These unique values can be of any type like primitive data types(int, strings, etc), object references, complex object/data types such as object, arrays, literals, etc.
several set object methods can be used to achieve different functionalities, for example, add(), delete(), forEach(), etc.
In this article, we will cover the below listed aspects of set object methods:
How to use new Set() to create a set
How to use add() method to add elements in a set.
How to use delete() method to remove elements from a set.
How to use clear() method to delete all elements from a set.
How to check the existence of some specific value in a set using has() method.
How to find/check the size of a set.
So, let’s begin!
How to use new Set() to create a set
To work with any of the Set object methods, firstly, we have to create a set.
To do so, we can use the “new Set()” constructor.
Example
The below given piece of code will explain how to create a Set using the “new Set()” constructor:
<script>
let employeeNames = new Set();
console.log(employeeNames);</script>
The above code will create an empty set as shown in the following output:
![]() The output shows that an empty Set is created, now we can perform any functionality on that set using different set object methods such as append elements, remove elements, etc.
The output shows that an empty Set is created, now we can perform any functionality on that set using different set object methods such as append elements, remove elements, etc.
How to use add() method to add elements in a set
JavaScript provides a method named add() that is used to append the elements in a set.
Example
Now, we will extend the above example a little bit more to add/append the elements to the Set:
employeeNames.add("Steve");
employeeNames.add("Michael");
employeeNames.add("Smith");
employeeNames.add("Paul");
employeeNames.add("Ambrose");
console.log(employeeNames);
In this example, we added five elements in the set named “employeeNames” using the add() method.
Afterward, we utilized the console.log() method to print all the elements stored in the “employeeNames” set on the browser’s console:
![]() The output verifies the working of the add() method.
The output verifies the working of the add() method.
How to use delete() method to remove elements from a set
In JavaScript, the delete() method can be used to remove some specific elements from the set object.
Example
Let’s suppose we want to remove “Smith”, and “Paul” from the set “employeeNames”.
To do so, we can utilize the delete() method:
employeeNames.delete("Smith");
employeeNames.delete("Paul");
console.log(employeeNames);
The above code block will generate the following output:
![]() The above snippet shows that the delete() method has removed “Smith” and “Paul” from the Set successfully.
The above snippet shows that the delete() method has removed “Smith” and “Paul” from the Set successfully.
How to use clear() method to delete all elements from a set
In JavaScript, the clear() method can be used to remove all the elements of a set object.
Example
In this example, we will utilize the clear() method to delete all the items from the set “employeeNames”:
employeeNames.clear();
console.log(employeeNames);
The above code snippet will produce the following results:
![]() The output shows the Set’s size equal to zero; it authenticates the working of the clear() method.
The output shows the Set’s size equal to zero; it authenticates the working of the clear() method.
How to check the existence of some specific value in a set using has() method
In JavaScript, the has() method can be used to check whether a specific element exists in the set or not.
Example
In this example, we will check the existence of two elements i.e.
“Smith”, and “Bryn” using the has() method:
console.log(employeeNames.has("Smith"));
console.log(employeeNames.has("bryn"));
The piece of code will return true if the specified value exists in the set and it will return false if the specified value doesn’t exist in the targeted set:
![]() The output shows that the has() method returns true for the element “smith” as it exists in the set while “Bryn” doesn’t exist in the targeted set therefore the has() method returns false for it.
The output shows that the has() method returns true for the element “smith” as it exists in the set while “Bryn” doesn’t exist in the targeted set therefore the has() method returns false for it.
How to find the size of a set
In JavaScript, the size property can be used to check the size/length of some specific set.
Example
In this example we will utilize the size property to check the size of the set “employeeNames”:
Following will be the corresponding output for the above-given code:
![]() The output shows the appropriate size of the specified set i.e “employeeNames” set.
The output shows the appropriate size of the specified set i.e “employeeNames” set.
Conclusion
In JavaScript, the set objects allow us to store only unique values in them.
These unique values can be of any type like primitive data types(int, strings, etc), object references, complex object/data types such as objects, arrays, literals, etc., there is a wide range of set object methods that can be used to perform different functionalities.
For example, Add(), delete(), and clear(), methods are used to append and remove elements, the has() method is used to check the existence of an element in a specific set, etc.
This write-up explained the working of various set object methods with the help of suitable examples.
How to Generate Random Numbers?
Javascript Math.random() is a built-in method that returns the pseudo-random numbers, floating points between the range of 0 and 1 (including 0, not 1).
These numbers could be an integer and floating-point also.
This method belongs to ECMAScript1 (ES1) and is supported by all the browsers such as Chrome, Edge, Safari, etc.
This article gives the following outcomes.
How does the JavaScript Math.random() method work
What is the usage of JavaScript Math.random() method
How does the JavaScript Math.random() method work
The JavaScript Math.random() method returns the random pseudo numbers instead of true values within the range.
Here, we will describe how the Math.random() function actually works.
Syntax
The following syntax represents the Math.random() method.
Math.random()
The random() function must be called through the substitute object ‘math’ because it is the stable function of the math object.
The Math.random() function returns the pseudo-random numbers, floating points between the range of 0 and 1 (including 0, not 1).
What is the usage of Math.random() Method
Math.random() method is used to return the integer in between the minimum and maximum value.
Example 1: How to find random numbers within the default range
The Math.random() method finds the random number within the default range.
This method returns a random number that includes the starting integer but not the ending.
This example shows how to find the random number using this function.
console.log(Math.random());
Here in this example, a random() method is called using a math class.
![]() The output showed the returned random number automatically in the range of 0 and 1 (>=0 & < 1).
The output showed the returned random number automatically in the range of 0 and 1 (>=0 & < 1).
Example 2: How to find a random number between specified values
The Javascript Math.random() method is also used to find the random numbers within the specified.
range.
These values could be an integer as well as floating-point also.
var x = 1;var y = 2;var random =
(Math.random() * (+y - +x)) + +x;
console.log(("Random Number Generated : " + random));
Two values 1 and 2 are given to find a random integer between the two values using the Javascript Math.random() method.
This example showed how to find an integer between two values using this method.
![]() The output showed the randomly generated integer between the two values.
The output value is ‘1’ which is greater than the minimum values but less than the maximum value in the given input.
The output showed the randomly generated integer between the two values.
The output value is ‘1’ which is greater than the minimum values but less than the maximum value in the given input.
Example 3: How to find random numbers between the min and max values
Math.random() function searches an integer in between the minimum and maximum values within a specified range.
Besides the minimum values, it also includes the maximum values.
var min = 17;var max = 64;var random =
Math.floor(Math.random() * (+max + 1 - +min)) + +min;
console.log(("Random Number Generated : " + random));
In this example, two random values 17 and 64 are given to find the new random integer between the maximum and minimum values.
The Math.random() function executes to search the random integer in between the minimum and maximum values.
![]() The output showed that ‘44’ is the random number generated between ‘17’ and ‘64’.
The output showed that ‘44’ is the random number generated between ‘17’ and ‘64’.
Conclusion
JavaScript Math random() method is used to generate a random number between two values, floating points between 0 and 1 which includes the 0 but excludes 1.
This complete guide provides a detailed insight into the JavaScript Math.random() method.
The functionality of the Math.random() method is provided along with its syntax.
We also narrated the complete working of the Math.random() method with examples.
JavaScript Return Statement
In JavaScript, the return statement is used by functions to return a specific value to the function call like any other programming language.
It will stop the execution of a program when the return statement is executed.
We can use the return statement within the function body only and it is a better practice to place the return statement at the end of the function’s body because every statement after the return statement is not reachable to the compiler.
This article is wrapped around
Why we use a return statement?
How a return statement works?
Return statement with a value
Return statement without a value
Function without a return statement
Return statement with multiple values using array
Return statement with multiple values using object
Why we use a return statement
We use a return statement when we need a specific value from the function to use for other programs.
A return statement can return every data type like:
String
Number
Boolean
Arrays
Objects
Functions
How a return statement works
A return statement uses a return keyword and an expression or a value that needs to be returned according to the programmer’s requirement.
A return statement must end with a semicolon (;).
Syntax
return value;
The Value in the above syntax is defined as the value returned by the function.
In the return statement value is optional.
A return statement returns an undefined result if we do not specify the value.
Return statement with a value
The following example is used to show the simple use of a return statement with a value.
Code
var show = a(2, 3); function a(b, c) { return b * c; }
console.log(`This function returns ${show} as a product of b and c.`);
Output
![]() Here we take a variable show and assign a function with 2 arguments.
Then we create a function a() which takes two parameters b and c and returns their product.
Then we display the result that is clearly seen above.
Here we take a variable show and assign a function with 2 arguments.
Then we create a function a() which takes two parameters b and c and returns their product.
Then we display the result that is clearly seen above.
Return statement without a value
We can also use a return statement without a value but a return statement without a value is only used to terminate a program.
The following example showcases the use of return statements without a value.
Code
var a = y(); function y(){
var x = 1;
while(x)
{
console.log(`${x} `);
if (x == 4)
{
return;
}
x++;
}}
Program continues to execute until the value of x becomes 4 and the control will go inside the if-statement and execute the return statement which will terminate the program.
Output
![]() Above example clearly shows that the program keeps on printing the value of x until the condition to execute the return statement arrives and the program terminates.
Above example clearly shows that the program keeps on printing the value of x until the condition to execute the return statement arrives and the program terminates.
Function without a return statement
The following example demonstrates what will happen if we do not specify the return statement in the function’s body and request a return value.
Code
function product(a){
let b = a * a;}
let result = product(4);
console.log(`Product : ${result}`);
Here we create a function product() which takes a parameter and stores the product of two numbers in variable b.
Then outside the function we take another variable result and initialize it with the function call.
Lastly, we print the result.
Output
![]() In the above example, it is clearly seen that the output is undefined because the result variable requests to get a return value from the function but the function has no return statement.
In the above example, it is clearly seen that the output is undefined because the result variable requests to get a return value from the function but the function has no return statement.
Return statement with multiple values using array
We can also return multiple values with the help of a return statement while using an array.
In the example below we can show how we use a return statement to return multiple values.
Code
function info(){
let name = 'Huzaifa',
contact = '+92302123456',
age = '26',
des = 'Content Writer';
return [name, contact, age, des]; } const [name, contact, age, des] = info();
console.log(`Name = ${name}
Contact = ${contact}
Age = ${age}
Designation = ${des}`);
Here we create a function info(), inside the function we created four variables (name, contact, age, des) and assign them some values.
After that we return an array which contains name, contact, age and des.
Outside the function we take the const array and initialize it with the info() function call.
Lastly, we print all the variables.
Output
![]() In the above example it is clearly seen that the program returns multiple values with the help of return statement while using an array.
In the above example it is clearly seen that the program returns multiple values with the help of return statement while using an array.
Return statement with multiple values using object
We can also return multiple values with the help of a return statement while using an object.
In the example below we can show how we use a return statement to return multiple values.
Code
function lpmodal(){
let name = 'Macbook Air pro',
brand = 'Apple',
price = '$550.73';
return {name, brand, price}; }
let {name, brand, price} = lpmodal();
console.log(`Name = ${name}
Company = ${brand}
Price = ${price}`);
Here we create a function lpmodal(), inside the function we create three variables (name, brand, price) and assign them with values.
After that we return an object which contains the name, brand and price as key-value pair.
Outside the function we take the object and initialize it with the lpmodal() function call.
Lastly, we print all the variables.
Output
![]() In the above example it is clearly seen that a program returns multiple values with the help of a return statement while using an object.
In the above example it is clearly seen that a program returns multiple values with the help of a return statement while using an object.
Conclusion
In JavaScript, the return statement terminates the program and returns a value if specified.
In the above article we can see how to use return statements, why to use return statements and how return statements work in different scenarios.
JavaScript Variables
In any programming language when we need to store data, a unique id or reference to the storage is required which helps the compiler to identify specific data when we try to access it from a huge pile of data., variables represent the name of the location where data is stored.
Variables help the compiler identify and access the specific data required by the program to perform different actions.
This article provides profound knowledge about
How to declare a variable
Rules to declare a variable
Declaring a variable using the var keyword
Declaring a variable using the const keyword
Declaring a variable using the let keyword
Variable Scope
How to declare a variable
JavaScript is a loosely typed language which means we don’t need to specify the datatype of a variable.
there are four ways to declare a variable:
var: this can be used where you don’t want to specify the datatype of a variable.
const: this is used where you are sure that the value of a variable is fixed and cannot be changed at any cost.
let: this is used where the value of the variable is not constant.
Without mentioning any datatype:, we can also declare variables without var, const, and let.
Syntax
var variable name;var variable_name = value;
variable_name;
In the above syntax, let and const can also be used in the place of the var.
Rules to declare a variable
Following are the rules that must be followed while declaring a variable.
A variable name must start with alphabets (both upper- and lower-case alphabets can be used), underscore (_), or a dollar sign ($).
A variable name cannot start with numbers or any other special characters.
Reserve keywords cannot be used for the variable name.
Must declare a variable before accessing it.
A variable name is case-sensitive.
Numerous variables can be declared in the same line.
Declaring a variable using the var keyword
Widely used method of declaring a variable is by using the var keyword because only the var keyword was available from 1995 to 2015.
If you want the old browsers to support your JavaScript code then use the var keyword to declare a variable.
Syntax
var variable_name;var variable_name = value;
In the above syntax, it is seen that variables with and without value can be declared using the var keyword.
Code
var n = 5var m
m = 6var x = n + m
console.log(`${n} + ${m} = ${x}`)
In this code, variables n and m are declared using the var keyword and assigned with some values.
Lastly, x is declared and assigned with the added value of n and m.
Output
![]() The output verifies that the variables are declared and utilized perfectly.
The output verifies that the variables are declared and utilized perfectly.
Declaring a variable using the const keyword
In JavaScript, a variable can also be declared by using the const keyword.
The const keyword was introduced in 2015(ES6) and it is used when we need to fix the value of a variable.
Syntax
const variable_name = value;
In the above syntax, it is seen that the variable declared with const must be initialized at the time of declaration.
Code
const a = 15const b = 12var c = a - b
console.log(`${a} - ${b} = ${c}`)
In this code, variables a and b are declared using the const keyword and assigned with some values.
Lastly, c is declared and assigned with the subtracted value of a and b.
Output
![]() The output verifies the usage of const keyword for declaring variables.
The output verifies the usage of const keyword for declaring variables.
Declaring a variable using the let keyword
In JavaScript, a variable can also be declared by using the let keyword.
The let keyword was also introduced in 2015(ES6) and it is used when we need the value of a variable to be changed dynamically.
Syntax
let variable_name;
let variable_name = value;
In the above syntax, it is seen that just like the var keyword, variables can also be declared with and without a value using the let keyword.
Code
let q = 4
let r
r = 2var s = q * r
console.log(`${q} x ${r} = ${s}`)
In this code we declared variables q, r, s using the let keyword.
Then assigned 4 to q and 2 to r.
Lastly, we declared s and assigned it with the multiplicative value of q and r.
Output
![]() In the above output, we declared the variables using the let keyword and get the required output.
In the above output, we declared the variables using the let keyword and get the required output.
Declaring a variable using nothing
JavaScript also allows the declaration of a variable without using any kind of keyword or data type due to its loosely-typed property.
Syntax
variable_name = value;
In the above syntax, we declare a variable without using var, let, and const.
However, a variable must be initialized at the time of declaration if you are declaring a variable without any keyword/datatype.
Code
a=5
x=8
b=2
z=(b*(x-a))
console.log(`${b} x (${x} - ${a})= ${z}`)
In this code, variables a, x, and b are declared without any keyword and initialized with some values.
Lastly, z is declared and assigned with some algebraic expressions.
Output
![]() In the above output it is clearly seen that we declare variables without using any keyword or data type and get the required result.
In the above output it is clearly seen that we declare variables without using any keyword or data type and get the required result.
Variable Scope
JavaScript allows us to declare variables locally and globally according to the requirement.
Global VariableGlobal variables are declared outside any function and can be acquired from anywhere in a program.
Syntax
var variable_name;function function_name(){
variable_name = value;}
The above syntax shows the declaration of a global variable.
ExampleIn the code given below, we declare three variables a, x, and i.
Then tried to access them inside the function’s body.
Finally, we simply call the function and display the result.
Code
var a = 5var x = 8var i = 0function add(){
i = x + a}
add()
console.log(`${x} + ${a} = ${i}`)
Output
![]() The result verifies that the variables are accessed successfully inside the function.
Local VariableLocal variables are declared inside a function and cannot be used outside the function.
If we try to access local variables outside the function then we get a syntax error.
Syntax
function function_name(){
var variable_name = value;}
The above syntax shows the declaration of a local variable inside a function scope.
Code
function add(){
var a = 5
var x = 8
var i
i = x + a}
add()
console.log(`${x} + ${a} = ${i}`)
In the above code, we created a function add() and declared three variables a, x and i inside the function’s body.
Now we are trying to access these locally declared variables outside the function which will eventually give a syntax error.
Output
The result verifies that the variables are accessed successfully inside the function.
Local VariableLocal variables are declared inside a function and cannot be used outside the function.
If we try to access local variables outside the function then we get a syntax error.
Syntax
function function_name(){
var variable_name = value;}
The above syntax shows the declaration of a local variable inside a function scope.
Code
function add(){
var a = 5
var x = 8
var i
i = x + a}
add()
console.log(`${x} + ${a} = ${i}`)
In the above code, we created a function add() and declared three variables a, x and i inside the function’s body.
Now we are trying to access these locally declared variables outside the function which will eventually give a syntax error.
Output
![]() The output verifies that local variables can only be accessed inside a function in which they are created.
The output verifies that local variables can only be accessed inside a function in which they are created.
Conclusion
In JavaScript a variable is the name of a storage container where data is stored.
This article states that the variables can be declared by using let, const and var keywords.
We can also declare variables without any keyword or data type but in this case, we must initialize the variable at the time of declaration.
Map.has() Function
Map.has() function is used to check the existence of an element with the specified key.
Map is a data structure that is used to add, store, manage and retrieve the key values of any data type.
Map.has() function accepts the input in string format.
A map can hold the key values of any data type.
It helps in searching for the specified key if a large amount of data is present on the map.
This article aims to enlighten a brief explanation of Map.has() function with the following expected outcomes:
How Map.has() function works?
How to use Map.has() function?
How Map.has() function works?
In JavaScript, the Map.has() function checks whether an element is present or not with a specified key on the map.
It returns the decision in a boolean value either true or false depending on the specific key value in the map.
Syntax
The syntax of the map.has() function is given as follows.
mapObj.has(key)
Key is a parameter that is to be searched inside the data structure.
If the key is present in the map object, then it returns true otherwise the output will be false.
What is the usage of the Map.has() function?
The Map.has() function has the key role in searching for a key or values.
This section presents the usage of Map.has() function.
How to use Map.has() function with specified key?The Map.has() function is a searching method that is used to check the existence of the elements with a specified value.
The following code makes use of the Map.has() function to trace the element
var myMap = new Map([['x', 1], ['y', 2], ['z', 3]]);
console.log(myMap.has('z'))
In the above code, we create a simple myMap object with key elements (x, y, z) and Map.has() function is applied to check the presence of the ‘z’ key.
![]() As the ‘z’ key was present in the myMap function therefore the Map.has() function has returned in the ‘true’.
Here, the same example is used as above to check the presence of a key that actually does not exist.
var myMap = new Map([['x', 1], ['y', 2], ['z', 3]]);
console.log(myMap.has('w'))
Three key values [‘x’, 1], [‘y’, 2], and [‘z’, 3] are stored in myMap object and the myMap.has() function is applied to them to check whether the ‘w’ is present or not?
As the ‘z’ key was present in the myMap function therefore the Map.has() function has returned in the ‘true’.
Here, the same example is used as above to check the presence of a key that actually does not exist.
var myMap = new Map([['x', 1], ['y', 2], ['z', 3]]);
console.log(myMap.has('w'))
Three key values [‘x’, 1], [‘y’, 2], and [‘z’, 3] are stored in myMap object and the myMap.has() function is applied to them to check whether the ‘w’ is present or not?
![]() It is observed that the ‘w’ is not present in the key values therefore the myMap.has() function has returned false.
How to use Map.has() function without specified key?This example explains how to use the map.has() function without a specified key.
var map=new Map();
map.set(1,"Android");
map.set(2,"Node.JS");
map.set(3,"HTML");
console.log(map.has(5));
In this code, we create a new Map object with the 3 classes.
However, we have passed ‘5’ as the parameter to the Map.has() function.
It is observed that the ‘w’ is not present in the key values therefore the myMap.has() function has returned false.
How to use Map.has() function without specified key?This example explains how to use the map.has() function without a specified key.
var map=new Map();
map.set(1,"Android");
map.set(2,"Node.JS");
map.set(3,"HTML");
console.log(map.has(5));
In this code, we create a new Map object with the 3 classes.
However, we have passed ‘5’ as the parameter to the Map.has() function.
![]() In the above example, there are only three defined values in the above code.
The Map.has() function tries to call the value ‘5’ which is not present.
Therefore, the output is false.
In the above example, there are only three defined values in the above code.
The Map.has() function tries to call the value ‘5’ which is not present.
Therefore, the output is false.
Conclusion
In JavaScript, the Map.has() function is used to search an element with a specified key in the map.
In this short article, we described the working and functionality of Map.has() function.
For a better understanding, various examples are illustrated to describe the use cases of Map.has() function.
Best 5 Compilers for JavaScript 2022
JavaScript is a high-level scripting language used by programmers worldwide to perform dynamic and interactive operations on websites.
So, every high-level language needs to be converted into a computer understandable language before execution and for that purpose, compilers and interpreters are used.
A compiler and interpreter itself have no separate existence like other software but it comes integrated into the IDEs which write and edit the JavaScript code, then compile/interpret it.
Before we proceed further, let us clear one thing first, JavaScript uses an interpreter to convert the source code into machine-understandable code.
Now the question is, how many great IDEs are there for JavaScript? The answer is there are numerous IDEs that are substantially expensive and free with powerful features.
There are code editors that provide functionalities just like IDEs.
So, in this article, we are excited to tell you about our list of best 5 JavaScript IDEs which are:
Visual Studio Code
Web Strom
Atom
Brackets
Eclipse
Visual Studio Code
The state of JS conducted research shows that visual studio code is the most commonly used code editor for JavaScript.
Although it does not provide a full working environment or work planning features.
However, it is lighter and more customizable.
It has integrated Git support and a first-class debugger.
So if you are looking for the best and free IDE to work with JavaScript’s big and complex projects then visual studio code might be the right choice.
![]()
WebStrom
WebStorm is the best supported and updated IDE available in the market right now.
It has a functional integration with GitHub and other VCSs.
This IDE is specially designed for JavaScript and typescript and has a lot of features.
For example:
Refactoring
On the go editing
Code Completion
Excellent Navigation
However, this IDE is not free and comes with a price that starts from $649.00 USD per year for companies and $129.00 USD per year for an individual user.
![]()
Atom
Atom is a simplistic yet mighty code editor built by GitHub.
It is a free open-source text editor and has the best GitHub integration.
The best part is atom has the capabilities to browse projects and edit them easily in a single window.
It is good for running huge and complex projects that can use all its modular features.
However, it also has a drawback, that atom needs a lot of resources and even on powerful machines, it becomes slow especially if the packages are not managed appropriately.
![]()
Brackets
Brackets is a free open-source entry into the code editor market from adobe.
This code editor is quick, light, and has a perceiving interface that makes it suitable for beginners.
Brackets provide outstanding preprocessor support and is focused on making visual tools.
This software has another great feature that allows a user to work on a code without opening multiple windows.
![]()
Eclipse
As we all know that the eclipse is a Java IDE but it is also commonly used for JavaScript development.
However, to use a JavaScript code in eclipse installation of special plugins is needed.
It is seen that eclipse has recently put a lot of effort to make this platform JavaScript friendly as much as possible and for that purpose it also supports some open-source solutions like:
Docker UI
Docker CLI
![]()
Conclusion
JavaScript is an interpreted language so it uses an interpreter instead of a compiler to convert the JavaScript code into machine-understandable code.
This article explains the top picks for the JavaScript IDEs which are more compatible for writing, editing, and interpreting JavaScript code.
Introduction to array.fill() Method for Beginners
In JavaScript, the array.fill() method is used to place an element into the array from the user-defined starting to ending index position.
It must be called through a specific instance of an array class because it belongs to an array object method.
This method overwrites the original array and fills a specified element in an array.
The array.fill() method belongs to ECMAScript6.
All the modern browsers such as Chrome, Edge, Safari, etc except Internet Explorer 11 support this method.
This article provides a deep insight into the array.fill() method and serves the following learning outcomes:
How array.fill() method works
How to use array.fill() method
How array.fill() method works
The working of the array.fill() method is described as follows.
Syntax
The following syntax represents the functionality of array.fill() method.
arr.fill(value[, start[, end]])
The array.fill() method is using the following parameters.
value represents an element to be filled in an array
start denotes the index number from where the arr.fill() method starts filling the value.
It is optional with 0 default number.
end shows the index position where the arr.fill() method stops filling the value in an array.
It is optional with a length-1 default value.
The array.fill() method returns a modified/filled array.
How to use array.fill() method
The array.fill() method overwrites the original array and fills the specified element.
Here, we will explain the usage of the array.fill() method with examples.
Example 1: How to overwrite an array using the array.fill() method
The array.fill() method is used to overwrite/modify the original array.
This example shows how to modify an array with the array.fill() method.
var title_array = [ 't' , 'i ', 't' , 'l' , 'e' ];
console.log(title_array.fill( 'z', 0, 2));
In the above code, we have declared an array object “title_array” with 5 elements.
The array.fill() method is applied to the “title_array” to modify the array.
The ‘z’ element is modified at the first two positions.
![]() The start index number was set to 0 and the ending index number was set to 2 (which states that the elements will be filled up to index number 1=(2-1)).
Therefore, the elements at 0th and 1st index are replaced with the ‘z’.
The start index number was set to 0 and the ending index number was set to 2 (which states that the elements will be filled up to index number 1=(2-1)).
Therefore, the elements at 0th and 1st index are replaced with the ‘z’.
Example 2: How to replace the elements of an array using the array.fill() method
The array.fill() method is used to fill the original array.
This example shows how to fill an array with the array.fill() method.
var arr=["Javascript", "Html", "Node.js"];
Var result=arr.fill("css");
console.log(result);
Here in this example, we have declared a variable and used the array.fill() method to fill an array.
We pass the new value “css” to fill in the existing array.
![]() The output shows that all the elements of the ‘arr’ have been replaced by the ‘css’ element.
The output shows that all the elements of the ‘arr’ have been replaced by the ‘css’ element.
Conclusion
In JavaScript, the Array.fill() method is used to place an array element from start to end index position.
In this complete guide, we described an introduction to the array.fill() method.
This step-by-step procedure explains the array.fill() method, syntax, and its functionality with examples.
How to create popup menu
In JavaScript, a popup menu is an on-screen menu that appears on the top of the text/image when someone clicks on it.
Normally, a popup menu is hidden and it can appear based on the user’s action such as right-click, left-click, or sometimes hovering above the link.
So all in all, we can say that a popup menu is a box that is used to show the notifications/messages to the user, however, these notifications appear based on the user’s actions.
In this write-up, we will learn how to create a pop-up menu, and in this regard, we will go through the following steps:
How to add HTML tags
How to declare a popup container
How to style/design a popup menu
How to add JavaScript code to open the popup menu
So, let’s get started!
How to Add HTML tags
Different HTML tags can be used to create pop-up menus for example, a button, <a> tag, <p> tag, etc.
The HTML code given below will assist you in this regard.
<div class="popupClass" onclick="showPopup()">ClICK ME!<span class="popupContent" id="popupItem">Welcome to linuxhint.com</span></div>
The above snippet describes that the showPopUp() method will be invoked when someone clicks on the text associated with the popup menu.
The popup menu will show a greeting message “Welcome to linuxhint.com”.
How to Declare a Pop-up Container
Now, we will declare the pop-up container where we will define the behavior of the popup menu using different CSS properties such as display, position, cursor, etc.
.popupClass {position: relative;display: inline-block;cursor: context-menu;}
How to style/design a popup menu
We can style a popup menu with different CSS properties as shown in the below snippet:
.popupClass .popupContent {visibility: hidden;background-color: black;color: red;width: 200px;text-align: center;position: absolute;z-index: 1;border-radius: 10px;padding: 10px 0;bottom: 100%;left: 30%;margin-left: -100px;}/* Styling Popup arrow */.popupClass .popupContent ::after {content: "";position: absolute;top: 100%;left: 10%;margin-left: -10px;border-width: 5px;border-style: solid;border-color: black transparent transparent transparent;}
In this example, we set the visibility as “hidden” which means that initially the popup menu will be hidden.
Next, we utilized some CSS properties to style the popup menu such as background color, text-align, padding, etc.
Lastly, we specified the properties like content, background color, position, etc.
to style the popup arrow.
How to add JavaScript code to open the popup menu
Now, it’s time to write the JavaScript code.
The below snippet will specify the code to open a popup menu when a user clicked on the div:
function showPopup() {
let value = document.getElementById("popupItem");
popup.classList.toggle("display");}
The below snippet shows the complete code to create a very simple popup menu:
<html><head><style>
.popupClass {
position: relative;
display: inline-block;
cursor: text;
}
.popupClass .popupContent {
visibility: hidden;
background-color: black;
color: red;
width: 200px;
text-align: center;
position: absolute;
z-index: 1;
border-radius: 10px;
padding: 10px 0;
bottom: 100%;
left: 30%;
margin-left: -100px;
}
/* Styling Popup arrow */
.popupClass .popupContent::after {
content: "";
position: absolute;
top: 100%;
left: 75%;
margin-left: -10px;
border-width: 5px;
border-style: solid;
border-color: black transparent transparent transparent;
}
/*hide and show the popup */
.popupClass .display {
visibility: visible;
}</style></head><body style="text-align:center"><h3>How to create a popup menu</h3><div class="popupClass" onclick="showPopup()">ClICK ME!<span class="popupContent" id="popupItem">Welcome to linuxhint.com!</span></div><script>
function showPopup() {
var value = document.getElementById("popupItem");
value.classList.toggle("display");
}</script></body></html>
We will get the following output on the successful execution of the code:
![]() The output shows that the popup menu appears when we click on the text.
The output shows that the popup menu appears when we click on the text.
Conclusion
In JavaScript, an on-screen menu that appears on the top of the text/image is referred to as the popup menu.
It appears only when someone clicks on it.
A popup menu remains hidden until someone clicks on it.
This post presented a step-by-step guide to create a popup menu.
For the clarity of concepts, we considered a couple of examples and implemented them practically.
How to add expressions in a string?
String interpolation is a process to use function calls, variables, and arithmetic expressions in a string directly.
Before the string interpolation, features of JavaScript variables, expression and function calls are embedded into a string using escape sequence, object literals, and concatenation process which makes the code messy and less understandable.
In this article, we are going to discuss string interpolation with the following learning outcomes:
How to use string interpolation in java
Difference between string interpolation and concatenation
How to use string interpolation with conditional statements?
How to use string interpolation with logical operators?
How to use string interpolation
In JavaScript, string interpolation is performed using template literal.
These template literals use backticks (“) to wrap a string inside and the $ sign with a pair of curly brackets {} is used to embed expression in a template literal for string interpolation.
Syntax:
`This is the string interpolation process ${expression}`
How to use arithmetic operators in string interpolation
In string interpolation, we can embed arithmetic operators with $ and curly braces as shown below
Code:
var a=2;
var b=3;const first = `String interpolation example ${a+b}`
console.log(first);
Here we take two variables a and b and initialize them, then we take another variable first in which we use backticks to embed string and expression.
Output:
![]() In the above example, expression is calculated inside the template literal which returns 5 as result.
In the above example, expression is calculated inside the template literal which returns 5 as result.
Difference between String Concatenation and String Interpolation
String interpolation and string concatenation, both are used to join the strings, function calls, and arithmetic expressions into one string.
The following examples show the difference between both string joining techniques.
String Concatenation:
The following examples show how we embed strings and variables before string interpolation.
Code:
const name = 'John';const age = 26;
information = "My name is "+ name +" and I am " + age + " years old ";
console.log(information);
Here we take a variable name, age and information.
Then we initialize the name with a string value, age with an integer value, and in the information variable, we perform string concatenation.
Output:
![]() It is clearly seen that we use (+) sign to join strings and variables which makes the code messy and less clear.
It is clearly seen that we use (+) sign to join strings and variables which makes the code messy and less clear.
String interpolation:
Let’s take the above example and perform string interpolation to understand the difference clearly.
Code:
const name = 'John';const age = 26;
information = `My name is ${name} and I am ${age} years old.`;
console.log(information);
Here we use the $ sign with the pair of {} curly braces to embed the variables into a string.
Output:
![]() With the help of template literal, we perform string interpolation which makes the code clean, easily readable, and understandable.
Now, you have understood the clear difference between the string concatenation and string interpolation.
Let’s have a look at code examples of string interpolation in different scenarios.
With the help of template literal, we perform string interpolation which makes the code clean, easily readable, and understandable.
Now, you have understood the clear difference between the string concatenation and string interpolation.
Let’s have a look at code examples of string interpolation in different scenarios.
How to use string interpolation with conditional statements
The following example demonstrates the use of string interpolation with conditional statements.
Code:
const x = 3;
console.log(`${x} is ${x%2 === 0 ? 'even' : 'odd'}`);
Here we added a ternary operator to check whether a number is even or odd with the help of string interpolation.
Output:
![]() The code worked as we expected.
The code worked as we expected.
How to use the logical operators with string interpolation
We can also use logical operators like &&, ||, ? with string interpolation.
In the following example, we are using && operator with string interpolation.
Code:
const age = 20;
console.log(`You are ${age>10 && age<18 ? 'a teenager':'an adult'}`);
Here we check if the person is an adult or a teenager with the help of && operator in string interpolation.
Output:
![]() With the help of && operator and ternary operator in String Interpolation, we have got our desired result.
With the help of && operator and ternary operator in String Interpolation, we have got our desired result.
Conclusion
String Interpolation is a very useful and important feature of ES6 which allows its users to embed expressions, variables, strings, and function calls directly into a string without using any escape sequences, string primitives, and concatenation.
Difference Between Math.round() and Math.trunc()
JavaScript provides several built-in methods such as Math.floor(), Math.ceil(), Math.round(), and Math.trunc.
All these methods are used to round off a number; however, each method rounds a number with a different formula/algorithm.
For instance, the Math.ceil() method rounds the specific number upward (towards positive infinity) while the floor() method rounds the given number downward(towards negative infinity), etc.
In this write-up we will understand the difference between Math.trunc() and Math.round method.
This post will be organized as follows:
What is Math.round() and how to use it
What is Math.trunc() and how to use it
Math.trunc() vs Math.round()
So, let’s begin!
What is Math.round() and how to use it
A built-in method that is used to round off a number to the nearest integer is referred to as the round() method.
The below code snippet shows the basic syntax of the Math.round() method:
Math.round(number);
The Math.round() method will take a number as a parameter and round the specified value to the nearest integer.
Example
In this example, we will consider various scenarios to understand how Math.round() method works:
var num1= Math.round(10.94);
var num2= Math.round(10.15);
var num3= Math.round(-54.87);
var num4= Math.round(-54.27);
console.log("10.94 rounded to: " , num1);
console.log("10.15 rounded to: ", num2);
console.log("-54.87 rounded to: ", num3);
console.log("-54.27 rounded to: ", num4);
In the above snippet, we passed different values to the Math.round() method and printed them on the browser’s console:
![]() From the output we concluded the following points:
When the floating-point value is greater than “.5” then the Math.round() method rounds up the number to 15.
When the floating-point value is less than “.5” then the Math.round() method rounds down the number to 10.
All in all, we can say that the Math.round() method rounds the specified values to the nearest integer values.
From the output we concluded the following points:
When the floating-point value is greater than “.5” then the Math.round() method rounds up the number to 15.
When the floating-point value is less than “.5” then the Math.round() method rounds down the number to 10.
All in all, we can say that the Math.round() method rounds the specified values to the nearest integer values.
What is Math.trunc() and how to use it
It is a predefined math that skips the fractional part and returns only the integer part of the specified value.
The below code snippet shows how to use the Math.trunc() method:
Math.trunc(number);
Example
The below code snippet will provide a detailed understanding of how Math.trunc() method works:
var num1= Math.trunc(10.94);
var num2= Math.trunc(10.15);
var num3= Math.trunc(-54.87);
var num4= Math.trunc(-54.27);
console.log("10.94 rounded to: " , num1);
console.log("10.15 rounded to: ", num2);
console.log("-54.87 rounded to: ", num3);
console.log("-54.27 rounded to: ", num4);
The Math.trunc() method will remove the floating points and it will generate the following output:
![]() The output verifies the working of the Math.trunc() method.
The output verifies the working of the Math.trunc() method.
Math.trunc() vs Math.round()
As of now, we have seen how Math.trunc() and Math.round() methods work.
Let’s conclude what we have learned from the above examples:
The round() method rounds the number on the basis of fractional/floating point value i.e.
if the fractional value is greater than “.50” then the round() method will round the number upward(towards positive infinity).
If the fractional value is less than “.50” then the round() method will round the number downward (towards negative infinity).
For example, the round() method will return 26 if the value is 25.50 while it will return 25 if the value is 25.49.
Now if we talk about the Math.trunc() method it skips the fractional part regardless of the fractional value i.e., it doesn’t matter what comes after the decimal point either its greater than “.50” or less than “.50” the trunc method will skip the floating-point part.
For example, the trunc() method will return 25 in both cases i.e.
either the value is 25.50 or its 25.49.
Conclusion
Math.round() and Math.trunc() are two predefined methods that are used to round a number.
The difference between both these methods is that the Math.trunc() method cut-off the fractional part and returns the remaining integer value, however the Math.round() method rounds the number to the nearest integer.
In this write-up we have learned the key difference between Math.round() and Math.trunc() method with the help of appropriate examples.
Difference Between toFixed() and toPrecision()
Javascript provides two methods to get the precise value in scientific or financial data to round the numbers.
These are called toFixed() and toPrecision() methods.
The toFixed() rounds the numbers and returns a value before the decimal point and includes the digits after it.
However, the toPrecision() rounds the whole number and returns a value before and after the decimal point as per parameter.
This post describes the difference between toFixed() and toPrecision(), with the following outcomes:
– How does toFixed() method work
– How does toPrecision() method work
– Difference between toFixed() and toPrecision()
How does toFixed() method work
The toFixed() method starts to count after the decimal point and rounds the number to a specific length as specified by the user.
Syntax
The syntax of toFixed() is given as follows:
number.toFixed(n)
Here, the ‘number’ represents a variable.
While ‘n’ is a parameter that represents the number of decimals.
The toFixed() returns a string with or without decimal representation.
Example: How to Round a number to 10 decimals using the toFixed() method
The toFixed() method rounds the number after the decimal point according to the provided length.
This example shows how it works.
let num = 1.16379;
console.log(num.toFixed(10));
In the above code, we took a random number ‘1.16379’ and rounded it using the toFixed() method.
We put the parameter value ‘10’
This method rounds the numbers after the decimal point according to the given input
![]() It is noticed that the toFixed() method has rounded the original value and 0’s are added to fulfil the specified length.
It is noticed that the toFixed() method has rounded the original value and 0’s are added to fulfil the specified length.
How does toPrecision() method work
The toPrecision() method considers the whole number including the digits before as well as after the decimal point.
To create a specific length, the nulls and decimal points are added according to need.
Syntax
The syntax of toPrecision() is given as follows:
number.toPrecision(n)
Here, the number represents a variable.
0’s are added if the specified number exceeds the decimal number length.
‘n’ is the total length of digits.
toPrecision() method rounds the whole number before and after the decimal point to a specified length.
Example: How to round a number to a specified length using toPrecision() method
The toPrecision() method rounds a number before and after the decimal point and formats it according to the specified length.
This example shows the working of this method.
let num = 32.3015;
console.log(num.toPrecision(2));
console.log(num.toPrecision(5));
console.log(num.toPrecision(10));
In the above code, a random number ‘32.3015’ is taken and applied to the formation using the toPrecision() method.
To format the number, we took the three-parameter values respectively.
![]() This code represents the number formatting with the specified length of ‘2, 5, 10’.
This code represents the number formatting with the specified length of ‘2, 5, 10’.
![]() After putting the parameter value ‘2’, the toPrecision considered only two digits after it.
While with the value of ‘5’, the five digits before and after the decimal point of a specified length.
Similarly, when the parameter’s value is ‘10’, the four ’0’s’ are added to complete the 10-digit length.
After putting the parameter value ‘2’, the toPrecision considered only two digits after it.
While with the value of ‘5’, the five digits before and after the decimal point of a specified length.
Similarly, when the parameter’s value is ‘10’, the four ’0’s’ are added to complete the 10-digit length.
Difference between toFixed() and toPrecision()
As we know, the toFixed() method count starts after the decimal point and rounds the number including the digit after it.
While the toPrecioson() count starts before the decimal point and rounds the whole number before and after the decimal point.
Here, we will explain the difference between the toFixed() method and the Precision() method by using the following example.
num = 3.37158
console.log(num.toFixed(9));
num = 3.37158
console.log(num.toPrecision(9));
In this code, a random number ‘3.37158’ is specified to the parameters using tofixed() and to Precision() methods.
We have passed the same parameter value, ‘9’, to both methods.
![]() In the case of the toFixed() value, the output showed that the function rounds the value to ‘9’ after the decimal point putting the four ’0’s’.
While in another case, the toPrecision() function rounds the specified value according to the given parameter before and after the decimal point.
In the case of the toFixed() value, the output showed that the function rounds the value to ‘9’ after the decimal point putting the four ’0’s’.
While in another case, the toPrecision() function rounds the specified value according to the given parameter before and after the decimal point.
Conclusion
The toFixed() and toPrecision() methods round the number to get accurate value in scientific or financial data.
This post intends to provide the difference between the toFixed() and toPrecision() methods.
For a better understanding, we have also enlightened the importance and the usages of both methods separately.
Different ways to round numbers
In JavaScript, Math is a predefined object that holds various properties and methods.
It can be used to perform different mathematical functionalities on the numbers., Math is a static object hence we can invoke all the methods or properties of Math directly (i.e., without creating the object).
JavaScript offers different ways/functions that can be used with the Math object to round off a number.This write-up will explain the below listed concepts that will assist you to understand how to round off the numbers:
What is Math.round()
What is Math.ceil()
What is Math.floor()
What is Math.trunc()
So, let’s begin!
What is Math.round()
It is a predefined method and is used with the Math object to round off a number to the nearest integer.
The below snippet depicts the basic syntax of the Math.round() method:
Math.round(number);
The Math.round() method takes a value and rounds the specified value to the nearest integer.
Example
In this example, we will consider various scenarios to understand how Math.round() method works:
var number1= Math.round(14.49);
var number2= Math.round(14.50);
var number3= Math.round(14.87);
var number4= Math.round(14.27);
console.log("14.49 rounded to: " , number1);
console.log("14.50 rounded to: ", number2);
console.log("14.87 rounded to: ", number3);
console.log("14.27 rounded to: ", number4);
In the above snippet, we passed four different values(one-by-one) to the Math.round() method and printed them on the browser’s console:
![]() From the output we observed that when the floating-point value is less than “.5” then the Math.round() method rounded down the number to 14.
If the floating-point value is greater than “.5” then the Math.round() method rounded up the number to 15.
It authenticates that the round() method rounds the specified values to the nearest integer values.
From the output we observed that when the floating-point value is less than “.5” then the Math.round() method rounded down the number to 14.
If the floating-point value is greater than “.5” then the Math.round() method rounded up the number to 15.
It authenticates that the round() method rounds the specified values to the nearest integer values.
What is Math.ceil()
It is a predefined method that rounds a number upward to the nearest integer number.
The below snippet depicts the basic syntax of the Math.ceil() method:
Math.ceil(number);
Example
In this example, we will understand the working of Math.ceil() method:
var number1= Math.ceil(14.49);
var number2= Math.ceil(14.50);
var number3= Math.ceil(14.87);
var number4= Math.ceil(14.27);
console.log("14.49 rounded to: " , number1);
console.log("14.50 rounded to: ", number2);
console.log("14.87 rounded to: ", number3);
console.log("14.27 rounded to: ", number4);
In this example, we considered exactly the same values as of example1, the only difference is that this time we utilized the Math.ceil() method instead of Math.round().
As a result, we will get the following output:
![]() From the output, we come to know that the ceil() method rounded the specified value upward to the nearest integer value.
From the output, we come to know that the ceil() method rounded the specified value upward to the nearest integer value.
What is Math.floor()
It is a predefined method that rounds a number downward to the nearest integer number.
The below snippet shows the basic syntax of the Math.floor() method:
Math.floor(number);
Example3
The below snippet will explain the working of Math.floor() method:
var number1= Math.floor(14.49);
var number2= Math.floor(14.50);
var number3= Math.floor(14.87);
var number4= Math.floor(14.27);
console.log("14.49 rounded to: " , number1);
console.log("14.50 rounded to: ", number2);
console.log("14.87 rounded to: ", number3);
console.log("14.27 rounded to: ", number4);
The Math.floor() method will generate the following output:
![]() The output shows that the Math.floor() method rounded the specified value downward to the nearest integer value.
The output shows that the Math.floor() method rounded the specified value downward to the nearest integer value.
What is Math.trunc()
It is a predefined method that skips the floating-point/fractional values and returns only the integer part of the specified value.
The below snippet shows the basic syntax of the Math.trunc() method:
Math.trunc(number);
Example
The below snippet shows how Math.trunc() method works:
var number1= Math.trunc(14.49);
var number2= Math.trunc(14.50);
var number3= Math.trunc(14.87);
var number4= Math.trunc(14.27);
console.log("14.49 rounded to: " , number1);
console.log("14.50 rounded to: ", number2);
console.log("14.87 rounded to: ", number3);
console.log("14.27 rounded to: ", number4);
The Math.trunc() method will remove the fractional part and the output will be as follows:
![]() The output verifies the working of Math.trunc() method.
The output verifies the working of Math.trunc() method.
Conclusion
In JavaScript, Math.round(), Math.trunc(), Math.ceil(), and Math.floor() methods are used to round the numbers.
The Math.round() method rounds the number to the nearest integer, Math.floor() method rounds the number downward (i.e., towards the negative infinity), the Math.ceil() method rounds the number upward (i.e., towards the positive infinity), and the Math.trunc() method keeps the integer value and skips the fractional part of the given value.
This write-up explained different ways to round the numbers.
JavaScript Array.unshift() Method | Explained
JavaScript provides multiple predefined methods that are used to perform different task on the arrays.
For instance, the Array.concat() method is used to concatenate multiple arrays, the Array.shift() method deletes the initial item of an array, Array.push() method inserts a new item at the end of an array, etc.
If we talk about the Array.unshift() method, it is a widely used array method that inserts one or more elements at the start of an array.In this write-up, we will learn about the Array.unshift() method with the help of some convenient examples.
To do so, this post will explain the following core concepts of the Array.unshift() method:
What is Array.unshift()
What does Array.unshift() Method Return
How to Use Array.unshift() Method
So, let’s begin!
What is Array.unshift()
It is a predefined method that is used to insert at least one item at the start of an array and hence increases the array’s length.
Syntax
The basic syntax of the Array.unshift() method is shown in the below-given snippet:
arrayName.unshift(item1, item2, item3, ....itemN);
In the above snippet, arrayName is an array while the item1, item2, etc.
are the items/elements to be inserted at the start of any specific array.
What does Array.unshift() Method Return
In JavaScript, the unshift() method takes some items as parameters, inserts them at the beginning of the targeted array, and returns a new length of the array(i.e.
increased length).
How to Use Array.unshift() Method
As of now, we are done with the theoretical part of the Array.unshift() method.
For the clarity of concepts, we will consider a couple of scenarios where we can use the Array.unshift() method.
Example1
In this example, firstly, we will create a numeric array of five elements, and afterward we will insert some new elements at the beginning of that array using the Array.unshift() method:
const empAge = [35, 40, 25, 27, 28];const size = empAge.unshift(23, 32);
console.log("Array Size: ", size);
console.log("Array Elements: ", empAge);
Initially, we created an array “empAge” of five elements, next, we utilized the unshift method and we passed it two elements and stored it in a variable size.
Afterwards, we printed array size and array elements of the browser’s console:
![]() The output shows that the Array.unshift() method returned the new length of the array.
The output shows that the Array.unshift() method returned the new length of the array.
Example2
Let’s consider another example to understand how Array.unshift() method works with the string data:
const empNames = ["Daniel", "Seth", "Joe", "Smith", "Denly"];const size = empNames.unshift("John", "Paul", "Ambrose");
console.log("Array Size: ", size);
console.log("Array Elements: ", empNames);
In this example we utilized the unshift() method to insert three elements “John”, “Paul”, and “Ambrose” at the start of the array.
![]() The output verifies the working of Array.unshift() method.
The output verifies the working of Array.unshift() method.
Conclusion
In JavaScript, the Array.unshift() is a predefined method that takes some items as parameters, inserts them at the beginning of the targeted array, and returns the array’s modified length.
The Array.unshift() method is equally effective for both numeric as well as string/alphabetic data.
This post explained different aspects of the Array.unshift() method e.g., what is Array.unshift() method, its syntax, and how to use it.
JavaScript Canvas
Have you ever used a windows paint application? Let’s just say you did but what if you want to draw shapes, lines, texts, and 2D or 3D graphics online on a web browser then what do you do? Here HTML 5 canvas comes in which allows us to draw 2D or 3D graphics in a browser.
This write-up will acknowledge you about
What is a canvas
How to activate a canvas using JavaScript
How to resize a canvas using JavaScript
How to create shapes on a canvas using JavaScript
What is a canvas
Canvas is a container, that allows us to draw different shapes, lines, and texts in a browser.
By default, the canvas container is invisible and has no border.
So to make it visible we use HTML 5 canvas tag and the CSS border property.
Syntax:
<canvas id="canvas" style="border:2px solid black;"></canvas>
The above syntax only displays a simple container with a border.
How to activate a canvas using JavaScript
Basically canvas is an HTML 5 tag but it is only operational with the help of a JavaScript.
The following code is compulsory to access and activate a canvas.
Code:
const canvas = document.querySelector("#canvas");const contxt = canvas.getContext("2d");
In this code, we use the querySelector() method to get the canvas id which will connect our JavaScript code with the canvas tag.
Then we use the getContext() method to specify the environment of a canvas(2D or 3D).
How to resize a canvas using JavaScript
We use JavaScript code to give height and width properties of canvas objects.
If we use CSS to give height and width to the canvas container it will pixelate the container rather than resizing it.
So use the following JavaScript code to resize the canvas container.
Syntax:
canvas.height = 200;
canvas.width = 400;
How to create shapes on canvas using javascript
Now we are going to see how we can create different shapes on canvas using javascript.
Rectangle
The following javascript code is used to create a rectangle on the canvas.
Syntax:
variable_name.strokeRect(value_x, value_y, width, height)
Here variable name represents the variable we have created for the getContext() method.
While the strockRect() method takes four parameters where the value x and the value y represent the position on the canvas where you want to draw the shape(rectangle).
Whereas, width and height are used to mention the size of the rectangle.
Code:
contxt.strokeRect(50,50,250,100)
In this code, a rectangle is created with 250px width and 100px height.
Output:
![]() In case, you want to change the color of the rectangle just add the following code before your rectangle creation code:
Code:
contxt.strokeStyle=”blue”;
Output:
In case, you want to change the color of the rectangle just add the following code before your rectangle creation code:
Code:
contxt.strokeStyle=”blue”;
Output:
![]()
Filled Rectangle
The following javascript code is used to create a filled rectangle on the canvas.
Syntax:
variable_name.fillRect(value_x, value_y, width, height)
The fillRect() method also takes the four parameters and is used to create a filled rectangle.
Code:
contxt.fillRect(50,50,250,100)
Output:
![]() To change the color of the rectangle just use the fillStyle property before your rectangle creation code:
Code:
contxt.fillStyle=”aqua”;
Output:
To change the color of the rectangle just use the fillStyle property before your rectangle creation code:
Code:
contxt.fillStyle=”aqua”;
Output:
![]()
Circle
The following javascript code is used to create a circle on the canvas.
Syntax:
variable_name.arc(value-x, value-y, circle-radius, start-angle, end-angle);
variable_name.stroke();
Here arc() method takes five parameters including the value x and value y representing the position of the circle, circle radius, starting angle, and ending angle value.
stroke() method is used draw a path of the circle which will eventually displays a circle.
Code:
contxt.arc(180, 100, 80, 0, 2 * Math.PI);
contxt.stroke();
Output:
![]()
Line
The following javascript code is used to create a line on the canvas.
Syntax:
variable_name.beginPath();
variable_name.moveTo(value-x, value-y);
variable_name.lineTo(start-point, end-point);
variable_name.stroke();
In this syntax,
beginPath() method starts a path,
moveTo() method takes two values x and y which moves the cursor to the specific point.
lineTo() method also takes two values, the starting point from where the line starts and ending point where the line ends.
stroke() method is used to draw a path of the line which will eventually display a line.
Code:
contxt.beginPath();
contxt.moveTo(50,50);
contxt.lineTo(300,150);
contxt.stroke();
Output:
![]()
Text
The following javascript code is used to write a text on the canvas.
Syntax:
variable_name.font="font-size font-family";
variable-name.fillStyle="color";
variable-name.fillText("Displaying-Text", value-x, value-y);
First, you need to mention the font size and font family using the font property.
Secondly, provide the color if you want using the fillStyle property.
Lastly, fillText() method takes three values, text, value x and value y.
Code:
contxt.font="50px Arial";
contxt.fillStyle = "lightgreen";
contxt.fillText("Canvas", 110, 120)
Output:
![]()
Hollow Text
The following javascript code is used to write a hollow text on the canvas.
Syntax:
variable_name.font="font-size font-family";
variable-name.strokeStyle="color";
variable-name.strokeText("Displaying-Text", value-x, value-y);
Here strokeText() method is used to writethe text in hollow style..
Code:
contxt.font="50px Arial";
contxt.strokeStyle = "orange";
contxt.strokeText("Canvas", 110, 120)
Output:
![]()
Conclusion
Canvas is an artboard to draw 2D or 3D graphics on a browser.
In this article we have learned how we can draw a circle, rectangle, line and text on a canvas through JavaScript.
Although canvas is an HTML5 tag but the operations on canvas can only be performed with the help of a JavaScript code.
JavaScript hash() function | Explained
In computer programming, the data structure is used to store, organise, and utilise the data.
Javascript hash() function converts the input strings into fixed-sized data (numbers) and returns the hash value.
JavaScript hash() function is an irreparable function and governs data solidarity as it returns the same hash value for a given input.
This article provides a deep insight into the JavaScript hash() function with the following learning outcomes:
– How JavaScript hash() function works
– How to use JavaScript hash() function
How JavaScripthash() function works
The hash() function transforms the large keys (strings) into small keys (numbers).
It identifies the preferred digit from an array index and converts it into the hash value.
Syntax
The syntax of the hash() function is given as follows.
functionfunc(string){
var hash = 0;return hash;}
Here, func(string) is a function that takes any input and returns the hash value.
The ‘0’ is the hash value of an empty string.
How to use the JavaScript hash() function
The hash() function calculates the index into an array of the slot from where it identifies the specified value.
Here, we will explain the complete functionality of the hash() function with examples.
Example 1: How to create hash value using the hash() function
The hash() function creates a hash value by converting the large key into small fixed hashes.
This example shows how to create a hash value using the hash() function by converting an integer into 32 bits.
functionfunc(string) {
var hash = 0;if (string.length == 0) return hash;for (x = 0; x <string.length; x++) {
ch = string.charCodeAt(x);
hash = ((hash <<5) - hash) + ch;
hash = hash & hash;
}return hash;}
var str = "Happymoments"
console.log(func(str))
A function ‘string ’ is passed with ‘0’ as a variable hash.
It returns ‘0’ if the variable length is ‘0’.
The string ‘Happymoments’ is stored in the function.
When the hash returns, it converts the integer into 32 bits.
![]() The output showed that the string ‘’happymoment is converted into a small hash value ‘-1245757517’ using the hash() function.
The output showed that the string ‘’happymoment is converted into a small hash value ‘-1245757517’ using the hash() function.
Example 2: How to convert a string into a hash value using the hash() function
The hash() function converts a string into a hash, hash number, or hash value.
This example shows the conversion of a string into a fixed hash.
functionfunc(string) {
var hash = 5;if (string.length == 5) return hash;for (a = 5; a <string.length; a++) {
ch = string.charCodeAt(a);
hash = ((hash <<5) - hash) + ch;
hash = hash & hash;
}return hash;}
var str = "LinuxHint"
console.log(func(str))
Here, in the above code a string is passed with a variable hash ‘5’ of total length, then it will return the hash value of the string ‘LinuxHint’.
![]() The output showed that the string is converted to a hash value that is ‘253386’ using has() function.
The output showed that the string is converted to a hash value that is ‘253386’ using has() function.
Conclusion
The hash() function takes the string as an input and transforms it into the hash value as an output.
This descriptive guide provides a deep insight into the hash() function.
The working of the hash() function is provided by using the syntax.
For a better understanding of hash() function, we have provided a set of examples that illustrate the usage of hash() function.
JavaScript Math random() Method | Explained
In JavaScript, there are multiple built-in methods that are used to achieve different functionalities, for example, the Math.round() method rounds the number to the nearest integer, the Math.trunc() method keeps the integer value and skips the fractional part of the given value, the Math.random() function returns a random numeric value between zero(included) and one (not included), etc.
This write-up will explain the thorough understanding of the below-listed aspects of Math.random() method:
What is Math.random()
Basic Syntax
How Math.random() Method works
So, let’s start!
What is Math.random()
It is a predefined method used to create a random floating point(fractional) number between 0.0(included) and 1.0(excluded).
In JavaScript, by default the Math.random() produces a random value between (0, 1).
However, we can specify the range of our choice by multiplying the returned value of the Math.random() method to the magnitude of the range.
Basic Syntax
The below snippet shows the basic syntax to generate a random number using Math.random() method:
Math.random();
The above snippet shows that the Math.random() method doesn’t take any parameter.
How Math.random() Method works
In this section, we will understand all the essentials of the Math.random() method.
To do so, we will consider some examples.
How to use the Math.random() method to get a random number
In this example we will utilize the Math.random() method to get a random number:
let number = Math.random();
console.log("Randomly Generated Number: ", number);
Whenever we run this program, we will get a new random number between 0.0(inclusive) and 1.0 (exclusive):
![]() The output shows that the Math.random() method returned a random number.
The output shows that the Math.random() method returned a random number.
How to generate a random number (floating point number) between the user-specified range
This time the Math.random() will create a random number between the user-specified range:
function randomValue(minVal, maxVal) {return Math.random() * (maxVal - minVal) + minVal;}
console.log("Random Value between 5 and 10: ", randomValue(5,10));
![]() The output shows that this Math.random() method produced a random number between the user-specified range.
The output shows that this Math.random() method produced a random number between the user-specified range.
How to generate an integer value using Math.random() method
To generate random integer values, we can use various Math methods like round(), ceil(), etc.
along with the Math.random() method.
var number = Math.round(Math.random()*10);
console.log("Random Value: ", number);
In this example, we utilized the Math.round() with Math.random() method.
Consequently, we will get a random number greater than or equal to zero but less than 10:
![]() This is how we can generate a random integer value using the Math.random() method.
This is how we can generate a random integer value using the Math.random() method.
How to use Math.random() method to generate an integer value between the user-specified range
In this example, we utilized the Math.floor() method along with the Math.random() method to generate a random integer between 5 and 10:
function randomVal(minVal, maxVal) {return Math.floor(Math.random() * (maxVal - minVal)) + minVal;}
console.log("Resultant Value: " , randomVal(5, 15));
![]() The above snippet verifies the working of Math.random() method.
The above snippet verifies the working of Math.random() method.
Conclusion
In JavaScript, a predefined method named Math.random() is used to produce a pseudo random fractional/floating point numeric value between 0.0(included) and 1.0(excluded).
We can get an integer value using the Math.random() method, to do so, we have to utilize some other Math methods along with the Math.random() method such as Math.round(), Math.ceil(), and so on.
This write-up discussed how to get the floating-point random numbers or integer numbers using Math.random() method.
Different Ways to Reverse an Array
Array reversing is a very well-known programming challenge that a developer can encounter at any time.
Therefore JavaScript provides multiple ways to deal with it such as using for-loop, reverse(), unshift() method, swapping technique etc.
Some of them modify the original array while some approaches don’t affect the original array.
This post will explain the below-mentioned approaches to reverse an array:
How to use Array.reverse() Method
How to use Traditional for-loop
How to use Array.unshift() method
So, let’s begin!
How to use Array.reverse() Method
The array.reverse() method overwrites the given array and returns a reversed array.
Example
In this example, we have an array of string type elements, we will utilize the array.reverse() method to reverse its element’s order:
<script>
let stdName = ["Joe", "Daniel", "Mike", "Allan", "Joseph"];
console.log("The Reversed Array: ");
console.log(stdName.reverse());</script>
The above piece of code will generate the following output:
![]() The output verified the working of Array.reverse() method.
The output verified the working of Array.reverse() method.
How to use Traditional for-loop to Reverse an Array
In JavaScript, we can utilize the traditional for loop to reverse array’s element.
The push() method can be utilized within the for-loop.
The push() method utilizes an extra variable to store the reversed array
Example
In this example, we will traverse the for-loop inversely i.e.
from the end to the beginning:
<script>
stdName = ["Joe", "Daniel", "Mike", "Allan", "Joseph"];
names = [];
console.log("The original Array: " + stdName);
for(let i = stdName.length-1; i >= 0; i--)
{
names.push(stdName[i]);
}
console.log("The Reversed Array: " + names);</script>
Here, the element present at the last index of the array will be traversed first, and the for-loop will continuously traverse the array until it reached the element present at the starting index :
![]() This is how we can reverse an array using the for-loop.
This is how we can reverse an array using the for-loop.
How to use Array.unshift() method
This Array.unshift() method is similar to the above method i.e.
the unshift() method.
It also utilizes the extra variable to store the reversed array, hence, the original array will remain unchanged.
Example
Let’s consider the below snippet to understand the working of unshift method:
<script>
stdName = ["Joe", "Daniel", "Mike", "Allan", "Joseph"];
names = [];
console.log("The original Array: " + stdName);
for(let i = 0; i<= stdName.length-1; i++)
{
names.unshift(stdName[i]);
}
console.log("The Reversed Array: " + names);</script>
The above code block will produce the following output:
![]() The output shows the appropriateness of the Array.unshift() method.
The output shows the appropriateness of the Array.unshift() method.
Conclusion
In JavaScript, various approaches can be used to reverse an array such as Array.reverse() method, Array.unshift() method, for loop, etc.
The array.reverse() overwrites the given array and returns a reversed array.
The push() and unshift() methods utilize the extra variable to store the reversed array, hence, doesn’t affect the original array.
This write-up explained various approaches to reverse an array.
For a profound understanding it explained each method with the help of some suitable examples.
How does void operator work
, an expression that is evaluated using the void operator, will always return undefined.
If we look at the dictionary definition of the term void, we will come to know that the word void means “completely empty”.
However, when it comes to the programming world, void means nothing will be returned.
This means the void operator will be used with the methods that have nothing to return.
What is Void operator
Basic Syntax
What does javascript:void(0) means?
How to use void operator
Examples
So, let’s begin!
What is Void operator
It is a unary operator that is used to get undefined primitive values.
In simple words, we can say that the void operator evaluates an expression and doesn’t return any value.
The void operator is frequently used in conjunction with Hyperlinks
Basic Syntax
The below-given code block will show the basic syntax of the void operator:
void expression
What does javascript:void(0) means?
The “javascript:” is described as the Pseudo URL while the void operator evaluates an expression and doesn’t return any value.
Hyperlinks are the most common use of javascript:void(0).
Whenever a user clicks on a link on a webpage then a new page loads in most of the cases.
But sometimes, we don’t want a URL to navigate to some other page or refresh a page.
In such a case, the void(0) can be used to restrict a website from refreshing/reloading when a link is clicked.
How to use void operator
Let’s consider some examples to understand the working of void operator:
Example1
In this example, we will create two links, in the first link we will utilize the void(0) method while in the second link we will utilize the alert method:
<body>
<h3>Javascript Void Method</h3>
<a href="javascript:void(0)">CLICK ME</a>
<h3>Javascript alert Method</h3>
<a href="javascript:void(alert('Welcome to Linuxhint'))">CLICK ME</a></body>
The above snippet will generate the following output:
![]() The output verified that when we clicked on link1, the void(0) method prevented it from refreshing.
Example2
In this example we will explain how to generate the undefined value using the void operator:
<html><head>
<script type="text/javascript">
function exampleFunction() {
var num1, num2, num3, num4;
num1 = 15, num2 = void (num3 = 37, num4 = 50);
document.write('num1 = ' + num1 + ' num2 = ' + num2 + ' num3 = ' + num3 + ' num4 = ' + num4);
}
</script></head><body>
<h3>Javascript Void Method</h3>
<form>
<input type="button" value="CLICK ME" onclick="exampleFunction();" />
</form></body></html>
In this example, we created a method that will be invoked when someone clicks on the “CLICK ME” button.
Within the method we created four variables and assigned some numeric values to all the variables except the second variable.
We assigned void to the second variable.
The output verified that when we clicked on link1, the void(0) method prevented it from refreshing.
Example2
In this example we will explain how to generate the undefined value using the void operator:
<html><head>
<script type="text/javascript">
function exampleFunction() {
var num1, num2, num3, num4;
num1 = 15, num2 = void (num3 = 37, num4 = 50);
document.write('num1 = ' + num1 + ' num2 = ' + num2 + ' num3 = ' + num3 + ' num4 = ' + num4);
}
</script></head><body>
<h3>Javascript Void Method</h3>
<form>
<input type="button" value="CLICK ME" onclick="exampleFunction();" />
</form></body></html>
In this example, we created a method that will be invoked when someone clicks on the “CLICK ME” button.
Within the method we created four variables and assigned some numeric values to all the variables except the second variable.
We assigned void to the second variable.
![]() From the output it is clear that the void operator assigned an undefined value to the second variable.
From the output it is clear that the void operator assigned an undefined value to the second variable.
Conclusion
The void operator is a unary operator that is used to get the undefined primitive values.
It evaluates an expression and doesn’t return any value and is commonly used in conjunction with Hyperlinks.
This write-up explained various aspects of void operator with the help of some relevant examples.
String Array
Arrays are one of the most significant and commonly used data structures in programming.s arrays can be of various types such as numeric, strings, etc.
if we talk about the string array, it is nothing but an array of strings.
As the name itself suggests the string array can store the fixed number of string values only.
The string arrays are very similar to the numbers array.
This write-up will explain the below-listed aspects of the String Array:
How to Use Traditional String Arrays
How to Use String Array as an Object
How to Use Built-in Methods with String Array
So, let’s get started!
How to Use Traditional String Arrays
As the name itself indicates it is a normal array just like numeric arrays, boolean arrays.
The array indexing will start from 0.
The below snippet will show you how to declare an array:
var arrayValues = ["Java", "JavaScript", "Python", "C++", "PHP"];
Here, “var” is a keyword used to declare any variable, “arrayValues” is a user-defined array name, while “Java”, “JavaScript”, etc.
are the elements of the array.
Example
In this example, firstly, we will declare and initialize a string array and afterward we will use the for-loop to print each array element on the browser’s console:
<script type="text/javascript">
var arrayValues = ["Java", "JavaScript", "Python", "C++", "PHP"];
console.log("Array Values: ");
for (let i = 0; i <= arrayValues.length-1; i++) {
console.log(arrayValues[i]);
}</script>
The above snippet will generate the below-given output:
![]() In this way, we can work with string arrays.
In this way, we can work with string arrays.
How to Use String Array as an Object
If we talk about a string array as an object, it utilizes the key-value pair.
Example
In this example, we will learn how to use string array as an object:
<script type="text/javascript">
var arrayValues = {1: "Java", 2: "JavaScript", third: "PHP", fourth: "Python" };
console.log(arrayValues[1]);
console.log(arrayValues["third"]);
console.log(arrayValues["fourth"]); </script>
In this example, firstly, we created a string array as an object, afterward, we accessed different elements the string array and printed them on the browser’s console:
![]() Output shows that the above program is working properly.
Output shows that the above program is working properly.
How to Use Built-in Methods with String Array
In JavaScript, multiple built-in methods such as concat(), includes(), split(), etc.
can be used with string arrays to achieve different functionalities.
Example
This example will explain the working of split() method:
<script type="text/javascript">
var message = "Welcome to the linuxhint.com!";
var splitValues = message.split(" ");
console.log(splitValues[3]); </script>
In this example, we utilized the split() method and passed it a “white space” as a parameter.
Consequently, it will split the string whenever a white space will be encountered in that string.
Finally, we printed the value of the third index:
![]() Output verifies the working of split() method.
Example
This example will explain the working of concat() method:
<script type="text/javascript">
var arrayValues1 = ["Java", "JavaScript"];
var arrayValues2 = ["Python", "C++", "PHP"];
var concatValues= arrayValues1.concat(arrayValues2);
console.log(concatValues); </script>
In this example, initially, we created two arrays, next, we utilized the concat() method to concatenate the values of both arrays:
Output verifies the working of split() method.
Example
This example will explain the working of concat() method:
<script type="text/javascript">
var arrayValues1 = ["Java", "JavaScript"];
var arrayValues2 = ["Python", "C++", "PHP"];
var concatValues= arrayValues1.concat(arrayValues2);
console.log(concatValues); </script>
In this example, initially, we created two arrays, next, we utilized the concat() method to concatenate the values of both arrays:
![]() The output displayed the concatenated array.
Example
This example will explain the working of includes() method:
<script type="text/javascript">
var arrayValues1 = ["Java", "JavaScript"];
var result= arrayValues1.includes("PHP");
console.log(result);
var result= arrayValues1.includes("Java");
console.log(result); </script>
In this example we utilized the includes() method to check the existence of the “PHP”, and “JAVA” in the string array:
The output displayed the concatenated array.
Example
This example will explain the working of includes() method:
<script type="text/javascript">
var arrayValues1 = ["Java", "JavaScript"];
var result= arrayValues1.includes("PHP");
console.log(result);
var result= arrayValues1.includes("Java");
console.log(result); </script>
In this example we utilized the includes() method to check the existence of the “PHP”, and “JAVA” in the string array:
![]() The output verifies the working of include() methods.
Similarly, there are many more methods that can be used with the string arrays to achieve different functionalities.
The output verifies the working of include() methods.
Similarly, there are many more methods that can be used with the string arrays to achieve different functionalities.
Conclusion
The string arrays can store the fixed number of string values only., string arrays can be used as either traditional string arrays or as an Object.
Traditional string arrays are normal arrays just like numeric arrays, boolean arrays, etc.
While the string array as an object utilizes the key-value pair.
JavaScript provides multiple built-in methods such as concat(), includes(), split(), etc.
that can be used with the string arrays to achieve different functionalities.
This post explained different aspects of string arrays in with the help of suitable examples.
How to create Enumerator
While programming, have you ever encountered a situation where it is required to manage some hard-coded values or a large file of constants with specific values such as default strings or URLs? If yes, then learn the concept of Enumeration to easily tackle such a problem the next time.
In JavaScript, enumerators create a set of “constants” or some distinct values, making the code easier to read and maintain.
They are also helpful in case of limiting the selection; for instance, the possible values to represent the seasons in temperate climate are Summer, Winter, Autumn, and Spring.
This write-up will discuss the method to create an Enumerator in JavaScript.
So, let’s start!
Enumerator
You may know that numbers can be utilized to refer to a “value” and the “type” of something.
For instance, in the below-given program, we will associate a number “1” with the constant “SUMMER” as a season type:
const SUMMER= 1;
Next, we will define a function named “getSeason()” that accepts the “type” as an argument and then compare it with the type of “SUMMER” using strict equality operator “===”:
function getSeason(type) {
functiongetSeason(type) {if (type === SUMMER) {
return{ name: 'Summer Season' };
}return{ name: 'Other Season' };}
Lastly, invoke the “getSeason()” function while passing “1” as an argument:
getSeason(1);
The output of the above-given code will print out the season information on the console, according to the passed type:
![]() Want to define more types of season? To do so, create constants with the name of the specific season and assign a number to it as its “type”:
const SUMMER= 1;const SUMMER= 1;const WINTER= 2;
functiongetSeason(type) {if (type === SUMMER) {
return{ name: 'Summer Season' };
}if (type === WINTER) {
return{ name: 'Winter Season' };
}
return{ name: 'Other Season' };}
getSeason(2);
Output
Want to define more types of season? To do so, create constants with the name of the specific season and assign a number to it as its “type”:
const SUMMER= 1;const SUMMER= 1;const WINTER= 2;
functiongetSeason(type) {if (type === SUMMER) {
return{ name: 'Summer Season' };
}if (type === WINTER) {
return{ name: 'Winter Season' };
}
return{ name: 'Other Season' };}
getSeason(2);
Output
![]() As you can see from the above-given output, our program is working perfectly.
Still, the defined season types are not logically connected and exist as independent constants that can be placed anywhere in the code, making them complex to handle.
In such a situation, “Enumerators” comes into play!
Enumerators offer the functionality of defining a set of named “constants” or distinct cases.
When this mechanism is utilized, all of the “hard-coded” values are added in a single location to which they are referred, not re-written.
Also, the usage of Enumerators also helps in improving the code maintainability.
Now, let’s check out the method of creating Enumerators.
As you can see from the above-given output, our program is working perfectly.
Still, the defined season types are not logically connected and exist as independent constants that can be placed anywhere in the code, making them complex to handle.
In such a situation, “Enumerators” comes into play!
Enumerators offer the functionality of defining a set of named “constants” or distinct cases.
When this mechanism is utilized, all of the “hard-coded” values are added in a single location to which they are referred, not re-written.
Also, the usage of Enumerators also helps in improving the code maintainability.
Now, let’s check out the method of creating Enumerators.
How to create an Enumerator
Enumerators are not supported in ES6 and the prior versions; however, it is a pattern, so we can replicate it using native JavaScript features and techniques.
In JavaScript, you can create Enumerators by:
Defining an Enumerator “Object”
Creating an Enumerator “Class”
We will discuss each of the specified methods in the next sections.
How to create Enumerator object
As mentioned earlier, Enumerators are defined as “constants” or “key-value” pairs, so to use them, you have to create an object with the name following “PascalCase” and keys in “Upper_Case”:
const Seasons= {
SUMMER: 1,
WINTER: 2,
SPRING: 3,
AUTUMN: 4}
Till this point, we have created an Enumerator named “Seasons,” but its values can be changed easily, which negates it being an Enumerator.
We have to specify its properties as “unchangeable” to alter this behavior.
For this purpose, we will invoke the JavaScript “Object.freeze()” method while defining the properties of the “Seasons” object.
Upon doing so, the “Object.freeze()” method will freeze the “Seasons” object and prevents its properties from any manipulation:
const Seasons= Object.freeze({
SUMMER: 1,
WINTER: 2,
SPRING: 3,
AUTUMN: 4});
Seasons;
Output
![]() For basic scenarios, you can create an Enumerator object; however, when you have to specify some logic for adding values, go for the Enumerator Implementation in a JavaScript class.
For basic scenarios, you can create an Enumerator object; however, when you have to specify some logic for adding values, go for the Enumerator Implementation in a JavaScript class.
How to create Enumerator class
To create an “Enumerator” class, follow the below-given instructions:
First of all, define a “constructor()” for the Enumerator class that accepts a variable number of arguments as “keys”.
The created constructor method will be responsible for adding each “key” to an Enumerator object and then freezing it instantly with the help of the “Object.freeze()” method.
In the next step, utilize the “Symbol.iterator()” method for converting an instance of the Enumerator class into an “iterable” object.
This functionality will make the Enumerator object more useful.
Lastly, declare an object of the “Enumerator” class and pass the “keys” to the constructor().
class Enumerator {
classEnumerator {
constructor(...keys) {
keys.forEach((key, i) => {
this[key] = i;
});
Object.freeze(this);
}
*[Symbol.iterator]() {
for (let key ofObject.keys(this)) yieldkey;
}}
constseasonsEnum = newEnumerator(
'summer',
'winter',
'spring',
'autumn');const seasons= [...seasonsEnum];
console.log(seasons);
Here is how we have implemented the Enumerator class:
![]() We have compiled different methods for creating Enumerators.
Depending upon your requirements, you can utilize any of them and benefit from Enumerators’ functionalities.
We have compiled different methods for creating Enumerators.
Depending upon your requirements, you can utilize any of them and benefit from Enumerators’ functionalities.
Conclusion
In JavaScript, you can create an “Enumerator Object” or “Enumerator Class” to implement the concept of Enumeration, where the Enumerator object is used in basic scenarios and the Enumerator class is defined for complex logic.
Both approaches utilize the “Object.freeze()” method to freeze the created Enumerator object and mark its properties as unchangeable.
This write-up discussed different methods to create an Enumerator.
How does Operator Precedence work
In JavaScript, the priority of operators in the specified operation is determined by the “Operator Precedence“.
Operator precedence decides which operators have high precedence as compared to others.
In this way, it assists in evaluating a mathematical expression in the correct sequence.
While performing an operation, the high precedence operators are considered the operands of lower precedence operators.
This signifies that, in a given operation, the operator having the higher precedence are evaluated first.
This write-up will discuss the working of Operator Precedence in JavaScript.
Operator Precedence
Before writing any expression, it is important to know the order in which the added operations will be performed, as it ensures that you attain the desired results.
Each JavaScript operator has a “level of importance” or “Precedence order” compared to other operators, so the operators with high precedence are executed before the low precedence operators.
Moreover, another term involved in this whole procedure is known as “Associativity”.
Operators Associativity
The associativity of the operators decides the direction of conducting operations which can be “left-to-right” or “right-to-left”.
“left-to-right” associativity exists for the arithmetic operators such as addition, multiplication, subtraction, and division.
In comparison, other operators such as the Boolean “NOT” operator and all assignment operators are based on “right-to-left” associativity.
Example: Operators Associativity
Subtraction is an excellent example of an operation in which associativity is important.
For instance, the result of subtracting “4 from 9” is not the same as subtracting “9 from 4”:
var x = 9 - 4;
var y = 4 - 9;
console.log(x)
console.log(y)
![]()
Levels of Operator Precedence
Operator precedence is divided into 19 different levels.
Check out the below-given table to know more about them:
Example: How does Operator Precedence work
Consider the following expression:
4 + 5 - 10 + 7 * 4 + 3
We have added three instances of the “+” addition operator in the above expression.
Without any operator precedence, the stated expression may yield a different value; however, we will solve it as per precedence order.
According to the table given in the previous section, the multiplication operator “*” has higher precedence than the precedence of addition and subtraction operators, so it will be performed first.
Both addition and subtraction operators have same precedence order, which means they are on the same level, and JavaScript will evaluate them from left to right.
JavaScript will perform the following steps behind the scenes to evaluate the given expression:
First of all, it will multiply 7 * 4 which equal to “28” and then update the equation as:
4 + 5 - 10 + 28 + 3
Next, the expression will be evaluated from “left-to-right” direction, starting from “4 + 5” addition operation which results “9”:
9 - 10 + 28 + 3
Then, “10” is subtracted from the “9” which yield “-2” value:
-1 + 28 + 3
After doing so, “28” will be subtracted from “-1”:
27 + 3
In the last step, the addition operation is performed for the number “27 + 3” which results in “30”:
![]() We have provided the essential information related to the working of operator precedence.
You can explore this topic further according to your requirements.
We have provided the essential information related to the working of operator precedence.
You can explore this topic further according to your requirements.
Conclusion
In JavaScript, each operator has a Precedence Order, which works in such a way that operators with high precedence are executed before the low precedence operators, and the high precedence operators are considered as the operands of lower precedence operators.
The operator precedence assists in evaluating a mathematical expression in the correct sequence.
This write-up discussed the working of operator precedence.
JavaScript textContent | Explained
, there are various properties that can be used to access and modify the content of html tags i.e.
textContent, innerText, and innerHTML.
The textContent property returns all the text contained by an element/node and all of its descendants including spaces and CSS hidden text, except the tags.
The innerText property returns all text content of a node/element and its child elements but without spacing and html tags, except the style and script tags.
While the innerHTML returns all the text contained by an element including spaces and html tags.
This post will explain the below-listed aspects regarding the textContent property:
What is textContent
Basic Syntax
What does textContent property Return
How to Use textContent
So, let’s start!
What is textContent
It is a property that allows us to get or set the text content of a node, or an element.
Setting the textContent property will remove and replace the child nodes with the new text node.
Basic Syntax
The below-given snippet will show how to get/return the text content of a node or element:
element.textContent | node.textContent
Let’s consider the below snippet to understand how to set the text content of a node or element:
element.textContent = text | node.textContent = text
What does textContent property Return
In JavaScript, the textContent property returns the content of an element/node and all of its descendents(child nodes).
It returns null if the element/node is a document/notation type.
How to Use textContent property
Up till now, we are done with the theoretical part of the textContent property.
Now, let’s move one step ahead to implement all these theoretical concepts practically.
Example1: Let’s consider the below-given code to understand how to get/return the text content of an element using the textContent property:
<html><body>
<h2> id="greetings">Welcome to linuxhint.com</h2></body<script type="text/javascript">
let content = document.getElementById('greetings');
alert(content.textContent);</script></html>
In the above code snippet, firstly, we utilized the getElementById() to select the h2 element with the id ‘greetings’.
Afterward, we accessed the textContent property to display the text of the node.
![]() This is how the textContent property modifies the text of an element.
Example2: How to set the textual content of an element using textContent property:
<html><body><h3>textContent Property</h3><p id="change" onclick="clickMe()">CLICK ME</p><script>function clickMe() {
document.getElementById("change").textContent = "Welcome to linuxhint.com";}</script></body></html>
The above code block will produce the following output:
This is how the textContent property modifies the text of an element.
Example2: How to set the textual content of an element using textContent property:
<html><body><h3>textContent Property</h3><p id="change" onclick="clickMe()">CLICK ME</p><script>function clickMe() {
document.getElementById("change").textContent = "Welcome to linuxhint.com";}</script></body></html>
The above code block will produce the following output:
![]() This is how the textContent property sets the text.
This is how the textContent property sets the text.
Conclusion
In JavaScript, the textContent property allows us to get or set the text content of a node, or an element.
Setting the textContent property will remove and replace the child nodes with the new text node.
The textContent property returns the content of an element/node and all of its descendents(child nodes).
It returns null if the element/node is a document/notation/document type.
This write-up explained what textContent is, what it returns, and how to use it.
How to Do Base64 Encoding and Decoding
Java Script is one of the most widely used programming languages in web-based programming.
The biggest advantage of using this scripting language is that the code written in this language is extremely concise and compact for it allows you to shrink multiple lines of code within a single line and offers the exact same functionality.
This is in fact the major reason behind its popularity among a vast community of developers.
As far as this guide is concerned, we want to teach you the method of performing the Base64 encoding and decoding in Java Script using the Windows 10 operating system.
In this article, you will be able to witness how easy it is to carry out these processes within Java Script and that too without having the need of installing any additional compiler.
Performing the Base64 Encoding and Decoding in Java Script in Windows 10
You do not even need to install a dedicated compiler rather you can easily do this while using any web browser of your choice to perform the Base64 encoding and decoding in Java Script.
In our case, we will be using the Google Chrome browser with a Windows 10 system.
To learn the Base64 encoding and decoding methods in Java Script, you will have to go through the following two main steps.
These steps are extremely simple and very easy to execute.
Step 1: Accessing the Console of the Desired Web Browser
First, we have launched the Google Chrome web browser on our Windows 10 system by clicking on its icon.
Then, we simply clicked on its hamburger menu icon to expand it.
From the hamburger menu of our Google Chrome browser, we need to click on the “More tools” option as shown in the following image:
![]() Clicking on this option will launch a sub-cascading menu from which we need to select the “Developer tools” option as highlighted below:
Clicking on this option will launch a sub-cascading menu from which we need to select the “Developer tools” option as highlighted below:
![]() This option will launch a small developer tools pane on the right side of your Google Chrome window.
From this developer tools pane, you need to switch to the “Console” tab where we will be writing our Java Script code.
This option will launch a small developer tools pane on the right side of your Google Chrome window.
From this developer tools pane, you need to switch to the “Console” tab where we will be writing our Java Script code.
![]()
Step 2: Writing and Running the Java Script Code for Performing the Base64 Encoding and Decoding
For doing the Base64 encoding and decoding in Java Script, we have written the code shown in the image below within our browser’s console.
You will have to press the Enter key after writing each statement so that it can be executed.
Now, we will thoroughly discuss this Java Script code in this section.
![]() The first statement in this Java Script code is “var str = “I Am a Tech Junkie”.
With the help of this statement, we have created a random string that we first want to encode and then decode later.
Then, our second statement is “console.log(“The original string is: ”+ str)”.
This statement will simply print our original string on the console as you can see from the line “VM56:1” of the image shown above.
Now, to encode our original string, we used the statement “var encodedString = btoa(str)”.
In this statement, we have created a string named “encodedString” for holding the encoded string and then we have just equalized it to the output of the function “btoa(str)”.
This is a built-in function of the Java Script and is used to encode any given string with Base64 encoding.
You simply need to pass the desired string to this function and let it perform its magic.
After that, we have used the statement “console.log(“The encoded string is: ”+ encodedString)” for printing our encoded string on the console.
You can witness our encoded string from the line “VM76:1” of the image shown above.
Then, we wanted to decode this encoded string with Base64 in Java Script.
To do that, we have used the statement “var decodedString = atob(encodedString)”.
In this statement, we have first created a string named “decodedString” and equalized it to the result of the “atob(encodedString)” function.
Again, this is a built-in function of the Java Script that is used for decoding an encoded string with Base64.
This function simply takes an encoded string as its input.
Finally, we have used the “console.log(“The decoded string is: ”+ decodedString)” statement for printing our decoded string on the terminal.
You can see our decoded string from the line “VM265:1” of the image shown above.
From here, you can easily verify that our decoded string is exactly the same as our original string which means that we have managed to carry out the Base64 encoding and decoding processes successfully while using the Java Script in Windows 10.
The first statement in this Java Script code is “var str = “I Am a Tech Junkie”.
With the help of this statement, we have created a random string that we first want to encode and then decode later.
Then, our second statement is “console.log(“The original string is: ”+ str)”.
This statement will simply print our original string on the console as you can see from the line “VM56:1” of the image shown above.
Now, to encode our original string, we used the statement “var encodedString = btoa(str)”.
In this statement, we have created a string named “encodedString” for holding the encoded string and then we have just equalized it to the output of the function “btoa(str)”.
This is a built-in function of the Java Script and is used to encode any given string with Base64 encoding.
You simply need to pass the desired string to this function and let it perform its magic.
After that, we have used the statement “console.log(“The encoded string is: ”+ encodedString)” for printing our encoded string on the console.
You can witness our encoded string from the line “VM76:1” of the image shown above.
Then, we wanted to decode this encoded string with Base64 in Java Script.
To do that, we have used the statement “var decodedString = atob(encodedString)”.
In this statement, we have first created a string named “decodedString” and equalized it to the result of the “atob(encodedString)” function.
Again, this is a built-in function of the Java Script that is used for decoding an encoded string with Base64.
This function simply takes an encoded string as its input.
Finally, we have used the “console.log(“The decoded string is: ”+ decodedString)” statement for printing our decoded string on the terminal.
You can see our decoded string from the line “VM265:1” of the image shown above.
From here, you can easily verify that our decoded string is exactly the same as our original string which means that we have managed to carry out the Base64 encoding and decoding processes successfully while using the Java Script in Windows 10.
Conclusion
This article was designed to teach you the methods of performing the Base64 encoding and decoding using the Java Script in Windows 10.
For that, we have used the Google Chrome browser’s console in Windows 10.
This was the best part of this method as we did not require any additional compiler for running our code.
After accessing the Google Chrome browser’s console, we created and executed a Java Script code for encoding and decoding the given string.
Using the very same method, you can encode or decode any string of your choice with Base64 in Windows 10.
You can even use browser consoles other than Google Chrome such as Firefox, Internet Explorer, Microsoft Edge, etc.
However, if you do not want to use the browser console for executing the Java Script code, then you can use any compiler of your choice to do so.
Types of Inheritance
In JavaScript, Inheritance is a mechanism that permits an object to inherit all of the methods and properties of its parent or base object.
It is also considered a crucial component of OOP (Object Oriented Programming).
The idea behind implementing Inheritance is to add new objects that are derived from existing objects.
When the newly created object becomes a child or derived object of a parent class, it can inherit all of its methods and properties.
This write-up will discuss types of Inheritance in JavaScript.
So, let’s start!
Types of Inheritance
JavaScript supports the following types of Inheritance:
Prototypal Inheritance
Pseudoclassical Inheritance
Functional Inheritance
![]() We will discuss each of the mentioned Inheritance types in the following sections.
We will discuss each of the mentioned Inheritance types in the following sections.
Prototypal Inheritance
“Prototypal Inheritance” enables you to access properties and methods of a parent object.
In this type of inheritance, a newly created object is permitted to inherit the properties and method of an existing object.
Typically, “Object.getPrototypeOf()” and “Object.setPrototypeOf()” can be used to get and set an object’s Prototype; however, ES6 standardize the “__proto__” accessor property that can be utilized for the similar purpose.
Syntax of Prototypal Inheritance
ChildObject.__proto__ = ParentObject
Here “ChildObject” represents the newly created object which inherits the properties and methods of “ParentObject”.
Example: How to implement Prototypal Inheritance
First of all, we will create two objects named “Bike” and “Venom” and add a “color” property for the “Bike” object and a “name” property for the “Venom” object:
let Bike= {
color: "Blue",};
let Venom = {
name: "Venom",};
By using “__proto__” property of the “Venom” object, we will inherit the properties of the “Bike” object:
Venom.__proto__ = Bike;
Lastly, we will display the “own” (Venom.name) and “inherited” (Venom.color) property values of “Venom” object:
console.log("This is a " + Venom.color + " " + Venom.name);
![]()
Pseudoclassical Inheritance
The idea of implementing the “Pseudoclassical Inheritance” is to create an “inherited” function that assists in associating the child class to the parent class.
For this purpose, the Pseudoclassical Inheritance utilizes:
A “constructor()” function
“new” operator for creating instances
A “prototype” property that establishes the chain of inheritance and is assigned to the constructor function so that all instances inherit the specified property.
Now, check out the below-given example to clearly understand the Pseudoclassical Inheritance.
Example: How to implement Pseudoclassical Inheritance
We will define a constructor function named “Bike()”:
function Bike(){this.name = 'Bike';}
Next, we will create an “info()” function that will be inherited by the child objects of “Bike”:
Bike.prototype.info= function(){
console.log('This is a ' + this.name );};
In our program, we will declare another object named “Venom,” and utilize the “Bike.call()” method for invoking the Bike constructor():
function Venom() {
Bike.call(this);this.name = 'Venom';}
Then, we will use the “prototype” property to implement the Pseudoclassical inheritance between “Venom” object and “Bike” object:
Venom.prototype = Object.create(Bike.prototype);
Venom.prototype.constructor = Bike;
In the last step, the “new“operator is utilized for creating the two instances, “venom” and “bike“:
var venom= new Venom();
var bike= new Bike();
After doing so, the “info()” function is invoked for both instances:
venom.info();
bike.info();
As you can see from the below-given output, the Pseudoclassical Inheritance is implemented, and the instance “venom” inherited and executed the “info()” function successfully :
![]()
Functional Inheritance
The mechanism of inheriting properties by applying an augmenting function (function having generic functionality) to an object instance is known as “Functional Inheritance”.
The defined augmenting function employs dynamic object extension to add additional properties and methods to an object instance.
You can also use its “closure scope” to keep some data private.
Example: How to implement Functional Inheritance
In this example, we will create a “Bike” object having a inner object named “x”:
function Bike(data) {
var x= {};
x.name = data.name;return x;}
Then, we will create a child object named “Venom” which establishes the inheritance with the “Bike” class.
This child object will comprises an augmenting function “info” which can have the access to the “name” property of the “x” object:
function Venom(data) {
var x= Bike(data);
x.info= function () {return "This is a " + x.name + " Bike";};return x;}
To implement the Functional Inheritance, we will create “venom” as a child instance and pass the value of the “name” property as “data” argument:
var venom= Venom({ name: "Venom" });
The given “console.log()” method will fetch the value of the “x.name” property from the parent “Bike” object and print it on the console:
console.log(venom.info());
Output
![]() That was all about the types of inheritance.
You can further explore them according to your preferences.
That was all about the types of inheritance.
You can further explore them according to your preferences.
Conclusion
Prototypal Inheritance, Pseudoclassical Inheritance, and Functional Inheritance are different types of Inheritance in JavaScript.
A Prototypal type of Inheritance is implemented using the “__proto__” property, whereas, in Functional Inheritance, an augmenting function is defined which accesses the properties of the parent class.
Moreover, the Pseudoclassical Inheritance utilizes a constructor() function, “new” operator, and prototype property to embed inheritance between two objects.
This write-up discussed different types of Inheritance.
How to use Comparison Operators
While programming in JavaScript, we often encounter situations where we have to compare two values before executing the next statement.
For instance, you are writing a program to check if a person’s age is greater than or equal to “20”.
This statement can be specified as an expression with the help of Comparison Operators.
Comparison operators are used to compare two values based on the added condition, and after performing the comparison, they return a boolean value, either “true” or “false”.
This write-up will discuss the usage of Comparison operators.
So, let’s start!
Types of Comparison operators
In JavaScript, Comparison operators are divided into two categories: “Equality Operators” and “Rational Operators”:
Equality Operators: The Equality operators return a Boolean value if two operands are equal.
The set of the Equality operators includes:
Equality operator (==)
Inequality operator (!=)
Strict Equality operator (===)
Strict Inequality operator (!==)
Rational Operators: Rational operators determine the relationship between two operands and return a boolean value after comparison.
The set of Rational Operators includes:
Greater than operator (>)
Less than operator (<)
Greater than or equal operator (>=)
Less than or equal operator (<=)
We will explain the usage of each of the above-mentioned comparison operators in the following sections.
How to use Equality operator (==)
The JavaScript Equality Operator “==” checks the equality of the specified operands and returns a boolean value.
After converting both values to a common type, it then performs the comparison.
Syntax of Equality operator (==)
x == y
Here, the equality operator “==” will compare “x” and “y” values after converting the value of “y” into the “x” operand’s data type.
Example: How to use Equality operator (==)
First of all, we will create three constants named “x”, “y”, and “z” having the following values:
const x = 6,
y = 13,
z = 'linuxhint';
![]() Next, we will compare the value of constant “x” with the value “6”:
console.log(x == 6);
The equality operator returns “true” because “6” equals to the constant “x” in terms of “value” and “type”:
Next, we will compare the value of constant “x” with the value “6”:
console.log(x == 6);
The equality operator returns “true” because “6” equals to the constant “x” in terms of “value” and “type”:
![]() In the below-given example, the equality operator “==” will first convert the string “13” to the number type and then compare it with the value stored in the constant “y”:
console.log(y == '13');
After evaluating the expression “y==’13’”, the equality operator will return “true”:
In the below-given example, the equality operator “==” will first convert the string “13” to the number type and then compare it with the value stored in the constant “y”:
console.log(y == '13');
After evaluating the expression “y==’13’”, the equality operator will return “true”:
![]() Lastly, we will check the constant “z” and the string “Linuxhint” for equality:
console.log(z == 'Linuxhint');
The right side operand is already a string, so the equality operator will directly compare its value and return the results:
Lastly, we will check the constant “z” and the string “Linuxhint” for equality:
console.log(z == 'Linuxhint');
The right side operand is already a string, so the equality operator will directly compare its value and return the results:
![]() The given output signifies that the specified operands are not equal.
As the value stored in the constant “z” is “linuxhint,” and the value with which it is compared is “Linuxhint”.
So, we can conclude that while comparing strings, the “equality” operator also compares the “Characters Case”.
The given output signifies that the specified operands are not equal.
As the value stored in the constant “z” is “linuxhint,” and the value with which it is compared is “Linuxhint”.
So, we can conclude that while comparing strings, the “equality” operator also compares the “Characters Case”.
How to use Inequality operator (!=)
To compare the inequality of two operands, the Inequality operator “!=” is used.
It returns a boolean value which indicates that the specified condition is true or false.
Syntax of Inequality operator (!=)
x != y
Example: How to use Inequality operator (!=)
In the following example, the inequality operator “!=” will compare “6” with the value of the “x” constant:
console.log(x != 6);
As both of the operands are equal, the inequality operator will return “false”:
![]() Comparing the value of “y” with the string “13” will return “true” because both values are unequal in terms of the data type:
console.log(y == '13');
Comparing the value of “y” with the string “13” will return “true” because both values are unequal in terms of the data type:
console.log(y == '13');
![]() Similarly, the string ‘linuxhint’ stored in the “z” constant is not equal to “Linuxhint“, because the first character is in Upper-case:
console.log(z != 'Linuxhint');
So the return case of the inequality operator “!=” will be set to “true”:
Similarly, the string ‘linuxhint’ stored in the “z” constant is not equal to “Linuxhint“, because the first character is in Upper-case:
console.log(z != 'Linuxhint');
So the return case of the inequality operator “!=” will be set to “true”:
![]()
How to use Strict Equality operator (===)
Another operator that can be utilized to compare the equality of two operands is the Strict Equality Operator “===”.
The term “strict” distinguishes it from the equality operator “==“, as it strictly compares the values of the specified operands without converting them into a common type.
Syntax of Strict Equality operator (===)
x === y
Example: How to use Strict Equality operator (===)
We will now check the equality between the value of “y” and the added string “13”, using the Strict Equality operator:
console.log(y === '13');
The output prints out “false” after comparing the numeric value of the constant “y” with the string “13”:
![]() In the other condition, the strict equality operator will check the equality between the value of “y” and a number “13”:
console.log(y === 13);
Both values are equal according to their associated data type, so the strict equality operator will mark them as equal and return a “true” boolean value:
In the other condition, the strict equality operator will check the equality between the value of “y” and a number “13”:
console.log(y === 13);
Both values are equal according to their associated data type, so the strict equality operator will mark them as equal and return a “true” boolean value:
![]()
How to use Strict Inequality operator (!==)
The JavaScript Strict Inequality operator (!==) validates the inequality between two operands based on their “value” and “type”.
It returns “true” if both type and value are unequal; otherwise, the return case is set to “false”.
Syntax of Strict Inequality operator (!==)
x !== y
Example: How to use Strict Inequality operator (!==)
The below-given example will use the Strict Inequality operator to compare the value of the constant “y” with the string “13”:
console.log(y !== '13');
The constant “y” comprises a value of the “number” type.
In contrast, the other specified operand has a “string” type value, so the strict inequality operator will declare both values as “unequal” and return “true”:
![]()
How to use Greater than operator (>)
This Rational operator is used for verifying if the value of the left-side operand is greater than the value of the right-side operand.
If both operands satisfy the added condition, the Greater than operator will return “true“; otherwise, it prints out “false”.
Syntax of Greater than operator (>)
x > y
Example: How to use Greater than operator (>)
For the demonstration purpose, we will create a constant named “x” and initialize it with “14”:
const x = 14;
In the next step, we will utilize the Greater than operator “>” to check if the value of the “x” constant is greater than “10” or not:
console.log(x > 10);
As the number “14” is greater than the “10” value, so the Greater than operator will return “true”:
![]()
How to use Less than (<) operator
The Less than relational operator “<” is used for verifying if the value of the left-side operand is less than the value of the right-side operand.
If both operands satisfy the added condition, the Less than or equal operator will return “true“; otherwise, it prints out “false”.
Syntax of Less than operator (<)
x <= y
Example: How to use Less than operator (<)
Now, we will utilize the Less than operator to check if the value of the constant “x” is less than “10” or not:
console.log(x < 10);
After performing the comparison, the specified operator returned “false,” which indicates that the value stored in the left side operand is greater than “10”:
![]()
How to use Greater than or equal operator (>)
The JavaScript Greater than or equal operator “>=” is used to compare the left-side value to the right-side value and check it is greater or equal to it.
If both operands satisfy the added condition, the Greater than or equal operator will return “true“; otherwise, it prints out “false”.
Syntax of Greater than or equal operator (>=)
x >= y
Example: How to use Greater than or equal operator (>=)
Here, the execution of the given Greater than or equal operator “>=” will return “true” because the constant “x” contains “14”:
console.log(x >= 14);
![]()
How to use Less than or equal operator (<=)
The JavaScript Less than or equal operator “<=” is utilized to compare the left-side value to the right-side value and check it is less or not.
If both operands satisfy the added condition, the Less than operator will return “true“; otherwise, it displays “false”.
Syntax of Greater than or equal operator (<=)
x <= y
Example: How to use Less than or equal operator (<=)
With the help of the Less than or equal operator, we will execute the below-given condition:
console.log(x <= 14);
The specified relational operator will mark both values as equal and return “true”:
![]() That was all essential information related to the usage of Comparison Operators.
Explore them further according to your preferences.
That was all essential information related to the usage of Comparison Operators.
Explore them further according to your preferences.
Conclusion
Comparison operators compare two values based on the added condition.
These JavaScript operators are divided into two categories: Equality Operators and Rational Operators.
Equality Operators check if two operands are equal, whereas the Rational operators determine the relationship between the specified operands.
This write-up discussed the method to use Comparison Operators.
How to use Arithmetic operators
Mathematical operations are considered the most basic and useful feature in the JavaScript programming language.
If you are stepping into JavaScript, then as a beginner, you should know what types of operators are available and how to utilize them for accomplishing maths related tasks.
JavaScript supports different types of operators such as Comparison operators, Bit-wise operators, Operator, Arithmetic operators, and Assignment operators.
In between other operators, Arithmetic operators are utilized for performing mathematical operations on operands such as Subtraction, Addition, Division, Multiplication, Increment, and Decrement.
This write-up will discuss the usage of Arithmetic operators in JavaScript.
So let’s start!
Arithmetic operators
Here is the list of Arithmetic operators supported by JavaScript:
Addition operator (+)
Subtraction operator (-)
Multiplication operator (*)
Division operator (/)
Modulus operator (%)
Exponentiation operator (**)
Increment operator (++)
Decrement operator (–)
We will now discuss the usage of each of the mentioned Arithmetic operators in the following sections.
How to use Addition operator (+)
In JavaScript, the Addition operator “+” generates the sum of the numerical values specified as “operands”.
It is also utilized to concatenate strings.
Syntax of Addition operator (+)
x + y
Example: How to use Addition operator (+)
In this example, the addition operator “+” will perform the addition operator for the specified number “1” and “2” and return “3” as their sum:
1 + 2
Output
![]() However, adding the addition operator between a “number” and a “string” value will concatenate both values and output the resultant string.
For instance, in the below-given example, the number “1” and “apple” strings are concatenated as “1 apple” with the help of the addition operator:
1 + " apple"
Output
However, adding the addition operator between a “number” and a “string” value will concatenate both values and output the resultant string.
For instance, in the below-given example, the number “1” and “apple” strings are concatenated as “1 apple” with the help of the addition operator:
1 + " apple"
Output
![]()
How to use Subtraction operator (-)
The JavaScript Subtraction operator “–” calculates the difference between the specified numerical values.
Syntax of Subtraction operator (-)
x - y
Example: How to use Subtraction (-) operator
Now, we will check out the difference between “5” and “3” numbers using the subtraction operator:
5 - 3
You can see from the output, the subtraction operation returned “2” as the difference of the specified numbers:
![]() When the Subtraction operator is utilized in between a string and a numeric value, its return case will be set to “NaN” (Not-a-Number):
"apple" - 1
Output
When the Subtraction operator is utilized in between a string and a numeric value, its return case will be set to “NaN” (Not-a-Number):
"apple" - 1
Output
![]()
How to use Multiplication operator (*)
The Multiplication operator “*” accepts two values as operands where the first operand is considered as “multiplicand” and the second as “multiplier”.
It performs the multiplication operation on the added operands.
Syntax of Multiplication operator (*)
x * y
Example: How to use Multiplication operator (*)
When two positive numbers are multiplied using the multiplication operator “*”, the sign of the resultant value will be “+”:
4 * 5
Output
![]() In case one of the operands has a negative “–” sign, then the multiplication operator will return a negative value after multiplying values:
4 * -5
Output
In case one of the operands has a negative “–” sign, then the multiplication operator will return a negative value after multiplying values:
4 * -5
Output
![]()
How to use Division operator (/)
The Division operator “/” is utilized to divide two numbers where the left operand is accepted as “dividend” and the right one as its “divisor”.
Syntax of Division operator (/)
x / y
Example: How to use Division operator (/)
Here, we will divide the number “7” with “2” and use the JavaScript division operator “/”:
7 / 2
The given output signifies that the result of the dividing “7/2” is “3.5”:
![]() The division operator will return a “float” value after dividing two float type values:
77.5 / 3.5
Output
The division operator will return a “float” value after dividing two float type values:
77.5 / 3.5
Output
![]() If zero is specified as a divisor, then the division will lead to “infinity”:
77.5 / 0
Output
If zero is specified as a divisor, then the division will lead to “infinity”:
77.5 / 0
Output
![]()
How to use Modulus operator (%)
The JavaScript Modulus operator “%” is used to fetch the “remainder” that is left after dividing the operands.
It is also called the “remainder operator“.
Also, the remainder sign depends on the sign associated with the dividend.
Syntax of Modulus operator (%)
x % y
Example: How to use Modulus operator (%)
In the below-given example, the modulus operator will return “1” as “remainder” after dividing “9 / 2”:
9 % 2
Output
![]() When the dividend contains a negative value, the value return by the modulus operator will also have a “–” sign:
-9 % 2
Output
When the dividend contains a negative value, the value return by the modulus operator will also have a “–” sign:
-9 % 2
Output
![]()
How to use Exponentiation operator (**)
The Exponentiation operator in JavaScript “**” raises the value of the first number to the power of the second number.
It works similar to the “Math.pow” method, except the Exponentiation operator accepts BigInts as operands.
Syntax of Exponentiation operator (**)
x ** y
Example: How to use Exponentiation operator (**)
We will use the exponentiation operator “**” to raise the number “6” to power “2”:
6 ** 2
The exponentiation operator will return “36” after evaluating the given expression:
![]()
How to use Increment operator (++)
The Increment operator “++” adds “one” to the specified operand.
Syntax of increment operator (++)
If the increment operator is added as a “postfix”, then it will output a value before incrementing:
x++
In the case of “prefix“, the Increment operation is performed first, and then the operator returns a value:
++x
Example: How to use Increment operator (++)
Here, the increment operator “++” will add “one” to the value of “x” variable after initializing “y” with “3”:
var x = 3;
y = x++;
console.log("x: " + x);
console.log("y: " + y);
Output
![]() However, when increment operator “++” is used as “prefix” in the statement “y = ++x”, it will firstly increment “1” in the value of “x” variable and then initialize “y” with the updated value:
var x = 3;
y = ++x;
console.log("x: " + x);
console.log("y: " + y);
Output
However, when increment operator “++” is used as “prefix” in the statement “y = ++x”, it will firstly increment “1” in the value of “x” variable and then initialize “y” with the updated value:
var x = 3;
y = ++x;
console.log("x: " + x);
console.log("y: " + y);
Output
![]()
How to use Decrement operator (–)
The JavaScript Decrement operator “—” subtracts “one” from the specified operand.
Syntax of Decrement operator (–)
If the decrement operator is added as a “postfix”, then it will output a value before decrementing:
x--
In the case of “prefix“, the decrement operation is performed first, and then the operator returns a value:
--x
Example: How to use Decrement (–) operator
In the below-given example, the decrement operator “—” will subtract “one” from the value of “x” variable after initializing “y” with “3”:
var x = 3;
y = x--;
console.log("x: " + x);
console.log("y: " + y);
Output
![]() In the other case, if the decrement operator is specified as “postfix”, it will firstly decrement “1” from the value of “x” variable and then initialize “y” with the modified value:
var x = 3;
y = --x;
console.log("x: " + x);
console.log("y: " + y);
Output
In the other case, if the decrement operator is specified as “postfix”, it will firstly decrement “1” from the value of “x” variable and then initialize “y” with the modified value:
var x = 3;
y = --x;
console.log("x: " + x);
console.log("y: " + y);
Output
![]() That was all essential information related to the basic usage of Arithmetic operators.
Explore them according to your requirements.
That was all essential information related to the basic usage of Arithmetic operators.
Explore them according to your requirements.
Conclusion
Arithmetic operators are commonly used to perform mathematical operations.
The arithmetic operators accept the numerical values as operands, which can be literals or variables, and then carry out addition, subtraction, division, multiplication, exponentiation, modulus, increment, and decrement operations.
This write-up discussed the usage of Arithmetic operators.
JavaScript Object.is() method | Explained
In JavaScript, the “Object.is()” method is primarily used to validate the equality of two values through comparison.
These values can be string, float, decimal, or integer type.
Moreover, the “Object.is()” method also provides the functionality to check the polarity of two numbers.
Do not confuse the “Object.is()” method with the JavaScript equality “==” operator because there exist significant differences between them.
For instance, the “Object.is()” is a JavaScript method that is utilized for performing comparison based on “original” values of primitive data types, and the “==” operator compares specified values after converting them to a common type.
Secondly, the equality operator marks the numbers “-1” and “1” as equal, whereas the Object.is() method treats them according to their polarity.
This write-up will explain the Object.is() method and its usage.
So, let’s start!
How to use JavaScript Object.is() method
JavaScript Object.is() method is invoked in the following use cases:
To compare two numbers.
To compare two strings.
To compare two objects.
To compare the polarity of two numbers.
We will discuss the mentioned use cases of the Object.is() method in the next section, but before jumping into it, check out the syntax of the Object.is() method.
Syntax of using JavaScript Object.is() method
Object.is(value1, value)
Here, “value1” represents the value that needs to be compared to “value2”:
How to use JavaScript Object.is() method for comparing strings
The JavaScript “Object.is()” method can be used for comparing strings.
For this purpose, you have to pass both strings as arguments to the Object.is() method in the following way:
console.log(Object.is("linuxhint", "linuxhint"));
The above-given “Object.is()” method will compare the first “linuxhint” string to the second “linuxhint” string, in terms of “length”, “characters,” and the “order” in which characters are assembled.
In our case, both values are equal according to the mentioned criteria, so the return case of the “Object.is()” method will be set to “true”:
![]() Now, let’s change the second argument value to “linux” and check out the output of the Object.is() method:
console.log(Object.is("linuxhint", "linux"));
As the length of the specified string arguments is not the same, Object.is() method will not further compare them and returns a “false” value:
Now, let’s change the second argument value to “linux” and check out the output of the Object.is() method:
console.log(Object.is("linuxhint", "linux"));
As the length of the specified string arguments is not the same, Object.is() method will not further compare them and returns a “false” value:
![]()
How to use JavaScript Object.is() method for comparing objects
In your program, you can also utilize “Object.is()” method for to perform a comparison between objects.
For instance, the below-given Object.is() method will compare two empty objects:
console.log(Object.is({}, {}));
Output
![]() At this point, you must be questioning yourself that the passed objects are empty, neither of them has any key-value pair, then why “Object.is()” returned “false”?
The specified objects look the same; however, they are two different objects as they refer to different memory addresses.
This is why the “Object.is()” method marked these empty objects as unequal after comparing their references.
Also, it does not matter if the added “key-value” pairs are the same in both objects.
The JavaScript “Object.is()” method will still return “false” after execution :
let object1 = { age: 23 };
let object2 = { age: 23 };
console.log(Object.is(object1, object2));
Output
At this point, you must be questioning yourself that the passed objects are empty, neither of them has any key-value pair, then why “Object.is()” returned “false”?
The specified objects look the same; however, they are two different objects as they refer to different memory addresses.
This is why the “Object.is()” method marked these empty objects as unequal after comparing their references.
Also, it does not matter if the added “key-value” pairs are the same in both objects.
The JavaScript “Object.is()” method will still return “false” after execution :
let object1 = { age: 23 };
let object2 = { age: 23 };
console.log(Object.is(object1, object2));
Output
![]() Two objects are only considered “equal” if they point towards the same memory address.
For example, when we will compare the created “object1” to itself, the “Object.is()” set “true” as its return case:
console.log(Object.is(object1, object1));
Output
Two objects are only considered “equal” if they point towards the same memory address.
For example, when we will compare the created “object1” to itself, the “Object.is()” set “true” as its return case:
console.log(Object.is(object1, object1));
Output
![]()
How to use JavaScript Object.is() method for comparing polarity of two numbers
The polarity of a number signifies whether the number is positive or negative.
Want to compare the polarity of two numbers? Utilize the “Object.is()” method in your code and specify numbers as arguments in it.
For instance, the numbers “-1” and “1” passed to the Object.is() method are not equal as “-1” is smaller than “1”, so the “Objects.is()” method will return “false”:
console.log(Object.is(-1, 1));
Output
![]() If the specified numbers are equal in terms of polarity, then in the next step, the “Object.is()” method will compare them and return “true” if their values are equal.
For instance, both of the arguments in the below-given “Object.is()” method are “positive,” and their values are equal, so the resultant boolean value will be printed out as “true”:
console.log(Object.is(3, 3));
Output
If the specified numbers are equal in terms of polarity, then in the next step, the “Object.is()” method will compare them and return “true” if their values are equal.
For instance, both of the arguments in the below-given “Object.is()” method are “positive,” and their values are equal, so the resultant boolean value will be printed out as “true”:
console.log(Object.is(3, 3));
Output
![]() We have compiled all of the essential information related to the JavaScript Object.is() method.
You can further explore it according to your requirements.
We have compiled all of the essential information related to the JavaScript Object.is() method.
You can further explore it according to your requirements.
Conclusion
JavaScript Object.is() method is used to compare two values.
It treats objects and primitive values differently.
In the case of primitive values, Object.is() method check them “by-value” and compares their “length”, “characters,” and the “order of characters”, whereas “objects” are compared based on “references”.
The polarity of multiple numbers can also be compared using JavaScript.is() method.
This write-up explained the working of the JavaScript Object.is() method.
JavaScript Object.assign() method | Explained
The JavaScript ES6 introduced the “Object.assign()” method that permits you to copy properties from a single or multiple “source” objects to a “target” object.
This method performs the “get” operation to fetch the properties of the source object and “set” them in the specified target object.
This write-up will discuss the working of the JavaScript Object.assign() method.
So, let’s start!
How to use JavaScript Object.assign() method
The JavaScript Object.assign() method is considered useful for the following cases:
To clone an object.
To merge multiple objects into one object.
We will discuss the mentioned applications of the Object.assign() method in the next section.
How to clone an object using JavaScript Object.assign() method
The “Object.assign()” method is used to clone the enumerable “key-value” pair of an already created source object into the target object.
It is primarily utilized to perform the “Shallow” copying procedure.
Syntax of using JavaScript Object.assign() method to clone object
Object.assign(target, source)
Here, “target” represents the JavaScript object whose key-value pair will be cloned, and “source” indicates the object where the copied key-value pair will be placed.
Example: How to clone an object using JavaScript Object.assign() method
First of all, we will create an “employee” object, having the two key-value pairs and an empty object named “emp1”:
const employee= {
name: 'Alex',
designation: 'Manager'};
let emp1 = { };
Then, we will clone the “employee” object properties to the “emp1” object using JavaScript “Object.assign()” method.
To do so, we will specify “emp1” as “target” object and “employee” as “source” object:
Object.assign(emp1, employee);
Execution of the “Object.assign()” method will return the target object which is “emp1” in our case:
![]() We will now modify the value of the “employee.name” property and check if the added changes also reflect the cloned “emp1” object or not:
employee.name = 'Stepheny';
console.log("emp1 name: " + emp1.name);
console.log("employee.name: " + employee.name);
As you can see from the below-given output that altering the “employee.name” property value has not modified the “emp1” object.
This is because the target object “emp1” gets disconnected from the “employee” object after cloning its values:
We will now modify the value of the “employee.name” property and check if the added changes also reflect the cloned “emp1” object or not:
employee.name = 'Stepheny';
console.log("emp1 name: " + emp1.name);
console.log("employee.name: " + employee.name);
As you can see from the below-given output that altering the “employee.name” property value has not modified the “emp1” object.
This is because the target object “emp1” gets disconnected from the “employee” object after cloning its values:
![]() However, when an inner referenced object is added, the JavaScript “Object.assign()” method will copy its reference, not the actual object.
In such a scenario, both source and target objects refer to the same inner referenced object, and changes made to the property of the source object will also affect the target object’s property value.
For instance, in the “employee” object, we will add “address” as an inner referenced object which comprises a “city” Property:
const employee= {
address: {
city: 'Ankara'}};
After that, we will clone the properties of the “employee” object in “emp1”:
let emp1 = { };Object.assign(emp1, employee);
Output
However, when an inner referenced object is added, the JavaScript “Object.assign()” method will copy its reference, not the actual object.
In such a scenario, both source and target objects refer to the same inner referenced object, and changes made to the property of the source object will also affect the target object’s property value.
For instance, in the “employee” object, we will add “address” as an inner referenced object which comprises a “city” Property:
const employee= {
address: {
city: 'Ankara'}};
After that, we will clone the properties of the “employee” object in “emp1”:
let emp1 = { };Object.assign(emp1, employee);
Output
![]() At this point, “emp1” object refers to the memory address of inner referenced “address” object of the “employee” and can access its key-value pair:
console.log("emp1.address.city: " + emp1.address.city);
console.log("employee.address.city: " + employee.address.city);
The given output shows that “Ankara” is set as the value of the “address” property for both “employee” and “emp1” objects:
At this point, “emp1” object refers to the memory address of inner referenced “address” object of the “employee” and can access its key-value pair:
console.log("emp1.address.city: " + emp1.address.city);
console.log("employee.address.city: " + employee.address.city);
The given output shows that “Ankara” is set as the value of the “address” property for both “employee” and “emp1” objects:
![]() Now, if we modify the value of “address.city” property of “employee” object then changes will be applied to the copied “emp1” object as well:
employee.address.city = 'Istanbul';
console.log("emp1.address.city: " + emp1.address.city);
console.log("employee.address.city: " + employee.address.city);
The invoked “console.log()” method will display “Istanbul” as “address.city” property value for both “employee” and “emp1” objects:
Now, if we modify the value of “address.city” property of “employee” object then changes will be applied to the copied “emp1” object as well:
employee.address.city = 'Istanbul';
console.log("emp1.address.city: " + emp1.address.city);
console.log("employee.address.city: " + employee.address.city);
The invoked “console.log()” method will display “Istanbul” as “address.city” property value for both “employee” and “emp1” objects:
![]() Now, let’s check out the method of merging objects using the JavaScript Object.assign() method.
Now, let’s check out the method of merging objects using the JavaScript Object.assign() method.
How to merge objects using JavaScript Object.assign() method
In JavaScript, you can also utilize the “Object.assign()” method for merging different source objects into a one target object.
For this purpose, you have to follow the below-given syntax.
Syntax of using JavaScript Object.assign() method for merge objects
target = Object.assign({ }, source1, source2);
Here, “source1”, and “source2” represents the multiple objects whose properties are going to be merged in the “target” object, using “Object.assign()” method.
Example: How to merge objects using JavaScript Object.assign() method
To demonstrate the procedure of merging objects by utilizing the “Object.assign()” method, firstly, we will create two objects named “fruit” and “vegetable”:
const fruit= { fruitName: 'Apple'};const vegetable= { vegetableName: 'Potato'};
After doing so, we will invoke the “Object.assign()” method to merge “fruit” and “vegetables” objects in the target “eatables” object which is currently empty { }:
const eatables= Object.assign({}, fruit, vegetable);
console.log(eatables);
As a result of the execution, the “console.log()” method will print out the “eatables” object properties and their respective values in the console:
![]() However, if you want to add a property to the “target” object before performing the merging operation, then have a look at the following syntax:
target = Object.assign({ property: 'value' }, source1, source2);
According to the above syntax, “property: value” represents the key-value pair which will be added to the “target” object, then the “Object.assign()” method will merge the “source1” and “source2” objects in the specified “target” object.
To understand the stated concept clearly, execute the below-given code:
const eatables= Object.assign({snacks: 'cookie' }, fruit, vegetable);
console.log(eatables);
Here, the “Object.assign()” method will merge the properties of “fruit” and “vegetable” objects in “eatables” object, after adding the “{snacks: ‘cookie’}” key-value pair to it:
However, if you want to add a property to the “target” object before performing the merging operation, then have a look at the following syntax:
target = Object.assign({ property: 'value' }, source1, source2);
According to the above syntax, “property: value” represents the key-value pair which will be added to the “target” object, then the “Object.assign()” method will merge the “source1” and “source2” objects in the specified “target” object.
To understand the stated concept clearly, execute the below-given code:
const eatables= Object.assign({snacks: 'cookie' }, fruit, vegetable);
console.log(eatables);
Here, the “Object.assign()” method will merge the properties of “fruit” and “vegetable” objects in “eatables” object, after adding the “{snacks: ‘cookie’}” key-value pair to it:
![]() We have compiled essential information related to the usage of the JavaScript Object.assign() method for copying and merging objects.
Explore them further according to your preferences.
We have compiled essential information related to the usage of the JavaScript Object.assign() method for copying and merging objects.
Explore them further according to your preferences.
Conclusion
The JavaScript Object.assign() method is used to clone the enumerable key-value pair of an already created object.
This method accepts two arguments: source and target, where “source” represents the object whose properties will be cloned in the “target” object.
It is also invoked for merging one or more multiple objects into a single object.
This write-up discussed the working of the JavaScript Object.assign() method.
JavaScript Math.max() method | Explained
JavaScript provides numerous mathematical methods such as floor(), sqrt(), max(), random(), etc.
All these methods are used to attain different objectives, such as the Math.random() method is used to get a random value between 0 and 1, the Math.sqrt() method is used to find the square root of the user-specified value, and so on.
If we talk about the Math.max() method, it is used to find the maximum value among different values.
This post will explain the below-listed perceptions regarding the Math.max() method:
What is Math.max()
Basic Syntax
What does Math.max() Method Return
How to Use Math.max() Method
So, let’s start!
What is Math.max()
It is a mathematical method that takes multiple values as arguments and returns the maximum value.
The Math.max() method is a static method of the Math object; hence it is invoked using the Math object.
Basic Syntax
The code block given below will provide the basic syntax of JavaScript’s Math.max() method:
Math.max([num1, num2, ...
num_n]);
Here, the num1, num2, etc., are the n number of parameters/arguments that a Math.max() can take.
The Math.max() method will find the greatest number among these values provided as parameters.
What does Math.max() Method Return
In JavaScript, the Math.max() method can take multiple numbers, compare the provided values, and return the greatest value among them.
The Math.max() method will return:
NaN(not a number) if the given values are non-numeric, and
-Infinity if we didn’t specify any parameter.
How to Use Math.max() Method
As of now we are done with the theoretical part of the Math.max() method.
Now, let’s move one step further and practically implement all these theoretical concepts.
Example1: Let’s consider the below-given code to understand the working of the Math.max() method:
<script>
console.log("Maximum Number: " + Math.max(14, 72));
console.log("Maximum Number: " + Math.max(-14, -72));
console.log("Maximum Number: " + Math.max(72, 12, 60));
console.log("Maximum Number: " + Math.max(-12, -5, 0, -18));</script>
In the above code snippet, we utilized the console.log() method to print the maximum value on the browser’s console:
![]() The output authenticates the working of the Math.max() method as it gave us accurate results.
Example2: In this example, we will see how the Math.max() method will behave if we didn’t provide it any parameters, or if we provide it a non-numeric value:
<script>
console.log("Maximum Number: " + Math.max());
console.log("Maximum Number: " + Math.max(5, 12, 'a'));</script>
The above code block will produce the following output:
The output authenticates the working of the Math.max() method as it gave us accurate results.
Example2: In this example, we will see how the Math.max() method will behave if we didn’t provide it any parameters, or if we provide it a non-numeric value:
<script>
console.log("Maximum Number: " + Math.max());
console.log("Maximum Number: " + Math.max(5, 12, 'a'));</script>
The above code block will produce the following output:
![]() This is how Math.max() method works.
Example3: Let’s consider the below code snippet to understand how to find the maximum value among the array elements using the Math.max() method:
<script>
var findMax = [115, 45, 72, 67, 1, 80, -72];
console.log("Maximum Number: " + Math.max(...findMax));</script>
The above code will generate the below given output:
This is how Math.max() method works.
Example3: Let’s consider the below code snippet to understand how to find the maximum value among the array elements using the Math.max() method:
<script>
var findMax = [115, 45, 72, 67, 1, 80, -72];
console.log("Maximum Number: " + Math.max(...findMax));</script>
The above code will generate the below given output:
![]() The Math.max() method returned “115” as the maximum value which authenticates the working of Math.max() method.
The Math.max() method returned “115” as the maximum value which authenticates the working of Math.max() method.
Conclusion
In JavaScript, the Math.max() method can take multiple numbers, compare the provided values, and return the greatest value among them.
The Math.max() method returns NaN(not a number) if the given values are non-numeric, and it returns -Infinity if we didn’t specify any parameter.
This write-up explained what Math.max() is, what it returns, and how to use it.
JavaScript Boolean Operators | Explained
Many foundations of mathematical logic are found in the field of computer science that be utilized to add logic related to Boolean algebra, truth tables, and comparisons in a program.
The JavaScript programming language offers different operators to evaluate expressions based on boolean variables.
These operators help to maintain the programming flow control with respect to the added mathematical logic.
More specifically, JavaScript Boolean operators allow you to perform different comparisons on the specified variables and evaluate the results.
This write-up will explain the working of the JavaScript Boolean operators.
So, let’s start!
JavaScript Boolean Operators
Here is the list of Boolean operators supported by JavaScript:
Boolean OR “||” operator
Boolean AND “&&” operator
Boolean NOT “!” operator
We will now discuss the usage of each of the mentioned JavaScript Boolean operators in the following sections.
How to use JavaScript Boolean OR operator
In JavaScript, the Boolean “OR” operator is utilized to evaluate boolean variables’ values.
It is represented using the double pipe operator “||”.
While using the Boolean “OR” operator, If the value of both of the specified variables is “true,” then the expression is considered as “truthy,” and it will return “true” value; otherwise, the return case of the OR operator will be set to “false”.
Syntax of JavaScript Boolean OR operator
result = x || y
Here, the Boolean OR operator “||” will evaluate the expression “x || y” based on their values and store the returned value in the “result” variable.
Truth table of JavaScript Boolean OR operator
The below-given truth table illustrates the OR operator result based on the specified values of “x” and “y” boolean variables:
| x | y | x || y |
| true | true | true |
| true | false | true |
| false | true | true |
| false | false | false |
According to the truth table, if the value of any operand is “true”, the Boolean OR operator “||” will mark the expression as “true” in case both values are “false,” then the OR operator will also return a “false” value.
Now, let’s check out a practical example of implementing the functionality of the JavaScript Boolean OR operator.
Example: How to use JavaScript Boolean OR operator
First of all, we will create two boolean variables named “x” and “y” having the following values:
let x = true,
y = false;
Next, we will use the Boolean OR operator “||” for evaluating the values of “x” and “y”:
console.log(x || y);
Execution of the provided code will return “true” because the value of one of the specified boolean variables is “true”:
![]() In case, if the values of both “x” and “y” variable is “false”, then the expression “x || y” will return “false”:
let x = false,
y = false;
console.log(x || y);
Output
In case, if the values of both “x” and “y” variable is “false”, then the expression “x || y” will return “false”:
let x = false,
y = false;
console.log(x || y);
Output
![]()
How to use JavaScript Boolean AND operator
Like the OR operator, the JavaScript Boolean AND operator is also used to evaluate the values of added boolean variables.
It is represented by using double ampersand “&&” sign.
While utilizing JavaScript Boolean AND operator, if both values are “true,” the expression is considered “truthy.” In the other case, if either of one value is “false“, the return case of AND operator will be set to “false”.
Syntax of JavaScript Boolean AND operator
result = x && y
Here, the Boolean AND operator “&&” will evaluate the expression “x && y” based on their values and store the returned value in the “result” variable.
Truth table of JavaScript Boolean OR operator
Now, check out the following truth table of the JavaScript Boolean AND operator to understand how it works:
| x | y | x && y |
| true | true | true |
| true | false | false |
| false | true | false |
| false | false | false |
According to the above-given truth table if any value of the operand is “false”, then after evaluating the expression, the AND operator “&&” will return a “false” value, in case both values are set as “true,” the AND operator will mark the expression as “true”.
Example: How to use JavaScript Boolean AND operator
In the following example, the boolean variable “x” comprises a “true” value and “y” is initialized with “false”:
let x = true,
y = false;
console.log(x && y);
The “x && y” expression will return “false” after checking the value of the “y” variable:
![]() In the other case, when both of the variables contain “true” as their value, then the Boolean AND operator will also return “true”:
let x = true,
y = true;
console.log(x && y);
Output
In the other case, when both of the variables contain “true” as their value, then the Boolean AND operator will also return “true”:
let x = true,
y = true;
console.log(x && y);
Output
![]()
How to use JavaScript Boolean NOT operator
The JavaScript Boolean NOT operator is used to inverse the value of an operand, and it is represented by an exclamation mark “!”.
Syntax of JavaScript Boolean NOT operator
!x
Here, the NOT operator will inverse the value of the “x” variable in such a way that if its value is “true”, the NOT operator will change it to “false.” If it already has a “false” value, then the resultant value of “!x” will be “true”.
Truth Table of JavaScript Boolean NOT operator
Based on the values of the “x” variable, the corresponding “!x” will work as follows:
| x | !x |
| undefined | true |
| null | true |
| NaN | true |
| Object {}
| false |
| Empty string “ “
| true |
| Non-empty string | false |
| Number other than 0
| false |
Example: How to use JavaScript Boolean NOT operator
Now, we will utilize the JavaScript Boolean NOT operator to inverse the values of the given “x” and “y” boolean variables:
let x = true,
y = false;
console.log(!x);
console.log(!y);
As you can see from the output, the values returned by the Boolean NOT operator are opposite to the original values of “x” and “y”:
![]() That was all essential information related to the usage of JavaScript Boolean Operators.
Explore them further according to your preferences.
That was all essential information related to the usage of JavaScript Boolean Operators.
Explore them further according to your preferences.
Conclusion
The JavaScript Boolean OR (||) operator, Boolean AND operator (&&), and Boolean NOT (!) operator are used to perform different types of comparison on the specified variables and evaluate the results.
The JavaScript NOT operator inverse the value of a boolean variable, whereas the return case of the Boolean OR and AND operators depend upon the specified variables’ values.
This write-up explained the usage of the JavaScript Boolean operators.
JavaScript Associative Array | Explained
Associative arrays serve as the foundation for the JavaScript language.
Everything is referred to as an object, or it is more correct to say that everything declared is an associative array.
For instance, a new object you create is an associative array, and to generate other JavaScript data structures, you must start with an associative array.
This write-up will explain the working of Associative arrays.
So, let’s start!
JavaScript Associative Array
A JavaScript associative array is considered a collection of keys.
These keys are associated with their respective values in such a way that when the key is passed to the array, it returns the corresponding value.
That is what the term “association” signifies.
Associative arrays are considered as “Objects,” not normal arrays.
That’s why only the methods and properties related to objects are assigned to it.
How to create JavaScript Associative array
To create a JavaScript associative array, you have to follow the below-given syntax:
var array= {key1: 'value1', key2: 'value2'}
Here, “array” is an associative array that comprises “key1” and “key2” as string indexes with their respective values as “value1” and “value2”.
For instance, we will create a JavaScript array named “employee” having two keys, “Employee Name” and “Age”.
The “value” of the “Employee Name” key is set to “Alex” and its “Age” as “25”:
var employee = {"Employee Name": 'Alex',"Age": 25};
That’s how you create a JavaScript associative array.
How to calculate the length of JavaScript Associative array
JavaScript Associative array is not a normal array; therefore, we can not utilize an array object’s “length” attribute to view its length.
For calculating the associative array’s length, we have to create an “Object.size()” function.
The “Object.size()” function will iterate through the “keys” of the associative array and use the “hasOwnProperty()” method is to verify the existence of keys in it.
In case, if the added condition evaluates to be “truthy”, then the size of array will be incremented, that was initially set to “0”:
Object.size = function(array) {
var size = 0;for (var key in array) {if (array.hasOwnProperty(key))
size++;}return size;};
Next, we will invoke the “Object.size()” method to check the length of the created JavaScript associative array:
var length = Object.size(employee);
console.log("Length of Employee array is: " + length);
As you can see from the output, the length of the “employee” associative array is “2”:
![]() Similarly, you can also use the “Object.keys()” method to calculate the length of an associative array:
console.log("Length of Employee array is: " + Object.keys(employee).length);
Output
Similarly, you can also use the “Object.keys()” method to calculate the length of an associative array:
console.log("Length of Employee array is: " + Object.keys(employee).length);
Output
![]()
How to retrieve values of JavaScript Associative array
In an associative array, you can retrieve the values of the added keys using “for” loop:
for (var key in employee){ var value = employee[key];
console.log(key + " = " + value + '');}
The above-given “for” loop will iterate through the “employee” array and fetch values of added keys:
![]()
How to convert JavaScript Associative array into Normal array
Want to convert the JavaScript Associative array into a normal array? To do so, invoke the JavaScript “map()” function.
The map() function will return a normal array from calling the function for every key “k” of the “employee” associative array:
var elements = Object.keys(employee).map(function(k) {return employee[k];})
console.log(elements);
The newly created array placed the values of the “employee” key at sequential indexes 0 and 1:
![]() That was all about JavaScript Associative array.
Before wind up, let’s check out the difference between an associative array and normal array.
That was all about JavaScript Associative array.
Before wind up, let’s check out the difference between an associative array and normal array.
Difference between Normal Array and Associative Array
Have a look at the following table to understand the difference between normal array and associative array:
| Normal Array | Associative Array |
| A normal array is declared using curly brace “[ ].” | An associative array is created using square brackets “{ }”. |
| In a normal array, values are accessed using “indexes”. | In an associative array, values are accessed by utilizing “keys”. |
| A normal array comprises ordered values based on its indexes. | An associative array comprises unordered values based on its keys. |
| The normal array keys are of the “number” type. |
The associative array keys can be of string or number type. |
|
Example: var employee= [“Alex”, 25]; |
Example: var employee= {
“Employee Name”: ‘Alex’,
“Age”: 25
};
|
We have compiled the essential information related to the JavaScript Associative Array.
Explore it according to your preferences.
Conclusion
A JavaScript associative array is considered a collection of keys.
These keys are associated with their respective values in such a way that when the key is passed to the associative array, it returns the corresponding value.
Associative arrays are considered Objects, not normal arrays; that’s why only the methods and properties related to objects are assigned to an associative array.
This write-up explained JavaScript associative arrays.
JavaScript Array.flatMap() method | Explained
JavaScript supports a wide range of array methods such as Array.forEach(), Array.flatMap(), Array.sort(), etc.
These methods are used to achieve different objectives such as traversing, sorting, etc.
The Array.flatMap() method is a relatively new addition to the Array object.
It is a combination of two methods flat() and map(), so, firstly it runs the Map() method on the array and then the flat().
This post will present a profound understanding of the below-listed concepts regarding the Array.flatMap() method:
What is Array.flatMap()
Basic Syntax
How Array.flatMap() Method Works
Examples
So, let’s begin!
What is Array.flatMap()
It is a predefined method that combines the abilities of two methods, i.e., map() and flat().
So, an array.flatMap() method firstly maps the array’s items using the map function, and afterward, it flats the given/input array into a new array.
Basic Syntax
There are multiple ways of using the array.flatMap() method e.g.
using an arrow function, callback function, or inline callback function.
The below snippet will show the arrow function syntax for the flatMap() method:
flatMap((currentValue, index, array) => { //return element} )
The below snippet will show the callback syntax for the flatMap() method:
flatMap(callbackFun, thisArg)
The following code snippet shows the syntax of flatMap() method with respect to inline callback function:
flatMap(function(currentValue, index, array) { //return element}, thisArg)
The table below will provide a detailed understanding of the parameters of the flatMap() method:
| Parameter | Description |
| callback | It produces the item for the newly created array, and it can hold any of the following parameters: currentValue, index, array, thisArg. |
| currentValue | It represents the current array element. |
| index | It is an optional parameter that shows the index of the array element (currently in process). |
| array | It is an optional parameter and is used when the flatMap is called upon. |
| thisArg | It is an optional parameter, and its value is utilized as ‘this’ while executing the callback function. |
How Array.flatMap() Method Works
Let’s consider some examples for a profound understanding of the Array.flatMap() method.
Example1
The below snippet will provide the basic understanding of the flatMap() method:
<script>
var array=[12, 24, 9, 81, 27];
document.write(array.flatMap(num=>[[num/3]]));</script>
In this example, we performed the following task:
Created an array.
Utilized the array.flatMap() method to perform Mapping and flatting.
Consequently, the array.flatmap() will return a new array where each element is a result of the callback function(each element will be divided with 3):
![]() The output shows the appropriateness of the Array.flatMap() method.
The output shows the appropriateness of the Array.flatMap() method.
Example2
In this example we will create two arrays and afterwards, we will use the flatMap() method to get a new array:
<script>
var array=['Joe', 'Mike', 'John', 'Seth', 'Bryn'];
var array1=[1, 2, 3, 4, 5];
document.write("The flattened Array: <br>");
var newArray=array.flatMap((array,index)=>[array,array1[index]]);
document.write("<br>"+ newArray);</script>
The flattened Array will display the employee’s name with their respective ID’s:
![]() This is how we can use the Array.flatMap() method.
This is how we can use the Array.flatMap() method.
Conclusion
Array.flatMap() is a predefined method that combines the abilities of two methods, i.e., map() and flat().
So, an array.flatMap() method firstly maps the array’s items using the map function, and afterward, it flats the given/input array into a new array.
This write-up explained what Array.flatMap() is? What it returns? and how it works?
JavaScript Array.includes() method | Explained
JavaScript provides several array methods, such as Array.includes(), Array.map(), Array.forEach(), etc.
These methods serve unique functionality and enable a developer to code more efficiently.
So, anyone who wants to become a valuable JavaScript developer must have considerable knowledge of these methods.
The significance of Array methods is that these methods make the code look simple, clean, and easy to understand.
In this post, we will learn one of the most frequently used array methods named Array.includes() method.
This write-up will provide a profound understanding of the below-listed perceptions regarding the Array.includes() method:
What is Array.includes()
Basic Syntax
What does Array.includes() Method Return
How to Use Array.includes() Method
So, let’s begin!
What is Array.includes()
It is a predefined method that is used to check whether the array includes the specified item or not.
It is a case-sensitive method which means the Array.includes() method will consider the “array” and “Array” as two different words.
Basic Syntax
The code block given below will provide the basic syntax of JavaScript’s Array.includes() method:
array.includes(item, startIndex);
In the above snippet, “item” is the value to be searched, while startIndex is an optional parameter to specify the starting search position.
By default, the value for the startIndex parameter is 0.
What does Array.includes() Method Return
The includes() method will return true if the specified value exists in the array, and it will return false if the value to be searched doesn’t exist in the targeted array.
How to Use Array.includes() Method
Let’s consider a couple of examples for a profound understanding of how the Array.includes() method works:
Example1: In this example, we have a string-type array of five items.
We will utilize the Array.includes() method to find some items in the array:
<script>
var items = ["JavaScript", "C", "Python", "Java", "PHP"];
console.log("Item Found: " + items.includes("Java"));
console.log("Item Found: " + items.includes("Ruby"));
console.log("Item Found: " + items.includes("HTML"));
console.log("Item Found: " + items.includes("JavaScript"));</script>
In the above snippet, we searched for the “Java”, “Ruby”, “HTML”, “JavaScript”; consequently, the Array.includes() method will produce the following output:
![]() The Array.includes() method returned true for “Java” and “JavaScript” and false for the rest of the values.
Example2: Let’s consider the below code snippet to understand how Array.includes method deals with case-sensitivity:
<script>
var items = ["JavaScript", "C", "Python", "Java", "PHP"];
console.log("Item Found: " + items.includes("java"));</script>
In this example, we used the includes() method to check whether “java” is there in the array or not:
The Array.includes() method returned true for “Java” and “JavaScript” and false for the rest of the values.
Example2: Let’s consider the below code snippet to understand how Array.includes method deals with case-sensitivity:
<script>
var items = ["JavaScript", "C", "Python", "Java", "PHP"];
console.log("Item Found: " + items.includes("java"));</script>
In this example, we used the includes() method to check whether “java” is there in the array or not:
![]() The includes() method returned false, which shows that it is a case-sensitive method.
Example1: let’s consider another example to check how the Array.includes method works when we have to search for the numeric values:
<script>
var items = [50, 72, 60, -14, 53, 23];
console.log("Item Found: " + items.includes(-14));
console.log("Item Found: " + items.includes(14));
console.log("Item Found: " + items.includes(23));</script>
The output for the above code block will be like this:
The includes() method returned false, which shows that it is a case-sensitive method.
Example1: let’s consider another example to check how the Array.includes method works when we have to search for the numeric values:
<script>
var items = [50, 72, 60, -14, 53, 23];
console.log("Item Found: " + items.includes(-14));
console.log("Item Found: " + items.includes(14));
console.log("Item Found: " + items.includes(23));</script>
The output for the above code block will be like this:
![]() 14 doesn’t exist in the array, so the Array.includes() method returned false.
It authenticates the working of Array.include() method.
14 doesn’t exist in the array, so the Array.includes() method returned false.
It authenticates the working of Array.include() method.
Conclusion
Array.includes() is a predefined method that is used to check whether the array includes the specified item or not.
The Array.includes() method returns true if the specified value exists in the array, and it returns false if the value to be searched doesn’t exist in the targeted array.
It is a case-sensitive method which means the Array.includes() method consider the “array” and “Array” as two different words.
This post explained what Array.includes() is? What it returns? and how to use it?
JavaScript Array.sort() method | Explained
JavaScript offers multiple array methods that are used for various objectives, such as Array.includes(), Array.sort(), Array.forEach(), and so on.
If we talk about the Array.sort() method, it is among one of the most commonly used array functions.
It can be used to sort the alphabetic as well as numerical arrays.
By default, it sorts the array elements in ascending order.
This article will present a detailed understanding of the below-listed concepts regarding the Array.sort() method:
What is Array.sort()
Basic Syntax
What does Array.sort() Method Return
How Array.sort() Method Works
How to Use Array.sort() Method
So, let’s get started!
What is Array.sort()
It is a predefined method that sorts the array’s elements in ascending order.
It sorts the string typed array elements ideally in alphabetically ascending order; however, it may produce faulty results while sorting numerical arrays.
Basic Syntax
The below-given code block will provide the basic syntax of JavaScript’s Array.sort() method:
Array.sort();
The Array.sort() method can take an optional parameter “compare_Function” to determine the sorting order:
Array.sort(compare_Function);
What does Array.sort() Method Return
In javaScript, the Array.sort() returns an array of sorted elements.
How Array.sort() Method Works
The Array.sort() method can take an optional parameter “compare_Function” which will return a zero, negative, or a positive value depending on the parameters.
In such cases, the Array.sort() method will sort the array elements based on the returned value of the compare_Function:
function(x, y){return x-y}
If the compare_function returns a negative value then the sort() method will sort x before y.
Example: if x=50, y=100; while comparing the value of x with y, the sort method will call the compare_Function which will return a negative value i.e 50-100=-50; so, the sort method will sort x before y.
If the compare_function returns a positive value then the sort() method will sort y before x.
Example: If x=100, y=50; while comparing the value of x with y, the sort method will call the compare_Function which will return a positive value i.e 100-50= 50; so, the sort method will sort y before x.
If the compare_function returns a zero then the sort() method will keep the original order of x and y.
How to Use Array.sort() Method
Let’s consider some examples to understand how the Array.sort() method works.
Example1:
In this example, we will utilize the Array.sort() method to sort the array elements in ascending order:
<script>
var items = ["JavaScript", "C", "Python", "Java", "PHP"];
console.log("Sorted Array: " + items.sort());</script>
The above code block will generate the following output:
![]() The output verifies that the sort() method sorted the array in ascending order.
The output verifies that the sort() method sorted the array in ascending order.
Example2:
Let’s consider the below snippet to understand how to sort an array in descending order:
<script>
var items = ["JavaScript", "C", "Python", "Java", "PHP"];
items.sort();
console.log("Sorted Array: " + items.reverse());</script>
In this example, initially, we utilized the sort() method to sort the array elements, and after that, we utilized the reverse() method to reverse the order of sorted array elements:
![]() In this way, we can sort the array elements in reverse order.
In this way, we can sort the array elements in reverse order.
Example3:
Let’s consider the below snippet to understand how to sort a numeric array in ascending order using the sort() method:
<script>
var items = [10, 12, 5, 11, 33, 50];
items.sort(function (x, y) {return x - y;});
console.log("Sorted Array: " + items);</script>
This time we passed compare function to the sort() method as a parameter, so the sort method will sort the array elements accordingly:
![]() The output verifies that the sort method sorted the array elements in ascending order.
The output verifies that the sort method sorted the array elements in ascending order.
Example4:
This example will explain how to sort a numeric array in descending order using the sort() method:
<script>
var items = [10, 12, 5, 11, 33, 50];
items.sort(function (x, y) {return y - x;});
console.log("Sorted Array: " + items);</script>
All the code remained the same as in the previous example except the return value of the compare function:
![]() This is how the sort() method sorts the array elements in descending order.
This is how the sort() method sorts the array elements in descending order.
Example4:
This example will explain how to find a greatest number from an array using the sort() method:
<script>
var items = [10, 12, 50, 11, 33, 5];
items.sort(function (x, y) {return y - x;});
var maximum =items[0];
console.log("Greatest Number: " + minimum);</script>
The above code block will generate the following output:
![]() The output authenticates the working of the sort() method.
The output authenticates the working of the sort() method.
Conclusion
Array.sort() is a predefined method that sorts the array’s elements in ascending order.
It sorts the string typed array elements ideally in alphabetically ascending order; however, it may produce faulty results while sorting the numerical arrays.
The compare function can be passed to the sort() method as an optional parameter to get the accurate results for the numeric arrays.
This write-up explained what Array.sort() is? What it returns? and how to use it?
How to Find Variable Type
Variables are building blocks of any programming language as they allow a programmer/developer to write flexible code., variables can hold numeric values(integers, floating points, etc.) or alphabetic values(characters, strings).
Moreover, variables can represent the memory addresses.
All in all, the variables book/reserve a spot in the memory to store various types of values.
But do you know how to check the variable type? If not! Then nothing to worry about! By the end of this post, you will have a profound knowledge of finding variable types.
This article will cover the following topics regarding variable types:
What is typeof
What is the need for typeof operator
What does typeof operator return
How to find variable type
So, let’s begin!
What is typeof
It is an operator that is used to find the type of an object or variable.
The below snippet will show the basic syntax of typeof operator:
typeof variableName|objectName;
The above snippet shows that to check the variable/object type, we have to use the typeof operator followed by the variable or object name.
What is the need for typeof operator
As JavaScript is a dynamically typed programming language, so, there is no need to assign the variable type at the time of variable creation/declaration.
It means; variables are not restricted to any data type.
Hence their type can be changed at runtime.
Therefore, sometimes we have to check the variable type in our program.
What does typeof operator return
If we use the typeof operator with any primitive data type then the typeof operator will return one of the below-listed data types:
String.
Boolean (for true or false).
Number (for int, float, etc.).
Undefined if a variable has no value.
The typeof operator will return one of the below-listed data type if we check the data type of the methods, objects, and arrays:
function (for methods).
object (for objects and arrays because, arrays are considered as objects).
How to find variable type
Now, let’s consider some examples for a profound understanding of the typeof operator.
Example1
How to find the type of a variable:
<script>
var item = 10;
var str = "Welcome to Linuxhint";
var a;
console.log(typeof item);
console.log(typeof str);
console.log(typeof a); </script>
In the above code snippet, we utilized the typeof operator to find the type of different variables.
Consequently, we will get the following output:
![]() From the above snippet, we can observe that the typeof operator returns “number” for the first variable that holds a numeric value, “string” for the second variable, and undefined for the third variable because it doesn’t hold any value.
From the above snippet, we can observe that the typeof operator returns “number” for the first variable that holds a numeric value, “string” for the second variable, and undefined for the third variable because it doesn’t hold any value.
Example2
How to find the type of an object and array:
<script>
var object = new String();
var array = [50, 26, 43, 74, 5];
console.log(typeof object);
console.log(typeof array);</script>
In the above code block, we utilized the typeof operator with an object, and array.
As a result, we will get the following output:
![]() From the output, it is clear that the typeof operator is working appropriately.
From the output, it is clear that the typeof operator is working appropriately.
Example3
How to find the type of a function:
<script>
console.log(typeof function () {});</script>
Following will be the output for the above-given lines of code:
![]() This is how the typeof operator works.
This is how the typeof operator works.
Conclusion
In JavaScript, the typeof operator is used to find the type of a variable, object, or method.
The typeof operator returns one of the following types: number, boolean, object, string, undefined, function.
To find the type of any variable, all you need to do is, write typeof > a space “ ” > and specify the variable or object whose type you want to check.
This write-up provided a detailed guide for finding the variable type in java.
JavaScript Datepicker
The JavaScript “datepicker” permits you to pick a date from an interactive drop-down calendar rather than manually typing it.
It is utilized in scenarios where you want to schedule tasks according to a specific date, such as saving a birthdate.
A “datepicker” can be quickly added to an “input field” using the “jQuery Plugin“.
Various other datepicker plugins also exist; however, “jQuery UI datepicker” stands out in the market because of its highly flexible nature.
This post will discuss the procedure to use a JavaScript datepicker.
So, let’s start!
jQueryUI datepicker Plugin
The jQueryUI “datepicker” Plugin enables the user to enter the dates visually.
It also allows you to easily change the date format and its language, add navigation options, and limit the date ranges.
To utilize all of these functionalities, jQueryUI offers a “datepicker()” method and adds new CSS classes to HTML pages by changing their appearance.
Syntax
$(selector).datepicker(options);
Here, the “selector” parameter represent the CSS selectors such as “div” or any Document Object Model node, and “options” is an optional parameter that comprises different options such as “dateFormat”, “closeText”, “dayNames”.
Now, let’s head towards the implementation of JavaScript “datepicker”.
How to use JavaScript datePicker
For the demonstration purpose, we will create a JavaScript application and add the functionality of a basic “datepicker” to an input field.
To do the same, follow the given step-by-step instructions:
Step 1: Import required libraries
First of all, import the required libraries in the HTML file for using jQuery UI plugin:
<link href="https://code.jquery.com/ui/1.10.4/themes/ui-lightness/jquery-ui.css" rel="stylesheet"><script src="https://code.jquery.com/jquery-1.10.2.js"></script><script src="https://code.jquery.com/ui/1.10.4/jquery-ui.js"></script>
Step 2: Add HTML elements
In the next step, create the desired HTML elements in your application.
In our case, we will firstly add a “title” within the “<head>” tag:
<head><title>JavaScript Datepicker</title></head>
Then, a heading with the “<h1>” tag and a paragraph with the “<p>” tag, inside of the “<body>” tag:
<body>
<h1>Demonstration of using JavaScript Datepicker</h1>
<p>Enter Date: <input type="text" id="datepicker"></p>
</body>
Also, in the added “input field”, an interactive calendar will appear in an overlay when the input field is focused.
Step 3: JavaScript file code
Switch to your JavaScript file and write out the following code to specify the input field id “#datepicker” as “selector” parameter of the “datepicker()” method.
Here, you can also add some advanced configuration “options” related to JavaScript “datepicker” such as changing the date format:
$(function () {
$("#datepicker").datepicker();
dateFormat: "yy-mm-dd"});
Step 4: CSS file code
To enhance the appearance of the JavaScript application, define the style of added HTML elements in the CSS file.
For instance, we will add the background color for “body“, text color, and font-family for the “h1” heading and “p” paragraph elements:
body {
background-color: powderblue;}
h1 {
color: rgb(21, 7, 145);
font-family:'Courier New', Courier, monospace;}
p {
color: rgb(37, 25, 5);
font-family:courier;}
Step 5: Link CSS and JavaScript to HTML file
Lastly, link the CSS and JavaScript files to the JavaScript project HTML file:
<script src="datepicker.js"></script><link rel="stylesheet" href="datepicker.css">
Here is how our “JavaScript datepicker.html” file looks like:
![]()
Step 6: Run JavaScript application
After adding all of the required code, right-click on the HTML file, and from the opened context menu, select the “Open with Live Server” option:
![]() Your created JavaScript application will now run in the browser.
Click on the “input field” and choose a date from the “datepicker”:
Your created JavaScript application will now run in the browser.
Click on the “input field” and choose a date from the “datepicker”:
![]() We showed you the method to utilize a basic JavaScript datepicker.
You can further explore as needed.
We showed you the method to utilize a basic JavaScript datepicker.
You can further explore as needed.
Conclusion
jQueryUI offers a “datepicker()” method that permits you to pick a date from an interactive drop-down calendar rather than manually typing it.
A JavaScript datepicker is used in scenarios where you want to schedule tasks according to a specific date, such as saving a birthdate.
In this post, we have discussed the method to add the functionality of a basic “datepicker” to an input field.
JavaScript Namespace
JavaScript “namespace” is a programming paradigm that is utilized for assigning scope to the identifiers such as variables and function names.
It is used to prevent collisions between the same-named variables and functions.
For instance, a JavaScript program requires creating the same name variable in a different context.
In this situation, utilizing “namespace” isolates the contexts, permitting the same identifier to be used in other namespaces.
This post will discuss the usage of the JavaScript namespace with the help of appropriate examples.
So, let’s start!
JavaScript namespace
In JavaScript, the concept of adding classes, methods, variables, and objects inside a container is known as “namespace“.
The code you write in a JavaScript program and the predefined methods are stored in the “window” variable, which can be considered a “global namespace“.
This window namespace is used whenever a new variable is created.
Also, storing any value in the newly created variable will utilize its namespace.
This is how the hierarchy works.
Is JavaScript namespace necessary
Here is the list of some of the issues that you may face in case of not using namespace in a JavaScript project:
If you have declared everything under the global or window namespace, then it is possible that someone else can override their functionality.
In such a scenario, the other compiler languages display a compilation error.
However, JavaScript will not throw any error, and your code will not work according to the added logic.
To name a new variable, you have to search carefully to check if another variable is already with the same name or not.
When everything is placed under one namespace, it becomes more difficult to find suggestions even after installing plugins in an Integrated Development Environment (IDE).
Lastly, it is not an ideal practice to add everything in a single global namespace.
Now, let’s demonstrate the method of using the JavaScript namespace.
How to use JavaScript namespace
To use namespace, you can create an “object” literal in the following way:
const vehicle = {
start: () => {
console.log('start the vehicle')
},
stop: () => {
console.log('stop the vehicle')
}}
In the above program, “start” and “stop” methods are namespaced under the “vehicle” object, and they are not polluting the “global object”.
Similarly, you can also associate the methods to an already created JavaScript object:
const vehicle= {}
vehicle.start = () => {
console.log('start the vehicle')}
vehicle.stop = () => {
console.log('stop the vehicle')}
In such a scenario, the methods are still accessible from the outside because of references to the “vehicle” object.
To completely hide the code from the outside, you can “wrap” the desired code within curly braces “{}”, inside an “independent” block:
{
const start = () => {
console.log('start the vehicle')
}
const stop = () => {
console.log('stop the vehicle')
}}
Now, check out the procedure of using the same identifier in different JavaScript namespaces.
Example
We will now create an identifier “start” and associate it with the “truck” and “bus” objects.
In this scenario the same identifier “start” is utilized in different namespaces by linking it with different global objects:
var truck= {
start: function () {
console.log("Truck in Started!");
}}
var bus = {
start: function () {
console.log("Bus is Started!");
}}
Next, we will invoke the “start()” function with both objects:
truck.start();
bus.start();
The given output signifies that both “truck” and “bus” successfully accessed the “start()” function:
![]()
Advantages of JavaScript namespace
Have a look at the following advantages of using the JavaScript namespace:
The JavaScript namespace usage protects and isolates the code from other applications.
It organizes the code, making it easy to read, understand, and change according to the requirements.
It avoids memory leakage.
If you want to use multiple functions with the same name, then distinguish them by utilizing the JavaScript namespace.
With the help of namespace, it becomes easy to recognize the variables and functions from where they are defined.
That was all essential information regarding the JavaScript namespace.
You can further research as required.
Conclusion
JavaScript namespace is a concept of adding classes, methods, variables, and objects inside a container.
It is a programming paradigm that is utilized for assigning scope to the identifiers, such as variables and functions name.
Javascript namespace assists in preventing the collision between the same name variables and functions.
This post discussed the usage of the JavaScript namespace with the help of appropriate examples.
Types of Namespaces
JavaScript “Namespace” is a programming paradigm that is utilized for assigning scope to the identifiers such as variables and function names.
It is used to prevent collisions between the same-named variables and functions.
For instance, a JavaScript program requires creating the same name variable in a different context.
In this situation, utilizing “Namespace” isolates the contexts, permitting the same identifier to be used in other namespaces.
This post will discuss different types of Namespaces.
So, let’s start!
JavaScript Namespace
The concept of adding classes, methods, variables, and objects inside a container is known as “Namespace”.
The code you write in a JavaScript program and the predefined methods are stored in the “window” variable, considered a “Global namespace“.
This window namespace is utilized whenever a new variable is created.
Also, storing any value in the newly created variable will use its namespace.
This is how the hierarchy works.
Types of Namespaces
JavaScript supports two types of Namespaces:
Static Namespace
Dynamic Namespace
We will discuss both of the mentioned Namespaces types in detail.
Static Namespace
When a “Namespace label” is hardcoded and a function is defined inside it, it is known as “Static Namespace“.
It permits the reassignment of the namespaces; however, a static namespace will always refer to the same old JavaScript objects.
The Static Namespaces are divided into the below-given categories:
Static Namespace with Direct Assignment
Static Namespace with Object Literal Notation
Static Namespace with Module Pattern
Now, let’s understand the functionality of each of the given types of Static Namespace.
Static Namespace with Direct Assignment
In “Direct Assignment”, functions are defined using the already created static namespace.
For instance, in the following example, we will create an object named “student,” which acts as a static namespace:
var student= {}
After doing so, we will define two functions “getName()” and “getAge()” and associate them with the “student” namespace:
student.getName = function() {
var name = "Alex";
return name; }
student.getAge = function() {
var age= 35;
return age; }
console.log(student.getName());
console.log(student.getAge());
As functions are directly assigned to the “student” namespace, it will result in the following output:
![]()
Static Namespace with Object Literal Notation
In this type of static namespace, functions are added within the namespace at object declaration.
In the below-given program, we have used the object literal notation to define a static namespace “student” and add the “getName()” and “getAge()” function within its scope:
var student= {
getName: function() {
var name = "Alex";
return name; },
getAge: function() {
var age= 35;
return age; }};
console.log(student.getName());
console.log(student.getAge());
Output
![]()
Static Namespace with Module Pattern
The JavaScript “module pattern” utilizes a function wrapper that returns an object.
The returned object refers to the logic of the module public interface within the global scope.
This type of static namespace invokes the function, saves the returned value to the namespace variable, and locks the module API within the namespace scope.
The variables not included in the return value are kept private and only accessible to the function that refers to them.
ExampleWe will now define “student” as a static namespace and wrap it in a function:
var student= (function() {
return {
getName: function() {
var name = "Alex";
return name; },
getAge: function() {
var age= 35;
return age; }
}; })();
console.log(student.getName());
console.log(student.getAge());
The value returned by the “getName()” and “getAge()” methods will be saved to the created static namespace variable:
![]()
Dynamic Namespace
Instead of hardcoding a namespace label, a “Dynamic Namespace” is referenced within the function wrapper.
This type of namespace eliminates the requirement to combine the return value to assign these values to the defined namespace.
It is mostly utilized in situations where multiple independent instances of a module are created in different instances.
Dynamic Namespace can be implemented by passing the namespace as an “argument” or defining it with the “apply” keyword.
Let’s understand both procedures one by one.
Passing Dynamic Namespace as an argument
JavaScript permits you to create a dynamic namespace by passing it as an argument to the self-invoking function.
These functions are defined with the help of the passed argument.
For example, we will create a “student” namespace and pass it as an argument “std”.
After that, we will define the “getName()” and “getAge()” functions by utilizing the “std” argument:
var student= {};(function(std) {
std.getName = function() {
var name = "Alex";
return name;
};
std.getAge = function() {
var age= 35;
return age;
} })(student);
console.log(student.getName());
console.log(student.getAge());
Execution of the above-given program will show the following output:
![]()
Creating Dynamic Namespace with apply keyword
Another method to create a dynamic namespace is to use the “apply” keyword and pass it as an argument.
After doing so, add the required functions with the “this” keyword.
Example
var student= {};(function() {
this.getName = function() {
var name = "Alex";
return name;
};
this.getAge = function() {
var age = 35;
return age;
} }).apply(student);
console.log(student.getName());
console.log(student.getAge());
Output
![]() That was all essential information regarding the types of Namespaces in JavaScript.
You can further research as required.
That was all essential information regarding the types of Namespaces in JavaScript.
You can further research as required.
Conclusion
The Static namespace type hardcodes the namespace label and defines functions within, and the Dynamic namespace type is referenced within the function wrapper., the Static namespace is created with direct assignment, object notation, and module pattern.
In contrast, a Dynamic namespace is defined by passing it as an argument or using the apply keyword.
This post discussed the types of namespaces.
JavaScript String toUpperCase() Method
While working with JavaScript, you may encounter a situation where you want to convert a “string” to “uppercase” characters.
For instance, it is required to perform a case-sensitive comparison in your JavaScript program.
To do so, you can use the JavaScript built-in String “toUpperCase()” method that assists in converting the characters of a string to uppercase format.
This post will discuss the usage of the JavaScript String toUpperCase() method.
So, let’s start!
What is JavaScript String toUpperCase() method
The “toUpperCase()” method is used for converting “string” characters to “uppercase” format.
As JavaScript “string” is of “immutable” type, the “toUpperCase()” method returns a new string and does not modify the original string.
Syntax
string.toUpperCase()
Here the “toUpperCase()” method will convert the characters of the “string” to “uppercase” format.
Now, check out the below-given examples to better understand the implementation of the String “toUpperCase()” method.
Example 1: Convert whole string to uppercase using JavaScript String toUpperCase() method
First of all, we will create a “string” variable having the value “This is linuxhint.com”:
var string = 'This is linuxhint.com';
To convert the whole “string” to “uppercase”, we will use the JavaScript “string.toUpperCase()” method:
console.log(string.toUpperCase());
Execution of the above-given program will show the following output:
![]()
Example 2: Convert a string with special characters to uppercase using JavaScript String toUpperCase() method
In case if the created “string” comprises any “special characters”, then the JavaScript String “toUpperCase()” method will convert all lowercase characters to uppercase without making any changes to the added special characters:
var string = 'This is linux$@#^&%hint';
console.log(string.toUpperCase());
Here, the JavaScript String “toUpperCase()” method will convert the string “This is linux$@#^&%hint” to uppercase:
![]()
Example 3: Convert first character of a string to uppercase using JavaScript String toUpperCase() method
Do you want to convert only the first character of a “string” to “uppercase”? To do so, follow the below-given instructions:
Firstly, create a string variable “str” and store the desired value in it:
const str= 'linuxhint';
In the next step, we will fetch the first character of the created string “str” using its index “0” and convert it to “uppercase” by invoking the “toUpperCase()” method.
Then, utilize the “substring()” method to generate a new string that contains all characters of “str” except the “first” one and combine this substring with the converted first uppercase character with the concatenation operator “+”:
const string= str[0].toUpperCase() + str.substring(1);
console.log(string);
The given output signifies that only the first character of the “str” string is converted to uppercase using JavaScript String “toUpperCase()” method:
![]()
Example 4: Convert first character of every word to uppercase using JavaScript String toUpperCase() method
In the previous example, we have seen the procedure to capitalize only the first character of a string that comprises a single word.
However, if a string contains more than one word and you want to convert the first character of each word to “uppercase,” then have a look at the below-given example:
We will now create a string named “str” with the following value:
const str= 'hello this is linuxhint';
Then we will split up each word of the string “str” using the JavaScript “split()” method.
The “split()” method is invoked with the “str” string object while passing the space character “(‘ ‘)” as a “separator” to split the “str” string between words:
const strArray= str.split(' ');
The execution of the above-given statement will return an array of words:
console.log('String Array: ' + strArray);
In the next step, we will utilize the “strArray.map()” method to iterate through the resultant array of words and perform the same operation of converting the first character of each word to “uppercase”:
const firstWordArray= strArray.map(word => word[0].toUpperCase() + word.substring(1));
console.log('String Array with first capitalize word: ' + firstWordArray);
At this point, the “firstWordArray” contains the first character of each word in the “uppercase” format.
However, the words exist as elements of the “firstWordArray”.
Now, to combine the “firstWordArray” elements into a “string”, we will use the JavaScript “join()” method which separates the words according to the specified separator “(‘ ‘)”:
const string = firstWordArray.join(' ')
console.log('Resultant string: ' + string);
As you can see in the below-given output, we have successfully converted the first character of each word of the “str” string to “uppercase”:
![]() That was all essential information related to the JavaScript String toUpperCase() method.
You can further research as needed.
That was all essential information related to the JavaScript String toUpperCase() method.
You can further research as needed.
Conclusion
The JavaScript “toUpperCase()” method is used for converting “string” characters to “uppercase” format.
It returns a new string and does not make any changes to the original string.
You can utilize the JavaScript toUpperCase() method to convert a whole string or only the first character of the words present in a string to uppercase.
This post discussed the usage of the JavaScript toUpperCase() method.
What are the uses of JavaScript
JavaScript is a lightweight, object-oriented, platform-independent language exclusively designed to handle browser data.
It is a specific-purpose language that offers several libraries utilized for different purposes.
JavaScript applications are called “WORA” (Write Once, Run Anywhere) because this programming language offers the functionality to execute the added code on any browser or platform without changing the script.
JavaScript also supports several tools which assist the developers in distributing the workload between browser and server through different activities such as basic validations and temporary data storage in cookies.
This write-up will discuss the different uses of JavaScript to understand how this language can help you.
So, let’s start!
Uses of JavaScript
Web-based applications and web browsers are the most common places to find JavaScript.
Moreover, this language is also utilized in servers-side applications and embedded hardware controllers.
Here are a few applications of how JavaScript is used.
Web-based applications
As browsers are enhancing their functionalities on a daily basis, JavaScript has also gained popularity in terms of developing web-based applications.
For instance, while using Google Maps, we only have to click and move the mouse to view the details.
In this application, the required detail is available with only a single click.
These types of concepts are implemented using JavaScript.
Mobile Applications
In this modern world, mobile devices are widely used for internet surfing or to access the internet.
For non-web environments, you can also develop an application with the help of JavaScript, and the core features of this language make it a significant tool for building applications for mobile devices.
For instance, React Native is a popular JavaScript framework utilized to develop mobile applications for several operating systems.
Also, you do not need to write separate codes for Android and iOS platforms because JavaScript is a platform-independent language.
Web Development
JavaScript is a scripting language that assists in creating web pages.
It permits us to add special effects and dynamic behavior to our website.
JavaScript is mainly utilized on websites for client-side data validation.
With the help of JavaScript, it is also possible to load the document content without reloading the web page.
Game development
JavaScript offers several useful frameworks and libraries that can be used to build a 2D/3D game.
You can also utilize JavaScript game engines such as Pixi.js and PhysicsJS to make a web game.
Also, to render 2D and 3D images in browsers, use the JavaScript WebGL (web graphics library) API.
Server Applications
Most web applications consist of a server-side component, where JavaScript is utilized to handle HTTP requests and generate content.
JavaScript is also used on servers with Node.js, which supports a server-side environment with all of the utilities needed to run an application.
Web Servers
To develop a web server, Node.js framework is used.
Node.js-based servers are fast, send data in chunks, and do not need buffering.
The HTTP module offers a createServer() method that is utilized for developing the Node.js-based server.
When someone tries to access port 8080, this method is invoked, and the HTTP server responds with the HTML included in the header.
Presentations
JavaScript also assists in making website presentations.
BespokeJs and Reveal.js are two libraries that can be used for creating a web-based slide presentation.
These JavaScript libraries are handy and permit us to create something attractive in a short period.
Reveal.js assists in creating fascinating and dynamic slide decks.
These types of presentations operate perfectly on mobile devices and tablets.
Reveal.js also works with all CSS color formats.
Whereas, the BespokeJS library supports responsive scaling, bullet lists that are animated, and other related features.
Some other JavaScript use cases
Various JavaScript applications are discussed in this write-up.
However, JavaScript also has several useful applications that improve website performance.
The following are some other use cases of JavaScript:
To show dialogue boxes and pop-up windows.
Validation of user input before form submission on the client-side.
To enhance the appearance of HTML documents.
To create forms that respond to user input without requiring a connection to a server.
Why use JavaScript
Apart from the extensive possibilities, there are other reasons why web developers should choose JavaScript over other programming languages:
According to Github, JavaScript is one of the top programming languages.
It is the only programming language that’s built right into the browser.
The best thing about JavaScript is that it does not require any prior programming skills, all you need is a basic understanding of it, and you are all good to go.
That was all essential information regarding the uses of JavaScript.
You can further research as needed.
Conclusion
JavaScript programming language is used to build web applications, mobile applications, server applications, web presentations, and gaming development.
It is also utilized to enhance the appearance of the HTML documents, validate the user input before form submission on the client-side, and display pop-up windows and dialogue boxes.
This write-up discussed the uses of JavaScript.
How to create an animated counter
You may know that interactive components improve the user experience of a web application.
One such element is an “Animated Counter” that can be used to show statistics on the website.
It is also utilized to display the number of visitors, how many members have signed up, or how many people played an online game.
The same functionality can be achieved using static numbers; however, animated counters assist in giving your website a more professional and expressive appearance.
This post will discuss the procedure of creating an animated counter in JavaScript.
So, let’s start!
How to create an animated counter
We will now create an animated counter for displaying the number count from “0” to “1000”.
To do the same, follow the below-given step-by-step instructions:
Step 1: Add HTML elements
First of all, we will create an HTML file named “myFile.html” and specify the title of our application as “Animated counter” in the “<head>” tag.
We will also link our JavaScript file “testfile.js” and CSS file “myStyle.css” with “MyFile.html” in the following way:
<head>
<script src="testfile.js"></script>
<link rel="stylesheet" href="myStyle.css">
<title>Animated counter</title></head>
In the next step, we will add a heading using the “<h1>” tag and a container with the “<div>” tag.
The “id” of the “<div>” tag will be set to “counter”:
<body>
<h1>Let the Counter Begin!</h1>
<div id="counter">
</div></body>
![]() Step 2: JavaScript code
Now move to your JavaScript file and utilize the “setInterval()” method for running the “updated” function:
let counts=setInterval(updated);
Then, create an “upto” variable that represents the limit of the counter.
As a starting point, the value of the “upto” variable is initialized to “0”:
let upto=0;
In the “updated()” function, we will first use the “getElementById()” method to fetch the HTML element with the “counter” id in the “count” variable.
After that, we will utilize the “innerHTML” property of the “count” variable to display the count as its inner text.
When the “count” value will reach “1000”, the “clearInterval()” method will stop the execution of the program:
function updated(){
var count= document.getElementById("counter");
count.innerHTML=++upto;
if(upto===1000)
{
clearInterval(counts);
}}
Step 2: JavaScript code
Now move to your JavaScript file and utilize the “setInterval()” method for running the “updated” function:
let counts=setInterval(updated);
Then, create an “upto” variable that represents the limit of the counter.
As a starting point, the value of the “upto” variable is initialized to “0”:
let upto=0;
In the “updated()” function, we will first use the “getElementById()” method to fetch the HTML element with the “counter” id in the “count” variable.
After that, we will utilize the “innerHTML” property of the “count” variable to display the count as its inner text.
When the “count” value will reach “1000”, the “clearInterval()” method will stop the execution of the program:
function updated(){
var count= document.getElementById("counter");
count.innerHTML=++upto;
if(upto===1000)
{
clearInterval(counts);
}}
![]() Step 3: Style HTML elements
To enhance the appearance of our animated counter application, we will style the added HTML elements.
For this purpose, firstly, we will align the text present inside the “body” to the “center” and also add a “background-image”:
body {
text-align: center;
background-image: url('counter.jpg');}
Then, we will set the “color” and “font-family” properties of the added heading:
h1 {
color: rgb(0, 0, 2);
font-family:'Courier New', Courier, monospace;}
Lastly, we will change the color of the “counter” container and specify the desired values for the “font-family”, “font-size” and “font-style” properties:
div {
color: rgb(37, 25, 5);
font-family:courier;
font-size: 200%;
font-style:normal;}
Step 3: Style HTML elements
To enhance the appearance of our animated counter application, we will style the added HTML elements.
For this purpose, firstly, we will align the text present inside the “body” to the “center” and also add a “background-image”:
body {
text-align: center;
background-image: url('counter.jpg');}
Then, we will set the “color” and “font-family” properties of the added heading:
h1 {
color: rgb(0, 0, 2);
font-family:'Courier New', Courier, monospace;}
Lastly, we will change the color of the “counter” container and specify the desired values for the “font-family”, “font-size” and “font-style” properties:
div {
color: rgb(37, 25, 5);
font-family:courier;
font-size: 200%;
font-style:normal;}
![]() Step 4: Run Animated Counter Application
After saving the specified code, open up the HTML file of your Animated Counter Project in the browser with the help of the “Live Server” extension:
Step 4: Run Animated Counter Application
After saving the specified code, open up the HTML file of your Animated Counter Project in the browser with the help of the “Live Server” extension:
![]() Here is how our animated counter JavaScript application looks like:
Here is how our animated counter JavaScript application looks like:
![]()
Conclusion
An animated counter is created in a JavaScript application to display the number counter in an animated form starting from 0 and ending with the specified number.
Many websites employ this feature to make their web page more attractive.
You can utilize an animated counter to show the number of registered users, the number of website visitors, or the number of people who played an online game.
This post discussed the procedure of creating an animated counter.
How to Use Instanceof Operator
Every JavaScript object comprises a prototype, which can be accessed using the “__proto__ property”.
This property is also associated with functions that set the initial property for the created object of the given type.
When a function is defined in a JavaScript program, a unique prototype is assigned to it.
You can use the JavaScript “instanceof” operator to determine whether an object is an instance of a class or a built function by checking its prototype.
This post will discuss the different use cases of the “instanceof” operator.
So, let’s start!
JavaScript instanceof operator
The “instanceof” operator is utilized for checking the object “type” according to the specified “class” at “run time”.
This operator returns a “boolean” value, where “true” indicates that the mentioned object is an instance of the specified JavaScript class, and “false” represents the negation.
Syntax
object instanceof class
Now, have a look at the below-given examples to implement the “instanceof” operator in a JavaScript program.
How to use instanceof operator to check String Type
First of all, we will create a “String” type object named “str” with the following value:
var str = new String("Alex");
Next, we will use the “instanceof” operator to check if “str” is an instance of the “String” class or not:
str instanceof String;
Execution of the above-given statement will return “true” as “str” comprises a string type value and is an object of the “String” class:
![]()
How to use instanceof operator to check Number Type
Similarly, you can utilize the “instanceof” operator to check if a created number variable is an instance of the “Number” class or not:
var num = new Number("2022");
num instanceof Number;
Output
![]()
How to use instanceof operator to check Array type
In the below-given JavaScript program, we will create an array name “arr” having some string values:
var arr = [ "HTML", "Python", "C#", "CSS", "Java", "JavaScript"];
Then, we will use the “instanceof” operator to check if the “arr” instance is a type of the JavaScript “Array” class:
arr instanceof Array;
The returned value is “true,” which signifies that “arr” is an Array instance:
![]()
How to use instanceof operator with Constructor functions
The “instanceof” operator is utilized to verify the object type of “Constructor functions”.
For instance, in the following example, we will create a constructor function named “Employee” that accepts a “name” argument:
function Employee(name) {
this.name = name}
Next, we will create an “employee1” of the “Employee” type while passing “Alex” as the “name” argument value:
let employee1= new Employee("Alex");
Lastly, we will utilize the “instanceof” JavaScript operator to check whether “employee1” is an instance of “Employee”:
console.log(employee1 instanceof Employee)
Output
![]()
How to use instanceof operator with Inheritance
JavaScript also offers “Prototype Inheritance,” used to add methods and properties to an object.
In this hierarchy, the “instanceof” operator is utilized to validate if the specified JavaScript object is an instance of the mentioned class or not.
For instance, we will create an “Employee” class that “extends” “Person” class as its “parent” class:
class Person {}class Employee extends Person {
constructor(name) {
super()
this.name = name
}}
After doing so, we will create an instance of the “Employee” class and use the “instanceof” operator to check if “employee” is considered an instance of both the “Person” and “Employee” classes or not:
let employee1= new Employee("Alex");
console.log(employee1 instanceof Person)
console.log(employee1 instanceof Employee)
The given output signifies that JavaScript marked “employee” as an instance of both classes because of inheritance:
![]() JavaScript beginners often get confused between the functionality of the “instanceof” and “typeof” operators.
To clear out your concept related to the mentioned operators, check out the following section.
JavaScript beginners often get confused between the functionality of the “instanceof” and “typeof” operators.
To clear out your concept related to the mentioned operators, check out the following section.
JavaScript instanceof operator vs typeof operator
The”typeof”JavaScript operator outputs a”string”representing the “type” of the value.
It is mostly used for built-in JavaScript types.
For instance, In the below-given program, the “typeof” operator will return “string” as a type of the “linuxhint” value and “number” for the “232” value:
console.log(typeof "linuxhint");
console.log(typeof 232);
![]() However, with the “instanceof” operator, you must mention the type or class for which the specified value is tested.
This operator returns a “true” or “false” boolean value which depends on the result of validation.
More specifically, the “instanceof” JavaScript operator is utilized for testing the “custom” and “advanced” types, whereas “typeof” operator is used to verify the “common” or “built-in” JavaScript data types.
That was all essential information regarding the JavaScript “instanceof” operator.
You can further research as required.
However, with the “instanceof” operator, you must mention the type or class for which the specified value is tested.
This operator returns a “true” or “false” boolean value which depends on the result of validation.
More specifically, the “instanceof” JavaScript operator is utilized for testing the “custom” and “advanced” types, whereas “typeof” operator is used to verify the “common” or “built-in” JavaScript data types.
That was all essential information regarding the JavaScript “instanceof” operator.
You can further research as required.
Conclusion
The “instanceof” operator is utilized for checking the object “type” according to the specified class at “run time”.
This operator returns a “boolean” value, where “true” indicates that the mentioned object is an instance of the specified JavaScript class, and “false” represents the negation.
The JavaScript “instanceof” operator is to verify custom and advanced data types.
This post discussed different use cases of the “instanceof” operator.
How does JavaScript work
JavaScript is a lightweight, object-oriented, platform-independent language exclusively designed to handle browser data.
It is a specific-purpose language that offers several libraries utilized for different purposes.
JavaScript applications are called “WORA” (Write Once, Run Anywhere) because this programming language offers the functionality to execute the added code on any browser or platform without changing the script.
Before diving deep into JavaScript programming, you need to know JavaScript works behind the scenes, and our post will assist in this regard.
So, let’s start!
How does JavaScript work
JavaScript is a programming language that runs on the client-side and is one of the most efficient and widely used scripting languages.
The term “client-side scripting language” signifies that it can operate on the client-side web browsers; however, the client web browser must support JavaScript to make it work.
We will now explain the working of JavaScript with the help of an example.
In the below-given program, we will invoke the pre-defined “alert()” method of JavaScript that will display the message “Hi! Welcome to linuxhint.com” in an alert box.
After that, the “console.log()” method will print out the string “JavaScript tutorial” on the console window:
<!DOCTYPE html><html lang="en"><title>Working of JavaScript</title></head><body>
<h1>How does JavaScript works</h1>
<script>
alert("Hi! Welcome to linuxhint.com");
console.log("JavaScript tutorial");
</script></body></html>
![]() Add the given code in an HTML file and open it in your browser.
Upon doing so, the following “alert” box will appear in the browser:
Add the given code in an HTML file and open it in your browser.
Upon doing so, the following “alert” box will appear in the browser:
![]() To check the output of the “console.log()” method, right-click in the opened window and select the “Inspect” option from the context menu:
To check the output of the “console.log()” method, right-click in the opened window and select the “Inspect” option from the context menu:
![]() The given output signifies that the “console.log()” method has successfully displayed the specified string in the console:
The given output signifies that the “console.log()” method has successfully displayed the specified string in the console:
![]() So it is clear from the above example that a JavaScript application runs perfectly on a web browser.
At this point, you may be wondering how the web browser understands the code and executes it effortlessly?
In this technological world, most modern web browsers have built-in JavaScript engines.
For instance, Google Chrome has a “V8” JavaScript engine, Safari has a “JavaScript core”, Edge has “Chakra,” and “Spidermonkey” engine is embedded in Firefox.
Thus, a JavaScript engine is utilized for executing the code.
Now, let’s discuss the working of the JavaScript engine.
So it is clear from the above example that a JavaScript application runs perfectly on a web browser.
At this point, you may be wondering how the web browser understands the code and executes it effortlessly?
In this technological world, most modern web browsers have built-in JavaScript engines.
For instance, Google Chrome has a “V8” JavaScript engine, Safari has a “JavaScript core”, Edge has “Chakra,” and “Spidermonkey” engine is embedded in Firefox.
Thus, a JavaScript engine is utilized for executing the code.
Now, let’s discuss the working of the JavaScript engine.
How does JavaScript engine work in a browser
In the previously given example, we have utilized the “Chrome” browser for executing the program.
The Chrome browser has a built-in “V8″ JavaScript engine that converts and executes the added code line by line rather than converting the whole program.
When a JavaScript program is executed in a browser, its JavaScript engine accepts the code and executes it to generate the result.
Also, a conventional JavaScript engine’s source code goes through multiple phases before running a program.
These phases are illustrated in the following diagram:
![]() Now, let’s take a closer look at each of these processes.
Step 1: Parsing JavaScript file
Whenever a JavaScript program is executed, the “Parser” present inside the JavaScript engine receives the code first.
It plays its role to check the code line by line and verify if it is syntactically correct or not.
If an error is identified, the parser throws an error and stops the code execution.
Step 2: Creating Abstract Syntax Tree
In the next step, the parser creates the “Abstract Syntax Tree” (AST) after checking the JavaScript code and determining that there exist no errors in the code.
Step 3: Converting JavaScript code to Machine code
JavaScript engine converts the provided code into machine code after parsing and creating the AST.
Step 4: Executing Machine code
Lastly, the converted code is submitted to the system for execution, and then the corresponding byte code is executed.
That was all essential information regarding the working of JavaScript.
You can further research as needed.
Now, let’s take a closer look at each of these processes.
Step 1: Parsing JavaScript file
Whenever a JavaScript program is executed, the “Parser” present inside the JavaScript engine receives the code first.
It plays its role to check the code line by line and verify if it is syntactically correct or not.
If an error is identified, the parser throws an error and stops the code execution.
Step 2: Creating Abstract Syntax Tree
In the next step, the parser creates the “Abstract Syntax Tree” (AST) after checking the JavaScript code and determining that there exist no errors in the code.
Step 3: Converting JavaScript code to Machine code
JavaScript engine converts the provided code into machine code after parsing and creating the AST.
Step 4: Executing Machine code
Lastly, the converted code is submitted to the system for execution, and then the corresponding byte code is executed.
That was all essential information regarding the working of JavaScript.
You can further research as needed.
Conclusion
In this technological world, most modern web browsers have built-in JavaScript engines.
When a JavaScript program is executed, the JavaScript engine Parser receives the code and validates it.
After that, it creates an Abstract Syntax Tree, then the provided code is converted to machine code and is submitted for execution.
This post discusses how JavaScript works in detail.
Features of JavaScript
Are you aware of the capabilities of JavaScript? JavaScript language does have certain unique characteristics that contribute to its popularity.
Today, practically every website employs JavaScript, making it a highly useful language to learn.
The best thing about JavaScript is that it does not require any prior programming skills, all you need is a basic understanding of it, and you are all good to go.
This post will discuss the Features of JavaScript.
So, let’s start!
Features of JavaScript
According to Github, JavaScript is a top programming language.
In order to properly appreciate what it can achieve, we need to understand the features of JavaScript.
So, now, we will briefly discuss the main features of the JavaScript language.
LightWeight Scripting Language
JavaScript is exclusively designed for handling data in a browser.
Therefore, it is a “lightweight”, “specific-purpose” scripting language that offers several libraries utilized for different purposes.
Also, the lightweight nature of JavaScript is a fantastic attribute meant for execution on client-side web applications.
Platform Independent
JavaScript is a programming language that does not depend on platforms.
Its applications are called “WORA” (Write Once Run Anywhere) because JavaScript offers the functionality to execute the added code on any browser or platform without changing the script.
Dynamic Typing
JavaScript language supports “Dynamic Typing,” which signifies that the stored value determines the variable types.
For instance, if you declare a variable named “str”, then it is up to you to store any type of value in it, such as string, array, or int.
This concept is called “Dynamic Typing”.
In languages such as Java, you must explicitly specify the “type” of a “variable” while declaring it.
However, JavaScript does not restrict developers to mention the data type at the time of declaration.
So, to create a variable, utilize the keyword “let” and “var” and then store the required data type value.
Functional Style
JavaScript is based on “Functional Style” programming, which states that objects are defined using the constructor methods, where each constructor indicates a different object type.
Also, JavaScript functions can be utilized as objects and passed to other methods for further processing.
Object-Oriented Programming (OOP) support
OOP principles have been more refined in the “ES6” JavaScript version.
Principles such as “Encapsulation” and “Inheritance” are considered the key aspects of OOP.
These features are available for everyone to explore.
Language Interpretation
The JavaScript interpreter is a core browser component that runs the script line by line.
Therefore, JavaScript is also known as an “Interpreted Language”.
However, most modern engines of JavScript utilize “Just-In-Time” compilation to execute code.
Prototype-based Language
JavaScript is a scripting language that is based on prototypes.
Instead of classes or Inheritance, prototypes are also used for creating objects for a specific class and multiple objects can be declared with the specified prototype.
However, in Java, firstly, a class is created, and then you are allowed to declare an object according to the class type.
Client-side validations
Every website includes a form where it is required to enter data.
To ensure that the user submitted the correct value, it is needed to implement the proper validations on both the server and client-side.
In such a scenario, the client-side validations are implemented with the help of JavaScript.
Async processing
When an asynchronous request is made via “Promises”, JavaScript does not wait for its response, which sometimes becomes a reason for blocking the request.
“ES6” also embeds “Async functions” that execute in parallel, which affects the processing time in a good way.
More controls in Browser
JavaScript supports several tools which help the developers in distributing the workload between browser and server through different activities such as basic validations and temporary data storage in cookies.
In addition to it, the following useful features are also introduced in the JavaScript latest version:
JavaScript has an extensive collection of built-in libraries with many advanced functions for data type conversion, validation, and string operations.
It can detect browser name, type, operating system version, and other related client information for analysis.
It also supports complex data types such as maps, arrays, lists, collections, and built-in methods for their manipulation.
That was all essential information regarding the features of JavaScript.
You can further research as needed.
Conclusion
Different features contribute to the increasing popularity of JavaScript.
From being a lightweight, object-oriented, platform-independent, and interpreted language to its functional style, dynamic typing nature, async processing, and client-side validations, these features make JavaScript an extremely useful language to learn.
In this post, we have talked about the main features of JavaScript.
How to Flatten a Nested JavaScript Array
JavaScript Array has the capability to store multiple arrays in itself.
When an inner array or sub-array is added to an array, it is known as a “Multi-dimensional” or “Nested” array.
There exist certain scenarios in which you may need to create an array that comprises all of the nested JavaScript array elements in their original order.
If that’s the case, then flatten the created nested array and reduce its dimensionality according to the specified depth.
This post will explain the methods to flatten a Nested JavaScript array.
But before jumping into it, we will explain the term “depth” as it is associated with the flattening procedure.
Depth of Nested JavaScript array
The operation of adding an inner array or nesting an array in normal array increments “1” in the depth level.
For instance, with no nested array, a normal array will have a “0” depth level:
[12, 23, 34, 45, 56, 67, 78] // Depth level = 0
With one inner sub-array, the depth level will become “1”:
[12, 23, 34, [45, 56, 67, 78]] // Depth level = 1
Similarly, increasing the number of inner sub-array will also increase the depth level:
[12, 23, [34, [45, 56, 67, 78]]] // Depth level = 2[12, [23, [34, [45, 56, 67, 78]]]] // Depth level = 3
Now, check out the method of flattening an array in the JavaScript version prior to ES6.
How to Flatten a Nested JavaScript Array using concat() method and spread operator […]
The combination of “concat()” method and “spread operator […]” method is used to flatten a nested JavaScript array in such as way that the spread operator […] spread the elements of the specified array and then concatenate them in an empty array using the JavaScript concat() method:
let array= [12, 23, [43, 34, 56]];
let flatArray= [].concat(...array);
console.log(flatArray);
Output
![]() However, this approach only flattens the level one nested arrays:
const numArray= [12, 23, [34, 45, 56, [67, 78]]];
let flatArray= [].concat(...numArray);
console.log(flatArray);
The above-given code will add the inner array of “numArray” as a whole to “flatArray” as it cannot spread its elements:
However, this approach only flattens the level one nested arrays:
const numArray= [12, 23, [34, 45, 56, [67, 78]]];
let flatArray= [].concat(...numArray);
console.log(flatArray);
The above-given code will add the inner array of “numArray” as a whole to “flatArray” as it cannot spread its elements:
![]() What if you have to flatten a deeply nested array? To do so, you can utilize the “Array.flatten()” method offered by the ES6 JavaScript version.
What if you have to flatten a deeply nested array? To do so, you can utilize the “Array.flatten()” method offered by the ES6 JavaScript version.
How to Flatten a Nested JavaScript Array using Array.flat() method
The “Array.flat()” method is embedded in ES6 that enables you to “flatten” a nested JavaScript Array.
This method returns a new array in which all of the elements of sub-arrays are concatenated according to the specified depth.
Syntax of Array.flat() method to flatten a Nested JavaScript Array
let newArray = Array.flat([depth])
Here, the “Array” object will invoke the “flat()” method while passing “depth” as an argument.
Now let’s check some examples to understand the stated concept.
Example 1: How to Flatten a Nested JavaScript Array with one level depth
First of all, we will create a Nested JavaScript Array having the following elements and a sub-array:
const numArray= [12, 23, [34, 45, 56]];
Then, we will flatten the created nested “numArray” with the help of the “flat()” method:
const flatArray= numArray.flat();
console.log(flatArray);
We have not passed the “depth” argument, so the “numArray.flat()” will consider the default depth value, which is “1” and concatenates the JavaScript nested array elements 34, 45, 56 to the newly created “flatArray”:
![]()
Example 2: How to Flatten a Nested JavaScript Array with two-level depth
In the following example, we will specify “2” as the “depth” level.
Upon doing so the “numArray.flat()” will flatten the inner two sub-arrays and add their elements in the resultant “flatArray()”:
const numArray= [12, 23, [34, 45, 56, [67, 78]]];const flatArray= numArray.flat(2);
console.log(flatArray);
Execution of the given program will show the following output:
![]()
Example 3: How to Flatten a Nested JavaScript Array without knowing the depth level
If you have no idea about the array depth level, pass “infinity” as an argument to the “Array.flat()” method.
In this case, all sub-arrays elements are “recursively” concatenated into another array.
For instance, to flatten the below-given “numArray”, we will specify “infinity” in place of the depth level argument:
const numArray= [12, 23, [34, 45, 56, [67, 78, [89, 90]]]];const flatArray= numArray.flat(Infinity);
console.log(flatArray);
As you can see, the “numArray.flat()” method has successfully flattened the nested “numArray”:
![]() That was all the essential information related to flattening an array.
You can further work on it according to your preferences.
That was all the essential information related to flattening an array.
You can further work on it according to your preferences.
Conclusion
The Array.flat() method is primarily used to flatten a Nested JavaScript array.
It accepts the depth level as an argument and returns a new array in which all of the elements of sub-arrays are concatenated according to the specified depth.
Prior to ES6, the combination of some built-in methods such as concat() and spread operator […] can only flatten the level one array; however, the Array.flat() method assists in flattening deeply nested arrays.
This write-up explained the procedure to flatten an array.
How to freeze an object
Have you ever been caught up in a situation where it is required to make an immutable JavaScript object and prevent it from changing the values of existing properties? If that’s the case, utilize the “Object.freeze()” method in your JavaScript program and make it an immutable data type.
What is Object.freeze() method
The “Object.freeze()” method is used to freeze an already declared object and restrict it all from manipulation such as adding new properties, removing existing properties, and updating the values of the existing properties.
This post will discuss the method to freeze an object.
So, let’s start!
How to freeze an object
By default, JavaScript objects are of “mutable” data type, which means that their values can be changed over time.
However, you can make it “immutable” by declaring it as a “constant”.
When an object is created using the “const” keyword, you can still individually reassign or change the values of its properties, but being an immutable data type, JavaScript does not allow you to reassign the whole object to something else.
Have a look at the following example to understand the stated concept.
Example
For instance, we will create an object named “employee” having the following properties:
const employee = {
age: 30,
name: "Alex"};
console.log(employee);
![]() After doing so, we will try to update the values of the “employee” object as a whole:
employee = {
age: 35,
name: "Paul"};
console.log(employee);
As you can see, the execution of the specified operation output a “TypeError” which states that assignment to an already declared constant variable is not possible:
After doing so, we will try to update the values of the “employee” object as a whole:
employee = {
age: 35,
name: "Paul"};
console.log(employee);
As you can see, the execution of the specified operation output a “TypeError” which states that assignment to an already declared constant variable is not possible:
![]() Now, we will check the other case by individually reassigning a value to the employee object’s “name” property:
employee.name= "Max";
console.log("After changing the employee.name property value");
console.log(employee);
The given output signifies that the “employee.name” property value is updated to “Max”:
Now, we will check the other case by individually reassigning a value to the employee object’s “name” property:
employee.name= "Max";
console.log("After changing the employee.name property value");
console.log(employee);
The given output signifies that the “employee.name” property value is updated to “Max”:
![]() Now, it is proved that although an object becomes “immutable” with the help of the “const” keyword, it still permits you to individually reassign its property values.
You can “freeze” an object in a situation where it is needed to restrict the object from updating the existing properties or addition of new properties.
Want to do so? Follow the below-given section to know more about freezing an object.
Now, it is proved that although an object becomes “immutable” with the help of the “const” keyword, it still permits you to individually reassign its property values.
You can “freeze” an object in a situation where it is needed to restrict the object from updating the existing properties or addition of new properties.
Want to do so? Follow the below-given section to know more about freezing an object.
How to freeze an object using Object.freeze() method
The “Object.freeze()” method is utilized to freeze an already declared object.
When an object gets freezed, it prevents the deletion of the existing object properties, addition of new properties, updation of the enumerability, writability, and configurability of existing properties.
Moreover, you cannot change the object prototype and value of the existing properties after freezing the related object.
Syntax
Object.freeze(obj)
Here, “obj” represents the JavaScript object which will be freezed with the help of the “Object.freeze()” method.
Example: How to freeze an object using Object.freeze() method
First of all, we will freeze the “employee” object by using the “Object.freeze()” method:
Object.freeze(employee);
At the time of freezing the “employee” object, the value of “employee.age” is “30,” and the “employee.name” is set as “Max”:
![]() In the next step, we will verify if the “employee” object is freezed or not.
For this purpose, JavaScript offers “Object.isFrozen()” built-in method that accepts a JavaScript “object” as an argument and returns “true” if the passed object is freezed, otherwise the return case of “Object.isFrozen()” method will be set to “false”:
Object.isFrozen(employee);
Output
In the next step, we will verify if the “employee” object is freezed or not.
For this purpose, JavaScript offers “Object.isFrozen()” built-in method that accepts a JavaScript “object” as an argument and returns “true” if the passed object is freezed, otherwise the return case of “Object.isFrozen()” method will be set to “false”:
Object.isFrozen(employee);
Output
![]() The value returned by the “Object.isFrozen()” method is “true,” which indicates that the “employee” object is successfully freezed.
The value returned by the “Object.isFrozen()” method is “true,” which indicates that the “employee” object is successfully freezed.
Updating freezed object property in strict mode vs non-strict mode
Now, we will try to update the “employee.name” property value to “Paul”:
employee.name= "Paul";
console.log(employee);
If you are in “non-strict” mode, then the specified operation of updating value will fail silently:
![]() However, in the case of “strict mode”, a “TypeError” will be also displayed on the console, while terminating the updation operation of the freezed “employee” object:
"use strict";
employee.name= "Paul";
console.log(employee);
Output
However, in the case of “strict mode”, a “TypeError” will be also displayed on the console, while terminating the updation operation of the freezed “employee” object:
"use strict";
employee.name= "Paul";
console.log(employee);
Output
![]()
Deleting freezed object property in strict mode vs non-strict mode
Similarly, you cannot delete an existing property of a freezed object:
delete employee.name;
console.log(employee);
The above-given code will try to remove the “name” property of the “employee” object and fail silently in “non-strict” mode:
![]() Whereas, in “strict mode”, a “TypeError” will be shown on the console, which states that you cannot delete the “name” property of the “employee” object that we have freezed with the help of the “Object.freeze()” method:
"use strict";
delete employee.name;
console.log(employee);
Output
Whereas, in “strict mode”, a “TypeError” will be shown on the console, which states that you cannot delete the “name” property of the “employee” object that we have freezed with the help of the “Object.freeze()” method:
"use strict";
delete employee.name;
console.log(employee);
Output
![]() That was all essential information related to freezing an object.
You can investigate further according to your preferences.
That was all essential information related to freezing an object.
You can investigate further according to your preferences.
Conclusion
The JavaScript Object.freeze() method is utilized to freeze a declared object.
When an object gets freezed, it prevents the deletion of the existing object properties, addition of new properties, updation of the enumerability, writability, and configurability of existing properties.
Moreover, you cannot change the object prototype and value of the existing properties after freezing it.
This write-up discussed the method to freeze an object in JavaScript.
How to create Dynamic Array
A Dynamic Array is a list data structure that has a variable size.
It automatically expands when you try to add more elements after creating it.
The dynamic array also permits adding or removing elements from the array at run-time.
It can also update its size after executing such operations.
JavaScript Arrays are dynamic in nature, which implies that their length can be changed at the time of execution (when necessary).
The run-time system automatically allocates dynamic arrays’ elements based on the utilized indexes.
Want to create a dynamic array? If yes, then follow this post as we will discuss the procedure to create dynamic arrays.
So, let’s start!
How to create Dynamic Array
To create a dynamic array, you can follow any of the below-given methods:
Creating dynamic array using Array Literal
Creating dynamic array using Default Constructor
Creating dynamic array using Parameterized Constructor
We will explain each of the methods mentioned above in the next sections.
How to create Dynamic Array using Array Literal
In JavaScript, a list of single or multiple expressions, where each expression represents an array element is known as “Array Literal”.
Typically, the elements added in an array literal are enclosed in square brackets “[ ]”.
When a dynamic array is created by utilizing an array literal, it is initialized with some specific values as array “elements,” and its length is automatically set according to the number of added arguments.
Syntax to create Dynamic Array using Array Literal
var array= [element1, element2, element3, ...];
Here, “array” is a dynamic array that comprises multiple elements such as “element1”, “element2”, “elements3” and so on.
Example: How to create Dynamic Array using Array literal
We will create a dynamic array named “array1” and initialize it with the following elements:
var array1 = ['linuxhint', 'is', 'number', 1, 'website'];
Then, we will check the length of the created dynamic array:
console.log(array1.length);
As the “array1” is initialized with five elements, that’s why its length is set to “5”:
![]() To iterate over the elements of the “array1”, we will use the “for…loop”:
for(var i=0; i <= array1.length; i++) {
console.log(array1[i]);}
The given “for..loop” will display the “array1” elements on the console:
To iterate over the elements of the “array1”, we will use the “for…loop”:
for(var i=0; i <= array1.length; i++) {
console.log(array1[i]);}
The given “for..loop” will display the “array1” elements on the console:
![]()
How to create Dynamic Array using Default Constructor
Another method to create a dynamic array is to use the “Array()” Default Constructor.
This default constructor has no arguments, so initially, the length of the declared dynamic array will be set to “0”.
Syntax to create Dynamic Array using Default Constructor
var array= new Array();
Here, the dynamic “array” is created by utilizing the pre-defined Array() constructor.
Example: How to create Dynamic Array using Default Constructor
First, we will utilize the “Array()” default constructor for creating a dynamic array named “array2”:
var array2= new Array();
array2.length;
Since we have not added any element yet, the length of the “array2” is equal to zero:
![]() In the next step, we will add some elements to the “array2” using JavaScript “push()”.
The “push()” method accepts the element as an argument that needs to be pushed into the specified array:
array2.push('linuxhint');
array2.push('website');
array2.length;
Till this point, we have added two elements in the “array2,” which signifies that its length is now set to “2” instead of zero:
In the next step, we will add some elements to the “array2” using JavaScript “push()”.
The “push()” method accepts the element as an argument that needs to be pushed into the specified array:
array2.push('linuxhint');
array2.push('website');
array2.length;
Till this point, we have added two elements in the “array2,” which signifies that its length is now set to “2” instead of zero:
![]() Lastly, we will use the “for..loop” to iterate over the “array2” elements and view their values:
for(var i=0; i <= array2.length; i++) {
console.log(array2[i]);}
Output
Lastly, we will use the “for..loop” to iterate over the “array2” elements and view their values:
for(var i=0; i <= array2.length; i++) {
console.log(array2[i]);}
Output
![]()
How to create Dynamic Array using Parameterized Constructor
JavaScript also allows you to create a dynamic array using the “Parameterized Constructor” of the built-in Array class.
To do so, you have to pass elements as an argument to the Array() parameterized constructor.
Syntax to create Dynamic Array using Parameterized Constructor
var array= new Array(element1, element2, element3, ...);
Here, “array” is a dynamic array that comprises multiple elements such as “element1”, “element2”, “elements3”, and so on.
Example: How to create Dynamic Array using Parameterized Constructor
We will now create a dynamic array named “array2” using the parameterized constructor while passing the below-given argument as its “elements:
var array3 = new Array('linuxhint', 'is', 'number', 1, 'website');
console.log(array3.length);
The length of “array3” is “5” as the array comprises five elements:
![]() Next, we will iterate through the elements of “array3” and print out their values on console window:
for(var i=0; i <= array3.length; i++) {
console.log(array3[i]);}
Output
Next, we will iterate through the elements of “array3” and print out their values on console window:
for(var i=0; i <= array3.length; i++) {
console.log(array3[i]);}
Output
![]() We have compiled three different methods for creating dynamic arrays.
You can use any of them according to your requirements.
We have compiled three different methods for creating dynamic arrays.
You can use any of them according to your requirements.
Conclusion
Using Array Literal, Array Default Constructor, and Parameterized Constructor, you can create dynamic arrays in JavaScript.
JavaScript Arrays are dynamic in nature, which implies that their length can be changed at the time of execution.
They also permit you to add or remove elements at run-time and then automatically update their size after executing the specified operations.
This write-up discussed the procedure to create dynamic arrays.
How does Nested Array work
In JavaScript, when an inner array or sub-array is added to an array, it is known as a “Multi-dimensional” or “Nested” array.
JavaScript does not provide an explicit format to create a nested array; therefore, we need to nest the required sub-arrays within a single outer array.
Also, the elements of inner arrays are accessed based on their index in the outer array.
After declaring a nested array, you can perform different operations on it, such as appending sub-arrays, accessing the elements of the sub-arrays, iterating over all of the sub-arrays elements, deleting a sub-array, or its related element, and reducing the dimensionality of the nested array.
This write-up will explain the working of the nested arrays in JavaScript with the help of suitable examples.
So, let’s start!
![]()
How to create a nested array
To create a nested array, you have to follow the below-given syntax:
let array = [ [inner_array1], [inner_array2], [inner_array3]....];
Here “array” represents the nested array that contains multiple inner-arrays such as “inner_array1”, “inner_array2”, “inner_array3”.
Example: How to create a nested array
We will create a multi-dimensional or nested array named “hobbies” that further comprises five inner arrays:
let hobbies= [['Reading', 4],['Gardening', 2],['Gaming', 1],['Painting', 8],['Cooking', 5]];
In the declared “hobbies” array, the added first dimension represents the “hobby,” and the second indicates the maximum number of “hours” spent while doing that activity.
Now, to display the created “hobbies” nested array, we will utilize the “console.table()” method while passing the “hobbies” array as an argument:
console.table(hobbies);
Execution of the above-given code will show the values of the “hobbies” array in a table format, where the first column represents the index of inner arrays and the other two columns contain their elements that are present at the first “[0]” and second “[1]” index:
![]()
How to access elements of nested arrays
Need to access the elements of a nested array? If yes, then have a look at the below-given syntax:
array.[a][b]
Here, “a” represents the index of the “inner” array in the created nested array, and “b” represents the index of the “element” in the specified inner or sub-array.
Example: How to access elements of nested arrays
For instance, we want to access the “Cooking” hobby that exists as the “First” element “[0]” of the fifth inner array “[4]”:
![]() To perform the specified operation, we will execute the below-given code statement:
console.log(hobbies[4][0]);
As you can see from the output, we have successfully accessed the value of the “hobbies” array that is placed at the first index of the fifth inner array:
To perform the specified operation, we will execute the below-given code statement:
console.log(hobbies[4][0]);
As you can see from the output, we have successfully accessed the value of the “hobbies” array that is placed at the first index of the fifth inner array:
![]()
How to add elements to nested array
JavaScript offers two ways for adding elements to an already created nested array; either you can append an element at the end of an array using the “push()” method or insert it at a specific position with the help of the “splice()” method.
Example: How to add elements to nested array
To push the “[Cycling, 6]” sub-array as at the end of the “hobbies” nested array, we will pass it as an argument to the “hobbies.push()” method:
hobbies.push(['Cycling', 6]);
console.table(hobbies);
When the given “hobbies.push()” gets executed, it will add the specified sub-array at the end of the “hobbies” array:
![]() Whereas, to insert a sub-array in the middle of other inner arrays, utilize the “splice()” method in the following way:
hobbies.splice(1, 0, ['Singing', 3]);
console.table(hobbies);
Here, the “hobbies.splice()” method will overwrite the “hobbies” array and add the “[‘Singing’, 3]” sub-array at the second position:
Whereas, to insert a sub-array in the middle of other inner arrays, utilize the “splice()” method in the following way:
hobbies.splice(1, 0, ['Singing', 3]);
console.table(hobbies);
Here, the “hobbies.splice()” method will overwrite the “hobbies” array and add the “[‘Singing’, 3]” sub-array at the second position:
![]() Till this point, we have learned the procedure to create a nested array and add elements to it.
In the next section, we will talk about iterating over the elements of a nested array.
Till this point, we have learned the procedure to create a nested array and add elements to it.
In the next section, we will talk about iterating over the elements of a nested array.
How to iterate over the elements of nested array
You may know that the JavaScript “for” loop is primarily utilized to iterate over the elements of an array.
However, as in our case, we have a “nested” array, so we will add two “for” loops nested within the other.
Example: How to iterate over the elements of nested array
The first loop “for” loop will iterate over the outer array elements according to its size and its nested “for” loop will perform the iteration over the inner sub-arrays:
for (leti = 0; i<hobbies.length; i++) {
varinnerArrayLength = hobbies[i].length;
for (let j = 0; j <innerArrayLength; j++) {
console.log('[' + i + ',' + j + '] = ' + hobbies[i][j]);
}}
The specified iteration operation will display all of the elements of the "hobbies” nested array:
![]() You can also use the “ForEach()” method for the same purpose.
You can also use the “ForEach()” method for the same purpose.
How to flatten a nested array
There are certain scenarios in which you may need to create an array that comprises all of the nested JavaScript array elements in their original order.
If that’s the case, then flatten the created nested array to reduce its dimensionality.
The “Array.flat()” method is embedded in ES6, which assists in flattening a nested JavaScript Array.
This method returns a new array after concatenating all of the sub-arrays elements.
Example: How to flatten a nested array
For instance, to flatten the “hobbies” array, we will execute the following code in the console window:
const flatArray= hobbies.flat();
console.log(flatArray);
The given “hobbies.flat()” method will reduce the dimensionality of the “hobbies” array and flatten the elements of the inner array:
![]()
How to delete elements of nested array
To remove elements from any sub-arrays of a nested array, use the “pop()” method.
The “pop()” method typically deletes the last inner-array from a nested array; however, it also helps in removing elements from inner arrays.
Example: How to delete elements of nested array
Before utilizing the “pop()” method, we have the following sub-arrays in the “hobbies” nested array:
![]() Now when we invoke the “pop()” method, the last sub-array will be deleted along with its elements:
hobbies.pop();
console.table(hobbies);
Output
Now when we invoke the “pop()” method, the last sub-array will be deleted along with its elements:
hobbies.pop();
console.table(hobbies);
Output
![]() To remove the second element of each “sub-array”, we will iterate through the “hobbies” array using the “forEach()” method, and at each iteration the “pop()” method deletes the element positioned at the first index:
hobbies.forEach((hobby) => {
hobby.pop(1);});
console.table(hobbies);
It can be seen in the below-given output that the element representing the maximum number of hours spent on each hobby is deleted for all sub-arrays:
To remove the second element of each “sub-array”, we will iterate through the “hobbies” array using the “forEach()” method, and at each iteration the “pop()” method deletes the element positioned at the first index:
hobbies.forEach((hobby) => {
hobby.pop(1);});
console.table(hobbies);
It can be seen in the below-given output that the element representing the maximum number of hours spent on each hobby is deleted for all sub-arrays:
![]() We have compiled all essential information related to the working of nested arrays.
You can further explore them according to your preferences.
We have compiled all essential information related to the working of nested arrays.
You can further explore them according to your preferences.
Conclusion
When an inner array or sub-array is added to an outer array, it is called a nested array.
After creating a JavaScript nested array, you can use the “push()” and “splice()” method for adding elements, “for loop” and “forEach()” method to iterate over the elements of the inner arrays, “flat()” method for reducing the dimensionality, and “pop()” method to delete sub-arrays or their elements from the nested arrays.
This write-up explained the working of nested loops.
Case Statement
JavaScript supports various conditional statements for making decisions at runtime, such as “if-else” and “Switch Case Statements“; however, under some specific conditions, utilizing Switch Case Statements instead of “if-else” statements is considered more convenient.
For instance, you need to test a variable for thousands of distinct values and then operate based on test results.
In this scenario, usage of the “if-else” statement is less efficient than Switch Case Statements.
So, to evaluate an expression for multiple cases, it is better to use Switch Case Statement as it also increases the code readability.
This write-up will discuss the working and usage of Switch Case Statement with the help of suitable examples.
Working of Switch Case Statement
The below-given flow-chart illustrates the working of the Switch Case Statement:
![]() When a Switch Case Statement is added, it performs the execution in the following steps:
First, the statement followed by the “switch” word is evaluated.
In the next step, the evaluation result is “strictly” compared to the “values” of the added “cases”, one by one from top to bottom.
When the result of the expression gets matched with the value of any “case“, the statements added in its code block will be executed, and the “break” keyword breaks the execution flow of the switch statement.
Lastly, the “default” case code block is executed when the results of expression evaluation do not match with any of the specified cases.
Now, check out the syntax of the Switch Case Statement, as it will help in implementation.
Syntax
switch (expression) {
casea:
//code block of case a
break;
caseb:
//code block of case b
break;
casec:
//code block of case c
break;
default:
//code block of default case
break;}
Here, “expression” is the condition which will be evaluated, “case” keyword is utilized for defining the cases followed by their values, “break” keyword is added to break the control flow of the Switch Case statement, and the “default” statement is “optional” case which will be executed when the Switch case expression is evaluated as “false”.
Now, let’s check out some examples related to Switch Case Statement.
When a Switch Case Statement is added, it performs the execution in the following steps:
First, the statement followed by the “switch” word is evaluated.
In the next step, the evaluation result is “strictly” compared to the “values” of the added “cases”, one by one from top to bottom.
When the result of the expression gets matched with the value of any “case“, the statements added in its code block will be executed, and the “break” keyword breaks the execution flow of the switch statement.
Lastly, the “default” case code block is executed when the results of expression evaluation do not match with any of the specified cases.
Now, check out the syntax of the Switch Case Statement, as it will help in implementation.
Syntax
switch (expression) {
casea:
//code block of case a
break;
caseb:
//code block of case b
break;
casec:
//code block of case c
break;
default:
//code block of default case
break;}
Here, “expression” is the condition which will be evaluated, “case” keyword is utilized for defining the cases followed by their values, “break” keyword is added to break the control flow of the Switch Case statement, and the “default” statement is “optional” case which will be executed when the Switch case expression is evaluated as “false”.
Now, let’s check out some examples related to Switch Case Statement.
Example 1: How to use Switch Case Statement with “break” keyword
First of all, we will create a variable named “a” and initialize it with the value “2”:
var a = 2;
In the next step, the variable “a” is passed to the Switch Case Statement as an “expression,” and the Switch Case Statement will compare the value of the variable “a” with all of the added cases:
switch (a) {
case0:
console.log("Number is Zero");
break;
case1:
console.log("Number is One");
break;
case2:
console.log("Number is Two");
break;
default:
console.log("Number is Not Zero, One or Two");}
As the value of the variable “a” matched with the “case 2“, its related code block will be executed, and the program will output “Number is Two” to the console window and get out of the case statement:
![]() In another case, if the variable value does not match with any of the specified cases, then JavaScript will execute the statements added in the “default” case.
For instance, in the below-given example, the value of the variable “a” is set to “10,” which will not match with the value of the added switch cases:
var a = 10;switch (a) {
case0:
console.log("Number is Zero");
break;
case1:
console.log("Number is One");
break;
case2:
console.log("Number is Two");
break;
default:
console.log("Number is Not Zero, One or Two");}
So, the Switch case statement will execute the code block of the “default” case:
In another case, if the variable value does not match with any of the specified cases, then JavaScript will execute the statements added in the “default” case.
For instance, in the below-given example, the value of the variable “a” is set to “10,” which will not match with the value of the added switch cases:
var a = 10;switch (a) {
case0:
console.log("Number is Zero");
break;
case1:
console.log("Number is One");
break;
case2:
console.log("Number is Two");
break;
default:
console.log("Number is Not Zero, One or Two");}
So, the Switch case statement will execute the code block of the “default” case:
![]()
Example 2: How to use Switch Case Statement without “break” keyword
If you have not added the “break” keyword, then the JavaScript will first execute the case, where the specified value gets matched, and after that, it will run all of the other cases even if the criteria are not met.
For instance, the “break” keyword is missing in the case statement of the below-given program:
var a = 2;switch (a) {
case0:
console.log("Number is Zero");
case1:
console.log("Number is One");
case2:
console.log("Number is Two");
case3:
console.log("Number is Three");
default:
console.log("Number is Not Zero, One or Two");}
In this scenario, the Switch Case Statement will sequentially match the value of the variable “a” with all cases until it reaches the “case 2”; as the “break” keyword is missing so after executing the code block of “case 2”, JavaScript will not break the execution control and then run the next cases:
![]()
Example 3: How to use Switch Case Statement with multiple criteria
There exists a chance that you have to perform similar operations for multiple cases.
In such a situation, instead of writing the same code block for each “case” again and again, exclude the “break” keyword and write out that particular operation for a group of cases in the following way:
const a= "4";switch (a) {
case"1":
case"2":
case"3":
case"4":
console.log("Number is less than 5");
break;
case"Number is 5":
default:
console.log("Number is not valid");}
The above-given program will print out the statement “Number is less than 5” if the value of the variable “a” matched with the case “1”, “2”, “3”, or “4”:
![]() We have provided the essential information related to the case statement.
You can further research it according to your requirements.
We have provided the essential information related to the case statement.
You can further research it according to your requirements.
Conclusion
The Switch Case Statement is utilized for executing one code block if the specified criteria is satisfied.
It is primarily utilized for performing operations based on different conditions.
Switch Case Statement works similar to the “if-else” conditionals; however, the usage of switch case maintains the code readability.
This write-up discussed the working of Case Statements with the help of suitable examples.
JavaScript Recursive Function
Recursion is a problem-solving approach in which you define a function that keeps invoking itself until it reaches the required outcome.
Recursion is a good way to go when you need to call the same function multiple times with different parameters.
It can be utilized in several situations; however, it excels at sorting, fractal math, and traversing non-linear data structures.
JavaScript Recursive functions are also straightforward to utilize because they are simple to construct, with a consistent and specific return value for the specified input, and do not affect external variables’ state.
This write-up will explain the working of JavaScript Recursive Function with the help of suitable examples.
So, let’s start!
JavaScript Recursive Function
A JavaScript “Recursive function” is a function that invokes itself, either directly or indirectly.
With the help of recursion, a specific problem can be solved by returning the value call of the same function.
Also, at some point, the recursive function must be terminated.
Internal conditions are frequently used to return a recursive function, which sends the logic down to a new iteration until the “base case” or base condition is satisfied.
Now, let’s understand what is a base case in the JavaScript recursive function.
Base case Recursive Function
The base case of a recursive function is an iteration that does not require any further recursion to solve a problem.
A JavaScript recursive function must have a base case; without it, a recursive function will never end, resulting in an infinite loop.
Syntax of JavaScript Recursive Function
function recurseFunc() {//definition of recurseFunc()
recurseFunc();}
recurseFunc();
Here, in the above-given syntax, the “recurseFunc()” is a JavaScript Recursive Function which invokes itself inside its body.
Working of JavaScript Recursive Function
The goal of a JavaScript recursive function is to break down the main task into smaller segments or sub-tasks until a sub-task fails to meet the specified condition and does not enter into any other code block written within the recursive function.
In JavaScript, it is not essential to only use looping statements for implementing recursion; instead, conditional blocks such as the “if-else” statement can be utilized for the same purpose.
We will now check out some examples of implementing recursive functions.
Example 1: Using JavaScript Recursive Function
In the following program, a recursive function is defined named “counter()”.
This “counter()” function will count the number till “5”:
function counter(x) {
console.log(x);const num= x + 1;if (num< 6) {
counter(num);}}
The “counter()” function will call itself until the base case “num < 6” meets:
counter(1);
Execution of the above-given code will print out numbers from “1” to “5”:
![]()
Example 2: Using JavaScript Recursive Function
The following program will recursively call the function “power()” for calculating the power of “2”, “4” times which will generate “16”.
Here, when the “power()” function is invoked, the execution block will divide into two parts based on the added conditional “if-else” statement.
The “if” condition will check if the second number “y” equals “1”, and the “else” part refers to the operation of multiplying the first number “x” with the value returned by the “power(x, y – 1)” function:
function power(x,y) {if (y == 1) {return x;}else {return x * power(x, y - 1);}}
console.log(( power(2, 4)));
As you can see from the output, we have successfully implemented the recursive function for calculating the “2” power “4,” which result in the value “16”:
![]()
When to use JavaScript Recursive Function
Here is the list of some of the situations where you can use JavaScript Recursive Function:
To resolve problems related to iterative branching such as binary search, traversal, sorting, or any other data structure, the usage of the recursive function is proved to be most effective and appropriate.
JavaScript recursive functions are useful when it is required to call the same function multiple times while passing different arguments within a loop.
For instance, you have to implement the Fibonacci series or calculate the factorial of a large number, then utilize the recursive function to solve the problem without any hassle.
When to avoid JavaScript Recursive Function
Under the following circumstances, you should avoid using JavaScript Recursive Function:
When an issue is too minor to be handled with just a few lines of basic code, one should avoid using Recursion to solve it.
The reason is that the JavaScript recursive function will keep invoking itself till it meets the base case.
As a result, the recursive function unnecessarily uses a significant amount of memory.
It is also possible that if recursion is overused, the entire program will become infinite, and there will be no other option for its termination.
So, you have to carefully use the recursion with correctness only where needed.
That was all essential information related to JavaScript Recursive Function.
You can further explore it according to your preferences.
Conclusion
A JavaScript Recursive function is a type of function that invokes itself, either directly or indirectly.
With the help of recursion, a specific problem can be solved by returning the value call of the same function.
A JavaScript recursive function must have a base case; without it, a recursive function will never end, resulting in an infinite loop.
This write-up explained JavaScript Recursive Function with the help of suitable examples.
How to convert array to string
JavaScript arrays are widely utilized in our day-to-day programming as they are the most flexible data structures.
Also, with the help of predefined methods, arrays can be converted to a string for performing the required manipulation.
For instance, you have to use the array elements as a CSV string separated by commas, or you want to display the array elements as text.
In such scenarios, it is preferred to convert that specific JavaScript array into a string.
This write-up will explain different methods for an array to string conversion.
So, let’s start!
How to convert array to string
To convert array to string, you can follow any of the below-given approaches:
Using toString() method
Using concat() method
Using toLocaleString() method
Using join() method
Using Type Coercion
We will explain each of the methods mentioned above in the next sections.
Using toString() method for array to string conversion
The JavaScript built-in “toString()” method assists in converting various data types into a string.
More specifically, we can use it to convert an array to a string.
This method outputs a string that comprises all array elements that are separated by commas.
Syntax
array.toString();
Here, the “toString()” method converts the “array” and returns its text representation as “string”.
Example
To demonstrate the usage of the JavaScript “toString()” method, firstly, we will create an array named “seasons” having the following elements:
const seasons= ['summer', 'winter', 'autumn'];
Next, we will utilize the “toString()” method for converting “seasons” array into a string:
seasons.toString();
Execution of the given code will return a “string” after conversion:
![]()
Using concat() method for array to string conversion
In JavaScript, the “concat()” method is primarily used for concatenating multiple strings.
However, it can also be utilized for converting the specified array to a string.
For this purpose, you have to concatenate the array elements with an empty string “ “.
Syntax
string = " ".concat(array);
In the above syntax, the “concat()” method concatenates the elements of the “array” with the empty string “ “ and returns the resultant “string”.
Example
The following example will convert the “seasons” array to a string by using the JavaScript “concat()” method:
string = " ".concat(seasons);
console.log(string);
As you can see in the output, the “concat()” method returned the converted “string” after concatenating “seasons” array elements with an empty string:
![]()
Using toLocaleString() method for array to string conversion
The “toLocaleString()” method is utilized for converting a number into a special type of numeric representation based on the browser’s language settings.
Additionally, this method is also used for an array to string conversion.
The “toLocaleString()” method is considered the “localized version” of the “toString()” method.
Syntax
array.toLocaleString()
The “toLocaleString()” method returns a string after converting an array to it.
Example
We will now use the JavaScript “toLocaleString()” method for converting the “seasons” array to a string:
seasons.toLocaleString()
Here is the string returned by the “toLocateString()” method:
![]()
Using join() method for array to string conversion
“join()” is another JavaScript method that offers the functionality of converting an array to a string.
This method converts all array elements to a string and concatenates them according to the “delimiter” passed as an argument.
If the “join()” method is invoked without any argument, then by default, values in the resultant string will be separated by commas.
Syntax
array.join("delimiter")
Here, the JavaScript “join()” method will convert “array” and return a “string” separated by the specified “delimiter”.
Example
In the following example, we have not passed any “delimiter“, so in the resultant string, the array elements will be separated by commas:
seasons.join()
Output
![]() In the other case, specifying the hyphen “-” as “delimiter” will yield different results:
seasons.join("-")
Output
In the other case, specifying the hyphen “-” as “delimiter” will yield different results:
seasons.join("-")
Output
![]()
Using Type Coercion for array to string conversion
“Type Coercion” is a methodology which converts a value from one data type to another.
JavaScript supports two types of coercion, “Explicit” and “Implicit” coercion.
In Implicit coercion, any JavaScript operator such as “+” or “-” is applied for the conversion purpose; whereas, when you use some JavaScript functions such as “Number()”, “String()”, they explicitly coerce the value to the required type.
If you want to explicitly convert an array to string, then go for the “String()” method; otherwise, an array can be implicitly converted by utilizing the “+” operator.
Syntax of explicit coercion
string= String(array)
Syntax of implicit coercion
string= " " + array
Example 1
The below-given example utilizes the “String()” method to explicitly convert the “seasons” array to string:
var string1= String(seasons);
console.log(string1);
Output
![]() Example 2
With the help of the concatenation operator “+”, we will now concatenate the “seasons” array with an empty string “ “:
var string2= " " + seasons;
console.log(string2);
Output
Example 2
With the help of the concatenation operator “+”, we will now concatenate the “seasons” array with an empty string “ “:
var string2= " " + seasons;
console.log(string2);
Output
![]() We have compiled different methods for converting an array to string.
Utilize any of the given methods according to your preferences.
We have compiled different methods for converting an array to string.
Utilize any of the given methods according to your preferences.
Conclusion
Using toString(), concat(), toLocaleString(), join() methods, and Type Coercion, you can easily convert an array to string in JavaScript.
The JavaScript toString() method directly converts an array to string, and toLocateString() method implicitly uses it for the same purpose.
In contrast, the concat() method and the concatenation operator “+” Concatenates the specified array with an empty string.
This write-up discussed different methods for converting an array to a string.
How does date parsing work
“Date Parsing” is the procedure in which we convert one data type into another.
For instance, in a JavaScript program, you have to convert a string comprising a “date” value to a date object.
This date parsing operation can be performed by utilizing the “Date.parse()” method.
After parsing the string value to date, the resultant value can be utilized in other coding tasks such as comparing, adding, or subtracting two date values.
This write-up will discuss the working of date parsing in JavaScript with the help of appropriate examples.
So, let’s start!
How does date parsing work
In JavaScript, the “Date.parse()” method is used to parse a “date” string and returns the number of “milliseconds” between the specified argument value and the “January 1, 1970” Unix epoch.
In case the added value is a non-valid string, then the “Date.parse()” method will return “NaN” (Not a Number).
Syntax
Date.parse(string);
Here, the “Date.parse()” method will parse the “string” and return the corresponding “milliseconds” value.
We will now provide some examples to demonstrate how date parsing works.
Example 1
First of all, we will parse a string value “February 22, 2022” using the “Date.parse()” method and store the resultant value in the variable “ms”:
let ms = Date.parse("February 22, 2022");
console.log("Number of milliseconds: "+ms);
The given “Date.parse()” method will return the time difference between the specified value and the “January 1, 1970” date in “milliseconds”:
![]() Example 2
The JavaScript “Date.parse()” method also permits you to parse a string that comprises the date and time in hours and minutes.
For instance, in the below-given example, we will pass the string “February 22, 2022 10:10 AM” as an argument to the “Date.parse()” method:
let ms = Date.parse("February 22, 2022 10:10 AM");
console.log("Number of milliseconds: "+ms);
As you can see, the output shows the parsed data string as “1645506600000” milliseconds:
Example 2
The JavaScript “Date.parse()” method also permits you to parse a string that comprises the date and time in hours and minutes.
For instance, in the below-given example, we will pass the string “February 22, 2022 10:10 AM” as an argument to the “Date.parse()” method:
let ms = Date.parse("February 22, 2022 10:10 AM");
console.log("Number of milliseconds: "+ms);
As you can see, the output shows the parsed data string as “1645506600000” milliseconds:
![]() You can also verify that the number of milliseconds returned by the “Date.parse()” method represents the passed date “string“.
For this purpose, create a “date” object while passing the retrieved “milliseconds”:
var date = new Date(ms);
Then, invoke the “date.toString()” method to convert the value of the date object to a string:
console.log("String to date conversion results: "+date.toString());
The execution of the above-given “date.toString()” method signifies that the converted value and the specified string are the same:
You can also verify that the number of milliseconds returned by the “Date.parse()” method represents the passed date “string“.
For this purpose, create a “date” object while passing the retrieved “milliseconds”:
var date = new Date(ms);
Then, invoke the “date.toString()” method to convert the value of the date object to a string:
console.log("String to date conversion results: "+date.toString());
The execution of the above-given “date.toString()” method signifies that the converted value and the specified string are the same:
![]() Example 3
In this example, we will add the hours, minutes as well as seconds with the date value and pass it to the “Date.parse()” method:
let ms = Date.parse("February 22, 2022 09:07:10 AM");
console.log("Number of milliseconds: "+ms);
The “Date.parse()” method will also consider the seconds while calculating the difference between it and the “January 1, 1970 00:00:00 AM”:
Example 3
In this example, we will add the hours, minutes as well as seconds with the date value and pass it to the “Date.parse()” method:
let ms = Date.parse("February 22, 2022 09:07:10 AM");
console.log("Number of milliseconds: "+ms);
The “Date.parse()” method will also consider the seconds while calculating the difference between it and the “January 1, 1970 00:00:00 AM”:
![]() Example 4
Using “Date.parse()” method, we will now parse a string that comprises a date value and time in “UTC” format:
let ms = Date.parse("February 22, 2022 09:07:10 AM UTC");
console.log("Number of milliseconds: "+ms);
Output
Example 4
Using “Date.parse()” method, we will now parse a string that comprises a date value and time in “UTC” format:
let ms = Date.parse("February 22, 2022 09:07:10 AM UTC");
console.log("Number of milliseconds: "+ms);
Output
![]() Example 5
If you have passed an invalid date string, then the return case of the JavaScript “Date.parse()” method will be set to “NaN” (Not a Number):
let ms = Date.parse("linuxhint");
console.log(ms);
Output
Example 5
If you have passed an invalid date string, then the return case of the JavaScript “Date.parse()” method will be set to “NaN” (Not a Number):
let ms = Date.parse("linuxhint");
console.log(ms);
Output
![]() That was all essential information related to parsing date.
You can further research according to your requirements.
That was all essential information related to parsing date.
You can further research according to your requirements.
Conclusion
In JavaScript, the “Date.parse()” method is used to parse a “date” string and returns the number of “milliseconds” between the specified argument value and the “January 1, 1970” Unix epoch.
In case the added value is a non-valid string, then the “Date.parse()” method will return “NaN” (Not a Number).
This write-up discussed the working of date parsing using some appropriate examples.
Hash Tables | Explained
Data structures are utilized in computer programming to organize data and apply algorithms for coding.
Therefore, understanding data structures and algorithms is beneficial for problem-solving and is required to pass coding interviews.
This write-up will discuss one such top data structure known as “Hash Table” that is considered ideal for storing a large amount of data.
Hash Tables can be also used for unique data representation, database indexing, searching in unsorted or sorted arrays.
Now, let’s dive deep into the working and implementation of Hash Tables.
Hash tables
In JavaScript, a “hash table” is a data structure that can be utilized to map keys to their specified values.
It is also known as a “hash map“.
Hash tables efficiently perform the insertion and deletion operation for a key-value pair and search the value of a key within a hash table.
Components of Hash Tables
There exist two components of Hash tables: an “Object” and a “Hash Function”:
Object: An object contains the hash table in which the data is stored.
It holds all the “key-value” pairs of the hash table.
Also, its size should be determined by the size of expected data.
Hash Function: A Hash Function is defined for a hash table to find out the “index” of the given key-value pair.
This function accepts a “key” as an input and then assigns a specific “index” and sets that as the return case.
Till this point, you have understood the concept of Hash Tables.
Now, let’s head towards its implementation side.
How to implement Hash Tables
For the basic implementation of hash tables, you need to perform these three operations:
Firstly, create a class for the hash table.
Define a hash function.
Define a method for adding key-value pairs for the hash tables.
We will step into the first operation and create a “HashTable” class in our JavaScript program.
Step 1: Create a class for the hash table
Our “HashTable” class comprises a the following “constructor”, in which we have declared an “object”, its “length”, and the hash table “size”:
class HashTable {
constructor() {
this.object= {};
this.size = 0;
this.length = 0;
}}
Step 2: Define a hash function
In the next step, we will define a “hashFunc()” hashing function that accepts “key” as an argument and calculates its “arithmetic modulus” and return the resultant value:
hashFunc(key) {
return key.toString().length % this.size;
}
In our “HashTable” class, we will now add a function named “addPair()” for adding the key-value pairs to the hash table.
Step 3: Define a method for adding key-value pairs for the hash tables
In the following “addPair()” function, the first operation which is going to be performed is the calculation of “hash” for the key specified as an argument, with the help of the “hashFunc()” function.
Next, an “if” condition verifies if the calculated “hash” does not already exist in the “object”, then stores the hash to it.
After doing so, the stored “hash” will be tested that if it does not contains any “key”, then increment the length “object” and add the “key-value” pair to the hash table object:
addPair(key, value) {
const hash = this.hashFunc(key);
if (!this.object.hasOwnProperty(hash)) {
this.object[hash] = {};
}
if (!this.object[hash].hasOwnProperty(key)) {
this.length++;
}
this.object[hash][key] = value;}
Want to search for a key in the hash table? For this purpose, you have to define a “searchFunction()” in your “HashTable” class.
This “searchFunction()” will accept a “key” as an argument and calculate its “hash” by utilizing the “hashFunc()” hashing function.
After that, an “if” condition is added in the “searchFunction()” which validates if the hash table “object” has the calculated “hash” and the specified “key” exists for that “hash”.
So, in case the added “if” statement evaluates to be “truthy”, then the stored value for the passed argument will be returned:
searchFunction(key) {
const hash = this.hashFunc(key);
if (this.object.hasOwnProperty(hash) && this.object[hash].hasOwnProperty(key)) {
return this.object[hash][key];
} else {
return null;
}
}
![]() Add all of the above-given functions in your “HashTable” class and then create an instance to use the defined functions:
const hashtable = new HashTable();
Now, we will add the following three “key-value” pairs in our created “hashtable” object:
hashtable.addPair("Alex", "01");
hashtable.addPair("Stepheny", "23");
hashtable.addPair("Max", "90");
Lastly, we will utilize the “searchFunction()” to find the value of the “Stepheny” key:
console.log(hashtable.searchFunction("Stepheny"));
The given output signifies that we have successfully retrieved the value of the specified key from the hash table:
Add all of the above-given functions in your “HashTable” class and then create an instance to use the defined functions:
const hashtable = new HashTable();
Now, we will add the following three “key-value” pairs in our created “hashtable” object:
hashtable.addPair("Alex", "01");
hashtable.addPair("Stepheny", "23");
hashtable.addPair("Max", "90");
Lastly, we will utilize the “searchFunction()” to find the value of the “Stepheny” key:
console.log(hashtable.searchFunction("Stepheny"));
The given output signifies that we have successfully retrieved the value of the specified key from the hash table:
![]() That was all of the essential information related to Hash Tables.
You can further research according to your requirements.
That was all of the essential information related to Hash Tables.
You can further research according to your requirements.
Conclusion
Hash Table in JavaScript is a data structure that can be utilized to map keys to their specified values.
It is mainly based on two components: an Object and a Hash Function, where the object contains the hash table in which the data is stored and holds all the “key-value” pairs of the hash table, and the Hash Function is used to determine the “index” of the specified key-value pair.
This write-up discussed the concept of Hash Tables.
JavaScript Math.abs() Method | Explained
While programming, you may face the situation where it is required to only use positive numbers.
For instance, when the program is about solving inequalities, or any problem related to finding distance.
In such scenarios, you can save your precious time and effort by simply invoking the JavaScript “Math.abs()” method and getting the “absolute” value of the specified number.
Don’t know anything about the JavaScript “Math.abs()” method? No worries! This write-up will guide you related to the working of the “Maths.abs()” method.
So, let’s start!
JavaScript Math.abs() method
The JavaScript “Math.abs()” method can be utilized to retrieve the absolute value of a number that refers to its distance from the “0” on the number line.
“Math.abs()” is a static method of the JavaScript “Math” class, so you should add “Math” as a prefix to execute it.
Syntax
Math.abs(x)
Here, the “Math.abs()” method returns the absolute value of the “x” argument.
Now, let’s check out some examples to understand the working of the JavaScript Math.abs() method.
Example 1
When a positive number is specified as an argument to the JavaScript “Math.abs()” method, it will return the number itself.
For instance, we have passed “3” as an argument in the following “Math.abs()” method:
console.log(Math.abs(3));
As the value is “non-negative”, the “Math.abs()” will return the value as it is:
![]() Example 2
For a “negative” number, the “Maths.abs()” method performs the negation and return the absolute value:
console.log(Math.abs(-3));
The above-give “Maths.abs()” method will output the absolute value of “-3” as “3”:
Example 2
For a “negative” number, the “Maths.abs()” method performs the negation and return the absolute value:
console.log(Math.abs(-3));
The above-give “Maths.abs()” method will output the absolute value of “-3” as “3”:
![]() Example 3
For a numeric single element array, the “Math.abs()” method sets the absolute value of the added element as its return case:
console.log(Math.abs([-10]));
Output
Example 3
For a numeric single element array, the “Math.abs()” method sets the absolute value of the added element as its return case:
console.log(Math.abs([-10]));
Output
![]() Example 4
In case the accepted argument is a numeric string such as “-23”, then the JavaScript “Math.abs()” method will return the absolute value of the number present within the string:
console.log(Math.abs("-23"));
Execution of the given statement will display “23” as the absolute value of “-23”:
Example 4
In case the accepted argument is a numeric string such as “-23”, then the JavaScript “Math.abs()” method will return the absolute value of the number present within the string:
console.log(Math.abs("-23"));
Execution of the given statement will display “23” as the absolute value of “-23”:
![]() Example 5
In the following example, we will execute the JavaScript “Math.abs()” method for a non-numeric string which will result “NaN” (Not a Number):
console.log(Math.abs("linuxhint"));
Output
Example 5
In the following example, we will execute the JavaScript “Math.abs()” method for a non-numeric string which will result “NaN” (Not a Number):
console.log(Math.abs("linuxhint"));
Output
![]() Example 6
As the value “undefined” is also a non-numeric argument, so upon executing the “Math.abs()” method, the result will be shown as “NaN”:
console.log(Math.abs(undefined));
Output
Example 6
As the value “undefined” is also a non-numeric argument, so upon executing the “Math.abs()” method, the result will be shown as “NaN”:
console.log(Math.abs(undefined));
Output
![]() Example 7
The JavaScript “Maths.abs()” method only works for a non-numeric single element array.
That’s the reason if the specified array comprises more than one element, “Math.abs()” method will not process it and return “NaN”:
console.log(Math.abs([4, 5, 7]));
Output
Example 7
The JavaScript “Maths.abs()” method only works for a non-numeric single element array.
That’s the reason if the specified array comprises more than one element, “Math.abs()” method will not process it and return “NaN”:
console.log(Math.abs([4, 5, 7]));
Output
![]() Example 8
When an empty string “” is passed as an argument, the JavaScript “Math.abs()” method return “0” as the absolute value:
console.log(Math.abs(""));
Output
Example 8
When an empty string “” is passed as an argument, the JavaScript “Math.abs()” method return “0” as the absolute value:
console.log(Math.abs(""));
Output
![]() Example 9
Also, for “null” objects, the return case of the “Math.abs()” method is set to “0”:
console.log(Math.abs(null));
Output
Example 9
Also, for “null” objects, the return case of the “Math.abs()” method is set to “0”:
console.log(Math.abs(null));
Output
![]() Example 10
Similarly, if an empty array “[]” is specified as an argument for the “Maths.abs()” method, then it will return “0”:
console.log(Math.abs([]));
Output
Example 10
Similarly, if an empty array “[]” is specified as an argument for the “Maths.abs()” method, then it will return “0”:
console.log(Math.abs([]));
Output
![]() That was essential information about the JavaScript Math.abs() method.
You can further research according to your preferences.
That was essential information about the JavaScript Math.abs() method.
You can further research according to your preferences.
Conclusion
The JavaScript Math.abs() method can be utilized to get the absolute value of a number that refers to its distance from the “0” on the number line.
For positive, negative numbers, number single element arrays, and numeric strings, the JavaScript Maths.abs() method returns their absolute value, whereas, for non-numeric arguments, it sets its return case as NaN or zero, depending upon the passed value.
This write-up discussed the working of the JavaScript Math.abs() method.
Different ways to convert object to string
Have you ever encountered a situation where you want to send some data to the web server that is in object format? If yes, first convert it to a string and then head towards the mentioned operation.
With the help of JavaScript methods, an object can be converted to a string without any hassle.
Don’t know the method of converting an object to string in JavaScript? No worries! This write-up will explain different ways for an object to string conversion.
So, let’s start!
Different ways to convert object to string
To perform the object to string conversion, you can follow any of the below-given approaches:
Using JSON.Stringify() method
Using toString() method
Using String() function
We will explain each of the methods mentioned above in the next sections.
Method 1: Converting object to string using JSON.stringify() method
“Stringification” is the process of converting a JavaScript object to a string.
This operation is performed when you want to serialize data to string for sending it to some web server or storing it in a database.
According to the JavaScript standard, the “JSON.stringify()” method is utilized to convert the specified object into a string with the help of Stringification.
Syntax
JSON.stringify(value, replacer, space)
Here, “value” refers to the “object” that needs to be converted into “string”, “replacer” is an optional parameter that represents a modification function or an array used as a filter, and “space” is another optional parameter that is utilized for controlling the space sequence in the final string.
Example
First of all, we will create an “employee” object having the following key-value pairs:
const employee= {
name: 'Max',
age: 25}
In the next step, we will check the initial “type” of the “employee” object:
console.log("Type of employee: " +typeof(employee));
The given output signifies that “employee” is of “object” type:
![]() Then, we will use the “JSON.stringify()” method for converting the “employee” object to “string”:
const string = JSON.stringify(employee);
console.log(string);
After conversion, we will again check the type by utilizing the “typeof” operator:
console.log("Type after conversion: " +typeof(string));
As you can see from the output, we have successfully converted the “employee” object to “string”:
Then, we will use the “JSON.stringify()” method for converting the “employee” object to “string”:
const string = JSON.stringify(employee);
console.log(string);
After conversion, we will again check the type by utilizing the “typeof” operator:
console.log("Type after conversion: " +typeof(string));
As you can see from the output, we have successfully converted the “employee” object to “string”:
![]()
Method 2: Converting object to string using toString() method
JavaScript also offers a built-in method primarily utilized for explicitly converting a data type into a string.
The “toString()” method returns the string representation of a number, an array, or a JavaScript object, whereas in the case of the object to string conversion; you have to override the “toString()” method so that it can print out the values of the object’s keys.
Syntax
object.toString()
Here, the “toString()” method converts the “object” and outputs the respective string.
Example
We will now use the “toString()” method to convert the “employee” object to a “string”:
const string = employee.toString();
console.log(string);
console.log("Type after conversion: " +typeof(string));
The output of the given program will print out “[object, Object]” and its type as “string”:
![]() However, you can override the “toString()” method to return the values of the object properties in a string format.
In the below-given program, the “Employee” object will override the “toString()” method which is inherited from the “Object” base class.
This user-defined “toString()” method will return a string containing the values of the “name” and “age” properties of the created “employee” object:
function Employee(name, age) {this.name= name;this.age = age;}
Employee.prototype.toString = function () {return 'Employee Name: '+this.name + ' Age: '+ this.age;}
employee = new Employee('Max', 35);var string = employee.toString();
console.log(string);
console.log("Type after conversion: " +typeof(string));
Now, when the “toString()” method is invoked, it will display the values of the “employee” object properties as string:
However, you can override the “toString()” method to return the values of the object properties in a string format.
In the below-given program, the “Employee” object will override the “toString()” method which is inherited from the “Object” base class.
This user-defined “toString()” method will return a string containing the values of the “name” and “age” properties of the created “employee” object:
function Employee(name, age) {this.name= name;this.age = age;}
Employee.prototype.toString = function () {return 'Employee Name: '+this.name + ' Age: '+ this.age;}
employee = new Employee('Max', 35);var string = employee.toString();
console.log(string);
console.log("Type after conversion: " +typeof(string));
Now, when the “toString()” method is invoked, it will display the values of the “employee” object properties as string:
![]()
Method 3: Converting object to string using String() function
“String()” is another built-in JavaScript function that can be used for converting the value of an object to string.
This function accepts a JavaScript “object” as an argument and converts it to the corresponding string.
Syntax
String(object)
Here, the “String()” function converts the added “object” to its corresponding “string”.
Example
In the below-given example, we will invoke the “String()” function to convert the “employee” object into a “string”:
var string = String(employee);
console.log(string);
console.log("Type after conversion: " +typeof(string));
Execution of the above-given code will display the “string” as “[object Object]” and its type as “string”:
![]() Similar to “toString()” method, we have to override the “String()” function to return the values of the “employee” object properties as a “string”:
function Employee(name, age) {this.name= name;this.age = age;}
Employee.prototype.String = function () {return 'Employee Name: '+this.name + ' Age: '+ this.age;}
employee = new Employee('Max', 35);var string = employee.String();
console.log(string);
console.log("Type after conversion: " +typeof(string));
The below-given output signifies that now the converted string comprises the values of the “employee” object properties:
Similar to “toString()” method, we have to override the “String()” function to return the values of the “employee” object properties as a “string”:
function Employee(name, age) {this.name= name;this.age = age;}
Employee.prototype.String = function () {return 'Employee Name: '+this.name + ' Age: '+ this.age;}
employee = new Employee('Max', 35);var string = employee.String();
console.log(string);
console.log("Type after conversion: " +typeof(string));
The below-given output signifies that now the converted string comprises the values of the “employee” object properties:
![]() We have compiled different methods for converting an object to string.
You can use any of them according to your requirements.
We have compiled different methods for converting an object to string.
You can use any of them according to your requirements.
Conclusion
The JSON.stringify() method, toString() method, and String() function are used to convert an object to string in JavaScript.
The JavaScript JSON.stringify() method performs the direct object to string conversion, whereas you have to override the toString() method and String() function, so that they can display the object properties value in the converted string.
This write-up discussed different ways to convert a JavaScript object to a string.
Beginner’s Guide to JavaScript Closures
“Closures” are among JavaScript’s most fundamental building blocks.
As a JavaScript beginner, you may have utilized closures knowingly or unknowingly; however, gathering knowledge about the working of Closures is crucial as it enables you to understand the interaction between variables and functions and the execution process of your JavaScript program.
This write-up is a complete beginner’s guide to JavaScript Closures in which we will discuss the variable access within different scopes.
Before diving into the concept of JavaScript Closures, we will first explain what Lexical scoping is as both terms are associated with each other.
Lexical scoping
The variable scope is determined by its declaration in the source code, known as “Lexical Scoping”.
For instance, in the below-given example, the created “name” variable is a “global” variable which signifies that it can be accessed from anywhere in the program, such as within the “displayMessage()” function.
However, “info” is a “local” variable that can be only accessed within the “displayMessage()” function:
let name = 'Alex';function displayMessage() {
let info= 'Hello! My name is';
console.log(info + ' '+ name);}
displayMessage();
Execution of the above-given code will show the following output:
![]()
Nested Lexical Scoping
The scopes of the variables can be nested using the “Lexical Scoping” in such a way that the inner function can have access to the variables declared in the outer scope.
Consider the following example:
function displayMessage() {
let info= 'Hello! My name is Alex.';
function show() {
console.log(info);
}
show();}
displayMessage();
In this example, the “displayMessage()” function has a local variable named “info” and a nested “show()” function, where “show()” is an inner function that has the capability to access the value of the “info” variable from the outer scope.
So, when the “displayMessage()” function is executed, it will call the “show()” function, which will then access the “info” variable and display its value on the console:
![]() Now, we will modify the “displayMessage()” method and instead of invoking the inner “show()” function, we will add a statement to return the “show()” function object:
function displayMessage() {
let info= 'Hello! My name is Alex.';
function show() {
console.log(info);
}
return show;}
Also, we have assigned the value returned by the “displayMessage()” function to “x” variable:
let x = displayMessage();
Lastly, we will invoke “x()” function that refers to the “show()” function:
console.log(x());
You can see from the given output, the value of the local variable “info” still exists which generally remains in the memory till the execution of the function where it is declared:
Now, we will modify the “displayMessage()” method and instead of invoking the inner “show()” function, we will add a statement to return the “show()” function object:
function displayMessage() {
let info= 'Hello! My name is Alex.';
function show() {
console.log(info);
}
return show;}
Also, we have assigned the value returned by the “displayMessage()” function to “x” variable:
let x = displayMessage();
Lastly, we will invoke “x()” function that refers to the “show()” function:
console.log(x());
You can see from the given output, the value of the local variable “info” still exists which generally remains in the memory till the execution of the function where it is declared:
![]() Seems confused? This is the magic of Closure which you have seen in the last example as “show()” is a closure function that maintains the outer scope in its own scope.
Seems confused? This is the magic of Closure which you have seen in the last example as “show()” is a closure function that maintains the outer scope in its own scope.
What are JavaScript Closures
JavaScript functions also serve as “Closures” because the body of a function has access to the variables that are defined outside of it.
Or we can define “Closure” as a function that is a child function and can access the variables created within the “parent” function scope.
Now, let’s check out some examples to understand the association between the variable scopes and Closure.
Example 1
This example demonstrates how a “local” variable “info” can be accessed inside the “show()” function where it is created.
Remember, the remaining script cannot access this “info” variable:
function show() {
let info= 'Hello! My name is Alex.';return info;}
show();
When the “show()” function is executed, it will display the value stored in the “info” variable:
![]() Example 2
Now, we will declare “info” as a “global” variable which is referred in the “show()” function (having different scope):
let info= 'Hello! My name is Alex.';function show() {return info;}
show();
As the JavaScript function “show()” function is a “Closure”, it will maintain the scope and state of the “info” variable:
Example 2
Now, we will declare “info” as a “global” variable which is referred in the “show()” function (having different scope):
let info= 'Hello! My name is Alex.';function show() {return info;}
show();
As the JavaScript function “show()” function is a “Closure”, it will maintain the scope and state of the “info” variable:
![]() Example 3
In another situation, when variables are defined in the scope of the “parent” function, the “child” function can still access their value:
var displayMessage= function () {
let info= 'Hello! My name is Alex.';
var show= function () {
console.log(info);}}
show();
The output of the given program signifies that “show()” which is a child function, can access the “info” variable declared in the “displayMessage()” parent function:
Example 3
In another situation, when variables are defined in the scope of the “parent” function, the “child” function can still access their value:
var displayMessage= function () {
let info= 'Hello! My name is Alex.';
var show= function () {
console.log(info);}}
show();
The output of the given program signifies that “show()” which is a child function, can access the “info” variable declared in the “displayMessage()” parent function:
![]() That was all essential information related to JavaScript Closures.
You can further research according to your requirements.
That was all essential information related to JavaScript Closures.
You can further research according to your requirements.
Conclusion
JavaScript functions also serve as Closures because the body of a function has access to the variables that are defined outside of it.
We can define Closure as a child function that can access the variables created within the parent function scope.
This write-up is a complete beginner’s guide to JavaScript Closures in which we have discussed variable access within different scopes.
How to convert string to float
Knowing the procedure to convert string to float is critical when you want to perform some mathematical operation on the string value.
For instance, the user inputs temperature as a string type, and it is required to utilize that string for generating the weekly weather report.
To do so, it is necessary to convert the specified string into a float number before further processing, and JavaScript built-in methods can assist you in this regard.
This post will discuss different methods for a string to float conversion.
So, let’s start!
How to convert string to float
In JavaScript, you can convert string to float using the following approaches:
Convert string to float using JavaScript “Type Conversion” feature
Convert string to float using JavaScript “parseFloat()” method
We will now explain each of the above-mentioned methods in detail.
How to convert string to float using Type Conversion
“Type Conversion” is a JavaScript feature that forces the compiler to change the given expression or value type., there exist several operators that are used for converting data types.
For instance, the Unary operator “+” converts string value to float.
Syntax
var float = +(string)
Here, the Unary operator “+” will convert the type of “string” value to a “float” number.
Example
First of all, we will define a “convert()” function that accepts a “string” argument and converts it to “float” using the Unary operator “+”.
This function will return the floating-point number:
function convert(x) {
var floatValue = +(x);
return floatValue;}
In the next step, we will create a string variable “a” having the value “63.23” and pass it to the “convert()” function:
var a = "63.23";
console.log("Before converting "+ a + " , type: " + typeof a);
newFloat = convert(a);
console.log("After converting "+ newFloat + " , type: " + typeof newFloat);
The given output signifies that the type of “63.23” is successfully converted from “string” to “float”:
![]() Now, let’s check out the other method for converting string to float.
Now, let’s check out the other method for converting string to float.
How to convert string to float using parseFloat() method
JavaScript offers a built-in method named “parseFloat()” that can be utilized for converting string to a floating-point number.
This method accepts the specified string “value” as an argument and then outputs the converted float number.
Syntax
parseFloat(string)
Here, the JavaScript “parseFloat()” method takes “string” as an argument and returns a floating-point number.
Example 1
We will now convert the value of the string “32.54” into a floating-point number by using the “parseFloat()” method:
var a = parseFloat("32.54");
console.log("After converting "+ a + ", type: " + typeof a);
As you can see, the “type” of the passed “string” argument is now changed to “number”:
![]() Example 2
If the specified string contains trailing and leading spaces, then the “parseFloat()” method will ignore them and return the floating-point number:
var a = parseFloat(" 220 ");
console.log("After conversion: "+ a);
console.log("Type: " + typeof a);
Execution of the above-given code will convert the string ” 220 ” into float “220”:
Example 2
If the specified string contains trailing and leading spaces, then the “parseFloat()” method will ignore them and return the floating-point number:
var a = parseFloat(" 220 ");
console.log("After conversion: "+ a);
console.log("Type: " + typeof a);
Execution of the above-given code will convert the string ” 220 ” into float “220”:
![]() Example 3
In case, if the string comprises different types of values, then the JavaScript “parseFloat()” method will return the floating point number until it reaches any non-numeric character:
var a = parseFloat("2022@linuxhint.com");
console.log("After conversion: "+ a);
console.log("Type: " + typeof a);
Here, the “parseFloat()” method will convert the string “2022@linuxhint.com” to “2022” floating point number:
Example 3
In case, if the string comprises different types of values, then the JavaScript “parseFloat()” method will return the floating point number until it reaches any non-numeric character:
var a = parseFloat("2022@linuxhint.com");
console.log("After conversion: "+ a);
console.log("Type: " + typeof a);
Here, the “parseFloat()” method will convert the string “2022@linuxhint.com” to “2022” floating point number:
![]() Example 4
For non-numeric characters, the “parseFloat()” number will return “NaN” (Not a Number):
var a = parseFloat("linuxhint.com2022@");
console.log("After conversion: "+ a);
Execution of the given “parseFloat()” method will return “NaN” for the passed string “linuxhint.com2022@” as it starts with a non-numeric character:
Example 4
For non-numeric characters, the “parseFloat()” number will return “NaN” (Not a Number):
var a = parseFloat("linuxhint.com2022@");
console.log("After conversion: "+ a);
Execution of the given “parseFloat()” method will return “NaN” for the passed string “linuxhint.com2022@” as it starts with a non-numeric character:
![]() Example 5
In a scenario where the passed “string” argument comprises spaces in between numbers, then the JavaScript “parseFloat()” method will only return the first encountered number.
For instance, in the following example, we will pass the “20 45 23456” string as an argument to the “parseFloat()” method, and it sets the first number “20” as its return case:
var a = parseFloat("20 45 23456");
console.log("After conversion: "+ a);
console.log("Type: " + typeof a);
Output
Example 5
In a scenario where the passed “string” argument comprises spaces in between numbers, then the JavaScript “parseFloat()” method will only return the first encountered number.
For instance, in the following example, we will pass the “20 45 23456” string as an argument to the “parseFloat()” method, and it sets the first number “20” as its return case:
var a = parseFloat("20 45 23456");
console.log("After conversion: "+ a);
console.log("Type: " + typeof a);
Output
![]() That was all the essential information related to converting a string to float.
You can further research according to your preferences.
That was all the essential information related to converting a string to float.
You can further research according to your preferences.
Conclusion
To convert string to float, you can use the “Type Conversion” JavaScript feature or the “parseFloat()” method.
Type conversion utilizes the Unary operator “+” for converting string value to float, whereas the “parseFloat()” method accepts a string “value” as an argument and returns the converted float number.
This write-up discussed different methods for converting strings to floating-point numbers.
JavaScript String endsWith() method | Explained
While programming, we may often encounter a situation where we have to check the ending characters of a string.
For instance, you are developing a Unit converter JavaScript application, and it is required to validate the current measurement unit before proceeding further.
For this purpose, ES6 introduced a JavaScript String endsWith() method that can be used to search out single or multiple characters at the end of the specified string.
This write-up will explain the usage of avaScript String endsWith() method.
So, let’s start!
JavaScript String endsWith() method
In JavaScript, the “endsWith()” method is utilized to find out if the specified string ends with particular characters or not.
This method returns a “boolean” value, where “true” represents that the specified substring is found at the ending of the “string”, and “false” indicates that the searched substring is not a part of it.
Syntax
string.endsWith(substring, length)
Here, the “endsWith()” method will search the “substring” within the specified length of the “string” value.
How to use JavaScript String endsWith() method
As mentioned earlier, “substring” is a required argument that we have to pass to the JavaScript String “endsWith()” method for searching purposes and it can comprise single or multiple characters.
The “endsWith()” method matches that argument value with the specified string ending characters and returns “true” in case both values get matched; otherwise, the return case of the “endsWith()” method is set to “false”.
Have a look at the below-given examples to understand the working of the String “endsWith()” method.
Example: Searching single character
First of all, we will create a constant named “string” having the following value:
const string= 'linuxhint';
With the help of the “endsWith()” method, we will now check if the value of the “string” ends with the character “l”:
string.endsWith('l');
Execution of the above-given command will return “false” because the last character of the “string” value is “t,” not “l”:
![]() Example: Searching multiple characters
Similarly, using the String “endsWith()” method, you can validate if a string comprises a “substring” or the passed “multiple characters” at its end or not.
For instance, the following “endsWith()” method will check if the “string” value contains “hint” as its ending characters:
string.endsWith('hint');
In this case, the “string.endsWith()” method will return “true” because the ending characters of the “linuxhint” matched with the added argument value:
Example: Searching multiple characters
Similarly, using the String “endsWith()” method, you can validate if a string comprises a “substring” or the passed “multiple characters” at its end or not.
For instance, the following “endsWith()” method will check if the “string” value contains “hint” as its ending characters:
string.endsWith('hint');
In this case, the “string.endsWith()” method will return “true” because the ending characters of the “linuxhint” matched with the added argument value:
![]() Example: Searching characters with length
The JavaScript String “endsWith()” method also permits you to search characters within a specific “length”.
For this purpose, you have to pass two arguments to the “endsWith()” method.
The first argument refers to the substring that needs to be matched, and the second argument indicates the number of characters or the length within which the search operation will be performed.
Before executing the “endsWith()” method, we will check out the length of the “linuxhint” property by utilizing the String “length” property:
console.log('linuxhint'.length);
The given output signifies that the string “linuxhint” has “9” characters:
Example: Searching characters with length
The JavaScript String “endsWith()” method also permits you to search characters within a specific “length”.
For this purpose, you have to pass two arguments to the “endsWith()” method.
The first argument refers to the substring that needs to be matched, and the second argument indicates the number of characters or the length within which the search operation will be performed.
Before executing the “endsWith()” method, we will check out the length of the “linuxhint” property by utilizing the String “length” property:
console.log('linuxhint'.length);
The given output signifies that the string “linuxhint” has “9” characters:
![]() In the next step, we will create another “string” and initialize it with the value “linuxhint website”:
const string= 'linuxhint website';
Then, we will invoke the “endsWith()” method for the created “string” while passing “nt” as “substring” and “9” as “length”:
string.endsWith('nt', 9);
When the given “string.endsWith()” method executes, it will grab the first “9” characters of the string “linuxhint website” and then search “nt” substring in its ending characters.
This operation will return the “true” value as the “linuxhint” string ends with “nt”:
In the next step, we will create another “string” and initialize it with the value “linuxhint website”:
const string= 'linuxhint website';
Then, we will invoke the “endsWith()” method for the created “string” while passing “nt” as “substring” and “9” as “length”:
string.endsWith('nt', 9);
When the given “string.endsWith()” method executes, it will grab the first “9” characters of the string “linuxhint website” and then search “nt” substring in its ending characters.
This operation will return the “true” value as the “linuxhint” string ends with “nt”:
![]() Example: Case-Sensitive Searching
Another important point to remember is that the JavaScript String “endsWith()” method is “case-sensitive“.
So, you have to take care of the searched “substring” characters case.
For instance, the below-given “endsWith()” will perform case-sensitive searching in the “string” value:
string.endsWith('website');
As the ending characters of the “string” value and the searched substring “website” are in the same case, the “string.endsWith()” method will return “true” value:
Example: Case-Sensitive Searching
Another important point to remember is that the JavaScript String “endsWith()” method is “case-sensitive“.
So, you have to take care of the searched “substring” characters case.
For instance, the below-given “endsWith()” will perform case-sensitive searching in the “string” value:
string.endsWith('website');
As the ending characters of the “string” value and the searched substring “website” are in the same case, the “string.endsWith()” method will return “true” value:
![]() While for the same substring having upper-case characters “WEBSITE”, the “string.endsWith()” will set its return case as “false”:
string.endsWith('WEBSITE');
Output
While for the same substring having upper-case characters “WEBSITE”, the “string.endsWith()” will set its return case as “false”:
string.endsWith('WEBSITE');
Output
![]() That was essential information related to the JavaScript String endsWith() method.
You can further research it according to your preferences.
That was essential information related to the JavaScript String endsWith() method.
You can further research it according to your preferences.
Conclusion
In JavaScript, the “endsWith()” method is utilized to find out if the specified string ends with particular characters or not.
This method returns a boolean value, where true represents that the added substring is found at the string’s ending, and false indicates that the searched substring is not a part of it.
This write-up explained the usage of the JavaScript String endsWith() method.
How to create an image slider using JavaScript
An Image Slider that comprises several images displayed on a web application is called “Slide Show” and “Carousels”.
It permits you to show multiple images, videos, or graphics on a web application.
Also, adding an Image Slider to a website can fascinate the users and capture their attention.
Being a JavaScript developer, if you are asked to create an image slider for a web application, you will quickly think about employing “jQuery Plugins“.
These plugins are helpful; however, they may encounter code conflicts with existing libraries and jQuery libraries.
So, what to do in this scenario? Instead of using jQuery, utilize JavaScript and create an image slider without hassle.
This write-up will teach the procedure of creating an image slider.
So, let’s start!
How to create an image slider using JavaScript
To create an image slider using JavaScript, you have to follow the below-given instructions:
Step 1: Upload desired images to the project folder.Step 2: Add required HTML elements to the “index.html” file.Step 3: Define logic in the JavaScript file.Step 4: Set the style of the added HTML element in the “style.css” file.
According to the mentioned steps, we will now go through the procedure of creating an image slider using JavaScript.
Note: For the demonstration purpose, we are using Visual Studio Code.
However, you can utilize any code editor of your choice.
Step 1: Upload desired images to the project
In your project, create a new folder named “images” and add the desired images to it for which you want to create an image slider.
For instance, in our “IMAGE SLIDER” project folder, we have created an “images” folder and then added three images to it: “img1.jpg”, “img2.jpg”, and “img3.jpg”:
![]()
Step 2: Add required HTML elements to the “index.html” file
In the “index.html” file, we will add a container “images-slideshow” using the “<div>” tag.
This container is further divided into the three image slides sections.
Along with the specified images slides, we will also add two HTML symbols with the help of the “<a>” anchor tag.
The “<” symbol will take us to the “previous” slide, whereas the second symbol “>” slides to the “next” image:
<div class="images-slideshow">
<div class="imageSlides fade">
<img src="images/img1.jpg">
</div>
<div class="imageSlides fade">
<img src="images/img2.jpg">
</div>
<div class="imageSlides fade">
<img src="images/img3.jpg">
</div>
<a class="slider-btn previous" onclick="setSlides(-1)"></a>
<a class="slider-btn next" onclick="setSlides(1)"></a></div>
Here is how our “index.html” file looks like:
![]()
Step 3: Define logic in the JavaScript file
We have to define logic in the “project.js” file in such a way that when the image slider gets loaded for the first time, it shows the first image on the slider.
After that, it permits us to move between the slides by utilizing the next and previous HTML symbols.
To do so, firstly, we will set “1” as the “currentIndex” of slides and pass it to the “displaySlides()” function:
var currentIndex = 1;
displaySlides(currentIndex);
The “displaySlides()” function accepts the “currentIndex” value as an argument “num”.
In the first step, this function fetches all of the elements with the class name “imageSlides”.
Then, we will add an “if” condition “num > slides.length” that checks if the value of the “num” argument is greater than the length of the slides “3”.
Note that the “num” value refers to the “currentIndex” of the slides.
In case, if the specified condition evaluates as “truthy”, the “currentIndex” of the slider will be set to “1”.
This condition will be applied in the situation where the last image (slide 3) is displayed and the user clicks the “next” button.
Upon doing so, the slider will set the “first” image (slide 1) on the slideshow.
Similarly, the second “if” condition “num < 1 “ will be evaluated as true, when the first image (slide 1) is displayed on the slideshow and the user clicks the “previous” button.
In this case, the value of the “currentIndex” is set as “3” which equals the slider “length” and the last image (slide 3) will be shown on the slideshow.
Also, when a slide is selected to display using its “currentIndex”, the display of the other two slides’ style will be set to “none”:
function displaySlides(num) {
var x;
var slides = document.getElementsByClassName("imageSlides");
if (num > slides.length) { currentIndex = 1 }
if (num < 1) { currentIndex = slides.length }
for (x = 0; x < slides.length; x++) {
slides[x].style.display = "none";
}
slides[currentIndex - 1].style.display = "block";}
On the Image slider, when we click on the (next) “>” HTML symbol, “1” is passed as an argument to the “setSlides()” function which signifies that the slider has to move to the next slide.
For this purpose, the “setSlides()” invokes “displaySlides()” function while passing “currentIndex += num” as an argument.
This operation will increment “1” in the “currentIndex” value and then show that specific image on the slideshow.
In the other case, when (previous) “<” symbol is clicked, a “-1” value is passed to the “displaySlides()” method for displaying the previous image on the slider:
function setSlides(num) {
displaySlides(currentIndex += num);}
![]()
Step 4: Set the style of the added HTML element in the “style.css” file
Next, add the below-given code in the “style.css” file to specify the style of the added HTML elements:
.imageSlides {
display: none}
img {
margin: auto;
display: block;
width: 100%;}
/* Our main images-slideshow container */
.images-slideshow {
max-width: 612px;
position: relative;
margin: auto;}
/*Style for ">" next and "<" previous buttons */
.slider-btn{
cursor: pointer;
position: absolute;
top: 50%;
width: auto;
padding: 8px 16px;
margin-top: -22px;
color: rgb(0, 0, 0);
font-weight: bold;
font-size: 18px;
transition: 0.6s ease;
border-radius: 0 3px 3px 0;
user-select: none;
background-color: rgba(255, 255, 255, 0.5);
border-radius: 50%;}
/* setting the position of the previous button towards left */
.previous {
left: 2%;}
/* setting the position of the next button towards right */
.next {
right: 2%;}
/* On hover, adding a background color */
.previous:hover,
.next:hover {
color: rgb(255, 253, 253);
background-color: rgba(0, 0, 0, 0.8);}
After saving the added code, open up the “index.html” file in the browser and check out the working of created Image Slider:
![]() That was all about creating a basic Image Slider using JavaScript.
You can further research to add some variation in the image slider.
That was all about creating a basic Image Slider using JavaScript.
You can further research to add some variation in the image slider.
Conclusion
Instead of utilizing jQuery plugins, creating an image slider using JavaScript is considered one of the best options.
It takes less time for implementation and ensures no errors or conflicts exist.
An Image Slider also makes a web page more innovative and captures the users’ attention.
This write-up discussed the procedure to create an image slider.
JavaScript isNaN() Function | Explained
In JavaScript, you cannot completely rely on the equality operators to determine if a value is a number or not.
For this reason, ES6 embedded a method named “isNaN()” to check whether a value is not a “NaN” (Not a Number) or not.
If the specified value is a number, this method will return “false“; otherwise, its return case is set to “true” for a NaN value.
This write-up will explain the usage of the JavaScript isNaN() function.
So, let’s start!
JavaScript isNaN() Function
The term “isNan” comprises two words “is” and “NaN”, where “NaN” is an acronym for “Not a Number” and adding the helping verb “is” in front of NaN turns it into a question that states whether a value is a “Not a Number”?
The JavaScript “isNaN()” function is also utilized to check if a value is acceptable or not to reassure the client-side security.
Syntax
isNaN(value)
Here, the “isNaN()” function will validate the “value” passed an argument and return a boolean value that can be “true” or “false”.
Now, let’s check out some examples related to the usage of the JavaScript isNaN() function.
Example 1
When a positive decimal number such as “678” is passed as an argument, the “isNaN()” function will return “false”:
console.log(isNaN(678))
Output
![]() Example 2
For a negative decimal number, the return case of the JavaScript “isNaN()” function is set to “false”.
For instance, we have added “-6.78” as an argument for the “inNaN()” function:
console.log(isNaN(-6.78))
The execution of the above-given code will print out “false” on the console window:
Example 2
For a negative decimal number, the return case of the JavaScript “isNaN()” function is set to “false”.
For instance, we have added “-6.78” as an argument for the “inNaN()” function:
console.log(isNaN(-6.78))
The execution of the above-given code will print out “false” on the console window:
![]() Example 3
The “undefined” value does not comprise any data that can be converted into a number, so passing it in the JavaScript “isNaN()” Function will result in a “true” value:
console.log(isNaN(undefined))
Output
Example 3
The “undefined” value does not comprise any data that can be converted into a number, so passing it in the JavaScript “isNaN()” Function will result in a “true” value:
console.log(isNaN(undefined))
Output
![]() Example 4
In the below-given example, we have specified the string “NaN” as an argument in the “isNaN()” function:
console.log(isNaN('NaN'))
The “NaN” string cannot be converted into a number because there is a non-numeric value within the quotes, that’s why the JavaScript “isNaN()” function will return “true”:
Example 4
In the below-given example, we have specified the string “NaN” as an argument in the “isNaN()” function:
console.log(isNaN('NaN'))
The “NaN” string cannot be converted into a number because there is a non-numeric value within the quotes, that’s why the JavaScript “isNaN()” function will return “true”:
![]() Example 5
We will pass the string “789” to the “isNaN()” function:
console.log(isNaN('789'))
Here, the “789” string will be converted into a number that is valid, then the JavaScript “isNaN()” function will return “false” after marking it as a numeric type:
Example 5
We will pass the string “789” to the “isNaN()” function:
console.log(isNaN('789'))
Here, the “789” string will be converted into a number that is valid, then the JavaScript “isNaN()” function will return “false” after marking it as a numeric type:
![]() Example 6
The added “linuxhint” string in the following “isNaN()” function cannot be converted into a number because it has non-numeric value; as a result of it, the execution of the “isNaN()” function will set its return case as “true”:
console.log(isNaN('linuxhint'))
Output
Example 6
The added “linuxhint” string in the following “isNaN()” function cannot be converted into a number because it has non-numeric value; as a result of it, the execution of the “isNaN()” function will set its return case as “true”:
console.log(isNaN('linuxhint'))
Output
![]() Example 7
In this example, today’s date “2022/03/23” is specified as an argument of the “isNaN()” function:
console.log(isNaN('2022/03/23'))
Hence the added value is the string representation of the data which cannot be converted into a number, so the JavaScript “isNaN()” will output “true”:
Example 7
In this example, today’s date “2022/03/23” is specified as an argument of the “isNaN()” function:
console.log(isNaN('2022/03/23'))
Hence the added value is the string representation of the data which cannot be converted into a number, so the JavaScript “isNaN()” will output “true”:
![]() JavaScript beginners often think that the “isNaN()” function and the “Number.isNaN()” method works in the same way, but that’s not the case.
There exists a significant difference between both of them.
Have a look at the following section to clear the confusion about the working of the “isNaN()” function and the “Number.isNaN()” method.
JavaScript beginners often think that the “isNaN()” function and the “Number.isNaN()” method works in the same way, but that’s not the case.
There exists a significant difference between both of them.
Have a look at the following section to clear the confusion about the working of the “isNaN()” function and the “Number.isNaN()” method.
Difference between JavaScript isNaN() function and Number.isNaN() method
In JavaScript, “isNaN()” is a global function that converts the specified argument to a “number” and then evaluates it, whereas the “Number.isNaN()” is a method of the JavaScript “Number” base class that checks if the passed argument is “Not a Number”, without converting it to the “number” type.
For instance, in the following code, both arguments are of “string” type which signifies that they are not numbers:
console.log(isNaN('linuxhint'));
console.log(isNaN('2022/3/23'));
The “isNaN()” will return “true” after validating the specified arguments:
![]() However, the “Number.isNaN()” method will only output “true” of the argument is of “Number” type and its value “NaN”:
Both of the specified conditions does not imply in the below-given statements, so the execution of the “Number.isNaN()” method will return “false”:
console.log(Number.isNaN('linuxhint'));
console.log(Number.isNaN('2022/3/23'));
Output
However, the “Number.isNaN()” method will only output “true” of the argument is of “Number” type and its value “NaN”:
Both of the specified conditions does not imply in the below-given statements, so the execution of the “Number.isNaN()” method will return “false”:
console.log(Number.isNaN('linuxhint'));
console.log(Number.isNaN('2022/3/23'));
Output
![]() That was all essential information related to the JavaScript isNaN() function.
You can further research it according to your preferences.
That was all essential information related to the JavaScript isNaN() function.
You can further research it according to your preferences.
Conclusion
The JavaScript “isNaN()” function can be utilized to check whether a value is a “NaN” (Not a Number) or not.
It is a global function that converts the specified argument to a number and then evaluates it.
If the specified value is a number, then the JavaScript “isNaN()” method will return “false“; otherwise, its return case is set to “true” for a NaN value.
This write-up explained the usage of the JavaScript isNaN() function.
JavaScript Math.sign() method | Explained
When a user inputs a number on a web page application, it is frequently necessary to validate if the number is positive, negative, or something else.
The built-in “Math.sign()” method can be utilized to find out the sign of a number at runtime.
It simplifies data parsing and the process to determine the sign of a number on the client-side.
As the “sign()” is a static method of the “Math” class, it can be accessed directly by invoking it with the name “Math.sign()”.
This write-up will discuss the usage of the Math.sign() method.
So, let’s start!
JavaScript Math.sign() method
With the ES6 JavaScript standard, determining the sign of a number is now a breeze.
The “Math.sign()” method is declared in the Math class which provides access to it directly using the class name.
Depending on the variables’ value, this method returns “0”, “-0”, “1”, “-1”.
Also, when a “non-numeric” value is passed to the “Math.sign()” method, it returns “NaN” (Not a Number).
Syntax
Math.sign(number)
Here, the “Math.sign()” method accepts the “number” as an argument and returns a value that represents its sign.
Valid values arguments for Math.sign() method: Numeric string, Floating-point number, Integer
Invalid values arguments for Math.sign() method: Empty variable, Non-numeric string.
At this point, you may wonder why to use the “Math.sign()” method when the JavaScript Comparison operators such as “>” or “<” can assist in determining if the number is positive or negative.
The below-given section will answer the stated question!
JavaScript Math.sign() method vs Comparison Operators
A Comparison operator can be utilized when you only want to check the boolean status of a number.
For instance, in the below-given example, we will validate if the value of the constant “number” is greater than “0” or not, with the help of the Greater than “>” Comparison operator:
const number = 8;
number > 0;
Above-program will output “true” as the specified value “8” is “positive” and greater than “0”:
![]() Whereas the “Math.sign()” method returns a “number” value that represents a “number” value that can be used to perform further mathematical calculations:
Math.sign(number);
Whereas the “Math.sign()” method returns a “number” value that represents a “number” value that can be used to perform further mathematical calculations:
Math.sign(number);
![]() So, it is preferred to use the “Math.sign()” method over the Comparison operators when it is required to check the sign of a number, and you have to utilize the resultant value in some other operation.
Now, let’s check out some examples related to the Math.sign() method implementation.
Example 1
In a JavaScript program, when a positive number is passed as an argument to the “Math.sign()” method, it will return the value “1”:
For instance, we have passed “4” to the “Math.sign()” method:
console.log(Math.sign(4));
The execution of the above-given “Math.sign()” method will return “1,” which indicates that “4” is a positive number:
So, it is preferred to use the “Math.sign()” method over the Comparison operators when it is required to check the sign of a number, and you have to utilize the resultant value in some other operation.
Now, let’s check out some examples related to the Math.sign() method implementation.
Example 1
In a JavaScript program, when a positive number is passed as an argument to the “Math.sign()” method, it will return the value “1”:
For instance, we have passed “4” to the “Math.sign()” method:
console.log(Math.sign(4));
The execution of the above-given “Math.sign()” method will return “1,” which indicates that “4” is a positive number:
![]() Example 2
Another case is when the JavaScript “Math.sign()” method accepts a negative number such as “-4”, it will output the value “-1”:
console.log(Math.sign(-4));
The returned value signifies that the passed number is “negative”:
Example 2
Another case is when the JavaScript “Math.sign()” method accepts a negative number such as “-4”, it will output the value “-1”:
console.log(Math.sign(-4));
The returned value signifies that the passed number is “negative”:
![]() Example 3
If you have passed a “non-numeric” value to the “Math.sign()” method, then it will return “NaN” (Not a Number):
console.log(Math.sign('linuxhint'));
As in the above statement, a “linuxhint” string is passed, so the resultant case of the “Math.sign()” method will be set to “NaN”:
Example 3
If you have passed a “non-numeric” value to the “Math.sign()” method, then it will return “NaN” (Not a Number):
console.log(Math.sign('linuxhint'));
As in the above statement, a “linuxhint” string is passed, so the resultant case of the “Math.sign()” method will be set to “NaN”:
![]() Example 4
Passing positive zero as an argument to the “Math.sign()” method will print out “0” value:
console.log(Math.sign(0));
Output
Example 4
Passing positive zero as an argument to the “Math.sign()” method will print out “0” value:
console.log(Math.sign(0));
Output
![]() Example 5
While for a negative zero argument, the return case of the JavaScript “Math.sign()” method is set to “-0”:
console.log(Math.sign(-0));
Output
Example 5
While for a negative zero argument, the return case of the JavaScript “Math.sign()” method is set to “-0”:
console.log(Math.sign(-0));
Output
![]() After checking the above-given output, have you thought about why we need a negative zero?
JavaScript developers employ the “magnitude” of a value to point towards any information, such as the sign of a number representing the direction of the movement.
In such applications, if the variable loses its sign, all of its information will be lost automatically.
That’s why preserving the sign of zero (-0) with the “Math.sign()” method prevents us from information loss.
That was all the essential information related to the JavaScript Math.sign() method.
You can further research it according to your requirements.
After checking the above-given output, have you thought about why we need a negative zero?
JavaScript developers employ the “magnitude” of a value to point towards any information, such as the sign of a number representing the direction of the movement.
In such applications, if the variable loses its sign, all of its information will be lost automatically.
That’s why preserving the sign of zero (-0) with the “Math.sign()” method prevents us from information loss.
That was all the essential information related to the JavaScript Math.sign() method.
You can further research it according to your requirements.
Conclusion
The JavaScript Math.sign() method is used to check the sign of a number and it returns “0” for positive zero, “-0” for negative zero, “1” for a positive number, and “-1” for a negative number.
Also, when a non-numeric value is passed to the Math.sign() method, it returns “NaN” (Not a Number).
Math.sign method is declared in Math class, which provides access to it directly utilizing the class name.
This write-up discussed the usage of the JavaScript Math.sign() method.
How to fill Array values
Have you ever come across a situation where creating a JavaScript array with some predefined values is required, or do you want to overwrite an existing array’s elements with static values? In such scenarios, it becomes necessary to fill the array values.
JavaScript offers various methods that can be used to fill values in an array such as “Array.fill()”, “Array.from()”, “Array push()” methods, and spread operator “[…]”, where “Array.fill()” method fills an existing array with the new values, and “Array.fill()” and the other two methods create a new array instance and then fill them with the specified static values.
This write-up will discuss different methods to fill array values.
So, let’s start!
How to fill array values
You can use any of the following approaches to fill array values:
Using the Array.fill() method
Using the Array push() method and for loop
Using the Array.from() method
Using the spread operator[…] and the map() function
We will now explain each of the methods mentioned above in detail.
How to fill array values using Array.fill() method
In JavaScript, the “Array.fill()” method is utilized for filling an array with static values.
It can be used to fill a particular part of an array or the entire array.
Syntax
array.fill(value, start, end)
Here, the “array.fill()” method will replace the elements of the array with the static “value“; “start,” and “end” are the optional arguments that represent the starting and ending index of the array, wherein between these indexes the static values are going to be placed.
Example 1
First of all, we will create a JavaScript “array” having the following values:
var array= ["Summer", "Winter", "Spring"];
Then, we will invoke the “array.fill()” method to fill the whole array with “Autumn” value:
array.fill("Autumn");
Execution of the above-given code will show the following output:
![]() Example 2
In the next example, we will try to fill the original “array” elements with “Autumn” at index “0” and “1”:
array.fill("Autumn", 0, 2);
Note that the ending index “2” will not include in this operation:
Example 2
In the next example, we will try to fill the original “array” elements with “Autumn” at index “0” and “1”:
array.fill("Autumn", 0, 2);
Note that the ending index “2” will not include in this operation:
![]()
How to fill array values using Array push() method and for loop
Another method used to fill an array is the Array “push()” method.
This method assists in adding one or more values to the array.
It is also utilized in combination with the “for loop” to fill an array with static values.
Syntax
array.push('value');
Here, the JavaScript “array” will be filled with the static “value” using the “push()” method.
Example
We will create a constant “length” having the value “5” and an empty “array” :
const length = 5;const array = [];
Next, we will use the “for loop” to loop over the array and “push()” method to fill the array with the “spring” value:
for (let i = 0; i < length; i++) {
array.push('spring');}
console.log(array);
The given output signifies that the whole “array” is filled with the “spring” value:
![]()
How to fill array values using Array.from() method
The JavaScript “Array.from()” method is utilized for creating a new array instance from an iterable or array-like object.
This method accepts an array-like object as an argument and returns the newly created array.
Syntax
Array.from(object, mapFunction, thisArg)
Here, the “object” represents the JavaScript object which needs to be converted into an array, “mapFunction” is an optional parameter that refers to the map function that will fill the array with the function result.
Lastly, when the specified map function is executed, “thisArg” is used as “this” value.
Example
Using “Array.from()” method, we will create an empty array object whose “length” property is set “5” and fill it with the value “spring” using the map function:
var array = Array.from({ length: 5 }, () => ('spring'))
console.log(array);
As you can see, the execution of the given “Array.from()” will add the “spring” value to all five indexes of “array”:
![]()
How to fill array values using spread operator […] and map() function
The spread operator “[…]” is another useful JavaScript ES6 feature that can be used in combination with the “map()” function to expand an array and fill it with some specific values.
Syntax
[...new Array()].map(() => 'value')
Here the spread operator “[…]” will create a new array and then pass it to the “map()” function to fill all of the indexes with the “value“.
Example
In this example, the spread operator “[…]” will create a new “array” with the length “5” and initialized it with an “undefined” value.
After doing so, the “map()” function will map the new object instances to “Autumn” value:
let array= [...new Array(5)].map(() => 'Autumn');
console.log(array);
The given output shows that we have successfully filled the “array” with the specified value:
![]() We have compiled different methods for filling an array with values.
Choose any of them according to your requirements.
We have compiled different methods for filling an array with values.
Choose any of them according to your requirements.
Conclusion
The JavaScript “Array.fill()”, “Array.from()” methods, combination of “Array push() method and for loop” and “spread operator[…] and map() function” are used to fill array values.
Using the Array.fill() method, an already created array can be filled with the new values.
In contrast, the Array.from() method and the other two combinations are utilized to create a new array instance and then fill it with the specified value.
This write-up discussed different methods to fill array values.
What is encodeURI()
“URI” or “Uniform Resource Identifier” identifies a resource and describes how to access it., “URLs” or “Uniform Resource Locators” can only contain the characters from ASCII 128 standard characters set.
Therefore, reserved words must be encoded if they are not part of the set before passing them into the URL.
For example, the user has filled out a form with data in string format, which must be handled URL.
In such a scenario, you can utilize the JavaScript “encodeURI()” function to encode the string value.
This write-up will discuss the usage of the encodeURI() method.
So, let’s start!
What is encodeURI()
The “encodeURI()” function encodes the specified URI by replacing the string characters with the escape sequences.
For instance, the “encodeURI()” function substitutes the space character “ “ of a string as a percent 20: “%20”.
However, there also exist some characters that cannot be encoded and have been left as is it.
These characters include:
Alphabets both lowercase and uppercase
Digits from 0 to 9
Other special characters such as # ; () , ’ / * ? ~ : ! @ .
& _ = – $ +
Now, let’s check out the syntax of the “encodeURI()” function.
Syntax
encodeURI(uri)
Here, the “encodeURI()” function accepts the “uri” as an argument and returns the respective encoded URI.
Example
The JavaScript “encodeURI()” function can be utilized to encode a URI that comprises some spaces.
For instance, in the below-given example, we will pass the URI “https://linuxhint.com/ javascript clear console ” to the “encodeURI()” function:
var encodedURI= encodeURI("https://linuxhint.com/ javascript clear console ");
console.log("The encoded URI is: "+ encodedURI);
Execution of the specified “encodeURI()” function will return the following encoded URI:
![]()
Difference between encodeURI() and encodeURIComponent() functions
Beginners often get confused between the “encodeURI()” and “encodeURIComponent()” functions and think that both functions are used for the same purpose; however, that’s not the case.
The JavaScript “encodeURI()” function is used when the string needs to be encoded as a whole URL, whereas the “encodeURIComponent()” function only encodes the section of a URL such as a “query string”.
As a result, the number of characters replaced by escape sequences exceeds that of the “encodeURI()” function.
Check out the below-given example for using the “encodeURIComponent()” function.
Example
In a situation where it is required to build a URL from a string, the “encodeURIcomponent()” function is used to encode the query string parameters.
After that, you can concatenate the encoded URI to the other part to form a URL:
var x = encodeURIComponent(' javascript ')var url = "http://linuxhint.com/?search=" + x + "&length=34";
console.log("New URL is: "+ url);
The given output signifies that with the help of the “encodeURIcomponent()” function, the string “ javascript ” is converted to its encoded version, and then it becomes a part of the “url” variable by utilizing the concatenation operator “+”:
![]()
Why you should use encodeURI() function
The usage of the “encodeURI()” function offers the following benefits:
The “encodeURI()” function permits the JavaScript developers to encode the specified URIs with simplicity and ease since it assists in encoding the whole set of characters at once, and returns the corresponding string value.
Most modern browsers are compatible with different versions of the “encodeURI()” function, so you can use these functions without any hassle.
That was all essential information related to JavaScript encodeURI() function.
You can further research it according to your requirements.
Conclusion
In JavaScript, the “encodeURI()” function encodes the specified URI by replacing the string characters with the escape sequences.
For instance, the “encodeURI()” function substitutes the space character “ “ of a string as a percent 20: “%20”.
It accepts the “uri” as an argument and returns the respective encoded URI.
This write-up discussed the usage of the encodeURI() with the help of suitable examples.
JavaScript Keywords
Keywords are an essential component of the JavaScript syntax., keywords are reserved words that have a specific purpose and are already defined in the language.
They are case sensitive, so you must write them in “lower-case” letters.
Also, JavaScript keywords cannot be utilized as identifiers or for naming variables, classes, or functions.
In this write-up, we will cover the following most commonly used keywords:
JavaScript in keyword
JavaScript instanceof keyword
JavaScript function keyword
JavaScript argument keyword
JavaScript do keyword
JavaScript while keyword
JavaScript class keyword
JavaScript new keyword
JavaScript for keyword
JavaScript if keyword
JavaScript break keyword
JavaScript continue keyword
JavaScript delete keyword
JavaScript typeof keyword
We will now discuss each of the mentioned keywords in detail.
So, let’s start!
JavaScript in keyword
The JavaScript “in” keyword is utilized to check if the specified property exists in an object or not.
It returns a “Boolean” value, where “true” signifies that property is found and “false” indicates that property does not exist.
Example: Using JavaScript in keyword
Firstly, we will create an object named “seasons” having the following “key-value” pairs:
var seasons= {s1: "summer", s2: "winter", s3: "autumn"};
After declaring the “seasons” object, we will validate if the “s1” property exists in it or not:
console.log("s1" in seasons);
Execution of the above-given code will print out “true” which means that “s1” is a property of “seasons” object:
![]()
JavaScript instanceof keyword
The “instanceof” keyword verifies if the created object is an instance of a particular class or not.
Example: Using JavaScript instanceof keyword
As “seasons” object is an instance of “Object” class, so the below-given “instanceof” operator will return “true” value:
seasons instanceof Object;
Output
![]()
JavaScript function keyword
The JavaScript “function” keyword is utilized for defining a function that executes a code block.
Example: Using JavaScript function keyword
In this example, we will create a function named “displayInfo()” by using the keyword “function”.
var displayInfo = function(){return "Hi! My name is Alex";}
console.log(displayInfo());
When this “displayInfo()” function executes, it will display a message “Hi! My name is Alex” on the console window:
![]()
JavaScript argument keyword
The “argument” keyword is passed to a JavaScript function when it is called.
It represents the list of “arguments” that a function accepts.
Example: Using JavaScript argument keyword
Here, the “func()” function accepts the arguments as “a”, “b”, and “c” which will be then added to a new array using the “Array.from()” method:
const func = function(a, b, c) {const parameters = Array.from(arguments);
console.log(parameters)}
func(23, 32, 12);
The “func()” will create a new array instance and add the argument values: “23”, “32”, “12” to it:
![]()
JavaScript do keyword
The JavaScript “do” keyword defines a “do-while” loop in a program.
Example: Using JavaScript do keyword
In the following program, the “do” loop will execute until the condition “x<=10” meets:
var x= 5;do {
console.log("iteration number " + x);
x++;}
while(x <= 10);
Output
![]()
JavaScript while keyword
The “while” keyword is used to define a while loop.
Example: Using JavaScript while keyword
The below-given “while” loop will execute its code block until the condition “x<=10” is evaluated as “truthy”:
var x= 3;
while(x <= 10){
console.log("iteration number " + x);
x++;}
Output
![]()
JavaScript class keyword
You can use the “class” keyword to create a class.
Example: Using JavaScript class keyword
Now, we will utilize the JavaScript “class” keyword for creating an “Employee” having the following properties:
class Employee {
name = "Alex";
age = 30;}
![]()
JavaScript new keyword
The JavaScript “new” keyword is used to create objects for the specified class.
Example: Using JavaScript new keyword
Now, we will create an object of the “Employee” class with the help of the “new” keyword:
const obj = new Employee();
![]()
JavaScript for keyword
The JavaScript “for” keyword defines a for loop in a program that executes until the specified condition is evaluated as “true”.
Example: Using JavaScript for keyword
Here, the “for..loop” will repeatedly display the value of “x” variable until it remains less than or equal to “5”:
for(var x=0; x<=5; x++) {
console.log("iteration number " + x);}
Output
![]()
JavaScript if keyword
The “if” keyword is used to define the conditional “if” statement.
Example: Using JavaScript if keyword
In the below-given example, “if” condition will evaluate the condition “a>15” and print out the message “Value is greater than 15”, in case if it is “true”:
var a= 20;if(a > 15) {
console.log("Value is greater than 15");} else {
console.log("Value is less than 15");}
Output
![]()
JavaScript break keyword
The JavaScript “break” keyword assists in breaking the execution of loops.
Example: JavaScript break keyword
Adding “break” keyword in the “if” condition will force the execution control to come out of the “for” loop:
for(var x=0; x<=10; x++) {if(x == 5)break;
console.log("The loop is running for " + x + " times");}
Output
![]()
JavaScript continue keyword
The “continue” keyword lets the JavaScript interpreter continue the loop execution and skip the added statement when the specified condition is “truthy”.
Example: Using JavaScript break keyword
In the below-given example, the statement of “for” loop is only skipped for the condition “x==5”:
for(var x=0; x<=10; x++) {if(x == 5)continue;
console.log("The loop is running for " + x + " times");}
Output
![]()
JavaScript delete keyword
The “delete” keyword is utilized to remove a property from a JavaScript object.
Example: Using JavaScript delete keyword
By using the “delete” keyword, we will remove “s2” property from the “seasons” object:
var seasons= {s1: "summer", s2: "winter", s3: "autumn"};delete seasons.s2;
The returned boolean value signifies that the “s2” property is successfully deleted from the “seasons” object:
![]()
JavaScript typeof keyword
The JavaScript “typeof” keyword displays the data type of an operand.
Example: JavaScript typeof keyword
We will now check the data type of “seasons” using the “typeof” keyword:
typeof("seasons")
Output
![]() We have compiled the information related to JavaScript keywords.
You can further explore them according to your requirements.
We have compiled the information related to JavaScript keywords.
You can further explore them according to your requirements.
Conclusion
JavaScript keywords are reserved words that have a specific purpose and are already defined in the language.
Keywords are essential components of JavaScript syntax, and they are case-sensitive, so we must write them in lower-case letters.
Also, JavaScript keywords cannot be utilized as identifiers or for naming variables, classes, or functions.
This write-up discussed the most commonly used JavaScript keywords.
JavaScript Constants
Before getting started with the JavaScript programming language, you must gather some knowledge about the basic terms such as variables and constants.
In JavaScript, constants are created using the “const” keyword.
After declaration, the value of a JavaScript constant cannot be modified, making it “immutable”.
They are also “block-scoped“, so JavaScript restricts their access outside of the block where they are created.
This write-up will discuss the declaration of JavaScript constants, their block scope, reassignment of constant variables, constant arrays, constant objects, and the procedure related to freezing constant objects.
So let’s start!
Declaration of JavaScript Constants
JavaScript constants are of immutable type, which signifies that their value cannot be modified after creation.
To create constants, you have to use the “const” keyword and remember the constant “name” should be specified in Uppercase:
const CONSTANT1= "value";
If the name of the JavaScript constant comprises than one word, then use the underscore “_” in between words:
const NEW_CONSTANT= "value";
Block Scope of JavaScript Constants
A JavaScript constant declared with the “const” keyword has the same scope as a variable created with the “let” keyword.
As a result, the JavaScript constants declared in a code block are only available within it and not outside of it.
For instance, we will create a JavaScript constant named “x” within a code block {}:
{
const x = 5;
alert(x);}
Then, we will try to access the constant “x” outside of the given block:
console.log(x);
The added code block will execute and display the value of the “x” constant in an alert box:
![]() When the execution control come out of the added code block, the “console.log()” method will try to access the constant “x,” which result in the following “ReferenceError”:
When the execution control come out of the added code block, the “console.log()” method will try to access the constant “x,” which result in the following “ReferenceError”:
![]()
Reassignment of JavaScript constant variables
As mentioned earlier, variables created using the “const” keyword are of the “immutable” type, which means that we cannot perform the operation of their value reassignment.
In the below-given example when will try to reassign the value to variable “age”, it will display a “TypeError” on console window:
const age= 30;
age= 30;
![]()
JavaScript Constants Objects
When a JavaScript constant object is created using the “const” keyword, its immutable data type restricts the reassignment of the object values as a whole.
Still, you can modify the values of the object properties.
For instance, we will declare a constant object named “employee” having the following properties:
const employee= {
age: 30,
name: "Alex"};
console.log(employee);
Notice that the “employee” object is of “immutable” data type, and we are reassigning a value to its “name” property:
employee.name= "Max";
console.log("After changing the employee.name property value");
console.log(employee);
The given output signifies that the “employee.name” property value is updated to “Max”:
![]() The execution of the above-given example proved that although an object becomes “immutable” with the help of the “const” keyword, it still permits you to reassign property values.
You can “freeze” an object when it is required to restrict the JavaScript constant object from updating the existing properties or adding new properties.
The execution of the above-given example proved that although an object becomes “immutable” with the help of the “const” keyword, it still permits you to reassign property values.
You can “freeze” an object when it is required to restrict the JavaScript constant object from updating the existing properties or adding new properties.
Freeze a JavaScript Constant Object using Object.freeze() method
The “Object.freeze()” method is utilized to freeze an already declared constant object.
When an object gets freezed, it prevents the deletion of the existing object properties, addition of new properties, updation of the enumerability, writability, and configurability of existing properties.
Moreover, you cannot change the object prototype and value of the existing properties after freezing the related object.
Syntax of using Object.freeze()
Object.freeze(obj)
Here, “obj” represents the JavaScript constant object which will be freezed with the help of the “Object.freeze()” method.
Example: How to freeze an object using Object.freeze() method
Firstly, we will freeze the “employee” constant object by using the “Object.freeze()” method:
Object.freeze(employee);
Note that at the time of freezing the “employee” object, the value of “employee.age” is “30,” and the “employee.name” is set as “Max”:
![]() In the next step, we will verify if the “employee” object is freezed or not.
For this purpose, JavaScript offers “Object.isFrozen()” built-in method that accepts a JavaScript constant “object” as an argument and returns “true” if the passed object is freezed, otherwise the return case of “Object.isFrozen()” method will be set to “false”:
Object.isFrozen(employee);
In the next step, we will verify if the “employee” object is freezed or not.
For this purpose, JavaScript offers “Object.isFrozen()” built-in method that accepts a JavaScript constant “object” as an argument and returns “true” if the passed object is freezed, otherwise the return case of “Object.isFrozen()” method will be set to “false”:
Object.isFrozen(employee);
Output
![]() The value returned by the “Object.isFrozen()” method is “true,” which indicates that the “employee” object is successfully freezed.
We will now try to update the “employee.name” property value to “Paul”:
employee.name= "Paul";
console.log(employee);
If you are in “non-strict” mode, then the specified operation of updating value will fail silently, and the freezed “employee” object will not modify the original values:
The value returned by the “Object.isFrozen()” method is “true,” which indicates that the “employee” object is successfully freezed.
We will now try to update the “employee.name” property value to “Paul”:
employee.name= "Paul";
console.log(employee);
If you are in “non-strict” mode, then the specified operation of updating value will fail silently, and the freezed “employee” object will not modify the original values:
![]()
JavaScript Constant Arrays
Similar to JavaScript constant objects, the operation of value reassignment is not possible for a constant array.
Check out the below-given example to understand the stated concept.
First of all, we will declare a JavaScript array “seasons” using the “const” keyword.
This “seasons” array comprises one element that is “spring”:
const seasons= ['spring'];
Then, we will push another element “autumn” to the “seasons” array with the help of the “array.push()” method:
seasons.push('autumn');
console.log(seasons);
As JavaScript constants permit to add elements to an array, so the specified operation will be executed successfully:
![]() However, we cannot reassign the “seasons” array.
Upon doing so, you will encounter a “TypeError”:
seasons = [];
However, we cannot reassign the “seasons” array.
Upon doing so, you will encounter a “TypeError”:
seasons = [];
Output
![]() That was all essential information related to JavaScript Constants.
You can further work on it according to your preferences.
That was all essential information related to JavaScript Constants.
You can further work on it according to your preferences.
Conclusion
The “const” keyword is used to define JavaScript constant variables and arrays that are block-scoped and cannot be modified after being created.
However, in the case of constant objects, you have to freeze them by utilizing the JavaScript Object.freeze() method for restricting the manipulation of an already created JavaScript constant object.
This write-up discussed the declaration of JavaScript constants, their block scope, reassignment of constant variables, constant arrays, constant objects, and the procedure related to freezing constant objects.
JavaScript TypedArray subarray() Method
In JavaScript, an Array buffer view that interprets the Array buffer bytes as an array of numbers is called a TypedArray.
It is similar to an array-like object which permits you to access the raw binary data.
Javascript values can also be assigned dynamically to these Array objects, and they are primarily used to convert raw binary data to typed arrays.
After creating a TypedArray, you can perform different operations on it, such as finding the index of an element using the “find()” method, reducing the elements into a single value by utilizing the “reduce()” method, or generating a new TypedArray of selected elements with the help of the TypedArray “subarray()” method.
This write-up will discuss the JavaScript TypedArray subarray() method.
So, let’s start!
JavaScript TypedArray subarray() Method
The JavaScript TypedArray subarray() method is utilized to create a new “TypedArray” on the same Array buffer with the same types of elements.
It returns the selected array elements without modifying the original array.
Syntax of JavaScript TypedArray subarray() Method
typedarray.subarray(start, end)
Here, “start” represents the index of the first element from where the elements are going to be selected, and “end” refers to the index of the last element till which the elements will be included in the returned typed array.
Note: When the TypedArray subarray() method is invoked, the element having the “start” index is added in the returned array, whereas the elements with the “end” index will not be added in the returned typed array.
Now, let’s check out some examples related to the TypedArray subarray() method.
Example 1: Using JavaScript TypedArray subarray() MethodFirst of all, we will create a new TypedArray “Uint8Array” object which will have the following values:
const array = new Uint8Array([10, 20, 30, 40, 50, 60, 70]);
In the next step, we will utilize the “subarray()” method to select the element from first index to the third index of “array”:
typed_array = array.subarray(1, 3)
console.log(typed_array);
Execution of the given program will return a new “typed_array” having two values, “20” and “30,” that are selected from the specified “array”:
![]() Example 2: Using JavaScript TypedArray subarray() MethodIf only the starting index is added, then the “TypedArray subarray()” method will select the element from that index to the end of the array.
For instance, we have specified “1” as the starting index, so the new “subarray()” method will add the “array” elements to “typed_array” from the first index till the last index which is “6”:
typed_array = array.subarray(1)
console.log(typed_array);
Output
Example 2: Using JavaScript TypedArray subarray() MethodIf only the starting index is added, then the “TypedArray subarray()” method will select the element from that index to the end of the array.
For instance, we have specified “1” as the starting index, so the new “subarray()” method will add the “array” elements to “typed_array” from the first index till the last index which is “6”:
typed_array = array.subarray(1)
console.log(typed_array);
Output
![]() Example 3: Using JavaScript TypedArray subarray() MethodThe below-given “typed_array” will comprise first five elements of the “array” from first index to the six index, while excluding the sixth index element:
typed_array = array.subarray(0, 6)
console.log(typed_array);
Output
Example 3: Using JavaScript TypedArray subarray() MethodThe below-given “typed_array” will comprise first five elements of the “array” from first index to the six index, while excluding the sixth index element:
typed_array = array.subarray(0, 6)
console.log(typed_array);
Output
![]() Example 4: Using JavaScript TypedArray subarray() MethodWhen “0” is specified as the starting index, then the “subarray()” method will add all of the elements of “array” to the newly created “typed_array”:
typed_array = array.subarray(0)
console.log(typed_array);
Output
Example 4: Using JavaScript TypedArray subarray() MethodWhen “0” is specified as the starting index, then the “subarray()” method will add all of the elements of “array” to the newly created “typed_array”:
typed_array = array.subarray(0)
console.log(typed_array);
Output
![]() Example 5: Using JavaScript TypedArray subarray() MethodThere exists another situation where the passed index is negative.
In such a scenario, the elements of the JavaScript TypedArray are accessed from the end.
For instance, in the following example, “-1” is passed to the “subarray()” method.
Its execution will select the last element of “array” and add it into the “typed_array”:
typed_array = array.subarray(-1)
console.log(typed_array);
As you can see, the last element of the “array” is “70,” which is now successfully added to the “typed_array”:
Example 5: Using JavaScript TypedArray subarray() MethodThere exists another situation where the passed index is negative.
In such a scenario, the elements of the JavaScript TypedArray are accessed from the end.
For instance, in the following example, “-1” is passed to the “subarray()” method.
Its execution will select the last element of “array” and add it into the “typed_array”:
typed_array = array.subarray(-1)
console.log(typed_array);
As you can see, the last element of the “array” is “70,” which is now successfully added to the “typed_array”:
![]() Example 6: Using JavaScript TypedArray subarray() Method
Adding “-2” as the index argument will select the last two elements of the “array” and then add it to the “typed_array”:
typed_array = array.subarray(-2)
console.log(typed_array);
“60” and “70” are the last two “array” elements which are now part of the “typed_array”:
Example 6: Using JavaScript TypedArray subarray() Method
Adding “-2” as the index argument will select the last two elements of the “array” and then add it to the “typed_array”:
typed_array = array.subarray(-2)
console.log(typed_array);
“60” and “70” are the last two “array” elements which are now part of the “typed_array”:
![]() That was all about the JavaScript TypedArray subarray() method.
You can further explore it based on your requirements.
That was all about the JavaScript TypedArray subarray() method.
You can further explore it based on your requirements.
Conclusion
The JavaScript TypedArray subarray() method is utilized to create a new “TypedArray” on the same Array buffer with the same types of elements.
This method accepts two arguments, where the first value represents the starting index and the other value indicates the ending index.
The execution of the JavaScript TypedArray subarray() method returns the selected array elements without modifying the original array.
This write-up explained the usage of the JavaScript TypedArray subarray() method.
How to Use toString() Method
JavaScript makes it possible to convert one type of data into another without manually modifying its values.
For example, you have to write a program for performing a number to string conversion.
This specified operation can be performed implicitly when the equality operator “==” is used or if the added value’s data type is incompatible.
However, JavaScript also offers a built-in method primarily utilized for explicitly converting a data type into a string.
The JavaScript toString() method is used to represent an array or a number as a string while converting an object to a string, you have to override the “toString()” method so that it can print out the values of the object’s keys.
This write-up will discuss the procedures to use the toString() method.
So, let’s start!
Converting number to string using toString() method
The “toString()” method can be used for number to string conversion.
For this purpose, pass the desired mathematical “base” as an argument, and the “toString()” method will convert the specified number according to the defined base.
For example, we will create a variable named “number” having “433” value:
var number = 433;
Then, we will invoke the “to.String()” method while passing “2” as the number base:
console.log("String with base 2 : " + number.toString(2));
The execution of the “toString()” method will return a value “110110001” as the representation of integer “433” in the “binary” number system:
![]() Similarly, you can convert any number to its “octal” representation by passing “8” as the base argument:
console.log("String with base 8 : " + number.toString(8));
The given output signifies that the number “433” is represented as “661” in the octal number system:
Similarly, you can convert any number to its “octal” representation by passing “8” as the base argument:
console.log("String with base 8 : " + number.toString(8));
The given output signifies that the number “433” is represented as “661” in the octal number system:
![]() The “to.String()” method also permits the conversion of a number to its “hexadecimal” representation.
For this purpose, specify “16” as the base argument:
console.log("String with base 16: " + number.toString(16));
As you can see, in the hexadecimal number system, the number “433” equals to “1b1”:
The “to.String()” method also permits the conversion of a number to its “hexadecimal” representation.
For this purpose, specify “16” as the base argument:
console.log("String with base 16: " + number.toString(16));
As you can see, in the hexadecimal number system, the number “433” equals to “1b1”:
![]() If the “toString()” method is invoked without passing any argument, then the “number” will be converted to “string” without changing the current base:
console.log("String: " + number.toString());
Output
If the “toString()” method is invoked without passing any argument, then the “number” will be converted to “string” without changing the current base:
console.log("String: " + number.toString());
Output
![]()
Converting array to string using toString() method
The “toString()” method can be applied to any type of array, and it returns its elements in a string format.
For instance, we have created an array named “numberArray” that has three elements: “34”, “23”, and “43”:
const numberArray= [34, 23, 43];
Next, we will convert the “numberArray” to a string by utilizing the “toString()” method:
numberArray.toString();
Note that the values displayed in output are enclosed in quotes ‘ ‘ not in square brackets:
![]() In the same way, the “toString()” method can be invoked for converting an array of strings to a single string which will comprise all of the values enclosed in the quotes ‘ ‘:
const stringArray= ['x', 'y', 'z'];
stringArray.toString();
Output
In the same way, the “toString()” method can be invoked for converting an array of strings to a single string which will comprise all of the values enclosed in the quotes ‘ ‘:
const stringArray= ['x', 'y', 'z'];
stringArray.toString();
Output
![]() When “toString()” is used with an “array” that contains another array inside of it, then the “toString()” method first “flatten” it and then returns all values in a string format, separated by a comma.
For instance, the below given “array” has two elements: “Paul” and “32” and a nested array which further comprises two elements.
Now, when the “toString()” method is called as “array.toString()”, it will reduce arrays’ dimensionality and return all of the four elements in a single string:
const array =[ 'Paul', 32, [ 'Max', 4 ] ];
array.toString();
Output
When “toString()” is used with an “array” that contains another array inside of it, then the “toString()” method first “flatten” it and then returns all values in a string format, separated by a comma.
For instance, the below given “array” has two elements: “Paul” and “32” and a nested array which further comprises two elements.
Now, when the “toString()” method is called as “array.toString()”, it will reduce arrays’ dimensionality and return all of the four elements in a single string:
const array =[ 'Paul', 32, [ 'Max', 4 ] ];
array.toString();
Output
![]()
Converting object to string using toString() method
With the help of the “toString()” method, you can perform object to string conversion.
For instance, we will create an “object” that has the following key-value pairs:
const object = { name: 'Paul', age: 40 };
After doing so, we will invoke the “toString()” method:
object.toString();
The output of the given program will print out the string “[object, Object]” which indicates that “object” belongs to the “Object” base class:
![]() However, you can override the “toString()” method to return the values of the object keys in a string format.
In the below-given program, the “Employee” object will override the “toString()” method which is inherited from the “Object” base class.
This user-defined “toString()” method will return a string containing the values of the “name” and “age” properties of the created “employee” object:
function Employee(name, age) {this.name= name;this.age = age;
}
Employee.prototype.toString = function () {return 'Employee Name: '+this.name + ' Age: '+ this.age;
}
employee1 = new Employee('Alex', 35);
console.log(employee1.toString());
Output
However, you can override the “toString()” method to return the values of the object keys in a string format.
In the below-given program, the “Employee” object will override the “toString()” method which is inherited from the “Object” base class.
This user-defined “toString()” method will return a string containing the values of the “name” and “age” properties of the created “employee” object:
function Employee(name, age) {this.name= name;this.age = age;
}
Employee.prototype.toString = function () {return 'Employee Name: '+this.name + ' Age: '+ this.age;
}
employee1 = new Employee('Alex', 35);
console.log(employee1.toString());
Output
![]() That was all of the essential information related to the JavaScript toString() method.
You can further research about it according to your requirements.
That was all of the essential information related to the JavaScript toString() method.
You can further research about it according to your requirements.
Conclusion
The JavaScript “toString()” method can be utilized to represent an array or a number as a string.
When a number is converted to a string, you must specify the desired “base” as an argument; otherwise, the toString() method only converts the number into a string without changing its base.
The toString() method is also utilized for retrieving the values of an object’s keys in a string format.
This write-up discussed the use of the JavaScript toString() method.
JavaScript Array.from() Method
Our day-to-day life somehow includes the task of converting one data type to another and choosing the righteous conversion method has its own significance.
For instance, you have a document of “docx” type and want to convert it in “pdf” format.
Rather than developing a new “word to pdf” converting application, you will search for an already created converter and then use it to resolve the query.
This strategy saves a lot of effort and time.
Similarly, while programming in JavaScript, if it is required to convert an iterable or array-like object to an array, you do not have to iterate over all elements and then add them to the array.
Instead, utilize the built-in JavaScript “Array.from()” method to perform the specified conversion.
Don’t know how to use the Array.from() method? No worries! This post will explain the working of the JavaScript Array.from() method with the help of suitable examples.
So, let’s start!
How to create an array from an iterable object
Prior to ES6 JavaScript, when an array is created using an iterable object, all of its elements are iterated and then added in another array.
For instance, in the below-given example, the “arrayFromArgs()” function will iterate over the arguments ‘Summer’, ‘Winter’, ‘Autumn’, ‘Spring’ and then add them in an “array” using the “push()” method.
After completing this operation, the “arrayFromArgs()” function will return “array1”:
function arrayFromArgs() {
var array1= [];
for (var i = 0; i < arguments.length; i++) {
array1.push(arguments[i]);
}
return array1;}var seasons = arrayFromArgs('Summer', 'Winter', 'Autumn', 'Spring' );
console.log(seasons);
Have a look at the output of the above program:
![]() However, in ES6, the same functionality can be performed using the built-in “Array.from()” method.
However, in ES6, the same functionality can be performed using the built-in “Array.from()” method.
JavaScript Array.from() method
“Array.from()” method is utilized for creating a new array instance from an iterable or array-like object that is passed as an argument.
It then returns the newly created array.
Syntax of JavaScript Array.from() method
Array.from(object, mapFunction, thisArg)
Here, the “object” represents the JavaScript object which needs to be converted into an array, “mapFunction” is an optional parameter that refers to the map function invoked on each array element.
Lastly, “thisArg” is used as “this” value when the specified map function is executed.
Now, let’s check out some examples related to the usage of Array.from().
Example 1: How to create an array from string using JavaScript Array.from() method
We will use the “Array.from()” method to create a JavaScript “array” from the string “linuxhint”.
In this case, “Array.from()” method will place each character on a separate index of the newly created array:
const string = "linuxhint";const array = Array.from(string);
console.log(array);
Execution of the above-given code will return an array comprising the characters of the passed “linuxhint” string:
![]() Example 2: How to create an array from an array-like object using JavaScript Array.from() method
First of all, we will define a function named “convert()” which utilizes the “Array.from()” method to create an array.
In this scenario, the “Array.from()” method accepts the “arguments” of the passed array-like object:
function convert() {
return Array.from(arguments);}
console.log(convert(10, 'dollars'));
When the given “Array.from()” method is executed, it will create a new array and add the number “10” at zero index and string “dollars” at the first index:
Example 2: How to create an array from an array-like object using JavaScript Array.from() method
First of all, we will define a function named “convert()” which utilizes the “Array.from()” method to create an array.
In this scenario, the “Array.from()” method accepts the “arguments” of the passed array-like object:
function convert() {
return Array.from(arguments);}
console.log(convert(10, 'dollars'));
When the given “Array.from()” method is executed, it will create a new array and add the number “10” at zero index and string “dollars” at the first index:
![]() Example 3: How to create an array using the mapping function of JavaScript Array.from() method
In the below-given example, the JavaScript “Array.from()” method will utilize the map function “x => x – 1” to subtract “1” from the values that are passed as arguments to the created “subtract()” function:
function subtract() {
return Array.from(arguments, x => x - 1);}
console.log(subtract(5, 7, 8));
After decrementing one, the arguments “5”, “7”, and “8” will be placed as “[4, 6,7]” in the returned array:
Example 3: How to create an array using the mapping function of JavaScript Array.from() method
In the below-given example, the JavaScript “Array.from()” method will utilize the map function “x => x – 1” to subtract “1” from the values that are passed as arguments to the created “subtract()” function:
function subtract() {
return Array.from(arguments, x => x - 1);}
console.log(subtract(5, 7, 8));
After decrementing one, the arguments “5”, “7”, and “8” will be placed as “[4, 6,7]” in the returned array:
![]() Example 4: How to create an array from a set object using JavaScript Array.from() method
The ES6 “Set” object creates a collection of unique values.
You can create a set object to restrict the addition of duplicated values and convert it to an array using the “Array.from()” method.
In this way, the created array will not have any repeated value:
const set= new Set([12, 56, 23, 12, 43, 12]);const array= Array.from(set);
console.log("Array: "+ array);
Execution of the specified “Array.from()” method will convert the “set” object into an “array”:
Example 4: How to create an array from a set object using JavaScript Array.from() method
The ES6 “Set” object creates a collection of unique values.
You can create a set object to restrict the addition of duplicated values and convert it to an array using the “Array.from()” method.
In this way, the created array will not have any repeated value:
const set= new Set([12, 56, 23, 12, 43, 12]);const array= Array.from(set);
console.log("Array: "+ array);
Execution of the specified “Array.from()” method will convert the “set” object into an “array”:
![]() That was all the essential information related to the JavaScript Array.from() method.
You can further work on it according to your preferences.
That was all the essential information related to the JavaScript Array.from() method.
You can further work on it according to your preferences.
Conclusion
The JavaScript “Array.from()” method is utilized for creating a new array instance from an iterable or array-like object that is passed as an argument.
It then returns the newly created array.
You can also utilize the JavaScript Array.from() method for converting different types of objects such as “set” and “string” to an “array”.
This post explained the usage of the JavaScriptArray.from() method.
How to clear JavaScript console
The “JavaScript console” is a type of interpreter that executes single-line based instructions.
Commands are added to the text entry panel in the JavaScript console, and pressing the “Enter” key performs the requested operation.
Also, the JavaScript console displays the output and executed command in the same window.
When numerous logs and commands are displayed on the console window, it becomes difficult to read the actual output—as a result, clearing the JavaScript console assists in making the console clean while displaying the required data.
This write-up will discuss different ways to clear the JavaScript console with the help of suitable examples.
So, let’s start!
![]()
How to clear JavaScript console
There are different ways to clear the JavaScript console.
Some of the most commonly used methods are:
Using the “console.clear()” method to clear JavaScript console
Using the “CTRL+L” keyboard shortcut to clear JavaScript console
Using the Browser options to clear JavaScript console
We will explain each of the mentioned methods in the next section.
Method 1: How to clear JavaScript console using console.clear() method
In JavaScript, the “console.clear()” method is utilized to clear the console buffer and its corresponding console window where information is displayed.
After clearing the JavaScript console, this method prints out a message stating that “Console was cleared“.
The console.clear() method is fully supported by all modern browsers.
Syntax of using “console.clear()” method to clear JavaScript console
console.clear();
The console.clear() method operates without any arguments.
Example: How to clear JavaScript console using console.clear() method
In our “project.js” file, we will add the “console.log()” method to write out a sample string on the console.
After that the “console.clear()” will clear the JavaScript console window:
console.log("Clearing console using console.clear()");
console.clear();
![]() Here is how our “index.html” file looks like:
Here is how our “index.html” file looks like:
![]() In the next step, we will use the “Live Server” extension of VS Code to open up the “index.html” file in the browser:
In the next step, we will use the “Live Server” extension of VS Code to open up the “index.html” file in the browser:
![]() Now, press “CTRL+SHIFT+j” to activate the console mode:
Now, press “CTRL+SHIFT+j” to activate the console mode:
![]() The added string “Clearing console using console.clear()” in the console.log() method has to be displayed on the JavaScript console; however, the invoked “console.clear()” cleared the data and then printed out the message “Console was cleared” on JavaScript console:
The added string “Clearing console using console.clear()” in the console.log() method has to be displayed on the JavaScript console; however, the invoked “console.clear()” cleared the data and then printed out the message “Console was cleared” on JavaScript console:
![]() As mentioned earlier, the data declared before the “console.clear()” method will be cleared as soon as the “console.clear()” method is called, and the commands added after it will be executed normally.
In the below-given example, the “console.clear()” method will clear the JavaScript console.
Then, the “console.log()” will display the specified string in the console window:
console.clear();
console.log("we have used console.clear() method");
As mentioned earlier, the data declared before the “console.clear()” method will be cleared as soon as the “console.clear()” method is called, and the commands added after it will be executed normally.
In the below-given example, the “console.clear()” method will clear the JavaScript console.
Then, the “console.log()” will display the specified string in the console window:
console.clear();
console.log("we have used console.clear() method");
![]() Now, the JavaScript console shows the following output:
Now, the JavaScript console shows the following output:
![]() The given “console.clear()” method is considered a programmatic approach for clearing the JavaScript console.
However, if you prefer keyboard shortcuts over other procedures, then have a look at the following section.
The given “console.clear()” method is considered a programmatic approach for clearing the JavaScript console.
However, if you prefer keyboard shortcuts over other procedures, then have a look at the following section.
Method 2: How to clear JavaScript console using Keyboard Shortcut
You can utilize the “CTRL+L” keyboard shortcut to clear the JavaScript console.
This keyboard shortcut is handy, and it will save your time and effort.
Example: How to clear JavaScript console using keyboard shortcut
At this point, our JavaScript console contains the following information:
![]() Now to clear the console window, we will press “CTRL+L”:
Now to clear the console window, we will press “CTRL+L”:
![]() Within a few microseconds, the console data will get erased like this:
Within a few microseconds, the console data will get erased like this:
![]() The given keyword shortcut works pretty well, but if you are a mouse person looking for a solution to clear JavaScript with the help of a single click, then the below-given section is right here for you!
The given keyword shortcut works pretty well, but if you are a mouse person looking for a solution to clear JavaScript with the help of a single click, then the below-given section is right here for you!
Method 3: How to clear JavaScript console using Browser Options
Your browser console window contains the “ban-circle” button on the toolbar’s left side.
Clicking on it will clear the JavaScript console:
![]() Another method is to left-click in the console and from the drop-down context menu, select the “Clear console” option:
Another method is to left-click in the console and from the drop-down context menu, select the “Clear console” option:
![]() Both of the specified operations will clear your JavaScript console:
Both of the specified operations will clear your JavaScript console:
![]() We have compiled several useful methods to clear the JavaScript console.
Select any of the given methods according to your preferences.
We have compiled several useful methods to clear the JavaScript console.
Select any of the given methods according to your preferences.
Conclusion
Using the “console.clear()” method, “CTR+L” keyboard shortcut, the “ban-circle” button of the console window toolbar, or the “Clear console” option of the context menu, you can quickly clear the JavaScript console.
This operation assists in making the console clean while displaying the required data.
In this write-up, we have discussed different methods to clear the JavaScript console with the help of suitable examples.
trimStart() and trimEnd() Methods
JavaScript is well-known for its variety of methods, such as the trim() method, which removes the whitespaces (at the start or end) from your string.
The trimStart() and trimEnd() are extensions of the trim() method.
Both methods intend to remove spaces from the string, the trimStart() removes from the beginning while trimEnd() does the same but from the ending of the string.
The whitespaces may include space characters, tab characters, newline characters, or vertical tab characters.
This guide serves the following learning outcomes:
How to use the trimStart() method
How to use the trimEnd() method
How to use the trimStart() method
The working mechanism of the trimStart() method depends on the following syntax.
string.trimStart()
The string refers to the string variable being examined for removing the white spaces.
Example 1The JS code written below practices the trimStart() method on a string variable.
var st = " Welcome to LinuxHint"
console.log(st.trimStart())
The above code applies the trimStart() method to a string named st.
Output
![]() The output shows that the spaces before the string st have been removed from the string.
Example 2The following example tries to make use of the trimStart() method to check whether it removes the whitespaces from the end of the string or not.
var st = "Welcome to LinuxHint "
console.log("length before trimStart() : " + st.length)
st = st.trimStart();
console.log(“length after trimStart() : ” + st.length)
The above code creates a string st which has whtespaces at its end.
Moreover, the code also checks the length of string before and after applying the trimStart() method.
Output
The output shows that the spaces before the string st have been removed from the string.
Example 2The following example tries to make use of the trimStart() method to check whether it removes the whitespaces from the end of the string or not.
var st = "Welcome to LinuxHint "
console.log("length before trimStart() : " + st.length)
st = st.trimStart();
console.log(“length after trimStart() : ” + st.length)
The above code creates a string st which has whtespaces at its end.
Moreover, the code also checks the length of string before and after applying the trimStart() method.
Output
![]() The output shows that the number of characters are the same before and after applying the trimStart() method which states that the trimStart() method cannot be used to trim the whitespaces from the end of the string.
The output shows that the number of characters are the same before and after applying the trimStart() method which states that the trimStart() method cannot be used to trim the whitespaces from the end of the string.
How to use the trimEnd() method
The trimEnd() method works on the following syntax
string.trimEnd()
The string refers to the string variable on which the trimEnd() method would be applied
ExampleThe following code refers to applying the trimEnd() method on a string.
var str = "LinuxHint "
console.log(str.trimEnd())
In the above code, string str is created with multiple tab spaces at the end of it.
Afterward, the trimEnd() method is applied to it to remove these spaces.
Output
![]() The output shows that the trimEnd() method has deleted whitespaces from the end of the string.
Example 2Let’s check how trimEnd() behaves if it is applied to trim the spaces from the end of the string.
var str = " LinuxHint"
console.log("length before trimEnd() : " + str.length)
str = str.trimEnd();
console.log("length after trimEnd() : " + str.length)
In the above code, string str is created that has some whitespaces at the start of the string.
Further, trimEnd() is applied to the string str.
Moreover, the length of string before and after applying the trimEnd() method is also being checked.
Output
The output shows that the trimEnd() method has deleted whitespaces from the end of the string.
Example 2Let’s check how trimEnd() behaves if it is applied to trim the spaces from the end of the string.
var str = " LinuxHint"
console.log("length before trimEnd() : " + str.length)
str = str.trimEnd();
console.log("length after trimEnd() : " + str.length)
In the above code, string str is created that has some whitespaces at the start of the string.
Further, trimEnd() is applied to the string str.
Moreover, the length of string before and after applying the trimEnd() method is also being checked.
Output
![]() As the length before and after applying trimEnd() remains the same, it is concluded that trimEnd() cannot remove whitespaces that occur at the beginning of the string.
As the length before and after applying trimEnd() remains the same, it is concluded that trimEnd() cannot remove whitespaces that occur at the beginning of the string.
Conclusion
The trimStart() and trimEnd() are widely used JavaScript methods that are applicable to strings.
These methods are quite helpful to avoid any useless spaces of the string.
The trimStart() method removes the white spaces from the beginning of the string and the trimEnd() deletes the spaces from the end of the string.
This guide provides a detailed usage of the trimStart() and trimEnd() methods.
Object Destructuring | Explained
In JavaScript, Object Destructuring is an assignment expression that permits you to access an object property value and bind them to separate variables.
This functionality was embedded in the JavaScript ES6 version, making it easier to extract the multiple properties of a JavaScript object with the execution of a single line.
While destructuring an object, the name of the object property is utilized as a variable name.
If the specified name does not match the object property, then the Object destructuring assignment operation will initialize the variable with an “undefined” value.
However, you can specify a “default value” for a non-existing object property with destructuring assignment.
This post will teach Object Destructuring and its usage.
So, let’s start!
How to use Object Destructuring
Suppose we have an “employee” object in the pre-ES6 environment, with the following two properties “name” and “designation”:
var employee= {
name: 'Paul',
designation: 'Manager'};
Now, to extract the properties of the “employee” object, we will add the following code in the program and execute it:
var name = employee.name;var designation = employee.designation;
console.log('Employee Name: ' + name);
console.log('Employee Designation: ' + designation);
Here, the value of the “employee.name” property is assigned to the “name” variable, and the “employee.designation” property’s value is assigned to “designation”:
![]() As you can see, the given procedure of accessing an object’s property and assigning them to the specified variable needs “boilerplate” code, where a section of code is executed with the same pattern and minor alteration.
ES6 embedded an alternative procedure for the assignment of an object’s properties to variables known as “Object Destructuring“.
Object Destructuring prevents the duplication of a property name, and it permits to extract multiple properties of a JavaScript object using a single statement.
As you can see, the given procedure of accessing an object’s property and assigning them to the specified variable needs “boilerplate” code, where a section of code is executed with the same pattern and minor alteration.
ES6 embedded an alternative procedure for the assignment of an object’s properties to variables known as “Object Destructuring“.
Object Destructuring prevents the duplication of a property name, and it permits to extract multiple properties of a JavaScript object using a single statement.
How to extract single property of an object using Object Destructuring
Here is the basic syntax of object destructuring that can be utilized for extracting a specific property of a JavaScript object:
const { property } = object;
Now, we will access the “name” property of already created “employee” object by destructuring it:
let { name } = employee;
console.log('Employee Name: ' + name);
Execution of the given code will create a variable named “name” and assign the value of the “employee.name” property to it:
![]()
How to extract multiple properties of an object using Object Destructuring
If you want to extract multiple properties of an object with the help of Object Destructuring, then follow the below-given syntax:
let { property1, property2 } = object;
Here, the created variables for the “property1” and “property2″ will have the same names that the specified “object” properties have; thus, it makes the program more concise.
For instance, we can destructure the “employee” object to access its “name” and “designation” properties in the following way:
let { name, designation } = employee;
Then, we will print out the extracted values of the specified properties on the console:
console.log('Employee Name: ' + name);
console.log('Employee Designation: ' + designation);
The given output signifies that we have successfully retrieved the “name” and “designation” properties of the “employee” object:
![]()
How to set default property value for an object using Object Destructuring
If you are trying to access a property that is not added in the destructured object, then that specific property will be initialized with an “undefined” value.
As our created “employee” object only comprises “name” and “designation” properties, and “age” property does not exist in it, so the given object destructuring assignment will assign “undefined” value to “age” property:
const { age } = employee;
console.log(age);
![]() However, Object Destructuring also enables you to set a “Default Value” for a property that is not defined in the destructured object.
To imply this functionality, follow the given syntax:
const { property = defaultValue } = object;
We will assign “25” as a default value of the “age” property:
const { age= [25] } = employee;
console.log(age);
Instead of “undefined”, now the “console.log()” method will print out “25” as the “age” property value:
However, Object Destructuring also enables you to set a “Default Value” for a property that is not defined in the destructured object.
To imply this functionality, follow the given syntax:
const { property = defaultValue } = object;
We will assign “25” as a default value of the “age” property:
const { age= [25] } = employee;
console.log(age);
Instead of “undefined”, now the “console.log()” method will print out “25” as the “age” property value:
![]() We have compiled the essential information related to Object Destructuring.
You can explore it according to your requirements.
We have compiled the essential information related to Object Destructuring.
You can explore it according to your requirements.
Conclusion
Object Destructuring is a useful feature that lets you extract single or multiple properties from a JavaScript object and assign their respective values to distinct variables.
It prevents the duplication of a property name and allows extracting multiple properties of a JavaScript object with a single statement.
This post explained Object Destructuring and its usage.
JavaScript String Interpolation | Explained
In JavaScript, the string interpolation concept allows adding variables or expressions to a string.
The interpolation can be carried out on strings that are created using the template literal.
The purpose of string interpolation is to add various variables or expressions inside a string in an error-free manner.
The phenomenon looks like a concatenation but differs in application and advantages.
Keeping the importance of interpolation, this guide serves the following learning outcomes.
Why string interpolation?
How to do a string interpolation
Why string interpolation?
You might be thinking that string concatenation can be used to do the task that string interpolation does, so why is the interpolation carried out?
The usual string concatenation allows you to add variables/expressions to a string.
To do so, you have to add/remove the quotation marks frequently as shown in the following image.
![]() As the above image shows, there is a complex expression that is being carried out to use multiple variables which may result in committing a mistake.
To avoid such a scenario, the interpolation of the string is quite useful in such a situation.
As the above image shows, there is a complex expression that is being carried out to use multiple variables which may result in committing a mistake.
To avoid such a scenario, the interpolation of the string is quite useful in such a situation.
How to do a string interpolation
Before getting into the examples, let’s understand how string interpolation is carried out.
There are multiple ways to create a string either by using the single/double quotes or creating a template literal (by using the backquote(`) ).
The interpolation can be carried out on strings that are created using the backquote(`).
The following syntax refers to the string interpolation.
`the string is being interpolated ${expression}`
The ${expression} indicates that the value of the expression/variable would be embedded into this string.
Let’s practice a few examples to better understand the string interpolation concept.
Example 1
The following code makes use of string interpolation to embed multiple variables in a string.
var age = 30;var name = "david";var post= "author"var str = `the name of ${post} is ${name} and is ${age} years old`
console.log(str);
In the above code, two strings and one integer variable are created.
These variables are used in the string named “str” by using the interpolation concept.
Lastly, the interpolated string is printed on the console.
Output
![]() The output shows that the values of variables “age”, “name”, and “post” are successfully embedded into the string “str” by using the string interpolation.
The output shows that the values of variables “age”, “name”, and “post” are successfully embedded into the string “str” by using the string interpolation.
Example 2
This example checks whether a string interpolation works on strings with single/double quotes.
var name = "david";var post= "author"
console.log("the name of ${post} is ${name}");
console.log('the name of ${post} is ${name}');
The above code tries to use the interpolation concept on a single/double quote’s strings.
Output
![]() The output shows that the string that exercised the interpolation phenomenon is printed as it is.
The value of the variables is not fetched because the single/double quotes print them as they were used.
The output shows that the string that exercised the interpolation phenomenon is printed as it is.
The value of the variables is not fetched because the single/double quotes print them as they were used.
Conclusion
The string interpolation allows adding the values of variables/expressions in a string.
The interpolation is quite helpful and easy to execute as compared to the concatenation concept.
This post provides a detailed guide on string interpolation.
For a brief guide, we have demonstrated a set of examples that illustrate how expressions can be embedded in strings.
Lastly, it is concluded that the template literals can embed the expressions inside them whereas the single/double quotes have to exercise concatenation to carry out the same task.
JavaScript Spread Operator Explained
JavaScript supports numerous operators, methods, and functions to make the code understandable and reusable easily.
One of the well-known operators, the spread operator is practiced retrieving elements from variables of various data types (i.e., strings, arrays, objects, etc).
Furthermore, the usage of the spread operator is manifold such that it can be used to copy array elements, concatenate arrays, append any element to an existing array, and many more.
This guide provides the working of spread operator with its manifold uses.
The following content would be covered in this article:
How spread operator works
How to use the spread operator
How spread operator works
The syntax of the spread operator is similar to the rest operator as can be seen below.
...var
Although the syntax of the rest and spread operator is the same, they have different functionality to offer.
The rest operator returns the combination of elements in an array variable while the spread operator spreads the object into individual elements.
How to concatenate arrays using the spread operator
What comes into your mind while concatenating arrays? concat() method, right? However, the spread operator can also be used to join two or more arrays into a single.
The code provided below refers to the concatenation of arrays using the spread operator.
var arr1=[1, 2, 3]var arr2=[4, 5, 6]var arr3=[...arr1, ...arr2];
console.log(arr3);
The above code creates two arrays named arr1, and arr2.
Later, these arrays are joined using a spread operator and stored in another array named arr3.
Output
![]() The output shows that the spread operator has concatenated two arrays.
The output shows that the spread operator has concatenated two arrays.
How to add new elements to an array using the spread operator
The following code refers to using the spread operator to add new elements to an array.
var arr1=[1, 2, 3]
arr1=[...arr1, 4, 5];
console.log(arr1);
The above code creates an array of numbers that has three elements.
However, by using the spread operator two other elements are added to the arr1.
Output
![]() The output shows that two new elements of arr1 are added.
The output shows that two new elements of arr1 are added.
How to use the spread operator with math functions
In JavaScript, the math functions are used to perform some calculations on the data.
You can use the spread operator with match functions to perform the calculations more effectively as would be practiced in the following code.
var arr1=[11, -22, 13, -44, 35]
console.log(Math.max(...arr1));
The above code creates an array of numbers and Math.max function is utilized on array values using the spread operator.
Output
![]() The output shows that the Math.max() function has been applied on the arr1 with the help of the spread operator and the maximum value from the arr1 is returned.
The output shows that the Math.max() function has been applied on the arr1 with the help of the spread operator and the maximum value from the arr1 is returned.
How to convert “string to an array of string characters” using the spread operator
The code provided below makes use of a spread operator to convert the string into an array of strings.
var x = "LinuxHint";var arr= [...x];
console.log(arr);
The above code initializes a string and then the spread operator separates the string characters into an array of strings.
Output
![]() The output shows that the spread operator has separated the string characters and is stored in an array.
The output shows that the spread operator has separated the string characters and is stored in an array.
How to use the spread operator in the function call
The code provided below makes use of a spread operator to be used for passing multiple arguments.
function add(a, b, c, d, e){
console.log(a+b+c+d+e)}var args=[10, 14, 18]
add(...args, 5, 8);
A function add is created that accepts five values as arguments and adds these values.
The args is an array of numbers that contain three elements.
While calling the function, the values in args are exercised with the spread operator and two parameters are used individually to complete the five arguments.
Output
![]() The output shows that the add() function is called with the args, 5, and 8.
The args comprise three values that would be spread over the function.
The output shows that the add() function is called with the args, 5, and 8.
The args comprise three values that would be spread over the function.
Conclusion
The spread operator allows you to extract the elements and spread them into individuals.
The spread operator came into the business in ES6 (the latest JS version released in 2015).
This article demonstrates the working and usage of a spread operator.
With the help of the spread operator, one can concatenate arrays, add new elements to an array, break down the string into individual characters, and many more.
All the above stated usages of spread operator are explained here with the help of examples.
JavaScript Rest Operator Explained
The rest operator is used to call a function with numerous arguments, and then one can access those arguments as an array.
Another notable use of the rest operator is in array destructuring where multiple array elements can relate to a single variable.
This article aims to provide a detailed guide to JavaScript rest operator with the following learning outcomes.
How the rest operator works
How to use JavaScript rest operator
How the rest operator work
The three dots are used with any variable to refer to as a rest operator.
...var
As the name of the operator directs (rest), this operator relates to the rest of the arguments of a function or the rest of the elements of an array.
For multiple arguments, the rest operator creates an array of values that are contained by it.
Moreover, the rest operator will only work if it is used as the last argument to a function or as the last element to destruct an array.
How to use the rest operator
The manifold usages of the rest operator allow one to use it as a function argument or to refer to multiple elements of an array.
Example 1
The code provided below makes use of the rest operator to pass multiple arguments of a function.
str("Windows", "macOS", "Linux", "Ubuntu", "Debian")function str(x, y, ...multi) {
console.log(x)
console.log(y)
console.log(multi)}
In the above code, the multi is referred to as the rest parameter (because three dots are prefixed with the multi).
The function is called where the x would relate to Windows, y to macOS, and (…multi) to the rest of the values.
Output
![]() The output shows that x has printed Windows, y shows the macOS in output, whereas the rest parameter (…multi) has displayed all the other values (in an array).
The output shows that x has printed Windows, y shows the macOS in output, whereas the rest parameter (…multi) has displayed all the other values (in an array).
Example 2
Another notable use of the rest operator is to destruct an array.
To practice this functionality, the following lines of code are used.
var x = ["welcome", "to" ,"LinuxHint", "JS/jQuery", "rest-operator"]var [a, b, ...c] = x
console.log(c);
The above code creates an array of strings and then an array destructuring is performed.
The a refers to the “Welcome“, b refers to the “to” string, and the rest-operator (…c) is used to refer to multiple values that occur after the “to” string to the end of the array.
Output
![]() The output shows that the values retrieved by the rest-parameter are printed in an array-like structure.
The output shows that the values retrieved by the rest-parameter are printed in an array-like structure.
Example 3
The rest operator can only be used as a last argument of the function.
What if we use it in between arguments or as the first argument? This example aims to answer the above-stated question:
str("Windows", "macOS", "Linux", "Ubuntu", "Debian")function str(x, ...multi, y) {
console.log(x)
console.log(y)
console.log(multi)}
The above code tries to make use of the rest parameter as the second argument.
Output
![]() The output has returned an error that states that the rest parameter must be used as the last parameter.
The output has returned an error that states that the rest parameter must be used as the last parameter.
Conclusion
The rest operator allows the use of numerous arguments by using a single variable prefixed with three dots.
The most notable use of the rest operator is array destructuring and using multiple arguments for a function.
This article provides the working of rest operator alongside various examples that illustrate the manifold uses of rest operator.
By the end of this guide, you would be able to destruct an array or use multiple arguments of a function with the help of the rest operator.
Shallow Copy vs Deep Copy
The copying task is quite straightforward for primitive data types.
However, you must carefully choose between the Shallow and Deep Copy techniques while handling objects and references.
In shallow copy only reference addresses are copied; therefore, altering one object will also apply the same changes to another object.
To avoid such a situation, you can utilize the Deep copy procedure.
This post will explain the concept of Shallow Copy and Deep Copy using appropriate examples.
So, let’s start!
Shallow Copy
A mechanism in which an object is bit-wise copied to a specified object is known as Shallow Copy.
The shallow copy method pastes an exact copy of a particular object into another object.
It is primarily utilized for copying One Dimensional array elements, where it only copies the elements present at the first level.
It only copies the reference addresses to another object.
Methods to Shallow Copy an Object
To shallow Copy a JavaScript object into another object, you can use the following methods:
Object.assign() method
spread operator […]
Assignment operator “=”
Note: If you utilize the “spread operator” or “Object.assign()” method, then after shallow copying, the copied object gets disconnected from the original object, whereas, in the case of using the “assignment” operator, altering the copied object will also modify the original object.
We will briefly discuss each of the mentioned methods to shallow copy an object.
Shallow Copy an object using spread operator
The “spread” operator can be utilized for shallow copying an object.
It is represented as three consecutive dots “…”.
Syntax of using spread operator to Shallow Copy an object
let object2= {...object1};
Here, the spread operator will copy the key-value pair of “object1” to “object2”.
Example: Shallow Copy an object using spread operator
First of all, we will create an object named “employee” having two key-value pairs:
const employee= {
name: 'Alex',
designation: 'Manager'};
Then, we will shallow copy the “employee” object to the newly created “emp1” object using the spread operator:
let emp1= {...employee};
Additionally, you can verify if modifying the property values of the “emp1” object can also affect the “employee” object’s name property:
emp1.name = 'Max';
console.log(“emp1 name: ” + emp1.name);
console.log(“employee name: ” + employee.name); [/cc]
We have successfully copied the “employee” object to the “emp1” object and modifying the “emp1.name” property value have not applied any changes to the “employee.name” property:
![]()
Shallow Copy using Object.assign() method
The JavaScript “Object.assign()” method is utilized to shallow copy the “key-value” pair of an already created object into another object.
The original object will not be affected while utilizing the object.assign() method.
Syntax of using Object.assign() method to Shallow Copy
Object.assign(target, source)
Here, “target” represents the JavaScript object whose key-value pair will be copied, and “source” indicates the object where the copied key-value pair will be placed.
Example: Shallow Copy using Object.assign() method
We will invoke the “Object.assign()” method for shallow copying the “employee” object to “emp1”:
let emp1 = { };Object.assign(emp1, employee);
The “Object.assign()” method will return the target object, which is “emp1” in our case:
![]() Next, we will update the “emp.name” property value:
emp1.name = 'Stepheny';console.log("emp1 name: " + emp1.name);
console.log("employee.name: " + employee.name);
As you can see in the below-given output, altering the “emp.name” property value has not modified the “employee” object.
Next, we will update the “emp.name” property value:
emp1.name = 'Stepheny';console.log("emp1 name: " + emp1.name);
console.log("employee.name: " + employee.name);
As you can see in the below-given output, altering the “emp.name” property value has not modified the “employee” object.
![]()
Shallow Copy using assignment operator
The assignment operator “=” can also assist in shallow copying an object.
In the case of using the assignment operator, both of the variables will refer to the same object.
Changes in one object will also affect the corresponding object’s property value:
Syntax of using assignment operator to Shallow Copy
object2 = object1
Here, the assignment operator copies the “object1” to “object2”.
Example: Shallow Copy using assignment operator
Now, we will use the JavaScript assignment operator for shallow copying the “employee” object to “emp1”:
let emp1 = { };emp1 = employee;
![]() In the next step, we will specify “Stepheny” as the value of “emp1.name” property:
emp1.name = 'Stepheny';console.log("emp1 name: " + emp1.name);
console.log("employee.name: " + employee.name);
The given output signifies that changing the “emp.name” property value has not modified the “employee” object “name” property:
In the next step, we will specify “Stepheny” as the value of “emp1.name” property:
emp1.name = 'Stepheny';console.log("emp1 name: " + emp1.name);
console.log("employee.name: " + employee.name);
The given output signifies that changing the “emp.name” property value has not modified the “employee” object “name” property:
![]() Now, we will discuss the concept of Deep Copy an object.
Now, we will discuss the concept of Deep Copy an object.
Deep Copy
“Deep Copy” is a recursive procedure of copying object.
This mechanism creates a new object and then clones the specified object’s key-value pair to it.
This statement signifies that, while Deep Copying, a JavaScript object is completely cloned into another object.
After that, the copied object gets disconnected from the original object.
Methods to Deep Copy an object
Methods utilized for deep copying a JavaScript object are JSON.stringify() and JSON.parse(), where the stringify() method converts a particular JavaScript object to a string, and then the parse() method performs the parsing operation and returns an object.
Syntax of using JSON.stringify() and JSON.parse() methods to Deep Copy an object
let object2= JSON.parse(JSON.stringify(object1));
Here, the stringify() method converts JavaScript “object1” to a string, and then the parse() method performs the parsing operation and returns which will be stored in “object2”.
Example: Deep Copy an object using JSON.stringify() and JSON.parse() methods
In this example, we have used the stringify() and parse() methods to copy “employee” to the “emp1” object.
The “JSON.stringify()” method will convert the “employee” object into a “string” and then the “JSON.parse()” method parse the resultant string and return a JavaScript object:
let employee= {
name:'Alex',
address: { city: 'Ankara', country: 'Turkey' }
};var emp1= JSON.parse(JSON.stringify(employee));
console.log(emp1);
Given output signifies that we have successfully copied the “employee” object to “emp1”:
![]() Lastly, we will modify some properties of the “emp1” object and then check out the result:
emp1.name = 'Max';
emp1.address.city = 'Istanbul';
console.log("emp1.name: " + emp1.name);
console.log("emp1.address.city : " + emp1.address.city);
console.log("employee.name: " + employee.name);
console.log("employee.address.city : " + employee.address.city);
After performing the deep copying operation, the “emp1” gets disconnected from the “employee,” so any changes made in the “emp1” will not affect the “employee” object:
Lastly, we will modify some properties of the “emp1” object and then check out the result:
emp1.name = 'Max';
emp1.address.city = 'Istanbul';
console.log("emp1.name: " + emp1.name);
console.log("emp1.address.city : " + emp1.address.city);
console.log("employee.name: " + employee.name);
console.log("employee.address.city : " + employee.address.city);
After performing the deep copying operation, the “emp1” gets disconnected from the “employee,” so any changes made in the “emp1” will not affect the “employee” object:
![]() We have compiled all of the essential information related to Shallow Copy and Deep Copy objects.
You can further explore it according to your requirements.
We have compiled all of the essential information related to Shallow Copy and Deep Copy objects.
You can further explore it according to your requirements.
Conclusion
spread operator “[…]”, “Object.assign()”, and “assignment” operator are methods that permit you to shallow copy objects and to deep copy a JavaScript object, JSON.stringify() and JSON.parse() methods are used, where the JSON.stringify() method converts a particular object to a string, which is then parsed back using JSON.parse() method.
This post explained the concept of Shallow and Deep Copy using appropriate examples.
Static vs Dynamic Binding
In JavaScript, Binding is the process of linking the correct function definition with a function call or associating a value to a variable.
A memory address is assigned to each function definition at the compilation phase.
When a particular function is invoked, the program execution shifts control to that specific memory address and fetches the function code stored at the executed location.
This mechanism is known as binding.
Binding is divided into two types: “Static Binding” and “Dynamic Binding”.
If all of the required information related to function calls and variable assignment is already known at compile-time, it is called Static Binding.
In the other case, Dynamic Binding occurs when the required information is acknowledged at run-time.
This write-up will explain Static Binding and Dynamic Binding with the help of appropriate examples.
So, let’s start!
Static Binding
JavaScript “Static Binding” occurs when a compiler recognizes all required information related to assigning values to variables or invoking a function, at the compilation phase.
It is also known as “Compile-time Binding” or “Early Binding”.
The JavaScript Static binding technique is implemented during the coding process, making the program more efficient because all variable values and the function calls are predefined in this type of binding.
However, it also affects code flexibility.
Some examples of the Static Binding procedure are: “Operator Overloading” and “Function Overloading”.
Now, let’s check out how Static binding works behind the Operator Overloading and Function Overloading.
Operator Overloading with Static Binding
JavaScript permits us to redefine how operators work for various user-defined types such as structures and objects.
This functionality is known as Operator Overloading.
Example: Operator Overloading with Static Binding
Since operator overloading provides the functionality to change the behavior of the specified operator at compile-time, we will use this functionality for redefining the behavior of the “+” operator:
For instance, you can utilize the “+” operator to add two numbers:
3 + 6
Or to concatenate strings:
'linux' + ' ' + 'hint'
Or to concatenate numbers with strings:
1 + ' article'
Output
![]() At compile-time, Operator “+” is overloaded based on the type of data we have used.
For instance, “3” + “6” created a new number “9”, whereas, “1” + “article” generated a “1 article” string.
That’s how we have implemented operator overloading with the help of static binding.
At compile-time, Operator “+” is overloaded based on the type of data we have used.
For instance, “3” + “6” created a new number “9”, whereas, “1” + “article” generated a “1 article” string.
That’s how we have implemented operator overloading with the help of static binding.
Function Overloading with Static Binding
Function Overloading is another example of static binding in which multiple functions are defined with the same name having different parameters. The function call binds itself to the correct function based on the passed arguments at the compilation time.
Example 1: Function Overloading with Static Binding
In Function Overloading, the added methods can have the same name, but to overload them, you have to pass different arguments, changing the results accordingly.
For instance, we have created two functions with the same name.
The first “show()” function accepts two arguments, “x” and “y,” and it returns their sum:
function show(x,y) {
return x+y;}
The second “show()” function will accept and return the passed “z” argument:
function show(z) {
return z;}
Now when we pass “3” and “5” values as arguments, the “show(3,5)” function call will bind itself to the first show() function, which accepts has two parameters, whereas when one argument is specified, the “show(2)” function call will bind with the second show() function:
show (3,5);
Output
![]() show(2);
show(2);
Output
![]() In the above-given example, both added “show()” functions are bound statistically at the compilation time.
As a result, no time will be wasted determining which function to call, which results in fast and efficient program execution.
We will now move ahead and discuss Dynamic Binding.
In the above-given example, both added “show()” functions are bound statistically at the compilation time.
As a result, no time will be wasted determining which function to call, which results in fast and efficient program execution.
We will now move ahead and discuss Dynamic Binding.
Dynamic Binding
“Dynamic Binding” is the process of assigning a value to a variable or invoking a function at run-time.
It is also known as “Runtime Binding” or “Late Binding” because the binding of function calls to the correct function or assignment of values to the respective variables is delayed until the run-time.
Dynamic Binding enables the program to be more flexible by permitting users to choose what function should be invoked and what value to assign to a variable at the execution time.
However, it slows the execution, as all of the specified information is delivered at run-time.
“Method Overriding” is an excellent example of the utilization of Dynamic Binding.
Method Overriding with Dynamic Binding
In JavaScript, Method Overriding is a mechanism that allows a child class to implement the method of the parent class in a different manner.
In this way, the child class overrides the parent class method with the help of dynamic binding.
Example: Method Overriding with Dynamic Binding
In this example, we will override the “speak()” method of the “Birds” (parent) class.
For this purpose, we will further define two “speak()” methods, first in the “Owl” class and second in the “Pigeon” class, and then invoke the “speak()” method of both of these child classes:
class Birds {
speak() {
console.log("Birds have different sounds");
}}class Owl extends Birds {
speak() {
console.log("Owl says Screeeeee");
}}class Pigeon extends Birds {
speak() {
console.log("Pigeon says coo COO coo");
}}const owl = new Owl();const pigeon = new Pigeon();
owl.speak();
pigeon.speak();
It can be seen from the below output the speak() method of Birds class is overridden by its child classes because of the Dynamic Binding:
![]() That was all about Static vs Dynamic Binding.
You can further explore this topic according to your requirements.
That was all about Static vs Dynamic Binding.
You can further explore this topic according to your requirements.
Conclusion
Static Binding occurs when a compiler recognizes all of the required information related to the assignment of variable values or invoking a function at the compilation phase, whereas Dynamic Binding is assigning a value to a variable or invoking an invoking value a function at run-time.
Function overloading and Operator overloading are based on Static Binding, and Method Overriding is considered an example of Dynamic Binding.
This write-up discussed Static Binding and Dynamic Binding with the help of suitable examples.
How to find the length of an array
A data type called an array is used for storing multiple items of the same type of data, including integers, strings, objects, etc.
JavaScript provides a list of array handling support such as length property is used to get or set the length of an array.
Although the .length property has manifold uses.
However, this article focuses on practicing the length property to find the length of an array.
How to find the length of an array
The JavaScript’s array.length property is the key stakeholder in dealing with the length of an array.
The length property of an array element contains the following properties:
must be greater than the highest index
it is an unsigned 32 bit integer
Syntax
To find the length of an array, the array.length property is exercised which depends on the following syntax.
array.length
The array refers to the array variable which is being examined for finding the length.
Example 1: Using contiguous elements
The following code returns the length of an array that has consistent indexing and the index refers to some value as well.
var staff= ["Mike", "Steve", "Joe", "Alex"];
console.log("The length is: " + staff.length)
The above code creates an array variable and stores various strings inside it.
The staff.length used in the second line would print the length of staff array.
Output
![]() The output shows that the length of the array is 1unit ahead of the highest index(3) of the staff array.
The output shows that the length of the array is 1unit ahead of the highest index(3) of the staff array.
Example 2: Non-contiguous
The following code refers to finding the length of an array that has some noncontiguous elements.
The noncontiguous concept states that the elements are not in a sequential indexing manner.
var num= [21, , 23, , 25, 28, 31, 34, 37, ,];
console.log("The length is: " + num.length)
In the above code, a num array is created that contains various numbers.
However, it is observed that few spaces are left blank.
After that the length property of an array is applied on the array to get the length of this array.
Output
![]() The output shows that the array.length has considered the empty elements in the counting.
The output shows that the array.length has considered the empty elements in the counting.
Conclusion
The length of the array can be obtained by using the length property.
In this post, we have demonstrated the ways to get the length of an array element.
To do so, the syntax of .length property is explained followed by various examples to better convey the usage of .length property.
How to filter array elements
JavaScript provides various functions and methods that may be used to perform some operations on array elements.
JavaScript’s filter() method allows you to filter array elements based on some condition.
The condition is defined inside the callback function.
The callback function comprises a set of code lines and this callback function is passed to the filter() method as an argument.
This post provides the working of the filter() method and a set of examples that shows how the fitter () method filters out the array elements.
How to filter array elements
As discussed earlier, the filter() method is practiced by filtering the array elements.
This section presents the working and usage of the filter() method.
How to use filter() method
Before getting into applying the filter() method, let’s have a look at the syntax to get the basic concept of the filter() method.
array.filter(callback-function(Val, index, array), this-val)
The above syntax illustrates that an array is being
The filter() method accepts two parameters callback-function() and this-val
the callback-function() is the key stakeholder which takes three parameters Val, Index, and Array
the Val represents the array value being passed
the Index shows the index of the element that is being passed
Array parameter in callback-function() denotes the array of the element
The return value of the filter() method
Note: The Val parameter of the callback-function() is necessary to be used.
However, the other parameters are optional and need not be used every time.
Example 1
The following JavaScript code makes use of the filter() method to filter specific elements of an array.
var a = [2, 7, 11, 15, 18, 22]function even(num){
return num%2 == 0; }
console.log(a.filter(even));
In the above code, an array of numbers is created on which the filter() method would be applied.
After that, a function is created that filters the even numbers only and this function is passed to the filter() method as an argument.
Output
![]() The output shows that only the even numbers from the array are printed on the console.
Example 2
The example explained here would filter out the positive numbers from the array.
var arr = [-2, 5, -10, -12, 7, 15]function pos(num){
return num >= 0; }
console.log(arr.filter(pos));
The above code creates an array of numbers and then a callback function is executed which filters returns the numbers that are greater than or equal to zero.
Output
The output shows that only the even numbers from the array are printed on the console.
Example 2
The example explained here would filter out the positive numbers from the array.
var arr = [-2, 5, -10, -12, 7, 15]function pos(num){
return num >= 0; }
console.log(arr.filter(pos));
The above code creates an array of numbers and then a callback function is executed which filters returns the numbers that are greater than or equal to zero.
Output
![]() The output shows that the filter method has returned only those numbers that have values greater than or equal to zero.
Note: One can update the content of the array by keeping only those values that are returned by the filter() method.
Example 3
The following code practices the use of the filter() method on an array of strings.
var str = ["Linux OS", "Windows OS", "macOS"]function len(num){
return num.length > 5; }
console.log(str.filter(len));
The above code creates an array of strings and then the callback function is applied to it that would get the length of each element.
After that, the callback function would return only those string elements that have a length greater than 5.
Output
The output shows that the filter method has returned only those numbers that have values greater than or equal to zero.
Note: One can update the content of the array by keeping only those values that are returned by the filter() method.
Example 3
The following code practices the use of the filter() method on an array of strings.
var str = ["Linux OS", "Windows OS", "macOS"]function len(num){
return num.length > 5; }
console.log(str.filter(len));
The above code creates an array of strings and then the callback function is applied to it that would get the length of each element.
After that, the callback function would return only those string elements that have a length greater than 5.
Output
![]() The output shows that only those string elements are returned that have lengths greater than 5.
The output shows that only those string elements are returned that have lengths greater than 5.
Conclusion
In JS, the array elements can be filtered out by using the filter() method.
The main ingredient of the filter() method is the callback function.
The filter() method is necessary to be executed with the callback function.
This callback function contains a few lines of code that set the condition which would be used to filter array elements.
By going through this post, you would have learned to filter array elements using the filter() method along with a set of examples.
Difference between Null and Undefined
Like other languages, JavaScript also supports Null and undefined terms for variable handling.
If a variable is declared but has not been assigned with any value, then it is referred to as undefined.
However, if a variable is assigned with a Null value, then it means that it is empty.
It is to notice that both the terms are intermingling for a novel programmer.
Therefore, this guide intends to list down the differences between Undefined and Null values.
By the end of this guide, the following learning outcomes are expected.
Null value
Undefined value
Difference between Null and Undefined values
Before digging into the difference, let’s elaborate both the terms individually.
Null value
Null represents no value and variables can be assigned with the Null keyword to represent them as a Null variable.
For instance, the following code assigns a null value to a variable.
var x = null;
console.log(x);
In the above code, a variable named ‘x‘ is created and null is assigned to that variable.
Output
![]() The output shows that the value of x (in which a null value was stored) is printed on the console.
The output shows that the value of x (in which a null value was stored) is printed on the console.
Undefined value
A variable that has been declared but whose value has not been assigned is referred to as an undefined variable.
Apart from this, the undefined term can be obtained by using the undefined keyword while assigning.
Let’s refer to the following few lines of code.
var y;
console.log(y);
In the above code, a variable y is declared but is not assigned with any value.
Output
![]() The output shows that the value has returned undefined as its output states that the value of the variable does not exist.
The output shows that the value has returned undefined as its output states that the value of the variable does not exist.
Difference between Null and Undefined
This section lists down the notable differences and provides examples that would better clarify each difference.
“Equal” but not “identical”
The Null and undefined values look alike but the following code differentiates the Null and undefined values by using the “==” and “===” operator.
Notice that, the “==” operator looks for the equality of the terms whereas the “===” operator looks for the value and type of the variables.
var x = null;var y;
console.log(x==y);
console.log(x===y);
The above code takes two variables, the x has a null value whereas the variable y is undefined.
Output
![]() The output shows that the “==” operator returns true but the strict equality operator has shown false.
Thus, it can be concluded that the Null and Undefined terms are not identical.
The output shows that the “==” operator returns true but the strict equality operator has shown false.
Thus, it can be concluded that the Null and Undefined terms are not identical.
Arithmetic Operation
While dealing with arithmetic operations, the Null and Undefined values show different behaviors.
The following code practices the addition by using Undefined and Null values.
var x = null;var y;
console.log(x + 2);
console.log(y + 1);
The above code declares one variable with a null value and the other variable is set to an undefined value.
Moreover, the console.log statement intends to print the result of the addition(+) operator, and the variables “x” and “y“.
Output
![]() The output shows that the Null value acts as a “0” while dealing with arithmetic operators.
Contrary to this, when an undefined value is used with arithmetic operators, it would show NaN (Not a Number) in output.
Type
Another prominent difference is the data type of these values.
The Null value is of object type whereas the Undefined values have an undefined type.
The following line of code refers to showing the difference between the types of these two values.
var x = null;var y;
console.log("Type of x is: " +typeof(x));
console.log("Type of y is: " +typeof(y));
The above code will print the type of the “x” and “y” variables.
Output
The output shows that the Null value acts as a “0” while dealing with arithmetic operators.
Contrary to this, when an undefined value is used with arithmetic operators, it would show NaN (Not a Number) in output.
Type
Another prominent difference is the data type of these values.
The Null value is of object type whereas the Undefined values have an undefined type.
The following line of code refers to showing the difference between the types of these two values.
var x = null;var y;
console.log("Type of x is: " +typeof(x));
console.log("Type of y is: " +typeof(y));
The above code will print the type of the “x” and “y” variables.
Output
![]() The above output represents that the type of x (which contains null value) is an object whereas the type of y (which is an undefined variable) is undefined.
The above output represents that the type of x (which contains null value) is an object whereas the type of y (which is an undefined variable) is undefined.
Conclusion
The Null and Undefined values refer to the various notions of variables.
Like, if the variable has not been assigned with any value, then it is referred to as undefined.
The Null is a value that is assigned to any variable which states that the variable is empty.
Majorly these can be differentiated by their data type, the way they operate in the presence of arithmetic operators.
Moreover, one can check the level of equality of Null and Undefined by using “abstract” and “strict” equality operators.
Array Destructuring | Explained
Arrays comprise numerous values of the same data type and the elements of arrays are accessed/retrieved by using the indexing phenomenon.
However, it may not be fruitful in the case of complex arrays and you want to retrieve the array elements from that.
The array destructuring phenomenon is carried out to retrieve the array elements with ease.
In array destructuring, each element is referred to as a variable and then by calling that variable you would be able to retrieve the element associated with that variable.
With the aim of getting elements, this article provides a detailed guide on array destructuring.
How array destructuring works
As discussed, earlier destructuring is referring to the array elements by using distinct variables.
Thus, for destructuring, you require a set of variables that can be used to get the specific element of an array.
The lines of code written below better demonstrate how destructuring works.
var arr = [1, 2, 3, 4];var [w, x, y, z,] = arr;
Upon calling the variable “w” you would get “1” in the output, similarly, the value “2” would be stored inside the “x” variable and so on.
How to destruct an array
This section provides a set of examples that illustrate how arrays can be manipulated by using the destructuring phenomenon.
Example 1
The following code creates distinct variables for each element of an array.
var arr = [10, 11, 12]var [x, y, z]= arr;
console.log(x);
console.log(y);
console.log(z);
The above code is described as,
an array arr is created which contains three numeric values
another set of variables is created that refers to the arr variable and thus they will be associated with each element of the array arr.
the variables x, y, and z are printed
Output
![]() The output shows that the values 10, 11, and 12 are now contained by the x, y, and z respectively.
Example 2
Let’s look at how the destructuring works if the number of elements is not equal to the number of variables.
var arr = [4, 7]var [x, y, z]= arr;
console.log(x);
console.log(y);
console.log(z);
The above code contains an array comprising two numeric values.
This array is being associated with three variables and then these variables are printed using the “console.log” statement.
Output
The output shows that the values 10, 11, and 12 are now contained by the x, y, and z respectively.
Example 2
Let’s look at how the destructuring works if the number of elements is not equal to the number of variables.
var arr = [4, 7]var [x, y, z]= arr;
console.log(x);
console.log(y);
console.log(z);
The above code contains an array comprising two numeric values.
This array is being associated with three variables and then these variables are printed using the “console.log” statement.
Output
![]() The above output shows that the value of z results in undefined because there are only two numbers in arr thus only two variables can be mapped on these variables.
Example 3
This example makes use of the rest operator to destruct an array.
var arr = ["LinuxHint", "welcome", "Linux, Windows", "JavaScript/jQuery", "informative tutorials"]var [x, y, ...other]= arr;
console.log(x);
console.log(y);
console.log(other);
The above code creates an array of strings and the x, y, and others refer to the elements of an array.
The x and y relate to the first, and second elements respectively whereas the other variable is used with the rest operator, therefore, the other contains all the elements occurring after the second element.
Output
The above output shows that the value of z results in undefined because there are only two numbers in arr thus only two variables can be mapped on these variables.
Example 3
This example makes use of the rest operator to destruct an array.
var arr = ["LinuxHint", "welcome", "Linux, Windows", "JavaScript/jQuery", "informative tutorials"]var [x, y, ...other]= arr;
console.log(x);
console.log(y);
console.log(other);
The above code creates an array of strings and the x, y, and others refer to the elements of an array.
The x and y relate to the first, and second elements respectively whereas the other variable is used with the rest operator, therefore, the other contains all the elements occurring after the second element.
Output
![]() The output shows that x and y contain the first two elements only while the rest of the array elements are contained in the other variable.
Note: As variables cannot be created using a number thus numeric values cannot be used to destruct the array.
The output shows that x and y contain the first two elements only while the rest of the array elements are contained in the other variable.
Note: As variables cannot be created using a number thus numeric values cannot be used to destruct the array.
Conclusion
The array destructuring is carried out by associating variables with the array elements.
These distinct variables can be used to get only specific elements of the array.
This article provides a detailed guide on array destructuring.
Here, you would get to know and perform the destructuring of arrays.
For better understanding, we have provided a set of examples that refer to destructuring the array elements.
How to use logical operators
In JavaScript, logical operators can be used on single or multiple expressions to mark a decision based on the true/false result of the conditions.
Like other languages, JavaScript also supports three logical operators AND, OR, and NOT.
The OR/AND operator is applied to multiple expressions whereas the NOT operator functions on a single operation as well as multiple conditions as well.
This article provides a descriptive guide to logical operators in Java and demonstrates the usage of each operator with the help of examples.
How to use logical AND operator
The logical AND operator compares multiple conditions and returns a Boolean value in returns.
The following outputs are expected while using AND operator:
true: if all the conditions/expressions are true
false: if any condition or all the conditions are false
The following example practices the AND operator.
var x = 5;var y = 7;if (x < 10 && y < 10){
console.log("the variables are digits");}
The above code initializes two variables x and y.
The AND operator is applied on both variables:
Output
![]() The output shows that the AND operator is applied, and the “if” body is executed that states both conditions are true.
Example
However, if one of the conditions is not true then the AND operator will return false.
The following code refers to the above-stated condition.
var x = 5;var y = 7;if (x 10){
console.log("the variables are digits");}else {
console.log("condition is false")}
In the above code, the second condition is false (y > 10) thus the whole expression will return false as the AND operator is being used on conditions.
Output
The output shows that the AND operator is applied, and the “if” body is executed that states both conditions are true.
Example
However, if one of the conditions is not true then the AND operator will return false.
The following code refers to the above-stated condition.
var x = 5;var y = 7;if (x 10){
console.log("the variables are digits");}else {
console.log("condition is false")}
In the above code, the second condition is false (y > 10) thus the whole expression will return false as the AND operator is being used on conditions.
Output
![]() From the output, the else part of the if-else statement is executed which states that either one condition or the whole expression is false.
From the output, the else part of the if-else statement is executed which states that either one condition or the whole expression is false.
How to use Logical OR operator
The OR operator compares multiple conditions and returns a Boolean value.
The OR operator may produce the following outputs.
true: if one condition or all conditions are true
false: if all the conditions are false
For a better interpretation of this operator, the following JavaScript code is practiced.
var x = 9;var y = 12;if (x < 10 || y < 10){
console.log("The sum of x and y is : " + (x+y));}
The above code is practiced using the OR operator between two conditions.
The one condition (y<10) is false and the other is true (x<10).
Output
![]() The output shows that the OR operator considered the whole expression as true as one condition is true.
The output shows that the OR operator considered the whole expression as true as one condition is true.
How to use Logical NOT operator
The NOT operator can be applied to a single condition or to a comparison of multiple conditions, it returns false if the expression/condition is true and vice versa.
The following lines of code are practiced showing the usage of the NOT operator.
var x = 5;var y = 10;if (!(x > 10)){
console.log("The difference of x and y is : " + (y-x));}
In the above code, the NOT operator is used on the condition (x > 10) and if the condition is false the NOT will consider it as true and the if-statement will be executed.
Output
![]() The output shows that the if block is executed because the condition used with the NOT operator is false and the NOT operator changes the false status to true.
The output shows that the if block is executed because the condition used with the NOT operator is false and the NOT operator changes the false status to true.
Conclusion
Logical operators allow you to produce results by comparing a few conditions.
The operators in this category include AND, OR, and NOT operators.
This article provides a descriptive guide on logical operators.
Depending on the condition and operator used, these operators can be used to compare expressions and a Boolean value can be obtained in return.
When all conditions are true, the AND operator returns true, whereas the OR operator returns true even when a single condition is true.
Moreover, the examples provided in this guide demonstrate the usage of logical operators.
How to use array concat() method
Whether it is JavaScript or any other programming language, arrays are the widely accepted data types as they could store numerous values of the same datatype., various methods are available to perform some operations on JavaScript.
The concat() method is used to join multiple arrays and store them inside a single array.
This article provides a detailed overview of the concat() method with the following learning outcomes.
How concat() method works
How to use concat() method
How concat() method works
The working of the concat() method depends on its syntax which is described below.
array1.concat(array2, array3, ...)
In the above syntax the array, array1, array2 refers to the arrays being considered for joining.
The data of array1, array2 will be appended to the elements of the array.
How to use concat() method
For better understanding, this section demonstrates various examples that better clarify the working of the concat() method.
Example 1: replacing the content of an array
The code provided below updates the values of arr1 with the help of concat() method.
var arr1 = [1, 4];var arr2 = [7, 15];var arr3= [13, 29];var arr4=[15, 16];var arr1 = arr2.concat(arr3, arr4);
console.log(arr1);
In the above code, the values of arr2, arr3, and arr4 are concatenated and updated the values of the arr1 variable.
Output
![]() The output shows that the value of the arr1 variable has been updated after concatenating the values of arr2, arr3, and arr4.
The output shows that the value of the arr1 variable has been updated after concatenating the values of arr2, arr3, and arr4.
Example 2: updating the content of an array
This example represents the usage of concat() method to append the elements of one array to another.
var arr1 = ["Linux", "Windows"];var arr2 = ["JavaScript", "jQuery"];var arr3 = ["NodeJS", "VS"];var arr1 = arr1.concat(arr2, arr3);
console.log(arr1);
The above code applies the concat() method to add the content of arr2 and arr3 to the array named arr1.
Output
![]() The output shows that the elements of arr2 and arr3 are appended to the existing elements of arr1.
The output shows that the elements of arr2 and arr3 are appended to the existing elements of arr1.
Example 3: using concat() on nested arrays
This example illustrates the usage of concat() method to manipulate the content of nested arrays.
var arr1 = ["mike", ["tom"]];var arr2 = [["jack"], ["john", "ben"]]var arr3=arr1.concat(arr2)
console.log(arr3);
The code creates two nested arrays (arr1 and arr2) and by using the concat() method, the content of these arrays is stored in another array arr3.
Output
![]() It is observed from the output that, with the help of concat() method the content of two nested arrays has been stored in another array.
It is observed from the output that, with the help of concat() method the content of two nested arrays has been stored in another array.
Conclusion
In JavaScript, the array concat() method is used to join multiple arrays to update, set, or change the elements of an array.
In this guide, the working mechanism of the concat() method is provided by describing the syntax of the concat() method.
For better understanding, a few examples are demonstrated that illustrate the usage of concat() method in various scenarios.
What are JavaScript Pointers
People often criticize JavaScript for being a basic language; however, a closer examination reveals that it deals with complexity itself.
For instance, in other programming languages such as Golang, C, and C#, the “&” operator is utilized to create “pointers,” which refer to a particular memory location.
You may think of the absence of pointers functionality, but that’s not the case.
JavaScript does have pointers though they are implemented differently.
This write-up will discuss JavaScript pointers and how they work for primitive data types and objects.
So, let’s start!
What are JavaScript Pointers
In JavaScript, “Object References” are called “Pointers”.
Instead of explicitly storing a primitive or object value, these pointers save the memory address where the data is stored.
Thus, the stored memory address can be used to refer to the data indirectly.
Working of JavaScript Pointer
When the assignment operator “=” is utilized with objects, this operation creates an alias (references) for the original object rather than creating a new object.
So making any changes in the “reference” will also affect the original object.
Whereas, in the case of primitive data types such as an array, string, and boolean, a copy of the original variable is created, and altering or reassigning the reference variable will not modify the original variable.
We will now practically implement the functionality of JavaScript pointers for the primitive and non-primitive values.
Example 1: Using JavaScript Pointers
First of all, we will create an “object literal” named “ref” having the following “key-value” pair:
var ref = {number: 23};
Next, we will create a “pointer()” function that accepts an “object” as an argument that increment its “number” property value:
function pointer(object){
object.number++;}
Then, we will pass the “ref” object” to the “pointer()” function:
pointer(ref);
console.log(ref.number);
![]() Open up your HTML file in the browser and press “CTRL+SHIFT+j” to activate the console mode:
Open up your HTML file in the browser and press “CTRL+SHIFT+j” to activate the console mode:
![]()
Output
![]() In the above-given program, the reference of the “ref” object is copied over the “object,” and both “object” and “ref” refer to the same “name-value” pair in the memory.
This statement also signifies that changing the value of the “number” property un the “pointer()” function will also affect the “number” property of “ref”.
Check out the below-given gif to have a better understanding of the execution process:
In the above-given program, the reference of the “ref” object is copied over the “object,” and both “object” and “ref” refer to the same “name-value” pair in the memory.
This statement also signifies that changing the value of the “number” property un the “pointer()” function will also affect the “number” property of “ref”.
Check out the below-given gif to have a better understanding of the execution process:
![]()
Example 2: Using JavaScript Pointers
In this example, we will add a paragraph element <p> with a “references” id:
<p id="references"></p>
After doing so, we will declare a “games” object having two “name-value” pairs.
Then, we will assign the “games” object as a reference to the paragraph element as its inner HTML content:
<script>
var games = {outdoor:"cricket", indoor:"ludo"};
document.getElementById("references").innerHTML = games;</script>
![]() The given output states that currently, the paragraph element is referring to an “Object”:
The given output states that currently, the paragraph element is referring to an “Object”:
![]() To access the value of “games.indoor” property, we will add the following line in our “index.html” file:
document.getElementById("references").innerHTML = games.indoor;
As you can see, now the paragraph element has successfully accessed the value of the “games.indoor” property:
To access the value of “games.indoor” property, we will add the following line in our “index.html” file:
document.getElementById("references").innerHTML = games.indoor;
As you can see, now the paragraph element has successfully accessed the value of the “games.indoor” property:
![]() Till this point, you may have understood how object references work for objects.
In the next example, we will check out the working of JavaScript pointers for the primitive data types.
Till this point, you may have understood how object references work for objects.
In the next example, we will check out the working of JavaScript pointers for the primitive data types.
Example 3: Using JavaScript Pointers
In our program, we have declared an array named “array1” and then created a reference “ref” of the original array:
var array1= [1, 2, 3];//assign-by-referencevar ref= array1;
After that, we will push an element to “array1”.
This action will also add the specified element to the “ref” variable because the created reference is the copy of the original array:
array1.push(0);
console.log("array : ", array1);
console.log("reference : ", ref);
Output
![]() However, specifically changing the values of the “ref” variable will not modify the original “array1” values:
ref = [3, 4, 34];
console.log("Reference", ref);
console.log("Original array", array1);
The given output shows that values of the “ref” variable are altered, but it the “array1” comprises the same original values and has not changed:
However, specifically changing the values of the “ref” variable will not modify the original “array1” values:
ref = [3, 4, 34];
console.log("Reference", ref);
console.log("Original array", array1);
The given output shows that values of the “ref” variable are altered, but it the “array1” comprises the same original values and has not changed:
![]() We have compiled the basic information related to JavaScript pointers.
You can further explore this topic according to your preferences.
We have compiled the basic information related to JavaScript pointers.
You can further explore this topic according to your preferences.
Conclusion
Object References are also called JavaScript Pointers.
Instead of explicitly storing a primitive or object value, the JavaScript pointers save the memory address where the data is stored.
Thus, the stored memory address can then indirectly refer to the data.
This write-up discussed JavaScript pointers and how they work for primitive data types and objects.
JavaScript FindIndex() Method | Explained
Sometimes, you may need to find an index of an array element to check if it satisfies the specified criteria.
For instance, in a JavaScript program, you are required to fetch the index number of the first element in an array whose value is less than 18.
It makes no difference if the value is 1 or 17; all that matters is that the particular index should be considered the first occurrence of the element with a value less than 8.
In such a scenario, JavaScript “findIndex()” method can be utilized.
This write-up will teach the usage of the JavaScript findIndex() method with the help of suitable examples.
So, let’s start!
JavaScript findIndex() method
The “findIndex()” method in ES6 is quite similar to the find() method.
However, instead of returning the element itself, it retrieves the index of that array element.
The “findIndex()” method accepts a testing function as an argument that searches for the first occurrence of the required elements and returns its “index.” It sets the return case to”-1”, if no such element exists.
Syntax of using JavaScript findIndex() method
findIndex(testFunc(element[, index[, array]])[, thisArg])
Here, the “findIndex()” method comprises two parameters: “testFunc()” and “thisArg”.
We will discuss both parameters of the JavaScript findIndex() method in the below-given section.
testFunc() parameter of findIndex() method
In the above-given syntax, the “testFunc()” function is invoked for each array element until the function returns “true”, which indicates that the required element is found.
This function accepts the following three arguments:
“element”: In testFunc(), “element” is a “required” argument that represents the current element of the array.
“index”: “index” is an “optional” argument of the “testFunc()” that indicates the index of the current array element.
“array”: “array” is another “optional” argument of the “testFunc()” that refers to the array under processing.
thisArg parameter of findIndex() method
“thisArg” is an optional parameter of the “findIndex()” method that is utilized while executing the callback.
Its value is set to “undefined” if you do not specify any value.
Let’s check out some practical examples that utilize the JavaScript findIndex() method.
Example 1: Using JavaScript findIndex() method
Firstly, we will create an array named “numbers” having the following elements:
let numbers = [2, 3, 5, 7, 8, 9, 7];
In the next step, we will invoke the “findIndex()” method on the “numbers” array and pass the arrow function “=>” which checks if the element in the “numbers” array is equal to “7”:
let index = numbers.findIndex(numbers=> numbers=== 7);
console.log("Index is " + index);
The first “7” element is found at the “third” index of the “numbers” array; that’s why the findIndex() method returned “3” as an index of the first occurrence of an element:
![]() We will now use the findIndex() method with a more complex condition.
We will now use the findIndex() method with a more complex condition.
Example 2: Using JavaScript findIndex() method
In the same program, we will modify the “findIndex()” method in such a way that it fetches the index of the first occurrence of the “7” element where the index is greater than “3” in “numbers” array:
let index = numbers.findIndex((numbers, index) => numbers=== 7 && index > 3);console.log("Index is " + index);
The “numbers” array comprises two “7” elements, one at the third index and the other at the sixth index.
However, according to the given condition, the “findIndex()” method will consider “6” as the index of the first occurrence of the “7” element:
![]()
Example 3: Using JavaScript findIndex() method
Suppose that you have a list of employees objects having “name” and “age” properties:
const employees= [
{ name: 'Alex', age: 24},
{ name: 'Max', age: 27},
{ name: 'Paul', age: 28},];
The following “findIndex()” method will find the first employee index in the “employees” array, whose age is greater than “18”:
const index1 = employees.findIndex(employees=> employees.age> 18);
console.log("Index of eligible employee " + index1);
As you can see from the output, the first eligible employee is present at the “0” index:
![]() According to the specified condition, If no element exists in the “employees” array then the “findIndex()” method will return “-1”:
const index2 = employees.findIndex(employees=> employees.age<= 18);
console.log("Index of ineligible employee is " + index2);
The output displays “-1” because not a single employee’s age is less than or equal to “18”:
According to the specified condition, If no element exists in the “employees” array then the “findIndex()” method will return “-1”:
const index2 = employees.findIndex(employees=> employees.age<= 18);
console.log("Index of ineligible employee is " + index2);
The output displays “-1” because not a single employee’s age is less than or equal to “18”:
![]() We have compiled all of the essential information related to using the JavaScript findIndex() method.
You can further explore this topic according to your preferences.
We have compiled all of the essential information related to using the JavaScript findIndex() method.
You can further explore this topic according to your preferences.
Conclusion
The JavaScript “findIndex()” method is utilized for fetching the index of the first occurrence of an array element.
This method accepts a testing function as an argument that searches for the first occurrence of the required elements and returns its “index,” and if no such element exists in the array, it sets the return case to “-1“.
In this write-up, we have discussed the usage of the JavaScript findIndex() method with the help of suitable examples.
How to reduce an array to a value
Arrays may be reduced to get a single value as an output.
The reduction in the array may be required when you are supposed to get the sum of the elements or to get the maximum or minimum element inside an array.
To do so, JavaScript allows the reduce() method to reduce the array.
This article provides a way to reduce an array.
How to reduce an array to a value
The reduce() method can be used to get a single value of the array elements.
The syntax of the reduce() method is described below:
array.reduce(function(total, CurrVal, CurrInd, array), IniVal)
It is observed that the reduce() method accepts only two parameters which are function() and IniVal.
The function() accepts the following parameters:
total(): specifies the IniVal of the function
CurrVal: value of the current element
CurrInd: index of the current element
array: the array object of the current element
IniVal: used to set the value to be passed to the function
Example 1: Using reduce() to get the sum
The below code practices the reduce() method to sum all the values in an array.
var num = [5, 9, 17, 33, 65]var sum = num.reduce(function(total, CurrVal) {
return total + CurrVal}, 0)
console.log(sum)
In the above code, a function(total, CurrVal) accepts the initial value of the function which is set to “0“.
Moreover, the CurrVal refers to the array elements and this method returns a sum of total and CurrVal.
Output
![]() The output returns 127 which is the sum of all the array elements used.
The output returns 127 which is the sum of all the array elements used.
Example 2: Using the reduce() method to get the sum
The code provided below
var obj = [{x: 4}, {x: 8}, {x: 16}, {x: 32}, {x: 64}]var sum = obj.reduce(function (total, CurrVal) {
return total + CurrVal.x}, 0)
console.log(sum)
In the above code, an array of objects is created and named as obj.
Moreover, a reduce function is applied to the obj array to add the elements
Output
![]() The output shows that the numbers inside the object are added and then the sum is returned.
The output shows that the numbers inside the object are added and then the sum is returned.
Conclusion
The reduce() method is practiced to reduce an array to a value.
This article provides a descriptive guide on reducing the array to a single value.
The syntax of the reduce() method is described briefly and its applicability is explained with the help of examples.
How to find the sum of an array of numbers
Arrays can store multiple elements of a single data type like an array of strings comprise values of string data types.
Similarly, the array of numbers refers to storing the numeric values inside an array.
JavaScript provides various methods that can be used to perform operations on arrays.
In this informative post, we have compiled various possibilities to sum an array of numbers.
By the end of this guide, you will get an understanding of the following methods:
how to use for loop to sum an array of numbers
how to use a while loop to sum an array of numbers
how to use the reduce() method to sum an array of numbers
How to use for loops to sum an array of numbers
The iterative nature of the for loop helps to sum all the numbers of an array.
Before getting into examples, let’s understand the working of for loop.
for(initialization; condition; increment/decrement){
statement 1;
statement 2;}
The initialization of the variable sets the value from where the loop variable will start.
The condition part of the for loop sets a threshold that must be fulfilled to execute statements (JavaScript code).
After each iteration, the increment/decrement part increases or decreases the value of the loop variable.
Example
The JavaScript code provided below makes use of a for loop to sum the elements of an array.
var arr1 =[2, 20, 40, 100];var res = 0;for (i=0; i < arr1.length; i++) {
res += arr1[i] }
console.log(res);
The above code creates an array of numbers named arr1.
The res variable is initialized to store the sum of elements.
After that, the for loop is exercised in the following manner:
the variable “i” is initialized at “i=0“
the looping condition is “i < arr1.length” which states that the loop will run until the value of “i” is less than the length of arr1.
After each iteration, the value of “i” would be incremented by “1“.
the statement inside the for loop updates the value of the res variable after each iteration by adding the array element in it
Output
![]() The output shows that the numbers inside the array are summed up and the sum is printed.
The output shows that the numbers inside the array are summed up and the sum is printed.
How to use a while loop to sum an array of numbers
The working of while-loop depends on the following syntax.
While (condition) {
Statement(s) of code;
Increment/decrement;}
Once a condition is checked, the code is executed until it is true.
A final increment or decrement of the variable concludes the iteration.
Example
The following JS code practices a while-loop to sum an array of numbers.
var arr =[2, 4, 8, 14];var sum = 0;var i=0;
while (i < arr.length) {
sum += arr[i]
i++;}
console.log(sum);
In the above code, the array named arr is initialized alongside the variables named “sum” and “i“.
Moreover, the condition is set to “i < arr.length” which states that the while loop will run until the value of variable “i” reaches the length of arr.
Inside the loop, each array element would be summed up to the value of sum.
Output
![]() The above output shows that the while loop can be used to sum an array of numbers.
The above output shows that the while loop can be used to sum an array of numbers.
How to use reduce() method to sum an array of numbers
The array reduce() method of JavaScript can also be used to sum the array of numbers.
Like for loop, the reduce() method also iterates over the numbers of an array.
The syntax followed by the reduce() method is provided below.
array.reduce(function(RetVal, CurrVal, CurrIndex, array), Val)
The reduce() method accepts two parameters, first if callback-function and the second is Val(initial value).
The callback-function can accept four parameters, two (RetVal and CurrVal) of them are necessary and other two (CurrIndex and array) are optional.
Example
The following JavaScript code makes use of the reduce() method to calculate the sum of the numbers stored in an array.
var arr = [4, 8, 12, 16];function sum(total, curr) {
return total + curr;
}
console.log(arr.reduce(sum, 0));
In the above code,
An array of numbers is initialized named arr
Callback-function (sum) is exercised which contains two parameters total and curr.
The total represents the last value returned by the sum function and the curr value refers to the element of the array.
Lastly, the reduce(sum, 0) is applied to iterate the sum function over each element of the array.
Output
![]() The output shows that the reduce() method has calculated the sum of the array of numbers.
The output shows that the reduce() method has calculated the sum of the array of numbers.
Conclusion
JavaScript provides the support of various loops(e.g.
“for” and “while”) and the reduce() method to sum an array of numbers.
The iterative nature of loops is helpful in getting the sum of an array because the loops intend to consider each element one by one.
To get the sum of array elements, we have provided the syntax and usage of for-loop, while-loop, and reduce() method to add all the numbers of an array.
JavaScript Date Object Methods | Explained
When creating applications it is often required to display the date and time of a region where the application is being used in.
JavaScript allows its user to play with dates by using date object.
A JavaScript date object is a representation of time and there is a huge range of JavaScript methods that are associated with the date object.
These methods are broadly classified into two categories which are as follows.
JavaScript Get Date Object Methods
JavaScript Set Date Object Methods
Let’s explore the methods that fall under the above-mentioned categories.
JavaScript Get Date Object Methods
The JavaScript methods that are used to fetch values such as year, month, day, etc, are referred to as the Get Date Object Methods.
Here we have discussed these methods in-depth.
getDate() Method
For the purpose of fetching the day of the date in numbers, the getDate() method is used.
Syntax
Date.getDate()
Example
The example below demonstrates the working of getDate() method.
We have first created a new date object by the name “date” and then used a variable “fetch” to extract the date.
![]() The date has been fetched.
The date has been fetched.
getFullYear() Method
In order to extract the full year of a date, the getFullYear() method is used.
Syntax
Date.getFullYear()
Example
We are first creating a date object and then simply using the getFullYear() method, we are printing the full year of the date object.
![]() The full year of the date object is 2022.
The full year of the date object is 2022.
getMonth() Method
This method is used to fetch the month of the date in the form of numbers.
Syntax
Date.getMonth()
Example
In the code below, we are using the getMonth() method to fetch the month of the date object.
![]() The month has been fetched successfully.
The month has been fetched successfully.
getDay() Method
To fetch the weekday of the date in numeric form, the getDay() method is used.
Syntax
Date.getDay()
Example
The example below demonstrates the working of the getDay() method.
![]() The number 4 represents the 4th day of the week.
The number 4 represents the 4th day of the week.
getHours() Method
As the name suggests, the getHours() method is used to extract the hour of the date object.
Syntax
Date.getHours()
Example
Here is how you can use the getHours() method.
![]() The hours have been fetched in numeric form.
The hours have been fetched in numeric form.
getMinutes() Method
For the purpose of fetching the minutes, the getMinutes() method is used.
Syntax
Date.getMinutes()
Example
By creating a date object first you can simply use the getMinutes() method to fetch the minutes of the date object.
![]() The minutes were fetched successfully.
The minutes were fetched successfully.
getSeconds() Method
In order to extract the seconds, the getSeconds() method is used.
Syntax
Date.getSeconds()
Example
The example below demonstrates the working of the getSeconds() method.
![]() The getSeconds() method is working properly.
The getSeconds() method is working properly.
getMilliseconds() Method
This method is used to extract the milliseconds of a date.
Syntax
Date.getMilliseconds()
Example
Here is how you use the getMilliseconds() method.
![]() The milliseconds were fetched successfully.
The milliseconds were fetched successfully.
getTime() Method
This method is used to extract the time in the date object in milliseconds.
Syntax
Date.getTime()
Example
This example illustrates how to use the getTime() method.
![]() The time has been fetched in milliseconds.
The time has been fetched in milliseconds.
JavaScript Set Date Object Methods
The JavaScript methods that are used to set values such as year, month, das, etc, are referred to as the Set Date Object Methods.
Below we have explained these methods in detail.
setDate() Method
For the purpose of setting the day of a date object, the setDate() method is used.
Syntax
Date.setDate(day)
The day is a required parameter which is an integer from 1-31.
Example
The example below demonstrates how you can create a new date object and then use the setDate() method to modify the initial date.
![]() The new date has been set.
The new date has been set.
setFullYear() Method
In order to set the full year of a date object, the setFullYear() method is used.
It can also set the month and day of the date object.
Syntax
Date.setFullYear(year, month, day)
The year is a required parameter, however, the month and day are optional parameters.
Example
This example demonstrates the working of the setFullYear() method.
We have created a new date object first and then extracted the year of that date object.
We then used the setFullYear() method to set the new year of the object to 2023.
![]() The new year has been set.
The new year has been set.
setMonth() Method
For the purpose of setting the month of a date object the setMonth() method is used.
Syntax
Date.setMonth(month, day)
The month is a required parameter accepting integer values from 0-11, however, the day is an optional parameter accepting values from 1-31.
Example
In the example mentioned below, a new date object has been created and the month of that object is being fetched.
Now using the setMonth() method we are setting the new of the object.
![]() The new month has been set.
The new month has been set.
setHours() Method
As the name suggests the setHours() method is used to set the hours of a date object.
Syntax
Date.setHour(hour, min, sec, millisec)
The hour is a required parameter accepting integer values from 0-23.
However, the min, and sec are optional parameters accepting values from 0-59.
The millisec is also an optional parameter that renders values from 0-999.
Example
In the code below, after creating a new date object we are extracting the hours of that object and then using the setHours() method we are setting the new hours to 23.
![]() The new hours have been set.
The new hours have been set.
setMinutes() Method
The method that is used to set the minutes of a date object is referred to as the setMinutes() method.
Syntax
Date.setMinutes(min, sec, millisec)
The min is a required parameter that exhibits values from 0-59.
The sec also accepts values from 0-59 but it is an optional parameter.
Meanwhile, the millisec is also an optional parameter that renders values from 0-999.
Example
We are setting a new date object and fetching its minutes as well.
Afterward, we are using the setMinutes() method to set new minutes to 20.
![]() The new minutes have been set.
The new minutes have been set.
setSeconds() Method
The method that is used to set the seconds of a date object is referred to as the setSeconds() method.
Syntax
Date.setSeconds(sec, millisec)
The sec is a required parameter that exhibits values from 0-59.
Meanwhile, the millisec is an optional parameter that renders values from 0-999.
Example
To demonstrate the working of the setSeconds() method, we are first creating a new date object and extracting the seconds of that date object.
Then we are using the setSeconds() method to set new seconds for the same date object.
![]() The new seconds have been set.
The new seconds have been set.
setMilliseconds() Method
The method that is used to set the milliseconds of a date object is referred to as the setMilliseconds() method.
Syntax
Date.setMilliseconds(millisec)
The millisec is a required parameter that renders values from 0-999.
Example
In the example below we are creating a date object by the name “date” then we are fetching the milliseconds of that date object.
Afterward, using the setMilliseconds() method we are setting the new milliseconds to 97.
![]() The milliseconds have been set.
The milliseconds have been set.
setTime() Method
For the purpose of setting the time in the date object in milliseconds started from epoch(1 January 1970), the setTime() method is used.
Syntax
Date.setTime(milliseconds)
The milliseconds is a required parameter.
Example
This example illustrates how to use the getTime() method.
![]() The time has been set in milliseconds.
The time has been set in milliseconds.
Conclusion
JavaScript date object methods are broadly classified into two categories which are get date object methods and set date object methods.
As the name suggests, these methods can be used to either fetch or set the date and time of a date object method.
Some methods that lie under the group of get date object methods are getDate(), getFullYear(), getHour(), etc.
Meanwhile, some methods that are classified into the category of set object methods are setDate(), setFullYear(), setHour() etc.
Methods that fall under both of these categories are explained in-depth in this tutorial.
Is JavaScript Case Sensitive
Yes, JavaScript is a case-sensitive language when it comes to accessing variables, constants, keywords, functions, and classes in a program.
For instance, you have created two variables named “employee” and “Employee”., both created variables are valid, distinct, and contain separate values.
So, by utilizing the “employee” variable, you cannot retrieve the value “Employee” variable as they have different memory addresses.
Similar to other programming languages, JavaScript also comprises a set of styling guidelines known as the “Naming Conventions”.
One such convention is to observe capitalization while naming a JavaScript class.
The utilization of the JavaScript naming convention assists in improving the code readability and makes code maintenance easier.
This write-up will explain the case-sensitive nature of JavaScript with respect to its supported naming convention.
So, let’s start!
JavaScript Names should be Descriptive
Any name assigned to a JavaScript class, function, or variable should be descriptive so that in the future, any other developer can easily understand the code without misinterpreting the name.
Here are some good and bad cases for naming a variable:
let data= "Alex"; // bad
let value= "Alex"; // bad
let name= "Alex"; // good
We will now move ahead and discuss the naming conventions for boolean type, constants, functions, and classes.
JavaScript Naming Convention for Boolean type variable
In JavaScript, the “boolean” variables are typically named by utilizing a prefix such as “has” or “is”.
Adding a prefix helps to distinguish the boolean type variables from number and string data types.
For instance, the below-given four boolean variables are created according to the JavaScript naming convention for boolean type variable:
let isMember = false;
let isActive = true;
let hasHousingAddress = false;
let isOnline = true;
JavaScript Naming Convention for Constants
A JavaScript constant is an immutable type of value, which means that its value cannot be changed after initialization.
The “const” keyword is utilized to declare constants, and its “name” should be assigned in capital (UpperCase) letters:
const COLOR = "Yellow";
If the constant you want to create comprises more than one word, then separate them by using the underscore “_” as follows:
const SYSTEM_LANGUAGE = "en-us";
JavaScript Naming Convention for Functions
Functions use the lower “camelCase” naming convention, same as variables.
You can also add a “verb” as a prefix with the function name that describes what the function does:
function getName(name) {
return name;}function setName(name){
employeeName= name;}
JavaScript Naming Convention for classes
The “PascalCase” or the upper “CamelCase” naming convention can be applied to the classes name, where the first character of each word starts with an “UpperCase” character:
class EmployeeProfile{}class Organization{}
In the above-given example, we have created two classes named “EmployeeProfile” and “Organization” by following the specified naming convention.
The next section will compare the behavior of JavaScript and HTML in terms of case sensitivity.
JavaScript case-sensitivity vs HTML case-sensitivity
In Web designing, HTML and JavaScript work together in such a way that objects are created using HTML tags, and then JavaScript assists in manipulating the added objects.
Now, you may think that if JavaScript is a sensitive language, then HTML should also behave the same to maintain a stable interaction, but that’s not the case.
As HTML language was designed to have a “universal” nature where both computers and humans can easily read the web pages.
In this language, all added letters are rendered the same.
There is no need to specify the uppercase or lowercase letter for naming any HTML element, which signifies that HTML language is not case sensitive.
However, JavaScript is case-sensitive because it is a “basic” language that follows a naming convention for the specified objects.
We have compiled the essential information related to case sensitive nature of JavaScript and its naming conventions.
You can further explore it according to your requirements.
Conclusion
JavaScript is a case-sensitive language when it comes to accessing variables, constants, keywords, functions, and classes in a program.
It also comprises a set of styling guidelines known as the “Naming Conventions”.
The utilization of the JavaScript naming convention assists in improving the code readability and makes code maintenance easier.
This write-up explained the case-sensitive nature of JavaScript with respect to its supported naming convention.
How to Implement JavaScript Stack Using an Array
You may have seen different examples of stacks in your day-to-day life, such as a bunch of books, a collection of DVDs, or trays of dishes that are stacked on top of each other.
For instance, you have placed all of your favorite books on a desk, and now you want to get the first book.
To do so, you have to remove all of the books one by one until you get the first book.
Stacks work on the same principle known as “Last In First Out“, where the last element pushed to the stack will pop out first.
It is based on two operations: “Push” and “Pop”, where “Push” refers to adding an element at the top of the stack, and the “Pop” method is utilized for its removal.
JavaScript arrays offer built-in “push()” and “pop()” methods; therefore, you can use an array to implement Stacks efficiently.
This write-up will discuss the method to implement JavaScript Stack using an array.
So, let’s start!
How to implement JavaScript Stack using an array
To implement Stack, we will create a “Stack” class and declare an array named “items” in the constructor.
This “items” array will be utilized to store Stack elements and execute its related methods:
class Stack {
constructor() {
items = [];
}
}
After creating a Stack class, add the below-given methods to perform different operations on the stack elements.
How to Push an element to JavaScript Stack
“Push” refers to the operation of adding an element to the top of the stack.
In our JavaScript Stack, the “push()” method will accept an “element” as an argument and push it in the “items” array:
push(element) {
this.items.push(element);
console.log(element + " is pushed to Stack.");}
How to Pop an element from JavaScript Stack
The “pop()” method deletes or removes the top element of a JavaScript array.
Adding the “pop()” method in the “Stack” class will assist in popping out the top element of the “items” array:
pop() {
return this.items.pop();}
How to Check Size of JavaScript Stack
The “length” property of the “items” array will return the size of our JavaScript stack:
size() {
return this.items.length;}
How to Peek an element from JavaScript Stack
Want to know which element is at the top of your JavaScript stack? For this purpose, you have to define a “peek()” method that fetches the element that exists on the top of the JavaScript Stack without removing it.
Here, the given “peek()” method will get the top element of the “items” array by decrementing “1” from the “length”:
peek() {
return this.items[this.items.length - 1];}
How to Clear JavaScript Stack
To remove all Stack elements at once, you have to set the “length” property of the “items” array to “0”:
clear() {
console.log( "Stack is cleared");
this.items.length = 0;}
How to Check if JavaScript Stack is empty
After clearing the elements, you can reconfirm that the JavaScript Stack is empty or not.
To do so, define an “isEmpty()” method and then use the strict equality operator “===” to compare the length of the “items” array to “0”:
isEmpty() {
return this.items.length === 0;}
The given “isEmpty()” method will return a boolean value, where “true” means that the “items” array is empty and “false” indicates that it is not empty.
We will practically implement the Stack class and discuss the specified methods in the following example.
Example: Implement JavaScript Stack using an array
Here is the complete code which we have added in our program for implementing JavaScript stack:
class Stack {
constructor() {
this.items = [];
}
//Performing push operation
push(element) {
this.items.push(element);
console.log(element + " is pushed to Stack.");
}
//Pop out element from Stack
pop() {
return this.items.pop();
}
//Check Stack size
size() {
return this.items.length;
}
//check top most element of Stack
peek() {
return this.items[this.items.length - 1];
}
//Clear Stack
clear() {
console.log( "Stack is cleared");
this.items.length = 0;
}
//Check if Stack is empty
isEmpty() {
return this.items.length === 0;
}}
![]() Firstly, we will create an instance of the “Stack” class and “Push” the following three values to the “items” array (stack):
var stack = new Stack();
stack.push(10);
stack.push(20);
stack.push(30);
Firstly, we will create an instance of the “Stack” class and “Push” the following three values to the “items” array (stack):
var stack = new Stack();
stack.push(10);
stack.push(20);
stack.push(30);
![]() In the next step, we will check the size of the created stack by invoking the “size()” method:
console.log(stack.size());
The given output signifies that the size of JavaScript Stack is “3”:
In the next step, we will check the size of the created stack by invoking the “size()” method:
console.log(stack.size());
The given output signifies that the size of JavaScript Stack is “3”:
![]() Next, use the “peek()” method to print out the topmost element of the stack:
console.log(stack.peek()+ " is at the top of stack");
As you can see from the output that “30” is at the top of our created stack:
Next, use the “peek()” method to print out the topmost element of the stack:
console.log(stack.peek()+ " is at the top of stack");
As you can see from the output that “30” is at the top of our created stack:
![]() Then, pop out the topmost element from the stack:
console.log(stack.pop() + " is popped out from the stack");
Then, pop out the topmost element from the stack:
console.log(stack.pop() + " is popped out from the stack");
![]() After removing “30”, now re-check stack size and the fetch new element that is positioned at the top:
console.log(stack.size());console.log(stack.peek()+ " is at the top of stack");
After removing “30”, now re-check stack size and the fetch new element that is positioned at the top:
console.log(stack.size());console.log(stack.peek()+ " is at the top of stack");
![]() Now, we will clear the stack by utilizing the “stack.clear()” method:
stack.clear();
Now, we will clear the stack by utilizing the “stack.clear()” method:
stack.clear();
![]() Lastly, verify if the stack is empty or not:
stack.isEmpty();
In the following output, “true” indicates that the length of the Stack is equal to “0”:
Lastly, verify if the stack is empty or not:
stack.isEmpty();
In the following output, “true” indicates that the length of the Stack is equal to “0”:
![]() That was all about the essential information related to implementing the JavaScript stack using an array.
You can further explore it according to your requirements.
That was all about the essential information related to implementing the JavaScript stack using an array.
You can further explore it according to your requirements.
Conclusion
Arrays offer the “push()” and “pop()” methods that permit you to implement the JavaScript stack efficiently.
After creating an array, you can perform further operations such as adding or removing an element to the stack, checking the topmost element, clearing the whole stack, and verifying the array size.
This write-up discussed the procedure to implement JavaScript Stack using an array.
How to Implement JavaScript Queue Using an Array
Suppose there is a queue of customers at a bank reception waiting to resolve their queries.
In this scenario, the customer who arrived first will be served first, while those who came later will be positioned at the end of the queue and served accordingly.
Queue works on the same principle known as “First In First Out”, where the first element added to the queue will be removed first.
It is based on two operations: “Enqueue” and “Dequeue”, where “Enqueue” refers to adding an element at the end of the queue and the “Dequeue” method is utilized to remove the front element, using array “shift()” method.
JavaScript arrays offer built-in “push()” and “shift()” methods; therefore, you can use an array to implement queues efficiently.
This write-up will discuss the method to implement JavaScript Queue using an array.
So, let’s start!
How to implement JavaScript Queue using an array
To implement Queue, we will create a “Queue” class and declare an array named “items” in its constructor.
This “items” array will be utilized to store queue elements:
class Queue{
constructor() {
items = [];
}}
After creating a Queue class, add the below-given methods to perform different operations on the queue elements.
How to Enqueue an element Queue
“Enqueue” refers to the operation of adding an element to the end of the queue.
In our JavaScript Queue class, we will define an “enqueue()” method to add the elements at end of the queue, with the help of the “items” array “push()” method:
enqueue(element){
console.log(element + " is added to JavaScript queue.");
this.items.push(element);}
How to Dequeue an element from JavaScript Queue
The “dequeue()” method is used to delete or remove the starting or front element of a JavaScript queue.
Invoking the “shift()” method in the “dequeue()” method will assist in removing the front end element from the created queue:
dequeue() {
return this.items.shift();}
How to check length of JavaScript Queue
The “length” property of the “items” array will return the length of the JavaScript queue:
length() {
return this.items.length;}
How to peek an element from JavaScript Queue
The “peek()” method is utilized to fetch the element that exists on the front of the JavaScript queue without modifying it:
peek() {
return this.items[0];}
How to print elements of JavaScript Queue
To print all of the Queue elements, we will define a “print()” method in the JavaScript Queue class.
This method will return a string named “str” that comprises all of the queue elements:
print(){
var str = "";
for(var i = 0; i < this.items.length; i++)
str += this.items[i] +" ";
return str;}
How to Clear JavaScript Queue
To remove all queue elements at once, you have to set the “length” property of the “items” array to “0”:
clear() {
console.log( "Queue is cleared");
this.items.length = 0;}
How to Check if JavaScript Queue is empty
After clearing the elements, you can reconfirm that the JavaScript queue is empty or not.
To do so, define an “isEmpty()” method and then use the strict equality operator “===” for comparing the length of the “items” array to “0”:
isEmpty() {
return this.items.length === 0;}
The given “isEmpty()” method will return a boolean value, where “true” means that the “items” array is empty and “false” indicates that it is not empty.
Now, let’s move ahead and practically implement the JavaScript Queue using an array and utilize the discussed methods:
Example: How to Implement JavaScript Queue using an array
Here is the complete code which we have added in our program for implementing JavaScript Queue:
class Queue {
constructor() {
this.items = [];
}
//Enqueue an element to Queue
enqueue(element) {
console.log(element + " is added to JavaScript queue.");
this.items.push(element);
}
//Dequeue an element from Queue
dequeue() {
return this.items.shift();
}
//Check Queue length
length() {
return this.items.length;
}
//Check front element of Queue
peek() {
return this.items[0];
}
//Print Queue elements
print() {
var str = "";
for (var i = 0; i < this.items.length; i++)
str += this.items[i] + " ";
return str;
}
//Clear Queue
clear() {
console.log("Queue is cleared");
this.items.length = 0;
}
//Check if Queue is empty
isEmpty() {
return this.items.length === 0;
}}
![]() Firstly, we will create an instance of the “Queue” class and “enqueue” following three values to the “items” array:
var queue= new Queue();
queue.enqueue(40);
queue.enqueue(50);
queue.enqueue(60);
Firstly, we will create an instance of the “Queue” class and “enqueue” following three values to the “items” array:
var queue= new Queue();
queue.enqueue(40);
queue.enqueue(50);
queue.enqueue(60);
![]() In the next step, we will check the length of the created queue by invoking the “length()” method:
console.log(queue.length());
The given output signifies that the length of the JavaScript Queue is “3”:
In the next step, we will check the length of the created queue by invoking the “length()” method:
console.log(queue.length());
The given output signifies that the length of the JavaScript Queue is “3”:
![]() Next, use the “peek()” method to print out the front element of the queue:
console.log(queue.peek()+ " is at the front of queue");
As you can see from the output that “40” is placed at the front of our created JavaScript queue:
Next, use the “peek()” method to print out the front element of the queue:
console.log(queue.peek()+ " is at the front of queue");
As you can see from the output that “40” is placed at the front of our created JavaScript queue:
![]() Then, we will dequeue the front element from the queue:
console.log(queue.dequeue() + " is removed from the queue");
Then, we will dequeue the front element from the queue:
console.log(queue.dequeue() + " is removed from the queue");
![]() After removing “40” element, now re-check queue length and the print out the remaining queue elements:
console.log(queue.length());
console.log("Remaining Queue elements are " + queue.print());
After removing “40” element, now re-check queue length and the print out the remaining queue elements:
console.log(queue.length());
console.log("Remaining Queue elements are " + queue.print());
![]() Check out the front element of the queue:
console.log(queue.peek()+ " is at the front of queue");
After removing the element “40”, “50” is now at the front of the JavaScript queue:
Check out the front element of the queue:
console.log(queue.peek()+ " is at the front of queue");
After removing the element “40”, “50” is now at the front of the JavaScript queue:
![]() Now, we will clear the queue by utilizing the “queue.clear()” method:
queue.clear();
Now, we will clear the queue by utilizing the “queue.clear()” method:
queue.clear();
![]() Lastly, verify if the queue is empty or not:
queue.isEmpty();
In the following output, “true” indicates that the length of the queue is equal to “0,” which means that the queue is empty:
Lastly, verify if the queue is empty or not:
queue.isEmpty();
In the following output, “true” indicates that the length of the queue is equal to “0,” which means that the queue is empty:
![]() That was all about the essential information about implementing the JavaScript queue using an array.
You can further explore it according to your requirements.
That was all about the essential information about implementing the JavaScript queue using an array.
You can further explore it according to your requirements.
Conclusion
Arrays offer the “push()” and “shift()” methods that permit you to implement the JavaScript queue efficiently.
After creating an array, you can perform further operations such as adding or removing an element to the queue, checking the front element, clearing the whole queue, and verifying its length.
This write-up discussed the procedure to implement JavaScript Queue using an array.
Different Ways to Check if an Object is Empty
Checking if an object is empty is a common task you might need to perform in daily programming activities.
JavaScript does not support any built-in “isEmpty()” or “length()” method to check if the specified Object is empty or not.
However, it offers different ways that you can utilize for creating a custom solution according to your requirement.
Additionally, the JavaScript “jQuery” library can also help you in this regard.
This write-up will teach different ways to verify if an object is empty.
So, let’s start!
How to Check if an Object is Empty
Before jumping into other ways, we will discuss the default behavior of JavaScript for verifying if an object is empty or not.
For this purpose, firstly create an object by utilizing the object literal syntax:
const object = {};
Now, compare it to an empty object using the strict equality operator “===”:
console.log(object === {});
The “console.log()” method will return “false” after performing the comparison, which signifies that both operands are not equal:
![]() At this point, you may wonder that if we have compared two empty JavaScript objects, then why the comparison operator return case is set as “false” instead of “true”?
In the above example, we compared the object references, not their values, and the references of these empty objects are not the same.
That’s the reason the specified comparison has not shown the expected results.
So,, is there any other way to verify if an object is empty?
The answer is Yes! JavaScript offers several methods for this purpose, such as:
Object.keys() method
JSON.stringify() method
Object.getOwnPropertyNames() method
jQuery.isEmptyObject() method
We will briefly discuss each of the mentioned methods in the following sections.
At this point, you may wonder that if we have compared two empty JavaScript objects, then why the comparison operator return case is set as “false” instead of “true”?
In the above example, we compared the object references, not their values, and the references of these empty objects are not the same.
That’s the reason the specified comparison has not shown the expected results.
So,, is there any other way to verify if an object is empty?
The answer is Yes! JavaScript offers several methods for this purpose, such as:
Object.keys() method
JSON.stringify() method
Object.getOwnPropertyNames() method
jQuery.isEmptyObject() method
We will briefly discuss each of the mentioned methods in the following sections.
Method 1: Check if an object is empty using Object.keys() method
The “Object.keys()” JavaScript method is used to check if the object passed as an argument is empty or not.
It returns an array that comprises the object keys.
Then, utilizing it with the “length” property will let you know about the number of object keys present in the array.
Syntax
Object.keys(object).length === 0
The “object” passed as an argument will be considered as an “empty” object if the “length” property returns “0”.
Example
We will create two objects named “employee1” and “employee2”.
The “employee1″ object is empty as it does not have a key-value pair, whereas, in “employee2”, we will add two keys, “name”, “age,” and their respective values.
Note: We have created two objects to easily distinguish between the output for an empty and non-empty object.
const employee1 = {};const employee2 = { name: 'Alex', age: 32 };
Now, add the following code in the program:
console.log(Object.keys(employee1).length === 0);
console.log(Object.keys(employee2).length === 0);
Execution of the given Object.keys() method first creates an array comprising the keys of the passed Object; then the “length” property checks array length using the strict equality operator “===”. This operation will output “true” if there exist no keys in an array and “false”, in case keys are found:
![]()
Method 2: Check if an object is empty using JSON.stringify() method
The “JSON.stringify()” method converts a JavaScript object into a string.
If the resultant string only has an opening and closing braces “{}”, it signifies that we stringify an empty JavaScript object.
Syntax
console.log(JSON.stringify(object) === '{}');
Here, the “JSON.stringify()” method will accept an “object”, converts it to a string, and then check if it is empty or not.
Example
We will usethe “JSON.stringify()” method to check if the created “employee1” and “employee2” objects are empty:
console.log(JSON.stringify(employee1) === '{}');
console.log(JSON.stringify(employee2) === '{}');
As “employee1” is an empty object so the invoked JSON.stringify() method will return “true,” and for “employee2,” the return case will be set to “false”:
![]()
Method 3: Check if an object is empty using Object.getOwnPropertyNames() method
“Object.getOwnPropertyNames()” is a JavaScript built-in object method that returns an array containing object properties as its elements.
Verifying the “length” of the returned array can also help to check whether a passed object is empty or not.
Syntax
Object.getOwnPropertyNames(employee1).length === 0)
Here, the “Object.getOwnPropertyNames()” method accepts a JavaScript “object” as an argument and the “length” property returns “0”, if the specified object is empty.
Example
In the this example, we will invoke the Object.getOwnPropertyNames() method to check if “employee1” and “employee2” objects are empty:
console.log(Object.getOwnPropertyNames(employee1).length === 0);
console.log(Object.getOwnPropertyNames(employee2).length === 0);
Output
![]() As you can see, the “Object.getOwnPropertyNames()” method has returned “true” for “employee1” because it is an empty object, and the return case of the second method output “false” as “employee2″ is a non-empty object, and it has two keys.
As you can see, the “Object.getOwnPropertyNames()” method has returned “true” for “employee1” because it is an empty object, and the return case of the second method output “false” as “employee2″ is a non-empty object, and it has two keys.
Method 4: Check if an object is empty using jQuery.isEmptyObject() method
The “jQuery.isEmptyObject()” method is also utilized to determine if a created JavaScript object is empty or not.
It returns a boolean value, where “true” specifies that the “object” accepted as an argument is “empty” and “false” indicates a “non-empty” object, having key-value pairs.
Syntax
jQuery.isEmptyObject(object);
Here, the “jQuery.isEmptyObject()” method accepts a JavaScript “object” as an argument and returns a “boolean” value.
Example
In our JavaScript program, we will now use the jQuery.isEmptyObject() method.
The invoked method will return “true” when “employee1” is passed as an argument and “false” for the “employee” non-empty object:
jQuery.isEmptyObject(employee1);
jQuery.isEmptyObject(employee2);
![]()
Output
![]() We have compiled different ways to check if an object is empty.
Utilize any given methods in your program and attain the required result.
We have compiled different ways to check if an object is empty.
Utilize any given methods in your program and attain the required result.
Conclusion
Using Object.keys(), JSON.stringify(), Object.getOwnPropertyNames(), and jQuery.isEmptyObject() are different methods to verify if an object is empty.
The Object.keys() and Object.getOwnPropertyNames() methods convert the passed object into an array, and its “length” property verifies the array length, whereas the JSON.stringify() method converts the accepted object into a string and then perform the same operation.
Lastly, jQuery.isEmptyObject() directly checks the object without performing any conversion.
Different Ways to Check If a Property Exists in an Object
While programming, we are frequently confronted with a problem that has a simple solution.
However, sometimes it becomes challenging to find it.
You can also face this situation if you are a JavaScript beginner trying to check whether a property exists in an object or not and do not know the proper approach to follow.
JavaScript offers different ways to verify if an object property exists or not.
Some of the most commonly used methods are: Object.hasOwnProperty() method, includes() method, and “in” operator.
This write-up will discuss different ways for checking the existence of an object’s property.
So, let’s start!
Method 1: Check if a property exists in an object using hasOwnProperty() method to
In JavaScript, the hasOwnProperty() method is utilized to verify the presence of the specified property within an object.
This method returns a “Boolean” value, which indicates whether the specified property exists within the object or not.
Syntax
object.hasOwnProperty('property');
In the above-given syntax, the “hasOwnProperty()” will be invoked with the selected “object” while passing the specified “property” as a “string”.
Example:
First of all, we will create an “employee” object having two properties: “name” and “designation” and their respective values:
let employee= {
name: 'Alex',
designation: 'Manager'};
In the next step, we will utilize the “hasOwnProperty()” method for checking if the “name” property exists in the created “employee” object:
let info= employee.hasOwnProperty('name');
console.log(info);
The value returned by the “hasOwnProperty()” method is “true,” which means that “name” is a property of “employee” object:
![]() Now, we will specify “age” as a property in the “hasOwnProperty()” and check the return case:
let info= employee.hasOwnProperty('gender');
console.log(info);
As “age” property does not exist in the “hasOwnProperty()”, that’s why the return case is set to “false”:
Now, we will specify “age” as a property in the “hasOwnProperty()” and check the return case:
let info= employee.hasOwnProperty('gender');
console.log(info);
As “age” property does not exist in the “hasOwnProperty()”, that’s why the return case is set to “false”:
![]() Remember, the “hasOwnProperty()” method only searches for the “own” properties of an object, not the inherited ones.
For instance, when you create an object, it automatically inherits the “toString” property of “Object”, however, the “hasOwnProperty()” method will not recognize “toString” as the property of the “employee” object:
let info= employee.hasOwnProperty('toString');
console.log(info);
The output will print out “false” because “toString” is an inherited property of the “employee” object, and “hasOwnProperty()” only perform the search operation for the “own” properties of a JavaScript object:
Remember, the “hasOwnProperty()” method only searches for the “own” properties of an object, not the inherited ones.
For instance, when you create an object, it automatically inherits the “toString” property of “Object”, however, the “hasOwnProperty()” method will not recognize “toString” as the property of the “employee” object:
let info= employee.hasOwnProperty('toString');
console.log(info);
The output will print out “false” because “toString” is an inherited property of the “employee” object, and “hasOwnProperty()” only perform the search operation for the “own” properties of a JavaScript object:
![]() Now, let’s move towards other methods for checking the existence of property within a JavaScript object.
Now, let’s move towards other methods for checking the existence of property within a JavaScript object.
Method 2: Check if a property exists in an object using includes() method
The second method to check if a property exists in an object comprises two steps:
In the first step, we will extract the keys of the specified object with the help of the “Object.keys()” method.
This method returns an array that contains the object keys.
Next, invoke the “includes()” function for checking if a particular property exists in the “keys” array or not.
Syntax
var keys = Object.keys(object);
console.log(keys.includes("property"));
In the above-given syntax, pass the selected “object” as an argument to the “Object.keys()” method and then specify the “property” in the “includes()” method, which you need to search in the “keys” array.
Example
Execute the following code to check if the “name” property of “employee” object exists in its “keys” array:
var keys = Object.keys(employee);
console.log(keys.includes("name"));
Given output signifies that the “name” property belongs to the “employee” object:
![]() Now, we will search out “gender” property in the “keys” array:
console.log(keys.includes("gender"));
As the “employee” object does not contain any “gender” property, so the “keys.includes()” method will return “false”:
Now, we will search out “gender” property in the “keys” array:
console.log(keys.includes("gender"));
As the “employee” object does not contain any “gender” property, so the “keys.includes()” method will return “false”:
![]() Also, the “keys.includes()” only checks for the specified property within the “keys” array.
That’s why the return case of the “key.includes()” method is set to false after looking for an inherited key:
console.log(keys.includes("toString"));
The “keys.includes()” method has not found the “toString” property with the “keys” array, therefore, the output has displayed “false” value:
Also, the “keys.includes()” only checks for the specified property within the “keys” array.
That’s why the return case of the “key.includes()” method is set to false after looking for an inherited key:
console.log(keys.includes("toString"));
The “keys.includes()” method has not found the “toString” property with the “keys” array, therefore, the output has displayed “false” value:
![]() Both “hasOwnProperty()” and “includes()” methods check for the “own” properties of an object.
What if you want to check any inherited property? Utilize the “in” operator in such a scenario.
Both “hasOwnProperty()” and “includes()” methods check for the “own” properties of an object.
What if you want to check any inherited property? Utilize the “in” operator in such a scenario.
Method 3: Check if a property exists in an object using the “in” operator
JavaScript offers a built-in “in” operator that determines whether the specified property belongs to an object or not.
It returns “true” if the particular property exists in the object and “false” for the case when the property is not found.
Syntax
'property' in object
Here, the “property” is the first parameter that represents the property name, and the “object” is the second parameter passed to the “in” operator, which needs to be checked for the particular property.
Example
In this example, we will use the “in” operator to check if the “name” property exists in the “employee” object:
let info= 'name' in employee;
console.log(info);
Output
![]() The “in” operator returns “true” as the “name” property exists in the “employee” object.
However, for the “gender” property, it will output “false” because we have not added the “employee” object declaration:
info= 'gender' in employee;
console.log(info);
The “in” operator returns “true” as the “name” property exists in the “employee” object.
However, for the “gender” property, it will output “false” because we have not added the “employee” object declaration:
info= 'gender' in employee;
console.log(info);
Output
![]() Lastly, utilize the “in” operator to check the inherited “toString” property of the “employee” object:
let info= 'toString' in employee;
console.log(info);
As you can see from the output, the “in” operator has successfully checked the existence of the passed inherited property and returned “true”:
Lastly, utilize the “in” operator to check the inherited “toString” property of the “employee” object:
let info= 'toString' in employee;
console.log(info);
As you can see from the output, the “in” operator has successfully checked the existence of the passed inherited property and returned “true”:
![]() We have compiled different ways to check if a property exists in a JavaScript object.
You can utilize any given method in your program to attain the required results.
We have compiled different ways to check if a property exists in a JavaScript object.
You can utilize any given method in your program to attain the required results.
Conclusion
JavaScript offers different ways the existence of an object’s property, such as “Object.hasOwnProperty()” method, “includes()” method, and “in” operator.
The Object.hasOwnProperty() and includes() method can be utilized for checking an object’s own property.
Whereas the “in” operator determines the own properties as well as inherited object properties.
This write-up discussed different ways to check the existence of a property in the specified object.
Encapsulation | Explained
JavaScript is a powerful object-oriented scripting language that can be utilized for developing complex applications.
With an increase in the complexity of the implementation, the need to maintain the code gets maximized.
“Encapsulation” is one of the commendable principles of Object-Oriented Programming(OOP) that assists in this regard.
With the help of Encapsulation, you can easily bind the data or a single unit to the methods that are performing some operations on it.
It also permits you to validate and control the data flow in a JavaScript application.
This write-up will explain Encapsulation with the help of suitable examples.
So, let’s start!
Encapsulation
Encapsulation in JavaScript is a methodology used for hiding information.
It is based on the concept that object properties should not be exposed publicly to the outside world.
Implementing Encapsulation prevents access to the variables by adding public entities inside an object, which the callers can use to achieve specific results.
Example: Implementing Encapsulation
First of all, we will create a JavaScript object named “student” having a “name” property:
var student= {
name : "Alexander",};
In the next step, we will print out the initial value of the “name” property:
console.log("student name is : "+ student.name);
Then, we will modify the “student.name” property value and again utilize the “console.log()” method to display it in the console:
student.name = "Max";
console.log("student name is : "+ student.name);
student.name = "Paul";
console.log("student name is : "+ student.name);
Output
![]() As you can see, everything is working perfectly according to the added logic.
However, a problem will arise when a user inputs an integer value for the “student.name” property.
As you can see, everything is working perfectly according to the added logic.
However, a problem will arise when a user inputs an integer value for the “student.name” property.
Example: Validating data with Encapsulation methods
A JavaScript variable can hold a value of any data type, so to resolve the mentioned issue, we have to limit the range of legal characters for the “name” property value.
For this purpose, we will utilize a Regex Expression “/\d+/” that will keep a check on “one or more occurrences of the digit characters (0-9)“.
This Regex Expression will be added in a new setter method, “setName” which performs further testing:
var student = {
name: "Alexander",
setName: function (value) {
var expression = new RegExp(/\d+/);
if (expression.test(value)) {
console.log("Invalid Name is entered");
}
else {
this.name = value;
}}
Next, we will add a getter method “getName” to retrieve the “student.name” property value:
getName: function () {
return this.name;
}};
console.log(student.getName());
student.setName("Max");
console.log(student.getName());
student.setName(34);
console.log(student.getName());
Now, If the statement “expression.test(value)” evaluates to be “true,” then a message will be displayed on the console window stating that “Invalid Name is entered”, otherwise the “value” passed as an argument will be assigned to the “name” property:
![]() We have successfully performed the validation using a Regex Expression in the setter method, but our program is not fully encapsulated.
That’s because the “name” property is declared globally, which permits the caller to access and modify its value:
student.name = 34;
console.log(student.getName());
We have successfully performed the validation using a Regex Expression in the setter method, but our program is not fully encapsulated.
That’s because the “name” property is declared globally, which permits the caller to access and modify its value:
student.name = 34;
console.log(student.getName());
![]() The above-given output shows that when we have directly accessed the “name” property of the “student” object, validation does not happen, and “34” is set as the property value.
This action proves that if an object’s property is available globally, it can be easily accessed, which risks the security of the data.
The above-given output shows that when we have directly accessed the “name” property of the “student” object, validation does not happen, and “34” is set as the property value.
This action proves that if an object’s property is available globally, it can be easily accessed, which risks the security of the data.
Encapsulation using Function Scope
Rather than exposing the object’s properties; we need to hide it from the outside.
To do so, you can use the “var” keyword to define a private property and enclose it in the scope of a function.
Example: Encapsulation using Function Scope
In the following “newFunc()” definition, “x” is a private variable which can be accessed within the function’s body:
function newFunc(){
var x = "linuxhint.com";
console.log(x);}
console.log(x);
Execution of the provided code shows an error because “x” is defined in the “newFunc()” and we are accessing it in terms of Global scope:
![]() Similarly, adding “name” as a private variable within the “setter” method will restrict its direct access.
In this scenario, the “name” variable can not be utilized outside of the “setter” method scope, which means that the “getter” method can not access it too.
Using “Closures” is the simplest and most elegant way to implement Encapsulation.
Similarly, adding “name” as a private variable within the “setter” method will restrict its direct access.
In this scenario, the “name” variable can not be utilized outside of the “setter” method scope, which means that the “getter” method can not access it too.
Using “Closures” is the simplest and most elegant way to implement Encapsulation.
Encapsulation using Closures
Inside a parent function, “Closures” allow a function to utilize another function’s local variable.
For instance, we have a private variable “name“, which can be accessed by both methods “getName” and “setName” within the function scope.
As a result, anytime the anonymous function is invoked, it must return the inner object and assign it to an outside variable.
Example: Encapsulation using Closures
In this example, when we invoke the “setName()” and “getName()” functions, this action generates a new invocation closure scope.
The scope is then preserved by returning a pointer to the “student” object:
var student = function () {
var name = "Alexander";
var expression = new RegExp(/\d+/);
return {
setName: function (value) {
if (expression.test(value)) {
console.log("Invalid Name is entered");
}
else {
name = value;
}
},
getName: function () {
return name;
}
};}();
The given function ending with “()” indicates that we are invoking the function and assigning the returned value to the “student” variable:
console.log(student.getName());
student.setName("Max");
console.log(student.getName());
student.setName(76);
student.name = 76;
console.log(student.getName());
In this case, Encapsulation is fully implemented using Closures, and the callers can not access the private variable directly:
![]() That was all about the basic information related to Encapsulation in JavaScript; you can further explore it according to our requirements.
That was all about the basic information related to Encapsulation in JavaScript; you can further explore it according to our requirements.
Conclusion
Using Function scopes and Closures, Encapsulation in JavaScript can be implemented easily.
With the help of Encapsulation, you can bind the data or a single unit to the methods that are performing some operations on it.
It also permits you to validate and control the data flow in a JavaScript application.
This write-up explained Encapsulation along with suitable examples.
Constructor Method
In JavaScript, the Constructor method is invoked when you create an instance of a class.
It is also used to initialize objects within a class.
However, JavaScript will automatically create and execute an empty constructor if you have not defined any constructor method for a class.
Constructors can be of different types, such as the Built-in JavaScript Constructors, the Custom Constructor function, and the Constructor method of a user-defined class.
Depending upon requirements, you can use these constructors for creating and initializing a class’s object or instance.
This write-up will discuss the Constructors and their types with the help of suitable examples.
Constructor Methods
In JavaScript, there are two types of Constructor Methods:
Default Constructor
Parameterized Constructor
The below-given section will briefly explain Default and Parameterized ConstructorS and their usage.
Default Constructor Method
A Default Constructor is created automatically by JavaScript if you have not added a constructor method in a particular class.
However, if you want to perform any specific operation while creating a class object, you can explicitly define a default constructor method.
Syntax of Default Constructor Method
class ClassName{
constructor(){
// body of the default constructor
}}
Note: The Constructor Method has no explicit return type.
Example: Default Constructor Method
In the below-given example, we will define a default constructor method for the “Employee” class.
According to the definition of the “constructor()” method, whenever an “Employee” class object is created, it will initialize its “name” property to “Alex”, and “age” property as “25”:
class Employee {
constructor() {
this.name = 'Alex';
this.age = 25;
}}const employee1 = new Employee();
console.log("Employee name: " + employee1.name);
console.log("Age: " + employee1.age);
Execution of the given program will create an “employee1” object of the “Employee” class by utilizing the default constructor.
The default constructor method will then initialize the specified properties for the “employee1” object.
Lastly, the “console.log()” method will print out the values stored in the “employee1.name” and “employee1.age” properties:
![]() Utilizing Default Constructor is helpful when you want to initialize the properties of all of the created objects with the same value.
But, what if you need to assign some unique values to the objects while creating them?, you can achieve this functionality with the help of the “Parameterized Constructor” method.
Utilizing Default Constructor is helpful when you want to initialize the properties of all of the created objects with the same value.
But, what if you need to assign some unique values to the objects while creating them?, you can achieve this functionality with the help of the “Parameterized Constructor” method.
Parameterized Constructor Method
A constructor which comprises parameters is known as the “Parameterized Constructor” method.
This type of constructor is mainly used when you want to initialize the properties of the class with some specific values.
Syntax of Parameterized Constructor Method
class ClassName{
constructor(parameter1, parameter2....., parameterN){
// body of the parameterized constructor
}}
Here, the parameterized constructor accepts parameters passed as “arguments” while creating a class object.
Example: Parameterized Constructor Method
We will create a parameterized constructor method for the “Employee” class that initializes the properties with the values passed as arguments:
class Employee {
constructor(name, age) {
this.name = name;
this.age = age;
}}
In the below-given code, “employee1” object of the “Employee” class is created using Parameterized constructor where “Stepheny” is passed as “name” property value, and “25” argument represents the value of “age” property:
const employee1 = new Employee("Stepheny", 25);
console.log("Employee name: " + employee1.name);
console.log("Age: " + employee1.age);
Output
![]() The above-given output signifies that we have successfully created an “employee1” object having the specified property values with the help of the Parameterized Constructor method.
Now, let’s discuss the Built-in Constructors of JavaScript.
The above-given output signifies that we have successfully created an “employee1” object having the specified property values with the help of the Parameterized Constructor method.
Now, let’s discuss the Built-in Constructors of JavaScript.
Built-in Constructors
The Built-in Constructors are also known as Object Constructors., when an object of the class “Object” is created, the Object Constructor is called directly, which assists in creating the Object of the specified class.
JavaScript offers built-in constructors for different predefined classes such as “Array”, “Date”, “String”, “Number”, “Boolean”, and “Object”.
The below-given section will demonstrate the usage of some built-in JavaScript Constructors.
Example: Object Built-in Constructor
To create a simple object, you can utilize the “Object” class built-in constructor.
For this purpose, you have to pass a “value” as an argument while invoking the Object() constructor:
new Object([value])
In this example, we will create two object named “employeeName” and “employeeAge”, by using the “Object” class constructor:
var employeeName = new Object("Alex");var employeeAge = new Object(25);
console.log("Employee Name : "+ employeeName)
console.log( "Age : "+ employeeAge);
Output
![]() Remember, you can specify any value in the “Object()” constructor, and it does not change the type of created object.
For example, we have initialized “employeeName” with a string value, and “employeeAge” contains a number value.
Still, the type of the “employeeName” and “employeeAge” is set to “object”:
Remember, you can specify any value in the “Object()” constructor, and it does not change the type of created object.
For example, we have initialized “employeeName” with a string value, and “employeeAge” contains a number value.
Still, the type of the “employeeName” and “employeeAge” is set to “object”:
![]()
Example: Array Built-in Constructor
Similarly, the Built-in constructor of the “Array” class can be used for creating an object that contains array elements:
new Array([value])
By utilizing the Array() class constructor, we will now create an “employees” object that comprises three array elements “Alex”, “Paul”, and “Max”:
var employees = new Array('Alex', 'Paul', 'Max');
console.log(employees);
console.log(typeof employees);
Output
![]() The Constructor method added in a user-defined class have their own significance; however, their scope is restricted, as you cannot utilize these constructors throughout your application whenever the creation of an object is needed.
Also, the Built-in Constructor does not permit you to customize itself.
In such a scenario, you can create a Custom Constructor function for customizing the behavior of a Constructor, which can be utilized anywhere in a program.
The Constructor method added in a user-defined class have their own significance; however, their scope is restricted, as you cannot utilize these constructors throughout your application whenever the creation of an object is needed.
Also, the Built-in Constructor does not permit you to customize itself.
In such a scenario, you can create a Custom Constructor function for customizing the behavior of a Constructor, which can be utilized anywhere in a program.
Custom Constructor function
Custom Constructor function is useful when creating multiple objects with the same properties and methods.
These functions are similar to regular functions, except they are invoked with “new” keyword.
Syntax of Custom Constructor function
function FunctionName(parameter1, parameter2....., parameterN)
{//body of the custom constructor function
}
Here, the custom function constructor accepts parameters passed as “arguments” while creating an object.
Example 1: Custom Constructor function
We will define a Custom Constructor function named “Employee” that comprises “name” and “age” properties and one “showInfo()” method.
Note that the custom function’s name “Employee” is starting with the Capital letter which distinguish it from the regular functions:
function Employee(name, age) {this.name = name;this.age = age;this.showInfo = function () {
return "Employee Name: "+ this.name + ", Age : "+ this.age;
};}
In the next step, we will define two objects “employee1” and “employee2” using the “Employee” constructor function:
var employee1 = new Employee('Alex', 25);var employee2 = new Employee('Paul', 35);
Lastly, invoking the “showInfo()” method for the created objects will show the values of the properties passed as arguments:
console.log(employee1.showInfo());
console.log(employee2.showInfo());
Output
![]() We have compiled the essential information related to Constructor methods, Built-in Constructors, and Custom Constructor Functions.
We have compiled the essential information related to Constructor methods, Built-in Constructors, and Custom Constructor Functions.
Conclusion
Constructors can be of different types, such as the Built-in JavaScript Constructors, the Custom Constructor function, and the Constructor method of a user-defined class.
The Constructor method is further divided into Default and Parameterized Constructors.
Depending upon requirements, you can use these constructors for creating and initializing a class’s object or instance.
This write-up discussed the Constructors and their types with the help of suitable examples.
Attributes of Cookies | Explained
Nowadays, it is essential to maintain the session information across multiple pages for most websites.
Usually, when a web server responds by sending a web page to your browser, the connection gets terminated, and all of the data stored on the server is lost.
This situation makes it difficult to store the information related to the user session, and you can not refer to the server for accessing it.
In such a scenario, Cookies are used to store useful information that can be fetched later to get to know about the user.
Cookies comprise tiny bits of data kept in a web browser and used to track user activity.
They also permit the website to provide specific features according to a particular user.
As a result, cookies are considered a core component of a website’s functionality.
This write-up will explain the Attributes of Cookies in JavaScript with the help of suitable examples.
So, let’s start!
Attributes of Cookies
JavaScript supports the following four cookie attributes:
expires
max-age
path
domain
The below-given sections will demonstrate the methods to use these attributes for enhancing the functionality of cookies.
Note: Cookies expire after a certain amount of time; however, the cookie’s expiration settings can be handled through its offered “expires” attribute.
Expires Attribute of Cookies
Cookies are automatically removed when the browser is closed.
It prohibits the visitors from reusing the cookie’s values when they later visit the website.
However, this behavior can be controlled by setting the “expiration date” for the cookie.
Cookies offer an “expires” attribute that permits you to add an “expirationDate” in Universal Time Coordinated (UTC) to the “name=value” cookie pair.
Syntax of Expires Attribute of Cookies
document.cookie = "name=value;expires=expirationDate UTC"
Here, the “expires” attribute is utilized to maintain the cookie’s state according to the “expirationDate” and “UTC” time.
Example: Expires Attribute of Cookies
First of all, in our “index.html” file, we will add two buttons: “setCookie” and “getCookie”.
The “setCookie” button invokes the “setCookie()” function to set the specified cookie, whereas, the “getCookie” button calls the “getCookie()” function to fetch the already set cookies:
<input type="button" class="button" value="setCookie" onclick="setCookie()"><input type="button" class="button" value="getCookie" onclick="getCookie()">
![]() In our “project.js” file, we will define the “setCookie()” and “getCookie()” functions that are associated with the “onclick” events of the “setCookie” and “getCookie” buttons.
The “setCookie()” function will create a cookie having “username” as cookie “name” and “Sharqa” as its “value”, and the “expires” attribute’s value as “Sun, 10 Aug 2030 12:00:00 UTC”:
function setCookie() {
document.cookie = "username=Sharqa;expires=Sun, 10 Aug 2030 12:00:00 UTC";}
Then, after checking the length of the created cookie in the “if” statement, the “getCookie()” function will fetch the cookie “name” and “value” and display it in an alert box.
In the other case, if the cookie gets expired or deleted, the alert box will state that “Cookie not available”:
functiongetCookie() {
if (document.cookie.length != 0) {
vararray = document.cookie.split("=");
alert("Name=" + array[0] + " " + "Value=" + array[1]);
}
else {
alert("Cookie not available");
}}
In our “project.js” file, we will define the “setCookie()” and “getCookie()” functions that are associated with the “onclick” events of the “setCookie” and “getCookie” buttons.
The “setCookie()” function will create a cookie having “username” as cookie “name” and “Sharqa” as its “value”, and the “expires” attribute’s value as “Sun, 10 Aug 2030 12:00:00 UTC”:
function setCookie() {
document.cookie = "username=Sharqa;expires=Sun, 10 Aug 2030 12:00:00 UTC";}
Then, after checking the length of the created cookie in the “if” statement, the “getCookie()” function will fetch the cookie “name” and “value” and display it in an alert box.
In the other case, if the cookie gets expired or deleted, the alert box will state that “Cookie not available”:
functiongetCookie() {
if (document.cookie.length != 0) {
vararray = document.cookie.split("=");
alert("Name=" + array[0] + " " + "Value=" + array[1]);
}
else {
alert("Cookie not available");
}}
![]() Now, we will save both files and then utilize the VS Code “Live Server” extension to run the application in the browser:
Now, we will save both files and then utilize the VS Code “Live Server” extension to run the application in the browser:
![]() The opened web page comprises two buttons: “setCookie” and “getCookie”, where clicking on the “setCookie” will create a new cookie with specified “name”, “value”, and “expires” attribute value:
The opened web page comprises two buttons: “setCookie” and “getCookie”, where clicking on the “setCookie” will create a new cookie with specified “name”, “value”, and “expires” attribute value:
![]() To view the “name-value” cookie pair in an alert box, click on the “getCookie” button:
To view the “name-value” cookie pair in an alert box, click on the “getCookie” button:
![]() The following alert box shows the cookie name as “username” and its value as “Sharqa”:
The following alert box shows the cookie name as “username” and its value as “Sharqa”:
![]() You can also use the “Developer Console” to check the details related to the added cookie.
To do so, right-click on the browser, and from its context menu, select the “Inspect” option:
You can also use the “Developer Console” to check the details related to the added cookie.
To do so, right-click on the browser, and from its context menu, select the “Inspect” option:
![]() Next, click on the “Application” option from the top-bar of the Developer console and look for “Cookies” in the “Storage” menu, present at the left side of the window:
Next, click on the “Application” option from the top-bar of the Developer console and look for “Cookies” in the “Storage” menu, present at the left side of the window:
![]() It can be seen in the above-given image that we have successfully created a cookie and set its expiration date with the help of the “expires” attribute.
It can be seen in the above-given image that we have successfully created a cookie and set its expiration date with the help of the “expires” attribute.
Max-age Attribute of Cookies
A cookie’s lifetime is set according to the current session duration of the browser, which means that the cookie will expire as soon as the user closes the browser.
You can use the “max-age” attribute to define its lifetime, which will be independent of the browser session duration.
Syntax of Max-age Attribute of Cookies
document.cookie = "name=value;max-age=" time
Here, the “max-age” attribute is utilized to specify the “time” within which the created cookie will stay in the system before its deletion.
This attribute accepts a time value in “seconds”.
Example: Max-age Attribute of Cookies
Now, we will create a cookie having “username” as its “name”, “Alex” as “value”.
Also, the “max-age” attribute of the cookie will set its lifetime to “30” days:
document.cookie = "username=Alex;max-age=" + 30*24*60*60 + ";"
![]() After saving the added code, open up the “index.html” file in the browser and click on the “setCookie” button for creating a new cookie and setting its lifetime:
After saving the added code, open up the “index.html” file in the browser and click on the “setCookie” button for creating a new cookie and setting its lifetime:
![]() The following alert box will be now displayed on the browser:
The following alert box will be now displayed on the browser:
![]() To verify the lifetime of the created cookie, explore the “Expires / Max-Age” column in the following window:
To verify the lifetime of the created cookie, explore the “Expires / Max-Age” column in the following window:
![]() In the above-given image, the “Expires / Max-Age” column contains the specified “max-age” attribute value according to the “Unix timestamp epoch”.
In the above-given image, the “Expires / Max-Age” column contains the specified “max-age” attribute value according to the “Unix timestamp epoch”.
Path Attribute of Cookies
In JavaScript, a cookie is accessible for all web pages present in the same directory or sub-directories.
However, you can use the “path” attribute to control the scope of the cookies across the web pages.
Syntax of Path Attribute of Cookies
document.cookie = "name=value; expires=expirationDate; path=/PATH";
Here, the “path” attribute is utilized to specify the “PATH” for which the created cookie is “accessible”.
Example: Path Attribute of Cookies
We will create a cookie by the name “username,” which comprises a value “Alex”, and set its expiration date and time as “Wed, 10 Jan 2030 23:00:00 UTC”.
Then, we will set its “path” attribute to “/,” which signifies that the created cookies will be available throughout a website:
document.cookie = "username=Alex; expires=Wed, 10 Jan 2030 23:00:00 UTC; path=/";
Save the provided code in your “index.html” file and open it in the browser:
![]() Now, click on the “setCookie” button, and then move to the Developer console window for the reconfirmation of the added path:
Now, click on the “setCookie” button, and then move to the Developer console window for the reconfirmation of the added path:
![]() As you can see in the “Path” column, the path attribute of the “username” cookie is set to “/”:
As you can see in the “Path” column, the path attribute of the “username” cookie is set to “/”:
![]() The “path” and the “domain” attribute of cookies are primarily used together while creating a cookie.
Now, we will discuss the “domain” attribute in the next section.
The “path” and the “domain” attribute of cookies are primarily used together while creating a cookie.
Now, we will discuss the “domain” attribute in the next section.
Domain Attribute of Cookies
The “domain” attribute of the JavaScript cookies is used to add the domain for which the cookie is considered “valid”.
For instance, the “domain” attribute’s value is “linuxhint.com”, then the set cookie will be valid for the specified domain and its sub-domains.
Syntax of Domain Attribute of Cookies
document.cookie = "name=value; path=/PATH; domain=DomainName";
In the above-given syntax, the “domainName” value specifies the domain to which the cookies belong.
Example: Domain Attribute of Cookies
For instance, we will create a cookie on “blog.linuxhint.com” and set the value of the “path” attribute to “/” and domain attribute’s value to “linuxhint.com”, then the cookie will be accessible for the webpages of the “linuxhint.com” website:
document.cookie = "name=value; path=/PATH; domain=DomainName";
![]() Instead of “linuxhint.com”, if we provide the sub-domain “blog.linuxhint.com”, then the “username” cookie will be valid only for the added subdomain.
Therefore, the ideal approach is to specify the corresponding domain instead of the sub-domain value.
For the demonstration purpose, we will set “127.0.0.1” as a domain for a cookie:
document.cookie = "name=sharqa; path=/; domain=127.0.0.1";
Instead of “linuxhint.com”, if we provide the sub-domain “blog.linuxhint.com”, then the “username” cookie will be valid only for the added subdomain.
Therefore, the ideal approach is to specify the corresponding domain instead of the sub-domain value.
For the demonstration purpose, we will set “127.0.0.1” as a domain for a cookie:
document.cookie = "name=sharqa; path=/; domain=127.0.0.1";
![]() The below-given output signifies that we have successfully set “127.0.0.1” as a valid domain for the created “key-value” cookie pair:
The below-given output signifies that we have successfully set “127.0.0.1” as a valid domain for the created “key-value” cookie pair:
![]() We have compiled the essential information related to attributes of Cookies in JavaScript.
We have compiled the essential information related to attributes of Cookies in JavaScript.
Conclusion
“expires”, “max-age”, “path”, and the “domain” are the attributes of cookies.
The expires and max-age attributes are utilized for setting the expiration date and the lifetime of cookies.
In contrast, the combination of domain and path attributes assist in specifying the valid domain and scope where the cookies are available.
This write-up explained the attributes of Cookies with the help of suitable examples.
Asynchronous Iterators vs Asynchronous Generators
You may find yourself in a situation where it is required to immediately process some sequential events rather than waiting until all of the events are generated, for instance, receiving data over a network where one packet is fetched at a time.
In such a situation, JavaScript libraries such as RxJS can assist in handling the asynchronous data; however, they also put additional overhead regarding the code complexity and the cognitive effort required to master them.
In JavaScript, Asynchronous Iterators and Asynchronous Generators offer the same functionality that could be effectively implemented using the JavaScript language primitives.
So, why not choose a simple solution rather than put yourself in another confusion?
This post discusses Asynchronous Iterators vs Asynchronous Generators along with suitable examples.
So, let’s start!
Iterators
In JavaScript, “Iterators” are used to access synchronous data structures such as arrays, maps, and sets.
They are primarily based on the “next()” method, which comprises two properties: “next” and “value”:
The “value” property of the next() method indicates the current value in the iteration sequence.
The “done” property of the next() method represents the iteration status, where “false” indicates that the iteration process is completed and “true” signifies that iteration is incomplete.
Now, we will check out the working of iterators with the help of an example.
Example: Using Iterators
We will create a “numbers” object having two properties: “start” and “end”.
Then, we will add an “iteration ability” to the “numbers” object by utilizing the “Symbol.iterator()” method.
The “Symbol.iterator()” method will be invoked once, at the beginning of the “for..of” loop, and returns an iterable object.
After performing this operation, the “for..of” loop will access the iterable object and fetch the values in the iteration sequence:
let numbers = {
start: 1,
end: 4,
[Symbol.iterator]() {
return {
current: this.start,
last: this.end,
next() {
if (this.current <= this.last) {
return { done: false, value: this.current++ };
} else {
return { done: true };
}
}
};
}};
The above-given, “next()” method will be invoked and return the “value” as an object:
for(let value of numbers) {
alert(value);}
Write out the provided code in the console window and execute it:
![]() We have successfully iterated over each element of the “numbers” object which can be seen in the following gif:
We have successfully iterated over each element of the “numbers” object which can be seen in the following gif:
![]() As mentioned earlier, regular JavaScript iterators can help you iterate over the synchronous data.
What if the values come asynchronously because of any delay? In such a scenario, you must implement the Asynchronous Iterators in JavaScript.
As mentioned earlier, regular JavaScript iterators can help you iterate over the synchronous data.
What if the values come asynchronously because of any delay? In such a scenario, you must implement the Asynchronous Iterators in JavaScript.
Asynchronous Iterators
The Asynchronous Iterators are embedded in ES9 to handle the asynchronous data sources.
It works similar to the regular iterator except that the “next()” method in an asynchronous iterator returns a “Promise” that resolves the “value” and “done” properties values of an object.
Convert Regular Iterator to Asynchronous Iterator
If you want to convert a regular iterator to an Asynchronous iterator, then follow the below-given instructions:
Instead of using the “Symbol.Iterator()” method, utilize “Symbol.asyncIterator()”.
Force the “next()” method to return a Promise and add an “async” keyword with it as: “async next()”.
Lastly, the “for await..of” loop can be used to iterate over an object, instead of the “for..of” loop.
Example: Asynchronous Iterators
We will now convert the regular iterator defined in the previous example to Asynchronous Iterators by following the specified rules.
For this purpose, we will replace the “Symbol.Iterator()” with the “Symbol.asyncIterator()” method.
Then, we will add the keyword “async” before the “next()” method.
Using “await” in the “next()” method will set the time for fulfilling the Promise after “2” seconds:
let numbers = {
start: 1,
end: 4,
[Symbol.asyncIterator]() {
return {
current: this.start,
last: this.end,
async next() {
awaitnewPromise(resolve => setTimeout(resolve, 2000));
if (this.current <= this.last) {
return { done: false, value: this.current++ };
} else {
return { done: true };
}
}
};
}};
For iteration over an asynchronous iterable object, the “for await..of” loop will be utilized in the following way:
(async () => {
for await (let value of numbers) {
alert(value);}})()
The output will display the iterated values in the alert box after a delay of two seconds:
![]() By this point, you have understood the working of Asynchronous Iterators.
Now, we will move ahead and learn about Asynchronous Generators.
By this point, you have understood the working of Asynchronous Iterators.
Now, we will move ahead and learn about Asynchronous Generators.
Generators
Iterators are quite useful; however, they need careful programming to perform their expected functionality.
The JavaScript Generator function is another powerful tool that permits you to define an iterative algorithm with the help of a single “non-continuous” function.
Initially, a Generator function does not execute its code when it is invoked; instead, it returns a specific type of iterator known as “Generator”.
The Generator function can be invoked as many times as needed, and on each call, it returns a new “Generator,” which can be iterated once.
To write the Generator function, the “function*” syntax is used.
This function also comprises a “yield” operator that pauses the Generator function’s execution until the next value of an object is requested.
Example: Using Generators
We will define a “generator” function that returns the values from a “startingPoint” to “endingPoint” using the “yield” operator.
The “*” added with the “function” keyword indicates that “generator()” is a Generator function, not a normal regular function.
function* generator(startingPoint, endingPoint) {
for (let i = startingPoint; i<= endingPoint; i++) {
yield i;
}}
In the next step, we will invoke the “generator()” function which returns a Generator stored in the “x” object:
let x = generator(1, 5);
Lastly, to iterate over the “x” generator, we will use the “for..of” loop:
for (const num of x) {
console.log(num);}
Execution of the provided program will show the iterated values:
![]() If you want to retrieve Promise based results from the “Generator“, you have to use “Asynchronous Generator” in the JavaScript program.
If you want to retrieve Promise based results from the “Generator“, you have to use “Asynchronous Generator” in the JavaScript program.
Asynchronous Generators
Asynchronous Generator works similar to the Generator function except that the “next()” method in Asynchronous Generator returns a “Promise” that resolves the “value” and “done” properties values of an object.
Convert Generator Function to Asynchronous Iterator
Follow the below-given instructions to convert a Generator function to an Asynchronous Iterator:
Use “async” before the “function*” keyword.
Instead of a “value”, “yield” should return a “Promise”.
Now, we will show you the practical procedure for converting a Generator function into Asynchronous Generators.
Example: Asynchronous Generators
First of all, we will add the “async” keyword before defining the “asyncSequence()” Asynchronous function.
The asyncSequence() yields a “Promise” which will be fulfilled in one second:
asyncfunction* asyncSequence(startingPoint, endingPoint) {
for (let i = startingPoint; i {
setTimeout(() => {
resolve(i);
}, 1000);
});
}}
Lastly, “for await..of” loop is used to iterate over and return the Asynchronous Generator:
(async () => {
let x = asyncSequence(1, 5);
for await (let num of x) {
console.log(num);
}})();
This JavaScript program will return values from “1” to “5” while taking a gap of “one” second:
![]() We have provided the essential information related to Asynchronous Iterators and Asynchronous Generators.
Both of them can be used for iterating over asynchronous data, however; It can be challenging for beginners to maintain the internal logic or definition of the Asynchronous Iterators, whereas the Asynchronous Generators offers a more efficient and less error-prone way of utilizing iterators.
It also hides the iterator’s complexity and makes code concise and readable.
So, we recommend you use Asynchronous Generators to handle iterations related to asynchronous data collection.
We have provided the essential information related to Asynchronous Iterators and Asynchronous Generators.
Both of them can be used for iterating over asynchronous data, however; It can be challenging for beginners to maintain the internal logic or definition of the Asynchronous Iterators, whereas the Asynchronous Generators offers a more efficient and less error-prone way of utilizing iterators.
It also hides the iterator’s complexity and makes code concise and readable.
So, we recommend you use Asynchronous Generators to handle iterations related to asynchronous data collection.
Conclusion
Asynchronous Iterators and Asynchronous Generators are utilized to iterate over the data, provided after a certain amount of time.
The Asynchronous Iterators execute the “Symbol.asyncIterator()” method to return an “iterator”, whereas the Asynchronous Generators return a special type of iterator “Generator” by itself, which can be used wherever the iteration is required.
This write-up discussed Asynchronous Iterators and Asynchronous Generators.
Abstraction | Explained
In JavaScript, most of the elements are based on “objects,” and it utilizes “Object-Oriented Programming” (OOP) in its own ways.
The concept of Abstraction in JavaScript is to hide the implementation details and highlight an object’s essential features to the users.
That’s how embedding Abstraction in a JavaScript program can enhance the readability of the code and avoid duplication.
By providing only important details to the users, it also improves the security of an application.
Don’t know how to implement Abstraction? No worries! This write-up will explain Abstraction in JavaScript with the help of suitable examples.
So, let’s start!
Abstract Classes
If a class comprises one or more abstract methods, it is known as an “Abstract Class” and this type of class has abstract as well as regular JavaScript methods.
Remember, to implement Abstraction in a class, you have to declare at least one abstract method.
Abstract Methods
In an Abstract class, a type of method that is only declared and has no implementation or “function body” is known as “Abstract Method“.
The abstract method must be declared in an Abstract class, whereas its definition can be added in the sub-classes.
We will now demonstrate the procedure for creating an Abstract class.
Example: How to create Abstract Class
First of all, we will create a constructor function named “Person” having a “name” property.
The created “Person” function will act as an “Abstract Class”:
function Person() {
this.name = "Alex";
if (this.constructor === Person) {
throw new Error("Your Error Message...");
}};
In the next step, we will define an “info()” method for the “Person” Abstract class which returns the value of the “name” property:
Person.prototype.info = function () {
return this.name;}
Lastly, we will create a “person” instance of the Abstract Class:
var person = new Person();
Execution of the provided code will throw an error as we can not create objects or instances of an Abstract class:
![]() Now, we will extend the above-given example by implementing the “Inheritance”.
For this purpose, we will create another constructor function that inherits the methods and properties of the “Person” Abstract class.
Now, we will extend the above-given example by implementing the “Inheritance”.
For this purpose, we will create another constructor function that inherits the methods and properties of the “Person” Abstract class.
Example: How to extend Abstract Class
In the same example, we will define a construct function (subclass) named “Teacher” that inherits the properties and methods of the created “Person” class by utilizing the “Prototype Chaining”:
function Person() {
this.name = "Alex";
if (this.constructor === Person) {
throw new Error("Your Error Message...");
}};
Person.prototype.info = function () {
return "Person name is: " + this.name;}function Teacher(name) {
this.name = name;}
Teacher.prototype = Object.create(Person.prototype);var teacher1 = new Teacher("Stepheny");
console.log(teacher1.info());
In this case, the implementation of the “Person” Abstract class is hidden, and the “Teacher” Subclass can only access the “info()” method to return the value of the “name” property:
![]() We have tried to implement Abstraction in previous examples; however, all of the properties of an Abstract Class are not completely satisfied; as we have not defined any Abstract methods yet.
The ES6 JavaScript version offers many enhanced features such as creating “Class” using the “class” keyword and implementing methods.
It also allows you to define Abstract methods within an Abstract class and extend them in the child or subclasses with the help of “Inheritance”.
In the following example, we will implement a JavaScript Abstract Class having the specified properties.
We have tried to implement Abstraction in previous examples; however, all of the properties of an Abstract Class are not completely satisfied; as we have not defined any Abstract methods yet.
The ES6 JavaScript version offers many enhanced features such as creating “Class” using the “class” keyword and implementing methods.
It also allows you to define Abstract methods within an Abstract class and extend them in the child or subclasses with the help of “Inheritance”.
In the following example, we will implement a JavaScript Abstract Class having the specified properties.
Example: How to implement Abstraction
By utilizing the “class” keyword, we will now define “Person” as an Abstract class, having a “constructor()”, and an “info()” Abstract method:
class Person {
constructor() {
if (this.constructor == Person) {
throw new Error("Your Error Message...");
}
}
info() {
throw new Error(" Added abstract Method has no implementation");
}}
Next, we will create a subclass “Teacher,” which inherits the properties and method of the “Person” class using “Inheritance” and define the implementation of the Parent class abstract method “info()” in the “Teacher” class:
class Teacher extends Person {
info() {
console.log("I am a Teacher");
}}var teacher1 = new Teacher();
teacher1.info();
As you can see, the implementation of the “info()” method is successfully executed:
![]() If the Parent class abstract “info()” method is invoked in the “Teacher” class, it will throw an error.
To verify this case, add the following code line in the definition of the child class “info()” method and then again execute the program:
super.info();
The given output signifies that executing the Abstract method of an Abstract class will throw an Error:
If the Parent class abstract “info()” method is invoked in the “Teacher” class, it will throw an error.
To verify this case, add the following code line in the definition of the child class “info()” method and then again execute the program:
super.info();
The given output signifies that executing the Abstract method of an Abstract class will throw an Error:
![]() We have compiled all of the essential information related to Abstraction.
We have compiled all of the essential information related to Abstraction.
Conclusion
Abstraction in JavaScript can be implemented with the help of Abstract Classes and Abstract Methods., an Abstract class must contain at least one or more declared Abstract methods, whereas its definition can be added in its sub-classes.
Abstraction hides the complicated and hard-to-comprehend details of the underlying system.
This write-up explained Abstraction along with suitable examples.
JavaScript Symbol Primitive Type | Explained
A new primitive type is introduced in ES6 known as “Symbol“.
Symbols are built-in objects used to add unique property keys for a JavaScript object.
These unique property keys won’t conflict with the keys added by other scripts and are hidden from the mechanisms used for accessing the object, such as “for..in” loop.
The JavaScript Symbol primitive type is created and can be shared globally.
Moreover it can also be used to define the hidden properties of an object.
There also exist some well-known JavaScript symbols that contain the common behavior of JavaScript.
This write-up will explain JavaScript Symbol Primitive Type with the help of suitable examples.
So, let’s start!
How to create a Symbol primitive type
The global “Symbol()” function is utilized to create a new JavaScript symbol in the following way:
let regID = Symbol();
Here, “regID” is a new JavaScript Symbol primitive type.
You can also add the symbol description within the parenthesis “()” of the Symbol() function.
This description is considered useful for debugging purposes and it also makes symbols more descriptive:
let regID = Symbol('Registration ID');
console.log(regID);
The output of the given code will display the primitive type of “regID” and its description:
![]()
Example: How to Create a Symbol primitive type
In the below-example, we will create two symbols named “name” and “age” and pass their descriptions as an argument to the “Symbol()” global function:
let name = Symbol('Employee name'),
age = Symbol('Age');
console.log(name);
console.log(age);
Execution of the above-given example shows the following output:
![]() Now, we will use the JavaScript “typeof” operator to determine whether “name” and “age” variables are created as a symbol or not:
console.log(typeof name);
console.log(typeof age);
As you can see from the output, the “typeof” operator returned “symbol” as the type of the specified variables:
Now, we will use the JavaScript “typeof” operator to determine whether “name” and “age” variables are created as a symbol or not:
console.log(typeof name);
console.log(typeof age);
As you can see from the output, the “typeof” operator returned “symbol” as the type of the specified variables:
![]() Remember that symbols are only created with the help of the “Symbol()” global function.
For the same purpose, using the “new” operator will throw an error as Symbols are primitive values:
let regID = new Symbol();
“regID” symbol will not be created, and the following “TypeError” will be shown:
Remember that symbols are only created with the help of the “Symbol()” global function.
For the same purpose, using the “new” operator will throw an error as Symbols are primitive values:
let regID = new Symbol();
“regID” symbol will not be created, and the following “TypeError” will be shown:
![]() The previous section provided the method for creating symbols as primitive type values.
Now, we will move ahead and discuss how you can share symbols.
The previous section provided the method for creating symbols as primitive type values.
Now, we will move ahead and discuss how you can share symbols.
How to share a Symbol primitive type
The “Global Symbol Registry” supported by the ES6 permits you to share the created symbol globally by utilize the “Symbol.for()” method instead of using the “Symbol()” function.
For instance, we are creating a “regID” symbol with a description using “Symbol.for()” method:
let regID= Symbol.for('regID');
When the “Symbol.for()” method executes, it searches for the “regID” key in the Global Symbol Registry; if the “regID” symbol already exists in the registry, the “Symbol.for()” method will return it.
In another case, a new “regID” symbol will be created and added to the Global Symbol Registry.
Now, invoking the “Symbol.for()” method while passing “regID” key as argument will return the existing “regID” symbol contained in the Global Symbol Registry:
let studentID = Symbol.for('regID');
console.log(regID === studentID);
The output shows “true” for the strict comparison between “regID” and “studentID” because both are the same in terms of type and added keys:
![]() For the verification of the key associated with the “studentID”, we will execute the “keyFor()” method and pass the “studentID” as an argument:
console.log(Symbol.keyFor(studentID));
The “keyFor()” method will return “regID” as the studentID symbol’s key:
For the verification of the key associated with the “studentID”, we will execute the “keyFor()” method and pass the “studentID” as an argument:
console.log(Symbol.keyFor(studentID));
The “keyFor()” method will return “regID” as the studentID symbol’s key:
![]() If you are searching for a symbol that is not added in the Global Symbol Registry, then the “keyFor()” method will return “undefined” value for the specified value:
let employeeID = Symbol('employeeID');
console.log(Symbol.keyFor(employeeID));
Here, the “employeeID” symbol does not exist in the Global Symbol Registry, because it is created using the “Symbol()” instead of “Symbol.for()” method, and when the “Symbol.for()” method looks for it in the Global Symbol Registry, it returned “undefined”:
If you are searching for a symbol that is not added in the Global Symbol Registry, then the “keyFor()” method will return “undefined” value for the specified value:
let employeeID = Symbol('employeeID');
console.log(Symbol.keyFor(employeeID));
Here, the “employeeID” symbol does not exist in the Global Symbol Registry, because it is created using the “Symbol()” instead of “Symbol.for()” method, and when the “Symbol.for()” method looks for it in the Global Symbol Registry, it returned “undefined”:
![]() You have seen that creating and sharing symbol primitive values is pretty straightforward.
The following section will demonstrate how you can use these symbols in your JavaScript code.
You have seen that creating and sharing symbol primitive values is pretty straightforward.
The following section will demonstrate how you can use these symbols in your JavaScript code.
How to use Symbols for creating hidden properties of an object
The JavaScript Symbol primitive value permits you to create hidden properties of an object.
For this purpose, you can create a “symbol” and utilize it as an object’s property key.
The created property will be skipped by the for..in loop, and another script would not be able to access it directly because the “symbol” is not included in other scripts.
In this way, symbols are considered ideal for hiding object properties.
Example: How to use Symbols for creating hidden properties of an object
First of all, we will create an “articleStatus” object which comprises the following three symbols as its hidden properties:
let articleStatus = {
IN_PROGRESS: Symbol('Article In progress'),
COMPLETED: Symbol('Article Completed'),
FINALIZED: Symbol('Article Finalized'),};
In the next step, we will add another symbol named “myStatus”:
let myStatus = Symbol('myStatus');
Here comes the exciting part, in the “task” object, we will add two properties, one is “description,” and the other is “[myStatus]”.
“[myStatus]” is a computed property of the task object as it is derived from the “myStatus” symbol and its value comprises the “COMPLETED” hidden property of the “articleStatus” object:
let task = {[myStatus]: articleStatus.COMPLETED,
description: ' JavaScript Symbol Primitive type'};
console.log(task);
Output
![]() The above-given output signifies that symbols work perfectly for creating hidden properties which can be only accessed with their associated objects.
The above-given output signifies that symbols work perfectly for creating hidden properties which can be only accessed with their associated objects.
Well-known Symbols
ES6 supports many predefined symbols that contain JavaScript’s common behavior, known as “well-known” symbols.
These well-known symbols represent the static property of the “Symbol” object.
Let’s check out the most useful well-known Symbols of JavaScript.
Symbol.hasInstance
Symbol.hasInstance is a symbol that is used to determine if the constructor object identifies the specified object as its instance or not.
Syntax of Symbol.hasInstance
[Symbol.hasInstance](Object)
Here, the “Symbol.hasInstance” symbol accepts an “object” as an argument.
Example: Symbol.hasInstance
Typically, when an instanceof operator is used as “object instanceof type“, JavaScript invokes the “Symbol.hasInstance” symbol.
Then, it verifies if the “object” is an instance of the other specified “type” object or not.
In the following example, the array “[ ]” is not an instance of the “Book” class, so the “instanceof” operator will return “false” as output:
class Book {}
console.log([] instanceof Book);
Output
![]() You can add the “Symbol.hasInstance” symbol to define array “[ ]” as an instance of the “Book” Class:
class Book {static [Symbol.hasInstance](obj) {return Array.isArray(obj);}}
console.log([] instanceof Book);
Output
You can add the “Symbol.hasInstance” symbol to define array “[ ]” as an instance of the “Book” Class:
class Book {static [Symbol.hasInstance](obj) {return Array.isArray(obj);}}
console.log([] instanceof Book);
Output
![]() Hence, the “instanceof” operator returned “true” after performing the specified check on the array “[ ]”.
Hence, the “instanceof” operator returned “true” after performing the specified check on the array “[ ]”.
Symbol.isConcatSpreadable
The Symbol.isConcatSpreadable Symbol returns a boolean value that determines whether a specified object is individually added to the result of the “concat()” function or not.
Syntax of Symbol.isConcatSpreadable
[Symbol.isConcatSpreadable]: value
Here, “value” is used to set the “boolean” value of Symbol.isConcatSpreadable symbol, where “true” permits the symbol to individually add the object elements and “false” will concatenate the specified object as a whole.
Example: Symbol.isConcatSpreadable
Firstly, we will create an “obj1” JavaScript, which has the following properties:
let obj1 = {0: 'JS',1: 'Symbol Primitive Type',
length: 2};
In the next step, we will concatenate “obj1” with [‘Teaching’] array using the “concat()” function:
let info = ['Teaching'].concat(obj1);
console.log(info);
The concat() function will not spread the individual elements of “obj1” while concatenating it with [‘Teaching’] array:
![]() If you want to individually add the elements of “obj1” to the array, you have to add the Symbol.isConcatSpreadable Symbol as a property to “obj1” and set its value to “true”:
let obj1 = {0: 'JS',1: 'Symbol Primitive Type',
length: 2,[Symbol.isConcatSpreadable]: true};
let info = ['Teaching'].concat(obj1);
console.log(info);
Check out the below-given output; the “obj1” elements are added individually in the resultant “info” array:
If you want to individually add the elements of “obj1” to the array, you have to add the Symbol.isConcatSpreadable Symbol as a property to “obj1” and set its value to “true”:
let obj1 = {0: 'JS',1: 'Symbol Primitive Type',
length: 2,[Symbol.isConcatSpreadable]: true};
let info = ['Teaching'].concat(obj1);
console.log(info);
Check out the below-given output; the “obj1” elements are added individually in the resultant “info” array:
![]() We have compiled all of the essential information related to the JavaScript Symbol Primitive Type.
We have compiled all of the essential information related to the JavaScript Symbol Primitive Type.
Conclusion
Using the Symbol() global function, you can create a JavaScript symbol primitive type that contains a unique value, whereas the Symbol.for() method enables you to create a symbol that can be shared globally.
JavaScript symbol primitive type is mostly used to define an object’s hidden properties.
This write-up explained JavaScript Symbol Primitive Type with the help of suitable examples.
JavaScript Primitive Wrapper Types | Explained
Whenever a primitive value is read in a program, JavaScript automatically creates an object for the corresponding primitive type known as the Primitive Wrapper type.
After creating the primitive wrapper type, JavaScript invokes the specified method and immediately deletes the instance from memory.
In this way, primitive values are considered lightweight compared to regular objects.
JavaScript offers primitive wrapper types for the “string”, “number”, “boolean”, “bigint”, and “symbol” data types, making it easier to use these primitive values.
This write-up explained JavaScript Primitive Wrapper Types, but before that, let’s look at the primitive data types.
JavaScript Primitive Data type
Primitive data types are the predefined or built-in data types supported by the JavaScript programming language.
It is frequently referred to as the lowest level of a computer language implementation.
The Primitive data types can neither be an object nor the methods.
Also, primitive values cannot be modified since they are “immutable“.
You can reassign a variable with a new primitive value but not alter the existing one.
JavaScript has seven primitive data types: number, boolean, bigint, string, symbol, null, and undefined.
The below-given section will demonstrate the primitive data types in detail.
String primitive data type
In JavaScript, the “string” primitive data type is represented by the sequence of characters added within the single ‘ ‘ or double quotes ” “.
Example
let string1 = 'primitive data type';
typeof string1;
Output
![]()
Number primitive data type
You can utilize the “number” primitive data types for storing decimal and non-decimal values.
Example
let number1 = 090078601;
typeof number1;
Output
![]()
Bigint primitive data type
“bigint” and “number” data are pretty similar; however, bigint permits you to present the integer values greater than (253).
To create a bigint primitive data type value, “n” is appended at the end of the number in the following way:
Example
let biginteger = 9999999999988872553627n;
typeof biginteger;
Output
![]()
Boolean primitive data type
JavaScript “boolean” primitive data type comprises two values: true or false.
Example
booleanVal = true;
typeof booleanVal;
Output
![]()
Symbol primitive data type
“symbol” is a primitive data type value that can be generated by invoking the “Symbol” function, which returns a “unique” value.
The Symbol function accepts a string description as an argument which will be printed out when you retrieve the symbol value.
Example
let z = Symbol("We have created a symbol value");
typeof z;
Output
![]()
Undefined primitive data type
The “undefined” primitive data type signifies that a variable is declared but not defined yet.
Example
let y;
typeof y;
Output
![]()
Null primitive data type
“null” is a data type that is used to represent “missing” or “unknown” values.
The “typeof” operator returns “object” as the type of “null”, but remember, null is a primitive value, not an object.
Example
let x = null;
typeof x;
Output
![]() At this point, you have understood what primitive data types are; now, we will learn about the concept behind accessing properties or methods of primitive values.
At this point, you have understood what primitive data types are; now, we will learn about the concept behind accessing properties or methods of primitive values.
JavaScript Primitive Wrapper Class
Primitive data type values can be manipulated using object notation.
For this purpose, JavaScript has defined corresponding object classes for each of the primitive values, except for “null” and “undefined”.
These primitive wrapper classes are considered “wrappers” around the JavaScript primitive data types.
Another important point to discuss is that the wrapper classes are utilized for storing the same value both externally and internally; however, the instances or objects of the wrapper classes will remain non-primitive in case of explicit object declaration.
JavaScript Primitive Wrapper object
A JavaScript primitive wrapper object comprises primitive values, and it additionally provides methods and properties for manipulating the values.
For instance, A “string” primitive value is utilized in an object context when accessing its related properties or method.
In this case, JavaScript internally generates a primitive “wrapper” object for that specific string primitive wrapper type.
Then, the primitive string value is added in the created string wrapper object, which has its methods and properties.
This automatically created wrapper object is deleted after invoking the specified method or property.
JavaScript Primitive wrapper objects can also be created manually using the “new” operator.
These wrapper objects stay in the memory until their scope goes out.
Also, the manually created primitive wrapper objects are of the “object” type.
JavaScript Primitive Wrapper type
The automatically created JavaScript script wrapper object is referred to as “Primitive Wrapper type”.
JavaScript offers primitive wrapper types for the “string”, “number”, “boolean”, “bigint”, and “symbol” data types, making it easier to use these primitive values.
Example: JavaScript Primitive Wrapper type
In the below-given example, the “language” variable contains “JavaScript” as its primitive string value.
This variable does not have access to the “substring()” method; however, it still retrieves the sub-string from the specified primitive value:
let language = 'JavaScript';
let str1 = language.substring(4);
console.log( 'str1 wrapper type is :' + typeof str1);
console.log(str1);
Output
![]() The above-given code is working perfectly, and now you must be wondering how the “language” variable invoked the “substring()” method that is associated with the string class?
The answer to this question is that whenever you call a method with a primitive value; JavaScript automatically creates an “object” according to the corresponding primitive data type, “string“.
After that, it invokes the specified method with the help of the created instance and then deletes the instance immediately from memory.
So technically, our executed program is equivalent to this code:
let language = 'JavaScript';// when language.substring(4) is invoked;
let tmp = new String(language);
str1 = tmp.substring(4);
console.log(str1);
tmp = null;
Execution of the above-given program will also show the same output:
The above-given code is working perfectly, and now you must be wondering how the “language” variable invoked the “substring()” method that is associated with the string class?
The answer to this question is that whenever you call a method with a primitive value; JavaScript automatically creates an “object” according to the corresponding primitive data type, “string“.
After that, it invokes the specified method with the help of the created instance and then deletes the instance immediately from memory.
So technically, our executed program is equivalent to this code:
let language = 'JavaScript';// when language.substring(4) is invoked;
let tmp = new String(language);
str1 = tmp.substring(4);
console.log(str1);
tmp = null;
Execution of the above-given program will also show the same output:
![]() Now, let’s check out the difference between Manual Primitive Wrapper Object and Automatic Primitive Wrapper Object (Primitive Wrapper type).
Now, let’s check out the difference between Manual Primitive Wrapper Object and Automatic Primitive Wrapper Object (Primitive Wrapper type).
Manual Primitive Wrapper Object vs Automatic Primitive Wrapper Object
As mentioned earlier, JavaScript permits you to create primitive wrapper objects manually using the new operator.
Unlike primitive wrapper types, manually created objects stay in the memory until these objects go out of scope.
Example: Manual Primitive Wrapper Object vs Automatic Primitive Wrapper Object
In the below-given example, we will create a manual primitive wrapper object named “str1” using the “new” operator and String() wrapper class constructor:
let str1 = new String('JavaScript');
console.log(typeof str1);
console.log(str1);
Given output signifies that we have successfully created an “object” having “String” prototype that stored “JavaScript” as its primitive string value:
![]() Whereas, in the case of automatically created primitive wrapper object or primitive wrapper type, the scope is restricted to a single invoked property and method:
let str1 = 'JavaScript';
str1.language = 'ES6';
console.log(str1.language);
Here, we firstly created a variable “str1” with a string primitive value “JavaScript” in the above example.
After reading the primitive value, JavaScript generates a new string primitive object or primitive wrapper type for “str1“.
Next, the “str1.language = ‘ES6’” command tries to access the language property of the “str1” string and assign value to it.
The “language” property exists in the memory till this point.
Therefore, the output has returned “undefined” instead of the value stored in “str1.language” when the next line is executed:
Whereas, in the case of automatically created primitive wrapper object or primitive wrapper type, the scope is restricted to a single invoked property and method:
let str1 = 'JavaScript';
str1.language = 'ES6';
console.log(str1.language);
Here, we firstly created a variable “str1” with a string primitive value “JavaScript” in the above example.
After reading the primitive value, JavaScript generates a new string primitive object or primitive wrapper type for “str1“.
Next, the “str1.language = ‘ES6’” command tries to access the language property of the “str1” string and assign value to it.
The “language” property exists in the memory till this point.
Therefore, the output has returned “undefined” instead of the value stored in “str1.language” when the next line is executed:
![]() We have compiled all of the essential information related to the Primitive wrapper types and primitive objects in JavaScript.
We have compiled all of the essential information related to the Primitive wrapper types and primitive objects in JavaScript.
Conclusion
JavaScript offers primitive wrapper types for the “string”, “number”, “boolean”, “bigint”, and “symbol” data types, making it easier to use these primitive values.
The primitive wrapper types are also called automatically created primitive wrapper objects as they are automatically created when the JavaScript engine reads any primitive value, and these objects get immediately deleted after invoking the specified method or property.
This write-up explained JavaScript primitive wrapper types with the help of suitable examples.
How to store multiple key-value pairs in Cookies
Cookies store useful information related to the user that can be fetched later.
They comprise tiny bits of data kept in a web browser to track user activity.
A cookie can contain only one “string” value, and storing multiple key-value pairs requires multiple cookies.
However, using multiple cookies can also cause some problems.
For instance, if a domain sets the cookie limits as “10“, then you cannot store the information of the 11th user in a new cookie.
In such cases, create a single cookie and store multiple key-value pairs.
This approach assists in saving similar information in a cookie and offers several advantages, such as applying an expiration date to multiple key-value pairs at once.
This post discusses the methods of storing multiple key-value pairs in Cookies along with the appropriate examples.
So, let’s start!
How to store Multiple key-value pairs in a Cookie
Instead of maintaining multiple cookies, is it highly beneficial to store relevant key-pair values in a single cookie; for instance, rather than creating three cookies for “FullName”, “Class”, “Subject”, we can save these key-value pairs in a single student cookie.
As mentioned earlier, a cookie can only hold a single “key-value” pair at a time.
However, to save multiple-key values, you have to follow the below-given instructions:
Create a custom object.
Convert it to a JSON string with the help of the “stringify()” method.
Store the resultant “document.cookie” object.
Now, check out the following example to understand the concept behind using a single cookie for storing multiple-key value pairs.
How to Store values in a Cookie
First of all, in our “index.html” file, three input fields, “FullName”, “Class”, and “Subject,” are added, which will accept the user input as the respective field values.
FullName: <input type="text" class="input" id="fullname">Class: <input type="text" class="input" id="class">
Subject: <input type="text" class="input" id="subject">
Next, we will add two buttons named: “setCookie” and “getCookie”.
The “setCookie” button invokes the “setCookie()” function to set the specified values in a cookie, whereas, the “getCookie” button call the “getCookie()” function to fetch the cookie values:
<input type="button" class="button" value="setCookie" onclick="setCookie()"><input type="button" class="button" value="getCookie" onclick="getCookie()">
Have a look at our “index.html” file:
![]() In our “project.js” file, we will define the “setCookie()” associated with the “onclick” event of the “setCookie” buttons.
The “setCookie()” function will access the values of the input fields by utilizing the “document.getElementById()” method and store them all together in a string “studentInfo”.
Then the string “studentInfo” value will be assigned to “document.cookie” object, which results in creating a cookie:
function setCookie() {
var studentInfo = "FullName=" + document.getElementById("fullname").value + ";Class=" + document.getElementById("class").value + ";Subject=" +document.getElementById("subject").value;
document.cookie = studentInfo;
alert("Cookie is created");}
We will define another function named “getCookie()” in the same file.
The “getCookie()” function will check the length of the created cookie in the “if” statement, and then display the created cookie in an alert box.
In the other case, if the cookie get expired or deleted, the alert box will state that “Sorry, is Cookie not available”:
function getCookie() {
if (document.cookie.length != 0) {
alert(document.cookie);
}
else {
alert("Sorry, is Cookie not available")
}}
Here is how our “project.js” file looks like:
In our “project.js” file, we will define the “setCookie()” associated with the “onclick” event of the “setCookie” buttons.
The “setCookie()” function will access the values of the input fields by utilizing the “document.getElementById()” method and store them all together in a string “studentInfo”.
Then the string “studentInfo” value will be assigned to “document.cookie” object, which results in creating a cookie:
function setCookie() {
var studentInfo = "FullName=" + document.getElementById("fullname").value + ";Class=" + document.getElementById("class").value + ";Subject=" +document.getElementById("subject").value;
document.cookie = studentInfo;
alert("Cookie is created");}
We will define another function named “getCookie()” in the same file.
The “getCookie()” function will check the length of the created cookie in the “if” statement, and then display the created cookie in an alert box.
In the other case, if the cookie get expired or deleted, the alert box will state that “Sorry, is Cookie not available”:
function getCookie() {
if (document.cookie.length != 0) {
alert(document.cookie);
}
else {
alert("Sorry, is Cookie not available")
}}
Here is how our “project.js” file looks like:
![]() We will save both files and then utilize the VS Code “Live Server” extension to run the application in the browser:
We will save both files and then utilize the VS Code “Live Server” extension to run the application in the browser:
![]() Enter values in the “FullName”, “Class”, and “Subject” input fields and then click on the “setCookie” button:
Enter values in the “FullName”, “Class”, and “Subject” input fields and then click on the “setCookie” button:
![]() An alert box will be generated at this point stating that a “Cookie is created”:
An alert box will be generated at this point stating that a “Cookie is created”:
![]() Now, click on the “getCookie” button to retrieve the multiple key-value pairs of the created cookie:
Now, click on the “getCookie” button to retrieve the multiple key-value pairs of the created cookie:
![]() As you can see from the output that a single “key-value” pair is displayed, which is “FullName=Sharqa”:
As you can see from the output that a single “key-value” pair is displayed, which is “FullName=Sharqa”:
![]() We have tried to store multiple key-value pairs in a cookie; however, the “getCookie()” function only fetched the first-key value pair.
This is because JavaScript cookies only permit you to store a single string as a key-value pair in a cookie.
In this situation, you can create a custom JavaScript object, then convert it to a JSON string and store its value (multiple key-value pairs) in a cookie.
The below-given example will demonstrate how to perform this operation.
We have tried to store multiple key-value pairs in a cookie; however, the “getCookie()” function only fetched the first-key value pair.
This is because JavaScript cookies only permit you to store a single string as a key-value pair in a cookie.
In this situation, you can create a custom JavaScript object, then convert it to a JSON string and store its value (multiple key-value pairs) in a cookie.
The below-given example will demonstrate how to perform this operation.
How to Store Multiple key-value pairs in a Cookie using JSON
Move into the “setCookie()” function of the JavaScript file and create a custom object named “object1”.
The “object1” will get the values of the added input fields as its properties:
function setCookie() {
var object1 = {};
object1.name = document.getElementById("fullname").value;
object1.class = document.getElementById("class").value;
object1.subject = document.getElementById("subject").value;
In the next step, we will convert “object1” to a JSON string with the help of “stringify()” method and store the resultant string “document.cookie” object:
var jsonString = JSON.stringify(object1);
document.cookie = jsonString;
alert("Cookie is created");}
To retrieve the multiple key-value pair stored as a string in the “document.cookie” object, we will use the “JSON.parse()” method.
The “JSON.parse()” method will parse the “document.cookie” into a JSON object.
Lastly, multiple key-value pairs will be displayed in an alert box:
function getCookie() {if (document.cookie.length != 0) {
var obj = JSON.parse(document.cookie);
alert("FullName=" + obj.name + " " + "Class=" + obj.class + " " + "Subject=" + obj.subject);
}
else {
alert("Cookie not available");
}}
![]() Now, again open up the “index.html” page in the browser and enter values in the specified fields:
Now, again open up the “index.html” page in the browser and enter values in the specified fields:
![]() Clicking on the “setCookie” button will let you know that a cookie is created:
Clicking on the “setCookie” button will let you know that a cookie is created:
![]() In the next step, click on the “getCookie” button, which is present next to the “setCookie”:
In the next step, click on the “getCookie” button, which is present next to the “setCookie”:
![]() The generated alert box signifies that we have successfully stored multiple key-value pairs in a single cookie:
The generated alert box signifies that we have successfully stored multiple key-value pairs in a single cookie:
![]() You can also utilize multiple cookies for the same purpose.
However, we do not recommend you use this approach as it makes it challenging to maintain multiple cookies.
You can also utilize multiple cookies for the same purpose.
However, we do not recommend you use this approach as it makes it challenging to maintain multiple cookies.
Conclusion
To store multiple key-value pairs in a cookie, you have to create a custom object, convert it to a JSON string with the help of the “stringify()” method, and store the resultant “document.cookie” object.
This approach assists in saving similar information in a cookie and offers several benefits, such as applying an expiration date to multiple key-value pairs at once.
This write-up discussed the procedure to store multiple key-value pairs in Cookies along with the suitable examples.
Hoisting | Explained
When the JavaScript engine executes a program, it creates a new execution context called Global Execution Context” or the “Default Context”.
You may know that JavaScript is a single-threaded language, so it only permits the creation of one Global Execution Context to execute the code.
In JavaScript, there are two phases of the Global Execution Context:
Creation
Execution
In the Creation phase, the declarations related to variables and functions are shifted to the top of the scope, known as “Hoisting“.
It is also considered the default behavior of JavaScript.
This post explains Hoisting along with the suitable examples.
So, let’s start!
Variable Hoisting
The JavaScript engine automatically moves the variable declarations to the program’s or script’s top.
This process is known as “Variable Hoisting”.
Example: Variable Hoisting
In the below-given example, we have declared a variable named “number” and initialized its value “4“, but before that, we are referencing the “number” variable through the “console.log()” method:
console.log(number);
var number= 4;
In this case, the “number” variable declaration is automatically moved to the script’s top.
That’s the reason the execution of the provided has not encountered any error:
![]() In terms of syntax, the code in the execution phase looks like this:
var number;
console.log(number);
number= 5;
So what happened in the background? The JavaScript engine allocated memory to the “number” variable during the Global Execution Context creation phase and then set its values as “undefined”.
In terms of syntax, the code in the execution phase looks like this:
var number;
console.log(number);
number= 5;
So what happened in the background? The JavaScript engine allocated memory to the “number” variable during the Global Execution Context creation phase and then set its values as “undefined”.
let keyword Hoisting
In JavaScript, the variables defined with the “let” keyword are hoisted at the script’s top, but the engine does not initialize them.
The code block knows about the defined variable; however, it cannot be utilized until we declare the specified variable.
Example: let keyword Hoisting
We will declare the same “number” variable using the “let” keyword:
number= 6;
let number= 5;
The given code will generate a “ReferenceError” that the “number” variable is not defined:
![]() The encountered “ReferenceError” also signifies that the “number” variable is placed in the heap memory, but it is not initialized yet.
We will try to access a variable “alpha” that does not exist in the memory.
In this case, the output will show another “ReferenceError” that the “alpha” variable is not defined:
console.log(alpha);
let number= 5;
Output
The encountered “ReferenceError” also signifies that the “number” variable is placed in the heap memory, but it is not initialized yet.
We will try to access a variable “alpha” that does not exist in the memory.
In this case, the output will show another “ReferenceError” that the “alpha” variable is not defined:
console.log(alpha);
let number= 5;
Output
![]() Now, let’s check out how the JavaScript engine handles Function Hoisting.
Now, let’s check out how the JavaScript engine handles Function Hoisting.
Function Hoisting
The Function declarations are also shifted to the top of the script by the JavaScript engine.
Similar to variables, JavaScript offers the functionality to hoist function declarations.
Example: Function Hoisting
In the following example, the “add()” function is invoked before adding its definition:
let a = 45,
b = 23;
let sum= add(a, b);
console.log(sum);
function add(x, y) {
return x + y;}
However, the program still outputs the value returned by the “add()” function:
![]() When the given example is executed, the JavaScript engine allocates memory to the declaration of the “add()” function.
More specifically, a JavaScript “Object” is created according to the type of “add()” function type and also adds a “Function reference” named “add,” which points towards the created object.
So technically, in the JavaScript engine, the above-given example is executed as follows:
function add(x, y){
return x + y;}
let a = 45,
b = 23;
let sum= add(a,b);
console.log(sum);
Output
When the given example is executed, the JavaScript engine allocates memory to the declaration of the “add()” function.
More specifically, a JavaScript “Object” is created according to the type of “add()” function type and also adds a “Function reference” named “add,” which points towards the created object.
So technically, in the JavaScript engine, the above-given example is executed as follows:
function add(x, y){
return x + y;}
let a = 45,
b = 23;
let sum= add(a,b);
console.log(sum);
Output
![]() Both of the given programs generated the same output.
Now, we will try to hoist Function Expressions in JavaScript.
Both of the given programs generated the same output.
Now, we will try to hoist Function Expressions in JavaScript.
Function Expressions hoisting
In a JavaScript Function Expression, a variable is initialized with a function value.
As a result, the named variable is only hoisted, not its function.
Example: Function expressions hoisting
We will change our regular “add()” function to a “function expression”:
var add =function add(x, y) {return x + y;}
This time a “TypeError” will appear on the console window informing that “add” is not a function:
![]() We have faced the above-given “TypeError” because the JavaScript engine placed “add” as a “variable” in the memory, not as a function.
That was all critical information related to Hoisting in JavaScript.
You can further explore this topic according to your preferences.
We have faced the above-given “TypeError” because the JavaScript engine placed “add” as a “variable” in the memory, not as a function.
That was all critical information related to Hoisting in JavaScript.
You can further explore this topic according to your preferences.
Conclusion
Hoisting in JavaScript is supported for variables and functions declarations.
In the creation phase of the Global Execution Context, the declaration related to variables and functions is moved to the top of the scope.
In this way, a place in the memory is allocated to both of them, permitting us to utilize variables and functions before declaration.
This write-up explained Hoisting along with suitable examples.
Strict Mode | Explained
As JavaScript is a scripting language, sometimes it shows the correct output even if it contains any errors.
You can use the “Strict Mode” in JavaScript to cope with this situation.
The JavaScript engine executes the script with additional restrictions checks when Strict Mode is enabled.
Strict Mode is a restricted variant or semantical stricter that generates errors for the issue, which the engine might handle silently.
In this Mode, the deprecated JavaScript features are also caught up, and the related error will be then shown as output.
As a result, Strict Mode enhances security, minimizes bugs, and boosts your JavaScript application’s performance.
This write-up discusses Strict Mode along with suitable examples.
So, let’s start!
How to enable Strict Mode
By utilizing the “use strict” string, you can enable “Strict Mode” and add it to the global scope for the entire script or apply it to a single function only.
We will now practically go through both of the mentioned ways.
Enabling Strict Mode for whole script
If you want to enable Strict Mode for the whole script, then add the “use strict” string at the start of the script, and write out the required code in the following way:
'use strict';// other script code
x = 5;
console.log(x);
After executing the above script, we have got a “ReferenceError” because, in Strict Mode, you cannot use variables without defining them:
![]()
Enabling Strict Mode for a single function
To enable “Strict Mode” within a function, add the “use strict” string at the function definition’s beginning.
For instance, in the below-given script, we activated “Strict Mode” only for the “displayInfo()” function:
x = 6;
console.log(x);function displayInfo() {
'use strict';
y = "linuxhint";
console.log(y);
}
displayInfo();
Output
![]() In the given output, you may have noticed that enabling Strict Mode has applied some restrictions to the script, resulting in some errors.
To know more about the “not allowed” kind of restrictions within the JavaScript Strict Mode, have a look at the upcoming section.
In the given output, you may have noticed that enabling Strict Mode has applied some restrictions to the script, resulting in some errors.
To know more about the “not allowed” kind of restrictions within the JavaScript Strict Mode, have a look at the upcoming section.
Undeclared variables within Strict Mode
In JavaScript Strict Mode, a variable cannot be initialized or used as an undeclared variable.
Example: Undeclared variable with Strict Mode
'use strict';
x = 'linuxhint';
We have not declared the “x” variable in the above-given example.
So, initializing it with the value “linuxhint” will throw the following “ReferenceError”:
![]()
Undeclared objects within Strict Mode
Similarly, in Strict Mode, all added objects must be declared first.
In case you are assigning properties and their respective values for an undeclared object, the JavaScript engine will throw a “ReferenceError”:
Example: Undeclared objects with Strict Mode
'use strict';
employee = {name: 'Alex', age: 33};
Output
![]()
Deleting objects within Strict Mode
JavaScript does not permit you to delete objects in Strict Mode.
If you do so, a SyntaxError will be thrown in the console window.
Example: Deleting objects within Strict Mode
'use strict';
let employee = {name: 'Alex', age: 33};delete employee;
Output
![]() In “Non-Strict” Mode, the attempt to delete the created “employee” object will fail silently the the “delete employee” expression will be evaluated as “false”:
In “Non-Strict” Mode, the attempt to delete the created “employee” object will fail silently the the “delete employee” expression will be evaluated as “false”:
![]()
Duplicating Parameters within Strict Mode
A function declaration in Strict Mode must have unique parameters name as duplicating the parameter name will throw a SyntaxError.
Example: Duplicate Parameters within Strict Mode
In the below-given example, we have defined a “showInfo()” function that comprises duplicate parameters (a, a):
"use strict";
functionshowInfo(a, a) { console.log('Strict Mode')};
showInfo();
Execution of the provided code will throw a “SyntaxError: Duplicate parameter name not allowed in this context”:
![]()
Read-only property within Strict Mode
Strict Mode restricts the writing access of a read-only property.
Example: Read-only property within Strict Mode
For instance, we will declare an “object1” having a “y” property in Strict Mode and then set its “writable” property to “false”.
Upon doing so, the “y” property of “object1” is converted into read-only or non-writable property:
'use strict';
let object1 = {};Object.defineProperty(object1, 'y', { value: 12, writable: false });
Next we will assign a new value to the “object1.y” property:
object1.y = 56;
Assigning value to the read-only “object1” property displays a TypeError:
![]()
Octal literals within Strict Mode
Numerals that comprise “zero” as a prefix are called Octal literals, and they are not allowed Strict Mode.
Example: Octal literals within Strict Mode
The following example will create an octal literal “x” with the value “001”:
'use strict';
let x = 001;
As mentioned earlier, the strict does not permit to define Octal literals, so you may encounter the following SyntaxError:
![]() Instead of utilizing “0” as a prefix, adding “0o” will solve the issue:
'use strict';
let x = 0o01;
console.log(x);
Now, we have successfully created an Octal literal within the Strict Mode using the “0o” prefix:
Instead of utilizing “0” as a prefix, adding “0o” will solve the issue:
'use strict';
let x = 0o01;
console.log(x);
Now, we have successfully created an Octal literal within the Strict Mode using the “0o” prefix:
![]()
eval and arguments within Strict Mode
In Strict Mode, you cannot utilize “eval” and “arguments” as function names, variable names, or function parameters.
Both “eval” and “arguments” are treated as “keywords” within the JavaScript Strict Mode.
Example: eval and arguments within Strict Mode
'use strict';
let eval = 32;
let arguments = 'linuxhint';
Using “eval” and “arguments” as variable names will output the following SyntaxError:
![]()
Non-extensible object within Strict Mode
The Strict Mode does not allow adding new properties to a created non-extensible object.
Example: Non-extensible object within Strict Mode
Firstly, we will declare an “object3” and convert it to a non-extensible object by utilizing the “Object.preventExtensions()” method.
After that, we will attempt to add a “newProperty” to “object3”:
'use strict';
let object3 = {};Object.preventExtensions(object3);
object3.newProperty = 'my object';
The given output signifies that the created object is not extensible; therefore, we cannot add a new property:
![]()
Why use Strict Mode
Here is the list of some of the fantastic advantages of using Strict Mode in JavaScript:
Strict Mode assists in writing a secure and cleaner script.
It eliminates the function of hiding silent JavaScript errors by throwing an error statement.
Fixing faults with the help of JavaScript Strict mode optimizes the code and the JavaScript engine executes it quickly compared to the code written in non-strict Mode.
We have provided the essential information related to Strict Mode, its advantages, and restrictions.
Conclusion
By utilizing the “use strict” string, you can enable Strict Mode in JavaScript in the global context of a script or for a single function.
It improves JavaScript semantics by providing extra security.
When Strict Mode is enabled in a script, undeclared variables and objects cannot be used.
It does not permit adding duplicate parameters, Octal literals, deleting objects, and writing into read-only object’s property.
This write-up explained Strict Mode along with appropriate examples.
OOP Classes | Explained
Before ES6, “prototypes” were utilized to simulate classes, where additional properties can be associated with a prototype using inheritance.
When a new and enhanced version of ES5 was introduced, known as ES6, JavaScript classes were added to it.
In ES6, classes are considered a fundamental component of JavaScript, and it has much simpler and error-prone syntax as compared to prototypes.
Similar to Object-Oriented Programming (OOP), the JavaScript class comprises a Constructor method, some specific properties, methods, and objects of the given class type.
This post explains OOP classes in JavaScript with the help of suitable examples.
So, let’s start!
OOP Classes
As mentioned earlier, JavaScript classes are introduced in ES6.
They offer a concise manner of declaring class by utilizing a syntax similar to what we use in OOP.
In JavaScript, you can use the “class” keyword for defining a class.
It adds syntactic sugar (a good kind of sugar) over the existing prototype inheritance pattern.
Syntax of OOP classes
To create an OOP class, you have to follow the below-given syntax:
class ClassName {
constructor() { ...
}}
Here, “class” is a keyword utilized to create a class.
Also, an OOP class must have a method named “constructor()”.
Example: Create OOP class
We will define a class named “Person” which has two properties: “name” and “age”:
class Person{
constructor() {
this.name = 'Alex';
this.age = 25;
}}
To utilize the Person class, we have to create an object or instance of the specified class:
let person1 = new Person();
Now, “person1” object can access the properties of the “Person” class:
console.log(person1.name + " " + person1.age);
![]() As mentioned earlier, an OOP class must contain a constructor.
Do you want to know more about Constructors? If yes, then follow the below-given section.
As mentioned earlier, an OOP class must contain a constructor.
Do you want to know more about Constructors? If yes, then follow the below-given section.
Constructors for OOP Classes
Constructor is a method invoked when you create an instance of an OOP class.
It is also used to initialize objects within a class.
However, JavaScript will automatically create and execute an empty constructor if you have not defined any constructor method for an OOP class.
Types of Constructors for OOP Classes
In JavaScript, there are the following two types of Constructors:
Default Constructor
Parameterized Constructor
The next section will briefly explain Default and Parameterized Constructor and their usage.
Default Constructor for OOP Classes
You can also explicitly define a default constructor without arguments if you want to perform any specific operation while creating an OOP class object.
Syntax of Default Constructor
class ClassName{
constructor(){
// body of the default constructor
}}
Example: Default Constructor for OOP Classes
In the below-given example, we will define a default constructor for the “Person” class.
According to the definition of the “constructor()” method, whenever a “Person” class object is created, it will initialize its “name” property to “Alex”, and “age” property as “25.”
class Person{
constructor() {
this.name = 'Alex';
this.age = 25;
}}const person1 = new Person();
console.log("Name: " + person1.name);
console.log("Age: " + person1.age);
Execution of the given program will create a “person1” object of the “Person” OOP class by utilizing the default constructor.
The default constructor will then initialize the specified properties for the “person1” object.
Lastly, the “console.log()” method will print out the values stored in the “person1.name” and “person1.age” properties:
![]() In an OOP class, utilizing the Default Constructor is useful when you want to initialize the properties of all of the created objects with the same value.
But, what if you need to assign some unique values to the object while creating it?, you can achieve this functionality with the help of the “Parameterized Constructor”.
In an OOP class, utilizing the Default Constructor is useful when you want to initialize the properties of all of the created objects with the same value.
But, what if you need to assign some unique values to the object while creating it?, you can achieve this functionality with the help of the “Parameterized Constructor”.
Parameterized Constructor for OOP classes
A constructor which comprises parameters is known as the “Parameterized Constructor“.
This type of constructor is mainly used when you want to initialize the properties of the JavaScript OOP class with some specific values.
Syntax of Parameterized Constructor
class ClassName{
constructor(parameter1, parameter2....., parameterN){
// body of the parameterized constructor
}}
The parameterized constructor accepts parameters passed as “arguments” while creating an OOP class object.
Example: Parameterized Constructor for OOP classes
We will create a parameterized constructor for the “Person” class that initializes the properties with the values passed as arguments:
class Person{
constructor(name, age) {
this.name = name;
this.age = age;
}}
In the below-given code, “person1” object of the “Person” class will be created using Parameterized constructor where “Max” is passed as “name” property value, and “25” argument represents the value of “age” property:
const person1 = new Person("Max", 25);
console.log("Name: " + person1.name);
console.log("Age: " + person1.age);
Following output signifies that we have successfully created a “person1” object having the specified property values with the help of the Parameterized Constructor:
![]() We have talked about creating OOP classes, their related objects and defining default and parameterized constructors.
Now, we will move ahead and discuss another critical component of an OOP class which is “Method”.
We have talked about creating OOP classes, their related objects and defining default and parameterized constructors.
Now, we will move ahead and discuss another critical component of an OOP class which is “Method”.
Methods in OOP classes
Methods are a type of function associated with specific JavaScript OOP classes.
They also operate as a member function when defined within a class and can be used to access the properties of the class.
Syntax of Methods for OOP classes
class ClassName{
methodName{// body of the methodName
}}
Note: The name of an OOP class method must be in lowercase.
Example: Methods in OOP classes
In the same “Person” class, we will define a “displayInfo()” method which return the values of “name” and “age” properties for a specified object:
displayInfo(){return ("Name: " + this.name + " Age: " + this.age);}
After doing so, we will create an object of the “Person” class:
const person1 = new Person("Max", 25);
Next, we will invoke the “displayInfo()” by utilizing the “person1” object:
person1.displayInfo();
The “displayInfo()” method will return the “name” and “age” values of the “person1” object:
![]() We have compiled the essential information related to the OOP class.
We have compiled the essential information related to the OOP class.
Conclusion
Using the “class” keyword, you can define an OOP Class.
In ES6, the JavaScript classes were introduced to add syntactic sugar (a good kind of sugar) over the existing prototype inheritance pattern.
Similar to OOP, the JavaScript class comprises a Constructor method, some specific properties, methods, and objects of the given class type.
This write-up explained OOP classes in JavaScript with the help of suitable examples.
Navigator Object | Explained
In JavaScript, the “navigator” object comprises the information about the current browser that the user is using to access a web application.
You may know that all browsers are different, and they process JavaScript differently.
In such a scenario, the navigator object helps in customizing your application according to the user’s browser settings.
The JavaScript navigator object permits you to use the location information to get details related to the user’s current location.
Its other useful properties assist in knowing about the browser name, its version, browser engine or product name, and the browser’s language.
In short, your website will be more compatible with different browsers if you utilize the navigator object properties correctly.
This write-up will explain the navigator object, its properties, and methods with the help of suitable examples.
So, let’s start!
Navigator Object
As mentioned earlier, the Navigator Object is used to retrieve browser-related information.
It is a window property that can be accessed using:
window.navigator
OR
navigator
The navigator object offers various properties and methods that help the programmers determine the features provided by the browser.
Follow this post to learn the commonly used navigator object properties and methods if you have the same motive.
Navigator Object appCodename property
The “appCodename” property of the JavaScript navigator object displays the browser code name.
Syntax of Navigator Object appCodename property
navigator.appCodeName
Example: Navigator Object appCodename property
In the below-given, the variable “browserCodeName” will store the browser code name returned by the “navigator.appCodeName” property:
let browserCodeName = navigator.appCodeName;
console.log("Browser code name is : " + browserCodeName);
As you can see from the output, our browser code name is “Mozilla”:
![]()
Navigator Object appName property
The “appName” property of the navigator object returns the browser’s name.
Note: All modern browsers will display “Netscape” as the appName navigator object property value.
Syntax of Navigator Object appName property
navigator.appName
Example: Navigator Object appName property
Now, we will retrieve the value of the “appName” property of the navigator object:
let browserName = navigator.appName;
console.log("Browser Name: " + browserName);
Output
![]()
Navigator Object appVersion property
If you want to know about the version of your current browser, then you can use the “appVersion” property of the JavaScript navigator object.
Syntax of Navigator Object appVersion property
navigator.appVersion
Example: Navigator Object appVersion property
In the following example, the value of the “navigator.appVersion” will be stored in the variable “version,” which is then displayed in the console with the help of the “console.log()” method:
let version = navigator.appVersion;
console.log("Browser version: " + version);
The below-given output shows our browser’s version:
![]()
Navigator Object cookieEnabled property
The Navigator object “cookiesEnabled” property is used to check if the cookies are enabled in the browser or not.
Syntax of Navigator Object cookieEnabled property
navigator.cookieEnabled
If cookies are enabled in the browser, the navigator.cookieEnabled property will return “true“; otherwise, the return case will be set to “false” if cookies are disabled.
Example: Navigator Object cookieEnabled property
We will check out the status of our browser’s cookies by using the “navigator.cookieEnabled” property:
let cookies = navigator.cookieEnabled;
console.log("Cookies enabled: " + cookies);
Given output signifies that cookies are enabled in our browser:
![]()
Navigator Object geolocation property
In JavaScript, the “geolocation” property of a navigator object returns a “Geolocation” object which permits you to provide the location-related information like the current position of the user.
Syntax of Navigator Object geolocation property
navigator.geolocation
Example: Navigator Object geolocation property
The navigator object “geolocation” property asks you to grant permission for getting the location.
In case of fulfilling the request, it will return a “Geolocation” object and this object can be used to perform further operations.
In our program, firstly we will access the Geolocation API using the “navigator.geolocation” property, if this operation get succeeded, then the specified property will invoke the “getCurrentPositions()” Geolocation object method while passing “showPosition()” as an argument, otherwise, the code written in the “else” block will be executed:
if (navigator.geolocation) {
navigator.geolocation.getCurrentPosition(showPosition);} else {
console.log("Geolocation is not supported by this browser.");}
After permitting the location access by the user, showPosition() function will perform its functionality and display the position of current device according to the “Latitude” and “Longitude” values:
function showPosition(position) {
console.log( "Latitude: " + position.coords.latitude + " " +
" Longitude: " + position.coords.longitude);}
To get to know about our current position, we will allow the location access for the Geolocation API:
![]() After doing so, the “Latitude” and “Longitude” values will be shown in the console window within a few microseconds:
After doing so, the “Latitude” and “Longitude” values will be shown in the console window within a few microseconds:
![]()
Navigator Object navigator.language property
The “navigator.language” property of the navigator object will fetch the current language of the browser.
Syntax of Navigator Object navigator.language property
navigator.language
If the browser is online, the “navigator.language” will return “true“; otherwise, its return case is set to “false” when the browser is offline.
Example: Navigator Object navigator.language property
Execute below-given code to check your browser’s language:
let language = navigator.language;
console.log( "Browser language: " + language);
The language of our browser is set to the English-United States; that’s why the string “en-US” is displayed as output:
![]()
Navigator Object navigator.onLine property
“navigator.onLine” is another useful property of the navigator object, which verifies if the browser is online or not.
Syntax of Navigator Object navigator.onLine property
navigator.onLine
Example: Navigator Object navigator.onLine property
To check the current status of your browser, type out the following code in the console window:
let online = navigator.onLine;
console.log("Browser online: " + online);
“true” represents that your browser is online, whereas “false” indicates that the browser is not currently active (offline):
![]()
Navigator Object navigator.platform property
The “navigator.platform” property of a JavaScript object identifies the platform on which your browser is running.
Syntax of Navigator Object navigator.platform property
navigator.platform
Example: Navigator Object navigator.platform property
let platform = navigator.platform;
console.log("Platform: " + platform);
The above-given program will output the platform for which the browser is compiled:
![]()
Navigator Object navigator.product property
In JavaScript, the “navigator.product” property of a navigator object is accessed to view the browser engine or product name.
Syntax of Navigator Object navigator.product property
navigator.product
Example: Navigator Object navigator.product property
Because of some compatibility reasons, modern browsers display “Gecko” as their product name when the “navigator.product” property is accessed:
let browserProduct = navigator.product;
console.log("Browser product: " + browserProduct);
Output
![]()
Navigator Object navigator.userAgent property
The browser sends the headers of the user-agent to the server and they can be fetched using “navigator.userAgent” property.
Syntax of Navigator Object navigator.userAgent property
navigator.userAgent
Example: Navigator Object navigator.userAgent property
To get the information stored in the user-agent header, we will invoke the “user-agent” property of the navigator object:
let agent = navigator.userAgent;
console.log("User-agent: " + agent);
The header user-agent header provides the information related to the browser platform, its name, version number:
![]()
Navigator Object javaEnabled() method
Is “Java” enabled in your browser? Utilize the “javaEnabled()” navigator object method for getting the answer to the specified question.
Syntax of Navigator Object javaEnabled() method
navigator.javaEnabled()
Example: Navigator Object javaEnabled() method
The “javaEnabled()” method will return a boolean value either true or false, where “true” represents that Java is enabled and “false” indicates that Java is disabled:
let java = navigator.javaEnabled();
console.log( "Java Enabled: " + java);
Output
![]() We have compiled the essential information related to the Navigator Object.
We have compiled the essential information related to the Navigator Object.
Conclusion
Navigator object is referred to as “navigator” or “window.navigator“.
It contains information about the browser and its capabilities.
The JavaScript navigator object offers several useful properties and methods that fetch the details related to the browser, such as browser name, its version, browser engine or product name, and the browser’s language.
This write-up explained the navigator object in JavaScript with the help of suitable examples.
How to Write and Run your First Node.js Program on Mac
As the JS code was initially available to run only on browsers or JS engines.
To run JS on a machine directly, a runtime environment is required as JRE for Java.
NodeJS is a runtime environment to run JavaScript code outside the browser.
Due to its association with JavaScript, NodeJS is quite popular among computing enthusiasts.
The primary purpose of NodeJS is to create web servers and the way of handling requests of NodeJS web servers outperforms the PHP or ASP-based web servers.
Initially, NodeJS support was available on Linux but later, NodeJS was made available for Windows and macOS users as well.
This article will guide you to write and run the NodeJS program on mac.
Additionally, you would also get to know about the installation of NodeJS on mac.
How to install NodeJS on Mac
To write a NodeJS program on mac, it must be installed on your machine.
This section will guide you to install NodeJS on your Mac.
Step 1: Navigate to the NodeJS website to get the required version of NodeJS.
Variety of old releases and new versions are available.
You can download the version as per your requirement.
Step 2: After downloading the required file, you would have to follow the similar steps as shown below to install NodeJS.
![]() Accept the licence agreement.
Accept the licence agreement.
![]() It will ask for confirmation, click on Agree to continue.
It will ask for confirmation, click on Agree to continue.
![]() Select the destination folder and click on Continue
Select the destination folder and click on Continue
![]() Click on Install to go with the recommended settings
Click on Install to go with the recommended settings
![]() The installation process will start up
The installation process will start up
![]() After successful installation, you will get the following interface.
Click on Close
After successful installation, you will get the following interface.
Click on Close
![]() Step 3: After completing the installation, you must verify the version by opening the terminal (command+space) and writing “node -v” to check the version.
Step 3: After completing the installation, you must verify the version by opening the terminal (command+space) and writing “node -v” to check the version.
![]()
How to write and run a NodeJS program on Mac
Here, you will find a step-by-step procedure to write a NodeJS program on Mac.
Let’s go through these steps.
Step 1: Open the code editor, create a new JavaScript(.js) file.
In our case it is first.js.
Step 2: Write some code inside it as we did by using the following lines of code.
var x="HELLO WORLD! ";var y=" Welcome to LinuxHint";
console.log(x+y);
In the above code, two string variables are created and printed using the console.log statement.
![]() Step 3: Open the terminal, and write the following command to run the first.js file.
node first.js
Step 3: Open the terminal, and write the following command to run the first.js file.
node first.js
![]() It is observed from the output that the result of the first.js file has been printed on the terminal.
That’s the major contribution of NodeJS, as you do not need any browser to run the JavaScript files.
It is observed from the output that the result of the first.js file has been printed on the terminal.
That’s the major contribution of NodeJS, as you do not need any browser to run the JavaScript files.
Conclusion
To write and run a NodeJS program on mac, first download and install the LTS version of NodeJS from its official website.
After installation, create a new JavaScript(.js) file, write some code inside it, and run the “node fileName.js” command in the terminal.
This post aims to write and run the first NodeJS program on Mac.
How to Delete a Cookie
Cookies comprise small files that store the user information related to the current and previous sessions in a browser.
This information is utilized when the user opens the browser again, and its last login session gets recovered with the help of cookies.
However, there comes a point when you may want to delete cookies because of any privacy concern or security risk.
JavaScript made it easier to delete cookies by setting the values of “max-age” and “expires” attributes.
Moreover, you can also delete all of the added cookies at once by utilizing the Browser’s settings.
This write-up will explain the methods to delete cookies.
So, let’s start!
How to delete a cookie using expires attribute
Cookies offer an “expires” attribute that permits you to add an expiration date in Universal Time Coordinated (UTC) to the cookie “name=value” pair.
By specifying any passed date as an expiry date, a cookie can be easily deleted.
Have a look at the below-given example.
Example: How to delete a cookie using expires attribute
First of all, we will add two buttons: “setCookie” and “getCookie” in the “index.html” file.
The “setCookie” button invokes the “setCookie()” function to create a cookie, whereas, the “getCookie” button calls the “getCookie()” function to fetch the cookie “key-value” pair:
<input type="button" class="button" value="setCookie" onclick="setCookie()"><input type="button" class="button" value="getCookie" onclick="getCookie()">
Here is how our “index.html” file looks like:
![]() Next, we will define “setCookie()” and “getCookie()” functions in the “project.js” file.
The “setCookie()” function will create a cookie having “key-value” pair as “name-Alexander” and sets the value of the “expires” attribute to “Sat, 20 Jan 1980 12:00:00 UTC”.
In this example, when the cookie object is created, the JavaScript interpreter will check the expiry date and delete it immediately from the system, as we have assigned a passed date to the “expires” attribute:
function setCookie() {
document.cookie = "name=Alexander; expires=Sat, 20 Jan 1980 12:00:00 UTC";}
Another function which we are going to define is the “getCookie()” function.
The “getCookie()” function will check the length of the created cookie and display the key-value pair in an alert box.
In our case, the created cookie is considered as “expired”, as a result of it, an alert box will appear on the browser stating that “Cookie is not available”:
function getCookie() {
if (document.cookie.length != 0) {
alert(document.cookie);
}
else {
alert("Cookie is not available");
}}
Next, we will define “setCookie()” and “getCookie()” functions in the “project.js” file.
The “setCookie()” function will create a cookie having “key-value” pair as “name-Alexander” and sets the value of the “expires” attribute to “Sat, 20 Jan 1980 12:00:00 UTC”.
In this example, when the cookie object is created, the JavaScript interpreter will check the expiry date and delete it immediately from the system, as we have assigned a passed date to the “expires” attribute:
function setCookie() {
document.cookie = "name=Alexander; expires=Sat, 20 Jan 1980 12:00:00 UTC";}
Another function which we are going to define is the “getCookie()” function.
The “getCookie()” function will check the length of the created cookie and display the key-value pair in an alert box.
In our case, the created cookie is considered as “expired”, as a result of it, an alert box will appear on the browser stating that “Cookie is not available”:
function getCookie() {
if (document.cookie.length != 0) {
alert(document.cookie);
}
else {
alert("Cookie is not available");
}}
![]() Next, we will save “index.html” and “project.js” files and then utilize the VS Code “Live Server” extension to run the application in the browser:
Next, we will save “index.html” and “project.js” files and then utilize the VS Code “Live Server” extension to run the application in the browser:
![]() The opened web page comprises two buttons: “setCookie” and “getCookie”, where clicking on the “setCookie” will create a new cookie with specified “key-value” pair and “expires” attribute value:
The opened web page comprises two buttons: “setCookie” and “getCookie”, where clicking on the “setCookie” will create a new cookie with specified “key-value” pair and “expires” attribute value:
![]() Then, click on the “getCookie” button:
Then, click on the “getCookie” button:
![]() An alert box will be generated upon performing the specified action with the message “Cookie is not available”.
This signifies that the created cookie is deleted successfully:
An alert box will be generated upon performing the specified action with the message “Cookie is not available”.
This signifies that the created cookie is deleted successfully:
![]() Another attribute that can be utilized for deleting cookies is called “max-age”.
Next, let’s learn how to use the “max-age” cookies attribute for deleting cookies.
Another attribute that can be utilized for deleting cookies is called “max-age”.
Next, let’s learn how to use the “max-age” cookies attribute for deleting cookies.
How to delete a cookie using max-age attribute
A cookie’s lifetime is set according to the current session duration of the browser; however, you can use the “max-age” attribute to define its lifetime, which will be independent of the browser session duration.
The “max-age” attribute accepts its value in the form of “seconds,” and setting “zero” or “negative numbers” defines the cookie lifetime as “zero” seconds.
In this way, you can utilize the “max-age” attribute to delete a cookie in the browser.
Example: How to delete a cookie using max-age attribute
In the “project.js” file, we will add the below-given line to create a cookie having a “zero” lifetime:
document.cookie = "name=Alexander; max-age=0";
After adding the “key-value” pair of a cookie, the JavaScript interpreter will check the value of the “max-age” attribute, which is set to “0,” and then delete the created cookie immediately from the system:
![]() Save the provided code and open it up in your browser.
After doing so, click on the “setCookie” button to set the specified cookie:
Save the provided code and open it up in your browser.
After doing so, click on the “setCookie” button to set the specified cookie:
![]() Next, click on the “getCookie” button:
Next, click on the “getCookie” button:
![]() The added value of the “max-age” attribute will force the JavaScript engine to delete the cookie.
As a result of this, the alert box will show a message “Cookie is not available”:
The added value of the “max-age” attribute will force the JavaScript engine to delete the cookie.
As a result of this, the alert box will show a message “Cookie is not available”:
![]() Want to try any explicit method for deleting cookies? If yes, then follow along with the next section.
Want to try any explicit method for deleting cookies? If yes, then follow along with the next section.
How to delete cookies using Browser settings
If you want to delete already created cookies all at once explicitly, then follow the below-given instructions:
Step 1: Firstly, open the browser settings by clicking the three vertical dots or the “Menu” button, present at the top right corner of the window:
![]() Step 2: Next, select the “History” option from the drop-down menu:
Step 2: Next, select the “History” option from the drop-down menu:
![]() Step 3: Now, look for the “Clear browsing data” in the left panel and click on it:
Step 3: Now, look for the “Clear browsing data” in the left panel and click on it:
![]() Step 4: A dialog box will pop-up and here mark the “Cookies and other side data” check box and hit the “Clear data” button.
This action will delete all of the added cookies within a few seconds:
Step 4: A dialog box will pop-up and here mark the “Cookies and other side data” check box and hit the “Clear data” button.
This action will delete all of the added cookies within a few seconds:
![]() We have provided essential information related to deleting cookies.
You can further explore it according to your preferences.
We have provided essential information related to deleting cookies.
You can further explore it according to your preferences.
Conclusion
Using “expires” and “max-age” attributes, you can delete cookies.
Specifying a passed date as the cookie’s expiry date immediately deletes the cookie after its creation.
Similarly, defining the lifetime of a cookie as zero seconds using the max-age attribute assists in deleting JavaScript cookies.
Besides these two methods, the Browser settings are also utilized for explicitly deleting all of the added cookies at once.
This post discussed the procedure to delete cookies along with the suitable examples.
How to copy Array elements
JavaScript offers various methods for copying array elements.
Arrays can comprise objects, references, and primitive values.
When you have the primitive type of data, the task of copying array elements is quite simple; however, when it comes to objects and references, you have to select in between the Shallow and Deep Copying procedures carefully.
When references exist in an array, the shallow copy only copies the reference addresses.
So, if you make some changes in one copy, the modification will also reflect in the other copy; as the memory locations are shared.
You can clone the Array elements using Deep copying to avoid this situation.
This write-up will discuss the methods to copy Array elements with the help of appropriate examples.
How to copy Array elements
JavaScript Arrays are considered as reference types which means that if you assign one array to another array using the assignment operator “=”, it will only assign the reference of the original array and it will not copy the array elements.
After the reference assignment, when you add or modify the elements of the second array, the first array elements will also get affected.
You can have a better understanding with the help of the following example:
Example
For instance, we have created an array named “birds” having the following elements:
var birds = ['Parrot', 'Crow'];
In the next step, we will try to assign “birds” to the “newBirds” array using the “=” assignment operator:
var newBirds = birds;
console.log(newBirds);
After that, we will add a new element to the “newBirds” array with the help of the JavaScript push() method:
newBirds.push('Pigeon')
Lastly, we will display the elements of the “birds” and “newBirds” array elements in the console window:
console.log(birds);
console.log(newBirds);
Below-given output signifies that when have copied the “birds” array elements by utilizing the assignment operator “=”, the changes made afterward are applied to both arrays:
![]() At this point, you have understood that Arrays are considered reference values, so when you use the assignment operator, only the reference of the original array will be copied, not the array elements.
In JavaScript, you can use the “Shallow Copy” or “Deep Copy” methods for copying array elements.
Do these terms sound new to you? No worries! We will explain them in the next sections.
At this point, you have understood that Arrays are considered reference values, so when you use the assignment operator, only the reference of the original array will be copied, not the array elements.
In JavaScript, you can use the “Shallow Copy” or “Deep Copy” methods for copying array elements.
Do these terms sound new to you? No worries! We will explain them in the next sections.
Shallow Copy
A bit-wise copy of an object is called a Shallow Copy.
In Shallow copy, a new object is created having an exact copy of the specified object values.
Shallow copy is mostly used to copy the first level element, which means that you can only clone the elements of a One Dimensional or 1D array.
If the original object contains any references then only the reference addresses will be copied.
The spread operator […], slice(), and concat() methods enable you to shallow copy array elements.
Deep Copy
If you want to copy the elements of a multi-dimensional array, you have to perform the Deep Copying operation to copy the original array elements.
The term “Deep Copy” refers to a recursive copying procedure.
Firstly, it creates a new object collection and then recursively copies the specified array elements.
So, we can say that, in the case of Deep Copy, a complete JavaScript array is copied or cloned into another array, and it copies the first level and all of the nested elements of a multi-dimensional array.
JSON.stringify() and JSON.parse() methods are utilized for copying multi-dimensional array, where the JSON.stringify() method will convert the specified object to string, which you can convert to Array with the help of JSON.parse() method.
Now, let’s check out some practical examples for copying single and multi-dimensional arrays with the mentioned Shallow and Deep copy methods.
How to copy Array elements using spread operator
In JavaScript, the “spread” operator can be used to copy or spread the array elements.
Three consecutive dots “…” represent the spread operator.
Remember that the spread operator will only copy the array elements at level one, and the nested elements are passed as references.
Syntax of spread operator to copy Array Element
var array2 = [...array1];
Here, the spread operator will copy the elements of “array1” to “array2”.
Example: How to copy Array elements using spread operator
First of all, we will create a new array named “birds” having two elements: “Parrot” and “Crow”:
var birds = ['Parrot','Crow'];
Then, we will copy the “birds” array elements to “newBirds” array:
var newBirds = [...birds];
console.log(newBirds);
Additionally, you can verify if adding a new element in the “newBirds” array will modify the “birds” array or not:
newBirds.push('Pigeon')
console.log(newBirds);
console.log(birds);
As you can see from the output, we have successfully copied the “birds” array elements to “newBirds” array, and pushing new elements to “newBirds” have not applied any changes in the “birds” array:
![]()
How to copy Array elements using slice() method
The JavaScript slice() method is utilized to copy array elements into another object or array.
The original array will not be modified in the case of using the slice() method.
Syntax of slice() method to copy Array Elements
var array2 = array1.slice();
According to the syntax, the slice() method will copy the elements of “array1” in “array2”.
Example: How to copy Array elements using slice() method
In the below-given example, we will utilize the “slice()” method for copying the “birds” array elements to “newBirds” array:
var birds = ['Parrot','Crow'];
var newBirds = birds.slice();
console.log(newBirds);
Now, pushing new elements in the “newBirds” array will not modify the “birds” array:
newBirds.push('Pigeon')
console.log(newBirds);
console.log(birds);
Here is the output we got from executing the above-given program:
![]() From the above-given output, it can be clearly seen that adding elements in the “newBirds” array has not affected the elements of the “birds” array.
From the above-given output, it can be clearly seen that adding elements in the “newBirds” array has not affected the elements of the “birds” array.
How to copy Array elements using concat() method
“concat()” is another useful JavaScript method that can assist you in copying array elements.
In the concat() method, you can take an empty array and copy the original array elements to it.
It will create a fresh copy of the specified array.
Syntax of concat() method to copy Array elements
var array2 = [].concat(array1);
In the above-given syntax, the concat() method will copy the “array1” elements in an empty array [], and then the result will be stored in “array2”.
Example: How to copy Array elements using concat() method
Now, we will use the JavaScript “concat()” method for copying the elements of the “birds” array to “newBirds”:
var birds = ['Parrot','Crow'];
var newBirds = [].concat(birds);
console.log(newBirds);
Next, we will push a new elements to “newBirds” array and check if it updates the “birds” array as well:
newBirds.push('Pigeon')
console.log(newBirds);
console.log(birds);
Have a look at the below-given output:
![]() As you can see in the above-given output, pushing new elements in the “newBirds” array has not modified the “birds” array.
As you can see in the above-given output, pushing new elements in the “newBirds” array has not modified the “birds” array.
How to copy Multi-Dimensional Array elements
If you want to copy elements from a multi-dimensional array, you can utilize the JSON.stringify() and JSON.parse() methods.
The JSON.stringify() method will convert the specified object to a string, which can be then converted to an array with the help of JSON.parse() method.
Syntax to copy Multi-Dimensional Array elements
var array2 = JSON.parse(JSON.stringify(array1));
Firstly, the “JSON.stringify()” method will convert “array1” to string and then it will parse it to an array (object) using the “JSON.parse()” method.
The returned array elements will be then copied to “array2”.
Example: How to copy Multi-Dimensional Array elements
In this example, we have used the JSON.stringify() and JSON.parse() methods to copy the elements of multi-dimensional “birds” array to “newBirds”:
var birds = [ { name:'Parrot' }, { name:'Crow'} ];
var newBirds = JSON.parse(JSON.stringify(birds));
console.log(newBirds);
![]() The above-given output signifies that we have successfully copied the elements of the “birds” array to “newBirds”.
The above-given output signifies that we have successfully copied the elements of the “birds” array to “newBirds”.
Conclusion
spread operator “[…]”, slice(), and concat() methods permit you to shallow copy 1D array elements and for deep copying multi-dimensional arrays, JSON.stringify() and JSON.parse() methods are utilized, where the JSON.stringify() method will convert the specified object to string, which can be then parsed to Array with JSON.parse() method.
This write-up discussed the methods to copy array elements.
How Methods of Map object work | Explained with Examples
In JavaScript, map is a cluster that consists of some elements in the form of key-value pairs, whereas, a map object is an iterable object that stores these pairs and can be used to display the key-value pairs in the same order they were stored in.
There are multiple map object methods available that are used for tasks such as creating a new map, setting or displaying values in a map, etc.
Here in this write-up, we have explained all of the JavaScript map object methods for you.
new Map()
The new map() method as the name suggests is used for creating a new map object.
Syntax
map = new Map(["key", value]);
Example
In this example, we have demonstrated the working of new Map().
const map1 = new Map();
map1.set('a',100);
map1.set('b',200);
map1.set('c',300);
console.log(map1.get("a"));
As indicated in the code we are creating a new map by the name “map1”.
Moreover we are assigning certain key-value pairs to the newly created map using set() method and lastly we are displaying the value stored in key ‘a’ by using get() method.
Output
![]() A new map was successfully created.
A new map was successfully created.
set()
For the purpose of adding or changing values to an existing map, the set() map object method is used.
Syntax
map.set("key", value);
Example
Suppose you want to change a certain value in an existing map.
Use the following code.
const map1 = new Map([
["coffee", 100],
["sugar", 200],
["milk", 300]]);
map1.set("coffee", 150);
console.log(map1.get("coffee"));
In the above code, a map is created which has certain keys and values stored in it.
We are using the set() method to change the value of the first key in the existing map.
Output
![]() The value of the key “coffee” was changed to “150”.
The value of the key “coffee” was changed to “150”.
get()
In order to get/fetch the value of a key in a map, the get() method is used.
Syntax
map.get("key");
Example
Let’s display the value of a certain key in an existing map.
const map1 = new Map([
["coffee", 100],
["sugar", 200],
["milk", 300]]);
console.log(map1.get("milk"));
Here we have first created a map and by using the get() method we are display the value of the key “milk”.
Output
![]() The value of the key “milk” was successfully displayed.
The value of the key “milk” was successfully displayed.
size
For the purpose of knowing the number elements that are present in a map, the size property is used.
Syntax
map.size;
Example
Suppose you want to display the number of elements present in map.
Follow the code provided.
const map1 = new Map([
["a", 1],
["b", 2],
["c", 3]]);
console.log(map1.size);
In the above code, we are creating a map and displaying its size using the size property.
Output
![]() The elements present in the map are 3.
The elements present in the map are 3.
delete()
For the purpose of deleting a certain element from a map, the delete() method is used.
Syntax
map.delete("key");
Example
Suppose you want to delete a specific element from a map:
const map1 = new Map([
["coffee", 1],
["sugar", 2],
["milk", 3]]);
map1.delete("sugar");
console.log(map1.size);
In the above javaScript code, we are deleting the “sugar” element from the map and displaying the remaining number of elements using the size property.
Output
![]() After deleting the “sugar” element, the remaining number of elements are 2.
After deleting the “sugar” element, the remaining number of elements are 2.
clear()
The clear() method is used for removing all the elements from a map.
Syntax
map.clear();
Example
Suppose you want to clear all the key-value pairs from a map and display the size of the map after clearing all the values.
Use the code below.
const map1 = new Map([
["a", 1],
["b", 2],
["c", 3]]);
map1.clear();
console.log(map1.size);
In the above code first we created a certain map, then used clear() method to remove all of its elements and displayed the map size using the size property.
Output
![]() All elements of map1 were removed.
All elements of map1 were removed.
has()
The has() method displays true if a specified key is present in a map and false if not.
Syntax
map.has("key");
Example
To evaluate that a certain key is present in a map or not, use the following code.
const map1 = new Map([
["coffee", 500],
["sugar", 300],
["milk", 200]]);
console.log(map1.has("banana");
In the above code, we have created a map and given it certain key-value pairs.
Using the has() method we are going to check if there is any key present in the map by the name “banana”.
Output
![]() The has() method displayed false since there is no such key present in the map.
The has() method displayed false since there is no such key present in the map.
forEach()
For the purpose of executing a function for each of the elements present in a map, the forEach() method is used.
Syntax
map.forEach((function(value, key));
Example
Suppose you want to display all the key-value pairs present in a map and for doing so you want to execute a function for each of these pairs using the forEach() method.
const map1 = new Map([
["coffee", 150],
["sugar", 250],
["milk", 350]]);
let txt = "";
map1.forEach (function(value, key) {
txt += key + ' = ' + value + ", "})
console.log(txt);
In the above code, we are executing a function for each key-value pairs present in a map.
This function will display each of these pairs.
Output
![]() Each of the key-value pairs present in the map have been displayed.
Each of the key-value pairs present in the map have been displayed.
keys()
For the purpose of displaying all the keys in a map, the keys() method is used.
Syntax
map.keys();
Example
This example demonstrates the working of the keys() method.
const map1 = new Map([
["coffee", 150],
["sugar", 250],
["milk", 350]]);
console.log(map1.keys());
In this code, we are using the key() method to get each key present in the map.
Output
![]() Each key in the map has been displayed successfully.
Each key in the map has been displayed successfully.
values()
For the purpose of displaying all the values in a map, the values() method is used.
Syntax
map.values();
Example
This example demonstrates the working of the values() method.
const map1 = new Map([
["coffee", 150],
["sugar", 250],
["milk", 350]]);
console.log(map1.values());
We are using the value() method to display each value present in the map.
Output
![]() All values in the map have been displayed.
All values in the map have been displayed.
entries()
In order to display all the keys as well as values present in a map, the entries() method is used.
Syntax
map.entries();
Example
Follow the example below to understand the working of the entries() method.
const map1 = new Map([
["coffee", 150],
["sugar", 250],
["milk", 350]]);
console.log(map1.entries());
Here we are using entries() method to display all key-value pairs present in a map.
Output
![]() The entries() method is working properly.
The entries() method is working properly.
Conclusion
There are multiple JavaScript map object methods that allow you to create a new map, set or display values in a map, etc.
These methods are set(), get(), delete(), clear(), has(), forEach(), keys(), values(), and entries().
All of these methods serve a different purpose which is explained in detail along with relevant example.
GET vs POST methods in jQuery
HTTP (Hypertext Transfer Protocol) enables the data transmission between clients and servers.
The GET and POST are two widely used HTTP methods that assist in client/server communication.
The clients place a request, and the server returns a response (which contains the requested data) to that request.
Like other languages, jQuery practices the GET and POST methods to send the requests/data and receive the data/response.
This article aims at the jQuery GET and jQuery POST methods with the following learning outcomes.
– working of GET and POST methods in jQuery
– comparison of jQuery GET and POST methods
jQuery GET method
The jQuery GET method makes a request to retrieve data from the server.
Moreover, the requested data can be observed in the url and the data would be in key-value pairs.
The syntax of this method is provided below.
$.get(url,callback);
The url refers to the address you want to make a request and get the response.
Whereas the callback function is used to show the output on the successful execution of the GET method.
jQuery POST method
The jQuery POST method makes a request to the server alongside some data.
For instance, a form that is being submitted with the POST method would store the form information on the server.
The syntax of the POST method is provided below.
$.post(url,data,callback)
The url defines the url we want to make a request.
The data parameter refers to the data that would be sent alongside the request.
And the callback function can be used to show some output or do any processing on successful execution of the POST method.
Note: The data and callback parameters are optional
jQuery GET vs jQuery POST
Here you will get a head-to-head comparison of both methods.
| Factor | GET | POST |
| Idempotency | GET is idempotent The idempotent methods return the same result every time | The Post is non-idempotent and calling it various times produces different results. |
| Data Transmission | The data is limited to the number of characters supported by URL (2048) | No data limit for a POST method |
| Security | The data is displayed in the URL thus making it less secure | Provides a more secure data transmission in credentials-based processing |
| Bookmark/Cache | The data can be bookmarked/cached as it is visible in the URL | The data is not visible to the end user thus cannot be cookmarked/cached |
| Data types | Supports only ASCII (special characters, numbers, letters) characters | Supports Binary(images, videos, audios) as well as ASCII characters |
From the above table, you would have understood the difference between GET vs POST which will assist in choosing the method for HTTP based data transmission.
Conclusion
The GET method can be useful when you want to save the URL for future use whereas the POST method is beneficial in performing secure processing of sensitive data.
The GET and POST are the most used methods to build communication between servers and clients.
This article provides a detailed overview of the GET and POST methods and offers a head-to-head comparison of both methods.
email validation
JavaScript, a programming language that is used to develop exquisitely pleasing websites.
Apart from giving a pleasant look to your website, it is also used for validation purposes when creating an HTML form.
Validation, most importantly email validation, is a highly significant partof a form that makes sure only authentic information is provided by the user.
We have designed this post to show you how to validate user email using JavaScript.
This write-up covers the following topics.
Introduction to Validation
How to validate email using JavaScript
Let’s get started.
Introduction to Validation
Validation is the procedure of making sure that the user, as well as the information that the user provides, is authentic.
JavaScript authenticates the information on the client-side which enhances the data processing procedure.
Validation is used to authenticate user name, password, email, phone number, and so forth.
In this post, we will to stick to email validation.
Let’s learn how to perform that using JavaScript.
How to validate email using JavaScript
As already mentioned validating an email is highly important when creating forms on websites.
An email address is divided into two parts which are separated using “@” symbol, moreover, each of these parts consist of a combination of ASCII characters.
The initial part of an email mostly denotes the personal information of a user and consists of the following.
1.
Both uppercase (A-Z) as well as lowercase letters (a-z).
2.
Numeric Digits (0-9).
3.
Special characters like ! # $ % ^ & * _ – = { } | ~.
4.
A full stop (It cannot be the first or the last character, moreover, you cannot use a full stop consecutively.)
Besides this, the domain name, which is the part of the email that comes after the @ symbol can consist of letters, digits, hyphens, and dots.
Example
Here we have demonstrated a complete example of an HTML form that validates an email using JavaScript.
HTML
<!DOCTYPE html><html><body onload='document.form1.text1.focus()'><div><h3 class="h3">Enter your email address</h3><form name="form1" action="#"><input type='text' name='text1'/><br><input type="submit" name="submit" value="Submit" onclick="validateEmail(document.form1.text1)"/></form></div><script src="email-validation.js"></script></body></html>
In the above HTML code, we have created an input field where the user will enter the email address and on the click of submit button, the entered email is passed to the validateEmail() method to be validated.
CSS
.h3 {margin-left: 38px;}
input {font-size: 20pX;}
input:focus, textarea:focus{background-color: whitesmoke;}
input submit {font-size: 12px;}
Here we are using some basic CSS to style our HTML elements.
JavaScript
functionvalidateEmail(inputText){
var mailformat = /^\w+([\.-]?\w+)*@\w+([\.-]?\w+)*(\.\w{2,3})+$/;if(inputText.value.match(mailformat))
{
alert("Valid email address!");
document.form1.text1.focus();
returntrue;
}else
{
alert("Invalid email address!");
document.form1.text1.focus();
returnfalse;
}}
In this JavaScript code, a regular expression /^\w+([\.-]?\w+)*@\w+([\.-]?\w+)*(\.\w{2,3})+$/ is used to validating an email.
Afterwards, if/else statements are being used to specify that if the user enters a valid email address an alert message will be generated confirming the authenticity of the email address and if the user enters an invalid email address, the alert message will notify the user about it.
Output
When you provide an authentic email address.
![]() When you enter an invalid email address.
When you enter an invalid email address.
![]() Email validation was sucessful.
Email validation was sucessful.
Conclusion
In javaScript, a regular expression /^\w+([\.-]?\w+)*@\w+([\.-]?\w+)*(\.\w{2,3})+$/ is used to validate an email address in HTML forms that specifies the pattern of a valid email.
Furthermore, if/else statements are used to specify conditions for valid as well invalid email addressess.
This write-up guides you on how to validate an email address using JavaScript with the help of a relevant code.
HTTP information status messages | Explained
404 page-not-found?
You probably have it many times and it is one of the HTTP status messages.
HTTP status messages are a means of communication between browser and server.
The HTTP status messages have been categorized into five categories, they are:
Informational,
Successful,
Redirection,
Client Error, and
Server Error
The HTTP information status message means that the request made by the browser to the server has been received and is in a continuing process.
As this status message is not a final response, therefore it cannot be observed.
The HTTP information status message category is described here with its derivatives as well.
HTTP information status message
The HTTP information status message is classified into further four message types:
100 continue,
101 switching protocol,
102 processing, and
103 early hints.
The first digit of each status message code represents its class.
The information status messages are referred to as 1xx informational status messages thus all the derivatives of information status messages have code “1xx” with their names.
100 continue
The 100 continue status message refers to the initial part of the request sent by the browser to the server.
The client must proceed with the body of the request, once the server has received the request.
101 switching protocol
This information status message refers to the request made by the client to the server which asks for changing the application protocol.
In response, the application protocol would be changed by the server.
102 Processing
The 102 processing shows that the request has been accepted by the server but the request has not yet been completed thus no response would be available.
103 Early Hints
As the name shows, this status message allows the client to preload the resources, and in the meantime, the server prepares a response.
Conclusion
The HTTP information status messages keep on tracking the sent request and the behavior of the server to that request.
The HTTP information status messages are divided into three categories and each category tells the status of the request and the relevant response of the server.
The 100 Continue refers to the initial part of the request made by the client, the 101 Switching Protocol represents that the client wants to change the application protocol, 102 Processing means the server has accepted the request whereas the 103 Early Hints tell the client that the server is preparing a response.
How to use Reflect API
Reflection is considered as the capability to manipulate properties, variables, and object methods at runtime.
Reflect API was introduced as a new global object in ES6, enabling you to invoke Object methods, get and set object property values, construct objects, extend and manipulate properties.
It also permits you to create dynamic code-handling frameworks and programs.
This write-up will discuss the use of Reflect API in JavaScript with the help of suitable examples.
So, let’s start!
Reflect API
Reflect is a new Global Object that offers numerous utility functions overlapping with the ES5 global “Object”.
All of the provided Reflect API methods are the “Introspection functions,” which allow you to examine and manipulate an object’s characteristics at run time.
Here, the point to consider is that the Introspection functions are already embedded; then, why is a new API required when these features might already be a part of the JavaScript object?
Have a look at the below-given points to get the answer:
All APIs in a single Namespace: As we have mentioned earlier, Object reflection APIs already exist; however, they were not structured under a single Namespace.
So, in ES6, all of the reflection APIs are organized within the “Reflect” namespace.
Code Simplicity:, when an Introspection method fails to complete a specified Object related operation, it throws an exception.
This adds additional overhead to the programmer for handling the exception.
Whereas, in the case of Reflect API, the exception is handled as a “Boolean” (true or false) value.
Reliability of function calls: Compared to Object functions in ES5, the Reflect API provides a more elegant and reliable way to call or apply a function.
Now, let’s go through the usage of the Reflect API methods in detail.
How to use Reflect.construct() method
The “Reflect.construct()” JavaScript method is used to invoke the Reflect API constructor while specifying the required arguments.
This method behaves similarly to the “new” operator.
You can also utilize the Reflect.construct() method for the setting prototype of an object.
Syntax of using Reflect.construct() method
Reflect.construct(target, argumentsList[, newTarget])
Here, “target” represents the target function that will be invoked, “argumentsList” are the function parameter, and “newTarget” is an optional parameter that is used to specify the prototype of a constructor.
Example: How to use Reflect.construct() method
Now, we will utilize the Reflect.construct() method to create an object “x” having “Array” prototype and the following arguments list:
const x = Reflect.construct( Array, [10,20,30,40,50] );
console.log(x);
Execution of the above-given code will return a new “x” object with the specified argument list and its prototype:
![]()
How to use Reflect.apply() method
The “Reflect.apply()” method is used for calling a function with the help of the specified argument.
Syntax of using Reflect.apply() method
Reflect.apply(target, thisArg, arguments)
Here, “target” represents the target function that will be invoked, “thisArg” will behave as a “this” keyword for the function, and “arguments” represent the parameters that the invoked function will accept.
Example: How to use Reflect.apply() method
First of all, we will create an “x” array which comprises five elements:
var x = [10,20,30,40,50];
In the next step, we will use the “Reflect.apply()” method to apply the “Math.max” function to the array named “x”:
console.log(Reflect.apply(Math.max, undefined, x));
The “Math.max” function will return the largest number that exists in the “x” array:
![]()
How to use Reflect.defineProperty() method
If you want to add or update the properties of an object, then use the Reflect.defineProperty() JavaScript method.
It works similar to the Object.defineProperty() method; However the Reflect.defineProperty() method returns a Boolean value rather then the modified object.
Syntax of using Reflect.defineProperty() method
Reflect.defineProperty(target, propertyKey, attributes)
Here, “target” represents the target function that will be invoked, “propertyKey” indicates the object’s property that needs to be defined or modified, and “attributes” set the value for the specified propertyKey.
Example: How to use Reflect.defineProperty() method
In the below-given example, we will define “prop” as propertyKey for the “obj1” JavaScript object which contains “60” as its value:
const obj1 = {};(Reflect.defineProperty(obj1, 'prop', {value: 60}))
console.log(obj1.prop);
As you can see, we have successfully defined a value for the “prop” propertyKey of “obj1” using the Reflect.defineProperty() method:
![]()
How to use Reflect.get() method
In JavaScript, the Reflect.get() method retrieves an object’s property as a function.
Syntax of using Reflect.get() method
Reflect.get(target, propertyKey[, receiver])
Here, “target” represents the JavaScript object whose property is accessed, “propertyKey” indicates the name of the property which you want to get, and “receiver” is an optional parameter that represents the value of “this” utilized for calling the target.
Example: How to use Reflect.get() method
The “Reflect.get()” method is used in the following example to get the first property value of the “x” array:
var x = [10,20,30,40,50];
console.log(Reflect.get(x, '1'));
The output of the provided code will display the value of the specified property:
![]()
How to use Reflect.getPrototypeOf() method
The “Reflect.getPrototypeOf()” method is invoked to retrieve the prototype of a JavaScript object.
Syntax of using Reflect.getPrototypeOf() method
Reflect.getPrototypeOf(target)
Here, “target” represents the objects whose prototype will be retrieved with the help of Reflect.getPrototypeOf() method.
Example: How to use Reflect.getPrototypeOf() method
Firstly, we will create an object of “null” prototype:
const obj1 = Object.create (null);
After that, we will use the “Reflect.getPrototypeOf()” method to get the prototype of “obj1”:
console.log(Reflect.getPrototypeOf (obj1));
Below-given output signifies that “obj1” has “null” prototype:
![]()
How to use Reflect.set() method
In JavaScript, the Reflect.set() method is utilized for setting the property value of an object.
Syntax of using Reflect.set() method
Reflect.set(target, propertyKey, value[, receiver])
Here, “target” represents the JavaScript object whole property value we are going to set, “propertyKey” is a specified object property, “value” indicates the new value.
Lastly, “receiver” is an optional parameter having the value of “this” utilized for calling the target.
Example: How to use Reflect.set() method
To demonstrate the usage of Reflect.set() method, first of all, create an empty object named “obj”:
const obj = [];
Then, execute below-given code to set the property values of the specified object:
Reflect.set(obj, 0, 'first');
Reflect.set(obj, 1, 'second');
Reflect.set(obj, 2, 'third');
console.log(obj);
Now, check out the “obj” property values that we have set using the Reflect.set() method:
![]()
How to use Reflect.deleteProperty() method
You can utilize the Reflect.deleteProperty() method for deleting the specified property of an object.
Syntax of using Reflect.deleteProperty() method
Reflect.deleteProperty(target, propertyKey)
Here, “target” represents the JavaScript object whose property will be deleted, and “propertyKey” indicates its property.
Example: How to use Reflect.deleteProperty() method
This example will use the Reflect.deleteProperty() method to delete the first property value of the created “x” object:
var x = [10,20,30,40,50];
Reflect.deleteProperty(x, '1');
Output
![]() The “Reflect.deleteProperty()” method will return “true” if the specified object’s property is successfully deleted; otherwise, the return case will be set to “false” when the specified property is not found.
The “Reflect.deleteProperty()” method will return “true” if the specified object’s property is successfully deleted; otherwise, the return case will be set to “false” when the specified property is not found.
Conclusion
The use of Reflect API enables you to invoke Object methods, get and set object property values, construct objects, extend and manipulate its properties at run-time.
It also permits the creation of dynamic code-handling frameworks and programs.
This write-up discussed the use of Reflect API with the help of suitable examples.
How to sort arrays
Array is a data type used to store various items of a single data type such as, an array of numbers refers to storing numbers, an array of strings refers to the string values, and an array of objects refers to storing multiple objects.
Array sorting is a phenomenon used to get the data (stored in an array) in an organized manner and the sort() method can be used to sort array elements.
In this article, we will look at array sorting with the following learning outcomes:
– working of JavaScript sort() method
– sorting an array using various functionality of the sort() method
How does the sort() method work
The sort() method can be used to sort the elements of an array.
Apart from just printing the sorted array, the sort() method can change the order of the original array as well.
The functionality of the sort() method depends on the following syntax.
array.sort(function);
In the above syntax,
– The array refers to the variable that contains array datatype
– And the sort() method is used to sort that array
– function is an optional parameter that compares two elements (using any arithmetic operator) of an array and the following possibilities can be devised.
– if the function(a,b) > 0 then a is at a lower index than b
– if the function(a,b) < 0 then b would be at a lower index than a
– if the function(a,b) = 0 then it would return the same order
Until now, you would have understood the basic understandings of the sort() method to sort an array.
How to sort an array
This section comprises of various sub sections which refer to the sorting of arrays in numerous scenarios.
Sort an array of strings
The string data type can also be inserted into an array.
This example provides a brief explanation of sorting an array of strings.
const st_arr= ["MERCEDES", "BMW", "TOYOTA", "HONDA", "ISUZU", "NISSAN"];const x=st_arr.sort();
console.log(x);
The st_arr is arranged in ascending order
Output
![]()
Sorting a numeric array
The arrays containing numeric elements cannot be sorted using the sort() method only.
To sort numeric arrays, the compare function is used which is exercised in this example.
const arr= [2,42,16,30,5,11];const arr_sort=arr.sort(function(a,b){
if (a>b) return 1;
if (a<b) return -1;});
console.log(arr_sort);
The above JavaScript code is described as,
– An array is initialized named arr that has various numbers inside it.
– The compare function compares a and b.
If a>b returns a positive value, then the order will be ascending.
However, for a descending order the expression (a<b) must return a negative number.
On contrary to these, if a=b then the order will be unchanged.
– The sorted array is stored in a variable arr_sort
– Lastly, the arr_sort is printed
Output
![]() It is observed that the values are now stored inside the arr_sort variable in ascending order.
It is observed that the values are now stored inside the arr_sort variable in ascending order.
Sort an array in descending order
To get the sorting result in a descending manner, you have to use the reverse logic of the compare function.
const arr= ["HP", "DELL", "APPLE", "LENOVO", "A4Tech", "ACER"];const y=arr.sort(function(a,b){
if (a>b) return -1;
if (a<b) return 1;});
console.log(y);
The above code is described as,
– an array named "arr” is initialized that contains the string variables
– The compare function is applied to a and b.
If the expression (a>b)is true then its return value is set to -1 and it would print the elements in descending order.
![]() The output shows that the array has been printed in descending order.
The output shows that the array has been printed in descending order.
Sort an array of objects
The objects refer to key-value pairs and they can also be stored inside an array.
This example sorts the array of objects.
const staff=[
{name: "John", designation: "Author"},
{name: "Smith", designation: "Lead"},
{name: "Allen", designation: "Instructor"}];
staff.sort(function(a, b){
const x = a.name;
const y = b.name;
if (x>y) return 1;
if (x<y) return -1;});
console.log(staff);
The above code is described as,
– an array of an object is initialized
– the sort method is applied to the staff array with compare function(which considers the name field of each object)
– the compare function assists in sorting the staff array w.r.t the name field
![]() From the above output, the objects are arranged in ascending order of the name field.
Similarly, the other fields of an object can also be used to get the sorted order of objects.
From the above output, the objects are arranged in ascending order of the name field.
Similarly, the other fields of an object can also be used to get the sorted order of objects.
Conclusion
The sort() method is the key stakeholder in sorting arrays and the sorting order can be either ascending or descending.
This article provides the working of the sort() method and demonstrates various examples to sort an array of strings, array of numbers, and an array of objects.
Moreover, the compare function is also practised which has a key role in sorting, the array of numbers, array of objects or sorting the array in descending order.
How to merge Arrays
A collection of items or elements is called an Array.
Arrays can store data as its elements, and then you can access them when required.
It is a data structure commonly used in different programming languages, including JavaScript.
There exist chances that you may need to merge arrays if the data is coming from multiple streams.
In such a situation, you can combine all of the elements of different arrays into a single array.
JavaScript supports the Immutable and Mutable merging of arrays, and each approach is based on specific methods.
This write-up will explain the procedure to merge arrays with the help of suitable examples.
So, let’s start!
How to merge Arrays
JavaScript offers two ways to merge arrays: Immutable Merging and Mutable Merging.
Immutable Merging of Arrays
In Immutable merging, a new array is created after merging the elements of the specified arrays.
JavaScript “spread” operator and “array.concat()” method is utilized for the immutable merging of arrays.
Mutable merging of Arrays
The Mutable method of merging Arrays is used to perform the merging operation into an existing array.
“array.push()” method can be used for pushing the elements of one array to another.
Now, let’s check out the procedure of using each of the specified methods.
How to merge Arrays using spread operator
The spread operator was introduced in ES6, represented by three consecutive dots “…”.
It is used for destructuring arrays and merging them accordingly.
Syntax of using spread operator for merging arrays
In the below-given syntax, you have to specify the arrays which need to be merged preceding with the spread operator “…”, in the array literal “[]”:
const mergedArray = [...array1, ...array2];
Here, JavaScript will generate a new “mergedArray” which comprises the elements of “array1” and “array2”.
Example: How to Merge Arrays using spread operator
First of all, we will create two arrays named “girls” and “boys,” which will have the following elements:
const girls = ['Marie', 'Stepheny'];const boys = ['Alex', 'Max'];
In the next step, we will use the JavaScript spread operator for merging “girls” and “boys” array elements into a new “people” array:
const people = [...girls, ...boys];
console.log(people);
Execution of the above-given program will show the following output:
![]() The order in which you specify arrays in the array literal does matter as the elements will be merged in the same sequence in which arrays are added.
So, you can select whether you want to insert the elements before or after the other array elements.
For instance, we want to merge both of the arrays, “girls” and “boys,” using the spread operator in such a way that the elements of the “boys” array come before the “girls” array elements.
For this purpose, we will specify “boys” before the “girls” array in the array literal:
const girls = ['Marie', 'Stepheny'];const boys = ['Alex', 'Max'];const people = [...boys, ...girls];
console.log(people);
Output
The order in which you specify arrays in the array literal does matter as the elements will be merged in the same sequence in which arrays are added.
So, you can select whether you want to insert the elements before or after the other array elements.
For instance, we want to merge both of the arrays, “girls” and “boys,” using the spread operator in such a way that the elements of the “boys” array come before the “girls” array elements.
For this purpose, we will specify “boys” before the “girls” array in the array literal:
const girls = ['Marie', 'Stepheny'];const boys = ['Alex', 'Max'];const people = [...boys, ...girls];
console.log(people);
Output
![]() As you can see, the starting index of the “people” array contains the “boys” array element, and after that, other indexes are referring “girls” array elements.
As you can see, the starting index of the “people” array contains the “boys” array element, and after that, other indexes are referring “girls” array elements.
How to merge Arrays using concat() method
“concat()” is one of the most useful JavaScript methods, and it is primarily used for merging multiple arrays into a new array.
Syntax of concat() method
If you want to merge arrays using the JavaScript “concat()” method, then these are the two forms of concat() method syntax:
const mergedArray = array1.concat(array2);
OR
const mergedArray = [].concat(array1, array2);
In the first form, the “concat()” method will merge the elements of “array2” in “array1”, whereas, in the second syntax form, “array1” and “array2” elements are merged into an empty array.
Example: How to Merge Arrays using concat() method
The following example will merge the elements of “girls” array with “boys” by utilizing the “array.concat()” method:
const girls = ['Marie', 'Stepheny'];const boys = ['Alex', 'Max'];const people = girls.concat(boys);
console.log(people);
Have a look at the below-given output:
![]() Now, we will execute the same example, while using the other syntax of the concat() method:
const girls = ['Marie', 'Stepheny'];const boys = ['Alex', 'Max'];const people = [].concat(girls, boys);
console.log(people);
The given JavaScript program will also merge the specified arrays in the same manner:
Now, we will execute the same example, while using the other syntax of the concat() method:
const girls = ['Marie', 'Stepheny'];const boys = ['Alex', 'Max'];const people = [].concat(girls, boys);
console.log(people);
The given JavaScript program will also merge the specified arrays in the same manner:
![]()
How to merge Arrays using push() method
If you want to merge array elements mutably, all you need is to use the JavaScript “push()” method.
Utilizing this method, you can easily merge multiple arrays in an existing array.
Syntax of push() method
array1.push(...array2);
To push the elements of “array2” in “array1”, you have to apply spread operator “…” to the arguments.
Example: Merge Arrays using push() method
The following example will utilize the “array.push()” method to merge or push the elements of “girls” array in “boys” array:
const girls = ['Marie', 'Stepheny'];const boys = ['Alex', 'Max'];
boys.push(...girls);
console.log(boys);
Now, check out the elements sequence of the “boys” array:
![]() Adding “spread” operator is important while passing the arguments to the “push()” method, otherwise, the “push()” method will append the “girls” array as a whole to the “boys” array:
const girls = ['Marie', 'Stepheny'];const boys = ['Alex', 'Max'];
boys.push(girls);
console.log(boys);
Given output signifies that after the execution of the push() method, the “girls” array is added as a whole at the second index of the “boys” array:
Adding “spread” operator is important while passing the arguments to the “push()” method, otherwise, the “push()” method will append the “girls” array as a whole to the “boys” array:
const girls = ['Marie', 'Stepheny'];const boys = ['Alex', 'Max'];
boys.push(girls);
console.log(boys);
Given output signifies that after the execution of the push() method, the “girls” array is added as a whole at the second index of the “boys” array:
![]() That is all of the essential information about merging arrays using the mutable and immutable method.
Now, you can explore them further according to your requirements.
That is all of the essential information about merging arrays using the mutable and immutable method.
Now, you can explore them further according to your requirements.
Conclusion
To merge arrays, you can utilize the array.concat() method or the spread operator […array1, …array2], in the array literal “[]” to merge arrays in an immutable way (creating a new array).
However, if you want to merge the specified array elements in an existing array mutably, you can use the array.push() method.
This article explained the procedure to merge arrays with the help of suitable examples.
How to find the index of an array element
The index of an array element represents the position of the element in the array.
The index number can be retrieved by using the indexOf(), lastIndexOf(), and findIndex() methods.
All of these methods are used for tracing the index of array elements.
This guide provides an insight into the possible methods that can be used to get the index number of a specific element in an array.
The following learning outcomes are expected when you go through this article:
indexOf() method
lastIndexOf() method
findIndex() method
How to find the index of an array element
The array element can be traced by using the indexOf(), lastIndexOf(), and findIndex() methods.
This section provides the working of each method with examples.
How to find the index of an array element using the indexOf() method
The indexOf() method traces the first occurrence of a specific element and returns the index.
Syntax
array.indexOf(element, start);
The array(or an array itself) refers to the array variable where the element would be traced for an index number.
The start value represents an index number from where the indexOf() method will start searching.
The start value can be set to negative or positive.
If the value is positive, then the indexOf() method would start from that index.
If the value is negative then the search would start after calculating the following expression.
(length of array + (negative value)).
Example
The usage of the indexOf() method is described to get the index of a specific element in an array variable.
arr = ["apple", "guava", "banana", "peach", "banana"];
console.log(arr.indexOf("banana"));
console.log(arr.indexOf("banana", -1));
The above code creates an array.
We have used the indexOf() method on the “banana” element of that array .
The first method traces the banana element and returns the index number of its first occurrence.
Whereas the second indexOf() method takes -1 for starting value, the sorting will start from index=(4+ (-1)=3).
Output
![]() The output shows the index of the first occurrence of “banana” without any starting condition and the second method takes the starting condition “-1” and will start the index counting from (4+(-1)).
The output shows the index of the first occurrence of “banana” without any starting condition and the second method takes the starting condition “-1” and will start the index counting from (4+(-1)).
How to find the index of an array element using the lastIndexOf() method
As the name of this method represents, it would return the last occurrence of an element.
Syntax
array.lastIndexOf(element);
The syntax is described as, the array is an array variable (or array itself) and the element is contained inside it.
Example
Here, the lastIndexOf() method is applied to get the index of a specific element
num = [3, 4, 3, 5, 9, 3, 12];
console.log(num.lastIndexOf(3));
console.log(num.lastIndexOf(30));
The above code creates a numeric array and the lastIndexOf() method is applied to that array to trace the last index of “3“.
Additionally, we have applied the lastIndexOf() method on a number “30” (that does not belong to an array).
Output
![]() The output shows that the last index number of an element “3” is “5” and as the number “30” does not belong to the array, the result is “-1“.
The output shows that the last index number of an element “3” is “5” and as the number “30” does not belong to the array, the result is “-1“.
How to find the index of an array element using the findIndex() method
By using findIndex(), you will be able to get the index of an element that meets the criteria you specified.
Once an element satisfies the function(criteria), the findIndex() method stops executing and returns the index of that element only.
array.findIndex(function(Current-Value, Index, Arr), This-Value)
The findIndex() method accepts two arguments, one is a function (a test function to run on each element until any element satisfies the condition) and the other is This-Value.
The function accepts the following parameters
Current-Value: It refers to the value of a current element
Index: This is an optional parameter and represents the index of the current element
Arr: Refers to the array of the current element
Example
The following JS code executes the findIndex() method to get the index number of an element that satisfies the condition.
num = [10, 9, 8, 20, 19];
function find(element) {return element > 10;};
console.log((num.findIndex(find)));
In the above code, an array named “num” is initialized and the find() function is applied on each element of num, and it returns values greater than 10.
After that, the “find()” method is called from the “findIndex()” function to get the index of the first element that is greater than “10“.
Output
![]() The “find()” method returns all the numbers that are greater than “10” and the “findIndex()” method picks only the index of the first number (that is 20 in our case).
The “find()” method returns all the numbers that are greater than “10” and the “findIndex()” method picks only the index of the first number (that is 20 in our case).
Conclusion
JavaScript provides various methods such as indexOf(), lastIndexOf(), and findIndex() methods to get the index number of an element in an array.
This guide provides syntaxes and the working of each above-mentioned method.
To get the first occurrence index of an element, the indexOf() method is used.
However, the lastInexOf() would give you the index of the last occurrence of any specific element.
As opposed to those methods, findIndex() returns the index number of the first element that satisfies a given function (which is passed as a parameter to findIndex()).
How to create proxy object
In JavaScript, the Proxy object enables you to define custom behavior indirectly for an object’s fundamental operations.
It also permits the developers to wrap a proxy object around another object and create an undetectable barrier around it.
With the help of the Proxy object, you can call functions, access properties, and set the target object’s properties.
A proxy object is also considered an excellent tool for encapsulation, as it restricts direct access to the original object.
This write-up will explain the procedure to create a proxy object.
So, let’s start!
How to create proxy object
A Proxy() constructor is utilized for creating a proxy object.
The created Proxy object will be then used to intercept the typical operations of the original object.
Check out the syntax of the JavaScript proxy constructor.
Syntax for creating a proxy object
You can utilize the below-given syntax for creating a new proxy object:
let proxy = new Proxy(target, handler);
Here, “target” represents the object which will be wrapped, “handler” is the object which comprises the methods for controlling the behavior of the specified target object.
Lastly, “traps” are added inside the “handler” object as its methods.
Example: How to create a proxy object
First of all, we will create an object named “employee” having the following three properties:
const employee = {
name: 'Alex',
gender: 'Male',
designation: 'Manager',}
Then, a “handler” object is defined, which contains JavaScript “get()” method as “trap”.
The JavaScript get() method will retrieve the specified “property” of the “target” case and store its value in the handler object:
const handler = {
get(target, property) {
console.log(`Property${property} is accessed`);
return target[property];
}}
In the next step, we will create a proxy object “proxyEmployee” and pass the “handler” and “employee” as target objects to the constructor:
const proxyEmployee = new Proxy(employee, handler);
The “proxyEmployee” utilizes the “employee” object to store data, and it then has all access to the “employee” object properties:
![]() Lastly, we will use the “proxyEmployee” object to get the “name” and “designation” Properties of the “employee” object:
console.log(proxyEmployee.name);
console.log(proxyEmployee.designation);
Below-given output signifies that “proxyEmployee” object has successfully accessed the employee object’s properties:
Lastly, we will use the “proxyEmployee” object to get the “name” and “designation” Properties of the “employee” object:
console.log(proxyEmployee.name);
console.log(proxyEmployee.designation);
Below-given output signifies that “proxyEmployee” object has successfully accessed the employee object’s properties:
![]() Another important thing to remember is that if you update any property value of the “employee” object, changes can also be seen in “proxyEmployee”.
For instance, we have modified the “employee” object’s “name” property value to “Paul”:
employee.name = 'Paul';
console.log(proxyEmployee.name);
Output
Another important thing to remember is that if you update any property value of the “employee” object, changes can also be seen in “proxyEmployee”.
For instance, we have modified the “employee” object’s “name” property value to “Paul”:
employee.name = 'Paul';
console.log(proxyEmployee.name);
Output
![]() As you can see from the output, the value of the “proxyEmployee.name” is also changed.
Similarly, any modification in the “proxyEmployee” object will also reflect upon the “employee” object:
proxyEmployee.designation = 'Author';
console.log(employee.designation);
Execution of the above-given code will also update the “designation” property value of the “employee” object:
As you can see from the output, the value of the “proxyEmployee.name” is also changed.
Similarly, any modification in the “proxyEmployee” object will also reflect upon the “employee” object:
proxyEmployee.designation = 'Author';
console.log(employee.designation);
Execution of the above-given code will also update the “designation” property value of the “employee” object:
![]() Till this point, you have learned the procedure to create a proxy object.
Now, check out the following table to get a brief overview of the Proxy Trap methods.
Till this point, you have learned the procedure to create a proxy object.
Now, check out the following table to get a brief overview of the Proxy Trap methods.
Proxy Traps
| Proxy Traps | Description |
| get() | The “get()” proxy trap is triggered when the proxy object accesses a target object’s property. |
| set() | The “set()” proxy trap is used to set the specified target object’s property value. |
| getPrototype() | The “getPrototype()” method traps an internal call to the Object.getPrototype() and returns the target object’s prototype. |
| setPrototype() | The “setPrototype()”sets the prototype of the target object by invoking the Object.setPrototype() method. |
| isExtensibile() | The “isExtensible()” proxy trap invokes the object.isExtensible() method to determine if the target is extensible or not. |
| preventExtensions() | The “preventExtensions()” trap call out the “Object.preventExtensions()” method to prevent the extensions of the target object. |
We have discussed the critical information about creating a Proxy object.
Moreover, a brief description of some useful Proxy traps is also provided; you can explore them further according to your preferences.
Conclusion
The Proxy() constructor is utilized to create a proxy object.
It accepts two arguments: target and handler, where the target represents the object which will be wrapped, and handler is the object which comprises methods (traps) for controlling the behavior of the specified target.
This write-up explained the procedure to create proxy objects.
Regex .exec(), .test(), .toString() Methods | Explained
Regular expressions are used to define patterns to search for combinations of characters in a string.
JavaScript treats regular expressions as objects and these are denoted either by “regex” or “RegExp”.
JavaScript provides a series of built-in methods to use regular expressions for manipulating and processing text.
In this write-up, we will stick to the following methods.
.exec() Method
.test() Method
.toString() Method
Let’s learn them in detail.
.exec() Method
For the purpose of finding a match in a given string, the JavaScript exec() method is used.
If this method finds a match the result is an array and the result is null if does not find any match.
Syntax
RegExpObject.exec(string)
The string is a required parameter that specifies the text that is to be searched.
Example
Suppose you want to find some text in a particular string.
Follow the example below.
HTML
<p>Learning regular expressions</p><button onclick="search()">Search</button><p id="tutorial"></p>
In the above code, we defined our string in the <p> tag, moreover we have created a button and applied an onclick event on it.
A function search() is assigned to the onlick event which is defined code.
The last <p> tags takes up an id that will be used to display the result of the exec() method.
JavaScript
function search() {
var txt ="Learning regular expressions";
var search = new RegExp("JavaScript");
var result = search.exec(txt);
document.getElementById("tutorial").innerHTML ="Result: "+ result;}
In this JavaScript code, we have defined a function by the name search.
We are creating a total of three variables.
The first variable “txt” takes up the text from which the exec() method searches for a particular string.
In the second variable we are narrowing down our search by specifying the string that is to be searched for.
The third variable executes the exec() method and if there are multiple matches then the this method will return an array.
Lastly, the resulting array is displayed in the <p> tag using the getElementById method.
Output
Before you click the button.
![]() After you click the button.
After you click the button.
![]() The exec() method is working properly.
The exec() method is working properly.
.test() Method
The test() method works in a similar way as that of exec() method with the only difference that it provides results in the form true or false.
Syntax
RegExpObject.test(string)
The string is a required parameter that specifies the text that is to be searched for.
Example
In order to understand the working of the test() method we are going to use the example used in the above section and use the test() method instead of the exec() method.
JavaScript
function search() {
var txt ="Learning regular expressions";
var search = new RegExp("JavaScript");
var result = search.test(txt);
document.getElementById("tutorial").innerHTML = result;}
Here we are using the test() method to search for a string in the given text.
This method will give true if it finds the matching string and false if it does not find the specified string.
Output
![]() The test() method found the specified string and returned “true”.
The test() method found the specified string and returned “true”.
.toString() Method
For the purpose of fetching a number in the form of a string, the toString() method is used.
Syntax
number.toString(base)
The base is an optional parameter that denotes a number which will be used as a base, moreover it must be an integer between 2 to 36.
Example 1:
This example demonstrated the working of the toString() method by no parameter.
JavaScript
let num = 20;
let text = num.toString();
console.log(text);
console.log(typeof(text));
console.log(typeof(num));
In the above code, we are passing no parameter to the toString() method to display the number 20 in the form of a string.
Output
![]() Here you can see that the toString() method converted the number to a string.
Here you can see that the toString() method converted the number to a string.
Example 2:
This example demonstrated the working of the toString() method by passing 2 as a parameter.
let num = 20;
let text = num.toString(2);
console.log(text);
console.log(typeof(text));
console.log(typeof(num));
In the above code, the first variable “num” specifies the number that is to be converted to a string and the second variable “text” takes up the first variable and applies the toString() method using 2 as a base.
Output
![]() The number 20 has been converted to string using base 2.
The number 20 has been converted to string using base 2.
Example 3:
This example demonstrated the working of the toString() method by 8 as a parameter.
JavaScript
let num = 20;
let text = num.toString(8);
console.log(text);
console.log(typeof(text));
console.log(typeof(num));
Here we are converting the number 20 to a string using base 8.
Output
![]() The number 20 has been converted to string using base 8.
The number 20 has been converted to string using base 8.
Example 4:
This example demonstrated the working of the toString() method by 16 as a parameter.
JavaScript
let num = 20;
let text = num.toString(16);
console.log(text);
console.log(typeof(text));
console.log(typeof(num));
In the above code, we are passing 16 as a base to the toString() method to convert the number 20 to a string.
Output
![]() The number 20 has been converted to string by passing 16 as a parameter.
The number 20 has been converted to string by passing 16 as a parameter.
Conclusion
JavaScript provides multiple built-in methods to use regular expressions for manipulating and processing text.
Some of them are .exec() method, .test() method, and .toString() method.
The .exec() method gives an array if the match is found otherwise it gives null and the .test() method gives true in case the match is found and false if not.
The .toString() method, on the other hand, transform a number into a string.
These methods are demonstrated along with relevant examples in the write-up.
What is Call Stack
A JavaScript engine is considered a software component that assists in executing the JavaScript code.
Although the first introduced JavaScript engines were simply interpreters, today, they are a brilliant piece of engineering that utilizes “Just-In-Time” compilation to boost performance.
Covering each aspect of the JavaScript engine would be complicated; however, there are some minor parts in each JavaScript engine doing the hard work behind the scenes.
“Call Stack” is one of those components that permits us to execute the code in a JavaScript engine smoothly.
Ready to know more about Call Stack?
This write-up will discuss Call Stack and its working with the help of a suitable example.
So, let’s start!
What is Call Stack
JavaScript is a single-threaded language as it utilizes only one “Call Stack” for the management of the “Global” and “Function“ Execution Contexts.
Call Stack is a type of data structure that maintains the tracks of invoked and executed functions.
Terms Associated with Call Stack
Push, Pop, and Top are the three terms commonly used while discussing Call Stack.
To know more about these terms, check out the given description:
Top:Iit comprises the top most element of the Call Stack, which can be a function call.
Also, the Call Stack can only execute the function that executes at the top position.
Push: In Call Stack, “Push” refers to placing something on the top of it.
For instance, when a function is invoked, its Function Execution Context is created, and the specified function is pushed to the top of the Call Stack.
Pop: “Pop” is the process to Popout the top element of the Call Stack.
Usually, a function is popped out when it completes its execution, and then the JavaScript engine resumes its execution where it was left.
![]()
Basic Principle of Call Stack
Call Stack is based on the Last In First Out (LIFO) principle, which signifies that the last function pushed to it will pop out first when the function returns or finishes its execution.
Now, let’s understand the working of Call Stack with the help of an example.
Example: How to use Call Stack
First of all, we will define a “product()” function which comprises two parameters “x” and “y”:
function product(x, y) {(return x * y);}
Next, we have added another function named “info()” which invokes the “product()” function as its return case:
function info(x, y) {
console.log("The product of given number is:");return product(x, y);}
Lastly, a variable is created which calls the “info()” while passing “3” and “6” as arguments and display the returned value in the console window:
let a = console.log(info(3, 6));
The code output will show “18” as the product of the “3” and “6” numbers:
![]() Within a few microseconds, we have got the output of the provided code.
We will now investigate how the JavaScript engine operates behind the scenes for this particular example.
Within a few microseconds, we have got the output of the provided code.
We will now investigate how the JavaScript engine operates behind the scenes for this particular example.
Working of Call Stack
When the given code is loaded into the memory, the first operation that the JavaScript engine performs is the creation of Global Execution Context.
After doing so, a “global()” or “main()” function is added to the top of the Call Stack so that script can be easily executed:
![]() The Global Execution Context will move towards the Execution phase by running the “info()” function call.
In this step, the “info()” function is pushed to the top of the Call Stack when its Function Execution Context is created:
The Global Execution Context will move towards the Execution phase by running the “info()” function call.
In this step, the “info()” function is pushed to the top of the Call Stack when its Function Execution Context is created:
![]() As you can see, the “info()” function is at the top of the Call Stack, and now the JavaScript engine will start its execution:
As you can see, the “info()” function is at the top of the Call Stack, and now the JavaScript engine will start its execution:
![]() According to the given script, the “info()” function will invoke the “product()” function, so the JavaScript engine will create another Function Execution context for it and then push the “product()” function on the top position:
According to the given script, the “info()” function will invoke the “product()” function, so the JavaScript engine will create another Function Execution context for it and then push the “product()” function on the top position:
![]() At this point, all of the required functions are pushed to the Class Stack in a particular sequence, where the “product()” function is at the top of the Class Stack:
At this point, all of the required functions are pushed to the Class Stack in a particular sequence, where the “product()” function is at the top of the Class Stack:
![]() Now, the JavaScript engine starts the execution of the “product()” function and pops it out from the Call Stack:
Now, the JavaScript engine starts the execution of the “product()” function and pops it out from the Call Stack:
![]() After completing the specified operation, the JavaScript engine will execute and pop out the “info()” function which exists at the top of the Call Stack:
After completing the specified operation, the JavaScript engine will execute and pop out the “info()” function which exists at the top of the Call Stack:
![]() As soon as the execution of info() function gets complete, and Call Stack becomes empty, the JavaScript engine will stop the execution and move towards the other execution tasks:
As soon as the execution of info() function gets complete, and Call Stack becomes empty, the JavaScript engine will stop the execution and move towards the other execution tasks:
![]() We have provided all of the basic information related to Call Stack and its working.
You can explore it further according to your requirements.
We have provided all of the basic information related to Call Stack and its working.
You can explore it further according to your requirements.
Conclusion
Call Stack is a type of data structure that maintains the tracks of invoked and executed functions.
Push, Pop, and Top are the three terms associated with Call Stack, where Top comprises the Call Stack’s topmost element, Push refers to placing something on the top of the Call Stack, and Pop is the process of popping the top element out of it.
This write-up discussed Call Stack and its working with the help of a suitable example.
What is Execution Context
You may have been coding for a long time and know the utilization of logic for any specific operation, but have you ever thought about how a function or variable maintains the information related to its environment?
The JavaScript engine performs all of the magic in the background by creating “Execution Context”.
It also permits the JavaScript engine to control the code complexity for the execution task.
This write will explain Execution Context and its types.
So, let’s start!
What is Execution Context
In Execution Context, the term “Execution” refers to the process of executing the code, and “Context” specifies the environment for the execution.
So, assembling both terms, we got a definition stating that the Execution Context provides information related to the environment where the code is stored and executed.
JavaScript Execution Context holds three different types:
Global Execution Context: The JavaScript Global Execution Context is created by default.
Function Execution Context: The Function Execution Context is created when a function is called in the provided code.
Eval Execution Context: An “eval()” function creates Eval Execution Context.
We will go through the types of Execution Context in the below-given sections.
Note: We are using a JavaScript Visualizer tool developed by ui.dev to visualize the Execution Context working.
Global Execution Context
When the JS engine executes a program, it creates the initial execution context.
But before that, it creates a new execution context known as “Global Execution Context” or the “Default Context”.
You may know that JavaScript is a single-threaded language, so it only permits the creation of one Global Execution Context to execute the code.
Open up the JavaScript Visualizer and without adding any code, click on the “Run” button from the left side of the screen:
![]() As you can see, the Global Execution Context is created by default:
As you can see, the Global Execution Context is created by default:
![]() Each Execution Context (including the Global Execution Context) comprises the following two objects:
Global Object: A global object contains functions and variables accessible within the current environment.
It is also referred to as a “window” object in the browser.
“this” object: “this” keyword points towards the current object in the execution context.
The following section will discuss different phases of Global Execution Context.
Each Execution Context (including the Global Execution Context) comprises the following two objects:
Global Object: A global object contains functions and variables accessible within the current environment.
It is also referred to as a “window” object in the browser.
“this” object: “this” keyword points towards the current object in the execution context.
The following section will discuss different phases of Global Execution Context.
Phases of Global Execution Context
There are two phases of the Global Execution Context: Creation and Execution.
Creation Phase of Global Execution Context
As mentioned earlier, the Global Execution Context is created by default when the JavaScript engine executes a script or program for the first time.
It is known as the Creation Phase of JavaScript Global Execution Context.
The Creation Phase of the Global Execution Context performs the following operations:
window/global object: A global object is created in the Creation phase, which contains the information related to the variables, functions, and their inner declaration.
this object: “this” object is created, which points towards the window or global object.
Variables: In the Creation phase, variables are initialized with an “undefined” value.
Functions: Functions are only declared and initialized in the Creation phase.
Now, let’s check out the working of the creation phase with the help of an example.
Example: Creation phase of Global Execution Context
We will create two variables, “x” and “y”, having the following values:
var x = 3;
var y = 2;
Next, a function named “product” is defined which accepts “n1” and “n2” parameters:
function product(n1, n2) {return n1 * n2;}
Now, we will add the above-given code in the JavaScript visualizer and click on the “Run” option to view its Global Execution Context:
![]() When the JS engine executes the given program, it will store and set the “x” and “y” variable’s values as “undefined” and then declare the function “product()” in the Global Execution Context:
When the JS engine executes the given program, it will store and set the “x” and “y” variable’s values as “undefined” and then declare the function “product()” in the Global Execution Context:
![]() The Global Execution Context will move towards the “Execution Phase” when the creation phase completes its specified operations.
The Global Execution Context will move towards the “Execution Phase” when the creation phase completes its specified operations.
Execution Phase of Global Execution Context
During the Execution Phase, the JS engine sequentially executes the code, then performs the value assignment operation for the variables, and lastly runs the added function calls.
Function Execution Context
A new “Function Execution Context” is created for each function call.
The Function Execution Context behaves similar to the Global Execution Context; however, instead of declaring a “global object”, the JavaScript engine will create an “arguments” object which comprises a function’s parameters references.
Example: Function Execution Context
In the same example, we will add the following line to invoke the “product()” function while passing “x” and “y” as its arguments:
product(<strong>x</strong>,y);
![]() The JavaScript visualizer will demonstrate the changes in the Global Execution context:
The JavaScript visualizer will demonstrate the changes in the Global Execution context:
![]() Now, a new Function Execution Context is created, which comprises the creation and execution phases.
It also has a unique object called “arguments”.
The value passed to the “product()” function is added in the arguments object:
Now, a new Function Execution Context is created, which comprises the creation and execution phases.
It also has a unique object called “arguments”.
The value passed to the “product()” function is added in the arguments object:
![]()
Eval Execution Context
In JavaScript, the “eval()” function converts a string into executable code.
When this method is added to a JavaScript program, it creates its own “Eval Execution Context”.
JavaScript developers do not use the “eval()” function as the string passed to it can be malicious, causing the application or database to crash.
As a result, the eval function has been deprecated.
We have provided all essential information regarding the Execution Context in JavaScript.
You can explore it further according to your requirements.
Conclusion
The Execution Context is created when the JavaScript engine executes the JavaScript code, and it has three types: Global, Function, and eval execution context.
It also comprises two phases: Creation and Execution.
The Creation phase is created when the program runs for the first time, whereas, in the Execution phase, the specified values are assigned to the variables, and added functions are invoked.
This write-up explained Execution Context and its types.
jQuery load method
The jQuery load() method is used to retrieve the data from the server and embed it into an HTML element.
The load() method can be used to get the content from the text or from an HTML file as well.
This article aims to provide an insight into the jQuery() load method with the following learning outcomes.
Working mechanism of jQuery load() method
An example that demonstrates the usage of the jQuery() method
How jQuery load method works
The working of jQuery primarily depends on the following syntax.
$(selector).load(URL,data,callback);
The instances in the above syntax are,
selector could be the name of the element or the class/id referring to the element
URL refers to the address of the file that is being fetched
the data (optional parameter) to be sent with the request (to the server)
the callback function is optional and is executed after the complete execution of the load() method
How to use the jQuery load method
This section provides the usage of the jQuery() load method in various scenarios.
Example
The execution of this example comprises of various steps that we have followed.
Step 1: Created an HTML file named lh.html and placed it on the server.
<div id="one"><h4> The data of lh.html is imported successfully </h4><p> Welcome to LinuxHint! </p><img src="lh.jpg" style="border: solid;"></div>
The code is described below,
– a div tag is created which contains an h4 tag, a p tag, and an img tag
![]() The content of lh.html is displayed below
The content of lh.html is displayed below
![]() Step 2: Another HTML file is created named index.html (which will be used to import data from the lh.html) and saved it inside the same folder as of lh.html.
jQuery
$(document).ready(function(){
$("#btn").click(function(){
$("#one").load("lh.html");});});
The code above is the primary part of index.html which executes the load() method to load the lh.html file.
– the click event of button id=”btn” will load the content of lh.html into the index.html file.
HTML
<body><div id="one"> </div><button id="btn"> Click Here to get the content </button></body>
In the HTML code,
– a div is created with id=”one” and a button id=”btn” is created that will be used to load the file(on the click function)
Step 2: Another HTML file is created named index.html (which will be used to import data from the lh.html) and saved it inside the same folder as of lh.html.
jQuery
$(document).ready(function(){
$("#btn").click(function(){
$("#one").load("lh.html");});});
The code above is the primary part of index.html which executes the load() method to load the lh.html file.
– the click event of button id=”btn” will load the content of lh.html into the index.html file.
HTML
<body><div id="one"> </div><button id="btn"> Click Here to get the content </button></body>
In the HTML code,
– a div is created with id=”one” and a button id=”btn” is created that will be used to load the file(on the click function)
![]() The output of the above scenario is shown in the following gif.
The output of the above scenario is shown in the following gif.
![]() The output shows that upon clicking the button the content of lh.html is fetched and displayed on the index.html.
The output shows that upon clicking the button the content of lh.html is fetched and displayed on the index.html.
Conclusion
The jQuery load() method is used to load the data from the server and embed it into an HTML element.
This article offers the working and usage of the jQuery load() method.
To demonstrate the working of load() method, we have presented the syntax and procedural working mechanism.
Moreover, the example demonstrated here loads the data from one file and integrates it into an HTML element(placed in another file).
JavaScript WeakSet Object | Explained
WeakSet objects are used for storing unique JavaScript objects.
They are often considered similar to “Set” objects, but that’s not the case.
In Sets, you can store values of any data type such as strings, numbers, objects, and booleans, whereas the WeakSet object can only comprise objects, and if you try to add any other type of data, the interpreter will throw an error.
Another critical difference is that a Set object can iterate over the object values; however, WeakSet objects are not iterable.
This property prevents the attackers from checking a system’s internal activity that contains WeakSet objects.
This write-up will explain WeakSet Object with the help of suitable examples.
So, let’s start!
JavaScript Weakset Object
In the introductory part, we have cleared the difference between WeakSet and Set objects.
Now you must be wondering what “weak” signifies in “WeakSet”.
The part “weak” indicates that the unique objects stored inside a WeakSet are held weakly, and if you have removed all of the references related to the WeakSet object, it will be released to the garbage collection.
JavaScript WeakSet Object Constructor
In JavaScript, the WeakSet Object constructor is used to create a new WeakSet object that can store objects.
You can utilize WeakSet() constructor for creating an empty WeakSet and then add the objects as values to it later using .add() method.
The syntax to create an empty Weakset is as follows:
const weakset = new WeakSet([]);
Another method is to pass the object as an argument at the time of creating the WeakSet object:
const weakset = new WeakSet([object]);
JavaScript WeakSet Object add() method
The add() method is utilized for adding a new object at the end of a JavaScript WeakSet Object.
Syntax of JavaScript WeakSet Object add() method
weakSetObject.add(value)
Here, “value” represents the object which needs to be added to the WeakSet object.
This method will return the updated “weakSetObject”.
Example: Using JavaScript WeakSet Object add() method
First of all, we will declare two objects named “obj1” and “obj2” both having the following “key: value” pair:
const obj1 = {name: "John"},
obj2 = {name: "Pete" };
Then, we will create a “weakset” object with the help of the WeakSet() constructor:
const weakset = new WeakSet();
Lastly, we will add the “obj1” and “obj2” to our “weakset” object:
weakset.add(obj1);
weakset.add(obj2);
Execution of the above-given program will show the following output:
![]() That was all about adding objects as values to the WeakSet object.
Now, we will move forward and check out the other JavaScript WeakSet Object methods.
That was all about adding objects as values to the WeakSet object.
Now, we will move forward and check out the other JavaScript WeakSet Object methods.
JavaScript WeakSet Object has() method
The JavaScript has() method of WeakSet object is used for verifying if the WeakSet object contains the specified object or not.
Syntax of JavaScript WeakSet Object has() method
weakSetObject.has(value)
The “value” in the above-given syntax is the object which will be searched in the “weakSetObject”.
If the specified object exists in the weakSetObject, the has() method will return “true“; otherwise, its value is set to “false”.
Example: Using JavaScript WeakSet Object has() method
In the below-given example, we will create two objects “obj1” and “obj2”.
After doing so, we will pass the “obj1” to the weakset object:
const obj1 = {name: "John"},
obj2 = {name: "Pete" };const weakset = new WeakSet([obj1]);
Next, we will invoke the has() method to determine if “obj1” and “obj2” exists in the weakset object:
console.log(weakset.has(obj1));
console.log(weakset.has(obj2));
In our case, only obj1 is present in the “weakset” object, so the weakset.has() method will return “true” for the “obj1” and “false” for the “obj2”:
![]()
JavaScript WeakSet Object delete() method
The delete() method is used for removing or deleting an object from a JavaScript WeakSet object.
Syntax of JavaScript WeakSet Object delete() method
weakSetObject.delete(value)
In the delete() method, the object you want to delete from the “weakSetObject” will be passed as the “value” argument.
After deleting the specified object, the delete() method will return “true”; otherwise, the return case is set to “false” if it does not find the specified object.
Example: Using JavaScript WeakSet Object delete() method
The following example utilized the JavaScript “delete()” method for deleting the “obj1” and “obj2” from the “weakset” object:
const obj1 = {name: "John"},
obj2 = {name: "Pete" };const weakset = new WeakSet([obj1]);
console.log(weakset.delete(obj1));
console.log(weakset.delete(obj2));
![]() The above-given output signifies that we have successfully deleted the “obj1” from the “weakset” object, and for the “obj2,” the delete() method returned “false” because the specified object does not exist in our “weakset” object.
The above-given output signifies that we have successfully deleted the “obj1” from the “weakset” object, and for the “obj2,” the delete() method returned “false” because the specified object does not exist in our “weakset” object.
Conclusion
The JavaScript WeakSet object is utilized for storing weakly held unique objects.
Compared to Sets, you cannot store primitive values such as strings and numbers in a WeakSet object.
Furthermore, if you have removed all of the references related to the created WeakSet object, then it will be released to the garbage collection.
This write-up explained WeakSet Object with the help of suitable examples.
JavaScript WeakMap Object | Explained
The JavaScript WeakMap Objects are utilized to store key-value pairs.
A WeakMap object is different from a Map object in the aspect that you have to store “object” as a key in the WeakMap object, and these objects must be weakly referenced.
In contrast, the Map objects allow you to add primitive values such as strings, booleans, symbols, and numbers to them.
WeakMap Objects are held weakly, which means that if the references related to a specific key are removed, or the object is deleted, the garbage collection will then remove the WeakMap element when it determines that the value is mapped to the specified object.
This write-up will explain the JavaScript WeakMap object with the help of appropriate examples.
So, let’s start!
JavaScript WeakMap Object
In ES6, a new collection was introduced, known as WeakMap Object.
This type of collection is primarily used to store key-value pairs in it.
WeakMap object permits you to create private variables that can be accessed from the outside class.
You can also utilize JavaScript WeakMap Object for saving the metadata related to the element of the Document Object Model in a browser.
JavaScript WeakMap Object Constructor
In JavaScript, the WeakMap Object constructor is used for creating a new WeakMap object.
The created object can then be utilized for storing key-value pairs.
You can create an empty WeakMap and then add the key-value pair to it later using the set() method.
The syntax to create an empty WeakMap() object is given below:
const weakmap = new WeakMap([]);
Another method is to pass the key-value pair as arguments at the time of creating the WeakMap object using the constructor:
const weakmap = new WeakMap([key,value]);
JavaScript WeakMap Object set() method
The set() method is utilized for adding or modifying the key-value pairs of the JavaScript WeakMap object.
Syntax of JavaScript WeakMap Object set() method
weakMapObject.set(key, value)
Here, the “key” represents the element’s key that needs to be set, and “value” is the value of an element that will be set for the specified key of “weakMapObject”.
This method will return the updated weakMapObject.
Example: Using JavaScript WeakMap Object set() method
First of all, we will create “weakmap” and “obj1” objects having the following “key-value” pair:
var weakmap = new WeakMap();
var obj1 = {name: "John"};
In the next step, we will add the “obj1” as key and “Welcome” as its value using the WeakMap Object’s set() method:
weakmap.set(obj1, 'Welcome');
console.log(weakmap);
Execution of the above-given program will show the following output:
![]() That was all about adding “key-value” pairs to the WeakMap object.
Now, we will move add and demonstrate other JavaScript WeakMap Object methods.
That was all about adding “key-value” pairs to the WeakMap object.
Now, we will move add and demonstrate other JavaScript WeakMap Object methods.
JavaScript WeakMap Object has() method
The JavaScript has() method of WeakMap object is used for verifying if the WeakMap object contains the specified object or not.
Syntax of JavaScript WeakMap Object has() method
weakMapObject.has(key)
The “key” argument in the above-given syntax is the key that will be searched in the “weakMapObject”.
If the specified key is present in the created weakMapObject, the has() method will return “true“; otherwise, its value is set to “false”.
Example: Using JavaScript WeakMap Object has() method
In the below-given example, we will create two objects “obj1” and “weakmap”.
After doing so, we will pass “obj1” as “key” to the weakmap object.
The “value” of the specified object is set as “Welcome”:
var weakmap = new WeakMap();
var obj1 = {name: "Marie"};
weakmap.set(obj1, 'Welcome');
Next, we will invoke the WeakMap object “has()” method to determine if “obj1” exist in weakmap object:
console.log(weakmap.has(obj1));
In this case, “obj1” is present in the “weakmap” object, so the “has()” method will return “true”.
However, if the specified key does not exist, “false” will be shown as output:
![]() The above-given “weakmap.has()” method returned “Welcome” as the value of the “obj1” key.
The above-given “weakmap.has()” method returned “Welcome” as the value of the “obj1” key.
JavaScript WeakMap Object get() method
The JavaScript get() method retrieves the “value” of the specified key you have added in the WeakMap object.
Syntax of JavaScript WeakMap Object get() method
weakMapObject.get(key)
Here, “key” represents the element’s key that needs to be retrieved from the “weakMapObject”.
This method will return the “value” for the added key.
Example: JavaScript WeakMap Object get() method
We will create a “weakmap” object which comprises “obj1” as key and “Welcome” as its value:
var weakmap = new WeakMap();
var obj1 = {name: "Alex"};
The specified operation will be performed using the set() method:
weakmap.set(obj1, 'Welcome');
Next, we will check out the existence of the “obj1” in the “weakmap” object:
console.log(weakmap.has(obj1));
Lastly, we will access the value of the “obj1” using the JavaScript WeakMap Object get() method:
console.log(weakmap.get(obj1));
Have a look at the output of the provided program:
![]()
JavaScript WeakMap Object delete() method
The delete() method is used for removing or deleting an element from a JavaScript WeakMap object.
Syntax of JavaScript WeakMap Object delete() method
weakMapObject.delete(key)
In the delete() method, the key you want to delete from the “weakMapObject” will be passed as an argument.
After deleting the specified key, the delete() method will return “true”; otherwise, the return case is set to “false” if the specified key is not found in the weakMapObject.
Example: Using JavaScript WeakMap Object delete() method
The following example utilized the JavaScript “delete()” method for deleting the “obj1” from the “weakmap” object.
But before that, let’s create the mentioned objects:
var weakmap = new WeakMap();
var obj1 = {name: "Stepheny"};
weakmap.set(obj1, 'Welcome');
We will also invoke the WeakMap Object “has()” method to verify the existence of “obj1” in weakmap, before and after the deletion:
console.log(weakmap.has(obj1));
weakmap.delete(obj1);
console.log(weakmap.has(obj1));
![]() The above-given output signifies that we have successfully deleted the “obj1” from the “weakmap” object.
The first has() method returned “true” because “obj1” was present in the weakmap object at that point.
The second has() method returned “false”, as obj1 no longer exists in the weakmap object after calling the JavaScript Weakset Object delete() method.
The above-given output signifies that we have successfully deleted the “obj1” from the “weakmap” object.
The first has() method returned “true” because “obj1” was present in the weakmap object at that point.
The second has() method returned “false”, as obj1 no longer exists in the weakmap object after calling the JavaScript Weakset Object delete() method.
Conclusion
The JavaScript WeakMap Object is utilized for storing weakly held key-value pairs.
Compared to Maps, you cannot store primitive values such as strings, symbols, booleans, and numbers in a WeakMap object.
WeakMap objects can be used to create private variables in a class or store metadata of a DOM element in the browser.
This write-up explained JavaScript WeakMap Object with the help of suitable examples.
JavaScript Math Object Methods | Explained
The JavaScript Math object has humongous range of properties and methods that can be used to perform mathematical operations which is often very useful when creating some educational websites.
Due to its lightweight, these JavaScript math object methods perform complex math operations in just a single line of code.
Here in this write-up, we have highlighted some significant JavaScript math object methods along with their relevant examples.
.round() Method
For the purpose of rounding off a specified number to its nearest integer, the round() method is used.
For instance, 3.49 will be rounded down to 3, and 3.5 will be rounded up to 4
Syntax
Math.round(num)
Example
Suppose you want to round off a number to its nearest integer:
HTML
<p>Nearest integer of 5.6</p><p id="tutorial"></p>
Here we have created two <p> elements, the first specifies that we are going to round a decimal number 5.6 and the other is used to displaying the result.
JavaScript
document.getElementById("tutorial").innerHTML = Math.round(5.6);
In the above code, we are using the .round() method to round the decimal number 5.6.
Output
![]() The nearest integer of 5.6 is 6.
The nearest integer of 5.6 is 6.
.ceil() Method
The ceil() method rounds up a specified number to its nearest integer which is either greater or equal in magnitude to the number specified.
Syntax
Math.ceil(num)
Example
This example demonstrates the working of ceil() method:
HTML
<p>Round up 3.4 using ceil() method</p><p id="tutorial"></p>
In the above code, we have created two <p> elements, the first specifies the number that is going to be rounded up and the other is used to display the result.
JavaScript
document.getElementById("tutorial").innerHTML = Math.ceil(3.4);
In the above code, we are using the .ceil() method to round up the decimal number 3.4.
Output
![]() 3.4 was rounded up to its nearest integer.
3.4 was rounded up to its nearest integer.
.floor() Method
For the purpose of rounding down a specified number to its nearest integer, the floor() method is used.
Rounding down means returning a number that is less than or equal to the number specified.
Syntax
Math.floor(num)
Example
Suppose you want to round down 2.9 to its nearest integer:
JavaScript
document.getElementById("tutorial").innerHTML = Math.floor(2.9);
Output
![]() 2.9 was rounded down to 2 that is its nearest integer.
2.9 was rounded down to 2 that is its nearest integer.
.trunc() Method
If a given number is a decimal number, the trunc() function will simply fetch the integer part of the decimal number.
Syntax
Math.trunc(num)
Example
Suppose you want to fetch the integer part of 6.7:
JavaScript
document.getElementById("tutorial").innerHTML = Math.trunc(6.7);
In the above code, we are using the .trunc() method to extract the integer part of the decimal number 6.7
Output
![]() The integer part of 6.7 has been fetched using the .trunc() method.
The integer part of 6.7 has been fetched using the .trunc() method.
.sign() Method
The sign method() returns +1 if the specified number is positive, -1 if the specified number is negative, 0 if the number specified is zero, and null if no number is specified.
Syntax
Math.sign(num)
Example
The code below illustrates the working of .sign() method:
JavaScript
document.getElementById("tutorial").innerHTML = Math.sign(5);
In the above code we have passed a positive number to the .sign() method therefore, +1 will be displayed as a result.
Output
![]() The .sign() method returned +1.
The .sign() method returned +1.
.pow() Method
For the purpose of calculating the base raise to the power exponent, the pow() method is used.
Syntax
Math.pow(base,exponent)
Example
Suppose you want to calculate 9(base) raise to the power 3(exponent):
JavaScript
document.getElementById("tutorial").innerHTML = Math.pow(9,3);
Output
![]() The .pow() method is working properly.
The .pow() method is working properly.
.sqrt() Method
As the name suggests, the sqrt() method calculates the square root of the specified number.
Syntax
Math.sqrt(num)
Example
Let’s calculate the square root of 10:
JavaScript
document.getElementById("tutorial").innerHTML = Math.sqrt(10);
Output
![]() The square root of 10 has been calculated using .sqrt() method.
The square root of 10 has been calculated using .sqrt() method.
.abs() Method
For the purpose of fetching the absolute value of a number, the abs() method is used.
Syntax
Math.abs(num)
Example
Suppose you want to calculate the absolute value of a negative number:
JavaScript
document.getElementById("tutorial").innerHTML = Math.abs(-8.99);
As we know that absolute absorbs the negative sign, therefore, this method will fetch the absolute value of the given number by absorbing the negative sign.
Output
![]() The absolute value of -8.99 has been derived successfully.
The absolute value of -8.99 has been derived successfully.
.sin() Method
For the purpose of calculating the sine of a number in radians, the sin() method is used.
Syntax
Math.sin(num)
Example
Suppose you want to calculate the sine of 90:
JavaScript
document.getElementById("tutorial").innerHTML = Math.sin(90);
Output
![]() The .sin() method is working properly.
The .sin() method is working properly.
.cos() Method
In order to calculate the cosine of a specified number in radians, the cos() method is used.
Syntax
Math.cos(num)
Example
Let’s calculate the cosine of 180.
JavaScript
document.getElementById("tutorial").innerHTML = Math.cos(180);
Output
![]() The cosine of 180 was calculated successfully.
The cosine of 180 was calculated successfully.
.min() Method
In a given set of numbers, the min() method finds the minimum number.
Syntax
Math.min(num1, num2, num3,....)
Example
Suppose you want to find the minimum number in a provided set of numbers using .min() method:
JavaScript
document.getElementById("tutorial").innerHTML = Math.min(10, 8, 6.5, -4, 34, -10, 0);
We have passed a set of numbers to the .min() method to fetch the minimum number amongst them.
Output
![]() The minimum number in the given set of numbers is -10.
The minimum number in the given set of numbers is -10.
.max() Method
In a given set of numbers, the max() method finds the maximum number.
Syntax
Math.max(num1, num2, num3,...)
Example
To fetch the maximum number amongst a set of numbers.
The code snippet for .max() method is as follows:
JavaScript
document.getElementById("tutorial").innerHTML = Math.max(10, 8, 6.5, -4, 34, -10, 0);
Output
![]() The maximum number has been fetched.
The maximum number has been fetched.
.radom() Method
For the purpose of returning a random number between 0 and 1, the random() method is used.
It includes 0 but not 1.
Syntax
Math.random()
Example
The example below demonstrates the working of .random() method:
JavaScript
document.getElementById("tutorial").innerHTML = Math.random();
No parameters are passed to the .random() method because it generates a random number.
Output
![]() The .random() method generated a random number.
The .random() method generated a random number.
.log() Method
In order to calculate a natural logarithm of a given number, the log() method is used.
Syntax
Math.log(num)
Example
Let’s calculate the log of 10 using the .log() method:
JavaScript
document.getElementById("tutorial").innerHTML = Math.log(10);
Output
![]() The log of 10 is calculated successfully.
The log of 10 is calculated successfully.
Conclusion
JavaScript math object consists of a huge variety of methods that perform multiple mathematical functions in a single line of code.
Some of these methods are; .round(), .ceil(), .floor(), .trunc(), .sign(), .pow(), .sqrt(), .abs(), .sin(), .cos(), .min(), .max(), .random(), and .log().
All of these functions serve a different purpose which is explained in this write-up along with relevant example.
JavaScript array forEach() method Explained
JavaScript array foreach() method is used to apply a function on every element of an array.
The extended functionality of the foreach() method allows to use it like a for loop.
This article focuses forEach() method with the following learning outcomes:
– working mechanism of forEach() method in JS
– usage of forEach() method in JS with examples
How forEach() method works
The functionality of the foreach() method depends on the following syntax.
array.forEach(function(Curr-Val, Index, arr), this-Val)
The syntax is described here,
The array refers to an array variable
The function() is a call back function that accepts following three parameters:
Curr-Val: this parameter refers to the current value of the array element
Index (optional): it represents the index number of a current element
arr (optional): refers to the array on which the forEach() is being used
How to use JavaScript array forEach() method
This section presents various examples that demonstrate the usage of the forEach() method in various scenarios.
Example 1
The following code practices the forEach() method to print the elements of an array.
make = ["HP", "DELL", "LENOVO", "ACER"];
function print(item){
console.log(item);}
make.forEach(print);
The above code contains an array named make and a function named print that has a console.log() command.
Furtherly, this function is passed to a forEach() method.
Output
![]() The output shows that the forEach() method has executed the print(item) function and the list of array elements is printed as well.
From this example, you would have learned the basic usage of the forEach() method.
The output shows that the forEach() method has executed the print(item) function and the list of array elements is printed as well.
From this example, you would have learned the basic usage of the forEach() method.
Example 2
The following code uses a function(item) directly into the forEach() method.
make = ["HP", "DELL", "LENOVO", "ACER"];
make.forEach(function(item) {
console.log(item);})
The above code uses a forEach() method and function(item) is passed to it as an argument.
The function(item) executes a single console.log() statement(which will be iterated over each element of the make array)
Output
![]() Note: The method used in the above example is widely used to use complex functions in forEach() method.
Note: The method used in the above example is widely used to use complex functions in forEach() method.
Example 3
In this example, the forEach() method is executed with the JS arrow function (allows you to write a function in shorter form).
make = ["HP", "DELL", "LENOVO", "ACER"];
make.forEach(item => {
console.log(item);})
The above code practices the arrow function in the forEach() method.
Output
![]() The output shows that the arrow function has nullified the purpose of creating a large function to use in the forEach() method.
Note: The arrow function best suits smaller functions.
The output shows that the arrow function has nullified the purpose of creating a large function to use in the forEach() method.
Note: The arrow function best suits smaller functions.
Conclusion
The array forEach() method is used to exercise any operation on each element of the array.
Usually, the for loop is famous for executing a specific function on each element of the array.
However, forEach() also iterates over each element of an array to execute some function on them.
Keeping in view the importance of the forEach() method, this descriptive post provides the working mechanism of the forEach() method.
Additionally, several examples are demonstrated to provide the usage forEach() method.
innerText property | Explained
The innerText property of JavaScript is used to get or set the text inside an HTML element and its descendants.
The innerText has a similar working phenomenon to innerHTML.
Both properties manipulate the content of an HTML element but with different aspects.
The innerText focuses on the textual content and the innerHTML considers the HTML content of an element.
This article provides an insight into the innerText property to achieve the following targets.
How the innerText property works
How to use the innerText property
Difference between innerText and innerHTML
How the innerText property works
The working of innerText depends on the following syntaxes.
To get the text of an HTML element:
node.innerText;
To set/update the text of an HTML element:
node.innerText="text"
In the above syntaxes:
The node refers to the HTML element and all its descendants.
The text represents the new text that would be updated or set in place of the existing text.
How to use the innerText property
The following examples demonstrate the usage of the innerText property in HTML.
Example 1: Get the text of an HTML element
We have illustrated this example to show how text of an element can be obtained using innerText.
property.
HTML
<p id="p1">
This is an <small>example</small> of<strong> innerText </strong>
</p>
<button onclick="get()"> Click here to get the innertext </button>
In the above code, a paragraph(id=”p1“) is created that contains a small tag and a strong tag.
Moreover, a get() function is called on the click of the button.
JavaScript
function get(){
alert(document.getElementById("p1").innerText);}
A function named get() is created that contains an alert statement to display the text of an element(id=”p1“).
![]() Output
Output
![]() It is observed that the text of the paragraph(id=”p1“) and all its descendants(span and strong) is displayed.
It is observed that the text of the paragraph(id=”p1“) and all its descendants(span and strong) is displayed.
Example 2: Update the text of an HTML element
The HTML and JS code provided below assist in updating the text of the element.
HTML
<p id="p1"> This is an example of innerText property </p><button onclick="update()"> Click here to update the innertext </button>
The HTML code creates a paragraph with id=”p1” and button that executes the update() function on its onclick property.
JavaScript
function update(){
document.getElementById("p1").innerText= "The text has been updated!";}
The JavaScript code provided above creates an update() function that applies the innerText property to the paragraph with id=”p1“.
![]() Output
Output
![]() It is observed from the output that the text of the paragraph has been updated to new text.
It is observed from the output that the text of the paragraph has been updated to new text.
Example 3: Set the text for an HTML element
In this example, the text of one element will be placed inside the other element and the following code assists in doing so.
HTML
<p id="old"> Welcome to Linuxhint </p><button onclick="set()"> Click here to set the innertext </button><h2 id="new"> </h2>
The HTML code contains a paragraph with id=”old“, a button to trigger the set() function, and a heading with id=”new“.
JavaScript
function set(){
document.getElementById("new").innerText=document.getElementById("old").innerText;}
The above code gets the text of a paragraph element (id=”old“) and assigns this text to the heading-element (id=”new“).
Output
![]() The above output shows that the text of paragraph (id= “old”) is set to a heading (id= “new”).
The above output shows that the text of paragraph (id= “old”) is set to a heading (id= “new”).
Difference between innerText and innerHTML
The innerText and innerHTML may put confusion in your head.
The innerText only considers the textual content whereas the innerHTML functions on the HTML content of an element which may include the tags as well.
This section provides the difference between innerText and innerHTML by using the following code.
HTML
<p id="text"> Welcome to <strong> LinuxHint </strong> </p><button onclick="text()"> for innerText </button><button onclick="html()"> for innerHTML </button>
The above code creates a paragraph tag and two buttons.
The first button triggers the text() function whereas the second function executes the html() function.
JavaScript
functiontext(){
alert(document.getElementById("text").innerText);}
functionhtml(){
alert(document.getElementById("text").innerHTML);}
Two functions are created that practice the innerText and innerHTML properties on a paragraph id=”text“.
![]() Output
Output
![]() It is observed that the innerHTML shows the inner elements whereas the innerText has only retrieved the textual content.
It is observed that the innerHTML shows the inner elements whereas the innerText has only retrieved the textual content.
Conclusion
The innerText property of JavaScript allows you to get or update/set the content of an HTML element.
This article demonstrates various syntaxes of the innerText property of JavaScript with examples that better convey the concept.
By going through the article, you would have learned to get the text, update the text, or set a text to an HTML element using the innerText property of JavaScript.
Lastly, we have presented the difference between innerText and innerHTML to pave the concept in your head.
innerHTML property
The innerHTML property enables the manipulation of the HTML content in various ways.
The innerHTML allows the user to set/update the HTML content, or get the content of an HTML element.
The innerHTML property uses the getElementById method to identify the element and perform a relevant operation.
For better understanding, we have divided the article into various chunks to demonstrate the usage of the innerHTML property in detail:
How innerHTML property works
How to get the content of an element using the innerHTML property
How to set the content of an element using innerHTML property
How to update the content of an element using innerHTML property
How innerHTML property works
The innerHTML property sets/updates or returns the HTML content of an element.
Both functionalities of an innerHTML property have different syntaxes that are provided below.
To get the HTML content:
HTMLObject.innerHTML;
To set/update the HTML content:
HTMLObject.innerHTML="new-val";
In the above syntaxes, the HTMLObject instance identifies the HTML element on which the innerHTML will be applied.
And the element is identified by using the getElementById method.
Whereas the new-val is any value that would be set to an HTML element.
How to use innerHTML property
This section enlists various examples that demonstrate the usage of the innerHTML property.
How to use innerHTML property to update HTML content
The following code snippets demonstrate the working of innerHTML property to update the HTML content.
HTML
<h4 id="h"> Welcome to Linuxhint </h4>
<button onclick="get()"> click here to get </button>
The above code has an h4 element with id=”h” and a button with onclick attribute.
JavaScript
function get(){
alert(document.getElementById("h").innerHTML);}
The above JavaScript code creates a get() function and contains an alert that would show the content of element id=”h“.
![]() Output
Output
![]() The output shows that the content of an HTML element is displayed as an alert content.
The output shows that the content of an HTML element is displayed as an alert content.
How to use innerHTML property to update HTML content
In this section, you will learn to update the content of an HTML element using innerHTML property.
HTML
<p id="p1"> LinuxHint </p><button onclick="update()"> click here to update </button>
The above code creates a paragraph having id=”p1” and a button with an onclick attribute.
JavaScript
function update(){
document.getElementById("p1").innerHTML=" Welcome! innerHTML property is being used! ";}
The JS code written above creates a function named update() which will be invoked on the click of the button to apply innerHTML property on element(paragraph) id=”p1“.
![]() Output
Output
![]() From the output, it is observed that the content of the paragraph is being updated.
From the output, it is observed that the content of the paragraph is being updated.
How to to use innerHTML property to set the HTML content
Here, we will show how innerHTML sets the content of an HTML element.
For this, the HTML and JavaScript code practiced in this section are elaborated below.
HTML
<p id="p1"> This is a Paragraph </p><button onclick="set()"> click here to set the content </button><div> <p id="p2"> </p> </div>
The above HTML code has two paragraphs where the value of the first paragraph(id=”p1“) will be used to set the value of second paragraph(id=”p2“).
Note: The div in the above code is just for sake of understating.
JavaScript
function set(){const old = document.getElementById("p1").innerHTML;
document.getElementById("p2").innerHTML= old;}
A set() function is created that has two statements.
The first statement gets the content from paragraph(id=”p1“) and saves it in a variable(old).
And the second statement sets the value of the variable to the paragraph (id=”p2“).
![]() Output
Output
![]() From the above output, the paragraph has nothing to show but upon clicking the button the content of the paragraph(id=”p1“) is set to the paragraph(id=”p2“)
From the above output, the paragraph has nothing to show but upon clicking the button the content of the paragraph(id=”p1“) is set to the paragraph(id=”p2“)
Conclusion
The innerHTML property of JavaScript allows to get or update/set the content of an HTML element.
Using the getElementById method, the innerHTML property identifies an HTML element.
In this article, the innerHTML property of JavaScript is demonstrated in a brief manner.
Each subsection here presents the functionality of innerHTML property to get, update, or set the content of an HTML element.
Methods to Traverse DOM Elements Using JQuery | Explained
In web development, it is often required to find or select certain HTML elements in order to manipulate them.
For the purpose of doing so you have traverse through the DOM tree and select a particular element.
jQuery provides a huge list of methods that are used for traversing through the DOM tree.
Here we have enlisted these jQuery methods.
children() method
each() method
find() method
first() method
next() method
parent () method
prev() method
siblings() method
These above-mentioned methods are explained in detail below.
children() Method
For the purpose of fetching all the immediate children of a specified element, the jQuery children() method is used.
This method only traverses one level down the DOM tree.
Syntax
$(selector).children(filter)
Filter is an optional parameter that is used to specify an element to restrict the search for children.
Example
Suppose you want to fetch the direct children of a certain element using the jQuery children() method.
Here is an example of doing so.
HTML
<body class="children">
<div style="width:500px;">div (grandparent)
<ul>ul (direct parent)
<li>li (direct child of ul)
<span>span (grandchild of ul)</span>
</li>
</ul>
</div></body>
We have created a <div> element in which a <ul> element is nested.
Further inside the <ul> element <li>, and <span> elements are nested.
CSS
.children * {
display: block;
border: 2px solid gray;
color: gray;
padding: 5px;
margin: 15px;}
The entire body has been given some style by using CSS.
jQuery
$(document).ready(function(){
$("ul").children().css({"color": "blue", "border": "2px solid blue"});});
Here the children() method is used to fetch the direct children of <ul> element.
Besides this, css() method is chained to the children() method in order to highlight the children of <ul>.
Output
![]() The direct child of <ul> has been fetched successfully.
The direct child of <ul> has been fetched successfully.
each() Method
In order to specify a function to be executed for each of the specified elements, the each() method is used.
Syntax
$(selector).each(function(index,element))
The function inside the .each() method is a required parameter function which will be executed for each of the specified elements.
Index parameter specifies the position of the selector.
Element parameter refers to the current element.
Example
Suppose you want to change the text for each of the <p> element using the jQuery each() method.
HTML
<p>First paragraph.</p><p>Second paragraph.</p><p>Third paragraph.</p><button>Change text of each paragraph</button>
In the above HTML code, we have created three <p> elements and one button.
jQuery
$(document).ready(function(){
var i = 0;
$("button").click(function(){
$("p").each(function(){
$(this).text(`Paragraph ${i+=1}`)
});
});});
Here we are using the each() method to change text for each of the <p> elements.
The “this” parameter refers to the current element, which in this case is the <p> element.
Output
The text changes everytime you click on the button.
![]() The each() method is working properly.
The each() method is working properly.
find() Method
For the purpose of finding all the successors of an element, the find() method is used.
All successors of an element include; children, grandchildren, great-grandchildren, and so forth.
Syntax
$(selector).find(filter)
Filter is a required parameter which refers to either a selector, element, or jQuery object whose children are to be found.
Example
Suppose you want to fetch the child, grandchild and great-grandchild of an element.
Here is how you do it.
HTML
<body class="main">
<div style="width:500px;">div (grandparent)
<ul>ul (direct parent)
<li>li (child)
<span>span (grandchild)
<span>span (great-grandchild)</span>
</span>
</li>
</ul>
</div></body>
In the above code, a <div> element is created and inside that <div> we have nested a <ul> element.
Furthermore, we have nested <li> and <span> elements inside the <ul> element.
The <span> element further nests a <span> element.
Multiple nesting was done in order to make the working of the find() method clear.
CSS
.main * {
display: block;
border: 2px solid gray;
color: gray;
padding: 5px;
margin: 15px;}
We styled the class “main” using CSS.
This class is assigned to body.
jQuery
$(document).ready(function(){
$("ul").find("li,span").css({"color": "blue", "border": "2px solid blue"});});
Here we are using the find() method to find <li> and <span> elements in the <ul> element and later applying some css styling to highlight the fetched successors.
Output
![]() The successors of the <ul> element were found.
The successors of the <ul> element were found.
first() Method
The first() method fetches the first nested element inside a specified element.
Syntax
$(selector).first()
Example
Suppose you want to fetch the first element <span> that is inside an <h1> element.
Follow the code below.
HTML
<h1>Method to <span>traverse</span> DOM <span>Elements</span> using jQuery</h1>
In the above HTML code, we have created an <h1> element and nested two <span> elements within that <h1> element.
jQuery
$(document).ready(function(){
$("h1 span").first().css("background-color", "pink");});
Here we have used the first() method to find the first <span> element of the <h1> element, moreover, used css() method to highlight the fetched element.
Output
![]() The first <span> element of the <h1> element is highlighted in pink.
The first <span> element of the <h1> element is highlighted in pink.
next() Method
In order to find the adjacent sibling of a specified element, the next() method is used.
Syntax
$(selector).next(filter)
Filter is an optional parameter that is used to specify an element to restrict the search for the adjacent sibling.
Example
Here we have illustrated the working of the jQuery next() method.
HTML
<h1>This a heading</h1><p>This is the first paragraph.</p><p>This is the second paragraph.</p>
Here we have created one <h1> element and two <p> elements.
jQuery
$(document).ready(function(){
$("h1").next().css("background-color", "pink");})
In the above code, we are using the next() method to find the adjacent sibling of the <h1> element.
Output
![]() The adjacent sibling of the <h1> element was fetched successfully.
The adjacent sibling of the <h1> element was fetched successfully.
parent () Method
For the purpose of finding the direct parent of an element, the parent() method is used.
It is a built-in jQuery function that only goes one level up the specified element and fetches the immediate parent of that element.
Syntax
$(selector).parent(filter)
Filter is an optional parameter which is used to restrict the search for parent element by specifying a selector expression.
Example
Suppose you want to fetch the direct parent of a <span> element which is present in an <li> element which further is a part of a <div> element.
HTML
<body class="main">
<div style="width:500px;">div (I am a great-grandparent)
<ul>ul (I am a grandparent)
<li>li (I am a direct parent)
<span>span</span>
</li>
</ul>
</div></body>
There are a total of four elements generated in the above code; <div>, <ul>, <li>, and <span>.
Observing their hierarchy, the <li> element is regarded as a direct parent of the <span> element, <ul> is the grandparent of the <span> element, and <div> is the great-grandparent because all of the elements are nested inside the <div> element.
CSS
.main * {
display: block;
border: 2px solid gray;
color: gray;
padding: 5px;
margin: 15px;}
Using CSS, we have given some style to the body.
jQuery
$(document).ready(function(){
$("span").parent().css({"color": "blue", "border": "2px solid blue"});});
We have applied the parent() method on the <span> element and also chained the css() method to it in order to highlight the direct parent of the <span> element and verify that the parent element is accessed successfully.
Output
![]() The parent element is accessed successfully.
The parent element is accessed successfully.
prev() Method
The jQuery prev() method is used to fetch the previous adjacent sibling of a specified element.
This method traverses in a backward manner in the DOM tree.
Syntax
$(selector).prev(filter)
Filter is an optional parameter that is used to specify an element to restrict the search for the previous adjacent sibling.
Example
Suppose you want to fetch the previous adjacent sibling of an element.
Use the following code.
HTML
<h1>Heading 1</h1><h2>Heading 2</h2><p>Some paragraph.</p>
In the above code, we have created three elements which are; <h1>, <h2>, and <p>.
jQuery
$(document).ready(function(){
$("h2").prev().css("background-color", "skyblue");})
We have used the jQuery prev() method to fetch the previous adjacent sibling of <h2> element.
Output
![]() The previous adjacent sibling of <h2> is <h1>.
The previous adjacent sibling of <h2> is <h1>.
siblings() Method
In order to fetch all the siblings of a specified element, the siblings() method is used.
This method traverses backwards as well as forward in the DOM tree to fetch all the siblings of an element.
Syntax
$(selector).siblings(filter)
Filter is an optional parameter that is used to specify an element to restrict the search for the siblings.
Example
This example demonstrates the working of the siblings() method.
HTML
<div style="width:500px;" class="div">
<ul>ul (parent)
<li>li (the previous adjacent sibling)</li>
<li class="siblings">li</li>
<li>li (the next sibling)</li>
<li>li (the next sibling)</li>
</ul></div>
In the above code, we have created a <div> element and nested a <ul> element inside that div.
Moreover, we have nested some <li> elements inside the <ul> element.
CSS
.div * {
display: block;
border: 2px solid gray;
color: gray;
padding: 5px;
margin: 15px;}
The <div> element has been given a certain style using CSS.
jQuery
$(document).ready(function(){
$("li.siblings").siblings().css({"color": "blue", "border": "2px solid blue"});});
Using the jQuery siblings() method we are going to fetch all the siblings of the <li> element.
Moreover, in order to highlight those siblings we have used css() method.
Output
![]() The siblings() method is working properly.
The siblings() method is working properly.
Conclusion
jQuery provides a huge range of methods that are used for the purpose of traversing DOM elements.
These methods are; children() method, each() method, find() method, first() method, next() method, parent() method, prev() method, and siblings() method.
All of these methods serve their own purpose which is explained in-depth in this guide along with the help of relevant examples.
JQuery Sliding Methods Explained
The sliding phenomenon allows you to slide up or slide down DOM elements.
Sometimes, a panel is attached with elements that provide additional information.
These panels are slid up/down depending on the requirement.
JQuery supports three sliding methods that are slideUp(), slideDown(), and slideToggle().
The slideUp() or slideDown() methods slide the elements in upward or downward directions respectively.
Alternatively, the slideToggle() method determines whether the element is in the slideUp() state or in slideDown().
For instance, if the element is in the slideUp() state, then slideToggle() will slide the element downwards and vice versa.
This article demonstrates the jQuery sliding methods in detail and serves the following learning outcomes.
working of slideUp(), slideDown(), and slideToggle() methods
demonstration of jQuery sliding methods using examples
How jQuery sliding methods work
This section provides the working mechanism of jQuery sliding methods by elaborating the syntaxes.
Additionally, an example is provided that refers to each jQuery method separately.
Let’s explore jQuery sliding methods one by one.
How to use the slideUp() method
This method slides the element upward using jQuery slideUp().
Syntax
$(selector).slideUp(speed,callback);
In the above syntax,
the selector can be any element or may refer to the class/id of an element
the speed parameter decides how fast/slow the element will be slid up and the values of speed can be slow, fast, or milliseconds (numeric value)
the callback is optional and is used to get some output after the sliding is completed
Example
The following lines of code practice the jQuery slideUp() method.
<script>
$(document).ready(function(){
$(".prim").click(function(){
$(".sec").slideUp("fast");
});});</script>
The code is explained here
the “prim” class refers to the main panel(on which the sliding depends)
the “sec” class is used for the secondary panel(which will be slid up)
the sliding speed is set to “fast“
![]()
Output
Before sliding-up
![]() After sliding in the upward direction
After sliding in the upward direction
![]()
How to use the slideDown() method
The slideDown() method slides the element in the downward direction.
Syntax
$(selector).slideDown(speed,callback);
Example
The usage of the jQuery slideDown() method is shown by exercising the following code.
<script>
$(document).ready(function(){
$(".main").click(function(){
$(".sec").slideDown("slow");
});});</script>
The above code is described as,
the “.main” class of paragraph is created and it is used as a primary element(used to slide down the panel)
the “.sec” refers to another paragraph that will be slid down after clicking on “.main” class paragraph
the speed of sliding is set to slow
Note: The element that will be slid down must have the display property set to none.
![]()
Output
Before sliding down
![]() Upon clicking, the paragraph(class=”sec“) will be slid down as shown below.
Upon clicking, the paragraph(class=”sec“) will be slid down as shown below.
![]()
How to use the slideToggle() method
The slideToggle() slides up the element if the element is in a slide-down state and if the element is in a slide-up state, it would slide the element in a downward direction.
Syntax
$(selector).slideToggle(speed,callback);
Example
To practice the jQuery slideToggle() method, we made use of the following code.
<script>$(document).ready(function(){
$(".prim").click(function(){
$(".sec").slideToggle(1000);
});});</script>
In the above code,
the “prim” class represents the primary element(on which the sliding depends)
the “sec” class refers to the element which will be slid up/down
the sliding speed is set in milliseconds (1000)
![]()
Output
Before sliding
![]() After applying the slideToggle() method
After applying the slideToggle() method
![]() If you keep on clicking the primary element, the slider will keep on changing its state.
If you keep on clicking the primary element, the slider will keep on changing its state.
Conclusion
To slide an element in an upward or downward direction, jQuery offers three methods: slideDown(), slideUp(), and slideToggle().
This descriptive post provides the working as well as the usage of each sliding method.
The slideDown() and slideUp() methods are exercised to slide the element in downward and upward directions respectively.
On the other hand, the slideToggle() method changes the current state of the element from slide-up to slide-down and vice versa.
JQuery Show() Method | Explained
Adding animations and different effects play an important role in increasing the user experience of a website.
These can be performed with absolute ease using various methods provided by jQuery, which is a JavaScript library.
There is a huge list of such jQuery methods, however, in this guide we will learn all about the jQuery show() method.
Let’s get started.
jQuery show() Method
As the name suggests, the jQuery show() method is used for the purpose of showing the hidden elements.
This property shows only those elements that are hidden using either jQuery hide() method, or the CSS display property.
Syntax
$selector.show(parameter)
The show() method exhibits the following parameters.
| Parameter | Description |
|---|
| speed | This parameter describes the speed of the show effects.
It renders values such as slow, fast, and milliseconds. |
| easing | This parameter describes the speed of an element at different animation points.
It renders values such as swing, and linear. |
| callback | It is a function that executes once the show() method is called. |
Note: All of the above-mentioned parameters are optional.
The examples below will aid you in establishing a better understanding of the show() method.
Example 1
In this example we have demonstrated the show() method by passing no parameter.
Since the show() method reveals only those elements that are hidden using jQuery hide() method, therefore, we have to first hide an element in order to show it using the show() method.
HTML
<h1>jQuery show() Method</h1><button class="button1">Click here to hide</button><button class="button2">Click here to show</button>
In the above HTML code two <button> elements and one <h1> element are being created.
Now we will apply the jQuery hide() and show() methods on the <button> elements to observe the hide and show effect on <h1> element.
jQuery
<script>
$(document).ready(function(){
$(".button1").click(function(){
$("h1").hide();
});
$(".button2").click(function(){
$("h1").show();
});
});</script>
Output
Before clicking on any of the buttons.
![]() Click on the first button to make the heading disappear and after it is hidden, click on the second button to reveal the heading.
Click on the first button to make the heading disappear and after it is hidden, click on the second button to reveal the heading.
![]() Heading disappeared and appeared successfully and quickly.
Heading disappeared and appeared successfully and quickly.
Example 2
This example shows the working of speed parameter.
jQuery
<script>
$(document).ready(function(){
$(".button1").click(function(){
$("h1").hide(900);
});
$(".button2").click(function(){
$("h1").show(900);
});
});</script>
In the above example, we have passed 900 as a parameter to the hide() and show() methods which means once you click the first button it will take only 900 milliseconds for the heading to disappear and only 900 milliseconds to appear again when you click the second button .
The lesser the number of milliseconds the faster the heading will appear, and vice versa.
Output
![]() The speed parameter was executed successfully.
The speed parameter was executed successfully.
Example 3
This example shows how the callback parameter works.
jQuery
<script>
$(document).ready(function(){
$(".button1").click(function(){
$("h1").hide(900, function(){
alert("Hide() method successfully completed!");
});
});
$(".button2").click(function(){
$("h1").show(900, function(){
alert("Show() method successfully completed!");
});
});
});</script>
In the above code snippet, along with the speed parameter we have also passed the callback parameter.
Once the hide() and show() methods are called, an alert message will also appear confirming the successful execution of both the methods.
Output
Before you click on any of the buttons.
![]() After you click on the first button to hide the heading.
After you click on the first button to hide the heading.
![]() After you click on the second button to show the heading.
After you click on the second button to show the heading.
![]() The callback parameter is working properly.
The callback parameter is working properly.
Conclusion
The jQuery show() method is used for the purpose of showing the hidden elements.
It shows only those elements that are hidden using either jQuery hide() method, or the CSS display property.
The jQuery show() method exhibits three parameters which are; speed, easing, and callback.
All of these parameters are optional.
The jQuery show() method is discussed in-depth in this guide along with examples that illustrate the usage of the different show() method parameters.
JQuery Hide() Method | Explained
jQuery which is a JavaScript library makes tasks like animation, event handling, or Ajax very easy.
These are some tasks that would usually take multiple lines of code to be achieved, but jQuery provides certain methods that can fulfill these tasks in just a single line of code.
Although, there are numerous amount of jQuery methods, however, in this guide we will stick to the jQuery hide() method and see how it works.
jQuery hide() Method
As the name suggests, the jQuery hide() method is used for the purpose of hiding specified elements.
The elements that you hide using the jQuery hide() method will be completely invisible to the user.
Syntax
$selector.hide(parameter)
The different parameters that you can pass to the hide() method are as follows.
| Parameter | Description |
|---|
| speed | This parameter describes the speed of the hide effects.
It can exhibit values such as slow, fast, and miliseconds. |
| easing | This parameter describes the speed of an element at different animation points.
It can exhibit values such as swing, and linear. |
| callback | It is a function that executes once the hide() method finishes. |
Note: All of the above-mentioned parameters are optional.
Below we have illustrated some examples that will help establish a better understanding of the hide() method.
Example 1
This example demonstrates the hide() method by passing no parameter.
HTML
<h1>Click on the button below to hide this heading.</h1><button class="button1">Hide</button>
In the above HTML code two elements are being created <h1> and <button>.
Now we will apply the jQuery hide() method on the <button> to hide the <h1> element.
jQuery
<script>
$(document).ready(function(){
$(".button1").click(function(){
$("h1").hide();
});
});</script>
Output
Before clicking on the “hide” button.
![]() After clicking on the button, the heading will disappear.
After clicking on the button, the heading will disappear.
![]() Heading disappeared successfully and quickly.
Heading disappeared successfully and quickly.
Example 2
This example shows the working of speed parameter.
jQuery
<script>
$(document).ready(function(){
$(".button1").click(function(){
$("h1").hide(900);
});
});</script>
In the above example, we have passed 900 as a parameter to the hide() function which means once you click the button it will take only 900 milliseconds for the heading to disappear.
The lesser the number of miliseconds the faster the heading will disappear and vice versa.
Output
![]() The speed parameter is working properly.
The speed parameter is working properly.
Example 3
This example shows the working of callback parameter.
jQuery
<script>$(document).ready(function(){
$(".button1").click(function(){
$("h1").hide(900, function(){
alert("Hide() method has been successfully executed!");
});
});});</script>
In the above code snippet, along with the speed parameter we have also passed the callback parameter.
Once the hide() method has been executed an alert message will also appear confirming the successful execution of the method.
Output
Before you click on the button.
![]() After you click on the button.
After you click on the button.
![]() The callback parameter is working properly.
The callback parameter is working properly.
Conclusion
The jQuery hide() method is used for the purpose of hiding specified elements.
Once the elements are hidden they will completely disappear from the sight of the user.
You can pass three parameters to the hide() function which are; speed, easing, and callback.
All of these parameters are optional.
The jQuery hide() method is explained in-depth in this guide along with examples that illustrate the usage of the different hide() method parameters.
JQuery Fading Methods Explained
Fading is the property that allows manipulating the opacity (transparency) of HTML elements.
JQuery offers four fading methods that allow you to change the transparency of elements.
These methods include, fadeIn(), fadeOut(), fadeToggle(), and fadeTo().
This article explores the fading methods in jQuery and serves the following learning outcomes.
working of jQuery fading methods
using jQuery fading methods
How to use jQuery fading methods
As discussed earlier, jQuery has four fading methods and a deep insight into all those methods is provided here.
How to use the fadeIn() method
The fadeIn() method displays the element by increasing the opacity.
The syntax of this method is provided below:
$(selector).fadeIn(speed,callback);
The syntax has the following instances
selector can be any element or may refer to the class or id of any element.
speed can be specified in either of four values: slow, medium, fast, and milliseconds.
callback is the optional parameter and is exercised after the function is executed successfully.
Example
The code provided below shows the usage of jQuery fadeout() method.
jQuery
$(document).ready(function(){$(".fadein").click(function(){
$(".slow").fadeIn("slow");
$(".fast").fadeIn("fast");
$(".mili").fadeIn(2000);});});
The code is described as,
.fadein refers to the button class and upon clicking the button, it will fade-in the paragraphs
the .slow, .fast, and .mili classes refer to three paragraphs that will be faded-in at various speeds
Note: The display property of the element(that you are going to fade-in) must be set to none.
![]()
Output
As we are fading-in and the display property of paragraphs is set to none.
Thus, the paragraphs will be hidden on running the page.
![]() After clicking the button, you will observe that the paragraphs will appear depending on the speed as shown in the image below.
After clicking the button, you will observe that the paragraphs will appear depending on the speed as shown in the image below.
![]()
How to use fadeOut() method
The fadeOut() method fades out the displayed element by decreasing the opacity of the element.
The syntax of this method is provided below:
$(selector).fadeOut(speed,callback);
Example
The code written below shows the usage of jQuery fadeout() method.
<script>$(document).ready(function(){
$(".fadeout").click(function(){
$(".slow").fadeOut("slow");
$(".fast").fadeOut("fast");
$(".mili").fadeOut(1000);
});});</script>
The above code is described as,
.fadeout class of button is used which will fade-out the paragraphs
the .slow, .fast, and .mili are the class names set for paragraphs and will be used to fadeout as well as for styling
![]()
Output
In the fadeout() method, the paragraphs will be displayed as shown below.
![]() After clicking the button, the paragraphs will fade-out.
After clicking the button, the paragraphs will fade-out.
![]()
How to use fadeTo() method
The fadeTo() method works on the principles of fadeOut() method.
However, fadeTo() fades the element by using a numeric range (0-1).
This opacity range defines the opacity level of the element, the higher the number higher will be the opacity and vice versa.
The syntax is provided below:
$(selector).fadeTo(speed,opacity,callback);
The opacity parameter accepts 0 to 1 value.
Example
The code provided below practices the fadeTo() method.
<script>
$(document).ready(function(){
$(".fadeto").click(function(){
$("#min").fadeTo("slow", 0);
$("#avg").fadeTo("slow", 0.5);
$("#max").fadeTo("slow", 1);
});});</script>
The code is described as,
.fadeto refers to the button class
the #min, #avg, and #max represents the id’s of three div tags, and these id’s refer to the values that will be used for fadeTo() method
the fading value varies from 0 to 1 in fadeTo() methods
![]()
Output
Before applying fadeTo() method
![]() After applying fadeTo() method
After applying fadeTo() method
![]() From the above output, it is observed that the paragraph having value 0 has been washed out.
From the above output, it is observed that the paragraph having value 0 has been washed out.
How to use fadeToggle() method
The fadeToggle() method lies between fadeIn() and fadeOut() methods.
By using fadeToggle(), you can display a hidden element and can hide a displayed element.
The syntax of this method is:
$(selector).fadeTo(speed,callback);
Example
The code provided below functions to use the fadeToggle() method.
<script>
$(document).ready(function(){
$(".fadetoggle").click(function(){
$("#slow").fadeToggle("slow");
$("#fast").fadeToggle("fast");
$("#mili").fadeToggle(1000);
});});</script>
.fadetoggle class refers to the button
the #slow, #fast, and #mili represents various id’s of div
![]()
Output
Before clicking the button
![]() After clicking the button,
After clicking the button,
![]() It is concluded that, if the element is displayed, it will be hidden after fadeToggle() method ( as fadeOut() method does).
Similarly, if the element is in fadeOut() state, then the fadeToggle()will act as a fadeIn() method.
It is concluded that, if the element is displayed, it will be hidden after fadeToggle() method ( as fadeOut() method does).
Similarly, if the element is in fadeOut() state, then the fadeToggle()will act as a fadeIn() method.
Conclusion
jQuery provides various fading methods that include fadeIn(), fadeOut(), fadeToggle(), and fadeTo() that assist in fading HTML elements.
This guide provides the working and usage of each jQuery fading method.
The fadeIn() method displays element if it is hidden whereas the fadeOut() hides the element.
The fadeTo() method fade’s in or out depending on the opacity number.
Lastly, the fadeToggle() method functions between fadeIn() and fadeOut() methods.
JavaScript vs PHP
JavaScript is famous for client-side operations of web pages and controls the dynamic elements.
In modern web applications, JavaScript is accompanied by HTML and CSS to design web pages.
It also functions on the server-end; thus, JS provides support for front-end and back-end development.
PHP is a server-side programming language intended to develop dynamic web pages.
It can be easily embedded in HTML and can; interact with databases, manage session tracking, encrypt data, handle forms, and many more.
This guide serves the following learning outcomes:
Basics of JavaScript and its notable features
Basics of PHP and its distinctive features
Comparison of JS and PHP
JavaScript
There are numerous scripting languages available for both front-end and backend development, with JavaScript being one of the most popular.
The primary use case of JS is at the front-end, intended to create and maintain the user interface of web pages.
Over the years, it has emerged as a leading front-end language due to the following characteristics.
A lightweight scripting language intended to handle data in browsers
Provides an in-time compilation
Cross-platform support to run scripts anywhere
Supports various common data types and functions
PHP (Hypertext Preprocessor)
As PHP has matured, it has become a widely used programming language.
Although PHP stands after Java, ASP.Net, Ruby, most of the websites are working under the PHP shed.
The noteworthy features of PHP are:
Manages the dynamic content on a website
Simple and easy to learn
Compatible with all famous servers like Netscape, Apache, Microsoft IIS (Internet Information Service)
Provides secure web development as it has multiple security layers
JavaScript vs PHP
The following points provide a comparison between both programming languages.
However, the following commonalities and differences are observed.
Development: According to a survey, 79% of all websites practices PHP for back-end development.
In contrast, JavaScript continues to be one of the most popular front end scripting languages.
Integration: PHP can be integrated with HTML only, however, JavaScript can be integrated with XML, Ajax, and HTML.
Complexity: JavaScript is harder to learn for a novel developer(due to its complex nature of syntax, advanced features) whereas the syntax of PHP is quite user-friendly.
Thus, PHP is less complex than JavaScript.
Reusability: Complexity has a direct relation with usability.
As JavaScript is more complex than PHP, it would be difficult to use JavaScript than PHP.
Performance: PHP creates a new process against a user’s request and in case of hundreds of requests, the PHP server may show a performance lag.
While, one request is entertained at one time while keeping the other requests in a queue.
This shows JS is quite fast than PHP.
Platform: PHP has cross-platform support for OS (Linux, Windows) and servers (Apache, IIS).
While JavaScript can be run in a wide range of browsers, including Chrome, Firefox, Edge, etc.
Database Accessibility: Being a server-side language, PHP can handle database operations standalone whereas JavaScript requires an environment (one of the famous is Node.js) to perform database functions.
Conclusion
The most popular programming languages at the moment are PHP and Java.
Each language has its own core functioning area and they do share some commonalities and differences.
This article provides the insights of PHP and JavaScript alongside their head to head comparison.
It is concluded from the historical information that PHP is best suited for back-end development whereas JavaScript is more fruitful for front-end development.
How to Stop Animation or Effect in JQuery
The animations or effects make the content presentable for end users.
jQuery offers various methods such as animate(), fadeIn(), fadeout() etc., to add animation or effect.
What if, you want to stop animation or effect? You can do so as well, let’s see how?
The stop() method assists to stop animation or effect in jQuery.
The stop method provides manifold functionality, like stopping the animation/effect instantly or sequentially.
This article demonstrates the ways to stop the animation or an effect in jQuery.
How to stop animation or effect in jQuery
The stop() method in jQuery helps in stopping the animation or effect that is running.
The syntax of the stop() method is shown below.
$(selector).stop(clearQueue, jumpToEnd);
The selector could be any HTML element or class/id of the element.
Moreover, the stop() method offers two parameters (that are optional but not necessary)
clearQueue: It accepts Boolean values (either true or false) and decides about the stopping of upcoming animations.
The false(default value) value directs that only the current animation will be stopped, and other queued animations will be started afterward.
Whereas the true value terminates the animation instantly.
jumpToEnd: Its default value is false, if the true value is assigned then it ends the animations and the queue is cleared as well.
The above syntax works for various jQuery methods such as fading(), sliding(), show(), hide() as well.
How to stop animations in jQuery
This section practices a few examples that guide to stop animations in various scenarios using the stop() method.
Example 1: using stop() method without parameters
<script>
$(document).ready(function(){
$(".start").click(function(){
$("div").animate({
width: "1250px",
}, 5000);
});
$(".stop").click(function(){
$("div").stop();
});});</script>
The above code animates the width of the div with a speed of milliseconds= “5000“.
Moreover, the stop() method stops the ongoing animation.
![]()
Output
Before animating
![]() After applying the stop() method randomly (stopping anywhere)
After applying the stop() method randomly (stopping anywhere)
![]()
Example 2: using stop() method with parameters
The following code practices stop() method by using both parameters.
And the value of the parameter is set to true.
<script>
$(document).ready(function(){
$(".start").click(function(){
$("div").animate({
width: "1250px",
}, 5000);
});
$(".stop").click(function(){
$("div").stop(true,true);
});});</script>
The above code animates the width property and then the stop(true,true) method is applied.
![]()
Output
Before doing any action
![]() After starting the animation, when the stop-animation button is clicked the animation ends immediately.
After starting the animation, when the stop-animation button is clicked the animation ends immediately.
![]()
How to stop the fading() effect in jQuery
The stop() method in jQuery can be used to stop an effect as well.
The code provided below exercises the fading effect and then the stop() method to stop that effect.
<script>$(document).ready(function(){
$(".fade").click(function(){
$("div").fadeOut(2500);
});
$(".stop").click(function(){
$("div").stop();
});});</script>
The above code fades-out the div at speed of 2500 milliseconds and the stop method is used to stop the fading out method.
![]()
Output
Before start/stop of fading process
![]() After the fading-out process is started, when the stop button is clicked the fading process will be stopped as shown in the image below(in our case).
After the fading-out process is started, when the stop button is clicked the fading process will be stopped as shown in the image below(in our case).
![]()
Conclusion
The stop() method of jQuery is used to stop the animation or an effect.
The stop() method accepts two parameters, and it can be applied without parameters as well.
Both parameters are Boolean in nature and thus true/false values are accepted only.
You would have learned the application of the stop() method to stop animation in jQuery.
Moreover, the stop() method is also exercised on a fadeOut() method in jQuery.
How to Set Dimensions of HTML Elements Using JQuery
Setting the dimensions of HTML elements properly is highly significant when structuring the layout of a web page because the right dimensions enhance the overall look of your website which in return boosts the user experience.
jQuery provides many methods that help you perform this task with great ease.
Dimensions of HTML elements can be set using the below-mentioned jQuery methods.
width() method
height () method
innnerWidth() method
innnerHeight() method
outerWidth() method
outerHeight() method
Let’s explore them in detail.
width() Method
For the purpose of setting or fetching the width of HTML elements, the width() method is used.
This method works in a way that when it is used only to fetch the width of an element it returns the width of the first matched element, however, when used for setting the width, it sets the width of all matched elements.
Syntax
For fetching the width of an element.
$(selector).width()
For setting the width of an element.
$(selector).width(value)
Example
Suppose you want to change the width of a <div> element using jQuery width() method.
Use the code below.
HTML
<div style="background-color: bisque; height:100px; width:200px; border:2px solid gray;"></div><br><button id="button">Set width</button>
In the above HTML code, we have created a <div>, and a <button> element.
Moreover we have given some style to the <div> element using inline CSS.
jQuery
$(document).ready(function(){
$("#button").click(function(){
$("div").width(500);
});});
In this jQuery code, width() method is being used to set a new width of the <div> element to 500px.
Output
Before you click on the button.
![]() After clicking the button.
After clicking the button.
![]() The width of the <div> element has been changed.
The width of the <div> element has been changed.
Heigth() Method
This method works in a similar way to the width() method, with the obvious difference that it is used to give or fetch the height of HTML elements.
This method also works in a way that when it is used only to fetch the height of an element it extracts the height of the first element that matches the specified element, however, when used for setting the height, it sets the height of all matched elements.
Syntax
For fetching the height of an element.
$(selector).height()
For setting the height of an element
$(selector).height(value)
Example
Suppose you want set some height of an element using the jQuery height() method.
Follow the code below.
HTML
Enter your name: <input type="text" style="background-color: lightpink; height: 10px; width:200px;"><br><br><button>Display the height of input field</button>
Here we have created, an input field and set a height of 10px, width of 200px, and background color pink.
Moreover, we have aslo created a button.
jQuery
$(document).ready(function(){
$("button").click(function(){
$("input").height(20);
});});
We have used the jQuery height() method here to change the height of the input field.
The height will change when you click on the button.
Output
Before you click on the button.
![]() After the button is clicked.
The height() method is working properly.
After the button is clicked.
The height() method is working properly.
innerWidth() Method
For the purpose of fetching the inner width of the first element that matches the specified element, the innerWidth() method is used.
Syntax
$(selector).innerWidth()
Example
Suppose you want to display the innerWidth of an image.
Use the following code.
HTML
<img src="dog.jpg" style="height: 150px; width:200px; padding: 5px; border: 2px solid black;"></img><br><button>Display the inner width of image</button>
Here we have displayed an image using the <img> tag, moreover, we have set its height, width, padding, and border.
Along with the image, we have also created a button that will be used to display the inner width of the image.
jQuery
$(document).ready(function(){
$("button").click(function(){
alert("Inner width of image: " + $("img").innerWidth());
});});
In the above code, we are using the innerWidth() method to display the inner width of the image.
Output
Before the button is clicked.
![]() After the button is clicked.
After the button is clicked.
![]() The inner width of the image has been displayed.
Note: The innerWidth() method includes padding as well while displaying the inner width of an element.
The inner width of the image has been displayed.
Note: The innerWidth() method includes padding as well while displaying the inner width of an element.
innerHeight() Method
The innerHeight() method is used for fetching the inner height of the first element that matches the specified element.
Syntax
$(selector).innerHeight()
Example
We are going to use the example used in the above section to understand the working of the jQuery innerHeight() method.
jQuery
$(document).ready(function(){
$("button").click(function(){
alert("Inner height of image: " + $("img").innerHeight());
});});
We have used the innerHeight() method to extract the inner height of the dog image.
Output
Before you click the button.
![]() After you click on the button.
After you click on the button.
![]() The innerHeight() method is working properly.
Note: The innerHeight() method also includes padding as well while displaying the inner height of an element.
The innerHeight() method is working properly.
Note: The innerHeight() method also includes padding as well while displaying the inner height of an element.
outerWidth() Method
For the purpose of fetching the outer width of the first element that matches the specified element, the outerWidth() method is used.
Syntax
$(selector).outerWidth()
Example
Suppose you want to extract the outer width of a div element.
Here is how you do it.
HTML
<div style="background-color: bisque; height:100px; width:200px; padding: 10px; border:2px solid gray;"></div><br><button id="button">Outer width of div</button>
We have created a div and given it a certain background color, height, width, padding, and border.
Furthermore, we have also created a button.
jQuery
$(document).ready(function(){
$("button").click(function(){
alert("Outer width of div: " + $("div").outerWidth());
});});
Here we have used the jQuery outerWidth() method to display the outer width of the div element.
Output
Before the button gets clicked.
![]() When the button is clicked.
When the button is clicked.
![]() The outerWidth() method is working properly.
Note: The outerWidth() method calculates padding as well border while displaying the outer width of an element.
The outerWidth() method is working properly.
Note: The outerWidth() method calculates padding as well border while displaying the outer width of an element.
outerHeight() Method
The outerHeight() method is used for fetching the outer height of the first element that matches the specified element.
Syntax
$(selector).outerHeight()
Example
We are going to use the example used in the above section to understand the working of the jQuery outerHeight() method.
jQuery
$(document).ready(function(){
$("button").click(function(){
alert("Outer height of div: " + $("div").outerHeight());
});});
We have used the outerHeight() method to extract the outer height of the div element.
Output
Before you click on the button.
![]() After you click on the button.
After you click on the button.
![]() The outerHeight() method is working properly.
Note: The outerHeight() method also includes padding as well border while displaying the outer height of an element.
The outerHeight() method is working properly.
Note: The outerHeight() method also includes padding as well border while displaying the outer height of an element.
Conclusion
The dimensions of an HTML element can be set using the various jQuery methods which are; width(), height(), innerWidth(), innerHeight(), outerWidth(), and outerHeight().
The width() and height() methods sets or fetches the width and height of elements, respectively.
While the innerWidth(), innerHeight(), outerWidth(), and outerHeight() method fetches the inner width, inner height, outer width, and outer height of the first matched elements respectively.
All of these methods are explained in detail along with the relevant examples.
How to Remove HTML Element from DOM Using JQuery
In web programming developers often face situations where it is required to remove either the entire HTML element or only the elements nested within a specified element.
To accomplish these tasks with great ease there are certain jQuery methods available such as remove() and empty().
This write-up will guide you on how to use these methods to remove an HTML element with the help of relevant examples.
Remove an HTML element using jQuery
Apply the below-mentioned methods to remove elements in jQuery.
remove()
empty()
Here we have discussed the above-mentioned methods in-depth.
remove() Method
This method removes an HTML element and everything inside it, which includes any content, or elements nested within the specified element.
Example
Suppose you want to remove a <div> element including all the nested elements present inside it using the remove() method.
Use the following code.
HTML
<div class="div" style="border: 2px solid black; height: 60px; width: 200px;"><p>Some paragraph</p></div><br><button class="button1">Remove</button>
In the above HTML code, we have created a <div>, and inside that <div> we have nested a <p> element.
Moreover, we have also created a button that will remove the <div> element.
jQuery
$(document).ready(function(){
$(".button1").click(function(){
$(".div").remove();
});});
Now we have applied the remove() method that will remove the entire <div> and all of its child elements.
Output
![]() The remove() method has successfully removed the whole div.
The remove() method has successfully removed the whole div.
empty() Method
The empty() method is also used for removing elements, however, this method only removes the content or the elements nested inside the specified element.
Example
To demonstrate the working of the empty() method, we are using the above example but now instead of applying the remove() method we will apply the empty() method.
jQuery
$(document).ready(function(){
$(".button1").click(function(){
$(".div").empty();
});});
In the above code, the empty() method is used that will remove only the content or elements nested inside the div.
Output
![]() The nested elements inside the div have been removed successfully.
The nested elements inside the div have been removed successfully.
Conclusion
HTML elements can be removed using the two methods provided by jQuery which are; remove(), and empty().
The remove() method removes an HTML element and everything inside it, which includes any content, or elements nested within the specified element, meanwhile, the empty() method only removes the content or the elements nested inside the specified element.
These methods are highlighted in detail in this guide, along with relevant examples.
How to Get Parent Element in JQuery
The JavaScript library, jQuery, provides certain methods that are used to fetch parent elements of an HTML element.
Using these methods you can fetch the direct parent, or all parents of an element with great ease.
Moreover, fetching elements between two specified elements, or the closest parent element that matches the selected element is also possible using jQuery methods.
This guide will teach you how to use jQuery methods to get parent element.
Let’s get started.
How to get Parent Element in jQuery
Four methods are available to fetch the parent element which are as follows.
parent() method
parents() method
parentUntil() method
closest() method
Let’s learn each of the above-mentioned methods in detail.
parent() Method
For the purpose of finding the direct parent of an element, the parent() method is used.
It is a built-in jQuery function that only goes one level up the specified element and fetches the immediate parent of that element.
Syntax
$(selector).parent(filter)
Note: The filter parameter is used to compact the search for parent element by specifying a selector expression and it is optional.
Example
Suppose a you want to fetch the direct parent of a <span> element which is present in an <li> element which further is a part of a <div> element.
HTML
<div style="width:500px;">I am a great-grandparent of span element
<ul>I am grandparent of span element
<li>I am direct parent of span element
<span>I am the span element</span>
</li>
</ul></div>
There are a total of four elements generated in the above code, which are; <div>, <ul>, <li>, and <span>.
Observing their hierarchy in the above the <li> element is regarded as a direct parent of the <span> element, <ul> is the grandparent of the <span> element, and <div> is the great-grandparent because all of the elements are nested inside the <div> element.
jQuery
$(document).ready(function(){
$("span").parent().css({"color": "purple", "border": "2px solid purple"});});
We have applied the parent() method on the <span> element and also chained the css() method to it in order to highlight the direct parent of the <span> element and verify that the parent element is accessed successfully.
Some basic styling is also applied to these elements using CSS for better demonstration and understanding.
Output
![]() The parent() method is working properly and the parent element is accessed successfully.
The parent() method is working properly and the parent element is accessed successfully.
parents() Method
The parents() method works in a similar way to the parent() method with the only difference that instead of fetching the direct parent it fetches all the parents of the specified element.
Syntax
$(selector).parents(filter)
Note: The filter parameter is used to compact the search for parent element by specifying a selector expression and it is optional.
Example
To understand the concept of the parents() method, we will consult the same example as above and use the parents() method instead of the parent() method and see how it works.
jQuery
$(document).ready(function(){
$("span").parents().css({"color": "purple", "border": "3px solid purple"});});
The above code should highlight all the parents of the <span> element in the style specified by the css() method.
Output
![]() The element highlighted above the body is the <html> element.
The parents() method fetches it as well since it is also a parent of the specified element.
The element highlighted above the body is the <html> element.
The parents() method fetches it as well since it is also a parent of the specified element.
parentsUntil() Method
In order to fetch parent elements between two specified elements, the parentUntil() method is used.
Syntax
$(selector).parentsUntil(stop,filter)
Note: The filter parameter has the same function as that of parent() and parents() method, however, the stop parameter is used to denote the element at which the search for parent elements should stop.
Both the parameters are optional.
Example
This example illustrates the working of parentUntil() method.
HTML
<body class="main"> body (great-grandparent)
<div style="width:500px;">div (grandparent)
<ul>ul (direct parent)
<li>li
<span>span</span>
</li>
</ul>
</div></body>
We have created a div and inside that div we have nested three elements which are <ul>, <li>, and <span>.
jQuery
$(document).ready(function(){
$("li").parentsUntil("body").css({"color": "blue", "border": "2px solid blue"});});
In the above code, we have selected the <li> element and used the parentUntil() method to find all the parents between the <li>, and <body> elements.
Output
![]() As it can been seen in the output, all the parents of <li> (div, and ul), before <body> have been highlighted.
As it can been seen in the output, all the parents of <li> (div, and ul), before <body> have been highlighted.
closest() Method
The closest() method fetches the first element that matches the specified element.
Syntax
$(selector).closest(filter,context)
Note: The filter parameter has the same functionality as in other methods, however, it is required in this method.
The context parameter, on the other hand, is optional, and specifies a DOM element within which a matching should be found.
Example
This example illustrates the working of closest() method.
<body class="main">body (great-great-grandparent)
<div style="width:500px;">div (great/grandparent)
<ul>ul (second ancestor/second grandparent)
<ul>ul (first ancestor/first grandparent)
<li>li (direct parent)
<span>span</span>
</li>
</ul>
</ul>
</div></body>
We have created a div and inside that div we have nested two <ul> elements, and one <li>, <span> element.
jQuery
$(document).ready(function(){
$("span").closest("ul").css({"color": "blue", "border": "2px solid blue"});});
We have applied the closest() method to highlight the first ancestor of the <span> element.
Output
![]() As it is pointed out in the output, the second <ul> element is first ancestor of the <span> element.
Using the above-mentioned methods, you can fetch parent elements of a specified HTML element.
As it is pointed out in the output, the second <ul> element is first ancestor of the <span> element.
Using the above-mentioned methods, you can fetch parent elements of a specified HTML element.
Conclusion
To fetch the parent element in jQuery by applying methods such as, parent(), parents(), parentUntil(), and closest().
The parent() method fetches the direct parent of an element, parents() method fetches all the parents of the an element, parentUntil() finds parent elements between two specified elements, and closest() method fetches the first element that matches the specified element.
All of these methods, along with their relevant examples are explained in this guide.
How to Filter HTML Elements in JQuery
jQuery is a JavaScript library with more easy-to-learn syntax.
Like its parent language JS, jQuery can also be integrated with HTML to perform various operations.
The jQuery provides the support to filter HTML elements using various methods that include first(), last(), eq(), slice(), filter(), has() and not() methods.
This guide provides aims to filter HTML elements in jQuery and provides the following learning outcomes.
working of all methods to filter HTML elements in jQuery
usage of each method (with examples)
How to filter HTML elements in jQuery
This section enlists the working of various methods to filter HTML elements in jQuery.
How to use the first() method
The first() method filters the elements based on some condition and returns the first element from the matched elements.
The syntax of the first() method is displayed below:
$("selector").first();
Example
<script>
$(document).ready(function(){
$("p").first().addClass("first");
});</script>
In the above code,
first() method is applied on selector=”p“
the addClass() method is applied to differentiate the filtered element
![]()
Output
![]() The output shows that only the first paragraph is selected, and its background is changed using the “first” class.
The output shows that only the first paragraph is selected, and its background is changed using the “first” class.
How to use the last() method
This method returns the last element from the set of matched elements.
It functions on the following syntax:
$("selector").last();
Example
<script>
$(document).ready(function(){
$("p").last().addClass("last");
});</script>
The above code practices the last() method on the paragraph element and a jQuery addClass() method is added to embed a CSS class.
Note: The purpose of the CSS class is to highlight the matched element.
![]()
Output
![]()
How to use eq() method
The eq() method returns the element that matches the index number of the element.
This method uses the following syntax
$("selector").eq();
The eq() method accepts numeric values either positive or negative.
The positive value starts counting from the starting (or top) elements whereas the negative value index starts counting from the bottom end.
Example
The following example practices the eq() method in both positive and negative indexes.
<script>
$(document).ready(function(){
$("p").eq(3).addClass("positive");
$("p").eq(-3).addClass("negative");});</script>
The code is described below,
the eq(3) is using the positive index number and CSS class=”positive” is associated with eq(3) method.
the eq(-3) uses the negative index number and the CSS class=”negative” is exercised when eq(-3) is executed.
![]()
Output
![]() From the above output, the eq(3) fetches the last paragraph(as it is at index=3) and the eq(-3) filters the third element from the bottom(zero is reserved for the first element and -1 is for the last element).
From the above output, the eq(3) fetches the last paragraph(as it is at index=3) and the eq(-3) filters the third element from the bottom(zero is reserved for the first element and -1 is for the last element).
How to use the slice() method
The slice method returns the specific range (defined by indexes) of elements.
To use the slice() method, the following syntax is practiced:
$("selector").slice(start, stop);
The slice() method accepts either positive or negative numeric value as its start/stop criteria
start: the start of slicing is determined by this parameter
stop(optional): this parameter stops the slicing before the specified index number is reached
positive index number: the positive indexing starts the selection of elements from top-order.
negative index number: the negative index number starts selecting the elemetns from the bottom-order.
Example 1: Using the positive-index number
<script>
$(document).ready(function(){
$("p").slice(0,2).addClass("positive");
});</script>
The above code is described as,
the “p” represents the paragraphs used for the “slice()” method
the “slice(0,2)” shows that the slicing will start from 0th index and stops before 2nd index
the addClass(“positive“) method will add the “positive” class on selected elements.
Output
![]()
Example 2: Using negative index number
The following code practices the negative index number in the slice() method
<script>
$(document).ready(function(){
$("p").slice(-2,-1).addClass("negative");});</script>
the slice(-2,-1) is applied to paragraphs and it would start from the second last element and ends before before the last element.
the addClass(“negative“) adding “negative” class to the sliced elements.
![]()
Output
![]()
How to use the filter() method
The filter() method returns the elements that match a specific criteria.
The syntax of this method is provided below:
$("selector").filter(criteria, function(index));
The criteria parameter is set to select elements and the function(index) parameter is optional (exercised when a specific element is to be fetched from the selection using the index).
Example
The following code practices the filter() method to retrieve two paragraphs by using their id and class names.
<script>
$(document).ready(function(){
$("p").filter(".p1, #p2").addClass("filter");
});</script>
The above code selects only those paragraphs that have class=”p1” and id=”p2“.
![]()
Output
![]()
How to use the not() method
The not() method would result in returning elements that are not within the matching criteria.
Or one can say that it is the opposite of the filter() method.
The syntax of not() is given below:
$("selector").not(criteria, function(index));
Example
<script>
$(document).ready(function(){
$("p").not(".p1, .p2").addClass("not");
});</script>
In the above code,
two classes “p1” and “p2” are passed into not() method
the addClass(“not”) is used to color the selection made by not() method
![]()
Output
![]()
How to use has() method
The has() method is practiced to get the element that has branch elements.
The syntax of this method is provided below:
$("selector").has("element");
In the above syntax, the “selector” that contains the “element” would be retrieved only.
Example
For better understanding of has() method, the following code is executed.
<script>
$(document).ready(function(){
$("div").has("p").addClass("has");
});</script>
The above code traces that “div” tag that has the “paragraph” element.
Additionally, the CSS class=”has” is used to show the selected “div” tag.
![]()
Output
![]() The above output shows that the div containing paragraphs is selected only and that div is colored with forest green color.
The above output shows that the div containing paragraphs is selected only and that div is colored with forest green color.
Conclusion
jQuery supports various methods such as first(), last(), eq(), not(), has(), slice() etc., to filter HTML elements.
This guide provides the working and usage of each method one by one.
Each method follows different filtering to select a few elements.
For instance, the eq() and slice() methods use index numbers whereas other methods use the class or id(of an element) to filter HTML elements.
How to Create Custom Animations in JQuery
The animations add various beautifying effects to engage the viewers.
jQuery supports a long list of methods to perform various operations.
The jQuery animate() method is used for creating custom animations in jQuery.
The CSS properties are the major stakeholder of the jQuery animate() method.
These properties can be animated at various speeds with various values.
This post aims to provide detailed guidelines on animations in jQuery with the following learning outcomes
working mechanism of animate() method
creating custom animations (using examples)
How to animate() method works in jQuery
The animate() method used to create animations has the following syntax.
$(selector).animate({CSS}, speed, callback);
The syntax provided above has the following instances
selector can be any element name, class, or id of an element
The {CSS} part of the animate() method is mandatory for animations and the CSS property that you want to animate would lie in the {CSS} part of the syntax
The speed defines the duration of the animation and it can be set either to “fast”, “slow”, or in milliseconds(numeric value)
Lastly, the callback is an optional parameter and is used to show some processing after the animation is performed
The animate() syntax processes the numeric value for altering the CSS.
For instance, the backgroundColor property cannot be set using the color name therefore the CSS color property is not included in jQuery animations.
Moreover, the property names must be in camel case such as borderColor, borderWidth, and so on.
How to create custom animations in jQuery
As discussed earlier, the animate() method is practiced to create jQuery animations.
The animate method can be used in the following scenarios
Multiple animations at once: All the specified animations are performed in a single go.
Animating the CSS properties one by one: In this case, the animate() method is applied in a sequential manner(one after the other).
Relative value’s animation: Usually the CSS properties are animated by using the current value of a CSS property.
However, the animate() method allows performing dynamic animations using the relative value phenomenon.
We would practice the possible ways in the upcoming examples.
Example 1: Multiple animations at once
Almost all the CSS properties can be animated using the animate() method.
This example illustrates the jQuery() animation effect using multiple CSS properties.
<script>
$(document).ready(function(){
$("div").click(function(){
$("div").animate({
width: "250px",
height: "200px"
},
"slow"
);
});});</script>
In the above code,
various CSS properties (width, height, and font size) of div element will be animated
the speed is set to slow
![]()
Output
Before animation
![]() After animation
After animation
![]()
Example 2: One after the other
The animation effect can be beautified by animating CSS properties one by one.
Let’s have a look at this method.
<script>
$(document).ready(function(){
$("div").click(function(){
$("div")
.animate({padding: "25px"}, "slow")
.animate({height: "250px"}, 2000)
.animate({width: "450"}, "fast")
.animate({borderWidth: "10px"}
});});</script>
The above code practices the animation on a div element and is explained below
the padding, height, width, and borderWidth with various speed values
firstly, the padding will be animated followed by height, width, and borderWidth
![]()
Output
Before animating
![]() After animating
After animating
![]()
Example 3: Relative values
The relative values are generated using two assignment operators “+=” and “-=”.
The current value of the CSS property is taken as reference values and new values are generated by adding/subtracting some numeric value from that current value.
<script>
$(document).ready(function(){
$("div").click(function(){
$("div").animate({
width: "+=10px",
height: "-=5px",
});
});});</script>
In the above code,
the width and height of the div will be animated
upon each click(in our case), the width will increase by 10px whereas the height will be decreased by 5px.
![]()
Output
Before animation,
![]() After multiple clicks,
After multiple clicks,
![]()
Example 4: Using string values
The animate() method only accepts three string values (hide, show, or toggle) for CSS properties.
The toggle property can animate the hidden property to show and vice versa.
<script>
$(document).ready(function(){
$(".toggle").click(function(){
$("div").animate({
height : "toggle"
});
});
$(".show").click(function(){
$("div").animate({
width : "show"
});
});});</script>
In the above code, the show and toggle operations are performed on width and height respectively.
For this, we have used button class=”toggle” and class=”show” .
![]()
Output
Before animation,
![]() After clicking on the toggle button the width will change its state (to hidden as it is in the “show” state) as can be seen in the following image.
After clicking on the toggle button the width will change its state (to hidden as it is in the “show” state) as can be seen in the following image.
![]() If you click on the show button, then it would display the div again.
If you click on the show button, then it would display the div again.
![]() The animations have a key role in following any content.
By following these examples, you would have learned the custom creation of animations in jQuerry.
The animations have a key role in following any content.
By following these examples, you would have learned the custom creation of animations in jQuerry.
Conclusion
The animate() method is used to create custom animations in jQuery.
The animate() method can be applied to animate multiple CSS properties at once or it can be applied in a sequential manner as well.
This article provides a detailed guide on creating custom animations in jQuery.
You would get an understanding of the animate() method(primary stakeholder for animations).
Furthermore, several examples are demonstrated that show the creation of custom animations in jQuery.
How to Add HTML Elements Through JQuery
jQuery, a library of JavaScript, makes numerous web programming tasks extremely easy to fulfill.
Tasks that would normally take multiple lines of code to be achieved such as event handling, animations, or Ajax, can be done in just one line of code.
Besides these tasks, adding HTML elements with great ease is possible using multiple methods provided in jQuery.
This guide will teach you how to add HTML elements through jQuery using several methods with the help of appropriate examples.
How to add HTML elements through jQuery
jQuery provides the following four methods to add HTML elements.
append()
prepend()
before()
after()
Here we have discussed all of these in detail.
append() Method
The append() method adds an element as a child within a specified element.
It takes an unlimited number of new HTML elements in the form of parameters.
This method works in a way that the HTML elements are generated using either text/HTML, jQuery, or JavaScript.
Afterward, those newly generated elements are appended as the last child using the append() method.
Example
Suppose you want to append new items at the end of an ordered list using the append() method.
Use the following code.
HTML
<button class="button">Click to add another item</button><ol>
<li>Item</li>
<li>Item</li>
<li>Item</li></ol>
In the above code, we have made a button and also created an ordered list.
jQuery
<script>
$(document).ready(function(){
$(".button").click(function(){
$("ol").append("<li>Item</li>");
});
});</script>
Using the jQuery append() method we will add another item to the list by clicking on the button.
Output
There were three items in the list, initially.
![]() Suppose you click on the button thrice.
Suppose you click on the button thrice.
![]() Three more items are added to the list.
Three more items are added to the list.
prepend() Method
This method works in a similar way to that of the append() method with the only difference that instead of appending the newly created HTML elements, it will prepend the elements as the first child.
It also takes an unlimited number of new HTML elements in the form of parameters.
Example
We will use the same example as above and see how the prepend() method works.
jQuery
<script>
$(document).ready(function(){
$(".button").click(function(){
$("ol").prepend("<li>Item prepended</li>");
});
});</script>
In the above code snippet, we are using the prepend() method to add items at the start of the ordered list.
Output
Originally there were three items on the list.
![]() Suppose you click on the button twice.
Suppose you click on the button twice.
![]() Two items are added at the start of the ordered list.
Two items are added at the start of the ordered list.
before() Method
The before() method takes an unlimited number of new HTML elements in the form of parameters.
This method works in a way that the HTML elements are generated using either text/HTML, jQuery, or JavaScript and are added before an already existing element as a sibling.
Example
Suppose you want to add a heading before a paragraph by clicking on a button.
This can be done using the before() method.
HTML
<p>Some paragraph.</p><button class="button">Click here to add a heading</button>
In the above code we have created <p>, and <button> elements.
Now we will use the before() method to add a heading before the paragraph.
jQuery
<script>
$(document).ready(function(){
$(".button").click(function(){
$("p").before("<h1>Heading</h1>");
});
});</script>
Output
![]() The before() method is working properly
The before() method is working properly
after() Method
This method takes an unlimited number of new HTML elements in the form of parameters.
This method works in a similar way to that of the before() method with the only difference being that the new HTML elements are added as a sibling but after the already existing elements.
Example
Suppose you want to add a paragraph after a heading by clicking on a button.
This can be done using the after() method.
HTML
<h1>Heading</h1><button class="button">Click here to add a paragraph</button>
In the above code we have created <h1>, and <button> elements, and using the after() method a paragraph will be added after the heading.
jQuery
<script>
$(document).ready(function(){
$(".button").click(function(){
$("h1").after("<p>Some paragraph.</p>");
});
});</script>
Output
![]() Successfully added a paragraph after the heading.
Successfully added a paragraph after the heading.
Conclusion
HTML elements can be added using various methods provided by jQuery such as append(), prepend(), before(), and after().
All of these methods take an unlimited number of new HTML elements in the form of parameters and once the elements are generated they are added to their appropriate positions with respect to the method used.
All of these methods are discussed in-depth in this guide, along with relevant examples.
How Chain Methods in JQuery?
jQuery, a library of JavaScript, lets its users write less and do more.
You can perform multiple actions by writing just one line of code.
An example of this is the chaining method that allows you to combine a series of jQuery methods and apply them to an element all at once.
It is a very fun technique that lessens your work and saves a lot of time.
This guide is designed to enlighten its readers on how to chain various methods in jQuery.
Chaining Methods in jQuery
As already mentioned we can chain various jQuery methods to perform multiple actions on an HTML element all at once.
This can be done by selecting an element and writing all the required methods in a single line separated by a dot.
The greatest advantage of using the chaining method is that it prevents the browser from tracking down the same element more than once.
In other words, there is absolutely no need to use the same selector over and over again, thereby, decreasing the chances of slowing down your code.
Let’s explore how to chain methods in jQuery further with the help of examples.
Example 1
In this example, we are chaining two jQuery methods which are css() and animate().
HTML
<p>jQuery Chaining Methods</p><button class="button">Click here</button>
In the above HTML code, two elements are created which are <p>, and <button>.
Now we will chain css() and animate() methods on the <p> element to see how chaining methods in jQuery works.
jQuery
$(document).ready(function(){
$(".button").click(function(){
$("p").css("color", "green").animate({ width: "100%" })
.animate({ fontSize: "46px" }).animate ({opacity: "0.4"});
});});
In the above code, we have applied color to the <p> element using the css() method and set width, fontSize, and opacity on the same element using the animate() method.
Output
When the button is clicked, here is what happens.
![]() The css(), and animate() methods are chained successfully.
As you can see in the above example we chained the jQuery methods in just one line of code, however, the code will work just fine even if you want to split the code into multiple lines to enhance the readability.
The css(), and animate() methods are chained successfully.
As you can see in the above example we chained the jQuery methods in just one line of code, however, the code will work just fine even if you want to split the code into multiple lines to enhance the readability.
jQuery
$("p").css("color", "green")
.animate({ width: "100%" })
.animate({ fontSize: "46px" })
.animate ({opacity: "0.4"});
There will be absolutely no effect on the output.
Example 2
The following example illustrates how to chain slideUp(), slideDown(), and fadeOut() methods simultaneously.
HTML
<h1>jQuery Chaining Methods</h1><button class="button">Click here</button>
In the above HTML code two elements are created which are <h1>, and <button>.
Let’s chain slideUp(), slideDown(), and fadeOut() methods to see the resulting effect.
jQuery
$(document).ready(function(){
$(".button").click(function(){
$("h1").slideUp(1000).slideDown(1000).fadeOut(1000);
});});
In the above code, each of the methods have been assigned a speed of 1000 milliseconds.
Output
![]() The slideUp(), slideDown(), and fadeOut() methods are chained and working properly.
The slideUp(), slideDown(), and fadeOut() methods are chained and working properly.
Chaining Methods without Passing Arguments
If you do not pass any parameter to a jQuery method, it will not return a jQuery object rather it will simply return the contents of the specified element instead.
Example
In this example, we are chaining the html(), addClass(), and hide() methods.
HTML
<h1>Some heading</h1><p>Some paragraph.</p><button class="button">Click here</button>
Three HTML elements have been created which are <h1>, <p>, and <button>.
jQuery
$(document).ready(function() {
$("button").click(function() {
//This will work
$("h1").html("Some heading").addClass("demo").fadeOut(1000);
//This will not work
$("p").html().addClass("demo");
});});
In the above code, we have passed the parameter to html() method when applying on <h1> only.
However, no parameter was passed to html() method in the case of <p>.
Therefore, the effects of chaining will only work for <h1>, and not for <p>.
Output
![]() No effect on the paragraph.
No effect on the paragraph.
Conclusion
Chaining various jQuery methods can be done by selecting an element and writing all the required methods in a single line separated by a dot to perform multiple actions on an HTML element all at once.
The advantage of doing so is that it prevents the browser from tracking down the same element over and over again, moreover, decreasing the chances of slowing down your code.
This write-up guides you on how to chain methods in jQuery with the help of suitable examples.
CSS Manipulation Through JQuery | Explained
jQuery is a lightweight, and fun JavaScript library that let’s you manipulate CSS in many different ways through the usage of various jQuery methods.
Using these methods you can set the style properties of elements, or you can either add or remove a certain class name from an element, or maybe toggle between adding or removing classes.
The below-mentioned jQuery methods are used to manipulate CSS .
css() method
addClass() method
hasClass() method
removeClass() method
toggleClass() method
Let’s explore them in detail.
css() Method
The css() method in jQuery is used for the purpose of either applying or fetching one or more style properties to an HTML element.
Syntax
css("property", "value"); // To set a CSS property
css("property"); // To get a CSS property
Example 1
Suppose you want to set the background-color of a <div> element using the css() method in jQuery.
HTML
<div style="padding: 15px; width: 200px; border: 2px solid black"><p>This is some paragraph</p></div><br><button class="button">Set background-color of div</button>
In the above code, three HTML elements that are <div>, <p>, and <button> are being created.
jQuery
$(document).ready(function(){
$(".button").click(function(){
$("div").css("background-color", "rosybrown");
});});
Using the css() method we are changing the background color of the <div> element only at teh click of the button.
Output
![]() The background color of the div has been set.
The background color of the div has been set.
Example 2
Suppose you only want to extract a style property of an HTML element.
Use the following code.
HTML
<p style="font-size:25px;">Some paragraph.</p><button>Return font-size of p</button>
In the above code, <p>, and <button> elements have been created, moreover, the <p> element has been given a font size of 25px.
jQuery
$(document).ready(function(){
$("button").click(function(){
alert("Font Size = " + $("p").css("font-size"));
});});
We are using the css() method to just fetch the font size of the paragraph.
Once you click the button, an alert message will appear displaying the font size of the paragraph.
Output
Before clicking the button.
![]() After clicking the button.
After clicking the button.
![]() The font size of the paragraph has been extracted.
The font size of the paragraph has been extracted.
addClass() Method
As the name suggests, the jQuery addClass() method is used to add either single or multiple class names to an HTML element.
Syntax
$(selector).addClass(classname,funcName(index,currentclass))
Note: The classname is a required parameter that indicates the class name to be added and the funcName is an optional parameter that specifies a function to fetch a class name to be added.
Example
Suppose you have defined a similar element more than once in a web page and you want to add a class to only one of those elements.
Use the following code.
HTML
<p>First paragraph.</p><p>Last paragraph.</p><button>Add a class name to the last paragraph</button>
In the above code, we have created two <p> tags, and one <button> element.
CSS
.note {
font-size: 160%;
color: blue;}
Here we have defined some styling for a class “note”.
jQuery
$(document).ready(function(){
$("button").click(function(){
$("p:last").addClass("note");
});});
In the above code, a class is added by the name “note” to the last <p> element.
Therefore, on the click of button, the style defined for the note class will be applied to the last paragraph.
Output
![]() The class “note” has successfully been added to the last paragraph.
The class “note” has successfully been added to the last paragraph.
hasClass() Method
For the purpose of evaluating whether an element has a class or not, the hasClass() method is used.
This method displays true if it detects any class or otherwise false.
Syntax
$(selector).hasClass(classname)
Note: The classname is a required parameter that is used to specify a class name to be searched for.
Example
Suppose you want check if there is any class applied to a certain set of similar elements.
This is how you do it.
HTML
<p class="main">A paragraph.</p><p>Another paragraph.</p><button>Does any p element has "main" class?</button>
In this HTML code, we created two <p> elements, and one <button> element.
Besides this, the first <p> element has been assigned the class “main”.
jQuery
$(document).ready(function(){
$("button").click(function(){
alert($("p").hasClass("main"));
});});
In the above code, an alert message has been designed that will return true when the hasClass() method detects a class with the name of “main”.
Output
![]() The hasClass() method is working properly.
The hasClass() method is working properly.
removeClass() Method
For the purpose of removing a single or multiple class names from HTML elements, the removeClass() method is used.
Syntax
$(selector).removeClass(classname,funcName(index,currentclass))
Note: The classname parameter specifies the class name to be removed, and the funcName parameter specifies a function that fetches single or multiple class names to be removed.
Both are optional parameters.
Example
Suppose you want to remove a class from a certain HTML element.
Use the code below.
HTML
<h1 class="head">Heading 1</h1><h2>Heading 2</h2><h3>Heading 3</h3><button>Remove the class "head" from h1 element.</button>
We have created four HTML elements which are <h1>,<h2>,<h3>, and <button>.
Moreover, we have applied a class “head” to the <h1> element.
CSS
.head {
opacity: 0.4;}
The class head has been given some style through CSS.
jQuery
$(document).ready(function(){
$("button").click(function(){
$("h1").removeClass("head");
});});
In the above code, removeClass() has been applied to remove the “head” class from <h1> element.
Output
![]() The “head” class has been removed from the <h1> element.
The “head” class has been removed from the <h1> element.
toggleClass() Method
This method switches between adding or removing single or multiple class names from HTML elements.
It works in a way that it adds class name(s) to those elements where it is missing and removes class name(s) from those elements where it has been set already.
Syntax
$(selector).toggleClass(classname,funcName(index,currentclass),toggle)
In the above syntax:
The classname is a required parameter that is used to specify a class name to be added or removed from an element.
The funcName parameter specify a function that fetches a class name to be added or removed.
On the other hand, the toggle parameter is a boolean value that tells if the a class name should be added (true), or removed (false).
Both funcName, and toggle are optional parameters.
Example
Suppose you want to toggle a class name between multiple HTML elements.
Follow the code below.
HTML
<h1>Heading 1</h1><h2>Heading 2</h2><h3>Heading 3</h3><button>Toggle</button>
Four HTML elements are being created which are <h1>, <h2>, <h3>, and <button>.
CSS
.head {
color: blue;
opacity: 0.3;}
Using CSS, a class by the name “head” has been given some style.
jQuery
$(document).ready(function(){
$("button").click(function(){
$("h1, h2, h3").toggleClass("head");
});});
In the above code, the class “head” is toggled amongst <h1>, <h2>, and <h3> elements.
Output
You have to click on the button multiple times to see the toggling effect.
The toggle class is working properly.
Conclusion
CSS can be manipulated through the usage of various jQuery method which are; the css() method applies or fetches one or more style properties of an element, the addClass() method adds class names to elements, the hasClass() detects wether an element has a class or not, the removeClass() removes class names from elements, and toggleClass() switches between adding or removing class names from elements.
These methods are explained in detail with the help of relevant examples.
What are Iterators
JavaScript offers several ways to iterate through a collection of object values such as loops.
However, Iterators are introduced in JavaScript 1.7, which provides a mechanism to customize the behavior of for each and for..in loops and integrates the concept of iteration into the core language.
If you need to add native iterative functionality to a well-encapsulated and custom data structure, you should use JavaScript Iterators.
It can be considered a more elegant way to standardize your custom objects.
This write-up will discuss iterators in JavaScript.
We will also demonstrate the usage of iterators, iterables, next() method, and User-Defined Iterators.
So, let’s start!
Iteration
In JavaScript, Iteration is a procedure in which a collection of structures or instructions is repeated in a sequence for a predetermined number of times or until the added condition is true.
You can utilize loops for iterating over the specified set of instructions.
For instance, we have declared an array “counting” and with the help of the “for..of” loop, we will iterate over the specified array:
const counting = [ 1, 2, 3];for (let x of counting) {
console.log(x);}
As a result of it, each value will be returned and shown as output:
![]() Now, let’s check out the method for iterating over a JavaScript object.
For this purpose, firstly, we will declare an object named “employee” and then utilize for..of loop for iterating over its properties:
const employee = { name: 'Alex', designation: 'Manager' };for (const prop of employee) {
console.log(prop);}
Now, let’s check out the method for iterating over a JavaScript object.
For this purpose, firstly, we will declare an object named “employee” and then utilize for..of loop for iterating over its properties:
const employee = { name: 'Alex', designation: 'Manager' };for (const prop of employee) {
console.log(prop);}
![]() As you can see, the output of the above-given code displayed a “TypeError” message which states that the “employee” object is not iterable.
Why does it happen? We have encountered the TypeError because the for..of loop requires an iterable object for iterating over the object’s properties.
To handle the current situation, you can use the JavaScript Iteration Protocol, which will assist you in making an object iterable for iterating over its properties.
As you can see, the output of the above-given code displayed a “TypeError” message which states that the “employee” object is not iterable.
Why does it happen? We have encountered the TypeError because the for..of loop requires an iterable object for iterating over the object’s properties.
To handle the current situation, you can use the JavaScript Iteration Protocol, which will assist you in making an object iterable for iterating over its properties.
JavaScript Iteration Protocol
JavaScript provides an Iteration protocol for iterating over objects.
This protocol specifies the procedure of iteration using “for..of” loop.
JavaScript iterators are divided into two components: “Iterables” and “Iterators”:
Iterables: Iterables are the objects that implement the “iterator()” iteration method i.e.
array or string.
Iterators: The object returned by the “iterator()” method is known as “Iterator“.
After getting the iterator, you can use the “next()” method for sequentially accessing iterable elements.
It can be hard for you to understand the usage of these methods at a glance, so we will sequentially go through each of them in the below-given sections.
next() method
“next()” is an iterator object method that is invoked for returning the next value in the iteration sequence.
This method comprises the following two properties:
The “value” property represents the current value in the iteration sequence, and it can be of any data type.
The “done” property is used to represent the iteration status, where “false” means that the iteration is not complete and “true” indicates that the iteration process is completed.
Let’s define a custom iterator and access the elements of an array sequentially using next() method.
Creating User-Defined Iterator
JavaScript allows you to create a user-defined iterator and invoke the “next()” method for accessing the elements of the iterable object.
Here, we have defined the “showElement()” method and it will return the “value” and “done” property of the iterable object that is accepted as an argument:
function showElements(arr) {
let number = 0;
return {
next() {
if(number < array.length) {
return {
value: array[number++],
done: false}
}
return {
value: undefined,
done: true}
}
}}
In the next step, we will create an “array” and then pass it to the “showElement()” method as an argument.
Then, the “showElements()” method will return an iterable object, to which we will store in “arrIterator”:
const array = ['l', 'i', 'n', 'u', 'x'];const arrIterator = showElements(array);
Now, each time when the “next()” method is invoked with the “arrIterator”, it will display the values of array element in a sequence with the defined “value” and “done” properties:
console.log(arrIterator.next());
console.log(arrIterator.next());
console.log(arrIterator.next());
console.log(arrIterator.next());
console.log(arrIterator.next());
console.log(arrIterator.next());
When all of the elements are iterated, the “value” property value will be set to “undefined”, with “done” property as “true”:
![]() The above-given output signifies that we have successfully created and executed a user-defined iterator in our program using next() method.
Now, let’s understand the concept of iterables as well and have a clear and profound understanding of Symbol.iterator()
Example: Creating Iterators from iterables using Symbol.iterator() methodIn this example, firstly, we will declare an array with the following three values:
const arr1 = ['l', 'i', 'n', 'u', 'x'];
Then, we will invoke the “Symbol.iterator()” method which will return an iterable object and “arrIterator” will store its value:
const arrIterator = arr1[Symbol.iterator]();
console.log(arrIterator);
Execution of the above-given program will output the array iterators:
The above-given output signifies that we have successfully created and executed a user-defined iterator in our program using next() method.
Now, let’s understand the concept of iterables as well and have a clear and profound understanding of Symbol.iterator()
Example: Creating Iterators from iterables using Symbol.iterator() methodIn this example, firstly, we will declare an array with the following three values:
const arr1 = ['l', 'i', 'n', 'u', 'x'];
Then, we will invoke the “Symbol.iterator()” method which will return an iterable object and “arrIterator” will store its value:
const arrIterator = arr1[Symbol.iterator]();
console.log(arrIterator);
Execution of the above-given program will output the array iterators:
![]() Example: Using next() method over an iterable objectThis example will demonstrate the usage of “next()” method for iterating over an iterable object.
To do so, firstly, we will create an “array” and then invoke the “Symbol.iterator()” method for returning an iterable object:
const array = ['l', 'i', 'n', 'u', 'x'];
let arrIterator = array[Symbol.iterator]();
Invoking the “next()” will also return an object having “value” and “done” property values:
console.log(arrIterator.next());
console.log(arrIterator.next());
console.log(arrIterator.next());
console.log(arrIterator.next());
console.log(arrIterator.next());
console.log(arrIterator.next());
At the end of the iteration sequence, the “done” property of the “next()” method is set to “false”:
Example: Using next() method over an iterable objectThis example will demonstrate the usage of “next()” method for iterating over an iterable object.
To do so, firstly, we will create an “array” and then invoke the “Symbol.iterator()” method for returning an iterable object:
const array = ['l', 'i', 'n', 'u', 'x'];
let arrIterator = array[Symbol.iterator]();
Invoking the “next()” will also return an object having “value” and “done” property values:
console.log(arrIterator.next());
console.log(arrIterator.next());
console.log(arrIterator.next());
console.log(arrIterator.next());
console.log(arrIterator.next());
console.log(arrIterator.next());
At the end of the iteration sequence, the “done” property of the “next()” method is set to “false”:
![]() Example: Iterating through Iterables with while loopThe symbol.iterator() method is automatically called by the for..of loop.
If you want to invoke it manually, you can use the “while” loop for iterating over the specified iterable object.
For instance, in the below-given example, we will use the “while” loop for iterating over the iterable objects returned by the “Symbol.iterator()” method:
const array = ['l', 'i', 'n', 'u', 'x'];
let arrIterator = array[Symbol.iterator]();
let text = ""
while (true) {
const result = arrIterator.next();
if (result.done) break;
console.log("value: "+ result.value + " done: " + result.done);}
Here, the output shows the returned result with “value” and “done” iterator properties:
Example: Iterating through Iterables with while loopThe symbol.iterator() method is automatically called by the for..of loop.
If you want to invoke it manually, you can use the “while” loop for iterating over the specified iterable object.
For instance, in the below-given example, we will use the “while” loop for iterating over the iterable objects returned by the “Symbol.iterator()” method:
const array = ['l', 'i', 'n', 'u', 'x'];
let arrIterator = array[Symbol.iterator]();
let text = ""
while (true) {
const result = arrIterator.next();
if (result.done) break;
console.log("value: "+ result.value + " done: " + result.done);}
Here, the output shows the returned result with “value” and “done” iterator properties:
![]() Look at the following diagram to understand the relationship between iterables, next() method, and iterators:
Look at the following diagram to understand the relationship between iterables, next() method, and iterators:
![]() That was all about the basic usage of Iterators.
You can explore it further according to your preferences.
That was all about the basic usage of Iterators.
You can explore it further according to your preferences.
Conclusion
Iterators are utilized for looping over a sequence of object values returned by the Symbol.Iterator() method.
This process also involves the implementation of the next() method that returns an object with the value and done properties, where “value” represents the current sequence value and “done” determines if the iteration is completed or not.
This write-up discussed JavaScript Iterators with the help of suitable examples.
AJAX – Server Response
AJAX engine has numerous dimensions, each of which has its own significance.
Once the AJAX engine has completed sending the request and receiving the response and then it can be handled using its provided properties.
You can use the “responseText” or “responseXML” AJAX properties to get a server’s response in string and XML form.
This write-up will explain the procedure to handle AJAX server response with the help of responseText and responseXML properties.
So, let’s start!
AJAX – Server responseText property
While dealing with an asynchronous request, the value of the “responseText” property comprises the current response received from the server, even if it has not responded completely.
This property returns the server response as a string.
Have a look at the syntax of responseText property:
document.getElementById("element_Id").innerHTML = xhttp.responseText;
Here, the “responseText” property will return the server response in the string form, which we will be then set as the content of the specified element.
Example: Using AJAX – Server responseText propertyIn this example, when the user will click on the added “button”, it will set server response as the content of the container defined by the <div> tag:
<div id="div1">
<h2>The XMLHttpRequest Object</h2>
<button type="button" onclick="loadDoc()">Change Content</button></div>
![]() In the loadDoc() function definition, firstly, we will add a “xhttp” XMLHttpRequest object:
function loadDoc() {const xhttp = new XMLHttpRequest();
When the xhttp object will be loaded, it will write-out the response data in the <div> container:
xhttp.onload = function() {
document.getElementById("div1").innerHTML =
this.responseText;}
The “xhttp” XMLHttpRequest Object will get the “sample.txt” file from the server which comprises the response data:
xhttp.open("GET", "sample.txt");
xhttp.send();
}
In the loadDoc() function definition, firstly, we will add a “xhttp” XMLHttpRequest object:
function loadDoc() {const xhttp = new XMLHttpRequest();
When the xhttp object will be loaded, it will write-out the response data in the <div> container:
xhttp.onload = function() {
document.getElementById("div1").innerHTML =
this.responseText;}
The “xhttp” XMLHttpRequest Object will get the “sample.txt” file from the server which comprises the response data:
xhttp.open("GET", "sample.txt");
xhttp.send();
}
![]() After saving the provided code, we will run our “myFile.html” with the help of the “Live Server” VS Code extension:
After saving the provided code, we will run our “myFile.html” with the help of the “Live Server” VS Code extension:
![]() Clicking on the “Change Content” button will display the server response as follows:
Clicking on the “Change Content” button will display the server response as follows:
![]()
AJAX – Server responseXML property
In case, when the response of the server is in XML format, and you have to parse it as an XML object, you can utilize the “responseXML” property.
Check out the syntax of the “responseXML” property:
var data = XMLHttpRequest.responseXML;
Here, the “data” object will store the server response.
Example: Using AJAX – Server responseXML propertyIn our HTML file, we will add a heading with the <h2> tag and a paragraph element with the help of “<p>” tag:
<h2>The XMLHttpRequest Object</h2><p id="demo"></p>
![]() Next, we will add the below-given code in the “projectFile.js” for requesting the “cd.xml” file.
const xhttp = new XMLHttpRequest();
xhttp.onload = function() {
const xmlDoc = this.responseXML;
Our “cd.xml” file looks like this:
Next, we will add the below-given code in the “projectFile.js” for requesting the “cd.xml” file.
const xhttp = new XMLHttpRequest();
xhttp.onload = function() {
const xmlDoc = this.responseXML;
Our “cd.xml” file looks like this:
![]() After retrieving the requested data by utilizing the “responseXML” property, the server response will be parsed and its child node values will be fetched using the code written below:
const x = xmlDoc.getElementsByTagName("ARTIST");
let txt = "";
for (let i = 0; i < x.length; i++) {
txt = txt + x[i].childNodes[0].nodeValue + "<br>";
}
Lastly, the parsed data will be displayed as content of the “paragraph” element:
document.getElementById("demo").innerHTML = txt;}
xhttp.open("GET", "cd.xml");
xhttp.send();
After retrieving the requested data by utilizing the “responseXML” property, the server response will be parsed and its child node values will be fetched using the code written below:
const x = xmlDoc.getElementsByTagName("ARTIST");
let txt = "";
for (let i = 0; i < x.length; i++) {
txt = txt + x[i].childNodes[0].nodeValue + "<br>";
}
Lastly, the parsed data will be displayed as content of the “paragraph” element:
document.getElementById("demo").innerHTML = txt;}
xhttp.open("GET", "cd.xml");
xhttp.send();
![]() The above-given output signifies that we have successfully retrieved the server response by using the “responseXML” property.
The above-given output signifies that we have successfully retrieved the server response by using the “responseXML” property.
Conclusion
Using responseText and responseXML properties, you can handle a request-response of an AJAX server.
The responseXML property retrieves the server response in XML, whereas the responseText is utilized for getting the server response in string format.
This write-up explained the procedure to handle AJAX server response with the help of responseText and responseXML properties.
How to Validate Email Form on Client-side
If you want to submit data to the server, double-checking the format of the data to be submitted is necessary.
This process is called client-side form validation.
Client-side form validation ensures that submitted data meets the criteria specified in the form controls.
On the client side, emails forms are validated to catch out invalid data so that the user can correct it immediately.
In other cases, if invalid data is submitted to the server, it will get rejected, and the corresponding server will send it back to the client.
This write-up will discuss validating email forms on the client-side in JavaScript.
So, let’s start!
How to validate email form on client-side
An email comprises a “string,” which is represented as a subset of ASCII characters, separated into two parts by utilizing the “@” symbol.
It can be written as “userinfo@domain”, where “userinfo” is the user’s private information.
The length of the “userinfo” part should not be more than 64 characters, while the domain name can have 253 characters.
The “userinfo” part can include the below-given ASCII characters:
Numbers from 0 to 9.
Uppercase (A-Z) and lowercase (a-z) English letters.
Special characters such as ~ _ ` / ? – + = { } ^ | $ * ‘ ! & # %
You can also add a period character “.”, but it should not be the first and last character of the “userinfo” part and do not repeat it after another.
The domain name specified in the email address, such as org, info, net, com, us, can contain digits, letters, hyphens, and full stop.
Check out below-given some examples of valid and invalid email ids:
Valid Email format examples
userinfo@galaxy.com
name@galaxy.org
yourwebsite@a.name.net
Invalid Email format examples
galaxy.com (“@” character is not added)
yourwebiste@.com.name (Top Level Domain can not start with “.”)
userinfo@gmail.a(“.a” is not a valid Top Level Domain)
.userinfo@galaxy.org(Do not start an email id with “.” character)
@any.domain.net (“userinfo” part is missing before the “@” character )
Now, we will demonstrate a practical example related to email validation form.
Example: validate email form on client sideFirst of all, we will create a form on our client side having an “input” field for entering email id and a “Submit” button for verifying the email format:
<body onload='document.form1.text1.focus()'>
<div class="email">
<h2>Kindly Enter your Email Address</h2>
<form name="form1" action="#">
<input type='text' name='text1' required size="30" />
<input type="submit" name="submit" value="Submit" onclick="ValidateEmail(document.form1.text1)" />
</form>
</div></body>
Regular Expression for validating email form on client side
In JavaScript, Regular Expressions are one of the most useful methods utilized for validating email format.
They represent a character of pattern which is compared with the user input.
In our JavaScript file, we will add the following regular expression for validating the email id entered by the user:
mailformat = /^\w+([\.-]?\w+)*@\w+([\.-]?\w+)*(\.\w{2,3})+$/;
The above-given regular expression permits you to add Uppercase (A-Z) and lowercase (a-z) letters, digits (0-9), period “.” and special characters such as ~ _ ` / ? – + = { } ^ | $ * ‘ ! & # % , in the email id.
We will create a “ValidateEmail()” function, which will take “inputText” as an argument.
After that, we will store the mentioned regular expression in the “mailformat”.
The added “mailformat” is then compared to the user input.
If the entered email id has a valid format, an alert will appear on the screen with the string “You have entered a Valid email address!”.
Otherwise, it will let you know that the email id is invalid:
function ValidateEmail(inputText) {
var mailformat = /^\w+([\.-]?\w+)*@\w+([\.-]?\w+)*(\.\w{2,3})+$/;
if (inputText.value.match(mailformat)) {
alert("You have entered a Valid email address!");
document.form1.text1.focus();
return true;
}
else {
alert("Invalid Email Address");
document.form1.text1.focus();
return false;
}}
We have also set the HTML elements style to enhance their appearance on the email validation form:
![]() Now, we will open up our “index.html” file with the help of VS Code “Live Server” extension:
Now, we will open up our “index.html” file with the help of VS Code “Live Server” extension:
![]() Here comes the email validation form with an input field and submit button:
Here comes the email validation form with an input field and submit button:
![]() For the first time, we will enter a valid email id and:
For the first time, we will enter a valid email id and:
![]() After clicking the “Submit” button, an alert box appears on our web page, which states that the entered email address is valid:
After clicking the “Submit” button, an alert box appears on our web page, which states that the entered email address is valid:
![]() Now, to check for an invalid email, we will write out an email having an invalid format and then click on the submit button:
Now, to check for an invalid email, we will write out an email having an invalid format and then click on the submit button:
![]() You can see that our Email validation form is working perfectly for validating the email id according to the specified format.
You can see that our Email validation form is working perfectly for validating the email id according to the specified format.
Conclusion
Using JavaScript, you can validate email forms on the client-side.
The created email validation form is based on user requirements, such as permitting regular expressions, accepting only characters and digits in email id, or only allowing specific domains.
Validating email forms also helps in submitting correct and valuable information to the server.
This write-up discussed the procedure of validating email forms on the client-side with the help of appropriate examples.
JavaScript Promise Error Handling
Asynchronous code can use Promises for applying structured Error Handling.
While using promises, you can specify an error handler to the “then()” method or use a “catch()” block.
Similar to the exceptions added in the regular code, when a promise gets rejected, it looks for the nearest error handler, where thrown error is passed as a second parameter to then() method or the error handler passes it to catch() method.
This write-up will discuss JavaScript Promise Error Handling with the help of suitable examples.
So, let’s start!
JavaScript Promise Error Handling
Promises are used for managing the execution flow in a program.
Chaining Promises is also useful when executing a series of asynchronous functions, where each depends on the prior function.
In a Promise, you can utilize two methods for handling errors which are the “then()” method and the “catch()” block.
JavaScript Promise Error Handling using then() method
The “then()” method is executed when a promise is fulfilled or rejected.
If the added Promise is fulfilled successfully, its related handler function will run.
However, the error handler for the “then()” method will be executed in case of promise rejection.
Example: JavaScript Promise Error Handling using then() methodIn the below-given example, we have added “then()” method, which comprises two callbacks, one is the success handler function and the other one is for error handling:
const promiseObj = new Promise((resolve, reject) => {
setTimeout(() => {
reject("An error is encountered");}, 2000)});
promiseObj.then((response) => {
console.log(response);}, (error) => {
console.log(error); });
Execution of the above-given program will show you the following output:
![]() As you can see from the output, that specified handler of the “then()” method is working perfectly; however, it also has some drawbacks.
For instance, we may encounter any error in the success handler, but the added success handler cannot handle it.
Also, in the case of using the then() method, you have to write an error handler for each “then()” block.
In such situation, you can utilize “catch()” to overcome the mentioned drawbacks.
Example 1: JavaScript Promise Error Handling using catch() blockNow, we will add a catch() for handling the error or the rejection state of the promise:
const promiseObj = new Promise((resolve, reject) => {
setTimeout(() => {
reject("An error is encountered");}, 2000)});
promiseObj.then((response) => {
console.log(response);}).catch((error) => {
console.log(error); });
When one of the added Promises gets rejected, the remaining promise chain will be terminated.
That’s the reason only one console log is executed:
As you can see from the output, that specified handler of the “then()” method is working perfectly; however, it also has some drawbacks.
For instance, we may encounter any error in the success handler, but the added success handler cannot handle it.
Also, in the case of using the then() method, you have to write an error handler for each “then()” block.
In such situation, you can utilize “catch()” to overcome the mentioned drawbacks.
Example 1: JavaScript Promise Error Handling using catch() blockNow, we will add a catch() for handling the error or the rejection state of the promise:
const promiseObj = new Promise((resolve, reject) => {
setTimeout(() => {
reject("An error is encountered");}, 2000)});
promiseObj.then((response) => {
console.log(response);}).catch((error) => {
console.log(error); });
When one of the added Promises gets rejected, the remaining promise chain will be terminated.
That’s the reason only one console log is executed:
![]() Example 2: JavaScript Promise Error Handling using catch() blockIn the following example, first of all, attendance promise object will accept “Taylor” as name argument and then display it to the console.
After that, the function will check if the promise function is fulfilled or rejected and execute the added code accordingly:
const attendance = function (name) {
return new Promise((resolve, reject) => {
if (name === "Louis") {
return reject("Louis is present");
} else {
setTimeout(() => {
return resolve(name);
}, 2000);
}
});}
attendance("Taylor")
.then((data) => {
console.log(data);
return attendance("Louis"); })
.then((data) => {
console.log(data);
return attendance("Stepheny"); })
.catch((error) => {
console.log(error); })
Example 2: JavaScript Promise Error Handling using catch() blockIn the following example, first of all, attendance promise object will accept “Taylor” as name argument and then display it to the console.
After that, the function will check if the promise function is fulfilled or rejected and execute the added code accordingly:
const attendance = function (name) {
return new Promise((resolve, reject) => {
if (name === "Louis") {
return reject("Louis is present");
} else {
setTimeout(() => {
return resolve(name);
}, 2000);
}
});}
attendance("Taylor")
.then((data) => {
console.log(data);
return attendance("Louis"); })
.then((data) => {
console.log(data);
return attendance("Stepheny"); })
.catch((error) => {
console.log(error); })
![]()
JavaScript Promise.all() method
The Promise.all() JavaScript method lets you execute multiple asynchronous operations concurrently.
In such a scenario, the callback will be executed when the Promise.all method completes the specified operations.
Example: using JavaScript Promise.all() methodThe provided example will simultaneously execute the promises “x”, “y”, and “z”.
After that, all of the promises will return “name”:
const promiseObj= function (name) {
return new Promise((resolve, reject) => {
setTimeout(() => {
return resolve(name);
}, 2000);
});}const x = promiseObj("Taylor");const y = promiseObj("Stepheny");const z = promiseObj("Max");
Promise.all([x,y,z])
.then((data) => {
console.log(data); });
The execution will only take two seconds for displaying three names, while in case of promise chaining it will require six seconds:
![]()
JavaScript Promise.race() method
If you want to execute the callback as soon as the first asynchronous operation is complete, you can utilize the “Promise.race()” method.
Example: Using JavaScript Promise.race() methodWe have created three promises objects “x”, “y”, and “z” with the name and time arguments passed to the “promiseObj()” function:
const promiseObj= function (name, time) {
return new Promise((resolve, reject) => {
setTimeout(() => {
return resolve(name);
}, time);
});}
Here, “Marie” has the least time of “1” second, so she is going to win the race and her name will be shown as output:
const x = promiseObj("Taylor", 3000);const y = promiseObj("Stepheny", 2000);const z = promiseObj("Marie", 1000);
Promise.race([x,y,z])
.then((data) => {
console.log(data); })
.catch((error) => {
console.log(error);})
![]() The above-given output signifies that we have successfully implemented the Promise.race() method for executing multiple operations simultaneously.
The above-given output signifies that we have successfully implemented the Promise.race() method for executing multiple operations simultaneously.
Conclusion
Using the catch() and then() methods, you can handle the error thrown or reject() call in Promise Chaining.
To handle errors, it is preferable to add a catch() method in your code.
The error handler then examines the code and handles them accordingly.
This write-up explained the Promise Error Handling with the help of suitable examples.
Callback Functions in jQuery | Explained
As a JavaScript developer, you may spend the majority of your time developing synchronous applications and programs.
Some specific operations can only start when the previous ones are finished in these kinds of applications.
However, when data is requested from an outside source such as an external API, we often have no idea when the required data will be returned.
In such cases, you have to wait for the response, but at the same time, you do not want your application to be at a halt state while the data is fetched.
Adding Callback functions are useful in this situation.
This write-up will explain callback functions in jQuery with the help of appropriate examples.
So, let’s start!
Callback Functions in jQuery
The statements added in a JavaScript program are executed sequentially.
But, when you utilize an effect in jQuery, it takes time to perform its functionality; meanwhile, the code added in the next lines will run.
To avoid this situation, jQuery offers a callback function for each jQuery effect method.
A callback function is a type of jQuery function that is executed when the added effects method finishes their operation.
This function is passed as a last argument in the specific jQuery effect method.
Now, look at the syntax of the callback function in jQuery.
Syntax of jQuery Callback Functions
$(selector).effect_function(speed, callback);
In “selector“, you can add a jQuery selector for selecting the required HTML elements, and the “effect_function()” is a jQuery effect method in which you have to pass an argument for “speed” and “callback” function.
Example 1: Using Callback functions in jQuery
First of all, we will add a “Hide Paragraph” button and a paragraph in our “index.html” file:
<button>Hide Paragraph</button><p>This is a paragraph with sample text.</p>
In the next step, we will move towards our JavaScript file “myProject.js” and write the following code in it:
$(document).ready(function () {
$("button").click(function () {
$("p").hide("slow", function () {
alert("The paragraph is now hidden");
});
});});
Now, when the user clicks on the “Hide paragraph” button, the jQuery Element Name Selector “$(“p”)” will find and get the “p” or paragraph element and then hide it slowly from the web page.
After doing so, the callback “function()” will be executed, and it displays an alert box in the browser:
Here is a gif that demonstrates the output of our JavaScript program:
![]() In case, you want to check how the same program will work without a jQuery callback function, then add the below-given code in your JavaScript file:
$(document).ready(function(){
$("button").click(function(){
$("p").hide(1000);
alert("The paragraph is now hidden");
});});
Without adding a callback function, the JavaScript interpreter will operate as follows:
In case, you want to check how the same program will work without a jQuery callback function, then add the below-given code in your JavaScript file:
$(document).ready(function(){
$("button").click(function(){
$("p").hide(1000);
alert("The paragraph is now hidden");
});});
Without adding a callback function, the JavaScript interpreter will operate as follows:
![]()
Example 2: Using Callback functions in jQuery
In this example, we will add a callback function for “slideToggle” jQuery effect.
Before that, we will add a paragraph and a “Click me” button:
<p>This is a sample paragraph.</p><button type="button">Click me</button>
![]() After that, we will write out the following code in our “myProject.js” file:
$(document).ready(function () {
$("button").click(function () {
$("p").slideToggle("slow", function () {
alert("The slide toggle effect is now completed.");
});
});});
The above-given code specifies that clicking the button will slowly slide down the “p” element.
When this “slideToggle()” effect finishes, the callback function will be executed, and an alert box will appear on the web page stating that “The slide toggle effect is now completed”:
Check out the output of the provided program:
After that, we will write out the following code in our “myProject.js” file:
$(document).ready(function () {
$("button").click(function () {
$("p").slideToggle("slow", function () {
alert("The slide toggle effect is now completed.");
});
});});
The above-given code specifies that clicking the button will slowly slide down the “p” element.
When this “slideToggle()” effect finishes, the callback function will be executed, and an alert box will appear on the web page stating that “The slide toggle effect is now completed”:
Check out the output of the provided program:
![]() Now, in the same “index.html” file, we will add a heading with the “<h1>” tag:
<h1>This is heading</h1>
Now, in the same “index.html” file, we will add a heading with the “<h1>” tag:
<h1>This is heading</h1>
![]() Next, the Element Name Selector $(“h1, p”) in the JavaScript file will find and get the h1 and p elements.
Then, the paragraph will be slide down with “slow” speed and heading will be shown in its position.
Lastly, the callback function will display the alert box on the browser:
$(document).ready(function () {
$("button").click(function () {
$("h1, p").slideToggle("slow", function () {
alert("The slide toggle effect has completed.");
});
});});
Now, the alert box will appear two times on the web page, one for the “h1” heading and the other for the “p” paragraph element:
Next, the Element Name Selector $(“h1, p”) in the JavaScript file will find and get the h1 and p elements.
Then, the paragraph will be slide down with “slow” speed and heading will be shown in its position.
Lastly, the callback function will display the alert box on the browser:
$(document).ready(function () {
$("button").click(function () {
$("h1, p").slideToggle("slow", function () {
alert("The slide toggle effect has completed.");
});
});});
Now, the alert box will appear two times on the web page, one for the “h1” heading and the other for the “p” paragraph element:
![]() As you can see from the above-given output we have successfully implemented Callback function in jQuery.
As you can see from the above-given output we have successfully implemented Callback function in jQuery.
Conclusion
The Callback function in jQuery is a function that is executed when the added effect method has finished its execution.
In a jQuery effect method, the callback function is passed to be called back later and is usually specified as the last argument.
This write-up explained callback functions in jQuery and we have also provided appropriate examples related to the usage of callback functions.
How to change CSS using jQuery?
Since we all know that we can perform many fun tasks using jQuery due to its lightweight and “write less, do more” agenda.
One such task is rendering changes to CSS style properties of HTML elements.
You can change CSS by using the css() method of jQuery.
Here in this guide, we have explained this method in detail, moreover, we have demonstrated different examples that help you better understand the method and its usage.
css() Method
The css() method in jQuery is used for the purpose of either fetching or applying one or more style properties to an HTML element.
Syntax
To apply a CSS property.
css("property", "value");
To fetch a CSS property.
css("property");
To apply multiple CSS properties.
css({"property": "value", "property": "value"....});
To better understand the css() method, let’s explore some examples.
Example 1: How to set a CSS property
Suppose you want to set the background color of a <h1>element using the css() method in jQuery.
HTML
<h1>Setting a CSS property</h1><br><button class="button">Set background-color of h1</button>
In the above HTML code, we have created an <h1>, and a <button>element.
jQuery
$(document).ready(function(){
$(".button").click(function(){
$("h1").css("background-color", "yellow");
});});
In the above jQuery code, we have applied a yellow background color to the <h1>element using the css() method.
Output
Before clicking the button.
![]() After clicking the button.
After clicking the button.
![]() The background color of the heading has been set successfully.
The background color of the heading has been set successfully.
How to fetch a CSS property
Suppose you want to fetch any CSS property of an element, for instance, background color of a div element.
Follow the code below.
HTML
<div style="padding: 25px; width: 200px; background-color: bisque;">Hello World</div>
<br><button>Return background-color of div</button>
Here we have created a <div>, and a <button>element.
jQuery
$(document).ready(function(){
$("button").click(function(){
alert("Background color = " + $("div").css("background-color"));
});});
In the above code, the css() method is used only to extract the background color assigned to the <div>element.
Moreover, an alert message has been created that will display the background color of the div.
Output
![]() The background color of the div element has been fetched and displayed successfully.
The background color of the div element has been fetched and displayed successfully.
How to set multiple CSS properties
Suppose you want to assign multiple style properties to any HTML element all at once.
Follow the example below.
HTML
<p>Some paragraph.</p><br><button>Set multiple styles</button>
In the above code, we have created a <p>element along with a <button>element.
jQuery
$(document).ready(function(){
$("button").click(function(){
$("p").css({"background-color": "yellow", "padding": "25px", "width": "200px"});
});});
Using the jQuery css() method we have applied a background color to the <p>element and assigned it some padding and width.
Output
![]() It can be verified from the above output that multiple styles are applied to the paragraph all at once.
It can be verified from the above output that multiple styles are applied to the paragraph all at once.
Conclusion
You can change CSS using the jQuery css() method which is used for the purpose of getting or setting style properties of an element.
Using this method you can apply multiple styles to an HTML all at once by manipulating CSS style properties.
This tutorial guides you on how to change CSS in various ways through jQuery css() method along with the relevant examples for better understanding.
Factory Functions
While writing a program, there are situations when you want to add multiple instances of an object quickly.
Factory functions in JavaScript are used explicitly for this purpose.
A real-world factory can massively and swiftly produce multiple copies of an item; the same goes for the Factory functions.
In JavaScript, a Factory function returns an object that can be reused for making multiple instances of the same object.
It can additionally accept arguments permitting you to customize the returned object.
This write-up will discuss factory functions with the help of appropriate examples.
So, let’s start!
Factory Function
JavaScript factory functions have the same functionality that a class function or a constructor has; however, these functions do not use the “new” keyword while creating an object instance and return an object comprising the method or values added.
So, if you have complex logic and need to construct several object instances repeatedly, add that logic once in a factory function and then utilize it for creating objects.
Example: How to use Factory functionsFirst of all, we will create an “employee1” object having two properties: “name” and “designation”:
let employee1 = {
name: 'Alex',
designation: 'Manager' ,
showInfo() {
return this.name + ' is a ' + this.designation;
}};
console.log(employee1.showInfo());
We have also added a “showInfo()” method that will output the object properties in a string format.
Check out the output of the showInfo() method for the “employee1” object:
![]() Now, let’s say you want to create another object “employee2” for a different employee.
For this purpose, you have to write out the same code while changing the values of properties according to your requirements:
let employee2 = {
name: 'Stepheny',
designation: 'Video Editor' ,
showInfo() {
return this.name + ' is a ' + this.designation;
}};
console.log(employee2.showInfo());
Now, let’s say you want to create another object “employee2” for a different employee.
For this purpose, you have to write out the same code while changing the values of properties according to your requirements:
let employee2 = {
name: 'Stepheny',
designation: 'Video Editor' ,
showInfo() {
return this.name + ' is a ' + this.designation;
}};
console.log(employee2.showInfo());
![]() You can follow the above-given procedure for creating a few employee objects.
But what if you want to create 100 employee objects? In such a case, creating each object separately while writing the same code again and again will consume a lot of time, effort, and can make your code complex to handle.
You can utilize a factory function for assisting you to avoid code duplication.
It creates an object without diving into complex classes or using the “new” keyword.
Now, we will create a JavaScript factory function “createEmployee” for creating our employee objects:
function createEmployee(name, designation) {return {
name: name,
designation: designation,
showInfo() {return this.name + ' is a ' + this.designation;}}}
The above-given factory function will return an object comprising the property values passed as arguments.
In the next step, we will create three employee objects named as Alex, Smith, and Marie:
let Alex = createEmployee('Alex', 'Manager');
let Smith = createEmployee('Smith', 'Video Editor');
let Marie = createEmployee('Marie', 'Content Writer');
After doing so, we will invoke the showInfo() function for each of the employee object:
console.log(Alex.showInfo());
console.log(Smith.showInfo());
console.log(Marie.showInfo());
Execution of the given JavaScript program signifies that we have successfully created employee object with the help of factory functions:
You can follow the above-given procedure for creating a few employee objects.
But what if you want to create 100 employee objects? In such a case, creating each object separately while writing the same code again and again will consume a lot of time, effort, and can make your code complex to handle.
You can utilize a factory function for assisting you to avoid code duplication.
It creates an object without diving into complex classes or using the “new” keyword.
Now, we will create a JavaScript factory function “createEmployee” for creating our employee objects:
function createEmployee(name, designation) {return {
name: name,
designation: designation,
showInfo() {return this.name + ' is a ' + this.designation;}}}
The above-given factory function will return an object comprising the property values passed as arguments.
In the next step, we will create three employee objects named as Alex, Smith, and Marie:
let Alex = createEmployee('Alex', 'Manager');
let Smith = createEmployee('Smith', 'Video Editor');
let Marie = createEmployee('Marie', 'Content Writer');
After doing so, we will invoke the showInfo() function for each of the employee object:
console.log(Alex.showInfo());
console.log(Smith.showInfo());
console.log(Marie.showInfo());
Execution of the given JavaScript program signifies that we have successfully created employee object with the help of factory functions:
![]()
Memory space problem with Factory functions
In the previous example, when you create an employee object and store it in a variable, that object needs memory space, hence slowing down the code performance.
However, you can avoid this problem by removing the “showInfo()” method from the factory function and storing it in another variable.
From our program, we will remove the “showInfo()” method from the createEmployee() factory function and store it in a separate variable named “x”:
function createEmployee(name, designation) {return {
name: name,
designation: designation,}}const x = {
showInfo() {return this.name + ' is a ' + this.designation;}}
Next, we will create two employee objects, “Alex” and “Smith,” and before invoking the “showInfo()” method for these objects, we will assign the object method “x” to the employee object in the following way:
let Alex = createEmployee('Alex', 'Manager');
let Smith = createEmployee('Smith', 'Video Editor');
Alex.showInfo = x.showInfo;
Smith.showInfo = x.showInfo;
console.log(Alex.showInfo());
console.log(Smith.showInfo());
Here is the output we got from executing the above-given program:
![]() However, the provided approach is not scalable if you want to add multiple methods for an employee object because you have to assign them individually.
If that’s the case, you should utilize “Object.create()” method in your JavaScript program.
However, the provided approach is not scalable if you want to add multiple methods for an employee object because you have to assign them individually.
If that’s the case, you should utilize “Object.create()” method in your JavaScript program.
Object.create() method
The Object.create() method creates a new object based on the existing object as the new object prototype.
We can use the Object.create() method in this way:
const x = {
showInfo() {return this.name + ' is a ' + this.designation;}}function createEmployee(name, designation) {
let employee = Object.create(x);
employee.name = name;
employee.designation = designation;
return employee;}
Next, we will create our employee objects and then invoke the method of “x” object which is showInfo():
let Alex = createEmployee('Alex', 'Manager');
let Smith = createEmployee('Smith', 'Video Editor');
console.log(Alex.showInfo());
console.log(Smith.showInfo());
![]() The output we have seen in the console signifies that our program is working perfectly fine with the Object.create() method implementation.
The output we have seen in the console signifies that our program is working perfectly fine with the Object.create() method implementation.
Conclusion
In JavaScript, a Factory function is a type of function that returns an object and does not require the usage of new keyword.
It can be used for initializing an object, similar to a constructor.
It is also considered a useful tool that permits you to produce multiple object instances quickly.
This write-up discussed Factory functions with the help of appropriate examples.
How to Chain Promises
JavaScript Promise object is used to handle asynchronous functions.
It represents the state and data returned by the specified function.
The state of the Promise Object can help you determine if the added asynchronous function is completed, rejected, or is still pending.
In JavaScript, Promises are chained together for managing the execution flow in a program.
Chaining Promises is also useful when you have to execute a series of asynchronous functions, where each depends on the prior function.
It also includes Error Propagation.
This write-up will discuss the procedure to Chain Promises in JavaScript with the help of suitable examples.
So, let’s start!
How to create a Promise
You can use the “Promise()” constructor for creating a promise object in your program:
let promise = new Promise(function(resolve, reject){
//body of the function})
In JavaScript, the “Promise()” constructor accepts a “function()” as an argument which further have two arguments: “resolve()” and “reject()“.
The resolve() function will be invoked if the promise is returned successfully; otherwise, the reject() function will be called.
Example: How to create a PromiseIn the below-given program, we will create a Promise object named “numberValue” by utilizing the Promise() constructor.
According to the given syntax, we have added the parameters “resolve()” and “reject()” for our promise object:
const number = true;
let numberValue = new Promise(function (resolve, reject) {
if (number) {
resolve("We have a number");
} else {
reject("We do not have any number");
}});
The value of the “number” is set to “true” so in this case the promise will be resolved:
console.log(numberValue);
Execution of the provided program will return the promise object with its state:
![]()
How to chain Promises
If you are stuck in a situation where you need to execute multiple asynchronous tasks in a sequence, then Promise Chaining can assist you in this regard.
With Promise Chaining, you can specify the operations after the particular promise is resolved.
For this purpose, the JavaScript “then()”, “catch()”, and “finally()” methods are used.
How to chain Promises using then() method
The JavaScript “then()” method is used for appending the handler function to the created promise object.
This method comprises “onFulfilled” and “onRejected” parameters, allowing you to handle the scenarios where promises are fulfilled or failed.
Syntax of JavaScript then() method
promiseObject.then(onFulfilled, onRejected);
Here “onFulfilled” and “onRejected” are the argument of the “then()” method.
This method will return a Promise object with the result of the handler function.
Example: How to chain Promises using then() methodFirst of all, we will create a Promise object named “numberValue” with the help of the Promise() constructor:
let numberValue = new Promise(function (resolve, reject) {
const product = 2;
resolve(product);});
After that, we will utilize “then()” method for chaining the functions “successValue()” and “successValue1()”, and “successValue2()” with the “product” as “onFulfilled” argument to the promise:
numberValue
.then(function successValue(product) {
console.log(product);
return product * 2;
})
.then(function successValue1(product) {
console.log(product);
return product * 4;
})
.then(function successValue2(product) {
console.log(product);
return product * 6;
});
The added chain of the then() methods will be executed when the specified promise is fulfilled:
![]()
How to chain Promises using catch() method
The JavaScript “catch()” method handles the rejected promises or the case when an error occurs.
It is considered a good practice to reject a promise rather than generate an error explicitly.
Example: How to chain Promises using catch() methodNow, we will try to add a catch() method in the previous example:
let numberValue = new Promise(function (resolve, reject) {
reject('Unfortunately, Promise is rejected');});
numberValue.then(
function successValue(result) {
console.log(result);
},)
The below-given “catch()” method will be executed if any error occurs:
.catch(
function errorValue(result) {
console.log(result);
});
As you can see from the output that the “numberValue” promise is rejected, and “catch()” method is then utilized for handling the error:
![]()
How to use finally() method with Promises
The “finally()” method is used in a situation where you have to execute some code regardless of whether the added promise is fulfilled or not.
Example: How to use finally() method with PromisesWe have added the JavaScript “finally()” in the following example which will run either Promise is rejected or fulfilled:
let numberValue = new Promise(function (resolve, reject) {
resolve('Promise is resolved');});
numberValue.finally(
function msg() {
console.log('Code is executed successfully');
});
![]() The above-given output signifies that the code added in the “finally()” method is executed successfully, and the promise is resolved.
The above-given output signifies that the code added in the “finally()” method is executed successfully, and the promise is resolved.
Conclusion
Using then() and catch() methods, you can chain Promises.
The then() method is utilized to specify the operation that needs to be done when the added promise is fulfilled, whereas the catch() method handles the case when the promise is rejected.
This write-up discussed the procedure to chain promises using the then() and catch() methods.
JavaScript bind() Method
In a JavaScript program, when you utilize “this” keyword with a method and invoke it from a receiver object, sometimes “this” is not bounded to the required object and thus results in errors.
You can use the JavaScript bind() method to prevent this issue.
The JavaScript bind() method is used to bind functions.
Using this method, you can bind an object to a common function to show different results according to your requirement.
You can also utilize the bind() method for borrowing functions from another object.
This write-up will explain the JavaScript bind() method, and examples related to function borrowing and function binding will be also demonstrated.
So, let’s start!
JavaScript bind() Method
The JavaScript bind() method saves the context of the current parameters and “this” for future execution.
It usually maintains a function’s execution context that runs in a different context.
In the case of function binding, the bind() method creates a new function having the exact copy of the original function’s body.
The value of “this” keyword is passed as the first parameter in the bind() method, and it can also take additional arguments for binding.
Whereas, in function borrowing, the JavaScript bind() method borrows the function of another object without making its copy.
Syntax of JavaScript bind() Method
Have a look at the syntax of the JavaScript bind() method:
function.bind(thisArg, [arg1], [arg2], ...);
Here, the “thisArg” represent “this” keyword and “[arg1], [arg2], …” are the additional arguments.
The given JavaScript bind() method will return a new function when it is invoked and also set “this” to the specified value.
Example 1: Using JavaScript bind() method for single-function bindingFirst of all, we will create a simple program that comprises an “employee” object.
The “employee” object has a “name” property and a “showInfo()” method:
let employee = {
name: 'Jack Smith',
showInfo: function() {
console.log(this.name);
}};
The “this” keyword added in the “showInfo()” method will bind the “name” variable to the function therefore accessing “Jack Smith” as an employee name is not an issue.
This process is known as default binding:
employee.showInfo();
Execution of the above-given program shows the following output:
![]() Now, we will create a new variable function, “showInfo2” that refers to the “showInfo()” function of the employee object.
In this case, the default binding will be lost, and the program will not show any output:
var showInfo2= employee.showInfo;
showInfo2();
So, when the callback “employee.showInfo” is invoked, the “name” property does not exist in the global object, and it is set to “undefined” as shown in output:
Now, we will create a new variable function, “showInfo2” that refers to the “showInfo()” function of the employee object.
In this case, the default binding will be lost, and the program will not show any output:
var showInfo2= employee.showInfo;
showInfo2();
So, when the callback “employee.showInfo” is invoked, the “name” property does not exist in the global object, and it is set to “undefined” as shown in output:
![]() You can utilize the JavaScript bind() method to ensure that any binding related to “this” keyword is not lost.
The bind() method sets “this” context to the specified object:
let employee = {
name: 'Jack Smith',
showInfo: function() {
console.log(this.name);
}};
Here the JavaScript bind() method creates a new function with “this” keyword referring to the parameter in the parentheses.
It also permits us to invoke the “showInfo()” function while passing the “employee” object as an argument:
var showInfo2= employee.showInfo.bind(employee);
showInfo2();
The showInfo2() method will display the assigned “name” of “employee” object:
You can utilize the JavaScript bind() method to ensure that any binding related to “this” keyword is not lost.
The bind() method sets “this” context to the specified object:
let employee = {
name: 'Jack Smith',
showInfo: function() {
console.log(this.name);
}};
Here the JavaScript bind() method creates a new function with “this” keyword referring to the parameter in the parentheses.
It also permits us to invoke the “showInfo()” function while passing the “employee” object as an argument:
var showInfo2= employee.showInfo.bind(employee);
showInfo2();
The showInfo2() method will display the assigned “name” of “employee” object:
![]() Example 2: Using JavaScript bind() method for Multiple functions bindingIn the following example, we will create three objects: “employee1”, “employee2”, and “employee3”:
let employee1 = {
name: 'Jack'};
let employee2 = {
name: 'Max'};
let employee3 = {
name: 'Paul'};function showInfo() {
console.log(this.name);}
For each of the above-given object, we will invoke the “showInfo()” method by utilizing the JavaScript “bind()” method:
var showInfo2= showInfo.bind(employee1);
showInfo2();var showInfo3= showInfo.bind(employee2);
showInfo3();var showInfo4= showInfo.bind(employee3);
showInfo4();
The output will display the name property values of the “employee1”, “employee2”, and “employee3” objects:
Example 2: Using JavaScript bind() method for Multiple functions bindingIn the following example, we will create three objects: “employee1”, “employee2”, and “employee3”:
let employee1 = {
name: 'Jack'};
let employee2 = {
name: 'Max'};
let employee3 = {
name: 'Paul'};function showInfo() {
console.log(this.name);}
For each of the above-given object, we will invoke the “showInfo()” method by utilizing the JavaScript “bind()” method:
var showInfo2= showInfo.bind(employee1);
showInfo2();var showInfo3= showInfo.bind(employee2);
showInfo3();var showInfo4= showInfo.bind(employee3);
showInfo4();
The output will display the name property values of the “employee1”, “employee2”, and “employee3” objects:
![]() Example 3: Using JavaScript bind() method for function borrowingWith the help of the JavaScript bind() method, an object can borrow a function of another added object.
For the demonstration, we will create two objects “car” and “airplane” having “name” property, “run()” and “fly()” methods respectively:
let car = {
name: 'car',
run: function(speed) {
console.log(this.name + ' is moving at ' + speed + ' mph.');
}};
let airplane = {
name: 'airplane',
fly: function(speed) {
console.log(this.name + ' is flying at ' + speed + ' mph.');
}};
Now, if you want the “airplane” object to run, then utilize the JavaScript bind() method for creating a run() function with the “this” keyword, which sets it to “airplane” object:
let run= car.run.bind(airplane, 20);
run();
We have called the bind() with the car.run() method and passed “airplane” as “name” property value and its speed as “20”:
Example 3: Using JavaScript bind() method for function borrowingWith the help of the JavaScript bind() method, an object can borrow a function of another added object.
For the demonstration, we will create two objects “car” and “airplane” having “name” property, “run()” and “fly()” methods respectively:
let car = {
name: 'car',
run: function(speed) {
console.log(this.name + ' is moving at ' + speed + ' mph.');
}};
let airplane = {
name: 'airplane',
fly: function(speed) {
console.log(this.name + ' is flying at ' + speed + ' mph.');
}};
Now, if you want the “airplane” object to run, then utilize the JavaScript bind() method for creating a run() function with the “this” keyword, which sets it to “airplane” object:
let run= car.run.bind(airplane, 20);
run();
We have called the bind() with the car.run() method and passed “airplane” as “name” property value and its speed as “20”:
![]() The above-given output signifies that by using the JavaScript bind() method, we have successfully borrowed the run() method from the car object, without making its copy.
The above-given output signifies that by using the JavaScript bind() method, we have successfully borrowed the run() method from the car object, without making its copy.
Conclusion
The JavaScript bind() method saves the context of the current parameters and “this” for future execution.
It usually maintains a function’s execution context that runs in a different context.
It can be utilized for function binding and function borrowing.
This write-up explained the JavaScript bind() method, and examples related to function borrowing and function binding are also demonstrated.
jQuery vs JavaScript
JavaScript is a client/server-side programming language to make interactive web pages.
The HTML and CSS work on the structure and styling of webpages whereas JavaScript adds interactive flavors to engage end-users.
JavaScript incorporates various libraries to get to this milestone.
JQuery is an open-source JavaScript library intended to manipulate the HTML DOM in an effective way.
HTML DOM is the key ingredient that jQuery uses to interact with HTML elements.
Moreover, jQuery assists the developers in easily exercising the JavaScript code.
Although jQuery is a kind of subset of JavaScript, they do have some commonalities and differences.
Keeping in view the importance of both terms, this article is designed to provide the following learning outcomes.
Basics of jQuery
Basics of JavaScript
Difference between jQuery and JavaScript
jQuery
It is a JS library that has provided the core functionality of JavaScript in less time (as jQuery has a shorter syntax than JS).
The developers write the code using jQuery and it is converted to JS internally.
Being a feature-rich JS library, jQuery has the following notable features.
Uses DOM library to manipulate the HTML elements
Supports all well-known browsers
Supports JS plugins
Allows building website using AJAX
Predefined CSS method to style HTML elements
JavaScript
JavaScript is a scripting language intended to provide interactive interfaces.
According to a survey, more than 95% of website’s practices JS to build user-friendly web pages.
The JS comes with the following distinctive features.
A lightweight scripting language intended to handle data in browsers
Provides an in-time compilation
Cross-platform support to run scripts anywhere
Supports various common data types and functions
JQuery vs JavaScript
As JavaScript is the parent language of jQuery, they do share some commonalities, but they have differences as well.
Let’s have a look at them:
Dependency: JavaScript is an independent language and exists on its own.
However, jQuery is the library of JavaScript and is dependent on JavaScript (as jQuery code is converted to JS first).
Complexity: jQuery can process the tasks with the least lines of code as compared to JS.
Thus, making JavaScript more complex than jQuery.
Speed: JS is processed by the browser directly without any hindrance, but the jQuery code is converted to JS and then it is processed.
Thus, making JS faster than jQuery.
Reusability: As the complexity of the JS is greater than jQuery, therefore, it would be difficult to reuse the JS code.
Contrary to this, the jQuery code can be reused easily.
Size: JavaScript is a full-fledged scripting language whereas jQuery is a library of JS.
Therefore, jQuery is lighter than raw JS and its other libraries.
Language: JavaScript is a high-level interpreted language composed of ECMA and DOM.
On the other hand, jQuery just relies on DOM (Document Object Model).
Note: ECMAScript specification guides to create a scripting language and JS implements ECMAScript specifications.
Whereas the DOM acts as a bridge between JS variables and the HTML elements.
Conclusion
JavaScript is a widely used front-end scripting language with backend support as well.
While, jQuery is a JS library that is used to exercise JS functionalities with the least lines of code.
Although the building block of jQuery is JS, due to the “write-less, do-more” feature of jQuery, it is accepted widely nowadays.
Keeping in view the importance of both, this guide aims to provide a detailed comparison of jQuery and JavaScript.
Alongside their comparison, you would also get the list of distinctive features provided by jQuery and JavaScript.
How to Return Multiple Values from a Function
Functions are utilized for performing a specific action, which involves a return case.
The return case can have a single value or nothing to pass.
There exist chances that you may need to return multiple values from the defined function.
The majority of the new programmers look for solutions to return multiple values from a function.
Unfortunately, JavaScript does not support this feature.
However, you can use Arrays and Objects for permitting multiple values to pack and then pass via a function.
This write-up will explain the procedure for returning multiple values in the JavaScript function using Arrays and Objects.
We will also discuss the methods to unpack array and object values using Destructing Assignment.
So, let’s start!
Method 1: Return multiple values from a function using Array
Arrays can be utilized when you want to retrieve multiple values from a JavaScript function.
For instance, in the below-given example, “showInfo()” is a function that fetches “employeeName” and “designation” from the third-party API response or from the backend database.
It returns the values as array elements:
function showInfo() {
let employeeName = 'Alex',
designation = 'Manager';return [employeeName, designation];}
Next, we will store the values returned by the showInfo() function into the array “arr”:
let arr = showInfo();
As the “arr” variable is an array, we will refer its elements by using the square brackets “[]” as follows:
const employeeName = arr[0],
designation = arr[1];
console.log("Employee Name: "+ employeeName + " Designation: " + designation);
Execution of the above-given program will display the values stored in array “arr” returned by the showInfo() function:
![]() Unpacking Array using Destructing AssignmentThe method of declaring objects or variables for storing elements is straightforward.
But, in the case of large data, defining variables each time is considered a tedious task.
Loops are also used for accessing the values of an array.
Besides this, ES6 offers a new feature, “Destructing Assignment,” that can be used for unpacking array elements:
function showInfo() {
let employeeName = 'Alex',
designation = 'Manager';return [employeeName, designation];}
Using destructing assignment, the “employeeName” and “designation” will take the first and second element of the returned function values:
const [employeeName, designation] = showInfo();
console.log("Designation of "+ employeeName + " is " + designation);
Now, check out the below-given output:
Unpacking Array using Destructing AssignmentThe method of declaring objects or variables for storing elements is straightforward.
But, in the case of large data, defining variables each time is considered a tedious task.
Loops are also used for accessing the values of an array.
Besides this, ES6 offers a new feature, “Destructing Assignment,” that can be used for unpacking array elements:
function showInfo() {
let employeeName = 'Alex',
designation = 'Manager';return [employeeName, designation];}
Using destructing assignment, the “employeeName” and “designation” will take the first and second element of the returned function values:
const [employeeName, designation] = showInfo();
console.log("Designation of "+ employeeName + " is " + designation);
Now, check out the below-given output:
![]()
Method 2: Return multiple values from a function using object
In a JavaScript function, objects are also used to assign a name to each returned value, making it easier to maintain and more readable.
For the demonstration purpose, we will again initialize “showInfo()” function and declare the return case in an object format:
function showInfo() {
let employeeName = 'Alex',
designation = 'Manager';return {
'employeeName': employeeName,
'designation': designation
};}
As the added property names and created variables names are similar, we can utilize the object literal syntax extension in the following way:
function showInfo() {
let employeeName = 'Alex',
designation = 'Manager';
return { employeeName, designation };}
let info = showInfo();
To access the specified values, we will utilize the “employeeName” and “designation” keys:
let employeeName = info.employeeName,
designation = info.designation;
console.log("Designation of "+ employeeName + " is " + designation);
![]() Unpacking Object using Destructing AssignmentIf a function returns an object comprising multiple values, the Destructing assignment can assist you in unpacking it.
The keys will be explicitly declared; however, it will immediately access the key-value pair from the “showInfo()” function:
let { employeeName, designation} = showInfo();
console.log("Designation of "+ employeeName + " is " + designation);
Unpacking Object using Destructing AssignmentIf a function returns an object comprising multiple values, the Destructing assignment can assist you in unpacking it.
The keys will be explicitly declared; however, it will immediately access the key-value pair from the “showInfo()” function:
let { employeeName, designation} = showInfo();
console.log("Designation of "+ employeeName + " is " + designation);
![]() The above-given output signifies that we have successfully used the destructing assignment for unpacking the multiple values stored in the “info” object.
The above-given output signifies that we have successfully used the destructing assignment for unpacking the multiple values stored in the “info” object.
Conclusion
With the help of Arrays and Objects, a JavaScript function can return multiple values.
Storing required values in an array will assist you in returning them from the created function, whereas, in the case of an object, you have to define an object comprising variables names as key-value pairs.
This write-up discussed the method to return multiple values from a function using Arrays and Objects and unpack them with the destructing assignment.
How to Define Private Methods
The idea behind using private methods is straightforward.
When you want to keep something private, whether a method or a property, in this scenario, you can define private methods or private properties, which are utilized to hide the inner functionality of a class from the other classes.
In a JavaScript class, you can add private fields, private instance methods, private static methods, and private getters and setters.
This write-up will explain the procedure to define Private Methods in JavaScript.
So, let’s start!
Private methods
The type of methods that cannot be accessed outside of the class where it is defined or by the base class is known are Private methods.
These methods are utilized to secure the sensitive information stored in class fields such as personal information or passwords.
In a JavaScript class, to declare something as “private,” which can be a method, property, or getter and setter, you have to prefix its name with the hash character “#”.
Syntax of Private instance method
class NewClass {
#privateMethod() {
// body of privateMethod
}}
In the above-given syntax, the private instance method is “#privateMethod”, which can be only invoked within “NewClass” and you cannot access it in the subclass of “NewClass” or from outside.
“this” keyword is used for calling the “#privateMethod()” inside of the created “NewClass”:
this.#privateMethod();
Private Static Methods
Private static methods are loaded in the memory before you create an instance of that specific class and they are independent of class instantiation.
Syntax for defining a private static method
In a JavaScript program, to define a private static method, you have to use the keyword “static” before adding the method name with the “#” character:
class NewClass {
static #privateStaticMethod() {
// body of the privateStaticMethod
}}
Now, to invoke the created static private method, we will specify the class name “NewClass” instead of using “this” keyword:
NewClass.#privateStaticMethod();
Private Getters and Setters
In JavaScript, private getters and setters are used for retrieving and setting the private fields of a class.
Syntax for defining private getters and setters
In JavaScript, “get” and “set” keywords are utilized for creating getters and setters for the private fields:
class NewClass {
#firstField;
get #field() {
return #firstField;
}
set #field(value){
#firstField = value;
}}
How to define Private Methods
The private methods can keep your data private.
It is preferred to define all class methods as “private” by default.
After that, if an object needs to interact with other class objects, you can turn it to a “public” method.
Example: How to define Private MethodsFirst of all, we will create an “Employee” class having two private fields: “#name” and “#designation”.
After doing so, we will add a constructor:
class Employee {
#name;
#designation;
constructor(name, designation) {
this.#name = name;
this.#designation = designation;
}
Next, we will define the private methods “#employeeName()” and “ #employeeDesignation()” for getting the values of the added private fields:
#employeeName() {
return `${this.#name}`;
}
#employeeDesignation() {
return `${this.#designation}`;
}
A “showInfo()” public function is also added in our Employee class which will invoke the following private methods:
showInfo(format = true){
console.log(this.#employeeName(), this.#employeeDesignation()); }}
After setting up the Employee class, we will create an “employee” object while passing “Alex” and “Manager” as the values of the “name” and “designation” fields:
let employee = new Employee('Alex', 'Manager');
Lastly, we will invoke the “showInfo()” method by utilizing the employee object:
employee.showInfo();
Execution of the above-given program will display the private field values of “employee” object in the console:
![]() Example: How to define Private Static MethodsWe will add a “#verify()” private static method in the Employee with “name” parameter.
The “#verify()” method will check if the length of “name” is greater than or equal to “4“; otherwise, it will throw an exception stating that “The entered name must be a string having at least 4 characters”.
The mentioned static private method will be added in the Employee Class constructor so that it can validate the “name” argument before assigning it to the corresponding attribute:
class Employee {
#name;
#designation;
constructor(name, designation) {
this.#name = Employee.#verify(name);
this.#designation = designation;}
static #verify(name) {
if (typeof name === 'string') {
let str = name.trim();
if (str.length === 4) {
return str;
}
}
throw 'The entered name must be a string having at least 4 characters';
}
#employeeName() {
return `${this.#name}`;
}
#employeeDesignation() {
return `${this.#designation}`;
}
showInfo(format = true){
console.log(this.#employeeName(), this.#employeeDesignation()); }}
In the first case, we will create an “employee” object and pass a name which will meet the added condition in the #verify() static private method:
let employee = new Employee('Alex', 'Manager');
employee.showInfo();
After validating the #name field, it can be easily fetched by the showInfo() method:
Example: How to define Private Static MethodsWe will add a “#verify()” private static method in the Employee with “name” parameter.
The “#verify()” method will check if the length of “name” is greater than or equal to “4“; otherwise, it will throw an exception stating that “The entered name must be a string having at least 4 characters”.
The mentioned static private method will be added in the Employee Class constructor so that it can validate the “name” argument before assigning it to the corresponding attribute:
class Employee {
#name;
#designation;
constructor(name, designation) {
this.#name = Employee.#verify(name);
this.#designation = designation;}
static #verify(name) {
if (typeof name === 'string') {
let str = name.trim();
if (str.length === 4) {
return str;
}
}
throw 'The entered name must be a string having at least 4 characters';
}
#employeeName() {
return `${this.#name}`;
}
#employeeDesignation() {
return `${this.#designation}`;
}
showInfo(format = true){
console.log(this.#employeeName(), this.#employeeDesignation()); }}
In the first case, we will create an “employee” object and pass a name which will meet the added condition in the #verify() static private method:
let employee = new Employee('Alex', 'Manager');
employee.showInfo();
After validating the #name field, it can be easily fetched by the showInfo() method:
![]() For the second time, we will specify a name which comprises three characters:
let employee = new Employee('Sia', 'Manager');
employee.showInfo();
You can see from the below-given output that the added static private method has thrown an exception for the employee name:
For the second time, we will specify a name which comprises three characters:
let employee = new Employee('Sia', 'Manager');
employee.showInfo();
You can see from the below-given output that the added static private method has thrown an exception for the employee name:
![]() The name “Sia” which we have passed in the Employee Constructor is not according to the “if” statement specified in the static #verify() method.
That’s why the “employee” instance is not created.
The name “Sia” which we have passed in the Employee Constructor is not according to the “if” statement specified in the static #verify() method.
That’s why the “employee” instance is not created.
Why you should use Private Methods
Here is a list of some of the advantages of using private methods:
Encapsulation is one of the key advantages of using private methods as it permits interfaces to hide the implementation details from other classes.
It also improves the readability of the code.
Defining private methods also ensures code re-usability and avoids code duplication.
If you declare all of your methods as “public”, you have to keep a check on who is going to read and make changes to the class properties.
Conclusion
Private methods are defined to hide crucial class methods or keep sensitive information private.
In a class, to define a private method instance, private static method, or a private getter and setter, you have to prefix its name with the hash character #.
This write-up explained the procedure to define the private methods with the help of suitable examples.
What is Polymorphism
The term Polymorphism is derived from the word “Polymorph,” where “Poly” means “Many” and “Morph” means “Transforming one form into another“.
In Object-Oriented Programming, Polymorphism allows you to perform the same operation in multiple ways.
It enables you to invoke the same method with different JavaScript objects by passing selected data members.
This write-up will discuss Polymorphism with the help of appropriate examples.
So, let’s start!
What is Polymorphism
Objects might act differently in different contexts because all of the object-oriented programming principles are based on objects usage.
Polymorphism refers to the concept that there can be multiple forms of a single method, and depending upon the runtime scenario, one type of object can have different behavior.
It utilizes “Inheritance” for this purpose.
In Polymorphism, multiple objects can have the same methods but with different implementations, and an object and its related method are selected based on the user preferences.
Example 1: Using Polymorphism
Animals are frequently used to explain Polymorphism.
In the below-given example, “Animal” is a parent class whereas, Cat and Dog are its derived or child classes.
The speak() method is common in both child classes.
The user can select an object from any child class at runtime, and the JavaScript interpreter will invoke the “speak()” method accordingly.
![]() According to the above-given description, we have defined the parent Animal class and its two child classes, Cat and Dog, in our program.
Then we have added a “speak()” method in the Animal class.
In this example, we will not define the “speak()” method in the child classes.
As a result of it, the Cat and Dog class will utilize the Animal class “speak()” method:
class Animal
{
speak()
{
console.log("Animals have different sounds");
}
} class Cat extends Animal
{
} class Dog extends Animal
{
Next, we will create two objects; one for the “Cat” and other for the “Dog” class respectively and then invoke the “speak()” method of the parent class by the help of the created objects:
var cat = new Cat();
cat.speak();var dog = new Dog();
dog.speak();
You can see from the below-given output that the “speak()” method of the Animal class is executed two times:
According to the above-given description, we have defined the parent Animal class and its two child classes, Cat and Dog, in our program.
Then we have added a “speak()” method in the Animal class.
In this example, we will not define the “speak()” method in the child classes.
As a result of it, the Cat and Dog class will utilize the Animal class “speak()” method:
class Animal
{
speak()
{
console.log("Animals have different sounds");
}
} class Cat extends Animal
{
} class Dog extends Animal
{
Next, we will create two objects; one for the “Cat” and other for the “Dog” class respectively and then invoke the “speak()” method of the parent class by the help of the created objects:
var cat = new Cat();
cat.speak();var dog = new Dog();
dog.speak();
You can see from the below-given output that the “speak()” method of the Animal class is executed two times:
![]()
Example 2: Using Polymorphism with Method Overriding
Method overriding is a specific type of Polymorphism that permits a child class to implement the method already added in the parent or base class, in a different manner.
Upon doing so, the child class overrides the method of the parent class.
JavaScript interpreter will determine which method you want to execute.
If you have created a parent class object, then the method which exists in the parent class will be executed.
However, invoking the same method with the child class object will execute the child or derived class method.
In this example, we will override the “speak()” method of the “Animal” class using Polymorphism.
For this purpose, we will write speak() method in our Cat and Dog classes which will override the speak() method of the parent class.
Lastly, we will invoke the defined methods using a forEach loop:
class Animal
{
speak() {
console.log("Animals have different sounds"); }
} class Cat extends Animal
{
speak(){
console.log("Cat says Meow Meow");}
} class Dog extends Animal
{
speak(){
console.log("Dog say Woof Woof");}
} var x=[new Cat(), new Dog()]
x.forEach(function(info) {
info.speak(); });
The output will show the strings added in the “speak()” method of Cat and Dog classes:
![]() It can be clearly verified from the above output, the speak() method of Animal class is overridden by the child classes(Cat and Dog).
It can be clearly verified from the above output, the speak() method of Animal class is overridden by the child classes(Cat and Dog).
Why you should use Polymorphism
Here are some of the advantages of using Polymorphism:
Polymorphism enables the programmers to reuse the code, which saves time.
Implicit type conversion is supported by Polymorphism.
It allows a child class to have the same name method added in the parent class, with different functionality.
In different scenarios, a method’s functionality is added differently.
Single variables can be utilized for storing multiple data types.
Conclusion
Polymorphism refers to the concept of reusing a single piece of code multiple times.
By utilizing Polymorphism, you can define multiple forms of a method, and depending upon the runtime scenario, one type of object can have different behavior.
This write-up discussed Polymorphism with the help of appropriate examples.
Get and Set inner text of HTML Elements in jQuery
Manipulating Document Object Model (DOM) is one of the key features of jQuery.
jQuery includes various DOM-related methods that make getting and setting the inner text of HTML elements a breeze.
html(), text(), and val() are some useful methods that comes under the specified category.
These methods are called getters when no arguments are added, and they get the inner text or value of the HTML elements.
Also, if you have added any value as an argument, these methods will behave as setter methods.
This write-up will discuss the procedure to get and set inner text of HTML Elements in jQuery.
Moreover, the examples related to html(), text(), and val() methods for getting and setting HTML Elements inner text will be provided.
So, let’s start!
Get and Set inner text of HTML Elements in jQuery using html() method
The JavaScript html() method is utilized to get and set the innerHTML or the content of the HTML elements in jQuery.
This method returns the content of the first matched HTML element if you use it to get the inner text; while setting the inner text, it overwrites the content of all HTML elements that get matched.
Syntax of html() method
To get the inner text of HTML elements:
$(selector).html()
To get and set inner text of HTML elements:
$(selector).html(value)
To get and set inner text of HTML elements by utilizing a function:
$(selector).html(function(index,currentvalue))
In the above-given syntax, “value” is the content which you want to add as the modified inner text of HTML elements, “index” is added to return the index position in the HTML element set, lastly, “currentvalue” is added to retrieve the current inner text of a specific HTML element.
Example: Get and Set inner text of HTML Elements in jQuery() using html() method
In the below-given example, we will change the inner text of all of the paragraphs which are added as HTML elements with the <p> tag.
To do so, we will write the following code in our “index.html” file:
<button>Change p elements content</button><p>This is the first paragraph.</p><p>This is the second paragraph.</p>
![]() For manipulating HTML elements in jQuery, we have to write the desired code within the body of the $(document).ready() method, in a JavaScript file.
Here, we will specify that on the “click” event of our “button”, the interpreter will select the all “p” elements and set their content to the string specified in the “html()” method:
$(document).ready(function(){
$("button").click(function(){
$("p").html("This is <b>linuxhint.com</b>");
});});
For manipulating HTML elements in jQuery, we have to write the desired code within the body of the $(document).ready() method, in a JavaScript file.
Here, we will specify that on the “click” event of our “button”, the interpreter will select the all “p” elements and set their content to the string specified in the “html()” method:
$(document).ready(function(){
$("button").click(function(){
$("p").html("This is <b>linuxhint.com</b>");
});});
![]() After saving the provided code in both files, we will open “index.html” with the help of VS Code “Liver Server”:
After saving the provided code in both files, we will open “index.html” with the help of VS Code “Liver Server”:
![]() Now, we will click on the “Change p elements content” button which is highlighted in the output:
Now, we will click on the “Change p elements content” button which is highlighted in the output:
![]() This action will get all of the HTML paragraph elements and set their inner text as follows:
This action will get all of the HTML paragraph elements and set their inner text as follows:
![]()
Get and Set the inner text of HTML Elements using text() method
Both text() and html() methods are used in jQuery to get and set the HTML elements inner text.
However, when you utilize the text() method for getting content of HTML elements, it removes the HTML markup after retrieving the matched elements.
So, if you want to get text, set text and the HTML markup of the elements at once, then go for the execution of the html() method; otherwise, the text() method got you covered.
Syntax of text() method
To get the content of HTML elements:
$(selector).text()
To get and set content of HTML elements:
$(selector).text(value)
To get and set content of HTML elements by utilizing a function:
$(selector).text(function(index,currentvalue))
Here, “value” is the content which you want to set as text of HTML elements, “index” is added to return the index position in the HTML element set, lastly, “currentvalue” is added to retrieve the current content of a specific HTML element.
Example: Get and Set the inner text of HTML Elements using text() method
Now, we will execute the previous given example with the help of “text()” method for getting and setting the text of all “p” HTML elements.
Here is the code which we have added in the “index.html” file:
<button>Change p elements content</button><p>This is the first paragraph.</p><p>This is the second paragraph.</p>
![]() In our “myProject.js” file, we will invoke the “text()” method to set the inner text of all paragraph elements to “This is linuxhint.com”:
$(document).ready(function(){
$("button").click(function(){
$("p").text("This is linuxhint.com");});});
In our “myProject.js” file, we will invoke the “text()” method to set the inner text of all paragraph elements to “This is linuxhint.com”:
$(document).ready(function(){
$("button").click(function(){
$("p").text("This is linuxhint.com");});});
![]() Clicking on the “Set content” button will change the text of the added paragraph elements to “This is linuxhint.com”:
Clicking on the “Set content” button will change the text of the added paragraph elements to “This is linuxhint.com”:
![]()
Get and Set inner text of HTML Elements in jQuery using val() method
When you add HTML form elements in your application, you can use the “val()” method to get and set the attribute value of the specified HTML elements.
It returns the attribute of the first matched HTML element when it is invoked for getting a value and in case of setting the attribute value, it changes the attribute value for all matched HTML elements.
Syntax of val() method
To get the attribute value of HTML elements:
$(selector).val()
To get and set attribute value of HTML elements:
$(selector).val(value)
To get and set attribute value of HTML elements by utilizing a function:
$(selector).val(function(index,currentvalue))
In the above-given syntax, “value” is the specified value which you want to modify for an attribute of HTML element, “index” is added to return the index position in the HTML element set, lastly, “currentvalue” is added to retrieve the current attribute value of the selected HTML element.
Example: Get and Set inner text of HTML Elements in jQuery using val() method
The below-given example will change the attribute value of the “input field” that is added in our “index.html” file:
<p>Name: <input type="text" name="website"></p><button>Set the value</button>
![]() For this purpose, we will utilize the “myProject.js” file to sets its value to “This is linuxhint.com” by using the val() method:
$(document).ready(function(){
$("button").click(function(){
$("input:text").val("This is linuxhint.com");
});
});
For this purpose, we will utilize the “myProject.js” file to sets its value to “This is linuxhint.com” by using the val() method:
$(document).ready(function(){
$("button").click(function(){
$("input:text").val("This is linuxhint.com");
});
});
![]() We will click on the “Set the value” button, and the string “This is linuxhint.com” will be set in the input field:
We will click on the “Set the value” button, and the string “This is linuxhint.com” will be set in the input field:
![]() The above-given output declares that we have successfully set the value of the added input field.
The above-given output declares that we have successfully set the value of the added input field.
Conclusion
The html(), text(), and val() are the most useful methods that can be utilized to get and set the inner text of HTML elements in jQuery.
text() method gets and sets the content of HTML elements whereas, the html() method also sets its HTML markup.
You can also invoke the val() HTML method for changing attribute values.
This write-up discussed the methods to get and set the inner text of HTML elements in jQuery by providing appropriate examples.
How to convert JavaScript Object into JSON string format
If you are using any web application, then there exist chances that you are utilizing the JavaScript Object Notation or JSON to organize, store, and send data between the server and that specific application.
With the help of the JSON.stringify() method, you can easily convert a JavaScript object into a string that will have a valid JSON format.
It is typically used for generating a ready-made string that can be delivered to a server.
This write-up will explain JSON.stringify() method.
We will also demonstrate the examples related to using JSON.stringify() method with replacer array, replacer function, and space parameter in this article.
So, let’s start!
What is JSON.stringify() Method
As a JavaScript developer, you may need to serialize the data to string to store in the application’s database or send it to any web server or an API.
If you need to send any specific data to a web server, it must be in string format.
Syntax of JSON.stringify() Method
JSON.stringify(value, replacer, space);
You can see from the above-given syntax that the JSON.stringify() method has there parameters: “value”, “replacer”, and “space”:
The first parameter, “value” represents the “object” that we will convert into a string.
The second parameter, “replacer” represents an array or any modifying function that can be utilized as a filter for the JSON.stringify() method.
Lastly, the “space” parameter controls spaces in the final generated string.
The “replacer” and “space” parameters are optional, whereas you must pass any object as “value” to the JSON.stringify() method so that it can return a string.
Example: JSON.stringify() Method
In the below-given example, we will utilize the JSON.stringify() method for converting an object in a string.
For this purpose, firstly we will create a JavaScript object “obj” and add some key-value pairs for it:
var obj = { "name":"Alex", "age":25, "city":"Paris"};
Next, we will pass “obj” to the JSON.stringify() method and the returned string will be stored in “JSON”:
var JSON = JSON.stringify(obj);
After invoking the JSON.stringify() method, the keys added in our “obj” JavaScript object are converted into a string, however, the specified method processed their values based on their type:
console.log(JSON);
You can utilize any online coding sandbox or your favorite code editor for executing the provided JavaScript program; however, we will use the Visual Studio Code:
![]() The output of the above program shows that the JSON.stringify() method has successfully converted the added object into a string:
The output of the above program shows that the JSON.stringify() method has successfully converted the added object into a string:
![]()
JSON.stringify() Method with replacer
As mentioned above, “replacer” is an argument passed to the JSON.stringify() method for making changes into a JavaScript object before its conversion into a string.
The “replacer” parameter of JSON.stringify() method can be an array or a function.
We will provide you examples related to both cases.
Example: JSON.stringify() Method with replacer function
To define a replacer function, first, you have to specify “key” and “value” as its arguments.
After that, you can add any conditional statements in its body and set this function to return a “value”.
In this example, we will try to convert the value of an object into uppercase letters before converting it into a string.
To do so, we will create a “obj” JavaScript object having three key-values pairs:
var obj = { "name":"Alex", "age":"20", "city":"Paris"};
Then, we will invoke the JSON.stringify() method and add the replacer function to convert the value of “city” key into uppercase letter.
After performing this operation, the JSON.stringify() method will convert “obj” to string and store the returned value in “text”:
var text = JSON.stringify(obj, function (key, value) {if (key == "city") {return value.toUpperCase();} else {return value;}});
Lastly, we will display the converted string using the console.log() method:
console.log(text);
![]() Check out the below-given output; the value of the “city” key is now in uppercase letters:
Check out the below-given output; the value of the “city” key is now in uppercase letters:
![]()
Example: JSON.stringify() Method with replacer array
Now, we will pass a replacer array into the JSON.stringify() method as an argument.
For this purpose, we will create an “obj” JavaScript object with the following “key: value” pairs:
var obj = { "name":"Alex", "age":25, "city":"Paris"};
Next, we will pass the “obj” as a value and “[‘name’, ‘age’]” as an array.
Upon doing so, the JSON.stringify() method will only convert the keys added into the passed array.
The value returned by the invoked method will be stored in “JSON”:
var JSON = JSON.stringify(obj, ['name', 'age']);
console.log(JSON);
![]() Here is the output we got from by passing replacer array in our JSON.stringify() method:
Here is the output we got from by passing replacer array in our JSON.stringify() method:
![]()
JSON.stringify() Method with space
“space” is another optional parameter added in the “JSON.stringify()” method for controlling the presentation or display of the converted string.
A “number” is added as space that represents the number of blank spaces you want to place at the start of a line where the string outputs start.
Example: JSON.stringify() Method with space
In our JavaScript program, we will invoke the JSON.stringify() method while adding space parameter.
To do so, we will create a JavaScript object named “obj”, having the following three “key: value” pairs:
var obj = { "name":"Alex", "age":"25", "city":"Paris"};
After that, we will utilize the JSON.stringify() method for converting our JavaScript object “obj” to a “text” string.
Note that we have added “4” as a space parameter that represents the number of spaces before the string starts:
var text = JSON.stringify(obj, null, 4);
console.log(text);
![]() As you can see from the above-given output that four spaces are successfully added before each“key: value” pair.
As you can see from the above-given output that four spaces are successfully added before each“key: value” pair.
Conclusion
The JSON.stringify() method converts a JSON object into a string.
In the JSON.stringify() method, you can specify various parameters such as replacer and space to change any key-value or control the spaces in the output.
This write-up explained JSON.stringify() method with the demonstration of the examples using replacer array, replacer function, and space.
How to Style HTML Elements in jQuery
Style properties for selected HTML elements are assigned or returned using the jQuery css() method.
When it is utilized as a getter function, it returns the property value of the first matched HTML element.
You can also use it to set single or multiple CSS properties of all matching elements.
This write-up will discuss the procedure to style HTML elements in jQuery.
We will also demonstrate some appropriate examples related to the css() method.
So, let’s start!
How to get CSS property of HTML Elements in jQuery
In jQuery, you can get the specified CSS property of the HTML elements by passing the “propertyName” as an argument in the css() method.
To do so, you have to follow the below-given syntax:
$(selector).css("propertyName");
You can add a jQuery “selector” for selecting the HTML elements, and the css() method is utilized to retrieve the values of the passed property.
Example: Getting CSS property of HTML Elements in jQueryIn our “index.html”, we have added a button and three paragraphs elements and set their “background-color” CSS property value:
<p style="background-color:#ff0000">This is 1st paragraph.</p><p style="background-color:#706d5a">This is 2nd paragraph.</p><p style="background-color:#ee1971">This is 3rd paragraph.</p><button>check background</button>
![]() Next, in our JavaScript file which is named as “myProject.js”, we will write-out the following code:
$(document).ready(function(){
$("button").click(function(){
alert("Background color = " + $("p").css("background-color"));
});});
When the user clicks the “check background” button, jQuery will search for the “p” or paragraphs and get the “background-color” CSS property of the first matched element.
In the end, an alert box will be shown on the browser comprising the property value of “background-color”:
Next, in our JavaScript file which is named as “myProject.js”, we will write-out the following code:
$(document).ready(function(){
$("button").click(function(){
alert("Background color = " + $("p").css("background-color"));
});});
When the user clicks the “check background” button, jQuery will search for the “p” or paragraphs and get the “background-color” CSS property of the first matched element.
In the end, an alert box will be shown on the browser comprising the property value of “background-color”:
![]() After adding the code in our “index.html”, we will execute it by using the “Liver Server” VS Code extension:
After adding the code in our “index.html”, we will execute it by using the “Liver Server” VS Code extension:
![]() Clicking on the “check background” button will let you know about the background-color CSS property of the first paragraph in an alert box:
Clicking on the “check background” button will let you know about the background-color CSS property of the first paragraph in an alert box:
![]()
How to set CSS property of HTML Elements in jQuery
jQuery css() method also permits you to set the CSS properties of HTML elements.
If you want to change the property values of an HTML element, then pass the “propertyName” and “value” as arguments to the css() method.
Both of the arguments should be separated by comma:
$(selector).css("propertyName", "value");
Example: Setting CSS property of HTML Elements in jQueryIn this example, we will set the “background-color” CSS property of all of the paragraph elements:
<h2>This is a heading</h2><p style="background-color:#cac39b">This is 1st paragraph.</p><p style="background-color:#82cc82">This is 2nd paragraph.</p><p style="background-color:#acacc8">This is 3rd paragraph.</p><p>This is a paragraph.</p><button>Set background-color of p</button>
![]() When the user will click the provided button, it will set the background-color of each paragraph element to “yellow”:
$(document).ready(function(){
$("button").click(function(){
$("p").css("background-color", "yellow");
});});
When the user will click the provided button, it will set the background-color of each paragraph element to “yellow”:
$(document).ready(function(){
$("button").click(function(){
$("p").css("background-color", "yellow");
});});
![]() You can see from the below-given output that the “background-color” CSS property value of the paragraph elements is now changed to “yellow”:
You can see from the below-given output that the “background-color” CSS property value of the paragraph elements is now changed to “yellow”:
![]()
How to set Multiple CSS properties of HTML Elements in jQuery
For setting multiple CSS properties of HTML elements with the css() method, you have to follow the below-given syntax:
css({"propertyname":"value","propertyname":"value",...});
Here, you have to write the properties and their values in a key value object format, separated by commas.
Example: Setting Multiple CSS properties of HTML Elements in jQueryIn this example, we will change the “background-color” and “font-size” for all of the added paragraph elements:
<h2>This is a heading</h2><p style="background-color:#cac39b">This is 1st paragraph.</p><p style="background-color:#82cc82">This is 2nd paragraph.</p><p style="background-color:#acacc8">This is 3rd paragraph.</p><p>This is a paragraph.</p><button>Set multiple css properties</button>
![]() On “button” click event, jQuery will select the paragraphs element and sets their background-color to “yellow” and font-size to “150%”:
$(document).ready(function(){
$("button").click(function(){
$("p").css({"background-color": "yellow", "font-size": "150%"});
});});
On “button” click event, jQuery will select the paragraphs element and sets their background-color to “yellow” and font-size to “150%”:
$(document).ready(function(){
$("button").click(function(){
$("p").css({"background-color": "yellow", "font-size": "150%"});
});});
![]()
![]() The above-given output signifies that we have successfully set the specified multiple CSS properties of the selected HTML Elements.
The above-given output signifies that we have successfully set the specified multiple CSS properties of the selected HTML Elements.
Conclusion
jQuery css() method is utilized for styling or changing the CSS properties of the selected HTML elements.
It can be used in various ways, from getting CSS property value to setting single and multiple HTML properties.
This write-up discussed the procedure to style HTML elements in jQuery, and we have also demonstrated some appropriate examples related to the css() method.
How to access Object Values
A JavaScript object comprises some keys and their corresponding values.
In certain situations, you may only need to access the values stored in an Object.
For instance, we have created an object that stores the player’s names on a leaderboard, and we need to write a JavaScript program for getting the names rather than the keys associated with them.
In such a scenario, “Object.values()” is a method that you can use in your JavaScript code.
This method accesses the object values effortlessly.
In this write-up, we will explain the procedure to access object values with the help of suitable examples.
So, let’s start!
Object.values() Method
In JavaScript, Object.values() method is utilized for accessing the object values.
This method accepts a JavaScript object as an argument and returns an array whose elements contain the enumerable property values of the specified Object.
Also, Object.values() method retrieves the object values in the same order they are added during object declaration.
Syntax of Object.values() Method
Object.values(obj)
In the above-given syntax, “obj” represents the Object whose enumerable property values will be returned by the Object.values() method.
Now, check out the provided examples to know how to access object values.
Example 1: Access Single Object Values using Object.values() method
For the demonstration purpose, firstly, we will create a JavaScript object named “myObject” having three key: value pairs as follows:
constmyObject={
x: 'sharqa',
y: 0,
z: true };
Once “myObject” is declared, we can access its object values by using the “Object.values()” method:
console.log(Object.values(myObject));
You can see from the given output that the Object.values() method has returned the values of our “myObject” in the form of an array with the same order in which they are initially added:
![]()
Example 2: Access Multiple Object Values using Object.values() method
You can also access multiple object values by using the Object.values() method.
For instance, we have created two objects, “obj1” and “obj2” and then added three “key: value” pairs to both of them:
constobj1={
x: 'Alex',
y: 25,
z: false};
constobj2={
a: 'Stepheny',
b: 23,
c: true };
Now, to access the values of the declared multiple objects, we will invoke “Object.values()” method two times while passing the “obj1” and “obj2,” respectively.
Also, console.log() will display the values of these objects in the console window:
console.log(Object.values(obj1),Object.values(obj2));
Have a look at the below-given output:
![]()
How Object.values() method works
We have already mentioned that Object.values() accepts an object as an argument.
After that, it declares an empty array such as “values“, as shown in the below-given example.
Then, it iterates through the properties of the added Object, and for each property, it pushes its value to the “values” array.
At the end of the iteration, the “values” array will be returned by the “Object.values()” method:
Object.values = function(myObject) {
var values = [];
for(varproperty in myObject) {
values.push(myObject[property]);
}
returnvalues; }
After defining the “Object.values()” method with the discussed functionality, we will create an “info” object and pass it as an argument to the “Object.values()” method:
var info = {x:11, y:22, z:33};
console.log(Object.values(info));
![]() The above-given output signifies that we have successfully implemented the functionality of the Object.values() method in our JavaScript program.
The above-given output signifies that we have successfully implemented the functionality of the Object.values() method in our JavaScript program.
Conclusion
The Object.values() method is used to access the object values.
This JavaScript method takes an object as an argument and returns its property values in an array.
It also iterates over each property to retrieve its value.
This write-up discussed the procedure to access object values using the Object.values() method with the help of appropriate examples.
How to Use Feather Icons in HTML and CSS
Feather icons are a collection of fonts that can be used in applications and websites.
It offers Scalable Vector Graphics icons that are highly customizable in terms of shadow, color, size, and any other property that CSS can handle.
Developers and designers working on various platforms can download the increasing Feather font icon collection and utilize it according to their preferences.
This write-up will discuss the method to use Feather icons in HTML and CSS.
Moreover, examples related to the specified procedure will be provided.
So, let’s start!
Note: Before moving towards, ensure that you have installed Feather icons.
If you do not have it already, then follow the below-given section.
How to install Feather icons
There are various methods for installing Feather icons; however, we have compiled the easiest one for you to embed Feather icons in HTML and CSS without any hassle.
Method 1: Installing Feather icons using CDN
Content Delivery Network (CDN) provides access to the JavaScript files that are utilized by people all around the world.
You can use any of the following links for adding Feather icons to your HTML file:
<script src="https://cdn.jsdelivr.net/npm/feather-icons/dist/feather.min.js"></script>
OR
<script src="https://unpkg.com/feather-icons"></script>
Method 2: Installing Feather icons using npm library
“feather-icons” is an npm library used to integrate Feather font to any JavaScript application.
If you want to install feather icons using the npm library, you have to execute this command in the terminal:
npm install feather-icons –save
Method 3: Installing Feather icons by downloading its collection
First of all, download the zipped folder of the Feather icons and then copy the “font/” and “css/” directories to your project.
Next, move to your HTML file and specify the path of the “feathericon.min.css” file in the “<link>” tag:
<link rel="stylesheet" href="[path/to/css/feathericon.min.css">
How to use Feather icons in HTML and CSS
To demonstrate the procedure of using Feather icons in HTML and CSS, we will create a new HTML file named “myFile.html” in Visual Studio Code:
![]() In “myFile.html” file, firstly, we will add the link of the Feather Icon package as a source, within the “<script>” tag:
<!DOCTYPE html>
<html lang="en">
<script src="https://unpkg.com/feather-icons"></script>
<body>
Then, we will specify the icons using “data-feather” attribute value in the <i> tag.
You can see from the given code, we are using “star”, “square”, “bell”, and “award” Feather icons in HTML file:
<h1>We are using Feather Icons in HTML And CSS</h1>
<!-- example icon -->
<i data-feather="star"></i>
<i data-feather="square"></i>
<i data-feather="bell"></i>
<i data-feather="award"></i>
Lastly, we will invoke the feather.replace() method for replacing the DOM elements with the added feather icons:
<script>
feather.replace()
</script>
</body>
</html>
Here is how the complete code looks in our “myFile.html”:
In “myFile.html” file, firstly, we will add the link of the Feather Icon package as a source, within the “<script>” tag:
<!DOCTYPE html>
<html lang="en">
<script src="https://unpkg.com/feather-icons"></script>
<body>
Then, we will specify the icons using “data-feather” attribute value in the <i> tag.
You can see from the given code, we are using “star”, “square”, “bell”, and “award” Feather icons in HTML file:
<h1>We are using Feather Icons in HTML And CSS</h1>
<!-- example icon -->
<i data-feather="star"></i>
<i data-feather="square"></i>
<i data-feather="bell"></i>
<i data-feather="award"></i>
Lastly, we will invoke the feather.replace() method for replacing the DOM elements with the added feather icons:
<script>
feather.replace()
</script>
</body>
</html>
Here is how the complete code looks in our “myFile.html”:
![]() Open the file in the browser and check out the Feather icons which we have used in the “myFile.html” file:
Open the file in the browser and check out the Feather icons which we have used in the “myFile.html” file:
![]() At this point, you have set the basic layout of the Feather icons in the HTML file.
So, now, if you want to customize the Feather icons style, you can perform this operation with the help of CSS.
In our “style.css” file, we will define three classes to set the size of the Feather icons:
.feather-10{
width: 10px;
height: 10px;}
.feather-24{
width: 24px;
height: 24px;}
.feather-48{
width: 48px;
height: 48px;}
At this point, you have set the basic layout of the Feather icons in the HTML file.
So, now, if you want to customize the Feather icons style, you can perform this operation with the help of CSS.
In our “style.css” file, we will define three classes to set the size of the Feather icons:
.feather-10{
width: 10px;
height: 10px;}
.feather-24{
width: 24px;
height: 24px;}
.feather-48{
width: 48px;
height: 48px;}
![]() To apply these settings to a Feather icon, you have to mention the required CSS class in the following way:
<i class="feather-40" data-feather="circle"></i>
To apply these settings to a Feather icon, you have to mention the required CSS class in the following way:
<i class="feather-40" data-feather="circle"></i>
![]() Again save your HTML file, open it to your favorite browser, and note the difference in the styling of the Feather icons:
Again save your HTML file, open it to your favorite browser, and note the difference in the styling of the Feather icons:
![]() That was all about the basic use of Feather icons in HTML and CSS.
To explore further, check out the Feather icons documentation.
That was all about the basic use of Feather icons in HTML and CSS.
To explore further, check out the Feather icons documentation.
Conclusion
To use Feather icons in HTML and CSS, you have to install them first using CDN, npm library, or by downloading its related files from the official website.
After installing Feather icons, you can integrate its beautiful collection of icons and style them according to your preferences using CSS.
This write-up discussed the method to use Feather icons in HTML and CSS.
Moreover, examples related to the specified procedure are also provided.
How to Receive and Parse JSON Data from the Server
JSON is a popular data format utilized to exchange information between servers and web applications.
The data that you receive from a server is in the form of a “string,” and you can use the “JSON.parse()” method for converting the string into a JavaScript object.
This write-up will explain the usage of the JSON.parse() method.
Moreover, the examples related to the JSON.parse() method for parsing strings, arrays, date objects, and functions will be demonstrated.
So, let’s start!
What is JSON.parse() Method
The JSON.parse() method accepts a string as an argument and converts it into a JavaScript object by parsing.
Here, parsing is the process that divides the strings into different parts and then identifies their relationship with one another.
Syntax of JSON.parse() Method
JSON.parse( string, function )
The above-given syntax states that the JSON.parse() method accepts “string” written in valid JSON format, and “function” is an optional parameter added for transforming the results.
Example: JSON.parse() Method for parsing string
In the following example, we will parse the data using JSON.parse() method.
First of all, we will store the received data in a “string1” variable as a string:
const string1 = '{"name":"Alex", "age":25, "city":"Paris"}'
In the next step, we will invoke the JSON.parse() method for converting “string1” into an “obj” object:
const obj = JSON.parse(string1);
You can also check the type of “string1” and “obj” by using the “typeof()” function:
console.log(typeof(string1));
console.log(typeof(obj));
Lastly, we will access the values of the “name” and “age” properties from the converted object and show it as output:
console.log(obj.name + ", " + obj.age);
You can utilize any online coding sandbox or your favorite code editor for executing the provided JavaScript program; however, we will use the Visual Studio Code:
![]() We will run the above-given program using the “Live Server” extension of VS Code.
It will display “Alex” as “name” and its age as “25” and also shows the type of “string1” and “obj” in the console window:
We will run the above-given program using the “Live Server” extension of VS Code.
It will display “Alex” as “name” and its age as “25” and also shows the type of “string1” and “obj” in the console window:
JSON.parse() Method for parsing Array
In JavaScript, the JSON.parse() method can be invoked on a JSON object that is derived from an array As a result of it, this method returns a JavaScript array rather than an object.
Example: JSON.parse() Method for parsing Array
In the below-given example, we will parse an array by calling the JSON.parse() method.
We will create an object “myArray” by parsing the JSON “text” string:
const text = '[ "Apple", "Mango", "Pear", "Plum" ]';const myArray = JSON.parse(text);
Then, we will get the content of the Array element and display it in the paragraph:
console.log(myArray[0]);
![]() The element present at the index “0” of “myArray” can be seen in the output:
The element present at the index “0” of “myArray” can be seen in the output:
![]()
JSON.parse() Method for parsing Date
JSON syntax does not permit you to use the date objects.
If you want to create a date object in your JavaScript program, you have to add it as a string, which can be converted back into a date object.
Example: JSON.parse() Method for parsing Date
In the below-given example, we have included “birthDate” in the “text” string:
const text = '{"name":"Alex", "birthDate":"1998-01-25", "city":"Paris"}';
By invoking the JSON.parse() method, we parse the “text” string:
const obj = JSON.parse(text);
Then, in the next step, we will convert the parsed string back to the date object in the following way:[cc lang="javascript" escaped="true" theme="blackboard" nowrap="0"]
obj.birth = new Date(obj.birthDate);
console.log(obj.name + ", " + obj.birth);
![]() Here is the output we got from executing the above-given code:
Here is the output we got from executing the above-given code:
![]()
JSON.parse() Method for parsing Functions
Similar to the date object, functions are also not allowed in the JSON format.
For including a function in JSON.parse() method, you have to add it as a string and then convert it to a function.
Example: JSON.parse() Method for parsing Functions
We will parse functions using the JSON.parse() functions in the below-given example.
Firstly, we will add a string that comprises a function for the “age” property and will return “25”:
const text = '{"name":"Alex", "age":"function() {return 25;}", "city":"Paris"}';
Then, we will parse the “text” and create a JSON object for storing the value:
const obj = JSON.parse(text);
After doing so, we will utilize the “eval()” JavaScript function for evaluating the age string as JavaScript code and for its execution:
obj.age = eval("(" + obj.age + ")");
Lastly, we will get the “obj.name” and “obj.age” values and display it in the added paragraph:
console.log(obj.name + ", " + obj.age());
![]() The given output shows that added function is parsed successfully by utilizing the JSON.parse() method.
The given output shows that added function is parsed successfully by utilizing the JSON.parse() method.
Conclusion
In JavaScript, the JSON.parse() method is utilized for parsing the string, which is the data received from the webserver.
JSON.parse() method will then return a JavaScript object and you can access the parsed data with the help of it.
This write-up explained the usage of the JSON.parse() method.
Moreover, the examples related to the JSON.parse() method for parsing strings, arrays, date objects, and functions are also demonstrated in this article.
How to write and run your first Node.js program on Ubuntu
Node.js is a cross-platform and open-source JavaScript runtime environment.
You can utilize Node.js to develop scalable and robust applications.
It is an event-driven and lightweight environment that can handle multiple concurrent connections on a single process with minimum overhead.
It is also used in chat and messaging, data streaming, I/O bound, and JSON APT-based applications.
This write-up will demonstrate the procedure to write and run your first Node.js program on Ubuntu.
First and foremost, you must install the Node.js and npm package on your Ubuntu system by following the below-given section.
How to install Node.js on Ubuntu
Node.js is based on the v8 JavaScript engine of Chrome and can be easily installed on various operating systems such as Windows, macOS, and Linux-based systems e.g.
Ubuntu.
Each Module in Node.js can be grouped into a single package.
Before installing Node.js, you have to make sure that existing packages of your system are updated.
For this purpose, press “CTRL+ALT+T” to open the terminal and then execute the following command in it:
$ sudo apt-get update
![]() Now, write out the below-given command for installing Node.js on your Ubuntu system:
$ sudo apt install nodejs
Now, write out the below-given command for installing Node.js on your Ubuntu system:
$ sudo apt install nodejs
![]() Enter “Y” to permit the Node.js installation procedure to continue:
Enter “Y” to permit the Node.js installation procedure to continue:
![]() The above-given error-free output signifies that we have successfully installed Node.js on our system.
For the verification purpose, we will execute the “node” command with the “-v” option:
$ node -v
Here, “v10.19.0” represents the version number of our Node.js:
The above-given error-free output signifies that we have successfully installed Node.js on our system.
For the verification purpose, we will execute the “node” command with the “-v” option:
$ node -v
Here, “v10.19.0” represents the version number of our Node.js:
![]() Lastly, utilize the given command for installing “npm,” which is the package manager of the Node.js:
$ sudo apt install npm
Lastly, utilize the given command for installing “npm,” which is the package manager of the Node.js:
$ sudo apt install npm
![]() Wait for a few minutes, as “npm” will take some time to complete the installation process:
Wait for a few minutes, as “npm” will take some time to complete the installation process:
![]() Type “y” and press Enter to grant permission:
Type “y” and press Enter to grant permission:
![]() At this point, Node.js and npm are installed successfully, and we are all ready to write our first Node.js program on our Ubuntu system.
At this point, Node.js and npm are installed successfully, and we are all ready to write our first Node.js program on our Ubuntu system.
How to write your first Node.js program on Ubuntu
To write your first Node.js program on a Ubuntu system, firstly create a new JavaScript file with the extension “js” and open it up in any command-line editor.
In our case, we will utilize the “nano” text editor and create our “hello.js” JavaScript file:
$ nano hello.js
![]() The created “hello.js” JavaScript file will be opened in the nano text editor:
The created “hello.js” JavaScript file will be opened in the nano text editor:
![]() As a beginner, you must step into Node.js programming slowly and gradually.
That’s why we will keep our first Node.js program simple.
Now, in the opened “hello.js” file, we will add the below-given statement and press “CTRL+S” to save it:
console.log("This is linuxhint.com");
In Node.js, the “console” is an object and the “log()” method with the “console” object will print out our added “This is linuxhint.com” string on the terminal:
As a beginner, you must step into Node.js programming slowly and gradually.
That’s why we will keep our first Node.js program simple.
Now, in the opened “hello.js” file, we will add the below-given statement and press “CTRL+S” to save it:
console.log("This is linuxhint.com");
In Node.js, the “console” is an object and the “log()” method with the “console” object will print out our added “This is linuxhint.com” string on the terminal:
![]() After saving the added code, press “CTRl+X” to exit from the opened nano text editor.
After saving the added code, press “CTRl+X” to exit from the opened nano text editor.
How to run your first Node.js program on Ubuntu
To check the output of a Node.js program, you have to run it with the help of the “node” command.
For instance, we have written a “hello.js” Node.js program in the previous section.
Now, to execute it, we will specify the file name “hello.js” in the “node” command and hit “Enter”:
$ node hello.js
![]() From the above-given image, you can see that the execution of our “hello.js” Node.js program outputs the string “This is linuxhint.com”, added in the “console.log()” method.
From the above-given image, you can see that the execution of our “hello.js” Node.js program outputs the string “This is linuxhint.com”, added in the “console.log()” method.
Conclusion
To write and run your first Node.js program in Ubuntu, firstly install node.js and NPM(Node Package Manager) using “sudo apt install nodejs” and “sudo apt install npm” commands respectively.
After installation, create a file with the “.js” extension, write Node.js code in it, and execute the file using the “node filename” command.
This write-up explained the procedure to write and run your first Node.js program on Ubuntu with a step-by-step guide.
jQuery Syntax | Explained
In jQuery syntax, all of the statements are based on a basic template that applies different methods and functions to the HTML elements and their related attributes.
You can also customize the jQuery syntax according to the added selector and action, which can be a method or function.
This write-up will explain jQuery Syntax in detail with the help of suitable examples.
So, let’s start!
jQuery Syntax | Explained
In jQuery, the first thing you have to do is select the HTML elements on which you want to perform any action.
The basic syntax of jQuery is as follows:
$(selector).action();
In the above-given jQuery syntax, you have to add a “$” sign for accessing or defining jQuery; then a “selector” is added within the parentheses, representing the query for finding the HTML elements.
Lastly, “action()” is the operation that will be performed on the selected HTML elements.
Now let’s check out the types of selectors you can add in the jQuery Syntax.
Types of Selectors in jQuery Syntax
jQuery selectors are considered an essential part of the jQuery library.
To utilize any jQuery methods, you must create a jQuery object by selecting a specific HTML element.
Various types of selectors exist in jQuery, such as Element Name Selector, Element #id Selector, and Element .class Selector.
For instance, to select all paragraph “p” elements, we will use the Element Name Selector in the following way:
$("p").hide()
You can also assign an id to an HTML element and then perform the same operation on it by utilizing the Element #id Selector:
$("#btnClick").hide()
With the help of Element .class Selector, you can select different HTML elements simultaneously which belongs to the same class:
$(".classname").hide()
Note: For selecting HTML elements using id, add hash character “#,” followed by the Element id and to find elements by utilizing their class name, add a “.” period character followed by the class name.
Document Ready Event in jQuery Syntax
Before working with a “document” in jQuery make sure that it is fully loaded and is all ready to use.
The “ready()” event of the “document” element can be utilized for this purpose:
$(document).ready(function(){
// Write out jQuery methods in the body});
The above-given method will prevent jQuery execution when the “document” element is not ready.
However, if you are trying to hide an HTML element that is not created yet, then the specified action will fail in this case.
So, ensure that the “document” is ready before running the jQuery code.
Here is a shorter method for writing the document ready event:
$(function(){
// Write out jQuery methods in the body});
Example: Using jQuery Syntax for hiding an HTML element
This example will demonstrate you the usage of jQuery syntax for hiding an HTML element with the help of Element Name Selector.
Firstly, in our “index.html” file we will add a heading with the “h2” tag, a paragraph using the “<p>” tag, and a “Click Me!” button:
<h2> find HTML Elements in jQuery</h2><p>This is the main paragraph with some sample text </p><button>Click Me!</button>
You can utilize any online coding sandbox or your favorite code editor for executing the program; however, we will use the Visual Studio Code:
![]() Next, move towards your JavaScript file, which is “myProject.js” in our case and write out following code in it:
$(document).ready(function () {
$("button").click(function () {
$("h2").hide();
});});
The provided code specified that jQuery “$(document).ready()” method will hide the HTML element with the “h2” element name when the user clicks the button:
Next, move towards your JavaScript file, which is “myProject.js” in our case and write out following code in it:
$(document).ready(function () {
$("button").click(function () {
$("h2").hide();
});});
The provided code specified that jQuery “$(document).ready()” method will hide the HTML element with the “h2” element name when the user clicks the button:
![]() After saving both files, we will open “index.html” by using VS Code “Liver Server” extension:
After saving both files, we will open “index.html” by using VS Code “Liver Server” extension:
![]() Now, we will click on the button highlighted in the below-given image:
Now, we will click on the button highlighted in the below-given image:
![]() As you can see, we have successfully hide the “h2” HTML element by following the jQuery Syntax:
As you can see, we have successfully hide the “h2” HTML element by following the jQuery Syntax:
![]() That was all about the basic syntax of jQuery.
You can explore it further according to your preferences.
That was all about the basic syntax of jQuery.
You can explore it further according to your preferences.
Conclusion
The $(selector).action() is the basic jQuery syntax that can be used for selecting HTML elements and applying specific action to them.
Once you have written the required code by following jQuery syntax, you can utilize the $(document).ready(function(){}) method for executing the program.
This write-up discussed jQuery syntax, types of jQuery Selectors, and the functionality of $(document).ready(function(){}) method in detail.
JSON Array Literals | Explained
A list of expressions representing array elements specified in a pair of square brackets is called JSON array literal.
When you create an array by utilizing a JSON array literal, the values of the JSON array literal are added as array elements, and its length is set according to the number of passed arguments.
This write-up will explain JSON array literal and its usage with the help of appropriate examples.
So, let’s start!
What is JSON Array Literal?
An array inside a JSON string is known as an array literal.
It is the same as arrays however it can only contain numbers, strings, booleans, arrays, objects, and null values except functions, expressions, dates, and undefined like arrays.
A JSON string:
jsonString = '["Apple", "Mango", "Orange"]';
An array literal in JSON string:
myArray = ["Apple", "Mango", "Orange"];
Creating a JSON string from an array
JavaScript permits you to create a JSON string from an array.
For this purpose, you have to declare a JavaScript array and then stringify the array to create a JSON string.
Example: How to create a JSON string from an array
In the below-given example, we will create an array named “myArray” having three string values “Apple”, “Mango”, and “Orange”:
const myArray = ["Apple", "Mango", "Orange"];
console.log(myArray);
You can utilize any online coding sandbox or your favorite code editor for executing the provided JavaScript program; however, we will use the Visual Studio Code:
![]() After adding the code in our “index.html”, we will execute it with the “Liver Server” VS Code extension:
After adding the code in our “index.html”, we will execute it with the “Liver Server” VS Code extension:
![]() The output shows the elements of our JavaScript “myArray”:
The output shows the elements of our JavaScript “myArray”:
![]() Now, to convert the array into the JSON string, JSON.stringify() method will be used as shown in the code snippet provided below:
let arrayLiteral = JSON.stringify(myArray);
Let’s show the “arrayLiteral” in the console along with its variable type using the typeof() method to verify whether the array is converted into string format or not.
console.log(arrayLiteral);
console.log(typeof(arrayLiteral));
The complete code snippet would go like this:
const myArray = ["Apple", "Mango", "Orange"];
console.log(myArray);
console.log(typeof(myArray));
let arrayLiteral = JSON.stringify(myArray);
console.log(arrayLiteral);
console.log(typeof(arrayLiteral));
The output of the above code snippet in the console will be:
Now, to convert the array into the JSON string, JSON.stringify() method will be used as shown in the code snippet provided below:
let arrayLiteral = JSON.stringify(myArray);
Let’s show the “arrayLiteral” in the console along with its variable type using the typeof() method to verify whether the array is converted into string format or not.
console.log(arrayLiteral);
console.log(typeof(arrayLiteral));
The complete code snippet would go like this:
const myArray = ["Apple", "Mango", "Orange"];
console.log(myArray);
console.log(typeof(myArray));
let arrayLiteral = JSON.stringify(myArray);
console.log(arrayLiteral);
console.log(typeof(arrayLiteral));
The output of the above code snippet in the console will be:
![]() The output verifies that the array is stringified successfully.
Note: The variable type of array is “Object”.
For further details, read our dedicated article’s section on arrays.
The output verifies that the array is stringified successfully.
Note: The variable type of array is “Object”.
For further details, read our dedicated article’s section on arrays.
Creating an array by parsing JSON string
Another method for creating a JavaScript array is to parse a JSON string and store its result in it.
In this case, you have to utilize the “JSON.parse()” method for parsing the added JSON string into the required data type.
Example: How to create an array by parsing JSON string
First of all, we will define a “myJSON” string having the following three values:
const myJSON = '["Cat", "Rabbit", "Pigeon"]';
In the next step, we will parse the “myJSON” string by invoking the “JSON.parse()” method.
The values returned by the specified method will be stored in “myArray”:
![]() Execute the above-given program, and check out its output:
Execute the above-given program, and check out its output:
![]() After parsing the JSON string into an array, you can also access an array element by using its index.
For instance, if we want to get the first Element of “myArray“, then we will add the following line in our JavaScript program:
console.log(myArray[1]);
After parsing the JSON string into an array, you can also access an array element by using its index.
For instance, if we want to get the first Element of “myArray“, then we will add the following line in our JavaScript program:
console.log(myArray[1]);
![]() The output will display “Rabbit” as it is the element that is present at the first index of “myArray”:
The output will display “Rabbit” as it is the element that is present at the first index of “myArray”:
![]()
Looping through the JSON array literal
If you want to loop through the values of JSON array literal, then the first thing you have to do is convert the JSON string into an array and use “for..in” or “for” JavaScript loops for the iteration.
Example: How to loop through the JSON array literal using for..in loop
In this example, we will utilize the “for..in” loop for looping through the added JSON array literal.
But before, that we will parse our “myJSON” string into “myObj” with the help of the “JSON.parse()” method:
const myJSON = '{"name":"Alex", "age":25, "hobbies":["Painting", "Gardening", "Gaming"]}';const myObj = JSON.parse(myJSON);
Next, we will declare an empty string “info”.
After doing so, we will loop through the parse JSON array literal by adding a “for..in” loop.
The result of each iteration will be appended to “info”:
let info = "";for (let i in myObj.hobbies) {
info += myObj.hobbies[i] + ", ";}
console.log(info);
![]() Example: Looping through the JSON array literal using for loop
In case of using “for” loop, you have to add the following code in your “index.html” file:
for (let i = 0; i < myObj.hobbies.length; i++) {
info += myObj.hobbies[i] + ", ";}
console.log(info);
Example: Looping through the JSON array literal using for loop
In case of using “for” loop, you have to add the following code in your “index.html” file:
for (let i = 0; i < myObj.hobbies.length; i++) {
info += myObj.hobbies[i] + ", ";}
console.log(info);
![]() The above-given output signifies that we have successfully looped through the JSON array literal with the “for” loop.
The above-given output signifies that we have successfully looped through the JSON array literal with the “for” loop.
Conclusion
Each JSON string has a JSON array literal which comprises some values.
The values added in the JSON string literal can be number, string, boolean, or null.
The JSON array literal values must be enclosed in square brackets [] and separated with a comma.
This write-up explained the JSON array literals and their usage in detail with the help of suitable examples.
How to find HTML Elements in jQuery
jQuery Selectors are utilized to find and manipulate HTML elements, and these selectors are considered an essential component of the jQuery library.
Using jQuery selectors, you can find HTML elements from Document Object Model based on the element name, class, id, attributes, and types.
This write-up will discuss the procedure to find HTML Elements in jQuery using Element Name Selector, Element #id Selector, and Element .class Selector. So, let’s start!
How to find HTML Elements in jQuery using Element Name Selector
In JQuery, you can find HTML elements using their “name,” and it should be passed in the parenthesis “()”.
Here is the syntax of using Element Name Selector.
Syntax of Element Name Selector
$("elementName")
In the above-given syntax, you have to add the “elementName” with the double quotation marks inside the parentheses.
Example: Find HTML Elements in jQuery using Element Name Selector
First of all, in our “index.html” file, we will add a heading with the “h2” tag, a paragraph using the “<p>” tag, and a “Click Me!” button:
<h2> find HTML Elements in jQuery</h2><p>This is the main paragraph with some sample text </p><button>Click Me!</button>
You can utilize any online coding sandbox or your favorite code editor for creating this project; however, we will use the Visual Studio Code:
![]() Next, move towards your JavaScript file, which is “myProject.js” in our case and write out following code in it:
$(document).ready(function () {
$("button").click(function () {
$("h2").hide();
});});
Using the $(“h2”) Element Name Selector, jQuery will search for the “h2” element and then hide it from the web page with the help of “hide()” method:
Next, move towards your JavaScript file, which is “myProject.js” in our case and write out following code in it:
$(document).ready(function () {
$("button").click(function () {
$("h2").hide();
});});
Using the $(“h2”) Element Name Selector, jQuery will search for the “h2” element and then hide it from the web page with the help of “hide()” method:
![]() After saving both files, we will open “index.html” with the help of VS Code “Liver Server” extension:
After saving both files, we will open “index.html” with the help of VS Code “Liver Server” extension:
![]() Clicking on the highlighted button will hide all of the <h2> heading elements of our web page.
Before clicking the button:
Clicking on the highlighted button will hide all of the <h2> heading elements of our web page.
Before clicking the button:
![]() After clicking the button:
After clicking the button:
![]() The Element Name Selector retrieves all HTML elements with the same name.
For instance, we have added $(“h2”) as the element name, so the Element Name Selector will select all <h2> heading elements of our web page and then apply the added settings to them.
However, if you want to find a specific HTML element, then you can utilize the Element #id Selector in jQuery().
The Element Name Selector retrieves all HTML elements with the same name.
For instance, we have added $(“h2”) as the element name, so the Element Name Selector will select all <h2> heading elements of our web page and then apply the added settings to them.
However, if you want to find a specific HTML element, then you can utilize the Element #id Selector in jQuery().
How to find HTML Elements in jQuery using Element #id Selector
To find HTML elements using element #id selector, we have to assign an id to that HTML element and it should be unique in a web page, as the Element #id Selector searches for the unique and single element.
Syntax of Element #id Selector
$("#my_id")
In the syntax of the Element #id Selector, you have to add the hash character “#,” followed by the “id” assigned to an HTML element.
Example: Find HTML Elements in jQuery using Element #id Selector
In our “index.html” file, we have added a paragraph, a “Click Me” button, and a heading with the “h2id” element id:
<h2 id="h2id">find HTML Elements in jQuery</h2><p>This is the main paragraph with some sample text </p><button>Click Me</button>
![]() To find the heading HTML element with the “h2id”, we will write out the following code in our “myProject.js” file:
$(document).ready(function () {
$("button").click(function () {
$("#h2id").hide();
});});
In this case, when we will click the button, the jQuery “$(“#h2id”)” method finds the HTML heading element with the “h2id” and hide it from the web page:
To find the heading HTML element with the “h2id”, we will write out the following code in our “myProject.js” file:
$(document).ready(function () {
$("button").click(function () {
$("#h2id").hide();
});});
In this case, when we will click the button, the jQuery “$(“#h2id”)” method finds the HTML heading element with the “h2id” and hide it from the web page:
![]() The added heading can be no longer seen after clicking the “Click Me” button:
The added heading can be no longer seen after clicking the “Click Me” button:
![]()
How to find HTML Elements in jQuery using Element .class Selector
Element #id Selector does not permit you to select two HTML elements simultaneously because both of them will have unique id values.
However, you can assign a class to different HTML elements and then utilize the Element .class Selector for finding the elements belonging to the same class.
Syntax of Element .class Selector
$(".myclass")
In the given syntax of Element .class Selector, you have to add a period character before writing out the class name, and it should be enclosed in parentheses.
Example: Find HTML Elements in jQuery using Element .class Selector
In this example, we will assign a class name “newclass” to the heading, paragraph element and button, which are added in our “index.html” file:
<h2 class="newclass">find HTML Elements in jQuery</h2><p>This is the main paragraph with some sample text </p><p class="newclass">this is the second paragraph</p><button class="newclass">Click Me</button>
Except for the first paragraph, all of the added HTML elements belong to the “newclass”:
![]() Now, firstly, we will find the HTML elements having class name “newclass”.
After that, we will hide them from our HTML page:
$(document).ready(function () {
$("button").click(function () {
$(".newclass").hide();
});});
Now, firstly, we will find the HTML elements having class name “newclass”.
After that, we will hide them from our HTML page:
$(document).ready(function () {
$("button").click(function () {
$(".newclass").hide();
});});
![]() Before clicking the button:
Before clicking the button:
![]() After clicking the button:
After clicking the button:
![]() The above-given output shows that we have successfully found the specified HTML elements using Element .class Selector and hid them from the web page.
The above-given output shows that we have successfully found the specified HTML elements using Element .class Selector and hid them from the web page.
Conclusion
Using Element Name Selector, Element #id Selector, and Element .class Selector, you can find HTML elements in jQuery.
Element Name Selector is utilized for selecting the HTML elements by their name.
In contrast, Element #id Selector finds a specific HTML element based on their unique id, and lastly, Element .class Selector retrieves them according to their class name.
This write-up discussed the procedure to find HTML Elements in jQuery using Element Name Selector, Element #id Selector, and Element .class Selector.
Window Object Methods | Explained
The Window Object is a global object automatically created for the currently opened browser window.
It is considered the object of the browser, not of JavaScript.
Window Object also comprises some methods that can be used for performing specific functions such as resizing the active window, displaying a prompt, decoding an encoded string, setting the time interval for performing operations, and much more.
This write-up will discuss Window Object methods.
We will demonstrate the usage of some useful Window Object Methods such as alert(), confirm(), prompt(), open(), and setTimeOut().
Moreover, a list of other JavaScript Window Object methods with their description will be also provided.
So, let’s start!
Window Object alert() method
The Window Object alert() method is utilized for displaying an alert box that contains the added string and has an “OK” button.
Example: Using Window Object alert() method
In this example, firstly, we will define a “msg()” function with the “alert()” window object method in its body.
After doing so, we will add a “Click Me” button and then attach the “msg()” function to its “onclick” event:
<!DOCTYPE html><html><script>
function msg(){
alert("We are learning Window Object Methods");
} </script> <input type="button" value="Click Me" onclick="msg()"/> </html>
Execute the above-given program in your favorite code editor or any online coding sandbox; however, we will utilize the JSBin for this purpose:
![]() Now, when we click on the highlighted button, an alert box will be displayed with the message “We are learning Window Object Methods”:
Now, when we click on the highlighted button, an alert box will be displayed with the message “We are learning Window Object Methods”:
![]()
Window Object confirm() method
In JavaScript, the confirm() Window Object method is used for showing a confirm dialog box that contains the added string and two buttons: “OK” and “Cancel”.
Example: Using Window Object confirm() method
In the below-given example, we will add a “msg()” function.
The “msg()” function will invoke the confirm() Window Object method with the specified message.
In case of clicking the “OK” button, it will show a prompt showing the “Yes” string, and for the “Cancel” button, it will display “No” on the prompt:
<!DOCTYPE html>
<html>
<script>
function msg(){
var v= confirm("Do you want to delete the record?");
if(v==true){
alert("Yes"); }
else{
alert("No"); }
}
</script>
Note that, we will attach the created “msg()” function, on the “onclick” event of the “Delete Record” button:
<input type="button" value="Delete Record" onclick="msg()"/>
</html>
![]() Here is the “Delete Record” button; clicking on it will show the below-given confirm dialog box:
Here is the “Delete Record” button; clicking on it will show the below-given confirm dialog box:
![]() We have clicked on the “OK” button, and the following prompt is displayed on the browser:
We have clicked on the “OK” button, and the following prompt is displayed on the browser:
![]() In case of clicking “Cancel”, our JavaScript program will show this prompt:
In case of clicking “Cancel”, our JavaScript program will show this prompt:
![]()
Window Object prompt() method
If you are looking for a Window Object method that can assist you in taking input from the user through a dialog box, you can use the “prompt()” method in your JavaScript code.
The “prompt()” Window Object method provides a text field and the specified message.
Example: Using Window Object prompt() method
In our JavaScript program, we have added a “Click Me” button, and on its “onclick” event, we will invoke the “showInfo()” function.
When the body of the “showInfo()” function will be executed, it will display a prompt asking you to enter your name, and then it will show the added name in an alert box when you will click on the “OK” button of the prompt:
<!DOCTYPE html>
<html>
<script>
function showInfo(){
var x= prompt("What is your name?");
alert("My name is "+x);
}
</script>
<input type="button" value="Click Me" onclick="showInfo()"/>
</html>
![]() Here, I have entered “sharqa” as name and then clicked on the “OK” button:
Here, I have entered “sharqa” as name and then clicked on the “OK” button:
![]() As you can see, the entered name is displayed in another alert box:
As you can see, the entered name is displayed in another alert box:
![]()
Window Object open() method
The Window Object open() method is utilized to display the added content in a new browser window.
Example: Using Window Object open() method
We have added a link in the “open()” Window Object method in the below-given example.
According to the provided code, when we will click the “linuxhint” button, the defined “openLink()” function will be invoked, and it will move the control to the new window.
The opened window will show the content of the added link:
<!DOCTYPE html>
<html>
<script>
function openLink(){
open("http://www.linuxhint.com"); }
</script>
<input type="button" value="linuxhint" onclick="openLink()"/>
</html>
![]() Clicking on the “linuxhint” button will open up our linuxhint website in the new window:
Clicking on the “linuxhint” button will open up our linuxhint website in the new window:
![]()
Window Object setTimeout() method
The setTimeOut() Window Object method performs a specified task after the added milliseconds.
Example: Window Object setTimeout() method
In the following example, the setTimeOut() method will be invoked when we will click the “Click Me” .
button.
Then, after “5” seconds, an alert box will appear on the browser window:
<!DOCTYPE html>
<html>
<script>
function message(){
setTimeout(
function(){
alert("Welcome to linuxhint.com after 5 seconds") },5000);
}
</script>
<input type="button" value="Click Me" onclick="message()"/>
</html>
![]() Here is the alert box which we have got after five seconds:
Here is the alert box which we have got after five seconds:
![]()
Other Window Object methods
Check out the list of some other useful Window Object methods:
| Window Object Method | Description |
|---|
| atob() | The Window Object atob() method is utilized for decoding a base-64 encoded string. |
| blur() | The Window Object blur() method is utilized for switching the focus from the active window. |
| btoa() | The Window Object btoa() method is utilized for encoding a string in base-64. |
| clearInterval() | The Window Object clearInterval() method is utilized to remove a timer set with setInterval() method. |
| clearTimeout() | The Window Object clearTimeout() method is utilized to remove a timer set with the help of the setTimeout() method. |
| close() | The Window Object close() method is utilized for closing the active window. |
| focus() | The Window Object focus() method is utilized for setting focus to the active window. |
| getComputedStyle() | The Window Object getComputedStyle() method is utilized for retrieving the active CSS styles that is applied to an HTML element. |
| getSelection() | The Window Object getSelection() method is utilized for displaying a Selection object which represents the text range selected by the user. |
| matchMedia() | The Window Object matchMedia() method is utilized to display a MediaQueryList that represents the specified media’s query string. |
| moveBy() | The Window Object moveBy() method is utilized for moving a browser’s window relative to its current position. |
| moveTo() | The Window Object moveTo() method is utilized for moving the browser’s window to the added position. |
| print() | The Window Object print() method is utilized to print the active window’s content. |
| requestAnimationFrame() | The Window Object requestAnimationFrame() method is utilized for requesting the browser to invoke the animation update function. |
| resizeBy() | The Window Object resizeBy() method is utilized for resizing the current window according to the added pixels. |
| resizeTo() | The Window Object resizeTo() method is utilized for resizing the current window to the specified height and width. |
| scrollBy() | The Window Object scrollBy() method is utilized for scrolling the document according to the specified number of pixels. |
| scrollTo() | The Window Object ScrollTo() method is utilized for scrolling the document according to the specified coordinate values. |
| stop() | The Window Object stop() method is utilized for stopping the window from being loaded. |
Conclusion
Window Object methods are invoked for performing specific functions for the window object, such as resizing the active window, displaying a prompt, decoding an encoded string, setting the time interval for performing operations, removing focus from the current window.
This write-up discussed Window Object methods.
We have demonstrated the usage of some useful Window Object Methods such as alert(), confirm(), prompt(), open(), and setTimeOut().
Moreover, a list of other JavaScript Window Object methods with descriptions is also provided.
AJAX – The XMLHttpRequest Object | Explained
Behind the scenes, the XMLHttpRequest object is used for exchanging data with a server.
This states that HTML page elements will be updated without reloading.
The XMLHttpRequest Object can make a lot of things easier for you which includes handling the user interaction of a web application.
This write-up will explain what AJAX – The XMLHttpRequest Object is and how you can create and use an XMLHttpRequest Object.
Moreover, we will also provide the methods and properties of the AJAX – The XMLHttpRequest Object.
So, let’s start!
What is XMLHttpRequest Object
The AJAX – The XMLHttpRequest object is an API that is utilized for retrieving data from a specific server.
AJAX programming makes extensive use of the XMLHttpRequest.
It can fetch any kind of data including text, XML, JSON.
In the background, the XMLHttpRequest Object requests for the data and then updates the website without requiring the client to reload the page.
To maintain the asynchronous communication between server and client, an object of type XMLHttpRequest Object is needed.
How to create an XMLHttpRequest Object
A built-in XMLHttpRequest object is avialble in all of the modern browsers such as Edge, Chrome, Firefox, Opera, and Safari.
To create an XMLHttpRequest object, you have to follow the below-given syntax of XMLHttpRequest Object:
var variableName = new XMLHttpRequest();
Example: Using AJAX – The XMLHttpRequest Object
In this example, we will try to fetch the content of the “ajax_info.txt” file from our server, and then we will replace the paragraph content with it:
<!DOCTYPE html><html><body><h1>AJAX - The XMLHttpRequest Object | Explained</h1>
Here, we have added a paragraph with the tag and a “Change paragraph” button which we will invoke the “loadingDoc()” function, when we will click this button:
<p id="p1">We will change this paragraph.</p><button type="button" onclick="loadingDoc()">Change paragraph</button><script>
In the loadingDoc() function, firstly, we will add a “xhttp” XMLHttpRequest object:
function loadingDoc() {
var xhttp = new XMLHttpRequest();
Next, we will add an event handler “onreadystatechange” which will be invoked whenever the “readyState” attribute changes its value.
If the request has been sent and the received response signifies that request has been succeeded, then it will be written in our HTML paragraph element:
xhttp.onreadystatechange = function() {
if (this.readyState == 4 && this.status == 200) {
document.getElementById("p1").innerHTML = this.responseText;
}
};
The “xhttp” XMLHttpRequest Object will get the “ajax_info.txt” file from the server and then with the help of the “send()” method, it will send the request to the server:
xhttp.open("GET", "ajax_info.txt", true);
xhttp.send();}</script></body></html>
Execute the above-given program in your favorite code editor or any online coding sandbox; however, we will utilize the JSBin for this purpose:
![]() From the given output, we will click on the “Change paragraph” button:
From the given output, we will click on the “Change paragraph” button:
![]() Clicking on the specified button will replace the current content of the paragraph with the text added in the “ajax_info.txt” server file:
Clicking on the specified button will replace the current content of the paragraph with the text added in the “ajax_info.txt” server file:
![]() Now let’s have a look at some of the useful properties and methods of XMLHttpRequest Object.
Now let’s have a look at some of the useful properties and methods of XMLHttpRequest Object.
Methods of XMLHttpRequest Object
| XMLHttpRequest Object Method | Description |
|---|
| abort() | The XMLHttpRequest Object “abort()” method is utilized for canceling the active request. |
| getResponseHeader() | The XMLHttpRequest Object “getResponseHeader()” method output the information related to a specific header. |
| getAllResponseHeader() | The XMLHttpRequest Object “getAllResponseHeader()” method displays the complete header information. |
| open() | The XMLHttpRequest Object “open()” method is utilized for specifying the request.
We can pass the user name, password, URL of a file, or method which can be “GET” or “POST” in this method. |
| send() | The XMLHttpRequest Object “send()” method is utilized for getting request. |
| sendRequestHeader() | The XMLHttpRequest Object “sendRequestHeader()” method is utilized for adding a “label: value” pair which you have to send to the server. |
Properties of XMLHttpRequest Object
| XMLHttpRequest Object Properties | Description |
|---|
| responseText | The XMLHttpRequest Object “responseText” property is utilized for displaying the response data as a string. |
| readyState | The XMLHttpRequest Object “readyState” property keeps the XMLHttpRequest status. |
| onreadystatechange | The XMLHttpRequest Object “onreadyststatechange” property is utilized for defining a function to be invoked whenever the value of the “readyState” changes. |
| responseXML | The XMLHttpRequest Object “responseXML” property displays the response data XML data. |
| statusText | The XMLHttpRequest Object “statusText” property outputs the status text such as “OK” or “Not Found”. |
Conclusion
The AJAX – The XMLHttpRequest object is an API that is utilized for retrieving data from a specific server.
AJAX programming makes extensive use of the XMLHttpRequest.
It can fetch any kind of data, including text, XML, JSON.
This write-up explained what AJAX – The XMLHttpRequest Object is and how you can create and use an XMLHttpRequest Object.
Moreover, we also provided the methods and properties of the AJAX – The XMLHttpRequest Object.
Invoking a Function
In JavaScript, functions are known as the building blocks based on a set of statements.
These sets of statements are used to perform defined specific tasks.
The functions can take input values called parameters and return an output value if required.
You can use the defined function multiple times just by calling it because functions are reusable pieces of code.
In this tutorial, we will learn how to invoke a function and execute a function.
Moreover, we will also look at the procedure of invoking a function that can be invoked without even being called.
Prerequisites of invoking a function
In JavaScript, a function should be defined and declared before invoking it in a program.
Definition: A function should be defined using the “function” keyword.
Declaration: A function must be declared with a name or you can also assign it to a variable.
Now, check out the syntax for defining a function.
Syntax of a function
Here, “fName” represents the function name, and “parameters_N” are the parameters which the defined function will accept:
function fName(parameters_N) {
// code for the execution}
The function definition and declaration are shown in the given example.
Example: Defining FunctionIn the below-given example, we will create an “addNumbers()” function having two parameters “a” and “b”.
The created function will return the sum of values passed as arguments:
function addNumbers(a,b){
return a + b;}
How to Invoke a function
After defining a function, we can call this function anywhere in the program; The term “Invoke a function” is the synonym of “call a function”.
Both terms are used alternatively.
Example: Invoking a functionAn “addFunction()” function is invoked in the given example by using its function name and we have also passed “111” and “232” numbers as arguments:
function addFunction(a, b) {
return a + b;}
addFunction(111, 232)
![]()
Function Expressions
In JavaScript, we can also define a function using expressions.
The function expressions are stored in the form of variables.
These variables are then added to the function at the time of declaration.
Example: Function ExpressionsIn the below-given example, a function expression is assigned to the “a” variable:
const a = function (x, y) {return x + y};
![]() When a function is stored in a variable, we can use these variables as the name of the function to invoke it.
Here, is an example of the given concept:
const a = function (x, y) {return x + y};
let b = a(4, 3);
When a function is stored in a variable, we can use these variables as the name of the function to invoke it.
Here, is an example of the given concept:
const a = function (x, y) {return x + y};
let b = a(4, 3);
![]()
Anonymous Function
The function which is called by a variable is also known as an anonymous function (a function without a name).
Note: The functions stored in variables do not have specific function names.
Invoke a function by using the “this” keyword
In JavaScript, when we use the “this” keyword with a function, it means “this” contains the current code as shown in the following example:
let x = myFunction();function myFunction() {
return this;}
Note: “this” is a global object, therefore it will return the window object.
![]()
Self-invoking function
A function that calls/invokes itself is known as a self-invoking function.
These functions are executed automatically, and they do not need any function calls.
To invoke a function by itself just put a parenthesis ‘()’ at the end of the expressions of function as shown below:
(function() {
var a = "Self call"; // Function will invoke itself
console.log(a);})();
The above-given function is an anonymous and self-invoking function that will produce the following output:
![]()
Invoking a function with function constructor
In constructor invocation, a function is invoked utilizing the “new” keyword.
By utilizing the “new” keyword, you can generate a new object that inherits the properties of the created constructor function.
Here is an example of invoking a function with a function constructor.
Example: Invoking a function with function constructorIn the following example, we will create a “x” object by invoking the “myArg()” function constructor:
// This is a function constructor:function myArg(arg1, arg2) {
this.radius = arg1;
this.height = arg2;}// This creates a new objectvar x = new myArg(6, 3);
console.log(x);
Here is the output, we got from executing the above-given JavaScript code:
![]()
Conclusion
A function is invoked when the code inside the function is executed by calling it.
The term invoking and calling a function is the same.
A function can be called multiple times only after defining it once.
This post discussed different methods for invoking functions.
Moreover, we have also explained the procedure of invoking function using this keyword, invoking function using a constructor, and self-invoking functions.
window.screen Object Properties | Explained
window.screen is a JavaScript built-in object type used to retrieve the information about the current browser window.
It comprises information related to the screen dimensions such as its width, height, color depth, pixel depth, available width, and available height.
This write-up will discuss window.screen object properties in JavaScript.
Moreover, the examples related to screen.width, screen.height, screen.availWidth, screen.availHeight, screen.colorDepth, and screen.pixelDepth window screen object properties will also be provided.
screen.width object property
The “screen.width” property of the window.screen object is utilized to display the width of the current screen window in pixels.
Example: Accessing screen.width object property
In the below-given example, we have added a paragraph with the tag “<p>” having an id “p1”:
<!DOCTYPE html><html><body><p id="p1"></p>
Now, we will display the width of the screen in pixels as content of the our paragraph:
<script>
document.getElementById("p1").innerHTML ="The width of the current screen is " + screen.width;</script></body></html>
Execute the above-given program in your favorite code editor or any online coding sandbox; however, we will utilize the JSBin for this purpose:
![]() As you can see from the output, the width of the current screen object is “1366”:
As you can see from the output, the width of the current screen object is “1366”:
![]()
screen.height object property
When we talk about the width of an object, another property that correlates with it comes to our mind which is “height”.
The screen.height property of a window.screen object shows the current screen’s height in pixels.
Example: Accessing screen.height object property
In this example, we will try to access the “screen.height” window.object property and will display its content inside a paragraph:
<!DOCTYPE html><html><body><p id="p1"></p><script>
document.getElementById("p1").innerHTML ="The height of the current screen is " + screen.height;</script></body></html>
![]() Here is the height of our current window.screen object in pixels:
Here is the height of our current window.screen object in pixels:
![]()
screen.availWidth object property
If you want to know about the available width for the current window object, then you can use the screen.availWidth property.
window.screen object properties such as availWidth and availHeight do not include space required by the features like the taskbar.
To determine the size of images for including in a document or creating a multiple browser windows, you can utilize the screen.availWidth and screen.availHeight object properties.
Example: Accessing screen.availWidth object property
Execute the following code to check the available width for your window.screen object:
<!DOCTYPE html><html><body><p id="p1"></p><script>
document.getElementById("p1").innerHTML ="The available width of the current screen is " + screen.availWidth;</script></body></html>
![]() The available width of the current screen is “1366”:
The available width of the current screen is “1366”:
![]()
window.availHeight object property
The “window.availHeight” property of the window.screen object is used to display the available height of the current window screen in pixels.
Example: Accessing window.availHeight object property
The following example will show you the current window object’s available height:
<!DOCTYPE html><html><body><p id="p1"></p><script>
document.getElementById("p1").innerHTML ="The available Height of the current screen is " + screen.availHeight;</script></body></html>
![]()
screen.colorDepth object property
The “screen.colorDepth” property of the screen object is utilized for displaying the depth of the images color palette.
This window.screen property specifies the base-2 logarithm of the color numbers.
Old computers used “16” bits and modern computers used “24” bits or “32” bits for color resolution.
Example: Accessing screen.colorDepth object property
Executing the below-given JavaScript program will show the screen’s color depth in bits:
<!DOCTYPE html><html><body><p id="p1"></p><script>
document.getElementById("p1").innerHTML ="The Color Depth of the current screen is " + screen.colorDepth;</script></body></html>
![]()
window.pixelDepth Object Property
The “window.pixelDepth” object property is used for returning the current screen’s pixel depth.
Example: Accessing window.pixelDepth Object Property
In the following example, we will display the pixel depth of the “window.screen” object as the content of our added paragraph HTML elements:
<!DOCTYPE html><html><body><p id="p1"></p><script>
document.getElementById("p1").innerHTML ="The Pixel Depth of the current screen is " + screen.pixelDepth;</script></body></html>
![]()
Conclusion
In JavaScript, the window.screen object is used for acquiring information related to the current user screen and the window.screen object properties are utilized to display the width, height, available width, available height, color depth, and pixel depth of the current screen.
This write-up discussed window.screen object properties.
Moreover, the examples related to screen.width, screen.height, screen.availWidth, screen.availHeight, screen.colorDepth, and screen.pixelDepth window screen object properties are also provided.
Working with Numbers | Explained with examples
In any programming, language numbers play a significant role; therefore, most of the programming languages defined different types of numbers.
However, JavaScript has only one type of number “floating-point numbers” that follows the IEEE 754 standards.
JavaScript, always stored the numbers in the form of floating-point or double-precision, and it stored the numbers in 64 bits.
numbers are also known as the fractions which are stored in bits from 0 to 51, the sign is stored in 63 bits and the exponent is stored in bits 52 to 62 bits.
In JavaScript a number can be used in the following forms:
Numbers with or without Decimals
To write the numbers in JavaScirpt with or without decimal points i as follows:
let a = 25;
let b = 3.55;
How to write extra-large or extra-small numbers
To write extra-large numbers the following syntax will be used:
let c = 2776e3 // 276000
let d = 43e-2 // 0.0043
Integer precision
As we discussed above, numbers are floating-point numbers; therefore, we should also know about the precision of an integer., an integer is accurate up to 15 digits as shown in the given example.
Example
let a =999999999999999; // a will be equal to 999999999999999
let b =9999999999999999; // b will be equal to 100000000000000
![]()
Floating Precision
Floating precision is also a part of floating-point numbers.
However, when we apply some arithmetic operation on floating numbers, their answer will not be accurate.
Have a look at the given example.
Example
let c = 0.7 + 0.2; // out will be 0.8999999999999999
![]() This problem can be solved by applying the multiplication and division operations on it.
let c = (0.7*10 + 0.2*10) / 10
This problem can be solved by applying the multiplication and division operations on it.
let c = (0.7*10 + 0.2*10) / 10
![]()
Number’s working with string
In JavaScript if we add a number with a number in string, then instead of addition, concatenation takes place.
As shown in the given example.
let a = 7;
let b = "45"
c = a+b;
![]() However, if we apply other arithmetic operations on two strings then in resultant we will get numbers instead of a string as shown in the following example.
let a = "70";
let b = "40";
let c = a / b;
let d = a * b;
let e = a -b;
console.log(c); // output will be 1.75
console.log(d); // output will be 2800
console.log(e); // output will be 30
However, if we apply other arithmetic operations on two strings then in resultant we will get numbers instead of a string as shown in the following example.
let a = "70";
let b = "40";
let c = a / b;
let d = a * b;
let e = a -b;
console.log(c); // output will be 1.75
console.log(d); // output will be 2800
console.log(e); // output will be 30
![]()
Symbolic number values
The floating-point numbers further have three types of symbolic values:
NaN (Not a Number)
+Infinity Number
-Infinity Number
NaN (Not a Number)
In JavaScript, if the result of some arithmetic operation is not a number then NaN is returned as shown in the code snippet given below:
let a = 5/ 'cat'
![]() Moreover, isNaN() is a global function available for checking if the value is a number or not, and by default its initial value is “Not-A-Number”.
The current browsers do not support this function because it is a non-writable and non-configured function.
The following program shows an example of isNaN().
Example
let x = 100 / "someString";
console.log(x);
isNaN(x);
Moreover, isNaN() is a global function available for checking if the value is a number or not, and by default its initial value is “Not-A-Number”.
The current browsers do not support this function because it is a non-writable and non-configured function.
The following program shows an example of isNaN().
Example
let x = 100 / "someString";
console.log(x);
isNaN(x);
![]()
Infinity
When it comes to calculation numbers, javascript has a limit and we can’t more than the largest possible number(1.7976931348623157e+308).
Now, any number above than the largest possible number would be considered as an Infinity.
Let’s divide a number with zero and check the result:
let x = 24/0;
console.log(x);
![]() In Javascript, the type of “infinity” is number:
typeof(x);
In Javascript, the type of “infinity” is number:
typeof(x);
![]()
Negative Infinity(-Infinity)
Just like Infinity, any number below than the smallest possible number(5e-324) would be considered as a Negative Infinity(-Infinity).
Let’s divide a number with zero and check the result:
let x = -24/0;
console.log(x);
![]()
Numbers as Object()
In javaScript numbers can also be represented in the form of an object.
We can define numbers as object by using the keyword “new”.
Take a look at the given example.
let a = 432; // a is a number
let b = new Number(432); // b is a Number object
console.log(typeof(a));
console.log(typeof(b));
![]()
Conclusion
JavaScript has only one type of number known as “floating-point numbers” that follows the IEEE 754 standards.
numbers are also known as the fractions which are stored in bits from 0 to 51, the sign is stored in 63 bits and the exponent is stored in bits 52 to 62 bits.
This post explains how numbers behave with the strings during arithmetic operations, and what are symbolic number values with the help of examples.
window.history object | Explained
Browser Object Model (BOM) is a JavaScript Model that uses a number of objects to communicate with the browser.
These objects help uncover the functionalities of a web browser.
There are many significant objects that form part of the Browser Object Model (BOM), such as screen object, history object, location object, navigation object, etc.
However, this post is designed to emphasize the significance of History Object only.
History Object
This object denotes the web browsing history of a user in the form of arrays consisting of the URLs that the user visited.
This object is used to load web pages, moreover, it is a property of the window object.
Syntax
It has the following syntax.
window.history
Or,
history
The history object consists of certain properties and methods that define its functionalities.
These are explained in detail below.
Properties
The JavaScript history object consists only of one property which is as follows.
length
The length property of the history object is used for fetching the total number of pages visited by the user in the ongoing browsing session.
If the user has not visited any web page, this property will return 1, corresponding to the current web page.
Syntax
The length property’s syntax is provided below.
history.length
Example
Suppose you want to fetch the number of web pages you visited in the present browsing session.
<!DOCTYPE html><html><body><p>Total number of web pages visited by the user:</p><p id="tutorial"></p><script>
let length = window.history.length;
document.getElementById("tutorial").innerHTML = length;</script></body></html>
In the above example, the length property of the history object is being utilized to extract the total number of URLs visited in the current session.
let length = window.history.length;
document.getElementById("tutorial").innerHTML = length;
Output
![]() Using the length property, the total number of web pages visited are fetched.
Methods
The JavaScript history object consists of the following methods.
forward()
It is used for the purpose of loading the next page (if a next page exists).
The browser calls this method by default when the user clicks the forward button in the browser, however, we can also do it manually.
Syntax
It has the following syntax.
history.forward()
Example
Suppose, you want to visit the next page in the history list using the forward() method of the history object.
<button onclick="history.forward()">Next</button>
In the above example, a button with a click event is being created.
By clicking on it the next page in the browsing history will be loaded.
back()
It is used for the purpose of loading the previous page (if there is a previous page).
The browser calls this method by default when the user clicks the back button in the browser, however, we can also perform it manually.
Syntax
It has the following syntax.
history.back()
Example
Suppose you want to load the previous page in the browsing history list using the back() method of the history object.
<button onclick="history.back()">Back</button>
In the above example, a button with a click event is being created.
By clicking on it the previous page in the history list will be loaded.
go()
It is used for the purpose of loading a particular page in the browning history list using the page number.
Syntax
It has the following syntax.
Example
Suppose you want to load a page which is 3 pages back then use the following code.
<button onclick="history.go(-3)">Move 3 pages back</button>
In the above example, a button with a click event is being created, and clicking on the button will take you 3 pages back.
Using the length property, the total number of web pages visited are fetched.
Methods
The JavaScript history object consists of the following methods.
forward()
It is used for the purpose of loading the next page (if a next page exists).
The browser calls this method by default when the user clicks the forward button in the browser, however, we can also do it manually.
Syntax
It has the following syntax.
history.forward()
Example
Suppose, you want to visit the next page in the history list using the forward() method of the history object.
<button onclick="history.forward()">Next</button>
In the above example, a button with a click event is being created.
By clicking on it the next page in the browsing history will be loaded.
back()
It is used for the purpose of loading the previous page (if there is a previous page).
The browser calls this method by default when the user clicks the back button in the browser, however, we can also perform it manually.
Syntax
It has the following syntax.
history.back()
Example
Suppose you want to load the previous page in the browsing history list using the back() method of the history object.
<button onclick="history.back()">Back</button>
In the above example, a button with a click event is being created.
By clicking on it the previous page in the history list will be loaded.
go()
It is used for the purpose of loading a particular page in the browning history list using the page number.
Syntax
It has the following syntax.
Example
Suppose you want to load a page which is 3 pages back then use the following code.
<button onclick="history.go(-3)">Move 3 pages back</button>
In the above example, a button with a click event is being created, and clicking on the button will take you 3 pages back.
Points to remember!
To reload the current page use history.go(0).
There isn’t any difference between history.forward() and history.go(1).
There isn’t any difference between history.back() and history.go(-1).
Conclusion
The history object (property of the window object) denotes the web browsing history of a user in the form of arrays consisting of the URLs that the user visited.
It consists of many properties and methods such as length property is used for fetching the number of web pages visited by the user, forward() method is used to load the next page, back() method is used to load the previous page and go() method is used to load a specific page using the page number.
These properties and methods are highlighted in this write-up along with suitable examples.
window.location object properties | Explained
Browser Object Model more commonly referred to as BOM is an object model that is used by JavaScript to communicate with the browser.
BOM contains objects that uncover the functionalities of a web browser.
There are many significant objects that form part of the Browser Object Model (BOM), such as history object, screen object, location object, navigation object, etc.
These objects consist of a lot of properties and methods.
This write-up, however, is designed to highlight the properties of the Location Object.
Before jumping right to the properties of the Location Object, let’s first understand what a location object is.
Location Object
The location object consists of the relevant information about the available URL and like document object, history object, and screen object, it is also a property of the window object.
Syntax
The syntax of the location object is as follows.
window.location
Or,
location
Example
In the following example, we are using the pathname property of the location object to fetch the pathname of the web page.
<!DOCTYPE html><html><body><p id="tutorial"></p><script>
let path = location.pathname;
document.getElementById("tutorial").innerHTML = path;</script></body></html>
Output
![]() Using the pathname property of the location object we have fetched the pathname of the existing URL.
Now that we have a basic understanding of the location object, let’s dive into the details of the properties of the location object.
Using the pathname property of the location object we have fetched the pathname of the existing URL.
Now that we have a basic understanding of the location object, let’s dive into the details of the properties of the location object.
Properties of the Location Object
Location object properties are as follows.
1.
hash
It is used for the purpose of fetching or setting the anchor of the URL (including the hash#).
Syntax
The syntax of the hash property is given below.
For fetching,
location.hash
For setting,
location.hash = anchor-name
Example
Suppose you want to get the anchor part of a url using the hash property of the location object.
<!DOCTYPE html><html><body><p><a id="linux" href="https://linuxhint.com/linux-command-cheat-sheet/#linux-command-cheat-sheet">Linux Command Cheat Sheet</a><p><p id="tutorial"></p><script>
let url = document.getElementById("linux");
document.getElementById("tutorial").innerHTML = "The anchor portion of the URL is: " + url.hash;</script></body></html>
In the above example, we provided a link to the href attribute of the <a> element then we used the hash property over the link to get the anchor portion of the URL.
document.getElementById("tutorial").innerHTML = "The anchor portion of the URL is: "
Output
![]() Using the hash property of the location object we extracted the anchor portion of the URL.
Using the hash property of the location object we extracted the anchor portion of the URL.
2.
host
It is used for the purpose of extracting the hostname and port number of the URL.
Syntax
The host property syntax is given below.
For fetching the host of the URL,
location.host
For setting the host of the URL,
location.host = new host:new port
Example
Suppose you want to fetch the hostname of the existing URL using the host property of the location object.
<!DOCTYPE html><html><body><p id="tutorial"></p><script>
let host = location.host;
document.getElementById("tutorial").innerHTML = host;</script></body></html>
In the above example, we are getting the hostname of the available URL using the following piece of code.
let host = location.host;
document.getElementById("tutorial").innerHTML = host;
Output
![]() Using the host property of the location object the hostname and port number of the existing URL has been fetched.
Using the host property of the location object the hostname and port number of the existing URL has been fetched.
3.
hostname
It is used for fetching the hostname of the URL.
Syntax
The hostname property syntax is provided below.
For fetching the hostname of the URL,
location.hostname
For setting the hostname of the URL,
location.hostname = new host name
Example
Suppose, you want to extract the hostname of the at hand URL.
<!DOCTYPE html><html><body><p id="tutorial"></p><script>
let hostname = location.hostname;
document.getElementById("tutorial").innerHTML = hostname;</script></body></html>
In the above example, the hostname property of the location object was used to get the hostname of the available URL.
let hostname = location.hostname;
document.getElementById("tutorial").innerHTML = hostname;
Output
![]() Using the hostname property of the location object the hostname of the present URL has been fetched.
Using the hostname property of the location object the hostname of the present URL has been fetched.
4.
href
It is used for the purpose of fetching or setting the complete URL.
Syntax
The href property syntax is given below.
For extracting the href of the URL,
location.href
For setting the href of the URL,
location.href = new URL
Example
Suppose you want to extract the complete URL of existing web page.
<!DOCTYPE html><html><body><p id="tutorial"></p><script>
let url = location.href;
document.getElementById("tutorial").innerHTML = url;</script></body></html>
In the above example, using the href property of the location object, the complete URL of the at hand web page is being fetched.
let url = location.href;
document.getElementById("tutorial").innerHTML = url;
Output
![]() The complete URL of the present web page has been extracted using the href property of the location object.
The complete URL of the present web page has been extracted using the href property of the location object.
5.
origin
It is used for the purpose of fetching the hostname, port number, and protocol of the URL.
Syntax
The syntax of the origin property is as follows.
location.origin
Example
Suppose you want to fetch the protocol, hostname and port number of the present URL.
<!DOCTYPE html><html><body><p id="tutorial"></p><script>
let origin = location.origin;
document.getElementById("tutorial").innerHTML = origin;</script></body></html>
In the above example, the origin (protocol, hostname, and port number) of the present URL is being fetch using origin property of the location object.
let origin = location.origin;
document.getElementById("tutorial").innerHTML = origin;
Output
![]() The output displays the protocol, hostname, and port number of the available URL.
The output displays the protocol, hostname, and port number of the available URL.
6.
pathname
It is used for the purpose of extracting or setting the pathname of the URL.
Syntax
The pathname property syntax is as follows.
For fetching the pathname of the URL,
location.pathname
For setting the pathname of the URL,
location.pathname = new pathname
Example
Suppose you want to extract the pathname of the present URL.
<!DOCTYPE html><html><body><p id="tutorial"></p><script>
let path = location.pathname;
document.getElementById("tutorial").innerHTML = path;</script></body></html>
In the above example, the pathname of the existing URL is being extracted using the pathname property of the location object.
let path = location.pathname;
document.getElementById("tutorial").innerHTML = path;
Output
![]() Using the pathname property of the location object, the pathname of the existing URL has been fetched.
Using the pathname property of the location object, the pathname of the existing URL has been fetched.
7.
port
It is used for the purpose of extracting or setting the port number of the URL.
Syntax
The port property syntax is as follows.
For fetching the port of the URL,
location.port
For setting the port of the URL,
location.port = new port number
Example
In the following example, the port number of the present web page is being extracted.
<!DOCTYPE html><html><body><p id="tutorial"></p><script>
let port = location.port;
document.getElementById("tutorial").innerHTML = "The port number of the current web page is: " + port;</script></body></html>
In the above example, using the port property of the location object, the port number of the present web page is being extracted.
let port = location.port;
document.getElementById("tutorial").innerHTML = "The port number of the current web page is: " + port;
Output
![]() The port number of the present web page has been fetched and shown in the output.
The port number of the present web page has been fetched and shown in the output.
8.
protocol
It is used for the purpose of fetching or setting the protocol of the URL.
Syntax
The protocol property syntax is as follows.
For extracting the port of the URL,
location.protocol
For setting the port of the URL,
location.protocol = new protocol
Example
In the following example, the protocol of the available URL is being fetched.
<!DOCTYPE html><html><body><p id="tutorial"></p><script>
let protocol = location.protocol;
document.getElementById("tutorial").innerHTML = protocol;</script></body></html>
The following piece of code fetches the protocol of the present URL.
let protocol = location.protocol;
document.getElementById("tutorial").innerHTML = protocol;
Output
![]() The protocol of the present URL has been extracted.
The protocol of the present URL has been extracted.
9.
search
It is used for the purpose of fetching or setting the querstring of the URL.
Syntax
The search property syntax is as follows.
For extracting the search of the URL,
location.search
For setting the search of the URL,
location.search = querystring
Example
<!DOCTYPE html><html><body><p><a id="linux" href="https://linuxhint.com/linux-command-cheat-sheet/?answer=yes">
https://linuxhint.com/linux-command-cheat-sheet/?answer=yes</a></p><p id="tutorial"></p><script>
let anchor = document.getElementById("linux");
let query = anchor.search;
document.getElementById("tutorial").innerHTML = "The search portion of the URL is: " + query;</script></body></html>
The following piece of code fetches the querystring of the URL.
let anchor = document.getElementById("linux");
let query = anchor.search;
document.getElementById("tutorial").innerHTML = "The search portion of the URL is: " + query;
Output
![]() The query string of the URL has been extracted.
The query string of the URL has been extracted.
Conclusion
The location object consists of the relevant information about the available URL and like document object, it is also a property of the window object.
It consists of many properties such as hash, host, hostname, pathname, etc.
These properties have different purposes that are highlighted in this post along with suitable examples.
How to store and retrieve data in the browser
Web browsers can utilize web storage to store and retrieve data locally.
Storing data in the web browser is more secure and it also enhances the performance of the website.
Unlike cookies, the web storage is much higher, and data is not transferred to the server.
Web storage is based on the protocol and domain, and all pages from a single source can store and retrieve the same information.
This write-up will discuss the procedure for storing and retrieving data in the browser.
Moreover, examples related to the usage of localStorage and sessionStorage HTML web objects will be provided.
So, let’s start!
Web Storage Objects in the browser
Two web storage objects are provided by the HTML, which you can use for storing and fetching the data.
“localStorage” is a type of HTML storage that does not have an expiration date, whereas the “sessionStorage” object only store the information related to a single session, which means closing the current browser tab will remove all of the saved data.
Before using localStorage and sessionStorage make sure that HTML web storage is supported by your browser:
if (typeof(Storage) !== "undefined") {
// Write out code for HTML storage objects} else {
// your browser is not supported}
localStorage HTML Web Storage Object in the browser
As mentioned earlier, the data stored within the localStorage object has no expiration date, and it is not deleted even if your browser is closed.
The stored data can be retrieved the next day, week, or year.
Example 1: Using localStorage HTML Web Storage Object in the browser
In the below-given example, we will create a “localStorage” web object having a “name: value” pair:
<!DOCTYPE html><html><body><div id="sample"></div><script>
if (typeof(Storage) !== "undefined") {
[/cce_javascript]
The “<strong>setItem()</strong>” method of the “<strong>localStorage</strong>” object is used for storing data:
[cce_javascript escaped="true" theme="blackboard" nowrap="0"]localStorage.setItem("name", "Paul");
Now, to retrieve the “value” of “name”, we will invoke the localStorage “getItem()” method:
document.getElementById("sample").innerHTML = localStorage.getItem("name");} else {
document.getElementById("name").innerHTML = "Browser not supported";}
</script>
</body>
</html>
Execute the above-given program in your favorite code editor or any online coding sandbox; however, we will utilize the JSBin for this purpose:
![]() As you can see from the output, we have successfully stored and retrieved data using the “localStorage” HTML web object:
As you can see from the output, we have successfully stored and retrieved data using the “localStorage” HTML web object:
![]() You can also execute the following code for the same purpose:
<!DOCTYPE html>
<html>
<body>
<div id="sample"></div>
<script>
if (typeof(Storage) !== "undefined") {
localStorage.name = "Paul";
document.getElementById("sample").innerHTML = localStorage.name; } else {
document.getElementById("name").innerHTML = "Browser not supported";}
</script>
</body>
</h
You can also execute the following code for the same purpose:
<!DOCTYPE html>
<html>
<body>
<div id="sample"></div>
<script>
if (typeof(Storage) !== "undefined") {
localStorage.name = "Paul";
document.getElementById("sample").innerHTML = localStorage.name; } else {
document.getElementById("name").innerHTML = "Browser not supported";}
</script>
</body>
</h
![]() The provided example will also show you the same output:
The provided example will also show you the same output:
![]() If you want to remove an item or entry from your localStorage object, then you have to call the “removeItem()” method and pass the “name” item as an argument:
localStorage.removeItem("name");
If you want to remove an item or entry from your localStorage object, then you have to call the “removeItem()” method and pass the “name” item as an argument:
localStorage.removeItem("name");
Example 2: Using localStorage HTML Web Storage Object in the browser
Let’s check out other example.
In the below-given JavaScript program the “localStorage” object will count and store the number of times a user clicked the “Click” button:
<!DOCTYPE html><html><head><script>
function buttonClickCounter() {
if (typeof(Storage) !== "undefined") {
if (localStorage.buttonClickCount) {
localStorage.buttonClickCount = Number(localStorage.buttonClickCount)+1;
} else {
localStorage.buttonClickCount = 1;
}
document.getElementById("sample").innerHTML = "Button is clicked " + localStorage.buttonClickCount + " times.";
} else {
document.getElementById("sample").innerHTML = "Browser not supported";
}
}</script></head><body><p><button onclick="buttonClickCounter()" type="button">Click</button></p><div id="sample"></div><p>Click the button to check the counter value.</p></body></html>
![]() Here, the output is showing a “Click” button; click on it to check the buttonClickCounter value:
Here, the output is showing a “Click” button; click on it to check the buttonClickCounter value:
![]() Initially, the value of buttonClickCounter was set to “0,” and it will be incremented whenever we will click the button:
Initially, the value of buttonClickCounter was set to “0,” and it will be incremented whenever we will click the button:
![]()
sessionStorage HTML Web Storage Object in the browser
The HTML “sessionStorage” object works the same as “localStorage“; however, you can only use it for storing and retrieving data for the current session.
As soon as the opened browser tab is closed, all of the stored data will be deleted.
Example 2: Using sessionStorage HTML Web Storage Object in the browser
The following JavaScript program will store and retrieve the “buttonClickCount” for the current session.
The buttonClickCount is added to count the number of times a user clicked the provided button:
<!DOCTYPE html>
<html>
<head>
<script>
function buttonClickCounter() {
if (typeof(Storage) !== "undefined") {
if (sessionStorage.buttonClickCount) {
sessionStorage.buttonClickCount = Number(sessionStorage.buttonClickCount)+1;
} else {
sessionStorage.buttonClickCount = 1;
}
document.getElementById("sample").innerHTML = "In this session, you have clicked the button " + sessionStorage.buttonClickCount + " times";
} else {
document.getElementById("sample").innerHTML = "Browser not supported";
}}
</script>
</head>
<body>
<p><button onclick="buttonClickCounter()" type="button">Click</button></p>
<div id="sample"><div>
<p>Click the button to check the counter value.</p>
</body>
</html>
![]() Hitting the highlighted button is retrieving the data stored in the “sessionStorage” button:
Hitting the highlighted button is retrieving the data stored in the “sessionStorage” button:
![]()
Conclusion
Developers can utilize localStorage and sessionStorage HTML web objects to store and retrieve data in the browser.
localStorage object does not have an expiration date, whereas sessionStorage only stores the information related to a single session, which means closing the current browser tab will remove all of the saved data.
This write-up discussed the procedure for storing and retrieving data in the browser.
Moreover, examples related to localStorage and sessionStorage HTML web objects usage are also provided.
HTML Elements Manipulation through JavaScript
DOM is an acronym for Document Object Model, and it can be simply described as a browser-generated tree of nodes.
JavaScript can be utilized for manipulating the methods and properties of each added node or HTML element.
Manipulating HTML elements is also considered the most useful feature of JavaScript.
This write-up will discuss manipulating HTML Elements through JavaScript.
We will also explain the procedure for adding HTML Elements, appending HTML Elements, Changing content of HTML Elements, finding and getting HTML Elements, and removing HTML Elements and their child nodes.
Moreover, the examples related to appendChild(), insertBefore(), innerHTML property, getElementById(), getElementbyClassName(), querySelectorAll(), remove(), and removeChild() methods will be provided.
So, let’s start!
How to add HTML Elements through JavaScript using appendChild() method
The JavaScript appendChild() method is utilized for adding an HTML element as the child of the specified parent node.
This method is used to move HTML elements.
Syntax of appendChild() method
parentNode.appendChild(childNode);
Here, the parentNode is the HTML element we want to declare as a parent, whereas the childNode is the newly created HTML element added to the parent node.
Example: How to add HTML Elements through JavaScript using appendChild() method
In this example, we will show you how to use the “appendChild()” method for adding the HTML elements through JavaScript.
First of all, we will add a heading and a paragraph using the <h2>and <p>HTML elements:
<!DOCTYPE html><html><body><h2>This is linuxhint.com</h2><p>Adding HTML Elements through JavaScript.</p><div id="div1"><p id="p1">This is the main paragraph.</p><p id="p2">This is second paragraph.</p></div>
In the next step, we will create a new <p>element “paragraph” by utilizing the “createElement()” method of the document object:
<script>const paragraph = document.createElement("p");
At this point, we have only created a <p>; however, we have not added any text node to it.
To do so, we have to create a text node:
const node = document.createTextNode("This is new node.");
Then, we will append the created text node “node” to our “paragraph” element, and we will find an existing element:
paragraph.appendChild(node);const element = document.getElementById("div1");
Lastly, we will append the “paragraph” element to the existing HTML “element”:
element.appendChild(paragraph);</script></body></html>
Execute the above-given program in your favorite code editor or any online coding sandbox; however, we will utilize the JSBin for this purpose:
![]() As you can see from the below-given output, a new HTML element is added having the text content “This is new node”:
As you can see from the below-given output, a new HTML element is added having the text content “This is new node”:
![]()
How to append HTML Elements through JavaScript using insertBefore() method
If you want to append an HTML element as a child node before the specified node, you can invoke the “insertBefore()” JavaScript method.
Syntax of insertMethod() method
parentNode.insertBefore(newNode, existingNode);
Here, the “newNode” is the newly created HTML element that you want to add, “existingNode” is the element before which you will insert your HTML element, and the “parentNode” is the HTML element that you have specified as the parent node.
Example: How to append HTML Elements through JavaScript using insertBefore() method
In the previous example, we have utilized the appendChild() method for adding the new HTML element as the last child of the parent HTML.
However, you can also use the JavaScript “insertBefore()” method to add an HTML element before the specified element.
The below-given example will teach you the usage of “insertBefore()” method.
Firstly, we will add a heading and some paragraphs as follows:
<!DOCTYPE html><html><body><h2>This is linuxhint.com</h2><p>Adding HTML Elements through JavaScript.</p><div id="div1"><p id="p1">This is the main paragraph.</p><p id="p2">This is second paragraph.</p></div>
Next, we will create a new element “paragraph” HTML element, and then define a child text node for it:
<script>const paragraph = document.createElement("p");const node = document.createTextNode("This is new node.");
paragraph.appendChild(node);const element = document.getElementById("div1");
Now, we will specify “p1” as child element, so that we can insert the created “paragraph” element before it:
const child = document.getElementById("p1");
Lastly, we will pass the HTML element “paragraph” and “child” element to the insertBefore() method:
element.insertBefore(paragraph,child);</script></body></html>
![]() Execution of the above-given program will add the “paragraph” HTML before “p1”:
Execution of the above-given program will add the “paragraph” HTML before “p1”:
![]()
How change content of HTML Elements through JavaScript using innerHTML property
The HTML DOM permits you to change the HTML content by utilizing the “innerHTML” property.
The “innerHTML” is typically used in web pages to generate dynamic HTML content such as comment forms, registration forms, and links.
Syntax of innerHTML JavaScript property
element.innerHTML = value
Here, “element” is the HTML element you have selected to change its content, and “value” is the content we will set.
Example 1: Changing content of HTML Elements through JavaScript
This example will show you how to use the “innerHTML” JavaScript property to modify an HTML element’s content.
Firstly, we will add a heading element with the <h2>heading tag and a paragraph with the <p>HTML tag:
<!DOCTYPE html><html><body><h2>Change HTML Elements using JavaScript</h2><p id="p1">A test string</p>
Now, we want to change the content of the “<p>” element having the id “p1”.
To do so, we will utilize the “document.getElementById()” method to get the specified element.
After that, we will set the content of our <p>element to “This is linuxhint.com”:
<script>
document.getElementById("p1").innerHTML = "This is linuxhint.com";</script><p>We have changed the content of the above paragraph</p></body></html>
![]() Check out the below-given output, which we got from executing the above-given program:
Check out the below-given output, which we got from executing the above-given program:
![]()
How to Find and Get HTML elements by Id through JavaScript
Most of the JavaScript developers utilized the getElementById() method for finding and getting HTML elements having unique ids.
If you have passed an id that does not belong to any HTML element, the getElementById() method will display the null value.
Syntax of getElementById() method
document.getElementById(elementId)
Here, the “elementId” represents the unique ID of the HTML element which you want to find and get in your JavaScript code.
Example: Find and Get HTML elements by Id through JavaScript
In the following example, we will add HTML elements such as a heading with the <h2>tag and three paragraph elements with the <p>tag.
Note that we have also added “ids” with the paragraph elements:
<!DOCTYPE html><html><body><h2>This is linuxhint.com</h2><p id="p1">Find and Get HTML elements by Id</p><p>This is a JavaScript program that utilizes the "getElementsById" method</p><p id="p2"></p>
In the next step, we will find and get the element having the id “p1” by using the “document.getElementById()” method.
After ding so, we will change the content of the retrieved HTML element:
<script>
const element = document.getElementById("p1");
document.getElementById("p2").innerHTML ="The text of the first paragraph is: " + element.innerHTML;
</script>
</body>
</html>
How to Find and Get HTML elements by ClassName through JavaScript
The “getElementsByClassName()” method is used for finding and getting HTML elements having the same class.
When you try to get an HTML element by utilizing the class name, the JavaScript interpreter will return all objects belonging to the same class.
After that, you can perform specific operations on those HTML elements.
Syntax of getElementsByClassName() method
document.getElementsByClassName(className)
Here, the “className” represents the class name of the HTML elements which you are required to find and get in your program.
Example: Find and Get HTML elements by ClassName through JavaScript
In the following example, we have added a heading and some paragraph elements with the className “c1”:
<!DOCTYPE html><html><body><h2>This is linuxhint.com</h2><p>Find and Get HTML elements by Class Name</p><p class="c1">text in first paragrpah</p><p class="c1">text in second paragraph</p><p id="p1"></p>
Next, we will search for the HTML elements which have “c1” as their class by using the getElementsByClassName() method and will store the collections of the objects in “a”:
<script>const a = document.getElementsByClassName("c1");
After finding and getting the required HTML elements, we will show the content of the first object present at the first index:
document.getElementById("p1").innerHTML ='The first paragraph (index 0) with is: ' + a[0].innerHTML;</script></body></html>
![]() Here is the output which we got from executing the above-given JavaScript program:
Here is the output which we got from executing the above-given JavaScript program:
![]()
How to Find and Get HTML elements by CSS selector through JavaScript
In HTML, the querySelectorAll() method returns a static NodeList object that comprises a collection of the child elements of an element matched with the specified CSS selectors.
Index numbers are used to find and get the nodes, starting at 0.
Syntax of querySelectorAll() method
element.querySelectorAll(selectors)
The querySelectorAll() method takes “selectors” as an argument; a DOM string comprises one or more valid CSS selectors.
Example: Find and Get HTML elements by CSS selector through JavaScript
In the below-given JavaScript program, we have used the querySelectorAll() method to find and get the paragraph HTML elements having “c1” as their class name:
<!DOCTYPE html><html><body><h2>This is linuxhint.com</h2><p>Find and Get HTML elements by Class Name</p><p class="c1">text in first paragrpah</p><p class="c1">text in second paragraph</p><p id="p1"></p><script>
const a = document.querySelectorAll("p.c1");
document.getElementById("p1").innerHTML =
'The first paragraph with is: ' + a[0].innerHTML;</script></body></html>
![]() Check out the output of the JavaScript querySelectorAll() method:
Check out the output of the JavaScript querySelectorAll() method:
![]() Execution of the above-given JavaScript program will show the following output:
Execution of the above-given JavaScript program will show the following output:
![]()
How to remove HTML Elements through JavaScript using remove() method
The JavaScript “remove()” method is used for deleting the specified HTML element from the Document Object Model (DOM).
Syntax of remove() method
node.remove()
Here, “node” represents the HTML element you want to delete through JavaScript.
Example: Remove HTML Elements through JavaScript using remove() method
In the below-given, we have add a heading HTML element, a paragraph <p>and a <div>element which comprises two paragraphs <p1>and <p2>as child nodes:
<!DOCTYPE html><html><body><h2>This is linuxhint.com</h2><p>Adding HTML Elements through JavaScript.</p><div id="div1"><p id="p1">This is the main paragraph.</p><p id="p2">This is second paragraph.</p></div>
Next, we will add a button and attach an “onclick” event handler.
According to the following code, when we will click on the “Remove Element” button, it will invoke the “myFunction()” method:
<button onclick="myFunction()">Remove Element</button>
In the “myFunction()” method, firstly, we utilize the “document.getElementbyId” to find the element which we want to delete by specifying its “id”, then we will invoke the “remove()” method:
<script>function myFunction() {
document.getElementById("p1").remove();}</script></body></html>
![]() The below-given output signifies that “p1” HTML is deleted from our JavaScript program with the help of the “remove()” function:
The below-given output signifies that “p1” HTML is deleted from our JavaScript program with the help of the “remove()” function:
![]()
How to remove child HTML Elements through JavaScript using removeChild() method
In JavaScript, the “removeChild()” is utilized for deleting a specific child HTML node from an HTML element.
Syntax of removeChild() method
parentNode.removChild(childNode)
Here, the parentNode is the HTML element we have specified as a “parent” node, and ChildNode is the HTML element we want to remove from the parent element.
Remove child HTML Elements through JavaScript using removeChild() method
In this example, we will try to remove the child element of our defined <div>HTML element:
<!DOCTYPE html><html><body><h2>This is linuxhint.com</h2><p>Adding HTML Elements through JavaScript.</p><div id="div1"><p id="p1">This is the main paragraph.</p><p id="p2">This is second paragraph.</p></div>
To delete a child element, first of all, you have to create a “parent” HTML element and specify the HTML element acting as a parent in your JavaScript code.
In our case, we have added “div1”:
<script>const parent = document.getElementById("div1");
Next, we will define a “child” element and will get the child Element which we want to delete from the parent HTML element:
const child = document.getElementById("p1");
To invoke the removeChild() method, we will utilize the “parent” element and then pass the “child” element as an argument to the removeChild() method:
parent.removeChild(child);</script></body></html>
![]() As you can see that the <p1> child element of the <div1> HTML element is deleted successfully:
As you can see that the <p1> child element of the <div1> HTML element is deleted successfully:
![]()
Conclusion
The Document Object Model (DOM) is an developer interface that permits you to manipulate the design, structure, and content of your website’s HTML elements.
This write-up discussed manipulating HTML Elements through JavaScript.
We have also explained the procedure for adding HTML Elements, appending HTML Elements, Changing content of HTML Elements, finding and getting HTML Elements, and removing HTML Elements and their child nodes.
Moreover, the examples related to appendChild(), insertBefore(), innerHTML property, getElementById(), getElementsbyClassName(), querySelectorAll(), remove(), and removeChild() methods are also provided.
What is Web API: Explained for Beginners
As the name implies, Web API is a web-based API that you can access with the help of HTTP protocol.
Web API is a concept, not a technological solution.
You can create Web APIs with various technologies, including .NET Java.
For instance, the Twitter APIs permit us to read and publish data programmatically, enabling us to integrate the features of Twitter in our own application.
This write-up will discuss APIs, Client-side APIs, Browser APIs, and Third-party APIs.
We have will also provide a list of common browser APIs and examples for demonstrating the usage of the Browser APIs code.
So, let’s start!
What are APIs
API or Application Programming Interfaces are the structures included in most programming languages, making it easier for the developers to handle complex functions.
They are utilized for replacing the complex code with a simpler syntax.
Consider the electricity supply in your apartment or home as an example.
If you want to use any electric appliance, you will plug it into the socket present on a wall.
However, you will not connect its wires directly into the power source because that would be inefficient and dangerous if you are not an electrician.
Similarly, rather than writing low-level code that has direct control over the GPU of the computer of other graphical functions, it is much easier to use an API written in a higher-level language for programming certain 3D graphics.
Client-Side APIs
Several APIs are available for the client-side, and these APIs are not built into the JavaScript language itself instead of on top of it.
We can say that APIs offer superpowers that you can utilize in your JavaScript code.
Client-Side APIs are divided into two groups: Third-Party APIs and Browser APIs.
Browser APIs
A collection of built-in Web APIs called Browser APIs are embedded in modern browsers to support performing complex operations and assisting in accessing data.
For instance, you can use the “Web Audio API” to control the audio in the browser, such as changing the volume level and applying effects to an audio track.
Your browser will perform the audio processing in the background using lower-level programming languages such as Rust or C++.
Third-party APIs
By Default, third-party APIs are not included in browsers, so you will have to find their code and related information from the Internet.
For instance, the Twitter API permits you to view the most recent tweets, and it also offers a unique set of constructs for querying the Twitter service and retrieving the specific data.
Example: Using Browser APIs
In our JavaScript program, we will use the “GeoLocation” Browser API for getting the longitude and latitude of browser location:
<!DOCTYPE html><html><body><h2>Geolocation Browser APIs</h2><p>Click on the following button to view coordinates values.</p><button onclick="getLocation()">Click me</button><p id="p1"></p><script>const a = document.getElementById("p1");function getLocation() {
try {
navigator.geolocation.getCurrentPosition(showPosition);
} catch {
a.innerHTML = err;
}}function showPosition(position) {
a.innerHTML = "Latitude: " + position.coords.latitude +
"<br>Longitude: " + position.coords.longitude;}</script></body></html>
![]()
![]()
List of common Browser APIs
Now, check out the below-given list of some common browser APIs:
DOM API: The Document Object Model API is utilized for manipulating documents.
XMLHttpRequest and Fetch APIs: Both of these APIs are utilized for retrieving data from the server.
WebGL and Canvas APIs: These Browsers APIs are utilized for manipulating and drawing graphics.
HTMLMediaElement, WebRTC, and Web Audio APIs: These Browsers APIs are utilized for creating custom user interfaces for the Audios and Videos.
Web Storage API: The Web Storage API is utilized for storing and retrieving data into the browser.
Conclusion
A Web API is defined as a web-based application programming interface that can be accessed with the help of the HTTP protocol.
Web APIs can extend the browser’s capability and substantially simplify complex functions, making complex codes easier to understand.
This write-up discussed APIs, Client-side APIs, Browser APIs, and Third-party APIs.
We have also provided a list of common browser APIs and examples for demonstrating the usage of the Browser APIs code.
How to add a JavaScript file in HTML?
Web pages are designed using multiple programming languages and two such web programming languages are HTML and JavaScript.
HTML acronym of Hypertext mark-up language is used to create the structure of web pages you see on the internet every day.
Meanwhile, Javascript is a well-known scripting language used to perform dynamic operations on web pages to make them more captivating.
To make these languages work together you have to add your JavaScript file into your HTML document.
For the purpose of doing so, you can add your external JavaScript file to your HTML document.
Adding JavaScript File
To add an external JavaScript file in your HTML document, assign the link of your file to the src attribute in the <script> tag.
Syntax
<script src= "jsFile.js"></script> //adding JS file using no path
Or,
<script src="/js/jsFile.js"></script> //adding JS file using file path
Or,
<script src="http://www.example.com/js/jsFile.js"></script> //adding JS file using URL
Points to remember!
You can place these <script> tags either in the <head> section or in the <body> section.
As indicated in the syntax the extension of external JavaScript files should be .js.
It is beneficial to use external JavaScript files when you have to use the same code in multiple HTML documents.
Moreover, this will enhance the readability and maintainability of your document.
Below we have discussed different approaches to add your JavaScript file in HTML.
Condition 1: Adding JS file using the file path
In order to add your external JavaScript file into your HTML document, you have to provide your file path in the src attribute of the <script> tag.
<script src="/js/jsFile.js"></script>
Suppose we have our HTML and javascript files in our directory:
![]()
HTML File
<!DOCTYPE html><html><body>
Enter your name:<input type="text" id="tutorial"><button onclick="functionName()">Submit</button><script src="jsFile.js"></script></body></html>
In the above example, we are creating an input field that asks the user to input his/her name.
Meanwhile, we have defined our function in the JavaScript file using the following code.
function functionName(){
alert("Your name has been submitted!");}
Once the user presses the submit button, an alert message is displayed.
![]() In another scenario, when your HTML file is placed in a separate folder and the JavaScript file in another folder as shown below.
In another scenario, when your HTML file is placed in a separate folder and the JavaScript file in another folder as shown below.
![]() Use the following syntax, to add your file path to the src attribute in the <script> tag.
<script src="../js/jsFile.js"></script>
Use the following syntax, to add your file path to the src attribute in the <script> tag.
<script src="../js/jsFile.js"></script>
Condition 2: Adding JS file using URL
When you want to add a JavaScript file that is stored online then you have to simply add the url of your online JavaScript file in the src attribute of your <script> tag.
<script src="http://www.example.com/js/jsFile.js"></script>
Example
<!DOCTYPE html><html><body>
Enter your name:<input type="text" id="tutorial"><button onclick="funcName()">Submit</button><script src="https://cdn.jsdelivr.net/gh/naftab017/test-repo/index.js"></script></body></html>
In the above example, we added the url of an external JavaScript file that is stored online.
The online JavaScript file looks like this.
![]() In the above file we have defined our function that is intended to display an alert message when the user presses the submit button.
In the above file we have defined our function that is intended to display an alert message when the user presses the submit button.
Output
![]() Following these steps, you can easily add your external JavaScript file to your HTML document.
Following these steps, you can easily add your external JavaScript file to your HTML document.
Conclusion
To add a JavaScript file in HTML provide your JavaScript file path to the src attribute of the <script> tag or if you are using a JavaScript file that is stored online then you have to add the URL of that file.
In this post, we have discussed in detail the approaches to adding your JavaScript file in HTML by demonstrating them through examples.
How to add a CSS file in HTML
CSS can be added as a separate file or embedded directly in your HTML document.
If you want to include CSS in HTML, then “Inline Styles”, “Embedded Styles,” and the “External Style Sheets” are the three methods to achieve this functionality.
However, the ideal way is to create and apply styles to HTML is by utilizing the external style sheets, as minimal markup modification will be required for affecting multiple pages at once.
This write-up will discuss the procedure for adding an external CSS file in HTML.
We will also explain linking and importing an external CSS file in HTML.
Moreover, examples related to the mentioned methods will be provided.
So, let’s start!
How to add an external CSS file in HTML
If you want to apply a style to multiple web pages simultaneously, adding an external CSS file is perfect.
An external CSS is considered a separate file comprising all the style rules, and it can be linked to any HTML page of your website.
Adding an external CSS file permits you to modify the look of your website by only making changes in a single file.
Also, keeping separate CSS, JavaScript, and HTML files enable you to maintain the code and improve readability.
There are two methods for adding an external CSS file HTML: linking and importing.
Linking an external CSS file in HTML
First of all, we will create a CSS file in HTML.
For this purpose, you can open your favorite code editor; however, we will use Visual Studio Code.
After opening VS Code, we will create a “style.css” CSS file for adding styles:
![]() Next, we will specify the style we want to apply to the web page in the opened CSS file.
Here, we have assigned the values to the “background” and “font” properties for the HTML “body” and also added the “color” for the heading:
body {
background: pink;
font: 18px Arial, sans-serif;
}
h1 {
color: blue;
}
Press “Ctrl+S” to save the added code in the “style.css” file:
Next, we will specify the style we want to apply to the web page in the opened CSS file.
Here, we have assigned the values to the “background” and “font” properties for the HTML “body” and also added the “color” for the heading:
body {
background: pink;
font: 18px Arial, sans-serif;
}
h1 {
color: blue;
}
Press “Ctrl+S” to save the added code in the “style.css” file:
![]() The “<link>” tag is utilized for linking an external CSS to an HTML file.
This tag is added in the “<head>” section of an HTML document.
We have linked our HTML file with “style.css” in the below-given program, using the <link> tag.
Then, we have added a heading with the <h1> tag and a paragraph with the <p> tag.
The specified style in the “style.css” file will be applied to these HTML elements:
<!DOCTYPE html>
<html lang="en">
<head>
<title>linuxhint</title>
<link rel="stylesheet" href="css/style.css">
</head>
<body>
<h1>This is linuxhint.com</h1>
<p>We are learing how to add a CSS file in HTML</p>
</body>
</html>
Save this JavaScript program and open your HTML file in the browser:
The “<link>” tag is utilized for linking an external CSS to an HTML file.
This tag is added in the “<head>” section of an HTML document.
We have linked our HTML file with “style.css” in the below-given program, using the <link> tag.
Then, we have added a heading with the <h1> tag and a paragraph with the <p> tag.
The specified style in the “style.css” file will be applied to these HTML elements:
<!DOCTYPE html>
<html lang="en">
<head>
<title>linuxhint</title>
<link rel="stylesheet" href="css/style.css">
</head>
<body>
<h1>This is linuxhint.com</h1>
<p>We are learing how to add a CSS file in HTML</p>
</body>
</html>
Save this JavaScript program and open your HTML file in the browser:
![]() As you can see, we have successfully applied the specified style to our HTML elements by linking them with the external CSS file:
As you can see, we have successfully applied the specified style to our HTML elements by linking them with the external CSS file:
![]()
Importing an external CSS file in HTML
Another method for adding an external CSS file is to use the “@import” rule in HTML document.
The JavaScript “@import” declarations give instructions to the browser for loading and utilizing the styles from the external CSS file.
You can import an external CSS file in HTML by simply adding the “@import” declaration in the <style> tag of the HTML document.
In this way, you will be allowed for adding other CSS rules for the HTML elements, within the same <style> tag:
<!DOCTYPE html>
<html lang="en">
<style>
@import url("css/style.css");
p {
color: purple;
font-size: 18px;
}
</style>
<body>
<h1>This is linuxhint.com</h1>
<p>We are learning how to add a CSS file in HTML</p>
</body>
</html>
In the provided JavaScript program, we have imported the “style.css” file, and the style specified with the mentioned file will be applied to the headings.
We have also added style for the paragraph HTML element:
![]() Our “myProject.html” file has the following HTML elements with the applied styles:
Our “myProject.html” file has the following HTML elements with the applied styles:
![]()
Conclusion
Adding a CSS file in HTML is useful if you want to apply a style to multiple web pages at once.
Also, when you keep the HTML, JavaScript, and CSS files separately, your code becomes easy to manage.
This write-up discussed the procedure for adding a CSS file in HTML.
We have also explained linking and importing an external CSS file in HTML.
Moreover, examples related to the mentioned methods are also provided.
Event Bubbling or Event Capturing
When an event occurs, event propagation determines the element order for the execution of the events.
In the HTML Document Object Model (DOM), two methods exist for event propagation: Event Bubbling and Event Capturing.
In Event Bubbling, the event related to the innermost or the child element is processed first.
In contrast, in Event Capturing, an event associated with the outermost or parent’s element is handled, and then the event flow control approaches the child element step by step.
This write-up will discuss JavaScript Event Bubbling and Event Capturing.
Moreover, the examples related to Event Bubbling and Event Capturing will be demonstrated in this article.
So, let’s start!
Event Bubbling
In JavaScript, Event Bubbling is an event that bubbles up from the target or the innermost elements to its parents, then it follows a bottom to top approach and moves the event control flow to its ancestors.
Event bubbling is considered as default event flow method in all modern browsers.
Example: Event Bubbling
In the following example, we have added a title with the <title> tag, a div element with the id “parentElement” and its nested child button element having the id “childElement”:
<!DOCTYPE html><html><head>
<title>JavaScript Event Bubbling</title></head><body>
<div id="parentElement">
<button id="childElement">Child</button>
</div>
After fetching the created HTML elements using the “document.querySelector()” method, we will add an event listener to both the div “parentElement” and its nested button “childElement”.
The function passed in the “addEventListener()” will display the added string in the “console.log()” method:
<script>
var parent = document.querySelector('#parentElement');
parent.addEventListener('click', function(){
console.log("Clicked Parent");
});
var child = document.querySelector('#childElement');
child.addEventListener('click', function(){
console.log("Clicked Child");
});
</script></body></html>
Execute the above-given program in your favorite code editor or any online coding sandbox; however, we will utilize the JSBin for this purpose:
![]() Now, we will click on the “Child” button which can be seen in the following output:
Now, we will click on the “Child” button which can be seen in the following output:
![]() By clicking the “Child” button, the passed “function()” in the addEventListener() method will be executed.
Then, the “onclick()” method of the “div” element will be invoked.
It is happening because of the “Event Bubbling”:
By clicking the “Child” button, the passed “function()” in the addEventListener() method will be executed.
Then, the “onclick()” method of the “div” element will be invoked.
It is happening because of the “Event Bubbling”:
![]() In the above-given example, when we have clicked the “Child” button, the “click” event is passed from the button having id “childElement” and event flow control moves to the “document” in the following order:
In the above-given example, when we have clicked the “Child” button, the “click” event is passed from the button having id “childElement” and event flow control moves to the “document” in the following order:
![]()
How to stop Event Bubbling
Using the “event.stopPropagation()” method, you can easily stop the event bubbling in your JavaScript program, and it stops the event travel from bottom to top.
Example: Stop Event Bubbling
In the below-given example, we will add the “event.stopPropagation()” method to the “onclick()” event of the created button having id “childElement”.
As a result of it, the JavaScript interpreter will not pass the event to the outermost “document” element:
<!DOCTYPE html><html><head>
<title>How to stop Event Bubbling</title></head><body>
<div id="parentElement">
<button id="childElement" onclick="event.stopPropagation()">Child</button>
</div>
<script>
var parent = document.querySelector('#parentElement');
parent.addEventListener('click', function(){
console.log("Clicked Parent");
});
var child = document.querySelector('#childElement');
child.addEventListener('click', function(){
console.log("Clicked Child");
});
</script></body></html>
![]() Clicking on the highlighted button will only print out “Clicked Child” and then it stops the event from bubbling:
Clicking on the highlighted button will only print out “Clicked Child” and then it stops the event from bubbling:
![]()
Event capturing
The process in which an event is captured when its flow of control moves from the top element to the target element is known as Event capturing.
Although modern browsers do not have the capability to enable event capturing by default, you can perform this operation through JavaScript code.
Example: Event Capturing
In our JavaScript program, first of all, we will add a title and a “div” element having id “parentElement” and its child element with “childElement” id:
<!DOCTYPE html>
<html>
<head>
<title>JavaScript Event Capturing</title>
</head>
<body>
<div id="parentElement">
<button id="childElement">Child</button>
</div>
Next, we will invoke the “document.querySelector()” method to get the parent and child element:
<script>
var parent = document.querySelector('#parentElement');
var child = document.querySelector('#childElement');
After doing so, event listeners are added to both HTML elements by using the “addEventListener()” method.
To enable the “Event Capturing” in the parent div element, we will also set the third parameter’s value of the addEventListener() method to “true”.
This action will force the JavaScript interpreter to firstly execute the parent element event and then move the event flow control to the target:
parent.addEventListener('click', function(){
console.log("Clicked Parent ");
},true);
child.addEventListener('click', function(){
console.log("Clicked Child");
});
</script></body></html>
![]() The following “Child” button will first invoke the event added to the parent element.
After that, it will execute the event attached to the target:
The following “Child” button will first invoke the event added to the parent element.
After that, it will execute the event attached to the target:
![]() In the above-given example, when we have clicked the “Child” button, the “click” event is passed from the parent element which is “document,” to the specified event target “childElement” button:
In the above-given example, when we have clicked the “Child” button, the “click” event is passed from the parent element which is “document,” to the specified event target “childElement” button:
![]()
How to Stop event capturing
To stop event capturing, you can utilize the “event.stopPropagation()” method.
The difference between stopping the event capturing and event bubbling is that, in event bubbling, we attached the “event.stopPropagation()” method with the event related to the child element, whereas, in event capturing, the event.stopPropagation() method is added in the parent event.
Execute the below-given example to know how to stop event capturing using JavaScript code:
<!DOCTYPE html><html><head>
<title>JavaScript Event Capturing</title></head><body>
<div id="parentElement">
<button id="childElement" onclick="event.stopPropagation()">Child</button>
</div>
<script>
var parent = document.querySelector('#parentElement');
var child = document.querySelector('#childElement');
parent.addEventListener('click', function(){
console.log("Clicked Parent ");
event.stopPropagation();
},true);
child.addEventListener('click', function(){
console.log("Clicked Child");
});
</script></body></html>
![]() The given output signifies that event capturing is stopped after executing the event associated with the parent element:
The given output signifies that event capturing is stopped after executing the event associated with the parent element:
![]() Here is the full view of the event flow with the event capturing and event bubbling phases:
Here is the full view of the event flow with the event capturing and event bubbling phases:
![]()
Conclusion
In JavaScript, Event Bubbling and Event Capturing are the most important concepts with respect to event propagation.
In HTML DOM, Event Capturing refers to the propagation of events from ancestor elements to their child.
In Event Bubbling, the event control flow moves from the child elements to the ancestors.
This write-up discussed JavaScript Event Bubbling and Event Capturing.
Moreover, the examples related to Event Bubbling and Event Capturing are also demonstrated in this article.
DOM Event Listener method
You can add the event listener to the HTML DOM elements with the help of the addEventListener() method.
The addEventListener() method permits you to control the reaction for the corresponding event.
The JavaScript is isolated from the HTML text when you utilize the addEventListener() method, making it easy to comprehend and enabling you to add event listeners even if you do not control the HTML Markup.
This write-up will discuss the DOM Event Listener method.
We will explain the usage of the DOM Event Listener method for adding single and multiple handlers to the HTML elements.
Moreover, examples related to Event Bubbling and Event capturing will also be demonstrated.
So, let’s start!
DOM Event Listener method
As a JavaScript programmer, you can utilize the DOM addEventListener() method for adding an event listener on any HTM object such as the window objects, HTML elements, HTML document or xmlHttpRequest object.
There exists another “on” JavaScript property that is used for the same purpose; however, it is not much useful as compared to the addEventListener() method because the DOM addEventListener() method permits you for adding multiple event listeners on a window object or HTML element.
Syntax of addEventListener() method
object.addEventListener(event, function, useCapture);
Here, the first parameter, “event” is added to specify the event for which you want to add the event handler; the second parameter, “function” invokes the function that will be executed when the specified event occurs.
The third parameter is optional; where you have to add either“event capturing” or “event bubbling”.
Example 1: Using DOM Evener Listener method for adding an Event Handler
This example will show you the procedure of adding a DOM Event Listener method for the mouse “click” event.
Firstly, we will add a heading with the <h2> tag, a paragraph with the <p> tag, and a button by using the <button> tag:
<!DOCTYPE html><html><body><h2> DOM Event Listener Method</h2><p>This JavaScript program utilized addEventListener() method</p>
We have also added an id “button1” for our “Click me” button:
<button id="button1">Click me</button><p id="p1"></p>
The getElementById method will be invoked to find and get the button having “button1” id.
After that, the “addEventListener()” method will add a “click” event which will trigger the “displayDate()” method:
<script>
document.getElementById("button1").addEventListener("click", displayDate);
According to the added code, when the user clicks the mentioned button, the current date will be displayed as output:
function displayDate() {
document.getElementById("p1").innerHTML = Date();}</script></body></html>
Execute the above-given program in your favorite code editor or any online coding sandbox; however, we will utilize the JSBin for this purpose:
![]() After getting the output, click on the “Click me” button to check out the current time and date:
After getting the output, click on the “Click me” button to check out the current time and date:
![]()
Example 2: Using DOM Evener Listener method for adding Multiple Event Handlers
JavaScript also offers the functionality to add multiple event handlers for the same object.
To demonstrate its procedure, we have written the following JavaScript program with a heading, paragraph, and a button having “button1” id.
Note that we will add multiple event handlers for the “button” HTML element:
<!DOCTYPE html<html><body><h2> Add an Event Handler</h2><p>This JavaScript program utilized addEventListener() method</p><button id="button1">Click me</button>
In the next step, we will an “a” object that will find and get the button with “button1” id through invoking the document.getElementById() method:
<script>var a = document.getElementById("button1");
Then, we will add two event listeners for the button “click” event; the first addEventListener() method will invoke the “firstFunction”, whereas, the second addEventListener() method will call the “secondFunction”:
a.addEventListener("click", firstFunction);
a.addEventListener("click", secondFunction);function firstFunction() {
alert ("this is linuxhint.com");}function secondFunction() {
alert ("second function is executed");}</script></body></html>
![]() Hit the “Click me” button, and you get two alerts on your browser, one after another:
Hit the “Click me” button, and you get two alerts on your browser, one after another:
![]()
![]()
Example 3: Using DOM Event Listener Method for adding Event Handler to the window Object
In the following example, we are adding the addEventListener() method to the “window” object.
The added addEventListener() method will be triggered when a user performs the “mousedown” action:
<!DOCTYPE html><html><body><h2>JavaScript addEventListener()</h2><p>This example uses the addEventListener() method on the window object.</p>
We will also pass an “event” object to the addEventListener() method.
The “event” object comprises all of the information related to the mousedown event:
<script>
window.addEventListener("mousedown",function(event){
alert("Event is mousedown");
console.log(event);});</script></body></html>
![]() Execution of the above-given JavaScript program will show the following output:
Execution of the above-given JavaScript program will show the following output:
![]() Now, press the “left” mouse button over the selected element, and you will see the following alert:
Now, press the “left” mouse button over the selected element, and you will see the following alert:
![]()
Event Bubbling
In JavaScript, Event Bubbling is an event that bubbles up from the target or the deepest elements to its parents, then it follows the bottom to top approach and moves the control flow to its ancestors.
Event bubbling is considered as default event flow method in all modern browsers.
Example: Event Bubbling
In the following example, we have added a title with the <title> tag, a div element with the id “parentElement” and its nested child button element having the id “childElement”:
<!DOCTYPE html><html><head>
<title>JavaScript Event Bubbling</title></head><body>
<div id="parentElement">
<button id="childElement">Child</button>
</div>
After assigning the created HTML elements by using the “document.querySelector()” method, we will add an event listener to both div “parentElement” and its nested “childElement” button.
The function passed in the “addEventListener()” will display the added string in the “console.log()” method:
<script>
var parent = document.querySelector('#parentElement');
parent.addEventListener('click', function(){
console.log("Clicked Parent");
});
var child = document.querySelector('#childElement');
child.addEventListener('click', function(){
console.log("Clicked Child");
});
</script></body></html>
![]() Now, we will click on the “Child” button, which can be seen in the following output:
Now, we will click on the “Child” button, which can be seen in the following output:
![]() By clicking the “Child” button, the passed “function()” in the addEventListener() method will be executed.
Then, the “onclick()” method of the “div” element will be invoked.
This all happens because of the “Event Bubbling”:
By clicking the “Child” button, the passed “function()” in the addEventListener() method will be executed.
Then, the “onclick()” method of the “div” element will be invoked.
This all happens because of the “Event Bubbling”:
![]() In the above-given example, when we have clicked the “Child” button, the “click” event is passed from the button having id “childElement” and event flow control moves to the “document” in the following order:
In the above-given example, when we have clicked the “Child” button, the “click” event is passed from the button having id “childElement” and event flow control moves to the “document” in the following order:
![]()
Event capturing
The process in which an event is captured when its flow of control moves from the top element to the target or outermost element is known as Event capturing.
Although modern browsers do not have the capability to enable event capturing by default, you can perform this operation through JavaScript code.
Example: Event Capturing
In our JavaScript program, first of all, we will add a title and a “div” element having id “parentElement” and its child element with “childElement” id:
<!DOCTYPE html><html><head>
<title>JavaScript Event Capturing</title></head><body>
<div id="parentElement">
<button id="childElement">Child</button>
</div>
Next, we will invoke the “document.querySelector()” method to get the parent and child element:
<script>
var parent = document.querySelector('#parentElement');
var child = document.querySelector('#childElement');
After doing so, event listeners are added to both of our HTML elements by using the “addEventListener()” method.
To enable the “Event Capturing” in the parent div element, we will also set the third parameter’s value of the addEventListener() method to “true”.
This action will force the JavaScript interpreter to firstly execute the parent element event and then move the vent flow control to the event target:
parent.addEventListener('click', function(){
console.log("Clicked Parent ");
},true);
child.addEventListener('click', function(){
console.log("Clicked Child");
});
</script></body></html>
![]() The following “Child” button will first invoke the event added to the parent element.
After that, it will execute the event attached to the event target:
The following “Child” button will first invoke the event added to the parent element.
After that, it will execute the event attached to the event target:
![]() In the above-given example, when we have clicked the “Child” button, the “click” event is passed from the parent element which is “document,” to the specified event target “childElement” button:
In the above-given example, when we have clicked the “Child” button, the “click” event is passed from the parent element which is “document,” to the specified event target “childElement” button:
![]()
Conclusion
Using the DOM addEventListener() method, you can add an event listener to the window object and HTML elements.
Without overwriting the existing event handlers, the addEventListener() JavaScript method assigns an event handler to the specific object.
Also, a single window object can have multiple event handlers as well.
This write-up discussed the DOM Event Listener method.
We also explained the usage of the DOM Event Listener method for adding single and multiple handlers to the HTML elements.
Moreover, examples related to Event Bubbling and Event capturing are also demonstrated.
Difference Between call() and apply() methods
In JavaScript, objects are defined with their own properties and are restricted for keeping the properties private.
To resolve this problem, we use the call and apply methods.
Using these methods, you can tie a function into an object and invoke it as if it belonged to the created object.
In JavaScript, call() and apply() methods are used to invoke a function with an optional argument and a specific “this” context.
Both methods are quite similar, with a minor difference.
Therefore, many people get confused with the usage of both these methods.
This write-up will discuss the difference between call() and apply() methods.
The primary difference between both of the mentioned methods is the way they handle the arguments of a function.
However, both functions allow you to control the “this” keyword inside the defined function.
call() Method
In this method, a function is called with its arguments which are provided individually.
The keyword “this” is added for referring to the owner of the object.
Example: Using call() Method
In the following example, “person” is the object of the “this” keyword that owns the properties of a mentioned object, such as firstName and lastName.
In the next step, we will define a “fullName()” function that is going to borrow the properties of the “person” object in its body:
const person = {
firstName: 'Alice',
lastName: 'Mark',}function fullName() {
console.log(`${this.firstName} ${this.lastName}`)}
fullName.call(person)
![]()
Invoke a call() method with arguments
object.objectMethod.call( objectInstance, arguments )
Parameters of call() method
Two parameters are accepted by the call() method.
argument: It takes the arguments which are separated by commas.
objectInstance: It has the instance of an object and checks the type of object at run time.
Example: Using call() method with arguments
First of all, we will create a “person” object and then add a “fullName” method in it.
The fullName method of “person” object is a function which will take “age” and “height” as its parameters.
This function will return the “firstName”, “lastName” of the current instance of the object, with its age and height:
const person = {
fullName: function(age, height) {
return this.firstName + " " + this.lastName + "," + age + "," + height;
}}
Next, we will create another object named “personN” having two properties, “firstName” and “lastName”.
After doing so, we will invoke the “fullName” method of the “person” object while passing “personN” as object instance, “25” as age argument, and “5ft” as the height argument value:
const personN = {
firstName:"Alice",
lastName: "Mark"}
person.fullName.call(personN, "25", "5ft");
![]()
apply() Method
The apply() method takes the arguments of a function in the form of an array, which can be used on different objects.
Example: Using apply() method
In the given example, apply() method is used to call the “fullName()” method of the “person” object while passing “personN” as an object instance:
const person = {
FullName: function() {
return this.FirstName + " " + this.LastName;
}}const personN = {
FirstName: "Alice",
LastName: "Mark"}
person.FullName.apply(personN);
Execution of the above-given program will show you the values of “firstName” and “lastName” properties of the “person” object:
![]()
Invoke an apply() method with arguments
object.objectMethod.apply(objectInstance, arrayOfArguments)
There are two parameters in apply() method:
objectInstance: It checks the type of an object at run time.
arrayOfArguments: It takes the arguments from an array..
Example: Using apply() method
The given example shows the implementation of the apply() method with arguments:
const person = {
FullName: function(age, height) {
return this.FirstName + " " + this.LastName + "," + age + "," + height;
}}const personN = {
FirstName:"Alice",
LastName: "Mark"}
person.FullName.apply(personN, ["25", "5ft"]);
![]()
Difference between call and apply methods
The main difference between call() and apply() JavaScript methods is:
In the call() method, arguments are passed individually.
The apply() method accepts the arguments in the form of an array.
Conclusion
In JavaScript, the call() method accepts the individual argument, whereas the apply() method accepts the arguments in the form of an array.
This article explained the difference between these two methods profoundly, demonstrated the implementation of both methods with and without arguments, and explicitly explained them with brief examples.
How AJAX works
AJAX comprises a set of useful web development techniques utilized to develop dynamic and speedy web pages.
Behind the scenes, it shares small chunks of the data, permitting the web pages to be updated asynchronously.
This states that by using AJAX, HTML page elements will be updated without reloading.
This write-up will discuss the components of AJAX and how AJAX works.
We will talk about the working of AJAX in some top web-based applications.
Moreover, a comparison between the conventional and AJAX model will be provided.
So, let’s start!
Components of AJAX
AJAX is a set of web development techniques.
It is based on the below-given components:
In the AJAX model, the XHTML/HTML is considered core languages and Cascade Style Sheets (CSS) as the presentation language.
The Document Object Model is utilized to show dynamic content and interaction purposes.
For exchanging data, AJAX relies on XML, and XSLT is used for data manipulation.
The XMLHttpRequest Object is used for the asynchronous communication in the model.
Lastly, JavaScript is used to connect all of these technologies in AJAX.
How AJAX works
Whenever users send any request from the user interface, or an event occurs such as a button being clicked or the web page being loaded, JavaScript creates an “XMLHttpRequest” object.
After that, the created object sends an HTTPRequest to the webserver.
Then, the server process the received HTTPRequest by interacting with the database.
When the required data gets fetched from the database, a response is generated, and the server sends back that JSON or XML data to the browser.
In the next step, JavaScript processes the returned data and updates the web page accordingly.
The below-given image also illustrates the working of AJAX:
![]()
AJAX Practical Examples
Consider the autocomplete feature of the Google website.
It assists you in completing the keywords as you type.
The Google web pages remain the same when the keywords change in real-time.
When the internet was not this much advance in the early 90s, the Google web page got reloaded whenever it showed a new recommendation of the browser screen.
In 2004, Google started to embed the AJAX model behind the scenes of Google Map and Google Mail.
It permits data exchange and enables the presentation layer to work without interfering.
AJAX is now commonly utilized in several web-based applications for simplifying communication with the server.
We have also compiled a list of some other practical AJAX examples:
Chat rooms: Nowadays, built-in chat rooms are among the most features of a website.
Websites offer chat rooms on their homepage, using which you can communicate with their customer service representative.
You can explore the web page while sending and receiving messages from chat rooms.
AJAX does not reload the whole page during these simultaneous activities.
Rating and Voting systems: Have you ever participated in some online voting form, or have you given a product rating after buying it online? AJAX is utilized in both mentioned systems.
After giving the rating or voting, the website will update the calculation section, while the rest remains unaltered.
Trending notification of Twitter: Twitter’s trendy notification is a great feature to keep up with what is going on in the world.
AJAX was recently employed on Twitter for the updates, and it updates the application whenever new tweets are sent regarding trendy topics without impacting the main website.
In short, AJAX models facilitate multitasking.
Suppose you notice an application executing two activities simultaneously, without putting one in idle and the other in an active state.
In these scenarios, AJAX is working in the background.
Comparison of AJAX and Conventional Model
| AJAX Model | Conventional Model |
|---|
| When an event occurs, the browser defines a JavaScript call, activating XMLHttpRequest. | The browser passes an HTTP request to the server in the conventional model. |
| The created object then sends an HTTP request to the server in the background. | The data is received and then retrieved by the server. |
| The request is received, required data is retrieved, and sent back to the web browser. | The web browser accepts the server response. |
| The fetched data is sent back to the browser and displayed directly on the page.
In the AJAX model, no page reload operation is performed meanwhile. | The browser reloads the page for updating it.
During this operation, users have to wait until the page gets reloaded.
This action is time-consuming and puts extra loads on the server. |
Conclusion
AJAX permits web pages to be updated asynchronously while exchanging the data in the background.
This states that web page elements can be updated without page reloading.
This write-up discussed the components of AJAX and how AJAX works.
We have talked about the working of AJAX in some top web-based applications.
Moreover, a comparison between the Conventional and AJAX models is also provided.
How to Add an Event Handler to the Window Object
Your browser window that is automatically created is known as a window object.
It is considered the object of the browser, not of JavaScript.
If you are reading this article in your favorite browser, the current tab represents the window object.
The Window object can use the windows’ width, height, alerts, and prompts.
With the help of the addEventListener() method, a JavaScript programmer can add event handlers to a specific window object.
This method permits you to control the reaction for the corresponding event.
The JavaScript is isolated from the HTML text when you utilize the addEventListener() method, making it easy to comprehend and enabling you to add event listeners even if you do not have control over the HTML Markup.
This write-up will discuss the procedure for adding event handlers to the window object in a JavaScript program.
Moreover, the examples related to the usage of the addEventListener() method will be also demonstrated.
So, let’s start!
Adding Event Handlers to the window Object
As a JavaScript programmer, you can utilize the addEventListener() method for adding an event listener to any HTML object.
There exists another “on” JavaScript property that is used for the same purpose; however, it is not much useful as compared to the addEventListener() method because the addEventListener() method permits you for adding multiple event listeners on a window object or HTML element.
Syntax of addEventListener() method
object.addEventListener(event, function, useCapture);
Here, the first parameter, “event” is added to specify the event for which you want to add the event handler; the second parameter, “function” invokes the function that will be executed when the specified event occurs.
The last parameter is optional which can be event capturing or bubbling.
Example 1: Adding an Event Handler to the window Object
We will add the addEventListener() method to the “window” object in the following example.
The added addEventListener() method will be triggered when a user performs the “mousedown” action:
<!DOCTYPE html><html><body><h2>JavaScript addEventListener()</h2><p>This example uses the addEventListener() method on the window object.</p>
We can also pass an “event” object to the addEventListener() method.
The “event” object comprises all of the information related to the mousedown event:
<script>
window.addEventListener("mousedown",function(event){
alert("Event is mousedown");
console.log(event);});</script></body></html>
Execute the above-given program in your favorite code editor or any online coding sandbox; however, we will utilize the JSBin for this purpose:
![]() Execution of the above-given JavaScript program will show the following output:
Execution of the above-given JavaScript program will show the following output:
![]() Now, left click on the screen and you will see the following alert:
Now, left click on the screen and you will see the following alert:
![]()
Example 2: Adding an Event Handler for mouse click event
This example will show you the procedure of adding an Event Handler for the mouse “click” event.
In this example, we are not adding event directly to the window object but to its document object.
Firstly, we will add a heading with the <h2> tag, a paragraph with the <p> tag, and a button by using the <button> tag:
<!DOCTYPE html><html><body><h2> Add an Event Handler</h2><p>This JavaScript program utilized addEventListener() method</p>
We have also added an id “button1” for our “Click me” button:
<button id="button1">>Click me</button><p id="p1"></p>
The getElementById method will be invoked to find and get the button having “button1” id.
After that, the “addEventListener()” method will add a “click” event which will trigger the “displayDate()” method:
<script>
document.getElementById("button1").addEventListener("click", displayDate);
According to the added code, when the user clicks the mentioned button, the current date and time will be displayed as output:
function displayDate() {
document.getElementById("p1").innerHTML = Date();}</script></body></html>
![]() After getting the output, click on the “Click me” button to check out the current time and date:
After getting the output, click on the “Click me” button to check out the current time and date:
![]()
Conclusion
Using the addEventListener() method, you can add an event handler to the window object and HTML elements.
Without overwriting the existing event handlers, the addEventListener() JavaScript method assigns an event handler to the specific object and a single window object can have multiple event handlers as well.
This write-up discussed the procedure for adding event handlers to the window object in a JavaScript program and the examples related to the usage of the addEventListener() method are also demonstrated.
How to Convert Numbers to Booleans
Type conversion is a phenomenon of converting one data type into another.
Just like any other programming language, JavaScript provides two types of data conversions i.e.
implicit and explicit.
In implicit conversion JavaScript automatically convert one data type to another while in explicit type conversion we have to use some built-in functions to convert the data type.
The “number to Boolean” conversion belongs to the explicit type conversion.
To convert a number to a Boolean data type we have to utilize a built-in function Boolean().
This write-up presents a detailed understanding of how to convert numbers to boolean.
Afterward, it explains the impact of using not “!” sign and double not “!!” sign.
How to Convert Numbers to Booleans
Before jumping into the type conversion, first, we have to understand what is Boolean data type? Well! It is a very simple data type that has only two possible outcomes either true or false.
Now the question is while converting the other data types to Boolean data type; when will it return true and when will it return a false value?
In JavaScript, the Boolean data type will convert all the values into true except the following values:
null
0
NaN
false
‘ ’
undefined
Now it’s time to understand how we can explicitly convert the numbers data type into Booleans data type., Boolean function will return true for all the numeric values other than 0.
Example
The below-given code will show how to convert a Number into a Boolean value:
var a= 10;
console.log("The original Number: ", a);
console.log("Number converted to Boolean", Boolean(a));
In the above code we created a variable and assigned a number to it.
To convert a numeric value to a Boolean value we utilized a built-in function “Boolean” and the console.log() function is used to print the original and the converted value of “a”.
On successful execution of the code, we will get the following output on the browser’s console:
![]() Example
Let’s consider another example to understand when Boolean will return the false value:
var a= 0;
console.log("The original Number: ", a);
console.log("Number converted to Boolean", Boolean(a));
Now the above code converts a numeric value “0” to a Boolean data type, as a result, it will return false as shown in the following snippet:
Example
Let’s consider another example to understand when Boolean will return the false value:
var a= 0;
console.log("The original Number: ", a);
console.log("Number converted to Boolean", Boolean(a));
Now the above code converts a numeric value “0” to a Boolean data type, as a result, it will return false as shown in the following snippet:
![]() Use of “!” sign within the Boolean function provides a contradictory value i.e.
Boolean function will show true for 0 and false for all non-zero values.
Using two not signs “!!” will provide the actual results i.e.
0=false, 1=true.
Example
For better understanding consider the following piece of code:
var a= 0;var b=10;
console.log("The original Number: ", a);
console.log("Number converted to Boolean", Boolean(!a));
console.log("The original Number: ", b);
console.log("Number converted to Boolean", Boolean(!b));
The above-given code provides the following output:
Use of “!” sign within the Boolean function provides a contradictory value i.e.
Boolean function will show true for 0 and false for all non-zero values.
Using two not signs “!!” will provide the actual results i.e.
0=false, 1=true.
Example
For better understanding consider the following piece of code:
var a= 0;var b=10;
console.log("The original Number: ", a);
console.log("Number converted to Boolean", Boolean(!a));
console.log("The original Number: ", b);
console.log("Number converted to Boolean", Boolean(!b));
The above-given code provides the following output:
![]() The above snippet verifies that use of “!” sign within the Boolean function shows the contrary results.
The above snippet verifies that use of “!” sign within the Boolean function shows the contrary results.
Conclusion
In JavaScript, a built-in function Boolean is used to convert the number data type to boolean data type.
The Boolean function returns true for all the numeric values other than zero.
However, the use of logical not operator within the Boolean function results in falsy results.
This write-up presents a complete overview of how to convert a number data type to a Boolean data type.
Moreover, it describes the consequences of using logical not operator “!” as well as double-negation “!!”.
How to Convert Numbers to Dates
JavaScript provides multiple date methods to format the date or time e.g.
getDate() returns the current date, Date.now() returns current date and time, etc.
Similarly, there exist some methods that are used to convert one data type to another e.g.
“.getTime()” method is used to convert a date into a number.
But what if we get a number instead of a date, how to convert that number into a date?
This article will provide a detailed guideline in this regard, for this purpose you have to understand the following aspects:
Date.now() method
Date object
How to convert numbers/milliseconds to date format.
So, without any delay let’s begin!
Date.now() method
In JavaScript, the internal clock starts from midnight January 1st, 1970.
So, the Date.now() method calculates the time and date from January 1st, 1970 till the current date and time.
As a result, it returns a value in milliseconds (number).
To convert this number into readable date format we have to use date object of javascript.
Before jumping into the conversion procedure first we need to understand what is a date object, what is the need of date object and how to use a date object.
Date object
JavaScript provides an inbuilt object named Date object which allows us to work with the dates.
The constructor “new Date()” is used to create a date object and it can be created in four different ways.
In order to get the current date and time all we have to do is simply use the new Date() as shown in the following snippet:
new Date();
There are numerous methods available that can be used with the date object to perform different functionalities e.g.
the Date.now() method, Date.getTime() and so on.
How to Convert Number to Date
To convert the date format from milliseconds/numbers to an easily readable date format we can use new Date() object.
Example
Let’s consider the below-given code where we utilize a Date.now() function to get the current date and time:
<script>
var currentDate = Date.now();
document.write("Current date and time in milliseconds: ",currentDate);</script>
In the above snippet Initially, we created a variable currentDate, and stored the value of Date.now() in the “currentDate” variable.
On successful execution the above code provides the following output:
![]() We were expecting a readable date format however we get a number instead of the current date and time.
Now, all we have to do is, convert the above number which is representing the number of milliseconds to a human-readable date format.
For this purpose we will pass the resultant value of Date.now() function into new Date() object:
<script>
var currentDate = Date.now();
document.write("Current date and time in milliseconds: ",currentDate);
var numDate= new Date(currentDate);
document.write("<br> Milliseconds converted to Date format: ",numDate);</script>
The above snippet will provide the following output:
We were expecting a readable date format however we get a number instead of the current date and time.
Now, all we have to do is, convert the above number which is representing the number of milliseconds to a human-readable date format.
For this purpose we will pass the resultant value of Date.now() function into new Date() object:
<script>
var currentDate = Date.now();
document.write("Current date and time in milliseconds: ",currentDate);
var numDate= new Date(currentDate);
document.write("<br> Milliseconds converted to Date format: ",numDate);</script>
The above snippet will provide the following output:
![]() Now the above output verifies that the use of the new Date object provides the results in human-readable date format.
Now the above output verifies that the use of the new Date object provides the results in human-readable date format.
Conclusion
To convert a number into date format simply pass the numeric/milliseconds value into the new Date() object.
This article presented a detailed understanding of Date.now() method, new Date() object, and how to convert a number into date format.
Moreover, this article considered some examples for a profound understanding of all these concepts.
How to Display Objects?
, an object is a single entity with some specific properties.
These defined properties are the characteristics of the given objects.
Moreover, almost everything is an object.Therefore, we should know how these objects can be displayed., various ways are present to display objects based on the condition and requirement.
However, some of the most common ways to display an object are:
Displaying objects based on their properties
Displaying values of an object using for..in loop
Display values using method object.values()
Displaying objects using JSON.stringify() method
Now we will elaborate on all the above techniques to display an object on a web browser with the help of examples to make it clear for you.
Displaying Objects Based On their Properties
It is the most common way to display objects as it prints the things by accessing the individual properties of an object.
We can use two methods to access an object by using its properties are as a square bracket or a (.) operator.
Let’s take a look at the below examples to understand it completely.
In the given example, an object is accessed by using the (.) operator.
Example
var boy = {
name: "Alice",
age: 25,
height: "5(ft)"}
console.log(boy.name + ", "+ boy.age + ", " + boy.height);
![]() In the following example, an object is accessed by using the square brackets [].
var boy = {
name: "Alice",
age: 25,
height: "5(ft)"}
console.log(boy['name']);
In the following example, an object is accessed by using the square brackets [].
var boy = {
name: "Alice",
age: 25,
height: "5(ft)"}
console.log(boy['name']);
![]()
Displaying Values of an Object using in Loop Structure
Loops can also be used to display and object and repeat the names of the properties of an object.
The benefit of operating in a loop structure is that we can get access to all the elements of an object simultaneously.
Javascript provides a “for..in” loop for accessing and manipulating objects.
Let’s understand it by an example statement.
Example
var boy = {
name: "Alicel",
age: 30,
height: "5(ft)"}
for(property in boy){
console.log(boy[property] +" ")}
If you use a for…in the loop, then it will iterate through the names of object properties like a string.
So we have to use an object[property] rather than an object:property.
![]()
Display Values using Method object.values()
JavaScript has numerous predefined functions and methods and it also provides built-in methods for accessing object values known as “Object.values()”, which is used to display all values of an object in an array.
Therefore, to display objects in array format, use the object.Value() method as the following example depicts.
Example
var boy = {
name: "Alice",
age: 25,
height: "5(ft)"}
arrayVal = Object.values(boy);
console.log(arrayVal)
![]()
Displaying Objects using JSON.stringify() Method
JavaScript Object Notation (JSON) is a predefined method used to display the entire structure of an object.
All the JavaScripts must have a JSON module that supports stringify() scenario that is also proficient at converting an object into strings, as shown in the below example.
Example
var boy = {
name: "Alice",
age: 25,
height: "5(ft)"}
objString = JSON.stringify(boy);
console.log(objString);
![]()
Conclusion
To display objects some of the most common ways are: displaying objects based on their properties, displaying values using for..in loop, display values using method object.values(), displaying objects using JSON.stringify() method.
This write-up explains each method to display objects briefly, along with the examples to have a profound and clear understanding.
Invoking a Function with a Function Constructor
, Invoking a function with a function “constructor” is different from invoking a function as a “method” and invoking it as a “function” because it creates a new object that inherits its constructor function’s properties and methods, and the other two methods do not include inheritance.
So make sure you are using the right method to invoke the function to execute JavaScript code efficiently.
This tutorial presents syntax and examples of calling a function using a function constructor.
It will also differentiate how the function constructor invoking method is different from the other two methods.
So, let’s start!
Invoking a Function as a Function Constructor
In the following example, we will create a “x” object by invoking the “myArg()” function constructor:
function myArg(arg1, arg2) {
this.radius = arg1;
this.height = arg2;
}
var x = new myArg(1,2)
console.log(x);
The output of this program is given below:
![]() The above example first defined a function “myArg()”.
After that, we have created an “x” object by invoking the “myArg()” function as a function constructor.
The function constructor will then inherits the properties from the original function.
We can see that only the values were passed as arguments to the “myArg()” function, but the output also shows the properties associated with them.
Now, let’s check out the other methods for invoking a function.
The above example first defined a function “myArg()”.
After that, we have created an “x” object by invoking the “myArg()” function as a function constructor.
The function constructor will then inherits the properties from the original function.
We can see that only the values were passed as arguments to the “myArg()” function, but the output also shows the properties associated with them.
Now, let’s check out the other methods for invoking a function.
Invoking a Function as a Function
It is straightforward to invoke a function as a function.
The function does not create a new object, but JavaScript will globally create an object.
The function will always belong to the HTML page, which is the default object of the function.
We can invoke a function by simply using its name and passing the arguments according to the specified parameters.
Example: Invoking a Function as a Function
In this example, we will create a “myFunction()” with two parameters “a” and “b”, and it will return the product of the values of the passed arguments:
function myFunction(a, b) {
return a * b;}
myFunction(10, 2); // Will return 20
![]()
Invoking a Function as a Method
JavaScript also allows us to invoke a function as a method.
In the below example, we can see that the fullName method is a function that belongs to an object, and “myObject” is the function owner.
Here the “this” keyword is also used in the code.
The value of “this” in this method is what myObject returns.
Example: Invoking a Function as a Method
In the below-given example, we have created an object named “myObject” having two properties “firstName”, “lastName” and a “fullName” method.
The “fullName” method belongs to the “myObject” and is a function.
To invoke “fullName()” method, we will simply invoke it with the help of “myObject” in the following way:
const myObject = {
firstName:"Alcei",
lastName: "Jhon",
fullName: function () {
return this.firstName + " " + this.lastName;
}}
myObject.fullName(); // Will return "Alice John"
As you can see from the output, the fullName method has returned values of “firstName” and “lastName” properties:
![]()
Why Use a Function Constructor to Invoke a Function?
Using other invoking methods rather than function constructors can cause security and performance related issues as other methods create dynamic functions.
Function constructor helps to create a function that can be executed in global scope only.
Invoking a Function with a New Function Constructor
A function constructor requires one or more string arguments.
In contrast, the last argument will show the function’s body, which consists of the added JavaScript statements separated with semicolons.
Example: Invoking a Function with a New Function Constructor
The following example shows how to invoke a function with a new function constructor:
<html>
<head>
<script>
var func = new Function("a", "b", "return a*b;");
function multiplyFunction() {
var result;
result = func(111,135);
document.write ( result );
}
</script>
</head>
<body>
<p>Click the following button to call the function</p>
<form>
<input type="button" onclick = "multiplyFunction()" value="Call Function">
</form>
</body></html>
![]()
Note
A function constructor will never pass an argument that specifies the function name created in the code.
It will automatically declare a function as an anonymous function.
Conclusion
In JavaScript, Invoking a function with a function constructor is uncharacteristic and it is based on inheritance.
Still, this method of invoking functions has its benefits and can come in handy in certain situations.
This tutorial discussed the procedure of invoking a function with the help of function constructor.
We also explained the difference between invoking function as a function constructor, invoking function as a method, and invoking function as a function with the help of examples.
Browser Object Model (BOM) | Explained
Browser Object Model aka BOM is an object model that JavaScript uses to communicate with the browser.
BOM can be thought of as a container of objects that uncover the functionalities of a web browser.
When a browser accesses a document it generates an object referred to as Document Object that contains all the relevant information about the document and how it should appear on the browser.
Apart from the document object, a browser utilizes a huge amount of objects and this huge collection of objects is referred to as Browser Object Model (BOM).
This model does not follow any specific set of standards but is implemented by almost all browsers.
Significant objects that are a part of the Browser Object Model (BOM) are;
Document
History
Screen
Navigator
Location
Frames
Browser objects are ranked in a certain order that BOM utilizes to uncover functionalities of a web browser.
Window Object that denotes the window of the browser, is the umbrella object of BOM, and the rest of the objects fall under the window object.
Here the window object has been explained in detail.
Window Object
A window object denotes the window of the browser and consists of all other browser objects.
All browsers support the window object.
The window object specifies some properties and methods that handle the functionalities of the web browser.
![]() The window object is a global object that consists of global JavaScript objects, variables (properties of the window object), and functions (methods of the window object).
Some of the window object methods are.
The window object is a global object that consists of global JavaScript objects, variables (properties of the window object), and functions (methods of the window object).
Some of the window object methods are.
alert()
It is used to display an alert box with an OK button on the window screen.
window.alert()
confirm()
It is used to display a confirmation box with an OK and CANCEL button on the window screen.
window.confirm()
prompt()
It is used to display a dialog box that is meant to take input from the user.
window.prompt()
open()
It is used to open a new window.
window.open()
close()
It is used to close a window.
window.close()
setTimeout()
It is used to perform certain actions after a specific time.
window.setTimeout()
Now that we have a good understanding of the window object, let’s learn about some other important BOM objects.
Document Object
Document object that is a core part of Browser Object Model (BOM) includes all elements of a web page such as HTML tags.
This object is used to denote a web page that has been opened in the browser, moreover, it is a property of the window object.
Syntax
The syntax of document object is given below.
window.document
Or,
document
Example
<!DOCTYPE html><html><body>
<p id="tutorial"></p>
<script>
let url = window.document.URL;
document.getElementById("tutorial").innerHTML = url;</script>
</body></html>
Output
![]()
History Object
The history object denotes the web browsing history of a user in the form of arrays consisting of the URLs that the user visited.
This object is used to load web pages.
Syntax
The syntax of the history object is as follows.
window.history
Or,
history
Like the window object, the history object also contains certain properties and methods that are discussed below.
Properties
The JavaScript history object consists only of one property which is as follows.
length
The length property of the history object is used for the purpose of returning the length of the visited URLs.
history.length
Methods
The JavaScript history object consists of the following methods.
forward()
It is used for the purpose of loading the next page.
It has the following syntax.
history.forward()
back()
It is used for the purpose of loading the previous page.
It has the following syntax.
history.back()
go()
It is used for the purpose of loading a page using the page number.
It has the following syntax.
history.go()
Screen Object
The screen object contains all relevant information regarding the browser screen such as height, width, colorDepth, availHeight, etc.
Syntax
The syntax of the screen object is given below.
window.screen
Or,
screen
The screen object consists of some properties which are explained below.
Properties
Properties of the screen object are as follows.
width
It is used for fetching the screen width.
screen.width
height
It is used for the purpose of fetch the screen height.
screen.height
availWidth
It is used for the purpose of fetching the current width.
screen.availWidth
availHeight
It is used for the purpose of returning the current height.
screen.availHeight
colorDepth
It is used for the purpose of displaying the depth of the color.
screen.colorDepth
pixelDepth
It is used for the purpose of displaying the depth of the pixel.
screen.pixelDepth
Location Object
The location object consists of the relevant information about the available URL and like document, history, and screen objects, it is also a property of the window object.
Syntax
The syntax of the location object is provided here.
window.location
Or,
location
Properties
Location object properties are highlight below
hash
It is used for the purpose of returning or setting the anchor of the URL.
location.hash
host
It is used for the purpose of fetching the hostname as well as the port number of the URL.
location.host
hostname
It is used for the purpose of fetching the hostname of the URL.
location.hostname
href
It is used for the purpose of returning or setting the complete URL.
location.href
origin
It is used for the purpose of fetching the hostname, and the port number, and also the protocol of the URL.
location.origin
pathname
It is used for the purpose of returning or setting the pathname of the URL.
location.pathname
port
It is used for the purpose of returning or setting the port number of the URL.
location.port
protocol
It is used for the purpose of returning or setting the protocol of the URL.
location.protocol
search
It is used for the purpose of returning or setting the querystring of the URL.
location.search
Methods
The location object has the following set of methods.
assign()
It is used for the purpose of loading a new document.
location.assign()
reload()
It is used for the purpose of reloading the document at hand.
location.reload()
replace()
It is used for the purpose of replacing the present document with a new document.
location.replace()
Conclusion
Browser Object Model aka BOM is an object model that JavaScript uses to communicate with the browser and is regarded as a container of objects that uncover the functionalities of a web browser.
BOM does not follow any specific set of standards but is implemented by almost all browsers.
Significant BOM objects along with the properties and methods that these objects comprise of are explained in depth in this write-up.
JavaScript Date Set Methods
If you want to create a website having an interface for scheduling appointments, a rail timetable, or a calendar, then JavaScript Date Set methods are what you are looking for.
Using the JavaScript Date Set methods, you can display the user’s current timezone or calculate the arrival and departure time in such applications.
It can also assist you in generating the report at the specified time of each day.
This write-up will discuss the JavaScript Date set methods and how you can use them in your JavaScript code.
Moreover, the examples related to each Date set method such as setFullYear(), setMonth(), setDay(), setDate(), setHours(), setMinutes(), and setSeconds() will be provided.
So, let’s start!
JavaScript Date setFullYear() Method
To set a year for the Date object, you can utilize the built-in JavaScript setFullYear() function.
The setFullYear() function takes the four-digit number “yyyy” as a parameter representing the year.
Additionally, you can also set the day and month using this method.
Example: Using JavaScript Date setFullYear() Method
This example will demonstrate the usage of the JavaScript Date setFullYear() method.
For this purpose, firstly, create a “Date” object “today1”.
This “today1” date object will store the current time and date as its value.
Next, we will print out the one year before and after the current year by specifying the “today1.getFullYear()” as an argument in both cases:
var today1 = new Date();
document.write("Today is:"+today1);
document.write("<br />");
today1.setFullYear(today1.getFullYear() - 1);
document.write("1 Year Before: "+today1);
document.write("<br />");
today1.setFullYear(today1.getFullYear() + 1);
document.write("1 Year After: "+today1);
![]() Execution of the above-given code will print out three lines.
You can see that the first line in the output shows the current date and time stored in the “today1” date object, and the other two lines display the values for the previous and next year with the same date and time:
Execution of the above-given code will print out three lines.
You can see that the first line in the output shows the current date and time stored in the “today1” date object, and the other two lines display the values for the previous and next year with the same date and time:
![]()
JavaScript Date setMonth() Method
In JavaScript, the setMonth() method is utilized for setting the month of a date object.
It takes values between 0-11, where zero represents “January” and “11” indicates “December”.
Example: Using JavaScript Date setMonth() Method
The following JavaScript program will set “March” as the month value of the “date1” date object:
var date1=new Date();
date1.setMonth(2);
document.write("Set Month is: "+date1);
![]() As you can see, “March” is assigned as a month for the created date1 object:
As you can see, “March” is assigned as a month for the created date1 object:
![]()
JavaScript Date setDate() Method
When you will create a simple “Date” object, it will store the current date and time values.
However, you can utilize the “setDate()” function to set the month’s day of your created date object, and it takes values between 0-31.
Example: Using JavaScript Date setDate() Method
To check out the working of the Date setDate() method, execute the following code in your console window:
var date1=new Date();
date1.setDate(5);
document.write("Set Date is: "+date1);
![]() Adding “5” will set the date object value to the 5th of the current month:
Adding “5” will set the date object value to the 5th of the current month:
![]()
JavaScript Date setHours() Method
“setHours()” is another built-in JavaScript method for the date object that is used to set the hours value of a “Date” object.
Its values range from 0-23.
Example: Using JavaScript Date setHours() Method
In this example, we will use the “setHours()” method for setting “12” as the hour’s value for the newly created “date1” object:
var date1=new Date();
date1.setHours(12);
document.write("Set Hours is: "+date1);
![]() The below-given output declares that we have successfully set the specified hour value:
The below-given output declares that we have successfully set the specified hour value:
![]()
JavaScript Date setMinutes() Method
Want to set the minutes for a date object? If yes, then there exists a JavaScript Date “setMinutes()” method which you can utilize for this purpose.
The setMinutes() method sets the minutes value between 0-59.
Example: Using JavaScript Date setMinutes() Method
First of all, we will create a new “date1” date object, and then we will set its Minutes value to “57” using the “date1.set.minutes()” method:
var date1=new Date();
date1.setMinutes(57);
document.write("Minutes Set: "+date1);
![]() The output of the above-given code will show the changes you have made into the “date1” object Minutes:
The output of the above-given code will show the changes you have made into the “date1” object Minutes:
![]()
JavaScript Date setSeconds() Method
The “setSeconds()” method is used to set the seconds of the date object with a value between 0-59.
Example: Using JavaScript Date setSeconds() Method
The below-given code will create a new “date1” date object and then set its seconds value to “10”:
var date1=new Date();
date1.setSeconds(10);
document.write("Seconds Set: "+date1);
![]() The execution of the provided code will print out the “date1” object data with specified changes in the “seconds” value:
The execution of the provided code will print out the “date1” object data with specified changes in the “seconds” value:
![]()
Conclusion
This write-up discussed the JavaScript Date set methods that you can use to set the Date object values of seconds, minutes, hours, days, months, and years in your JavaScript code for different purposes, such as creating a calendar.
We have also demonstrated the examples related to each JavaScript Date set methods including setFullYear(), setMonth(), setDay(), setDate(), setHours(), setMinutes(), and setSeconds() in this article.
Getters and Setters Class
In a JavaScript class, getters and setters are used to get or set the properties values.
“get” is the keyword utilized to define a getter method for retrieving the property value, whereas “set” defines a setter method for changing the value of a specific property.
When we want to access a property of our JavaScript object, the value returned by the getter method is used, and to set a property value, the setter method is invoked and then we pass the value as an argument that we want to set.
This write-up will discuss getters and setters.
Moreover, we will also demonstrate examples related to getter and setter definition usage in the JavaScript class.
So, let’s start!
Getters and Setters Class
In the below-given example, we will create an “Employee” class having a constructor.
The constructor of the “Employee” class will initialize the Employee “name” to the string passed as an argument :
classEmployee {
constructor(name) {
this.name = name;
}}
Now, we will create an Employee class object named “employee” and add “Jack” as its name:
let employee = new Employee("Jack");
After doing so, we can access the “name” property of the “employee” object in the following way:
console.log(employee.name);
The output of the above-given program is shown below:
![]() Sometimes, you might not want to access a property directly.
That’s where the getter and setter pair come to the play.
Sometimes, you might not want to access a property directly.
That’s where the getter and setter pair come to the play.
Example 1: Getters and Setters Class
To demonstrate the usage of the getter and setter, firstly, we will create an “Employee” class having a “name” property:
classEmployee {
constructor(name) {
this.setName(name);}}
In the next step, we will define a “getName()” method which will return the value of Employee “name” property:
getName() {
returnthis.name;}
Another method, which we are going to add is “setName()”.
The setName() method of our Employee class has a “newName” parameter.
This method will remove any whitespaces from the value of the “newName” and it will also throw an exception if you have not entered any name:
setName(newName) {
newName = newName.trim();
if (newName === '') {
throw'Enter an Employee name';
}
this.name = newName;
}
As we have called our “setName()” method in the constructor, so whenever we will create an “Employee” object, the “name” passed as the argument will be taken by the setName() method.
Then, the constructor will shift the control flow to the setName() method, and it will set the values passed an argument as “Employee” object name:
let employee = new Employee('Jack Smith');
console.log(employee);
![]() You can also invoke the created “setName()” and “getName()” methods in the following way:
employee.setName('William Smith');
console.log(employee.getName());
The above-given lines of code will set “William Smith” as the name of the “employee” object.
Then, the “getName()” method will let you know about the employee name property value:
You can also invoke the created “setName()” and “getName()” methods in the following way:
employee.setName('William Smith');
console.log(employee.getName());
The above-given lines of code will set “William Smith” as the name of the “employee” object.
Then, the “getName()” method will let you know about the employee name property value:
![]() In the provided example, the setName() and getName() method are working as getter and setter .
In the provided example, the setName() and getName() method are working as getter and setter .
Example 2: Getters and Setters Class
For defining getters and setters in the JavaScript class, ES6 also offers a specific syntax.
To show you how to use that, we will move into our Employee class:
classEmployee {
constructor(name) {
this.name = name;}}
Then we will define the getter method by utilizing the keyword “get” which will be followed by the method name.
Another thing which we would like to mention here is that the “name” property of our “Employee” class will be change to “_name” to avoid the conflict with the getter and setter:
getname() {
returnthis._name;}
To define a setter method, you have to add the “setter” keyword before specifying the method name:
set name(newName) {
newName = newName.trim();
if (newName === '') {
throw' Kindly enter an Employee name';
}
this._name = newName;
}
When you will assign any value to the “name” property of your “Employee” class object, JavaScript will invoke the setter method “name()”:
employee.name = 'Paul Max';
Next, we will call the out getter method in using the below-given syntax:
let empName = employee.name;
Now, when the JavaScript interpreter will execute the above-given lines, it will check of there exists any “name” property in the “Employee” class.
It will further search for any method that binds the “name” property if it is not found.
In our case, the interpreter will access the getter method and after executing it, it will return the value of “name” property:
![]() In case, if you have not defined a setter method in your JavaScript class, then you will get a TypeError which will state that you cannot set the property “name” of the “Employee” object, as the “Employee” class has only a getter function:
class Employee {
constructor(name) {
this.name = name;
}
get name() {
returnthis._name;}
//no setter method}
let employee = new Employee("Stephen Edward");
console.log(employee.name);
Here, we will try to change name of our “employee” object; however, we have not added any setter method in our class:
employee.name = 'Paul Smith';
console.log(employee.name);
As you can see, we have encountered a type error while trying to set the name property value:
In case, if you have not defined a setter method in your JavaScript class, then you will get a TypeError which will state that you cannot set the property “name” of the “Employee” object, as the “Employee” class has only a getter function:
class Employee {
constructor(name) {
this.name = name;
}
get name() {
returnthis._name;}
//no setter method}
let employee = new Employee("Stephen Edward");
console.log(employee.name);
Here, we will try to change name of our “employee” object; however, we have not added any setter method in our class:
employee.name = 'Paul Smith';
console.log(employee.name);
As you can see, we have encountered a type error while trying to set the name property value:
![]()
Conclusion
Using the get and set keywords, you can easily define the getter and setter methods in a JavaScript class.
The getter method returns the property value, whereas, in the setter method, an argument is passed to the setter method, which assigns that specific value to the property of the JavaScript class object.
This write-up discussed getters and setters.
Moreover, we also demonstrated examples related to getter and setter definition and usage in the JavaScript class.
How to add or delete HTML Elements through JavaScript
In your JavaScript program, you can use the “appendChild()” and “insertBefore()” methods for adding the HTML elements and to delete the HTML elements “remove()” and the “removeChild()” methods are invoked.
This write-up will discuss the procedures of adding or deleting the HTML elements through JavaScript.
We will also demonstrated the usage of appendChild() and insertBefore() methods for adding the HTML elements.
Moreover, examples related to remove() and removeChild() methods for deleting the HTML elements will be provided to you.
So, let’s start!
How to add HTML Elements through JavaScript using appendChild() method
The JavaScript appendChild() method is utilized for adding an HTML element as the child of the specified parent node.
This method is used to move HTML elements.
Syntax of appendChild() method
parentNode.appendChild(childNode);
Here, the parentNode is the HTML element we want to declare as a parent, whereas the childNode is the newly created HTML element that will be added to the parent node.
Example: How to add HTML Elements through JavaScript using appendChild() method
In this example, we will show you how to use the “appendChild()” method for adding the HTML elements through JavaScript.
First of all, we will add a heading and a paragraph using the <h2> and <p> HTML elements:
<!DOCTYPE html><html><body><h2>This is linuxhint.com</h2><p>Adding HTML Elements through JavaScript.</p><div id="div1"><p id="p1">This is the main paragraph.</p><p id="p2">This is second paragraph.</p></div>
In the next step, we will create a new <p> element “paragraph” by utilizing the “createElement()” method of the document object:
<script>const paragraph = document.createElement("p");
At this point, we have only created a <p>; however, we have not added any text node to it.
To do so, we have to create a text node:
const node = document.createTextNode("This is new node.");
Then, we will append the created text node “node” to our “paragraph” element, and we will find an existing element:
paragraph.appendChild(node);const element = document.getElementById("div1");
Lastly, we will append the “paragraph” element to the existing HTML “element”:
element.appendChild(paragraph);</script></body></html>
Execute the above-given program in your favorite code editor or any online coding sandbox; however, we will utilize the JSBin for this purpose:
![]() As you can see from the below-given output, a new HTML element is added having the text content “This is new node”:
As you can see from the below-given output, a new HTML element is added having the text content “This is new node”:
![]()
How to add HTML Elements through JavaScript using insertBefore() method
If you want to insert an HTML element as a child node before the specified node, you can invoke the “insertBefore()” JavaScript method.
Syntax of insertMethod() method
parentNode.insertBefore(newNode, existingNode);
Here, the “newNode” is the newly created HTML element that you want to add, “existingNode” is the element before which you will insert your HTML element, and the “parentNode” is the HTML element that you have specified as the parent node.
Example: How to add HTML Elements through JavaScript using insertBefore() method
In the previous example, we have utilized the appendChild() method for adding the new HTML element as the last child of the parent HTML.
However, you can also use the JavaScript “insertBefore()” method to add an HTML element before the specified element.
The below-given example will teach you the usage of “insertBefore()” method.
Firstly, we will add a heading and some paragraphs as follows:
<!DOCTYPE html><html><body><h2>This is linuxhint.com</h2><p>Adding HTML Elements through JavaScript.</p><div id="div1"><p id="p1">This is the main paragraph.</p><p id="p2">This is second paragraph.</p></div>
Next, we will create a new element “paragraph” HTML element, and then define a child text node for it:
<script>const paragraph = document.createElement("p");const node = document.createTextNode("This is new node.");
paragraph.appendChild(node);const element = document.getElementById("div1");
Now, we will specify “p1” as child element, so that we can insert the created “paragraph” element before it:
const child = document.getElementById("p1");
Lastly, we will pass the HTML element “paragraph” and “child” element to the insertBefore() method:
element.insertBefore(paragraph,child);</script></body></html>
![]() Execution of the above-given program will add the “paragraph” HTML before “p1”:
Execution of the above-given program will add the “paragraph” HTML before “p1”:
![]()
How to delete HTML Elements through JavaScript using remove() method
The JavaScript “remove()” method is used for deleting the specified HTML element from the Document Object Model (DOM).
Syntax of remove() method
node.remove()
Here, “node” represents the HTML element you want to delete through JavaScript.
Example: How to delete HTML Elements through JavaScript using remove() method
In the below-given, we have add a heading HTML element, a paragraph <p> and a <div> element which comprises two paragraphs <p1> and <p2> as child nodes:
<!DOCTYPE html><html><body><h2>This is linuxhint.com</h2><p>Adding HTML Elements through JavaScript.</p><div id="div1"><p id="p1">This is the main paragraph.</p><p id="p2">This is second paragraph.</p></div>
Next, we will add a button and attach an “onclick” event handler.
According to the following code, when we will click on the “Remove Element” button, it will invoke the “myFunction()” method:
<button onclick="myFunction()">Remove Element</button>
In the “myFunction()” method, firstly, we utilize the “document.getElementbyId” to find the element which we want to delete by specifying its “id”, then we will invoke the “remove()” method:
<script>
function myFunction() {
document.getElementById("p1").remove();}</script></body></html>
![]() The below-given output signifies that “p1” HTML is deleted from our JavaScript program with the help of the “remove()” function:
The below-given output signifies that “p1” HTML is deleted from our JavaScript program with the help of the “remove()” function:
![]()
How to delete HTML Elements through JavaScript using removeChild() method
In JavaScript, the “removeChild()” is utilized for deleting a specific child HTML node from an HTML element.
Syntax of removeChild() method
parentNode.removChild(childNode)
Here, the parentNode is the HTML element we have specified as a “parent” node, and ChildNode is the HTML element we want to remove from the parent element.
Example: How to delete HTML Elements through JavaScript using removeChild() method
In this example, we will try to remove the child element of our defined <div> HTML element:
<!DOCTYPE html><html><body><h2>This is linuxhint.com</h2><p>Adding HTML Elements through JavaScript.</p><div id="div1"><p id="p1">This is the main paragraph.</p><p id="p2">This is second paragraph.</p></div>
To delete a child element, first of all, you have to create a “parent” HTML element and specify the HTML element acting as a parent in your JavaScript code.
In our case, we have added “div1”:
<script>const parent = document.getElementById("div1");
Next, we will define a “child” element and will get the child Element which we want to delete from the parent HTML element:
const child = document.getElementById("p1");
To invoke the removeChild() method, we will utilize the “parent” element and then pass the “child” element as an argument to the removeChild() method:
parent.removeChild(child);</script></body></html>
![]() As you can see that the <p1> child element of the <div1> HTML element is deleted successfully:
As you can see that the <p1> child element of the <div1> HTML element is deleted successfully:
![]()
Conclusion
To add an HTML element in your JavaScript program, you can use the appendChild() and insertBefore() method, whereas, for deleting any specific HTML element or a child HTML node, remove() and removeChild() methods are used according to your requirements.
This write-up discussed how to add or delete the HTML elements through JavaScript.
We have also demonstrated the usage of appendChild() and insertBefore() methods for adding the HTML elements.
Moreover, examples related to remove() and removeChild() methods for deleting the HTML elements are also provided in this article.
How to change HTML Elements using JavaScript
The HTML DOM permits you to change the HTML content by utilizing the “innerHTML” property.
The “innerHTML” is typically used in web pages to generate dynamic HTML content such as comment forms, registration forms, and links.
This write-up will discuss the procedure for changing the HTML elements using JavaScript.
Moreover, the examples related to the usage of innerHTML property will also be demonstrated in this article.
So, let’s start!
Syntax of innerHTML JavaScript property
element.innerHTML = value
Here, “element” is the HTML element you have selected to change its content, and “value” is the content we will set.
Example 1: Changing HTML Elements using JavaScript
This example will show you how to use the “innerHTML” JavaScript property to modify an HTML element’s content.
Firstly, we will add a heading element with the <h2> heading tag and a paragraph with the <p> HTML tag:
<!DOCTYPE html><html><body><h2>Change HTML Elements using JavaScript</h2><p id="p1">A test string</p>
Now, we want to change the content of the “<p>” element having the id “p1”.
To do so, we will utilize the “document.getElementById()” method to get the specified element.
After that, we will set the content of our <p> element to “This is linuxhint.com”:
<script>
document.getElementById("p1").innerHTML = "This is linuxhint.com";</script><p>We have changed the content of the above paragraph</p></body></html>
Execute the above-given program in your favorite code editor or any online coding sandbox; however, we will utilize the JSBin for this purpose:
![]() Check out the below-given output, which we got from executing the above-given program:
Check out the below-given output, which we got from executing the above-given program:
![]()
Example 2: Changing HTML Elements using JavaScript
In the previous example, we have changed the content of the paragraph element.
Now, we will write a JavaScript program for modifying the content of the heading HTML element.
As you can see, we have added a heading with the <h1> tag with id “id1” having the content “The Old JavaScripT Heading”:
<!DOCTYPE html><html><body><h1 id="id1">The Old JavaScript Heading</h1>
In the next step, we will create an element variable that will invoke the “document.getElementById()” method to get the heading element with the id “id1”:
<script>const element = document.getElementById("id1");
Then, we will change the HTML element content to “The New JavaScript Heading”:
element.innerHTML = "The New JavaScript Heading";</script><p>This program changed the "The Old JavaScript Heading" to "The New JavaScript Heading"</p></body></html>
![]() The below-given output signifies that the content of the heading HTML element is changed now:
The below-given output signifies that the content of the heading HTML element is changed now:
![]()
Example 3: Changing HTML Elements using JavaScript
You can also change the content of the multiple HTML elements at once.
To demonstrate you how to do that, we will add three HTML elements, a heading with the <h1> tag, a paragraph with the <p1> tag, and a content division HTML element with the <div> tag:
<!DOCTYPE html><html><body><h1>Change HTML Elements using JavaScript</h1><p id="p1">This is the first p element.</p><div id="div1">This is the first div element.</div>
Now, we will change the content of the paragraph element with the id “p1” and content division element with “div” id:
<script>
document.getElementById("p1").innerHTML = "Hi";
document.getElementById("div1").innerHTML = "this is linuxhint.com";</script></body></html>
![]() Have a look at the output of our JavaScript program:
Have a look at the output of our JavaScript program:
![]()
Example 4: Changing HTML Elements using JavaScript
You can also delete the content of an HTML element by utilizing the JavaScript “innerHTML” property.
In the following JavaScript code, we have added a paragraph element with the “demo” id:
<!DOCTYPE html><html><body><p id="demo">Click on the below given button to delete the HTML content</p>
In the next step, we will add a button and attach a “onClick” event listener to it.
When we will click the “Delete” button, it will invoke the “myFunction()” method to delete the content of <p> HTML element:
<button onclick="myFunction()">Delete</button>
Lastly, we will define the “myFunction()” method as follows:
<script>
function myFunction() {
document.getElementById("demo").innerHTML = "";}</script></body></html>
![]() Execution of the above-given program will show you the following output.
Click on the “Delete” button to delete the content of the paragraph HTML element:
Execution of the above-given program will show you the following output.
Click on the “Delete” button to delete the content of the paragraph HTML element:
![]() As you can see, the “innerHTML” property of the <p> HTML element is now set to blank:
As you can see, the “innerHTML” property of the <p> HTML element is now set to blank:
![]()
Conclusion
The innerHTML HTML DOM property is utilized for changing the content of the HTML Elements.
It can also be used to write the dynamic HTML on the HTML document, such as links, comment forms, and registration forms.
This write-up discussed the procedure for changing the HTML elements using JavaScript.
Moreover, examples related to the usage of innerHTML HTML property are also demonstrated in this article.
How to find and get HTML Elements
As a JavaScript programmer, you may need to manipulate the added HTML elements without modifying the HTML code.
In this case, you can find, get, and then update the HTML elements without overwriting them.
The HTML Document Object Model (DOM) offers various ways to find and get HTML elements.
This write-up will discuss the procedures of finding and getting HTML elements.
Moreover, the examples related to getElementById(), getElementsByTagName(), getElementsByClassName(), and querySelectorAll() methods will be demonstrated in this article.
So, let’s start!
How to Find and Get HTML elements by Id
Most of the JavaScript developers utilized the getElementById() method for finding and getting HTML elements having unique ids.
If you have passed an id that does not belong to any HTML element, the getElementById() method will display the null value.
Syntax of getElementById() method
document.getElementById(elementId)
Here, the “elementId” represents the unique ID of the HTML element which you want to find and get in your JavaScript code.
Example: Find and Get HTML elements by Id
We will add HTML elements such as a heading with the <h2> tag and three paragraph elements with the <p> tag in the following example.
Note that we have also added “ids” with the paragraph elements:
<!DOCTYPE html><html><body><h2>This is linuxhint.com</h2><p id="p1">Find and Get HTML elements by Id</p><p>This is a JavaScript program that utilizes the "getElementsById" method</p><p id="p2"></p>
In the next step, we will find and get the element having the id “p1” by using the “document.getElementById()” method.
After ding so, we will change the content of the retrieved HTML element:
<script>const element = document.getElementById("p1");
document.getElementById("p2").innerHTML ="The text of the first paragraph is: " + element.innerHTML;</script></body></html>
Execute the above-given program in your favorite code editor or any online coding sandbox; however, we will utilize the JSBin for this purpose:
![]() Execution of the above-given JavaScript program will show the following output:
Execution of the above-given JavaScript program will show the following output:
![]()
How to Find and Get HTML elements by TagName
You can utilize the “getElementsByTagName()” JavaScript method for finding and getting a specific HTML element by its tag name.
Syntax of getElementsByTagName() method
document.getElementsByTagName(tagName)
Here, the tagName represents the tag name of the HTML element which you want to retrieve.
Example: Find and Get HTML elements by TagName
The below-given example will find and get all HTML elements having the tag name “p” using the getElementsByTagName() method.
After that, it will display the content of the HTML present at the first index of the object collection:
<!DOCTYPE html><html><body><h2>This is linuxhint.com</h2><p>Find and Get HTML elements by Tag Name</p><p>This is a JavaScript program that utilizes the "getElementsByTagName" method</p><p id="p1"></p><script>
const element = document.getElementsByTagName("p");
document.getElementById("p1").innerHTML = 'Main paragraph text (index 0) is: ' + element[0].innerHTML;</script></body></html>
![]() As you can see, the text of the first paragraph of our JavaScript program is displayed successfully:
As you can see, the text of the first paragraph of our JavaScript program is displayed successfully:
![]()
How to Find and Get HTML elements by ClassName
The “getElementsByClassName()” method is used for finding and getting HTML elements having the same class.
By utilizing the class name, when you try to get an HTML element, the JavaScript interpreter will return all objects belonging to the same class.
After that, you can perform specific operations on those HTML elements.
Syntax of getElementsByClassName() method
document.getElementsByClassName(className)
Here, the “className” represents the class name of the HTML elements which you are required to find and get in your program.
Example: Find and Get HTML elements by ClassName
In the following example, we have added a heading and some paragraph elements with the className “c1”:
<!DOCTYPE html><html><body><h2>This is linuxhint.com</h2><p>Find and Get HTML elements by Class Name</p><p class="c1">text in first paragrpah</p><p class="c1">text in second paragraph</p><p id="p1"></p>
Next, we will search for the HTML elements which have “c1” as their class by using the getElementsByClassName() method and will store the collections of the objects in “a”:
<script>const a = document.getElementsByClassName("c1");
After finding and getting the required HTML elements, we will show the content of the first object present at the first index:
document.getElementById("p1").innerHTML ='The first paragraph (index 0) with is: ' + a[0].innerHTML;</script></body></html>
![]() Here is the output which we got from executing the above-given JavaScript program:
Here is the output which we got from executing the above-given JavaScript program:
![]()
How to Find and Get HTML elements by CSS selector
In HTML, the querySelectorAll() method returns a static NodeList object that comprises a collection of the child elements of an element matched with the specified CSS selectors.
Index numbers are used to find and get the nodes, starting at 0.
Syntax of querySelectorAll() method
element.querySelectorAll(selectors)
The querySelectorAll() method takes “selectors” as an argument, a DOM string comprises one or more valid CSS selectors.
Example: Find and Get HTML elements by CSS selector
In the below-given JavaScript program, we have used the querySelectorAll() method to find and get the paragraph HTML elements having “c1” as their class name:
<!DOCTYPE html><html><body><h2>This is linuxhint.com</h2><p>Find and Get HTML elements by Class Name</p><p class="c1">text in first paragrpah</p><p class="c1">text in second paragraph</p><p id="p1"></p><script>
const a = document.querySelectorAll("p.c1");
document.getElementById("p1").innerHTML =
'The first paragraph with is: ' + a[0].innerHTML;</script></body></html>
![]() Check out the output of the JavaScript querySelectorAll() method:
Check out the output of the JavaScript querySelectorAll() method:
![]()
Conclusion
getElementById(), getElementsByTagName(), getElementsByClassName(), and querySelectorAll() are the most common JavaScript methods that are used to find and get elements in a JavaScript program.
You can use any of the mentioned method to search for a specific HTML element in the code.
This write-up discussed the procedures of finding and getting HTML elements.
Moreover, the examples related to getElementById(), getElementsByTagName(), getElementsByClassName(), and querySelectorAll() methods are also demonstrated in this article.
How to find HTML Elements by CSS Selectors
In your JavaScript program, you may need to find HTML elements by CSS selectors to apply any changes to them.
The JavaScript methods that can help you in this regard are “querySelector()” and “querySelectorAll()” methods.
This write-up will discuss the procedures to find the HTML Elements by CSS Selectors.
Moreover, we will also explain the usage of querySelector() and querySelectorAll() methods for finding out the elements by CSS Selectors, with the help of examples.
So, let’s start!
querySelector() method to find elements by CSS Selectors
The Element Interface has a “querySelector()” method, which can be utilized for finding elements by CSS selectors.
The querySelector() method will return a “null” value If no matching element is found.
This method uses the “depth-first pre-order” traversal method to traverse the document’s nodes.
Syntax
element = document.querySelector(selectors);
The querySelector() method takes “selectors” as an argument which is a DOM string comprising one or more valid CSS selectors.
How to use the querySelector() method to find elements by CSS Selectors
Now, we will show the procedure to find our elements by CSS selectors using the querySelector() method.
Example 1: Using the querySelector() method to find elements by CSS Selectors
In the first example, the querySelector() method will find out the first <p> element in with class=“tutorial” and sets its background color to “yellow”:
!DOCTYPE html><html><body><h1>Finding HTML Elements by CSS Selector</h1><h2>The querySelector() Method</h2><p>This is linuxhint.com="tutorial"</p><h2 class="tutorial">The main heading</h2><p class="tutorial">First paragraph.</p><script>
document.querySelector("p.tutorial").style.backgroundColor = "yellow";</script></body></html>
Execute the above-given program in any code editor or online coding sandbox, however, we will utilize the JSBin for this purpose:
![]() As you can see the background of the first “<p>” element is changed to “yellow”:
As you can see the background of the first “<p>” element is changed to “yellow”:
![]()
Example 2: Using the querySelector() method to find elements by CSS Selectors
The below-given program will change the text element with id=“sample”:
<!DOCTYPE html><html><body><h1>Finding elements by CSS selectors</h1><h2>The querySelector() Method</h2><p>We will change the text element with id="sample":</p><p id="sample">This is a p element having the id="sample".</p><script>
document.querySelector("#sample").innerHTML = "linuxhint.com";</script></body></html>
![]() Executing the above-given code will show you the following output:
Executing the above-given code will show you the following output:
![]()
Example 3: Using the querySelector() method to find elements by CSS Selectors
In the third example, we will use the “querySelector()” method for finding the first <p> element with the <div> parent and then change its background color to “yellow”:
<!DOCTYPE html><html><head><style>
div {
border: 1px solid blue;
margin-bottom: 15px;}</style></head><body><div><h4>First element</h4><p>I am the first p element and the div element is my parent</p></div><div><h4>Second element</h4><p>I am the second p element and the div is element is my parent.</p></div><p>Click on the below given button for changing the background color of the first p element</p><button onclick="myFunction()">Change Color</button><script>
function myFunction() {
var x = document.querySelector("div > p");
x.style.backgroundColor = "yellow";}</script></body></html>
![]() Click on the “Change Color” button to change the background color of the first <p> element:
Click on the “Change Color” button to change the background color of the first <p> element:
![]()
querySelectorAll() to find elements by CSS Selectors
In HTML, the querySelectorAll() method returns a static NodeList object that comprises a collection of the child elements of an element matched with the specified CSS selectors.
Index numbers are used to find out the nodes, starting at 0.
Syntax
element.querySelectorAll(selectors)
The querySelectorAll() method takes “selectors” as an argument, which is a DOM string that comprises one or more valid CSS selectors.
Example 1: Using querySelectorAll() method to find elements by CSS Selectors
In the first example, we will use the querySelectorAll() method to find all <p> elements in the document.
After doing so, it will set the “background color” of the first <p> element to “pink”:
<!DOCTYPE html><html><body><h2 class="tutorial">Main heading with class="tutorial"</h2><p class="tutorial">First paragraph with class="tutorial".</p><p class="tutorial">Second paragraph with class="tutorial".</p><p>Change the background color of the first p element with class="tutorial"</p><button onclick="myFunction()">Change Color</button><p><strong>Note: We are learning how to find elements by CSS selectors</p><script>
function myFunction() {
var x = document.querySelectorAll("p.tutorial");
x[0].style.backgroundColor = "pink";}</script></body></html>
![]() As you can see, the background of the first <p> element is changed to “pink”:
As you can see, the background of the first <p> element is changed to “pink”:
![]()
Example 2: Using querySelectorAll() method to find elements by CSS Selectors
Now, we will write a JavaScript program to find out the total number of elements with the “tutorial” class by utilizing the “length” property of the NodeList object:
<html><body><div class="tutorial">
The first div element with class="tutorial"</div><div class="tutorial">
Second div element with class="tutorial"</div><p class="tutorial">A p element with class="tutorial"</p><p>Click on the following button to find out how number of elements with class "tutorial"</p><button onclick="myFunction()">Click me</button><p id="demo"></p><script>
function myFunction() {
var a = document.querySelectorAll(".tutorial");
document.getElementById("demo").innerHTML = a.length;}</script></body></html>
![]() Now, the output will show you a “Click me” button; click on it to check the number of elements with class=“tutorial”:
Now, the output will show you a “Click me” button; click on it to check the number of elements with class=“tutorial”:
![]()
Example 3: Using querySelectorAll() method to find elements by CSS Selectors
In the following example, we will use the querySelectorAll() method to find “h2”, “div”, and “span” elements.
After finding the specified elements, we will change their background color to “red”:
<h1>The main element</h1><h2>The second h2 element</h2><div>A DIV element</div><p>A p element.</p><p>A p element having <span style="color:blue;">span</span> element</p><p>Click on the following button to set the background color of all h2, div and span elements.</p><button onclick="myFunction()">Change color</button><script>
function myFunction() {
var x = document.querySelectorAll("h2, div, span");
var i;for (i = 0; i < x.length; i++) {
x[i].style.backgroundColor = "red";}}</script></body></html>
![]() Clicking on the highlighted button will change the background color of the h2, div, and span elements:
Clicking on the highlighted button will change the background color of the h2, div, and span elements:
![]()
Conclusion
Using the querySelector() and querySelectorAll() methods, you can find out the elements by CSS selectors.
The querySelector() element interface method returns a NodeList with the first matched element.
In contrast, the querySelectorAll() method returns a static NodeList object with the child elements matched with the specified CSS selectors.
This write-up discussed the procedure to find the HTML Elements by CSS Selectors.
We also explained the usage of querySelector() and querySelectorAll() methods for finding out the elements by CSS Selectors.
HTML DOM Methods and Properties
JavaScript can also access the HTML Document Object Model (DOM) similar to other programming languages.
All HTML elements are defined as “objects” in the DOM, where each object has some set of methods and properties.
The HTML DOM property is a value that can be retrieved or changed, and the HTML DOM method is an action that you can perform for HTML elements, for instance, deleting HTML elements.
This write-up will discuss HTML DOM Methods and Properties.
Moreover, we will also provide separate lists of the most useful HTML DOM methods and properties.
So, let’s start!
HTML DOM Methods
The “actions” you perform on HTML elements are called HTML DOM Methods.
You can use the HTML DOM methods as a JavaScript beginner for generating the required results without putting in too much effort and writing a bunch of code.
The HTML DOM methods can assist you in simplifying the task.
In the below-given table, we have compiled some of the HTML DOM Methods that can be utilized on all HTML elements:
| HTML DOM Methods | Description |
| addEventListener() | The “addEventListener()” HTML DOM method is utilized for attaching an event handler to a particular element. |
| appendChild() | The “appendChild()” method is used to add a new child node for an element. |
| blur() | The “blur()” method is used to eliminate focus from an HTML element. |
| click() | The “click()” method puts on a mouse-click on an HTML element. |
| cloneNode() | The “cloneNode()” method is utilized to clone an element. |
| closest() | The “closest()” HTML DOM method is utilized for searching the DOM tree for the closest element, which matches with a specified CSS selector. |
| compareDocumentPosition() | The “compareDocumentPosition()” HTML DOM method is utilized for comparing the document position of any two HTMLelements. |
| exitFullscreen() | The “existFullscreen()” property cancels an element in a fullscreen mode. |
| focus() | The “focus()” HTML DOM method for assigning focus to an HTML element. |
| getAttribute() | The “getAttribute()” HTML DOM method displays an element’s attribute value. |
| getAttributeNode() | The “getAttributeNode()” HTML DOM method displays the specified attribute node. |
| getBoundingClientRect() | The “getBoundingClientRect()” HTML DOM method outputs the position and size of an element related to the viewport. |
| getElementsByClassName() | The “getElementByClassName()” HTML DOM method displays the list of child elements of a particular class. |
| getElementsByTagName() | The “getElementsByTagName()” HTML DOM method displays the list of child elements of a particular tag. |
| hasAttribute() | The “hasAttribute()” HTML DOM method outputs true if an element has the added attribute, otherwise, this method returns false. |
| hasChildNodes() | The “hasChildNodes()” HTML DOM method outputs true if a particular element has any child nodes, otherwise, this method returns false. |
| insertAdjacentElement() | The “insertAdjacentElement()” HTML DOM method is utilized for inserting a HTML element at a particular position related to the active element. |
| insertAdjacentHTML() | The “insertAdjacentHTML()” HTML DOM method is utilized for inserting an HTML formatted text at a particular position related to the active element. |
| insertAdjacentText() | The “insertAdjacentText()” HTML DOM method is utilized for inserting text at a particular position related to the active element. |
| insertBefore() | The “insertBefore()” HTML method is used for inserting a new child node before an existing child node. |
| isDefaultNamespace() | The “isDefaultNamespace()” HTML DOM method outputs true if a particular namespaceURI is set as default, otherwise, this method outputs false. |
| isEqualNode() | The “isEqualNode()” method is used for checking if two HTML elements are equal or not. |
| isSameNode() | The “isSameNode()” HTML DOM method is utilized for verifying if two HTML elements are the same node or not. |
| isSupported() | The “isSupported()” HTML DOM method outputs true if a particular feature is supported for the HTML element. |
| matches() | The “matches()” method outputs a Boolean value indicating whether a specific CSS selector matches an element or not. |
| normalize() | The “normalize()” HTML DOM method is utilized for joining adjacent text nodes and for eliminating empty text nodes from a HTML element. |
| querySelector() | The “querySelector()” HTML DOM method is utilized to output the first child element that gets matched with a particular CSS selector of an HTML element. |
| querySelectorAll() | The “querySelectorAll()” method returns all child elements that match a specified CSS selector of an element. |
| remove() | The “remove()” HTML DOM method is utilized for removing a particular HTML element from DOM. |
| removeAttribute() | The “removeAttribute()” HTML DOM method is utilized for removing a particular attribute from a HTML element. |
| removeAttributeNode() | The “removeAttributeNode()” HTML DOM method eliminates the added attribute node and shows it as output. |
| removeChild() | The “removeChild()” HTML DOM method is utilized for removing a particular a child node from an HTML element. |
| removeEventListener() | The “removeEventListener()” HTML DOM method is utilized for removing an attached event handler. |
| replaceChild() | The “replaceChild()” HTML DOM method is used for replacing a child node from an HTML element. |
| requestFullscreen() | The “requestFullscreen()” HTML DOM method is utilized for showing the HTML element in fullscreen mode. |
| scrollIntoView() | The “scrollIntoView()” HTML DOM method is utilized for scrolling a particular HTML element into the browser’s visible area. |
| setAttribute() | The “setAttribute()” HTML DOM method is utilized for setting the attributes to the added value. |
| setAttributeNode() | The “setAttributeNode()” HTML DOM method is utilized for changing or displaying the specified attribute node. |
| toString() | The “toString()” HTML DOM method is utilized for converting an element to a string. |
HTML DOM Properties
The values you can set or change the HTML elements are called HTML DOM Properties.
The HTML properties are defined by DOM, which can be easily modified by using the pre-defined HTML DOM Properties.
Now, check out the below-given table; we have compiled some of the HTML DOM Properties that can be utilized on all HTML elements:
| HTML DOM Properties | Description |
| accessKey | The “accessKey” sets or returns the accesskey HTML DOM property. |
| attributes | The “attributes” HTML DOM property outputs a NamedNodeMap of the attribute of an HTML element. |
| activeElement | The “activeElement” property gets the element that is currently active. |
| childElementCount | The “childElementCount” HTML DOM property is utilized for displaying the total number of an HTML element’s child elements. |
| childNodes | The “childNodes” HTML DOM property outputs the child nodes of an HTML element. |
| classList | The “classList” HTML DOM property returns an element’s class name. |
| className | The “className” HTML DOM property is utilized for changing or displaying the HTML class name value. |
| clientHeight | The “clientHeight” HTML DOM property outputs the HTML element’s height. |
| clientLeft | The “clientLeft” HTML DOM property is utilized for displaying the left border’s width of an HTML element. |
| clientTop | The “clientTop” HTML DOM property is utilized for displaying the top border’s width of an HTML element. |
| clientWidth | The “clientWidth” property returns or outputs the width of an element, which includes padding. |
| contentEditable | The “contentEditable” HTML DOM property sets or returns whether an element’s content is editable or not. |
| dir | The “dir” HTML DOM property is utilized for changing or displaying an element’s dir value. |
| firstChild | The “firstChild” HTML DOM property is utilized for displaying the first child node of an HTML element. |
| firstElementChild | The “firstElementChild” HTML DOM property is utilized for displaying the first child element of an HTML element. |
| id | The “id” HTML DOM property is utilized for changing and displaying an element’s id attribute value. |
| innerHTML | The “innerHTML” HTML DOM property is utilized for changing and displaying the element’s content. |
| innerText | The “innerText” HTML DOM property is utilized for changing and displaying the node’s text content and its descendants. |
| isContentEditable | The “isContentEditable” HTML DOM property is utilized for checking if an element’s content is editable or not. |
| lang | The “lang” HTML DOM property is utilized for setting the lang attribute’s value of an HTML element. |
| lastChild | The “lastChild” property returns an elements’ last child node. |
| lastElementChild | The “lastElementChild” HTML DOM property is utilized to display an element’s last child element. |
| namespaceURI | The “namespaceURL” HTML DOM property is utilized to output the namespace URI of an HTML element. |
| nextSibling | The “nextSibling” HTML DOM property is utilized for displaying the next node in a tree level. |
| nextElementSibling | The “nextElementSibling” HTML DOM property is utilized for displaying the next HTML element in a tree level. |
| nodeName | The “nodeName”HTML DOM property outputs the node name. |
| nodeType | The “nodeType” HTML DOM property is utilized for displaying the node type. |
| nodeValue | The “nodeValue” HTML DOM property is utilized for displaying or changing the node value. |
| ownerDocument | The “ownerDocument” property sets or returns the root element or document object for an element. |
| parentNode | The “parentNode” HTML DOM property is utilized for displaying the parent node of an element. |
| parentElement | The “parentElement” HTML DOM property is utilized for displaying the HTML element’s parent element. |
| previousSibling | The “previousSibling” HTML DOM property is utilized for displaying the HTML element’s previous sibling. |
| previousElementSibling | The “previousElementSibling” HTML DOM property is utilized for displaying the sibling of the previous HTML element. |
| scrollHeight | The “scrollHeight” HTML DOM property is utilized for displaying the height of an HTML element. |
| style | The “style” HTML DOM property is utilized for changing or displaying the attribute’s value of an HTML element. |
| tabIndex | The “tabIndex” HTML DOM property is utilized for changing or displaying the attribute’s tab index value of an HTML element. |
| tagName | The “tagName” HTML DOM property is utilized for displaying an element’s tag name. |
| textContent | The “textContent” HTML DOM property is utilized for changing or displaying a node’s textual content. |
| title | The “title” is utilized for changing or displaying the title attribute’s value of the HTML element. |
| scripts | The “scripts” property is usedto get all the script elements. |
| strictErrorChecking | The “strictErrorChecking” property is utilized for setting the error checking to strict mode. |
| URL | The “URL” HTML DOM property is utilized for gettingthe full URL of an HTML document. |
Conclusion
An HTML element defined as an object has some DOM properties and methods.
HTML DOM methods specify the action you want to perform on the HTML element, whereas the HTML DOM properties are the values you want to get or set for a particular object or HTML element.
This write-up discussed HTML DOM Methods and Properties.
Moreover, we also provided separate lists of the most useful HTML DOM methods and properties.
JavaScript Bitwise Operators
Bitwise operators are used to perform numerical conversions.
numbers are stored as 64 bits; however, all bitwise operations are worked on binary numbers with 32 bits.
Therefore, JavaScript converts numbers into 32 bits before the implementation of bitwise operators.
After the implementation of bitwise operators, the numbers are converted back into 64 bits.
The basic reason to use these operators is that these operators are much faster in math and parseInt equivalents.
In this tutorial, we will learn about the bitwise operators and learn about the need and use of these operators.
In this article, we describe the types of bitwise operators with examples.
Types of bitwise operators
All bitwise operators deal with their operands in a set of 32-bits; these bits are in the form of binary digits.
However, the result of these bits is shown in decimal form.
In the following table, we are defining multiple bitwise operators with code examples.
Representation of Operators
| Name of Operators | Symbol of Operator | Example |
| AND Operator | & | a & b |
| OR Operator | | | a | b |
| NOT Operator | ~ | a ~ b |
| XOR Operator | ^ | a ^ b |
Note: The maximum and minimum representable integer ranges are defined in bitwise operators such as
minimum representable integer range = -2147483648,
maximum representable integer range = 2147483647.
Let’s know about each operator one by one along with a couple of examples.
AND operator
There is two operands in binary form (0,1) in the AND operator.
Its output is 0, if any of the operands is 0 and returns 1 if both operands are 1.
The outputs of AND table are shown in the given table.
Operations of AND Operator
| Operand 1 | Operand 2 | And Operation |
| 1 | 1 | 1 & 1=1 |
| 1 | 0 | 1 & 0=0 |
| 0 | 1 | 0 & 1=0 |
| 0 | 0 | 0& 0=0 |
Let’s have a look at an example for further explanation of AND operator.
Example
There are two integers 12 and 25 for the implementation of AND operator.
At the first step, both integers are converted into bits.
The bit conversion of 12 and 25 is:
12 = 00000000000000000000000000001100,25 = 00000000000000000000000000011001.
After the conversion of integers, the AND operator is applied.
// First convert both integers in binary form,12 = 0110025 = 011001
00001100& 00011001--------
00001000 = 8 // (In decimal)
The preceding zeros are removed for the sake of simplicity.
After the implementation of AND operator, the answer is 00001000, which is equal to 8 in integers.
Program of bitwise AND Operator
let a = 12;
let b = 25;
result = a & b;
console.log(result); // 8
![]()
OR operator:
There are two operands in binary form (0,1) in the OR operator.
The output is 0, if both operands are 0s and output is 1 if any of one operand is 1.
In the given table, all possible outputs of the OR operator are given:
Operations of OR Operator
| Operand 1 | Operand 2 | And Operation |
| 1 | 1 | 1 | 1 =1 |
| 1 | 0 | 1 | 0 =1 |
| 0 | 1 | 0 | 1 =1 |
| 0 | 0 | 0| 0 =0 |
Let’s have a look at an example for further explanation of OR operator.
Example
There are two integers 12 and 25 for the implementation of the OR operator.
First, we convert both integers into bits.The bit conversion of 12 and 25 is:
12 = 01100,25 = 11001.
The preceding zeros are removed for the sake of simplicity.
// First convert both integers in binary form,12 = 0110025 = 11001// Bitwise OR Operation of 12 and 25
00001100| 00011001--------
00011101 = 29 // (In decimal)
After the conversion of integers, the OR operator is applied the answer is 11101, which is equal to 29.
Program of bitwise OR Operator
// bitwise OR operator example
let a = 12;
let b = 25;
result = a | b;
console.log(result); // 29
![]()
XOR operator
There are two operands in binary form (0,1) in the XOR operator.
It returns 0 as an output if both operands are the same and returns 1 as an output if both operands are different.
In the given table all possible outputs of XOR operator are given:
Operations of XOR Operator
| Operand 1 | Operand 2 | And Operation |
| 1 | 1 | 1 ^ 1 = 0 |
| 1 | 0 | 1 ^ 0 = 1 |
| 0 | 1 | 0 ^ 1 = 1 |
| 0 | 0 | 0 ^ 0 = 0 |
Let’s have a look at an example for further explanation of XOR operator.
Example
There are two integers 12 and 25 for the implementation of the XOR operator.
First, we convert both integers into bits.The bit conversion of 12 and 25 is:
12 = 01100,25 = 11001.
// First convert both integers in binary form,12 = 0110025 = 11001// Bitwise XOR Operation of 12 and 25
01100^ 11001-----10101 = 21 // (In decimal)
After the conversion of integers, the XOR operator is applied, the answer is 11101, which is equal to 21.
Program of bitwise XOR Operator
// bitwise XOR operator example
let a = 12;
let b = 25;
result = a ^ b;
console.log(result); // 21
![]()
NOT Operator
NOT operator is called as negation operator.
It converts the bits 1 to 0 and 0 to 1.
It is a unary operator among all the bitwise operators.
Operations of NOT Operator
| Operand 1 | NOT Operation |
| 1 | (~1) = 0 |
| 0 | (~0) = 1 |
Let’s have a look at an example for further explanation of NOT operator.
Example
Since NOT operator is a unary operator; therefore, here we took only one operand (12) and applied Not operation on it.
First, convert the 12 into binary form:
12 = 00000000000000000000000000001100.
The NOT operator will convert all 0’s into the 1’s and changes all 1’s into the 0’s.
// First convert the integer in binary form,12 = 00000000000000000000000000001100// Bitwise Not Operation of 12
~ 00000000000000000000000000001100---------------------------------11111111111111111111111111110011 = -13 // (In decimal)
The answer will become 11111111111111111111111111110011, which is equal to -13 in integer form.
Program of bitwise NOT Operator
// bitwise NOT operator example
let b = 12;
result = ~b;
console.log(result); // -13
![]()
Conclusion
Bitwise operators are those which work on integers at binary level.
There are total four bitwise operators: AND, OR, XOR, and NOT.
This write-up explains all four bitwise types of operators and their working.
We described all operators with their possible outputs in the form of tables.
All operations are well explained by examples and codes.
JavaScript Focus and Blur Events
HTML DOM includes various JavaScript Events like clicking a button, pressing a key, maximizing a window, etc are all considered as an event.
Events are interactions between HTML and JavaScript that happen when a web page is manipulated by either the user or the browser.
There are numerous categories of JavaScript events but in this article, we will emphasize the usage of JavaScript focus and blur events.
JavaScript Focus and Blur Events
When HTML elements gain focus or lose focus, the JavaScript focus or blur events happen which are a part of the FocusEvent Object.
The events that are classified in the category of JavaScript focus and blur events are demonstrated below:
onblur Event
onfocus Event
onfocusin Event
onfocusout Event
Each of the above mentioned events are discussed below.
1.
onblur Event
The onblur event happens when the focus of an object is lost.
It is mostly used within the validation code of a form.
It does not bubble and cannot be canceled.
It supports all HTML tags other than <base>, <bdo>, <br>, <head>, <html>, <iframe>, <meta>, <param>, <script>, <style>, and <title> and is included in DOM level 2.
Syntax
Syntax of onblur event is as follows.
HTML Syntax
<element onblur="functionName()">
JavaScript Syntax
object.onblur = function(){script};
JavaScript addEventListener() Syntax
object.addEventListener("blur", script);
Example
<!DOCTYPE html><html><body>
Enter your name: <input type="text" id="fname" onblur="myFunc()"><p>The function will change lower case letters to upper case letters.</p><script>
function myFunc() {
var x = document.getElementById("fname");
x.value = x.value.toUpperCase();}</script></body></html>
Output
When you leave the input field, the onblur event occurs and the lower-case letters are shifted to upper-case letter.
![]()
2.
onfocus Event
The onfocus event happens when an elements is focused.
It is mostly used with <input>, <select>, and <a>.
It does not bubble and cannot be canceled.
It supports all HTML tags other than <base>, <bdo>, <br>, <head>, <html>, <iframe>, <meta>, <param>, <script>, <style>, and <title> and is included in DOM level 2.
Syntax
Syntax of onfocus event is as follows.
HTML Syntax
<element onfocus="functionName">
JavaScript Syntax
object.onfocus = function(){script};
JavaScript addEventListener() Syntax
object.addEventListener("focus", script);
Example
<!DOCTYPE html><html><body>
Enter your name: <input type="text" onfocus="abFunction(this)"><p>A function changes the background color of the input field when it is focused.</p><script>
function abFunction(focus) {
focus.style.background = "pink";}</script></body></html>
Output
When you click on the input field, the background color of input field will be changed to blue.
We have shown the before and after state of the input field below.
Before
![]() After
After
![]()
3.
onfocusin Event
The onnfocusin event is same like onfocus event and happens when an element just gets the focus however a subtle difference between these two is that this (onfocusin) event bubbles and it cannot be canceled.
It supports all HTML tags other than <base>, <bdo>, <br>, <head>, <html>, <iframe>, <meta>, <param>, <script>, <style>, and <title> and is included in DOM level 2.
Syntax
Syntax of onfocusin event is as follows.
HTML Syntax
<element onfocusin="functionName()">
JavaScript Syntax
object.onfocusin = function(){script};
JavaScript addEventListener() Syntax
object.addEventListener("focusin", script);
Example
<!DOCTYPE html><html><body>Name: <input type="text" id="fname" onfocusin="abFunction()"><p>Click on the input field</p><script>
function abFunction() {
document.getElementById("fname").style.backgroundColor = "pink";}</script></body></html>
Output
Before clicking the input field.
![]() After clicking the input field, the background color of the input field will be changed to pink.
After clicking the input field, the background color of the input field will be changed to pink.
![]()
4.
onfocusout Event
The onnfocusout event is same like onblur event and happens when an element just loses the focus however a subtle difference between these two is that this (onfocusout) bubbles and it cannot be canceled.
It supports all HTML tags other than <base>, <bdo>, <br>, <head>, <html>, <iframe>, <meta>, <param>, <script>, <style>, and <title> and is included in DOM level 2.
Syntax
Syntax of onfocusout event is as follows.
HTML Syntax
<element onfocusout="functionName()">
JavaScript Syntax
object.onfocusout = function(){script};
JavaScript addEventListener() Syntax
object.addEventListener("focusout", script);
Example
<!DOCTYPE html><html><body>
Enter your name: <input type="text" id="fname" onfocusout="abFunction()"><p>Leave the input field to shift the lower-case letters to upper-case.</p><script>
function abFunction() {
var out = document.getElementById("fname");
out.value = out.value.toUpperCase();}</script></body></html>
Output
When you leave the input field the lower case letters will be shifted to upper case letters.
![]()
Conclusion
Events that occur when an element gains or loses its focus are referred to as JavaScript focus and blur events.
Events that are classified into the category of JavaScript focus and blur events are onblur event, onfouc event, onfocusin event, and onfocusout event.
All these events are discussed in detail along with appropriate example.
JavaScript Form Events
JavaScript Events are defined as the interaction between JavaScript and HTML.
Events occur every time the web page is manipulated by the user or the browser.
Document Object Model (DOM) version 3 consists of JavaScript events and these are a part of almost all HTML elements and can activate Javascript code.
Clicking a button, pressing a key, maximizing a window, etc are all considered as an event.
There are various types of JavaScript events however we will specifically discuss JavaScript Form Events in this write-up.
JavaScript Form Events
Events that occur through the interaction of a user with an HTML form are called JavaScript form events.
There are various types of events that fall under the category of JavaScript form events which are listed below.
onblur
onchange
oncontextmenu
onfocus
oninput
oninvalidl
onreset
onsearch
onselect
onsubmit
Each of the above mentioned events are discussed below.
1.
onblur Event
The onblur event happens when the focus of an element is lost.
It is mostly used within the validation code of a form.
It does not bubble and cannot be canceled.
It supports all HTML tags other than <base>, <bdo>, <br>, <head>, <html>, <iframe>, <meta>, <param>, <script>, <style>, and <title> and is included in DOM level 2.
Syntax
Syntax of onblur event is as follows.
HTML Syntax
<element onblur="functionName()">
JavaScript Syntax
object.onblur = function(){script};
JavaScript addEventListener() Syntax
object.addEventListener("blur", script);
Example
<!DOCTYPE html><html><body>
Enter your name: <input type="text" id="tutorial" onblur="functionName()"><script>
function functionName() {
document.getElementById("tutorial").style.background = "yellow";}</script></body></html>
In the above example, when the user leaves the input field the onblur event gets triggered and the background color of the input field changes to yellow.
Output
![]()
2.
onchange Event
When a user changes the value of an element and leave the element, the onchange event happens.
This event resembles the oninput event, however, what differentiates it from the oninput event is that it can work on the <select> element and happens when an element has lost its focus.
Moreover, it can support, <input type=”checkbox”>, <input type=”file”>, <input type=”password”>, <input type=”radio”>, <input type=”range”>, <input type=”search”>, <input type=”text”>, <select> and <textarea> HTML tags.
It bubbles but cannot be canceled and is a part of DOM version 2.
Syntax
Syntax of onchange event is as follows.
HTML Syntax
<element onchange="functionName()">
JavaScript Syntax
object.onchange = function(){script};
JavaScript addEventListener() Syntax
object.addEventListener("change", script);
Example
<!DOCTYPE html><html><body>Name: <input type="text" id="tutorial" onchange="functionName()"><script>
function functionName() {
var change = document.getElementById("tutorial");
change.value = change.value.toUpperCase();}</script></body></html>
In the above example, when a user enters his/her name in the input field and then leaves the input field, the onchange event is triggered because an element (input field) lost its focus and as a result lowercase letters are shifted to uppercase letters.
Output
![]()
![]()
3.
oncontextmenu Event
When the context menu of an element is opened using the right-click, the oncontextmenu event happens.
It bubbles and is also cancelable.
This event supports all HTML tags and is included in DOM version 3.
Syntax
The syntax of oncontextmenu event is given below.
HTML Syntax
<element oncontextmenu="funtionName()">
JavaScript Syntax
object.oncontextmenu = function(){script};
JavaScript addEventListener() Syntax
object.addEventListener("contextmenu", script);
Example
<!DOCTYPE html><html><body><input type="text" id="tutorial" oncontextmenu="functionName()"><script>
function functionName() {
alert("You just right-clicked!");}</script></body></html>
In the above example, when you right click on the input field, the oncontextmenu event will trigger and first a dialoag box will appear telling that you just performed a right click and after you click OK on the dialog box the context menu will open.
Output
Now when you will right-click the input field, the dialog box will appear.
![]() After clicking OK, the context menu will open.
After clicking OK, the context menu will open.
![]()
4.
onfocus Event
The onfocus event happens when an elements is focused.
It is mostly used with <input>, <select>, and <a>.
It does not bubble and cannot be canceled.
It supports all HTML tags other than <base>, <bdo>, <br>, <head>, <html>, <iframe>, <meta>, <param>, <script>, <style>, and <title> and is included in DOM level 2.
Syntax
Syntax of onfocus event is as follows.
HTML Syntax
<element onfocus="functionName">
JavaScript Syntax
object.onfocus = function(){script};
JavaScript addEventListener() Syntax
object.addEventListener("focus", script);
Example
<!DOCTYPE html><html><body>
Enter your name: <input type="text" onfocus="abFunction(this)"><p>A function changes the background color of the input field when it is focused.</p><script>
function abFunction(focus) {
focus.style.background = "pink";}</script></body></html>
Output
When you click on the input field, the background color of input field will be changed to blue.
We have shown the before and after state of the input field below.
Before
![]() After
After
![]()
5.
oninput Event
When a user gives an input to an element the oninput event happens.
This event resembles the onchange event, however, what differentiates it from the onchange event is that it happens immediately after an element value has been chnaged.
Moreover, it can support, <input type=”checkbox”>, <input type=”file”>, <input type=”password”>, <input type=”radio”>, <input type=”range”>, <input type=”search”>, <input type=”text”>, <select> and <textarea> HTML tags.
It bubbles but cannot be canceled and is a part of DOM version 3.
Syntax
Syntax of oninput event is as follows.
HTML Syntax
<element oninput="functionName">
JavaScript Syntax
object.oninput = function(){script};
JavaScript addEventListener() Syntax
object.addEventListener("input", script);
Example
<!DOCTYPE html><html><body>Name: <input type="text" value="John" oninput="functionName()"><script>
function functionName() {
alert("You just changed the input field value!");}</script></body></html>
In the above example when you try to change the value inside the input field, the oninput event triggers and a dialog box appears that tells you that you just changed the input field value.
Output
![]() As soon as you change the input field value the alert message will appear.
As soon as you change the input field value the alert message will appear.
![]()
6.
oninvalid Event
When a user gives an input that is not permitted or an invalid input the oninvalid event happens.
This event does not bubbles but can be canceled.
It supports only the <input> HTML tag and is included in DOM level 3.
Syntax
Syntax of oninvalid event is as follows.
HTML Syntax
<element oninvalid="functionName">
JavaScript Syntax
object.oninvalid = function(){script};
JavaScript addEventListener() Syntax
object.addEventListener("invalid", script);
Example
<!DOCTYPE html><html><body><form>
Enter your name:<input type="text" oninvalid="functionName()" name="name" required><input type="submit" value="Submit"></form><script>
function functionName() {
alert("Name field required!");}</script></body></html>
In the above example, if you press the submit button without providing your name in the input field, the oninvalid event will trigger and an alert message will appear telling you that the name field is required.
Output
![]()
7.
onreset Event
When a user resets a form the onreset event occurs.
This event bubbles and can be canceled, moreover, it only supports the <form> HTML and is included in DOM version 2.
Syntax
Syntax of onreset event is as follows.
HTML Syntax
<element onreset="functionName">
JavaScript Syntax
object.onreset = function(){script};
JavaScript addEventListener() Syntax
object.addEventListener("reset", script);
Example
<!DOCTYPE html><html><body><form onreset="functionName()">
Enter name: <input type="text"><input type="reset"></form><p id="tutorial"></p><script>
function functionName() {
alert("Press OK to reset the form.");}</script></body></html>
In the above example, when you press the reset button, the onreset event gets triggered and an alert message appears and as soon as you press OK button on the dialog box, the input field gets cleared out.
Output
When you press the reset button, the alert message appears.
![]() After pressing the OK button, the form will reset.
After pressing the OK button, the form will reset.
![]()
8.
onsearch Event
When a user begins a search in an <input> element with type= “search”, the onsearch event happens.
This event neither bubbles nor can be canceled, furthermore, it only supports <input type= “search”> HTML tag and is included in DOM level 3.
Syntax
Syntax of onsearch event is as follows.
HTML Syntax
<element onsearch="functionName">
JavaScript Syntax
object.onseacrh = function(){script};
JavaScript addEventListener() Syntax
object.addEventListener("seacrh", script);
Example
<!DOCTYPE html><html><body><p>Type what you want to search and press ENTER.</p><input type="search" id="mySearch" onsearch="functionName()"><p id="tutorial"></p><script>
function functionName() {
var search = document.getElementById("mySearch");
alert ("Searching for google.com");}</script></body></html>
In the above example, when you will type something in the search bar and press enter, the onsearch event gets triggered and a message will be displayed telling you that the search has begun.
Output
After typing google.com in the search bar and pressing ENTER.
![]()
9.
onselect Event
It occurs when a piece of text is selected in an element.
It is not cancelable and neither bubbles.
It supports <input type=”file”>, <input type=”password”>, <input type=”text”>, and <textarea> HTML tags and is included in DOM level 2.
Syntax
Syntax of onselect event is as follows.
HTML Syntax
<element onselect="funtionName()">
JavaScript Syntax
object.onselect = function(){script};
JavaScript addEventListener() Syntax
object.addEventListener("select", script);
Example
<!DOCTYPE html><html><body>
Select text: <input type="text" value="Select me" onselect="myFunction()"><script>
function myFunction() {
alert("Text selected");}</script></body></html>
Output
Before selecting.
![]() After selecting.
After selecting.
![]()
10.
onsubmit Event
When a user submits a form, the onsubmit event happens.
This event bubbles and can be canceled, moreover, it only supports <form> HTML tag and is included in DOM level 2.
Syntax:
Syntax of onsubmit event is as follows.
HTML Syntax:
<element onsubmit="funtionName()">
JavaScript Syntax:
object.onsubmit = function(){script};
JavaScript addEventListener() Syntax:
object.addEventListener("submit", script);
Example
<!DOCTYPE html><html><body><form action="/action_page.php" onsubmit="functionName()">
Enter name: <input type="text" name="myname"><input type="submit" value="Submit"></form><script>
function functionName() {
alert("Form submitted!");}</script></body></html>
In the above example, when you press the submit button the onsubmit event gets triggered and a dialog box appears telling you that the form was submitted.
Output
![]()
Conclusion
Events that occur when a user interacts with an HTML form are called JavaScript form events.
Events that fall under the category of JavaScript form events are onblur event, onchange event, oncontextmenu event, onfocus event, oninput event, oninvalid event, onreset event, onsearch event, onselect event, and onsubmit event.
All these events are discussed in detail along with appropriate example.
 Output
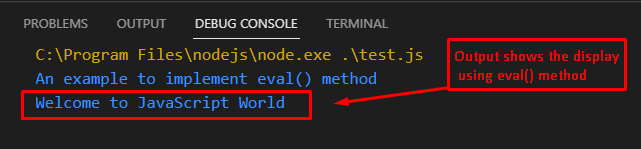 The output returns the above executable code and displays the dynamic variable names with the eval() method.
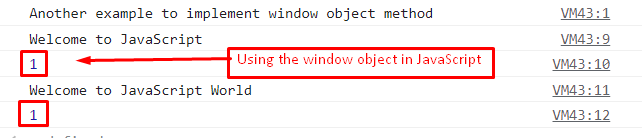 The output shows the dynamic variable names x1 and x2 are utilized by employing the window object.
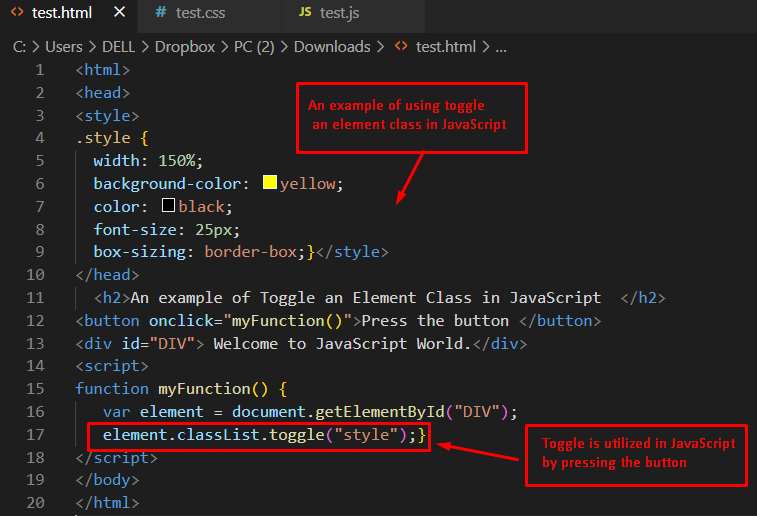 Output
Before pressing the button:
Output
Before pressing the button:
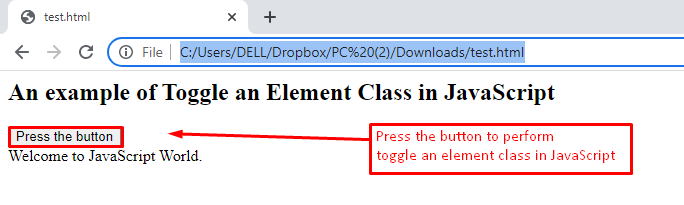 After executing the above code, the output displays a button “Press the button”.
Moreover, a message is displayed here “Welcome to JavaScript World”.
After pressing the button:
After executing the above code, the output displays a button “Press the button”.
Moreover, a message is displayed here “Welcome to JavaScript World”.
After pressing the button:
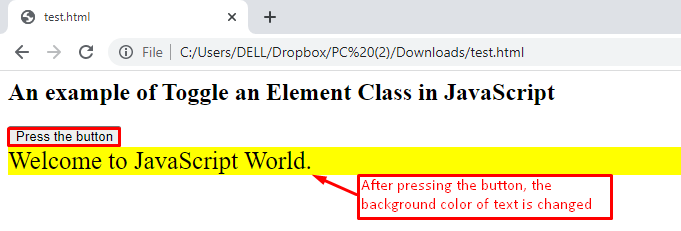 After pressing the button, the JavaScript code is executed on the backend and toggles the div element to “style”.
After that, it is observed that various styles are included in the div.
After pressing the button, the JavaScript code is executed on the backend and toggles the div element to “style”.
After that, it is observed that various styles are included in the div.
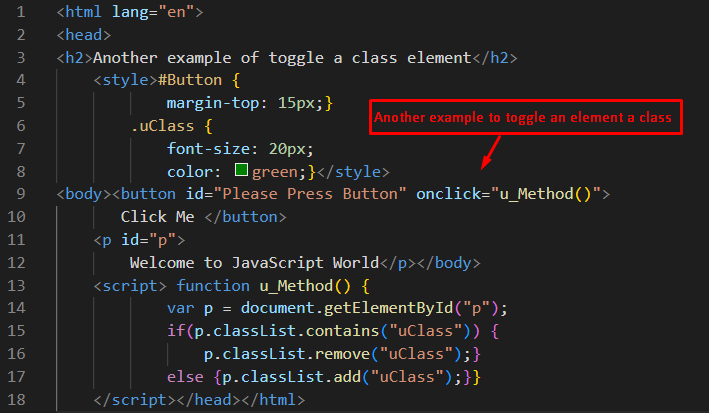 The description of the code is as below.
In this code, u_method() is used to get the HTML element in the p variable.
After that, the contain() method is utilized to evaluate whether the method is triggered or not.
If it contains the event, then use the remove() method to disable the event.
Otherwise, the add() method is used to add the toggle event.
Output
Before pressing the button:
The description of the code is as below.
In this code, u_method() is used to get the HTML element in the p variable.
After that, the contain() method is utilized to evaluate whether the method is triggered or not.
If it contains the event, then use the remove() method to disable the event.
Otherwise, the add() method is used to add the toggle event.
Output
Before pressing the button:
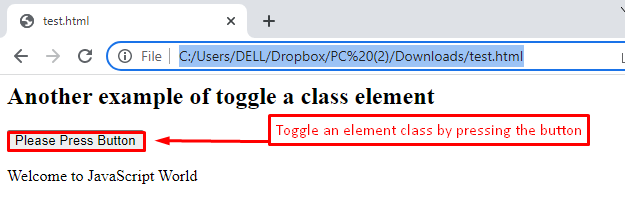 After pressing the button “Please Press Button”, a class element is toggled using the add(), remove(), and contain() methods.
After pressing the button:
After pressing the button “Please Press Button”, a class element is toggled using the add(), remove(), and contain() methods.
After pressing the button:
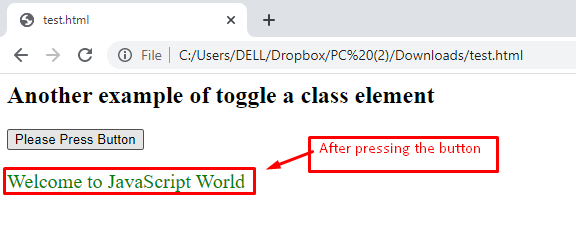 By clicking the “Please Press Button” button, a message “Welcome to JavaScript World” is displayed using the add(), remove(), and contain() methods.
 Output
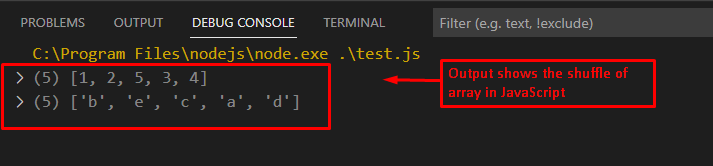 The code returns the two arrays of numbers and letters by changing the position of the elements of each array.
 Output
 The output shows the execution of the above code and returns the shuffled array using JavaScript.
 The output represents that the data type before coercion was “number”.
After the coercion, the data type is changed to “string”.
The output represents that the data type before coercion was “number”.
After the coercion, the data type is changed to “string”.
 The output represents that the datatype is a “number” before the coercion.
However, after coercion, the data type is transformed to “string”.
The output represents that the datatype is a “number” before the coercion.
However, after coercion, the data type is transformed to “string”.
 Output
 The output illustrates that the datatype is a “number” before the coercion.
However, after coercion, the data type is converted to “boolean”.
The output illustrates that the datatype is a “number” before the coercion.
However, after coercion, the data type is converted to “boolean”.
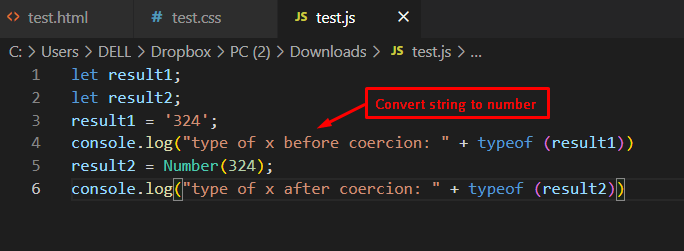 Output
 The output represents that the datatype is “string” before the coercion.
However, after coercion, the data type is converted to “number”.
The output represents that the datatype is “string” before the coercion.
However, after coercion, the data type is converted to “number”.
 Output
 The output displays the execution of the above code and returns “27”, which is the sum of 12, 10, and 5 values.
 Output
 The output shows the message “I Love JavaScript World” by the synchronous method in JavaScript.
 Output
 The display returns the asynchronous output.
In this code, first, write the start() method but execute the statement of the end() method and display a message asking, “Are you ready for execution?”.
After that, pause the execution for 5000 milliseconds.
Finally, the start() method is executed and shows the message “Welcome to JavaScript World.”
The display returns the asynchronous output.
In this code, first, write the start() method but execute the statement of the end() method and display a message asking, “Are you ready for execution?”.
After that, pause the execution for 5000 milliseconds.
Finally, the start() method is executed and shows the message “Welcome to JavaScript World.”
 The output shows the random quotes in the browser by employing HTML, CSS, and JavaScript.
By pressing each time, a new random quote is generated in the browser.
The output shows the random quotes in the browser by employing HTML, CSS, and JavaScript.
By pressing each time, a new random quote is generated in the browser.
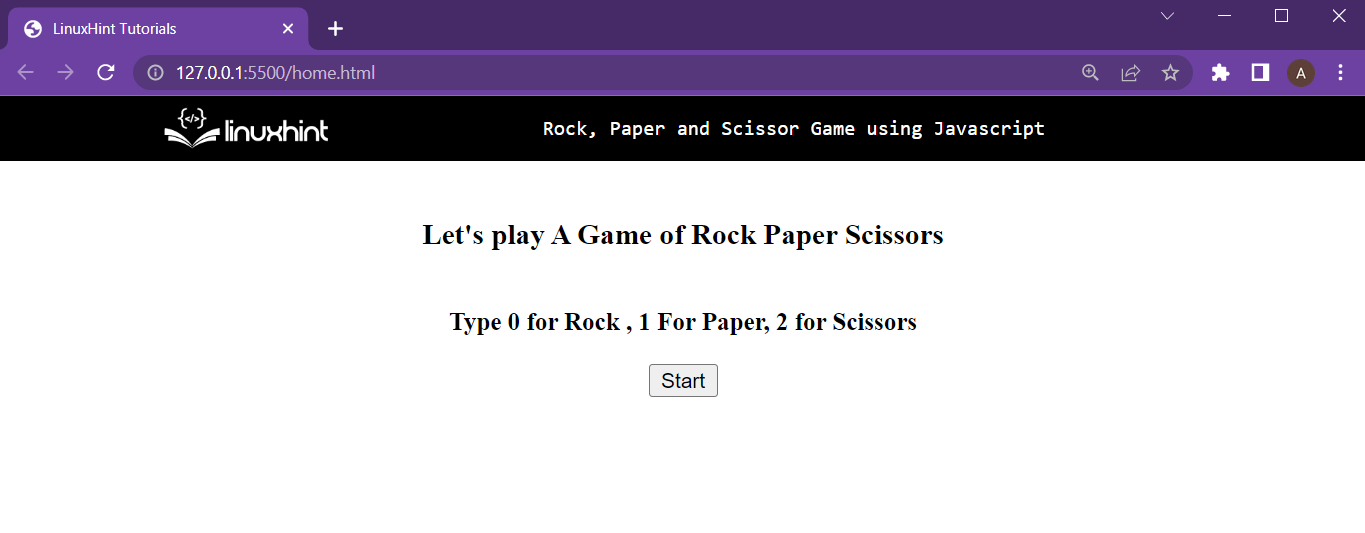 Everything is placed o=in the center of the webpage thanks to the <center> tag
 With that, the Rock, Paper, and Scissor is fully functioning, ENJOY!
 In JavaScript code, the property of __proto__ is used under prototypal inheritance.
Output
The output of the above executable code is here.
In JavaScript code, the property of __proto__ is used under prototypal inheritance.
Output
The output of the above executable code is here.
 The execution of JavaScript code is performed in the web browser.
The output represents that the properties are shared between the objects of Car and Color using the __proto__ keyword.
The execution of JavaScript code is performed in the web browser.
The output represents that the properties are shared between the objects of Car and Color using the __proto__ keyword.
 The string has been printed on the terminal, The constraint of defining a string can be the encapsulation with a double quotation mark.
 The constraint for creating a number is that it cannot contain any other value than numeric characters and a decimal point.
 Both of the variables returned undefined on the terminal.

 The variable obj was displayed on the terminal in the object notation.
The other way of creating an object variable is by using literal notation.
To demonstrate this, use the following lines:
var obj1 = {
stringVal: "String inside the object",
intVal: 14,};
console.log(obj1);
As it is clear from the code snippet above, to use the literal notation for object definition, simply use the curly brackets as the value of the variable and inside the curly brackets, pass the key-value pairs.
Running the above lines of code provides the following output:
The variable obj was displayed on the terminal in the object notation.
The other way of creating an object variable is by using literal notation.
To demonstrate this, use the following lines:
var obj1 = {
stringVal: "String inside the object",
intVal: 14,};
console.log(obj1);
As it is clear from the code snippet above, to use the literal notation for object definition, simply use the curly brackets as the value of the variable and inside the curly brackets, pass the key-value pairs.
Running the above lines of code provides the following output:
 The output is the object’s key-value pairs in literal notation
 The array1 variable with almost all primitive data types was printed on the terminal
 Output
 The output shows that the “SyntaxError: Unexpected token” is thrown because of the extra parenthesis.
 Output
 The “SyntaxError: Unexpected token” is thrown because of the extra colon.
 The script is ready for execution after removing the colon.
 The output shows the SyntaxError – Unexpected Token is resolved.
It is concluded that the “SyntaxError: Unexpected token” can be resolved using the proper notations.
The output shows the SyntaxError – Unexpected Token is resolved.
It is concluded that the “SyntaxError: Unexpected token” can be resolved using the proper notations.
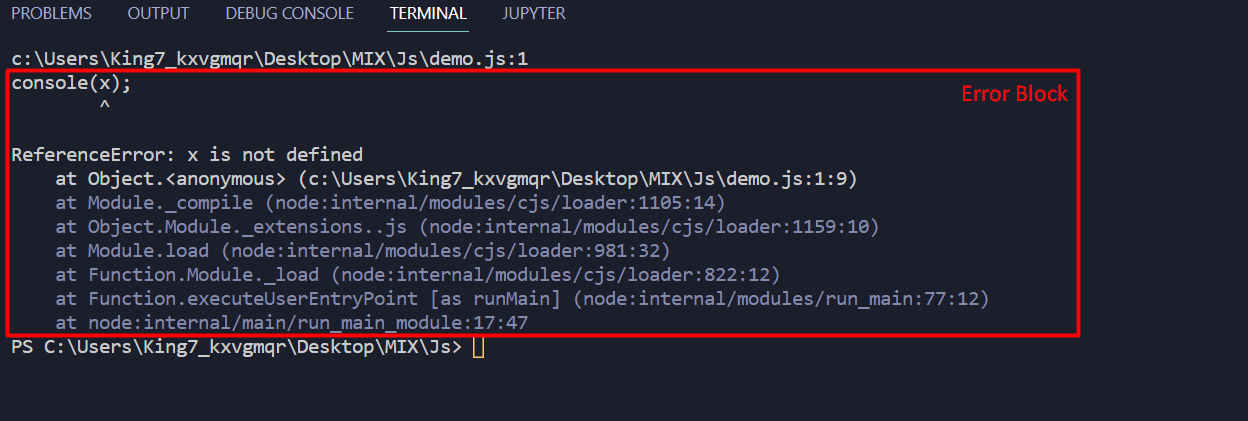 The error message contains around 10 different lines, and all of these lines tell a different story on why the error was caused.
Now, if the programmer were to visit the files linked in these 10 lines and try to figure out the error, he would find himself in a maze.
The error message contains around 10 different lines, and all of these lines tell a different story on why the error was caused.
Now, if the programmer were to visit the files linked in these 10 lines and try to figure out the error, he would find himself in a maze.
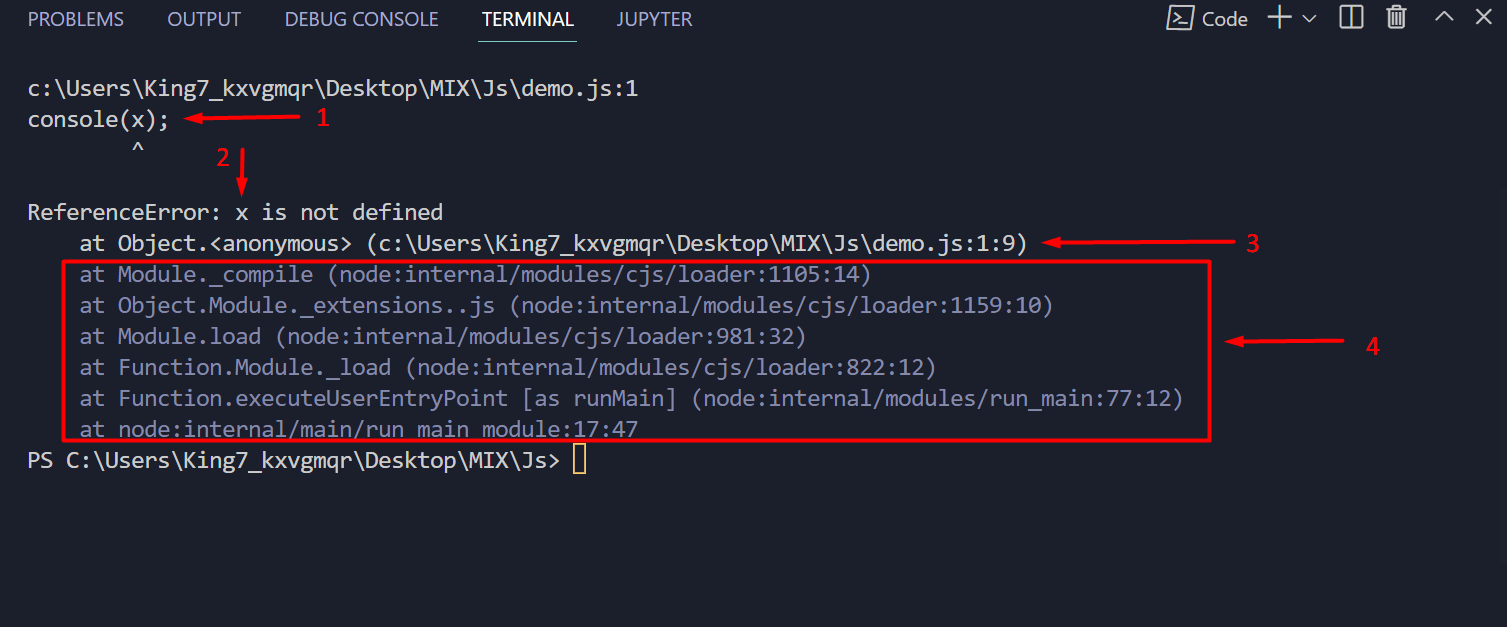 Let’s explain the markings that are done on the screenshot:
1: This is the JavaScript statement that has caused the error
2: This is the variable whose reference the compiler couldn’t find
3: The file name and the line number of the statement which caused the error
4: Files of the environment that led to error (Ignore these lines)
Let’s explain the markings that are done on the screenshot:
1: This is the JavaScript statement that has caused the error
2: This is the variable whose reference the compiler couldn’t find
3: The file name and the line number of the statement which caused the error
4: Files of the environment that led to error (Ignore these lines)
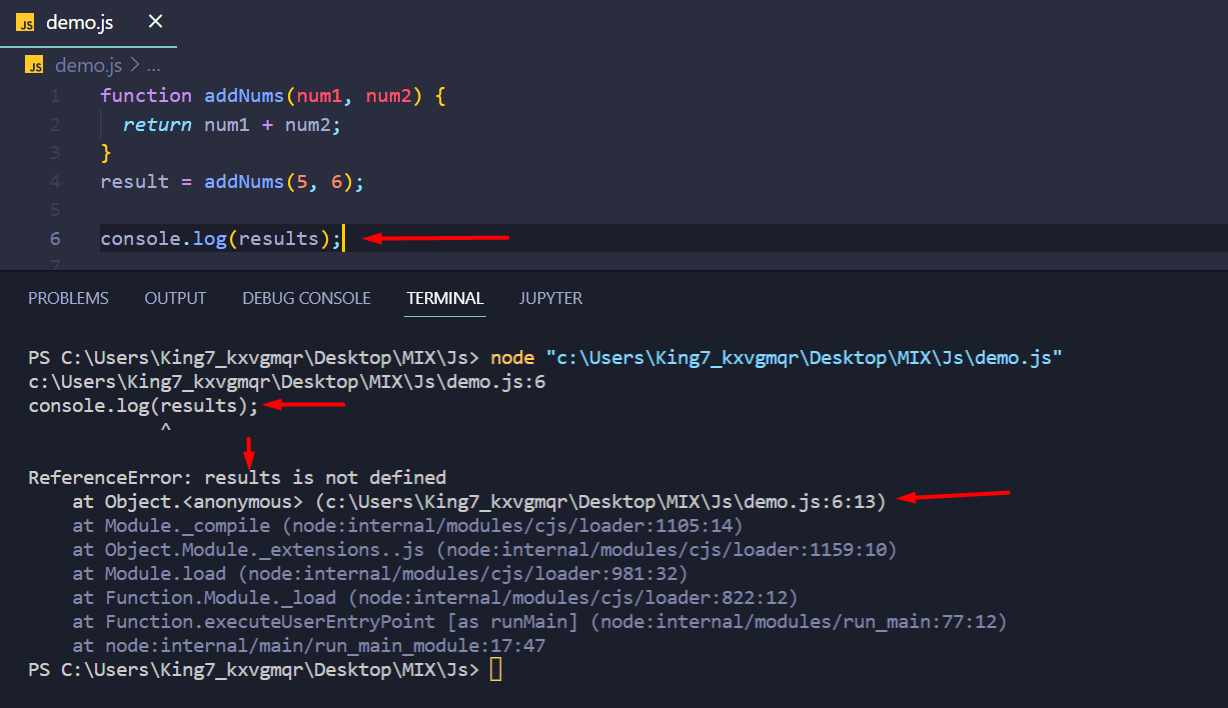 It says the “results” variable couldn’t be referenced and points to the line number 6.
Now, compare line 6 and line 4:
result = addNums(5 + 6); // Line Number 4
console.log(results); // Line number 6
It is clear that the error is caused due to the misspelling of the name of the variable in line number 6.
Correct the spelling of the identifier which has the return value of the function to:
result = addNums(5 + 6); // Line Number 4
console.log(result); // Line number 6
After that, execute the program and observe the following output:
It says the “results” variable couldn’t be referenced and points to the line number 6.
Now, compare line 6 and line 4:
result = addNums(5 + 6); // Line Number 4
console.log(results); // Line number 6
It is clear that the error is caused due to the misspelling of the name of the variable in line number 6.
Correct the spelling of the identifier which has the return value of the function to:
result = addNums(5 + 6); // Line Number 4
console.log(result); // Line number 6
After that, execute the program and observe the following output:
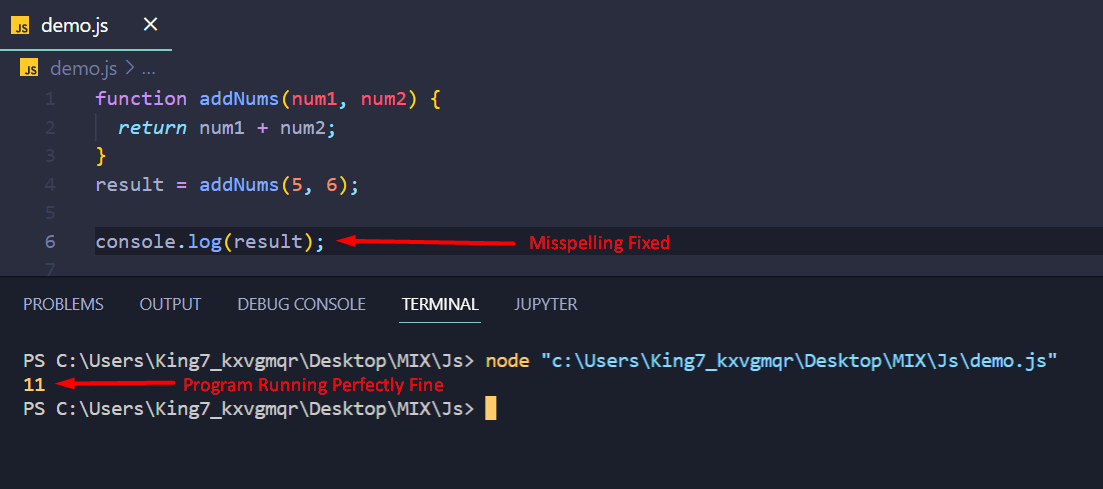 The output shows that the program is now working without any errors
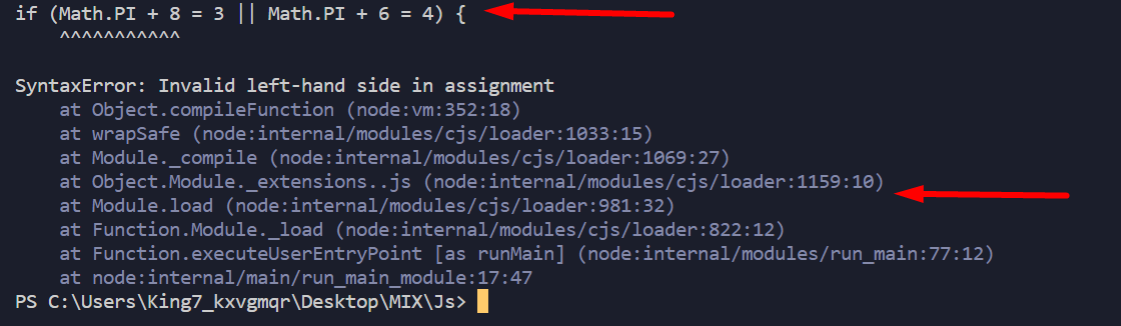 It is pretty clear from the above image that the error message doesn’t really help the user that much apart from highlighting the line that has caused the error.
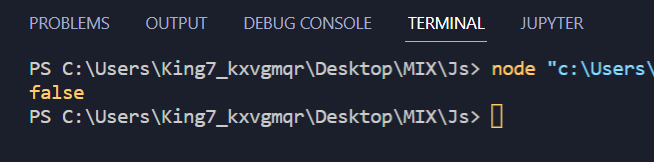 The program didn’t crash and the result was printed on the terminal
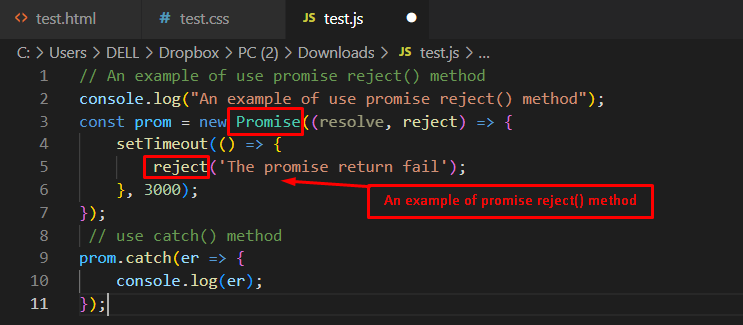 Output
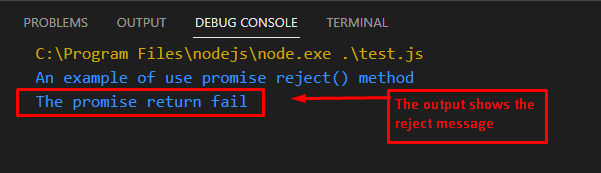 The outcome shows that the message “The promise return fail” is displayed using the reject() method.
Moreover, it is displayed after 3 seconds by utilizing the setTimeout() method.
The outcome shows that the message “The promise return fail” is displayed using the reject() method.
Moreover, it is displayed after 3 seconds by utilizing the setTimeout() method.
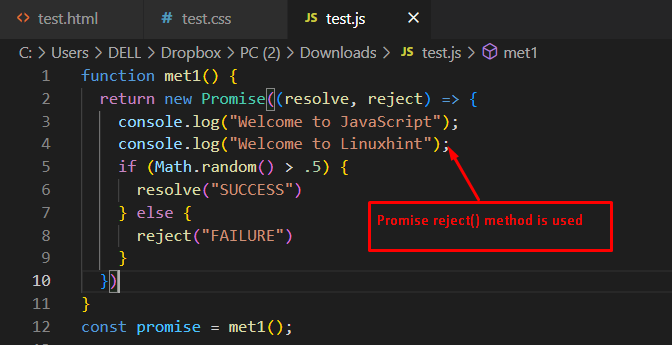 In this code:
A user-defined met1() method is created that returns the output of the Promise object.
After that, two parameters, resolve and reject are passed to this method.
In this method, two messages are displayed using the console.log() method.
After that, check the condition, if the Math.random() method returns a value greater than.5, then the resolve() method is called.
Otherwise, the reject() method is executed.
At the end of the code, an object promise is initialized to call the met1() method.
Output
In this code:
A user-defined met1() method is created that returns the output of the Promise object.
After that, two parameters, resolve and reject are passed to this method.
In this method, two messages are displayed using the console.log() method.
After that, check the condition, if the Math.random() method returns a value greater than.5, then the resolve() method is called.
Otherwise, the reject() method is executed.
At the end of the code, an object promise is initialized to call the met1() method.
Output
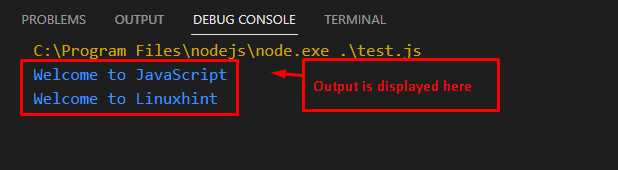 The output returns the executable code by displaying the messages in the console window.
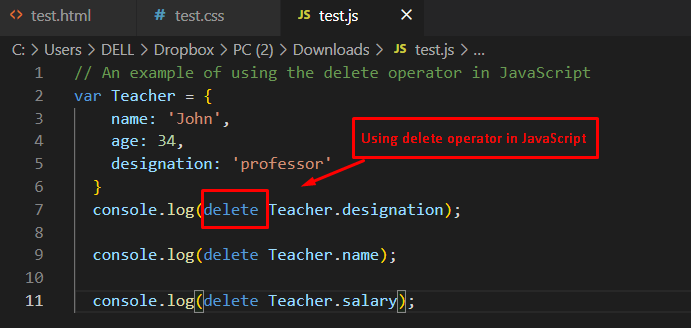 Output
 The output returns the true value that represents that the delete operator successfully deleted the name, age, and designation properties.
 Output
 The outcome of the code represents that the model and color properties of the object car are deleted and returned undefined.
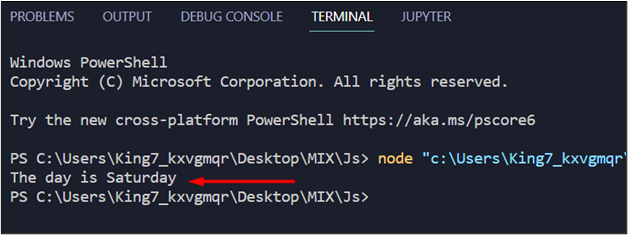 It is clear from the output that the program is working perfectly fine and deciding the day of the week from the integer value correctly.
Example 2: Trying the Default Clause With a Non-Matching Expression
To demonstrate the working of the default clause, simply take the code snippet from example 1, and in that example, simply modify the value of numericValue to a string value like:
numericValue = "Google";
Now, this can be considered to be an invalid input to our program.
Executing the code with this value would result in the following output:
It is clear from the output that the program is working perfectly fine and deciding the day of the week from the integer value correctly.
Example 2: Trying the Default Clause With a Non-Matching Expression
To demonstrate the working of the default clause, simply take the code snippet from example 1, and in that example, simply modify the value of numericValue to a string value like:
numericValue = "Google";
Now, this can be considered to be an invalid input to our program.
Executing the code with this value would result in the following output:
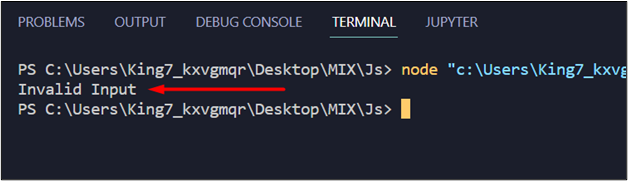 From this output, it is easy to conclude that the default clause is executed when none of the cases match the expression.
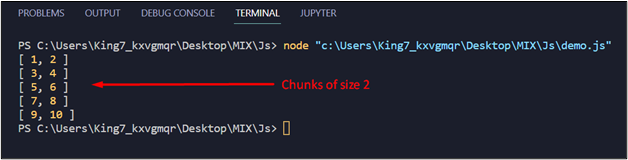 The output displays the array converted into smaller chunks each of size 2.
 It is clear from the output that the splice() method splits the array into chunks each of size 4.
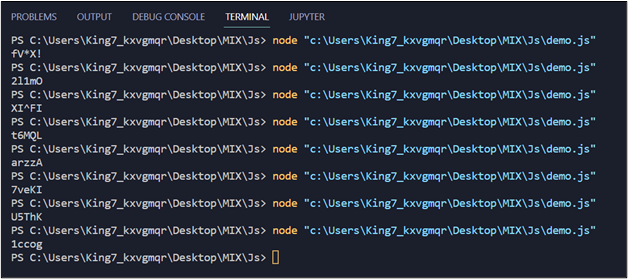 As you can see, for every execution we are generating a new random string of length 5.
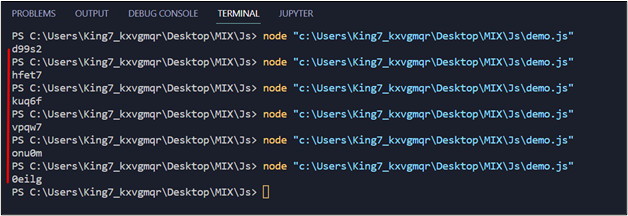 As you can observe in the output, we were able to generate a random string with a length of 5.
However, method 1 is a little longer but it is much better because it allows you to define the possibility of the characters that can be placed in the string which is far greater than the 26 lower case alphabets and the 10 numbers that we get with method 2.
As you can observe in the output, we were able to generate a random string with a length of 5.
However, method 1 is a little longer but it is much better because it allows you to define the possibility of the characters that can be placed in the string which is far greater than the 26 lower case alphabets and the 10 numbers that we get with method 2.
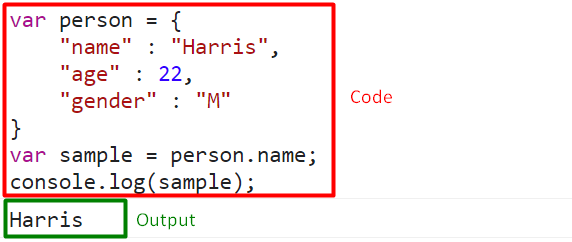 In using this method, not only can the value be accessed and displayed, but also assigned to variables.

 Step 2: Get and Set Date
The “setDate()” and “getDate()” functions are being utilized in this section to assign tomorrow’s date, as we see in the following code:
let dateTomorrow = new Date();
dateTomorrow.setDate(dateToday.getDate() + 1);
console.log("Tomorrow's date is: ",dateTomorrow);
Firstly, another variable named “dateTomorrow” is declared.
Next, the “setDate()” function is used to set the date in the variable.
To assign tomorrow’s date, the “getDate()” method is used to access the date value from the “dateToday” variable and add 1 to it.
This assigns tomorrow’s date to the “dateTomorrow” variable.
Below is an example of this:
Step 2: Get and Set Date
The “setDate()” and “getDate()” functions are being utilized in this section to assign tomorrow’s date, as we see in the following code:
let dateTomorrow = new Date();
dateTomorrow.setDate(dateToday.getDate() + 1);
console.log("Tomorrow's date is: ",dateTomorrow);
Firstly, another variable named “dateTomorrow” is declared.
Next, the “setDate()” function is used to set the date in the variable.
To assign tomorrow’s date, the “getDate()” method is used to access the date value from the “dateToday” variable and add 1 to it.
This assigns tomorrow’s date to the “dateTomorrow” variable.
Below is an example of this:
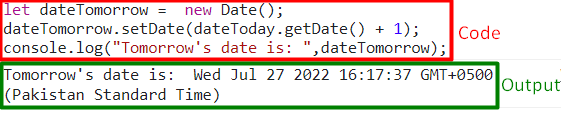 Step 3: Convert the variable to a String
The final step is to convert the variable “dateTomorrow” into a String.
Below are two statements that you can use to achieve that depending on the format you prefer.
The “toDateString” format
The sample below demonstrates how to implement “toDateString()” function and what the output will look like:
dateTomorrow.toDateString();
Step 3: Convert the variable to a String
The final step is to convert the variable “dateTomorrow” into a String.
Below are two statements that you can use to achieve that depending on the format you prefer.
The “toDateString” format
The sample below demonstrates how to implement “toDateString()” function and what the output will look like:
dateTomorrow.toDateString();
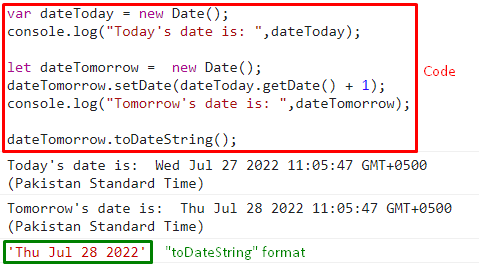 The “toLocaleDateString” format
Below an example is given of how the “toLocaleDateString()” function works and it’s corresponding output:
dateTomorrow.toLocaleDateString();
The “toLocaleDateString” format
Below an example is given of how the “toLocaleDateString()” function works and it’s corresponding output:
dateTomorrow.toLocaleDateString();
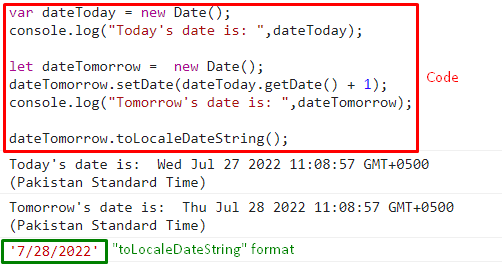 Following these 3 simple steps will provide the desired output which in this case is tomorrow’s date.
 There are a few other details to note about this code as well.
The default delay time is 0.
The function returns will return the id of the timer.
Additional functions can also be passed in versions after “IE9”
There are a few other details to note about this code as well.
The default delay time is 0.
The function returns will return the id of the timer.
Additional functions can also be passed in versions after “IE9”
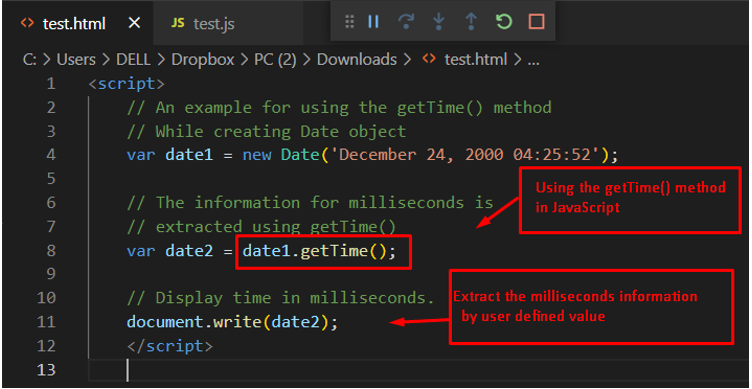 Output
After executing the code, the display represents the output in milliseconds using the getTime() method.
Output
After executing the code, the display represents the output in milliseconds using the getTime() method.
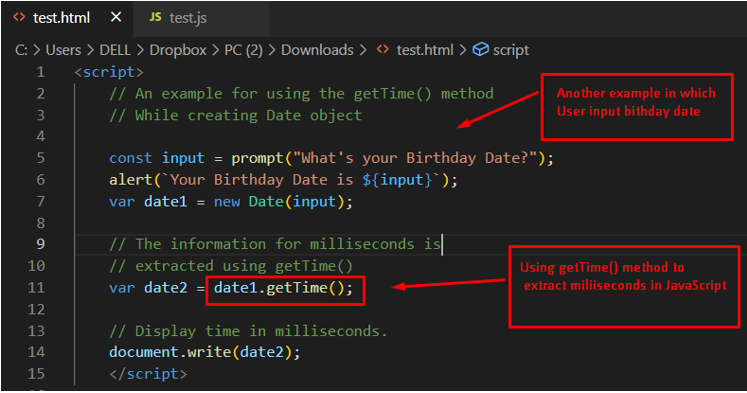 Output
Upon executing the code, the following interface is observed:
Output
Upon executing the code, the following interface is observed:
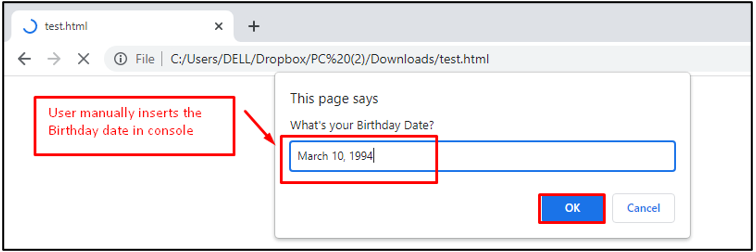 After the execution of the code, the user must input the date of birth, as we entered March 10, 1994. Click on OK to proceed further:
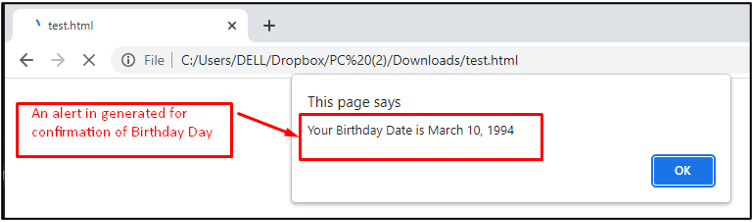 A prompt message is generated for confirmation of the data provided through the user input:
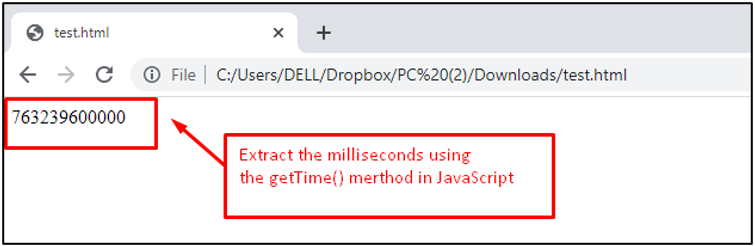 In the end, the milliseconds that have passed since January 1st, 1970, are displayed.
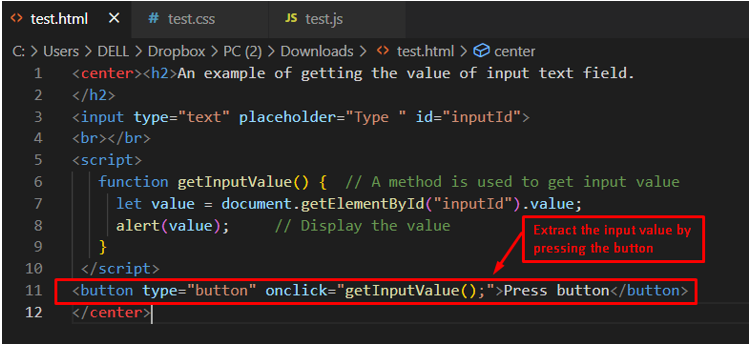 Output
After executing the code, a text box and a button will appear.
When you write some word in the text box and the button is pressed, an alert box will appear that contains the word/text written in the text box earlier.
The alert pop-up would be as shown below:
Output
After executing the code, a text box and a button will appear.
When you write some word in the text box and the button is pressed, an alert box will appear that contains the word/text written in the text box earlier.
The alert pop-up would be as shown below:
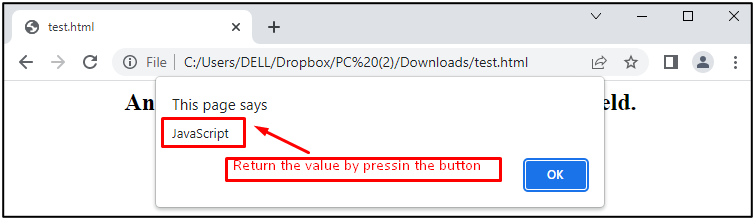
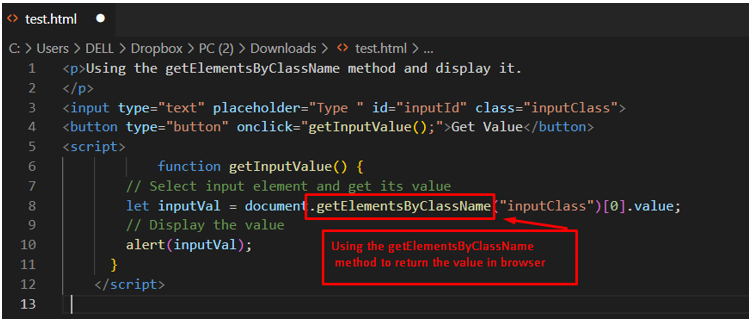 Output
In the above display, the value “Minhal” is placed inside the text filed.
Output
In the above display, the value “Minhal” is placed inside the text filed.
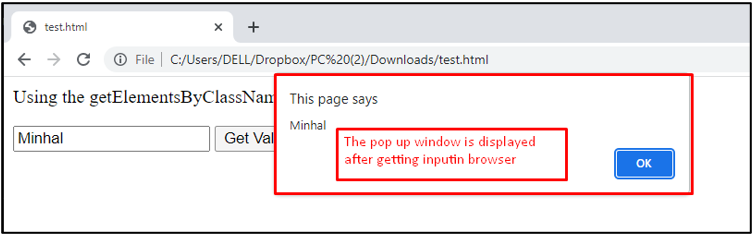 After pressing the Get Value button, the value is stored and displayed as an alert message in the pop-up window.
In this way, the getElementsByClassName() method can be used to get the value of the text input field using JavaScript.
After pressing the Get Value button, the value is stored and displayed as an alert message in the pop-up window.
In this way, the getElementsByClassName() method can be used to get the value of the text input field using JavaScript.
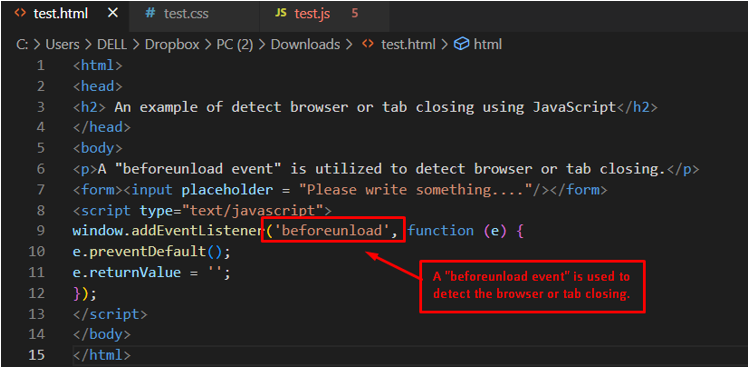 Note: Some browsers do not support the beforeunload event without first writing some information in the text field.
The above display demonstrates how the beforeunload event detects the browser or tab closing.
Moreover, this event also detects the page reload as well.
Note: Some browsers do not support the beforeunload event without first writing some information in the text field.
The above display demonstrates how the beforeunload event detects the browser or tab closing.
Moreover, this event also detects the page reload as well.
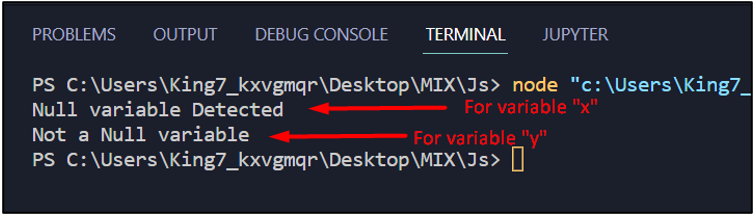 The first line in the output is for the variable “x” and from the output we can determine that it is a null variable.
The second line is for the variable “y”; from the output, we can determine that it is not a null variable.
The first line in the output is for the variable “x” and from the output we can determine that it is a null variable.
The second line is for the variable “y”; from the output, we can determine that it is not a null variable.
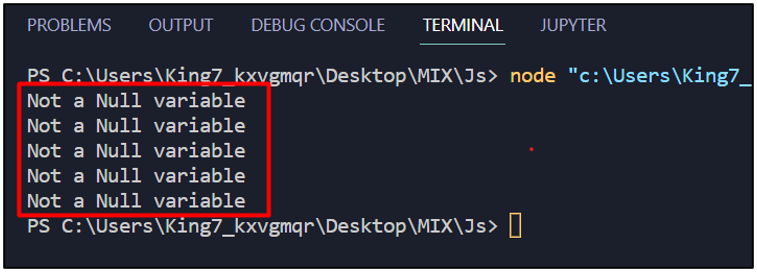 All of these variables were considered to be non-null even though all belong to the same family which is “falsy values”.
 The true value in the terminal means that the key age does exist in the object personObject.
After that, we also want to check for a key that is not present in the personObject.
For this, we are going to use the in operator to find the key “martialStatus” in the personObject like:
existence = "martialStatus" in personObject;
And then again, we can simply pass this existence variable to the console log function to print the result on the terminal like:
console.log(existence);
Execute the program and observe the following result from the terminal:
The true value in the terminal means that the key age does exist in the object personObject.
After that, we also want to check for a key that is not present in the personObject.
For this, we are going to use the in operator to find the key “martialStatus” in the personObject like:
existence = "martialStatus" in personObject;
And then again, we can simply pass this existence variable to the console log function to print the result on the terminal like:
console.log(existence);
Execute the program and observe the following result from the terminal:
 As you can see, the result was false meaning that there is no such key as martialStatus inside our personObject.
 The output on the terminal is true, which means the car object contains the key make.
After that, let’s check for the existence of the key “mileage” in our car object.
For this, simply pass the key as mileage in the hasOwnProperty() method’s argument:
existence = car.hasOwnProperty("mileage");
To show the result on the terminal, simply pass the variable “existence” in the console log function:
console.log(existence);
Execute the program and observe the following output:
The output on the terminal is true, which means the car object contains the key make.
After that, let’s check for the existence of the key “mileage” in our car object.
For this, simply pass the key as mileage in the hasOwnProperty() method’s argument:
existence = car.hasOwnProperty("mileage");
To show the result on the terminal, simply pass the variable “existence” in the console log function:
console.log(existence);
Execute the program and observe the following output:
 The output shows that there is no such key as mileage in the object car.
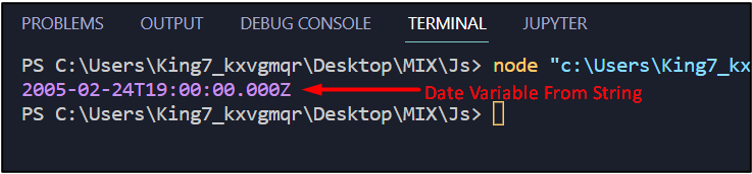 It is clear from the result in the terminal that date1 is actually a date variable constructed from a string.
To demonstrate the use of an invalid date string, set the variable dateString equal to an invalid format like:
dateString = "2005 FEB 25th";
Afterwards, do the same steps, pass this in the Date() constructor and show the result on the terminal using the console log function:
date1 = new Date(dateString);
console.log(date1);
Upon execution of this, the terminal shows the following outcome:
It is clear from the result in the terminal that date1 is actually a date variable constructed from a string.
To demonstrate the use of an invalid date string, set the variable dateString equal to an invalid format like:
dateString = "2005 FEB 25th";
Afterwards, do the same steps, pass this in the Date() constructor and show the result on the terminal using the console log function:
date1 = new Date(dateString);
console.log(date1);
Upon execution of this, the terminal shows the following outcome:
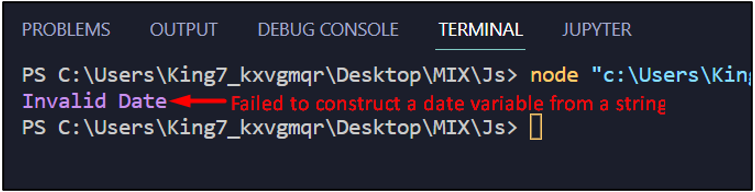 The result is as “Invalid Date”, which means that not every string can be interpreted into a date variable.
That is why following the format for the date string is essential.
The result is as “Invalid Date”, which means that not every string can be interpreted into a date variable.
That is why following the format for the date string is essential.
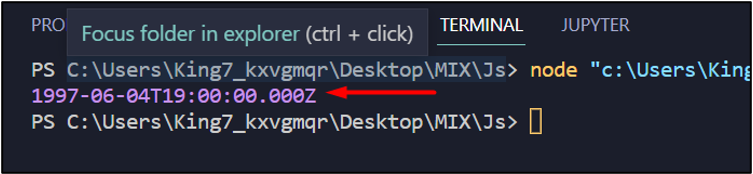 It is clear from the output that this is a date variable constructed from the given string.
However, if you notice the value on the output that the Date of the month part is one less than the value we passed in the String.
It should be the 5th of June, but rather it is the 4th of June in the output.
The reason is that in the Date object or date variables, the “date of the month” part starts from 0 instead of 1.
Therefore, the 5th of June 1997 is represented by “1997-06-04”.
It is clear from the output that this is a date variable constructed from the given string.
However, if you notice the value on the output that the Date of the month part is one less than the value we passed in the String.
It should be the 5th of June, but rather it is the 4th of June in the output.
The reason is that in the Date object or date variables, the “date of the month” part starts from 0 instead of 1.
Therefore, the 5th of June 1997 is represented by “1997-06-04”.
 Output
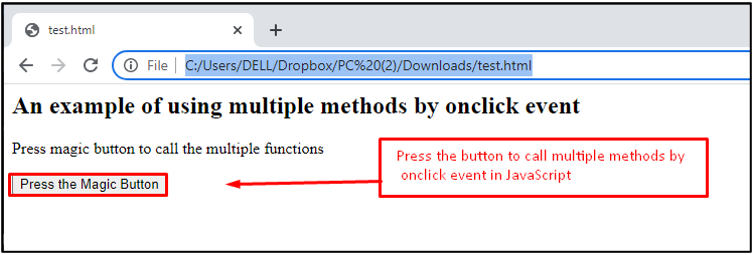 A button named “Press the Magic Button” is utilized to execute the multiple methods by its onclick event.
After pressing the button, method1 and method2 are called to display the information present in it.
A button named “Press the Magic Button” is utilized to execute the multiple methods by its onclick event.
After pressing the button, method1 and method2 are called to display the information present in it.
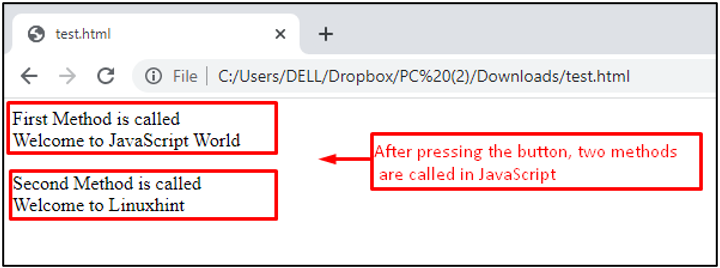 After pressing the button, two methods are called and display messages “Welcome to JavaScript World” and “Welcome to Linuxhint”.
 As you can see from the output, to visit the bold tag, one must manually scroll the browser’s window.
To add functionality to the button so that it scrolls us directly on the bold tag with text, write the following lines in the script file:
function clicked() {
window.scrollTo(0, 4000);}
In these lines, the function clicked() is created, which is called upon pressing the button, and in this function, we are simply passing the Y-coordinate as 4000px to the window scrollTo() method.
This provides the following outcome on the HTML webpage:
As you can see from the output, to visit the bold tag, one must manually scroll the browser’s window.
To add functionality to the button so that it scrolls us directly on the bold tag with text, write the following lines in the script file:
function clicked() {
window.scrollTo(0, 4000);}
In these lines, the function clicked() is created, which is called upon pressing the button, and in this function, we are simply passing the Y-coordinate as 4000px to the window scrollTo() method.
This provides the following outcome on the HTML webpage:
 As it is clearly shown in the output, pressing the button pans the browser’s window to 4000px vertically.
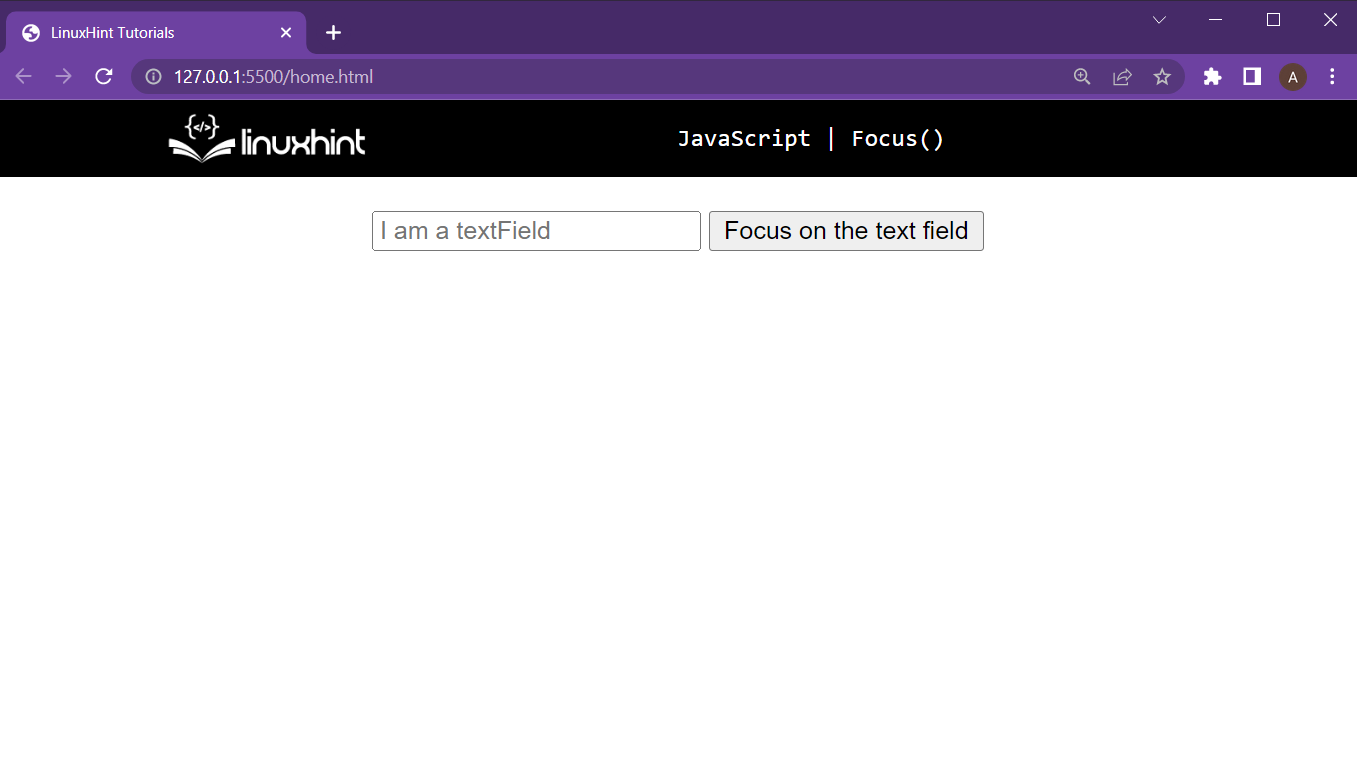 The text field and button are both displayed on the webpage.
Now to add the functionality upon button press, add the following lines in the JavaScript file:
function buttonClicked() {
tf = document.getElementById("TF1");
tf.focus();}
In the above JavaScript lines:
First create a function named as buttonClicked()
In that function, get the reference of the text field by using its Id and store that reference in the “tf” variable
After that, simply call the focus() method with the “tf” variable with the help of the dot operator
At this point, webpage produces the following outcome:
The text field and button are both displayed on the webpage.
Now to add the functionality upon button press, add the following lines in the JavaScript file:
function buttonClicked() {
tf = document.getElementById("TF1");
tf.focus();}
In the above JavaScript lines:
First create a function named as buttonClicked()
In that function, get the reference of the text field by using its Id and store that reference in the “tf” variable
After that, simply call the focus() method with the “tf” variable with the help of the dot operator
At this point, webpage produces the following outcome:
 It is observable in the output, that pressing the putting puts the text field as active or “in focus”.
Example 2: Focusing on an Element With “options” Arguments
In this example, the main goal is to have an element at a scrollable position.
After that, the button should not only focus on that element but also bring that element into view from the document.
Start by creating an HTML document, and just like in the first example, create a text field and a button with the following lines:
<center>
<input
type="text"
id="TF1"
class="scrolled"
placeholder="I am a textField"
/>
<button id="btn1" onclick="buttonClicked()">
Focus on the text field
</button>
</center>
In these lines the only difference is:
The input that now has a class “scrolled”, which will be used to place this input tag at a scrollable position in the document
After that, add the following lines to the CSS file or in the <style> tag:
body {
height: 7000px;}
.scrolled {
position: absolute;
top: 4000px;}
In the lines mentioned above:
The <body> of the document has been a height of 7000px so that the document becomes scrollable
After that, we are setting the element with the scrolled class to an absolute position of 4000px from the top
Running this HTML document give the following webpage on the browser:
It is observable in the output, that pressing the putting puts the text field as active or “in focus”.
Example 2: Focusing on an Element With “options” Arguments
In this example, the main goal is to have an element at a scrollable position.
After that, the button should not only focus on that element but also bring that element into view from the document.
Start by creating an HTML document, and just like in the first example, create a text field and a button with the following lines:
<center>
<input
type="text"
id="TF1"
class="scrolled"
placeholder="I am a textField"
/>
<button id="btn1" onclick="buttonClicked()">
Focus on the text field
</button>
</center>
In these lines the only difference is:
The input that now has a class “scrolled”, which will be used to place this input tag at a scrollable position in the document
After that, add the following lines to the CSS file or in the <style> tag:
body {
height: 7000px;}
.scrolled {
position: absolute;
top: 4000px;}
In the lines mentioned above:
The <body> of the document has been a height of 7000px so that the document becomes scrollable
After that, we are setting the element with the scrolled class to an absolute position of 4000px from the top
Running this HTML document give the following webpage on the browser:
 From the output, it is clear that the text field is now placed at a position of 4000px from the top.
After that, we are going to add the following lines of JavaScript:
function buttonClicked() {
tf = document.getElementById("TF1");
tf.focus({ preventScroll: false });}
In these lines:
A function buttonClicked() is made
In that function, a reference to the text field is made by using its ID and stored inside the variable “tf”.
After that, apply the focus() method on the text field and in its argument pass {preventScroll:false}.
This will bring the element in focus and scroll the document to bring that element in view.
Run the HTML document, and you will get the following result upon clicking the button:
From the output, it is clear that the text field is now placed at a position of 4000px from the top.
After that, we are going to add the following lines of JavaScript:
function buttonClicked() {
tf = document.getElementById("TF1");
tf.focus({ preventScroll: false });}
In these lines:
A function buttonClicked() is made
In that function, a reference to the text field is made by using its ID and stored inside the variable “tf”.
After that, apply the focus() method on the text field and in its argument pass {preventScroll:false}.
This will bring the element in focus and scroll the document to bring that element in view.
Run the HTML document, and you will get the following result upon clicking the button:
 It is observable from the output that upon clicking the button, the text field is brought into the view of the browser by scrolling the document.
Moreover, the text field is now being focused on.
It is observable from the output that upon clicking the button, the text field is brought into the view of the browser by scrolling the document.
Moreover, the text field is now being focused on.
 Our webpage includes two input fields and a link that has an onclick() attribute set to it.
Step 2: Making the Form “submit” on Link Press
Every form element in the HTML contains the submit() method.
To submit a form, it must be referenced in the JavaScript, and then the submit() method must be called using that reference.
In the script file, create the function linkPress() and add the functionality using the following lines:
function linkPress() {
form = document.getElementById("form");
form.submit();}
First line gets the reference of our form tag and stores it inside the variable “form”.
The second line uses that reference and then calls the submit() of the form.
Running this HTML document gives the following result:
Our webpage includes two input fields and a link that has an onclick() attribute set to it.
Step 2: Making the Form “submit” on Link Press
Every form element in the HTML contains the submit() method.
To submit a form, it must be referenced in the JavaScript, and then the submit() method must be called using that reference.
In the script file, create the function linkPress() and add the functionality using the following lines:
function linkPress() {
form = document.getElementById("form");
form.submit();}
First line gets the reference of our form tag and stores it inside the variable “form”.
The second line uses that reference and then calls the submit() of the form.
Running this HTML document gives the following result:
 Pressing the link submits the form, but since there is no backend file connected to receive the form, therefore it just resets the field.
Step 3: Prompt the “username” Upon Form Submission
You want to add a function ready() upon the complete loading of the webpage; therefore, add the property of “onload” on the <body> tag like:
<body onload="ready()">
And then in the script file, add the following lines:
function ready() {
form = document.getElementById("form");
form.addEventListener("submit", function (event) {
event.preventDefault();
name = document.getElementById("name").value;
alert("Welcome " + name);
});}
When the HTML document is completely loaded:
An Event listener is added onto the form element by using its reference.
This event listener listens to the submit event
Upon submission, it prevents the form’s default behavior (stop the redirection).
At the end, it greets the user using its username.
If the webpage is loaded now, it gives the following output:
Pressing the link submits the form, but since there is no backend file connected to receive the form, therefore it just resets the field.
Step 3: Prompt the “username” Upon Form Submission
You want to add a function ready() upon the complete loading of the webpage; therefore, add the property of “onload” on the <body> tag like:
<body onload="ready()">
And then in the script file, add the following lines:
function ready() {
form = document.getElementById("form");
form.addEventListener("submit", function (event) {
event.preventDefault();
name = document.getElementById("name").value;
alert("Welcome " + name);
});}
When the HTML document is completely loaded:
An Event listener is added onto the form element by using its reference.
This event listener listens to the submit event
Upon submission, it prevents the form’s default behavior (stop the redirection).
At the end, it greets the user using its username.
If the webpage is loaded now, it gives the following output:
 As you can see, the form was submitted, and by preventing the default behavior, we were able to avoid the need for a backend to manage the data from the fields.
 As you can see, clicking the link takes us to the second page, and from the second page, you can press the back button to again come to the home.html
Now in the home.html document, you are going to add in the following script lines inside the script tag:
<script>
window.history.forward();</script>
In these lines, we are accessing the history of the browser’s window object and then calling the forward() method to move the browser back to the second page.
Thus messing with the normal flow of the back button of the browser.
As you can see, clicking the link takes us to the second page, and from the second page, you can press the back button to again come to the home.html
Now in the home.html document, you are going to add in the following script lines inside the script tag:
<script>
window.history.forward();</script>
In these lines, we are accessing the history of the browser’s window object and then calling the forward() method to move the browser back to the second page.
Thus messing with the normal flow of the back button of the browser.
 As you can see, clicking the back button on the browser’s doesn’t take us back to the home.html rather it takes us again on the secondPage.html
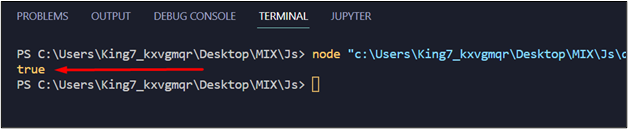 The output shows that the object passed to this method was actually an array.
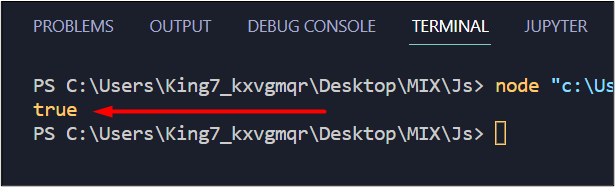 From the output, it is conclusive that the type of data stored inside the array doesn’t matter.
It only checks whether the object is an array or not, which in this case was true.
From the output, it is conclusive that the type of data stored inside the array doesn’t matter.
It only checks whether the object is an array or not, which in this case was true.
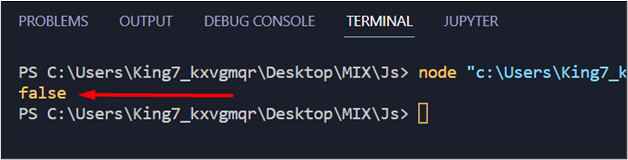 It returns that the object passed into its argument was not an array.
 The keys and values are stored together, but they are still not in the “key => format”
To display them in the correct format, use the following lines of code:
for (x of Object.keys(resultObj)) {
console.log(x + " => " + resultObj[x]);}
In this code snippet:
Object.keys() method returns the keys of the object in its argument one by one.
The keys are getting stored inside the variable “x”
String concatenation is used to format the output of the console log as “keys=> values”
Executing the program now produces the following result:
The keys and values are stored together, but they are still not in the “key => format”
To display them in the correct format, use the following lines of code:
for (x of Object.keys(resultObj)) {
console.log(x + " => " + resultObj[x]);}
In this code snippet:
Object.keys() method returns the keys of the object in its argument one by one.
The keys are getting stored inside the variable “x”
String concatenation is used to format the output of the console log as “keys=> values”
Executing the program now produces the following result:
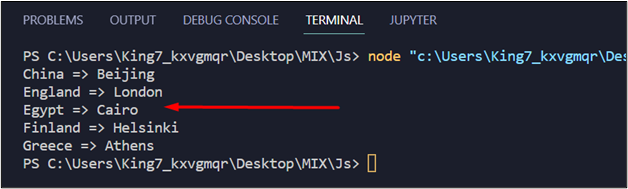 The output shows that the keys are not only stored together but also formatted in the correct way.
 It is sort of in the right format, but it includes a little extra information.
To correctly format it, use the following lines:
for (key of resultMap.keys()) {
console.log(key + " => " + resultMap.get(key));}
In this code snippet:
resultMap.keys() method returns the keys of the map one by one to the key variable.
resultMap.get() method is used to get the value of a specific key.
And in the console log function, string concatenation is used to correctly format the output.
Executing the code now produces the following output on the terminal:
It is sort of in the right format, but it includes a little extra information.
To correctly format it, use the following lines:
for (key of resultMap.keys()) {
console.log(key + " => " + resultMap.get(key));}
In this code snippet:
resultMap.keys() method returns the keys of the map one by one to the key variable.
resultMap.get() method is used to get the value of a specific key.
And in the console log function, string concatenation is used to correctly format the output.
Executing the code now produces the following output on the terminal:
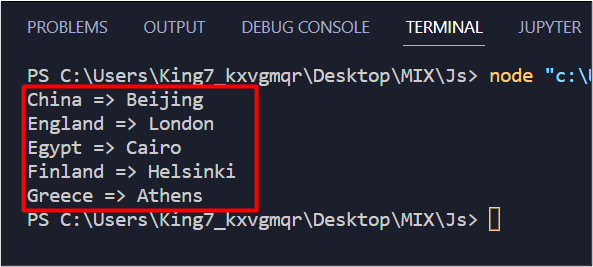 The output shows that the keys are not only stored together but also formatted in the correct way.
 To change these values into an integer, simply pass the value variable into the Math.floor() method and remove the console.log(value) line:
indexValue = Math.floor(value)
At the end of the function, use a return statement and return the element at the indexValue of the array:
return arr[indexValue];
After that, come out of the function element_Selector, and make a call to this function and wrap that call inside a console log function to print out the randomly selected element:
console.log(elemenet_Selector(my_arr));
The complete code snippet is as:
my_arr = ["Paris", "London", "Bangkok", "New York", "Los Angeles", "Dubai"];function elemenet_Selector(arr) {
array_length = arr.length;
value = Math.random() * array_length;
indexValue = Math.floor(value);
return arr[indexValue];}
console.log(elemenet_Selector(my_arr));
Execute this program and observe the following result:
To change these values into an integer, simply pass the value variable into the Math.floor() method and remove the console.log(value) line:
indexValue = Math.floor(value)
At the end of the function, use a return statement and return the element at the indexValue of the array:
return arr[indexValue];
After that, come out of the function element_Selector, and make a call to this function and wrap that call inside a console log function to print out the randomly selected element:
console.log(elemenet_Selector(my_arr));
The complete code snippet is as:
my_arr = ["Paris", "London", "Bangkok", "New York", "Los Angeles", "Dubai"];function elemenet_Selector(arr) {
array_length = arr.length;
value = Math.random() * array_length;
indexValue = Math.floor(value);
return arr[indexValue];}
console.log(elemenet_Selector(my_arr));
Execute this program and observe the following result:
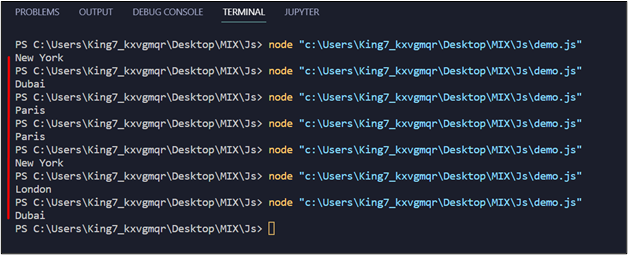 It is clear from the output that random elements are selected from the array.
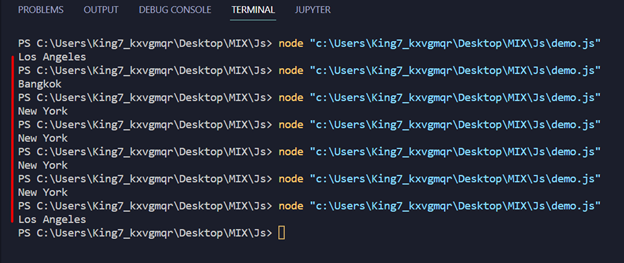 It is clear from the output that a random element is being selected from the array
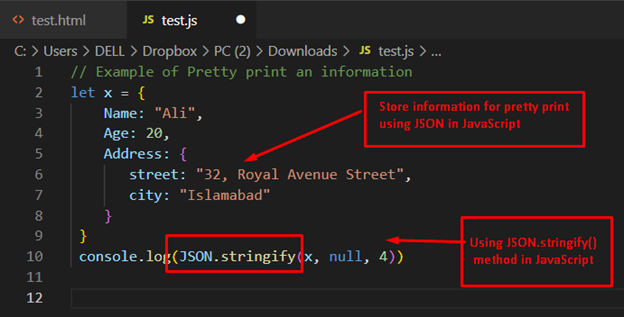 Output
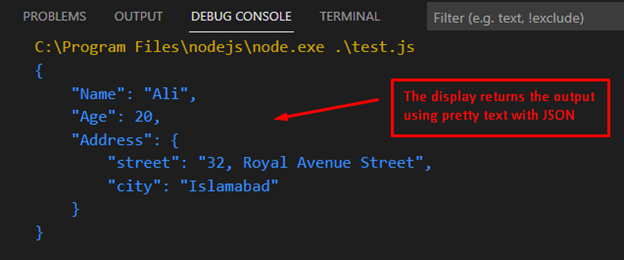 The output is displayed in the console window in which a JSON object is presented in a pretty way using JavaScript.
Example 2: Pretty Print a Date
Another example is adapted for printing data in an efficient manner with JavaScript.
Let’s head over to the code to practice this example:
Code
// Another example is using the pretty print
console.log("Display the date in pretty print")
console.log(JSON.stringify(new Date(2022, 2, 10, 9, 3, 2)));
In the above code, the workings of different methods are as follows:
Firstly, the console.log() method is used to display a message.
After that, the Date() method is passed to the JSON.stringify() method for displaying the pretty message.
The screenshot of the code is as follows:
The output is displayed in the console window in which a JSON object is presented in a pretty way using JavaScript.
Example 2: Pretty Print a Date
Another example is adapted for printing data in an efficient manner with JavaScript.
Let’s head over to the code to practice this example:
Code
// Another example is using the pretty print
console.log("Display the date in pretty print")
console.log(JSON.stringify(new Date(2022, 2, 10, 9, 3, 2)));
In the above code, the workings of different methods are as follows:
Firstly, the console.log() method is used to display a message.
After that, the Date() method is passed to the JSON.stringify() method for displaying the pretty message.
The screenshot of the code is as follows:
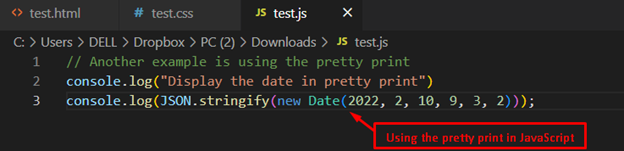 Output
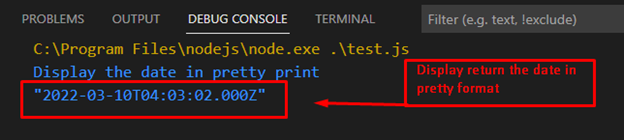 The above output shows the pretty print of JSON strings by utilizing JavaScript’s JSON.stringify() method.
The JSON.stringify() method displays the date information in an efficient way for better understanding.
The above output shows the pretty print of JSON strings by utilizing JavaScript’s JSON.stringify() method.
The JSON.stringify() method displays the date information in an efficient way for better understanding.
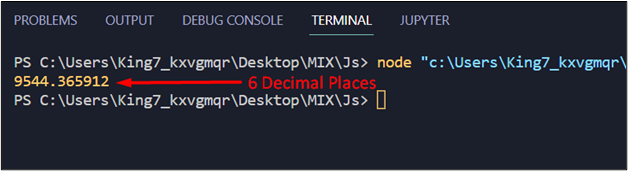 This is not what is required.
Therefore, apply the toFixed() method on this parsedValue variable with the help of a dot operator and set the argument equal to 2 as:
result = parsedValue.toFixed(2);
After that, simply pass this result variable to the console log function:
console.log(result);
Executing the program will show the following result on the terminal:
This is not what is required.
Therefore, apply the toFixed() method on this parsedValue variable with the help of a dot operator and set the argument equal to 2 as:
result = parsedValue.toFixed(2);
After that, simply pass this result variable to the console log function:
console.log(result);
Executing the program will show the following result on the terminal:
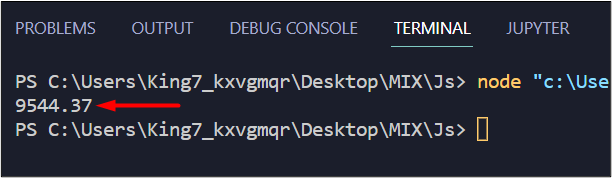 It is clear that the number has been parsed with only two decimal places.
Also, there is one more thing, you can apply the parseFloat() method and the toFixed() in a single statement like:
result = parseFloat(stringValue).toFixed(2);
The output will be:
It is clear that the number has been parsed with only two decimal places.
Also, there is one more thing, you can apply the parseFloat() method and the toFixed() in a single statement like:
result = parseFloat(stringValue).toFixed(2);
The output will be:
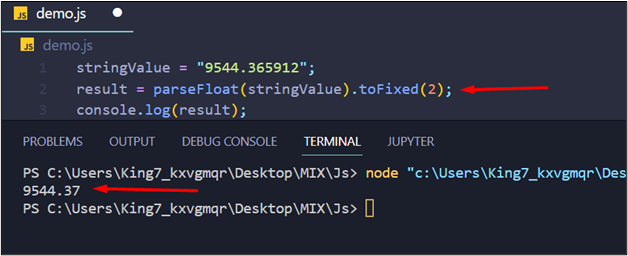 It produced the same result with fixed two decimal places.
 The browser shows up the two buttons and the <p> tag is displaying the current value.
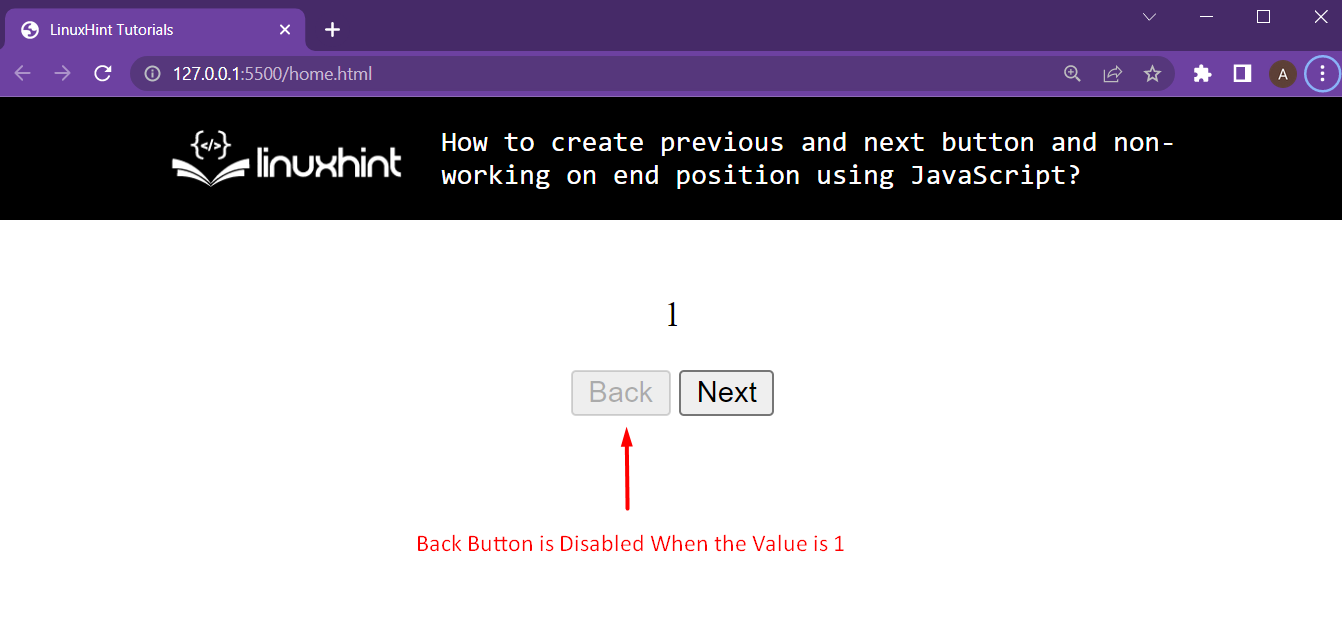
 It is clear from the output that when the value changes from 1(lower end position) the back button is enabled.
And also, when the value reaches 7 (maximum end position), the next button is enabled.
It is clear from the output that when the value changes from 1(lower end position) the back button is enabled.
And also, when the value reaches 7 (maximum end position), the next button is enabled.
 It is clear from the output that both of the buttons are working perfectly and the non-working on end position is also working.
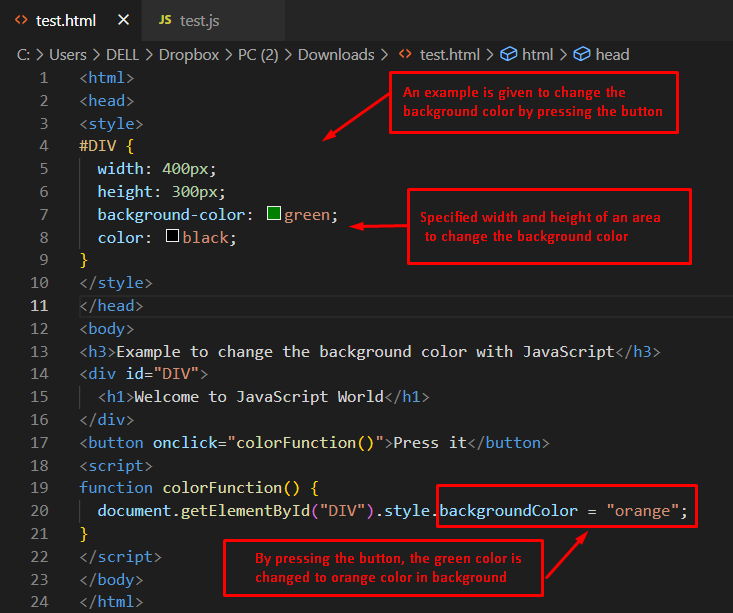 Output before clicking on the button:
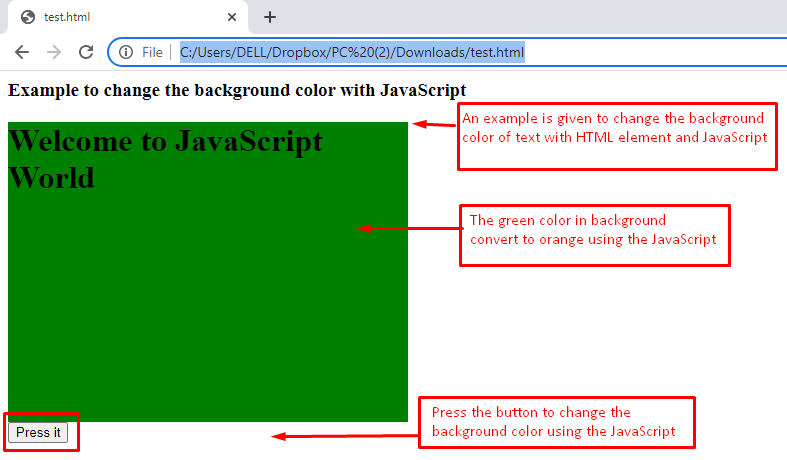 In the output, green is present in the background of the text “Welcome to JavaScript World”.
Moreover, an HTML button “Press it” is attached.
Output after clicking on the button:
In the output, green is present in the background of the text “Welcome to JavaScript World”.
Moreover, an HTML button “Press it” is attached.
Output after clicking on the button:
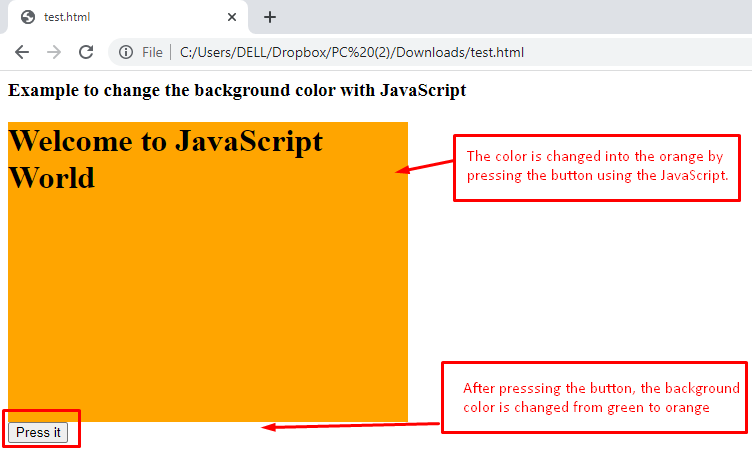 When the button is pressed, the green color changes to orange as can be seen in the above image.
 It is clear from the output that the compiler was able to access the variable string from the JavaScript file outside of any enclosements, from within the if statement, from within the for loop, and last from within a function.
This makes this variable a globally available variable throughout this JavaScript file.
It is clear from the output that the compiler was able to access the variable string from the JavaScript file outside of any enclosements, from within the if statement, from within the for loop, and last from within a function.
This makes this variable a globally available variable throughout this JavaScript file.
 The output shows a reference error that x is not defined meaning that the scope of the variable x was enclosed inside the if Statement.
But to demonstrate that the block scope exists between a pair of curly brackets regardless of the statement used with it.
Simply create the variable x inside curly brackets like:
{
let x = "Hello";}
And try accessing the variable x outside of these curly brackets using the console log function:
console.log(x);
The whole code snippet will look like this:
{
let x = "Hello";}
console.log(x);
Executing this populates the terminal with the following result:
The output shows a reference error that x is not defined meaning that the scope of the variable x was enclosed inside the if Statement.
But to demonstrate that the block scope exists between a pair of curly brackets regardless of the statement used with it.
Simply create the variable x inside curly brackets like:
{
let x = "Hello";}
And try accessing the variable x outside of these curly brackets using the console log function:
console.log(x);
The whole code snippet will look like this:
{
let x = "Hello";}
console.log(x);
Executing this populates the terminal with the following result:
 From the output and the error in the output, it is easily conclusive that the let keyword bounds the scope of the variable at hand within the curly bracket {} in which it is initialized.
 The greeting was printed onto the terminal
 As you can see, siteBot object printed the greetings on the terminal.
Now, try to call this greetUser() method like you would call a normal function using the dot operator or the object’s name:
greetUser();
You will get the following output in the terminal:
As you can see, siteBot object printed the greetings on the terminal.
Now, try to call this greetUser() method like you would call a normal function using the dot operator or the object’s name:
greetUser();
You will get the following output in the terminal:
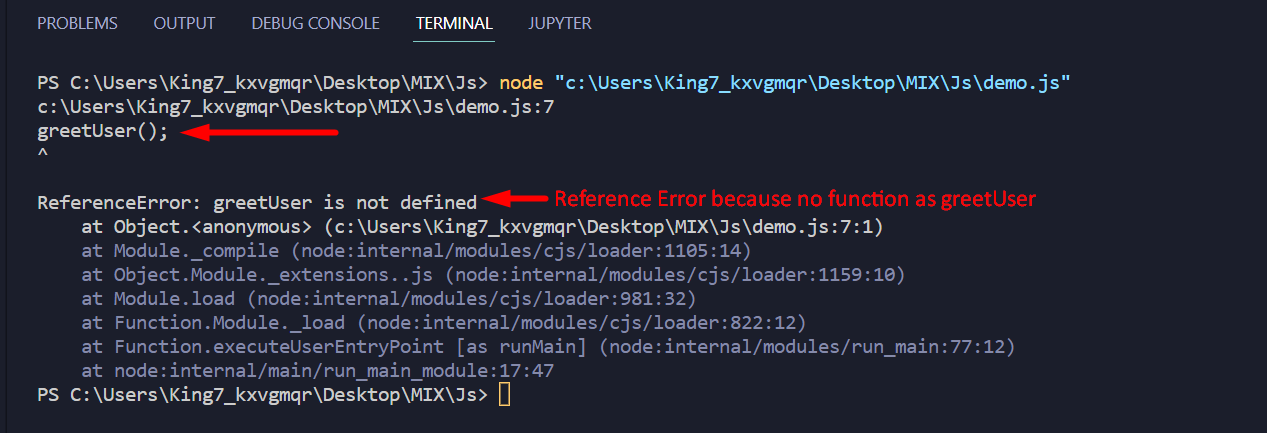 From this output, it is clear that you cannot call methods like you would call a normal function.
 Elements in a tensor are reversed.
 Elements in a tensor are reversed.
 Rows in a tensor are reversed.
 Columns in a tensor are reversed.
 Here, the axis parameter is not specified.
So, elements are reversed in a linear fashion.
Here, the axis parameter is not specified.
So, elements are reversed in a linear fashion.
 A string is encoded using the utf-8 format.
Example 2We will encode the string: ‘Linux Hint hold java and other tutorials’ with utf-8 encoding technique.
<html><!-- CDN Link that delivers the Tensorflow.js framework --><script src="https://cdn.jsdelivr.net/npm/@tensorflow/tfjs"></script><body><center><h1>Tensorflow.js - tf.util.encodeString()</h1></center><script>//create a string
let actual_string = 'Linux Hint hold java and other tutorials';//actual tensor
document.write("<b>Actual String: </b>",actual_string);
document.write("<br>");//encode the string
document.write("<b>Encoded String: </b>"+tf.util.encodeString(actual_string,'utf-8'));</script></body></html>
Output
A string is encoded using the utf-8 format.
Example 2We will encode the string: ‘Linux Hint hold java and other tutorials’ with utf-8 encoding technique.
<html><!-- CDN Link that delivers the Tensorflow.js framework --><script src="https://cdn.jsdelivr.net/npm/@tensorflow/tfjs"></script><body><center><h1>Tensorflow.js - tf.util.encodeString()</h1></center><script>//create a string
let actual_string = 'Linux Hint hold java and other tutorials';//actual tensor
document.write("<b>Actual String: </b>",actual_string);
document.write("<br>");//encode the string
document.write("<b>Encoded String: </b>"+tf.util.encodeString(actual_string,'utf-8'));</script></body></html>
Output
 A string is encoded using the utf-8 format.
 The 65 bytes character is A.
Example 2We will decode the bytes, 67 and 68, with the tf.util.decodeString() function.
<html><!-- CDN Link that delivers the Tensorflow.js framework --><script src="https://cdn.jsdelivr.net/npm/@tensorflow/tfjs"></script><body><center><h1>Tensorflow.js - tf.util.decodeString()</h1></center><script>//create a buffer with size 2
let store = new ArrayBuffer(2);// specify the bytes into the buffer store
let value = new Uint8Array(store);//add byte
value[0] = 67;
value[1] = 68;//decode the byte
document.write("Decoded: "+ tf.util.decodeString(value, "ASCII"));</script></body></html>
Output
The 65 bytes character is A.
Example 2We will decode the bytes, 67 and 68, with the tf.util.decodeString() function.
<html><!-- CDN Link that delivers the Tensorflow.js framework --><script src="https://cdn.jsdelivr.net/npm/@tensorflow/tfjs"></script><body><center><h1>Tensorflow.js - tf.util.decodeString()</h1></center><script>//create a buffer with size 2
let store = new ArrayBuffer(2);// specify the bytes into the buffer store
let value = new Uint8Array(store);//add byte
value[0] = 67;
value[1] = 68;//decode the byte
document.write("Decoded: "+ tf.util.decodeString(value, "ASCII"));</script></body></html>
Output
 The 67 bytes character is C, and 68 is converted to D.
 Tensor1 and Tensor2 are stacked one after another.
 Tensor1 and Tensor2 are stacked element by element in both tensors, and returned tensor has stacked elements placed in separate rows.
 In the first output, four tensors are stacked element by element, and in the second output, tensors are stacked at a time.
 Elements in a tensor are duplicated 4 times.
 Elements in a tensor are duplicated 2 times.
If you want to duplicate elements in a two-dimensional tensor, then you have to specify the duplicate values for the row and column.
Elements in a tensor are duplicated 2 times.
If you want to duplicate elements in a two-dimensional tensor, then you have to specify the duplicate values for the row and column.
 We can see that the rows are duplicated two times, and, in each row, each value is duplicated three times.
 Values in Tensor-2 are appended to Tensor-1.
 Values in Tensor-2, Tensor-3, and Tensor-4 are appended to Tensor-1.
 Values in Tensor-2 are appended to Tensor-1.
 The first row values in Tensor-2 are appended to first row values in Tensor-1.
Similarly, second row values in Tensor-2 are appended to second row values in Tensor-1.
The first row values in Tensor-2 are appended to first row values in Tensor-1.
Similarly, second row values in Tensor-2 are appended to second row values in Tensor-1.
 In the first output, three tensors are concatenated.
In the second output, row by row in all the tensors are concatenated.
In the first output, three tensors are concatenated.
In the second output, row by row in all the tensors are concatenated.
 Actual tensor matrix is:
[10 2030 40]
Transposed Matrix is:
[10 3020 40]
Actual tensor matrix is:
[10 2030 40]
Transposed Matrix is:
[10 3020 40]
 Actual tensor matrix is:
[1 23 45 67 8]
Here is the Transposed Matrix:
[1 3 5 72 4 6 8]
Actual tensor matrix is:
[1 23 45 67 8]
Here is the Transposed Matrix:
[1 3 5 72 4 6 8]

 We can see that false is present in a tensor.
So, all are not true.
We can see that false is present in a tensor.
So, all are not true.
 We can see that all the values are true.
So, it returned true.
We can see that all the values are true.
So, it returned true.

 We can see that true is present in a tensor.
So, it returned true.
We can see that true is present in a tensor.
So, it returned true.
 We can see that true is present in a tensor.
So, it returned true.
We can see that true is present in a tensor.
So, it returned true.


 34 is the maximum.

 Hyperbolic Cosine values were returned from the above one- dimensional tensor.
 Hyperbolic Cosine values were returned from the above one- dimensional tensor.
 Hyperbolic Cosine values were returned from the above one- dimensional tensor.
 Hyperbolic Sine values were returned from the above one-dimensional tensor.
 Hyperbolic Sine values were returned from the above one-dimensional tensor.
 Hyperbolic Sine values were returned from the above one-dimensional tensor.

 23 is the minimum.

 90 is the maximum among all the elements and is present in the 4th position.
Index is 3.
So 3 is returned.
Example 2Let’s create a tensor that has 2 dimensions with 4 rows and 2 columns that has integer values and return maximum value indices across columns.
<html><!-- CDN Link that delivers the Tensorflow.js framework --><script src="https://cdn.jsdelivr.net/npm/@tensorflow/tfjs"></script><body><center><h2>Tensorflow.js - tf.argMax() </h2></center><script>
let values = tf.tensor2d([10,13,15,6,67,5,10,2],[4,2]);//actual tensor
document.write("Actual Tensor: ",values);
document.write("<br>");
document.write("<br>");//apply argMax() on the above tensor
document.write("Maximum value Positions across columns:- "+tf.argMax(values,0));</script></body></html>
Output
90 is the maximum among all the elements and is present in the 4th position.
Index is 3.
So 3 is returned.
Example 2Let’s create a tensor that has 2 dimensions with 4 rows and 2 columns that has integer values and return maximum value indices across columns.
<html><!-- CDN Link that delivers the Tensorflow.js framework --><script src="https://cdn.jsdelivr.net/npm/@tensorflow/tfjs"></script><body><center><h2>Tensorflow.js - tf.argMax() </h2></center><script>
let values = tf.tensor2d([10,13,15,6,67,5,10,2],[4,2]);//actual tensor
document.write("Actual Tensor: ",values);
document.write("<br>");
document.write("<br>");//apply argMax() on the above tensor
document.write("Maximum value Positions across columns:- "+tf.argMax(values,0));</script></body></html>
Output
 WorkingTensor Tensor [[10, 13], [15, 6 ], [67, 5 ], [10, 2 ]]
Maximum value among (10,15,67,10) is 67 and (13,6,5,2) is 13.
Index positions 67 and 13 are 2 and 0.
Example 3Let’s create a tensor with 2 dimensions in js with 4 rows and 2 columns with integer values and return maximum value indices across rows.
<html><!-- CDN Link that delivers the Tensorflow.js framework --><script src="https://cdn.jsdelivr.net/npm/@tensorflow/tfjs"></script><body><center><h2>Tensorflow.js - tf.argMax() </h2></center><script>
let values = tf.tensor2d([10,13,15,6,67,5,10,2],[4,2]);//actual tensor
document.write("Actual Tensor: ",values);
document.write("<br>");
document.write("<br>");//apply argMax() on the above tensor
document.write("Maximum value Positions across rows:- "+tf.argMax(values,1));</script></body></html>
Output
WorkingTensor Tensor [[10, 13], [15, 6 ], [67, 5 ], [10, 2 ]]
Maximum value among (10,15,67,10) is 67 and (13,6,5,2) is 13.
Index positions 67 and 13 are 2 and 0.
Example 3Let’s create a tensor with 2 dimensions in js with 4 rows and 2 columns with integer values and return maximum value indices across rows.
<html><!-- CDN Link that delivers the Tensorflow.js framework --><script src="https://cdn.jsdelivr.net/npm/@tensorflow/tfjs"></script><body><center><h2>Tensorflow.js - tf.argMax() </h2></center><script>
let values = tf.tensor2d([10,13,15,6,67,5,10,2],[4,2]);//actual tensor
document.write("Actual Tensor: ",values);
document.write("<br>");
document.write("<br>");//apply argMax() on the above tensor
document.write("Maximum value Positions across rows:- "+tf.argMax(values,1));</script></body></html>
Output
 Working[[10, 13], [15, 6 ], [67, 5 ], [10, 2 ]]
Maximum values among [10,13] is 13, [15, 6] is 15, [67, 5] is 67 and [10, 2 ] is 10.
Index positions of 13 is 1, 15 is 0, 67 is 0 and 10 is 0.
Example 4Let’s create a tensor with 2 dimensions in js with 4 rows and 2 columns with integer values and return the indices of the maximum values.
<html><!-- CDN Link that delivers the Tensorflow.js framework --><script src="https://cdn.jsdelivr.net/npm/@tensorflow/tfjs"></script><body><center><h2>Tensorflow.js - tf.argMax() </h2></center><script>
let values = tf.tensor2d([1,2,3,4,5,6,7,8],[4,2]);//actual tensor
document.write("Actual Tensor: ",values);
document.write("<br>");
document.write("<br>");//apply argMax() on the above tensor
document.write("Maximum value index:- "+tf.argMax(values));</script></body></html>
Output
Working[[10, 13], [15, 6 ], [67, 5 ], [10, 2 ]]
Maximum values among [10,13] is 13, [15, 6] is 15, [67, 5] is 67 and [10, 2 ] is 10.
Index positions of 13 is 1, 15 is 0, 67 is 0 and 10 is 0.
Example 4Let’s create a tensor with 2 dimensions in js with 4 rows and 2 columns with integer values and return the indices of the maximum values.
<html><!-- CDN Link that delivers the Tensorflow.js framework --><script src="https://cdn.jsdelivr.net/npm/@tensorflow/tfjs"></script><body><center><h2>Tensorflow.js - tf.argMax() </h2></center><script>
let values = tf.tensor2d([1,2,3,4,5,6,7,8],[4,2]);//actual tensor
document.write("Actual Tensor: ",values);
document.write("<br>");
document.write("<br>");//apply argMax() on the above tensor
document.write("Maximum value index:- "+tf.argMax(values));</script></body></html>
Output
 WorkingTensor [[1,2], [3,4], [5,6 ], [7,8 ]]
Maximum value in the [1,3,5,7] column is 7, and its index is 3.
Maximum value in the [2,4,6,8] column is 8, and its index is 3.
WorkingTensor [[1,2], [3,4], [5,6 ], [7,8 ]]
Maximum value in the [1,3,5,7] column is 7, and its index is 3.
Maximum value in the [2,4,6,8] column is 8, and its index is 3.
 WorkingTensor-1: Tensor [100, 200, 300, 500]
Tensor-2: Tensor [50, 200, 675, 120]
Element wise comparison:
100>=50 – true
200>=200 – true
300>=675 – false
500>=120 – true
Example 2Create two values using scalar() and apply tf.greaterEqual() to check if the value is greater than or equal to the value present in the second scalar.
<html><!-- CDN Link that delivers the Tensorflow.js framework --><script src="https://cdn.jsdelivr.net/npm/@tensorflow/tfjs"></script><body><script>//scalar1
let value1 = tf.scalar(34);//scalar2
let value2 = tf.scalar(23);
document.write("Scalar-1: ",value1);
document.write("<br>");
document.write("<br>");
document.write("Scalar-2: ",value2);</script><h3>Tensorflow.js - tf.greaterEqual(scalar1,scalar2) </h3><script>//tf.greaterEqual(value1,value2)
document.write(tf.greaterEqual(value1,value2));</script><h3>Tensorflow.js - scalar1.greaterEqual(scalar2) </h3><script>//value1.greaterEqual(value2)
document.write(value1.greaterEqual(value2));</script></body></html>
Output
WorkingTensor-1: Tensor [100, 200, 300, 500]
Tensor-2: Tensor [50, 200, 675, 120]
Element wise comparison:
100>=50 – true
200>=200 – true
300>=675 – false
500>=120 – true
Example 2Create two values using scalar() and apply tf.greaterEqual() to check if the value is greater than or equal to the value present in the second scalar.
<html><!-- CDN Link that delivers the Tensorflow.js framework --><script src="https://cdn.jsdelivr.net/npm/@tensorflow/tfjs"></script><body><script>//scalar1
let value1 = tf.scalar(34);//scalar2
let value2 = tf.scalar(23);
document.write("Scalar-1: ",value1);
document.write("<br>");
document.write("<br>");
document.write("Scalar-2: ",value2);</script><h3>Tensorflow.js - tf.greaterEqual(scalar1,scalar2) </h3><script>//tf.greaterEqual(value1,value2)
document.write(tf.greaterEqual(value1,value2));</script><h3>Tensorflow.js - scalar1.greaterEqual(scalar2) </h3><script>//value1.greaterEqual(value2)
document.write(value1.greaterEqual(value2));</script></body></html>
Output
 34 is greater than 23.
So It returned true.
Example 3Create 2 two-dimensional tensors with 2 rows and 2 columns and apply tf.greaterEqual() to check if the elements in the first tensor are greater than or equal to the elements in the second tensor.
<html><!-- CDN Link that delivers the Tensorflow.js framework --><script src="https://cdn.jsdelivr.net/npm/@tensorflow/tfjs"></script><body><script>//tensor1
let values1 = tf.tensor2d([90,56,78,12],[2,2]);//tensor2
let values2 = tf.tensor2d([10,56,34,45],[2,2]);
document.write("Tensor-1: ",values1);
document.write("<br>");
document.write("<br>");
document.write("Tensor-2: ",values2);</script><h3>Tensorflow.js - tf.greaterEqual(tensor1,tensor2) </h3><script>//tf.greaterEqual(values1,values2)
document.write(tf.greaterEqual(values1,values2));</script><h3>Tensorflow.js - tensor1.greaterEqual(tensor2) </h3><script>//values1.greaterEqual(values2)
document.write(values1.greaterEqual(values2));</script></body></html>
Output
34 is greater than 23.
So It returned true.
Example 3Create 2 two-dimensional tensors with 2 rows and 2 columns and apply tf.greaterEqual() to check if the elements in the first tensor are greater than or equal to the elements in the second tensor.
<html><!-- CDN Link that delivers the Tensorflow.js framework --><script src="https://cdn.jsdelivr.net/npm/@tensorflow/tfjs"></script><body><script>//tensor1
let values1 = tf.tensor2d([90,56,78,12],[2,2]);//tensor2
let values2 = tf.tensor2d([10,56,34,45],[2,2]);
document.write("Tensor-1: ",values1);
document.write("<br>");
document.write("<br>");
document.write("Tensor-2: ",values2);</script><h3>Tensorflow.js - tf.greaterEqual(tensor1,tensor2) </h3><script>//tf.greaterEqual(values1,values2)
document.write(tf.greaterEqual(values1,values2));</script><h3>Tensorflow.js - tensor1.greaterEqual(tensor2) </h3><script>//values1.greaterEqual(values2)
document.write(values1.greaterEqual(values2));</script></body></html>
Output
 WorkingTensor-1: Tensor [[90, 56], [78, 12]]
Tensor-2: Tensor [[10, 56], [34, 45]]
Element wise comparison:
90>=10 – true
56>=56 – true
78>=34 – true
12>=45 – false
WorkingTensor-1: Tensor [[90, 56], [78, 12]]
Tensor-2: Tensor [[10, 56], [34, 45]]
Element wise comparison:
90>=10 – true
56>=56 – true
78>=34 – true
12>=45 – false
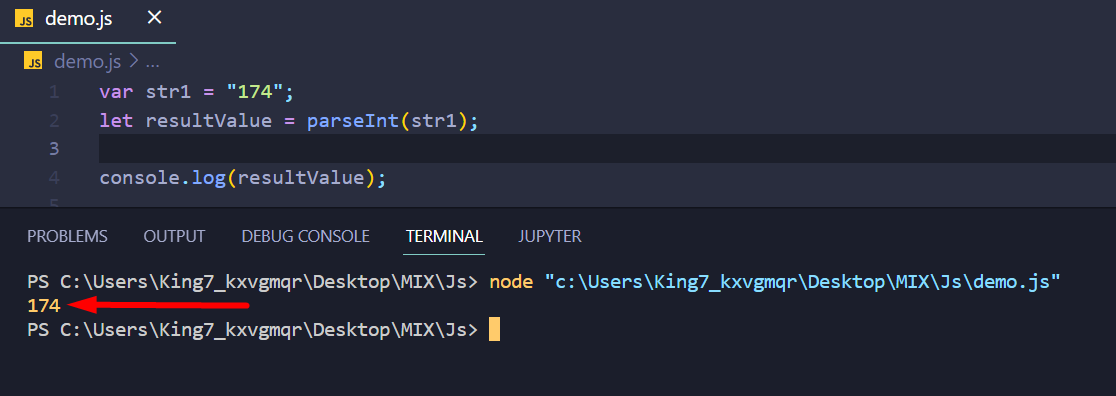 The result on the terminal shows that the parseInt() method fetched the integer value 174 from the given string.
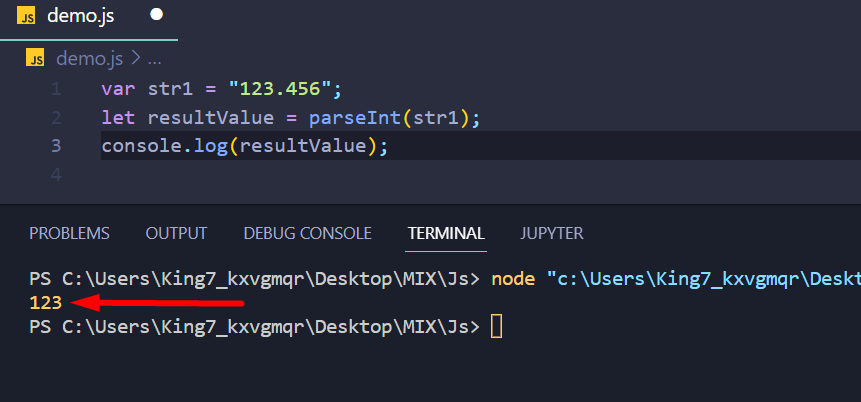 After observing the output, it is clear that only the integer part inside the string value is converted.
At the point where the parseInt() discovers the first non-integer value, it stops.
After observing the output, it is clear that only the integer part inside the string value is converted.
At the point where the parseInt() discovers the first non-integer value, it stops.
 As the output shows, the value 111 in binary is equivalent to 7 in the decimal number system.
 It is clear from the screenshot above, that the parseInt() method ignores the blank spaces on either end of the numeric value.
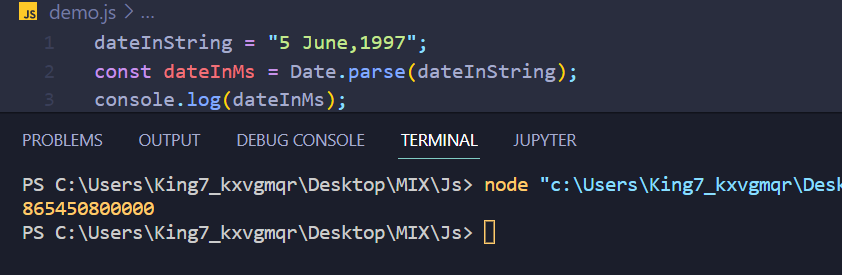 From the screenshot, observe that the output is a numeric value representing time in the form of milliseconds.
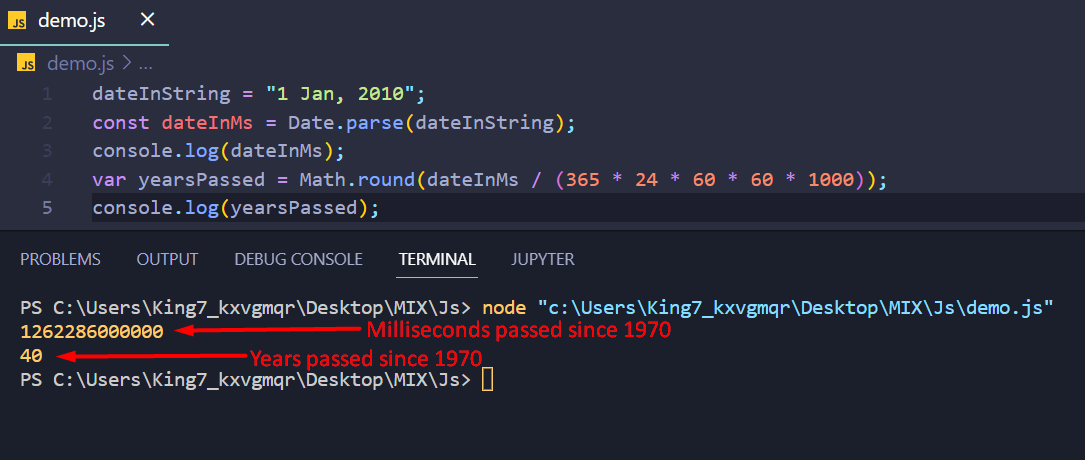 The years passed since 1970 were printed onto the terminal.
 The result was NaN meaning depicting that the string contained an invalid date.
 Hyperbolic Tangent values were returned from the above one-dimensional tensor.
 Hyperbolic Tangent values were returned from the above one-dimensional tensor.
We observed that for null.NaN and undefined, it returned 0.
Hyperbolic Tangent values were returned from the above one-dimensional tensor.
We observed that for null.NaN and undefined, it returned 0.
 Hyperbolic Tangent values were returned from the above one-dimensional tensor.
 Working:
The difference between 30 and 70 is -40.
Working:
The difference between 30 and 70 is -40.
 Working:
[10-1,20-2,30-3,40-4,50-5] => [9, 18, 27, 36, 45].
Working:
[10-1,20-2,30-3,40-4,50-5] => [9, 18, 27, 36, 45].
 Working:
[[1-34,2-10,3-20],[4-30,5-40,6-50]] => [[-33, -8 , -17], [-26, -35, -44]].
Working:
[[1-34,2-10,3-20],[4-30,5-40,6-50]] => [[-33, -8 , -17], [-26, -35, -44]].
 Working:
[10-1, 20-1, 30-1, 4-1, 5-1, 6-1] => [9, 19, 29, 3, 4, 5].
Working:
[10-1, 20-1, 30-1, 4-1, 5-1, 6-1] => [9, 19, 29, 3, 4, 5].
 Sine values were returned from the above one-dimensional tensor.
 Sine values were returned from the above one-dimensional tensor.
 Sine values were returned from the above one-dimensional tensor.
 Cosine values were returned from the above one-dimensional tensor.
 Cosine values were returned from the above one-dimensional tensor.
We observed that for null.NaN and undefined, it returned 1.
Cosine values were returned from the above one-dimensional tensor.
We observed that for null.NaN and undefined, it returned 1.
 Cosine values were returned from the above one-dimensional tensor.
 Working:
The Sum of 30 and 70 is 100.
Working:
The Sum of 30 and 70 is 100.
 Working:
[1+10,2+20,3+30,4+40,5+50] => [11, 22, 33, 44, 55].
Working:
[1+10,2+20,3+30,4+40,5+50] => [11, 22, 33, 44, 55].
 Working:
[[1+34,2+10,3+20],[4+30,5+40,6+50]] => [[35, 12, 23], [34, 45, 56]].
Working:
[[1+34,2+10,3+20],[4+30,5+40,6+50]] => [[35, 12, 23], [34, 45, 56]].
 Working:
[1+10, 2+10, 3+10, 4+10, 5+10, 6+10] => [11, 12, 13, 14, 15, 16].
Working:
[1+10, 2+10, 3+10, 4+10, 5+10, 6+10] => [11, 12, 13, 14, 15, 16].
 There are three negative values present in the above tensor.
-45, -12, and -67 are converted to positive but 5 and 95 remain the same.
There are three negative values present in the above tensor.
-45, -12, and -67 are converted to positive but 5 and 95 remain the same.
 There are three negative values present in the above tensor.
-45, -12, and -43 are converted to positive but 34, 56, and 67 remain the same.
There are three negative values present in the above tensor.
-45, -12, and -43 are converted to positive but 34, 56, and 67 remain the same.
 There are three negative values present in the above tensor.
-0.56, -0.45, and -9.4499998 are converted to positive but 4.5599999,4.5599999 and 8.8999996 remain the same.
There are three negative values present in the above tensor.
-0.56, -0.45, and -9.4499998 are converted to positive but 4.5599999,4.5599999 and 8.8999996 remain the same.
 WorkingTensor-1: Tensor [100, 200, 300, 500]
Tensor-2: Tensor [50, 345, 675, 120]
Element-wise comparison:
100<=50 – false
200<=345 – true
300<=675 – true
500<=120 – false
Example 2Create two values using scalar() and apply tf.lessEqual() to check if the value is less than or equal to the value present in the second scalar.
<html><!-- CDN Link that delivers the Tensorflow.js framework --><script src="https://cdn.jsdelivr.net/npm/@tensorflow/tfjs"></script><body><script>//scalar1
let value1 = tf.scalar(34);//scalar2
let value2 = tf.scalar(23);
document.write("Scalar-1: ",value1);
document.write("<br>");
document.write("<br>");
document.write("Scalar-2: ",value2);</script><h3>Tensorflow.js - tf.lessEqual(scalar1,scalar2) </h3><script>//tf.lessEqual(value1,value2)
document.write(tf.lessEqual(value1,value2));</script><h3>Tensorflow.js - scalar1.lessEqual(scalar2) </h3><script>//value1.lessEqual(value2)
document.write(value1.lessEqual(value2));</script></body></html>
Output
WorkingTensor-1: Tensor [100, 200, 300, 500]
Tensor-2: Tensor [50, 345, 675, 120]
Element-wise comparison:
100<=50 – false
200<=345 – true
300<=675 – true
500<=120 – false
Example 2Create two values using scalar() and apply tf.lessEqual() to check if the value is less than or equal to the value present in the second scalar.
<html><!-- CDN Link that delivers the Tensorflow.js framework --><script src="https://cdn.jsdelivr.net/npm/@tensorflow/tfjs"></script><body><script>//scalar1
let value1 = tf.scalar(34);//scalar2
let value2 = tf.scalar(23);
document.write("Scalar-1: ",value1);
document.write("<br>");
document.write("<br>");
document.write("Scalar-2: ",value2);</script><h3>Tensorflow.js - tf.lessEqual(scalar1,scalar2) </h3><script>//tf.lessEqual(value1,value2)
document.write(tf.lessEqual(value1,value2));</script><h3>Tensorflow.js - scalar1.lessEqual(scalar2) </h3><script>//value1.lessEqual(value2)
document.write(value1.lessEqual(value2));</script></body></html>
Output
 34 is not less than or equal to 23.
So It returned false.
Example 3Create 2 two-dimensional tensors with 2 rows and 2 columns and apply tf.lessEqual() to check if the elements in the first tensor are less than or equal to the elements in the second tensor.
<html><!-- CDN Link that delivers the Tensorflow.js framework --><script src="https://cdn.jsdelivr.net/npm/@tensorflow/tfjs"></script><body><script>//tensor1
let values1 = tf.tensor2d([90,56,78,12],[2,2]);//tensor2
let values2 = tf.tensor2d([10,56,34,45],[2,2]);
document.write("Tensor-1: ",values1);
document.write("<br>");
document.write("<br>");
document.write("Tensor-2: ",values2);</script><h3>Tensorflow.js - tf.lessEqual(tensor1,tensor2) </h3><script>//tf.lessEqual(values1,values2)
document.write(tf.lessEqual(values1,values2));</script><h3>Tensorflow.js - tensor1.lessEqual(tensor2) </h3><script>//values1.lessEqual(values2)
document.write(values1.lessEqual(values2));</script></body></html>
Output
34 is not less than or equal to 23.
So It returned false.
Example 3Create 2 two-dimensional tensors with 2 rows and 2 columns and apply tf.lessEqual() to check if the elements in the first tensor are less than or equal to the elements in the second tensor.
<html><!-- CDN Link that delivers the Tensorflow.js framework --><script src="https://cdn.jsdelivr.net/npm/@tensorflow/tfjs"></script><body><script>//tensor1
let values1 = tf.tensor2d([90,56,78,12],[2,2]);//tensor2
let values2 = tf.tensor2d([10,56,34,45],[2,2]);
document.write("Tensor-1: ",values1);
document.write("<br>");
document.write("<br>");
document.write("Tensor-2: ",values2);</script><h3>Tensorflow.js - tf.lessEqual(tensor1,tensor2) </h3><script>//tf.lessEqual(values1,values2)
document.write(tf.lessEqual(values1,values2));</script><h3>Tensorflow.js - tensor1.lessEqual(tensor2) </h3><script>//values1.lessEqual(values2)
document.write(values1.lessEqual(values2));</script></body></html>
Output
 WorkingTensor-1: Tensor [[90, 56], [78, 12]]
Tensor-2: Tensor [[10, 56], [34, 45]]
Element-wise comparison:
90<=10 – false
56<=56 – true
78<=34 – false
12<=45 – true
WorkingTensor-1: Tensor [[90, 56], [78, 12]]
Tensor-2: Tensor [[10, 56], [34, 45]]
Element-wise comparison:
90<=10 – false
56<=56 – true
78<=34 – false
12<=45 – true
 WorkingTensor-1: Tensor [34, 12, 34, 11, 10, 34]
Tensor-2: Tensor [34, 12, 2, 3, 10, 23]
Element wise comparison:
34!=34 – false
12!=12 – false
34!=2 – true
11!=3 – true
10!=10 – false
34!=23 – true
Example 2Create two values using scalar() and apply tf.notEqual() to check if the values are the same or not.
<html><!-- CDN Link that delivers the Tensorflow.js framework --><script src="https://cdn.jsdelivr.net/npm/@tensorflow/tfjs"></script><body><script>//scalar1
let value1 = tf.scalar(34);//scalar2
let value2 = tf.scalar(23);
document.write("Scalar-1: ",value1);
document.write("<br>");
document.write("<br>");
document.write("Scalar-2: ",value2);</script><h3>Tensorflow.js - tf.notEqual(scalar1,scalar2) </h3><script>//tf.notEqual(value1,value2)
document.write(tf.notEqual(value1,value2));</script><h3>Tensorflow.js - scalar1.notEqual(scalar2) </h3><script>//value1.notEqual(value2)
document.write(value1.notEqual(value2));</script></body></html>
Output
WorkingTensor-1: Tensor [34, 12, 34, 11, 10, 34]
Tensor-2: Tensor [34, 12, 2, 3, 10, 23]
Element wise comparison:
34!=34 – false
12!=12 – false
34!=2 – true
11!=3 – true
10!=10 – false
34!=23 – true
Example 2Create two values using scalar() and apply tf.notEqual() to check if the values are the same or not.
<html><!-- CDN Link that delivers the Tensorflow.js framework --><script src="https://cdn.jsdelivr.net/npm/@tensorflow/tfjs"></script><body><script>//scalar1
let value1 = tf.scalar(34);//scalar2
let value2 = tf.scalar(23);
document.write("Scalar-1: ",value1);
document.write("<br>");
document.write("<br>");
document.write("Scalar-2: ",value2);</script><h3>Tensorflow.js - tf.notEqual(scalar1,scalar2) </h3><script>//tf.notEqual(value1,value2)
document.write(tf.notEqual(value1,value2));</script><h3>Tensorflow.js - scalar1.notEqual(scalar2) </h3><script>//value1.notEqual(value2)
document.write(value1.notEqual(value2));</script></body></html>
Output
 34 is not equal to 23.
So It returned true.
Example 3Create 2 two-dimensional tensors with 2 rows and 2 columns and apply tf.notEqual() to check if the elements are the same or not.
<html><!-- CDN Link that delivers the Tensorflow.js framework --><script src="https://cdn.jsdelivr.net/npm/@tensorflow/tfjs"></script><body><script>//tensor1
let values1 = tf.tensor2d([90,56,78,12],[2,2]);//tensor2
let values2 = tf.tensor2d([90,56,34,45],[2,2]);
document.write("Tensor-1: ",values1);
document.write("<br>");
document.write("<br>");
document.write("Tensor-2: ",values2);</script><h3>Tensorflow.js - tf.notEqual(tensor1,tensor2) </h3><script>//tf.notEqual(values1,values2)
document.write(tf.notEqual(values1,values2));</script><h3>Tensorflow.js - tensor1.notEqual(tensor2) </h3><script>//values1.notEqual(values2)
document.write(values1.notEqual(values2));</script></body></html>
Output
34 is not equal to 23.
So It returned true.
Example 3Create 2 two-dimensional tensors with 2 rows and 2 columns and apply tf.notEqual() to check if the elements are the same or not.
<html><!-- CDN Link that delivers the Tensorflow.js framework --><script src="https://cdn.jsdelivr.net/npm/@tensorflow/tfjs"></script><body><script>//tensor1
let values1 = tf.tensor2d([90,56,78,12],[2,2]);//tensor2
let values2 = tf.tensor2d([90,56,34,45],[2,2]);
document.write("Tensor-1: ",values1);
document.write("<br>");
document.write("<br>");
document.write("Tensor-2: ",values2);</script><h3>Tensorflow.js - tf.notEqual(tensor1,tensor2) </h3><script>//tf.notEqual(values1,values2)
document.write(tf.notEqual(values1,values2));</script><h3>Tensorflow.js - tensor1.notEqual(tensor2) </h3><script>//values1.notEqual(values2)
document.write(values1.notEqual(values2));</script></body></html>
Output
 Working
Tensor-1: Tensor [[90, 56], [78, 12]]
Tensor-2: Tensor [[90, 56], [34, 45]]
Element wise comparison:
90!=90 – false
56!=56 – false
78!=34 – true
12!=45 – true
Working
Tensor-1: Tensor [[90, 56], [78, 12]]
Tensor-2: Tensor [[90, 56], [34, 45]]
Element wise comparison:
90!=90 – false
56!=56 – false
78!=34 – true
12!=45 – true
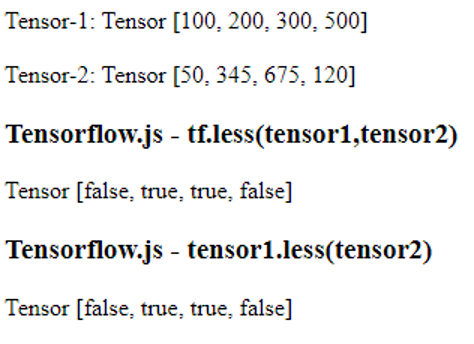 WorkingTensor-1: Tensor [100, 200, 300, 500]
Tensor-2: Tensor [50, 345, 675, 120]
Element-wise comparison:
100<50 – false
200<345 – true
300<675 – true
500<120 – false
Example 2Create two values using scalar() and apply tf.less() to check if the value is less than the value present in the second scalar.
<html><!-- CDN Link that delivers the Tensorflow.js framework --><script src="https://cdn.jsdelivr.net/npm/@tensorflow/tfjs"></script><body><script>//scalar1
let value1 = tf.scalar(34);//scalar2
let value2 = tf.scalar(23);
document.write("Scalar-1: ",value1);
document.write("<br>");
document.write("<br>");
document.write("Scalar-2: ",value2);</script><h3>Tensorflow.js - tf.less(scalar1,scalar2) </h3><script>//tf.less(value1,value2)
document.write(tf.less(value1,value2));</script><h3>Tensorflow.js - scalar1.less(scalar2) </h3><script>//value1.less(value2)
document.write(value1.less(value2));</script></body></html>
Output
WorkingTensor-1: Tensor [100, 200, 300, 500]
Tensor-2: Tensor [50, 345, 675, 120]
Element-wise comparison:
100<50 – false
200<345 – true
300<675 – true
500<120 – false
Example 2Create two values using scalar() and apply tf.less() to check if the value is less than the value present in the second scalar.
<html><!-- CDN Link that delivers the Tensorflow.js framework --><script src="https://cdn.jsdelivr.net/npm/@tensorflow/tfjs"></script><body><script>//scalar1
let value1 = tf.scalar(34);//scalar2
let value2 = tf.scalar(23);
document.write("Scalar-1: ",value1);
document.write("<br>");
document.write("<br>");
document.write("Scalar-2: ",value2);</script><h3>Tensorflow.js - tf.less(scalar1,scalar2) </h3><script>//tf.less(value1,value2)
document.write(tf.less(value1,value2));</script><h3>Tensorflow.js - scalar1.less(scalar2) </h3><script>//value1.less(value2)
document.write(value1.less(value2));</script></body></html>
Output
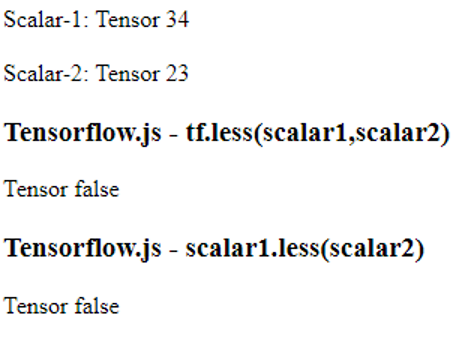 34 is not less than 23.
So It returned false.
Example 3Create 2 two-dimensional tensors with 2 rows and 2 columns and apply tf.less() to check if the elements in the first tensor are less than the elements in the second tensor.
<html><!-- CDN Link that delivers the Tensorflow.js framework --><script src="https://cdn.jsdelivr.net/npm/@tensorflow/tfjs"></script><body><script>//tensor1
let values1 = tf.tensor2d([90,56,78,12],[2,2]);//tensor2
let values2 = tf.tensor2d([10,56,34,45],[2,2]);
document.write("Tensor-1: ",values1);
document.write("<br>");
document.write("<br>");
document.write("Tensor-2: ",values2);</script><h3>Tensorflow.js - tf.less(tensor1,tensor2) </h3><script>//tf.less(values1,values2)
document.write(tf.less(values1,values2));</script><h3>Tensorflow.js - tensor1.less(tensor2) </h3><script>//values1.less(values2)
document.write(values1.less(values2));</script></body></html>
Output
34 is not less than 23.
So It returned false.
Example 3Create 2 two-dimensional tensors with 2 rows and 2 columns and apply tf.less() to check if the elements in the first tensor are less than the elements in the second tensor.
<html><!-- CDN Link that delivers the Tensorflow.js framework --><script src="https://cdn.jsdelivr.net/npm/@tensorflow/tfjs"></script><body><script>//tensor1
let values1 = tf.tensor2d([90,56,78,12],[2,2]);//tensor2
let values2 = tf.tensor2d([10,56,34,45],[2,2]);
document.write("Tensor-1: ",values1);
document.write("<br>");
document.write("<br>");
document.write("Tensor-2: ",values2);</script><h3>Tensorflow.js - tf.less(tensor1,tensor2) </h3><script>//tf.less(values1,values2)
document.write(tf.less(values1,values2));</script><h3>Tensorflow.js - tensor1.less(tensor2) </h3><script>//values1.less(values2)
document.write(values1.less(values2));</script></body></html>
Output
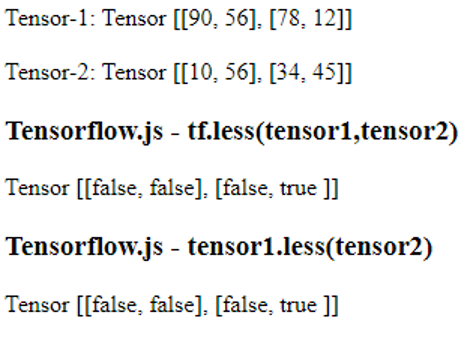 WorkingTensor-1: Tensor [[90, 56], [78, 12]]
Tensor-2: Tensor [[10, 56], [34, 45]]
Element-wise comparison:
90<10 – false
56<56 – false
78<34 – false
12<45 – true
WorkingTensor-1: Tensor [[90, 56], [78, 12]]
Tensor-2: Tensor [[10, 56], [34, 45]]
Element-wise comparison:
90<10 – false
56<56 – false
78<34 – false
12<45 – true
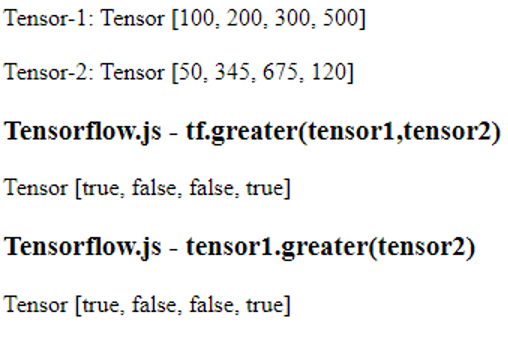 WorkingTensor-1: Tensor [100, 200, 300, 500]
Tensor-2: Tensor [50, 345, 675, 120]
Element-wise comparison:
100>50 – true
200>345 – false
300>675 – false
500>120 – true
Example 2Create two values using scalar() and apply tf.greater() to check if the value is greater than the value present in the second scalar.
<html><!-- CDN Link that delivers the Tensorflow.js framework --><script src="https://cdn.jsdelivr.net/npm/@tensorflow/tfjs"></script><body><script>//scalar1
let value1 = tf.scalar(34);//scalar2
let value2 = tf.scalar(23);
document.write("Scalar-1: ",value1);
document.write("<br>");
document.write("<br>");
document.write("Scalar-2: ",value2);</script><h3>Tensorflow.js - tf.greater(scalar1,scalar2) </h3><script>//tf.greater(value1,value2)
document.write(tf.greater(value1,value2));</script><h3>Tensorflow.js - scalar1.greater(scalar2) </h3><script>//value1.greater(value2)
document.write(value1.greater(value2));</script></body></html>
Output
WorkingTensor-1: Tensor [100, 200, 300, 500]
Tensor-2: Tensor [50, 345, 675, 120]
Element-wise comparison:
100>50 – true
200>345 – false
300>675 – false
500>120 – true
Example 2Create two values using scalar() and apply tf.greater() to check if the value is greater than the value present in the second scalar.
<html><!-- CDN Link that delivers the Tensorflow.js framework --><script src="https://cdn.jsdelivr.net/npm/@tensorflow/tfjs"></script><body><script>//scalar1
let value1 = tf.scalar(34);//scalar2
let value2 = tf.scalar(23);
document.write("Scalar-1: ",value1);
document.write("<br>");
document.write("<br>");
document.write("Scalar-2: ",value2);</script><h3>Tensorflow.js - tf.greater(scalar1,scalar2) </h3><script>//tf.greater(value1,value2)
document.write(tf.greater(value1,value2));</script><h3>Tensorflow.js - scalar1.greater(scalar2) </h3><script>//value1.greater(value2)
document.write(value1.greater(value2));</script></body></html>
Output
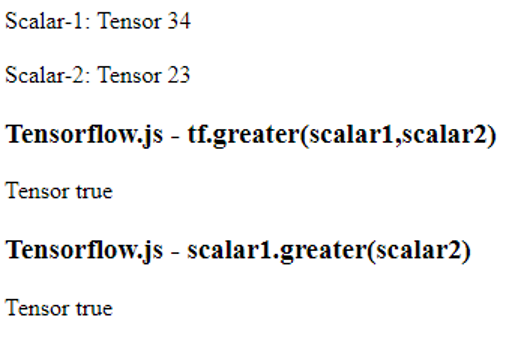 34 is greater than 23.
So It returned true.
Example 3Create 2 two-dimensional tensors with 2 rows and 2 columns and apply tf.greater() to check if the elements in the first tensor are greater than the elements in the second tensor.
<html><!-- CDN Link that delivers the Tensorflow.js framework --><script src="https://cdn.jsdelivr.net/npm/@tensorflow/tfjs"></script><body><script>//tensor1
let values1 = tf.tensor2d([90,56,78,12],[2,2]);//tensor2
let values2 = tf.tensor2d([10,56,34,45],[2,2]);
document.write("Tensor-1: ",values1);
document.write("<br>");
document.write("<br>");
document.write("Tensor-2: ",values2);</script><h3>Tensorflow.js - tf.greater(tensor1,tensor2) </h3><script>//tf.greater(values1,values2)
document.write(tf.greater(values1,values2));</script><h3>Tensorflow.js - tensor1.greater(tensor2) </h3><script>//values1.greater(values2)
document.write(values1.greater(values2));</script></body></html>
Output
34 is greater than 23.
So It returned true.
Example 3Create 2 two-dimensional tensors with 2 rows and 2 columns and apply tf.greater() to check if the elements in the first tensor are greater than the elements in the second tensor.
<html><!-- CDN Link that delivers the Tensorflow.js framework --><script src="https://cdn.jsdelivr.net/npm/@tensorflow/tfjs"></script><body><script>//tensor1
let values1 = tf.tensor2d([90,56,78,12],[2,2]);//tensor2
let values2 = tf.tensor2d([10,56,34,45],[2,2]);
document.write("Tensor-1: ",values1);
document.write("<br>");
document.write("<br>");
document.write("Tensor-2: ",values2);</script><h3>Tensorflow.js - tf.greater(tensor1,tensor2) </h3><script>//tf.greater(values1,values2)
document.write(tf.greater(values1,values2));</script><h3>Tensorflow.js - tensor1.greater(tensor2) </h3><script>//values1.greater(values2)
document.write(values1.greater(values2));</script></body></html>
Output
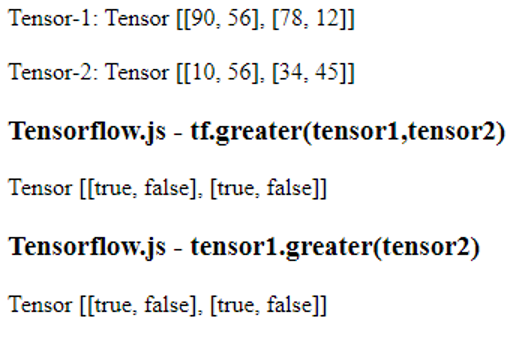 WorkingTensor-1: Tensor [[90, 56], [78, 12]]
Tensor-2: Tensor [[10, 56], [34, 45]]
Element-wise comparison:
90>10 – true
56>56 – false
78>34 – true
12>45 – false
WorkingTensor-1: Tensor [[90, 56], [78, 12]]
Tensor-2: Tensor [[10, 56], [34, 45]]
Element-wise comparison:
90>10 – true
56>56 – false
78>34 – true
12>45 – false
 Working30/70 = 0.4285714030265808.
 Working[10/1,20/2,30/3,40/4,50/5] => Tensor [10, 10, 10, 10, 10].
Example 2Create 2 two-dimensional tensors with 2 rows and 3 columns and apply tf.div().
<html><!-- CDN Link that delivers the Tensorflow.js framework --><script src="https://cdn.jsdelivr.net/npm/@tensorflow/tfjs"></script><body><script>//tensor1
let values1 = tf.tensor2d([1,2,3,4,5,6],[2,3]);//tensor2
let values2 = tf.tensor2d([34,10,20,30,40,50],[2,3]);
document.write("Tensor-1: ",values1);
document.write("<br>");
document.write("<br>");
document.write("Tensor-2: ",values2);</script><h3>Tensorflow.js - tf.div() </h3><script>//tf.div(values1,values2)
document.write(tf.div(values1,values2));</script></body></html>
Output
Working[10/1,20/2,30/3,40/4,50/5] => Tensor [10, 10, 10, 10, 10].
Example 2Create 2 two-dimensional tensors with 2 rows and 3 columns and apply tf.div().
<html><!-- CDN Link that delivers the Tensorflow.js framework --><script src="https://cdn.jsdelivr.net/npm/@tensorflow/tfjs"></script><body><script>//tensor1
let values1 = tf.tensor2d([1,2,3,4,5,6],[2,3]);//tensor2
let values2 = tf.tensor2d([34,10,20,30,40,50],[2,3]);
document.write("Tensor-1: ",values1);
document.write("<br>");
document.write("<br>");
document.write("Tensor-2: ",values2);</script><h3>Tensorflow.js - tf.div() </h3><script>//tf.div(values1,values2)
document.write(tf.div(values1,values2));</script></body></html>
Output
 Working[[1/34,2/10,3/20],[4/30,5/40,6/50]] => [[0.0294118, 0.2 , 0.15], [0.1333333, 0.125, 0.12]].
 Working[10/10, 20/10, 30/10, 4/10, 5/10, 6/10] => [1, 2, 3, 0.4, 0.5, 0.6].
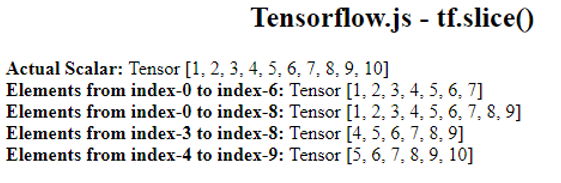 We got the elements from index-0 to index-6.
The total number of elements is 7.
Hence, we specified the size as 7.
Similarly:
We got the elements from index-0 to index-6.
The total number of elements is 7.
Hence, we specified the size as 7.
Similarly:
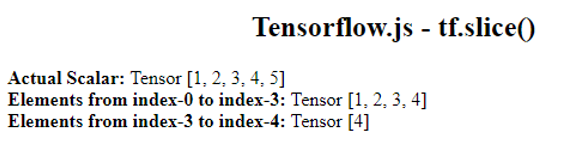
 Row index-2 => [9, 10, 11, 12] and Row index-3 => [13, 14, 15, 16].
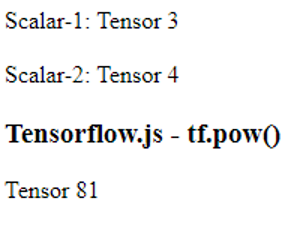 Working
3 to the power of 4 => 3*3*3*3 = 81.
Working
3 to the power of 4 => 3*3*3*3 = 81.
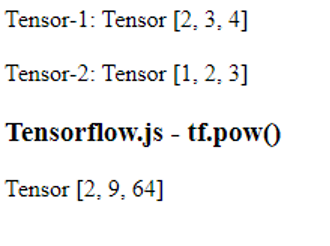 Working
[2 power 1,3 power 2,4 power 3,] => Tensor [2,9,64].
Example 2Create 2 two-dimensional tensors with 2 rows and 3 columns and apply tf.pow().
<html><!-- CDN Link that delivers the Tensorflow.js framework --><script src="https://cdn.jsdelivr.net/npm/@tensorflow/tfjs"></script><body><script>//tensor1
let values1 = tf.tensor2d([1,2,3,4,5,6],[2,3]);//tensor2
let values2 = tf.tensor2d([2,2,2,2,2,2],[2,3]);
document.write("Tensor-1: ",values1);
document.write("<br>");
document.write("<br>");
document.write("Tensor-2: ",values2);</script><h3>Tensorflow.js - tf.pow() </h3><script>//tf.pow(values1,values2)
document.write(tf.pow(values1,values2));</script></body></html>
Output
Working
[2 power 1,3 power 2,4 power 3,] => Tensor [2,9,64].
Example 2Create 2 two-dimensional tensors with 2 rows and 3 columns and apply tf.pow().
<html><!-- CDN Link that delivers the Tensorflow.js framework --><script src="https://cdn.jsdelivr.net/npm/@tensorflow/tfjs"></script><body><script>//tensor1
let values1 = tf.tensor2d([1,2,3,4,5,6],[2,3]);//tensor2
let values2 = tf.tensor2d([2,2,2,2,2,2],[2,3]);
document.write("Tensor-1: ",values1);
document.write("<br>");
document.write("<br>");
document.write("Tensor-2: ",values2);</script><h3>Tensorflow.js - tf.pow() </h3><script>//tf.pow(values1,values2)
document.write(tf.pow(values1,values2));</script></body></html>
Output
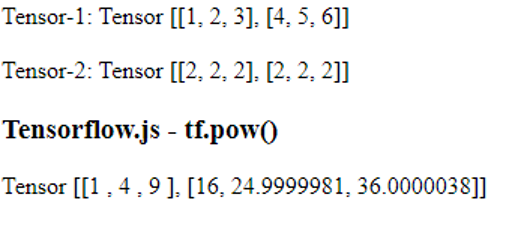
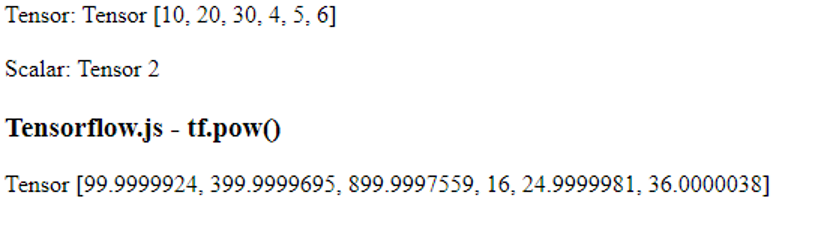
 2 is added 10 times to a tensor.
 ‘Linux Hint’ is added 4 times to a tensor with string data type.
 The value, 20, is added in tensor with shape 2 rows and 3 columns.
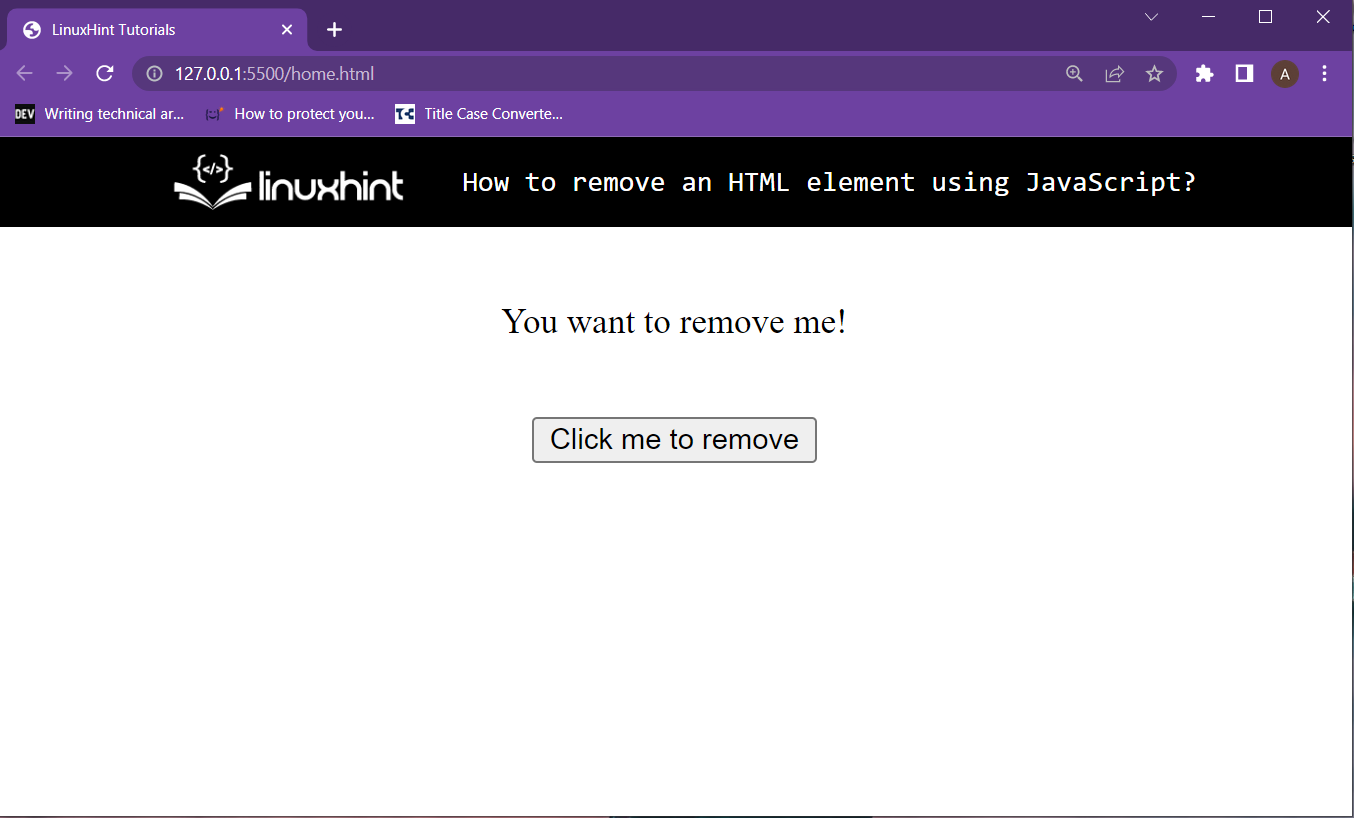 To add functionality on the button click, head over to the script file and create the buttonClicked() function with the following lines of code:
function buttonClicked() {
// Upcoming lines are to be placed over inside here}
Inside this function, the very first step is to get a reference to the paragraph to be removed by using the getElementById() method like
var elem = document.getElementById("myText");
The reference has been stored inside the elem variable.
Use the remove() method on this elem variable with the help of the dot operator
elem.remove();
The whole script code snippet is will be like the following:
function buttonClicked() {
var elem = document.getElementById("myText");
elem.remove();}
Execute the web page and click on the button to remove the paragraph tag with the id “myText”:
To add functionality on the button click, head over to the script file and create the buttonClicked() function with the following lines of code:
function buttonClicked() {
// Upcoming lines are to be placed over inside here}
Inside this function, the very first step is to get a reference to the paragraph to be removed by using the getElementById() method like
var elem = document.getElementById("myText");
The reference has been stored inside the elem variable.
Use the remove() method on this elem variable with the help of the dot operator
elem.remove();
The whole script code snippet is will be like the following:
function buttonClicked() {
var elem = document.getElementById("myText");
elem.remove();}
Execute the web page and click on the button to remove the paragraph tag with the id “myText”:
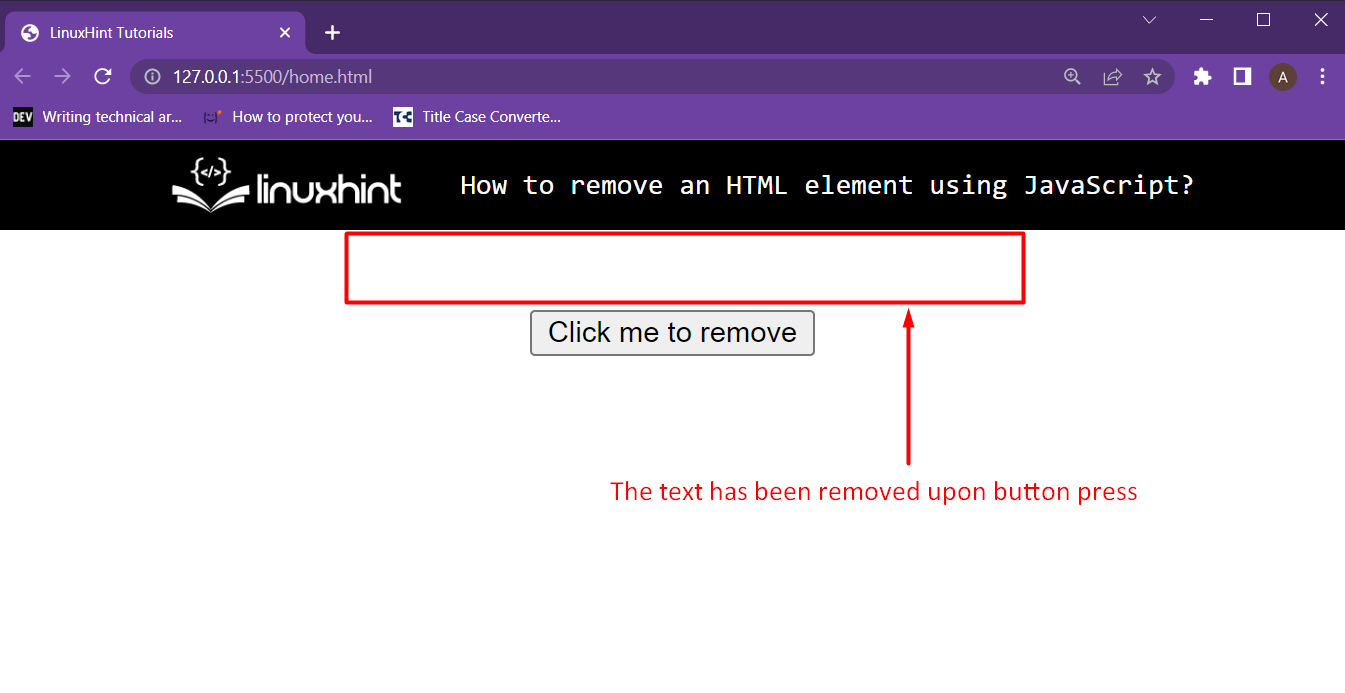 And the element has been removed from the HTML webpage and the DOM as well.
 Working:
34+56+78+90 = 258.
Working:
34+56+78+90 = 258.
 Working:
Tensor [[34, 56], [78, 90], [1 , 0 ], [3 , 4 ]]
=>34+78+1+0 = 11656+90+0+4=150.
Working:
Tensor [[34, 56], [78, 90], [1 , 0 ], [3 , 4 ]]
=>34+78+1+0 = 11656+90+0+4=150.
 Working:
Tensor [[1, 0], [3, 4]]
=>1+0 = 13+4=7.
Working:
Tensor [[1, 0], [3, 4]]
=>1+0 = 13+4=7.
 Working:
Tensor [[34, 56], [78, 90], [1 , 0 ], [3 , 4 ]]
=>34+56+78+90+1+0+3+4=266.
Working:
Tensor [[34, 56], [78, 90], [1 , 0 ], [3 , 4 ]]
=>34+56+78+90+1+0+3+4=266.
 Working:
[1/8.56,1/3.45,1/7.89,1/8.32,1/9.03,1/1.00,1/45.6] => [0.1168224, 0.2898551, 0.1267427, 0.1201923, 0.110742, 1, 0.0219298]
Working:
[1/8.56,1/3.45,1/7.89,1/8.32,1/9.03,1/1.00,1/45.6] => [0.1168224, 0.2898551, 0.1267427, 0.1201923, 0.110742, 1, 0.0219298]
 Working:
[[1/3, 1/4], [1/2, 1/3]], => [[0.3333333, 0.25 ], [0.5 , 0.3333333]]
Working:
[[1/3, 1/4], [1/2, 1/3]], => [[0.3333333, 0.25 ], [0.5 , 0.3333333]]
 Working:
[[1/2.7182817,1/ 1.7182819 ], [1/3.7182817, 1/24.4645367]] => [[0.3678795, 0.5819767], [0.2689414, 0.0408755]]
Working:
[[1/2.7182817,1/ 1.7182819 ], [1/3.7182817, 1/24.4645367]] => [[0.3678795, 0.5819767], [0.2689414, 0.0408755]]
 Working:
 Working:
 34 is the minimum among all the elements.
 Working:
Tensor [[1,2], [3,4], [5,6 ], [7,8 ]]
Minimum values among (1,3,5,7) is 1 and (2,4,6,8) is 2.
Working:
Tensor [[1,2], [3,4], [5,6 ], [7,8 ]]
Minimum values among (1,3,5,7) is 1 and (2,4,6,8) is 2.
 Working:
Tensor [[1, 2], [3, 4], [5, 6], [7, 8]]
Minimum values among [1, 2] is 1, [3, 4] is 3, [5, 6] is 5 and [7, 8] is 7.
Working:
Tensor [[1, 2], [3, 4], [5, 6], [7, 8]]
Minimum values among [1, 2] is 1, [3, 4] is 3, [5, 6] is 5 and [7, 8] is 7.
 Working:
Tensor [[1, 2], [3, 4], [5, 6], [7, 8]]
The minimum value is 1.
Working:
Tensor [[1, 2], [3, 4], [5, 6], [7, 8]]
The minimum value is 1.
 Working:
(34+56+78+90)/4 = 64.5
Working:
(34+56+78+90)/4 = 64.5
 Working:
Tensor [[1,2], [3,4], [5,6 ], [7,8 ]]
=>(1+3+5+7)/4 => 16/4 = 4(2+4+6+8)/4 => 20/4 = 5
Working:
Tensor [[1,2], [3,4], [5,6 ], [7,8 ]]
=>(1+3+5+7)/4 => 16/4 = 4(2+4+6+8)/4 => 20/4 = 5
 Working:
Tensor [[1], [3]]
=>13.
Since there is only one element in each row, it itself returns.
Working:
Tensor [[1], [3]]
=>13.
Since there is only one element in each row, it itself returns.
 Working:
Tensor [[34, 56], [78, 90], [1, 0], [3, 4]]
=>(34+56+78+90+1+0+3+4)/8=33.25.
Working:
Tensor [[34, 56], [78, 90], [1, 0], [3, 4]]
=>(34+56+78+90+1+0+3+4)/8=33.25.
 90 is the maximum among all the elements.
 Working:
Tensor [[1,2], [3,4], [5,6 ], [7,8 ]]
Maximum values among (1,3,5,7) is 7 and (2,4,6,8) is 8.
Working:
Tensor [[1,2], [3,4], [5,6 ], [7,8 ]]
Maximum values among (1,3,5,7) is 7 and (2,4,6,8) is 8.
 Working:
Tensor [[1, 2], [3, 4], [5, 6], [7, 8]]
Maximum values among [1, 2] is 2, [3, 4] is 4, [5, 6] is 6 and [7, 8] is 8.
Working:
Tensor [[1, 2], [3, 4], [5, 6], [7, 8]]
Maximum values among [1, 2] is 2, [3, 4] is 4, [5, 6] is 6 and [7, 8] is 8.
 Working:
Tensor [[1,2], [3,4], [5,6 ], [7,8 ]]
The maximum value is 8.
Working:
Tensor [[1,2], [3,4], [5,6 ], [7,8 ]]
The maximum value is 8.
 Working:
Tensor-1: Tensor [34, 12, 34, 11, 10, 34]
Tensor-2: Tensor [34, 12, 2, 3, 10, 23]
Element-wise comparison:
34==34 - true12==12 - false34==2 - false11==3 - false10==10 - true34==23 - false
Working:
Tensor-1: Tensor [34, 12, 34, 11, 10, 34]
Tensor-2: Tensor [34, 12, 2, 3, 10, 23]
Element-wise comparison:
34==34 - true12==12 - false34==2 - false11==3 - false10==10 - true34==23 - false
 34 is not equal to 23.
So It returned false.
34 is not equal to 23.
So It returned false.
 Working:
Tensor-1: Tensor [[90, 56], [78, 12]]
Tensor-2: Tensor [[90, 56], [34, 45]]
Element-wise comparison:
Working:
Tensor-1: Tensor [[90, 56], [78, 12]]
Tensor-2: Tensor [[90, 56], [34, 45]]
Element-wise comparison:
 Working:
 Working:
Tensor [[1, 2], [3, 4], [5, 6]]
Column values:-
Column 1: [1,1+3,1+3+5]=>[1,4,9]
Column 1: [2,2+4,2+4+6]=>[2,6,12]
Working:
Tensor [[1, 2], [3, 4], [5, 6]]
Column values:-
Column 1: [1,1+3,1+3+5]=>[1,4,9]
Column 1: [2,2+4,2+4+6]=>[2,6,12]
 Working:
Tensor [[1, 2], [3, 4], [5, 6], [7, 8]]
Row values:-
Working:
Tensor [[1, 2], [3, 4], [5, 6], [7, 8]]
Row values:-
 Working:
Tensor [[1, 2], [3, 4], [5, 6], [7, 8]]
Column values:-
Column 1: [1,1+3,1+3+5,1+3+5+7]=>[1,4,9,16]
Column 1: [2,2+4,2+4+6,2+4+6+8]=>[2,6,12,20]
Working:
Tensor [[1, 2], [3, 4], [5, 6], [7, 8]]
Column values:-
Column 1: [1,1+3,1+3+5,1+3+5+7]=>[1,4,9,16]
Column 1: [2,2+4,2+4+6,2+4+6+8]=>[2,6,12,20]
 Working:
 Working:
Tensor [[1, 2], [3, 4], [5, 6]]
Column values:-
Column 1: [1,1*3,1*3*5]=>[1,3,15]
Column 1: [2,2*4,2*4*6]=>[2,8,48]
Working:
Tensor [[1, 2], [3, 4], [5, 6]]
Column values:-
Column 1: [1,1*3,1*3*5]=>[1,3,15]
Column 1: [2,2*4,2*4*6]=>[2,8,48]
 Working:
Tensor [[1, 2], [3, 4], [5, 6], [7, 8]]
Row values:-
Working:
Tensor [[1, 2], [3, 4], [5, 6], [7, 8]]
Row values:-
 Working:
Tensor [[1, 2], [3, 4], [5, 6], [7, 8]]
Column values:-
Column 1: [1,1*3,1*3*5,1*3,1*3*5*7]=>[1,3,15,105]
Column 1: [2,2*4,2*4*6,2*4*6*8]=>[2,8,48,384]
Working:
Tensor [[1, 2], [3, 4], [5, 6], [7, 8]]
Column values:-
Column 1: [1,1*3,1*3*5,1*3,1*3*5*7]=>[1,3,15,105]
Column 1: [2,2*4,2*4*6,2*4*6*8]=>[2,8,48,384]
 34 is the minimum among all the elements, and it is present in the 1st position.
An index is 0.
So 0 is returned.
34 is the minimum among all the elements, and it is present in the 1st position.
An index is 0.
So 0 is returned.
 Working:
Tensor Tensor [[10, 13], [15, 6 ], [67, 5 ], [10, 2 ]]
Minimum value among (10,15,67,10) is 10 and (13,6,5,2) is 2.
Index positions of 10 and 2 are 0 and 3.
Working:
Tensor Tensor [[10, 13], [15, 6 ], [67, 5 ], [10, 2 ]]
Minimum value among (10,15,67,10) is 10 and (13,6,5,2) is 2.
Index positions of 10 and 2 are 0 and 3.
 Working:
[[10, 13], [15, 6 ], [67, 5 ], [10, 2 ]]
Minimum values among [10,13] is 10, [15, 6] is 6, [67, 5] is 5 and [10, 2 ] is 2.
Index positions of the above minimum values are – 0,1,1,1.
Working:
[[10, 13], [15, 6 ], [67, 5 ], [10, 2 ]]
Minimum values among [10,13] is 10, [15, 6] is 6, [67, 5] is 5 and [10, 2 ] is 2.
Index positions of the above minimum values are – 0,1,1,1.
 Working:
Tensor [[1,2], [3,4], [5,6 ], [7,8 ]]
Minimum value in the [1,3,5,7] column is 1, and its index is 0.
Minimum value in the [2,4,6,8] column is 2, and its index is 0.
Working:
Tensor [[1,2], [3,4], [5,6 ], [7,8 ]]
Minimum value in the [1,3,5,7] column is 1, and its index is 0.
Minimum value in the [2,4,6,8] column is 2, and its index is 0.
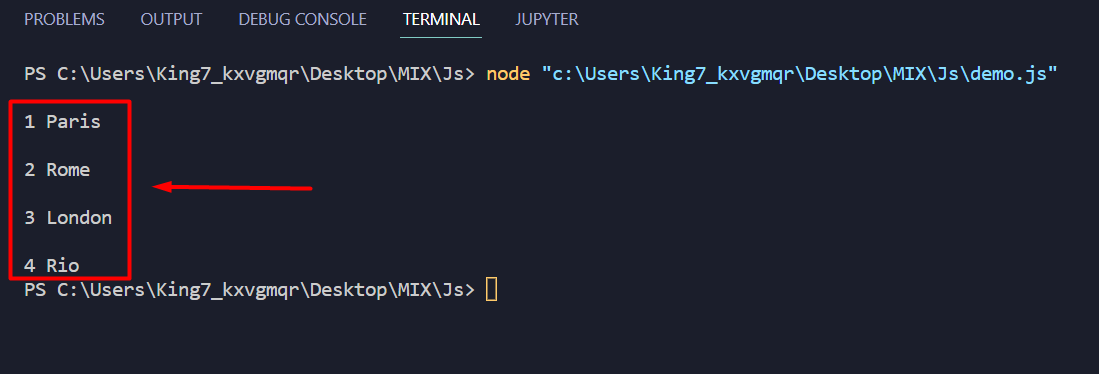 The keys and the respective values were printed onto the terminal.
 It is clear from the output, that the “Paris” value was excluded or filtered out from the output.
 It is crystal clear from the result on the terminal that the forEach() method returns undefined
 [2*2, 3*3, 4*4, 5*5, 6*6] => [4, 9, 16, 25, 36]
Example 2:
We get the square of the number that is stored in a scalar.
<html><!-- CDN Link that delivers the Tensorflow.js framework --><script src="https://cdn.jsdelivr.net/npm/@tensorflow/tfjs"></script>
<body><center><h1>Linux Hint</h1></center><center><h2>Tensorflow.js - tf.square() </h2></center><script>
let value = tf.scalar(20);//actual Scalar
document.write("Actual Scalar: ",value);
document.write("<br>");
document.write("<br>");
//apply square() on the above Scalar
document.write("Square value:- "+tf.square(value));</script>
</body></html>
Output:
[2*2, 3*3, 4*4, 5*5, 6*6] => [4, 9, 16, 25, 36]
Example 2:
We get the square of the number that is stored in a scalar.
<html><!-- CDN Link that delivers the Tensorflow.js framework --><script src="https://cdn.jsdelivr.net/npm/@tensorflow/tfjs"></script>
<body><center><h1>Linux Hint</h1></center><center><h2>Tensorflow.js - tf.square() </h2></center><script>
let value = tf.scalar(20);//actual Scalar
document.write("Actual Scalar: ",value);
document.write("<br>");
document.write("<br>");
//apply square() on the above Scalar
document.write("Square value:- "+tf.square(value));</script>
</body></html>
Output:
 20*20 = 400.
 [√4, √9, √16, √400, √100] => [2, 3, 4, 20, 10]
Example 2:
We get the square root of the number that is stored in a scalar.
<html><!-- CDN Link that delivers the Tensorflow.js framework --><script src="https://cdn.jsdelivr.net/npm/@tensorflow/tfjs"></script>
<body><center><h1>Linux Hint</h1></center><center><h2>Tensorflow.js - tf.sqrt() </h2></center><script>
let value = tf.scalar(400);//actual Scalar
document.write("Actual Scalar: ",value);
document.write("<br>");
document.write("<br>");
//apply sqrt() on the above Scalar
document.write("Squareroot:- "+tf.sqrt(value));</script>
</body></html>
Output:
[√4, √9, √16, √400, √100] => [2, 3, 4, 20, 10]
Example 2:
We get the square root of the number that is stored in a scalar.
<html><!-- CDN Link that delivers the Tensorflow.js framework --><script src="https://cdn.jsdelivr.net/npm/@tensorflow/tfjs"></script>
<body><center><h1>Linux Hint</h1></center><center><h2>Tensorflow.js - tf.sqrt() </h2></center><script>
let value = tf.scalar(400);//actual Scalar
document.write("Actual Scalar: ",value);
document.write("<br>");
document.write("<br>");
//apply sqrt() on the above Scalar
document.write("Squareroot:- "+tf.sqrt(value));</script>
</body></html>
Output:
 √400 =20
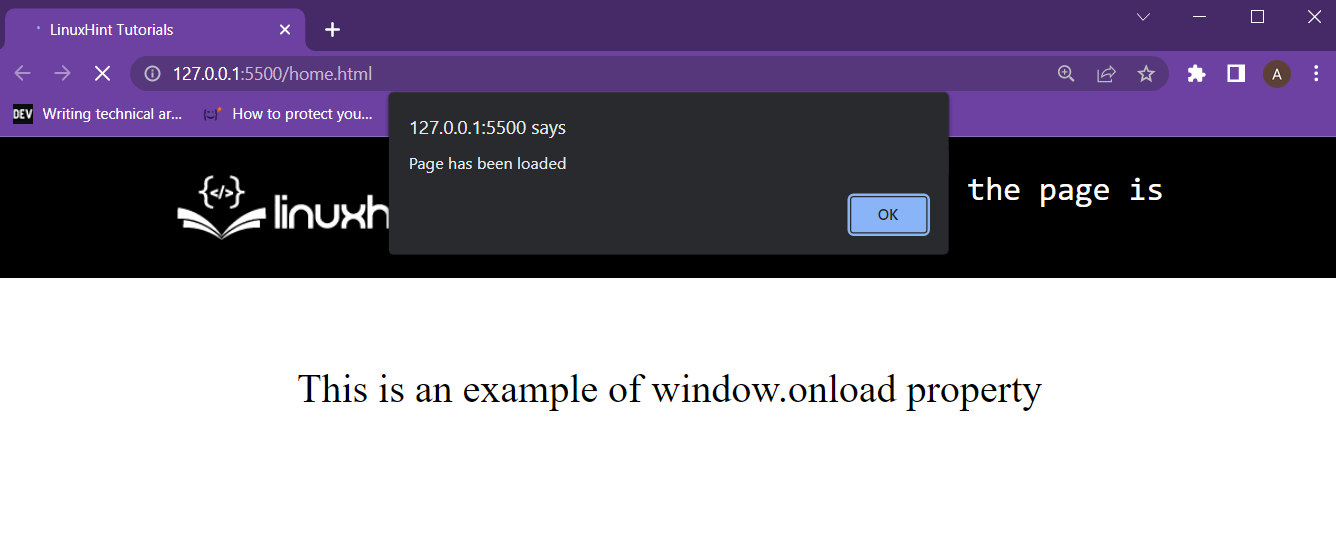 It is clear from the output that the function was executed after the browser fully loaded the webpage’s “window”.
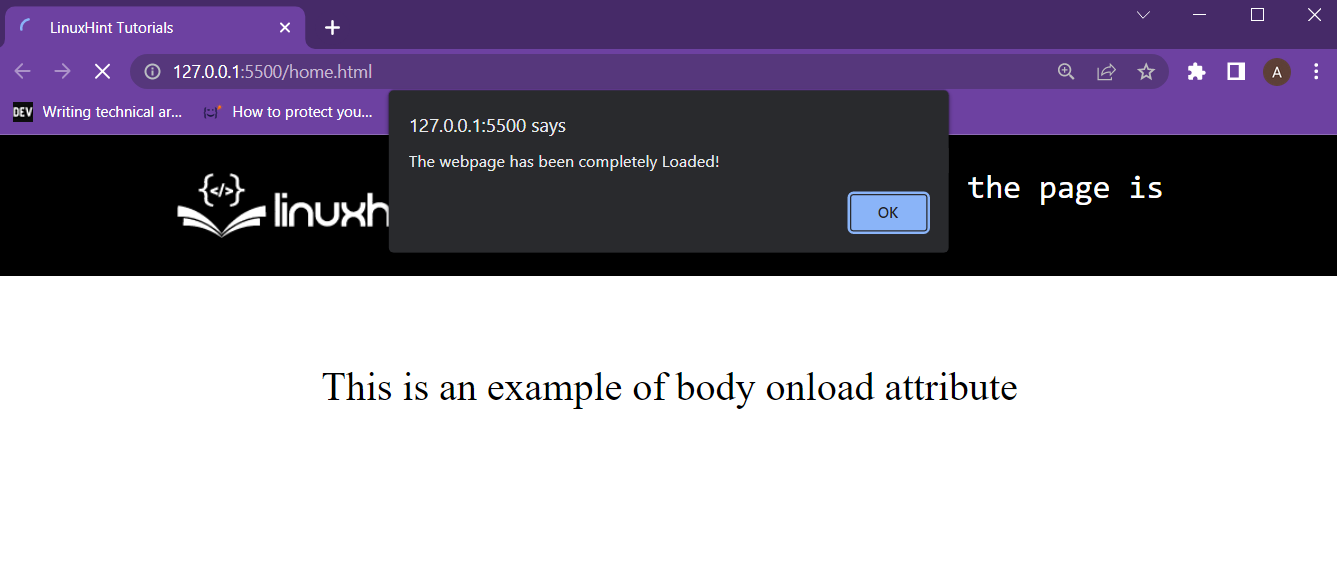 The user is prompted after the body tag, and all the elements inside the body tag have been fully loaded.
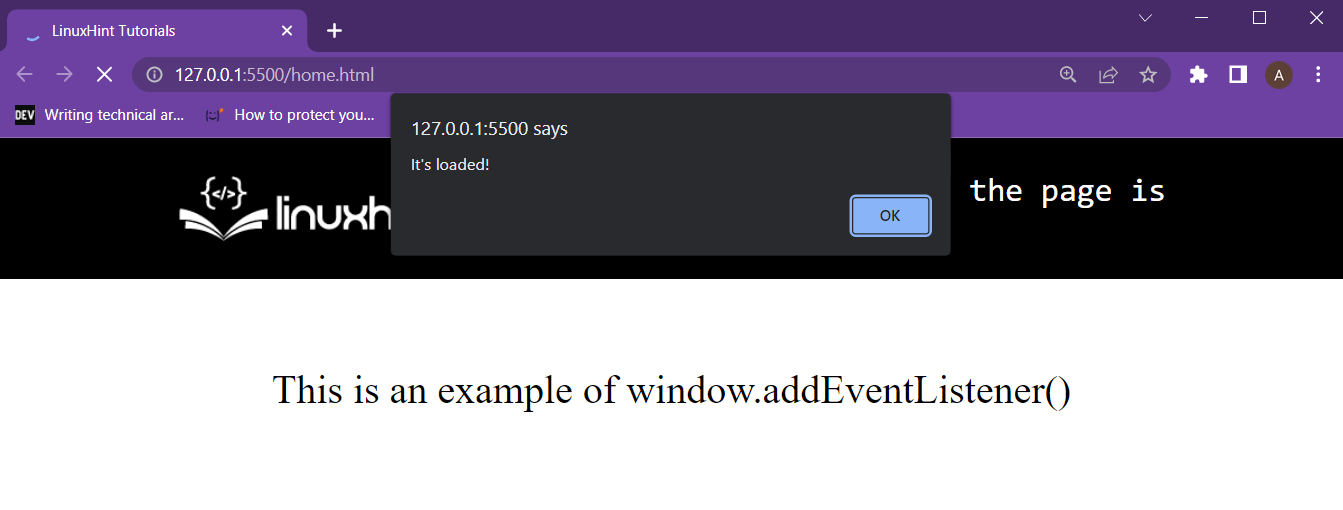 The user is prompted as soon as the window is fully loaded.
However, notice that this alert appears when the “window” is loaded.
This means the user might get the alert before all elements completely load.
The user is prompted as soon as the window is fully loaded.
However, notice that this alert appears when the “window” is loaded.
This means the user might get the alert before all elements completely load.
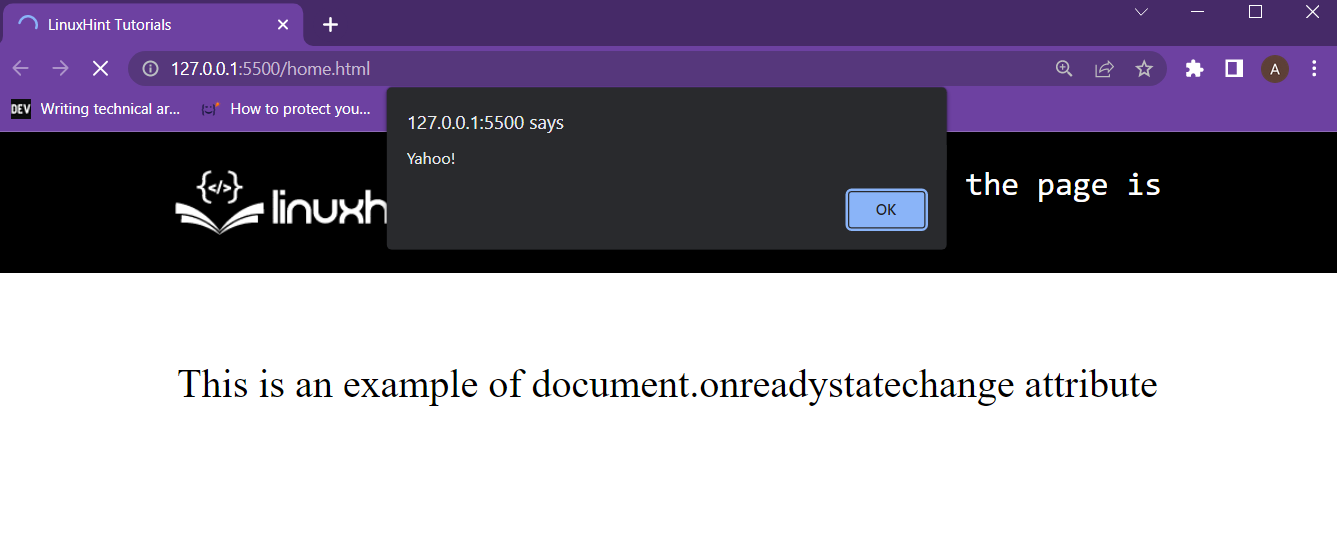 The user was alerted after the document’s ready state was “complete”.
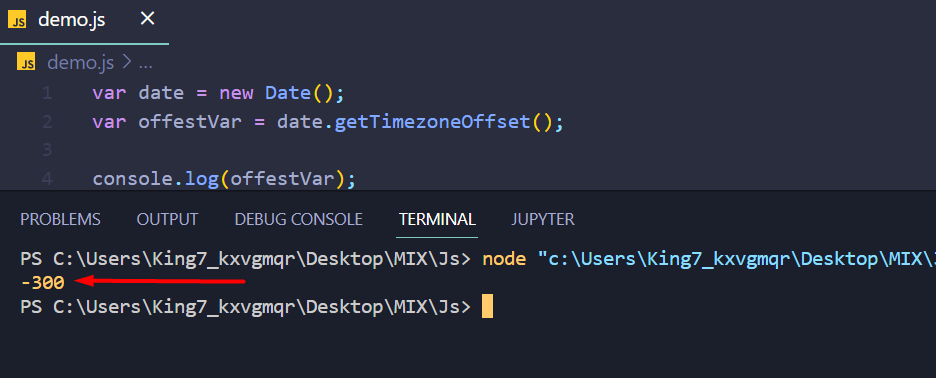 The timezone offset is -300.
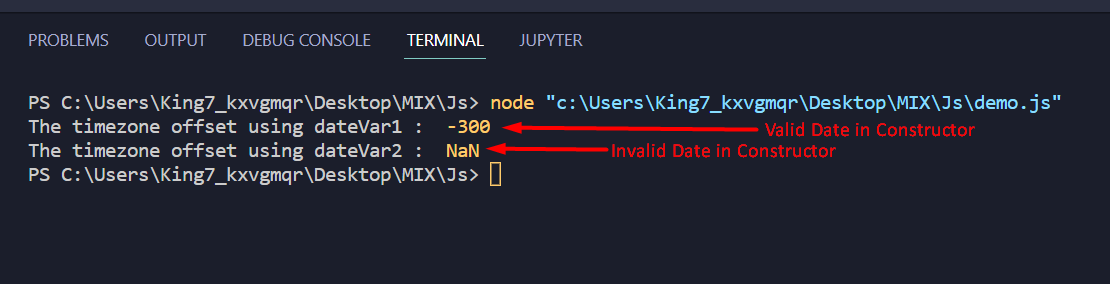 Two things are evident from the output screenshot above:
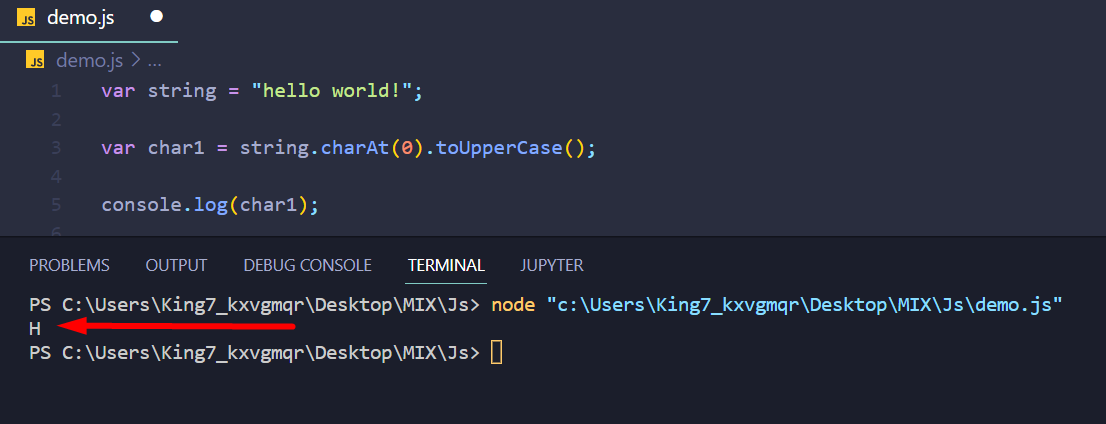 It is clear from the output that the first character has been extracted and capitalized.
But the original string is yet to be restored.
For that, use the slice method with the argument as 1 to slice the string from index 1 to the very end like
var remainingString = string.slice(1);
After that, simply create a new variable and call it as resultString and concatenate char1 and remainingString inside it using the following line:
var resultString = char1 + remainingString;
Pass this variable resultString to the console log function to see the outcome:
console.log(resultString);
Executing the program will produce the following output on the terminal:
It is clear from the output that the first character has been extracted and capitalized.
But the original string is yet to be restored.
For that, use the slice method with the argument as 1 to slice the string from index 1 to the very end like
var remainingString = string.slice(1);
After that, simply create a new variable and call it as resultString and concatenate char1 and remainingString inside it using the following line:
var resultString = char1 + remainingString;
Pass this variable resultString to the console log function to see the outcome:
console.log(resultString);
Executing the program will produce the following output on the terminal:
 The final string has the first letter capitalized.
 The first character of the string has been successfully capitalized.
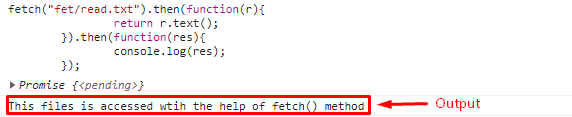 The above output shows that the fetch() method requests a read.txt file and gets a fulfilled promise in return.
After that the then() function uses this promise and gets the server response and uses it inside its body to return the response along with the text() method.
Lastly, the second then() method gets the result and displays the content of the read.txt file.
That is all the information regarding the fetch() method.
You have understood the working and usage of the fetch() method.
The above output shows that the fetch() method requests a read.txt file and gets a fulfilled promise in return.
After that the then() function uses this promise and gets the server response and uses it inside its body to return the response along with the text() method.
Lastly, the second then() method gets the result and displays the content of the read.txt file.
That is all the information regarding the fetch() method.
You have understood the working and usage of the fetch() method.
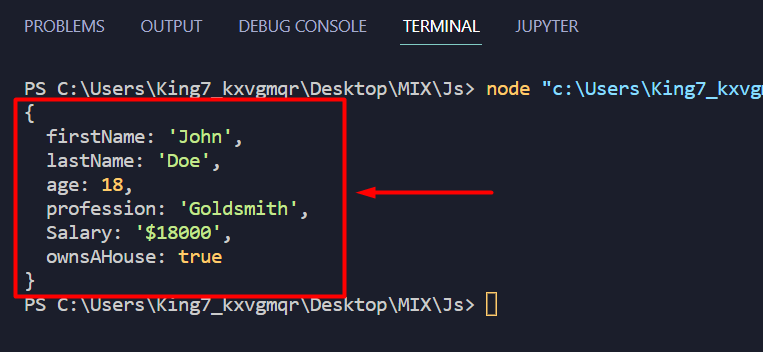 From the output, you can conclude that the JSON.parse() method successfully converted the JSON text into a JavaScript-Object.
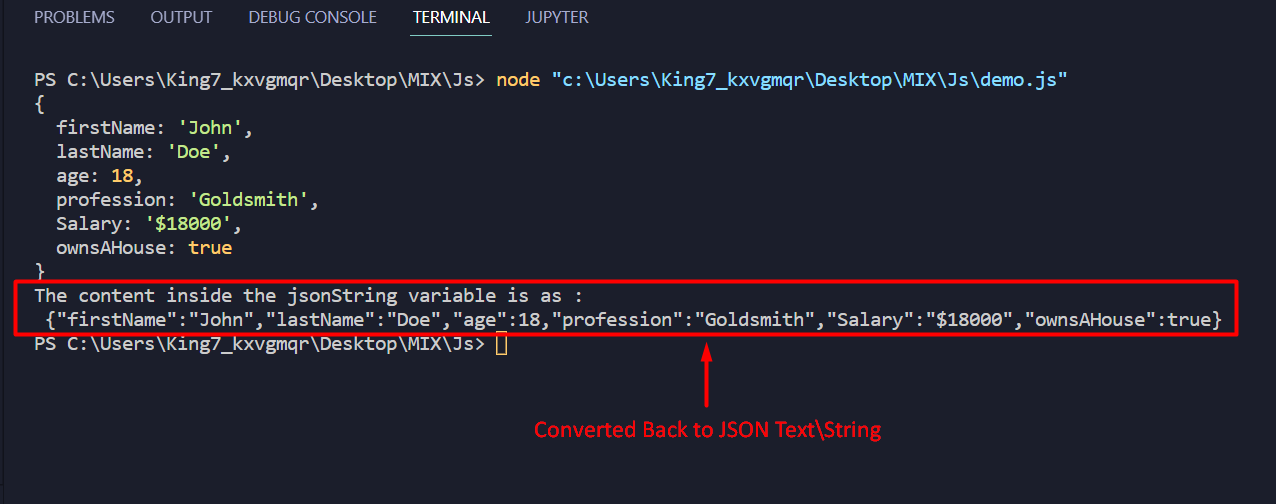 The JavaScript object was successfully converted into a JSON text using the stringify() method
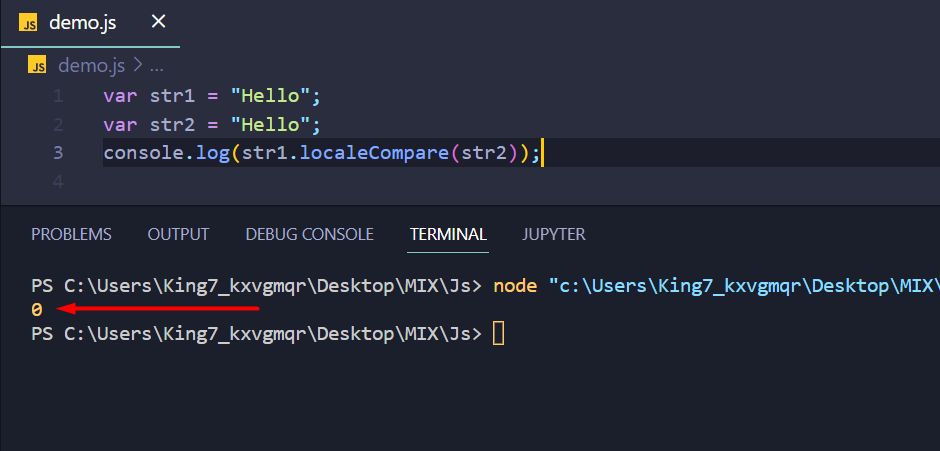 However, the above output isn’t really that user-friendly, therefore, remove the console log function and wrap the localeCompare() statement inside an if-else condition like:
if (str1.localeCompare(str2) == 0) {
console.log("Both the strings are identical");} else {
console.log("Both the strings are different");}
Re-execute the program and the following result shows in the terminal:
However, the above output isn’t really that user-friendly, therefore, remove the console log function and wrap the localeCompare() statement inside an if-else condition like:
if (str1.localeCompare(str2) == 0) {
console.log("Both the strings are identical");} else {
console.log("Both the strings are different");}
Re-execute the program and the following result shows in the terminal:
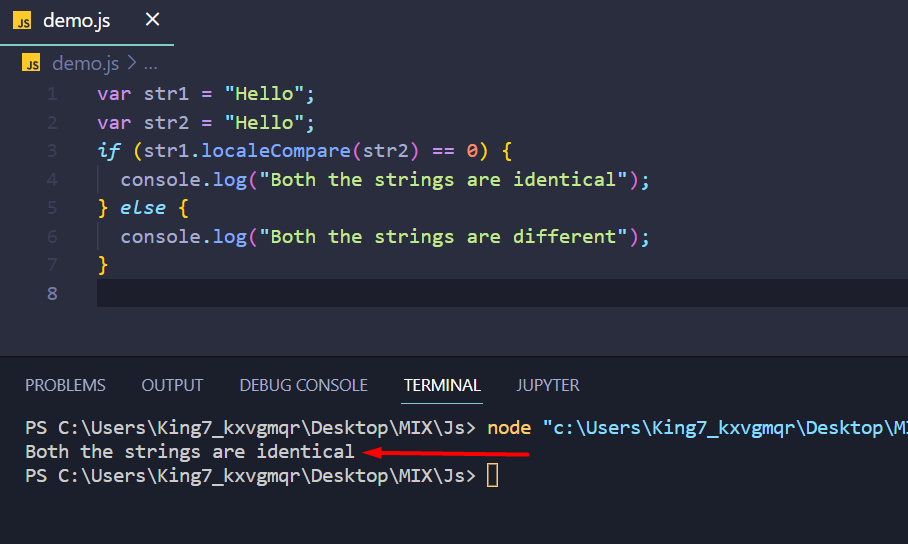 The above-code snippet basically creates an identical-string checker, to verify this, change the values inside the string variables like:
var str1 = "Hello";var str2 = "World";
Re-executing the program will provide the following result:
The above-code snippet basically creates an identical-string checker, to verify this, change the values inside the string variables like:
var str1 = "Hello";var str2 = "World";
Re-executing the program will provide the following result:
 It is clear from the output that the strings are not identical to each other.
 From the output, it is clear that both the strings are different.
But the more interesting part is that the str1 > str2 in numeric equivalence.
To showcase a negative return value from the localeComapre() method, simply switch the reference string and the compare string with each other in the localeCompare() statement like:
console.log(str2.localeCompare(str1));
Executing the program will now yield the following outcome:
From the output, it is clear that both the strings are different.
But the more interesting part is that the str1 > str2 in numeric equivalence.
To showcase a negative return value from the localeComapre() method, simply switch the reference string and the compare string with each other in the localeCompare() statement like:
console.log(str2.localeCompare(str1));
Executing the program will now yield the following outcome:
 The output on the terminal depicts that str2 > str1 in numeric equivalence.
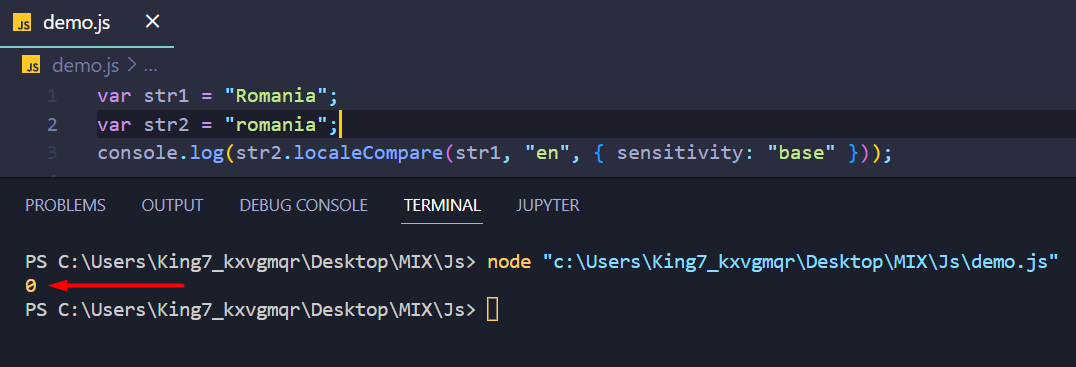 As you can see, we got the output as “0” meaning that both of the strings are considered to be equal to each other.
 WorkingThe product of 30 and 70 is 2100.
 Working[10*1,20*2,30*3,40*4,50*5] => [10, 40, 90, 160, 250].
Example 2Create 2 two-dimensional tensors with 2 rows and 3 columns and apply tf.mul().
<html><!-- CDN Link that delivers the Tensorflow.js framework --><script src="https://cdn.jsdelivr.net/npm/@tensorflow/tfjs"></script><body><script>//tensor1
let values1 = tf.tensor2d([1,2,3,4,5,6],[2,3]);//tensor2
let values2 = tf.tensor2d([34,10,20,30,40,50],[2,3]);
document.write("Tensor-1: ",values1);
document.write("<br>");
document.write("<br>");
document.write("Tensor-2: ",values2);</script><h3>Tensorflow.js - tf.mul() </h3><script>//tf.mul(values1,values2)
document.write(tf.mul(values1,values2));</script></body></html>
Output
Working[10*1,20*2,30*3,40*4,50*5] => [10, 40, 90, 160, 250].
Example 2Create 2 two-dimensional tensors with 2 rows and 3 columns and apply tf.mul().
<html><!-- CDN Link that delivers the Tensorflow.js framework --><script src="https://cdn.jsdelivr.net/npm/@tensorflow/tfjs"></script><body><script>//tensor1
let values1 = tf.tensor2d([1,2,3,4,5,6],[2,3]);//tensor2
let values2 = tf.tensor2d([34,10,20,30,40,50],[2,3]);
document.write("Tensor-1: ",values1);
document.write("<br>");
document.write("<br>");
document.write("Tensor-2: ",values2);</script><h3>Tensorflow.js - tf.mul() </h3><script>//tf.mul(values1,values2)
document.write(tf.mul(values1,values2));</script></body></html>
Output
 Working[[1*34,2*10,3*20],[4*30,5*40,6*50]] => [[34 , 20 , 60 ], [120, 200, 300]].
 Working[10*1, 20*1, 30*1, 4*1, 5*1, 6*1] => [10, 20, 30, 4, 5, 6].
 Working
30%70 = 30.
Working
30%70 = 30.
 Working
[10%1,20%2,30%3,40%4,50%5] => Tensor [0,0,0,0,0].
Example 2Create 2 two-dimensional tensors with 2 rows and 3 columns and apply tf.mod().
<html><!-- CDN Link that delivers the Tensorflow.js framework --><script src="https://cdn.jsdelivr.net/npm/@tensorflow/tfjs"></script><body><script>//tensor1
let values1 = tf.tensor2d([1,2,3,4,5,6],[2,3]);//tensor2
let values2 = tf.tensor2d([34,10,20,30,40,50],[2,3]);
document.write("Tensor-1: ",values1);
document.write("<br>");
document.write("<br>");
document.write("Tensor-2: ",values2);</script><h3>Tensorflow.js - tf.mod() </h3><script>//tf.mod(values1,values2)
document.write(tf.mod(values1,values2));</script></body></html>
Output
Working
[10%1,20%2,30%3,40%4,50%5] => Tensor [0,0,0,0,0].
Example 2Create 2 two-dimensional tensors with 2 rows and 3 columns and apply tf.mod().
<html><!-- CDN Link that delivers the Tensorflow.js framework --><script src="https://cdn.jsdelivr.net/npm/@tensorflow/tfjs"></script><body><script>//tensor1
let values1 = tf.tensor2d([1,2,3,4,5,6],[2,3]);//tensor2
let values2 = tf.tensor2d([34,10,20,30,40,50],[2,3]);
document.write("Tensor-1: ",values1);
document.write("<br>");
document.write("<br>");
document.write("Tensor-2: ",values2);</script><h3>Tensorflow.js - tf.mod() </h3><script>//tf.mod(values1,values2)
document.write(tf.mod(values1,values2));</script></body></html>
Output
 Working
[[1%34,2%10,3%20],[4%30,5%40,6%50]] => [[1, 2, 3], [4, 5, 6]].
Working
[[1%34,2%10,3%20],[4%30,5%40,6%50]] => [[1, 2, 3], [4, 5, 6]].
 Working
[10%10, 20%10, 30%10, 4%10, 5%10, 6%10] => [0, 0, 0, 4, 5, 6].
Working
[10%10, 20%10, 30%10, 4%10, 5%10, 6%10] => [0, 0, 0, 4, 5, 6].
 WorkingOutput 1: false logicalOr false – false
Output 2: false logicalOr true – true
WorkingOutput 1: false logicalOr false – false
Output 2: false logicalOr true – true
 Working[true, false, true, true] logicalOr [false, false, true, true] => [true, false, true, true]
 Workingtrue logicalOr false – true
false logicalOr false – false
true logicalOr false – true
Workingtrue logicalOr false – true
false logicalOr false – false
true logicalOr false – true
 Working
Output 1: true logicalAnd false – false
Output 2: true logicalAnd true – true
Working
Output 1: true logicalAnd false – false
Output 2: true logicalAnd true – true
 Working
[true, false, true, true] logicalAnd [false, true, true, true] => [false, false, true, true]
Working
[true, false, true, true] logicalAnd [false, true, true, true] => [false, false, true, true]

 Working
Output 1: logicalNot false – true
Output 2: logicalNot true – false
Working
Output 1: logicalNot false – true
Output 2: logicalNot true – false
 Working
logicalNot [true, false, true, true] => [false, true, false, false].
Working
logicalNot [true, false, true, true] => [false, true, false, false].
 Working
Output 1: true logicalXor false – true
Output 2: true logicalXor true – false
Working
Output 1: true logicalXor false – true
Output 2: true logicalXor true – false
 Working
[true, false, true, true] logicalXor [false, true, true, true] => [true, true, false, false]
Working
[true, false, true, true] logicalXor [false, true, true, true] => [true, true, false, false]
 Working
true logicalXor true – false
false logicalXor true – true
true logicalXor true – false
Working
true logicalXor true – false
false logicalXor true – true
true logicalXor true – false
 Tensor takes null as 0 and the undefined and NaN as NaN value.


 Tensor takes null as 0 and the undefined and NaN as NaN value.


 All elements are replaced with 1.
 All elements are replaced with 1.
 All elements are replaced with 0.
 All elements are replaced with 0.
 Tensor takes null as 0 and the undefined and NaN as NaN value.


 1s would be created with integer32 and float32 types.
We can specify the number of rows and columns inside the size parameter.
1s would be created with integer32 and float32 types.
We can specify the number of rows and columns inside the size parameter.
 In the first tensor, 1’s are created in 4 rows and 2 columns.
In the second tensor, 1’s are created in 2 rows and 3 columns.
In the first tensor, 1’s are created in 4 rows and 2 columns.
In the second tensor, 1’s are created in 2 rows and 3 columns.
 0’s are created with integer32 and float32 types.
We can specify the number of rows and columns inside the size parameter.
0’s are created with integer32 and float32 types.
We can specify the number of rows and columns inside the size parameter.
 In the first tensor, 0’s are created in 4 rows and 2 columns with integer type.
In the second tensor, 0’s are created in 2 rows and 3 columns with float type.
In the first tensor, 0’s are created in 4 rows and 2 columns with integer type.
In the second tensor, 0’s are created in 2 rows and 3 columns with float type.
 We can see that it returns true for the Infinity values (both positive and negative).
 Since they are not related to Infinite values, false is returned.
 There are two Infinities present in the previous tensor.
Hence, for those values, true is returned.
There are two Infinities present in the previous tensor.
Hence, for those values, true is returned.
 The tangent values were returned from the given one dimensional tensor.
 The tangent values were returned from the given one dimensional tensor.
We observed that for the null, NaN, and undefined values, it returned 0.
The tangent values were returned from the given one dimensional tensor.
We observed that for the null, NaN, and undefined values, it returned 0.
 The tangent values were returned from the given one dimensional tensor.
 We can see that false is returned for the Infinity values (both positive and negative).
 Since they are related to the Finite values, it returns true.
 There are two Infinities present in the previous tensor.
Hence, for those values, false is returned while the rest of the values are returned true.
There are two Infinities present in the previous tensor.
Hence, for those values, false is returned while the rest of the values are returned true.


 We can notice that for the values 0, null, NaN, and undefined, the rounded values is 0.
 The rounded values is the same as the integers.
 The floor values were returned that are lower to the decimal values.
 The floor values were returned that are lower to the decimal values.
 The floor values were returned that are the same as the integer values.
 We can observe that only the real numbers were returned from the complex numbers:
34 + 12j =>3456 + 34j =>5678 + 56j =>7845 + 89j =>450 + 66j =>0
We can observe that only the real numbers were returned from the complex numbers:
34 + 12j =>3456 + 34j =>5678 + 56j =>7845 + 89j =>450 + 66j =>0
 Working:
Tensor [[1,2], [3,4], [5,6 ], [7,8 ]]
=>1*3*5*7 = 1052*4*6*8=384
We can observe that the null value is taken as 0 while the NaN and undefined values are taken as NaN.
Finally, they were returned.
Working:
Tensor [[1,2], [3,4], [5,6 ], [7,8 ]]
=>1*3*5*7 = 1052*4*6*8=384
We can observe that the null value is taken as 0 while the NaN and undefined values are taken as NaN.
Finally, they were returned.
 Working:
34*56*78*90 = 13366080.
If the values are already negative, the results are positive.
Working:
34*56*78*90 = 13366080.
If the values are already negative, the results are positive.
 Working:
Tensor [[1,2], [3,4], [5,6 ], [7,8 ]]
=>1*3*5*7 = 1052*4*6*8=384
Working:
Tensor [[1,2], [3,4], [5,6 ], [7,8 ]]
=>1*3*5*7 = 1052*4*6*8=384
 Working:
Tensor [[1], [3]]
=>13.
Since there is only one element in each row, it returns itself.
Working:
Tensor [[1], [3]]
=>13.
Since there is only one element in each row, it returns itself.
 Working:
Tensor [[34, 56], [78, 90], [1 , 0 ], [3 , 4 ]]
=>34*56*78*90*1*0*3*4=0..
Working:
Tensor [[34, 56], [78, 90], [1 , 0 ], [3 , 4 ]]
=>34*56*78*90*1*0*3*4=0..
 Working:
Tensor [8.5600004*-1, 3.45*-1, 7.8899999*-1, 8.3199997*-1]
If the values are already negative, the results are positive.
Working:
Tensor [8.5600004*-1, 3.45*-1, 7.8899999*-1, 8.3199997*-1]
If the values are already negative, the results are positive.
 The positive values were returned with respect to the given negative values.
Working:
Tensor [-8.5600004*-1, -3.45*-1, -7.8899999*-1, -8.3199997*-1]
The positive values were returned with respect to the given negative values.
Working:
Tensor [-8.5600004*-1, -3.45*-1, -7.8899999*-1, -8.3199997*-1]
 Working:
Tensor [[-34*-1, 4*-1], [41*-1 , 7*-1]]
Working:
Tensor [[-34*-1, 4*-1], [41*-1 , 7*-1]]

 Tensor takes null as 0 and undefined as NaN.


 The ceil values were returned that are higher than the decimal values.

 The ceil values were returned that are the same as the integer values.

 Tensor takes null as 0 and undefined as NaN.


 Working:
(0-1)*(0-1) = 1
(1-4)*(1-4)=9
(2-1)*(2-1)=1
(3-5)*(3-5)=4
Working:
(0-1)*(0-1) = 1
(1-4)*(1-4)=9
(2-1)*(2-1)=1
(3-5)*(3-5)=4
 If the values in a tensor are the same, then the squared difference is 0.
It is also possible to get the squared difference with a tensor and a scalar.
If the values in a tensor are the same, then the squared difference is 0.
It is also possible to get the squared difference with a tensor and a scalar.
 Working:
 The inverse hyperbolic sine values were returned from the given one-dimensional tensor.
Example 2:
Let’s create a tensor that has 2 dimensions in js with 5 rows and 2 columns and return the inverse hyperbolic cosine values.
<html><!-- CDN Link that delivers the Tensorflow.js framework --><script src="https://cdn.jsdelivr.net/npm/@tensorflow/tfjs"></script><body><center><h1>Tensorflow.js - tf.asinh() </h1></center><script>
let values = tf.tensor2d([[0,null],[10,NaN],[45,82],[34,undefined],[67,43]]);//actual tensor
document.write("Actual Tensor: ",values);
document.write("<br>");
document.write("<br>");//apply asinh() on the above tensor
document.write("Tensor with Inverse Hyperbolic Sine Values: "+tf.asinh(values));</script></body></html>
Output:
The inverse hyperbolic sine values were returned from the given one-dimensional tensor.
Example 2:
Let’s create a tensor that has 2 dimensions in js with 5 rows and 2 columns and return the inverse hyperbolic cosine values.
<html><!-- CDN Link that delivers the Tensorflow.js framework --><script src="https://cdn.jsdelivr.net/npm/@tensorflow/tfjs"></script><body><center><h1>Tensorflow.js - tf.asinh() </h1></center><script>
let values = tf.tensor2d([[0,null],[10,NaN],[45,82],[34,undefined],[67,43]]);//actual tensor
document.write("Actual Tensor: ",values);
document.write("<br>");
document.write("<br>");//apply asinh() on the above tensor
document.write("Tensor with Inverse Hyperbolic Sine Values: "+tf.asinh(values));</script></body></html>
Output:
 The inverse hyperbolic sine values were returned from the given one-dimensional tensor.
Example 3:
In this case, we will consider the decimal values.
Let’s create a tensor that has 2 dimensions in js with 5 rows and 2 columns and return the inverse hyperbolic sine values.
<html><!-- CDN Link that delivers the Tensorflow.js framework --><script src="https://cdn.jsdelivr.net/npm/@tensorflow/tfjs"></script><body><center><h1>Tensorflow.js - tf.asinh() </h1></center><script>
let values = tf.tensor2d([[4.80,0],[45.10,null],[46.785,8.2],[31.4,5.6],[6.87,43.76]]);//actual tensor
document.write("Actual Tensor: ",values);
document.write("<br>");
document.write("<br>");//apply asinh() on the above tensor
document.write("Tensor with Inverse Hyperbolic Sine Values: "+tf.asinh(values));</script></body></html>
Output:
The inverse hyperbolic sine values were returned from the given one-dimensional tensor.
Example 3:
In this case, we will consider the decimal values.
Let’s create a tensor that has 2 dimensions in js with 5 rows and 2 columns and return the inverse hyperbolic sine values.
<html><!-- CDN Link that delivers the Tensorflow.js framework --><script src="https://cdn.jsdelivr.net/npm/@tensorflow/tfjs"></script><body><center><h1>Tensorflow.js - tf.asinh() </h1></center><script>
let values = tf.tensor2d([[4.80,0],[45.10,null],[46.785,8.2],[31.4,5.6],[6.87,43.76]]);//actual tensor
document.write("Actual Tensor: ",values);
document.write("<br>");
document.write("<br>");//apply asinh() on the above tensor
document.write("Tensor with Inverse Hyperbolic Sine Values: "+tf.asinh(values));</script></body></html>
Output:
 The inverse hyperbolic sine values were returned from the given one-dimensional tensor.
 The inverse hyperbolic cosine values were returned from the given one-dimensional tensor.
Example 2:
Let’s create a tensor that has 2 dimensions in js with 5 rows and 2 columns and return the inverse hyperbolic cosinevalues.
<html><!-- CDN Link that delivers the Tensorflow.js framework --><script src="https://cdn.jsdelivr.net/npm/@tensorflow/tfjs"></script><body><center><h1>Tensorflow.js - tf.acosh() </h1></center><script>
let values = tf.tensor2d([[0,null],[10,NaN],[45,82],[34,undefined],[67,43]]);//actual tensor
document.write("Actual Tensor: ",values);
document.write("<br>");
document.write("<br>");//apply acosh() on the above tensor
document.write("Tensor with Inverse Hyperbolic Cosine Values: "+tf.acosh(values));</script></body></html>
Output:
The inverse hyperbolic cosine values were returned from the given one-dimensional tensor.
Example 2:
Let’s create a tensor that has 2 dimensions in js with 5 rows and 2 columns and return the inverse hyperbolic cosinevalues.
<html><!-- CDN Link that delivers the Tensorflow.js framework --><script src="https://cdn.jsdelivr.net/npm/@tensorflow/tfjs"></script><body><center><h1>Tensorflow.js - tf.acosh() </h1></center><script>
let values = tf.tensor2d([[0,null],[10,NaN],[45,82],[34,undefined],[67,43]]);//actual tensor
document.write("Actual Tensor: ",values);
document.write("<br>");
document.write("<br>");//apply acosh() on the above tensor
document.write("Tensor with Inverse Hyperbolic Cosine Values: "+tf.acosh(values));</script></body></html>
Output:
 The inverse hyperbolic cosine values were returned from the given one-dimensional tensor.
Example 3:
In this case, we will consider the decimal values.
Let’s create a tensor that has 2 dimensions in js with 5 rows and 2 columns and return the inverse hyperbolic cosine values.
<html><!-- CDN Link that delivers the Tensorflow.js framework --><script src="https://cdn.jsdelivr.net/npm/@tensorflow/tfjs"></script><body><center><h1>Tensorflow.js - tf.acosh() </h1></center><script>
let values = tf.tensor2d([[4.80,0],[45.10,null],[46.785,8.2],[31.4,5.6],[6.87,43.76]]);//actual tensor
document.write("Actual Tensor: ",values);
document.write("<br>");
document.write("<br>");//apply acosh() on the above tensor
document.write("Tensor with Inverse Hyperbolic Cosine Values: "+tf.acosh(values));</script></body></html>
Output:
The inverse hyperbolic cosine values were returned from the given one-dimensional tensor.
Example 3:
In this case, we will consider the decimal values.
Let’s create a tensor that has 2 dimensions in js with 5 rows and 2 columns and return the inverse hyperbolic cosine values.
<html><!-- CDN Link that delivers the Tensorflow.js framework --><script src="https://cdn.jsdelivr.net/npm/@tensorflow/tfjs"></script><body><center><h1>Tensorflow.js - tf.acosh() </h1></center><script>
let values = tf.tensor2d([[4.80,0],[45.10,null],[46.785,8.2],[31.4,5.6],[6.87,43.76]]);//actual tensor
document.write("Actual Tensor: ",values);
document.write("<br>");
document.write("<br>");//apply acosh() on the above tensor
document.write("Tensor with Inverse Hyperbolic Cosine Values: "+tf.acosh(values));</script></body></html>
Output:
 The inverse hyperbolic cosine values were returned from the given one-dimensional tensor.
 The inverse cosine values were returned from the given one-dimensional tensor.
Example 2:
Let’s create a tensor that has 2 dimensions in js with 5 rows and 2 columns and return the inverse cosine values.
<html><!-- CDN Link that delivers the Tensorflow.js framework --><script src="https://cdn.jsdelivr.net/npm/@tensorflow/tfjs"></script><body><center><h1>Tensorflow.js - tf.acos() </h1></center><script>
let values = tf.tensor2d([[0,null],[10,NaN],[45,82],[34,undefined],[67,43]]);//actual tensor
document.write("Actual Tensor: ",values);
document.write("<br>");
document.write("<br>");//apply acos() on the above tensor
document.write("Tensor with Inverse Cosine Values: "+tf.acos(values));</script></body></html>
Output:
The inverse cosine values were returned from the given one-dimensional tensor.
Example 2:
Let’s create a tensor that has 2 dimensions in js with 5 rows and 2 columns and return the inverse cosine values.
<html><!-- CDN Link that delivers the Tensorflow.js framework --><script src="https://cdn.jsdelivr.net/npm/@tensorflow/tfjs"></script><body><center><h1>Tensorflow.js - tf.acos() </h1></center><script>
let values = tf.tensor2d([[0,null],[10,NaN],[45,82],[34,undefined],[67,43]]);//actual tensor
document.write("Actual Tensor: ",values);
document.write("<br>");
document.write("<br>");//apply acos() on the above tensor
document.write("Tensor with Inverse Cosine Values: "+tf.acos(values));</script></body></html>
Output:
 The Inverse cosine values were returned from the previous one-dimensional tensor.
Example 3:
In this case, we will consider the decimal values.
Let’s create a tensor that has 2 dimensions in js with 5 rows and 2 columns and return the inverse cosine values.
<html><!-- CDN Link that delivers the Tensorflow.js framework --><script src="https://cdn.jsdelivr.net/npm/@tensorflow/tfjs"></script><body><center><h1>Tensorflow.js - tf.acos() </h1></center><script>
let values = tf.tensor2d([[4.80,0],[45.10,null],[46.785,8.2],[31.4,5.6],[6.87,43.76]]);//actual tensor
document.write("Actual Tensor: ",values);
document.write("<br>");
document.write("<br>");//apply acos() on the above tensor
document.write("Tensor with Inverse Cosine Values: "+tf.acos(values));</script></body></html>
Output:
The Inverse cosine values were returned from the previous one-dimensional tensor.
Example 3:
In this case, we will consider the decimal values.
Let’s create a tensor that has 2 dimensions in js with 5 rows and 2 columns and return the inverse cosine values.
<html><!-- CDN Link that delivers the Tensorflow.js framework --><script src="https://cdn.jsdelivr.net/npm/@tensorflow/tfjs"></script><body><center><h1>Tensorflow.js - tf.acos() </h1></center><script>
let values = tf.tensor2d([[4.80,0],[45.10,null],[46.785,8.2],[31.4,5.6],[6.87,43.76]]);//actual tensor
document.write("Actual Tensor: ",values);
document.write("<br>");
document.write("<br>");//apply acos() on the above tensor
document.write("Tensor with Inverse Cosine Values: "+tf.acos(values));</script></body></html>
Output:
 The inverse cosine values were returned from the given one-dimensional tensor.
 The inverse sine values were returned from the given one-dimensional tensor.
Example 2:
Let’s create a tensor that has 2 dimensions in js with 5 rows and 2 columns and return the inverse sine values.
<html><!-- CDN Link that delivers the Tensorflow.js framework --><script src="https://cdn.jsdelivr.net/npm/@tensorflow/tfjs"></script><body><center><h1>Tensorflow.js - tf.asin() </h1></center><script>
let values = tf.tensor2d([[0,null],[10,NaN],[45,82],[34,undefined],[67,43]]);//actual tensor
document.write("Actual Tensor: ",values);
document.write("<br>");
document.write("<br>");//apply asin() on the above tensor
document.write("Tensor with Inverse Sine Values: "+tf.asin(values));</script></body></html>
Output:
The inverse sine values were returned from the given one-dimensional tensor.
Example 2:
Let’s create a tensor that has 2 dimensions in js with 5 rows and 2 columns and return the inverse sine values.
<html><!-- CDN Link that delivers the Tensorflow.js framework --><script src="https://cdn.jsdelivr.net/npm/@tensorflow/tfjs"></script><body><center><h1>Tensorflow.js - tf.asin() </h1></center><script>
let values = tf.tensor2d([[0,null],[10,NaN],[45,82],[34,undefined],[67,43]]);//actual tensor
document.write("Actual Tensor: ",values);
document.write("<br>");
document.write("<br>");//apply asin() on the above tensor
document.write("Tensor with Inverse Sine Values: "+tf.asin(values));</script></body></html>
Output:
 The inverse sine values were returned from the given one-dimensional tensor.
Example 3:
In this case, we will consider the decimal values.
Let’s create a tensor that has 2 dimensions in js with 5 rows and 2 columns and return the sine values.
<html><!-- CDN Link that delivers the Tensorflow.js framework --><script src="https://cdn.jsdelivr.net/npm/@tensorflow/tfjs"></script><body><center><h1>Tensorflow.js - tf.asin() </h1></center><script>
let values = tf.tensor2d([[4.80,0],[45.10,null],[46.785,8.2],[31.4,5.6],[6.87,43.76]]);//actual tensor
document.write("Actual Tensor: ",values);
document.write("<br>");
document.write("<br>");//apply asin() on the above tensor
document.write("Tensor with Inverse Sine Values: "+tf.asin(values));</script></body></html>
Output:
The inverse sine values were returned from the given one-dimensional tensor.
Example 3:
In this case, we will consider the decimal values.
Let’s create a tensor that has 2 dimensions in js with 5 rows and 2 columns and return the sine values.
<html><!-- CDN Link that delivers the Tensorflow.js framework --><script src="https://cdn.jsdelivr.net/npm/@tensorflow/tfjs"></script><body><center><h1>Tensorflow.js - tf.asin() </h1></center><script>
let values = tf.tensor2d([[4.80,0],[45.10,null],[46.785,8.2],[31.4,5.6],[6.87,43.76]]);//actual tensor
document.write("Actual Tensor: ",values);
document.write("<br>");
document.write("<br>");//apply asin() on the above tensor
document.write("Tensor with Inverse Sine Values: "+tf.asin(values));</script></body></html>
Output:
 The inverse sine values were returned from the given one-dimensional tensor.
 The inverse tangent values were returned from the given one-dimensional tensor.
 The inverse tangent values were returned from the given one-dimensional tensor.
We observed that for null.NaN and undefined values, it returned 0.
The inverse tangent values were returned from the given one-dimensional tensor.
We observed that for null.NaN and undefined values, it returned 0.
 The inverse tangent values were returned from the given one-dimensional tensor.
 The inverse hyperbolic tangent values were returned from the given one-dimensional tensor.
 The inverse hyperbolic tangent values were returned from the given one-dimensional tensor.
 The inverse hyperbolic tangent values were returned from the given one-dimensional tensor.
 We can observe that only the imaginary numbers were returned from the complex numbers:
34 + 12j =>1256 + 34j =>3478 + 56j =>5645 + 89j =>890 + 66j =>66
Example 2:
Here, we will create a complex tensor that has null, undefined, and NaN values for the complex part.
It considers the null value as 0 and the undefined and NaN values as NaN(Not a Number).
<html><!-- CDN Link that delivers the Tensorflow.js framework --><script src="https://cdn.jsdelivr.net/npm/@tensorflow/tfjs"></script><body><center><h1>Tensorflow.js - tf.imag() </h1></center><script>//create a tensor that store 3 complex numbers with null,NaN and undefined
let complex_numbers = tf.complex([null,undefined,NaN,], [null,undefined,NaN]);//actual tensor
document.write("Actual Tensor: ",complex_numbers);
document.write("<br>");//return only complex part from the above complex_numbers
document.write("Tensor with complex numbers: "+tf.imag(complex_numbers));</script></body></html>
Output:
We can observe that only the imaginary numbers were returned from the complex numbers:
34 + 12j =>1256 + 34j =>3478 + 56j =>5645 + 89j =>890 + 66j =>66
Example 2:
Here, we will create a complex tensor that has null, undefined, and NaN values for the complex part.
It considers the null value as 0 and the undefined and NaN values as NaN(Not a Number).
<html><!-- CDN Link that delivers the Tensorflow.js framework --><script src="https://cdn.jsdelivr.net/npm/@tensorflow/tfjs"></script><body><center><h1>Tensorflow.js - tf.imag() </h1></center><script>//create a tensor that store 3 complex numbers with null,NaN and undefined
let complex_numbers = tf.complex([null,undefined,NaN,], [null,undefined,NaN]);//actual tensor
document.write("Actual Tensor: ",complex_numbers);
document.write("<br>");//return only complex part from the above complex_numbers
document.write("Tensor with complex numbers: "+tf.imag(complex_numbers));</script></body></html>
Output:
 We can observe that the null value is taken as 0 while the NaN and undefined values are taken as NaN.
Finally, they were returned.
We can observe that the null value is taken as 0 while the NaN and undefined values are taken as NaN.
Finally, they were returned.
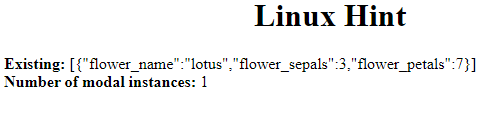 Run the application in your browser by saving the code in the file with .html as an extension.
Here, we can see the length() method returns an integer value 1 that represents there is only a model instance in the previous collection.
Run the application in your browser by saving the code in the file with .html as an extension.
Here, we can see the length() method returns an integer value 1 that represents there is only a model instance in the previous collection.
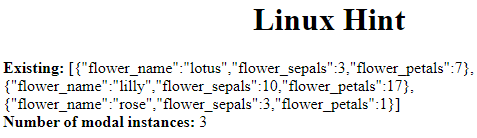 Run the application in your browser by saving the code in the file with .html as an extension.
Here, we can see the length() method returned 3.
Run the application in your browser by saving the code in the file with .html as an extension.
Here, we can see the length() method returned 3.
 Run the application in your browser by saving the code in the file with .html as an extension.
Here, we can see that there are two model instances that match with flower_petals equal to 9.
But findWhere() will return only the first model instance.
There are three model instances that match with flower_name equal to “lilly”, But findWhere() will return only the first model instance.
Run the application in your browser by saving the code in the file with .html as an extension.
Here, we can see that there are two model instances that match with flower_petals equal to 9.
But findWhere() will return only the first model instance.
There are three model instances that match with flower_name equal to “lilly”, But findWhere() will return only the first model instance.
 The undefined is returned for the attribute flower_petals = 90 since it does not exist.
 Run the application in your browser by saving the code in the file with .html as an extension.
Here, we created FlowerCollection by extension of the collection.after that we passed the Flowers model to it.
Run the application in your browser by saving the code in the file with .html as an extension.
Here, we created FlowerCollection by extension of the collection.after that we passed the Flowers model to it.
 Run the application in your browser by saving the code in the file with .html as an extension.
Here, the remove() method removes the instance from the collection.
Run the application in your browser by saving the code in the file with .html as an extension.
Here, the remove() method removes the instance from the collection.
 Run the application in your browser by saving the code in the file with .html as an extension.
Here, we can see the remove() method removes the flower1 and flower2 from the collection, and in the remaining instance, flower3 is displayed.
Run the application in your browser by saving the code in the file with .html as an extension.
Here, we can see the remove() method removes the flower1 and flower2 from the collection, and in the remaining instance, flower3 is displayed.
 Run the application in your browser by saving the code in the file with .html as an extension.
Here, the push() method adds the flower2 instance to flower_collection at the end.
Run the application in your browser by saving the code in the file with .html as an extension.
Here, the push() method adds the flower2 instance to flower_collection at the end.
 Run the application in your browser by saving the code in the file with .html as an extension.
Here, we can see the push() method added the flower2 and flower3 to the collection at the end.
Run the application in your browser by saving the code in the file with .html as an extension.
Here, we can see the push() method added the flower2 and flower3 to the collection at the end.
 Run the application in your browser by saving the code in the file with .html as an extension.
Here, the pop() method removes the last instance from the collection.
Run the application in your browser by saving the code in the file with .html as an extension.
Here, the pop() method removes the last instance from the collection.
 Run the application in your browser by saving the code in the file with .html as an extension.
Here, we can see the pop() method removes flower3 from the collection, and the remaining instances, flower1 and flower2, are displayed.
Run the application in your browser by saving the code in the file with .html as an extension.
Here, we can see the pop() method removes flower3 from the collection, and the remaining instances, flower1 and flower2, are displayed.
 Run the application in your browser by saving the code in the file with .html as an extension.
Here, we can see that model instances were returned based on the attribute specified in the where() method.
Run the application in your browser by saving the code in the file with .html as an extension.
Here, we can see that model instances were returned based on the attribute specified in the where() method.
 Run the application in your browser by saving the code in the file with .html as an extension.
Here, we can see that the total model instances were returned based on the attribute specified in the where() method.
Run the application in your browser by saving the code in the file with .html as an extension.
Here, we can see that the total model instances were returned based on the attribute specified in the where() method.
 Run the application in your browser by saving the code in the file with .html as an extension.
Here, we can see the unshift() method adds the flower2 instance to the flower_collection at the beginning.
Run the application in your browser by saving the code in the file with .html as an extension.
Here, we can see the unshift() method adds the flower2 instance to the flower_collection at the beginning.
 Run the application in your browser by saving the code in the file with .html as an extension.
Here, we can see the unshift( )method added the flower2 and flower3 to the collection at the beginning
Run the application in your browser by saving the code in the file with .html as an extension.
Here, we can see the unshift( )method added the flower2 and flower3 to the collection at the beginning
 Run the application in your browser by saving the code in the file with .html as an extension.
Here, we can see that model instances were returned from 0 to 2.
Run the application in your browser by saving the code in the file with .html as an extension.
Here, we can see that model instances were returned from 0 to 2.
 Run the application in your browser by saving the code in the file with .html as extension.
Here, we can see that model instances were returned from 1 to 4.
Run the application in your browser by saving the code in the file with .html as extension.
Here, we can see that model instances were returned from 1 to 4.
 Run the application in your browser by saving the code in the file with .html as an extension.
Here, we can see the shift() method removes the first instance from the collection.
Run the application in your browser by saving the code in the file with .html as an extension.
Here, we can see the shift() method removes the first instance from the collection.
 Run the application in your browser by saving the code in the file with .html as an extension.
Here, we can see the shift() method removes the flower1 from the collection, and the remaining instances flower2 and flower3 are displayed.
Run the application in your browser by saving the code in the file with .html as an extension.
Here, we can see the shift() method removes the flower1 from the collection, and the remaining instances flower2 and flower3 are displayed.
 Run the application in your browser by saving the code in the file with .html as an extension.
Here, we can see the set() method updated the old instance with a new instance model in a collection and returned both instances.
Run the application in your browser by saving the code in the file with .html as an extension.
Here, we can see the set() method updated the old instance with a new instance model in a collection and returned both instances.
 Run the application in your browser by saving the code in the file with .html as an extension.
Here, we can see the set() method adds a new instance model – flower2 to a collection.
Run the application in your browser by saving the code in the file with .html as an extension.
Here, we can see the set() method adds a new instance model – flower2 to a collection.
 Run the application in your browser by saving the code in the file with .html as an extension.
Here, we can see that the isNew() method returns True.
Run the application in your browser by saving the code in the file with .html as an extension.
Here, we can see that the isNew() method returns True.
 Run the application in your browser by saving the code in the file with .html as an extension.
Here, we assigned flower_sepals to null.
So this attribute has() returned false because it has a null value.
Example 2
In this example, we will create a Modal class named – Flowers and create a model object – flower from it.
After that we used the set() method to create three attributes – (flower_name,flower_sepals,flower_petals) with values.
Finally, we used the has() method to check the attribute values and display them using document.write() method.
We are implementing this entire functionality inside the <body> tag.
<html>
<head>
<script src="https://code.jquery.com/jquery-2.1.3.min.js" ></script>
<script src="https://cdnjs.cloudflare.com/ajax/libs/underscore.js/1.8.2/underscore-min.js" ></script>
<script src="https://cdnjs.cloudflare.com/ajax/libs/backbone.js/1.1.2/backbone-min.js" ></script>
</head>
<body>
<center>
<h1>Linux Hint</h1>
</center>
<script>
//create Model named Flowers using extend()
var Flowers = Backbone.Model.extend();
// create a variable named flower using the above model.
var flower = new Flowers();
//create flower_name attribute and set to "lotus"
//create flower_sepals attribute and set to undefined
//create flower_petals attribute and set to 5
flower.set({ flower_name:"lotus",flower_sepals: undefined, flower_petals:5});
//check the flower_sepals has non-undefined value or not?
document.write("<strong>Does flower has flower sepals ? </strong> "+ flower.has('flower_sepals'));
document.write("<br>");
//check the flower_petals has non-undefined value or not?
document.write("<strong>Does flower has flower petals ? </strong> "+ flower.has('flower_petals'));
document.write("<br>");
</script>
</body> </html>
Output:
Run the application in your browser by saving the code in the file with .html as an extension.
Here, we assigned flower_sepals to null.
So this attribute has() returned false because it has a null value.
Example 2
In this example, we will create a Modal class named – Flowers and create a model object – flower from it.
After that we used the set() method to create three attributes – (flower_name,flower_sepals,flower_petals) with values.
Finally, we used the has() method to check the attribute values and display them using document.write() method.
We are implementing this entire functionality inside the <body> tag.
<html>
<head>
<script src="https://code.jquery.com/jquery-2.1.3.min.js" ></script>
<script src="https://cdnjs.cloudflare.com/ajax/libs/underscore.js/1.8.2/underscore-min.js" ></script>
<script src="https://cdnjs.cloudflare.com/ajax/libs/backbone.js/1.1.2/backbone-min.js" ></script>
</head>
<body>
<center>
<h1>Linux Hint</h1>
</center>
<script>
//create Model named Flowers using extend()
var Flowers = Backbone.Model.extend();
// create a variable named flower using the above model.
var flower = new Flowers();
//create flower_name attribute and set to "lotus"
//create flower_sepals attribute and set to undefined
//create flower_petals attribute and set to 5
flower.set({ flower_name:"lotus",flower_sepals: undefined, flower_petals:5});
//check the flower_sepals has non-undefined value or not?
document.write("<strong>Does flower has flower sepals ? </strong> "+ flower.has('flower_sepals'));
document.write("<br>");
//check the flower_petals has non-undefined value or not?
document.write("<strong>Does flower has flower petals ? </strong> "+ flower.has('flower_petals'));
document.write("<br>");
</script>
</body> </html>
Output:
 Run the application in your browser by saving the code in the file with .html as an extension.
Here, we assigned flower_sepals to null.
So this attribute has() returned false because it has an undefined value.
Run the application in your browser by saving the code in the file with .html as an extension.
Here, we assigned flower_sepals to null.
So this attribute has() returned false because it has an undefined value.
 The get() method returned attribute values.
Example 2
In this example, we will create a Modal class named – Flowers and create a model object – flower from it.
After that we used the set() method to create three attributes – (flower_name,flower_sepals,flower_petals) with values.
Finally, we used the get() method to return attribute values and display them using the document.write() method.
We are implementing this entire functionality inside the <head> tag.
<html>
<head>
<script src="https://code.jquery.com/jquery-2.1.3.min.js" ></script>
<script src="https://cdnjs.cloudflare.com/ajax/libs/underscore.js/1.8.2/underscore-min.js" ></script>
<script src="https://cdnjs.cloudflare.com/ajax/libs/backbone.js/1.1.2/backbone-min.js" ></script>
<script>
//create Model named Flowers using extend()
var Flowers = Backbone.Model.extend();
// create a variable named flower using the above model.
var flower = new Flowers();
//create flower_name attribute and set to "lotus"
//create flower_sepals attribute and set to 4
//create flower_petals attribute and set to 5
flower.set({ flower_name:"lotus",flower_sepals: 4, flower_petals:5});
//get the flower_name
document.write("<strong>Flower Name: </strong> "+ flower.get('flower_name'));
document.write("<br>");
//get the flower_sepals
document.write("<strong>Flower Sepals: </strong> "+ flower.get('flower_sepals'));
document.write("<br>");
//get the flower_petals
document.write("<strong>Flower Petals: </strong> "+ flower.get('flower_petals'));
</script>
</head>
<body>
<center>
<h1>Linux Hint</h1>
</center>
</body> </html>
Output:
Run the application in your browser by saving the code in the file with .html as an extension.
The get() method returned attribute values.
Example 2
In this example, we will create a Modal class named – Flowers and create a model object – flower from it.
After that we used the set() method to create three attributes – (flower_name,flower_sepals,flower_petals) with values.
Finally, we used the get() method to return attribute values and display them using the document.write() method.
We are implementing this entire functionality inside the <head> tag.
<html>
<head>
<script src="https://code.jquery.com/jquery-2.1.3.min.js" ></script>
<script src="https://cdnjs.cloudflare.com/ajax/libs/underscore.js/1.8.2/underscore-min.js" ></script>
<script src="https://cdnjs.cloudflare.com/ajax/libs/backbone.js/1.1.2/backbone-min.js" ></script>
<script>
//create Model named Flowers using extend()
var Flowers = Backbone.Model.extend();
// create a variable named flower using the above model.
var flower = new Flowers();
//create flower_name attribute and set to "lotus"
//create flower_sepals attribute and set to 4
//create flower_petals attribute and set to 5
flower.set({ flower_name:"lotus",flower_sepals: 4, flower_petals:5});
//get the flower_name
document.write("<strong>Flower Name: </strong> "+ flower.get('flower_name'));
document.write("<br>");
//get the flower_sepals
document.write("<strong>Flower Sepals: </strong> "+ flower.get('flower_sepals'));
document.write("<br>");
//get the flower_petals
document.write("<strong>Flower Petals: </strong> "+ flower.get('flower_petals'));
</script>
</head>
<body>
<center>
<h1>Linux Hint</h1>
</center>
</body> </html>
Output:
Run the application in your browser by saving the code in the file with .html as an extension.
 The get() method returned attribute values.
Example 3:
Let’s check if we get the value of the nonexistent attribute.
<html>
<head>
<script src="https://code.jquery.com/jquery-2.1.3.min.js" ></script>
<script src="https://cdnjs.cloudflare.com/ajax/libs/underscore.js/1.8.2/underscore-min.js" ></script>
<script src="https://cdnjs.cloudflare.com/ajax/libs/backbone.js/1.1.2/backbone-min.js" ></script>
<script>
//create Model named Flowers using extend()
var Flowers = Backbone.Model.extend();
// create a variable named flower using the above model.
var flower = new Flowers();
//create flower_name attribute and set to "lotus"
//create flower_sepals attribute and set to 4
//create flower_petals attribute and set to 5
flower.set({ flower_name:"lotus",flower_sepals: 4, flower_petals:5});
//get the flower_size that is not existing
document.write("<strong>Flower Size: </strong> "+ flower.get('flower_size'));
document.write("<br>");
</script>
</head>
<body>
<center>
<h1>Linux Hint</h1>
</center>
</body> </html>
Output:
The get() method returned attribute values.
Example 3:
Let’s check if we get the value of the nonexistent attribute.
<html>
<head>
<script src="https://code.jquery.com/jquery-2.1.3.min.js" ></script>
<script src="https://cdnjs.cloudflare.com/ajax/libs/underscore.js/1.8.2/underscore-min.js" ></script>
<script src="https://cdnjs.cloudflare.com/ajax/libs/backbone.js/1.1.2/backbone-min.js" ></script>
<script>
//create Model named Flowers using extend()
var Flowers = Backbone.Model.extend();
// create a variable named flower using the above model.
var flower = new Flowers();
//create flower_name attribute and set to "lotus"
//create flower_sepals attribute and set to 4
//create flower_petals attribute and set to 5
flower.set({ flower_name:"lotus",flower_sepals: 4, flower_petals:5});
//get the flower_size that is not existing
document.write("<strong>Flower Size: </strong> "+ flower.get('flower_size'));
document.write("<br>");
</script>
</head>
<body>
<center>
<h1>Linux Hint</h1>
</center>
</body> </html>
Output:
 We can see the output is undefined since the flower_size attribute does not exist in the flower model.
 Run the application in your browser by saving the code in the file with .html as an extension.
The Escape() method returned attribute values.
Example 2
In this example, we will create a Modal class named – Flowers and create a model object – flower from it.
After that we used the set() method to create three attributes – (flower_name,flower_sepals,flower_petals) with values.
Finally, we used the Escape() method to return the attribute values and display them using the document.write() method.
We are implementing this entire functionality inside the tag.
<html>
<head>
<script src="https://code.jquery.com/jquery-2.1.3.min.js" ></script>
<script src="https://cdnjs.cloudflare.com/ajax/libs/underscore.js/1.8.2/underscore-min.js" ></script>
<script src="https://cdnjs.cloudflare.com/ajax/libs/backbone.js/1.1.2/backbone-min.js" ></script>
<script>
//create Model named Flowers using extend()
var Flowers = Backbone.Model.extend();
// create a variable named flower using the above model.
var flower = new Flowers();
//create flower_name attribute and set to "lotus"
//create flower_sepals attribute and set to 4
//create flower_petals attribute and set to 5
flower.set({ flower_name:"lotus",flower_sepals: 4, flower_petals:5});
//get the flower_name
document.write("<strong>Flower Name: </strong> "+ flower.escape('flower_name'));
document.write("<br>");
//get the flower_sepals
document.write("<strong>Flower Sepals: </strong> "+ flower.escape('flower_sepals'));
document.write("<br>");
//get the flower_petals
document.write("<strong>Flower Petals: </strong> "+ flower.escape('flower_petals'));
</script>
</head>
<body>
<center>
<h1>Linux Hint</h1>
</center>
</body> </html>
Output:
Run the application in your browser by saving the code in the file with .html as an extension.
The Escape() method returned attribute values.
Example 2
In this example, we will create a Modal class named – Flowers and create a model object – flower from it.
After that we used the set() method to create three attributes – (flower_name,flower_sepals,flower_petals) with values.
Finally, we used the Escape() method to return the attribute values and display them using the document.write() method.
We are implementing this entire functionality inside the tag.
<html>
<head>
<script src="https://code.jquery.com/jquery-2.1.3.min.js" ></script>
<script src="https://cdnjs.cloudflare.com/ajax/libs/underscore.js/1.8.2/underscore-min.js" ></script>
<script src="https://cdnjs.cloudflare.com/ajax/libs/backbone.js/1.1.2/backbone-min.js" ></script>
<script>
//create Model named Flowers using extend()
var Flowers = Backbone.Model.extend();
// create a variable named flower using the above model.
var flower = new Flowers();
//create flower_name attribute and set to "lotus"
//create flower_sepals attribute and set to 4
//create flower_petals attribute and set to 5
flower.set({ flower_name:"lotus",flower_sepals: 4, flower_petals:5});
//get the flower_name
document.write("<strong>Flower Name: </strong> "+ flower.escape('flower_name'));
document.write("<br>");
//get the flower_sepals
document.write("<strong>Flower Sepals: </strong> "+ flower.escape('flower_sepals'));
document.write("<br>");
//get the flower_petals
document.write("<strong>Flower Petals: </strong> "+ flower.escape('flower_petals'));
</script>
</head>
<body>
<center>
<h1>Linux Hint</h1>
</center>
</body> </html>
Output:
 Run the application in your browser by saving the code in the file with .html as an extension.
The Escape() method returned attribute values.
Example 3
Let’s check if we get the value of the nonexistent attribute.
<html>
<head>
<script src="https://code.jquery.com/jquery-2.1.3.min.js" ></script>
<script src="https://cdnjs.cloudflare.com/ajax/libs/underscore.js/1.8.2/underscore-min.js" ></script>
<script src="https://cdnjs.cloudflare.com/ajax/libs/backbone.js/1.1.2/backbone-min.js" ></script>
<script>
//create Model named Flowers using extend()
var Flowers = Backbone.Model.extend();
// create a variable named flower using the above model.
var flower = new Flowers();
//create flower_name attribute and set to "lotus"
//create flower_sepals attribute and set to 4
//create flower_petals attribute and set to 5
flower.set({ flower_name:"lotus",flower_sepals: 4, flower_petals:5});
//get the flower_size that is not existing
document.write("<strong>Flower Size: </strong> "+ flower.escape('flower_size'));
document.write("<br>");
</script>
</head>
<body>
<center>
<h1>Linux Hint</h1>
</center>
</body> </html>
Output:
Run the application in your browser by saving the code in the file with .html as an extension.
The Escape() method returned attribute values.
Example 3
Let’s check if we get the value of the nonexistent attribute.
<html>
<head>
<script src="https://code.jquery.com/jquery-2.1.3.min.js" ></script>
<script src="https://cdnjs.cloudflare.com/ajax/libs/underscore.js/1.8.2/underscore-min.js" ></script>
<script src="https://cdnjs.cloudflare.com/ajax/libs/backbone.js/1.1.2/backbone-min.js" ></script>
<script>
//create Model named Flowers using extend()
var Flowers = Backbone.Model.extend();
// create a variable named flower using the above model.
var flower = new Flowers();
//create flower_name attribute and set to "lotus"
//create flower_sepals attribute and set to 4
//create flower_petals attribute and set to 5
flower.set({ flower_name:"lotus",flower_sepals: 4, flower_petals:5});
//get the flower_size that is not existing
document.write("<strong>Flower Size: </strong> "+ flower.escape('flower_size'));
document.write("<br>");
</script>
</head>
<body>
<center>
<h1>Linux Hint</h1>
</center>
</body> </html>
Output:
 We can see the output is empty since the flower_size attribute does not exist in the flower model.
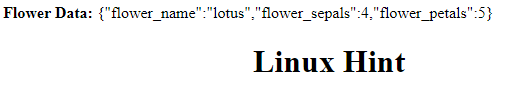 We can see that all the attributes along with values were returned in JSON Format.
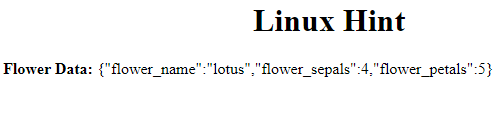 We can see that all the attributes along with values were returned in JSON Format.
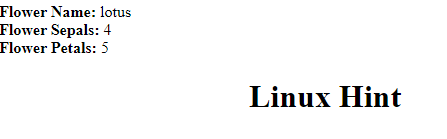
 Run the application in your browser by saving the code in the file with .html as an extension.
Here, we can see when we display the previousAttributes(), “lotus” is returned for flower_name instead of “lilly” because we are returning previous attributes.
Run the application in your browser by saving the code in the file with .html as an extension.
Here, we can see when we display the previousAttributes(), “lotus” is returned for flower_name instead of “lilly” because we are returning previous attributes.
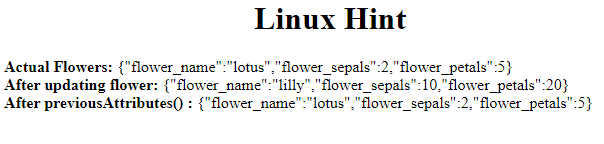 Run the application in your browser by saving the code in the file with .html as an extension.
Here, we can see when we display the previousAttributes(), “lotus” is returned for flower_name instead of “lilly”, 2 is returned instead of 10, and 5 is retired instead of 20 because we are returning previous attributes.
Run the application in your browser by saving the code in the file with .html as an extension.
Here, we can see when we display the previousAttributes(), “lotus” is returned for flower_name instead of “lilly”, 2 is returned instead of 10, and 5 is retired instead of 20 because we are returning previous attributes.
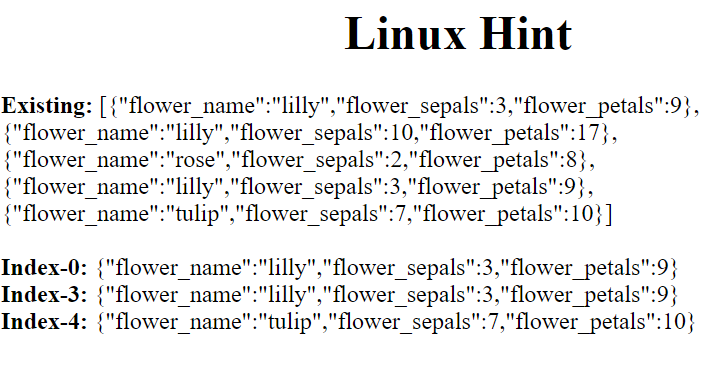 Run the application in your browser by saving the code in the file with .html as an extension.
Here, we can see that at() returns the model instances using the indices – 0, 3, and 4.
Run the application in your browser by saving the code in the file with .html as an extension.
Here, we can see that at() returns the model instances using the indices – 0, 3, and 4.
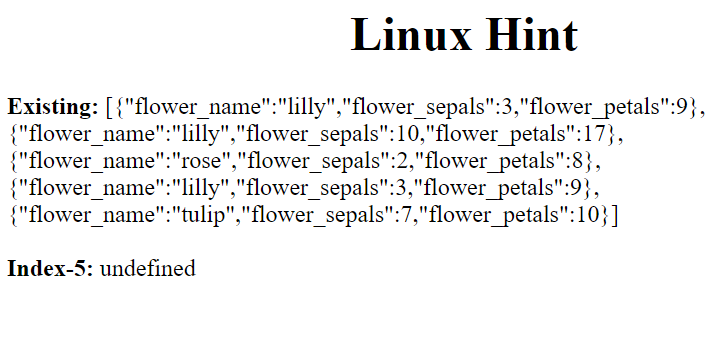 Run the application in your browser by saving the code in the file with .html as an extension.
Here, we can see that at() returns undefined since the model instance at index-5 doesn’t exist in a collection.
Run the application in your browser by saving the code in the file with .html as an extension.
Here, we can see that at() returns undefined since the model instance at index-5 doesn’t exist in a collection.
 Run the application in your browser by saving the code in the file with .html as an extension.
Here, we can see the add() method added the model instance to the collection.
Run the application in your browser by saving the code in the file with .html as an extension.
Here, we can see the add() method added the model instance to the collection.
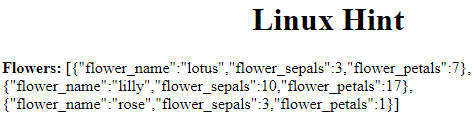 Run the application in your browser by saving the code in the file with .html as an extension.
Here, we can see the add() method added the array of models (3) to the collection.
Run the application in your browser by saving the code in the file with .html as an extension.
Here, we can see the add() method added the array of models (3) to the collection.
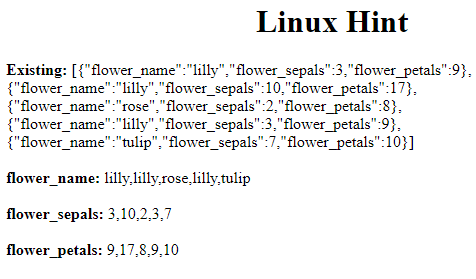 Run the application in your browser by saving the code in the file with .html as an extension.
Here, we returned all the attributes using the pluck() method.
Run the application in your browser by saving the code in the file with .html as an extension.
Here, we returned all the attributes using the pluck() method.
 Run the application in your browser by saving the code in the file with .html as extension.
Here, we returned all the attributes using the pluck() method.
Run the application in your browser by saving the code in the file with .html as extension.
Here, we returned all the attributes using the pluck() method.
 Run the application in your browser by saving the code in the file with .html as an extension.
Here, we can see that the entire collection is displayed in JSON Format.
Run the application in your browser by saving the code in the file with .html as an extension.
Here, we can see that the entire collection is displayed in JSON Format.
 Run the application in your browser by saving the code in the file with .html as an extension.
Here, we can see that after clearing the entire model, JSON.stringify() returns an empty model.
Run the application in your browser by saving the code in the file with .html as an extension.
Here, we can see that after clearing the entire model, JSON.stringify() returns an empty model.
 Run the application in your browser by saving the code in the file with .html as an extension.
Here, we can see that after clearing the entire model, get() returns undefined for attributes.
Run the application in your browser by saving the code in the file with .html as an extension.
Here, we can see that after clearing the entire model, get() returns undefined for attributes.
 Run the application in your browser by saving the code in the file with .html as an extension.
Here, we can see that models are returned from the collection using the models() method.
Run the application in your browser by saving the code in the file with .html as an extension.
Here, we can see that models are returned from the collection using the models() method.
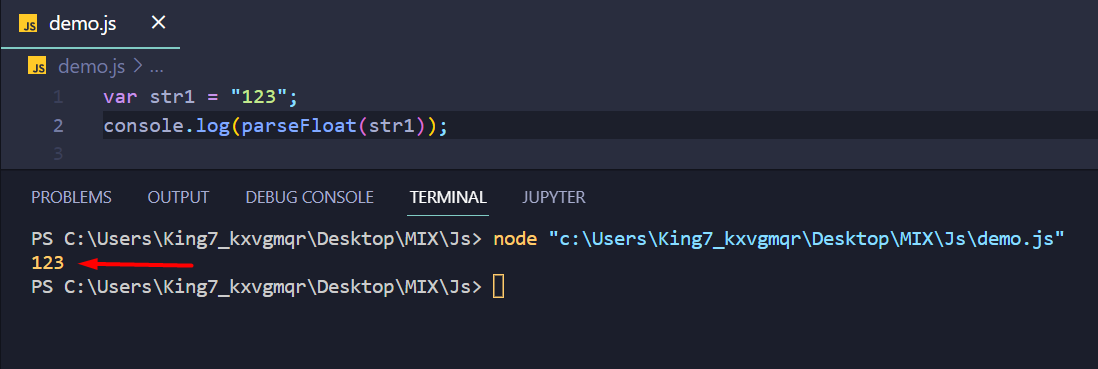 As you can see, we got the absolute numeric value onto our terminal.
A string containing a floating-point numeric value
This time around, we are going to create a string that contains a decimal point with the following line:
var str2 = "123.22";
Then, we are going to parse this string and store the return value inside another variable, and then we are going to pass that to console log function as
var output = parseFloat(str2);
console.log(output);
We get the following result on the terminal:
As you can see, we got the absolute numeric value onto our terminal.
A string containing a floating-point numeric value
This time around, we are going to create a string that contains a decimal point with the following line:
var str2 = "123.22";
Then, we are going to parse this string and store the return value inside another variable, and then we are going to pass that to console log function as
var output = parseFloat(str2);
console.log(output);
We get the following result on the terminal:
 As you can see, we got the total floating-point value in our variable output.
A string with a floating-point value but zero at the end
For this example, we will create the following string
var str3 = "99.100";
As you can see, inside the string, the value ends on two zeroes.
Now, we are going to convert this string into a float and store it inside a new variable as
var output = parseFloat(str3);
After that, we can use the console log function to print out the value from this variable output:
console.log(output);
Upon execution, we get the following output:
As you can see, we got the total floating-point value in our variable output.
A string with a floating-point value but zero at the end
For this example, we will create the following string
var str3 = "99.100";
As you can see, inside the string, the value ends on two zeroes.
Now, we are going to convert this string into a float and store it inside a new variable as
var output = parseFloat(str3);
After that, we can use the console log function to print out the value from this variable output:
console.log(output);
Upon execution, we get the following output:
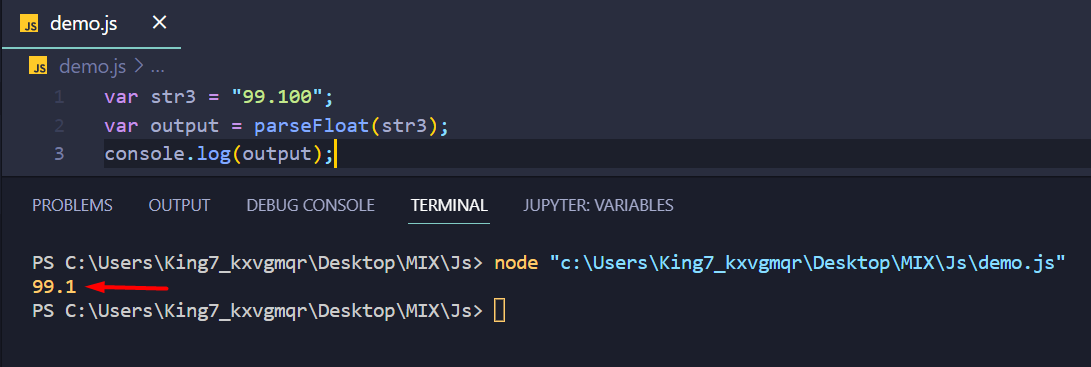 As you can see, the parseFloat() function removed the ending zeroes from the numeric value as they don’t mean anything.
A string with spaces and multiple numbers
For this example, we are going to create a new string that is going to include multiple numbers but with spaces between them like
var str4 = "50 60 112 342";
Now, we are going to parse inside the parseFloat() function and then store the return value into a variable like
var output = parseFloat(str4);
Now, we get the display using the console log function like:
console.log(output);
Upon execution, we get the following result on our terminal:
As you can see, the parseFloat() function removed the ending zeroes from the numeric value as they don’t mean anything.
A string with spaces and multiple numbers
For this example, we are going to create a new string that is going to include multiple numbers but with spaces between them like
var str4 = "50 60 112 342";
Now, we are going to parse inside the parseFloat() function and then store the return value into a variable like
var output = parseFloat(str4);
Now, we get the display using the console log function like:
console.log(output);
Upon execution, we get the following result on our terminal:
 As you can observe, upon encountering a character other than a number or a decimal point, the parseFloat() ignores the upcoming characters in the string and only returns us the number before the first blank space.
A string with a single number between spaces
Now, we are going to work with another example including spaces, this time around, we are going to work with the following string:
var str5 = " 333 ";
As you can see, the above string contains the number between blank spaces on both ends.
Now we are going to pass it into our parseFloat() function, and then we are going to console log the output onto the terminal using:
var output = parseFloat(str5);
console.log(output);
We get the following result onto our terminal:
As you can observe, upon encountering a character other than a number or a decimal point, the parseFloat() ignores the upcoming characters in the string and only returns us the number before the first blank space.
A string with a single number between spaces
Now, we are going to work with another example including spaces, this time around, we are going to work with the following string:
var str5 = " 333 ";
As you can see, the above string contains the number between blank spaces on both ends.
Now we are going to pass it into our parseFloat() function, and then we are going to console log the output onto the terminal using:
var output = parseFloat(str5);
console.log(output);
We get the following result onto our terminal:
 As you can see, the spaces were ignored, and only the number was taken and converted into floating-point value.
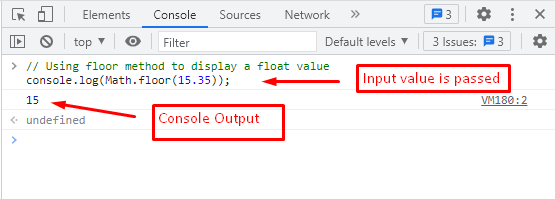 Using the Math.floor() method, the output number 15 is displayed in the above figure.
It shows that the float value (15.35) is rounded off to the nearest small value(integer/whole-number).
Using the Math.floor() method, the output number 15 is displayed in the above figure.
It shows that the float value (15.35) is rounded off to the nearest small value(integer/whole-number).
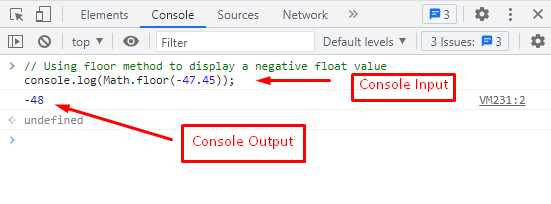 The Math.floor() method has returned -48, as it is the nearest small value to “-47.45‘.
Note: For a negative number, the larger negative number (“-48” is smaller than “-47.45”.
Congratulations! You have learned various ways to apply the Math.floor() method.
The Math.floor() method has returned -48, as it is the nearest small value to “-47.45‘.
Note: For a negative number, the larger negative number (“-48” is smaller than “-47.45”.
Congratulations! You have learned various ways to apply the Math.floor() method.
 As you can see, we have successfully retrieved “90000” as the value of the “Computer” key with the help of the JavaScript get() method.
In case, if you try to get a value from the Map object that does not exist in any of its “key-value” pairs, then “undefined” will be displayed as output.
For instance, we have not added a “Server” key in our “Gadgets” Map object.
So, passing “Server” as a key argument to the JavaScript get() method will print out “undefined” on the console:
Gadgets.get("Server");
Output
As you can see, we have successfully retrieved “90000” as the value of the “Computer” key with the help of the JavaScript get() method.
In case, if you try to get a value from the Map object that does not exist in any of its “key-value” pairs, then “undefined” will be displayed as output.
For instance, we have not added a “Server” key in our “Gadgets” Map object.
So, passing “Server” as a key argument to the JavaScript get() method will print out “undefined” on the console:
Gadgets.get("Server");
Output
 We have compiled the information related to the usage of the JavaScript Map get() method.
 As you can easily observe, toLowerCase() changed all the alphabetical characters to lowercase characters, and the special character “!” was not affected.
 We were able to convert a string into an all-uppercase string
 Both the strings have been concatenated with each other and even a blank space has been placed in between them.
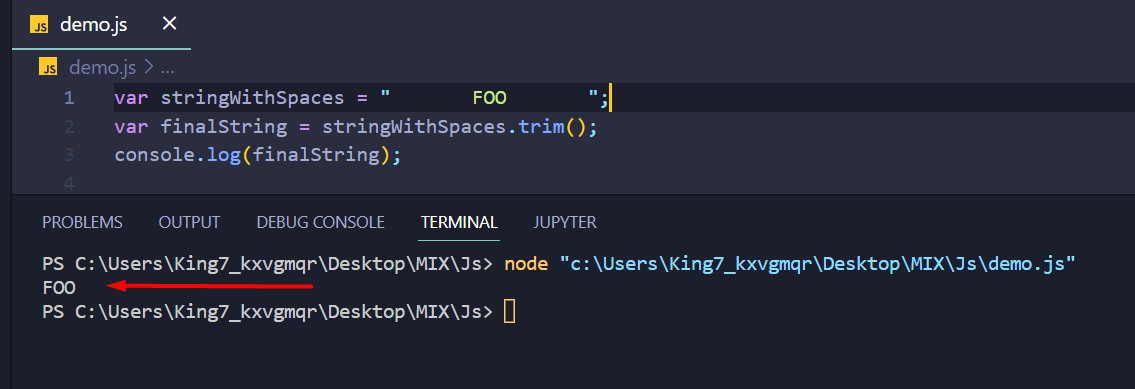 The blank spaces have been successfully removed from both the ends of the string
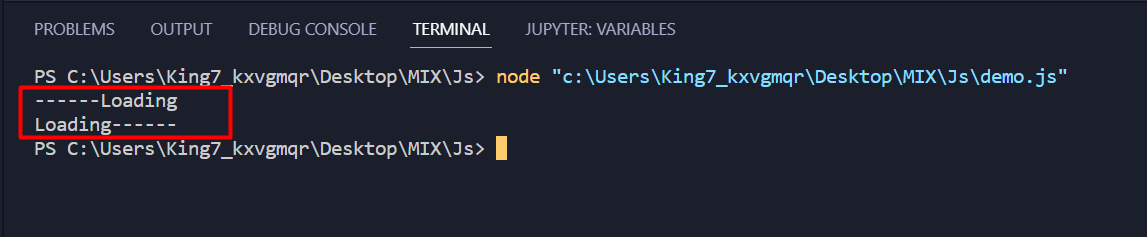 First, we have the string with padding in the start.
And then, we have the string with padding at the end.
If we want to have the padding at both sides we have to use a combination of padStart() and padEnd() functions like
\
let string = "Loading";
let padded = string.padStart(10, "-");
padded = padded.padEnd(13, "-");
console.log(padded);
Upon execution, we can see the following output on our terminal
First, we have the string with padding in the start.
And then, we have the string with padding at the end.
If we want to have the padding at both sides we have to use a combination of padStart() and padEnd() functions like
\
let string = "Loading";
let padded = string.padStart(10, "-");
padded = padded.padEnd(13, "-");
console.log(padded);
Upon execution, we can see the following output on our terminal
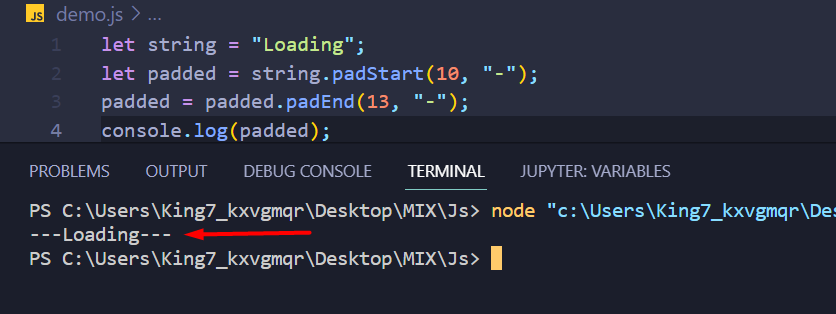 The padding has been successfully added on both ends of the string.
 Only the word “Welcome” was extracted as a substring, and printed onto the terminal.
 As you can see, the substring() method took the negative value as 0 and sliced the string from the starting index.
Now, let’s try not giving it an ending argument like
let string = "As above so below";
let resultString = string.substring(7);
console.log(resultString);
Upon execution of the code mentioned above we get the following output
As you can see, the substring() method took the negative value as 0 and sliced the string from the starting index.
Now, let’s try not giving it an ending argument like
let string = "As above so below";
let resultString = string.substring(7);
console.log(resultString);
Upon execution of the code mentioned above we get the following output
 It is clear from the output, that the substring() method sliced the string till the last character when the ending argument was missing.
 As you can see, it parted the string from the 4th index and the length of the parted string was 4 characters.
 As you can see, we got the length of our string like “21” characters long along with blank spaces.
 As you can see, the replace() method replaced the word “Mars” with the word “Pluto”.
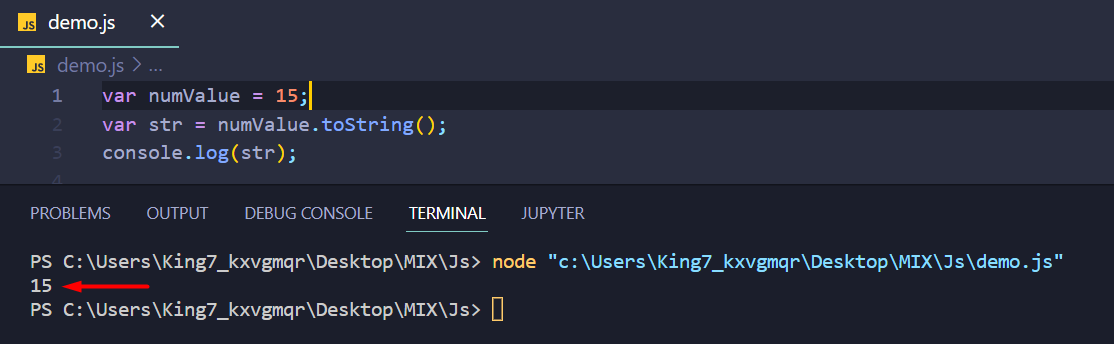 As you can see, the toString() converted the number into the string without changing its base.
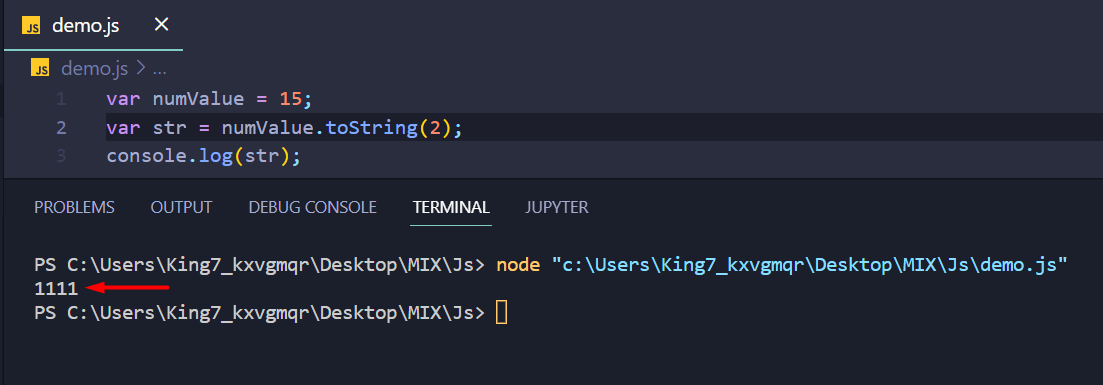 As you can see, the result was “1111” which is equivalent to 15 but in binary or base 2.
 The output “17” in octal is equivalent to 15 in the base 10.
 As you can easily observe, we get the output as “f” which is equivalent to 15 in the decimal base.
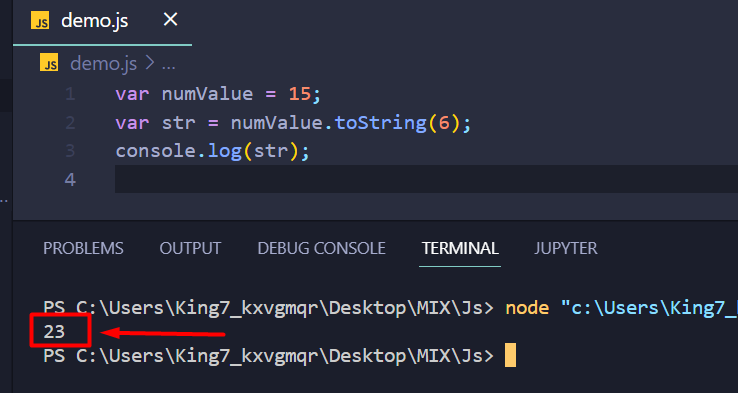 As you can easily observe that the value 15 when converted from the decimal base (10) into base 6, it results in the value 23.
 Run the application in your browser by saving the code in the file with .html as an extension.
Here, we can see that it is removed after unsetting the flower_name attribute, and the remaining attributes are displayed.
Example 2In this example, we will create a Modal class named – Flowers and create a model object – flower from it.
After that, we used the set() method to create three attributes – (flower_name,flower_sepals,flower_petals) with values.
Finally, we used the unset() method to unset the flower_sepals and flower_petals attributes.
We are implementing this entire functionality inside the <body> tag.
<html>
<head>
<script src="https://code.jquery.com/jquery-2.1.3.min.js" ></script>
<script src="https://cdnjs.cloudflare.com/ajax/libs/underscore.js/1.8.2/underscore-min.js" ></script>
<script src="https://cdnjs.cloudflare.com/ajax/libs/backbone.js/1.1.2/backbone-min.js" ></script>
</head>
<body>
<center>
<h1>Linux Hint</h1>
</center>
<script>
//create Model named Flowers using extend()
var Flowers = Backbone.Model.extend();
// create a variable named flower using the above model.
var flower = new Flowers();
//create flower_name attribute and set to "lotus"
//create flower_sepals attribute and set to 2
//create flower_petals attribute and set to 5
flower.set({ flower_name:"lotus",flower_sepals: 2, flower_petals:5});
//display the flower model
document.write("<strong>Flower Details: </strong> "+ JSON.stringify(flower));
document.write("<br>");
//unset the flower_sepals and flower_petals attribute.
flower.unset('flower_sepals');
flower.unset('flower_petals');
//display the flower model
document.write("<strong>Flower Details after unsetting flower_sepals and flower_petals attributes: </strong> "+ JSON.stringify(flower));
document.write("<br>");
</script>
</body></html>
Output
Run the application in your browser by saving the code in the file with .html as an extension.
Here, we can see that it is removed after unsetting the flower_name attribute, and the remaining attributes are displayed.
Example 2In this example, we will create a Modal class named – Flowers and create a model object – flower from it.
After that, we used the set() method to create three attributes – (flower_name,flower_sepals,flower_petals) with values.
Finally, we used the unset() method to unset the flower_sepals and flower_petals attributes.
We are implementing this entire functionality inside the <body> tag.
<html>
<head>
<script src="https://code.jquery.com/jquery-2.1.3.min.js" ></script>
<script src="https://cdnjs.cloudflare.com/ajax/libs/underscore.js/1.8.2/underscore-min.js" ></script>
<script src="https://cdnjs.cloudflare.com/ajax/libs/backbone.js/1.1.2/backbone-min.js" ></script>
</head>
<body>
<center>
<h1>Linux Hint</h1>
</center>
<script>
//create Model named Flowers using extend()
var Flowers = Backbone.Model.extend();
// create a variable named flower using the above model.
var flower = new Flowers();
//create flower_name attribute and set to "lotus"
//create flower_sepals attribute and set to 2
//create flower_petals attribute and set to 5
flower.set({ flower_name:"lotus",flower_sepals: 2, flower_petals:5});
//display the flower model
document.write("<strong>Flower Details: </strong> "+ JSON.stringify(flower));
document.write("<br>");
//unset the flower_sepals and flower_petals attribute.
flower.unset('flower_sepals');
flower.unset('flower_petals');
//display the flower model
document.write("<strong>Flower Details after unsetting flower_sepals and flower_petals attributes: </strong> "+ JSON.stringify(flower));
document.write("<br>");
</script>
</body></html>
Output
 Run the application in your browser by saving the code in the file with .html as an extension.
Here, we can see that after unsetting the flower_sepals and flower_petals attributes, they are removed, and the remaining attribute is displayed.
Run the application in your browser by saving the code in the file with .html as an extension.
Here, we can see that after unsetting the flower_sepals and flower_petals attributes, they are removed, and the remaining attribute is displayed.
 Run the application in your browser by saving the code in the file with .html as an extension.
Here, we can see the reset() method reset the old instances in a collection with a new instance.
Run the application in your browser by saving the code in the file with .html as an extension.
Here, we can see the reset() method reset the old instances in a collection with a new instance.
 Run the application in your browser by saving the code in the file with .html as an extension.
Here, the reset() method removes all the old model instances in a collection.
Run the application in your browser by saving the code in the file with .html as an extension.
Here, the reset() method removes all the old model instances in a collection.
 Clicking the “Print” button will call the JavaScript “printDivContent()” function and the following window will appear on the screen:
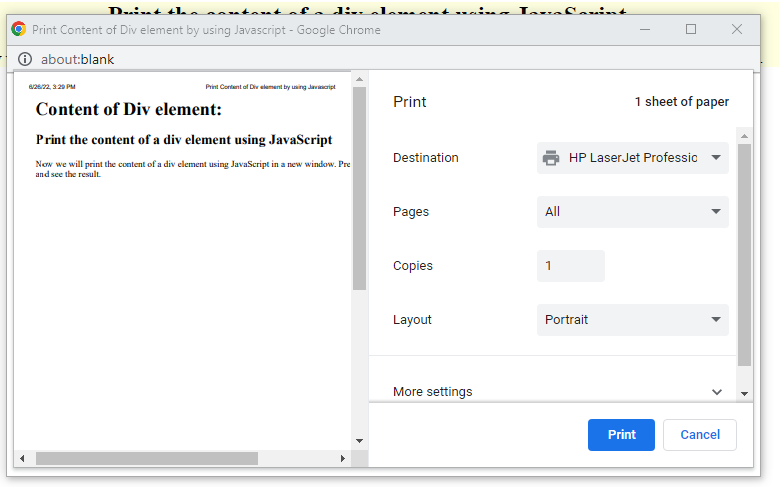 As you can see, we have successfully accessed the content of the added “div” element:
 We have provided all the necessary information about printing the content of a “div” element using Javascript.
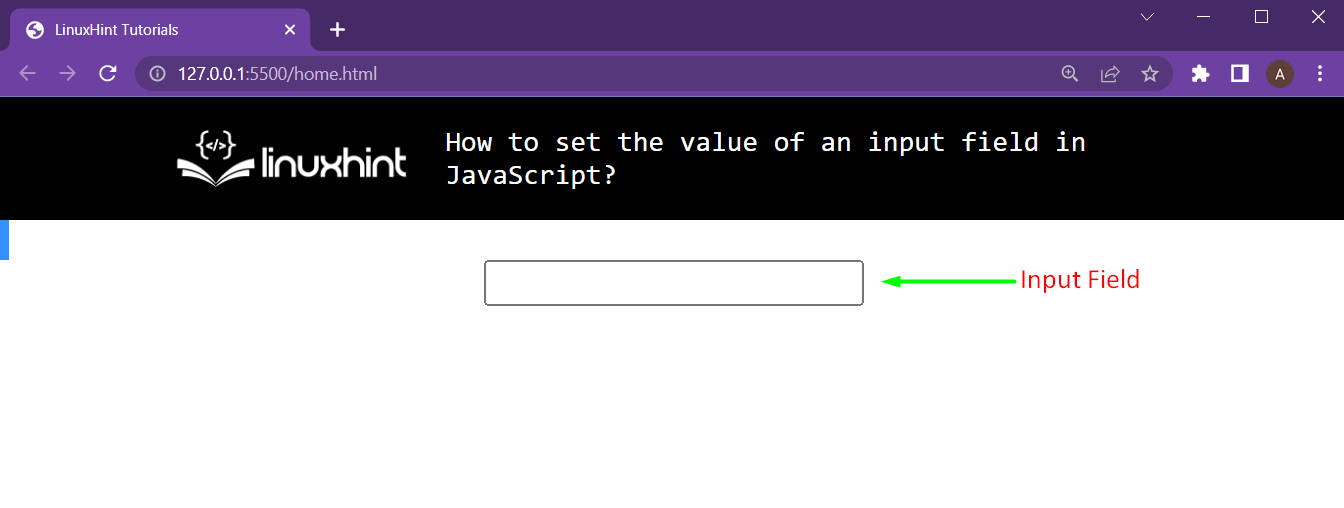 We can see our input field on the screen.
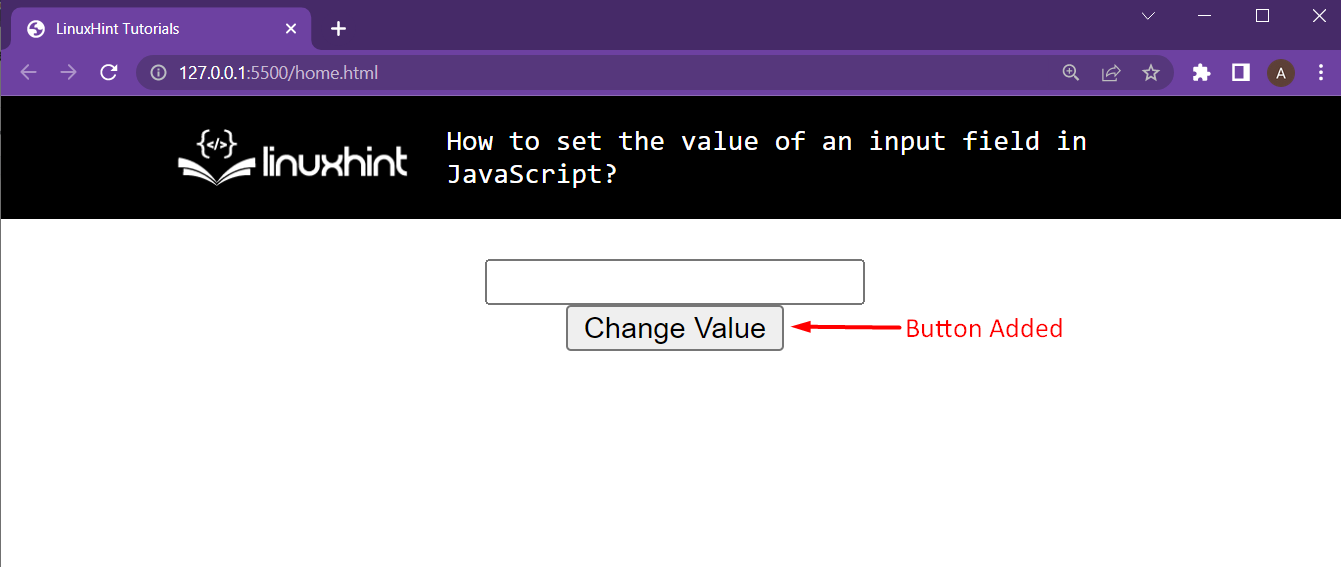 In the script file, we are going to add the following functionality to make this button work:
function changeValue() {
textField = document.getElementById("textField1");
textField.value = "Method 1";}
We are first getting a reference to our text field using the document.getElementbyId().
After that, we use the dot operator to get the value attribute and directly assign it a string value.
Upon clicking this button, we get the following output:
In the script file, we are going to add the following functionality to make this button work:
function changeValue() {
textField = document.getElementById("textField1");
textField.value = "Method 1";}
We are first getting a reference to our text field using the document.getElementbyId().
After that, we use the dot operator to get the value attribute and directly assign it a string value.
Upon clicking this button, we get the following output:
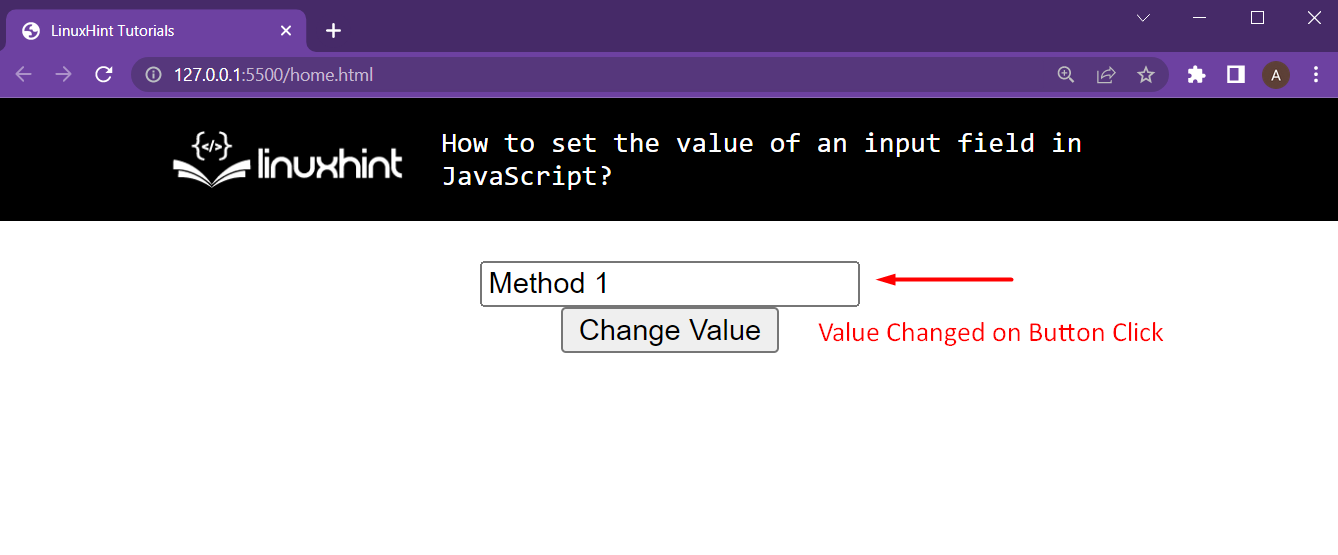 As you can see, we were able to change the input field’s value using the dot-operator and the value attribute.
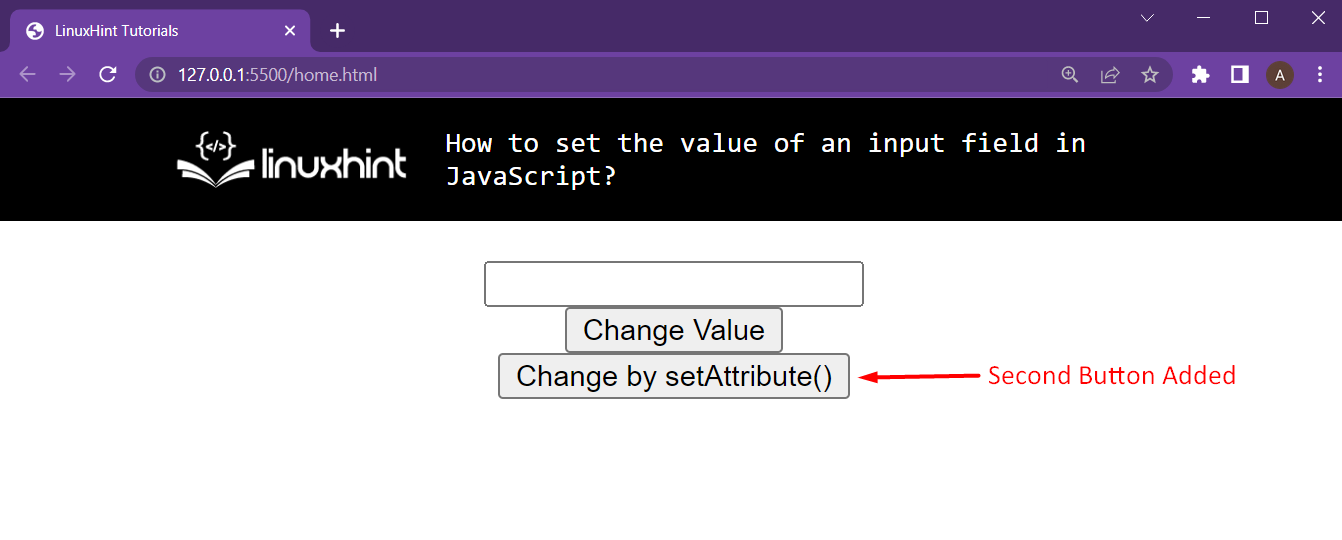 Then we head inside the script file, and define this setAttributeChange() change function as follows:
function setAttributeChange() {
textField = document.getElementById("textField1");
textField.setAttribute("value", "Method 2");}
In the first line, we are getting a reference to the text field using the document.getElementById() function.
After that, we are using the dot-operator and the setAttribute() function to choose the attribute “value” and then give it a string value as “Method 2”.
Upon clicking the button, we get the following output:
Then we head inside the script file, and define this setAttributeChange() change function as follows:
function setAttributeChange() {
textField = document.getElementById("textField1");
textField.setAttribute("value", "Method 2");}
In the first line, we are getting a reference to the text field using the document.getElementById() function.
After that, we are using the dot-operator and the setAttribute() function to choose the attribute “value” and then give it a string value as “Method 2”.
Upon clicking the button, we get the following output:
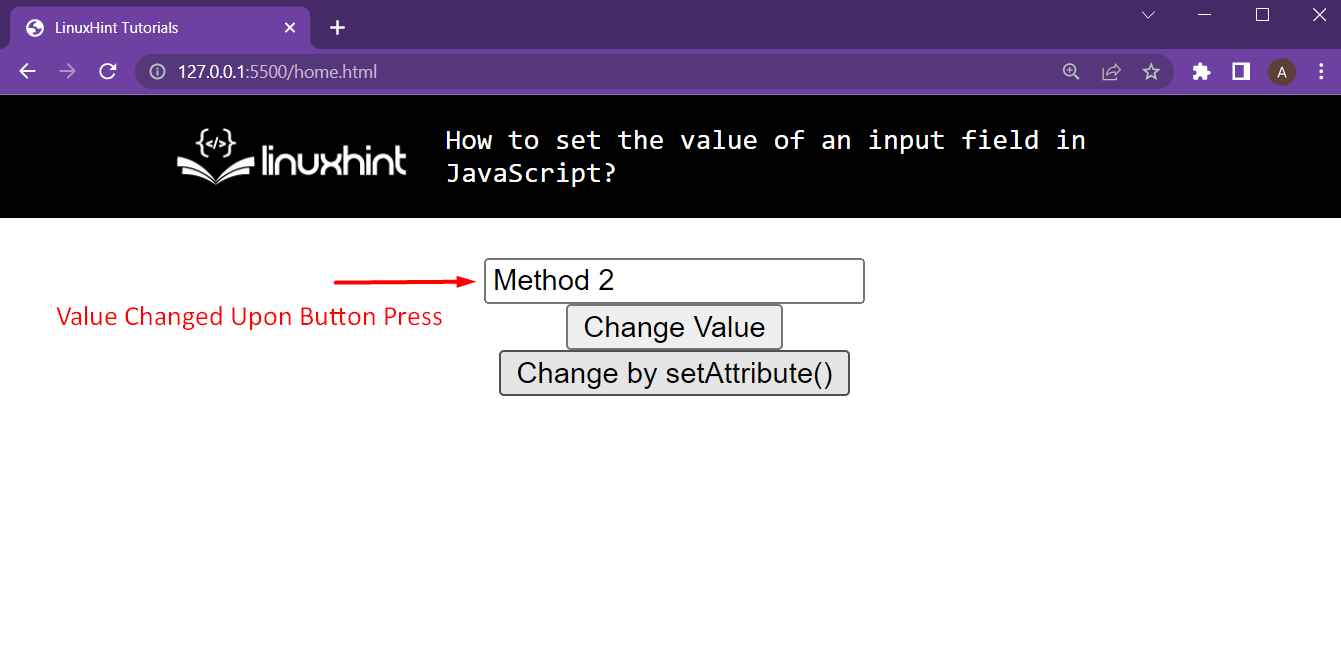 As you can see, we were able to change the value of the input field using the setAttribute() function.
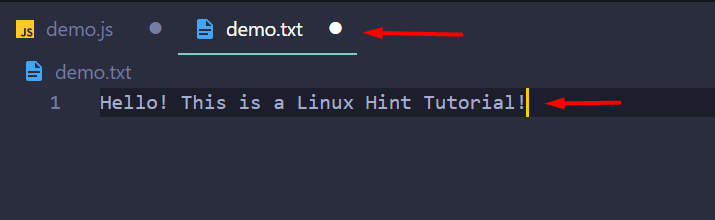 After that, head inside your javascript file and include the file system package using the require keyword:
const fs = require("fs");
Then use the following lines:
fs.readFile("demo.txt", (err, data) => {
if (err) throw err;
console.log(data.toString());});
The following steps are being performed in the code mentioned above:
Read the file “demo.txt”
If there is an error, then throw that error message onto the terminal
In case of no error, store the data read from the file in the data variable
Print the content of the data variable after converting it to string using the toString() method
Upon execution of the code, you will observe the following output on your terminal:
After that, head inside your javascript file and include the file system package using the require keyword:
const fs = require("fs");
Then use the following lines:
fs.readFile("demo.txt", (err, data) => {
if (err) throw err;
console.log(data.toString());});
The following steps are being performed in the code mentioned above:
Read the file “demo.txt”
If there is an error, then throw that error message onto the terminal
In case of no error, store the data read from the file in the data variable
Print the content of the data variable after converting it to string using the toString() method
Upon execution of the code, you will observe the following output on your terminal:
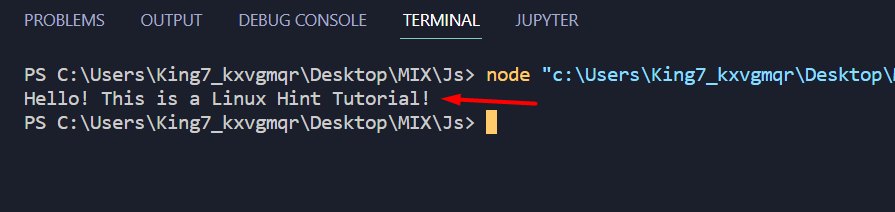 The data from the file has been printed onto the terminal.
 After that, head over to the javascript file and write down the following lines of code:
document.getElementById("inputFileToRead")
.addEventListener("change", function () {
var fr = new FileReader();
fr.readAsText(this.files[0]);
fr.onload = function () {
console.log(fr.result);
};
});
The following steps are being performed in the code mentioned above:
An action listener is being applied on your <input> with the id “inputFileToRead”
Then a object of file reader (fr) has been created using the FileReader() constructor
Then the first file on the <input> is being read as a text using the fr variable
Upon successful read of the file that data is being printed onto the console
To demonstrate this, select the same file that was selected in the first example and you will get the following result on the console of your browser:
After that, head over to the javascript file and write down the following lines of code:
document.getElementById("inputFileToRead")
.addEventListener("change", function () {
var fr = new FileReader();
fr.readAsText(this.files[0]);
fr.onload = function () {
console.log(fr.result);
};
});
The following steps are being performed in the code mentioned above:
An action listener is being applied on your <input> with the id “inputFileToRead”
Then a object of file reader (fr) has been created using the FileReader() constructor
Then the first file on the <input> is being read as a text using the fr variable
Upon successful read of the file that data is being printed onto the console
To demonstrate this, select the same file that was selected in the first example and you will get the following result on the console of your browser:
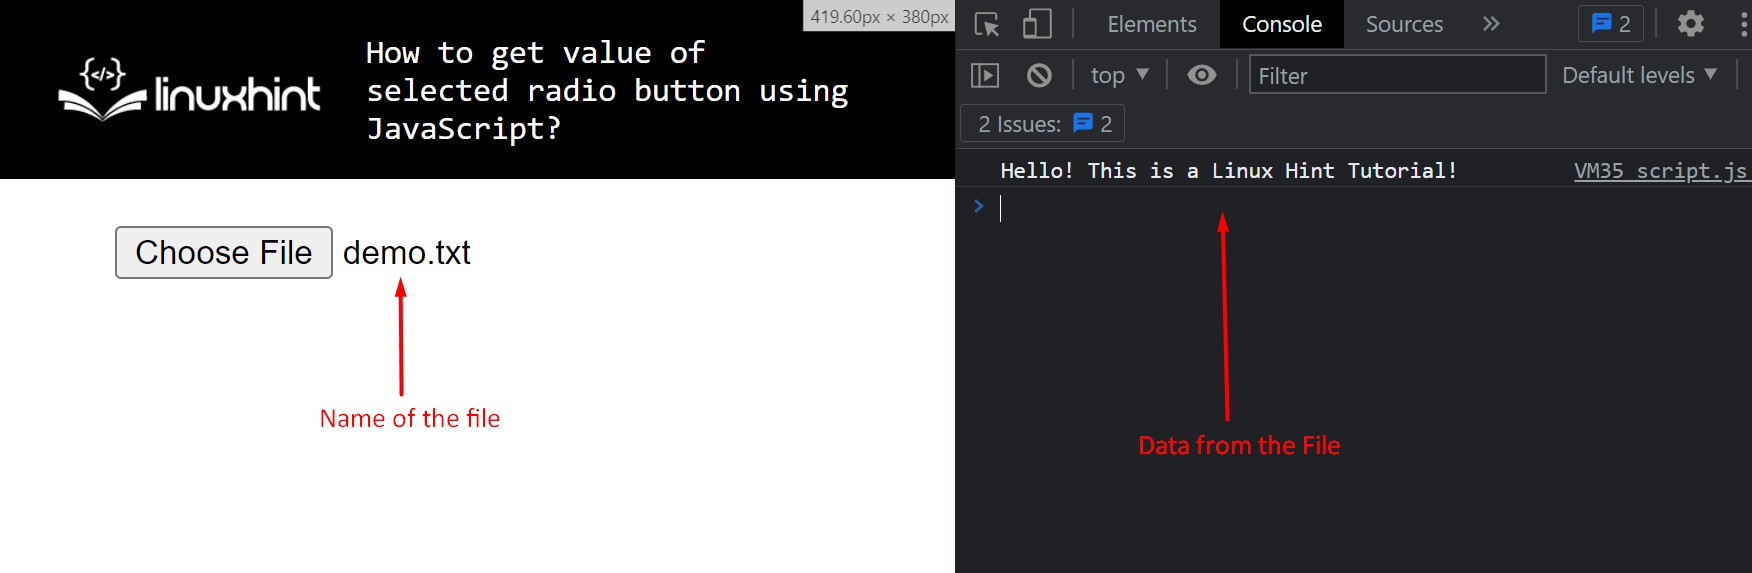 The result shows that the file has been successfully read by the HTML webpage.
 First, the size of the set is printed onto the terminal, and then the values of the set are enclosed with curly brackets.
 Observe the output as it has the following things:
It is in ascending order because sets are ordered lists
It doesn’t contain duplicated items (more precisely the value 3) as JavaScript removed them to make the elements of the set unique
Observe the output as it has the following things:
It is in ascending order because sets are ordered lists
It doesn’t contain duplicated items (more precisely the value 3) as JavaScript removed them to make the elements of the set unique
 The value 66 was successfully removed from the set.
 This means that the value 22 is present inside the set.
Look for the value 75 in the set with the following line:
console.log(mySet.has(75));
You will see the following on the terminal
This means that the value 22 is present inside the set.
Look for the value 75 in the set with the following line:
console.log(mySet.has(75));
You will see the following on the terminal
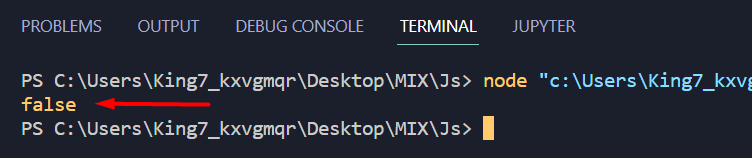 The output is “false”, therefore, you can conclude that the value 75 is not present in our set.
 From the output, it is easy to conclude that the clear() method has removed all the values from the set.
 The output verified that the “const” keyword failed to prevent an object from being modified.
The shallow freeze approach can be used to resolve/fix this problem.
The output verified that the “const” keyword failed to prevent an object from being modified.
The shallow freeze approach can be used to resolve/fix this problem.
 The output clarified that the Object.freeze() method doesn’t allow modifications to the object.
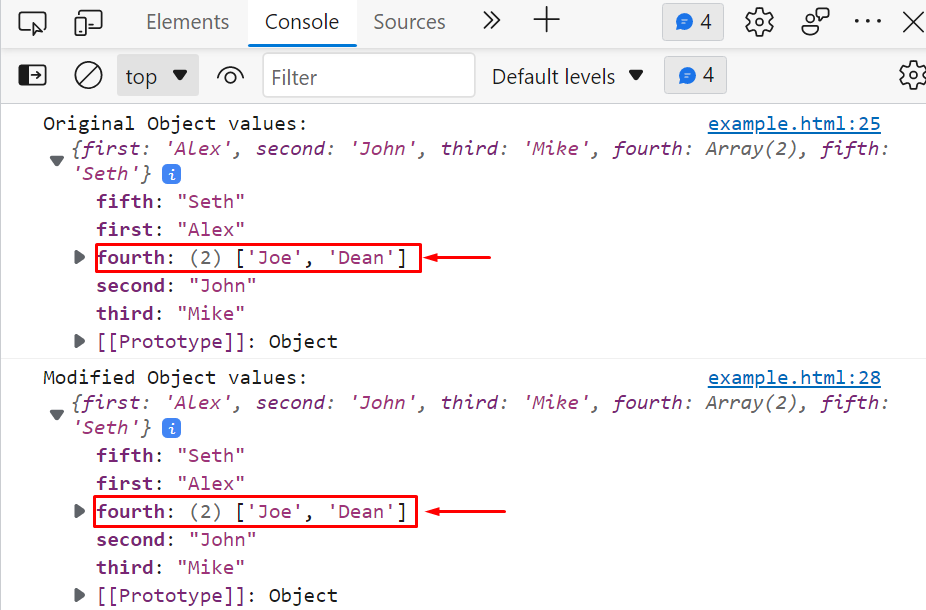 From the above-given output, it is clear that the deep freeze approach prevents the object from being modified.
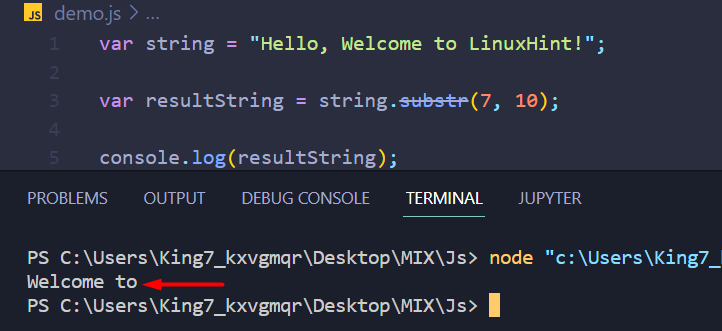 You can see that the resultString contains a substring that is 10 characters long (including blank spaces) extracted from our original string.
To verify that substr() method did not modify the original string, print the original string using the console log function as well:
console.log(string);
Executing this code, give the following output:
You can see that the resultString contains a substring that is 10 characters long (including blank spaces) extracted from our original string.
To verify that substr() method did not modify the original string, print the original string using the console log function as well:
console.log(string);
Executing this code, give the following output:
 As you can see, the original string is not modified.
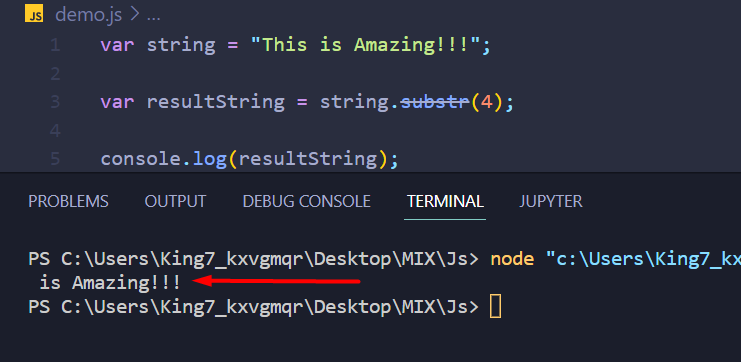 As it is clear from the output, if the length parameter is not given, then the substr() method would extract the substring till the last index of the original string.
 It is clear from the result, that when negative values are passed in either of the arguments of the substr() method, the result is always an empty string.
 To verify that the original string is unscathed, print the original string variable using the console log function as well:
console.log(string);
You will observe the following result on your terminal:
To verify that the original string is unscathed, print the original string variable using the console log function as well:
console.log(string);
You will observe the following result on your terminal:
 You can observe that the original string is not modified.
 You were able to match the pattern of two consecutive numbers and remove them from our string.
 You can see that, even though all the words in the string spelled “hello”, still only the one with all capital letters was replaced.
Showing that the replace() is indeed case sensitive.
You can see that, even though all the words in the string spelled “hello”, still only the one with all capital letters was replaced.
Showing that the replace() is indeed case sensitive.
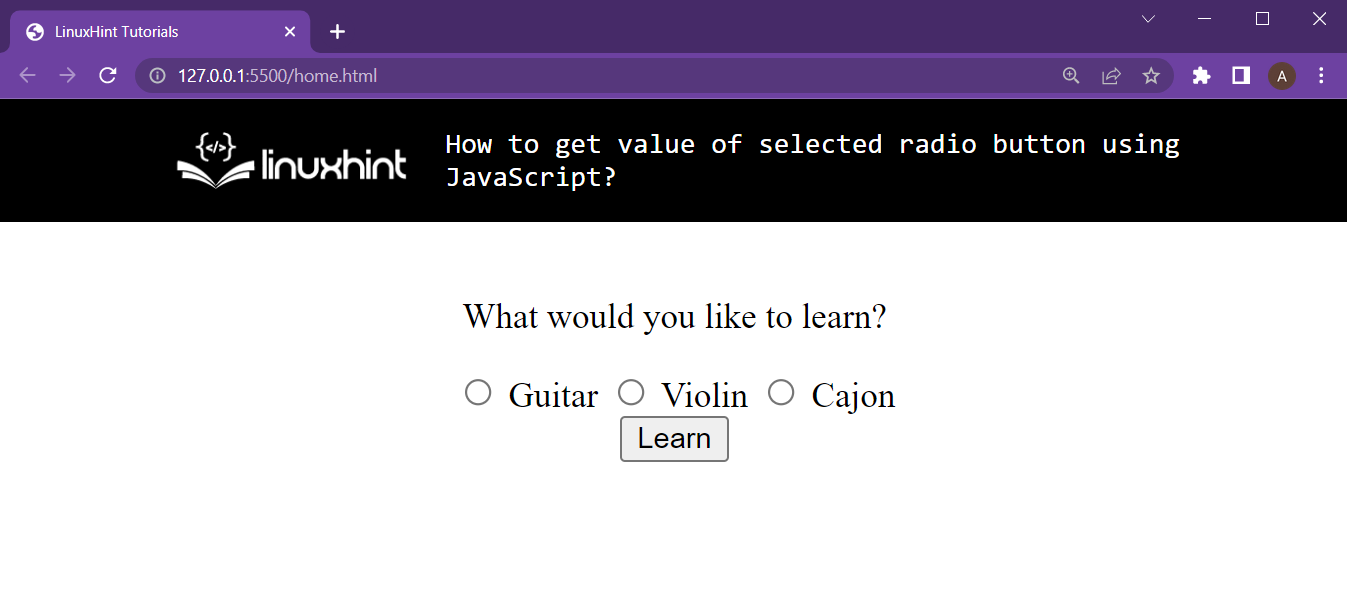 We have radio buttons, and our learn button in the middle of the webpage.
 You have successfully fetched the value from a checked radio button and alerted the user about his choice.
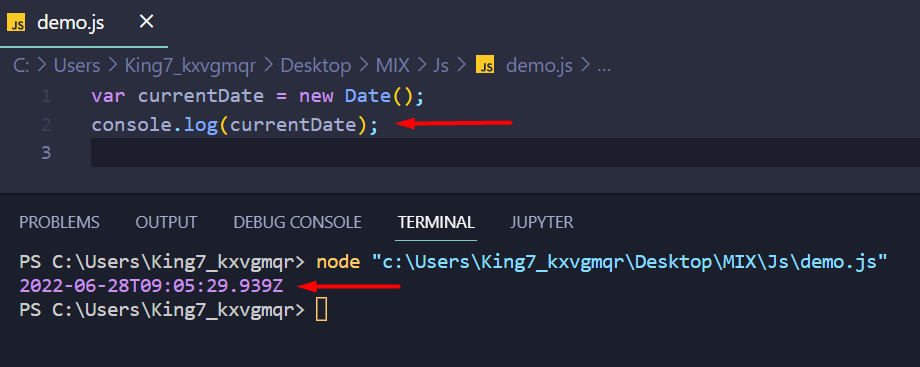 This is not the format, so we are going to work on this now step by step.

 Example 2
We will now create a function named “getRandomNumber()” and pass two arguments “min_number” and “max_number” to it.
This function will call the “Math.random()” method for generating a floating-point random number between the specified range:
function getRandomNumber(min_number, max_number){
return Math.random()* (max_number - min_number) + min_number;}
Next, we will call the function “getRandomNumber()” by passing “25” as “min_number” and “80” as “max_number”:
getRandomNumber(25,80);
Now we will execute the above-given program in the console and view the output:
Example 2
We will now create a function named “getRandomNumber()” and pass two arguments “min_number” and “max_number” to it.
This function will call the “Math.random()” method for generating a floating-point random number between the specified range:
function getRandomNumber(min_number, max_number){
return Math.random()* (max_number - min_number) + min_number;}
Next, we will call the function “getRandomNumber()” by passing “25” as “min_number” and “80” as “max_number”:
getRandomNumber(25,80);
Now we will execute the above-given program in the console and view the output:
 As you can see, the given program generated the decimal random number “38.48177131797334”.
In case, if you want to generate a whole number, then check out the below-given procedure.
As you can see, the given program generated the decimal random number “38.48177131797334”.
In case, if you want to generate a whole number, then check out the below-given procedure.
 Example 2
First of all, we will create a function named “getRandomNumber()” and pass two arguments “min_num” and “max_num”.
As we discussed above, the “max_num” is the maximum number and “min_num” represents the minimum number of the given range.
The function “getRandomNumber()” will call the method “Math.random()” in the “Math.floor()” method for rounding off the resultant random number:
function GetRandomNumber (min_num, max_num){
return Math.floor(Math.random()* (max_num - min_num) + min_num);}
In the next step, we will invoke the function “getRandomNumber()” by passing values “25” as “min_num” and “80” as “max_num”:
GetRandomNumber(25,80);
Executing the above-given program in the console will display “63” as an integer random number:
Example 2
First of all, we will create a function named “getRandomNumber()” and pass two arguments “min_num” and “max_num”.
As we discussed above, the “max_num” is the maximum number and “min_num” represents the minimum number of the given range.
The function “getRandomNumber()” will call the method “Math.random()” in the “Math.floor()” method for rounding off the resultant random number:
function GetRandomNumber (min_num, max_num){
return Math.floor(Math.random()* (max_num - min_num) + min_num);}
In the next step, we will invoke the function “getRandomNumber()” by passing values “25” as “min_num” and “80” as “max_num”:
GetRandomNumber(25,80);
Executing the above-given program in the console will display “63” as an integer random number:
 We have provided essential information related to generating a random number.
 The output verified the working of javascript:void(0).
 The output verified that the link with void(0) didn’t perform any task while the link without void(0) directed us to the specified link.
This is how the javascript:void(0) prevents a page from reloading/navigating/refreshing.
The output verified that the link with void(0) didn’t perform any task while the link without void(0) directed us to the specified link.
This is how the javascript:void(0) prevents a page from reloading/navigating/refreshing.
 As we have mentioned earlier, pass-by-value creates a copy of data therefore, it doesn’t change the original values of the variables.
This is how the pass-by-value works.
As we have mentioned earlier, pass-by-value creates a copy of data therefore, it doesn’t change the original values of the variables.
This is how the pass-by-value works.
 As we have mentioned earlier, pass-by-reference doesn’t create a copy of data, therefore, modifications made in the examplePBR() function affect the original value.
 This is how the new map() method works.
 The output clarified that the map object with five elements had been created successfully.
 This is how we can delete a specific map element, however,, the clear() method can be used to delete all map elements:


 This is how you can get the size of a map.
 This is how we can utilize any map() object method to achieve different functionalities.
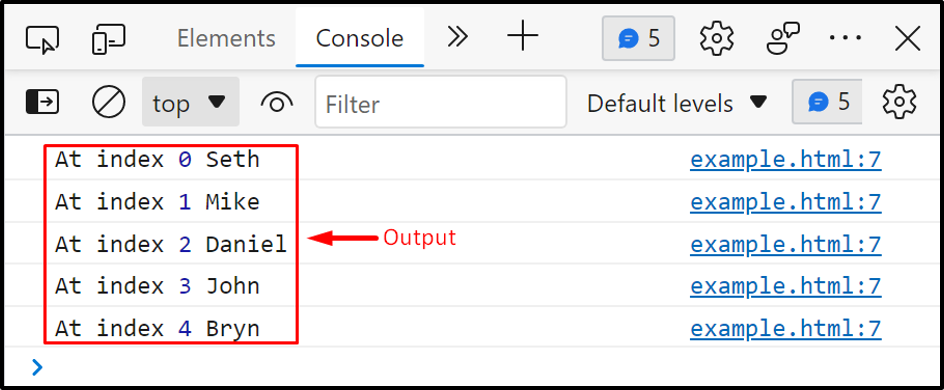 This is how we can utilize the for loop to iterate array elements.
 This is how the forEach() method works.

 The output verified the working of the for…of statements.
 The output clarified that the map() method iterated over each array element and multiplied the array elements by 2.
Similarly, we can utilize some other well-known built-in array methods to iterate over an array for example “array.filter()”, “array.some()”, “array.every()”, and so on.
The output clarified that the map() method iterated over each array element and multiplied the array elements by 2.
Similarly, we can utilize some other well-known built-in array methods to iterate over an array for example “array.filter()”, “array.some()”, “array.every()”, and so on.
 Now, we will assign the value “John” to the variable “emp_name” and try to display the specified value as output:
emp_name= "John";
console.log(emp_name);
Hence “emp_name” is no longer “undefined”, so the “console.log()” method will print “John” as its value:
Now, we will assign the value “John” to the variable “emp_name” and try to display the specified value as output:
emp_name= "John";
console.log(emp_name);
Hence “emp_name” is no longer “undefined”, so the “console.log()” method will print “John” as its value:
 Now, let’s move ahead to know about the “not defined” keyword.
 We have provided essential information related to “undefined” and “not defined” JavaScript keywords.
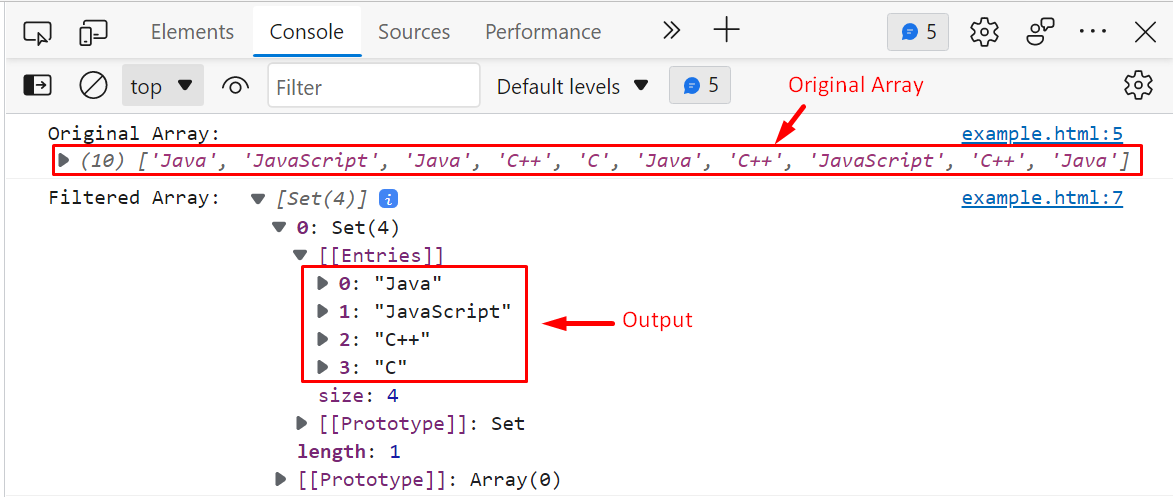 In this way, we can utilize the JavaScript Set to remove duplicate elements from an array.
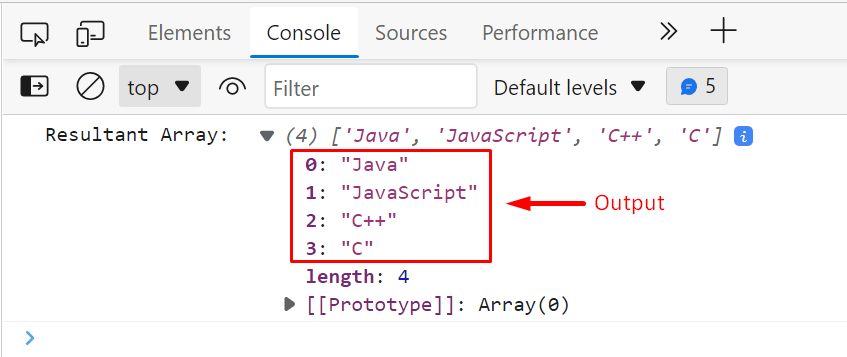 This is how we can get an array of unique elements using the indexOf() and Push() methods.
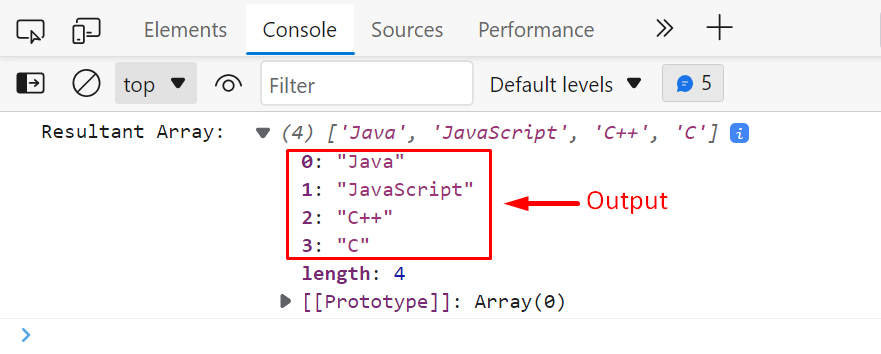 This is how we can remove the duplicate elements from an array using the filter method.
 The output verified that the existing property modified successfully however, new property can’t be added to the restricted/locked object.
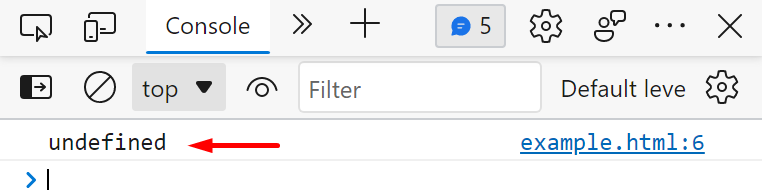 The typeof operator returned undefined which verified that an unassigned variable has a default value of “undefined”.
 The output verified that an empty string and an undefined variable are two different things.
The undefined variable has a data type “undefined” while an empty string has a data type “string”.
The output verified that an empty string and an undefined variable are two different things.
The undefined variable has a data type “undefined” while an empty string has a data type “string”.
 This is how the undefined type works.
 The output verified that clicking the button scrolled the page to the topmost position.
 This is how the scrollTop() method works in jQuery
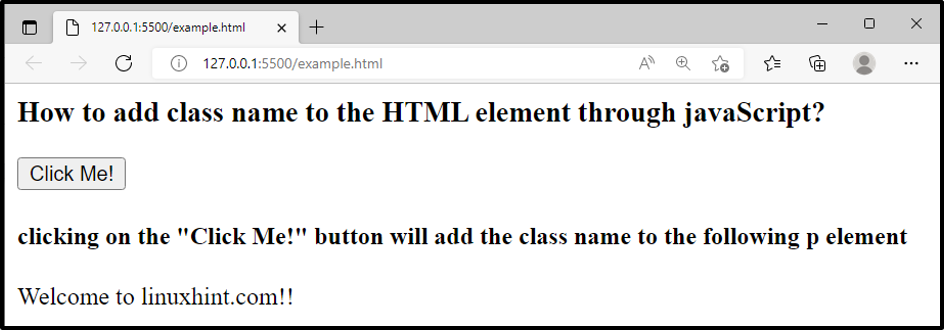 Clicking on “Click Me!” button will generate the below-given output:
 This is how the “.add()” method work.
 After clicking on the “Click Me!” button, the classNameFun() will be invoked, consequently, we will get the following output:
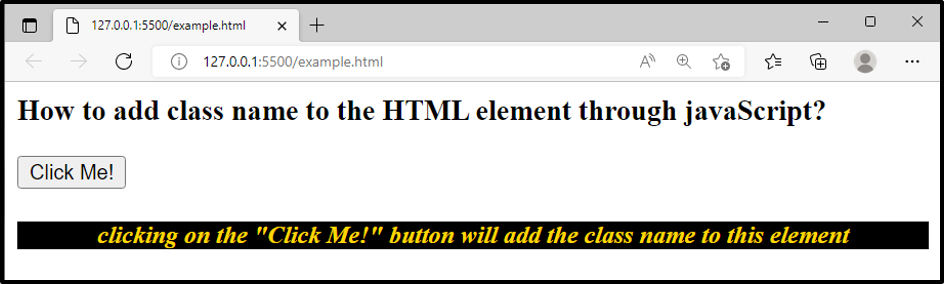 The output clarifies that the class name has been added successfully to the <h4> element.
 This is how we can get a character array from a string using the split method.
 In this way, we can utilize the substring() method to get the array from the given string.
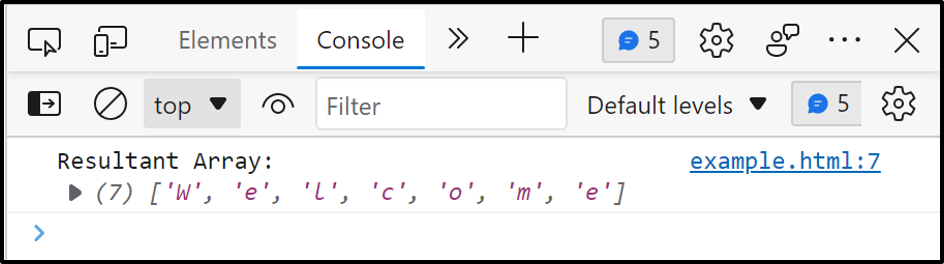 This is how the Array.from() method works.
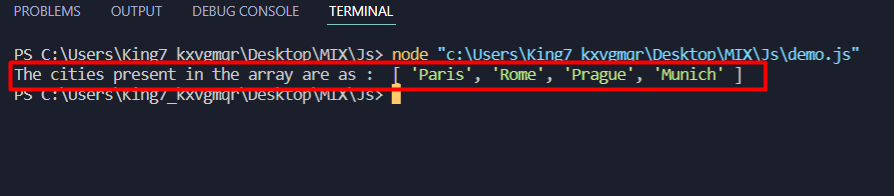 As you can see in the output, the city “Amsterdam” has been removed from this array.
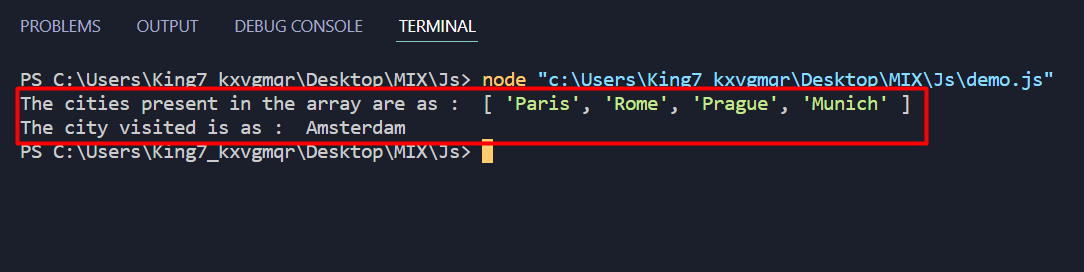 As you can observe, we didn’t only remove the last element “Amsterdam” from the array, and we were also able to print it after placing it in another variable.
 In the export.js file, we are going to create a new function that is going to print us the area of a square using the length of its side as
function areaOfSquare(length) {
return length * length;}
Now at the end of this file, we are going to use the export default keyword to export this function like
export default areaOfSquare;
Inside the demo.js file, we are going to first of import this function in our program as areaFunction like:
import areaFunction from "./export.js";
After that, we are going to create a length variable, and we are going to define the length of a square:
var length = 4;
Then we can simply print out the of the square using the following console log function as:
console.log("Area of the square is as " + areaFunction(length));
After executing only the demo.js file, we get the following output on our terminal:
In the export.js file, we are going to create a new function that is going to print us the area of a square using the length of its side as
function areaOfSquare(length) {
return length * length;}
Now at the end of this file, we are going to use the export default keyword to export this function like
export default areaOfSquare;
Inside the demo.js file, we are going to first of import this function in our program as areaFunction like:
import areaFunction from "./export.js";
After that, we are going to create a length variable, and we are going to define the length of a square:
var length = 4;
Then we can simply print out the of the square using the following console log function as:
console.log("Area of the square is as " + areaFunction(length));
After executing only the demo.js file, we get the following output on our terminal:
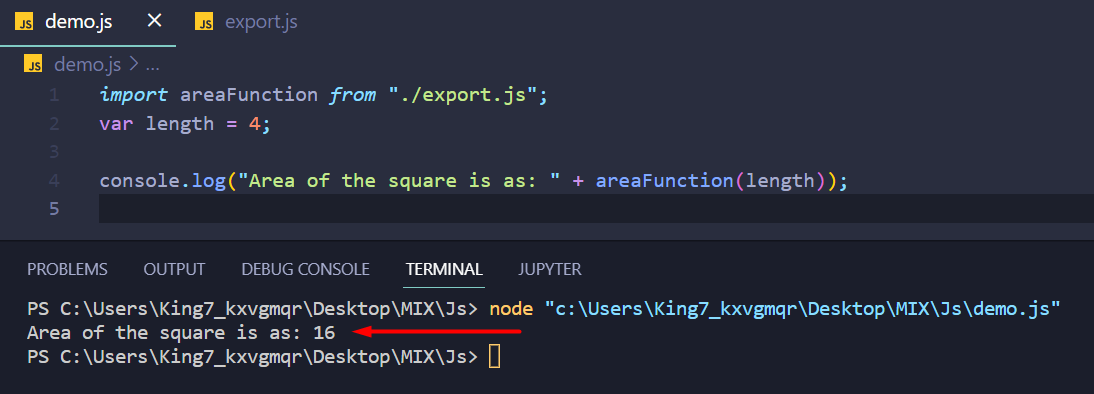 You were able to use the function that was exported from the other file.
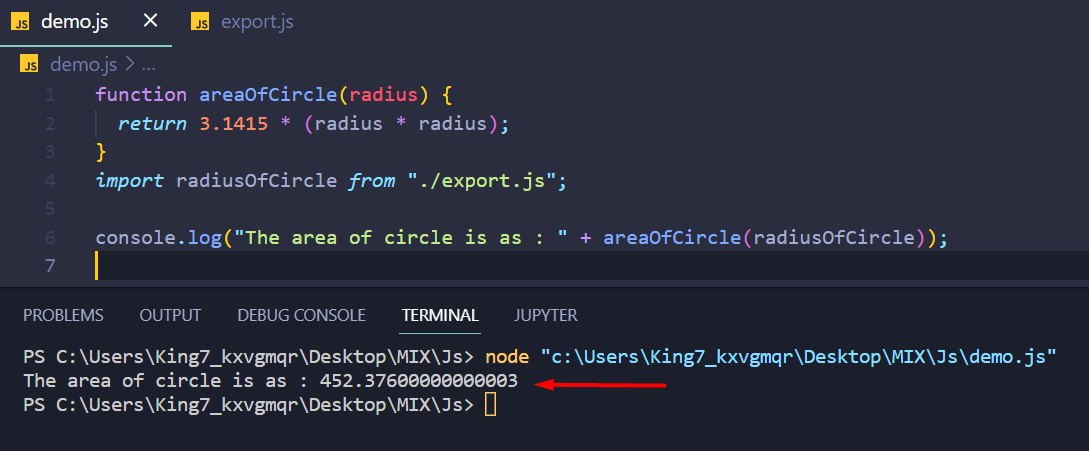 As you can see, we were able to print the area of the circle by using the radius which was defined in the other file.
 As we can see in the above output, 150 is placed before every element as it is greater than every element in the array but here as sort() method focuses on the very first digit of a number so 1 < 2 that's why the compiler placed it at the start of the array.
 The output clearly shows that now each element is placed in numerically ascending order.
Note: To place elements in descending order just use n-m at the place of m-n.
The output clearly shows that now each element is placed in numerically ascending order.
Note: To place elements in descending order just use n-m at the place of m-n.
 The output clearly shows that the array is sorted according to the length of elements in the array.
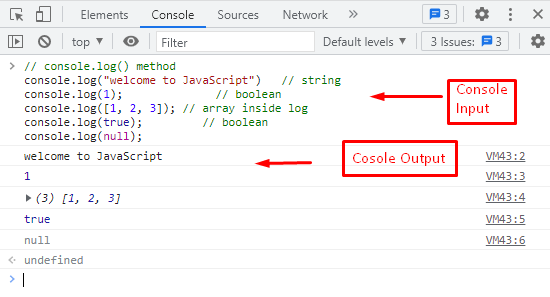 It is observed that the string, boolean, and array values are printed on the console.
 In the console window, string output is displayed by using console.info() method.
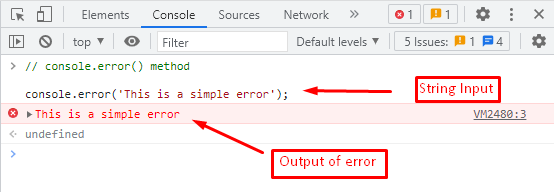 By passing a single argument of string type, the error message is displayed on the console.
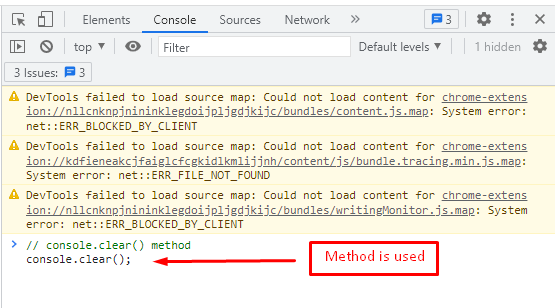 Now, observe the console after applying the clear() method.
 The output figure shows a clear display in the console window using the console.clear() method.
 The output shows a warning symbol and the message you entered in the console.warn() method.
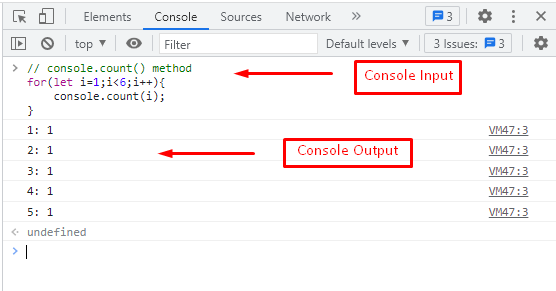 The figure shows that five counts are called in a for loop using the console.count() method.
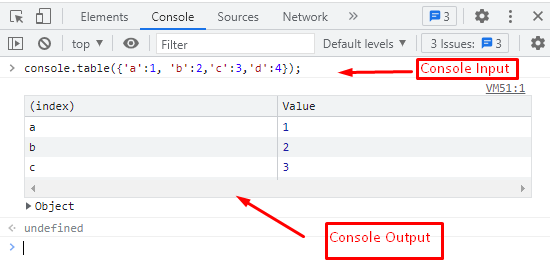 The below figure shows a table in which values are stored by assigning indexes.
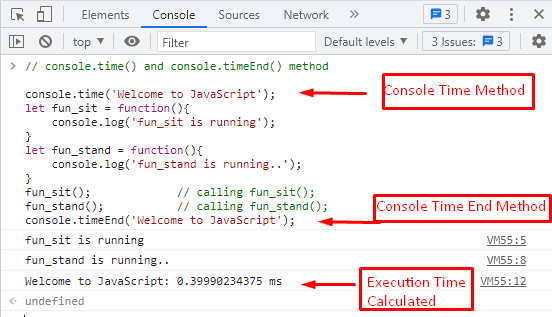 It is observed from the output that the code written between the console.time() and console.timeEnd() methods took 8.96 ms to execute.
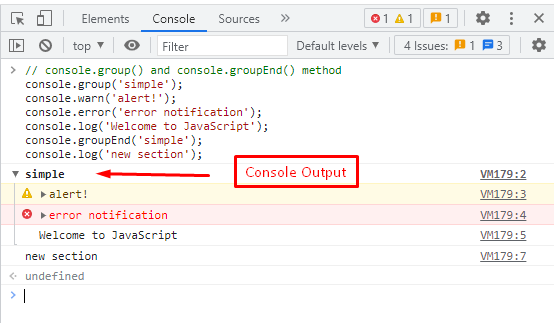 The output illustrates the group of messages in which errors and warning notifications are displayed.
whereas the statement ‘new section’ is displayed outside of the group.
Here it is! You have learned to understand and apply console objects and their methods.
The output illustrates the group of messages in which errors and warning notifications are displayed.
whereas the statement ‘new section’ is displayed outside of the group.
Here it is! You have learned to understand and apply console objects and their methods.
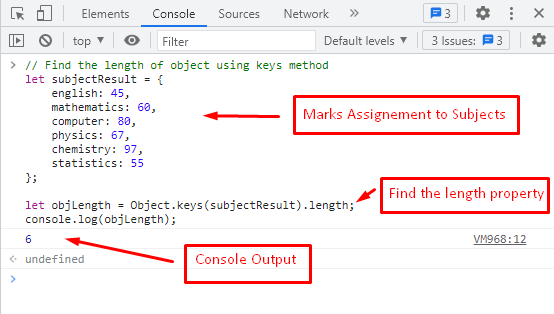 The output in the console returns the length of objLength, which is 6.
It represents the total number of subjects that are stored in objLength using the length property of the Object.keys() method.
The output in the console returns the length of objLength, which is 6.
It represents the total number of subjects that are stored in objLength using the length property of the Object.keys() method.
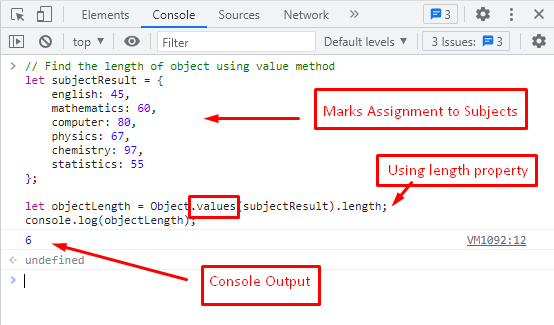 The output shows the length of an object utilizing the method of Object.values().
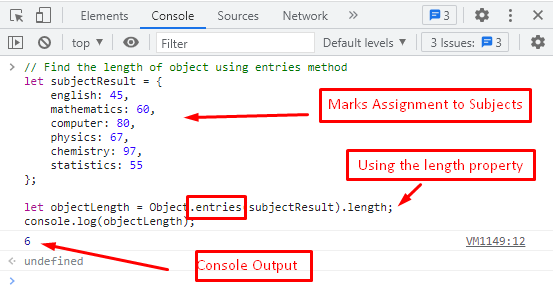 The output represents the number of key-value pairs stored in the objectLength variable.
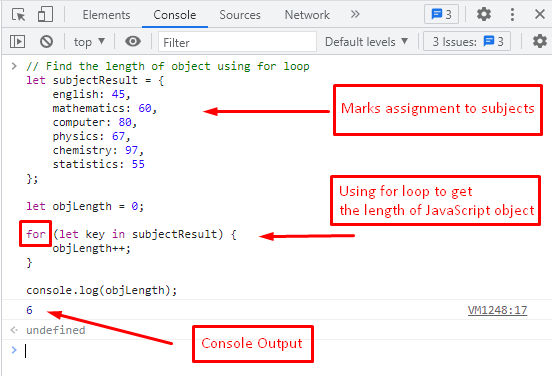 The output represents the number of iterations that are executed in a for-loop, which is 6.
Congratulations! In this post, you have learned to determine the length of an object in JavaScript with the help of four different methods.
The output represents the number of iterations that are executed in a for-loop, which is 6.
Congratulations! In this post, you have learned to determine the length of an object in JavaScript with the help of four different methods.

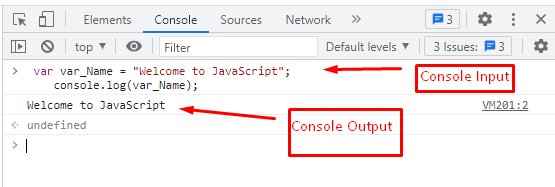 In the input part, the var_Name is declared in the 1st line of the script.
After that, information that is stored in var_Name is displayed using the console.log() method.
In the output part, the “Welcome to JavaScript” message is displayed as output in the browser console.
In the input part, the var_Name is declared in the 1st line of the script.
After that, information that is stored in var_Name is displayed using the console.log() method.
In the output part, the “Welcome to JavaScript” message is displayed as output in the browser console.
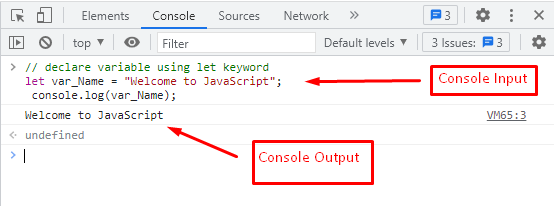 The message “Welcome to JavaScript” is displayed as output in the browser console using the let keyword in JavaScript.
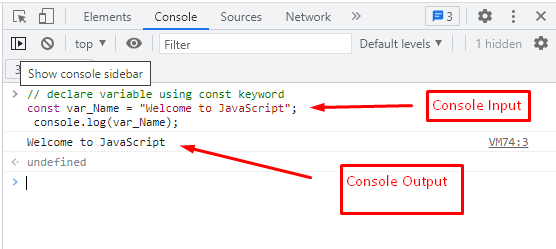 The output displayed in the above figure shows:
the var_Name variable is declared in the first line using the const keyword, and the string “Welcome to JavaScript” is stored in var_Name.
At the end, the string is displayed using the console.log() method.
In this post, you learned three different methods for declaring variables in JavaScript.
The output displayed in the above figure shows:
the var_Name variable is declared in the first line using the const keyword, and the string “Welcome to JavaScript” is stored in var_Name.
At the end, the string is displayed using the console.log() method.
In this post, you learned three different methods for declaring variables in JavaScript.
 It is clear from the output that our set has been successfully converted into an array.
 The output consists of an array created from our set.
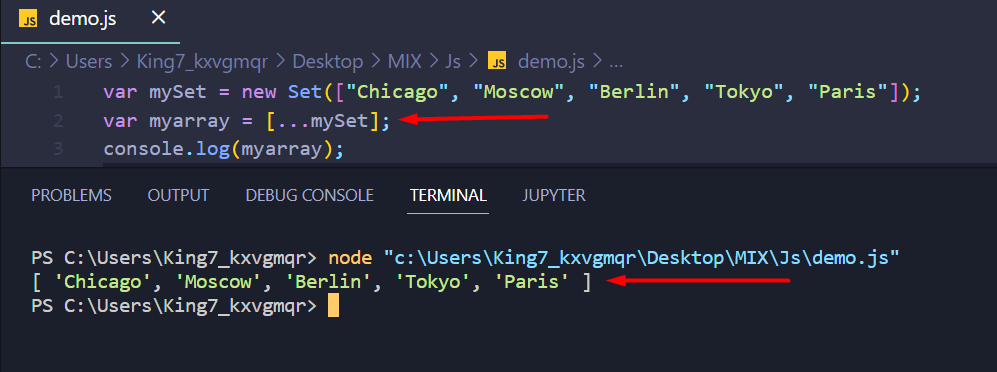 As you can see, we were able to successfully convert our set into an array using the spread operator.
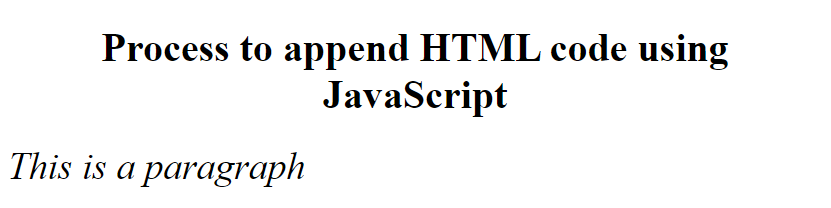 The output clearly shows that we append HTML <em> tag with some content and styling inside the empty div tag using innerHTML through JavaScript.
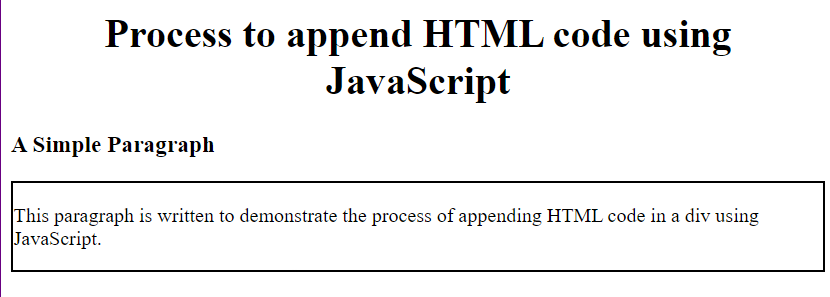 The output clearly shows that insertAdjacentHTML method appends HTML code before the targeted div because we use its beforebegin attribute to position our appended HTML code.
beforeend
In the following code, this attribute will place the HTML code inside the check id div but after the <p> tag.
Code:
<!DOCTYPE html>
<html lang="en">
<head>
<title>Append</title>
</head>
<body>
<h1 style="text-align: center;">Process to append HTML code using JavaScript</h1>
<div id="check">
<p>This paragraph is written to demonstrate the process of appending HTML code in a div using JavaScript.</p>
</div>
<script>
document.getElementById("check").insertAdjacentHTML("beforeend","<h3>A Simple Paragraph</h3>")
</script>
</body>
</html>
In this code, we create a simple HTML document with <h1> tag and a <div> having unique id check.
Inside this div a paragraph is written using <p>.
Now we append HTML <h3> tag using insertAdjacentHTML method and use beforeend position to append this HTML code on a specific position.
Output:
The output clearly shows that insertAdjacentHTML method appends HTML code before the targeted div because we use its beforebegin attribute to position our appended HTML code.
beforeend
In the following code, this attribute will place the HTML code inside the check id div but after the <p> tag.
Code:
<!DOCTYPE html>
<html lang="en">
<head>
<title>Append</title>
</head>
<body>
<h1 style="text-align: center;">Process to append HTML code using JavaScript</h1>
<div id="check">
<p>This paragraph is written to demonstrate the process of appending HTML code in a div using JavaScript.</p>
</div>
<script>
document.getElementById("check").insertAdjacentHTML("beforeend","<h3>A Simple Paragraph</h3>")
</script>
</body>
</html>
In this code, we create a simple HTML document with <h1> tag and a <div> having unique id check.
Inside this div a paragraph is written using <p>.
Now we append HTML <h3> tag using insertAdjacentHTML method and use beforeend position to append this HTML code on a specific position.
Output:
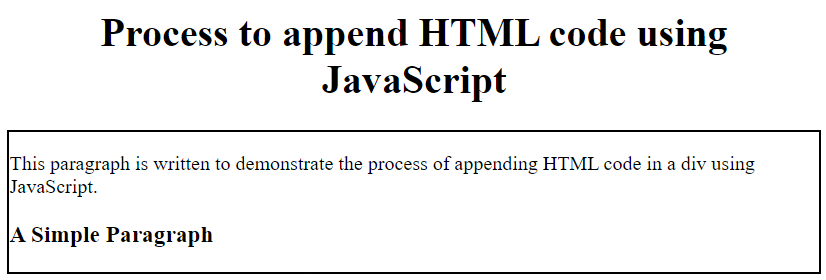 The output clearly shows that insertAdjacentHTML method appends HTML code after the <p> tag inside the targeted div because we use its beforeend attribute to position our appended HTML code.
afterbegin
In the following code, this attribute will place the HTML code inside the check id div but just before the <p> tag.
Code:
<!DOCTYPE html>
<html lang="en">
<head>
<title>Append</title>
</head>
<body>
<h1 style="text-align: center;">Process to append HTML code using JavaScript</h1>
<div id="check">
<p>This paragraph is written to demonstrate the process of appending HTML code in a div using JavaScript.</p>
</div>
<script>
document.getElementById("check").insertAdjacentHTML("afterbegin","<h3>A Simple Paragraph</h3>")
</script>
</body>
</html>
In this code, we create a simple HTML document with <h1> tag and a <div> having unique id check.
Inside this div a paragraph is written using <p>.
Now we append HTML <h3> tag using insertAdjacentHTML method and use afterbegin position to append this HTML code on a specific position.
Output:
The output clearly shows that insertAdjacentHTML method appends HTML code after the <p> tag inside the targeted div because we use its beforeend attribute to position our appended HTML code.
afterbegin
In the following code, this attribute will place the HTML code inside the check id div but just before the <p> tag.
Code:
<!DOCTYPE html>
<html lang="en">
<head>
<title>Append</title>
</head>
<body>
<h1 style="text-align: center;">Process to append HTML code using JavaScript</h1>
<div id="check">
<p>This paragraph is written to demonstrate the process of appending HTML code in a div using JavaScript.</p>
</div>
<script>
document.getElementById("check").insertAdjacentHTML("afterbegin","<h3>A Simple Paragraph</h3>")
</script>
</body>
</html>
In this code, we create a simple HTML document with <h1> tag and a <div> having unique id check.
Inside this div a paragraph is written using <p>.
Now we append HTML <h3> tag using insertAdjacentHTML method and use afterbegin position to append this HTML code on a specific position.
Output:
 The output clearly shows that insertAdjacentHTML method appends HTML code inside the targeted div but just before the <p> tag because we use its afterbegin attribute to position our appended HTML code.
afterend
In the following code, this attribute will place the HTML code after the check id div.
Code:
<!DOCTYPE html>
<html lang="en">
<head>
<title>Append</title>
</head>
<body>
<h1 style="text-align: center;">Process to append HTML code using JavaScript</h1>
<div id="check">
<p>This paragraph is written to demonstrate the process of appending HTML code in a div using JavaScript.</p>
</div>
<script>
document.getElementById("check").insertAdjacentHTML("afterend","<h3>A Simple Paragraph</h3>")
</script>
</body>
</html>
In this code, we create a simple HTML document with <h1> tag and a <div> having a unique id check.
Inside this div a paragraph is written using <p>.
Now we append HTML <h3> tag using insertAdjacentHTML method and use afterend position to append this HTML code on a specific position.
Output:
The output clearly shows that insertAdjacentHTML method appends HTML code inside the targeted div but just before the <p> tag because we use its afterbegin attribute to position our appended HTML code.
afterend
In the following code, this attribute will place the HTML code after the check id div.
Code:
<!DOCTYPE html>
<html lang="en">
<head>
<title>Append</title>
</head>
<body>
<h1 style="text-align: center;">Process to append HTML code using JavaScript</h1>
<div id="check">
<p>This paragraph is written to demonstrate the process of appending HTML code in a div using JavaScript.</p>
</div>
<script>
document.getElementById("check").insertAdjacentHTML("afterend","<h3>A Simple Paragraph</h3>")
</script>
</body>
</html>
In this code, we create a simple HTML document with <h1> tag and a <div> having a unique id check.
Inside this div a paragraph is written using <p>.
Now we append HTML <h3> tag using insertAdjacentHTML method and use afterend position to append this HTML code on a specific position.
Output:
 The output clearly shows that insertAdjacentHTML method appends HTML code after the targeted div because we use its afterend attribute to position our appended HTML code.
 The output clarified that the for-loop traversed through all <label> elements.
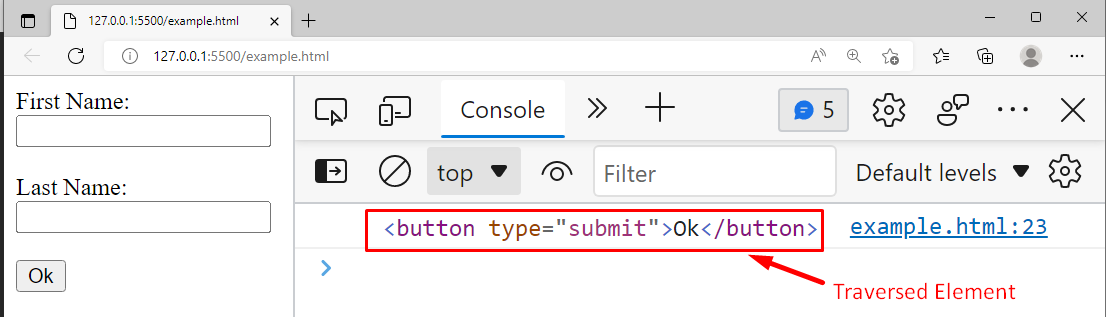 This is how the for-of loop is used to traverse HTML elements.
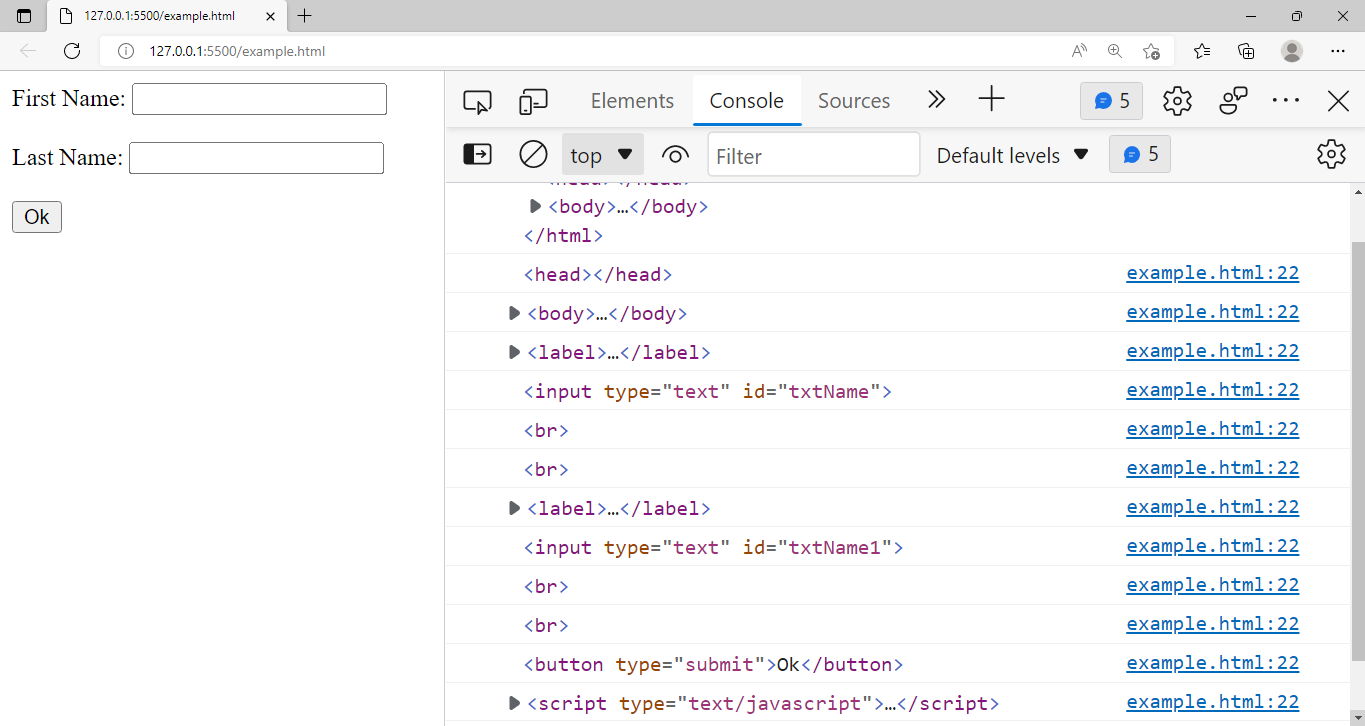 This is how we can loop through HTML elements without using the forEach() method.
 Launch the installer package once the download is complete and follow along with the setup wizard.
Under “Custom Setup,” select Add to PATH and set it to “Entire feature will be installed on the local hard drive.”
Launch the installer package once the download is complete and follow along with the setup wizard.
Under “Custom Setup,” select Add to PATH and set it to “Entire feature will be installed on the local hard drive.”
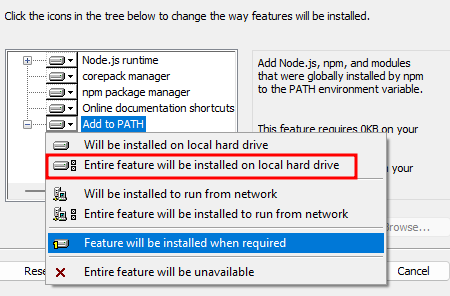 Follow the following steps, click install a begin the installation process.


 In this output, it is clearly seen that we use ceil() method to round off 3.1 into an exact value and ceil() method round it off to 4 instead of 3.
 The output clearly shows that 0 and NaN are returned without any change.
You are now able to apply the Math.ceil() method to get the whole number (which comes next to the decimal point number).
The output clearly shows that 0 and NaN are returned without any change.
You are now able to apply the Math.ceil() method to get the whole number (which comes next to the decimal point number).
 The output verified that the search() method returns the appropriate index.
Example 2: Case sensitive
In this example, we will search for a substring “javascript” using the search method:
var regex = /javascript/;var givenString = "JavaScript, Java, PHP, C++, javascript";var result = givenString.search(regex);
console.log(result);
In the given string JavaScript occurs two times firstly at the 0th index and secondly at the 28th index:
The output verified that the search() method returns the appropriate index.
Example 2: Case sensitive
In this example, we will search for a substring “javascript” using the search method:
var regex = /javascript/;var givenString = "JavaScript, Java, PHP, C++, javascript";var result = givenString.search(regex);
console.log(result);
In the given string JavaScript occurs two times firstly at the 0th index and secondly at the 28th index:
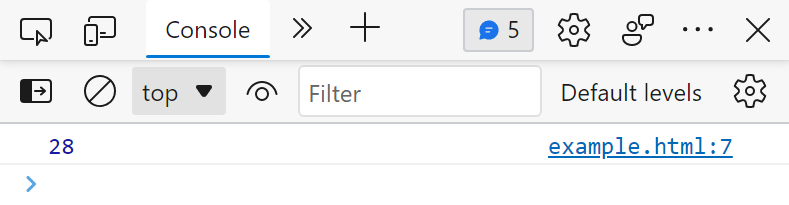 The output shows that the search() method returns “28” instead of “0”.
This shows that the search() method is case-sensitive.
Example 3: Case insensitive search
We can use the “i” in the regex to search a substring irrespective of the case sensitivity.
var regex = /javascript/i;var givenString = "JavaScript, Java, PHP, C++, javascript";var result = givenString.search(regex);
console.log(result);
Now the search() method will search for the substring irrespective of the uppercase or lowercase:
The output shows that the search() method returns “28” instead of “0”.
This shows that the search() method is case-sensitive.
Example 3: Case insensitive search
We can use the “i” in the regex to search a substring irrespective of the case sensitivity.
var regex = /javascript/i;var givenString = "JavaScript, Java, PHP, C++, javascript";var result = givenString.search(regex);
console.log(result);
Now the search() method will search for the substring irrespective of the uppercase or lowercase:
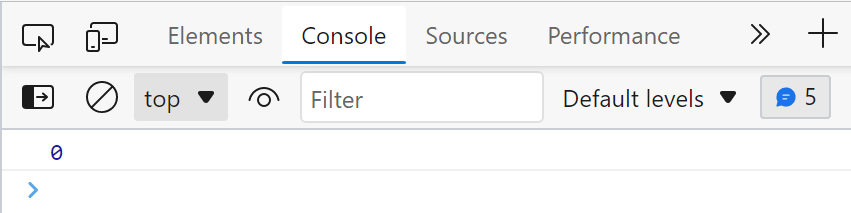 This time the search() method returned the 0th index.
Example 4: Unsuccessful Search
Let’s search for a substring that doesn’t exist in the given string:
var regex = /Python/;var givenString = "JavaScript, Java, PHP, C++";var result = givenString.search(regex);
console.log(result);
When we searched for “Python” within the given string, consequently, the search method will return the following output:
This time the search() method returned the 0th index.
Example 4: Unsuccessful Search
Let’s search for a substring that doesn’t exist in the given string:
var regex = /Python/;var givenString = "JavaScript, Java, PHP, C++";var result = givenString.search(regex);
console.log(result);
When we searched for “Python” within the given string, consequently, the search method will return the following output:
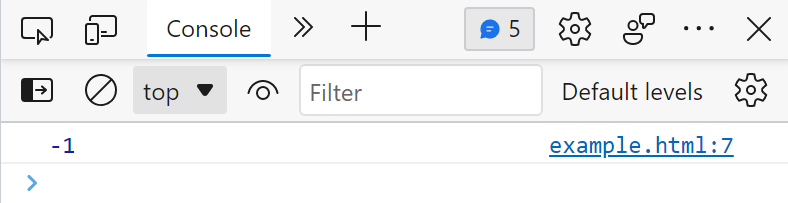 The above snippet verified that the search() method returned -1, when it doesn’t find a perfect match.
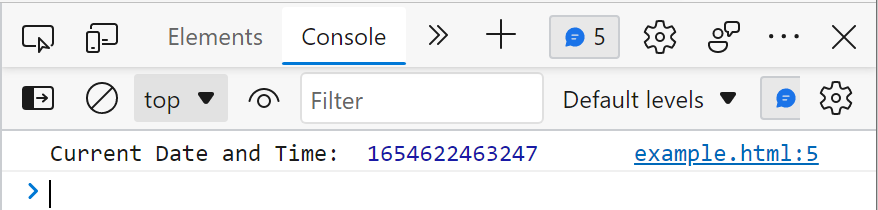 The output shows that the Date.now() method returns the date and time in milliseconds.
But the returned time is not understandable/readable.
So, how to convert it into a human-readable format?
The output shows that the Date.now() method returns the date and time in milliseconds.
But the returned time is not understandable/readable.
So, how to convert it into a human-readable format?
 This is how we can get the date and time in a human-readable format.
 Output clearly shows that the program returns 3 as the length of the given array because there are only three elements in the given array.
How to change an array size using the length method?
The length method can also be used for changing the array size as shown in the following code.
Code:
var fruits=['Apple','Pineapple','Watermelon']
fruits.length = 4
console.log(fruits)
In the above code, we create an array with three elements in it.
Then we set the array length to “4” using the length method.
Output:
Output clearly shows that the program returns 3 as the length of the given array because there are only three elements in the given array.
How to change an array size using the length method?
The length method can also be used for changing the array size as shown in the following code.
Code:
var fruits=['Apple','Pineapple','Watermelon']
fruits.length = 4
console.log(fruits)
In the above code, we create an array with three elements in it.
Then we set the array length to “4” using the length method.
Output:
 The fruit array had three three elements.
However, the length is set to 4 using the length method.
Resultantly, another element (empty) was added to the array to reach the length=4.
The fruit array had three three elements.
However, the length is set to 4 using the length method.
Resultantly, another element (empty) was added to the array to reach the length=4.
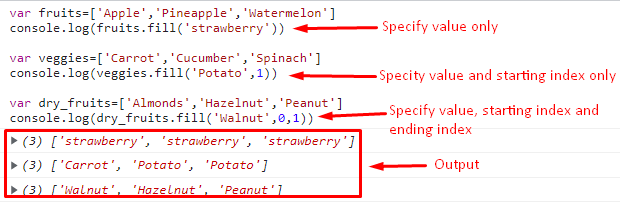 The above output is described as:
In the fruits array, all the elements are replaced with strawberry because we didn’t specify the starting and ending indexes.
In the veggies array, all the elements starting from the starting index(1) have been replaced with a potato.
Lastly, in the dry_fruits array, only the element on the 0th index is replaced with walnut.
copyWithin() method
This JavaScript array method is used to copy array elements from one index to another index in an array.
Syntax:
array_name.copyWithin(target_index, copy_index)
In the above syntax
copy_index is the index number of the element which will be copied
target_index is the index number where the element (copy_index) is copied
Code:
var fruits=["Grapes", "Pineapple", "Mango"]
console.log(fruits.copyWithin(2,0))
In this code we create an array of fruits with three elements in it, then we use the copyWithin() array method to copy the data from the 0th index and replace it with the data on the 2nd index of the array.
Output:
The above output is described as:
In the fruits array, all the elements are replaced with strawberry because we didn’t specify the starting and ending indexes.
In the veggies array, all the elements starting from the starting index(1) have been replaced with a potato.
Lastly, in the dry_fruits array, only the element on the 0th index is replaced with walnut.
copyWithin() method
This JavaScript array method is used to copy array elements from one index to another index in an array.
Syntax:
array_name.copyWithin(target_index, copy_index)
In the above syntax
copy_index is the index number of the element which will be copied
target_index is the index number where the element (copy_index) is copied
Code:
var fruits=["Grapes", "Pineapple", "Mango"]
console.log(fruits.copyWithin(2,0))
In this code we create an array of fruits with three elements in it, then we use the copyWithin() array method to copy the data from the 0th index and replace it with the data on the 2nd index of the array.
Output:
 Above output shows the copyWithin() array method copies Grapes from the 0th index of the array and replaces it with the Mango which is the element placed at index-2.
 In the above output, it is seen that the output is 12 because the condition was to find the even elements in a given array so the JavaScript find() method returns the first even element that it finds in an array.
findIndex() method
This JavaScript method finds and returns the first element’s index number that is found according to the given condition in an array.
Syntax:
array_name.findIndex(function_name)
In the above syntax function_name represents the function to check the condition.
Code:
var pos=[-9,-30,-13,14,15,16,20,21,23,27,29]function check(pos){
if (pos > 0)
{
return true
}}
console.log(pos.findIndex(check))
In the code above, we create an array of positive and negative integers and then we create a function to check the positive integer in an array.
Lastly, we use the findIndex() method to return the index number of the positive integers that is found first in an array.
Output:
In the above output, it is seen that the output is 12 because the condition was to find the even elements in a given array so the JavaScript find() method returns the first even element that it finds in an array.
findIndex() method
This JavaScript method finds and returns the first element’s index number that is found according to the given condition in an array.
Syntax:
array_name.findIndex(function_name)
In the above syntax function_name represents the function to check the condition.
Code:
var pos=[-9,-30,-13,14,15,16,20,21,23,27,29]function check(pos){
if (pos > 0)
{
return true
}}
console.log(pos.findIndex(check))
In the code above, we create an array of positive and negative integers and then we create a function to check the positive integer in an array.
Lastly, we use the findIndex() method to return the index number of the positive integers that is found first in an array.
Output:
 In this output, it is clearly shown that the findIndex() method returns the index number of the first positive integers found by the compiler in an array.
 In the above output, it is seen that a nested array is given as the input and the flat() method merges the nested array into a new single array.
Map() method
This JavaScript method is used to create a new array by applying the functionality of the given function to every element of the array.
Syntax:
array_name.map((variable => functionality))
In above syntax functionality represents the operation to be performed on the array.
Code:
var num=[1,2,3,4,5,6,7]
console.log(num.map((x => x*2)))
In this code, we create an array and then we apply a map function on the array which will create a new array of the numbers after multiplying by 2.
Output:
In the above output, it is seen that a nested array is given as the input and the flat() method merges the nested array into a new single array.
Map() method
This JavaScript method is used to create a new array by applying the functionality of the given function to every element of the array.
Syntax:
array_name.map((variable => functionality))
In above syntax functionality represents the operation to be performed on the array.
Code:
var num=[1,2,3,4,5,6,7]
console.log(num.map((x => x*2)))
In this code, we create an array and then we apply a map function on the array which will create a new array of the numbers after multiplying by 2.
Output:
 The above output clearly shows that the map() method creates a new array of numbers after multiplying each element in the array by 2.
flatMap() method
This JavaScript method is the combination of JavaScript’s flat() and map() methods.
This method first maps each element of the array and then flattens the array which results in creating a new array.
Syntax:
array_name.flatMap((variable => functionality))
In above syntax functionality represents the operation to be performed on the array.
Code:
var pos=[-9,-30,-13,14,15,16,20,21,23,27,29]
fm=pos.flatMap((em) => em * 0)
console.log(fm)
In this code we create an array then we use the flatMap() method to multiply each element of the array with zero.
Output:
The above output clearly shows that the map() method creates a new array of numbers after multiplying each element in the array by 2.
flatMap() method
This JavaScript method is the combination of JavaScript’s flat() and map() methods.
This method first maps each element of the array and then flattens the array which results in creating a new array.
Syntax:
array_name.flatMap((variable => functionality))
In above syntax functionality represents the operation to be performed on the array.
Code:
var pos=[-9,-30,-13,14,15,16,20,21,23,27,29]
fm=pos.flatMap((em) => em * 0)
console.log(fm)
In this code we create an array then we use the flatMap() method to multiply each element of the array with zero.
Output:
 The above output shows that the flatMap() method multiplies each array element with zero and returns a new array of 0’s as an output.
forEach() method
In JavaScript, this array method is used to apply some functionality to each element of the array.
Syntax:
array_name.forEach(function_name)
In the above syntax function_name represents the function that is to be applied to each element of the array.
Code:
var num=[1,2,5,6,7]function square(x){
console.log(x*x)}
num.forEach(square)
In this code, we create an array of numbers, then we create a function square() which will print the square of all the elements in an array, and lastly, we use the forEach() array method to apply the functionality of the square function on each element of the array.
Output:
The above output shows that the flatMap() method multiplies each array element with zero and returns a new array of 0’s as an output.
forEach() method
In JavaScript, this array method is used to apply some functionality to each element of the array.
Syntax:
array_name.forEach(function_name)
In the above syntax function_name represents the function that is to be applied to each element of the array.
Code:
var num=[1,2,5,6,7]function square(x){
console.log(x*x)}
num.forEach(square)
In this code, we create an array of numbers, then we create a function square() which will print the square of all the elements in an array, and lastly, we use the forEach() array method to apply the functionality of the square function on each element of the array.
Output:
 The above output shows that the square() method is applied to each element of the array.
 Output shows that we give Grapes as an input and this word is broken down into a series of characters to create a new array.
of() method
This JavaScript method is used to create a new array from the set of objects.
Syntax:
Array.of("element 1", "element 2", ......., "element N")
In this syntax, of() method takes elements as the parameter for that you want to create an array.
Code:
fruits = Array.of("Mango", "Apple", "Apricot")
console.log(fruits)
In this code, we take a variable fruits and assign it with the of() method having three words as parameters.
Output:
Output shows that we give Grapes as an input and this word is broken down into a series of characters to create a new array.
of() method
This JavaScript method is used to create a new array from the set of objects.
Syntax:
Array.of("element 1", "element 2", ......., "element N")
In this syntax, of() method takes elements as the parameter for that you want to create an array.
Code:
fruits = Array.of("Mango", "Apple", "Apricot")
console.log(fruits)
In this code, we take a variable fruits and assign it with the of() method having three words as parameters.
Output:
 The output shows that the of() method has created an array of the words that were passed to the of() method.
 The output shows that the include() method checks whether Mango is present in the fruits array and has returned ‘true’
filter() method
This JavaScript method returns a new array by picking the elements from the current array depending on the given condition.
Syntax:
array_name.filter(function_name)
The function_name is passed to the filter() method as a parameter.
Code:
var num=[11,12,13,14,15,16,20,21,23,27,29]function check(num){
if (num % 2 == 0)
{
return true
}}
console.log(num.filter(check))
In this code, we create an array of numbers, then we create a function that checks if the array has even numbers or not.
Lastly, we use the JavaScript filter() method to create a separate array of even numbers if any exist in a given array.
Output:
The output shows that the include() method checks whether Mango is present in the fruits array and has returned ‘true’
filter() method
This JavaScript method returns a new array by picking the elements from the current array depending on the given condition.
Syntax:
array_name.filter(function_name)
The function_name is passed to the filter() method as a parameter.
Code:
var num=[11,12,13,14,15,16,20,21,23,27,29]function check(num){
if (num % 2 == 0)
{
return true
}}
console.log(num.filter(check))
In this code, we create an array of numbers, then we create a function that checks if the array has even numbers or not.
Lastly, we use the JavaScript filter() method to create a separate array of even numbers if any exist in a given array.
Output:
 The above example shows that we give an array of random numbers and the filter() method gives us a new array containing even numbers only.
 The output clearly shows that the indexOf() method checks the index number of pineapple in the fruits array and returns the index number.
keys() method
This JavaScript method uses a for loop to return the index numbers of the elements present in an array.
It also takes spaces as an array element.
This method takes no parameter.
Syntax:
variable = array_name.keys()for(var new_variable of variable)
console.log(new_variable)
In the above syntax, variable represents the first variable and array_name represents the array that contains elements.
The new_variable represents the second variable.
Code:
var js=["This", "write-up", "is", "about", "JavaScript"]var test = js.keys()for(var check of test)
console.log(check)
In the code above, we take an array (js) and two variables (test & check).
Then we apply the keys() method on the js array and the resulting value is stored in the test variable.
Lastly, we create a check variable in for look and use the test variable with it.
Output:
The output clearly shows that the indexOf() method checks the index number of pineapple in the fruits array and returns the index number.
keys() method
This JavaScript method uses a for loop to return the index numbers of the elements present in an array.
It also takes spaces as an array element.
This method takes no parameter.
Syntax:
variable = array_name.keys()for(var new_variable of variable)
console.log(new_variable)
In the above syntax, variable represents the first variable and array_name represents the array that contains elements.
The new_variable represents the second variable.
Code:
var js=["This", "write-up", "is", "about", "JavaScript"]var test = js.keys()for(var check of test)
console.log(check)
In the code above, we take an array (js) and two variables (test & check).
Then we apply the keys() method on the js array and the resulting value is stored in the test variable.
Lastly, we create a check variable in for look and use the test variable with it.
Output:
 The output shows that the keys() method returns the index numbers of the elements of the array using a for loop.
lastIndexOf() method
This JavaScript method is used to return the last index number of a number (which occurs multiple times in an array).
Syntax:
array_name.lastIndexOf(element)
In this syntax, element represents an array’s element whose last index is to be searched.
Code:
var fruits=["Grapes", "Pineapple", "Mango", "Apple", "Apricot", "Mango"]var test = fruits.lastIndexOf("Mango")
console.log(test)
In this code, we take a fruit array and apply the lastIndexof() method on it to get the index of last occurrence of “Mango”.
Output:
The output shows that the keys() method returns the index numbers of the elements of the array using a for loop.
lastIndexOf() method
This JavaScript method is used to return the last index number of a number (which occurs multiple times in an array).
Syntax:
array_name.lastIndexOf(element)
In this syntax, element represents an array’s element whose last index is to be searched.
Code:
var fruits=["Grapes", "Pineapple", "Mango", "Apple", "Apricot", "Mango"]var test = fruits.lastIndexOf("Mango")
console.log(test)
In this code, we take a fruit array and apply the lastIndexof() method on it to get the index of last occurrence of “Mango”.
Output:
 The output shows that the program returns 5 as an output because Mango occurs twice in an array and the index number of last occurrence is 5.
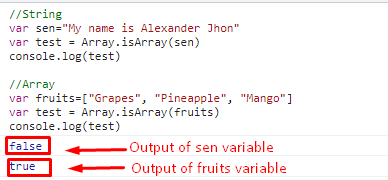 The above output clearly shows that we give a string and an array as an input.
Then we get false for string input and true for fruit output.
The above output clearly shows that we give a string and an array as an input.
Then we get false for string input and true for fruit output.
 The output shows that we take two arrays js and num.
In the Js array module we use join() method with a parameter (empty space) and in the num array module we use join() method without any parameter.
Because of that we get two different results.
Concat() method
This JavaScript method is used to join two arrays and return a new array which is the union of two arrays.
Syntax:
first_array_name.concat(second_array_name)
The syntax shows that it takes the first array then uses the concat() method and takes the second array as a parameter.
Code:
var fruits=['Apple','Pineapple','Watermelon']var veggies=['Carrot','Cucumber','Spinach']
console.log(fruits.concat(veggies))
Here we created two arrays, fruits and veggies.
The elements in both arrays are joined using the concat() method.
Output:
The output shows that we take two arrays js and num.
In the Js array module we use join() method with a parameter (empty space) and in the num array module we use join() method without any parameter.
Because of that we get two different results.
Concat() method
This JavaScript method is used to join two arrays and return a new array which is the union of two arrays.
Syntax:
first_array_name.concat(second_array_name)
The syntax shows that it takes the first array then uses the concat() method and takes the second array as a parameter.
Code:
var fruits=['Apple','Pineapple','Watermelon']var veggies=['Carrot','Cucumber','Spinach']
console.log(fruits.concat(veggies))
Here we created two arrays, fruits and veggies.
The elements in both arrays are joined using the concat() method.
Output:
 Output clearly shows that the two arrays “fruits” and “veggies” are we create two arrays and then join them into a single array by using the JavaScript concat() method.
 The above output shows that pop() method removes “Apricot” from the array and displays it.
push() method
This JavaScript method adds one element at a time but at the end position in an array.
This method takes an element, adds that element at the end of the array and returns the size of an array.
Syntax:
array_name.push("Element")
In the above syntax, Element represents the element that you want to insert in the array.
Code:
//Returns number of array elements
fruits = ["Mango", "Apple", "Apricot"]
console.log(fruits.push("Pineapple"))// Returns an array
fruits = ["Mango", "Apple", "Apricot"]
fruits.push("Pineapple")
console.log(fruits)
In the above code, we applied the push() method on an array named fruits.
The push() method adds the pineapple keyword at the end position in the array.
In the first part, the number of elements will be printed while the second part shows the updated array.
Output:
The above output shows that pop() method removes “Apricot” from the array and displays it.
push() method
This JavaScript method adds one element at a time but at the end position in an array.
This method takes an element, adds that element at the end of the array and returns the size of an array.
Syntax:
array_name.push("Element")
In the above syntax, Element represents the element that you want to insert in the array.
Code:
//Returns number of array elements
fruits = ["Mango", "Apple", "Apricot"]
console.log(fruits.push("Pineapple"))// Returns an array
fruits = ["Mango", "Apple", "Apricot"]
fruits.push("Pineapple")
console.log(fruits)
In the above code, we applied the push() method on an array named fruits.
The push() method adds the pineapple keyword at the end position in the array.
In the first part, the number of elements will be printed while the second part shows the updated array.
Output:
 The first output has returned the number of elements after adding “Pineapple” whereas the second output prints the updated array.
slice() method
This JavaScript method is used to separate or cut a specific set of elements from an array and returns that set as a new array.
It takes two parameters, a starting index and an ending index.
Syntax:
array_name.slice(start, end)
In this syntax, start and end represent the starting and ending indexes of an array.
Code:
fruits = ["Mango", "Apple", "Apricot","Cherry", "Gava", "Lychee"]var cut=fruits.slice(1,4)
console.log(cut)
In the above code, we have created an array of fruits.
The slice() method is applied on the fruits array which will slice the elements from 1st to 4th index.
The result of the slice() method is stored in the variable named cut.
Output:
The first output has returned the number of elements after adding “Pineapple” whereas the second output prints the updated array.
slice() method
This JavaScript method is used to separate or cut a specific set of elements from an array and returns that set as a new array.
It takes two parameters, a starting index and an ending index.
Syntax:
array_name.slice(start, end)
In this syntax, start and end represent the starting and ending indexes of an array.
Code:
fruits = ["Mango", "Apple", "Apricot","Cherry", "Gava", "Lychee"]var cut=fruits.slice(1,4)
console.log(cut)
In the above code, we have created an array of fruits.
The slice() method is applied on the fruits array which will slice the elements from 1st to 4th index.
The result of the slice() method is stored in the variable named cut.
Output:
 The above output shows that the slice method returns the elements from index 1 till index 4 and displays an array which contains these elements.
shift() method
This JavaScript method is just like the pop() method but the difference is this method removes the element from the start of an array and displays it.
This method takes no parameters.
Syntax:
array_name.shift()
In this syntax array_name represents the array while the shift() method removes the elements from the array.
Code:
fruits = ["Mango", "Apple", "Apricot","Cheery", "Gava", "Lychee"]var rem=fruits.shift()
console.log(rem)
In this code we create an array and apply the shift() method that removes the first element from an array.
The output of the shift() method is stored in “rem”.
Output:
The above output shows that the slice method returns the elements from index 1 till index 4 and displays an array which contains these elements.
shift() method
This JavaScript method is just like the pop() method but the difference is this method removes the element from the start of an array and displays it.
This method takes no parameters.
Syntax:
array_name.shift()
In this syntax array_name represents the array while the shift() method removes the elements from the array.
Code:
fruits = ["Mango", "Apple", "Apricot","Cheery", "Gava", "Lychee"]var rem=fruits.shift()
console.log(rem)
In this code we create an array and apply the shift() method that removes the first element from an array.
The output of the shift() method is stored in “rem”.
Output:
 The output shows that the Mango is removed from the array and is printed on the console.
unshift() method
This JavaScript method is just like the push() method but the difference is it adds one or more than one element at the start of the array.
This method takes elements as a parameter that we want to add.
Syntax:
array_name.unshift(Elements)
In the above syntax, Elements represent those elements that we want to add in an array.
Code:
fruits = ["Mango", "Apple", "Apricot","Cheery", "Gava", "Lychee"]
fruits.unshift("Banana")
console.log(fruits)
In the above code, we create an array and alter the array by adding Banana in the array using the unshift method.
Output:
The output shows that the Mango is removed from the array and is printed on the console.
unshift() method
This JavaScript method is just like the push() method but the difference is it adds one or more than one element at the start of the array.
This method takes elements as a parameter that we want to add.
Syntax:
array_name.unshift(Elements)
In the above syntax, Elements represent those elements that we want to add in an array.
Code:
fruits = ["Mango", "Apple", "Apricot","Cheery", "Gava", "Lychee"]
fruits.unshift("Banana")
console.log(fruits)
In the above code, we create an array and alter the array by adding Banana in the array using the unshift method.
Output:
 As we can see in the above output, the unshift() method adds Banana at the start of the array.
splice() method
This JavaScript method is also used to remove and add specific elements from the array.
It takes three values as parameters.
This method() returns the removed element as an output.
Syntax:
array_name.splice(index_number, elements_number, value)
In the above syntax, index_number represents the starting index of the removing part.
The element_number represents the ending index of the removing part.
Lastly, the value represents the new element that replaces the removed part.
Code:
fruits = ["Mango", "Apple", "Apricot","Cheery", "Gava", "Lychee"]
fruits.splice(1,1,"Watermelon")
console.log(fruits)
In this code, we create an array and then we use the splice() method having three parameters which will eventually remove the element and add a new element at the place of the removed element.
Output:
As we can see in the above output, the unshift() method adds Banana at the start of the array.
splice() method
This JavaScript method is also used to remove and add specific elements from the array.
It takes three values as parameters.
This method() returns the removed element as an output.
Syntax:
array_name.splice(index_number, elements_number, value)
In the above syntax, index_number represents the starting index of the removing part.
The element_number represents the ending index of the removing part.
Lastly, the value represents the new element that replaces the removed part.
Code:
fruits = ["Mango", "Apple", "Apricot","Cheery", "Gava", "Lychee"]
fruits.splice(1,1,"Watermelon")
console.log(fruits)
In this code, we create an array and then we use the splice() method having three parameters which will eventually remove the element and add a new element at the place of the removed element.
Output:
 The above output shows that we remove the apple from the first index and replace it with the watermelon with the help of the splice method.
 The above output clearly shows that the toString() method converts the fruits array into string.
toLocaleString() method
This JavaScript method is also used to convert an array into a string of elements but in a specific format.
Syntax:
array_name.toLocaleString()
With the help of above syntax, we can convert an array into a string of elements in a specific format.
Now let’s convert an array using this syntax.
Code:
fruits = ["Mango", 120]var st=fruits.toLocaleString()
console.log(st)
In the above code we take an array with two different values, a word and a number.
Now the toLocaleString() method converts it into a string.
Output:
The above output clearly shows that the toString() method converts the fruits array into string.
toLocaleString() method
This JavaScript method is also used to convert an array into a string of elements but in a specific format.
Syntax:
array_name.toLocaleString()
With the help of above syntax, we can convert an array into a string of elements in a specific format.
Now let’s convert an array using this syntax.
Code:
fruits = ["Mango", 120]var st=fruits.toLocaleString()
console.log(st)
In the above code we take an array with two different values, a word and a number.
Now the toLocaleString() method converts it into a string.
Output:
 The above output shows that the toLocaleString() method converts the array elements into a string.
 The above output shows that the reverse() method changes the order of the elements in an array and returns a new array.
sort() method
This JavaScript method sorts the array elements in a specified order whether it is ascending or descending.
We can use functions as parameters in order to sort an array in a specific format.
By default, this method sorts an array in ascending order.
Code:
fruits = ["Mango", "Apple", "Apricot","Cherry", "Gava", "Lychee"]
console.log(fruits.sort())
In this code we create an array of six elements which are not in any sequence.
Then we use the sort() method to sort the array.
Output:
The above output shows that the reverse() method changes the order of the elements in an array and returns a new array.
sort() method
This JavaScript method sorts the array elements in a specified order whether it is ascending or descending.
We can use functions as parameters in order to sort an array in a specific format.
By default, this method sorts an array in ascending order.
Code:
fruits = ["Mango", "Apple", "Apricot","Cherry", "Gava", "Lychee"]
console.log(fruits.sort())
In this code we create an array of six elements which are not in any sequence.
Then we use the sort() method to sort the array.
Output:
 This output shows that sort() method sequence the elements in the array alphabetically or in other words we can say in ascending order.
Probably, you are now able to apply various array methods to manipulate/manage arrays.
This output shows that sort() method sequence the elements in the array alphabetically or in other words we can say in ascending order.
Probably, you are now able to apply various array methods to manipulate/manage arrays.
 As we can see in the above output the shift() method removes Norton V4 from the array and returns it as an output.
 The above output clearly shows that the shift() method removes array elements one by one from the start of the array.
 The above output clearly shows that the shift() method tries to remove elements from an empty array and gets undefined as output.
 The above output shows that the push() method adds Roll Royce and Ford mustang at the end of the array which eventually changes the original array size and returns a new array as an output.
 This output shows that elements are added at the end of the array using a for loop which changes the original array size and returns a new array as output.
 This output shows that the array was empty and then we use a for loop to add elements.
Here you go! You can now append or fill elements to a non-empty or empty array respectively.
This output shows that the array was empty and then we use a for loop to add elements.
Here you go! You can now append or fill elements to a non-empty or empty array respectively.
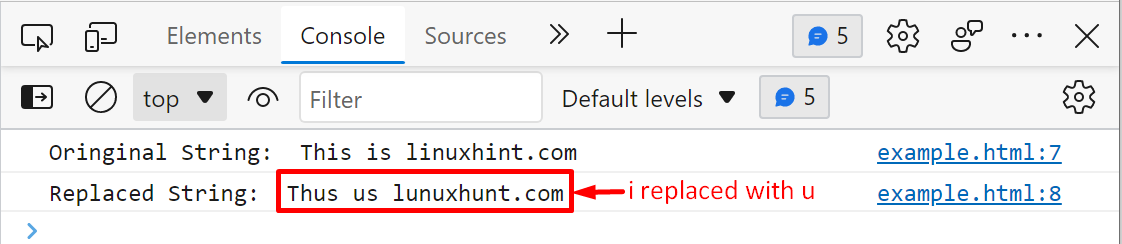 The output shows that the replaceAll() method replaced all the occurrences of “i” with “u”.
Example 2: Replace a word
Let’s consider the below snippet to understand how to use the replaceAll() method to replace all the occurrences of a word with another word:
var givenString = "this is linuxhint.com, this is an example of replaceAll() method";var result = givenString.replaceAll("this", "it");
console.log("Original String: ", givenString);
console.log("Replaced String: ", result);
In the above-given program, we utilized the replaceAll() method to replace all the occurrences of the “this” with the “it”:
The output shows that the replaceAll() method replaced all the occurrences of “i” with “u”.
Example 2: Replace a word
Let’s consider the below snippet to understand how to use the replaceAll() method to replace all the occurrences of a word with another word:
var givenString = "this is linuxhint.com, this is an example of replaceAll() method";var result = givenString.replaceAll("this", "it");
console.log("Original String: ", givenString);
console.log("Replaced String: ", result);
In the above-given program, we utilized the replaceAll() method to replace all the occurrences of the “this” with the “it”:
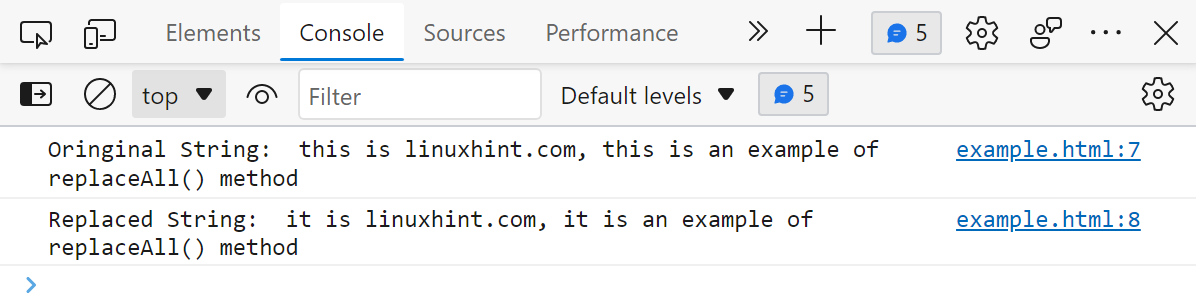 This is how we can utilize the replaceAll() method to replace all the occurrences of a specific word.
Example 3: Replace a special character
Using the replaceAll() method we can replace a special character as shown in the below snippet:
var givenString = "Good Morning! Welcome to linuxhint.com!";var result = givenString.replaceAll("!", ";");
console.log("Original String: ", givenString);
console.log("Replaced String: ", result);
In this example program, we will replace the “!” sign with the “;” using replaceAll() method:
This is how we can utilize the replaceAll() method to replace all the occurrences of a specific word.
Example 3: Replace a special character
Using the replaceAll() method we can replace a special character as shown in the below snippet:
var givenString = "Good Morning! Welcome to linuxhint.com!";var result = givenString.replaceAll("!", ";");
console.log("Original String: ", givenString);
console.log("Replaced String: ", result);
In this example program, we will replace the “!” sign with the “;” using replaceAll() method:
 This is how the replaceAll() method works.
 Congratulations, you now have the nodemon command available.
 The output proved that the array.map() method returned an array of modified elements (i.e., each element is incremented by 50).
 This is how the array.map() method works with an array of objects.
 This is how we can utilize any built in method along with array.map() method to achieve different functionalities.
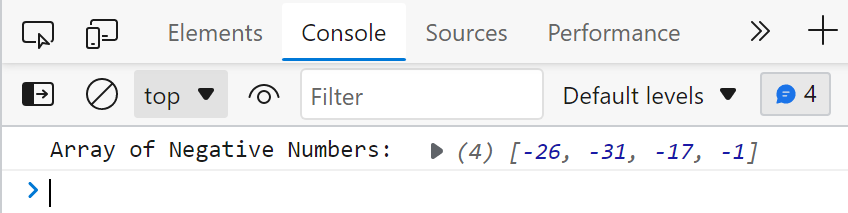 The output authenticates the working of array.filter() method as it returns only negative values.
 The output shows that there are three employees in the array whose age is greater than 25 and the array.filter() method filters them successfully.
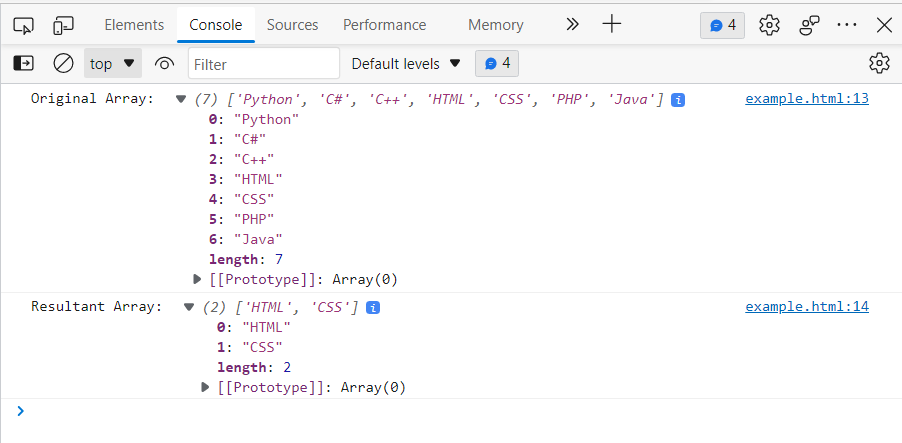 The output verified that the array.slice() method returned a new array of selected elements only.
 The output shows that If we didn’t specify the starting and end position then the array.slice() method will return a complete array.
 This is how the array.slice() method works with the negative indices.
 The output shows the array.splice() method returns an array of deleted countries.
 The output verified that this time the splice() method deleted the element from the user-specified position.
 This is how we can add and delete elements in an array using the array.splice() method.
 The output shows that the new elements are added to the array without deleting the existing array elements.
 Clicking on the button will lead us to the given URL.
 This is how location.href property works.
 When we clicked on the button “Click Me!”, it directs us to the following window:
 We can observe that both location.href and location.assign produced the same result.
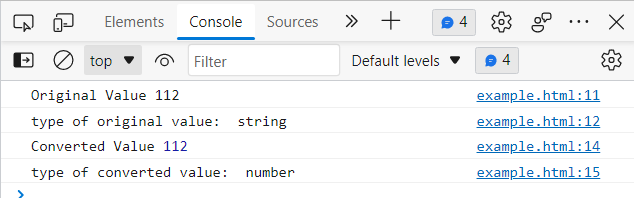 The output verified that initially, the variable’s type is a string; however, the parseInt() function converted the string into an integer.
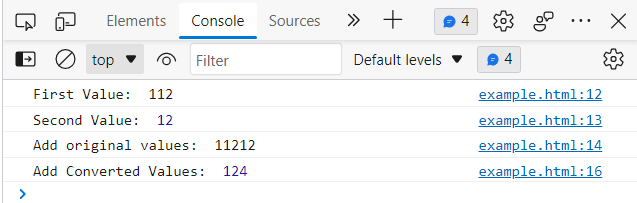 From the above snippet, we observed that both values got concatenated when we performed addition on the original values.
When we performed addition on the converted values, we got the desired result, i.e., the sum of both values.
From the above snippet, we observed that both values got concatenated when we performed addition on the original values.
When we performed addition on the converted values, we got the desired result, i.e., the sum of both values.
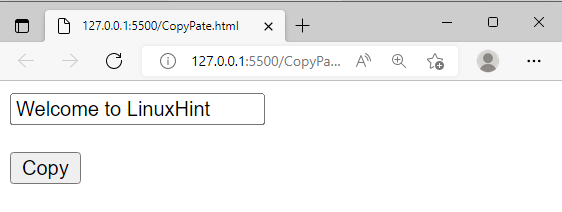 If everything goes fine, then clicking on the “Copy” button will show a message “Text copied” alongwith the copied text:
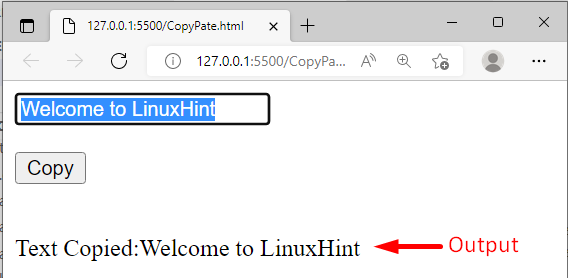 The output authenticates that our program is working perfectly fine.
 The above snippet shows how to copy/paste the text into the clipboard using JavaScript.
 The output verified that the Object.keys() returned an array of Strings that consists of all the keys of the “empDetails” object.
 The output verified that the Object.keys() method returned an array of keys.
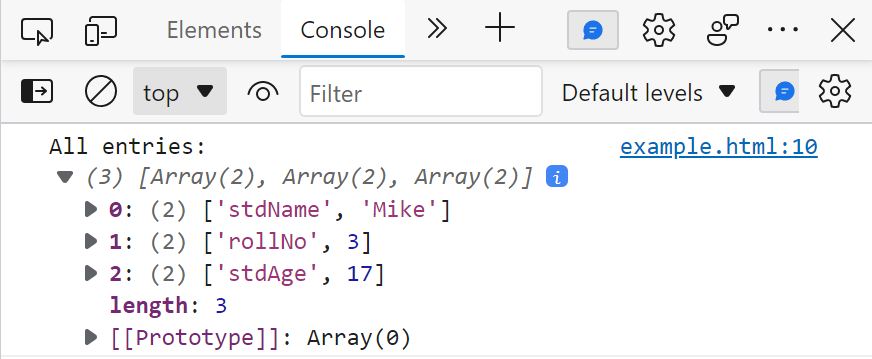 The output shows that the Object.entries() method returns an array of Strings that consists of all the entries of the given object.
 This is how the Object.entries() method works.
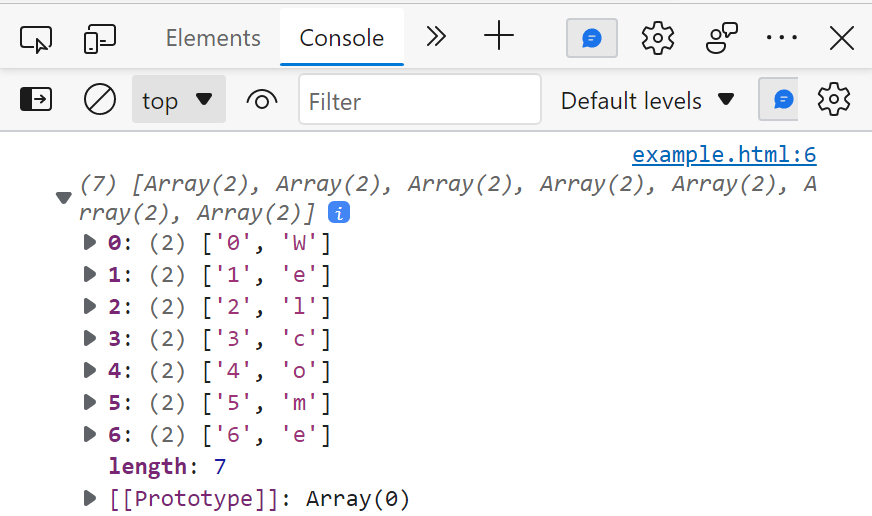 The output shows that the Object.entries() method returned the array of key-value pairs.
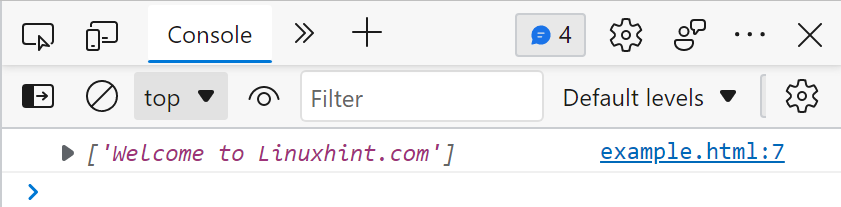 Output verified that the split() method returned an array of only one string, i.e., the original string.
 In this program, space occurred two times so the whole string broke into three substrings.
 The output verified that the String.split() method returned an array of characters including spaces.
 This is how the limit parameter works in the string.split() method.
 The output verifies that for the Math.trunc() method, it doesn’t matter whether the decimal value is greater than .5 or less than .5.
It will simply trim the fractional/decimal value.
The output verifies that for the Math.trunc() method, it doesn’t matter whether the decimal value is greater than .5 or less than .5.
It will simply trim the fractional/decimal value.
 The output proved that Math.trunc() method skipped the decimal value and returned the remaining integer part of the given value.
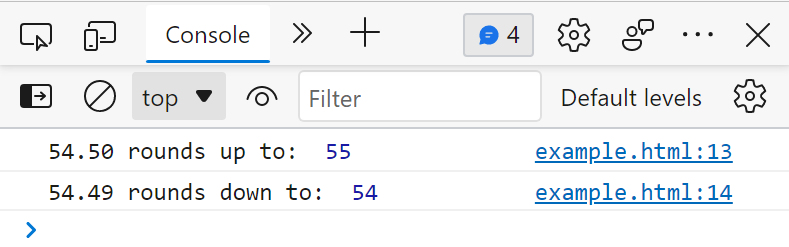 The output verified that the Math.round() function successfully converted the given values to the nearest integers.
 This is how the Math.round() works.
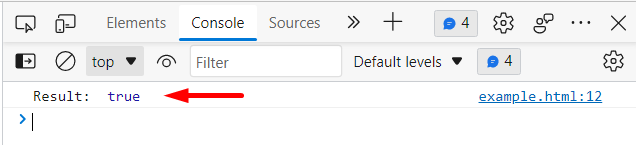 The output shows “true”, it authenticates that the word “linux” is present in the string.
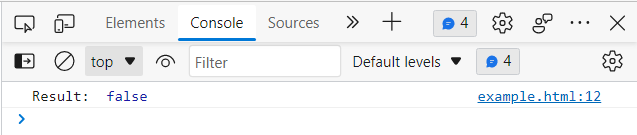 The word “welcome” is present in the string “Welcome to linuxhint.com”, but still, we get the result “false”.
This is because in the string, the first letter of the searching string is capital, i.e., “Welcome”, while we searched for the substring “welcome”, whose first letter is in lower case.
Hence we get the result “false”, it proves that the string.includes() is case-sensitive.
The word “welcome” is present in the string “Welcome to linuxhint.com”, but still, we get the result “false”.
This is because in the string, the first letter of the searching string is capital, i.e., “Welcome”, while we searched for the substring “welcome”, whose first letter is in lower case.
Hence we get the result “false”, it proves that the string.includes() is case-sensitive.
 The substring “Welcome” is present in the string, but still, the result is false.
Why? This is because we started the search from the 8th index while the starting index of the “Welcome” is 0, therefore we get the result “false”.
The substring “Welcome” is present in the string, but still, the result is false.
Why? This is because we started the search from the 8th index while the starting index of the “Welcome” is 0, therefore we get the result “false”.
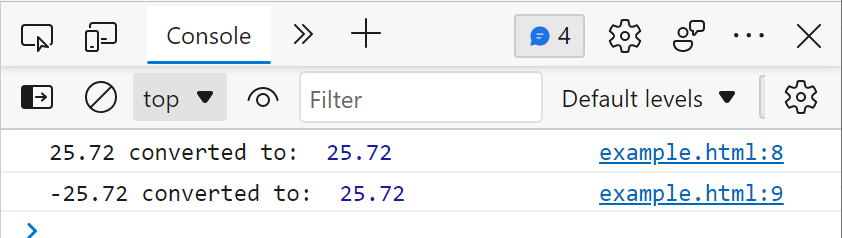 The output verified that the Math.abs() method returned the absolute value of the given number.
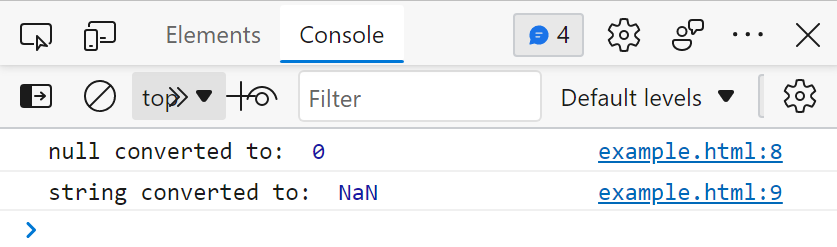 The output verified that the Math.abs() method returned 0 for null and NaN for string/non-numeric values.
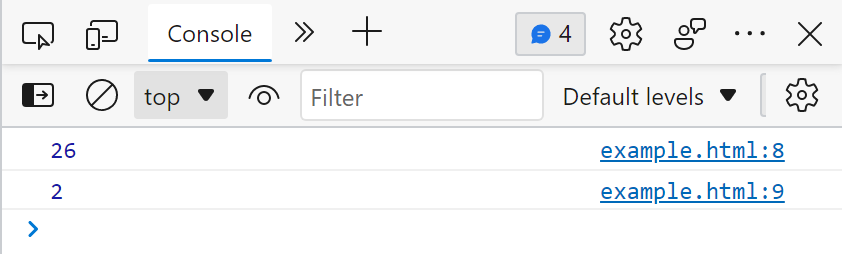 The output verified that the Math.abs() method calculated the given expression and returned an absolute value.
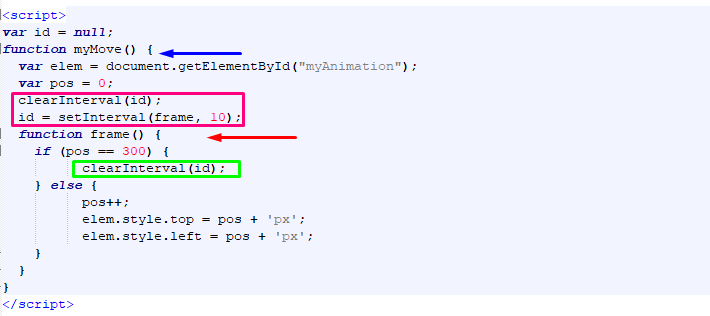 Execution of the above-given JavaScript program will show the following output:
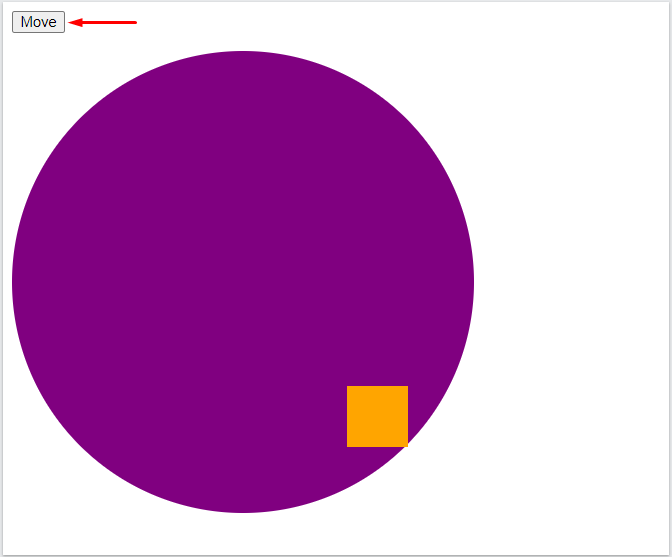 Then click on “Move” button to view the created JavaScript animation:
 That was all essential information related to JavaScript animation.
You can further explore as required.
That was all essential information related to JavaScript animation.
You can further explore as required.
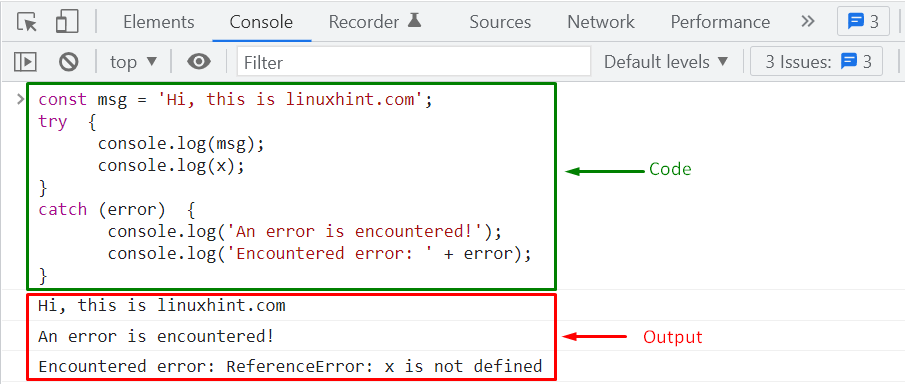
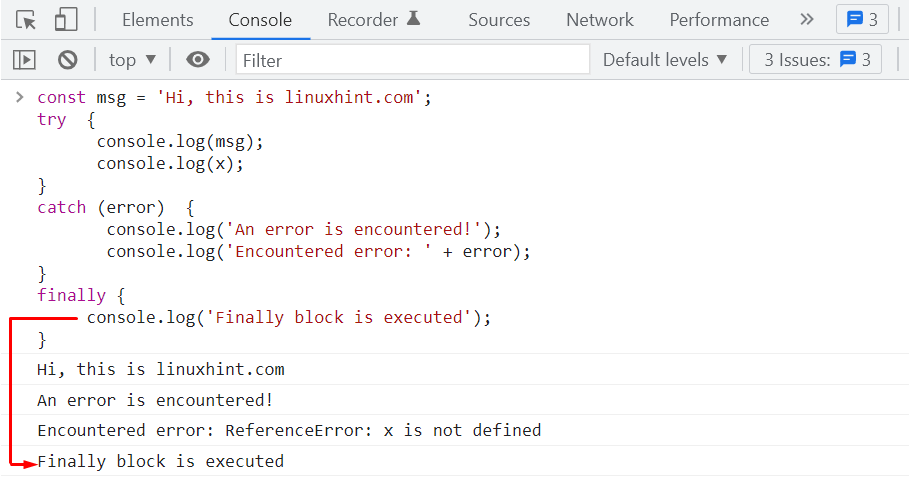 That was all essential information about JavaScript try…catch…finally. Go for further research if required.
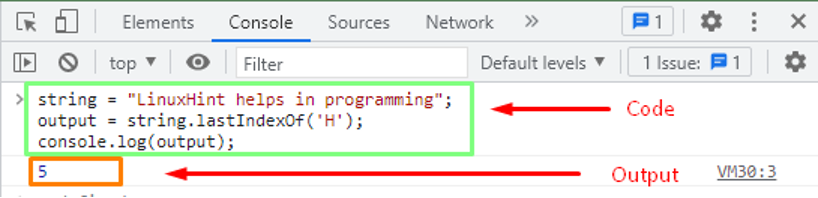 The returned output showed that the specified character ‘H’ is located at the index position ‘5’ in the string.
Example: How String lastIndexOf() method behaves when a substring is not foundThe lasIndexOf() method retrieves the index position of a specified character in a given string.
This example explains how this function works with the null string.
string = "LinuxHint helps in programming";
output = string.lastIndexOf('Talha Saif Inc');
console.log(output);
In this example, a string “LinuxHint helps in programming” is passed to an object.
We use the substring “Talha Saif Inc” that is to be searched.
When a function calls, it returns the location of the specified substring.
The returned output showed that the specified character ‘H’ is located at the index position ‘5’ in the string.
Example: How String lastIndexOf() method behaves when a substring is not foundThe lasIndexOf() method retrieves the index position of a specified character in a given string.
This example explains how this function works with the null string.
string = "LinuxHint helps in programming";
output = string.lastIndexOf('Talha Saif Inc');
console.log(output);
In this example, a string “LinuxHint helps in programming” is passed to an object.
We use the substring “Talha Saif Inc” that is to be searched.
When a function calls, it returns the location of the specified substring.
 The returned output showed that the specified substring is not located in the given string.
Therefore the function returned -1.
Example: How the String lastIndexOf() method works with defined start parameterThe lastIndexOf() method works in the backward order.
However if the start parameter is defined, it will work in a different scenario.
Let’s have a look at how it works.
string = "LinuxHint is a Linux-based content provider";
output = string.lastIndexOf('n', 4);
console.log(output);
In this example, the starting index of the given string is defined with the index position ‘4’.
When the function calls, it will not search the specified index throughout the whole string.
But it will only search in the defined index point.
The returned output showed that the specified substring is not located in the given string.
Therefore the function returned -1.
Example: How the String lastIndexOf() method works with defined start parameterThe lastIndexOf() method works in the backward order.
However if the start parameter is defined, it will work in a different scenario.
Let’s have a look at how it works.
string = "LinuxHint is a Linux-based content provider";
output = string.lastIndexOf('n', 4);
console.log(output);
In this example, the starting index of the given string is defined with the index position ‘4’.
When the function calls, it will not search the specified index throughout the whole string.
But it will only search in the defined index point.
 The returned output showed that the specified character ‘n’ is present at the index ‘2’ with a defined start parameter.
Example: How the String lastIndexOf() method reacts in a case insensitive matchingThe lastIndexOf() method has a case insensitive property.
This example checks how the String lastIndexOf() method reacts in a case-insensitive matching.
string = "LinuxHint helps in programming";
output = string.lastIndexOf('P');
console.log(output);
In this example, a string “LinuxHint helps in programming” is passed to an object.
However, there is a case sensitivity in the substring ‘P’.
The returned output showed that the specified character ‘n’ is present at the index ‘2’ with a defined start parameter.
Example: How the String lastIndexOf() method reacts in a case insensitive matchingThe lastIndexOf() method has a case insensitive property.
This example checks how the String lastIndexOf() method reacts in a case-insensitive matching.
string = "LinuxHint helps in programming";
output = string.lastIndexOf('P');
console.log(output);
In this example, a string “LinuxHint helps in programming” is passed to an object.
However, there is a case sensitivity in the substring ‘P’.
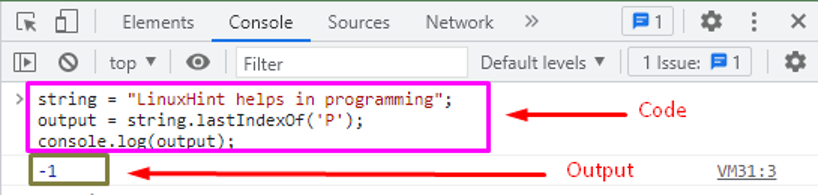 The output showed that in the case-insensitivity scenario, the function returned the ‘-1’ output.
 The returned output showed that the function Range() created a range of specified charters that represented the “[ ‘S’, ‘T’, ‘U’, ‘V’, ‘W’, ‘X’, ‘Y’, ‘Z’ ]”.
Example: How to create a range of integers using the Range() functionThe range() function creates the range and difference between the starting and ending points of an index.
The index values may be characters and integers.
This example shows how the range() function creates the range for integers.
function* iterate(x, y) {
for (j = x; j String.fromCharCode(n));
console.log(output);
}}
range('3', '7');
The range() function mostly used the For loop to iterate.
In the given list of integers ‘3-7’, the range functions create all the possible values that start from minimum to maximum value.
When the function calls, it returns the created range between the specified integers.
The returned output showed that the function Range() created a range of specified charters that represented the “[ ‘S’, ‘T’, ‘U’, ‘V’, ‘W’, ‘X’, ‘Y’, ‘Z’ ]”.
Example: How to create a range of integers using the Range() functionThe range() function creates the range and difference between the starting and ending points of an index.
The index values may be characters and integers.
This example shows how the range() function creates the range for integers.
function* iterate(x, y) {
for (j = x; j String.fromCharCode(n));
console.log(output);
}}
range('3', '7');
The range() function mostly used the For loop to iterate.
In the given list of integers ‘3-7’, the range functions create all the possible values that start from minimum to maximum value.
When the function calls, it returns the created range between the specified integers.
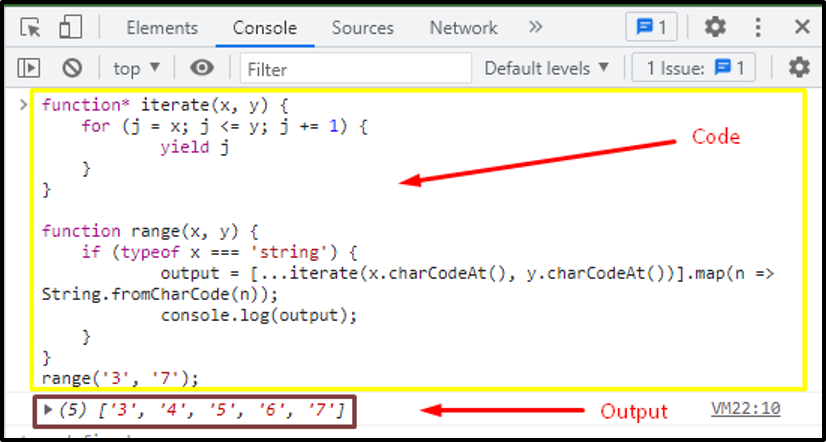 The output shows that the range is created between the passed arguments that are ‘3’ and ‘7’.
Finally, you can now create a range of characters as well as range of integers.
The output shows that the range is created between the passed arguments that are ‘3’ and ‘7’.
Finally, you can now create a range of characters as well as range of integers.
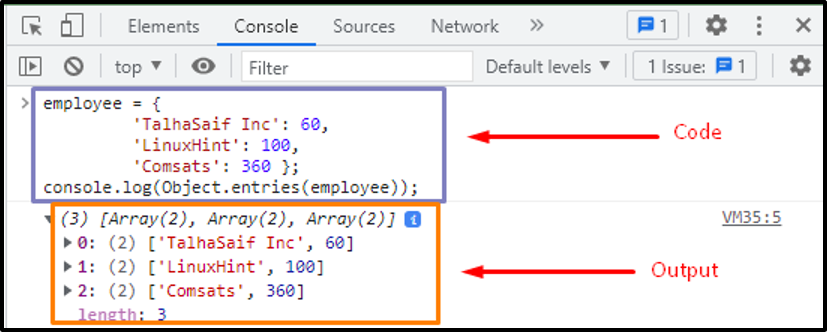 The returned output showed that the object ‘employee’ has countable string-keyed properties in an array form.
Example: How Object.entries() access a specific property objectThe Object.entries() method can also access the specified property in the given array using the index number.
In this example, you will learn how this function gets a specified property.
employee = {
'TalhaSaif Inc': 60,
'LinuxHint': 100,
'Comsats': 360 };
console.log(Object.entries(employee)[1]);
In this code, an object ‘employee’ is created with the values in specified order.
Here, [1] represents the index number of an array.
When a function is called, it will return the specified property of the given index number in an array.
The returned output showed that the object ‘employee’ has countable string-keyed properties in an array form.
Example: How Object.entries() access a specific property objectThe Object.entries() method can also access the specified property in the given array using the index number.
In this example, you will learn how this function gets a specified property.
employee = {
'TalhaSaif Inc': 60,
'LinuxHint': 100,
'Comsats': 360 };
console.log(Object.entries(employee)[1]);
In this code, an object ‘employee’ is created with the values in specified order.
Here, [1] represents the index number of an array.
When a function is called, it will return the specified property of the given index number in an array.
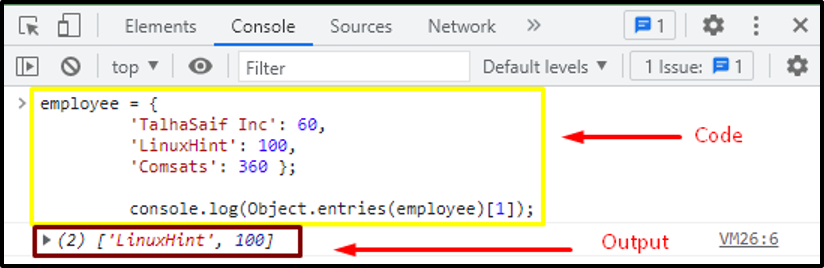 The returned output showed the countable property ‘’[‘LinuxHint’, 100]” of the specified index of an array.
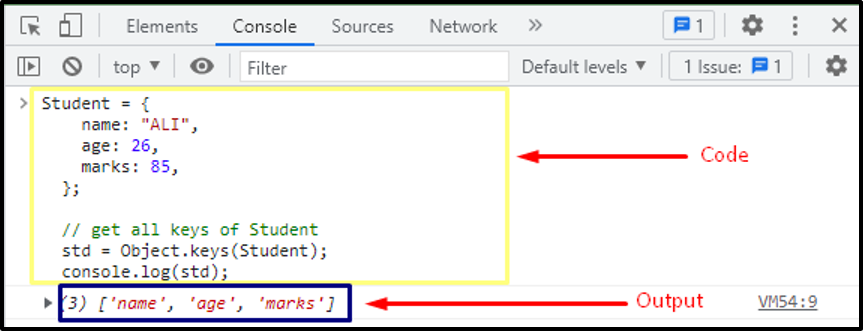 After applying the Object.keys() method, the keys of an object ‘student’ are displayed on the console.
Example: How to get Object keys of Non-enumerable propertiesIn JavaScript, the Object.keys() method returns only enumerable properties of the object.
Let’s refer to the following code to get the keys of uncountable properties of an object.
keys = Object.create({}, {
getName: {
value: function () { return this.name; }
}});
keys.name = 'LinuxHint';
console.log(Object.keys(keys));
This code narrates that an object is created in which the function has a null value.
However, there must be a value to an object.
Otherwise, it will not return the property key.
The example shows that if the called function is empty, it will simply return the name only.
After applying the Object.keys() method, the keys of an object ‘student’ are displayed on the console.
Example: How to get Object keys of Non-enumerable propertiesIn JavaScript, the Object.keys() method returns only enumerable properties of the object.
Let’s refer to the following code to get the keys of uncountable properties of an object.
keys = Object.create({}, {
getName: {
value: function () { return this.name; }
}});
keys.name = 'LinuxHint';
console.log(Object.keys(keys));
This code narrates that an object is created in which the function has a null value.
However, there must be a value to an object.
Otherwise, it will not return the property key.
The example shows that if the called function is empty, it will simply return the name only.
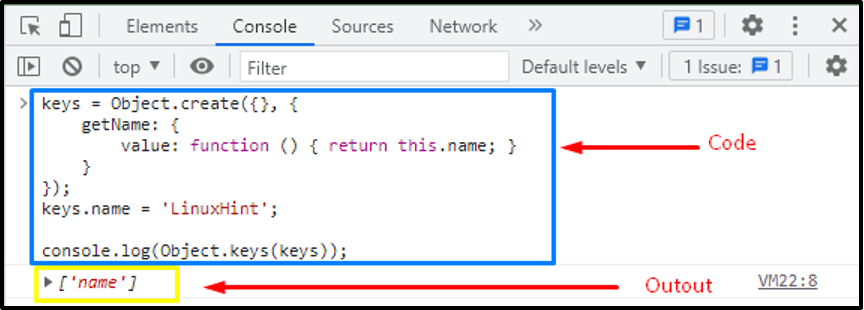 The returned output showed that when a null or undefined value is passed the function only returns the “[‘name’]”.
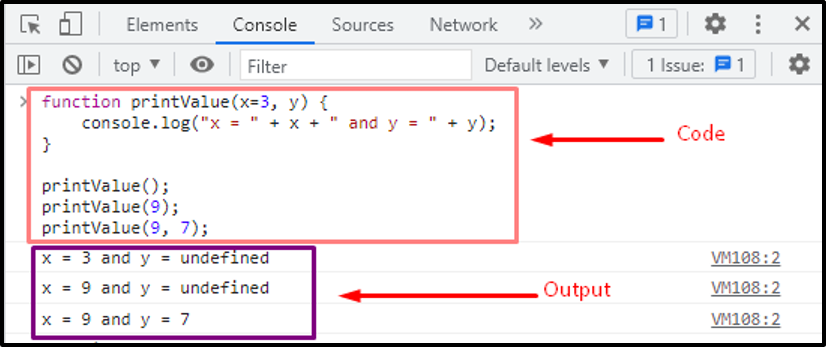 It is concluded from the output that:
When printValue() is called without arguments, the default values are printed i.e., ‘x=3’ and ‘y=undefined’
When printValue() is called with only one argument (that is 3) then that value will be assigned to the first parameter(x)
When printValue() is called with two arguments (9 and 7) then the default values of x and y are replaced with 9 and 7 respectively.
Example: How the function works without default parametersThere can be more than one parameter in an object.
In the following code, we will check how the function behaves without default values.
function printValue(x, y) {
console.log("x = " + x + " and y = " + y);}
printValue(3);
In this example, two parameters ‘x‘ and ‘y’ are passed as an argument without any default value.The function body refers to the code which prints the values of x and y.
The “Value(3);” statement will set the value of ‘x’ to 3.
It is concluded from the output that:
When printValue() is called without arguments, the default values are printed i.e., ‘x=3’ and ‘y=undefined’
When printValue() is called with only one argument (that is 3) then that value will be assigned to the first parameter(x)
When printValue() is called with two arguments (9 and 7) then the default values of x and y are replaced with 9 and 7 respectively.
Example: How the function works without default parametersThere can be more than one parameter in an object.
In the following code, we will check how the function behaves without default values.
function printValue(x, y) {
console.log("x = " + x + " and y = " + y);}
printValue(3);
In this example, two parameters ‘x‘ and ‘y’ are passed as an argument without any default value.The function body refers to the code which prints the values of x and y.
The “Value(3);” statement will set the value of ‘x’ to 3.
 When printValue() is called with only argument ‘3’, then the default values are printed as ‘x=3’ and ‘y=undefined’.
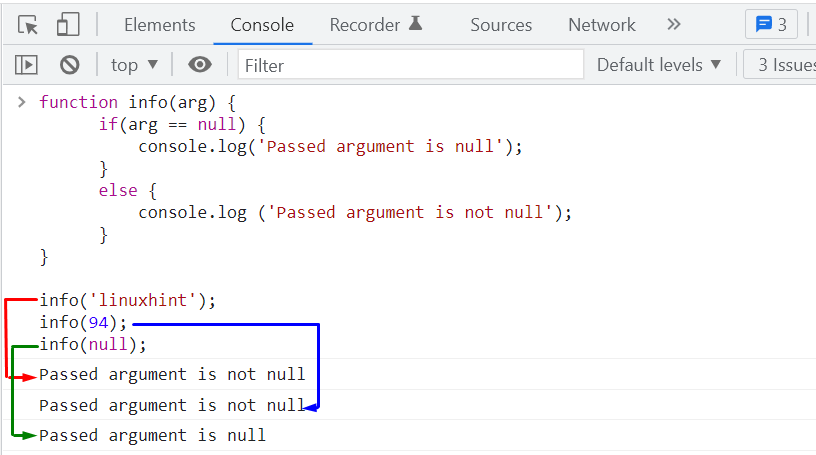 The above-given output signifies that our created “info()” function is successfully checking for the null values.
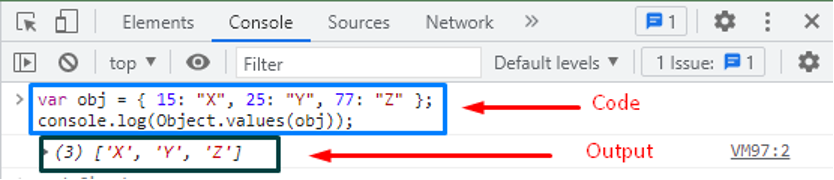 The Object.values() method has returned the countable values of the ‘obj’ as can be seen in the output.
Example 2: How to access the enumerable properties of an objectThe Object.values() method can be used to access the enumerable property of an object.
student = { name: 'NAEEM', education: 'MS CS', age: '26' };
console.log(Object.values(student));
In this code, the object ‘student’ has the three-parameter values with the enumerable properties ‘name’, ‘education’ and ‘age’.
When the function calls the object, it returns countable properties of a specified object.
The Object.values() method has returned the countable values of the ‘obj’ as can be seen in the output.
Example 2: How to access the enumerable properties of an objectThe Object.values() method can be used to access the enumerable property of an object.
student = { name: 'NAEEM', education: 'MS CS', age: '26' };
console.log(Object.values(student));
In this code, the object ‘student’ has the three-parameter values with the enumerable properties ‘name’, ‘education’ and ‘age’.
When the function calls the object, it returns countable properties of a specified object.
 From the output, it is observed that the enumerable properties of an object ‘student’ are [‘NAEEM’, ‘MS CS’, ’26’].
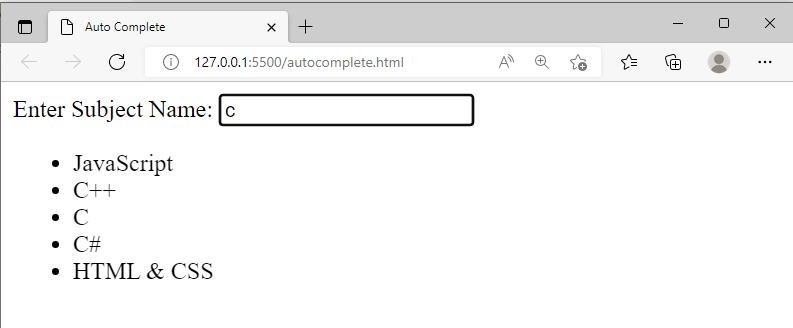 The above snippet verified that when the user entered the letter “c”, consequently, the autocomplete feature showed the filtered list of relevant words.
 Now, we will enter some data in the input fields, and afterward, we will click on the “Show Details” button.
After clicking on the button, we will get the following output:
Now, we will enter some data in the input fields, and afterward, we will click on the “Show Details” button.
After clicking on the button, we will get the following output:
 This is how you can get started with the JavaScript forms.
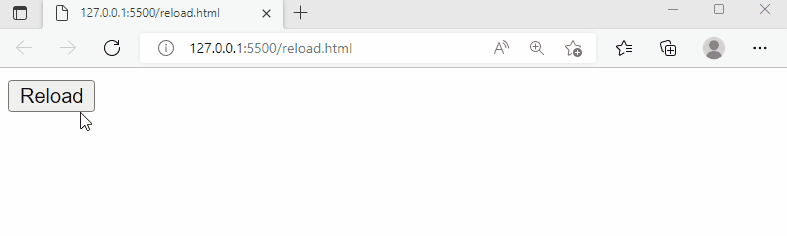 This is how the location.reload method works.
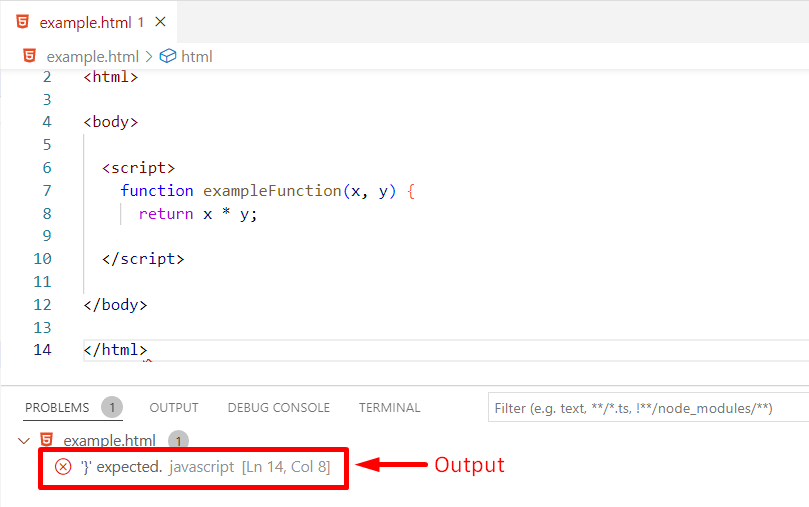 This is how a runtime error occurs.
 The output verified that putting the closing curly “}” bracket successfully resolved the syntax error.
 This is how runtime errors occur.
 The output verified that the catch block didn’t execute because the code was error-free.
 Output verified that location.replace()method replaced the current webpage with the specified URL.
 The above-given GIF shows that location.href property redirects us to the specified link.
Using location.href property we can navigate back to the previous/original webpage.
The above-given GIF shows that location.href property redirects us to the specified link.
Using location.href property we can navigate back to the previous/original webpage.
 The above GIF verified that the location.assign method redirects us to the specified link (i.e.
google.com).
Moreover, it confirmed that the back button is enabled which means we can navigate back to the previous page/link.
The above GIF verified that the location.assign method redirects us to the specified link (i.e.
google.com).
Moreover, it confirmed that the back button is enabled which means we can navigate back to the previous page/link.
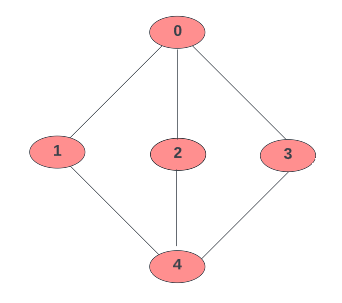 We will now use this traversal algorithm on the specified graph.
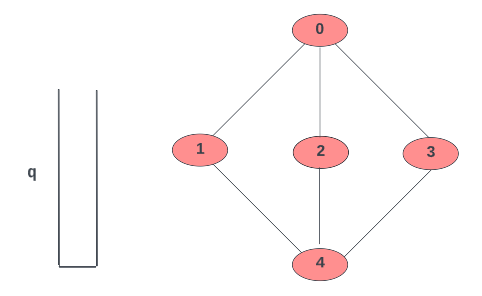
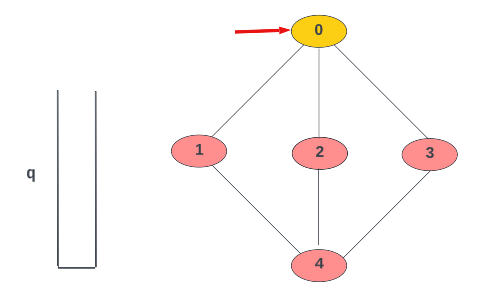
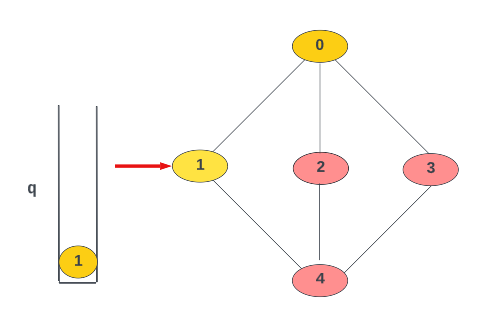 Now, the unvisited node of “0” is “2”, which is also marked as visited and added to the queue:
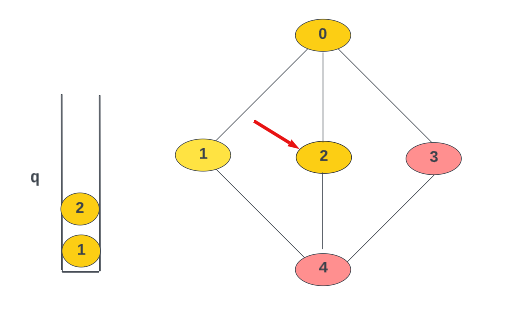 Then, we will visit the last unvisited adjacent node, which is “3”, marked it as visited and enqueue it:
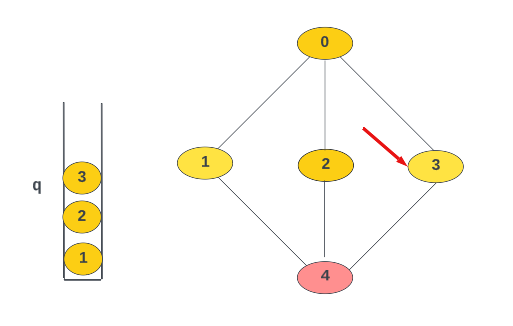
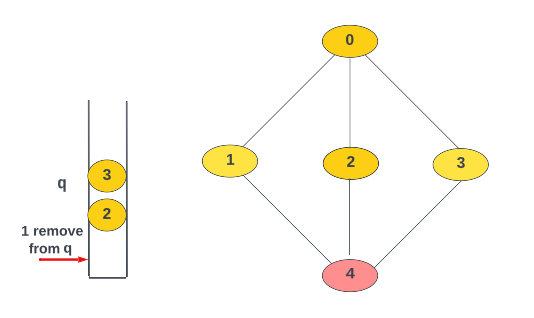
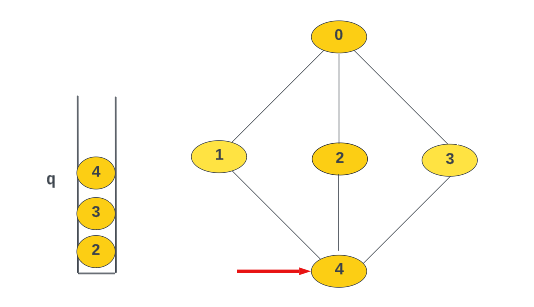 Node “4” is now marked as visited and added to the queue.
Now, we have no more unvisited nodes.
However, according to the algorithm, we will obtain all unvisited nodes and continue to remove the node from the queue as per the procedure.
The program will end when the queue becomes empty.
Let’s implement an example to check how Breadth-first Search works in JavaScript.
Node “4” is now marked as visited and added to the queue.
Now, we have no more unvisited nodes.
However, according to the algorithm, we will obtain all unvisited nodes and continue to remove the node from the queue as per the procedure.
The program will end when the queue becomes empty.
Let’s implement an example to check how Breadth-first Search works in JavaScript.
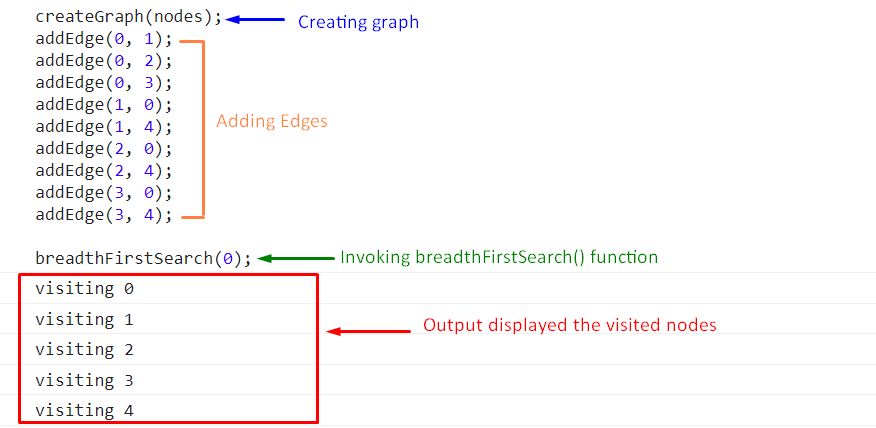 That was all useful information about Breadth-first search traversal algorithm.
Go for further research if required.
That was all useful information about Breadth-first search traversal algorithm.
Go for further research if required.
 The user entered two values i.e.
“MR.
” in the first text field and “Java” in the second text field.
Clicking on the “Concat” button will produce the following output:
The user entered two values i.e.
“MR.
” in the first text field and “Java” in the second text field.
Clicking on the “Concat” button will produce the following output:
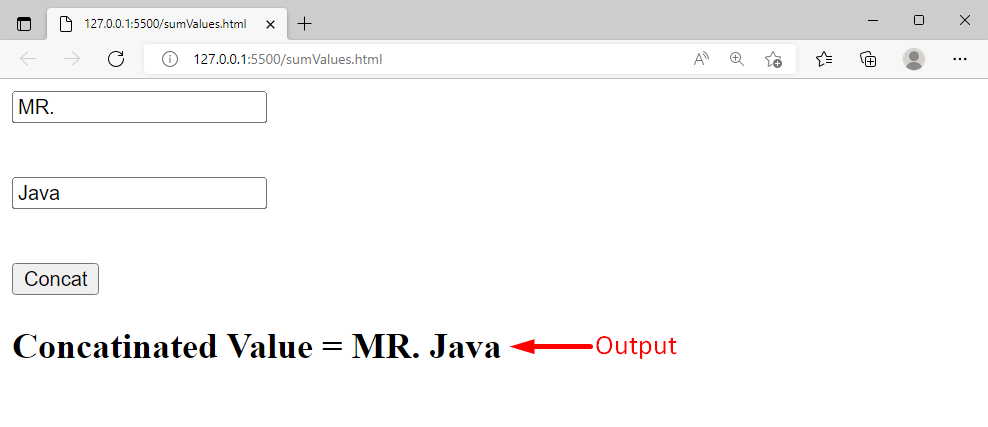 The output verified that our program is running perfectly fine.
 Now this time when we run the code, we will get the following output:
 Clicking on the button doesn’t perform any action, it shows that something went wrong with our code.
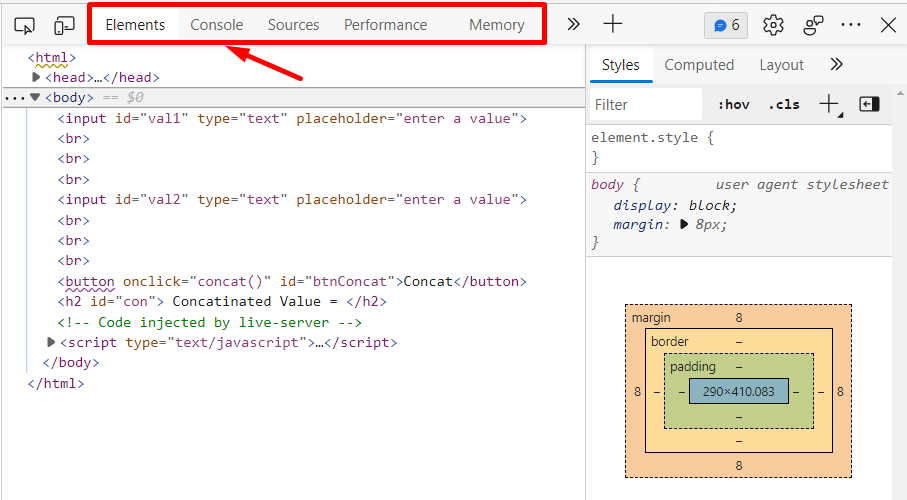 At the top, you will find the different tabs, for example, the first tab is the “Elements” tab, and clicking on the Elements tab will show us the complete code/tags.
The second tab is the “Console” tab where we can perform the debugging, and so on.
JavaScript provides a method named console() that can take some values/expressions and print the result on the browser console., the console.log() method is usually used for debugging purposes.
At the top, you will find the different tabs, for example, the first tab is the “Elements” tab, and clicking on the Elements tab will show us the complete code/tags.
The second tab is the “Console” tab where we can perform the debugging, and so on.
JavaScript provides a method named console() that can take some values/expressions and print the result on the browser console., the console.log() method is usually used for debugging purposes.
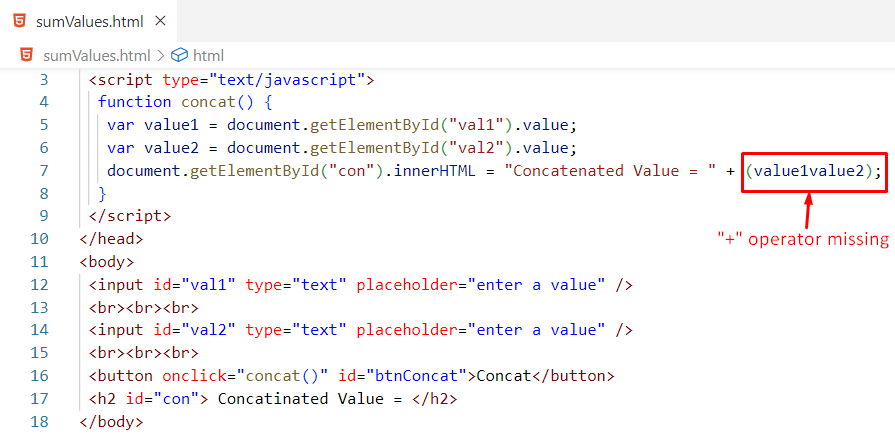 In the above snippet, we missed the “+” operator between value1 and value2, consequently, our program wouldn’t work appropriately:
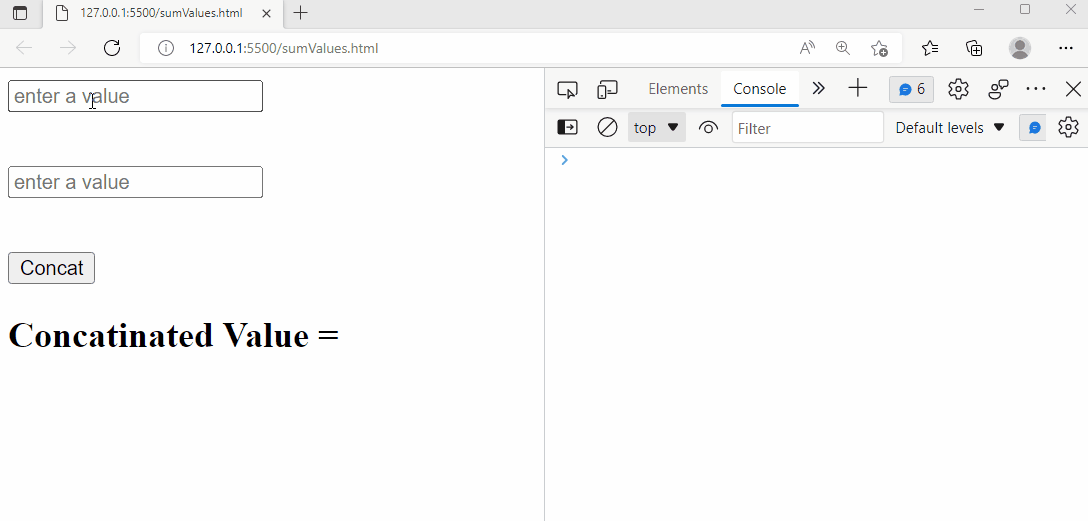 The output verifies that the error is debugged in the console window and it provides complete details about the error i.e.
what kind of error it is? Which line causes the error etc.
In this example program, we will utilize the console.log() method to debug the error:
console.log(value1value2);
The output verifies that the error is debugged in the console window and it provides complete details about the error i.e.
what kind of error it is? Which line causes the error etc.
In this example program, we will utilize the console.log() method to debug the error:
console.log(value1value2);
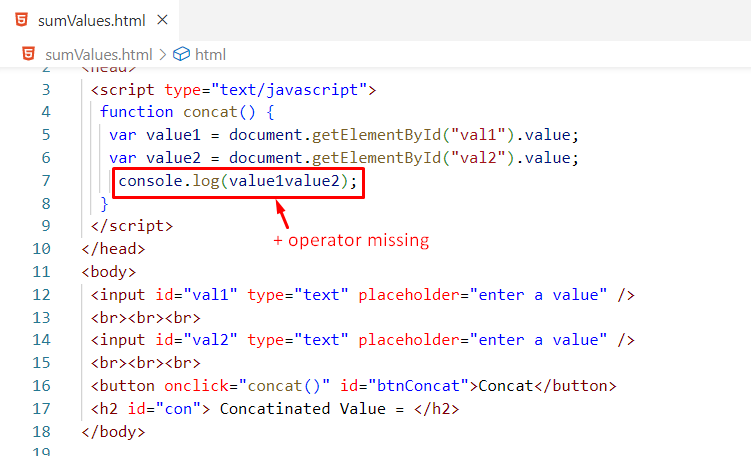 In the above program, value1value2 is not defined anywhere in the program.
But still, the text editor didn’t show any kind of error, however, it will be debugged in the browser’s console:
In the above program, value1value2 is not defined anywhere in the program.
But still, the text editor didn’t show any kind of error, however, it will be debugged in the browser’s console:
 The above snippet explained that value1value2 is not defined in our code, the error occurred because of line 7, and the error occurred when we clicked on the button.
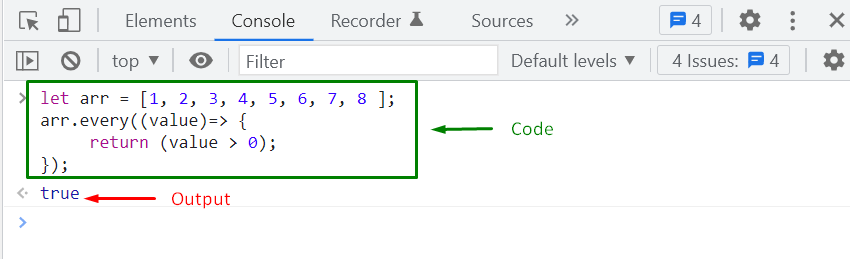
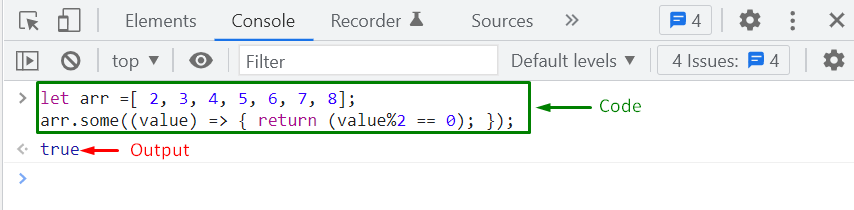 We have disscussed the difference between some() and every() method, their syntax and example.
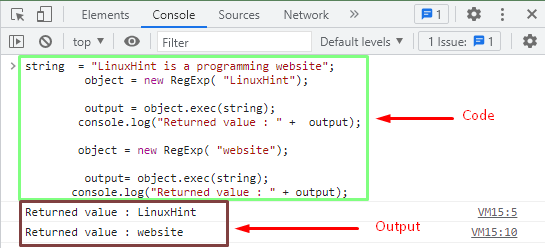 The returned output showed that there is a matching string in a function.
Therefore the function returned the original strings as ‘LinuxHint’ and ‘website’.
The returned output showed that there is a matching string in a function.
Therefore the function returned the original strings as ‘LinuxHint’ and ‘website’.
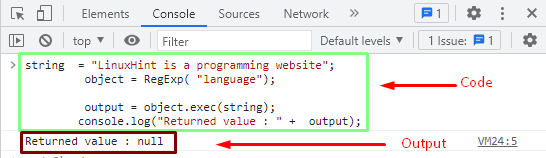 The output showed there is not a matching string in the string of the specified object.
Therefore the function returned the ‘null’ value.
The output showed there is not a matching string in the string of the specified object.
Therefore the function returned the ‘null’ value.
 The output showed that the function returned the same value as an output because the Math.abs() function returns the absolute values only.
Therefore, the returned output number is ‘37’.
The output showed that the function returned the same value as an output because the Math.abs() function returns the absolute values only.
Therefore, the returned output number is ‘37’.
 The output showed that the function returned the positive value of the ‘18’.
We know that the Math.abs() function only returns the absolute values.With the negative values, this function removes the negation sign and converts them into positive values.
The output showed that the function returned the positive value of the ‘18’.
We know that the Math.abs() function only returns the absolute values.With the negative values, this function removes the negation sign and converts them into positive values.
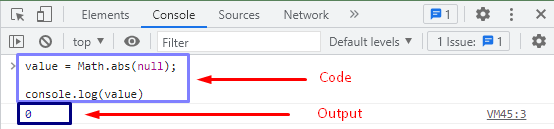 The output showed that the Math.abs() function returned the ‘0’ when a null value is passed to a parameter.
It is the property of Math.abs() method that the function returns the ‘0’ for an empty string.
The output showed that the Math.abs() function returned the ‘0’ when a null value is passed to a parameter.
It is the property of Math.abs() method that the function returns the ‘0’ for an empty string.
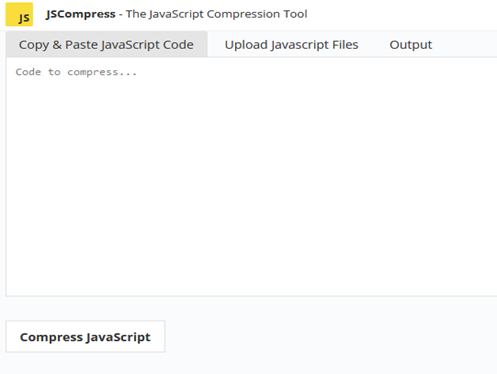
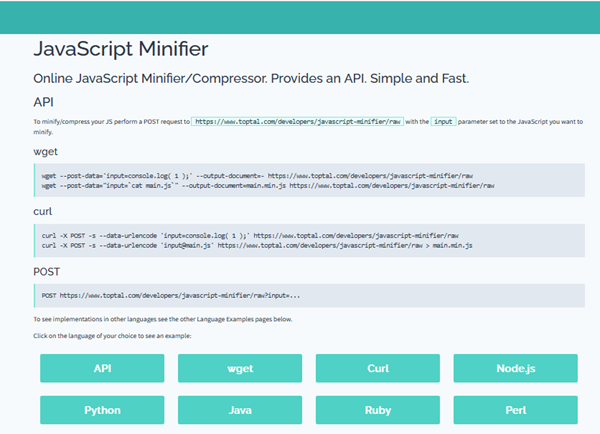
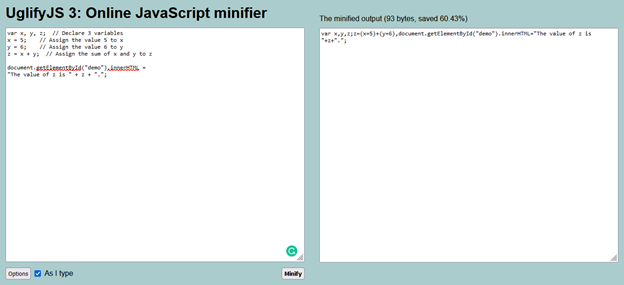


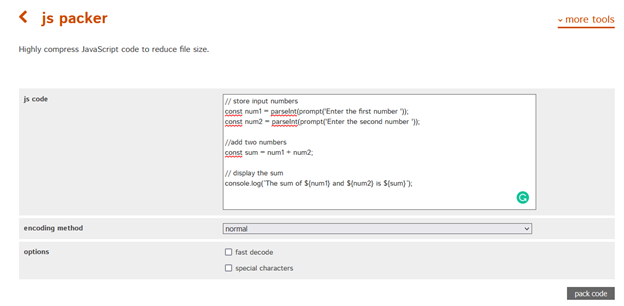
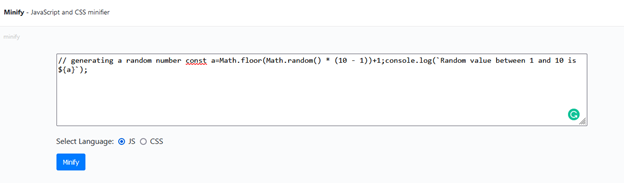 We have compiled the top 7 best JavaScript minification tools for you.
Go for further research as required.
We have compiled the top 7 best JavaScript minification tools for you.
Go for further research as required.
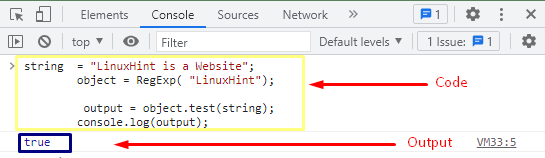 As the characters “LinuxHint” are present in the string variable therefore the test() method has returned true.
 The output showed that there is no matching string in a particular string.
Therefore the test() method returned the output ‘false’.
The output showed that there is no matching string in a particular string.
Therefore the test() method returned the output ‘false’.
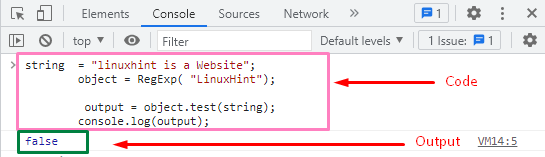 The letter-case of the pattern and the string did not match therefore the test() method has returned false.
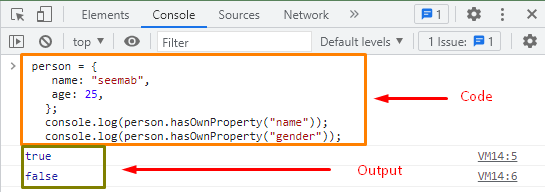 The output showed that ‘name’ is the own property of the specified object.
The method returns ‘true’ when the ‘name’ is passed to it.
However, ‘gender’ is not the own property of an object in this case, therefore the function returns the ‘false’.
The output showed that ‘name’ is the own property of the specified object.
The method returns ‘true’ when the ‘name’ is passed to it.
However, ‘gender’ is not the own property of an object in this case, therefore the function returns the ‘false’.
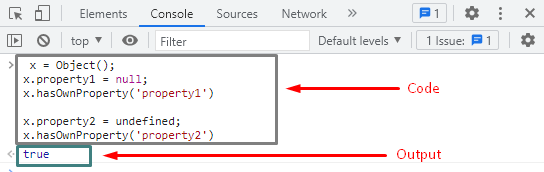 The output showed that the function accepted the ‘null’ and ‘undefined’ values as its own property values and returned the ‘true’.
 The above “GIF” shows that when we clicked on the button “CLICK ME”, consequently it generates a pop-up box that shows the user specified notification.
 The above “GIF” shows that when we click on the button “CLICK ME”, consequently it generates a pop up box that asks the user to “Enter Password”.
 The above snippet shows the appropriateness of the confirm box.
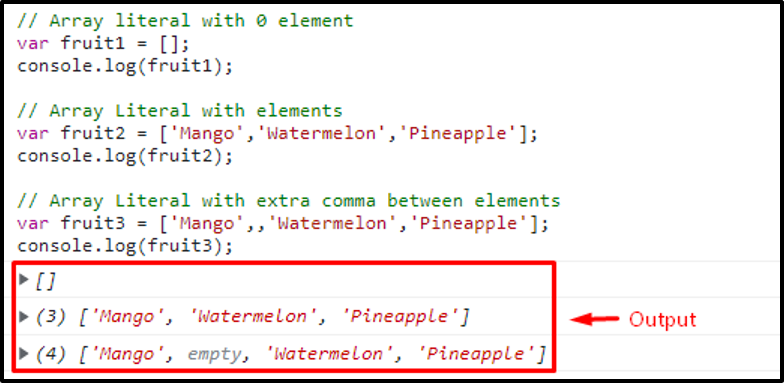 In the above example, we create three arrays fruit1, fruit2, and fruit3 using an array literal.
We add no elements in the first array which is considered as an array but with no element.
In the second array, we add three elements that initialize the array as string type due to the elements in it, and its size is specified as 3 because of the number of elements in it as shown in the above output.
In the third array, we also add three elements but put an extra comma between the elements due to which the compiler considers the length of the array to be 4 but with one empty index as shown in the above output.
Note: If we put a comma at the start of the elements or between the elements, the compiler considers it as an index but if we put a comma at the end of the elements, the compiler ignores it completely.
In the above example, we create three arrays fruit1, fruit2, and fruit3 using an array literal.
We add no elements in the first array which is considered as an array but with no element.
In the second array, we add three elements that initialize the array as string type due to the elements in it, and its size is specified as 3 because of the number of elements in it as shown in the above output.
In the third array, we also add three elements but put an extra comma between the elements due to which the compiler considers the length of the array to be 4 but with one empty index as shown in the above output.
Note: If we put a comma at the start of the elements or between the elements, the compiler considers it as an index but if we put a comma at the end of the elements, the compiler ignores it completely.
 As in the above output it is clearly shown that the check variable returns a false value and the comp variable returns a true value as they both used boolean literals.
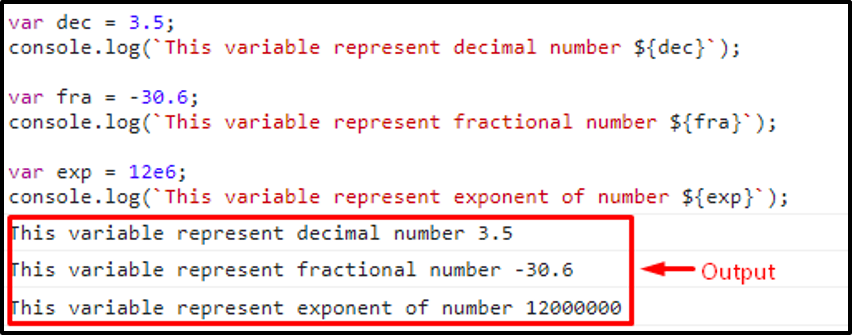 The above output clearly shows that the dec variable prints a positive decimal point value.
The decimal point value is always positive.
The fra variable print decimal point integer value which means floating-point literal can be a positive or negative number with a decimal point.
The exp variable print exponent of a number which means floating-point literal can be used to represent an exponent of a number.
The above output clearly shows that the dec variable prints a positive decimal point value.
The decimal point value is always positive.
The fra variable print decimal point integer value which means floating-point literal can be a positive or negative number with a decimal point.
The exp variable print exponent of a number which means floating-point literal can be used to represent an exponent of a number.
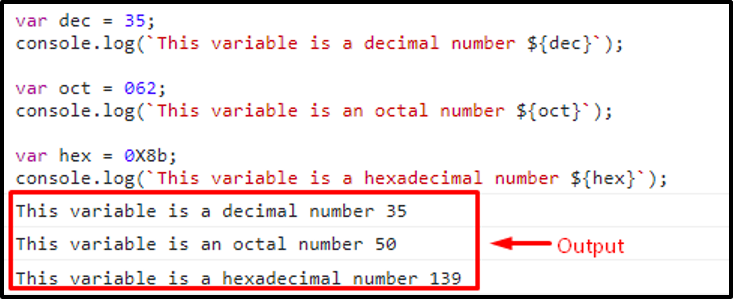 In the above output it is clearly seen that the dec variable prints the decimal number.
The oct variable takes an octal number and prints the value after converting it into a decimal number.
The hex variable takes a hexadecimal number and prints the value after converting it into a decimal number.
In the above output it is clearly seen that the dec variable prints the decimal number.
The oct variable takes an octal number and prints the value after converting it into a decimal number.
The hex variable takes a hexadecimal number and prints the value after converting it into a decimal number.
 As above, the output shows that we get the expected output with the help of object literal.
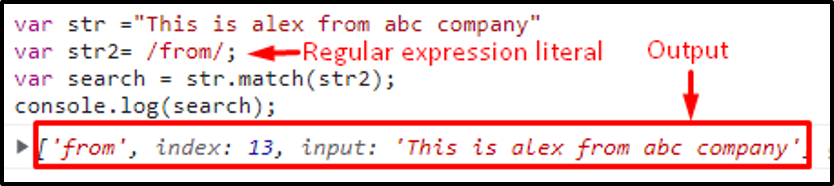 Above output clearly shows that we search (from) word from the given string with the help of regular expression literal and it displays the word that is searched, the index number where that word is placed, and the string from which that word is searched.
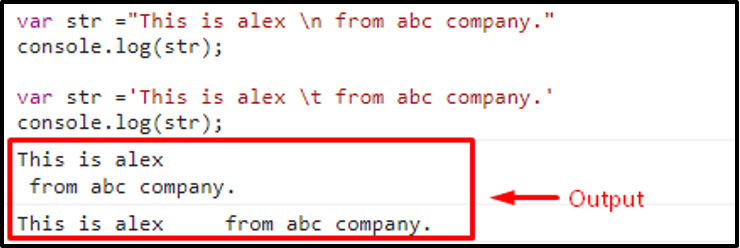 Above output clearly shows that both string literals, double and single quote print strings but \n starts a new line while \t adds a tab in a string.
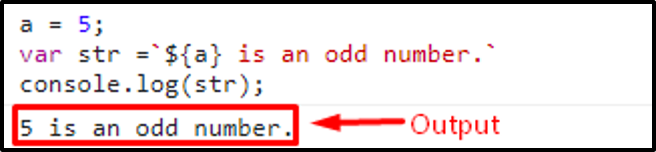 Above output clearly shows that we get the required output using template literals.
 The output shows that an empty Set is created, now we can perform any functionality on that set using different set object methods such as append elements, remove elements, etc.
 The output verifies the working of the add() method.
 The above snippet shows that the delete() method has removed “Smith” and “Paul” from the Set successfully.
 The output shows the Set’s size equal to zero; it authenticates the working of the clear() method.
 The output shows that the has() method returns true for the element “smith” as it exists in the set while “Bryn” doesn’t exist in the targeted set therefore the has() method returns false for it.
 The output shows the appropriate size of the specified set i.e “employeeNames” set.
 The output showed the returned random number automatically in the range of 0 and 1 (>=0 & < 1).
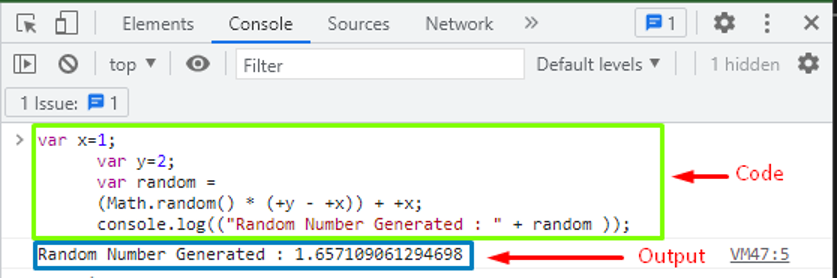 The output showed the randomly generated integer between the two values.
The output value is ‘1’ which is greater than the minimum values but less than the maximum value in the given input.
The output showed the randomly generated integer between the two values.
The output value is ‘1’ which is greater than the minimum values but less than the maximum value in the given input.
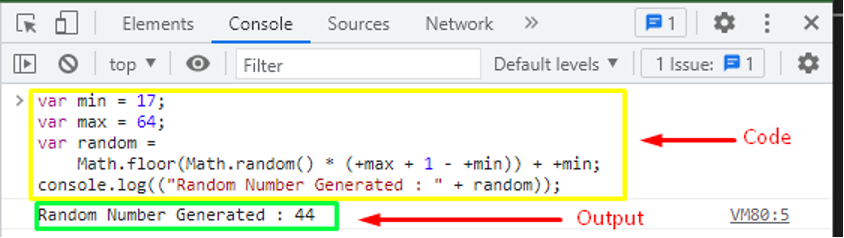 The output showed that ‘44’ is the random number generated between ‘17’ and ‘64’.
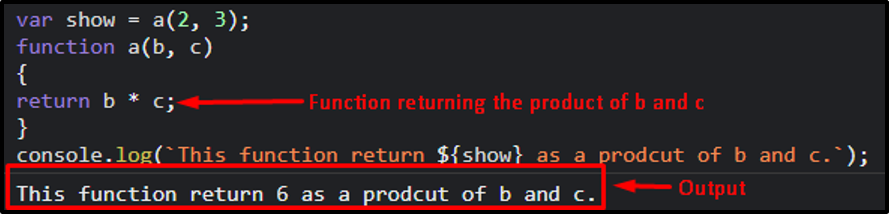 Here we take a variable show and assign a function with 2 arguments.
Then we create a function a() which takes two parameters b and c and returns their product.
Then we display the result that is clearly seen above.
Here we take a variable show and assign a function with 2 arguments.
Then we create a function a() which takes two parameters b and c and returns their product.
Then we display the result that is clearly seen above.
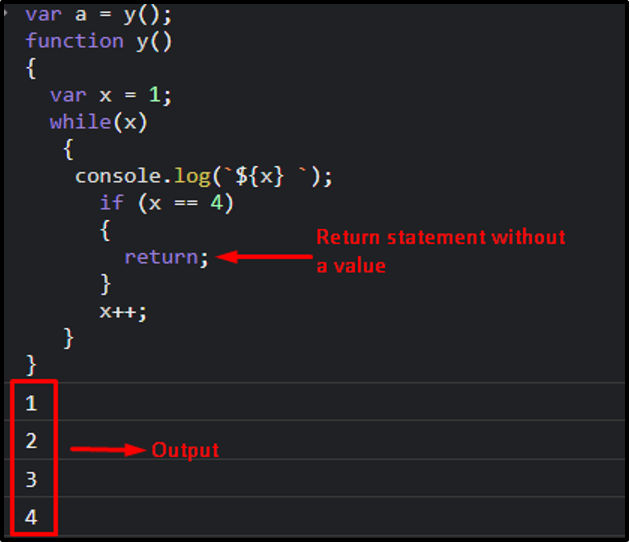 Above example clearly shows that the program keeps on printing the value of x until the condition to execute the return statement arrives and the program terminates.
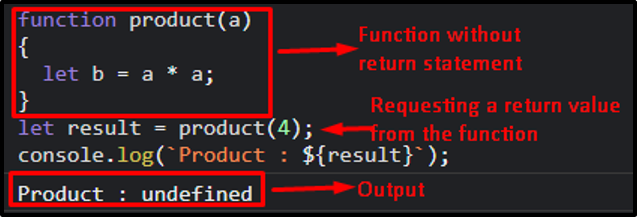 In the above example, it is clearly seen that the output is undefined because the result variable requests to get a return value from the function but the function has no return statement.
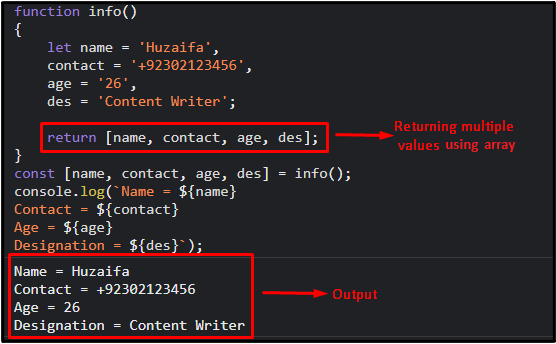 In the above example it is clearly seen that the program returns multiple values with the help of return statement while using an array.
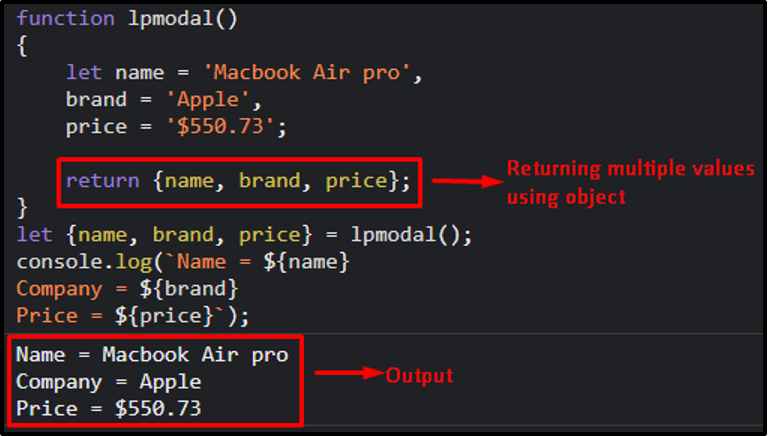 In the above example it is clearly seen that a program returns multiple values with the help of a return statement while using an object.
 The output verifies that the variables are declared and utilized perfectly.
 The output verifies the usage of const keyword for declaring variables.
 In the above output, we declared the variables using the let keyword and get the required output.
 In the above output it is clearly seen that we declare variables without using any keyword or data type and get the required result.
 The result verifies that the variables are accessed successfully inside the function.
Local VariableLocal variables are declared inside a function and cannot be used outside the function.
If we try to access local variables outside the function then we get a syntax error.
Syntax
function function_name(){
var variable_name = value;}
The above syntax shows the declaration of a local variable inside a function scope.
Code
function add(){
var a = 5
var x = 8
var i
i = x + a}
add()
console.log(`${x} + ${a} = ${i}`)
In the above code, we created a function add() and declared three variables a, x and i inside the function’s body.
Now we are trying to access these locally declared variables outside the function which will eventually give a syntax error.
Output
The result verifies that the variables are accessed successfully inside the function.
Local VariableLocal variables are declared inside a function and cannot be used outside the function.
If we try to access local variables outside the function then we get a syntax error.
Syntax
function function_name(){
var variable_name = value;}
The above syntax shows the declaration of a local variable inside a function scope.
Code
function add(){
var a = 5
var x = 8
var i
i = x + a}
add()
console.log(`${x} + ${a} = ${i}`)
In the above code, we created a function add() and declared three variables a, x and i inside the function’s body.
Now we are trying to access these locally declared variables outside the function which will eventually give a syntax error.
Output
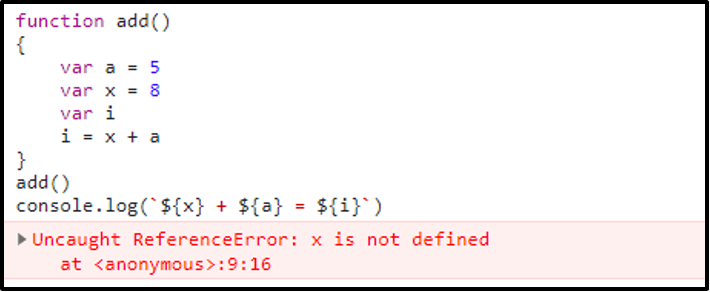 The output verifies that local variables can only be accessed inside a function in which they are created.
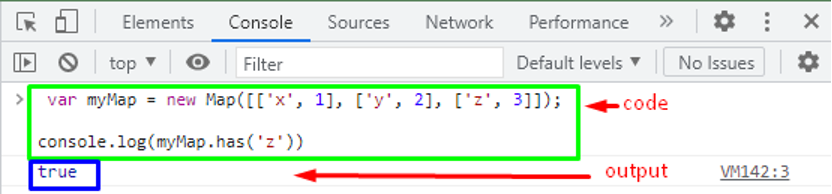 As the ‘z’ key was present in the myMap function therefore the Map.has() function has returned in the ‘true’.
Here, the same example is used as above to check the presence of a key that actually does not exist.
var myMap = new Map([['x', 1], ['y', 2], ['z', 3]]);
console.log(myMap.has('w'))
Three key values [‘x’, 1], [‘y’, 2], and [‘z’, 3] are stored in myMap object and the myMap.has() function is applied to them to check whether the ‘w’ is present or not?
As the ‘z’ key was present in the myMap function therefore the Map.has() function has returned in the ‘true’.
Here, the same example is used as above to check the presence of a key that actually does not exist.
var myMap = new Map([['x', 1], ['y', 2], ['z', 3]]);
console.log(myMap.has('w'))
Three key values [‘x’, 1], [‘y’, 2], and [‘z’, 3] are stored in myMap object and the myMap.has() function is applied to them to check whether the ‘w’ is present or not?
 It is observed that the ‘w’ is not present in the key values therefore the myMap.has() function has returned false.
How to use Map.has() function without specified key?This example explains how to use the map.has() function without a specified key.
var map=new Map();
map.set(1,"Android");
map.set(2,"Node.JS");
map.set(3,"HTML");
console.log(map.has(5));
In this code, we create a new Map object with the 3 classes.
However, we have passed ‘5’ as the parameter to the Map.has() function.
It is observed that the ‘w’ is not present in the key values therefore the myMap.has() function has returned false.
How to use Map.has() function without specified key?This example explains how to use the map.has() function without a specified key.
var map=new Map();
map.set(1,"Android");
map.set(2,"Node.JS");
map.set(3,"HTML");
console.log(map.has(5));
In this code, we create a new Map object with the 3 classes.
However, we have passed ‘5’ as the parameter to the Map.has() function.
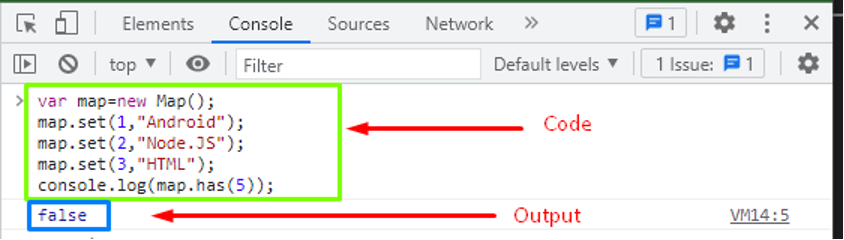 In the above example, there are only three defined values in the above code.
The Map.has() function tries to call the value ‘5’ which is not present.
Therefore, the output is false.
In the above example, there are only three defined values in the above code.
The Map.has() function tries to call the value ‘5’ which is not present.
Therefore, the output is false.


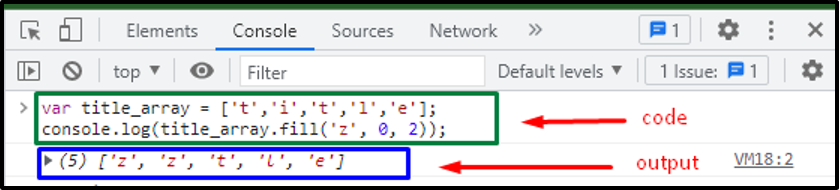 The start index number was set to 0 and the ending index number was set to 2 (which states that the elements will be filled up to index number 1=(2-1)).
Therefore, the elements at 0th and 1st index are replaced with the ‘z’.
The start index number was set to 0 and the ending index number was set to 2 (which states that the elements will be filled up to index number 1=(2-1)).
Therefore, the elements at 0th and 1st index are replaced with the ‘z’.
 The output shows that all the elements of the ‘arr’ have been replaced by the ‘css’ element.
 The output shows that the popup menu appears when we click on the text.
 In the above example, expression is calculated inside the template literal which returns 5 as result.
 It is clearly seen that we use (+) sign to join strings and variables which makes the code messy and less clear.
 With the help of template literal, we perform string interpolation which makes the code clean, easily readable, and understandable.
Now, you have understood the clear difference between the string concatenation and string interpolation.
Let’s have a look at code examples of string interpolation in different scenarios.
With the help of template literal, we perform string interpolation which makes the code clean, easily readable, and understandable.
Now, you have understood the clear difference between the string concatenation and string interpolation.
Let’s have a look at code examples of string interpolation in different scenarios.
 The code worked as we expected.
 With the help of && operator and ternary operator in String Interpolation, we have got our desired result.
 From the output we concluded the following points:
When the floating-point value is greater than “.5” then the Math.round() method rounds up the number to 15.
When the floating-point value is less than “.5” then the Math.round() method rounds down the number to 10.
All in all, we can say that the Math.round() method rounds the specified values to the nearest integer values.
From the output we concluded the following points:
When the floating-point value is greater than “.5” then the Math.round() method rounds up the number to 15.
When the floating-point value is less than “.5” then the Math.round() method rounds down the number to 10.
All in all, we can say that the Math.round() method rounds the specified values to the nearest integer values.
 The output verifies the working of the Math.trunc() method.
 It is noticed that the toFixed() method has rounded the original value and 0’s are added to fulfil the specified length.
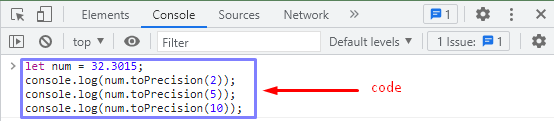 This code represents the number formatting with the specified length of ‘2, 5, 10’.
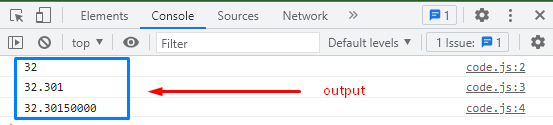 After putting the parameter value ‘2’, the toPrecision considered only two digits after it.
While with the value of ‘5’, the five digits before and after the decimal point of a specified length.
Similarly, when the parameter’s value is ‘10’, the four ’0’s’ are added to complete the 10-digit length.
After putting the parameter value ‘2’, the toPrecision considered only two digits after it.
While with the value of ‘5’, the five digits before and after the decimal point of a specified length.
Similarly, when the parameter’s value is ‘10’, the four ’0’s’ are added to complete the 10-digit length.
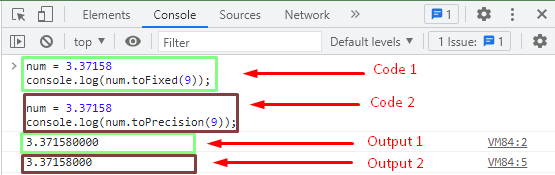 In the case of the toFixed() value, the output showed that the function rounds the value to ‘9’ after the decimal point putting the four ’0’s’.
While in another case, the toPrecision() function rounds the specified value according to the given parameter before and after the decimal point.
In the case of the toFixed() value, the output showed that the function rounds the value to ‘9’ after the decimal point putting the four ’0’s’.
While in another case, the toPrecision() function rounds the specified value according to the given parameter before and after the decimal point.
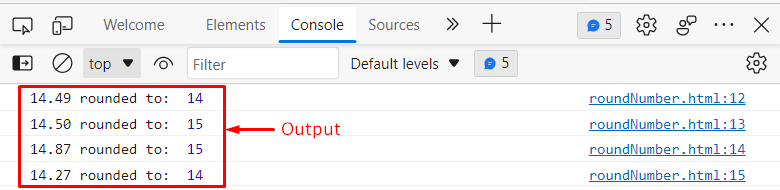 From the output we observed that when the floating-point value is less than “.5” then the Math.round() method rounded down the number to 14.
If the floating-point value is greater than “.5” then the Math.round() method rounded up the number to 15.
It authenticates that the round() method rounds the specified values to the nearest integer values.
From the output we observed that when the floating-point value is less than “.5” then the Math.round() method rounded down the number to 14.
If the floating-point value is greater than “.5” then the Math.round() method rounded up the number to 15.
It authenticates that the round() method rounds the specified values to the nearest integer values.
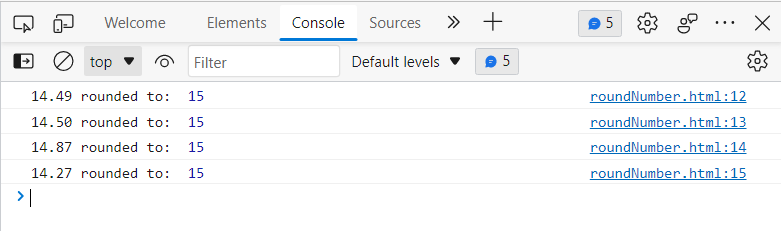 From the output, we come to know that the ceil() method rounded the specified value upward to the nearest integer value.
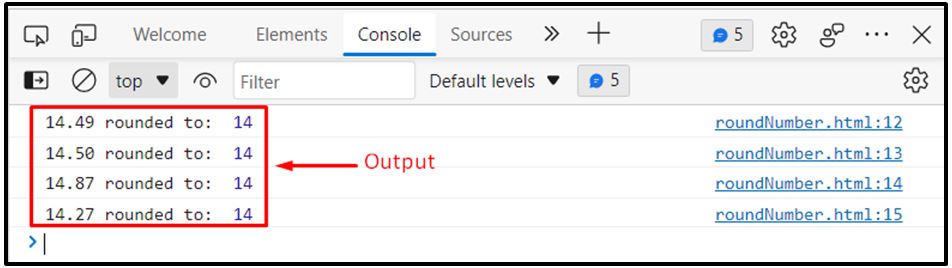 The output shows that the Math.floor() method rounded the specified value downward to the nearest integer value.
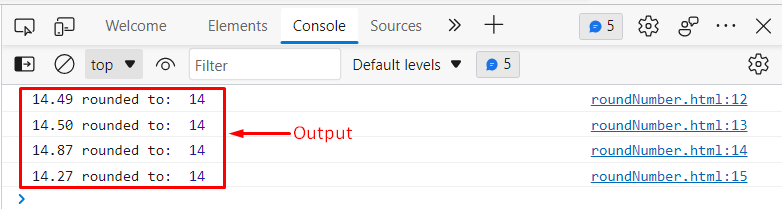 The output verifies the working of Math.trunc() method.
 The output shows that the Array.unshift() method returned the new length of the array.
 The output verifies the working of Array.unshift() method.
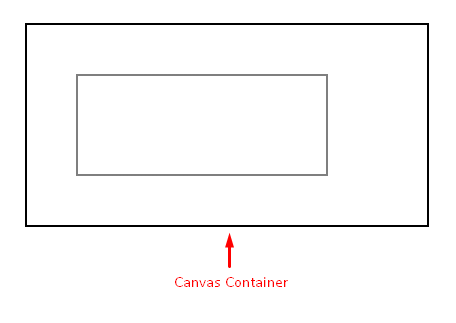 In case, you want to change the color of the rectangle just add the following code before your rectangle creation code:
Code:
contxt.strokeStyle=”blue”;
Output:
In case, you want to change the color of the rectangle just add the following code before your rectangle creation code:
Code:
contxt.strokeStyle=”blue”;
Output:
 To change the color of the rectangle just use the fillStyle property before your rectangle creation code:
Code:
contxt.fillStyle=”aqua”;
Output:
To change the color of the rectangle just use the fillStyle property before your rectangle creation code:
Code:
contxt.fillStyle=”aqua”;
Output:


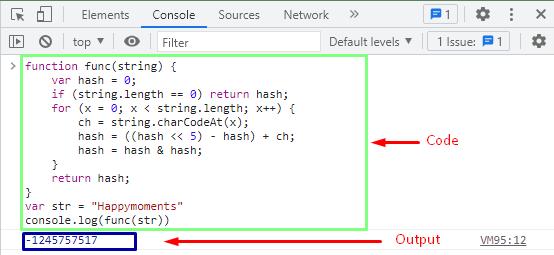 The output showed that the string ‘’happymoment is converted into a small hash value ‘-1245757517’ using the hash() function.
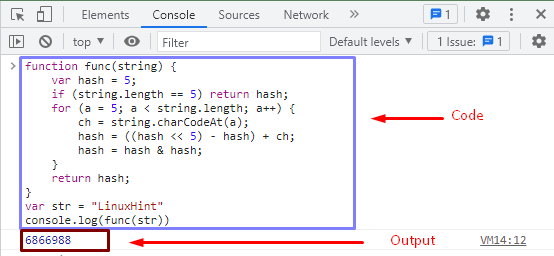 The output showed that the string is converted to a hash value that is ‘253386’ using has() function.
 The output shows that the Math.random() method returned a random number.
 The output shows that this Math.random() method produced a random number between the user-specified range.
 This is how we can generate a random integer value using the Math.random() method.
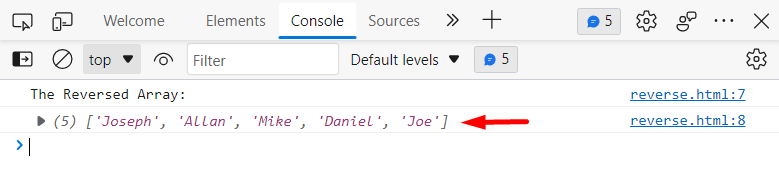 The output verified the working of Array.reverse() method.
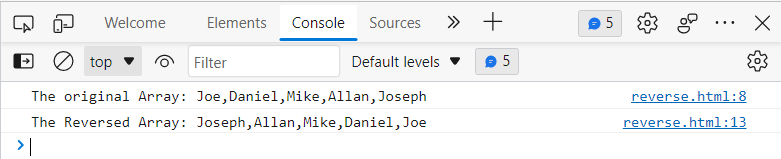 This is how we can reverse an array using the for-loop.
 The output shows the appropriateness of the Array.unshift() method.
 The output verified that when we clicked on link1, the void(0) method prevented it from refreshing.
Example2
In this example we will explain how to generate the undefined value using the void operator:
<html><head>
<script type="text/javascript">
function exampleFunction() {
var num1, num2, num3, num4;
num1 = 15, num2 = void (num3 = 37, num4 = 50);
document.write('num1 = ' + num1 + ' num2 = ' + num2 + ' num3 = ' + num3 + ' num4 = ' + num4);
}
</script></head><body>
<h3>Javascript Void Method</h3>
<form>
<input type="button" value="CLICK ME" onclick="exampleFunction();" />
</form></body></html>
In this example, we created a method that will be invoked when someone clicks on the “CLICK ME” button.
Within the method we created four variables and assigned some numeric values to all the variables except the second variable.
We assigned void to the second variable.
The output verified that when we clicked on link1, the void(0) method prevented it from refreshing.
Example2
In this example we will explain how to generate the undefined value using the void operator:
<html><head>
<script type="text/javascript">
function exampleFunction() {
var num1, num2, num3, num4;
num1 = 15, num2 = void (num3 = 37, num4 = 50);
document.write('num1 = ' + num1 + ' num2 = ' + num2 + ' num3 = ' + num3 + ' num4 = ' + num4);
}
</script></head><body>
<h3>Javascript Void Method</h3>
<form>
<input type="button" value="CLICK ME" onclick="exampleFunction();" />
</form></body></html>
In this example, we created a method that will be invoked when someone clicks on the “CLICK ME” button.
Within the method we created four variables and assigned some numeric values to all the variables except the second variable.
We assigned void to the second variable.
 From the output it is clear that the void operator assigned an undefined value to the second variable.
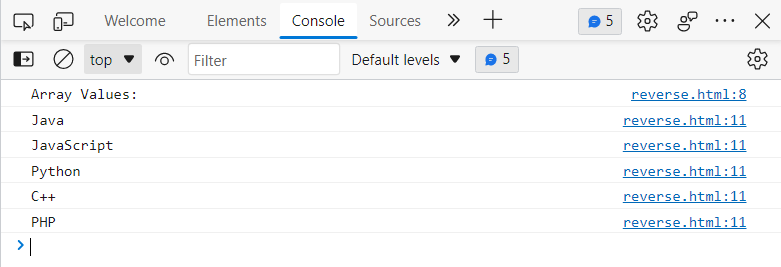 In this way, we can work with string arrays.
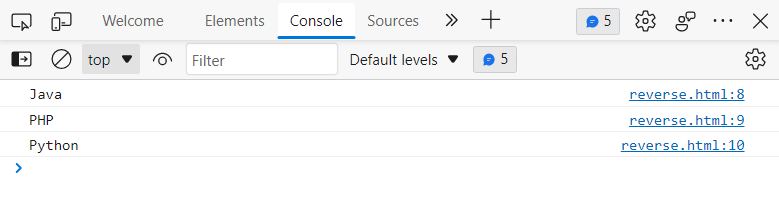 Output shows that the above program is working properly.
 Output verifies the working of split() method.
Example
This example will explain the working of concat() method:
<script type="text/javascript">
var arrayValues1 = ["Java", "JavaScript"];
var arrayValues2 = ["Python", "C++", "PHP"];
var concatValues= arrayValues1.concat(arrayValues2);
console.log(concatValues); </script>
In this example, initially, we created two arrays, next, we utilized the concat() method to concatenate the values of both arrays:
Output verifies the working of split() method.
Example
This example will explain the working of concat() method:
<script type="text/javascript">
var arrayValues1 = ["Java", "JavaScript"];
var arrayValues2 = ["Python", "C++", "PHP"];
var concatValues= arrayValues1.concat(arrayValues2);
console.log(concatValues); </script>
In this example, initially, we created two arrays, next, we utilized the concat() method to concatenate the values of both arrays:
 The output displayed the concatenated array.
Example
This example will explain the working of includes() method:
<script type="text/javascript">
var arrayValues1 = ["Java", "JavaScript"];
var result= arrayValues1.includes("PHP");
console.log(result);
var result= arrayValues1.includes("Java");
console.log(result); </script>
In this example we utilized the includes() method to check the existence of the “PHP”, and “JAVA” in the string array:
The output displayed the concatenated array.
Example
This example will explain the working of includes() method:
<script type="text/javascript">
var arrayValues1 = ["Java", "JavaScript"];
var result= arrayValues1.includes("PHP");
console.log(result);
var result= arrayValues1.includes("Java");
console.log(result); </script>
In this example we utilized the includes() method to check the existence of the “PHP”, and “JAVA” in the string array:
 The output verifies the working of include() methods.
Similarly, there are many more methods that can be used with the string arrays to achieve different functionalities.
The output verifies the working of include() methods.
Similarly, there are many more methods that can be used with the string arrays to achieve different functionalities.
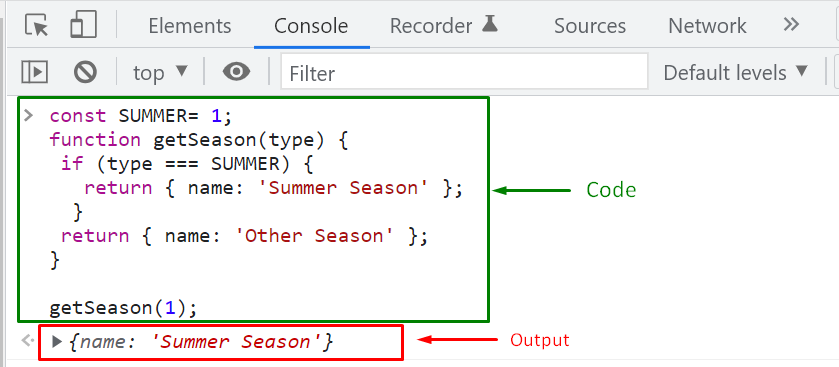 Want to define more types of season? To do so, create constants with the name of the specific season and assign a number to it as its “type”:
const SUMMER= 1;const SUMMER= 1;const WINTER= 2;
functiongetSeason(type) {if (type === SUMMER) {
return{ name: 'Summer Season' };
}if (type === WINTER) {
return{ name: 'Winter Season' };
}
return{ name: 'Other Season' };}
getSeason(2);
Output
Want to define more types of season? To do so, create constants with the name of the specific season and assign a number to it as its “type”:
const SUMMER= 1;const SUMMER= 1;const WINTER= 2;
functiongetSeason(type) {if (type === SUMMER) {
return{ name: 'Summer Season' };
}if (type === WINTER) {
return{ name: 'Winter Season' };
}
return{ name: 'Other Season' };}
getSeason(2);
Output
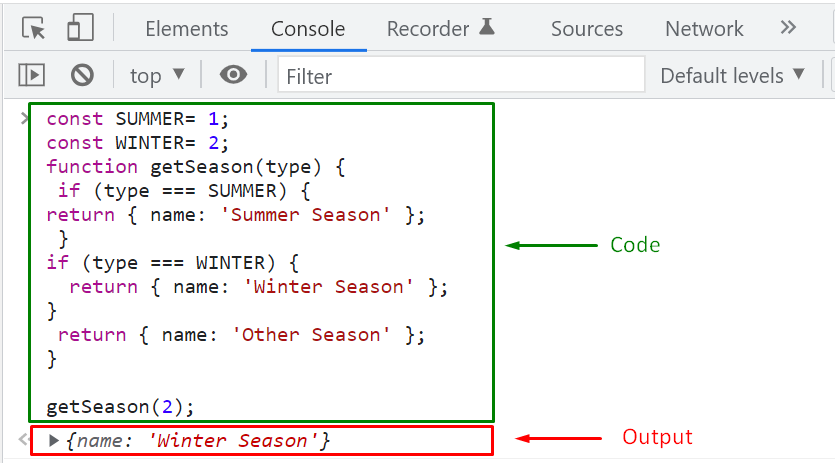 As you can see from the above-given output, our program is working perfectly.
Still, the defined season types are not logically connected and exist as independent constants that can be placed anywhere in the code, making them complex to handle.
In such a situation, “Enumerators” comes into play!
Enumerators offer the functionality of defining a set of named “constants” or distinct cases.
When this mechanism is utilized, all of the “hard-coded” values are added in a single location to which they are referred, not re-written.
Also, the usage of Enumerators also helps in improving the code maintainability.
Now, let’s check out the method of creating Enumerators.
As you can see from the above-given output, our program is working perfectly.
Still, the defined season types are not logically connected and exist as independent constants that can be placed anywhere in the code, making them complex to handle.
In such a situation, “Enumerators” comes into play!
Enumerators offer the functionality of defining a set of named “constants” or distinct cases.
When this mechanism is utilized, all of the “hard-coded” values are added in a single location to which they are referred, not re-written.
Also, the usage of Enumerators also helps in improving the code maintainability.
Now, let’s check out the method of creating Enumerators.
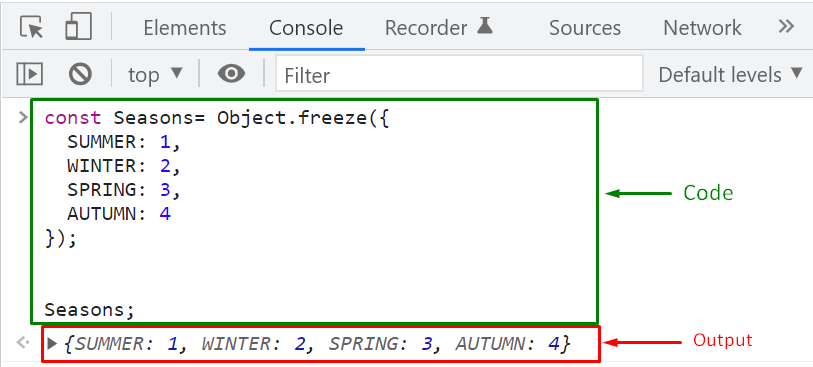 For basic scenarios, you can create an Enumerator object; however, when you have to specify some logic for adding values, go for the Enumerator Implementation in a JavaScript class.
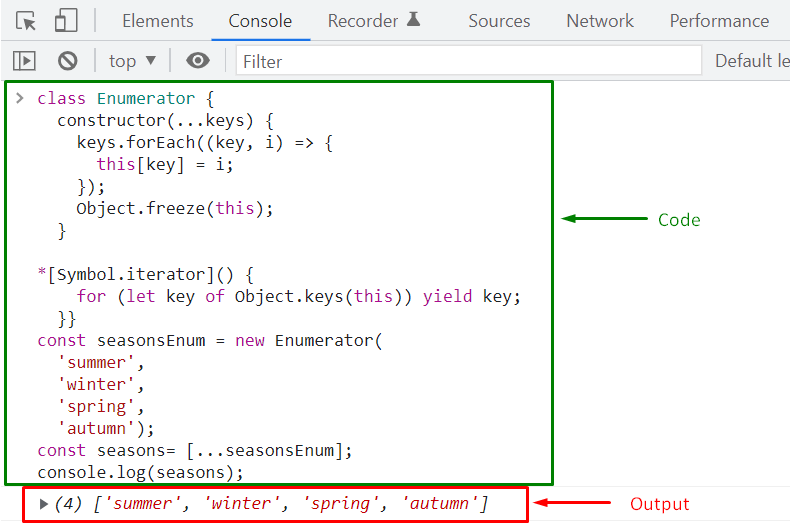 We have compiled different methods for creating Enumerators.
Depending upon your requirements, you can utilize any of them and benefit from Enumerators’ functionalities.
We have compiled different methods for creating Enumerators.
Depending upon your requirements, you can utilize any of them and benefit from Enumerators’ functionalities.
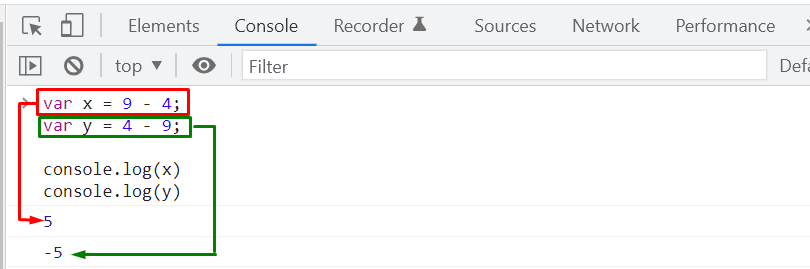
 We have provided the essential information related to the working of operator precedence.
You can explore this topic further according to your requirements.
We have provided the essential information related to the working of operator precedence.
You can explore this topic further according to your requirements.
 This is how the textContent property modifies the text of an element.
Example2: How to set the textual content of an element using textContent property:
<html><body><h3>textContent Property</h3><p id="change" onclick="clickMe()">CLICK ME</p><script>function clickMe() {
document.getElementById("change").textContent = "Welcome to linuxhint.com";}</script></body></html>
The above code block will produce the following output:
This is how the textContent property modifies the text of an element.
Example2: How to set the textual content of an element using textContent property:
<html><body><h3>textContent Property</h3><p id="change" onclick="clickMe()">CLICK ME</p><script>function clickMe() {
document.getElementById("change").textContent = "Welcome to linuxhint.com";}</script></body></html>
The above code block will produce the following output:
 This is how the textContent property sets the text.
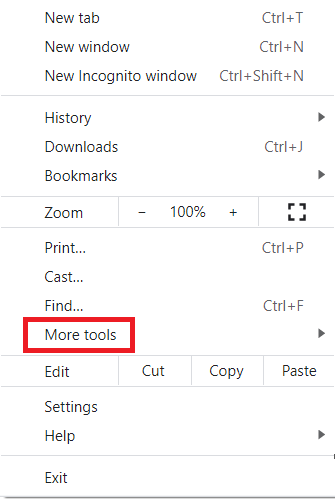 Clicking on this option will launch a sub-cascading menu from which we need to select the “Developer tools” option as highlighted below:
 This option will launch a small developer tools pane on the right side of your Google Chrome window.
From this developer tools pane, you need to switch to the “Console” tab where we will be writing our Java Script code.
This option will launch a small developer tools pane on the right side of your Google Chrome window.
From this developer tools pane, you need to switch to the “Console” tab where we will be writing our Java Script code.
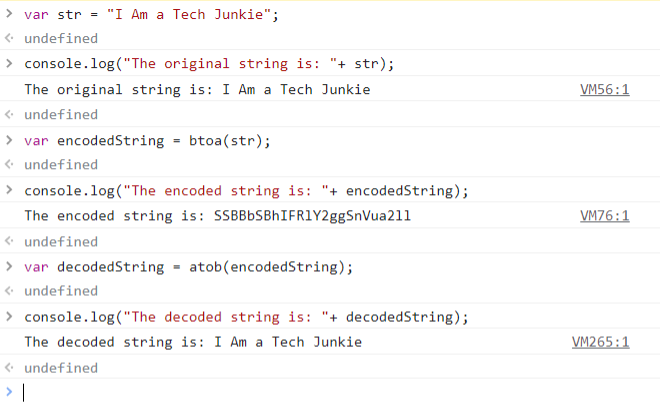 The first statement in this Java Script code is “var str = “I Am a Tech Junkie”.
With the help of this statement, we have created a random string that we first want to encode and then decode later.
Then, our second statement is “console.log(“The original string is: ”+ str)”.
This statement will simply print our original string on the console as you can see from the line “VM56:1” of the image shown above.
Now, to encode our original string, we used the statement “var encodedString = btoa(str)”.
In this statement, we have created a string named “encodedString” for holding the encoded string and then we have just equalized it to the output of the function “btoa(str)”.
This is a built-in function of the Java Script and is used to encode any given string with Base64 encoding.
You simply need to pass the desired string to this function and let it perform its magic.
After that, we have used the statement “console.log(“The encoded string is: ”+ encodedString)” for printing our encoded string on the console.
You can witness our encoded string from the line “VM76:1” of the image shown above.
Then, we wanted to decode this encoded string with Base64 in Java Script.
To do that, we have used the statement “var decodedString = atob(encodedString)”.
In this statement, we have first created a string named “decodedString” and equalized it to the result of the “atob(encodedString)” function.
Again, this is a built-in function of the Java Script that is used for decoding an encoded string with Base64.
This function simply takes an encoded string as its input.
Finally, we have used the “console.log(“The decoded string is: ”+ decodedString)” statement for printing our decoded string on the terminal.
You can see our decoded string from the line “VM265:1” of the image shown above.
From here, you can easily verify that our decoded string is exactly the same as our original string which means that we have managed to carry out the Base64 encoding and decoding processes successfully while using the Java Script in Windows 10.
The first statement in this Java Script code is “var str = “I Am a Tech Junkie”.
With the help of this statement, we have created a random string that we first want to encode and then decode later.
Then, our second statement is “console.log(“The original string is: ”+ str)”.
This statement will simply print our original string on the console as you can see from the line “VM56:1” of the image shown above.
Now, to encode our original string, we used the statement “var encodedString = btoa(str)”.
In this statement, we have created a string named “encodedString” for holding the encoded string and then we have just equalized it to the output of the function “btoa(str)”.
This is a built-in function of the Java Script and is used to encode any given string with Base64 encoding.
You simply need to pass the desired string to this function and let it perform its magic.
After that, we have used the statement “console.log(“The encoded string is: ”+ encodedString)” for printing our encoded string on the console.
You can witness our encoded string from the line “VM76:1” of the image shown above.
Then, we wanted to decode this encoded string with Base64 in Java Script.
To do that, we have used the statement “var decodedString = atob(encodedString)”.
In this statement, we have first created a string named “decodedString” and equalized it to the result of the “atob(encodedString)” function.
Again, this is a built-in function of the Java Script that is used for decoding an encoded string with Base64.
This function simply takes an encoded string as its input.
Finally, we have used the “console.log(“The decoded string is: ”+ decodedString)” statement for printing our decoded string on the terminal.
You can see our decoded string from the line “VM265:1” of the image shown above.
From here, you can easily verify that our decoded string is exactly the same as our original string which means that we have managed to carry out the Base64 encoding and decoding processes successfully while using the Java Script in Windows 10.

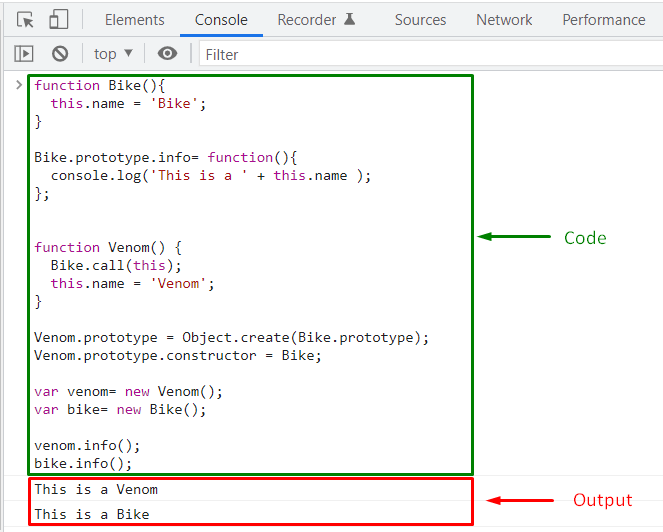
 That was all about the types of inheritance.
You can further explore them according to your preferences.
That was all about the types of inheritance.
You can further explore them according to your preferences.
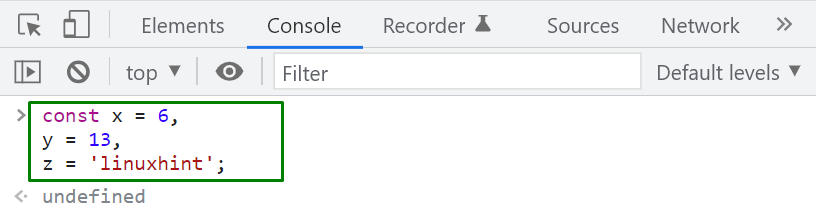 Next, we will compare the value of constant “x” with the value “6”:
console.log(x == 6);
The equality operator returns “true” because “6” equals to the constant “x” in terms of “value” and “type”:
Next, we will compare the value of constant “x” with the value “6”:
console.log(x == 6);
The equality operator returns “true” because “6” equals to the constant “x” in terms of “value” and “type”:
 In the below-given example, the equality operator “==” will first convert the string “13” to the number type and then compare it with the value stored in the constant “y”:
console.log(y == '13');
After evaluating the expression “y==’13’”, the equality operator will return “true”:
In the below-given example, the equality operator “==” will first convert the string “13” to the number type and then compare it with the value stored in the constant “y”:
console.log(y == '13');
After evaluating the expression “y==’13’”, the equality operator will return “true”:
 Lastly, we will check the constant “z” and the string “Linuxhint” for equality:
console.log(z == 'Linuxhint');
The right side operand is already a string, so the equality operator will directly compare its value and return the results:
Lastly, we will check the constant “z” and the string “Linuxhint” for equality:
console.log(z == 'Linuxhint');
The right side operand is already a string, so the equality operator will directly compare its value and return the results:
 The given output signifies that the specified operands are not equal.
As the value stored in the constant “z” is “linuxhint,” and the value with which it is compared is “Linuxhint”.
So, we can conclude that while comparing strings, the “equality” operator also compares the “Characters Case”.
The given output signifies that the specified operands are not equal.
As the value stored in the constant “z” is “linuxhint,” and the value with which it is compared is “Linuxhint”.
So, we can conclude that while comparing strings, the “equality” operator also compares the “Characters Case”.
 Comparing the value of “y” with the string “13” will return “true” because both values are unequal in terms of the data type:
console.log(y == '13');
Comparing the value of “y” with the string “13” will return “true” because both values are unequal in terms of the data type:
console.log(y == '13');
 Similarly, the string ‘linuxhint’ stored in the “z” constant is not equal to “Linuxhint“, because the first character is in Upper-case:
console.log(z != 'Linuxhint');
So the return case of the inequality operator “!=” will be set to “true”:
Similarly, the string ‘linuxhint’ stored in the “z” constant is not equal to “Linuxhint“, because the first character is in Upper-case:
console.log(z != 'Linuxhint');
So the return case of the inequality operator “!=” will be set to “true”:

 In the other condition, the strict equality operator will check the equality between the value of “y” and a number “13”:
console.log(y === 13);
Both values are equal according to their associated data type, so the strict equality operator will mark them as equal and return a “true” boolean value:
In the other condition, the strict equality operator will check the equality between the value of “y” and a number “13”:
console.log(y === 13);
Both values are equal according to their associated data type, so the strict equality operator will mark them as equal and return a “true” boolean value:


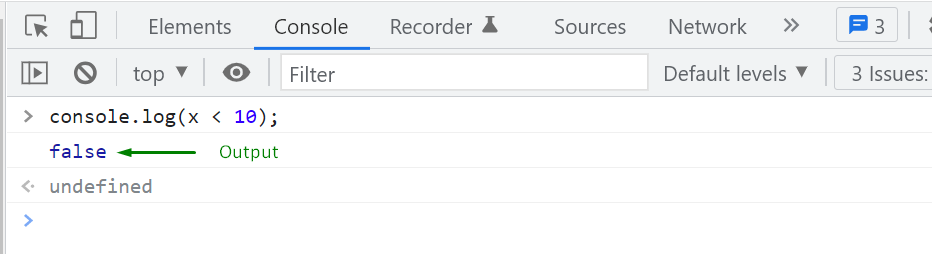

 That was all essential information related to the usage of Comparison Operators.
Explore them further according to your preferences.
That was all essential information related to the usage of Comparison Operators.
Explore them further according to your preferences.
 However, adding the addition operator between a “number” and a “string” value will concatenate both values and output the resultant string.
For instance, in the below-given example, the number “1” and “apple” strings are concatenated as “1 apple” with the help of the addition operator:
1 + " apple"
Output
However, adding the addition operator between a “number” and a “string” value will concatenate both values and output the resultant string.
For instance, in the below-given example, the number “1” and “apple” strings are concatenated as “1 apple” with the help of the addition operator:
1 + " apple"
Output

 When the Subtraction operator is utilized in between a string and a numeric value, its return case will be set to “NaN” (Not-a-Number):
"apple" - 1
Output
When the Subtraction operator is utilized in between a string and a numeric value, its return case will be set to “NaN” (Not-a-Number):
"apple" - 1
Output

 In case one of the operands has a negative “–” sign, then the multiplication operator will return a negative value after multiplying values:
4 * -5
Output
In case one of the operands has a negative “–” sign, then the multiplication operator will return a negative value after multiplying values:
4 * -5
Output

 The division operator will return a “float” value after dividing two float type values:
77.5 / 3.5
Output
The division operator will return a “float” value after dividing two float type values:
77.5 / 3.5
Output
 If zero is specified as a divisor, then the division will lead to “infinity”:
77.5 / 0
Output
If zero is specified as a divisor, then the division will lead to “infinity”:
77.5 / 0
Output

 When the dividend contains a negative value, the value return by the modulus operator will also have a “–” sign:
-9 % 2
Output
When the dividend contains a negative value, the value return by the modulus operator will also have a “–” sign:
-9 % 2
Output


 However, when increment operator “++” is used as “prefix” in the statement “y = ++x”, it will firstly increment “1” in the value of “x” variable and then initialize “y” with the updated value:
var x = 3;
y = ++x;
console.log("x: " + x);
console.log("y: " + y);
Output
However, when increment operator “++” is used as “prefix” in the statement “y = ++x”, it will firstly increment “1” in the value of “x” variable and then initialize “y” with the updated value:
var x = 3;
y = ++x;
console.log("x: " + x);
console.log("y: " + y);
Output

 In the other case, if the decrement operator is specified as “postfix”, it will firstly decrement “1” from the value of “x” variable and then initialize “y” with the modified value:
var x = 3;
y = --x;
console.log("x: " + x);
console.log("y: " + y);
Output
In the other case, if the decrement operator is specified as “postfix”, it will firstly decrement “1” from the value of “x” variable and then initialize “y” with the modified value:
var x = 3;
y = --x;
console.log("x: " + x);
console.log("y: " + y);
Output
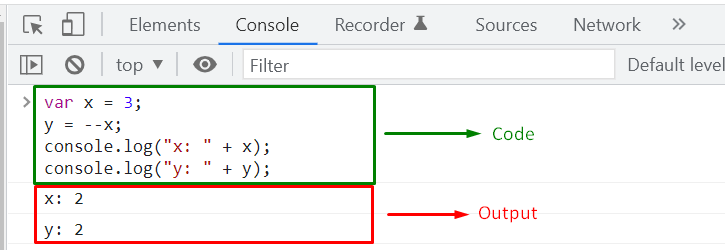 That was all essential information related to the basic usage of Arithmetic operators.
Explore them according to your requirements.
That was all essential information related to the basic usage of Arithmetic operators.
Explore them according to your requirements.
 Now, let’s change the second argument value to “linux” and check out the output of the Object.is() method:
console.log(Object.is("linuxhint", "linux"));
As the length of the specified string arguments is not the same, Object.is() method will not further compare them and returns a “false” value:
Now, let’s change the second argument value to “linux” and check out the output of the Object.is() method:
console.log(Object.is("linuxhint", "linux"));
As the length of the specified string arguments is not the same, Object.is() method will not further compare them and returns a “false” value:

 At this point, you must be questioning yourself that the passed objects are empty, neither of them has any key-value pair, then why “Object.is()” returned “false”?
The specified objects look the same; however, they are two different objects as they refer to different memory addresses.
This is why the “Object.is()” method marked these empty objects as unequal after comparing their references.
Also, it does not matter if the added “key-value” pairs are the same in both objects.
The JavaScript “Object.is()” method will still return “false” after execution :
let object1 = { age: 23 };
let object2 = { age: 23 };
console.log(Object.is(object1, object2));
Output
At this point, you must be questioning yourself that the passed objects are empty, neither of them has any key-value pair, then why “Object.is()” returned “false”?
The specified objects look the same; however, they are two different objects as they refer to different memory addresses.
This is why the “Object.is()” method marked these empty objects as unequal after comparing their references.
Also, it does not matter if the added “key-value” pairs are the same in both objects.
The JavaScript “Object.is()” method will still return “false” after execution :
let object1 = { age: 23 };
let object2 = { age: 23 };
console.log(Object.is(object1, object2));
Output
 Two objects are only considered “equal” if they point towards the same memory address.
For example, when we will compare the created “object1” to itself, the “Object.is()” set “true” as its return case:
console.log(Object.is(object1, object1));
Output
Two objects are only considered “equal” if they point towards the same memory address.
For example, when we will compare the created “object1” to itself, the “Object.is()” set “true” as its return case:
console.log(Object.is(object1, object1));
Output

 If the specified numbers are equal in terms of polarity, then in the next step, the “Object.is()” method will compare them and return “true” if their values are equal.
For instance, both of the arguments in the below-given “Object.is()” method are “positive,” and their values are equal, so the resultant boolean value will be printed out as “true”:
console.log(Object.is(3, 3));
Output
If the specified numbers are equal in terms of polarity, then in the next step, the “Object.is()” method will compare them and return “true” if their values are equal.
For instance, both of the arguments in the below-given “Object.is()” method are “positive,” and their values are equal, so the resultant boolean value will be printed out as “true”:
console.log(Object.is(3, 3));
Output
 We have compiled all of the essential information related to the JavaScript Object.is() method.
You can further explore it according to your requirements.
We have compiled all of the essential information related to the JavaScript Object.is() method.
You can further explore it according to your requirements.
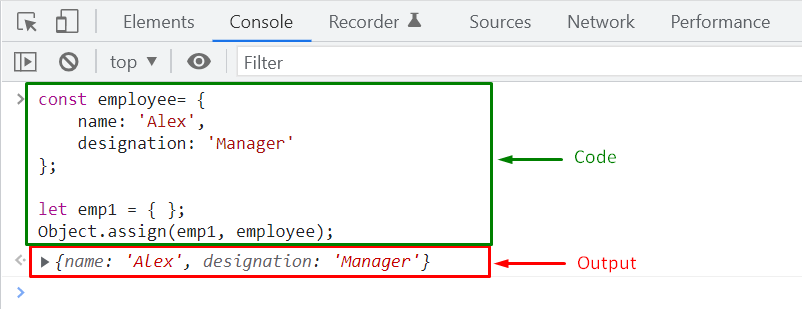 We will now modify the value of the “employee.name” property and check if the added changes also reflect the cloned “emp1” object or not:
employee.name = 'Stepheny';
console.log("emp1 name: " + emp1.name);
console.log("employee.name: " + employee.name);
As you can see from the below-given output that altering the “employee.name” property value has not modified the “emp1” object.
This is because the target object “emp1” gets disconnected from the “employee” object after cloning its values:
We will now modify the value of the “employee.name” property and check if the added changes also reflect the cloned “emp1” object or not:
employee.name = 'Stepheny';
console.log("emp1 name: " + emp1.name);
console.log("employee.name: " + employee.name);
As you can see from the below-given output that altering the “employee.name” property value has not modified the “emp1” object.
This is because the target object “emp1” gets disconnected from the “employee” object after cloning its values:
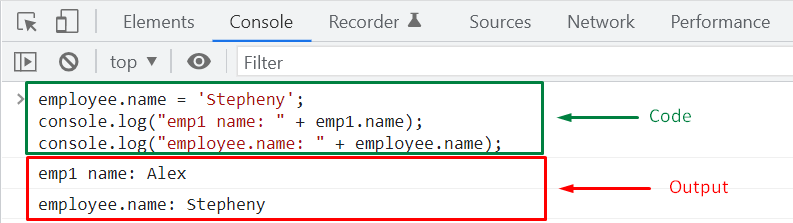 However, when an inner referenced object is added, the JavaScript “Object.assign()” method will copy its reference, not the actual object.
In such a scenario, both source and target objects refer to the same inner referenced object, and changes made to the property of the source object will also affect the target object’s property value.
For instance, in the “employee” object, we will add “address” as an inner referenced object which comprises a “city” Property:
const employee= {
address: {
city: 'Ankara'}};
After that, we will clone the properties of the “employee” object in “emp1”:
let emp1 = { };Object.assign(emp1, employee);
Output
However, when an inner referenced object is added, the JavaScript “Object.assign()” method will copy its reference, not the actual object.
In such a scenario, both source and target objects refer to the same inner referenced object, and changes made to the property of the source object will also affect the target object’s property value.
For instance, in the “employee” object, we will add “address” as an inner referenced object which comprises a “city” Property:
const employee= {
address: {
city: 'Ankara'}};
After that, we will clone the properties of the “employee” object in “emp1”:
let emp1 = { };Object.assign(emp1, employee);
Output
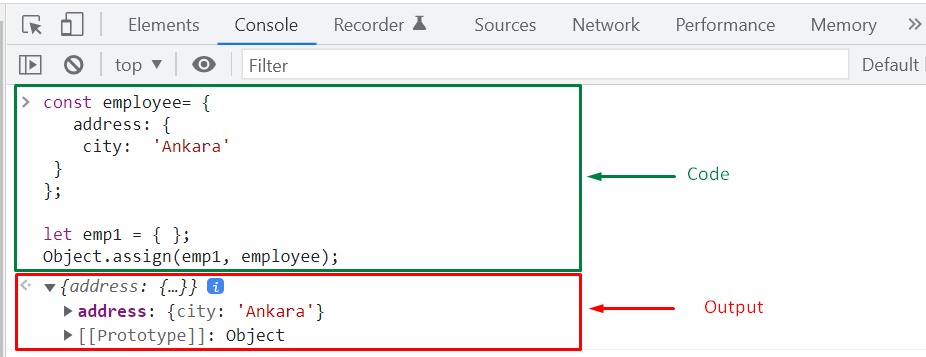 At this point, “emp1” object refers to the memory address of inner referenced “address” object of the “employee” and can access its key-value pair:
console.log("emp1.address.city: " + emp1.address.city);
console.log("employee.address.city: " + employee.address.city);
The given output shows that “Ankara” is set as the value of the “address” property for both “employee” and “emp1” objects:
At this point, “emp1” object refers to the memory address of inner referenced “address” object of the “employee” and can access its key-value pair:
console.log("emp1.address.city: " + emp1.address.city);
console.log("employee.address.city: " + employee.address.city);
The given output shows that “Ankara” is set as the value of the “address” property for both “employee” and “emp1” objects:
 Now, if we modify the value of “address.city” property of “employee” object then changes will be applied to the copied “emp1” object as well:
employee.address.city = 'Istanbul';
console.log("emp1.address.city: " + emp1.address.city);
console.log("employee.address.city: " + employee.address.city);
The invoked “console.log()” method will display “Istanbul” as “address.city” property value for both “employee” and “emp1” objects:
Now, if we modify the value of “address.city” property of “employee” object then changes will be applied to the copied “emp1” object as well:
employee.address.city = 'Istanbul';
console.log("emp1.address.city: " + emp1.address.city);
console.log("employee.address.city: " + employee.address.city);
The invoked “console.log()” method will display “Istanbul” as “address.city” property value for both “employee” and “emp1” objects:
 Now, let’s check out the method of merging objects using the JavaScript Object.assign() method.
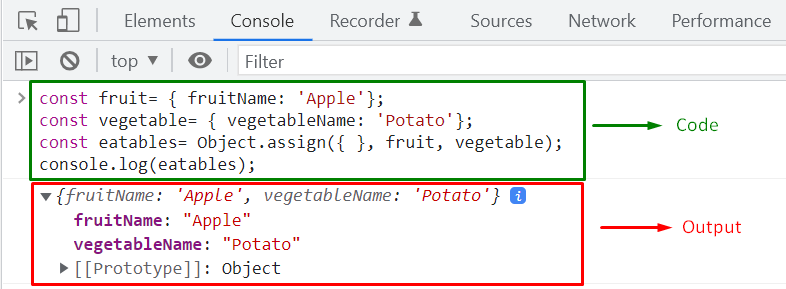 However, if you want to add a property to the “target” object before performing the merging operation, then have a look at the following syntax:
target = Object.assign({ property: 'value' }, source1, source2);
According to the above syntax, “property: value” represents the key-value pair which will be added to the “target” object, then the “Object.assign()” method will merge the “source1” and “source2” objects in the specified “target” object.
To understand the stated concept clearly, execute the below-given code:
const eatables= Object.assign({snacks: 'cookie' }, fruit, vegetable);
console.log(eatables);
Here, the “Object.assign()” method will merge the properties of “fruit” and “vegetable” objects in “eatables” object, after adding the “{snacks: ‘cookie’}” key-value pair to it:
However, if you want to add a property to the “target” object before performing the merging operation, then have a look at the following syntax:
target = Object.assign({ property: 'value' }, source1, source2);
According to the above syntax, “property: value” represents the key-value pair which will be added to the “target” object, then the “Object.assign()” method will merge the “source1” and “source2” objects in the specified “target” object.
To understand the stated concept clearly, execute the below-given code:
const eatables= Object.assign({snacks: 'cookie' }, fruit, vegetable);
console.log(eatables);
Here, the “Object.assign()” method will merge the properties of “fruit” and “vegetable” objects in “eatables” object, after adding the “{snacks: ‘cookie’}” key-value pair to it:
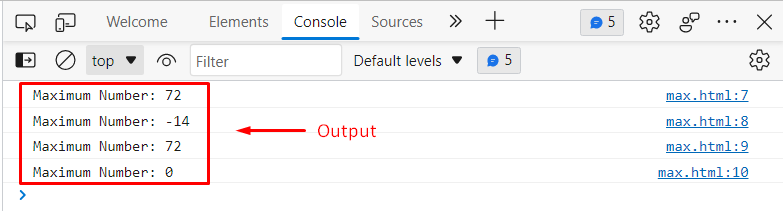 The output authenticates the working of the Math.max() method as it gave us accurate results.
Example2: In this example, we will see how the Math.max() method will behave if we didn’t provide it any parameters, or if we provide it a non-numeric value:
<script>
console.log("Maximum Number: " + Math.max());
console.log("Maximum Number: " + Math.max(5, 12, 'a'));</script>
The above code block will produce the following output:
The output authenticates the working of the Math.max() method as it gave us accurate results.
Example2: In this example, we will see how the Math.max() method will behave if we didn’t provide it any parameters, or if we provide it a non-numeric value:
<script>
console.log("Maximum Number: " + Math.max());
console.log("Maximum Number: " + Math.max(5, 12, 'a'));</script>
The above code block will produce the following output:
 This is how Math.max() method works.
Example3: Let’s consider the below code snippet to understand how to find the maximum value among the array elements using the Math.max() method:
<script>
var findMax = [115, 45, 72, 67, 1, 80, -72];
console.log("Maximum Number: " + Math.max(...findMax));</script>
The above code will generate the below given output:
This is how Math.max() method works.
Example3: Let’s consider the below code snippet to understand how to find the maximum value among the array elements using the Math.max() method:
<script>
var findMax = [115, 45, 72, 67, 1, 80, -72];
console.log("Maximum Number: " + Math.max(...findMax));</script>
The above code will generate the below given output:
 The Math.max() method returned “115” as the maximum value which authenticates the working of Math.max() method.
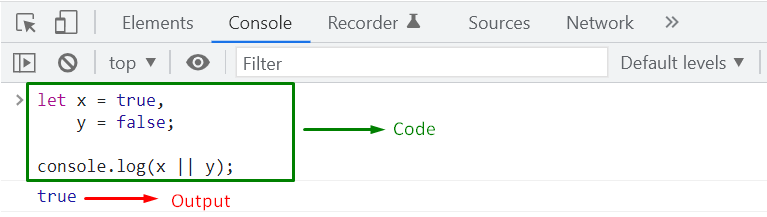 In case, if the values of both “x” and “y” variable is “false”, then the expression “x || y” will return “false”:
let x = false,
y = false;
console.log(x || y);
Output
In case, if the values of both “x” and “y” variable is “false”, then the expression “x || y” will return “false”:
let x = false,
y = false;
console.log(x || y);
Output

 That was all essential information related to the usage of JavaScript Boolean Operators.
Explore them further according to your preferences.
That was all essential information related to the usage of JavaScript Boolean Operators.
Explore them further according to your preferences.
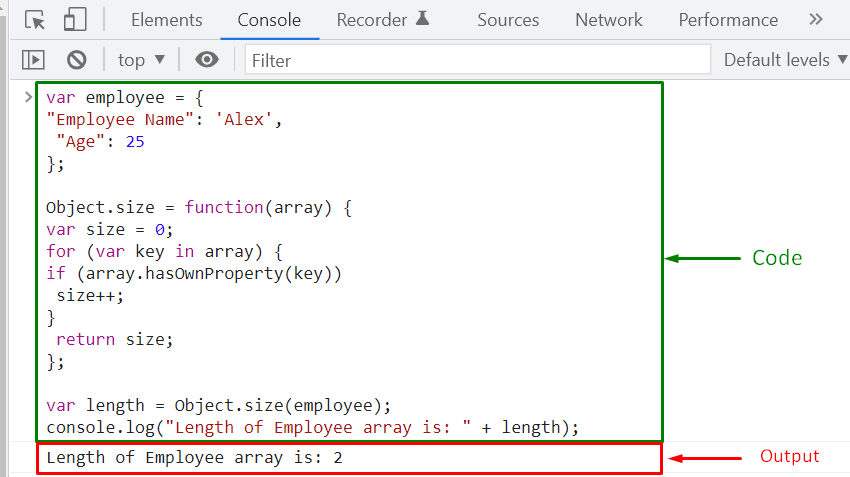 Similarly, you can also use the “Object.keys()” method to calculate the length of an associative array:
console.log("Length of Employee array is: " + Object.keys(employee).length);
Output
Similarly, you can also use the “Object.keys()” method to calculate the length of an associative array:
console.log("Length of Employee array is: " + Object.keys(employee).length);
Output


 That was all about JavaScript Associative array.
Before wind up, let’s check out the difference between an associative array and normal array.
That was all about JavaScript Associative array.
Before wind up, let’s check out the difference between an associative array and normal array.
 The output shows the appropriateness of the Array.flatMap() method.
 This is how we can use the Array.flatMap() method.
 The Array.includes() method returned true for “Java” and “JavaScript” and false for the rest of the values.
Example2: Let’s consider the below code snippet to understand how Array.includes method deals with case-sensitivity:
<script>
var items = ["JavaScript", "C", "Python", "Java", "PHP"];
console.log("Item Found: " + items.includes("java"));</script>
In this example, we used the includes() method to check whether “java” is there in the array or not:
The Array.includes() method returned true for “Java” and “JavaScript” and false for the rest of the values.
Example2: Let’s consider the below code snippet to understand how Array.includes method deals with case-sensitivity:
<script>
var items = ["JavaScript", "C", "Python", "Java", "PHP"];
console.log("Item Found: " + items.includes("java"));</script>
In this example, we used the includes() method to check whether “java” is there in the array or not:
 The includes() method returned false, which shows that it is a case-sensitive method.
Example1: let’s consider another example to check how the Array.includes method works when we have to search for the numeric values:
<script>
var items = [50, 72, 60, -14, 53, 23];
console.log("Item Found: " + items.includes(-14));
console.log("Item Found: " + items.includes(14));
console.log("Item Found: " + items.includes(23));</script>
The output for the above code block will be like this:
The includes() method returned false, which shows that it is a case-sensitive method.
Example1: let’s consider another example to check how the Array.includes method works when we have to search for the numeric values:
<script>
var items = [50, 72, 60, -14, 53, 23];
console.log("Item Found: " + items.includes(-14));
console.log("Item Found: " + items.includes(14));
console.log("Item Found: " + items.includes(23));</script>
The output for the above code block will be like this:
 14 doesn’t exist in the array, so the Array.includes() method returned false.
It authenticates the working of Array.include() method.
14 doesn’t exist in the array, so the Array.includes() method returned false.
It authenticates the working of Array.include() method.
 The output verifies that the sort() method sorted the array in ascending order.
 In this way, we can sort the array elements in reverse order.
 The output verifies that the sort method sorted the array elements in ascending order.
 This is how the sort() method sorts the array elements in descending order.
 The output authenticates the working of the sort() method.
 From the above snippet, we can observe that the typeof operator returns “number” for the first variable that holds a numeric value, “string” for the second variable, and undefined for the third variable because it doesn’t hold any value.
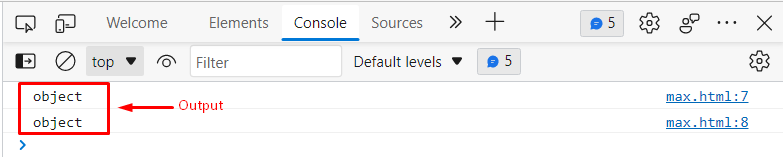 From the output, it is clear that the typeof operator is working appropriately.
 This is how the typeof operator works.
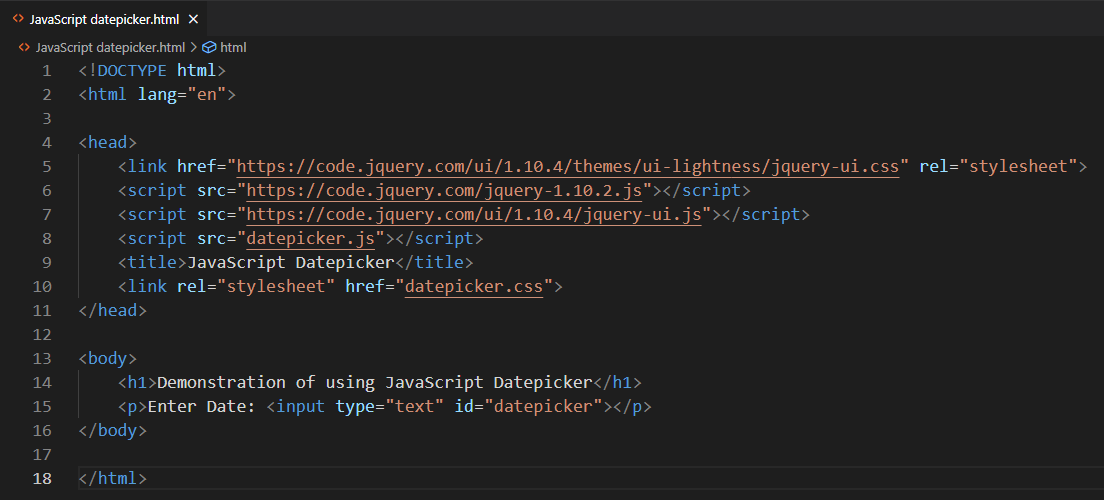
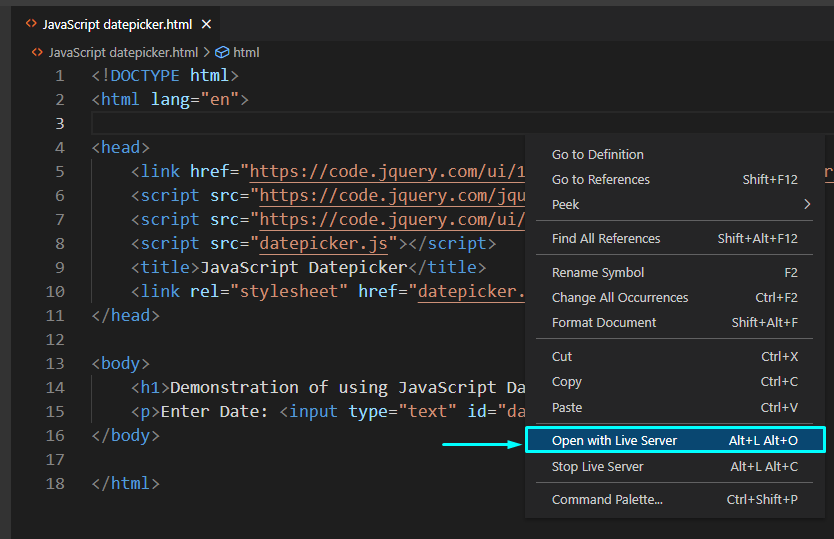 Your created JavaScript application will now run in the browser.
Click on the “input field” and choose a date from the “datepicker”:
Your created JavaScript application will now run in the browser.
Click on the “input field” and choose a date from the “datepicker”:
 We showed you the method to utilize a basic JavaScript datepicker.
You can further explore as needed.
We showed you the method to utilize a basic JavaScript datepicker.
You can further explore as needed.
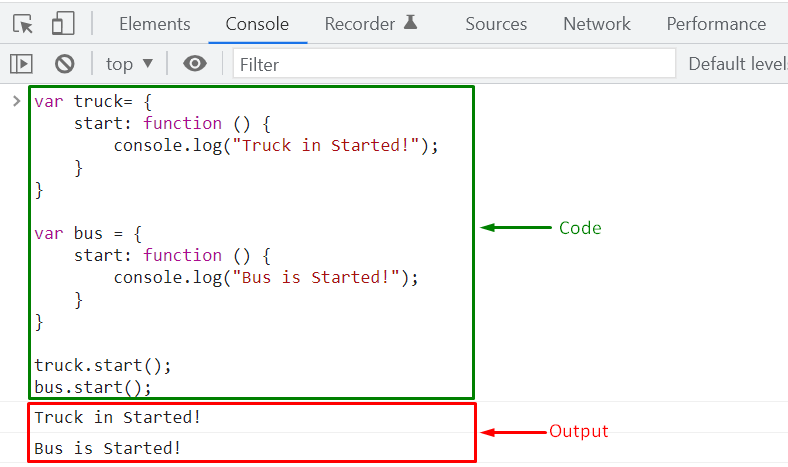

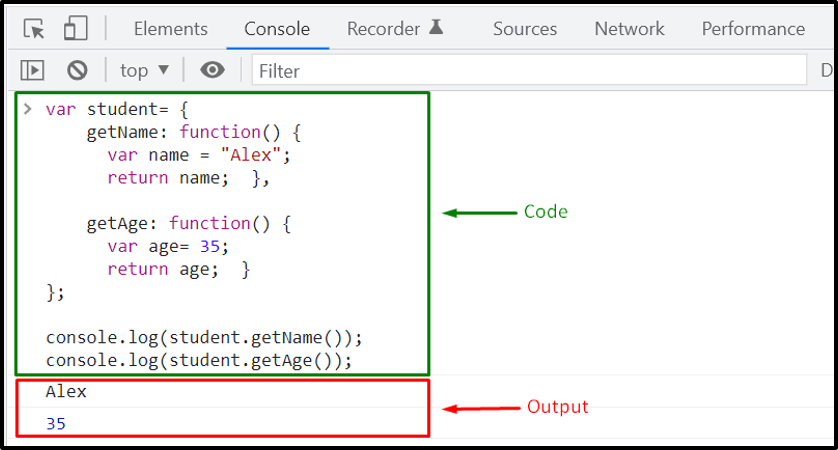

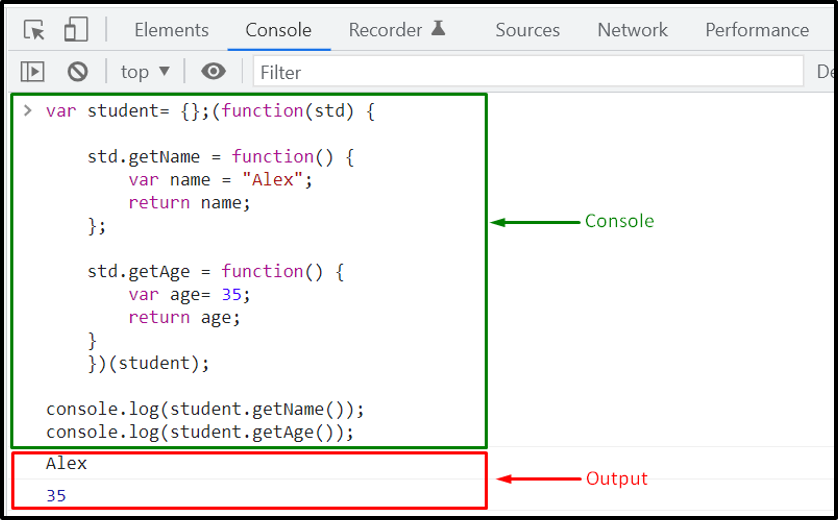
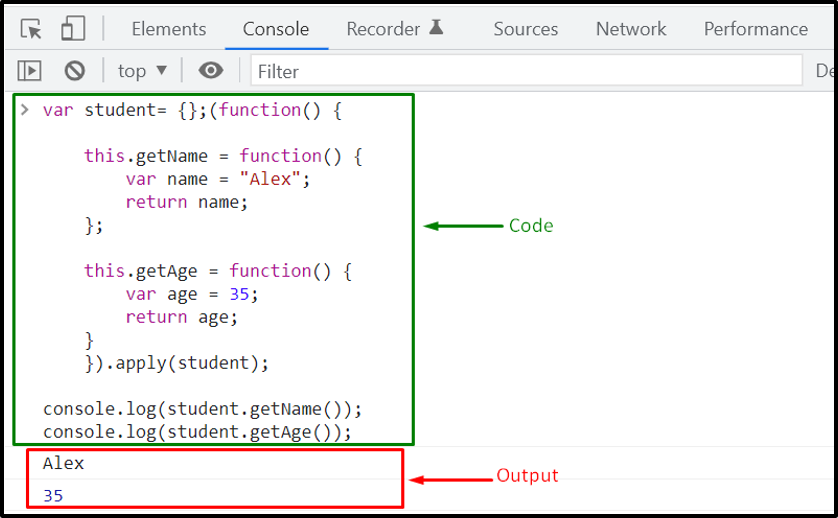 That was all essential information regarding the types of Namespaces in JavaScript.
You can further research as required.
That was all essential information regarding the types of Namespaces in JavaScript.
You can further research as required.
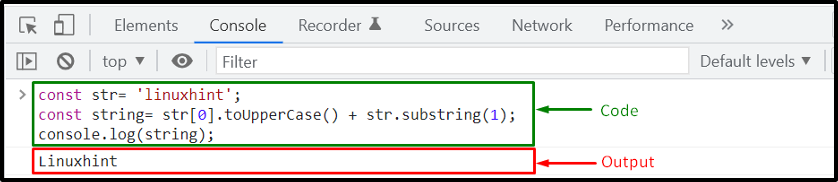
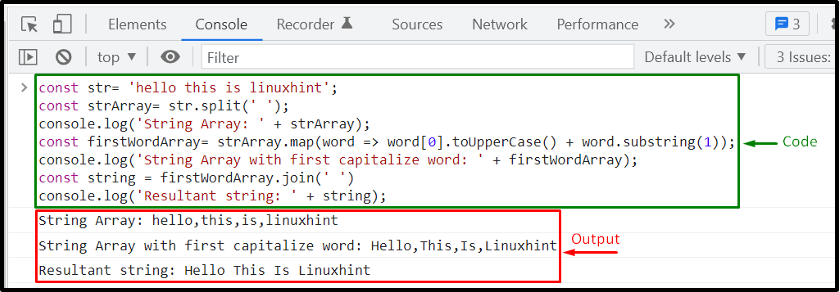 That was all essential information related to the JavaScript String toUpperCase() method.
You can further research as needed.
That was all essential information related to the JavaScript String toUpperCase() method.
You can further research as needed.
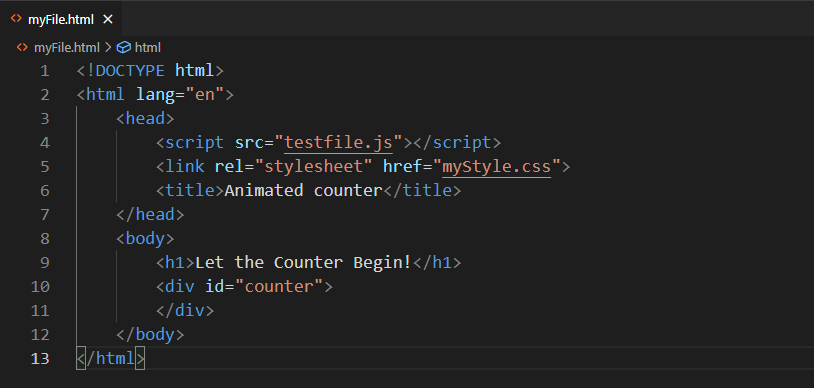 Step 2: JavaScript code
Now move to your JavaScript file and utilize the “setInterval()” method for running the “updated” function:
let counts=setInterval(updated);
Then, create an “upto” variable that represents the limit of the counter.
As a starting point, the value of the “upto” variable is initialized to “0”:
let upto=0;
In the “updated()” function, we will first use the “getElementById()” method to fetch the HTML element with the “counter” id in the “count” variable.
After that, we will utilize the “innerHTML” property of the “count” variable to display the count as its inner text.
When the “count” value will reach “1000”, the “clearInterval()” method will stop the execution of the program:
function updated(){
var count= document.getElementById("counter");
count.innerHTML=++upto;
if(upto===1000)
{
clearInterval(counts);
}}
Step 2: JavaScript code
Now move to your JavaScript file and utilize the “setInterval()” method for running the “updated” function:
let counts=setInterval(updated);
Then, create an “upto” variable that represents the limit of the counter.
As a starting point, the value of the “upto” variable is initialized to “0”:
let upto=0;
In the “updated()” function, we will first use the “getElementById()” method to fetch the HTML element with the “counter” id in the “count” variable.
After that, we will utilize the “innerHTML” property of the “count” variable to display the count as its inner text.
When the “count” value will reach “1000”, the “clearInterval()” method will stop the execution of the program:
function updated(){
var count= document.getElementById("counter");
count.innerHTML=++upto;
if(upto===1000)
{
clearInterval(counts);
}}
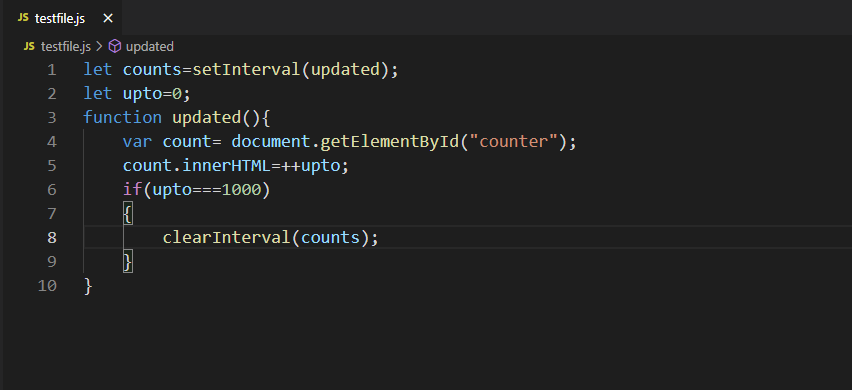 Step 3: Style HTML elements
To enhance the appearance of our animated counter application, we will style the added HTML elements.
For this purpose, firstly, we will align the text present inside the “body” to the “center” and also add a “background-image”:
body {
text-align: center;
background-image: url('counter.jpg');}
Then, we will set the “color” and “font-family” properties of the added heading:
h1 {
color: rgb(0, 0, 2);
font-family:'Courier New', Courier, monospace;}
Lastly, we will change the color of the “counter” container and specify the desired values for the “font-family”, “font-size” and “font-style” properties:
div {
color: rgb(37, 25, 5);
font-family:courier;
font-size: 200%;
font-style:normal;}
Step 3: Style HTML elements
To enhance the appearance of our animated counter application, we will style the added HTML elements.
For this purpose, firstly, we will align the text present inside the “body” to the “center” and also add a “background-image”:
body {
text-align: center;
background-image: url('counter.jpg');}
Then, we will set the “color” and “font-family” properties of the added heading:
h1 {
color: rgb(0, 0, 2);
font-family:'Courier New', Courier, monospace;}
Lastly, we will change the color of the “counter” container and specify the desired values for the “font-family”, “font-size” and “font-style” properties:
div {
color: rgb(37, 25, 5);
font-family:courier;
font-size: 200%;
font-style:normal;}
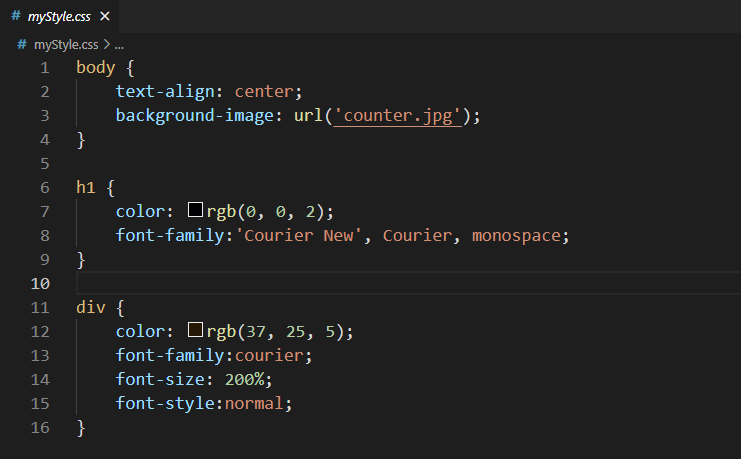 Step 4: Run Animated Counter Application
After saving the specified code, open up the HTML file of your Animated Counter Project in the browser with the help of the “Live Server” extension:
Step 4: Run Animated Counter Application
After saving the specified code, open up the HTML file of your Animated Counter Project in the browser with the help of the “Live Server” extension:
 Here is how our animated counter JavaScript application looks like:


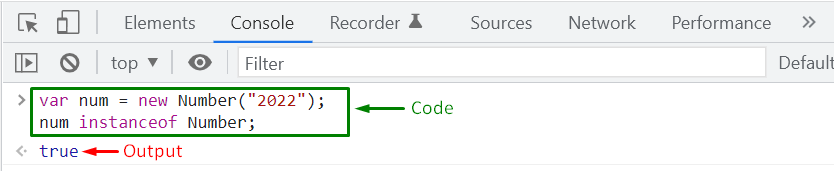

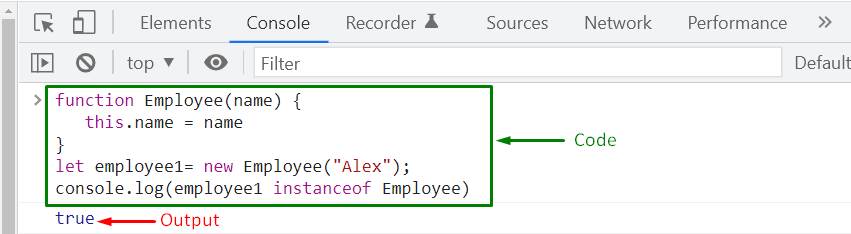
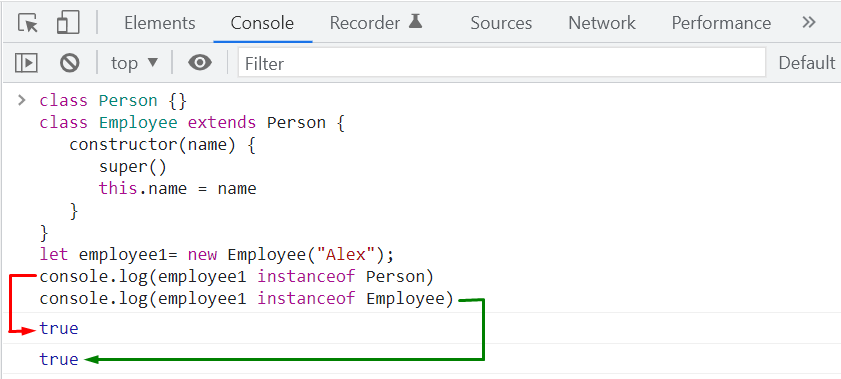 JavaScript beginners often get confused between the functionality of the “instanceof” and “typeof” operators.
To clear out your concept related to the mentioned operators, check out the following section.
JavaScript beginners often get confused between the functionality of the “instanceof” and “typeof” operators.
To clear out your concept related to the mentioned operators, check out the following section.
 However, with the “instanceof” operator, you must mention the type or class for which the specified value is tested.
This operator returns a “true” or “false” boolean value which depends on the result of validation.
More specifically, the “instanceof” JavaScript operator is utilized for testing the “custom” and “advanced” types, whereas “typeof” operator is used to verify the “common” or “built-in” JavaScript data types.
That was all essential information regarding the JavaScript “instanceof” operator.
You can further research as required.
However, with the “instanceof” operator, you must mention the type or class for which the specified value is tested.
This operator returns a “true” or “false” boolean value which depends on the result of validation.
More specifically, the “instanceof” JavaScript operator is utilized for testing the “custom” and “advanced” types, whereas “typeof” operator is used to verify the “common” or “built-in” JavaScript data types.
That was all essential information regarding the JavaScript “instanceof” operator.
You can further research as required.
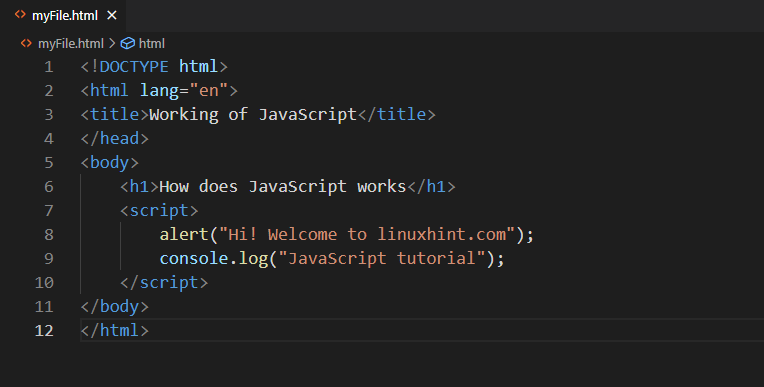 Add the given code in an HTML file and open it in your browser.
Upon doing so, the following “alert” box will appear in the browser:
Add the given code in an HTML file and open it in your browser.
Upon doing so, the following “alert” box will appear in the browser:
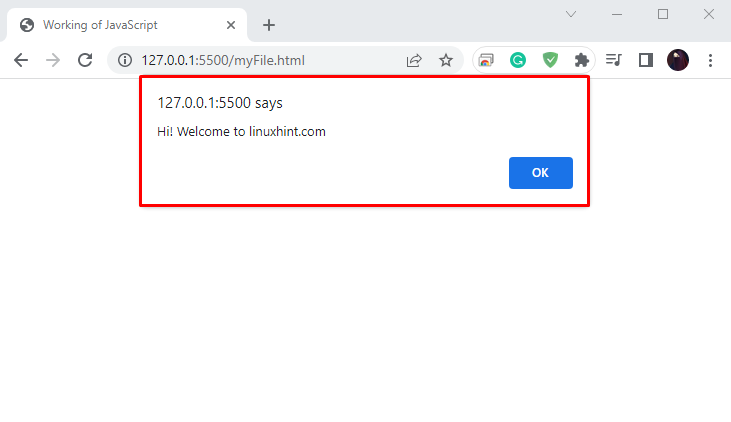 To check the output of the “console.log()” method, right-click in the opened window and select the “Inspect” option from the context menu:
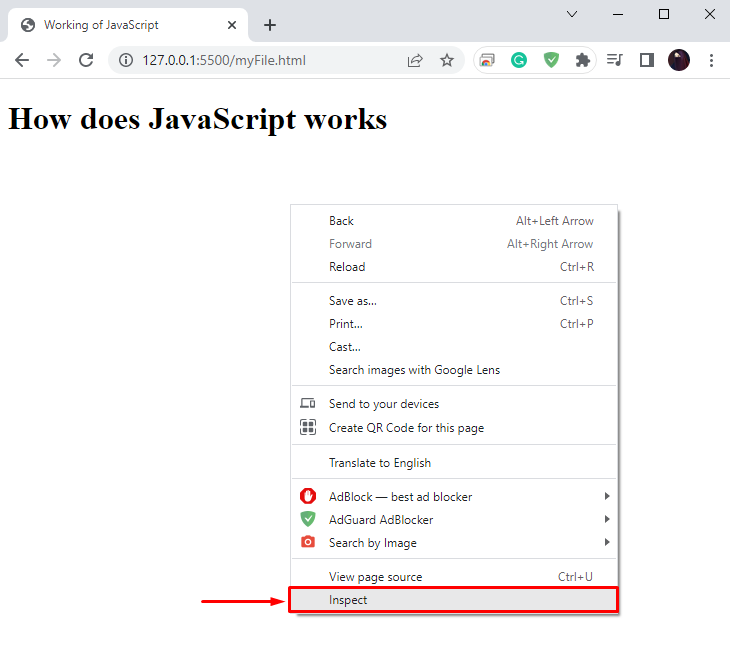 The given output signifies that the “console.log()” method has successfully displayed the specified string in the console:
 So it is clear from the above example that a JavaScript application runs perfectly on a web browser.
At this point, you may be wondering how the web browser understands the code and executes it effortlessly?
In this technological world, most modern web browsers have built-in JavaScript engines.
For instance, Google Chrome has a “V8” JavaScript engine, Safari has a “JavaScript core”, Edge has “Chakra,” and “Spidermonkey” engine is embedded in Firefox.
Thus, a JavaScript engine is utilized for executing the code.
Now, let’s discuss the working of the JavaScript engine.
So it is clear from the above example that a JavaScript application runs perfectly on a web browser.
At this point, you may be wondering how the web browser understands the code and executes it effortlessly?
In this technological world, most modern web browsers have built-in JavaScript engines.
For instance, Google Chrome has a “V8” JavaScript engine, Safari has a “JavaScript core”, Edge has “Chakra,” and “Spidermonkey” engine is embedded in Firefox.
Thus, a JavaScript engine is utilized for executing the code.
Now, let’s discuss the working of the JavaScript engine.
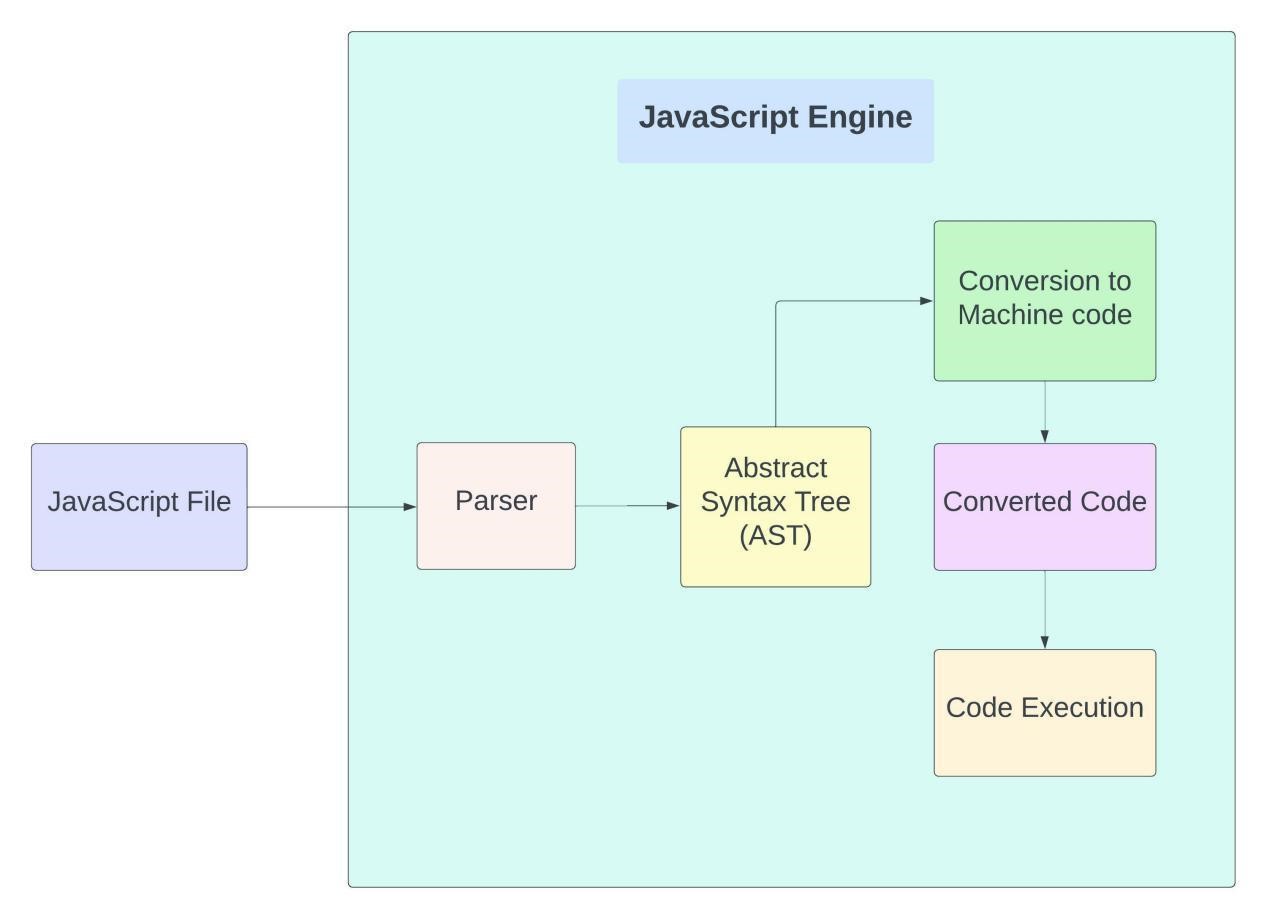 Now, let’s take a closer look at each of these processes.
Step 1: Parsing JavaScript file
Whenever a JavaScript program is executed, the “Parser” present inside the JavaScript engine receives the code first.
It plays its role to check the code line by line and verify if it is syntactically correct or not.
If an error is identified, the parser throws an error and stops the code execution.
Step 2: Creating Abstract Syntax Tree
In the next step, the parser creates the “Abstract Syntax Tree” (AST) after checking the JavaScript code and determining that there exist no errors in the code.
Step 3: Converting JavaScript code to Machine code
JavaScript engine converts the provided code into machine code after parsing and creating the AST.
Step 4: Executing Machine code
Lastly, the converted code is submitted to the system for execution, and then the corresponding byte code is executed.
That was all essential information regarding the working of JavaScript.
You can further research as needed.
Now, let’s take a closer look at each of these processes.
Step 1: Parsing JavaScript file
Whenever a JavaScript program is executed, the “Parser” present inside the JavaScript engine receives the code first.
It plays its role to check the code line by line and verify if it is syntactically correct or not.
If an error is identified, the parser throws an error and stops the code execution.
Step 2: Creating Abstract Syntax Tree
In the next step, the parser creates the “Abstract Syntax Tree” (AST) after checking the JavaScript code and determining that there exist no errors in the code.
Step 3: Converting JavaScript code to Machine code
JavaScript engine converts the provided code into machine code after parsing and creating the AST.
Step 4: Executing Machine code
Lastly, the converted code is submitted to the system for execution, and then the corresponding byte code is executed.
That was all essential information regarding the working of JavaScript.
You can further research as needed.
 However, this approach only flattens the level one nested arrays:
const numArray= [12, 23, [34, 45, 56, [67, 78]]];
let flatArray= [].concat(...numArray);
console.log(flatArray);
The above-given code will add the inner array of “numArray” as a whole to “flatArray” as it cannot spread its elements:
However, this approach only flattens the level one nested arrays:
const numArray= [12, 23, [34, 45, 56, [67, 78]]];
let flatArray= [].concat(...numArray);
console.log(flatArray);
The above-given code will add the inner array of “numArray” as a whole to “flatArray” as it cannot spread its elements:
 What if you have to flatten a deeply nested array? To do so, you can utilize the “Array.flatten()” method offered by the ES6 JavaScript version.


 That was all the essential information related to flattening an array.
You can further work on it according to your preferences.
That was all the essential information related to flattening an array.
You can further work on it according to your preferences.
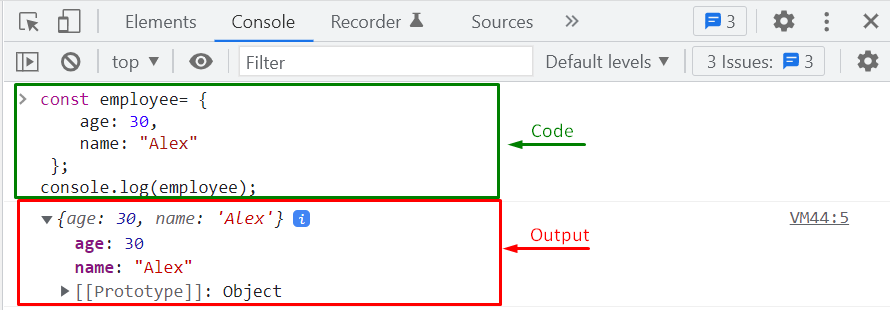 After doing so, we will try to update the values of the “employee” object as a whole:
employee = {
age: 35,
name: "Paul"};
console.log(employee);
As you can see, the execution of the specified operation output a “TypeError” which states that assignment to an already declared constant variable is not possible:
After doing so, we will try to update the values of the “employee” object as a whole:
employee = {
age: 35,
name: "Paul"};
console.log(employee);
As you can see, the execution of the specified operation output a “TypeError” which states that assignment to an already declared constant variable is not possible:
 Now, we will check the other case by individually reassigning a value to the employee object’s “name” property:
employee.name= "Max";
console.log("After changing the employee.name property value");
console.log(employee);
The given output signifies that the “employee.name” property value is updated to “Max”:
Now, we will check the other case by individually reassigning a value to the employee object’s “name” property:
employee.name= "Max";
console.log("After changing the employee.name property value");
console.log(employee);
The given output signifies that the “employee.name” property value is updated to “Max”:
 Now, it is proved that although an object becomes “immutable” with the help of the “const” keyword, it still permits you to individually reassign its property values.
You can “freeze” an object in a situation where it is needed to restrict the object from updating the existing properties or addition of new properties.
Want to do so? Follow the below-given section to know more about freezing an object.
Now, it is proved that although an object becomes “immutable” with the help of the “const” keyword, it still permits you to individually reassign its property values.
You can “freeze” an object in a situation where it is needed to restrict the object from updating the existing properties or addition of new properties.
Want to do so? Follow the below-given section to know more about freezing an object.
 In the next step, we will verify if the “employee” object is freezed or not.
For this purpose, JavaScript offers “Object.isFrozen()” built-in method that accepts a JavaScript “object” as an argument and returns “true” if the passed object is freezed, otherwise the return case of “Object.isFrozen()” method will be set to “false”:
Object.isFrozen(employee);
Output
In the next step, we will verify if the “employee” object is freezed or not.
For this purpose, JavaScript offers “Object.isFrozen()” built-in method that accepts a JavaScript “object” as an argument and returns “true” if the passed object is freezed, otherwise the return case of “Object.isFrozen()” method will be set to “false”:
Object.isFrozen(employee);
Output
 The value returned by the “Object.isFrozen()” method is “true,” which indicates that the “employee” object is successfully freezed.
 However, in the case of “strict mode”, a “TypeError” will be also displayed on the console, while terminating the updation operation of the freezed “employee” object:
"use strict";
employee.name= "Paul";
console.log(employee);
Output
However, in the case of “strict mode”, a “TypeError” will be also displayed on the console, while terminating the updation operation of the freezed “employee” object:
"use strict";
employee.name= "Paul";
console.log(employee);
Output

 Whereas, in “strict mode”, a “TypeError” will be shown on the console, which states that you cannot delete the “name” property of the “employee” object that we have freezed with the help of the “Object.freeze()” method:
"use strict";
delete employee.name;
console.log(employee);
Output
Whereas, in “strict mode”, a “TypeError” will be shown on the console, which states that you cannot delete the “name” property of the “employee” object that we have freezed with the help of the “Object.freeze()” method:
"use strict";
delete employee.name;
console.log(employee);
Output
 That was all essential information related to freezing an object.
You can investigate further according to your preferences.
That was all essential information related to freezing an object.
You can investigate further according to your preferences.
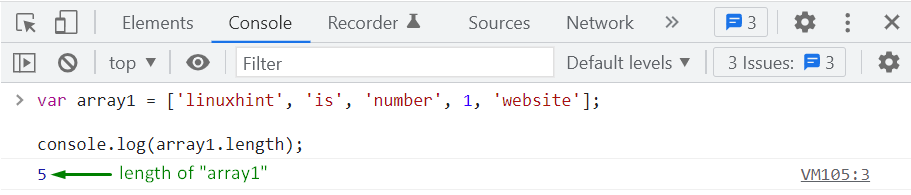 To iterate over the elements of the “array1”, we will use the “for…loop”:
for(var i=0; i <= array1.length; i++) {
console.log(array1[i]);}
The given “for..loop” will display the “array1” elements on the console:
To iterate over the elements of the “array1”, we will use the “for…loop”:
for(var i=0; i <= array1.length; i++) {
console.log(array1[i]);}
The given “for..loop” will display the “array1” elements on the console:
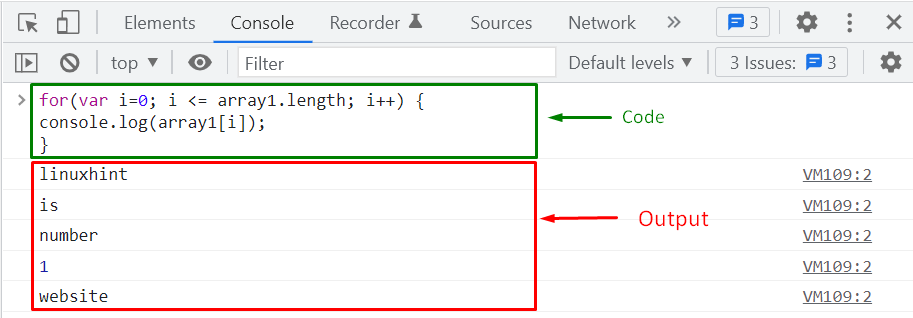
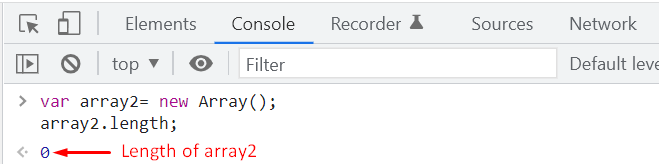 In the next step, we will add some elements to the “array2” using JavaScript “push()”.
The “push()” method accepts the element as an argument that needs to be pushed into the specified array:
array2.push('linuxhint');
array2.push('website');
array2.length;
Till this point, we have added two elements in the “array2,” which signifies that its length is now set to “2” instead of zero:
In the next step, we will add some elements to the “array2” using JavaScript “push()”.
The “push()” method accepts the element as an argument that needs to be pushed into the specified array:
array2.push('linuxhint');
array2.push('website');
array2.length;
Till this point, we have added two elements in the “array2,” which signifies that its length is now set to “2” instead of zero:
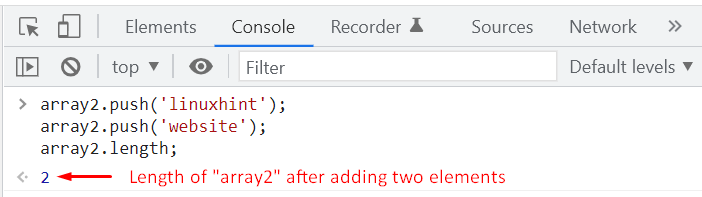 Lastly, we will use the “for..loop” to iterate over the “array2” elements and view their values:
for(var i=0; i <= array2.length; i++) {
console.log(array2[i]);}
Output
Lastly, we will use the “for..loop” to iterate over the “array2” elements and view their values:
for(var i=0; i <= array2.length; i++) {
console.log(array2[i]);}
Output
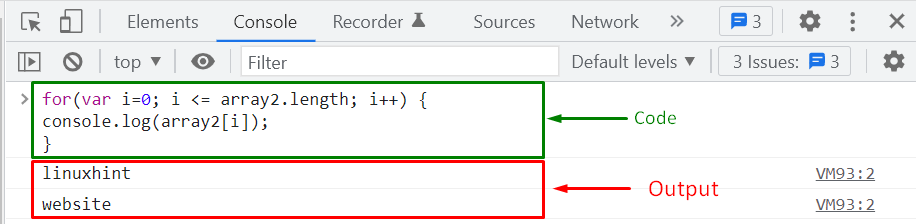
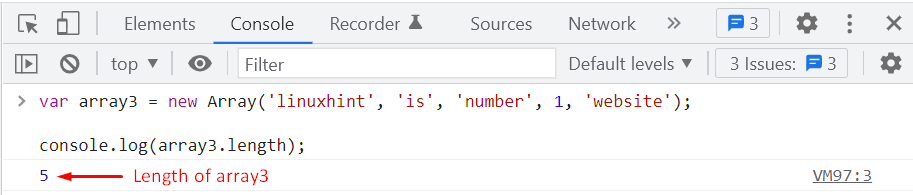 Next, we will iterate through the elements of “array3” and print out their values on console window:
for(var i=0; i <= array3.length; i++) {
console.log(array3[i]);}
Output
Next, we will iterate through the elements of “array3” and print out their values on console window:
for(var i=0; i <= array3.length; i++) {
console.log(array3[i]);}
Output
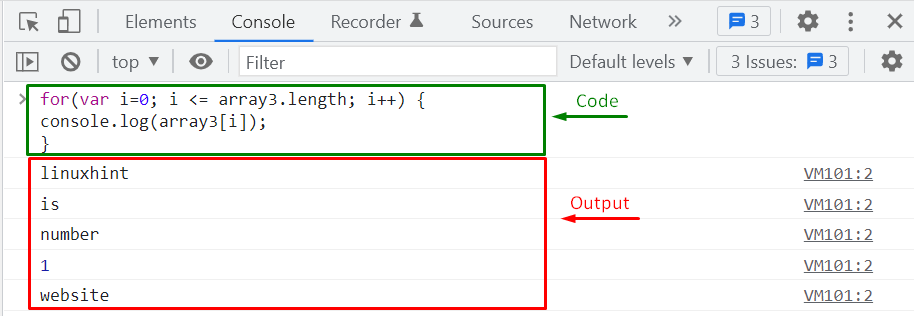 We have compiled three different methods for creating dynamic arrays.
You can use any of them according to your requirements.
We have compiled three different methods for creating dynamic arrays.
You can use any of them according to your requirements.


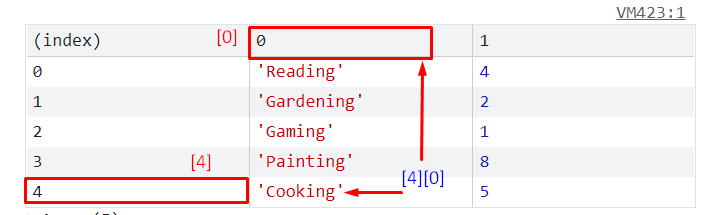 To perform the specified operation, we will execute the below-given code statement:
console.log(hobbies[4][0]);
As you can see from the output, we have successfully accessed the value of the “hobbies” array that is placed at the first index of the fifth inner array:
To perform the specified operation, we will execute the below-given code statement:
console.log(hobbies[4][0]);
As you can see from the output, we have successfully accessed the value of the “hobbies” array that is placed at the first index of the fifth inner array:

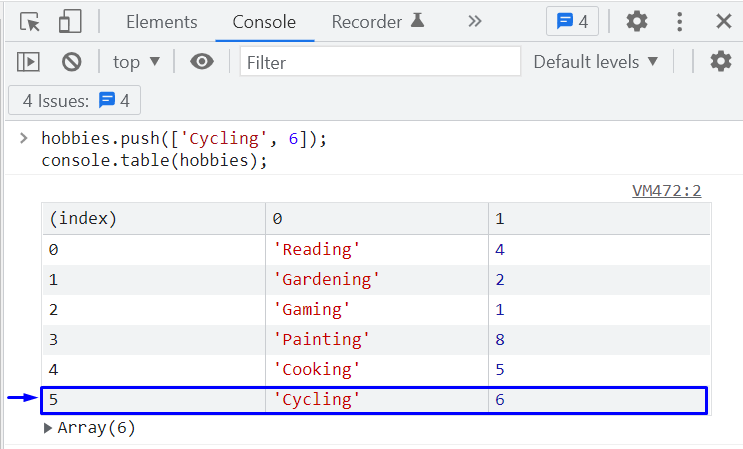 Whereas, to insert a sub-array in the middle of other inner arrays, utilize the “splice()” method in the following way:
hobbies.splice(1, 0, ['Singing', 3]);
console.table(hobbies);
Here, the “hobbies.splice()” method will overwrite the “hobbies” array and add the “[‘Singing’, 3]” sub-array at the second position:
Whereas, to insert a sub-array in the middle of other inner arrays, utilize the “splice()” method in the following way:
hobbies.splice(1, 0, ['Singing', 3]);
console.table(hobbies);
Here, the “hobbies.splice()” method will overwrite the “hobbies” array and add the “[‘Singing’, 3]” sub-array at the second position:
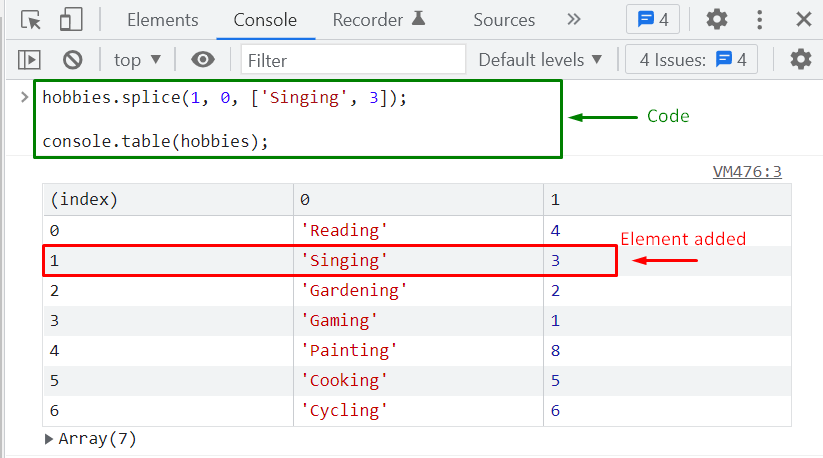 Till this point, we have learned the procedure to create a nested array and add elements to it.
In the next section, we will talk about iterating over the elements of a nested array.
Till this point, we have learned the procedure to create a nested array and add elements to it.
In the next section, we will talk about iterating over the elements of a nested array.
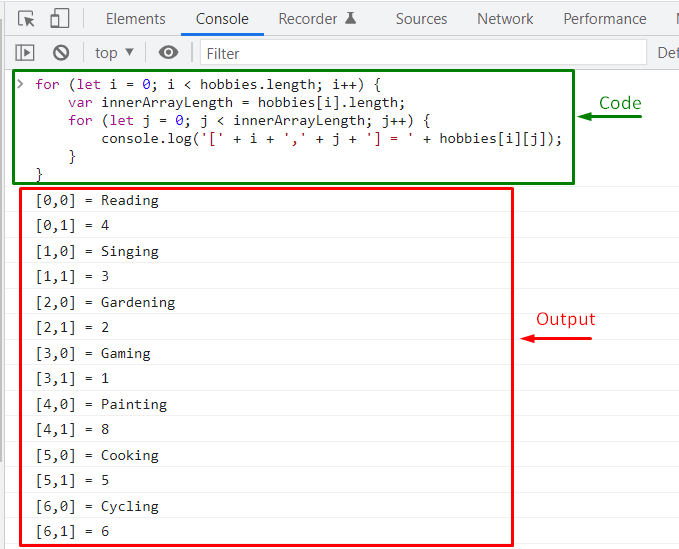 You can also use the “ForEach()” method for the same purpose.
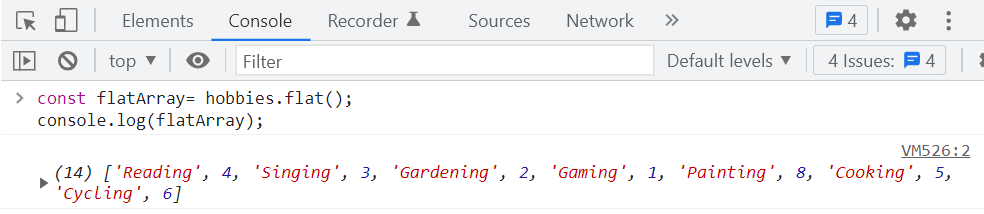
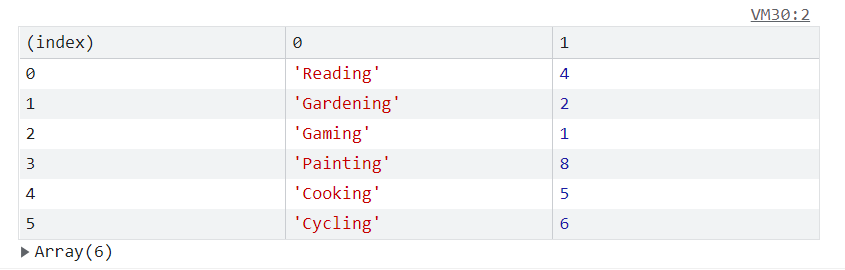 Now when we invoke the “pop()” method, the last sub-array will be deleted along with its elements:
hobbies.pop();
console.table(hobbies);
Output
Now when we invoke the “pop()” method, the last sub-array will be deleted along with its elements:
hobbies.pop();
console.table(hobbies);
Output
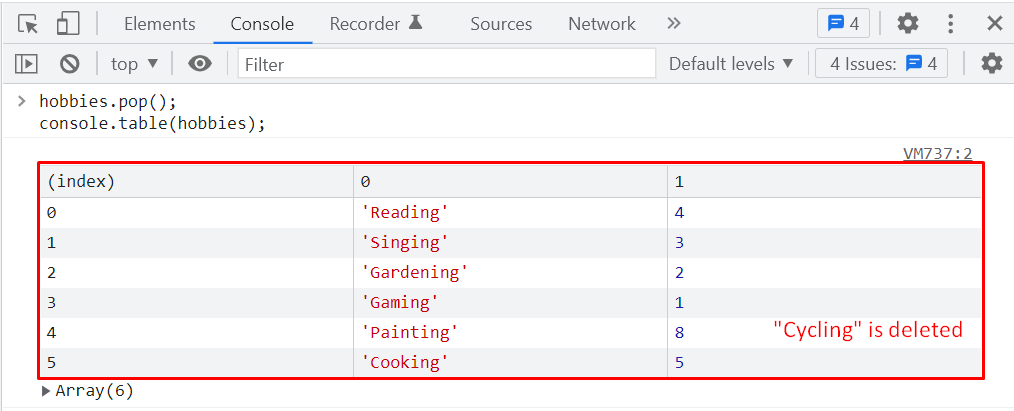 To remove the second element of each “sub-array”, we will iterate through the “hobbies” array using the “forEach()” method, and at each iteration the “pop()” method deletes the element positioned at the first index:
hobbies.forEach((hobby) => {
hobby.pop(1);});
console.table(hobbies);
It can be seen in the below-given output that the element representing the maximum number of hours spent on each hobby is deleted for all sub-arrays:
To remove the second element of each “sub-array”, we will iterate through the “hobbies” array using the “forEach()” method, and at each iteration the “pop()” method deletes the element positioned at the first index:
hobbies.forEach((hobby) => {
hobby.pop(1);});
console.table(hobbies);
It can be seen in the below-given output that the element representing the maximum number of hours spent on each hobby is deleted for all sub-arrays:
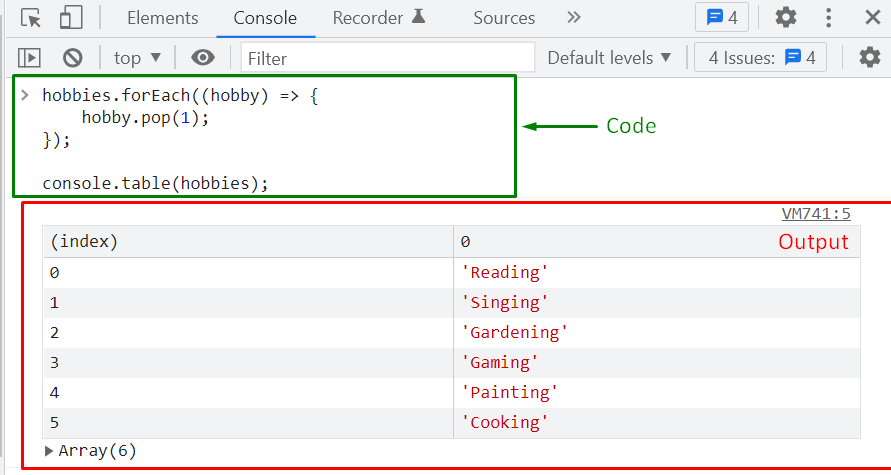 We have compiled all essential information related to the working of nested arrays.
You can further explore them according to your preferences.
We have compiled all essential information related to the working of nested arrays.
You can further explore them according to your preferences.
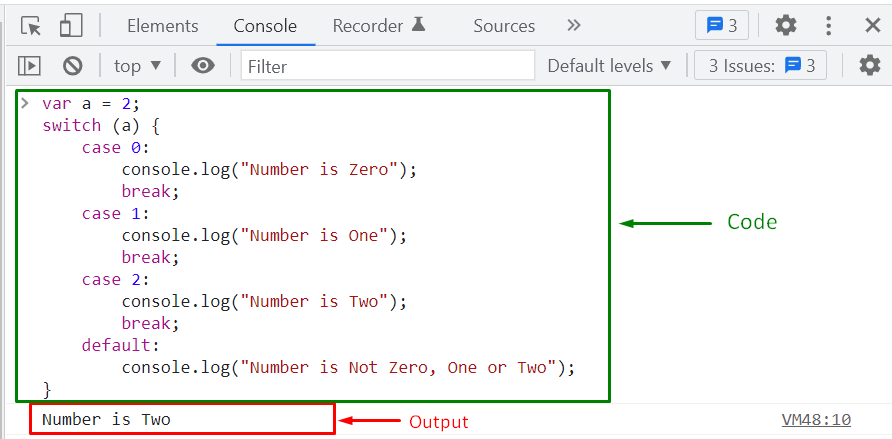 In another case, if the variable value does not match with any of the specified cases, then JavaScript will execute the statements added in the “default” case.
For instance, in the below-given example, the value of the variable “a” is set to “10,” which will not match with the value of the added switch cases:
var a = 10;switch (a) {
case0:
console.log("Number is Zero");
break;
case1:
console.log("Number is One");
break;
case2:
console.log("Number is Two");
break;
default:
console.log("Number is Not Zero, One or Two");}
So, the Switch case statement will execute the code block of the “default” case:
In another case, if the variable value does not match with any of the specified cases, then JavaScript will execute the statements added in the “default” case.
For instance, in the below-given example, the value of the variable “a” is set to “10,” which will not match with the value of the added switch cases:
var a = 10;switch (a) {
case0:
console.log("Number is Zero");
break;
case1:
console.log("Number is One");
break;
case2:
console.log("Number is Two");
break;
default:
console.log("Number is Not Zero, One or Two");}
So, the Switch case statement will execute the code block of the “default” case:
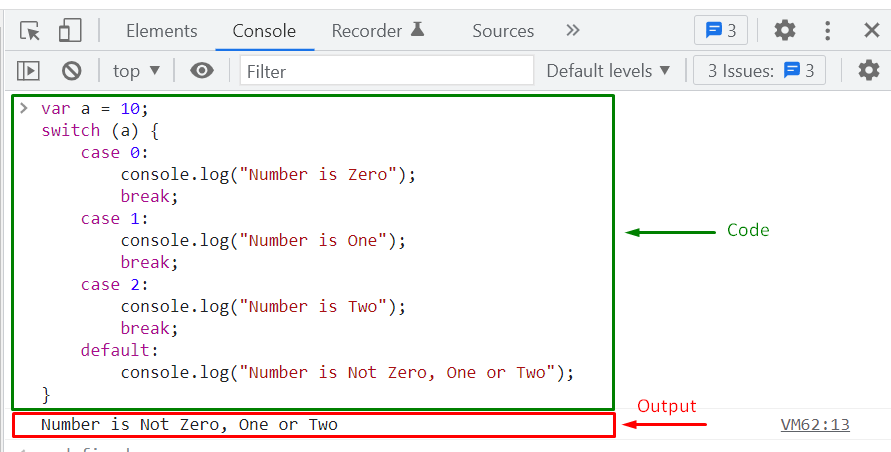
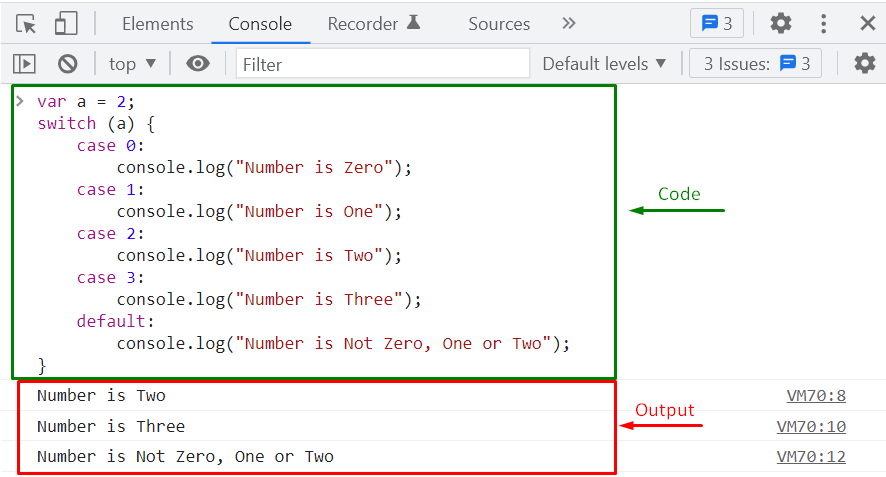
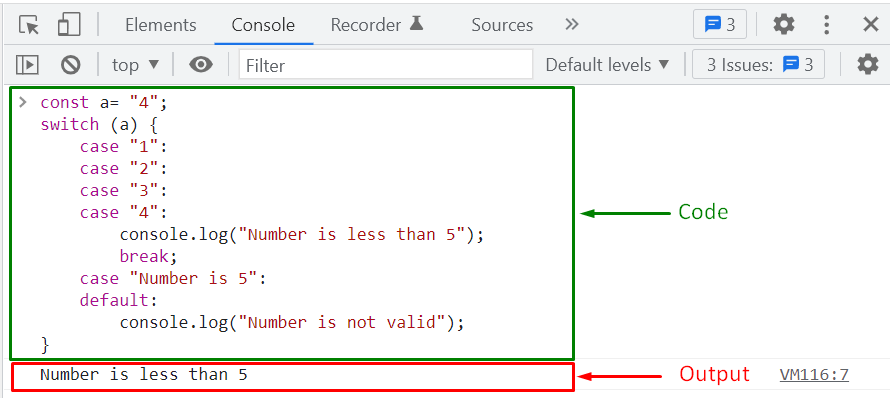 We have provided the essential information related to the case statement.
You can further research it according to your requirements.
We have provided the essential information related to the case statement.
You can further research it according to your requirements.
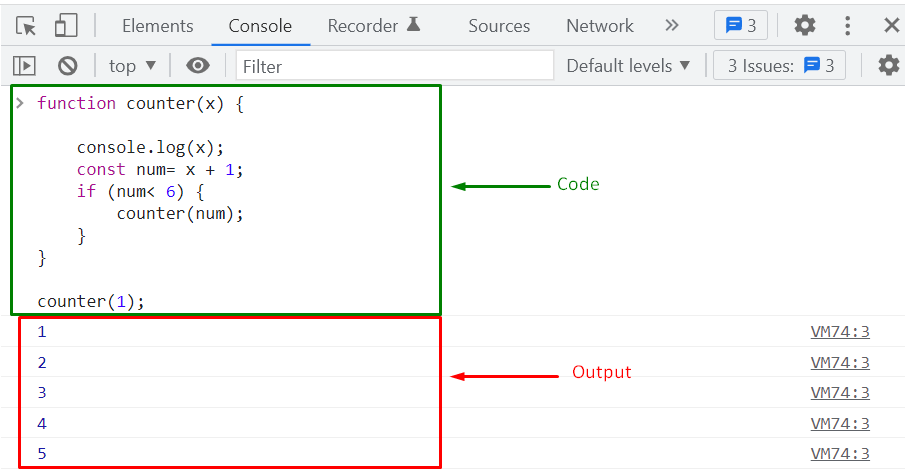
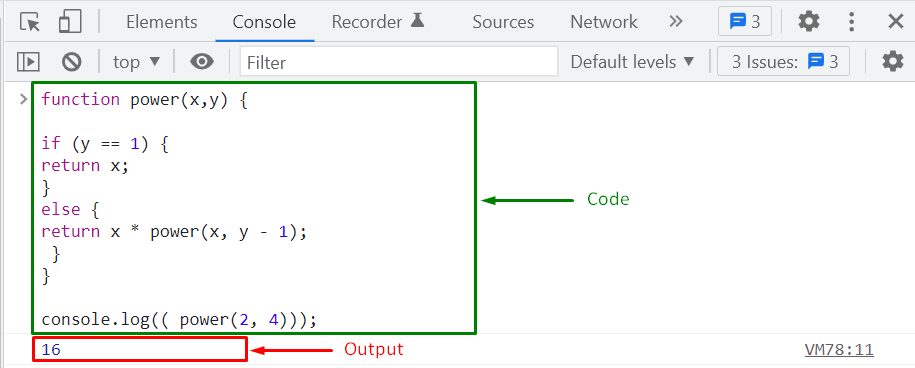


 In the other case, specifying the hyphen “-” as “delimiter” will yield different results:
seasons.join("-")
Output
In the other case, specifying the hyphen “-” as “delimiter” will yield different results:
seasons.join("-")
Output

 Example 2
With the help of the concatenation operator “+”, we will now concatenate the “seasons” array with an empty string “ “:
var string2= " " + seasons;
console.log(string2);
Output
Example 2
With the help of the concatenation operator “+”, we will now concatenate the “seasons” array with an empty string “ “:
var string2= " " + seasons;
console.log(string2);
Output
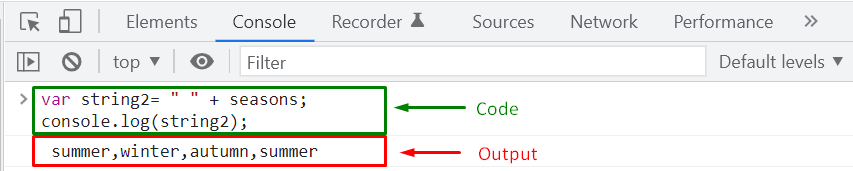 We have compiled different methods for converting an array to string.
Utilize any of the given methods according to your preferences.
We have compiled different methods for converting an array to string.
Utilize any of the given methods according to your preferences.
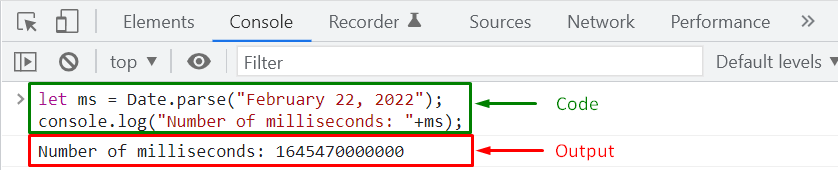 Example 2
The JavaScript “Date.parse()” method also permits you to parse a string that comprises the date and time in hours and minutes.
For instance, in the below-given example, we will pass the string “February 22, 2022 10:10 AM” as an argument to the “Date.parse()” method:
let ms = Date.parse("February 22, 2022 10:10 AM");
console.log("Number of milliseconds: "+ms);
As you can see, the output shows the parsed data string as “1645506600000” milliseconds:
Example 2
The JavaScript “Date.parse()” method also permits you to parse a string that comprises the date and time in hours and minutes.
For instance, in the below-given example, we will pass the string “February 22, 2022 10:10 AM” as an argument to the “Date.parse()” method:
let ms = Date.parse("February 22, 2022 10:10 AM");
console.log("Number of milliseconds: "+ms);
As you can see, the output shows the parsed data string as “1645506600000” milliseconds:
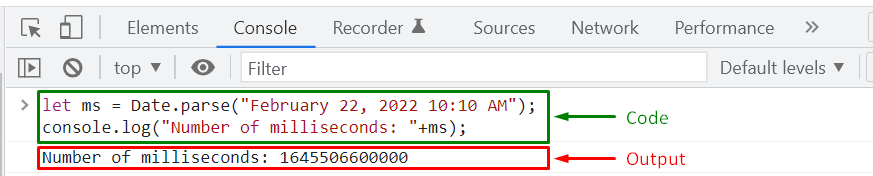 You can also verify that the number of milliseconds returned by the “Date.parse()” method represents the passed date “string“.
For this purpose, create a “date” object while passing the retrieved “milliseconds”:
var date = new Date(ms);
Then, invoke the “date.toString()” method to convert the value of the date object to a string:
console.log("String to date conversion results: "+date.toString());
The execution of the above-given “date.toString()” method signifies that the converted value and the specified string are the same:
You can also verify that the number of milliseconds returned by the “Date.parse()” method represents the passed date “string“.
For this purpose, create a “date” object while passing the retrieved “milliseconds”:
var date = new Date(ms);
Then, invoke the “date.toString()” method to convert the value of the date object to a string:
console.log("String to date conversion results: "+date.toString());
The execution of the above-given “date.toString()” method signifies that the converted value and the specified string are the same:
 Example 3
In this example, we will add the hours, minutes as well as seconds with the date value and pass it to the “Date.parse()” method:
let ms = Date.parse("February 22, 2022 09:07:10 AM");
console.log("Number of milliseconds: "+ms);
The “Date.parse()” method will also consider the seconds while calculating the difference between it and the “January 1, 1970 00:00:00 AM”:
Example 3
In this example, we will add the hours, minutes as well as seconds with the date value and pass it to the “Date.parse()” method:
let ms = Date.parse("February 22, 2022 09:07:10 AM");
console.log("Number of milliseconds: "+ms);
The “Date.parse()” method will also consider the seconds while calculating the difference between it and the “January 1, 1970 00:00:00 AM”:
 Example 4
Using “Date.parse()” method, we will now parse a string that comprises a date value and time in “UTC” format:
let ms = Date.parse("February 22, 2022 09:07:10 AM UTC");
console.log("Number of milliseconds: "+ms);
Output
Example 4
Using “Date.parse()” method, we will now parse a string that comprises a date value and time in “UTC” format:
let ms = Date.parse("February 22, 2022 09:07:10 AM UTC");
console.log("Number of milliseconds: "+ms);
Output
 Example 5
If you have passed an invalid date string, then the return case of the JavaScript “Date.parse()” method will be set to “NaN” (Not a Number):
let ms = Date.parse("linuxhint");
console.log(ms);
Output
Example 5
If you have passed an invalid date string, then the return case of the JavaScript “Date.parse()” method will be set to “NaN” (Not a Number):
let ms = Date.parse("linuxhint");
console.log(ms);
Output
 That was all essential information related to parsing date.
You can further research according to your requirements.
That was all essential information related to parsing date.
You can further research according to your requirements.
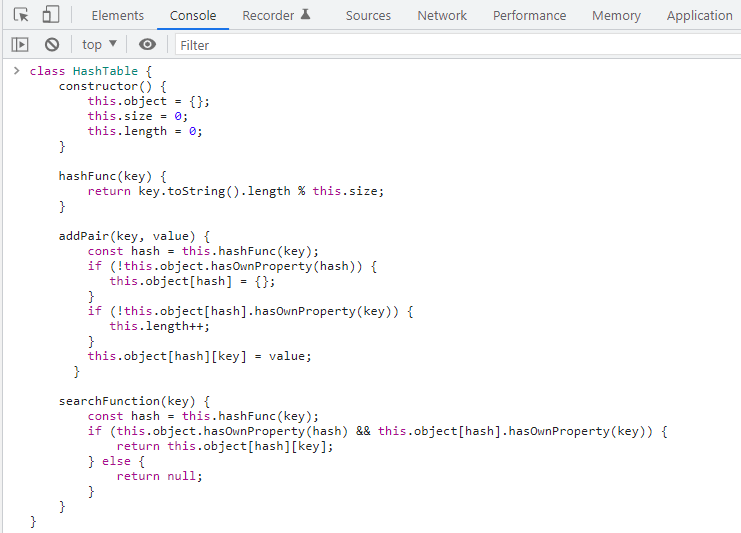 Add all of the above-given functions in your “HashTable” class and then create an instance to use the defined functions:
const hashtable = new HashTable();
Now, we will add the following three “key-value” pairs in our created “hashtable” object:
hashtable.addPair("Alex", "01");
hashtable.addPair("Stepheny", "23");
hashtable.addPair("Max", "90");
Lastly, we will utilize the “searchFunction()” to find the value of the “Stepheny” key:
console.log(hashtable.searchFunction("Stepheny"));
The given output signifies that we have successfully retrieved the value of the specified key from the hash table:
Add all of the above-given functions in your “HashTable” class and then create an instance to use the defined functions:
const hashtable = new HashTable();
Now, we will add the following three “key-value” pairs in our created “hashtable” object:
hashtable.addPair("Alex", "01");
hashtable.addPair("Stepheny", "23");
hashtable.addPair("Max", "90");
Lastly, we will utilize the “searchFunction()” to find the value of the “Stepheny” key:
console.log(hashtable.searchFunction("Stepheny"));
The given output signifies that we have successfully retrieved the value of the specified key from the hash table:
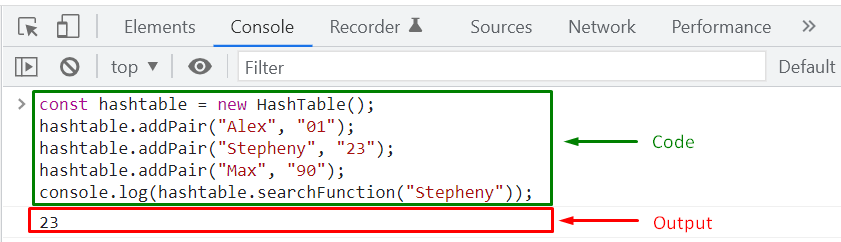 That was all of the essential information related to Hash Tables.
You can further research according to your requirements.
That was all of the essential information related to Hash Tables.
You can further research according to your requirements.
 Example 2
For a “negative” number, the “Maths.abs()” method performs the negation and return the absolute value:
console.log(Math.abs(-3));
The above-give “Maths.abs()” method will output the absolute value of “-3” as “3”:
Example 2
For a “negative” number, the “Maths.abs()” method performs the negation and return the absolute value:
console.log(Math.abs(-3));
The above-give “Maths.abs()” method will output the absolute value of “-3” as “3”:
 Example 3
For a numeric single element array, the “Math.abs()” method sets the absolute value of the added element as its return case:
console.log(Math.abs([-10]));
Output
Example 3
For a numeric single element array, the “Math.abs()” method sets the absolute value of the added element as its return case:
console.log(Math.abs([-10]));
Output
 Example 4
In case the accepted argument is a numeric string such as “-23”, then the JavaScript “Math.abs()” method will return the absolute value of the number present within the string:
console.log(Math.abs("-23"));
Execution of the given statement will display “23” as the absolute value of “-23”:
Example 4
In case the accepted argument is a numeric string such as “-23”, then the JavaScript “Math.abs()” method will return the absolute value of the number present within the string:
console.log(Math.abs("-23"));
Execution of the given statement will display “23” as the absolute value of “-23”:
 Example 5
In the following example, we will execute the JavaScript “Math.abs()” method for a non-numeric string which will result “NaN” (Not a Number):
console.log(Math.abs("linuxhint"));
Output
Example 5
In the following example, we will execute the JavaScript “Math.abs()” method for a non-numeric string which will result “NaN” (Not a Number):
console.log(Math.abs("linuxhint"));
Output
 Example 6
As the value “undefined” is also a non-numeric argument, so upon executing the “Math.abs()” method, the result will be shown as “NaN”:
console.log(Math.abs(undefined));
Output
Example 6
As the value “undefined” is also a non-numeric argument, so upon executing the “Math.abs()” method, the result will be shown as “NaN”:
console.log(Math.abs(undefined));
Output
 Example 7
The JavaScript “Maths.abs()” method only works for a non-numeric single element array.
That’s the reason if the specified array comprises more than one element, “Math.abs()” method will not process it and return “NaN”:
console.log(Math.abs([4, 5, 7]));
Output
Example 7
The JavaScript “Maths.abs()” method only works for a non-numeric single element array.
That’s the reason if the specified array comprises more than one element, “Math.abs()” method will not process it and return “NaN”:
console.log(Math.abs([4, 5, 7]));
Output
 Example 8
When an empty string “” is passed as an argument, the JavaScript “Math.abs()” method return “0” as the absolute value:
console.log(Math.abs(""));
Output
Example 8
When an empty string “” is passed as an argument, the JavaScript “Math.abs()” method return “0” as the absolute value:
console.log(Math.abs(""));
Output
 Example 9
Also, for “null” objects, the return case of the “Math.abs()” method is set to “0”:
console.log(Math.abs(null));
Output
Example 9
Also, for “null” objects, the return case of the “Math.abs()” method is set to “0”:
console.log(Math.abs(null));
Output
 Example 10
Similarly, if an empty array “[]” is specified as an argument for the “Maths.abs()” method, then it will return “0”:
console.log(Math.abs([]));
Output
Example 10
Similarly, if an empty array “[]” is specified as an argument for the “Maths.abs()” method, then it will return “0”:
console.log(Math.abs([]));
Output
 That was essential information about the JavaScript Math.abs() method.
You can further research according to your preferences.
That was essential information about the JavaScript Math.abs() method.
You can further research according to your preferences.
 Then, we will use the “JSON.stringify()” method for converting the “employee” object to “string”:
const string = JSON.stringify(employee);
console.log(string);
After conversion, we will again check the type by utilizing the “typeof” operator:
console.log("Type after conversion: " +typeof(string));
As you can see from the output, we have successfully converted the “employee” object to “string”:
Then, we will use the “JSON.stringify()” method for converting the “employee” object to “string”:
const string = JSON.stringify(employee);
console.log(string);
After conversion, we will again check the type by utilizing the “typeof” operator:
console.log("Type after conversion: " +typeof(string));
As you can see from the output, we have successfully converted the “employee” object to “string”:
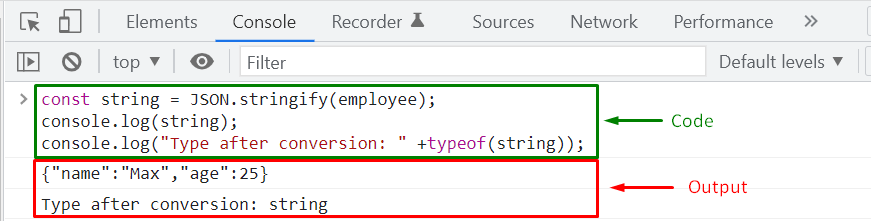
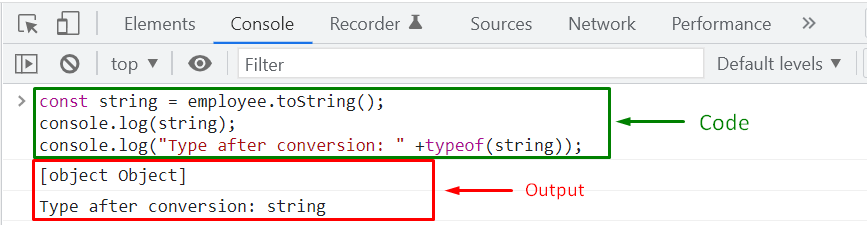 However, you can override the “toString()” method to return the values of the object properties in a string format.
In the below-given program, the “Employee” object will override the “toString()” method which is inherited from the “Object” base class.
This user-defined “toString()” method will return a string containing the values of the “name” and “age” properties of the created “employee” object:
function Employee(name, age) {this.name= name;this.age = age;}
Employee.prototype.toString = function () {return 'Employee Name: '+this.name + ' Age: '+ this.age;}
employee = new Employee('Max', 35);var string = employee.toString();
console.log(string);
console.log("Type after conversion: " +typeof(string));
Now, when the “toString()” method is invoked, it will display the values of the “employee” object properties as string:
However, you can override the “toString()” method to return the values of the object properties in a string format.
In the below-given program, the “Employee” object will override the “toString()” method which is inherited from the “Object” base class.
This user-defined “toString()” method will return a string containing the values of the “name” and “age” properties of the created “employee” object:
function Employee(name, age) {this.name= name;this.age = age;}
Employee.prototype.toString = function () {return 'Employee Name: '+this.name + ' Age: '+ this.age;}
employee = new Employee('Max', 35);var string = employee.toString();
console.log(string);
console.log("Type after conversion: " +typeof(string));
Now, when the “toString()” method is invoked, it will display the values of the “employee” object properties as string:
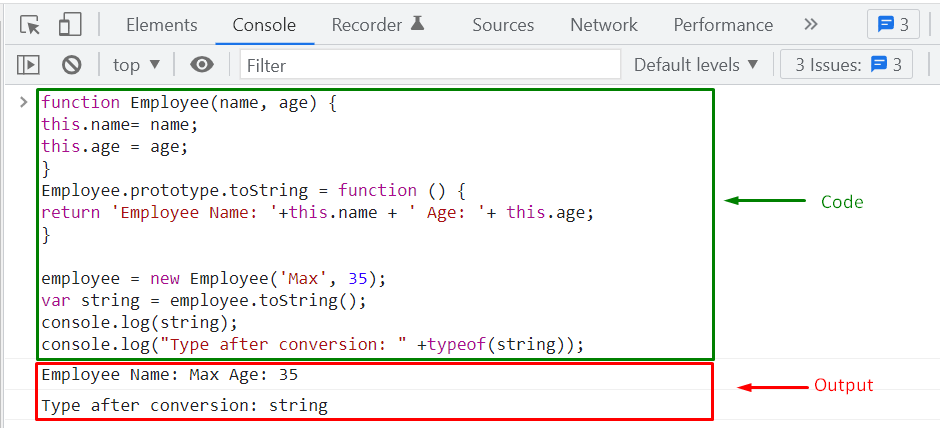
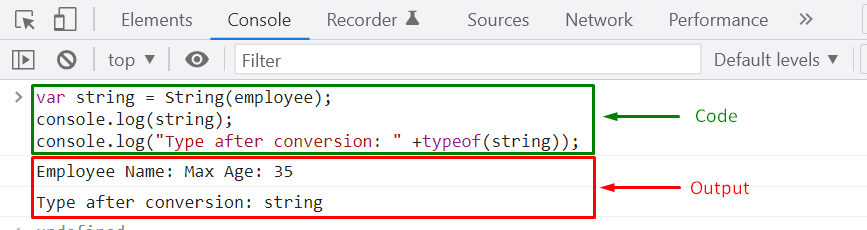 Similar to “toString()” method, we have to override the “String()” function to return the values of the “employee” object properties as a “string”:
function Employee(name, age) {this.name= name;this.age = age;}
Employee.prototype.String = function () {return 'Employee Name: '+this.name + ' Age: '+ this.age;}
employee = new Employee('Max', 35);var string = employee.String();
console.log(string);
console.log("Type after conversion: " +typeof(string));
The below-given output signifies that now the converted string comprises the values of the “employee” object properties:
Similar to “toString()” method, we have to override the “String()” function to return the values of the “employee” object properties as a “string”:
function Employee(name, age) {this.name= name;this.age = age;}
Employee.prototype.String = function () {return 'Employee Name: '+this.name + ' Age: '+ this.age;}
employee = new Employee('Max', 35);var string = employee.String();
console.log(string);
console.log("Type after conversion: " +typeof(string));
The below-given output signifies that now the converted string comprises the values of the “employee” object properties:
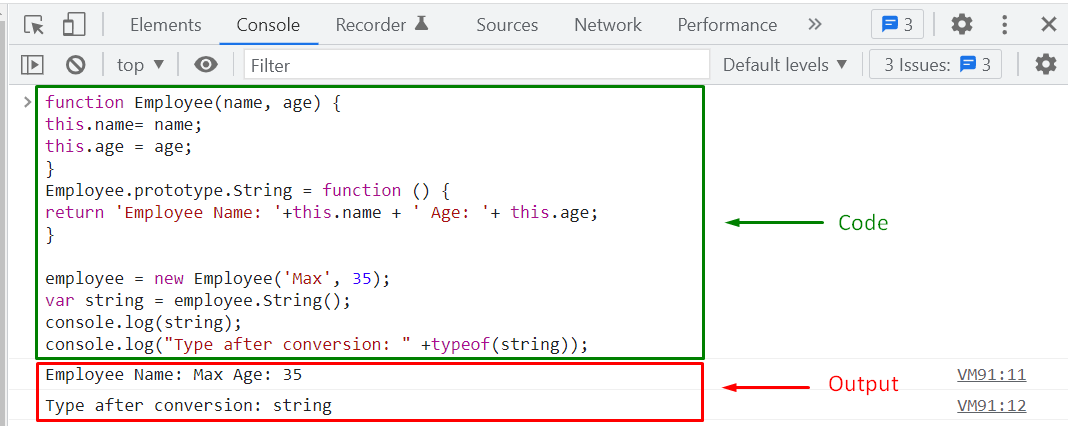 We have compiled different methods for converting an object to string.
You can use any of them according to your requirements.
We have compiled different methods for converting an object to string.
You can use any of them according to your requirements.

 Now, we will modify the “displayMessage()” method and instead of invoking the inner “show()” function, we will add a statement to return the “show()” function object:
function displayMessage() {
let info= 'Hello! My name is Alex.';
function show() {
console.log(info);
}
return show;}
Also, we have assigned the value returned by the “displayMessage()” function to “x” variable:
let x = displayMessage();
Lastly, we will invoke “x()” function that refers to the “show()” function:
console.log(x());
You can see from the given output, the value of the local variable “info” still exists which generally remains in the memory till the execution of the function where it is declared:
Now, we will modify the “displayMessage()” method and instead of invoking the inner “show()” function, we will add a statement to return the “show()” function object:
function displayMessage() {
let info= 'Hello! My name is Alex.';
function show() {
console.log(info);
}
return show;}
Also, we have assigned the value returned by the “displayMessage()” function to “x” variable:
let x = displayMessage();
Lastly, we will invoke “x()” function that refers to the “show()” function:
console.log(x());
You can see from the given output, the value of the local variable “info” still exists which generally remains in the memory till the execution of the function where it is declared:
 Seems confused? This is the magic of Closure which you have seen in the last example as “show()” is a closure function that maintains the outer scope in its own scope.
 Example 2
Now, we will declare “info” as a “global” variable which is referred in the “show()” function (having different scope):
let info= 'Hello! My name is Alex.';function show() {return info;}
show();
As the JavaScript function “show()” function is a “Closure”, it will maintain the scope and state of the “info” variable:
Example 2
Now, we will declare “info” as a “global” variable which is referred in the “show()” function (having different scope):
let info= 'Hello! My name is Alex.';function show() {return info;}
show();
As the JavaScript function “show()” function is a “Closure”, it will maintain the scope and state of the “info” variable:
 Example 3
In another situation, when variables are defined in the scope of the “parent” function, the “child” function can still access their value:
var displayMessage= function () {
let info= 'Hello! My name is Alex.';
var show= function () {
console.log(info);}}
show();
The output of the given program signifies that “show()” which is a child function, can access the “info” variable declared in the “displayMessage()” parent function:
Example 3
In another situation, when variables are defined in the scope of the “parent” function, the “child” function can still access their value:
var displayMessage= function () {
let info= 'Hello! My name is Alex.';
var show= function () {
console.log(info);}}
show();
The output of the given program signifies that “show()” which is a child function, can access the “info” variable declared in the “displayMessage()” parent function:
 That was all essential information related to JavaScript Closures.
You can further research according to your requirements.
That was all essential information related to JavaScript Closures.
You can further research according to your requirements.
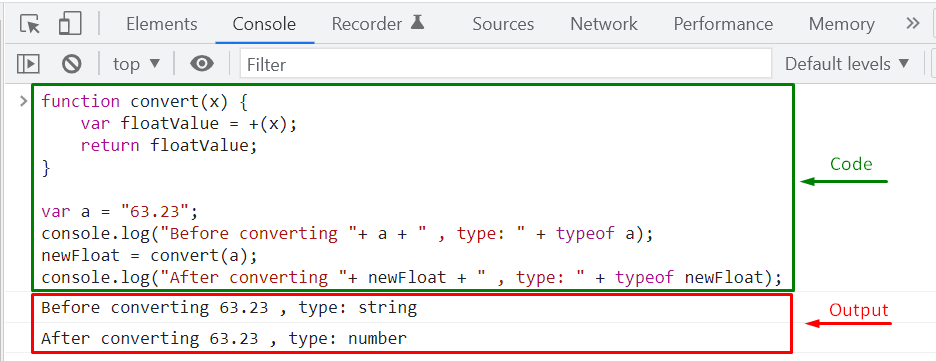 Now, let’s check out the other method for converting string to float.
 Example 2
If the specified string contains trailing and leading spaces, then the “parseFloat()” method will ignore them and return the floating-point number:
var a = parseFloat(" 220 ");
console.log("After conversion: "+ a);
console.log("Type: " + typeof a);
Execution of the above-given code will convert the string ” 220 ” into float “220”:
Example 2
If the specified string contains trailing and leading spaces, then the “parseFloat()” method will ignore them and return the floating-point number:
var a = parseFloat(" 220 ");
console.log("After conversion: "+ a);
console.log("Type: " + typeof a);
Execution of the above-given code will convert the string ” 220 ” into float “220”:
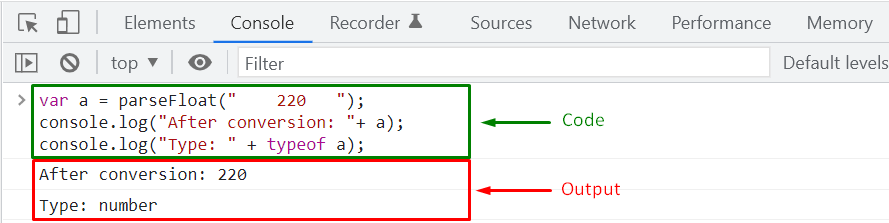 Example 3
In case, if the string comprises different types of values, then the JavaScript “parseFloat()” method will return the floating point number until it reaches any non-numeric character:
var a = parseFloat("2022@linuxhint.com");
console.log("After conversion: "+ a);
console.log("Type: " + typeof a);
Here, the “parseFloat()” method will convert the string “2022@linuxhint.com” to “2022” floating point number:
Example 3
In case, if the string comprises different types of values, then the JavaScript “parseFloat()” method will return the floating point number until it reaches any non-numeric character:
var a = parseFloat("2022@linuxhint.com");
console.log("After conversion: "+ a);
console.log("Type: " + typeof a);
Here, the “parseFloat()” method will convert the string “2022@linuxhint.com” to “2022” floating point number:
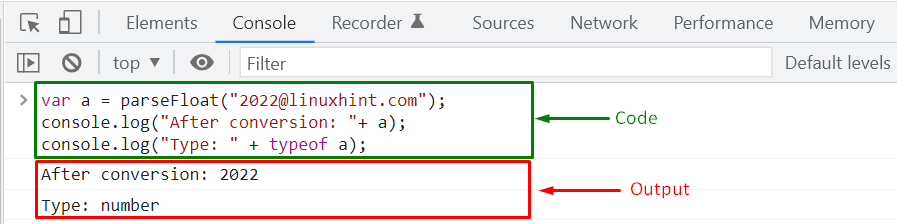 Example 4
For non-numeric characters, the “parseFloat()” number will return “NaN” (Not a Number):
var a = parseFloat("linuxhint.com2022@");
console.log("After conversion: "+ a);
Execution of the given “parseFloat()” method will return “NaN” for the passed string “linuxhint.com2022@” as it starts with a non-numeric character:
Example 4
For non-numeric characters, the “parseFloat()” number will return “NaN” (Not a Number):
var a = parseFloat("linuxhint.com2022@");
console.log("After conversion: "+ a);
Execution of the given “parseFloat()” method will return “NaN” for the passed string “linuxhint.com2022@” as it starts with a non-numeric character:
 Example 5
In a scenario where the passed “string” argument comprises spaces in between numbers, then the JavaScript “parseFloat()” method will only return the first encountered number.
For instance, in the following example, we will pass the “20 45 23456” string as an argument to the “parseFloat()” method, and it sets the first number “20” as its return case:
var a = parseFloat("20 45 23456");
console.log("After conversion: "+ a);
console.log("Type: " + typeof a);
Output
Example 5
In a scenario where the passed “string” argument comprises spaces in between numbers, then the JavaScript “parseFloat()” method will only return the first encountered number.
For instance, in the following example, we will pass the “20 45 23456” string as an argument to the “parseFloat()” method, and it sets the first number “20” as its return case:
var a = parseFloat("20 45 23456");
console.log("After conversion: "+ a);
console.log("Type: " + typeof a);
Output
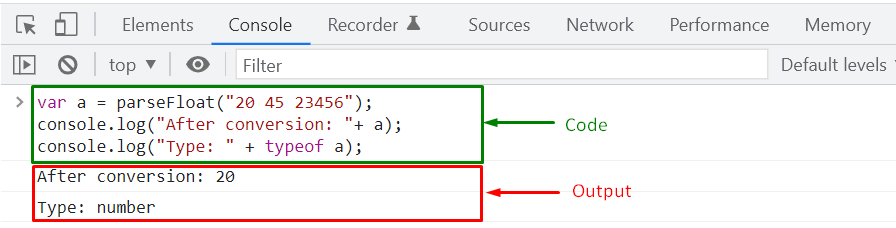 That was all the essential information related to converting a string to float.
You can further research according to your preferences.
That was all the essential information related to converting a string to float.
You can further research according to your preferences.
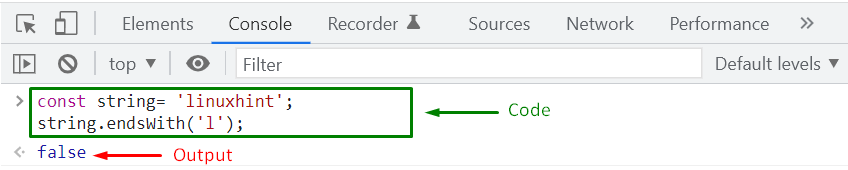 Example: Searching multiple characters
Similarly, using the String “endsWith()” method, you can validate if a string comprises a “substring” or the passed “multiple characters” at its end or not.
For instance, the following “endsWith()” method will check if the “string” value contains “hint” as its ending characters:
string.endsWith('hint');
In this case, the “string.endsWith()” method will return “true” because the ending characters of the “linuxhint” matched with the added argument value:
Example: Searching multiple characters
Similarly, using the String “endsWith()” method, you can validate if a string comprises a “substring” or the passed “multiple characters” at its end or not.
For instance, the following “endsWith()” method will check if the “string” value contains “hint” as its ending characters:
string.endsWith('hint');
In this case, the “string.endsWith()” method will return “true” because the ending characters of the “linuxhint” matched with the added argument value:
 Example: Searching characters with length
The JavaScript String “endsWith()” method also permits you to search characters within a specific “length”.
For this purpose, you have to pass two arguments to the “endsWith()” method.
The first argument refers to the substring that needs to be matched, and the second argument indicates the number of characters or the length within which the search operation will be performed.
Before executing the “endsWith()” method, we will check out the length of the “linuxhint” property by utilizing the String “length” property:
console.log('linuxhint'.length);
The given output signifies that the string “linuxhint” has “9” characters:
Example: Searching characters with length
The JavaScript String “endsWith()” method also permits you to search characters within a specific “length”.
For this purpose, you have to pass two arguments to the “endsWith()” method.
The first argument refers to the substring that needs to be matched, and the second argument indicates the number of characters or the length within which the search operation will be performed.
Before executing the “endsWith()” method, we will check out the length of the “linuxhint” property by utilizing the String “length” property:
console.log('linuxhint'.length);
The given output signifies that the string “linuxhint” has “9” characters:
 In the next step, we will create another “string” and initialize it with the value “linuxhint website”:
const string= 'linuxhint website';
Then, we will invoke the “endsWith()” method for the created “string” while passing “nt” as “substring” and “9” as “length”:
string.endsWith('nt', 9);
When the given “string.endsWith()” method executes, it will grab the first “9” characters of the string “linuxhint website” and then search “nt” substring in its ending characters.
This operation will return the “true” value as the “linuxhint” string ends with “nt”:
In the next step, we will create another “string” and initialize it with the value “linuxhint website”:
const string= 'linuxhint website';
Then, we will invoke the “endsWith()” method for the created “string” while passing “nt” as “substring” and “9” as “length”:
string.endsWith('nt', 9);
When the given “string.endsWith()” method executes, it will grab the first “9” characters of the string “linuxhint website” and then search “nt” substring in its ending characters.
This operation will return the “true” value as the “linuxhint” string ends with “nt”:
 Example: Case-Sensitive Searching
Another important point to remember is that the JavaScript String “endsWith()” method is “case-sensitive“.
So, you have to take care of the searched “substring” characters case.
For instance, the below-given “endsWith()” will perform case-sensitive searching in the “string” value:
string.endsWith('website');
As the ending characters of the “string” value and the searched substring “website” are in the same case, the “string.endsWith()” method will return “true” value:
Example: Case-Sensitive Searching
Another important point to remember is that the JavaScript String “endsWith()” method is “case-sensitive“.
So, you have to take care of the searched “substring” characters case.
For instance, the below-given “endsWith()” will perform case-sensitive searching in the “string” value:
string.endsWith('website');
As the ending characters of the “string” value and the searched substring “website” are in the same case, the “string.endsWith()” method will return “true” value:
 While for the same substring having upper-case characters “WEBSITE”, the “string.endsWith()” will set its return case as “false”:
string.endsWith('WEBSITE');
Output
While for the same substring having upper-case characters “WEBSITE”, the “string.endsWith()” will set its return case as “false”:
string.endsWith('WEBSITE');
Output
 That was essential information related to the JavaScript String endsWith() method.
You can further research it according to your preferences.
That was essential information related to the JavaScript String endsWith() method.
You can further research it according to your preferences.
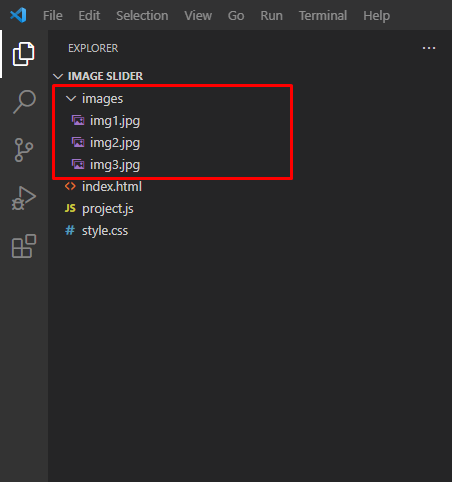
 That was all about creating a basic Image Slider using JavaScript.
You can further research to add some variation in the image slider.
That was all about creating a basic Image Slider using JavaScript.
You can further research to add some variation in the image slider.
 Example 2
For a negative decimal number, the return case of the JavaScript “isNaN()” function is set to “false”.
For instance, we have added “-6.78” as an argument for the “inNaN()” function:
console.log(isNaN(-6.78))
The execution of the above-given code will print out “false” on the console window:
Example 2
For a negative decimal number, the return case of the JavaScript “isNaN()” function is set to “false”.
For instance, we have added “-6.78” as an argument for the “inNaN()” function:
console.log(isNaN(-6.78))
The execution of the above-given code will print out “false” on the console window:
 Example 3
The “undefined” value does not comprise any data that can be converted into a number, so passing it in the JavaScript “isNaN()” Function will result in a “true” value:
console.log(isNaN(undefined))
Output
Example 3
The “undefined” value does not comprise any data that can be converted into a number, so passing it in the JavaScript “isNaN()” Function will result in a “true” value:
console.log(isNaN(undefined))
Output
 Example 4
In the below-given example, we have specified the string “NaN” as an argument in the “isNaN()” function:
console.log(isNaN('NaN'))
The “NaN” string cannot be converted into a number because there is a non-numeric value within the quotes, that’s why the JavaScript “isNaN()” function will return “true”:
Example 4
In the below-given example, we have specified the string “NaN” as an argument in the “isNaN()” function:
console.log(isNaN('NaN'))
The “NaN” string cannot be converted into a number because there is a non-numeric value within the quotes, that’s why the JavaScript “isNaN()” function will return “true”:
 Example 5
We will pass the string “789” to the “isNaN()” function:
console.log(isNaN('789'))
Here, the “789” string will be converted into a number that is valid, then the JavaScript “isNaN()” function will return “false” after marking it as a numeric type:
Example 5
We will pass the string “789” to the “isNaN()” function:
console.log(isNaN('789'))
Here, the “789” string will be converted into a number that is valid, then the JavaScript “isNaN()” function will return “false” after marking it as a numeric type:
 Example 6
The added “linuxhint” string in the following “isNaN()” function cannot be converted into a number because it has non-numeric value; as a result of it, the execution of the “isNaN()” function will set its return case as “true”:
console.log(isNaN('linuxhint'))
Output
Example 6
The added “linuxhint” string in the following “isNaN()” function cannot be converted into a number because it has non-numeric value; as a result of it, the execution of the “isNaN()” function will set its return case as “true”:
console.log(isNaN('linuxhint'))
Output
 Example 7
In this example, today’s date “2022/03/23” is specified as an argument of the “isNaN()” function:
console.log(isNaN('2022/03/23'))
Hence the added value is the string representation of the data which cannot be converted into a number, so the JavaScript “isNaN()” will output “true”:
Example 7
In this example, today’s date “2022/03/23” is specified as an argument of the “isNaN()” function:
console.log(isNaN('2022/03/23'))
Hence the added value is the string representation of the data which cannot be converted into a number, so the JavaScript “isNaN()” will output “true”:
 JavaScript beginners often think that the “isNaN()” function and the “Number.isNaN()” method works in the same way, but that’s not the case.
There exists a significant difference between both of them.
Have a look at the following section to clear the confusion about the working of the “isNaN()” function and the “Number.isNaN()” method.
JavaScript beginners often think that the “isNaN()” function and the “Number.isNaN()” method works in the same way, but that’s not the case.
There exists a significant difference between both of them.
Have a look at the following section to clear the confusion about the working of the “isNaN()” function and the “Number.isNaN()” method.
 However, the “Number.isNaN()” method will only output “true” of the argument is of “Number” type and its value “NaN”:
Both of the specified conditions does not imply in the below-given statements, so the execution of the “Number.isNaN()” method will return “false”:
console.log(Number.isNaN('linuxhint'));
console.log(Number.isNaN('2022/3/23'));
Output
However, the “Number.isNaN()” method will only output “true” of the argument is of “Number” type and its value “NaN”:
Both of the specified conditions does not imply in the below-given statements, so the execution of the “Number.isNaN()” method will return “false”:
console.log(Number.isNaN('linuxhint'));
console.log(Number.isNaN('2022/3/23'));
Output
 That was all essential information related to the JavaScript isNaN() function.
You can further research it according to your preferences.
That was all essential information related to the JavaScript isNaN() function.
You can further research it according to your preferences.
 Whereas the “Math.sign()” method returns a “number” value that represents a “number” value that can be used to perform further mathematical calculations:
Math.sign(number);
Whereas the “Math.sign()” method returns a “number” value that represents a “number” value that can be used to perform further mathematical calculations:
Math.sign(number);
 So, it is preferred to use the “Math.sign()” method over the Comparison operators when it is required to check the sign of a number, and you have to utilize the resultant value in some other operation.
Now, let’s check out some examples related to the Math.sign() method implementation.
Example 1
In a JavaScript program, when a positive number is passed as an argument to the “Math.sign()” method, it will return the value “1”:
For instance, we have passed “4” to the “Math.sign()” method:
console.log(Math.sign(4));
The execution of the above-given “Math.sign()” method will return “1,” which indicates that “4” is a positive number:
So, it is preferred to use the “Math.sign()” method over the Comparison operators when it is required to check the sign of a number, and you have to utilize the resultant value in some other operation.
Now, let’s check out some examples related to the Math.sign() method implementation.
Example 1
In a JavaScript program, when a positive number is passed as an argument to the “Math.sign()” method, it will return the value “1”:
For instance, we have passed “4” to the “Math.sign()” method:
console.log(Math.sign(4));
The execution of the above-given “Math.sign()” method will return “1,” which indicates that “4” is a positive number:
 Example 2
Another case is when the JavaScript “Math.sign()” method accepts a negative number such as “-4”, it will output the value “-1”:
console.log(Math.sign(-4));
The returned value signifies that the passed number is “negative”:
Example 2
Another case is when the JavaScript “Math.sign()” method accepts a negative number such as “-4”, it will output the value “-1”:
console.log(Math.sign(-4));
The returned value signifies that the passed number is “negative”:
 Example 3
If you have passed a “non-numeric” value to the “Math.sign()” method, then it will return “NaN” (Not a Number):
console.log(Math.sign('linuxhint'));
As in the above statement, a “linuxhint” string is passed, so the resultant case of the “Math.sign()” method will be set to “NaN”:
Example 3
If you have passed a “non-numeric” value to the “Math.sign()” method, then it will return “NaN” (Not a Number):
console.log(Math.sign('linuxhint'));
As in the above statement, a “linuxhint” string is passed, so the resultant case of the “Math.sign()” method will be set to “NaN”:
 Example 4
Passing positive zero as an argument to the “Math.sign()” method will print out “0” value:
console.log(Math.sign(0));
Output
Example 4
Passing positive zero as an argument to the “Math.sign()” method will print out “0” value:
console.log(Math.sign(0));
Output
 Example 5
While for a negative zero argument, the return case of the JavaScript “Math.sign()” method is set to “-0”:
console.log(Math.sign(-0));
Output
Example 5
While for a negative zero argument, the return case of the JavaScript “Math.sign()” method is set to “-0”:
console.log(Math.sign(-0));
Output
 After checking the above-given output, have you thought about why we need a negative zero?
JavaScript developers employ the “magnitude” of a value to point towards any information, such as the sign of a number representing the direction of the movement.
In such applications, if the variable loses its sign, all of its information will be lost automatically.
That’s why preserving the sign of zero (-0) with the “Math.sign()” method prevents us from information loss.
That was all the essential information related to the JavaScript Math.sign() method.
You can further research it according to your requirements.
After checking the above-given output, have you thought about why we need a negative zero?
JavaScript developers employ the “magnitude” of a value to point towards any information, such as the sign of a number representing the direction of the movement.
In such applications, if the variable loses its sign, all of its information will be lost automatically.
That’s why preserving the sign of zero (-0) with the “Math.sign()” method prevents us from information loss.
That was all the essential information related to the JavaScript Math.sign() method.
You can further research it according to your requirements.
 Example 2
In the next example, we will try to fill the original “array” elements with “Autumn” at index “0” and “1”:
array.fill("Autumn", 0, 2);
Note that the ending index “2” will not include in this operation:
Example 2
In the next example, we will try to fill the original “array” elements with “Autumn” at index “0” and “1”:
array.fill("Autumn", 0, 2);
Note that the ending index “2” will not include in this operation:
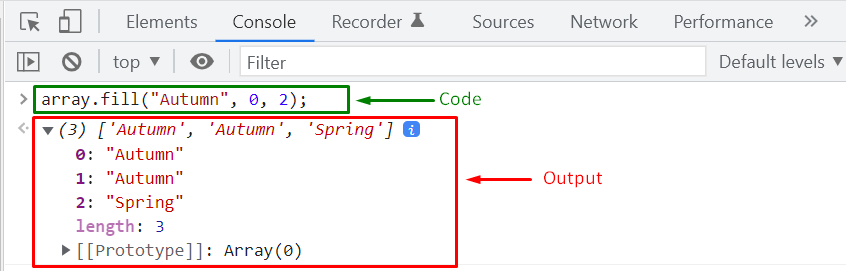
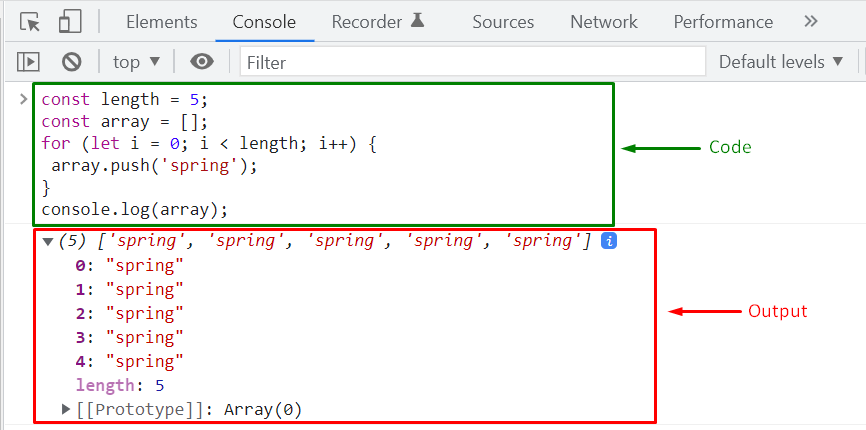

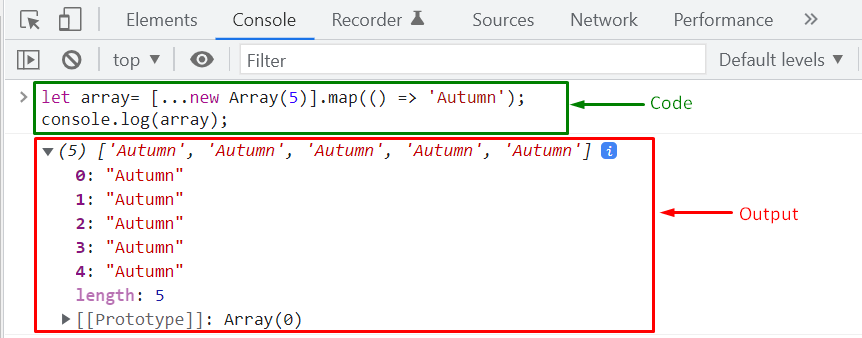 We have compiled different methods for filling an array with values.
Choose any of them according to your requirements.
We have compiled different methods for filling an array with values.
Choose any of them according to your requirements.

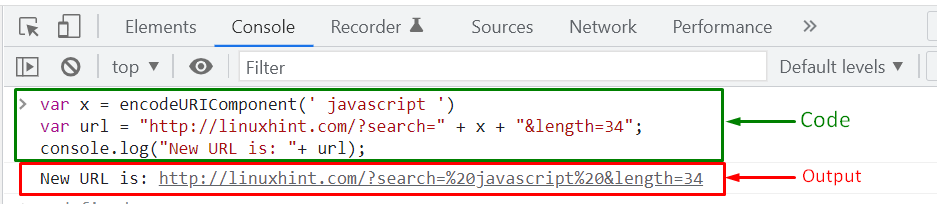


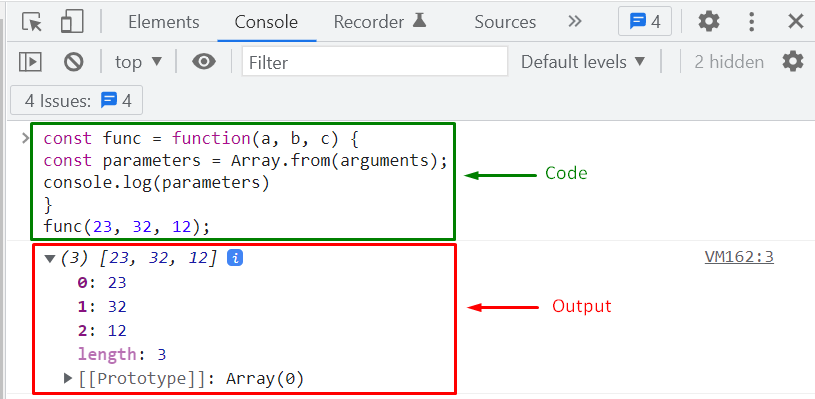
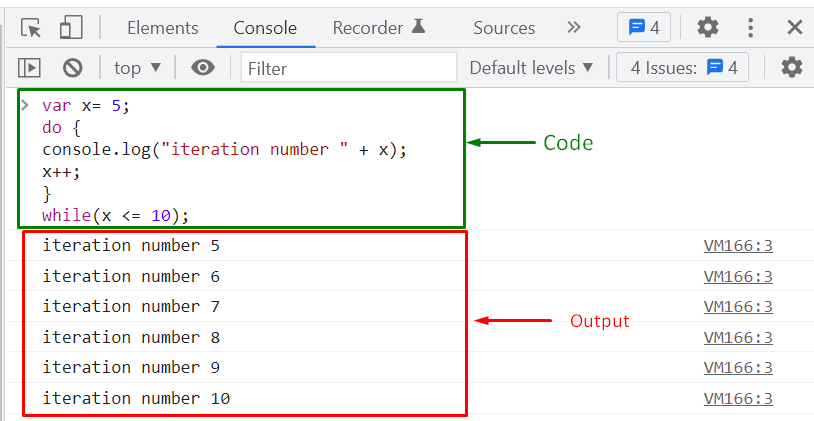


 We have compiled the information related to JavaScript keywords.
You can further explore them according to your requirements.
We have compiled the information related to JavaScript keywords.
You can further explore them according to your requirements.
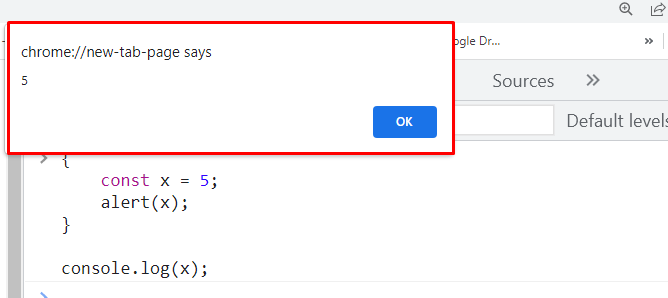 When the execution control come out of the added code block, the “console.log()” method will try to access the constant “x,” which result in the following “ReferenceError”:
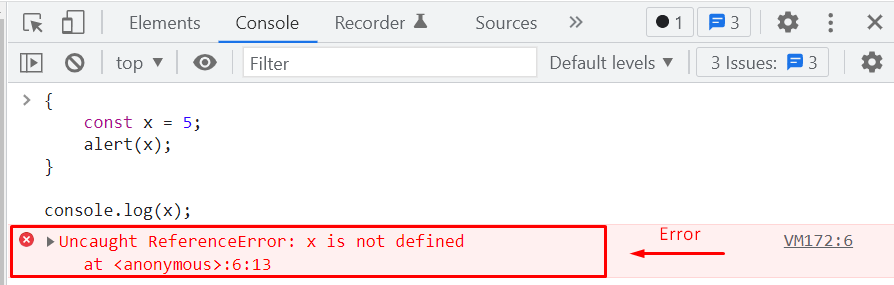
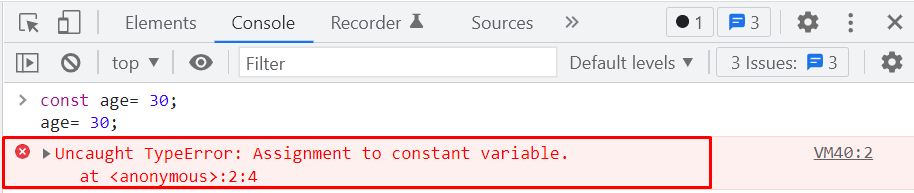
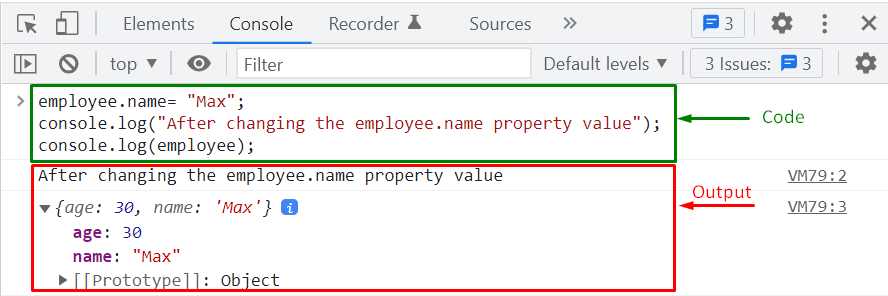 The execution of the above-given example proved that although an object becomes “immutable” with the help of the “const” keyword, it still permits you to reassign property values.
You can “freeze” an object when it is required to restrict the JavaScript constant object from updating the existing properties or adding new properties.
The execution of the above-given example proved that although an object becomes “immutable” with the help of the “const” keyword, it still permits you to reassign property values.
You can “freeze” an object when it is required to restrict the JavaScript constant object from updating the existing properties or adding new properties.
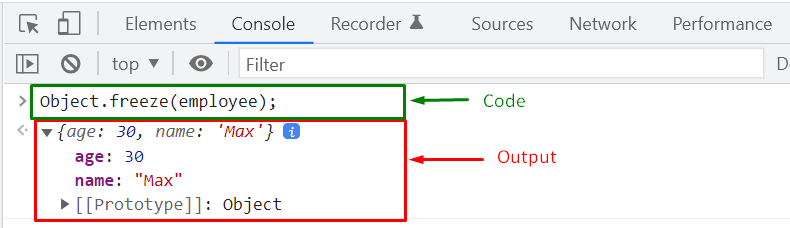 In the next step, we will verify if the “employee” object is freezed or not.
For this purpose, JavaScript offers “Object.isFrozen()” built-in method that accepts a JavaScript constant “object” as an argument and returns “true” if the passed object is freezed, otherwise the return case of “Object.isFrozen()” method will be set to “false”:
Object.isFrozen(employee);
In the next step, we will verify if the “employee” object is freezed or not.
For this purpose, JavaScript offers “Object.isFrozen()” built-in method that accepts a JavaScript constant “object” as an argument and returns “true” if the passed object is freezed, otherwise the return case of “Object.isFrozen()” method will be set to “false”:
Object.isFrozen(employee);
 The value returned by the “Object.isFrozen()” method is “true,” which indicates that the “employee” object is successfully freezed.
We will now try to update the “employee.name” property value to “Paul”:
employee.name= "Paul";
console.log(employee);
If you are in “non-strict” mode, then the specified operation of updating value will fail silently, and the freezed “employee” object will not modify the original values:
The value returned by the “Object.isFrozen()” method is “true,” which indicates that the “employee” object is successfully freezed.
We will now try to update the “employee.name” property value to “Paul”:
employee.name= "Paul";
console.log(employee);
If you are in “non-strict” mode, then the specified operation of updating value will fail silently, and the freezed “employee” object will not modify the original values:
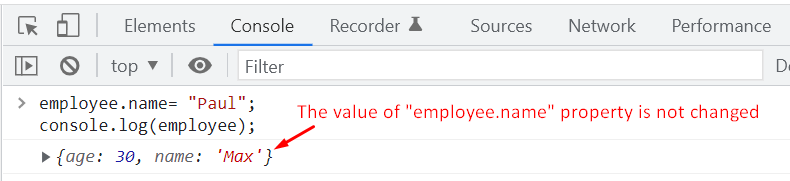
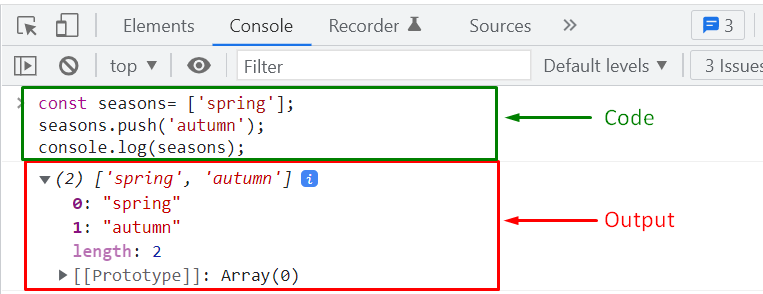 However, we cannot reassign the “seasons” array.
Upon doing so, you will encounter a “TypeError”:
seasons = [];
However, we cannot reassign the “seasons” array.
Upon doing so, you will encounter a “TypeError”:
seasons = [];
 That was all essential information related to JavaScript Constants.
You can further work on it according to your preferences.
That was all essential information related to JavaScript Constants.
You can further work on it according to your preferences.
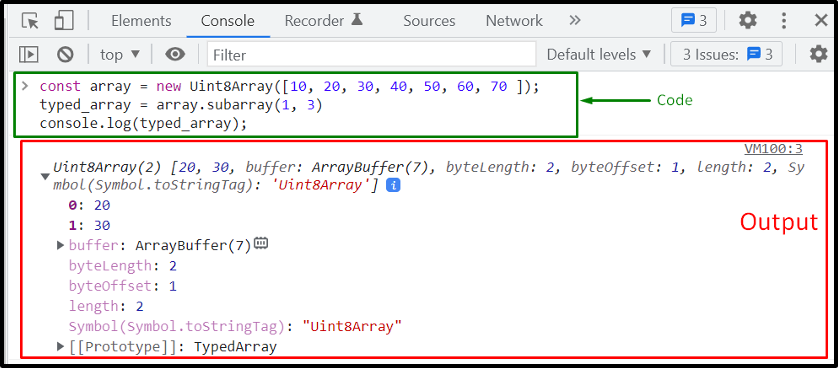 Example 2: Using JavaScript TypedArray subarray() MethodIf only the starting index is added, then the “TypedArray subarray()” method will select the element from that index to the end of the array.
For instance, we have specified “1” as the starting index, so the new “subarray()” method will add the “array” elements to “typed_array” from the first index till the last index which is “6”:
typed_array = array.subarray(1)
console.log(typed_array);
Output
Example 2: Using JavaScript TypedArray subarray() MethodIf only the starting index is added, then the “TypedArray subarray()” method will select the element from that index to the end of the array.
For instance, we have specified “1” as the starting index, so the new “subarray()” method will add the “array” elements to “typed_array” from the first index till the last index which is “6”:
typed_array = array.subarray(1)
console.log(typed_array);
Output
 Example 3: Using JavaScript TypedArray subarray() MethodThe below-given “typed_array” will comprise first five elements of the “array” from first index to the six index, while excluding the sixth index element:
typed_array = array.subarray(0, 6)
console.log(typed_array);
Output
Example 3: Using JavaScript TypedArray subarray() MethodThe below-given “typed_array” will comprise first five elements of the “array” from first index to the six index, while excluding the sixth index element:
typed_array = array.subarray(0, 6)
console.log(typed_array);
Output
 Example 4: Using JavaScript TypedArray subarray() MethodWhen “0” is specified as the starting index, then the “subarray()” method will add all of the elements of “array” to the newly created “typed_array”:
typed_array = array.subarray(0)
console.log(typed_array);
Output
Example 4: Using JavaScript TypedArray subarray() MethodWhen “0” is specified as the starting index, then the “subarray()” method will add all of the elements of “array” to the newly created “typed_array”:
typed_array = array.subarray(0)
console.log(typed_array);
Output
 Example 5: Using JavaScript TypedArray subarray() MethodThere exists another situation where the passed index is negative.
In such a scenario, the elements of the JavaScript TypedArray are accessed from the end.
For instance, in the following example, “-1” is passed to the “subarray()” method.
Its execution will select the last element of “array” and add it into the “typed_array”:
typed_array = array.subarray(-1)
console.log(typed_array);
As you can see, the last element of the “array” is “70,” which is now successfully added to the “typed_array”:
Example 5: Using JavaScript TypedArray subarray() MethodThere exists another situation where the passed index is negative.
In such a scenario, the elements of the JavaScript TypedArray are accessed from the end.
For instance, in the following example, “-1” is passed to the “subarray()” method.
Its execution will select the last element of “array” and add it into the “typed_array”:
typed_array = array.subarray(-1)
console.log(typed_array);
As you can see, the last element of the “array” is “70,” which is now successfully added to the “typed_array”:
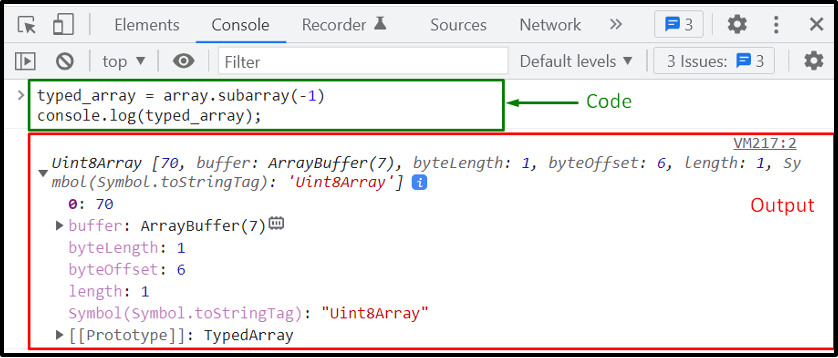 Example 6: Using JavaScript TypedArray subarray() Method
Adding “-2” as the index argument will select the last two elements of the “array” and then add it to the “typed_array”:
typed_array = array.subarray(-2)
console.log(typed_array);
“60” and “70” are the last two “array” elements which are now part of the “typed_array”:
Example 6: Using JavaScript TypedArray subarray() Method
Adding “-2” as the index argument will select the last two elements of the “array” and then add it to the “typed_array”:
typed_array = array.subarray(-2)
console.log(typed_array);
“60” and “70” are the last two “array” elements which are now part of the “typed_array”:
 That was all about the JavaScript TypedArray subarray() method.
You can further explore it based on your requirements.
That was all about the JavaScript TypedArray subarray() method.
You can further explore it based on your requirements.
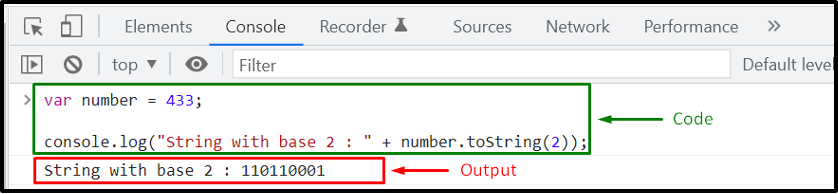 Similarly, you can convert any number to its “octal” representation by passing “8” as the base argument:
console.log("String with base 8 : " + number.toString(8));
The given output signifies that the number “433” is represented as “661” in the octal number system:
Similarly, you can convert any number to its “octal” representation by passing “8” as the base argument:
console.log("String with base 8 : " + number.toString(8));
The given output signifies that the number “433” is represented as “661” in the octal number system:
 The “to.String()” method also permits the conversion of a number to its “hexadecimal” representation.
For this purpose, specify “16” as the base argument:
console.log("String with base 16: " + number.toString(16));
As you can see, in the hexadecimal number system, the number “433” equals to “1b1”:
The “to.String()” method also permits the conversion of a number to its “hexadecimal” representation.
For this purpose, specify “16” as the base argument:
console.log("String with base 16: " + number.toString(16));
As you can see, in the hexadecimal number system, the number “433” equals to “1b1”:
 If the “toString()” method is invoked without passing any argument, then the “number” will be converted to “string” without changing the current base:
console.log("String: " + number.toString());
Output
If the “toString()” method is invoked without passing any argument, then the “number” will be converted to “string” without changing the current base:
console.log("String: " + number.toString());
Output

 In the same way, the “toString()” method can be invoked for converting an array of strings to a single string which will comprise all of the values enclosed in the quotes ‘ ‘:
const stringArray= ['x', 'y', 'z'];
stringArray.toString();
Output
In the same way, the “toString()” method can be invoked for converting an array of strings to a single string which will comprise all of the values enclosed in the quotes ‘ ‘:
const stringArray= ['x', 'y', 'z'];
stringArray.toString();
Output
 When “toString()” is used with an “array” that contains another array inside of it, then the “toString()” method first “flatten” it and then returns all values in a string format, separated by a comma.
For instance, the below given “array” has two elements: “Paul” and “32” and a nested array which further comprises two elements.
Now, when the “toString()” method is called as “array.toString()”, it will reduce arrays’ dimensionality and return all of the four elements in a single string:
const array =[ 'Paul', 32, [ 'Max', 4 ] ];
array.toString();
Output
When “toString()” is used with an “array” that contains another array inside of it, then the “toString()” method first “flatten” it and then returns all values in a string format, separated by a comma.
For instance, the below given “array” has two elements: “Paul” and “32” and a nested array which further comprises two elements.
Now, when the “toString()” method is called as “array.toString()”, it will reduce arrays’ dimensionality and return all of the four elements in a single string:
const array =[ 'Paul', 32, [ 'Max', 4 ] ];
array.toString();
Output
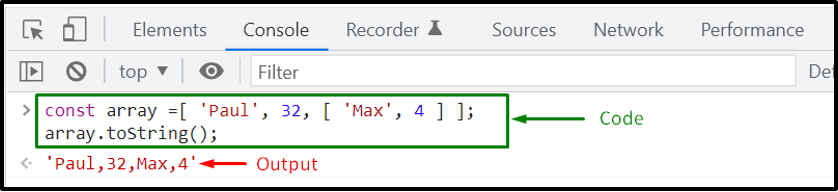
 However, you can override the “toString()” method to return the values of the object keys in a string format.
In the below-given program, the “Employee” object will override the “toString()” method which is inherited from the “Object” base class.
This user-defined “toString()” method will return a string containing the values of the “name” and “age” properties of the created “employee” object:
function Employee(name, age) {this.name= name;this.age = age;
}
Employee.prototype.toString = function () {return 'Employee Name: '+this.name + ' Age: '+ this.age;
}
employee1 = new Employee('Alex', 35);
console.log(employee1.toString());
Output
However, you can override the “toString()” method to return the values of the object keys in a string format.
In the below-given program, the “Employee” object will override the “toString()” method which is inherited from the “Object” base class.
This user-defined “toString()” method will return a string containing the values of the “name” and “age” properties of the created “employee” object:
function Employee(name, age) {this.name= name;this.age = age;
}
Employee.prototype.toString = function () {return 'Employee Name: '+this.name + ' Age: '+ this.age;
}
employee1 = new Employee('Alex', 35);
console.log(employee1.toString());
Output
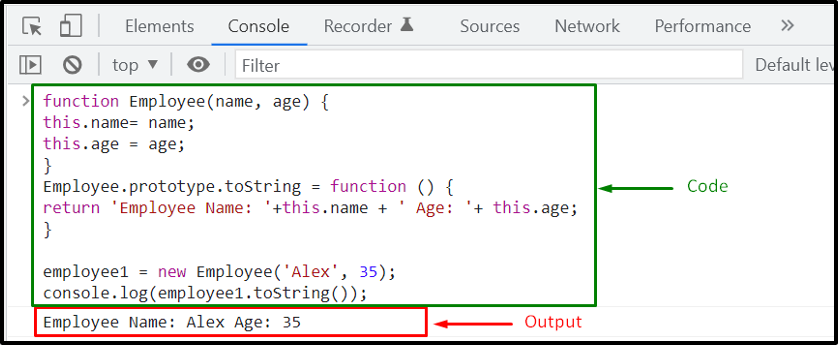 That was all of the essential information related to the JavaScript toString() method.
You can further research about it according to your requirements.
That was all of the essential information related to the JavaScript toString() method.
You can further research about it according to your requirements.
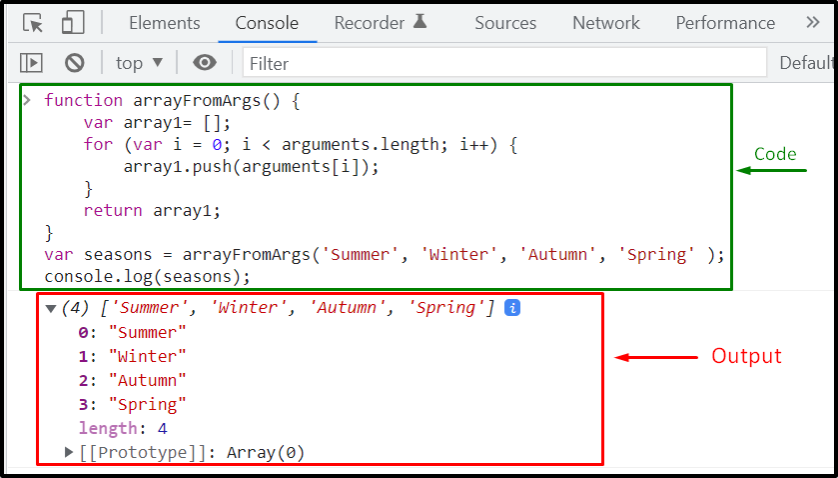 However, in ES6, the same functionality can be performed using the built-in “Array.from()” method.
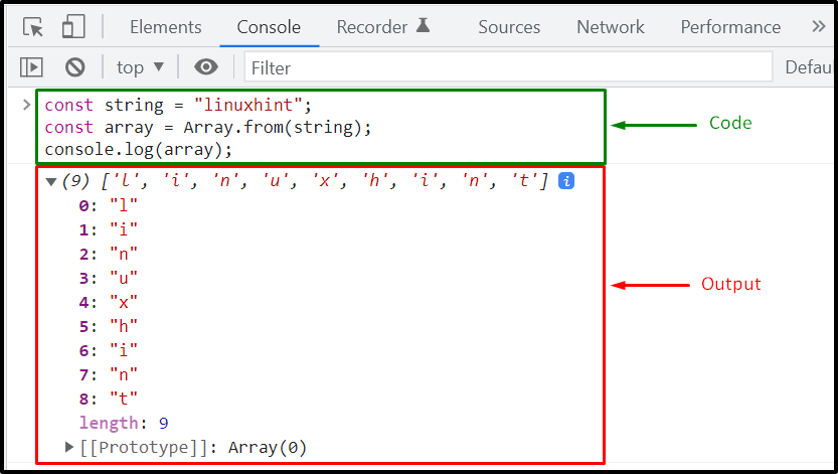 Example 2: How to create an array from an array-like object using JavaScript Array.from() method
First of all, we will define a function named “convert()” which utilizes the “Array.from()” method to create an array.
In this scenario, the “Array.from()” method accepts the “arguments” of the passed array-like object:
function convert() {
return Array.from(arguments);}
console.log(convert(10, 'dollars'));
When the given “Array.from()” method is executed, it will create a new array and add the number “10” at zero index and string “dollars” at the first index:
Example 2: How to create an array from an array-like object using JavaScript Array.from() method
First of all, we will define a function named “convert()” which utilizes the “Array.from()” method to create an array.
In this scenario, the “Array.from()” method accepts the “arguments” of the passed array-like object:
function convert() {
return Array.from(arguments);}
console.log(convert(10, 'dollars'));
When the given “Array.from()” method is executed, it will create a new array and add the number “10” at zero index and string “dollars” at the first index:
 Example 3: How to create an array using the mapping function of JavaScript Array.from() method
In the below-given example, the JavaScript “Array.from()” method will utilize the map function “x => x – 1” to subtract “1” from the values that are passed as arguments to the created “subtract()” function:
function subtract() {
return Array.from(arguments, x => x - 1);}
console.log(subtract(5, 7, 8));
After decrementing one, the arguments “5”, “7”, and “8” will be placed as “[4, 6,7]” in the returned array:
Example 3: How to create an array using the mapping function of JavaScript Array.from() method
In the below-given example, the JavaScript “Array.from()” method will utilize the map function “x => x – 1” to subtract “1” from the values that are passed as arguments to the created “subtract()” function:
function subtract() {
return Array.from(arguments, x => x - 1);}
console.log(subtract(5, 7, 8));
After decrementing one, the arguments “5”, “7”, and “8” will be placed as “[4, 6,7]” in the returned array:
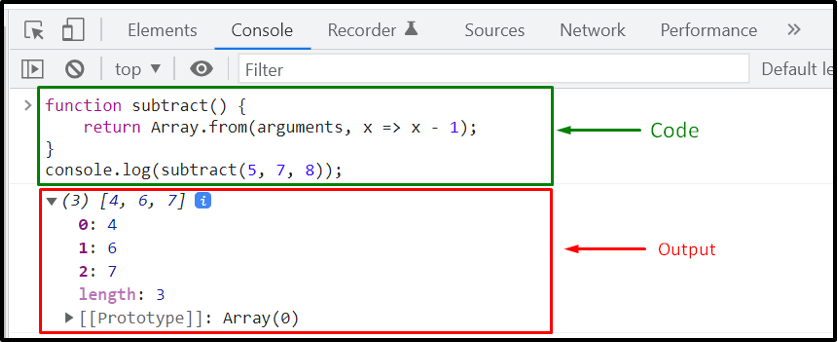 Example 4: How to create an array from a set object using JavaScript Array.from() method
The ES6 “Set” object creates a collection of unique values.
You can create a set object to restrict the addition of duplicated values and convert it to an array using the “Array.from()” method.
In this way, the created array will not have any repeated value:
const set= new Set([12, 56, 23, 12, 43, 12]);const array= Array.from(set);
console.log("Array: "+ array);
Execution of the specified “Array.from()” method will convert the “set” object into an “array”:
Example 4: How to create an array from a set object using JavaScript Array.from() method
The ES6 “Set” object creates a collection of unique values.
You can create a set object to restrict the addition of duplicated values and convert it to an array using the “Array.from()” method.
In this way, the created array will not have any repeated value:
const set= new Set([12, 56, 23, 12, 43, 12]);const array= Array.from(set);
console.log("Array: "+ array);
Execution of the specified “Array.from()” method will convert the “set” object into an “array”:
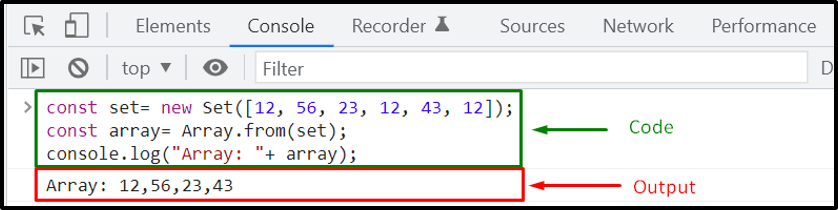 That was all the essential information related to the JavaScript Array.from() method.
You can further work on it according to your preferences.
That was all the essential information related to the JavaScript Array.from() method.
You can further work on it according to your preferences.
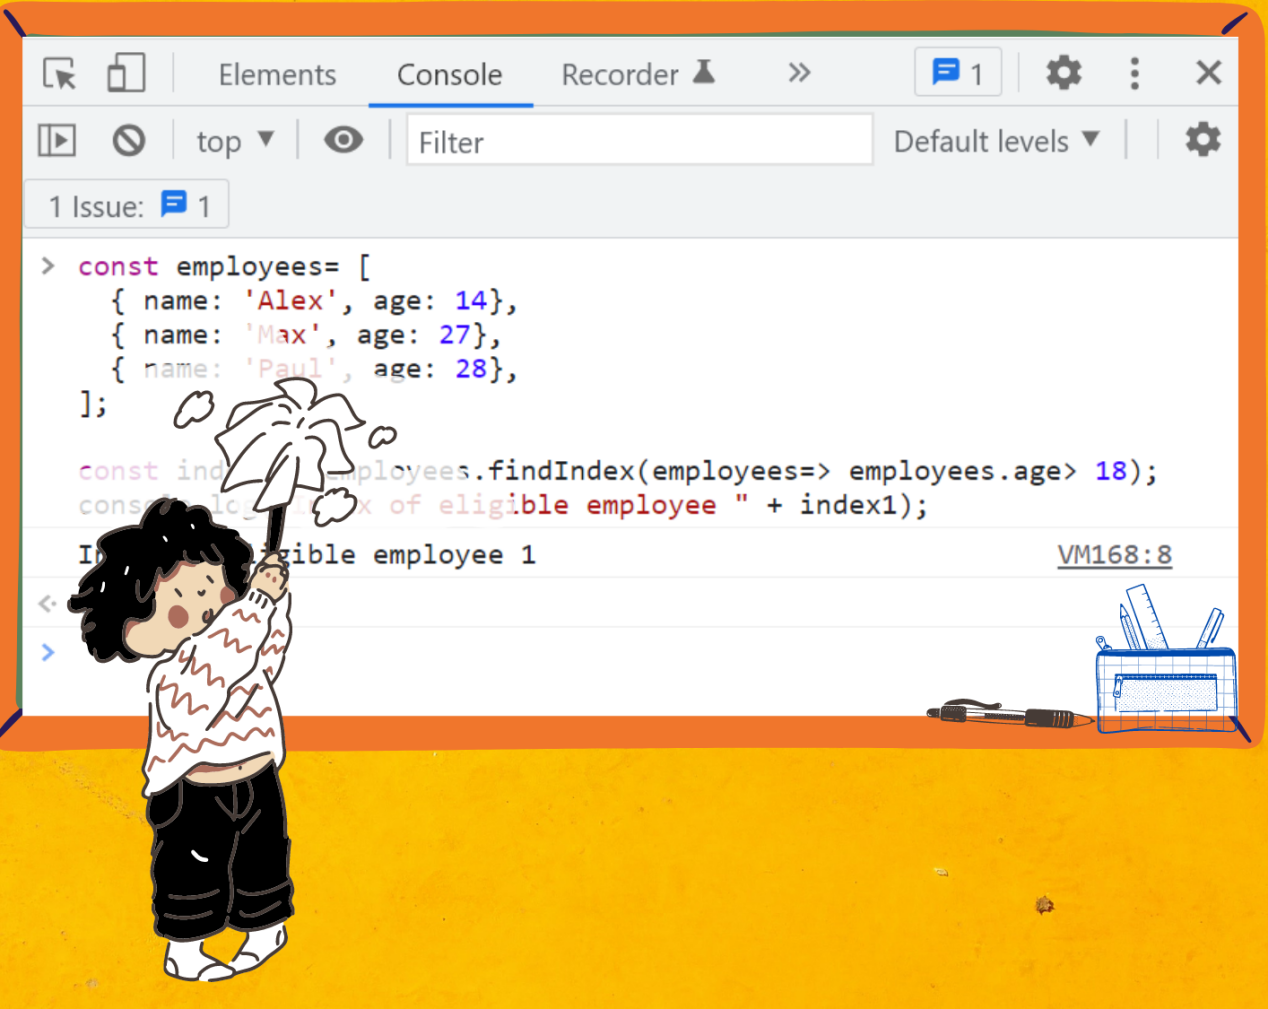
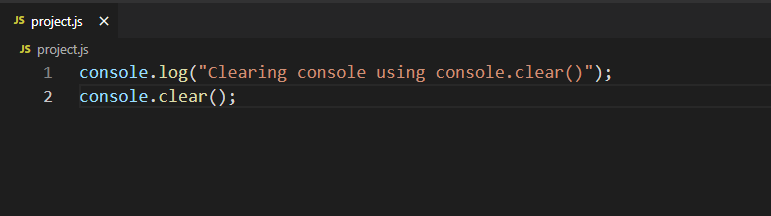 Here is how our “index.html” file looks like:
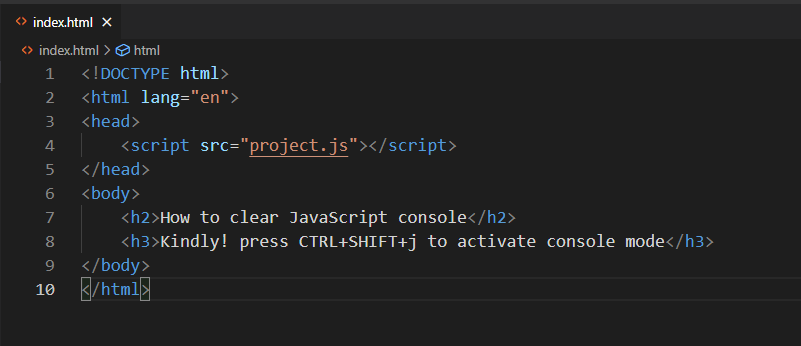 In the next step, we will use the “Live Server” extension of VS Code to open up the “index.html” file in the browser:
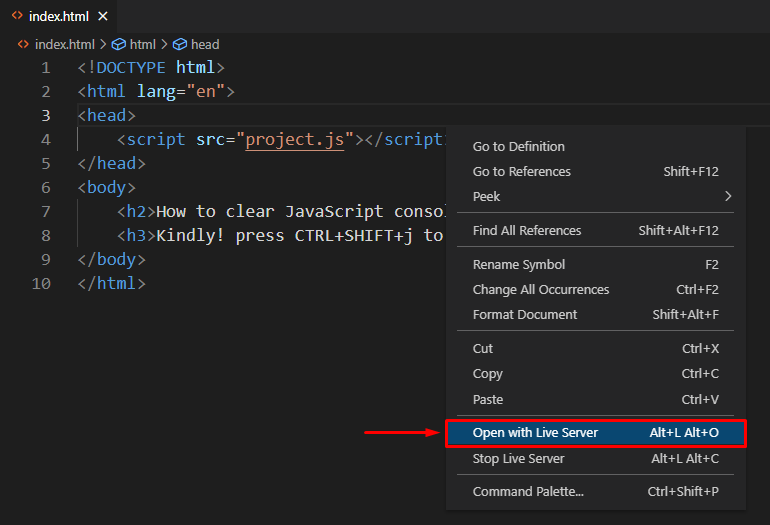 Now, press “CTRL+SHIFT+j” to activate the console mode:
 The added string “Clearing console using console.clear()” in the console.log() method has to be displayed on the JavaScript console; however, the invoked “console.clear()” cleared the data and then printed out the message “Console was cleared” on JavaScript console:
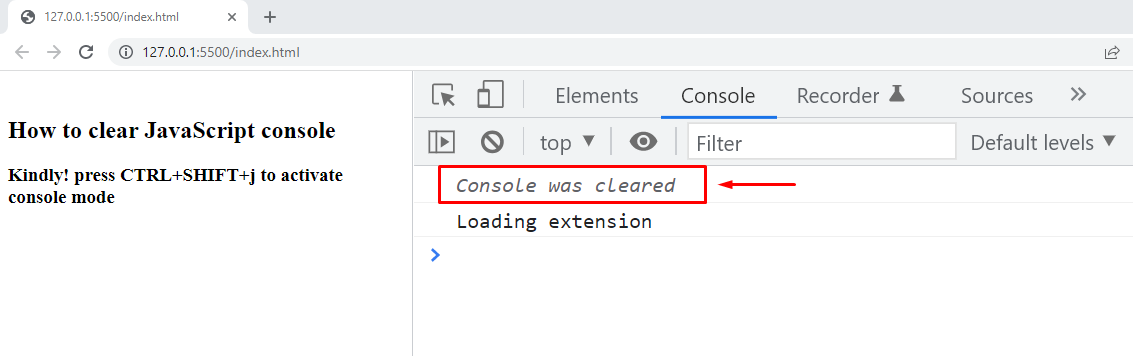 As mentioned earlier, the data declared before the “console.clear()” method will be cleared as soon as the “console.clear()” method is called, and the commands added after it will be executed normally.
In the below-given example, the “console.clear()” method will clear the JavaScript console.
Then, the “console.log()” will display the specified string in the console window:
console.clear();
console.log("we have used console.clear() method");
As mentioned earlier, the data declared before the “console.clear()” method will be cleared as soon as the “console.clear()” method is called, and the commands added after it will be executed normally.
In the below-given example, the “console.clear()” method will clear the JavaScript console.
Then, the “console.log()” will display the specified string in the console window:
console.clear();
console.log("we have used console.clear() method");
 Now, the JavaScript console shows the following output:
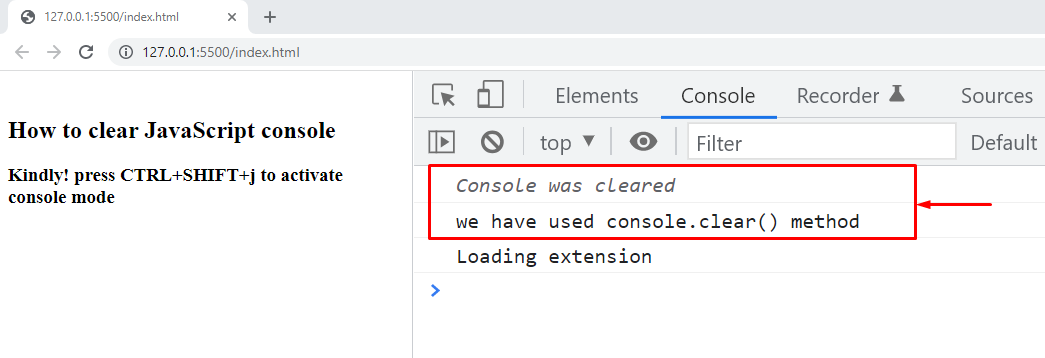 The given “console.clear()” method is considered a programmatic approach for clearing the JavaScript console.
However, if you prefer keyboard shortcuts over other procedures, then have a look at the following section.
The given “console.clear()” method is considered a programmatic approach for clearing the JavaScript console.
However, if you prefer keyboard shortcuts over other procedures, then have a look at the following section.
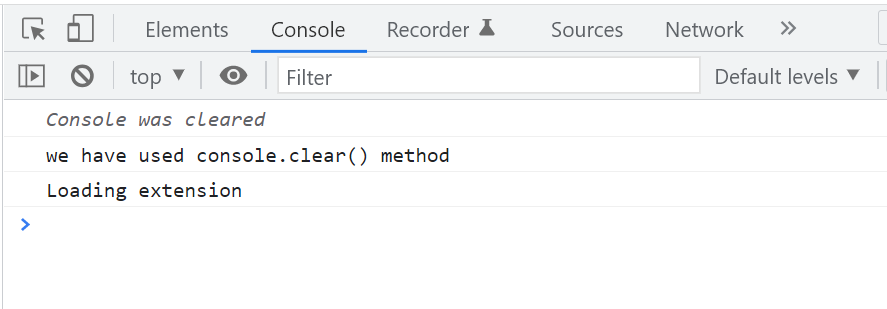 Now to clear the console window, we will press “CTRL+L”:
 Within a few microseconds, the console data will get erased like this:
 The given keyword shortcut works pretty well, but if you are a mouse person looking for a solution to clear JavaScript with the help of a single click, then the below-given section is right here for you!
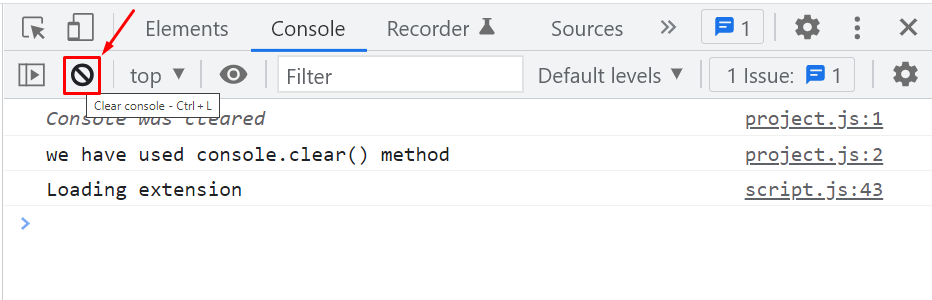 Another method is to left-click in the console and from the drop-down context menu, select the “Clear console” option:
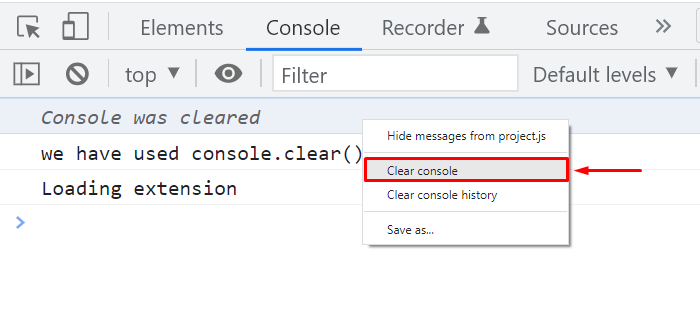 Both of the specified operations will clear your JavaScript console:
 We have compiled several useful methods to clear the JavaScript console.
Select any of the given methods according to your preferences.
We have compiled several useful methods to clear the JavaScript console.
Select any of the given methods according to your preferences.
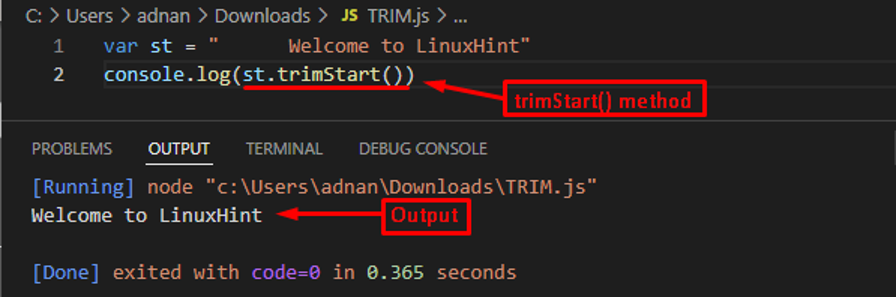 The output shows that the spaces before the string st have been removed from the string.
Example 2The following example tries to make use of the trimStart() method to check whether it removes the whitespaces from the end of the string or not.
var st = "Welcome to LinuxHint "
console.log("length before trimStart() : " + st.length)
st = st.trimStart();
console.log(“length after trimStart() : ” + st.length)
The above code creates a string st which has whtespaces at its end.
Moreover, the code also checks the length of string before and after applying the trimStart() method.
Output
The output shows that the spaces before the string st have been removed from the string.
Example 2The following example tries to make use of the trimStart() method to check whether it removes the whitespaces from the end of the string or not.
var st = "Welcome to LinuxHint "
console.log("length before trimStart() : " + st.length)
st = st.trimStart();
console.log(“length after trimStart() : ” + st.length)
The above code creates a string st which has whtespaces at its end.
Moreover, the code also checks the length of string before and after applying the trimStart() method.
Output
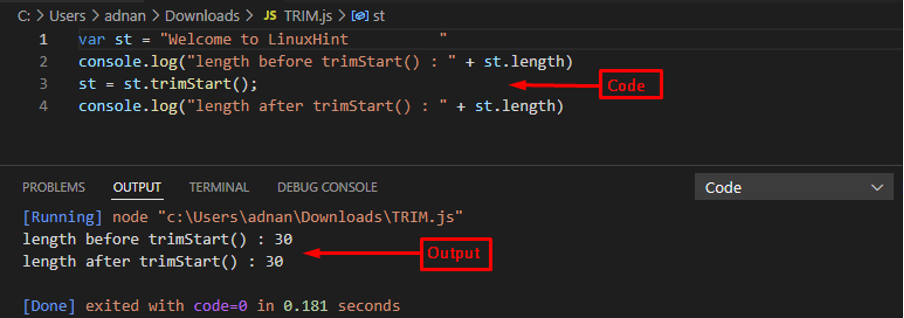 The output shows that the number of characters are the same before and after applying the trimStart() method which states that the trimStart() method cannot be used to trim the whitespaces from the end of the string.
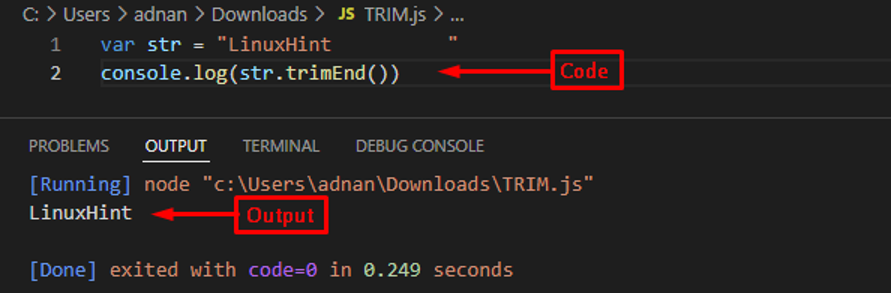 The output shows that the trimEnd() method has deleted whitespaces from the end of the string.
Example 2Let’s check how trimEnd() behaves if it is applied to trim the spaces from the end of the string.
var str = " LinuxHint"
console.log("length before trimEnd() : " + str.length)
str = str.trimEnd();
console.log("length after trimEnd() : " + str.length)
In the above code, string str is created that has some whitespaces at the start of the string.
Further, trimEnd() is applied to the string str.
Moreover, the length of string before and after applying the trimEnd() method is also being checked.
Output
The output shows that the trimEnd() method has deleted whitespaces from the end of the string.
Example 2Let’s check how trimEnd() behaves if it is applied to trim the spaces from the end of the string.
var str = " LinuxHint"
console.log("length before trimEnd() : " + str.length)
str = str.trimEnd();
console.log("length after trimEnd() : " + str.length)
In the above code, string str is created that has some whitespaces at the start of the string.
Further, trimEnd() is applied to the string str.
Moreover, the length of string before and after applying the trimEnd() method is also being checked.
Output
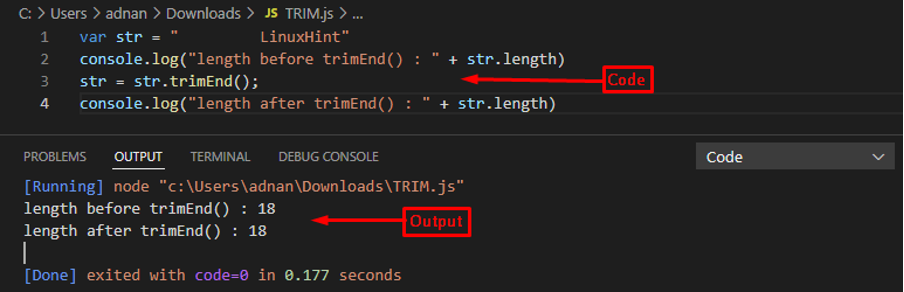 As the length before and after applying trimEnd() remains the same, it is concluded that trimEnd() cannot remove whitespaces that occur at the beginning of the string.
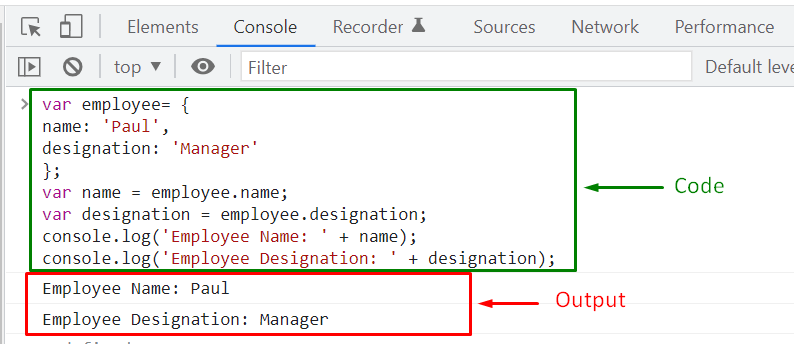 As you can see, the given procedure of accessing an object’s property and assigning them to the specified variable needs “boilerplate” code, where a section of code is executed with the same pattern and minor alteration.
ES6 embedded an alternative procedure for the assignment of an object’s properties to variables known as “Object Destructuring“.
Object Destructuring prevents the duplication of a property name, and it permits to extract multiple properties of a JavaScript object using a single statement.
As you can see, the given procedure of accessing an object’s property and assigning them to the specified variable needs “boilerplate” code, where a section of code is executed with the same pattern and minor alteration.
ES6 embedded an alternative procedure for the assignment of an object’s properties to variables known as “Object Destructuring“.
Object Destructuring prevents the duplication of a property name, and it permits to extract multiple properties of a JavaScript object using a single statement.


 However, Object Destructuring also enables you to set a “Default Value” for a property that is not defined in the destructured object.
To imply this functionality, follow the given syntax:
const { property = defaultValue } = object;
We will assign “25” as a default value of the “age” property:
const { age= [25] } = employee;
console.log(age);
Instead of “undefined”, now the “console.log()” method will print out “25” as the “age” property value:
However, Object Destructuring also enables you to set a “Default Value” for a property that is not defined in the destructured object.
To imply this functionality, follow the given syntax:
const { property = defaultValue } = object;
We will assign “25” as a default value of the “age” property:
const { age= [25] } = employee;
console.log(age);
Instead of “undefined”, now the “console.log()” method will print out “25” as the “age” property value:
 We have compiled the essential information related to Object Destructuring.
You can explore it according to your requirements.
We have compiled the essential information related to Object Destructuring.
You can explore it according to your requirements.
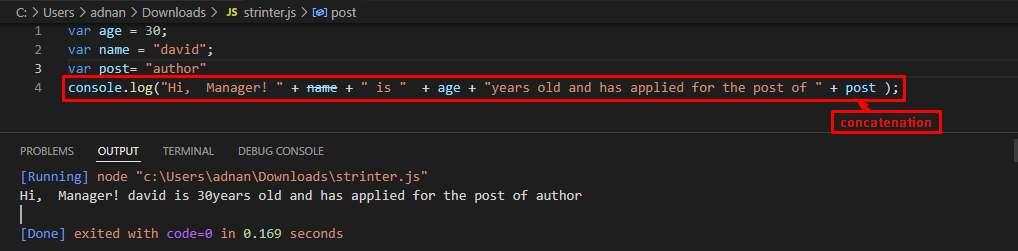 As the above image shows, there is a complex expression that is being carried out to use multiple variables which may result in committing a mistake.
To avoid such a scenario, the interpolation of the string is quite useful in such a situation.
As the above image shows, there is a complex expression that is being carried out to use multiple variables which may result in committing a mistake.
To avoid such a scenario, the interpolation of the string is quite useful in such a situation.
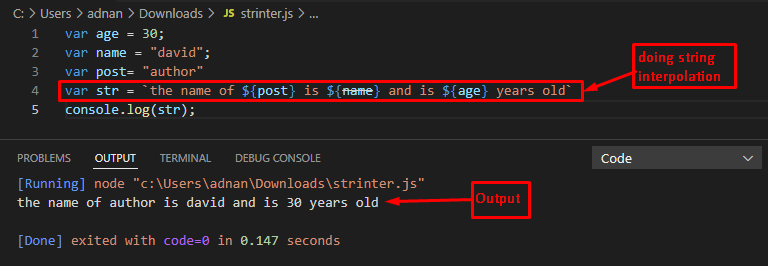 The output shows that the values of variables “age”, “name”, and “post” are successfully embedded into the string “str” by using the string interpolation.
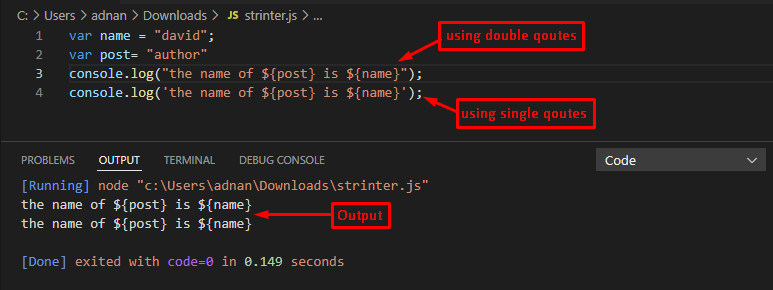 The output shows that the string that exercised the interpolation phenomenon is printed as it is.
The value of the variables is not fetched because the single/double quotes print them as they were used.
The output shows that the string that exercised the interpolation phenomenon is printed as it is.
The value of the variables is not fetched because the single/double quotes print them as they were used.
 The output shows that the spread operator has concatenated two arrays.
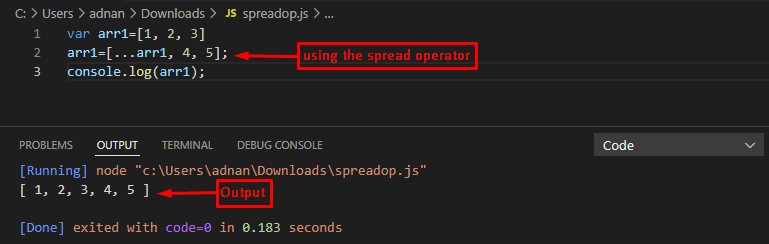 The output shows that two new elements of arr1 are added.
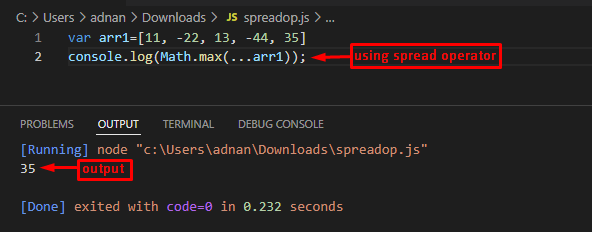 The output shows that the Math.max() function has been applied on the arr1 with the help of the spread operator and the maximum value from the arr1 is returned.
 The output shows that the spread operator has separated the string characters and is stored in an array.
 The output shows that the add() function is called with the args, 5, and 8.
The args comprise three values that would be spread over the function.
The output shows that the add() function is called with the args, 5, and 8.
The args comprise three values that would be spread over the function.
 The output shows that x has printed Windows, y shows the macOS in output, whereas the rest parameter (…multi) has displayed all the other values (in an array).
 The output shows that the values retrieved by the rest-parameter are printed in an array-like structure.
 The output has returned an error that states that the rest parameter must be used as the last parameter.
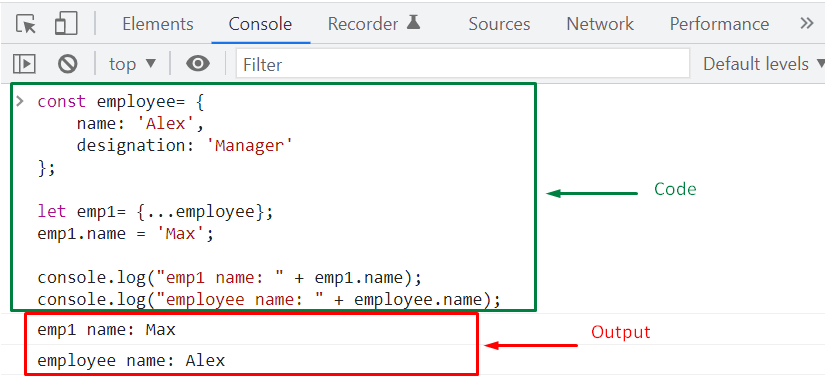
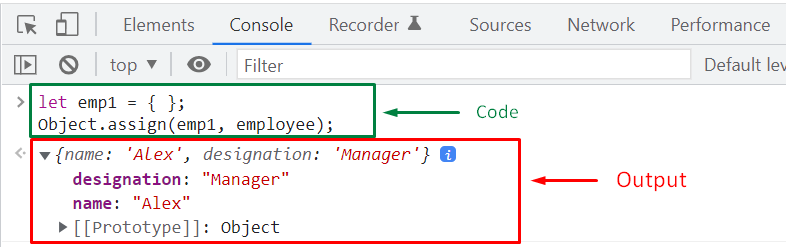 Next, we will update the “emp.name” property value:
emp1.name = 'Stepheny';console.log("emp1 name: " + emp1.name);
console.log("employee.name: " + employee.name);
As you can see in the below-given output, altering the “emp.name” property value has not modified the “employee” object.
Next, we will update the “emp.name” property value:
emp1.name = 'Stepheny';console.log("emp1 name: " + emp1.name);
console.log("employee.name: " + employee.name);
As you can see in the below-given output, altering the “emp.name” property value has not modified the “employee” object.
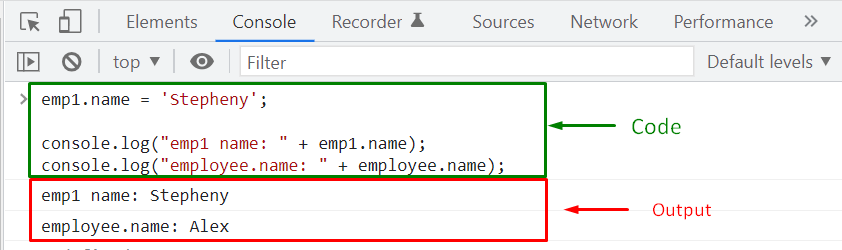
 In the next step, we will specify “Stepheny” as the value of “emp1.name” property:
emp1.name = 'Stepheny';console.log("emp1 name: " + emp1.name);
console.log("employee.name: " + employee.name);
The given output signifies that changing the “emp.name” property value has not modified the “employee” object “name” property:
In the next step, we will specify “Stepheny” as the value of “emp1.name” property:
emp1.name = 'Stepheny';console.log("emp1 name: " + emp1.name);
console.log("employee.name: " + employee.name);
The given output signifies that changing the “emp.name” property value has not modified the “employee” object “name” property:
 Now, we will discuss the concept of Deep Copy an object.
 Lastly, we will modify some properties of the “emp1” object and then check out the result:
emp1.name = 'Max';
emp1.address.city = 'Istanbul';
console.log("emp1.name: " + emp1.name);
console.log("emp1.address.city : " + emp1.address.city);
console.log("employee.name: " + employee.name);
console.log("employee.address.city : " + employee.address.city);
After performing the deep copying operation, the “emp1” gets disconnected from the “employee,” so any changes made in the “emp1” will not affect the “employee” object:
Lastly, we will modify some properties of the “emp1” object and then check out the result:
emp1.name = 'Max';
emp1.address.city = 'Istanbul';
console.log("emp1.name: " + emp1.name);
console.log("emp1.address.city : " + emp1.address.city);
console.log("employee.name: " + employee.name);
console.log("employee.address.city : " + employee.address.city);
After performing the deep copying operation, the “emp1” gets disconnected from the “employee,” so any changes made in the “emp1” will not affect the “employee” object:
 We have compiled all of the essential information related to Shallow Copy and Deep Copy objects.
You can further explore it according to your requirements.
We have compiled all of the essential information related to Shallow Copy and Deep Copy objects.
You can further explore it according to your requirements.
 At compile-time, Operator “+” is overloaded based on the type of data we have used.
For instance, “3” + “6” created a new number “9”, whereas, “1” + “article” generated a “1 article” string.
That’s how we have implemented operator overloading with the help of static binding.
At compile-time, Operator “+” is overloaded based on the type of data we have used.
For instance, “3” + “6” created a new number “9”, whereas, “1” + “article” generated a “1 article” string.
That’s how we have implemented operator overloading with the help of static binding.
 show(2);
 In the above-given example, both added “show()” functions are bound statistically at the compilation time.
As a result, no time will be wasted determining which function to call, which results in fast and efficient program execution.
We will now move ahead and discuss Dynamic Binding.
In the above-given example, both added “show()” functions are bound statistically at the compilation time.
As a result, no time will be wasted determining which function to call, which results in fast and efficient program execution.
We will now move ahead and discuss Dynamic Binding.
 That was all about Static vs Dynamic Binding.
You can further explore this topic according to your requirements.
That was all about Static vs Dynamic Binding.
You can further explore this topic according to your requirements.
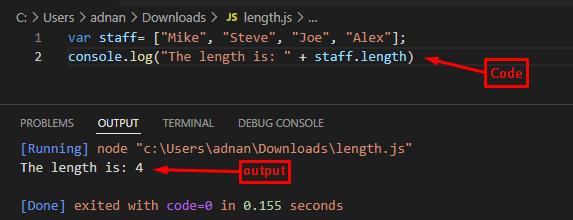 The output shows that the length of the array is 1unit ahead of the highest index(3) of the staff array.
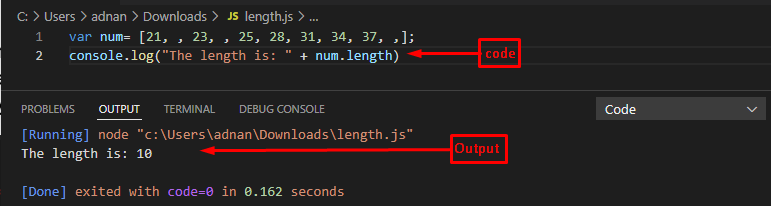 The output shows that the array.length has considered the empty elements in the counting.
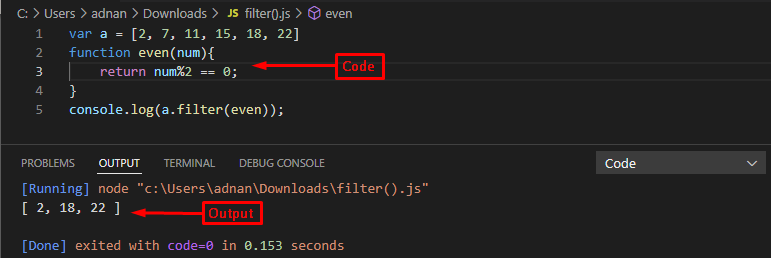 The output shows that only the even numbers from the array are printed on the console.
Example 2
The example explained here would filter out the positive numbers from the array.
var arr = [-2, 5, -10, -12, 7, 15]function pos(num){
return num >= 0; }
console.log(arr.filter(pos));
The above code creates an array of numbers and then a callback function is executed which filters returns the numbers that are greater than or equal to zero.
Output
The output shows that only the even numbers from the array are printed on the console.
Example 2
The example explained here would filter out the positive numbers from the array.
var arr = [-2, 5, -10, -12, 7, 15]function pos(num){
return num >= 0; }
console.log(arr.filter(pos));
The above code creates an array of numbers and then a callback function is executed which filters returns the numbers that are greater than or equal to zero.
Output
 The output shows that the filter method has returned only those numbers that have values greater than or equal to zero.
Note: One can update the content of the array by keeping only those values that are returned by the filter() method.
Example 3
The following code practices the use of the filter() method on an array of strings.
var str = ["Linux OS", "Windows OS", "macOS"]function len(num){
return num.length > 5; }
console.log(str.filter(len));
The above code creates an array of strings and then the callback function is applied to it that would get the length of each element.
After that, the callback function would return only those string elements that have a length greater than 5.
Output
The output shows that the filter method has returned only those numbers that have values greater than or equal to zero.
Note: One can update the content of the array by keeping only those values that are returned by the filter() method.
Example 3
The following code practices the use of the filter() method on an array of strings.
var str = ["Linux OS", "Windows OS", "macOS"]function len(num){
return num.length > 5; }
console.log(str.filter(len));
The above code creates an array of strings and then the callback function is applied to it that would get the length of each element.
After that, the callback function would return only those string elements that have a length greater than 5.
Output
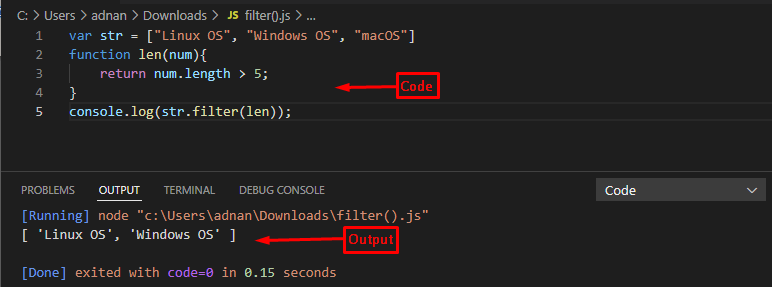 The output shows that only those string elements are returned that have lengths greater than 5.
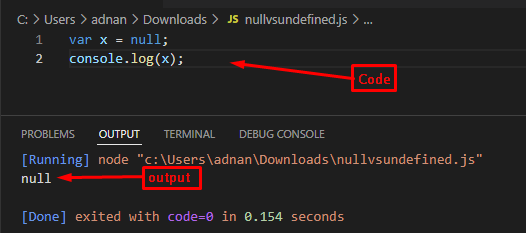 The output shows that the value of x (in which a null value was stored) is printed on the console.
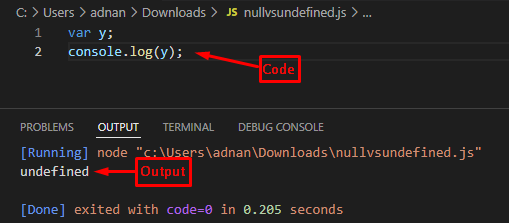 The output shows that the value has returned undefined as its output states that the value of the variable does not exist.
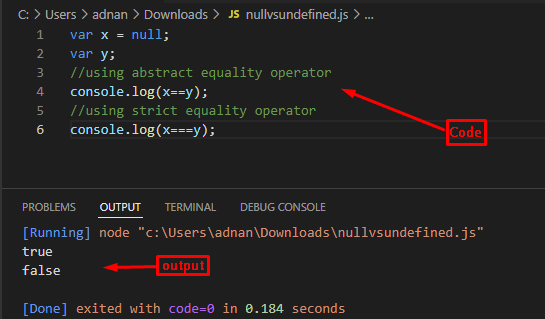 The output shows that the “==” operator returns true but the strict equality operator has shown false.
Thus, it can be concluded that the Null and Undefined terms are not identical.
The output shows that the “==” operator returns true but the strict equality operator has shown false.
Thus, it can be concluded that the Null and Undefined terms are not identical.
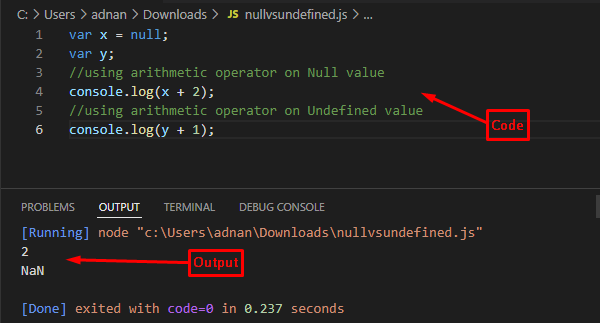 The output shows that the Null value acts as a “0” while dealing with arithmetic operators.
Contrary to this, when an undefined value is used with arithmetic operators, it would show NaN (Not a Number) in output.
Type
Another prominent difference is the data type of these values.
The Null value is of object type whereas the Undefined values have an undefined type.
The following line of code refers to showing the difference between the types of these two values.
var x = null;var y;
console.log("Type of x is: " +typeof(x));
console.log("Type of y is: " +typeof(y));
The above code will print the type of the “x” and “y” variables.
Output
The output shows that the Null value acts as a “0” while dealing with arithmetic operators.
Contrary to this, when an undefined value is used with arithmetic operators, it would show NaN (Not a Number) in output.
Type
Another prominent difference is the data type of these values.
The Null value is of object type whereas the Undefined values have an undefined type.
The following line of code refers to showing the difference between the types of these two values.
var x = null;var y;
console.log("Type of x is: " +typeof(x));
console.log("Type of y is: " +typeof(y));
The above code will print the type of the “x” and “y” variables.
Output
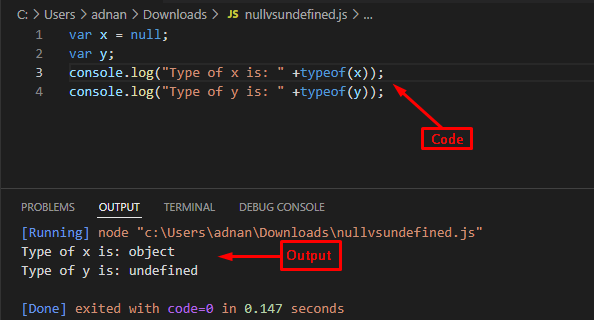 The above output represents that the type of x (which contains null value) is an object whereas the type of y (which is an undefined variable) is undefined.
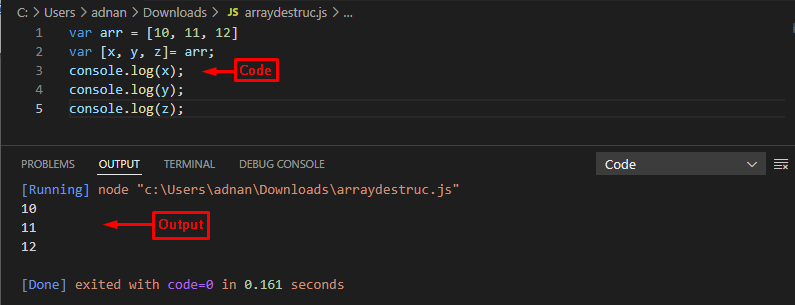 The output shows that the values 10, 11, and 12 are now contained by the x, y, and z respectively.
Example 2
Let’s look at how the destructuring works if the number of elements is not equal to the number of variables.
var arr = [4, 7]var [x, y, z]= arr;
console.log(x);
console.log(y);
console.log(z);
The above code contains an array comprising two numeric values.
This array is being associated with three variables and then these variables are printed using the “console.log” statement.
Output
The output shows that the values 10, 11, and 12 are now contained by the x, y, and z respectively.
Example 2
Let’s look at how the destructuring works if the number of elements is not equal to the number of variables.
var arr = [4, 7]var [x, y, z]= arr;
console.log(x);
console.log(y);
console.log(z);
The above code contains an array comprising two numeric values.
This array is being associated with three variables and then these variables are printed using the “console.log” statement.
Output
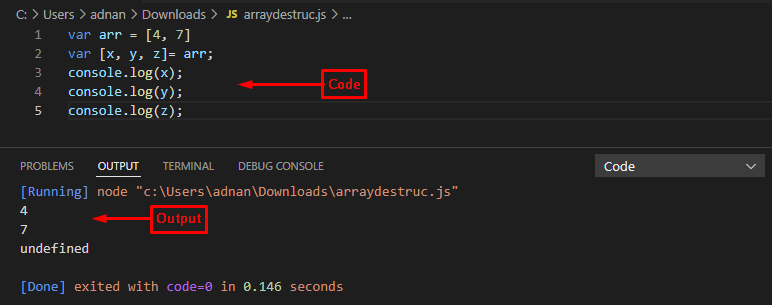 The above output shows that the value of z results in undefined because there are only two numbers in arr thus only two variables can be mapped on these variables.
Example 3
This example makes use of the rest operator to destruct an array.
var arr = ["LinuxHint", "welcome", "Linux, Windows", "JavaScript/jQuery", "informative tutorials"]var [x, y, ...other]= arr;
console.log(x);
console.log(y);
console.log(other);
The above code creates an array of strings and the x, y, and others refer to the elements of an array.
The x and y relate to the first, and second elements respectively whereas the other variable is used with the rest operator, therefore, the other contains all the elements occurring after the second element.
Output
The above output shows that the value of z results in undefined because there are only two numbers in arr thus only two variables can be mapped on these variables.
Example 3
This example makes use of the rest operator to destruct an array.
var arr = ["LinuxHint", "welcome", "Linux, Windows", "JavaScript/jQuery", "informative tutorials"]var [x, y, ...other]= arr;
console.log(x);
console.log(y);
console.log(other);
The above code creates an array of strings and the x, y, and others refer to the elements of an array.
The x and y relate to the first, and second elements respectively whereas the other variable is used with the rest operator, therefore, the other contains all the elements occurring after the second element.
Output
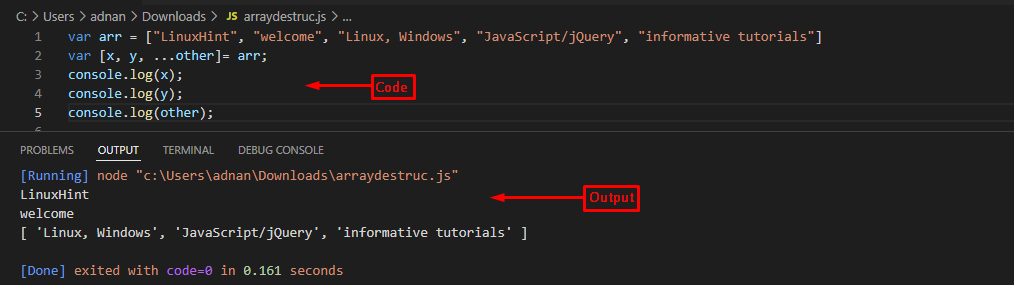 The output shows that x and y contain the first two elements only while the rest of the array elements are contained in the other variable.
Note: As variables cannot be created using a number thus numeric values cannot be used to destruct the array.
The output shows that x and y contain the first two elements only while the rest of the array elements are contained in the other variable.
Note: As variables cannot be created using a number thus numeric values cannot be used to destruct the array.
 The output shows that the AND operator is applied, and the “if” body is executed that states both conditions are true.
Example
However, if one of the conditions is not true then the AND operator will return false.
The following code refers to the above-stated condition.
var x = 5;var y = 7;if (x 10){
console.log("the variables are digits");}else {
console.log("condition is false")}
In the above code, the second condition is false (y > 10) thus the whole expression will return false as the AND operator is being used on conditions.
Output
The output shows that the AND operator is applied, and the “if” body is executed that states both conditions are true.
Example
However, if one of the conditions is not true then the AND operator will return false.
The following code refers to the above-stated condition.
var x = 5;var y = 7;if (x 10){
console.log("the variables are digits");}else {
console.log("condition is false")}
In the above code, the second condition is false (y > 10) thus the whole expression will return false as the AND operator is being used on conditions.
Output
 From the output, the else part of the if-else statement is executed which states that either one condition or the whole expression is false.
 The output shows that the OR operator considered the whole expression as true as one condition is true.
 The output shows that the if block is executed because the condition used with the NOT operator is false and the NOT operator changes the false status to true.
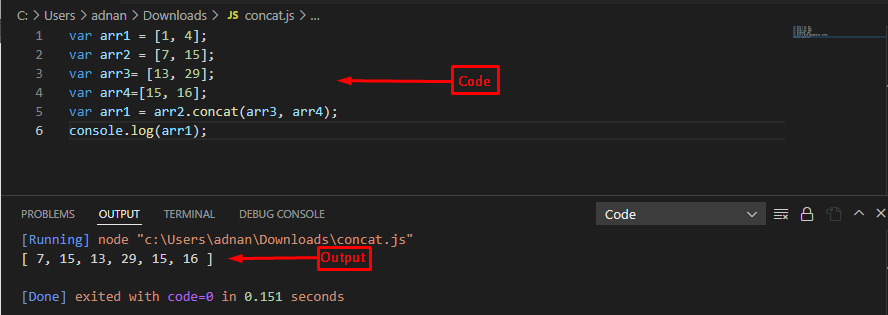 The output shows that the value of the arr1 variable has been updated after concatenating the values of arr2, arr3, and arr4.
 The output shows that the elements of arr2 and arr3 are appended to the existing elements of arr1.
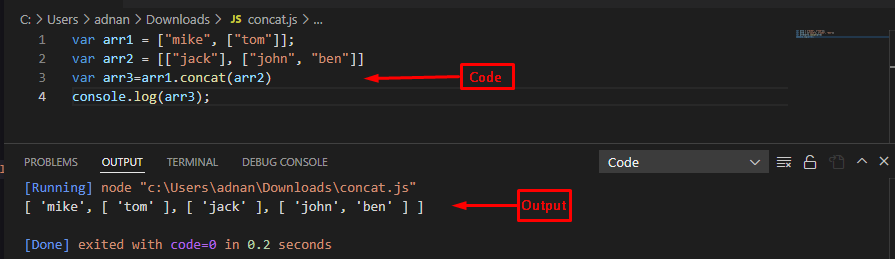 It is observed from the output that, with the help of concat() method the content of two nested arrays has been stored in another array.
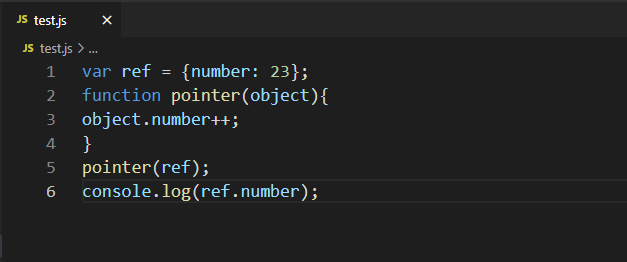 Open up your HTML file in the browser and press “CTRL+SHIFT+j” to activate the console mode:
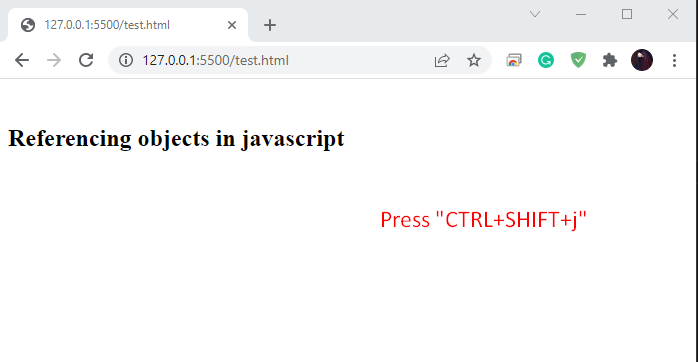
 In the above-given program, the reference of the “ref” object is copied over the “object,” and both “object” and “ref” refer to the same “name-value” pair in the memory.
This statement also signifies that changing the value of the “number” property un the “pointer()” function will also affect the “number” property of “ref”.
Check out the below-given gif to have a better understanding of the execution process:
In the above-given program, the reference of the “ref” object is copied over the “object,” and both “object” and “ref” refer to the same “name-value” pair in the memory.
This statement also signifies that changing the value of the “number” property un the “pointer()” function will also affect the “number” property of “ref”.
Check out the below-given gif to have a better understanding of the execution process:
 The given output states that currently, the paragraph element is referring to an “Object”:
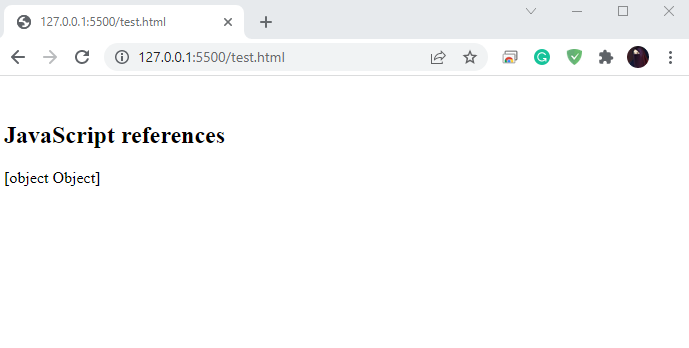 To access the value of “games.indoor” property, we will add the following line in our “index.html” file:
document.getElementById("references").innerHTML = games.indoor;
As you can see, now the paragraph element has successfully accessed the value of the “games.indoor” property:
To access the value of “games.indoor” property, we will add the following line in our “index.html” file:
document.getElementById("references").innerHTML = games.indoor;
As you can see, now the paragraph element has successfully accessed the value of the “games.indoor” property:
 Till this point, you may have understood how object references work for objects.
In the next example, we will check out the working of JavaScript pointers for the primitive data types.
Till this point, you may have understood how object references work for objects.
In the next example, we will check out the working of JavaScript pointers for the primitive data types.
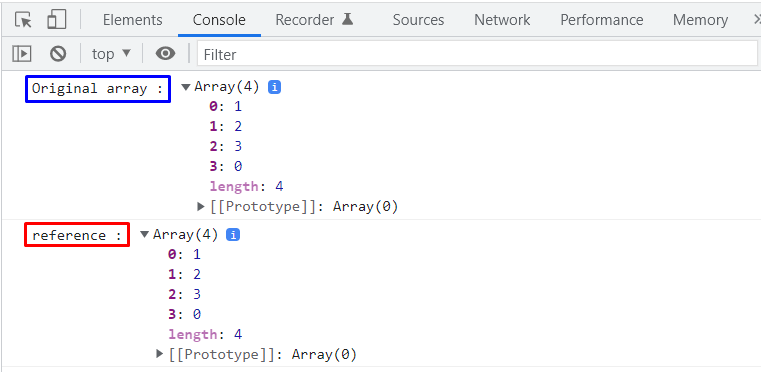 However, specifically changing the values of the “ref” variable will not modify the original “array1” values:
ref = [3, 4, 34];
console.log("Reference", ref);
console.log("Original array", array1);
The given output shows that values of the “ref” variable are altered, but it the “array1” comprises the same original values and has not changed:
However, specifically changing the values of the “ref” variable will not modify the original “array1” values:
ref = [3, 4, 34];
console.log("Reference", ref);
console.log("Original array", array1);
The given output shows that values of the “ref” variable are altered, but it the “array1” comprises the same original values and has not changed:
 We have compiled the basic information related to JavaScript pointers.
You can further explore this topic according to your preferences.
We have compiled the basic information related to JavaScript pointers.
You can further explore this topic according to your preferences.
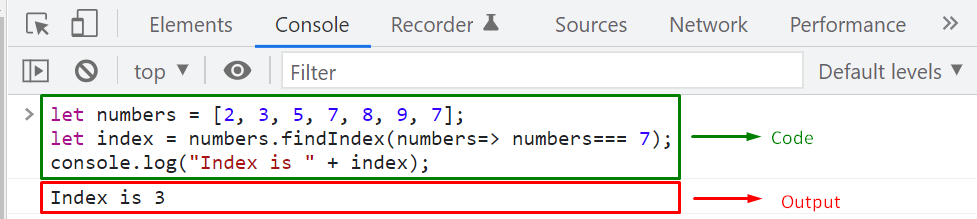 We will now use the findIndex() method with a more complex condition.

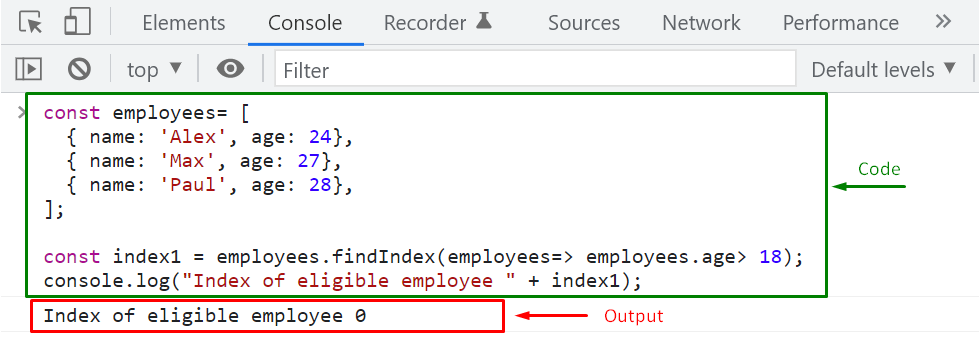 According to the specified condition, If no element exists in the “employees” array then the “findIndex()” method will return “-1”:
const index2 = employees.findIndex(employees=> employees.age<= 18);
console.log("Index of ineligible employee is " + index2);
The output displays “-1” because not a single employee’s age is less than or equal to “18”:
According to the specified condition, If no element exists in the “employees” array then the “findIndex()” method will return “-1”:
const index2 = employees.findIndex(employees=> employees.age<= 18);
console.log("Index of ineligible employee is " + index2);
The output displays “-1” because not a single employee’s age is less than or equal to “18”:
 We have compiled all of the essential information related to using the JavaScript findIndex() method.
You can further explore this topic according to your preferences.
We have compiled all of the essential information related to using the JavaScript findIndex() method.
You can further explore this topic according to your preferences.
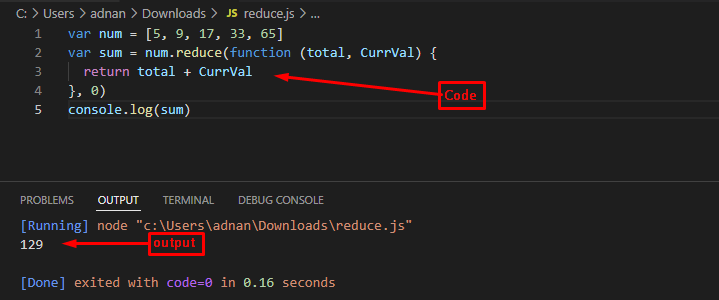 The output returns 127 which is the sum of all the array elements used.
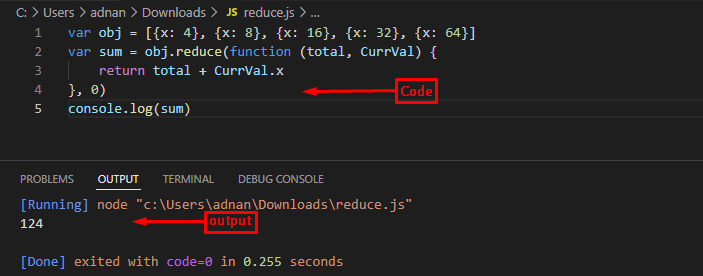 The output shows that the numbers inside the object are added and then the sum is returned.
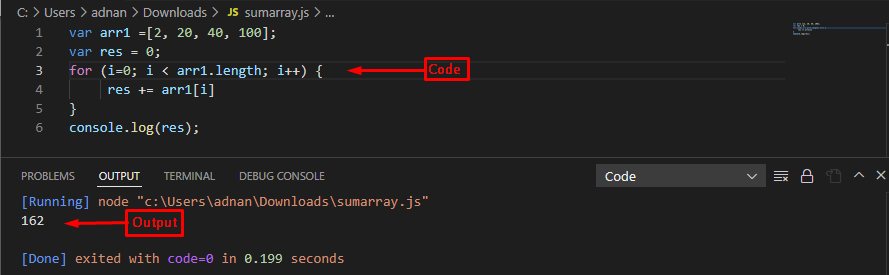 The output shows that the numbers inside the array are summed up and the sum is printed.
 The above output shows that the while loop can be used to sum an array of numbers.
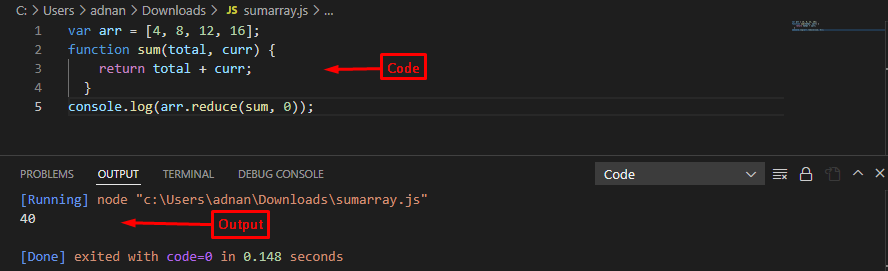 The output shows that the reduce() method has calculated the sum of the array of numbers.
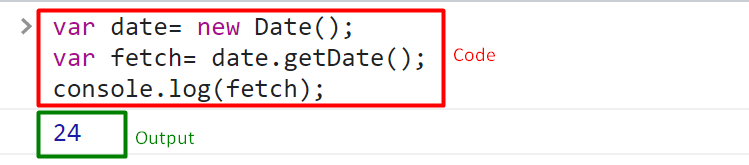 The date has been fetched.
 The full year of the date object is 2022.
 The month has been fetched successfully.
 The number 4 represents the 4th day of the week.
 The hours have been fetched in numeric form.
 The minutes were fetched successfully.
 The getSeconds() method is working properly.
 The milliseconds were fetched successfully.
 The time has been fetched in milliseconds.
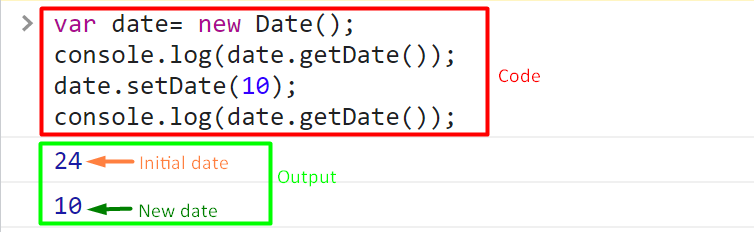 The new date has been set.
 The new year has been set.
 The new month has been set.
 The new hours have been set.
 The new minutes have been set.
 The new seconds have been set.
 The milliseconds have been set.
 The time has been set in milliseconds.
 Firstly, we will create an instance of the “Stack” class and “Push” the following three values to the “items” array (stack):
var stack = new Stack();
stack.push(10);
stack.push(20);
stack.push(30);
Firstly, we will create an instance of the “Stack” class and “Push” the following three values to the “items” array (stack):
var stack = new Stack();
stack.push(10);
stack.push(20);
stack.push(30);
 In the next step, we will check the size of the created stack by invoking the “size()” method:
console.log(stack.size());
The given output signifies that the size of JavaScript Stack is “3”:
In the next step, we will check the size of the created stack by invoking the “size()” method:
console.log(stack.size());
The given output signifies that the size of JavaScript Stack is “3”:
 Next, use the “peek()” method to print out the topmost element of the stack:
console.log(stack.peek()+ " is at the top of stack");
As you can see from the output that “30” is at the top of our created stack:
Next, use the “peek()” method to print out the topmost element of the stack:
console.log(stack.peek()+ " is at the top of stack");
As you can see from the output that “30” is at the top of our created stack:
 Then, pop out the topmost element from the stack:
console.log(stack.pop() + " is popped out from the stack");
Then, pop out the topmost element from the stack:
console.log(stack.pop() + " is popped out from the stack");
 After removing “30”, now re-check stack size and the fetch new element that is positioned at the top:
console.log(stack.size());console.log(stack.peek()+ " is at the top of stack");
After removing “30”, now re-check stack size and the fetch new element that is positioned at the top:
console.log(stack.size());console.log(stack.peek()+ " is at the top of stack");
 Now, we will clear the stack by utilizing the “stack.clear()” method:
stack.clear();
Now, we will clear the stack by utilizing the “stack.clear()” method:
stack.clear();
 Lastly, verify if the stack is empty or not:
stack.isEmpty();
In the following output, “true” indicates that the length of the Stack is equal to “0”:
Lastly, verify if the stack is empty or not:
stack.isEmpty();
In the following output, “true” indicates that the length of the Stack is equal to “0”:
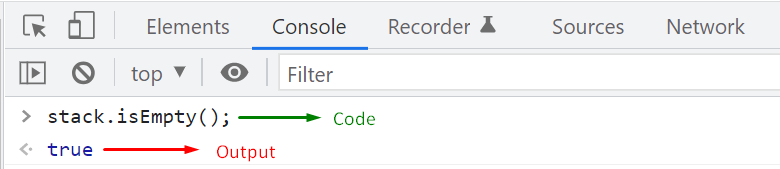 That was all about the essential information related to implementing the JavaScript stack using an array.
You can further explore it according to your requirements.
That was all about the essential information related to implementing the JavaScript stack using an array.
You can further explore it according to your requirements.
 Firstly, we will create an instance of the “Queue” class and “enqueue” following three values to the “items” array:
var queue= new Queue();
queue.enqueue(40);
queue.enqueue(50);
queue.enqueue(60);
Firstly, we will create an instance of the “Queue” class and “enqueue” following three values to the “items” array:
var queue= new Queue();
queue.enqueue(40);
queue.enqueue(50);
queue.enqueue(60);
 In the next step, we will check the length of the created queue by invoking the “length()” method:
console.log(queue.length());
The given output signifies that the length of the JavaScript Queue is “3”:
In the next step, we will check the length of the created queue by invoking the “length()” method:
console.log(queue.length());
The given output signifies that the length of the JavaScript Queue is “3”:
 Next, use the “peek()” method to print out the front element of the queue:
console.log(queue.peek()+ " is at the front of queue");
As you can see from the output that “40” is placed at the front of our created JavaScript queue:
Next, use the “peek()” method to print out the front element of the queue:
console.log(queue.peek()+ " is at the front of queue");
As you can see from the output that “40” is placed at the front of our created JavaScript queue:
 Then, we will dequeue the front element from the queue:
console.log(queue.dequeue() + " is removed from the queue");
Then, we will dequeue the front element from the queue:
console.log(queue.dequeue() + " is removed from the queue");
 After removing “40” element, now re-check queue length and the print out the remaining queue elements:
console.log(queue.length());
console.log("Remaining Queue elements are " + queue.print());
After removing “40” element, now re-check queue length and the print out the remaining queue elements:
console.log(queue.length());
console.log("Remaining Queue elements are " + queue.print());
 Check out the front element of the queue:
console.log(queue.peek()+ " is at the front of queue");
After removing the element “40”, “50” is now at the front of the JavaScript queue:
Check out the front element of the queue:
console.log(queue.peek()+ " is at the front of queue");
After removing the element “40”, “50” is now at the front of the JavaScript queue:
 Now, we will clear the queue by utilizing the “queue.clear()” method:
queue.clear();
Now, we will clear the queue by utilizing the “queue.clear()” method:
queue.clear();
 Lastly, verify if the queue is empty or not:
queue.isEmpty();
In the following output, “true” indicates that the length of the queue is equal to “0,” which means that the queue is empty:
Lastly, verify if the queue is empty or not:
queue.isEmpty();
In the following output, “true” indicates that the length of the queue is equal to “0,” which means that the queue is empty:
 That was all about the essential information about implementing the JavaScript queue using an array.
You can further explore it according to your requirements.
That was all about the essential information about implementing the JavaScript queue using an array.
You can further explore it according to your requirements.
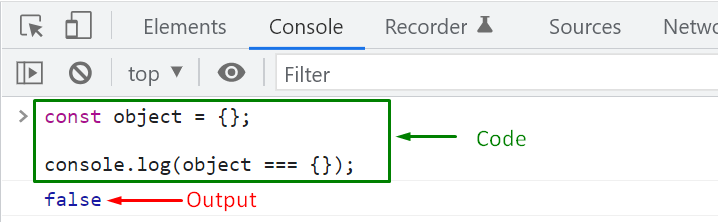 At this point, you may wonder that if we have compared two empty JavaScript objects, then why the comparison operator return case is set as “false” instead of “true”?
In the above example, we compared the object references, not their values, and the references of these empty objects are not the same.
That’s the reason the specified comparison has not shown the expected results.
So,, is there any other way to verify if an object is empty?
The answer is Yes! JavaScript offers several methods for this purpose, such as:
Object.keys() method
JSON.stringify() method
Object.getOwnPropertyNames() method
jQuery.isEmptyObject() method
We will briefly discuss each of the mentioned methods in the following sections.
At this point, you may wonder that if we have compared two empty JavaScript objects, then why the comparison operator return case is set as “false” instead of “true”?
In the above example, we compared the object references, not their values, and the references of these empty objects are not the same.
That’s the reason the specified comparison has not shown the expected results.
So,, is there any other way to verify if an object is empty?
The answer is Yes! JavaScript offers several methods for this purpose, such as:
Object.keys() method
JSON.stringify() method
Object.getOwnPropertyNames() method
jQuery.isEmptyObject() method
We will briefly discuss each of the mentioned methods in the following sections.


 As you can see, the “Object.getOwnPropertyNames()” method has returned “true” for “employee1” because it is an empty object, and the return case of the second method output “false” as “employee2″ is a non-empty object, and it has two keys.

 We have compiled different ways to check if an object is empty.
Utilize any given methods in your program and attain the required result.
We have compiled different ways to check if an object is empty.
Utilize any given methods in your program and attain the required result.
 Now, we will specify “age” as a property in the “hasOwnProperty()” and check the return case:
let info= employee.hasOwnProperty('gender');
console.log(info);
As “age” property does not exist in the “hasOwnProperty()”, that’s why the return case is set to “false”:
Now, we will specify “age” as a property in the “hasOwnProperty()” and check the return case:
let info= employee.hasOwnProperty('gender');
console.log(info);
As “age” property does not exist in the “hasOwnProperty()”, that’s why the return case is set to “false”:
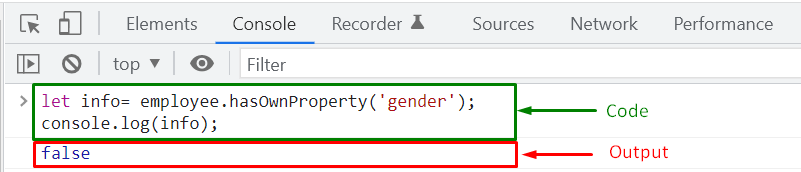 Remember, the “hasOwnProperty()” method only searches for the “own” properties of an object, not the inherited ones.
For instance, when you create an object, it automatically inherits the “toString” property of “Object”, however, the “hasOwnProperty()” method will not recognize “toString” as the property of the “employee” object:
let info= employee.hasOwnProperty('toString');
console.log(info);
The output will print out “false” because “toString” is an inherited property of the “employee” object, and “hasOwnProperty()” only perform the search operation for the “own” properties of a JavaScript object:
Remember, the “hasOwnProperty()” method only searches for the “own” properties of an object, not the inherited ones.
For instance, when you create an object, it automatically inherits the “toString” property of “Object”, however, the “hasOwnProperty()” method will not recognize “toString” as the property of the “employee” object:
let info= employee.hasOwnProperty('toString');
console.log(info);
The output will print out “false” because “toString” is an inherited property of the “employee” object, and “hasOwnProperty()” only perform the search operation for the “own” properties of a JavaScript object:
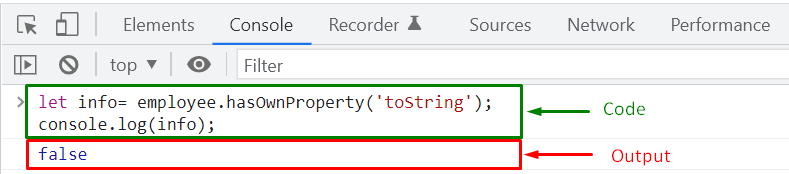 Now, let’s move towards other methods for checking the existence of property within a JavaScript object.
 Now, we will search out “gender” property in the “keys” array:
console.log(keys.includes("gender"));
As the “employee” object does not contain any “gender” property, so the “keys.includes()” method will return “false”:
Now, we will search out “gender” property in the “keys” array:
console.log(keys.includes("gender"));
As the “employee” object does not contain any “gender” property, so the “keys.includes()” method will return “false”:
 Also, the “keys.includes()” only checks for the specified property within the “keys” array.
That’s why the return case of the “key.includes()” method is set to false after looking for an inherited key:
console.log(keys.includes("toString"));
The “keys.includes()” method has not found the “toString” property with the “keys” array, therefore, the output has displayed “false” value:
Also, the “keys.includes()” only checks for the specified property within the “keys” array.
That’s why the return case of the “key.includes()” method is set to false after looking for an inherited key:
console.log(keys.includes("toString"));
The “keys.includes()” method has not found the “toString” property with the “keys” array, therefore, the output has displayed “false” value:
 Both “hasOwnProperty()” and “includes()” methods check for the “own” properties of an object.
What if you want to check any inherited property? Utilize the “in” operator in such a scenario.
Both “hasOwnProperty()” and “includes()” methods check for the “own” properties of an object.
What if you want to check any inherited property? Utilize the “in” operator in such a scenario.
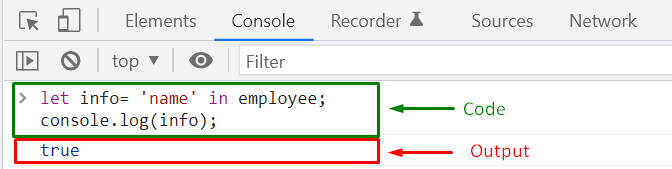 The “in” operator returns “true” as the “name” property exists in the “employee” object.
However, for the “gender” property, it will output “false” because we have not added the “employee” object declaration:
info= 'gender' in employee;
console.log(info);
The “in” operator returns “true” as the “name” property exists in the “employee” object.
However, for the “gender” property, it will output “false” because we have not added the “employee” object declaration:
info= 'gender' in employee;
console.log(info);
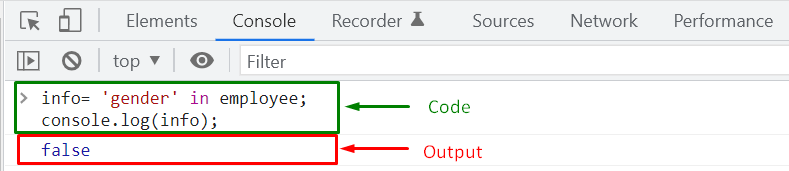 Lastly, utilize the “in” operator to check the inherited “toString” property of the “employee” object:
let info= 'toString' in employee;
console.log(info);
As you can see from the output, the “in” operator has successfully checked the existence of the passed inherited property and returned “true”:
Lastly, utilize the “in” operator to check the inherited “toString” property of the “employee” object:
let info= 'toString' in employee;
console.log(info);
As you can see from the output, the “in” operator has successfully checked the existence of the passed inherited property and returned “true”:
 We have compiled different ways to check if a property exists in a JavaScript object.
You can utilize any given method in your program to attain the required results.
We have compiled different ways to check if a property exists in a JavaScript object.
You can utilize any given method in your program to attain the required results.
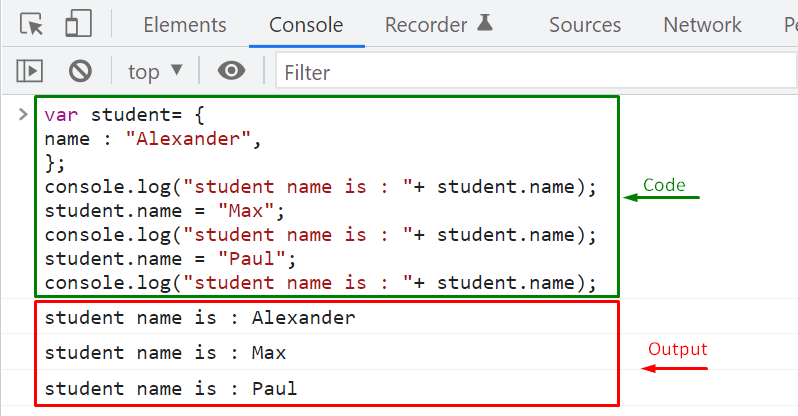 As you can see, everything is working perfectly according to the added logic.
However, a problem will arise when a user inputs an integer value for the “student.name” property.
As you can see, everything is working perfectly according to the added logic.
However, a problem will arise when a user inputs an integer value for the “student.name” property.
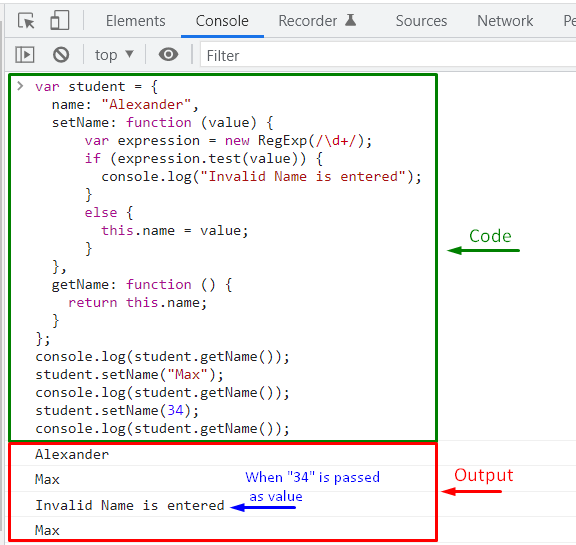 We have successfully performed the validation using a Regex Expression in the setter method, but our program is not fully encapsulated.
That’s because the “name” property is declared globally, which permits the caller to access and modify its value:
student.name = 34;
console.log(student.getName());
We have successfully performed the validation using a Regex Expression in the setter method, but our program is not fully encapsulated.
That’s because the “name” property is declared globally, which permits the caller to access and modify its value:
student.name = 34;
console.log(student.getName());
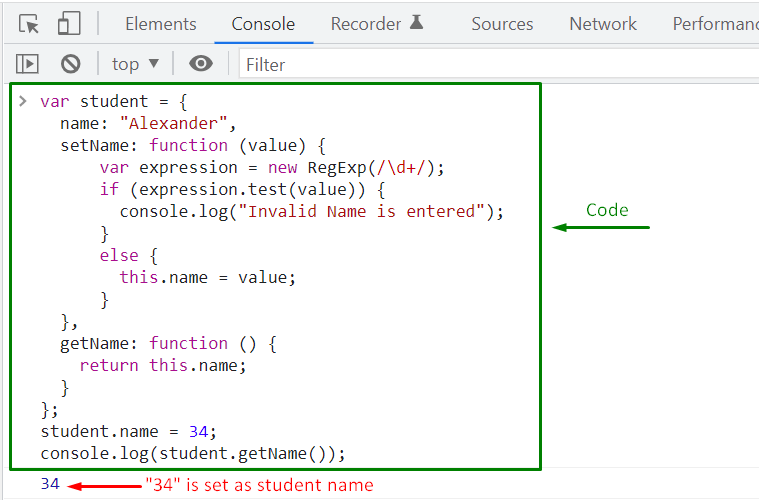 The above-given output shows that when we have directly accessed the “name” property of the “student” object, validation does not happen, and “34” is set as the property value.
This action proves that if an object’s property is available globally, it can be easily accessed, which risks the security of the data.
The above-given output shows that when we have directly accessed the “name” property of the “student” object, validation does not happen, and “34” is set as the property value.
This action proves that if an object’s property is available globally, it can be easily accessed, which risks the security of the data.
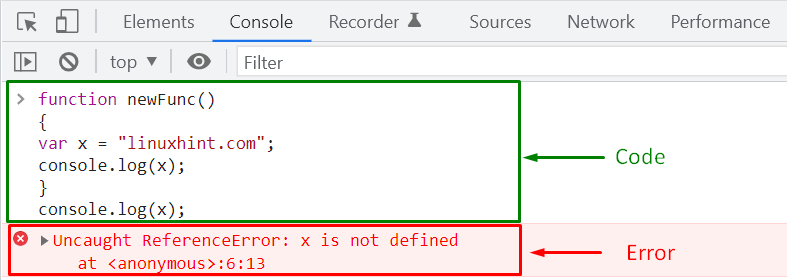 Similarly, adding “name” as a private variable within the “setter” method will restrict its direct access.
In this scenario, the “name” variable can not be utilized outside of the “setter” method scope, which means that the “getter” method can not access it too.
Using “Closures” is the simplest and most elegant way to implement Encapsulation.
Similarly, adding “name” as a private variable within the “setter” method will restrict its direct access.
In this scenario, the “name” variable can not be utilized outside of the “setter” method scope, which means that the “getter” method can not access it too.
Using “Closures” is the simplest and most elegant way to implement Encapsulation.
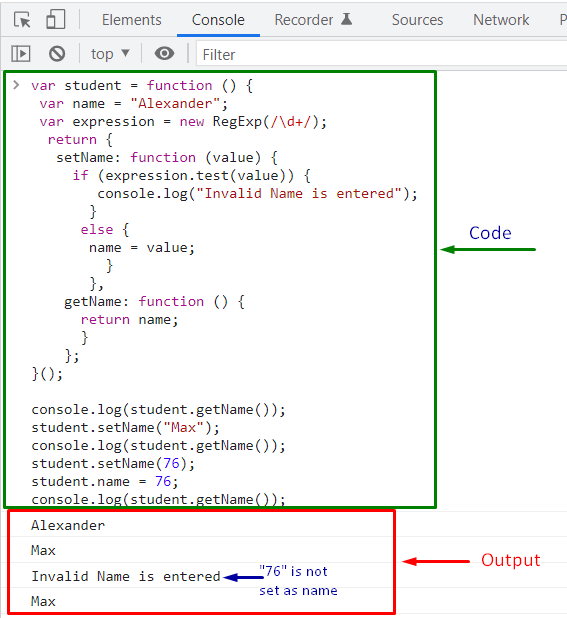 That was all about the basic information related to Encapsulation in JavaScript; you can further explore it according to our requirements.
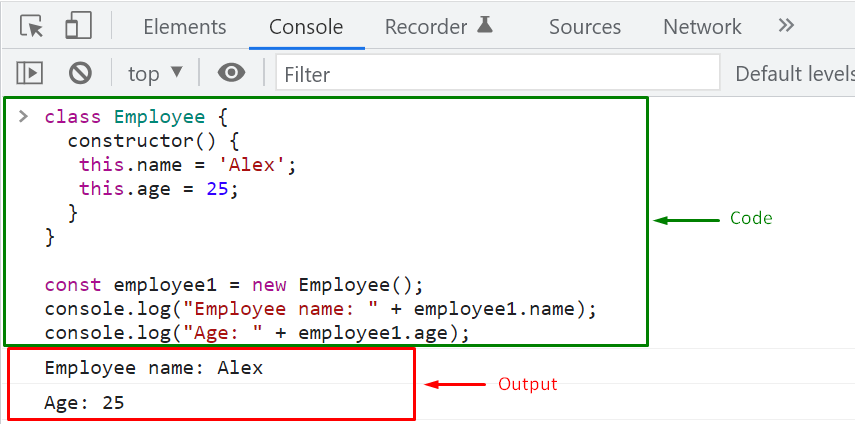 Utilizing Default Constructor is helpful when you want to initialize the properties of all of the created objects with the same value.
But, what if you need to assign some unique values to the objects while creating them?, you can achieve this functionality with the help of the “Parameterized Constructor” method.
Utilizing Default Constructor is helpful when you want to initialize the properties of all of the created objects with the same value.
But, what if you need to assign some unique values to the objects while creating them?, you can achieve this functionality with the help of the “Parameterized Constructor” method.
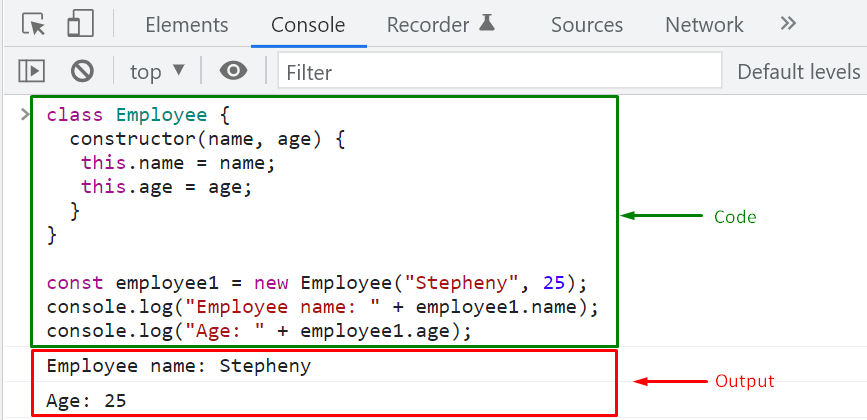 The above-given output signifies that we have successfully created an “employee1” object having the specified property values with the help of the Parameterized Constructor method.
Now, let’s discuss the Built-in Constructors of JavaScript.
The above-given output signifies that we have successfully created an “employee1” object having the specified property values with the help of the Parameterized Constructor method.
Now, let’s discuss the Built-in Constructors of JavaScript.
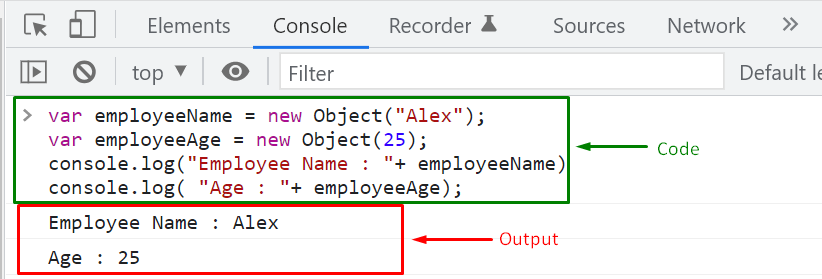 Remember, you can specify any value in the “Object()” constructor, and it does not change the type of created object.
For example, we have initialized “employeeName” with a string value, and “employeeAge” contains a number value.
Still, the type of the “employeeName” and “employeeAge” is set to “object”:
Remember, you can specify any value in the “Object()” constructor, and it does not change the type of created object.
For example, we have initialized “employeeName” with a string value, and “employeeAge” contains a number value.
Still, the type of the “employeeName” and “employeeAge” is set to “object”:

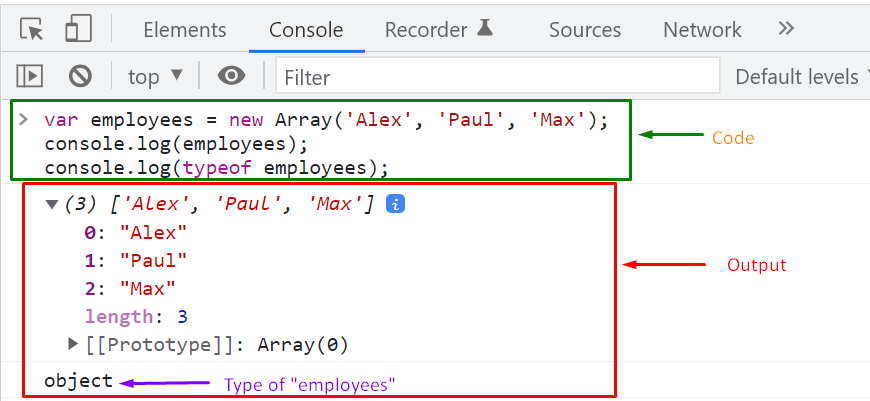 The Constructor method added in a user-defined class have their own significance; however, their scope is restricted, as you cannot utilize these constructors throughout your application whenever the creation of an object is needed.
Also, the Built-in Constructor does not permit you to customize itself.
In such a scenario, you can create a Custom Constructor function for customizing the behavior of a Constructor, which can be utilized anywhere in a program.
The Constructor method added in a user-defined class have their own significance; however, their scope is restricted, as you cannot utilize these constructors throughout your application whenever the creation of an object is needed.
Also, the Built-in Constructor does not permit you to customize itself.
In such a scenario, you can create a Custom Constructor function for customizing the behavior of a Constructor, which can be utilized anywhere in a program.
 We have compiled the essential information related to Constructor methods, Built-in Constructors, and Custom Constructor Functions.
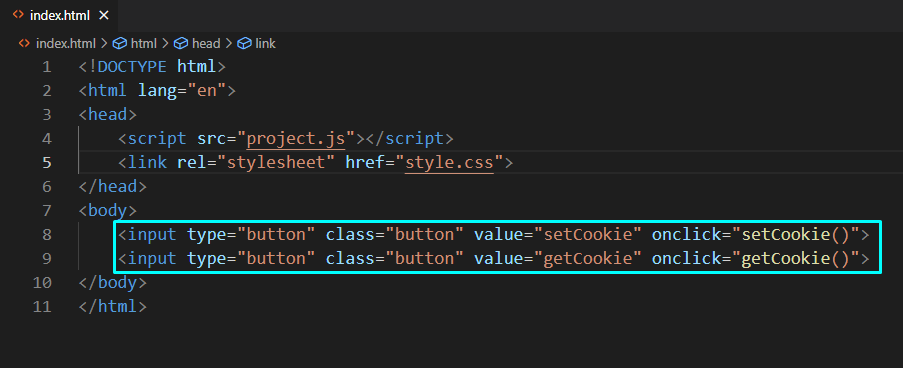 In our “project.js” file, we will define the “setCookie()” and “getCookie()” functions that are associated with the “onclick” events of the “setCookie” and “getCookie” buttons.
The “setCookie()” function will create a cookie having “username” as cookie “name” and “Sharqa” as its “value”, and the “expires” attribute’s value as “Sun, 10 Aug 2030 12:00:00 UTC”:
function setCookie() {
document.cookie = "username=Sharqa;expires=Sun, 10 Aug 2030 12:00:00 UTC";}
Then, after checking the length of the created cookie in the “if” statement, the “getCookie()” function will fetch the cookie “name” and “value” and display it in an alert box.
In the other case, if the cookie gets expired or deleted, the alert box will state that “Cookie not available”:
functiongetCookie() {
if (document.cookie.length != 0) {
vararray = document.cookie.split("=");
alert("Name=" + array[0] + " " + "Value=" + array[1]);
}
else {
alert("Cookie not available");
}}
In our “project.js” file, we will define the “setCookie()” and “getCookie()” functions that are associated with the “onclick” events of the “setCookie” and “getCookie” buttons.
The “setCookie()” function will create a cookie having “username” as cookie “name” and “Sharqa” as its “value”, and the “expires” attribute’s value as “Sun, 10 Aug 2030 12:00:00 UTC”:
function setCookie() {
document.cookie = "username=Sharqa;expires=Sun, 10 Aug 2030 12:00:00 UTC";}
Then, after checking the length of the created cookie in the “if” statement, the “getCookie()” function will fetch the cookie “name” and “value” and display it in an alert box.
In the other case, if the cookie gets expired or deleted, the alert box will state that “Cookie not available”:
functiongetCookie() {
if (document.cookie.length != 0) {
vararray = document.cookie.split("=");
alert("Name=" + array[0] + " " + "Value=" + array[1]);
}
else {
alert("Cookie not available");
}}
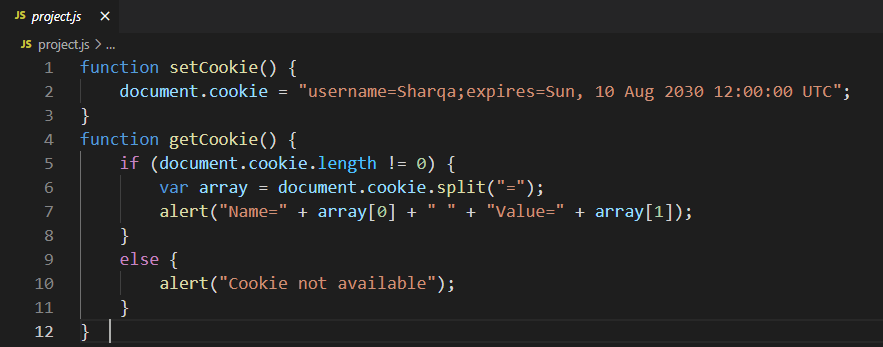 Now, we will save both files and then utilize the VS Code “Live Server” extension to run the application in the browser:
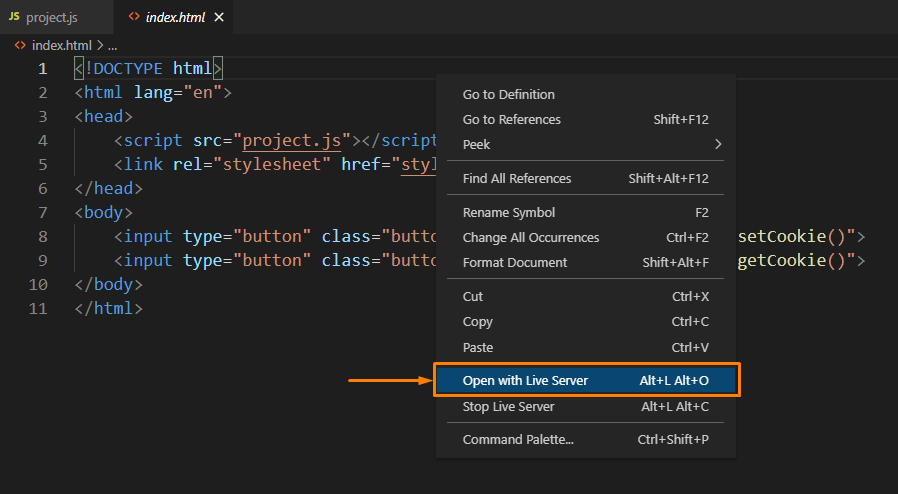 The opened web page comprises two buttons: “setCookie” and “getCookie”, where clicking on the “setCookie” will create a new cookie with specified “name”, “value”, and “expires” attribute value:
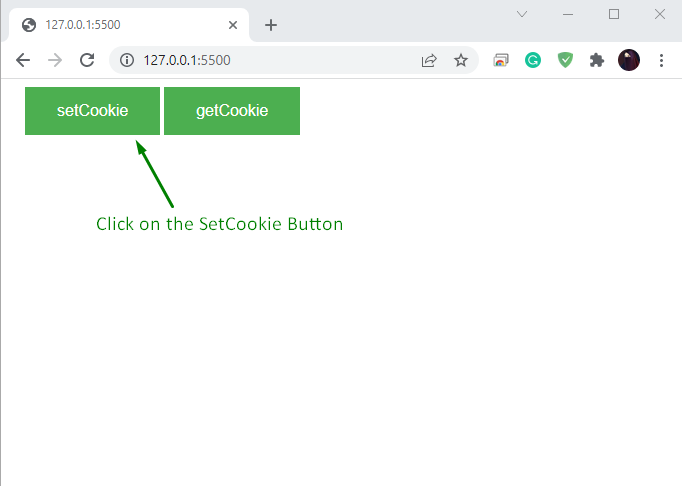 To view the “name-value” cookie pair in an alert box, click on the “getCookie” button:
 The following alert box shows the cookie name as “username” and its value as “Sharqa”:
 You can also use the “Developer Console” to check the details related to the added cookie.
To do so, right-click on the browser, and from its context menu, select the “Inspect” option:
You can also use the “Developer Console” to check the details related to the added cookie.
To do so, right-click on the browser, and from its context menu, select the “Inspect” option:
 Next, click on the “Application” option from the top-bar of the Developer console and look for “Cookies” in the “Storage” menu, present at the left side of the window:
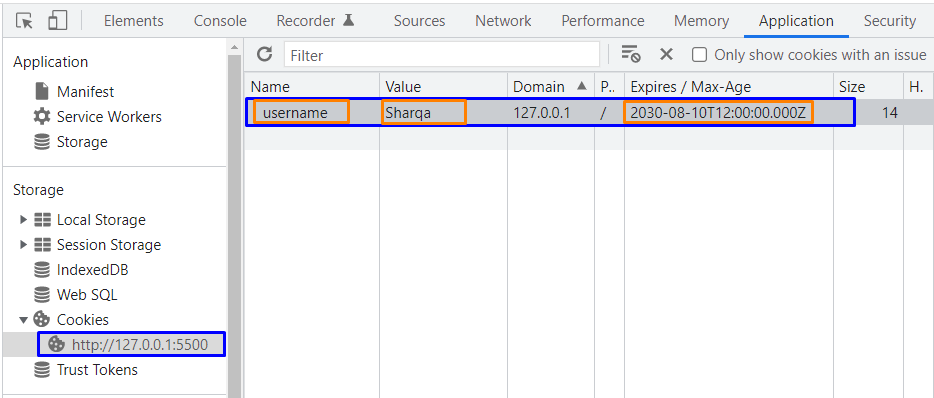 It can be seen in the above-given image that we have successfully created a cookie and set its expiration date with the help of the “expires” attribute.
 After saving the added code, open up the “index.html” file in the browser and click on the “setCookie” button for creating a new cookie and setting its lifetime:
 The following alert box will be now displayed on the browser:
 To verify the lifetime of the created cookie, explore the “Expires / Max-Age” column in the following window:
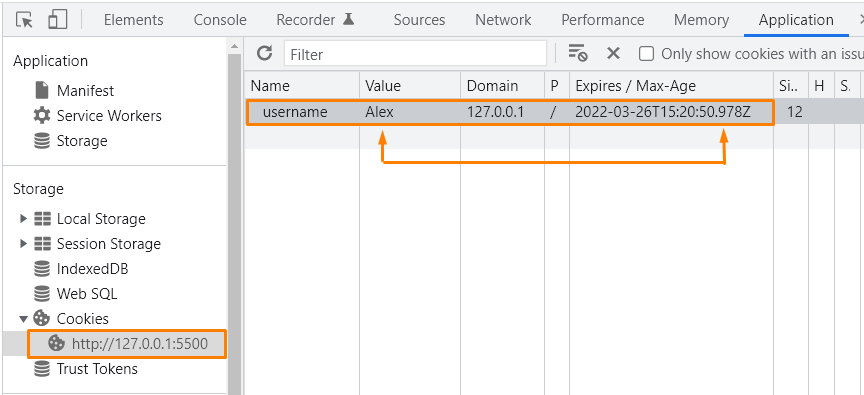 In the above-given image, the “Expires / Max-Age” column contains the specified “max-age” attribute value according to the “Unix timestamp epoch”.
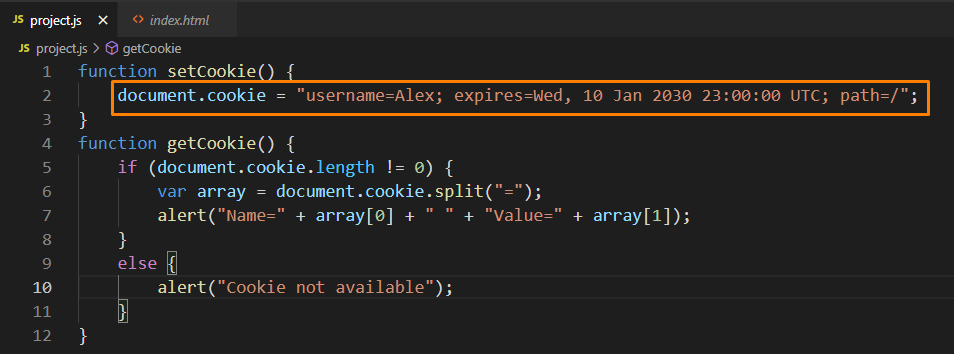 Now, click on the “setCookie” button, and then move to the Developer console window for the reconfirmation of the added path:
 As you can see in the “Path” column, the path attribute of the “username” cookie is set to “/”:
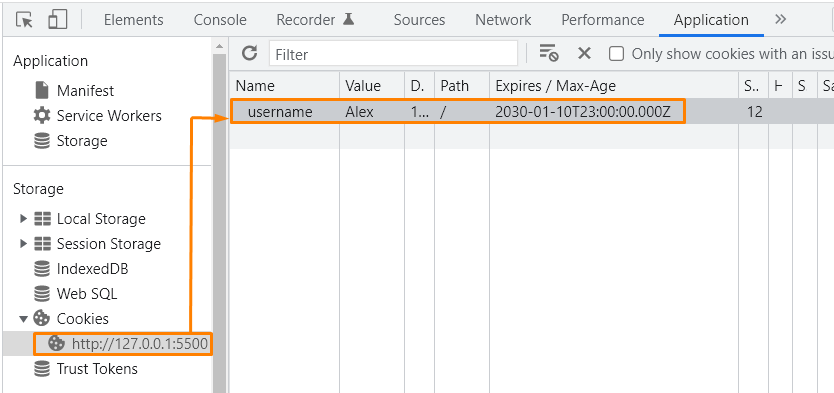 The “path” and the “domain” attribute of cookies are primarily used together while creating a cookie.
Now, we will discuss the “domain” attribute in the next section.
The “path” and the “domain” attribute of cookies are primarily used together while creating a cookie.
Now, we will discuss the “domain” attribute in the next section.
 Instead of “linuxhint.com”, if we provide the sub-domain “blog.linuxhint.com”, then the “username” cookie will be valid only for the added subdomain.
Therefore, the ideal approach is to specify the corresponding domain instead of the sub-domain value.
For the demonstration purpose, we will set “127.0.0.1” as a domain for a cookie:
document.cookie = "name=sharqa; path=/; domain=127.0.0.1";
Instead of “linuxhint.com”, if we provide the sub-domain “blog.linuxhint.com”, then the “username” cookie will be valid only for the added subdomain.
Therefore, the ideal approach is to specify the corresponding domain instead of the sub-domain value.
For the demonstration purpose, we will set “127.0.0.1” as a domain for a cookie:
document.cookie = "name=sharqa; path=/; domain=127.0.0.1";
 The below-given output signifies that we have successfully set “127.0.0.1” as a valid domain for the created “key-value” cookie pair:
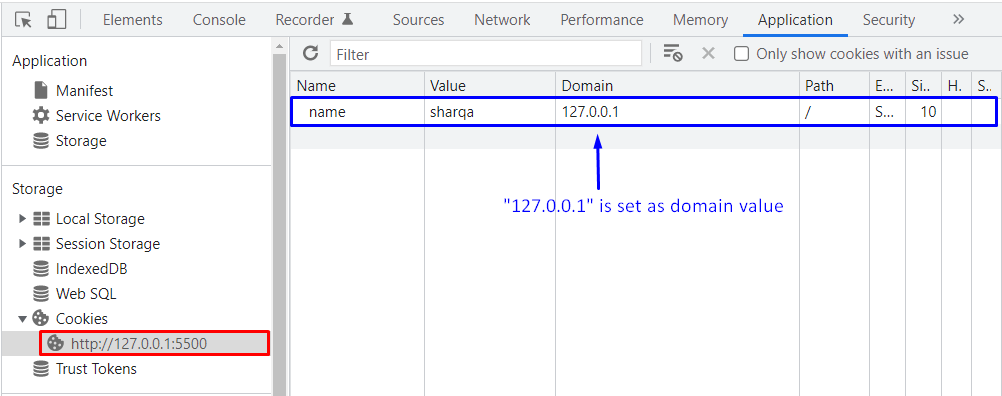 We have compiled the essential information related to attributes of Cookies in JavaScript.
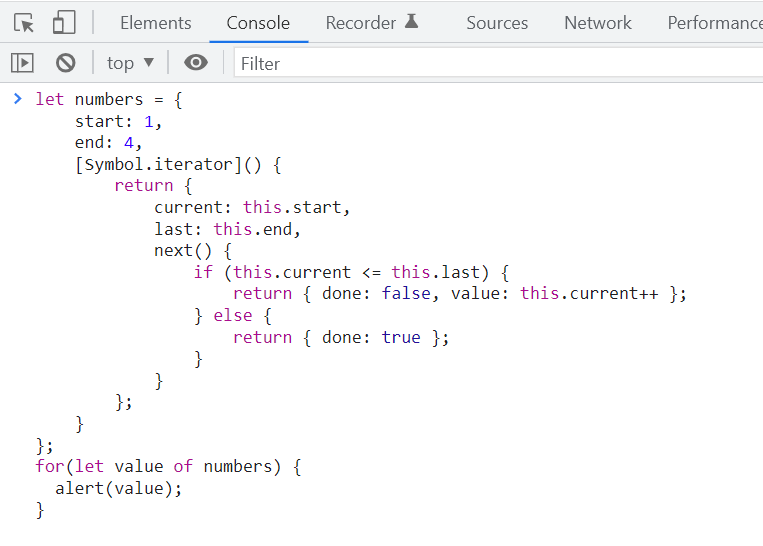 We have successfully iterated over each element of the “numbers” object which can be seen in the following gif:
 As mentioned earlier, regular JavaScript iterators can help you iterate over the synchronous data.
What if the values come asynchronously because of any delay? In such a scenario, you must implement the Asynchronous Iterators in JavaScript.
As mentioned earlier, regular JavaScript iterators can help you iterate over the synchronous data.
What if the values come asynchronously because of any delay? In such a scenario, you must implement the Asynchronous Iterators in JavaScript.
 By this point, you have understood the working of Asynchronous Iterators.
Now, we will move ahead and learn about Asynchronous Generators.
By this point, you have understood the working of Asynchronous Iterators.
Now, we will move ahead and learn about Asynchronous Generators.
 If you want to retrieve Promise based results from the “Generator“, you have to use “Asynchronous Generator” in the JavaScript program.
 We have provided the essential information related to Asynchronous Iterators and Asynchronous Generators.
Both of them can be used for iterating over asynchronous data, however; It can be challenging for beginners to maintain the internal logic or definition of the Asynchronous Iterators, whereas the Asynchronous Generators offers a more efficient and less error-prone way of utilizing iterators.
It also hides the iterator’s complexity and makes code concise and readable.
So, we recommend you use Asynchronous Generators to handle iterations related to asynchronous data collection.
We have provided the essential information related to Asynchronous Iterators and Asynchronous Generators.
Both of them can be used for iterating over asynchronous data, however; It can be challenging for beginners to maintain the internal logic or definition of the Asynchronous Iterators, whereas the Asynchronous Generators offers a more efficient and less error-prone way of utilizing iterators.
It also hides the iterator’s complexity and makes code concise and readable.
So, we recommend you use Asynchronous Generators to handle iterations related to asynchronous data collection.
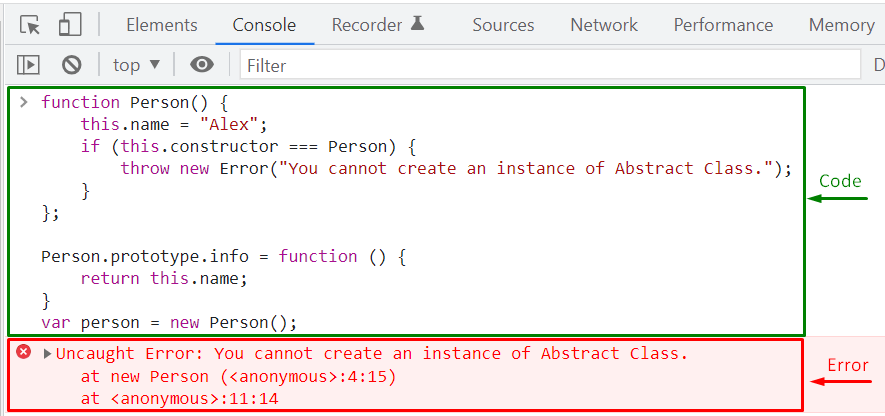 Now, we will extend the above-given example by implementing the “Inheritance”.
For this purpose, we will create another constructor function that inherits the methods and properties of the “Person” Abstract class.
Now, we will extend the above-given example by implementing the “Inheritance”.
For this purpose, we will create another constructor function that inherits the methods and properties of the “Person” Abstract class.
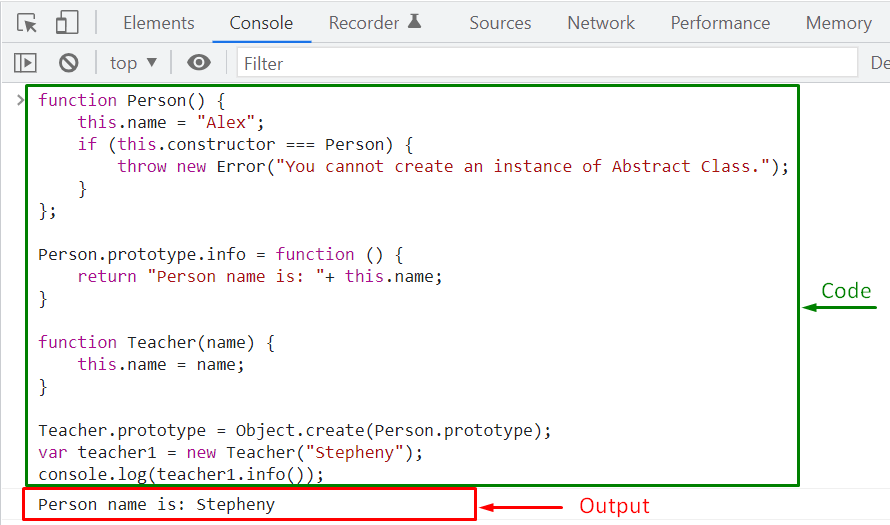 We have tried to implement Abstraction in previous examples; however, all of the properties of an Abstract Class are not completely satisfied; as we have not defined any Abstract methods yet.
The ES6 JavaScript version offers many enhanced features such as creating “Class” using the “class” keyword and implementing methods.
It also allows you to define Abstract methods within an Abstract class and extend them in the child or subclasses with the help of “Inheritance”.
In the following example, we will implement a JavaScript Abstract Class having the specified properties.
We have tried to implement Abstraction in previous examples; however, all of the properties of an Abstract Class are not completely satisfied; as we have not defined any Abstract methods yet.
The ES6 JavaScript version offers many enhanced features such as creating “Class” using the “class” keyword and implementing methods.
It also allows you to define Abstract methods within an Abstract class and extend them in the child or subclasses with the help of “Inheritance”.
In the following example, we will implement a JavaScript Abstract Class having the specified properties.
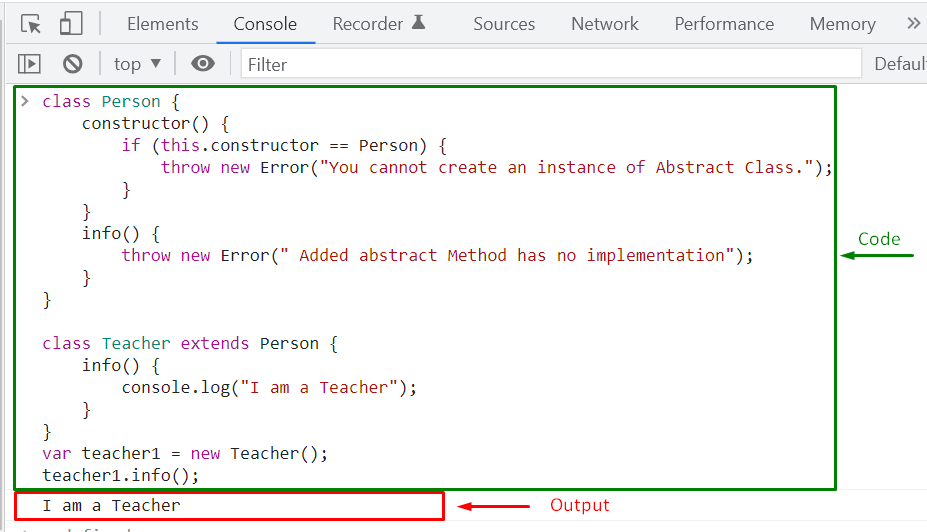 If the Parent class abstract “info()” method is invoked in the “Teacher” class, it will throw an error.
To verify this case, add the following code line in the definition of the child class “info()” method and then again execute the program:
super.info();
The given output signifies that executing the Abstract method of an Abstract class will throw an Error:
If the Parent class abstract “info()” method is invoked in the “Teacher” class, it will throw an error.
To verify this case, add the following code line in the definition of the child class “info()” method and then again execute the program:
super.info();
The given output signifies that executing the Abstract method of an Abstract class will throw an Error:
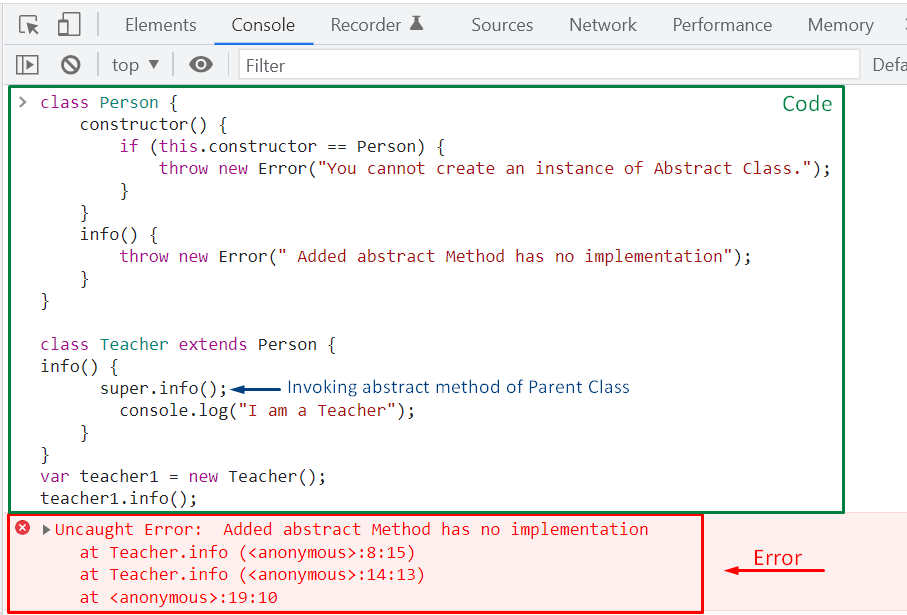 We have compiled all of the essential information related to Abstraction.
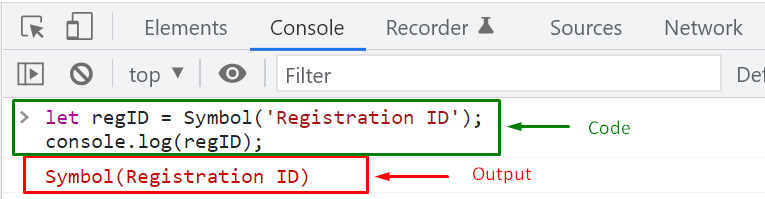
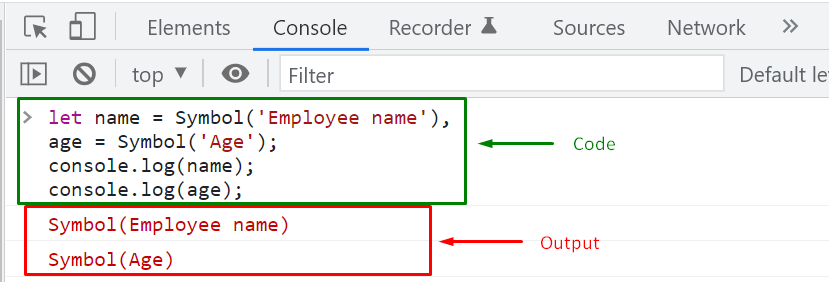 Now, we will use the JavaScript “typeof” operator to determine whether “name” and “age” variables are created as a symbol or not:
console.log(typeof name);
console.log(typeof age);
As you can see from the output, the “typeof” operator returned “symbol” as the type of the specified variables:
Now, we will use the JavaScript “typeof” operator to determine whether “name” and “age” variables are created as a symbol or not:
console.log(typeof name);
console.log(typeof age);
As you can see from the output, the “typeof” operator returned “symbol” as the type of the specified variables:
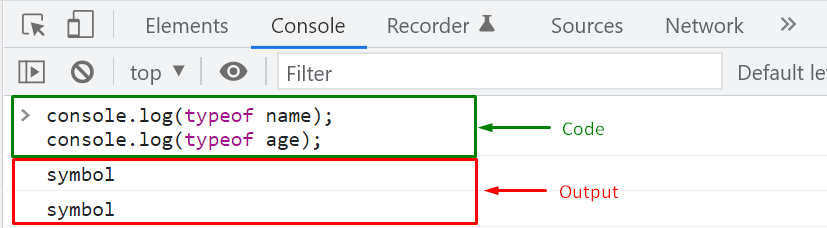 Remember that symbols are only created with the help of the “Symbol()” global function.
For the same purpose, using the “new” operator will throw an error as Symbols are primitive values:
let regID = new Symbol();
“regID” symbol will not be created, and the following “TypeError” will be shown:
Remember that symbols are only created with the help of the “Symbol()” global function.
For the same purpose, using the “new” operator will throw an error as Symbols are primitive values:
let regID = new Symbol();
“regID” symbol will not be created, and the following “TypeError” will be shown:
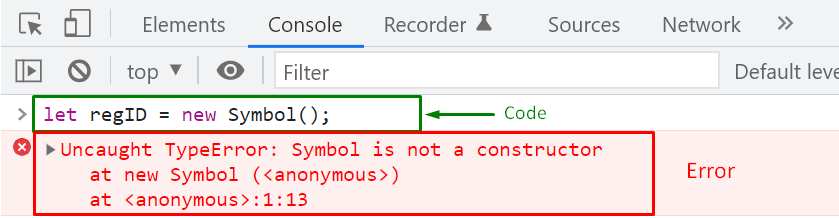 The previous section provided the method for creating symbols as primitive type values.
Now, we will move ahead and discuss how you can share symbols.
The previous section provided the method for creating symbols as primitive type values.
Now, we will move ahead and discuss how you can share symbols.
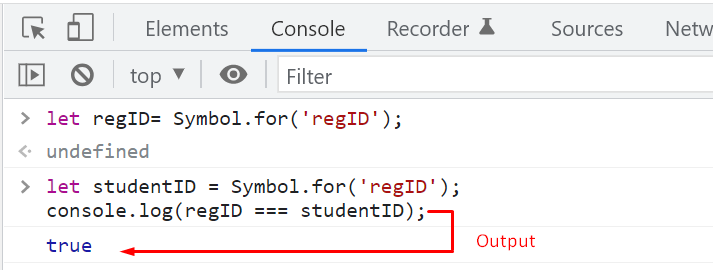 For the verification of the key associated with the “studentID”, we will execute the “keyFor()” method and pass the “studentID” as an argument:
console.log(Symbol.keyFor(studentID));
The “keyFor()” method will return “regID” as the studentID symbol’s key:
For the verification of the key associated with the “studentID”, we will execute the “keyFor()” method and pass the “studentID” as an argument:
console.log(Symbol.keyFor(studentID));
The “keyFor()” method will return “regID” as the studentID symbol’s key:
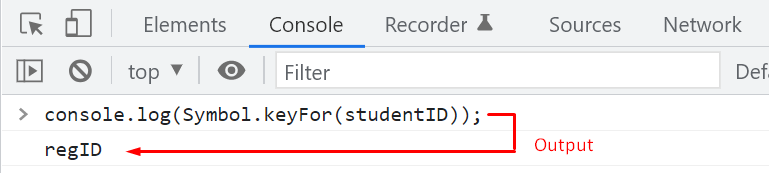 If you are searching for a symbol that is not added in the Global Symbol Registry, then the “keyFor()” method will return “undefined” value for the specified value:
let employeeID = Symbol('employeeID');
console.log(Symbol.keyFor(employeeID));
Here, the “employeeID” symbol does not exist in the Global Symbol Registry, because it is created using the “Symbol()” instead of “Symbol.for()” method, and when the “Symbol.for()” method looks for it in the Global Symbol Registry, it returned “undefined”:
If you are searching for a symbol that is not added in the Global Symbol Registry, then the “keyFor()” method will return “undefined” value for the specified value:
let employeeID = Symbol('employeeID');
console.log(Symbol.keyFor(employeeID));
Here, the “employeeID” symbol does not exist in the Global Symbol Registry, because it is created using the “Symbol()” instead of “Symbol.for()” method, and when the “Symbol.for()” method looks for it in the Global Symbol Registry, it returned “undefined”:
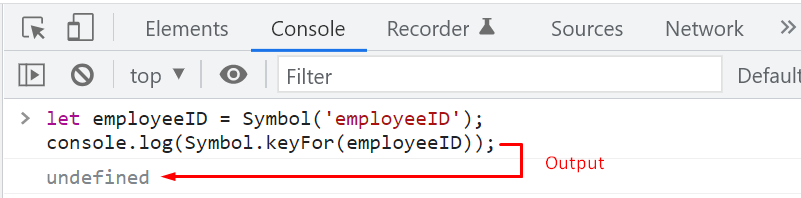 You have seen that creating and sharing symbol primitive values is pretty straightforward.
The following section will demonstrate how you can use these symbols in your JavaScript code.
You have seen that creating and sharing symbol primitive values is pretty straightforward.
The following section will demonstrate how you can use these symbols in your JavaScript code.
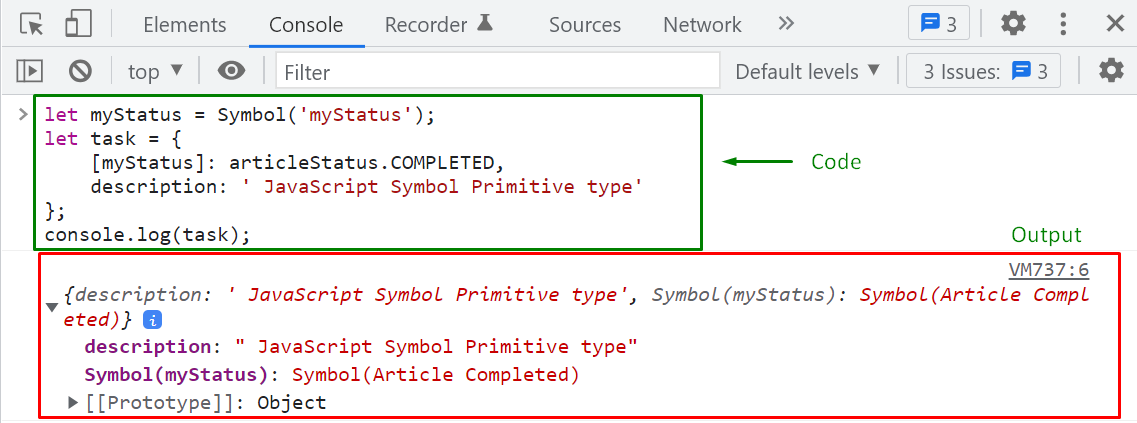 The above-given output signifies that symbols work perfectly for creating hidden properties which can be only accessed with their associated objects.
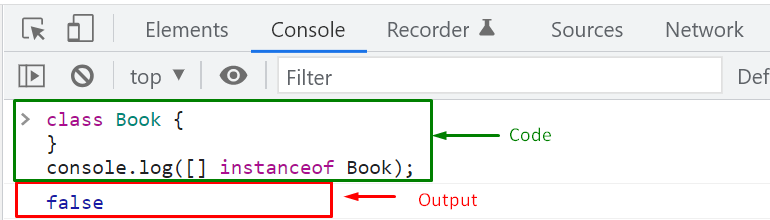 You can add the “Symbol.hasInstance” symbol to define array “[ ]” as an instance of the “Book” Class:
class Book {static [Symbol.hasInstance](obj) {return Array.isArray(obj);}}
console.log([] instanceof Book);
Output
You can add the “Symbol.hasInstance” symbol to define array “[ ]” as an instance of the “Book” Class:
class Book {static [Symbol.hasInstance](obj) {return Array.isArray(obj);}}
console.log([] instanceof Book);
Output
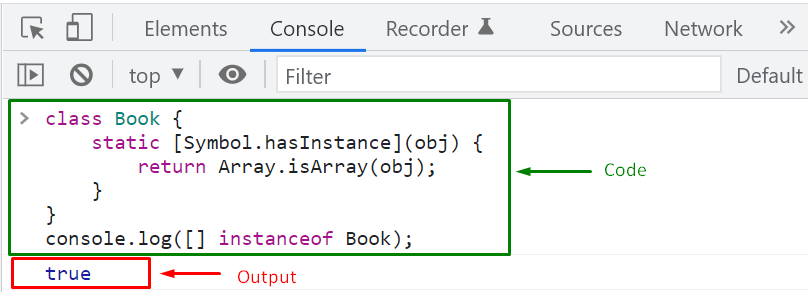 Hence, the “instanceof” operator returned “true” after performing the specified check on the array “[ ]”.
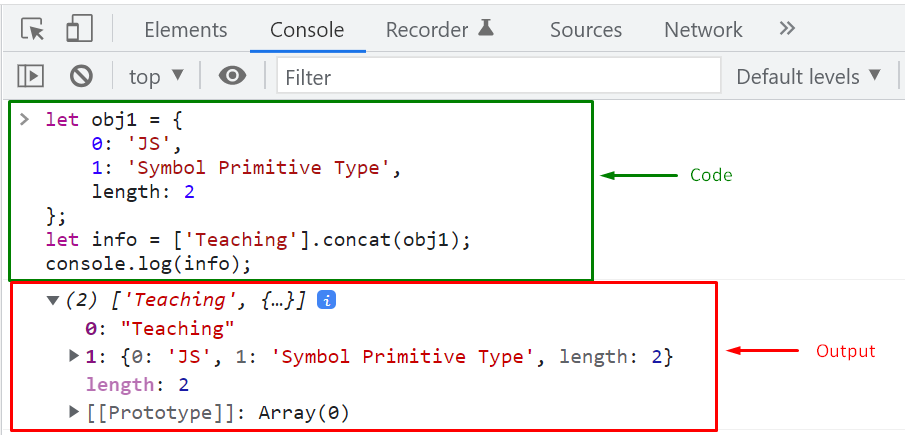 If you want to individually add the elements of “obj1” to the array, you have to add the Symbol.isConcatSpreadable Symbol as a property to “obj1” and set its value to “true”:
let obj1 = {0: 'JS',1: 'Symbol Primitive Type',
length: 2,[Symbol.isConcatSpreadable]: true};
let info = ['Teaching'].concat(obj1);
console.log(info);
Check out the below-given output; the “obj1” elements are added individually in the resultant “info” array:
If you want to individually add the elements of “obj1” to the array, you have to add the Symbol.isConcatSpreadable Symbol as a property to “obj1” and set its value to “true”:
let obj1 = {0: 'JS',1: 'Symbol Primitive Type',
length: 2,[Symbol.isConcatSpreadable]: true};
let info = ['Teaching'].concat(obj1);
console.log(info);
Check out the below-given output; the “obj1” elements are added individually in the resultant “info” array:
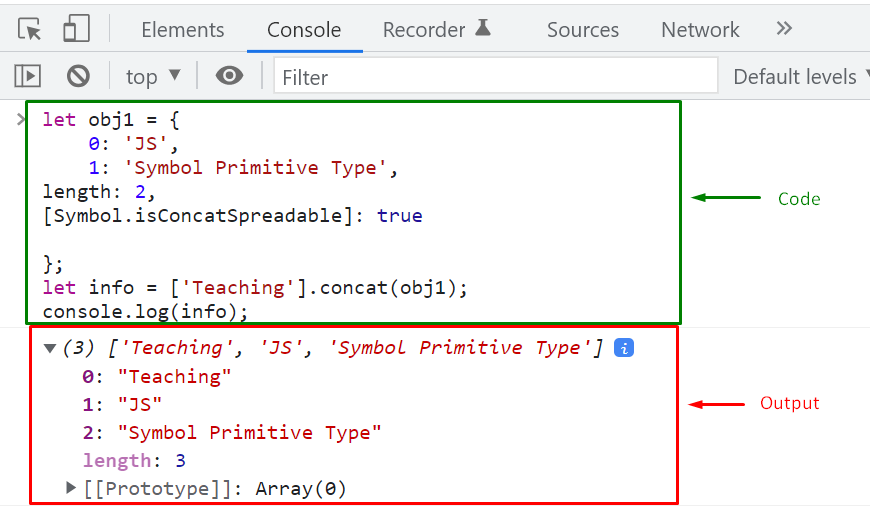 We have compiled all of the essential information related to the JavaScript Symbol Primitive Type.


 At this point, you have understood what primitive data types are; now, we will learn about the concept behind accessing properties or methods of primitive values.
 The above-given code is working perfectly, and now you must be wondering how the “language” variable invoked the “substring()” method that is associated with the string class?
The answer to this question is that whenever you call a method with a primitive value; JavaScript automatically creates an “object” according to the corresponding primitive data type, “string“.
After that, it invokes the specified method with the help of the created instance and then deletes the instance immediately from memory.
So technically, our executed program is equivalent to this code:
let language = 'JavaScript';// when language.substring(4) is invoked;
let tmp = new String(language);
str1 = tmp.substring(4);
console.log(str1);
tmp = null;
Execution of the above-given program will also show the same output:
The above-given code is working perfectly, and now you must be wondering how the “language” variable invoked the “substring()” method that is associated with the string class?
The answer to this question is that whenever you call a method with a primitive value; JavaScript automatically creates an “object” according to the corresponding primitive data type, “string“.
After that, it invokes the specified method with the help of the created instance and then deletes the instance immediately from memory.
So technically, our executed program is equivalent to this code:
let language = 'JavaScript';// when language.substring(4) is invoked;
let tmp = new String(language);
str1 = tmp.substring(4);
console.log(str1);
tmp = null;
Execution of the above-given program will also show the same output:
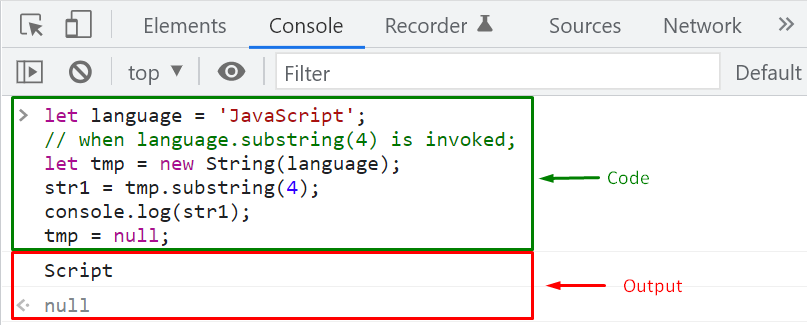 Now, let’s check out the difference between Manual Primitive Wrapper Object and Automatic Primitive Wrapper Object (Primitive Wrapper type).
 Whereas, in the case of automatically created primitive wrapper object or primitive wrapper type, the scope is restricted to a single invoked property and method:
let str1 = 'JavaScript';
str1.language = 'ES6';
console.log(str1.language);
Here, we firstly created a variable “str1” with a string primitive value “JavaScript” in the above example.
After reading the primitive value, JavaScript generates a new string primitive object or primitive wrapper type for “str1“.
Next, the “str1.language = ‘ES6’” command tries to access the language property of the “str1” string and assign value to it.
The “language” property exists in the memory till this point.
Therefore, the output has returned “undefined” instead of the value stored in “str1.language” when the next line is executed:
Whereas, in the case of automatically created primitive wrapper object or primitive wrapper type, the scope is restricted to a single invoked property and method:
let str1 = 'JavaScript';
str1.language = 'ES6';
console.log(str1.language);
Here, we firstly created a variable “str1” with a string primitive value “JavaScript” in the above example.
After reading the primitive value, JavaScript generates a new string primitive object or primitive wrapper type for “str1“.
Next, the “str1.language = ‘ES6’” command tries to access the language property of the “str1” string and assign value to it.
The “language” property exists in the memory till this point.
Therefore, the output has returned “undefined” instead of the value stored in “str1.language” when the next line is executed:
 We have compiled all of the essential information related to the Primitive wrapper types and primitive objects in JavaScript.
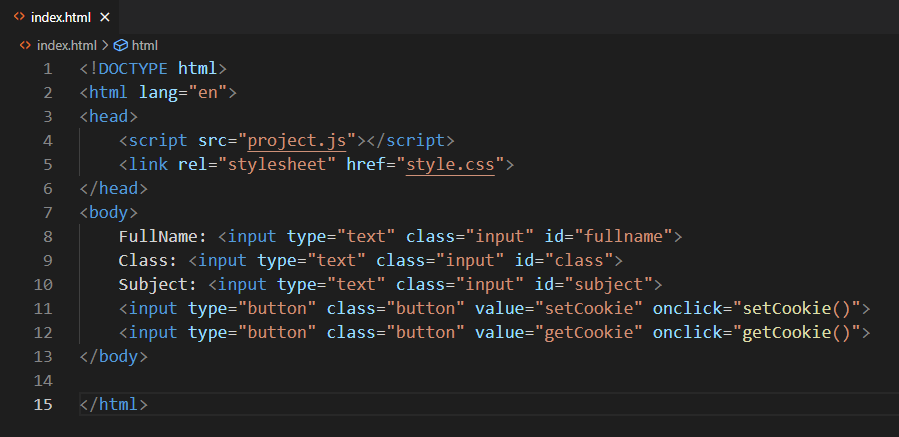 In our “project.js” file, we will define the “setCookie()” associated with the “onclick” event of the “setCookie” buttons.
The “setCookie()” function will access the values of the input fields by utilizing the “document.getElementById()” method and store them all together in a string “studentInfo”.
Then the string “studentInfo” value will be assigned to “document.cookie” object, which results in creating a cookie:
function setCookie() {
var studentInfo = "FullName=" + document.getElementById("fullname").value + ";Class=" + document.getElementById("class").value + ";Subject=" +document.getElementById("subject").value;
document.cookie = studentInfo;
alert("Cookie is created");}
We will define another function named “getCookie()” in the same file.
The “getCookie()” function will check the length of the created cookie in the “if” statement, and then display the created cookie in an alert box.
In the other case, if the cookie get expired or deleted, the alert box will state that “Sorry, is Cookie not available”:
function getCookie() {
if (document.cookie.length != 0) {
alert(document.cookie);
}
else {
alert("Sorry, is Cookie not available")
}}
Here is how our “project.js” file looks like:
In our “project.js” file, we will define the “setCookie()” associated with the “onclick” event of the “setCookie” buttons.
The “setCookie()” function will access the values of the input fields by utilizing the “document.getElementById()” method and store them all together in a string “studentInfo”.
Then the string “studentInfo” value will be assigned to “document.cookie” object, which results in creating a cookie:
function setCookie() {
var studentInfo = "FullName=" + document.getElementById("fullname").value + ";Class=" + document.getElementById("class").value + ";Subject=" +document.getElementById("subject").value;
document.cookie = studentInfo;
alert("Cookie is created");}
We will define another function named “getCookie()” in the same file.
The “getCookie()” function will check the length of the created cookie in the “if” statement, and then display the created cookie in an alert box.
In the other case, if the cookie get expired or deleted, the alert box will state that “Sorry, is Cookie not available”:
function getCookie() {
if (document.cookie.length != 0) {
alert(document.cookie);
}
else {
alert("Sorry, is Cookie not available")
}}
Here is how our “project.js” file looks like:
 We will save both files and then utilize the VS Code “Live Server” extension to run the application in the browser:
 Enter values in the “FullName”, “Class”, and “Subject” input fields and then click on the “setCookie” button:
 An alert box will be generated at this point stating that a “Cookie is created”:
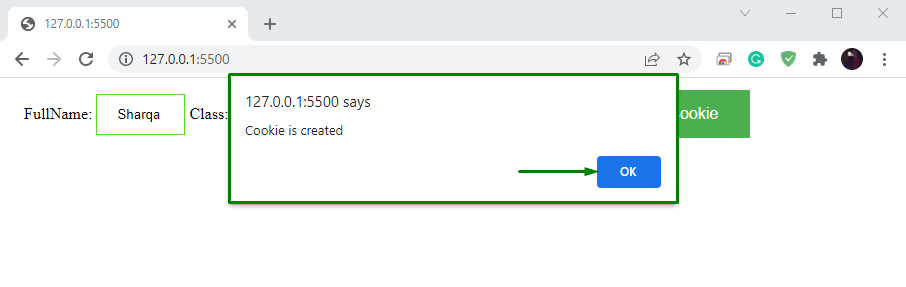 Now, click on the “getCookie” button to retrieve the multiple key-value pairs of the created cookie:
 As you can see from the output that a single “key-value” pair is displayed, which is “FullName=Sharqa”:
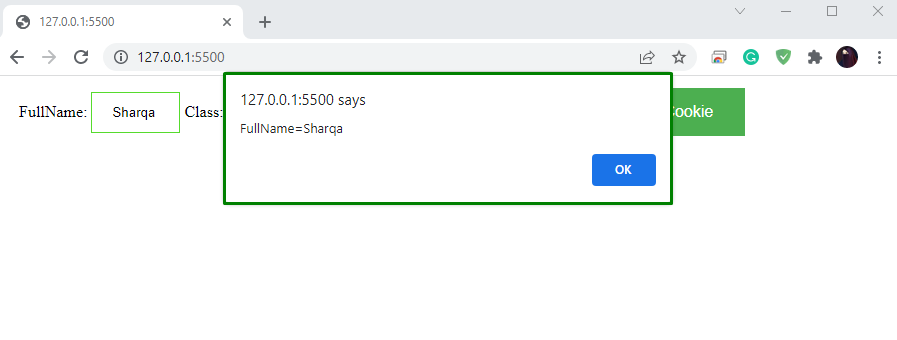 We have tried to store multiple key-value pairs in a cookie; however, the “getCookie()” function only fetched the first-key value pair.
This is because JavaScript cookies only permit you to store a single string as a key-value pair in a cookie.
In this situation, you can create a custom JavaScript object, then convert it to a JSON string and store its value (multiple key-value pairs) in a cookie.
The below-given example will demonstrate how to perform this operation.
We have tried to store multiple key-value pairs in a cookie; however, the “getCookie()” function only fetched the first-key value pair.
This is because JavaScript cookies only permit you to store a single string as a key-value pair in a cookie.
In this situation, you can create a custom JavaScript object, then convert it to a JSON string and store its value (multiple key-value pairs) in a cookie.
The below-given example will demonstrate how to perform this operation.
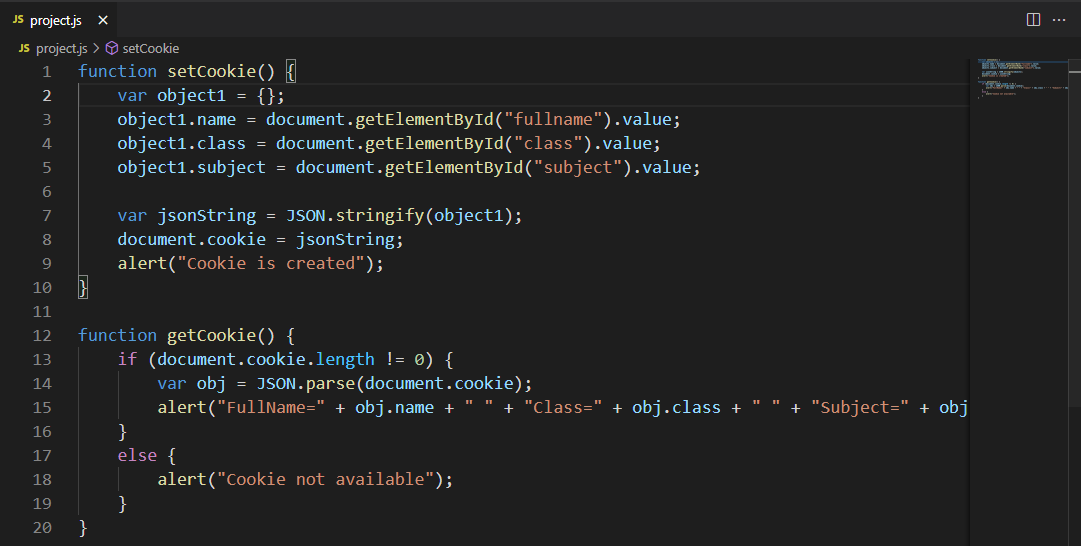 Now, again open up the “index.html” page in the browser and enter values in the specified fields:
 Clicking on the “setCookie” button will let you know that a cookie is created:
 In the next step, click on the “getCookie” button, which is present next to the “setCookie”:
 The generated alert box signifies that we have successfully stored multiple key-value pairs in a single cookie:
 You can also utilize multiple cookies for the same purpose.
However, we do not recommend you use this approach as it makes it challenging to maintain multiple cookies.
You can also utilize multiple cookies for the same purpose.
However, we do not recommend you use this approach as it makes it challenging to maintain multiple cookies.
 In terms of syntax, the code in the execution phase looks like this:
var number;
console.log(number);
number= 5;
So what happened in the background? The JavaScript engine allocated memory to the “number” variable during the Global Execution Context creation phase and then set its values as “undefined”.
In terms of syntax, the code in the execution phase looks like this:
var number;
console.log(number);
number= 5;
So what happened in the background? The JavaScript engine allocated memory to the “number” variable during the Global Execution Context creation phase and then set its values as “undefined”.
 The encountered “ReferenceError” also signifies that the “number” variable is placed in the heap memory, but it is not initialized yet.
We will try to access a variable “alpha” that does not exist in the memory.
In this case, the output will show another “ReferenceError” that the “alpha” variable is not defined:
console.log(alpha);
let number= 5;
Output
The encountered “ReferenceError” also signifies that the “number” variable is placed in the heap memory, but it is not initialized yet.
We will try to access a variable “alpha” that does not exist in the memory.
In this case, the output will show another “ReferenceError” that the “alpha” variable is not defined:
console.log(alpha);
let number= 5;
Output
 Now, let’s check out how the JavaScript engine handles Function Hoisting.
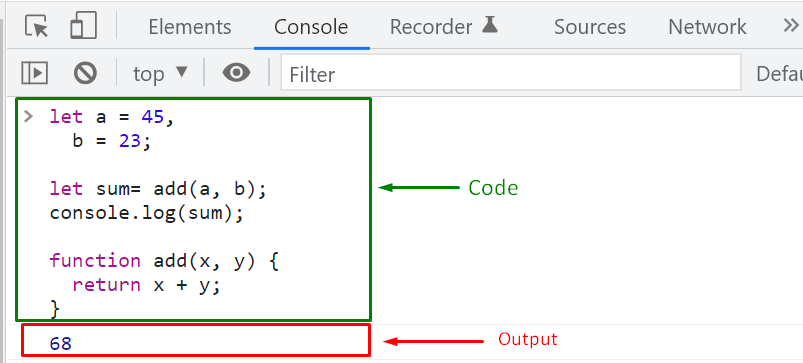 When the given example is executed, the JavaScript engine allocates memory to the declaration of the “add()” function.
More specifically, a JavaScript “Object” is created according to the type of “add()” function type and also adds a “Function reference” named “add,” which points towards the created object.
So technically, in the JavaScript engine, the above-given example is executed as follows:
function add(x, y){
return x + y;}
let a = 45,
b = 23;
let sum= add(a,b);
console.log(sum);
Output
When the given example is executed, the JavaScript engine allocates memory to the declaration of the “add()” function.
More specifically, a JavaScript “Object” is created according to the type of “add()” function type and also adds a “Function reference” named “add,” which points towards the created object.
So technically, in the JavaScript engine, the above-given example is executed as follows:
function add(x, y){
return x + y;}
let a = 45,
b = 23;
let sum= add(a,b);
console.log(sum);
Output
 Both of the given programs generated the same output.
Now, we will try to hoist Function Expressions in JavaScript.
Both of the given programs generated the same output.
Now, we will try to hoist Function Expressions in JavaScript.
 We have faced the above-given “TypeError” because the JavaScript engine placed “add” as a “variable” in the memory, not as a function.
That was all critical information related to Hoisting in JavaScript.
You can further explore this topic according to your preferences.
We have faced the above-given “TypeError” because the JavaScript engine placed “add” as a “variable” in the memory, not as a function.
That was all critical information related to Hoisting in JavaScript.
You can further explore this topic according to your preferences.

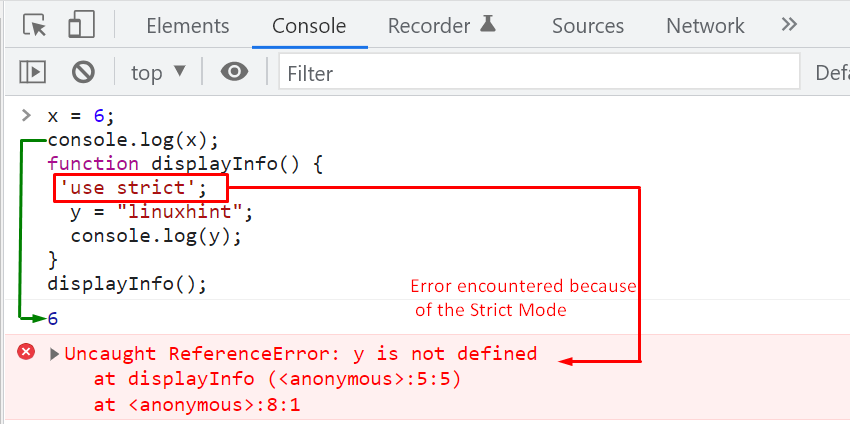 In the given output, you may have noticed that enabling Strict Mode has applied some restrictions to the script, resulting in some errors.
To know more about the “not allowed” kind of restrictions within the JavaScript Strict Mode, have a look at the upcoming section.
In the given output, you may have noticed that enabling Strict Mode has applied some restrictions to the script, resulting in some errors.
To know more about the “not allowed” kind of restrictions within the JavaScript Strict Mode, have a look at the upcoming section.
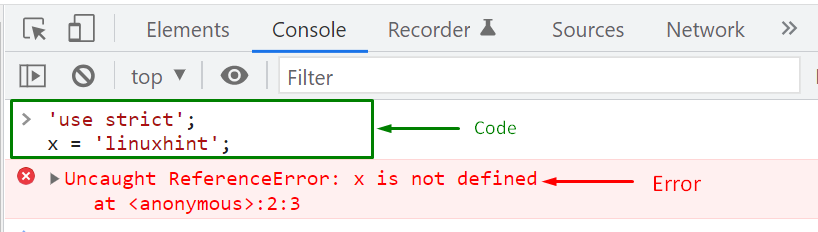

 In “Non-Strict” Mode, the attempt to delete the created “employee” object will fail silently the the “delete employee” expression will be evaluated as “false”:


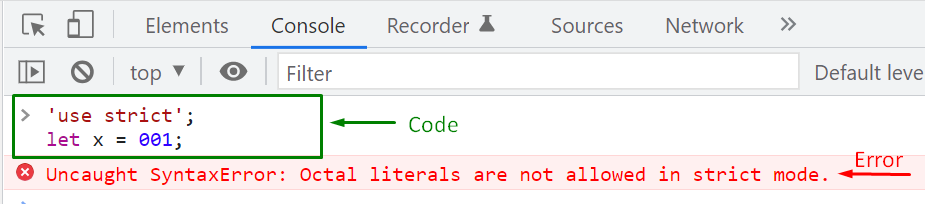 Instead of utilizing “0” as a prefix, adding “0o” will solve the issue:
'use strict';
let x = 0o01;
console.log(x);
Now, we have successfully created an Octal literal within the Strict Mode using the “0o” prefix:
Instead of utilizing “0” as a prefix, adding “0o” will solve the issue:
'use strict';
let x = 0o01;
console.log(x);
Now, we have successfully created an Octal literal within the Strict Mode using the “0o” prefix:
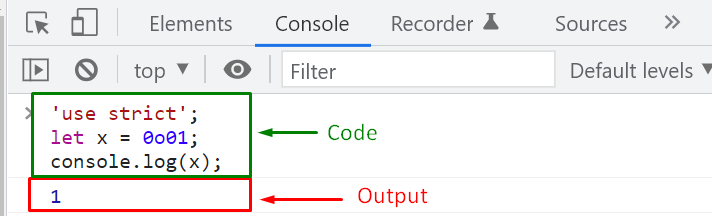


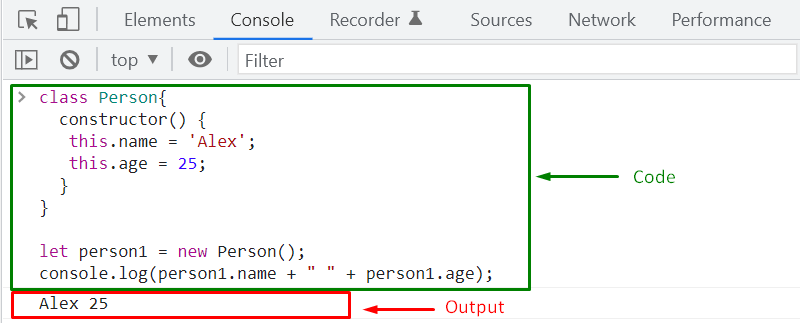 As mentioned earlier, an OOP class must contain a constructor.
Do you want to know more about Constructors? If yes, then follow the below-given section.
As mentioned earlier, an OOP class must contain a constructor.
Do you want to know more about Constructors? If yes, then follow the below-given section.
 In an OOP class, utilizing the Default Constructor is useful when you want to initialize the properties of all of the created objects with the same value.
But, what if you need to assign some unique values to the object while creating it?, you can achieve this functionality with the help of the “Parameterized Constructor”.
In an OOP class, utilizing the Default Constructor is useful when you want to initialize the properties of all of the created objects with the same value.
But, what if you need to assign some unique values to the object while creating it?, you can achieve this functionality with the help of the “Parameterized Constructor”.
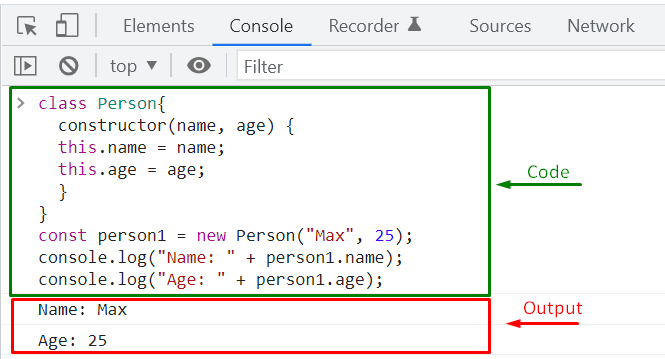 We have talked about creating OOP classes, their related objects and defining default and parameterized constructors.
Now, we will move ahead and discuss another critical component of an OOP class which is “Method”.
We have talked about creating OOP classes, their related objects and defining default and parameterized constructors.
Now, we will move ahead and discuss another critical component of an OOP class which is “Method”.
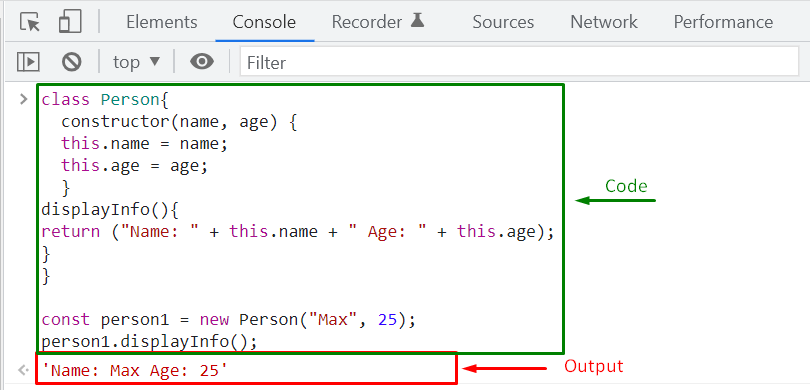 We have compiled the essential information related to the OOP class.

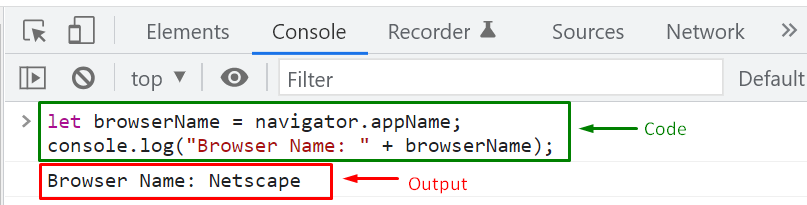


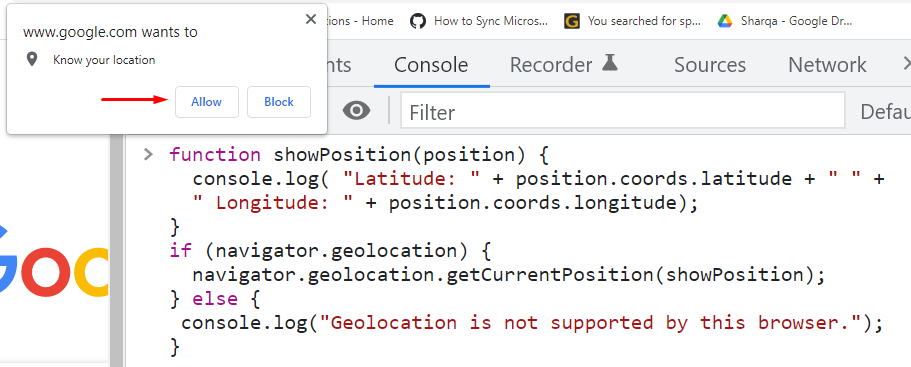 After doing so, the “Latitude” and “Longitude” values will be shown in the console window within a few microseconds:
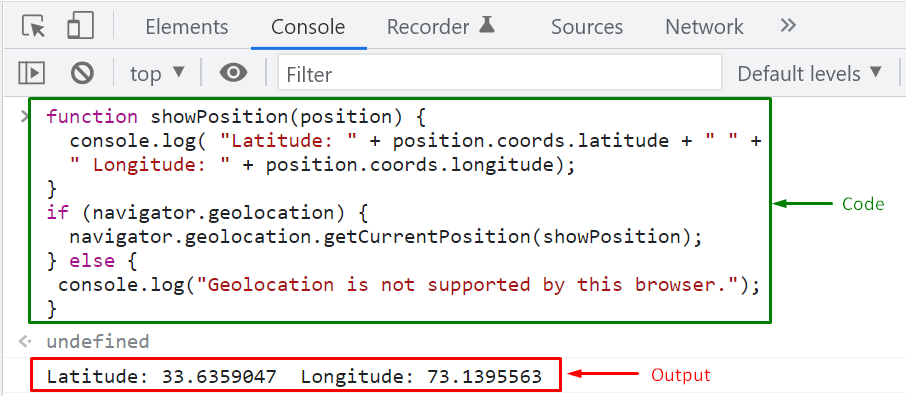
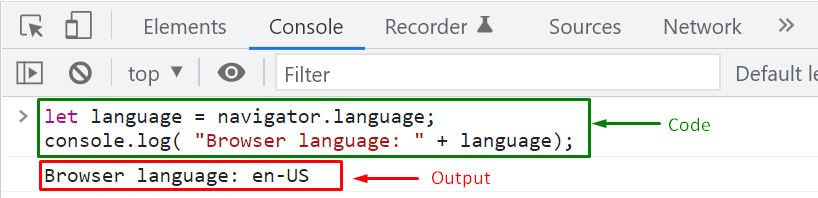

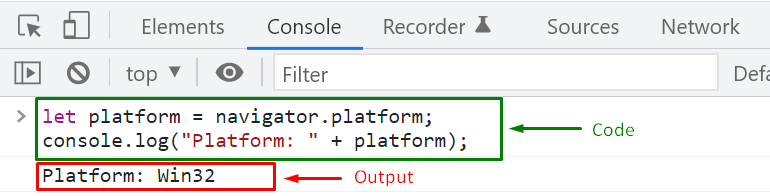

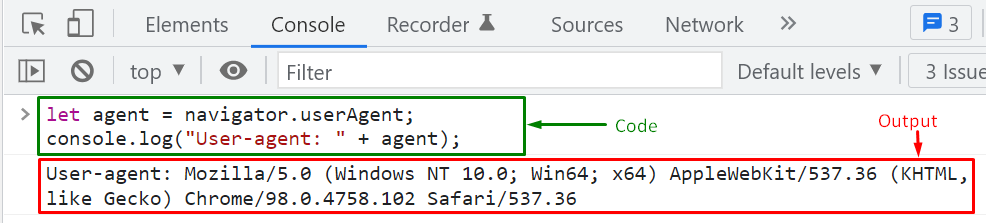
 We have compiled the essential information related to the Navigator Object.
 Accept the licence agreement.
 It will ask for confirmation, click on Agree to continue.
 Select the destination folder and click on Continue
 Click on Install to go with the recommended settings
 The installation process will start up
 After successful installation, you will get the following interface.
Click on Close
After successful installation, you will get the following interface.
Click on Close
 Step 3: After completing the installation, you must verify the version by opening the terminal (command+space) and writing “node -v” to check the version.
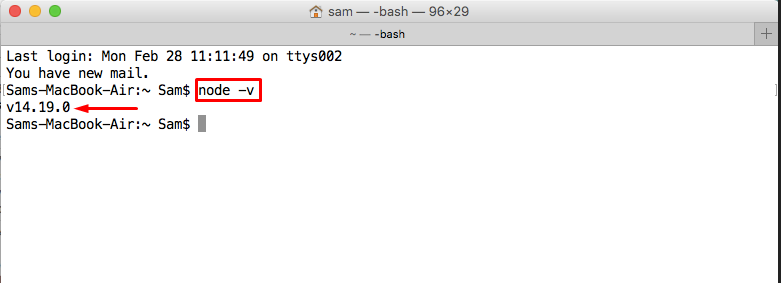
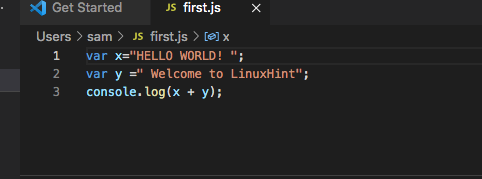 Step 3: Open the terminal, and write the following command to run the first.js file.
node first.js
Step 3: Open the terminal, and write the following command to run the first.js file.
node first.js
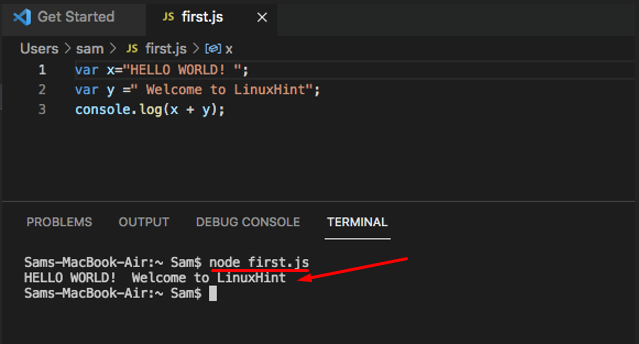 It is observed from the output that the result of the first.js file has been printed on the terminal.
That’s the major contribution of NodeJS, as you do not need any browser to run the JavaScript files.
It is observed from the output that the result of the first.js file has been printed on the terminal.
That’s the major contribution of NodeJS, as you do not need any browser to run the JavaScript files.
 Next, we will define “setCookie()” and “getCookie()” functions in the “project.js” file.
The “setCookie()” function will create a cookie having “key-value” pair as “name-Alexander” and sets the value of the “expires” attribute to “Sat, 20 Jan 1980 12:00:00 UTC”.
In this example, when the cookie object is created, the JavaScript interpreter will check the expiry date and delete it immediately from the system, as we have assigned a passed date to the “expires” attribute:
function setCookie() {
document.cookie = "name=Alexander; expires=Sat, 20 Jan 1980 12:00:00 UTC";}
Another function which we are going to define is the “getCookie()” function.
The “getCookie()” function will check the length of the created cookie and display the key-value pair in an alert box.
In our case, the created cookie is considered as “expired”, as a result of it, an alert box will appear on the browser stating that “Cookie is not available”:
function getCookie() {
if (document.cookie.length != 0) {
alert(document.cookie);
}
else {
alert("Cookie is not available");
}}
Next, we will define “setCookie()” and “getCookie()” functions in the “project.js” file.
The “setCookie()” function will create a cookie having “key-value” pair as “name-Alexander” and sets the value of the “expires” attribute to “Sat, 20 Jan 1980 12:00:00 UTC”.
In this example, when the cookie object is created, the JavaScript interpreter will check the expiry date and delete it immediately from the system, as we have assigned a passed date to the “expires” attribute:
function setCookie() {
document.cookie = "name=Alexander; expires=Sat, 20 Jan 1980 12:00:00 UTC";}
Another function which we are going to define is the “getCookie()” function.
The “getCookie()” function will check the length of the created cookie and display the key-value pair in an alert box.
In our case, the created cookie is considered as “expired”, as a result of it, an alert box will appear on the browser stating that “Cookie is not available”:
function getCookie() {
if (document.cookie.length != 0) {
alert(document.cookie);
}
else {
alert("Cookie is not available");
}}
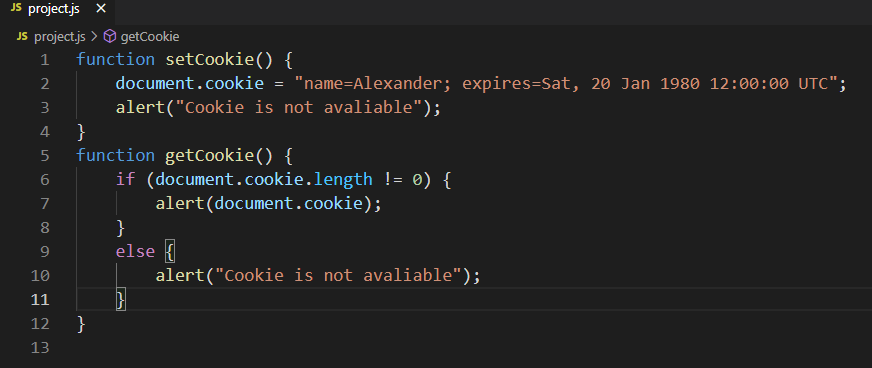 Next, we will save “index.html” and “project.js” files and then utilize the VS Code “Live Server” extension to run the application in the browser:
 The opened web page comprises two buttons: “setCookie” and “getCookie”, where clicking on the “setCookie” will create a new cookie with specified “key-value” pair and “expires” attribute value:
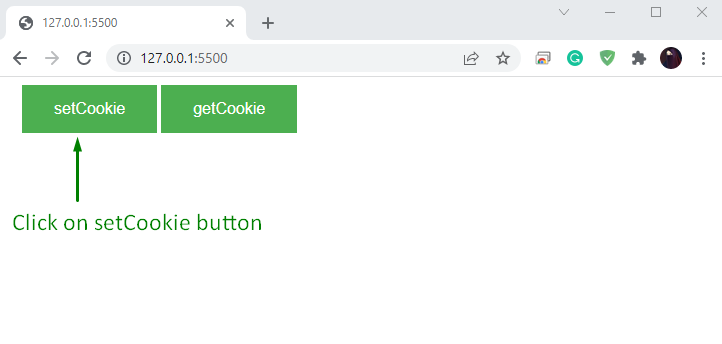 Then, click on the “getCookie” button:
 An alert box will be generated upon performing the specified action with the message “Cookie is not available”.
This signifies that the created cookie is deleted successfully:
An alert box will be generated upon performing the specified action with the message “Cookie is not available”.
This signifies that the created cookie is deleted successfully:
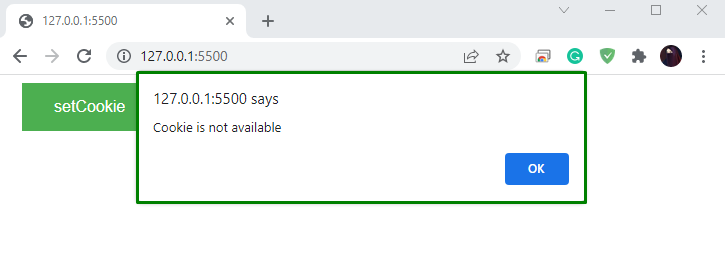 Another attribute that can be utilized for deleting cookies is called “max-age”.
Next, let’s learn how to use the “max-age” cookies attribute for deleting cookies.
Another attribute that can be utilized for deleting cookies is called “max-age”.
Next, let’s learn how to use the “max-age” cookies attribute for deleting cookies.
 Save the provided code and open it up in your browser.
After doing so, click on the “setCookie” button to set the specified cookie:
Save the provided code and open it up in your browser.
After doing so, click on the “setCookie” button to set the specified cookie:
 Next, click on the “getCookie” button:
 The added value of the “max-age” attribute will force the JavaScript engine to delete the cookie.
As a result of this, the alert box will show a message “Cookie is not available”:
The added value of the “max-age” attribute will force the JavaScript engine to delete the cookie.
As a result of this, the alert box will show a message “Cookie is not available”:
 Want to try any explicit method for deleting cookies? If yes, then follow along with the next section.
 Step 2: Next, select the “History” option from the drop-down menu:
 Step 3: Now, look for the “Clear browsing data” in the left panel and click on it:
 Step 4: A dialog box will pop-up and here mark the “Cookies and other side data” check box and hit the “Clear data” button.
This action will delete all of the added cookies within a few seconds:
Step 4: A dialog box will pop-up and here mark the “Cookies and other side data” check box and hit the “Clear data” button.
This action will delete all of the added cookies within a few seconds:
 We have provided essential information related to deleting cookies.
You can further explore it according to your preferences.
We have provided essential information related to deleting cookies.
You can further explore it according to your preferences.
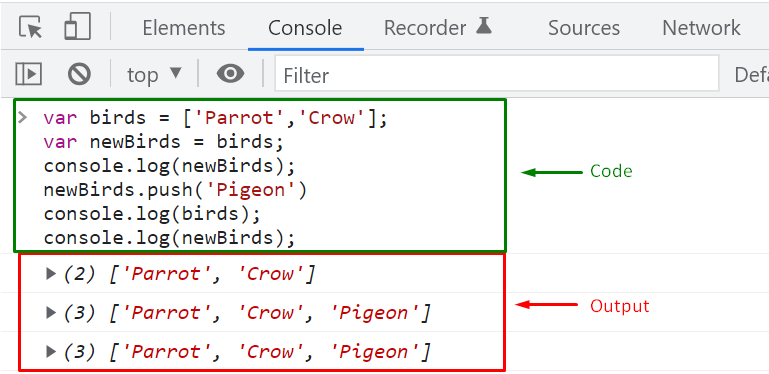 At this point, you have understood that Arrays are considered reference values, so when you use the assignment operator, only the reference of the original array will be copied, not the array elements.
In JavaScript, you can use the “Shallow Copy” or “Deep Copy” methods for copying array elements.
Do these terms sound new to you? No worries! We will explain them in the next sections.
At this point, you have understood that Arrays are considered reference values, so when you use the assignment operator, only the reference of the original array will be copied, not the array elements.
In JavaScript, you can use the “Shallow Copy” or “Deep Copy” methods for copying array elements.
Do these terms sound new to you? No worries! We will explain them in the next sections.
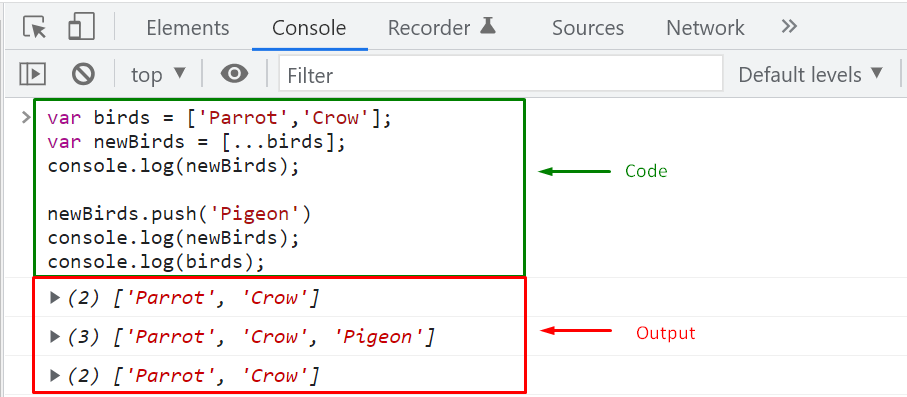
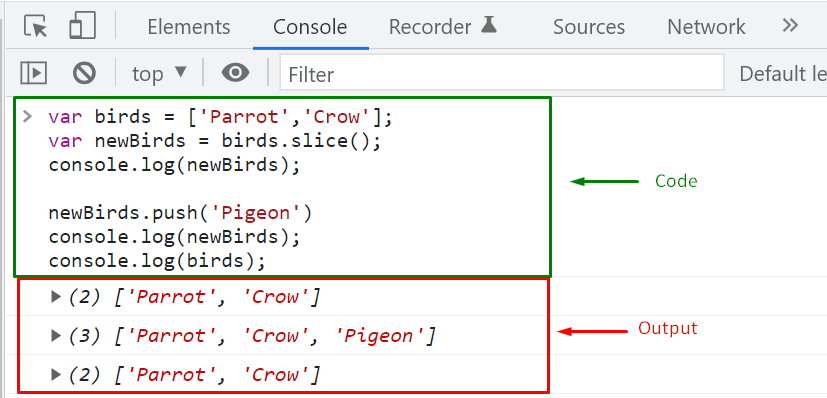 From the above-given output, it can be clearly seen that adding elements in the “newBirds” array has not affected the elements of the “birds” array.
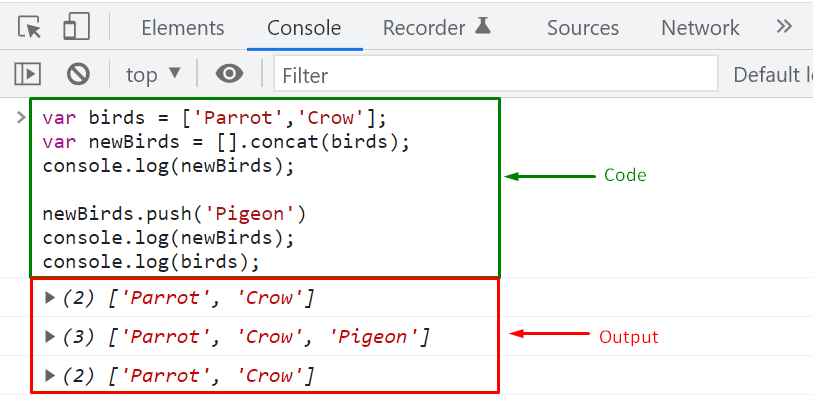 As you can see in the above-given output, pushing new elements in the “newBirds” array has not modified the “birds” array.
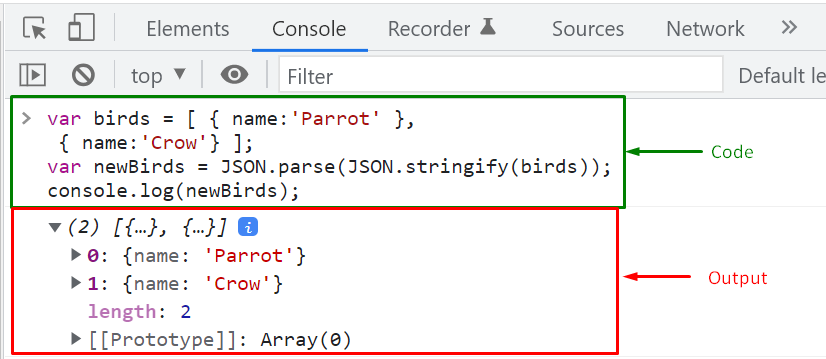 The above-given output signifies that we have successfully copied the elements of the “birds” array to “newBirds”.
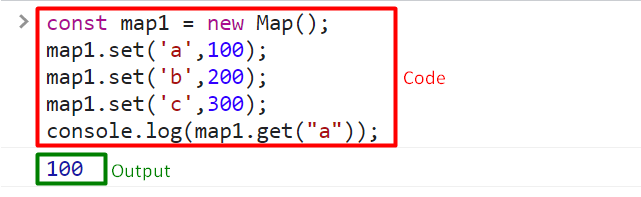 A new map was successfully created.
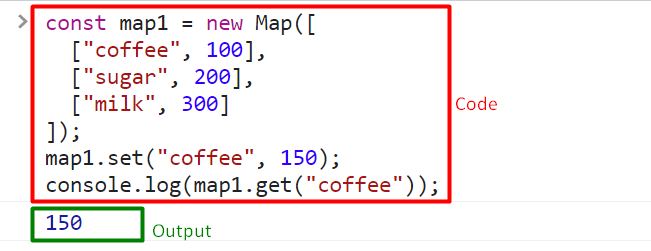 The value of the key “coffee” was changed to “150”.
 The value of the key “milk” was successfully displayed.
 The elements present in the map are 3.
 After deleting the “sugar” element, the remaining number of elements are 2.
 All elements of map1 were removed.
 The has() method displayed false since there is no such key present in the map.
 Each of the key-value pairs present in the map have been displayed.
 Each key in the map has been displayed successfully.
 All values in the map have been displayed.
 The entries() method is working properly.
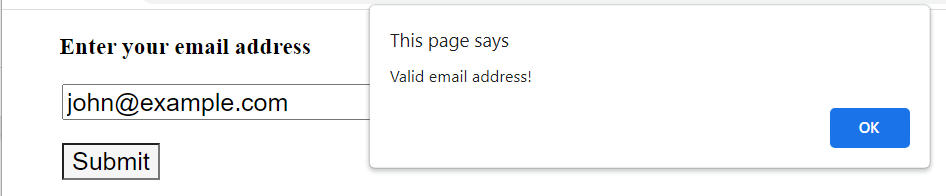 When you enter an invalid email address.
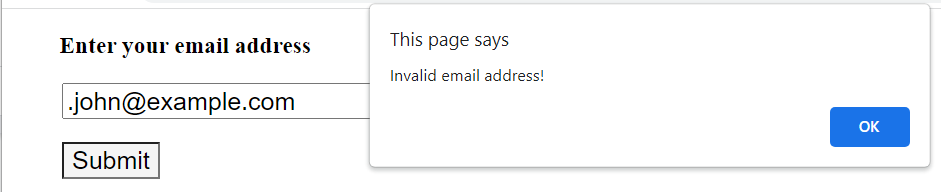 Email validation was sucessful.
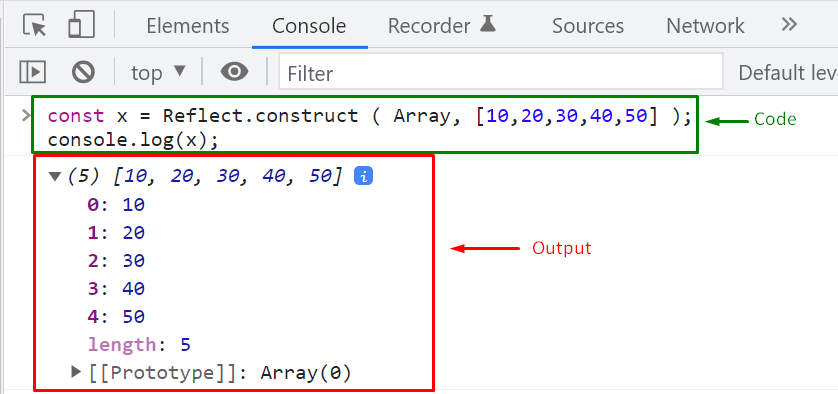
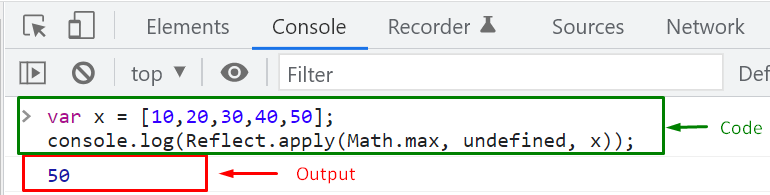
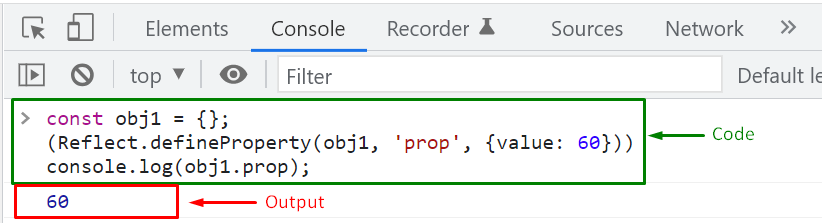
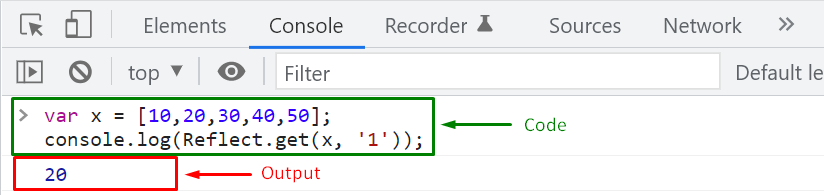
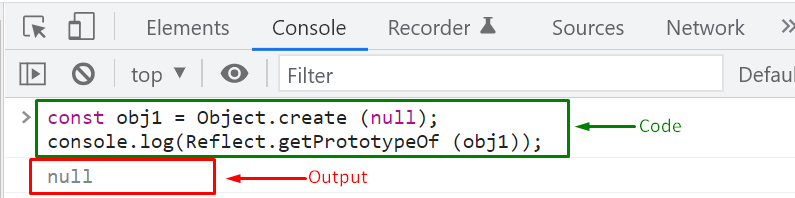
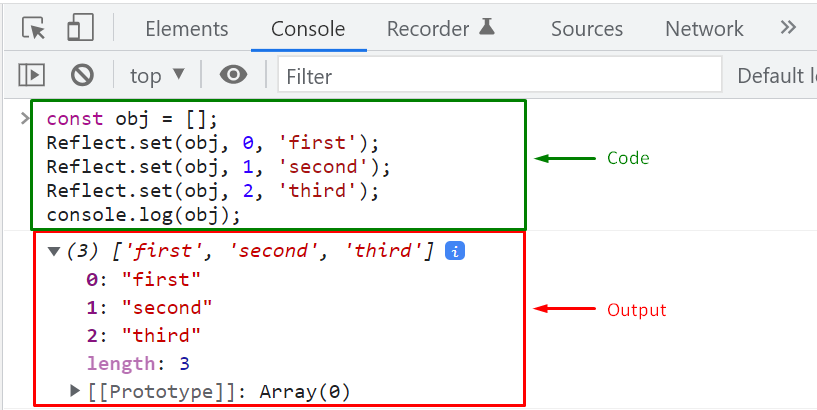
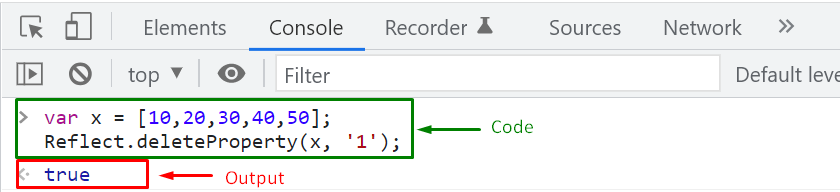 The “Reflect.deleteProperty()” method will return “true” if the specified object’s property is successfully deleted; otherwise, the return case will be set to “false” when the specified property is not found.
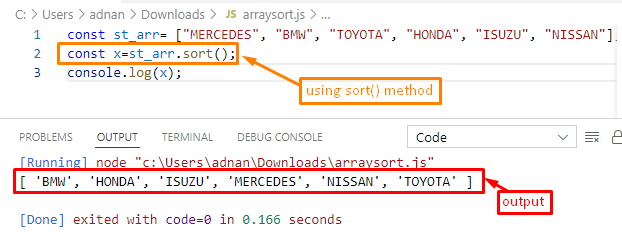
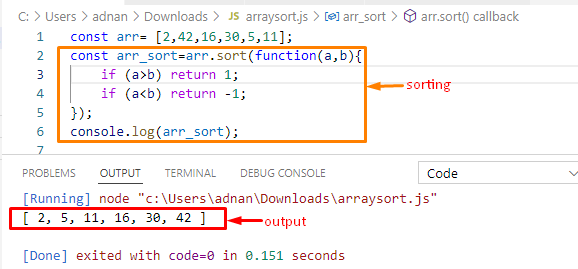 It is observed that the values are now stored inside the arr_sort variable in ascending order.
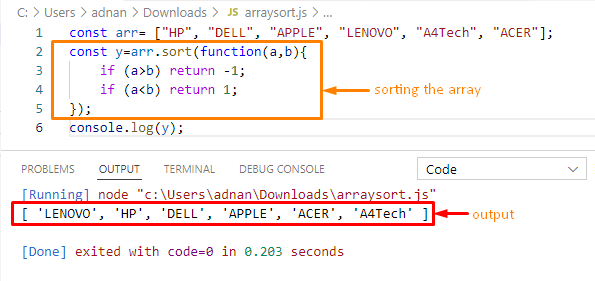 The output shows that the array has been printed in descending order.
 From the above output, the objects are arranged in ascending order of the name field.
Similarly, the other fields of an object can also be used to get the sorted order of objects.
From the above output, the objects are arranged in ascending order of the name field.
Similarly, the other fields of an object can also be used to get the sorted order of objects.
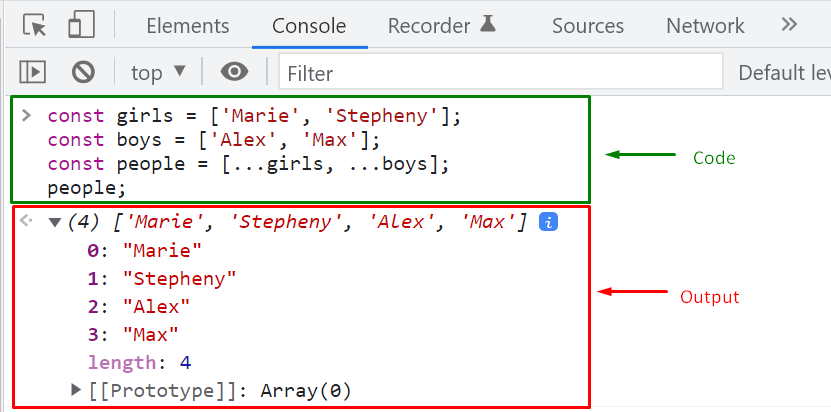 The order in which you specify arrays in the array literal does matter as the elements will be merged in the same sequence in which arrays are added.
So, you can select whether you want to insert the elements before or after the other array elements.
For instance, we want to merge both of the arrays, “girls” and “boys,” using the spread operator in such a way that the elements of the “boys” array come before the “girls” array elements.
For this purpose, we will specify “boys” before the “girls” array in the array literal:
const girls = ['Marie', 'Stepheny'];const boys = ['Alex', 'Max'];const people = [...boys, ...girls];
console.log(people);
Output
The order in which you specify arrays in the array literal does matter as the elements will be merged in the same sequence in which arrays are added.
So, you can select whether you want to insert the elements before or after the other array elements.
For instance, we want to merge both of the arrays, “girls” and “boys,” using the spread operator in such a way that the elements of the “boys” array come before the “girls” array elements.
For this purpose, we will specify “boys” before the “girls” array in the array literal:
const girls = ['Marie', 'Stepheny'];const boys = ['Alex', 'Max'];const people = [...boys, ...girls];
console.log(people);
Output
 As you can see, the starting index of the “people” array contains the “boys” array element, and after that, other indexes are referring “girls” array elements.
 Now, we will execute the same example, while using the other syntax of the concat() method:
const girls = ['Marie', 'Stepheny'];const boys = ['Alex', 'Max'];const people = [].concat(girls, boys);
console.log(people);
The given JavaScript program will also merge the specified arrays in the same manner:
Now, we will execute the same example, while using the other syntax of the concat() method:
const girls = ['Marie', 'Stepheny'];const boys = ['Alex', 'Max'];const people = [].concat(girls, boys);
console.log(people);
The given JavaScript program will also merge the specified arrays in the same manner:

 Adding “spread” operator is important while passing the arguments to the “push()” method, otherwise, the “push()” method will append the “girls” array as a whole to the “boys” array:
const girls = ['Marie', 'Stepheny'];const boys = ['Alex', 'Max'];
boys.push(girls);
console.log(boys);
Given output signifies that after the execution of the push() method, the “girls” array is added as a whole at the second index of the “boys” array:
Adding “spread” operator is important while passing the arguments to the “push()” method, otherwise, the “push()” method will append the “girls” array as a whole to the “boys” array:
const girls = ['Marie', 'Stepheny'];const boys = ['Alex', 'Max'];
boys.push(girls);
console.log(boys);
Given output signifies that after the execution of the push() method, the “girls” array is added as a whole at the second index of the “boys” array:
 That is all of the essential information about merging arrays using the mutable and immutable method.
Now, you can explore them further according to your requirements.
That is all of the essential information about merging arrays using the mutable and immutable method.
Now, you can explore them further according to your requirements.
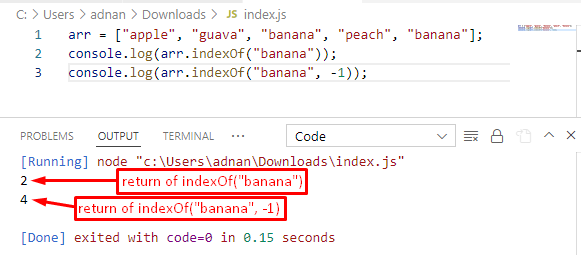 The output shows the index of the first occurrence of “banana” without any starting condition and the second method takes the starting condition “-1” and will start the index counting from (4+(-1)).
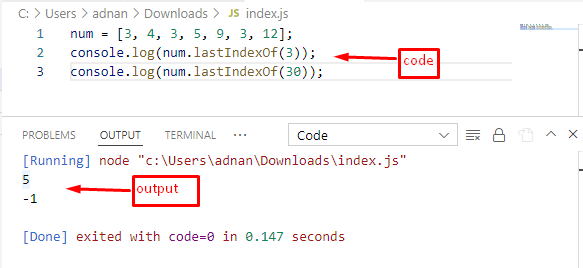 The output shows that the last index number of an element “3” is “5” and as the number “30” does not belong to the array, the result is “-1“.
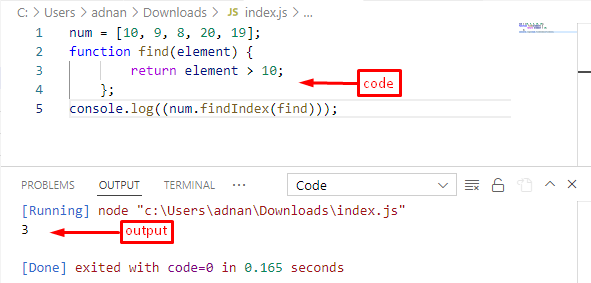 The “find()” method returns all the numbers that are greater than “10” and the “findIndex()” method picks only the index of the first number (that is 20 in our case).
 Lastly, we will use the “proxyEmployee” object to get the “name” and “designation” Properties of the “employee” object:
console.log(proxyEmployee.name);
console.log(proxyEmployee.designation);
Below-given output signifies that “proxyEmployee” object has successfully accessed the employee object’s properties:
Lastly, we will use the “proxyEmployee” object to get the “name” and “designation” Properties of the “employee” object:
console.log(proxyEmployee.name);
console.log(proxyEmployee.designation);
Below-given output signifies that “proxyEmployee” object has successfully accessed the employee object’s properties:
 Another important thing to remember is that if you update any property value of the “employee” object, changes can also be seen in “proxyEmployee”.
For instance, we have modified the “employee” object’s “name” property value to “Paul”:
employee.name = 'Paul';
console.log(proxyEmployee.name);
Output
Another important thing to remember is that if you update any property value of the “employee” object, changes can also be seen in “proxyEmployee”.
For instance, we have modified the “employee” object’s “name” property value to “Paul”:
employee.name = 'Paul';
console.log(proxyEmployee.name);
Output
 As you can see from the output, the value of the “proxyEmployee.name” is also changed.
Similarly, any modification in the “proxyEmployee” object will also reflect upon the “employee” object:
proxyEmployee.designation = 'Author';
console.log(employee.designation);
Execution of the above-given code will also update the “designation” property value of the “employee” object:
As you can see from the output, the value of the “proxyEmployee.name” is also changed.
Similarly, any modification in the “proxyEmployee” object will also reflect upon the “employee” object:
proxyEmployee.designation = 'Author';
console.log(employee.designation);
Execution of the above-given code will also update the “designation” property value of the “employee” object:
 Till this point, you have learned the procedure to create a proxy object.
Now, check out the following table to get a brief overview of the Proxy Trap methods.
Till this point, you have learned the procedure to create a proxy object.
Now, check out the following table to get a brief overview of the Proxy Trap methods.
 After you click the button.
 The exec() method is working properly.
 The test() method found the specified string and returned “true”.
 Here you can see that the toString() method converted the number to a string.
 The number 20 has been converted to string using base 2.
 The number 20 has been converted to string using base 8.
 The number 20 has been converted to string by passing 16 as a parameter.
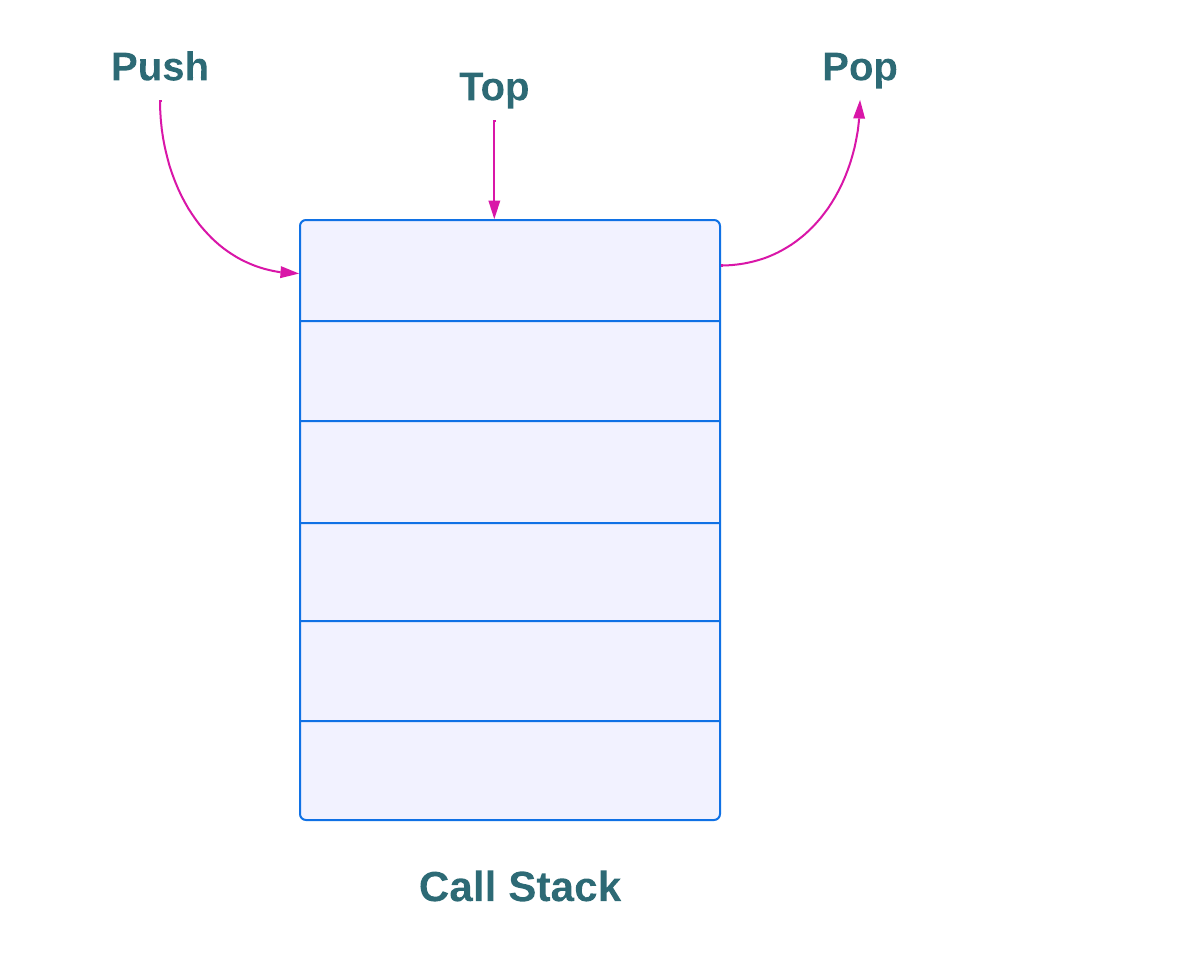
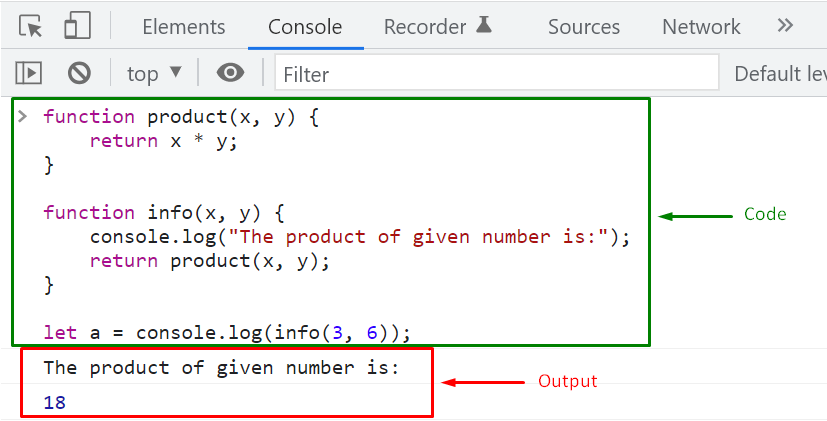 Within a few microseconds, we have got the output of the provided code.
We will now investigate how the JavaScript engine operates behind the scenes for this particular example.
Within a few microseconds, we have got the output of the provided code.
We will now investigate how the JavaScript engine operates behind the scenes for this particular example.
 The Global Execution Context will move towards the Execution phase by running the “info()” function call.
In this step, the “info()” function is pushed to the top of the Call Stack when its Function Execution Context is created:
The Global Execution Context will move towards the Execution phase by running the “info()” function call.
In this step, the “info()” function is pushed to the top of the Call Stack when its Function Execution Context is created:
 As you can see, the “info()” function is at the top of the Call Stack, and now the JavaScript engine will start its execution:
 According to the given script, the “info()” function will invoke the “product()” function, so the JavaScript engine will create another Function Execution context for it and then push the “product()” function on the top position:
 At this point, all of the required functions are pushed to the Class Stack in a particular sequence, where the “product()” function is at the top of the Class Stack:
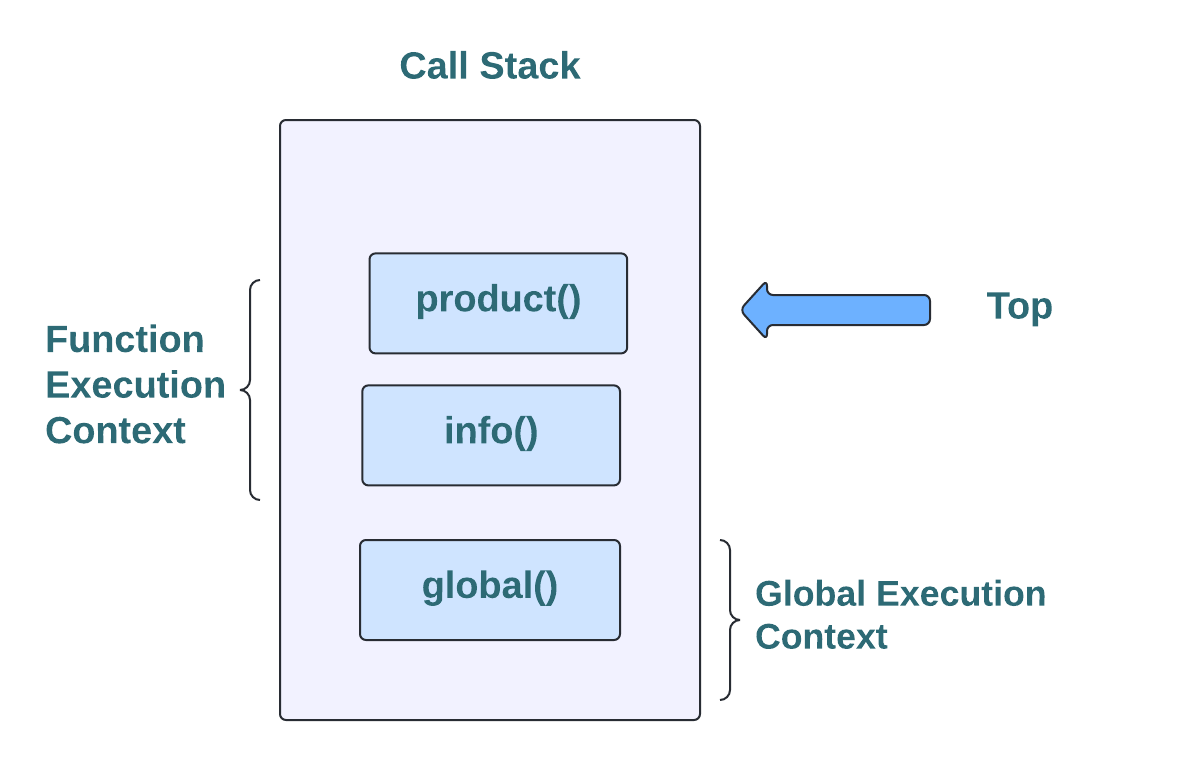 Now, the JavaScript engine starts the execution of the “product()” function and pops it out from the Call Stack:
 After completing the specified operation, the JavaScript engine will execute and pop out the “info()” function which exists at the top of the Call Stack:
 As soon as the execution of info() function gets complete, and Call Stack becomes empty, the JavaScript engine will stop the execution and move towards the other execution tasks:
 We have provided all of the basic information related to Call Stack and its working.
You can explore it further according to your requirements.
We have provided all of the basic information related to Call Stack and its working.
You can explore it further according to your requirements.
 As you can see, the Global Execution Context is created by default:
 Each Execution Context (including the Global Execution Context) comprises the following two objects:
Global Object: A global object contains functions and variables accessible within the current environment.
It is also referred to as a “window” object in the browser.
“this” object: “this” keyword points towards the current object in the execution context.
The following section will discuss different phases of Global Execution Context.
Each Execution Context (including the Global Execution Context) comprises the following two objects:
Global Object: A global object contains functions and variables accessible within the current environment.
It is also referred to as a “window” object in the browser.
“this” object: “this” keyword points towards the current object in the execution context.
The following section will discuss different phases of Global Execution Context.
 When the JS engine executes the given program, it will store and set the “x” and “y” variable’s values as “undefined” and then declare the function “product()” in the Global Execution Context:
 The Global Execution Context will move towards the “Execution Phase” when the creation phase completes its specified operations.
 The JavaScript visualizer will demonstrate the changes in the Global Execution context:
 Now, a new Function Execution Context is created, which comprises the creation and execution phases.
It also has a unique object called “arguments”.
The value passed to the “product()” function is added in the arguments object:
Now, a new Function Execution Context is created, which comprises the creation and execution phases.
It also has a unique object called “arguments”.
The value passed to the “product()” function is added in the arguments object:

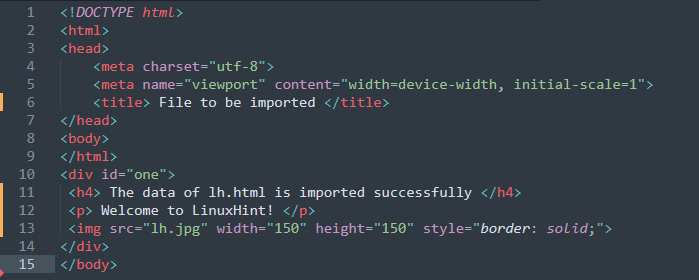 The content of lh.html is displayed below
 Step 2: Another HTML file is created named index.html (which will be used to import data from the lh.html) and saved it inside the same folder as of lh.html.
jQuery
$(document).ready(function(){
$("#btn").click(function(){
$("#one").load("lh.html");});});
The code above is the primary part of index.html which executes the load() method to load the lh.html file.
– the click event of button id=”btn” will load the content of lh.html into the index.html file.
HTML
<body><div id="one"> </div><button id="btn"> Click Here to get the content </button></body>
In the HTML code,
– a div is created with id=”one” and a button id=”btn” is created that will be used to load the file(on the click function)
Step 2: Another HTML file is created named index.html (which will be used to import data from the lh.html) and saved it inside the same folder as of lh.html.
jQuery
$(document).ready(function(){
$("#btn").click(function(){
$("#one").load("lh.html");});});
The code above is the primary part of index.html which executes the load() method to load the lh.html file.
– the click event of button id=”btn” will load the content of lh.html into the index.html file.
HTML
<body><div id="one"> </div><button id="btn"> Click Here to get the content </button></body>
In the HTML code,
– a div is created with id=”one” and a button id=”btn” is created that will be used to load the file(on the click function)
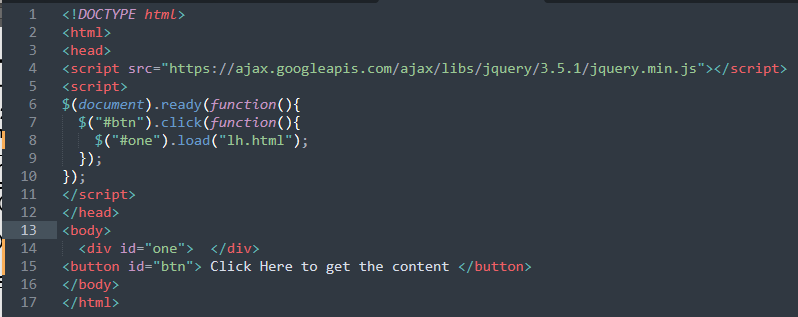 The output of the above scenario is shown in the following gif.
 The output shows that upon clicking the button the content of lh.html is fetched and displayed on the index.html.
 That was all about adding objects as values to the WeakSet object.
Now, we will move forward and check out the other JavaScript WeakSet Object methods.
That was all about adding objects as values to the WeakSet object.
Now, we will move forward and check out the other JavaScript WeakSet Object methods.

 The above-given output signifies that we have successfully deleted the “obj1” from the “weakset” object, and for the “obj2,” the delete() method returned “false” because the specified object does not exist in our “weakset” object.
 That was all about adding “key-value” pairs to the WeakMap object.
Now, we will move add and demonstrate other JavaScript WeakMap Object methods.
That was all about adding “key-value” pairs to the WeakMap object.
Now, we will move add and demonstrate other JavaScript WeakMap Object methods.
 The above-given “weakmap.has()” method returned “Welcome” as the value of the “obj1” key.

 The nearest integer of 5.6 is 6.
 3.4 was rounded up to its nearest integer.
 2.9 was rounded down to 2 that is its nearest integer.
 The integer part of 6.7 has been fetched using the .trunc() method.
 The .sign() method returned +1.
 The .pow() method is working properly.
 The square root of 10 has been calculated using .sqrt() method.
 The absolute value of -8.99 has been derived successfully.
 The .sin() method is working properly.
 The cosine of 180 was calculated successfully.
 The minimum number in the given set of numbers is -10.
 The maximum number has been fetched.
 The .random() method generated a random number.
 The log of 10 is calculated successfully.
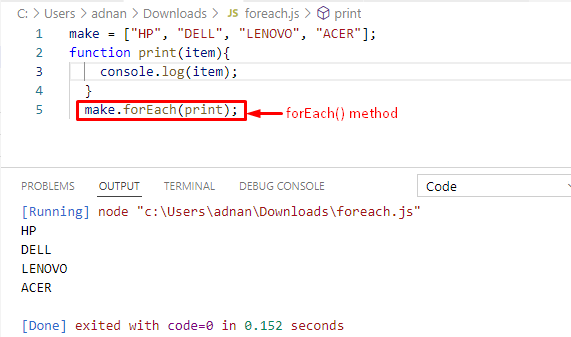 The output shows that the forEach() method has executed the print(item) function and the list of array elements is printed as well.
From this example, you would have learned the basic usage of the forEach() method.
The output shows that the forEach() method has executed the print(item) function and the list of array elements is printed as well.
From this example, you would have learned the basic usage of the forEach() method.
 Note: The method used in the above example is widely used to use complex functions in forEach() method.
 The output shows that the arrow function has nullified the purpose of creating a large function to use in the forEach() method.
Note: The arrow function best suits smaller functions.
The output shows that the arrow function has nullified the purpose of creating a large function to use in the forEach() method.
Note: The arrow function best suits smaller functions.
 Output
 It is observed that the text of the paragraph(id=”p1“) and all its descendants(span and strong) is displayed.
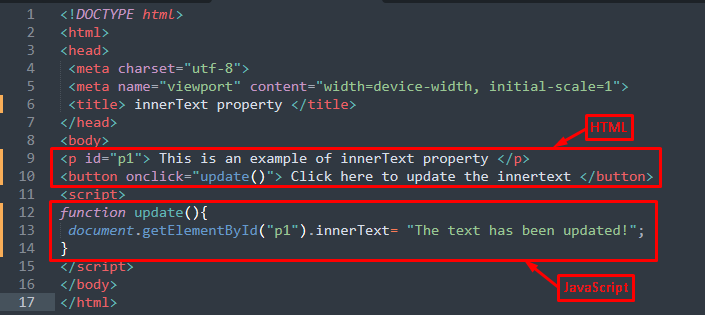 Output
 It is observed from the output that the text of the paragraph has been updated to new text.
 The above output shows that the text of paragraph (id= “old”) is set to a heading (id= “new”).
 Output
 It is observed that the innerHTML shows the inner elements whereas the innerText has only retrieved the textual content.
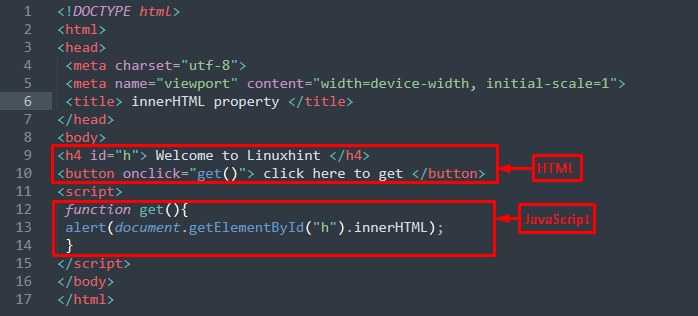 Output
 The output shows that the content of an HTML element is displayed as an alert content.
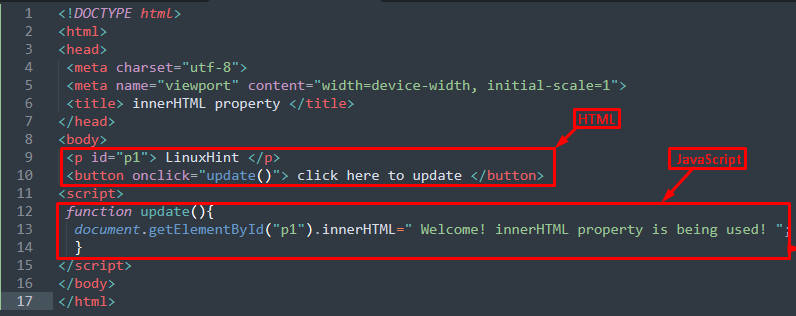 Output
 From the output, it is observed that the content of the paragraph is being updated.
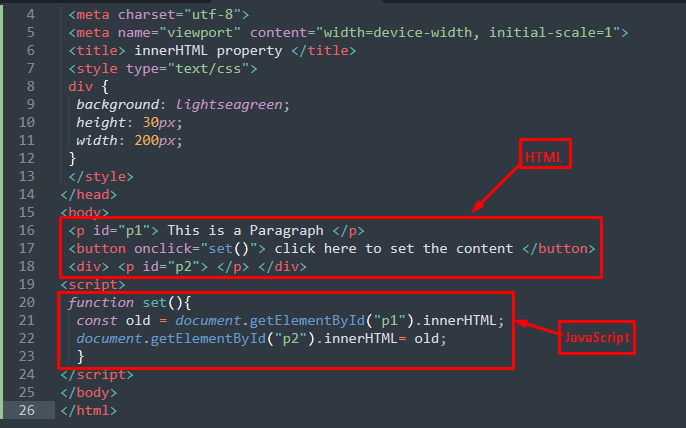 Output
 From the above output, the paragraph has nothing to show but upon clicking the button the content of the paragraph(id=”p1“) is set to the paragraph(id=”p2“)
 The direct child of <ul> has been fetched successfully.
 The each() method is working properly.
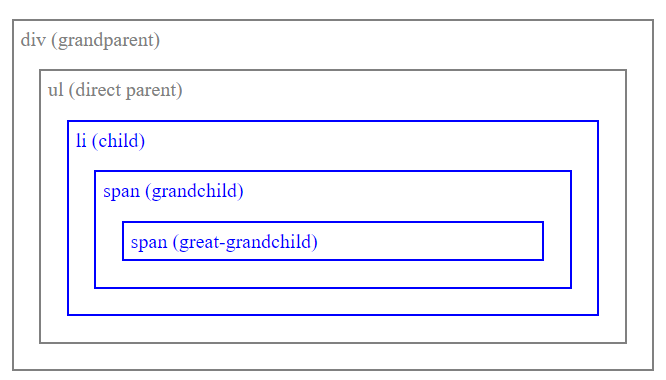 The successors of the <ul> element were found.
 The first <span> element of the <h1> element is highlighted in pink.
 The adjacent sibling of the <h1> element was fetched successfully.
 The parent element is accessed successfully.
 The previous adjacent sibling of <h2> is <h1>.
 The siblings() method is working properly.
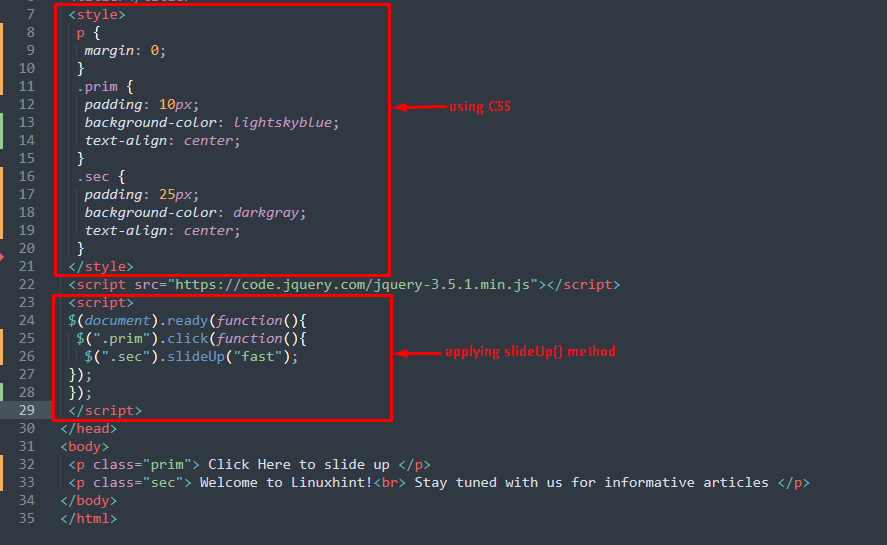
 After sliding in the upward direction

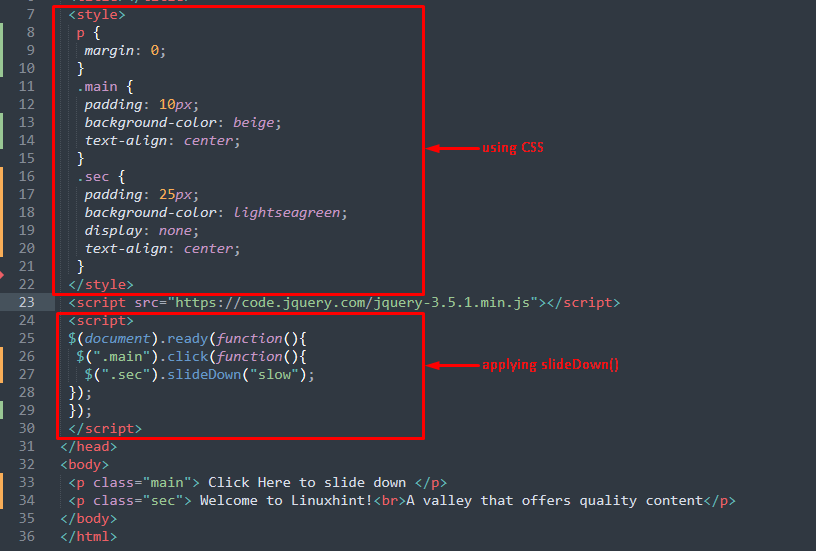
 Upon clicking, the paragraph(class=”sec“) will be slid down as shown below.

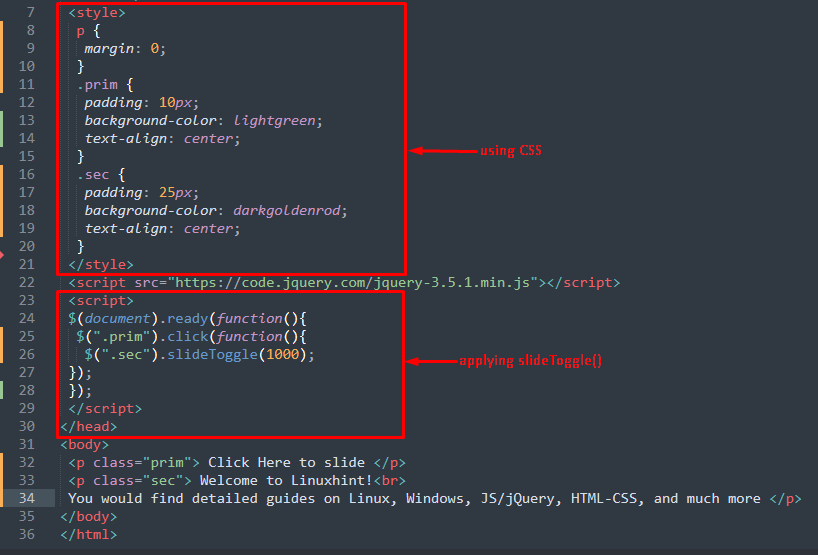
 After applying the slideToggle() method
 If you keep on clicking the primary element, the slider will keep on changing its state.
 Click on the first button to make the heading disappear and after it is hidden, click on the second button to reveal the heading.
 Heading disappeared and appeared successfully and quickly.
 The speed parameter was executed successfully.
 After you click on the first button to hide the heading.
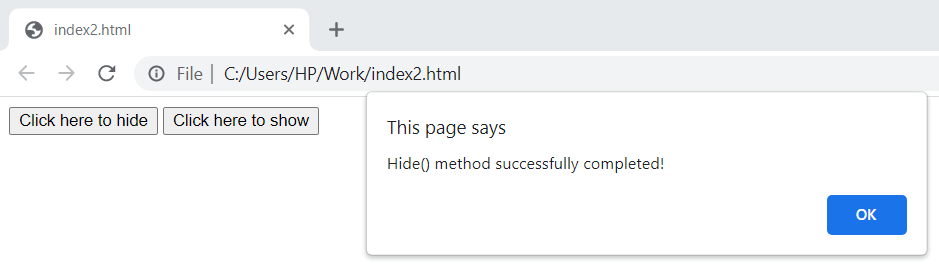 After you click on the second button to show the heading.
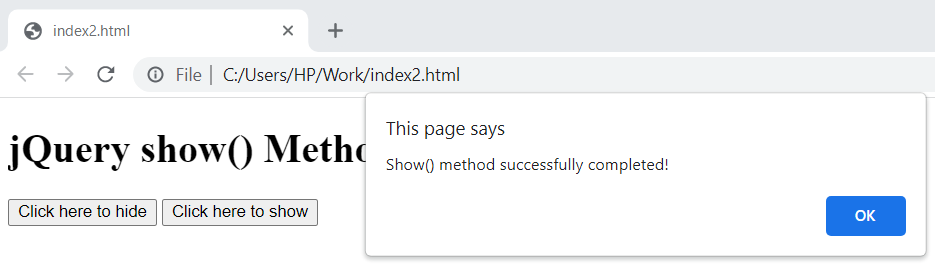 The callback parameter is working properly.
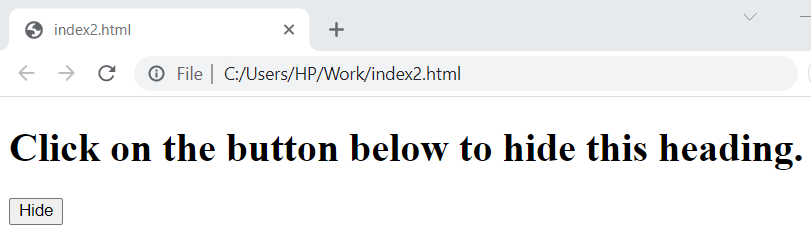 After clicking on the button, the heading will disappear.
 Heading disappeared successfully and quickly.
 The speed parameter is working properly.
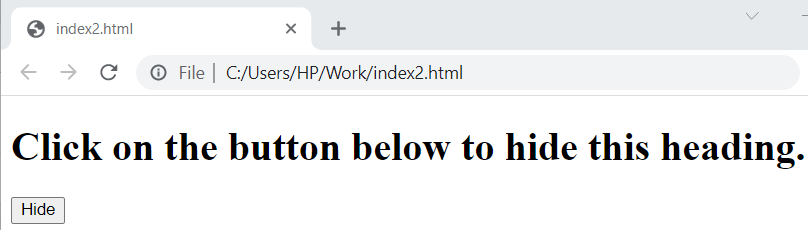 After you click on the button.
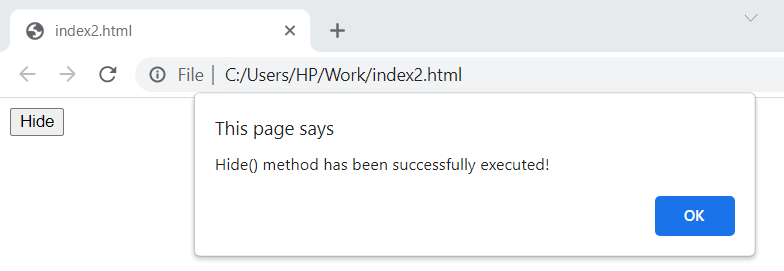 The callback parameter is working properly.
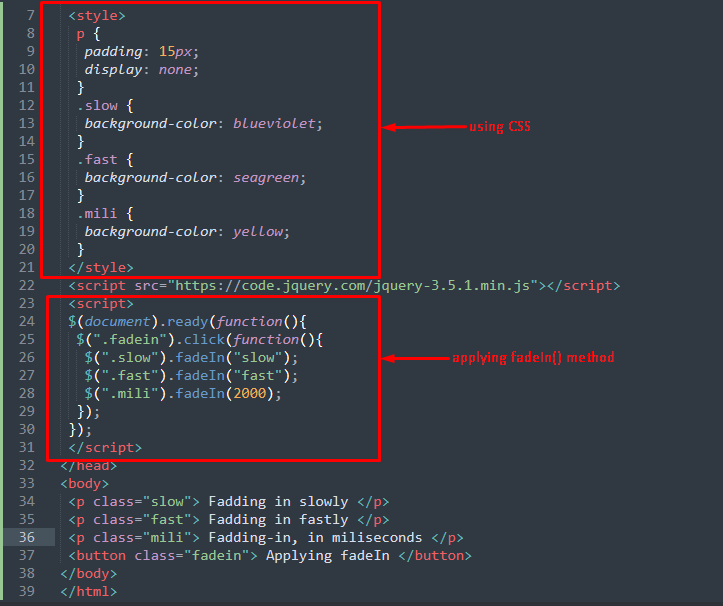
 After clicking the button, you will observe that the paragraphs will appear depending on the speed as shown in the image below.
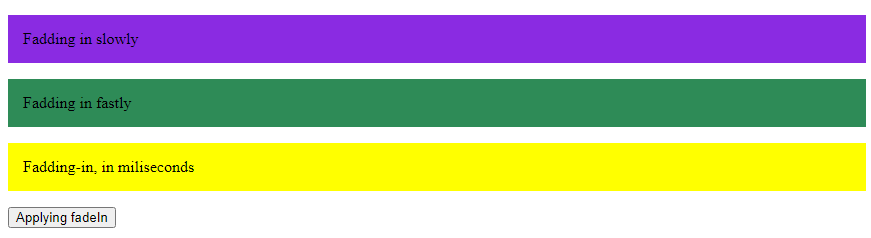
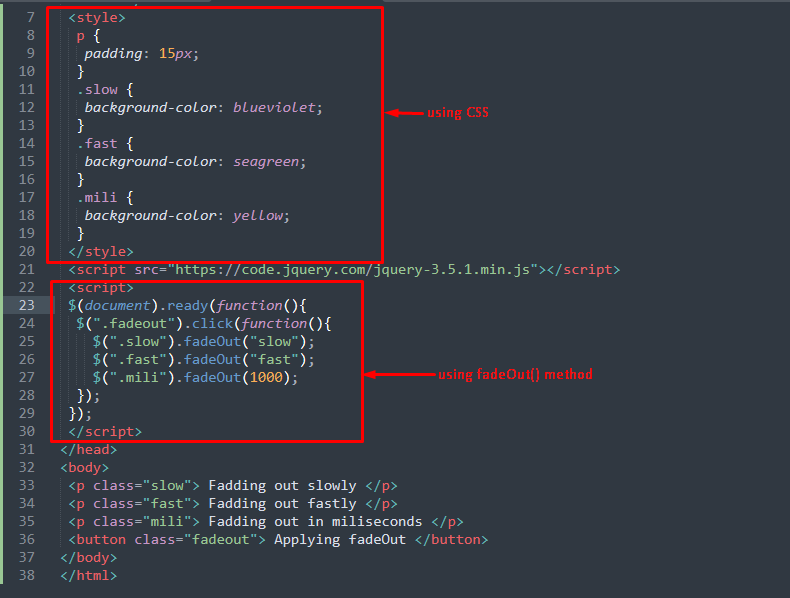
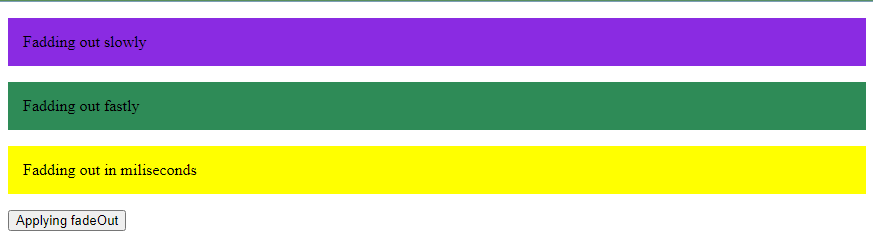 After clicking the button, the paragraphs will fade-out.

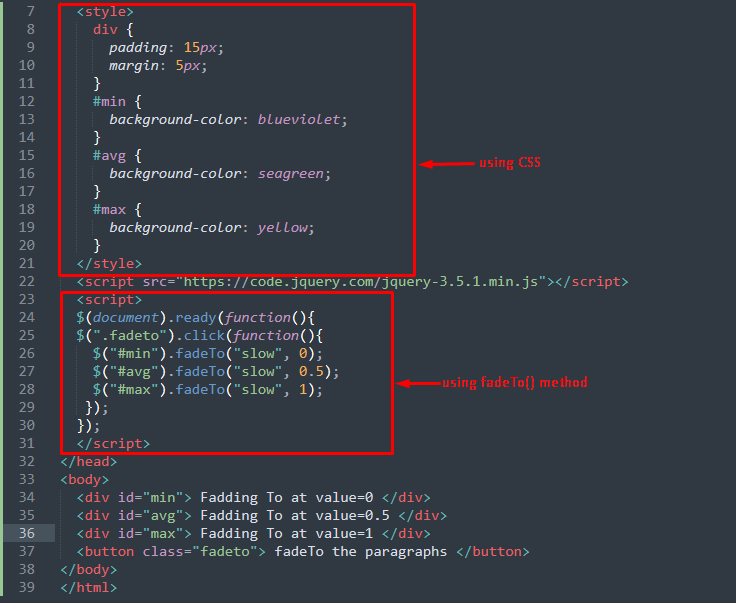
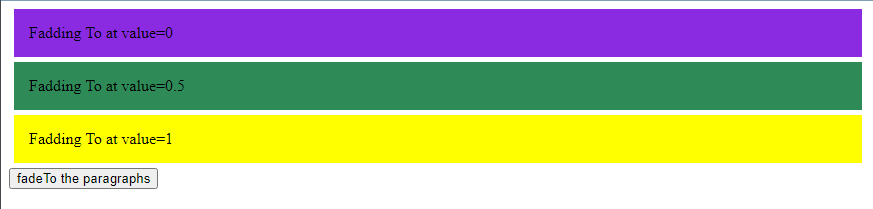 After applying fadeTo() method
 From the above output, it is observed that the paragraph having value 0 has been washed out.
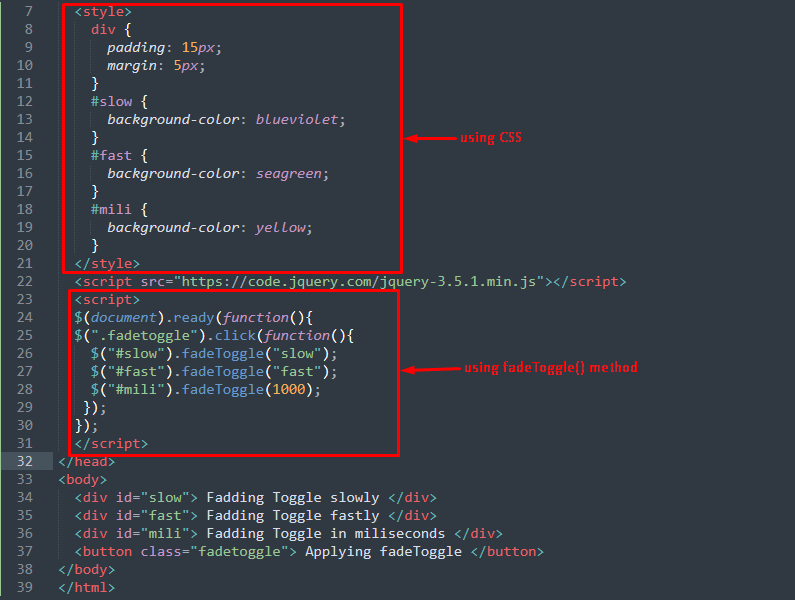
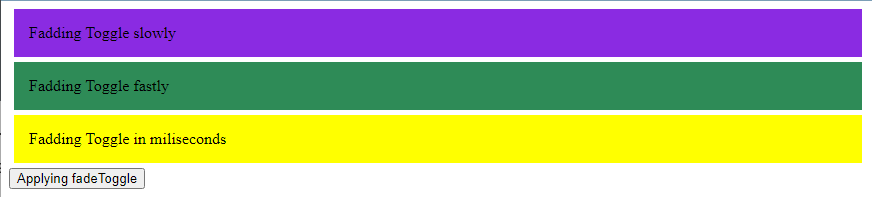 After clicking the button,
 It is concluded that, if the element is displayed, it will be hidden after fadeToggle() method ( as fadeOut() method does).
Similarly, if the element is in fadeOut() state, then the fadeToggle()will act as a fadeIn() method.
It is concluded that, if the element is displayed, it will be hidden after fadeToggle() method ( as fadeOut() method does).
Similarly, if the element is in fadeOut() state, then the fadeToggle()will act as a fadeIn() method.

 After applying the stop() method randomly (stopping anywhere)
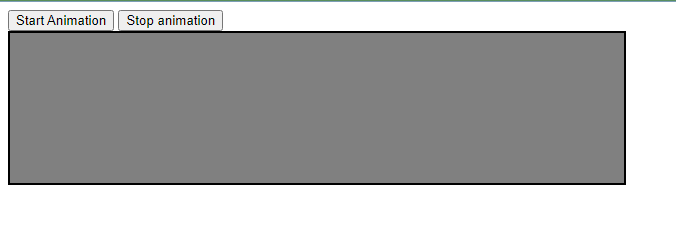
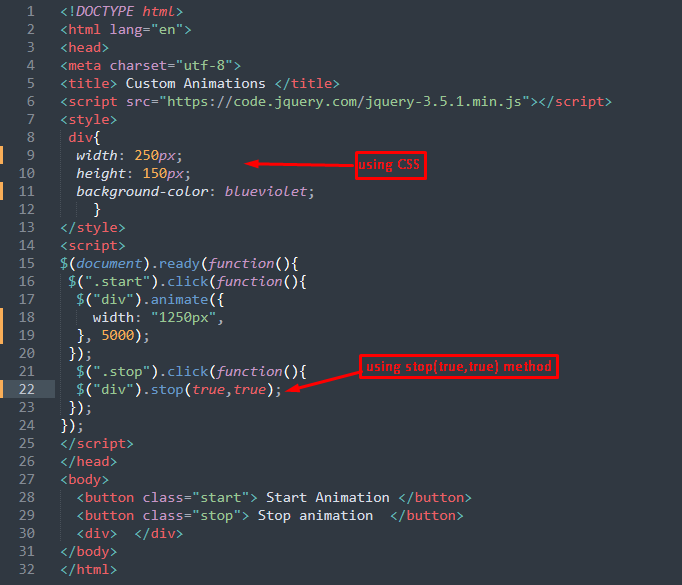
 After starting the animation, when the stop-animation button is clicked the animation ends immediately.


 After the fading-out process is started, when the stop button is clicked the fading process will be stopped as shown in the image below(in our case).

 After clicking the button.
 The width of the <div> element has been changed.
 After the button is clicked.
The height() method is working properly.
After the button is clicked.
The height() method is working properly.
 After the button is clicked.
 The inner width of the image has been displayed.
Note: The innerWidth() method includes padding as well while displaying the inner width of an element.
The inner width of the image has been displayed.
Note: The innerWidth() method includes padding as well while displaying the inner width of an element.
 After you click on the button.
 The innerHeight() method is working properly.
Note: The innerHeight() method also includes padding as well while displaying the inner height of an element.
The innerHeight() method is working properly.
Note: The innerHeight() method also includes padding as well while displaying the inner height of an element.
 When the button is clicked.
 The outerWidth() method is working properly.
Note: The outerWidth() method calculates padding as well border while displaying the outer width of an element.
The outerWidth() method is working properly.
Note: The outerWidth() method calculates padding as well border while displaying the outer width of an element.
 After you click on the button.
 The outerHeight() method is working properly.
Note: The outerHeight() method also includes padding as well border while displaying the outer height of an element.
The outerHeight() method is working properly.
Note: The outerHeight() method also includes padding as well border while displaying the outer height of an element.
 The remove() method has successfully removed the whole div.
 The nested elements inside the div have been removed successfully.
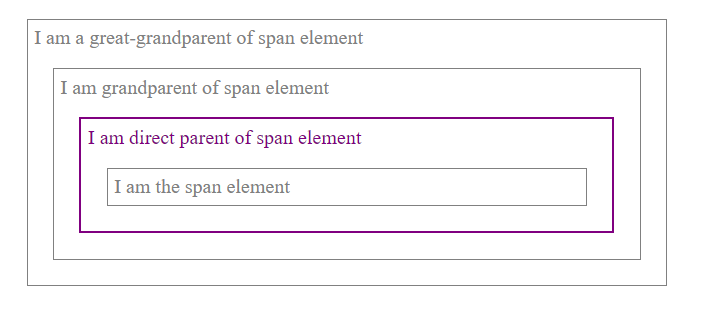 The parent() method is working properly and the parent element is accessed successfully.
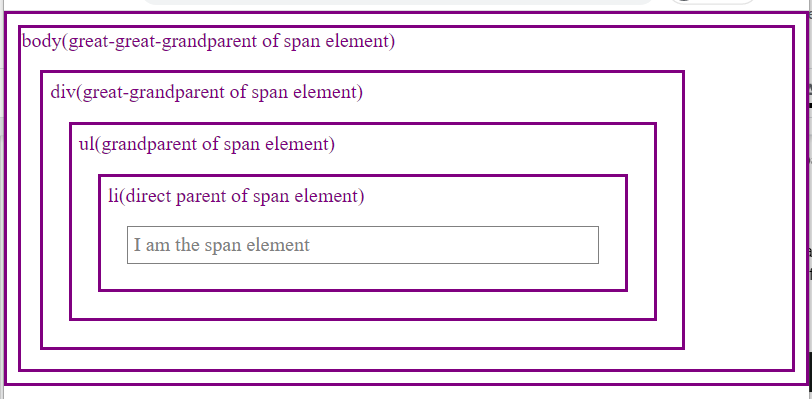 The element highlighted above the body is the <html> element.
The parents() method fetches it as well since it is also a parent of the specified element.
The element highlighted above the body is the <html> element.
The parents() method fetches it as well since it is also a parent of the specified element.
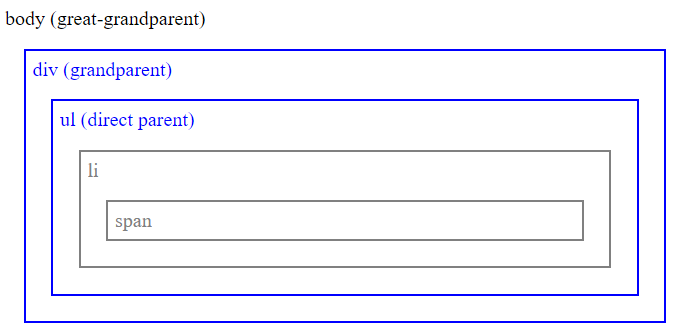 As it can been seen in the output, all the parents of <li> (div, and ul), before <body> have been highlighted.
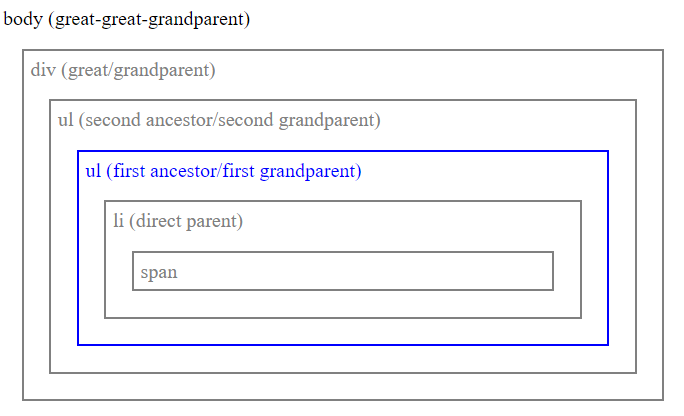 As it is pointed out in the output, the second <ul> element is first ancestor of the <span> element.
Using the above-mentioned methods, you can fetch parent elements of a specified HTML element.
As it is pointed out in the output, the second <ul> element is first ancestor of the <span> element.
Using the above-mentioned methods, you can fetch parent elements of a specified HTML element.
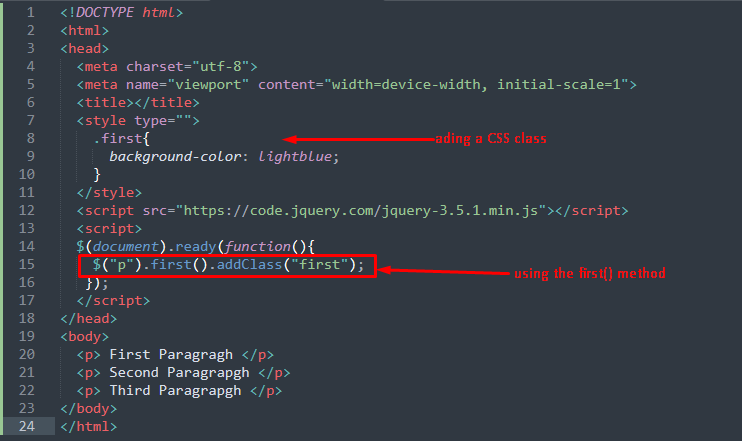
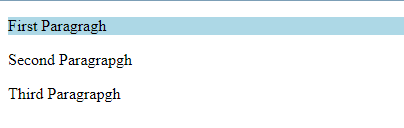 The output shows that only the first paragraph is selected, and its background is changed using the “first” class.
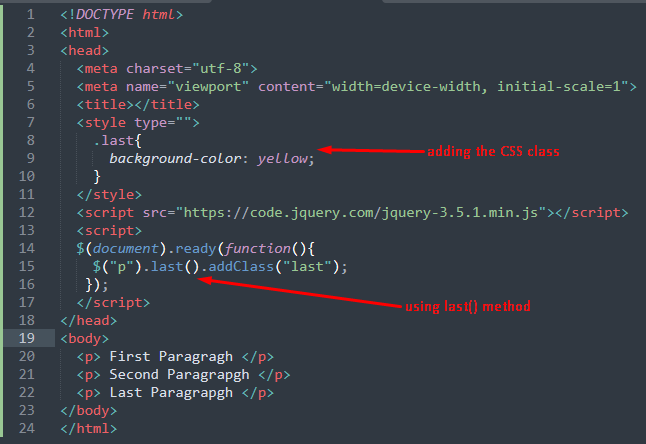

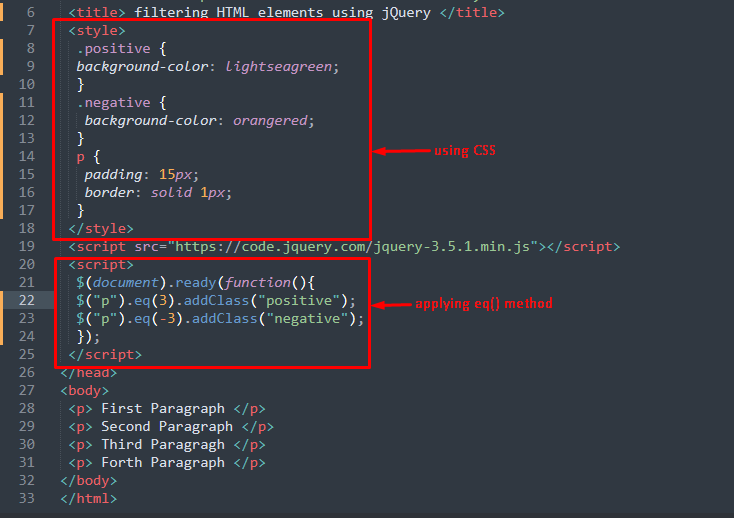
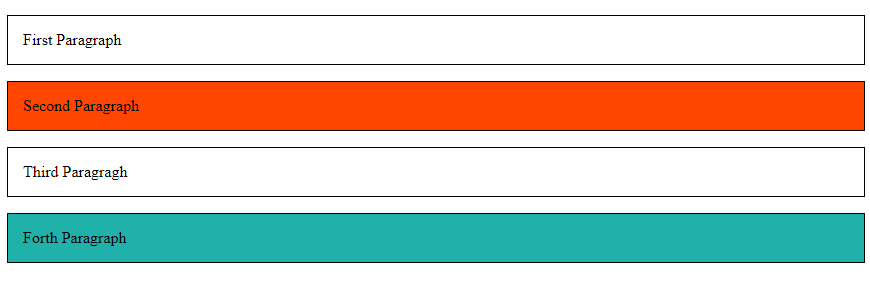 From the above output, the eq(3) fetches the last paragraph(as it is at index=3) and the eq(-3) filters the third element from the bottom(zero is reserved for the first element and -1 is for the last element).

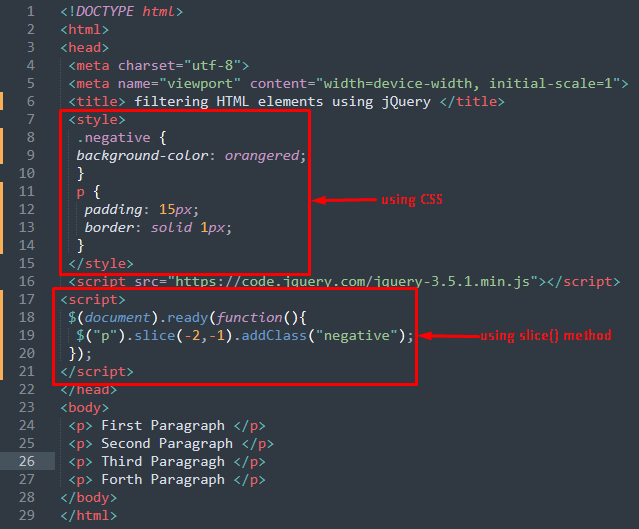
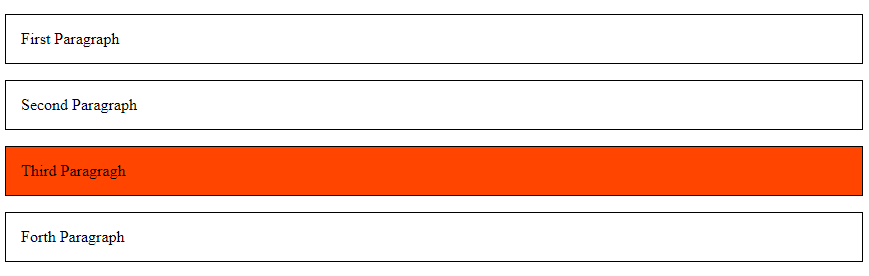
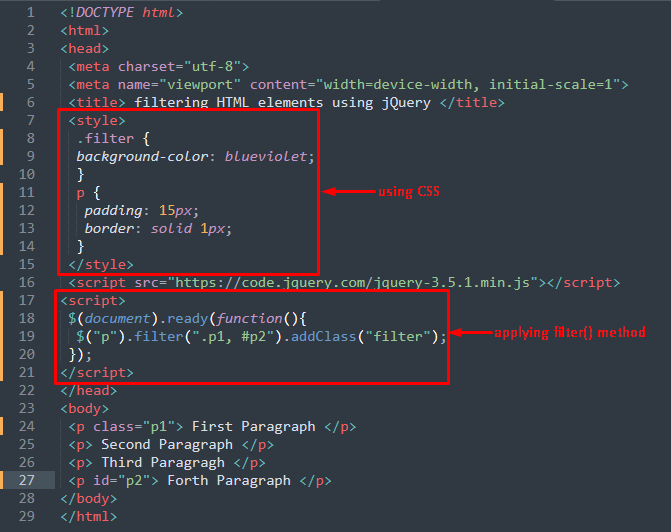

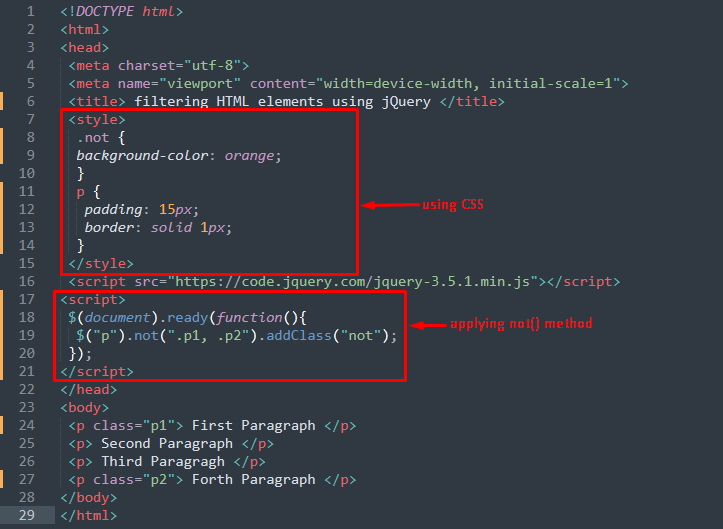

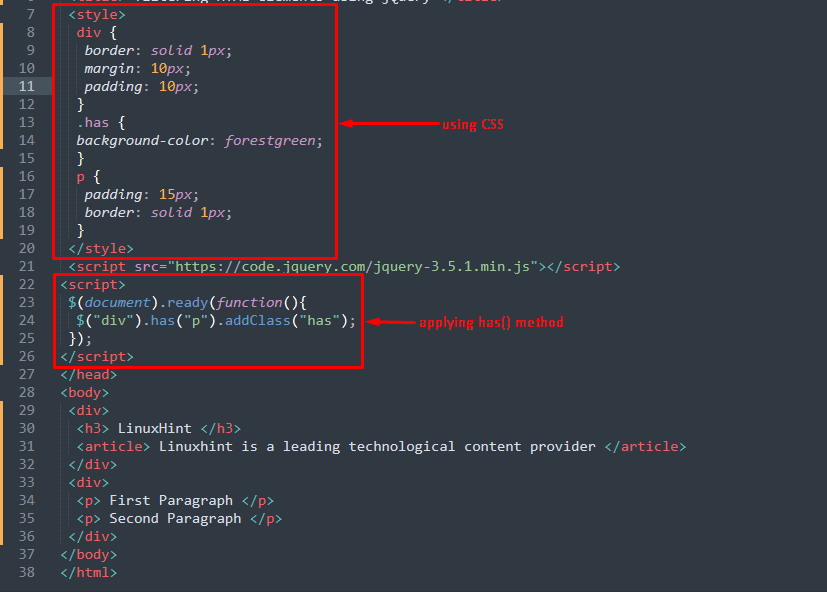
 The above output shows that the div containing paragraphs is selected only and that div is colored with forest green color.
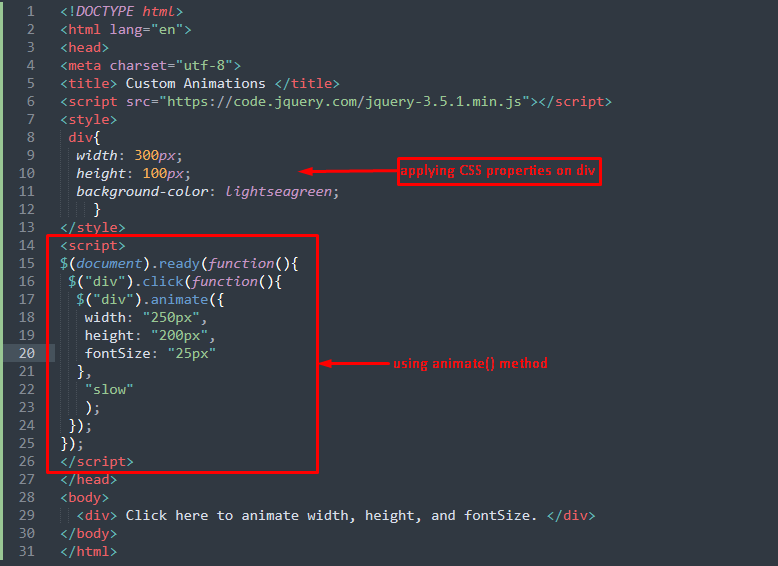
 After animation


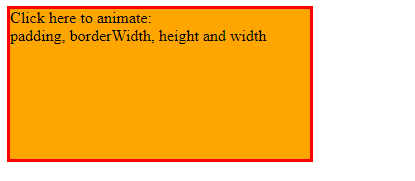 After animating

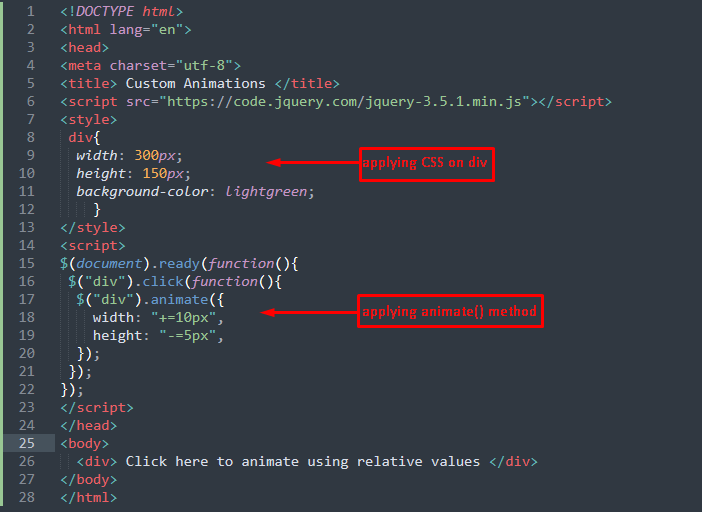
 After multiple clicks,


 After clicking on the toggle button the width will change its state (to hidden as it is in the “show” state) as can be seen in the following image.
 If you click on the show button, then it would display the div again.
 The animations have a key role in following any content.
By following these examples, you would have learned the custom creation of animations in jQuerry.
The animations have a key role in following any content.
By following these examples, you would have learned the custom creation of animations in jQuerry.
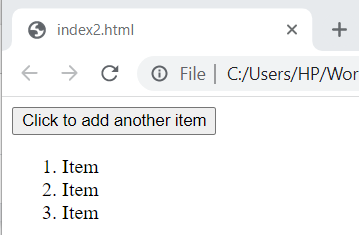 Suppose you click on the button thrice.
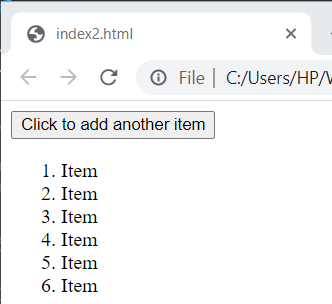 Three more items are added to the list.
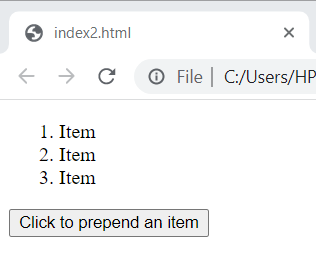 Suppose you click on the button twice.
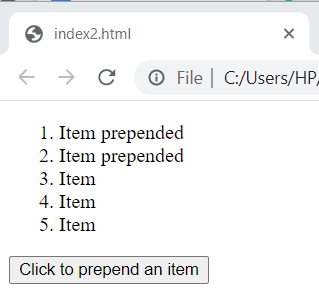 Two items are added at the start of the ordered list.
 The before() method is working properly
 Successfully added a paragraph after the heading.
 The css(), and animate() methods are chained successfully.
As you can see in the above example we chained the jQuery methods in just one line of code, however, the code will work just fine even if you want to split the code into multiple lines to enhance the readability.
The css(), and animate() methods are chained successfully.
As you can see in the above example we chained the jQuery methods in just one line of code, however, the code will work just fine even if you want to split the code into multiple lines to enhance the readability.
 The slideUp(), slideDown(), and fadeOut() methods are chained and working properly.
 No effect on the paragraph.
 The background color of the div has been set.
 After clicking the button.
 The font size of the paragraph has been extracted.
 The class “note” has successfully been added to the last paragraph.
 The hasClass() method is working properly.
 The “head” class has been removed from the <h1> element.
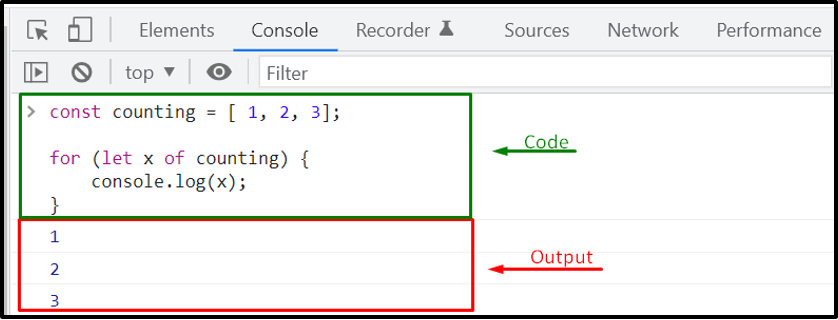 Now, let’s check out the method for iterating over a JavaScript object.
For this purpose, firstly, we will declare an object named “employee” and then utilize for..of loop for iterating over its properties:
const employee = { name: 'Alex', designation: 'Manager' };for (const prop of employee) {
console.log(prop);}
Now, let’s check out the method for iterating over a JavaScript object.
For this purpose, firstly, we will declare an object named “employee” and then utilize for..of loop for iterating over its properties:
const employee = { name: 'Alex', designation: 'Manager' };for (const prop of employee) {
console.log(prop);}
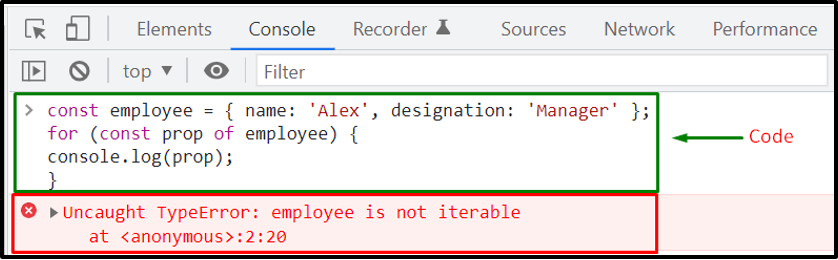 As you can see, the output of the above-given code displayed a “TypeError” message which states that the “employee” object is not iterable.
Why does it happen? We have encountered the TypeError because the for..of loop requires an iterable object for iterating over the object’s properties.
To handle the current situation, you can use the JavaScript Iteration Protocol, which will assist you in making an object iterable for iterating over its properties.
As you can see, the output of the above-given code displayed a “TypeError” message which states that the “employee” object is not iterable.
Why does it happen? We have encountered the TypeError because the for..of loop requires an iterable object for iterating over the object’s properties.
To handle the current situation, you can use the JavaScript Iteration Protocol, which will assist you in making an object iterable for iterating over its properties.
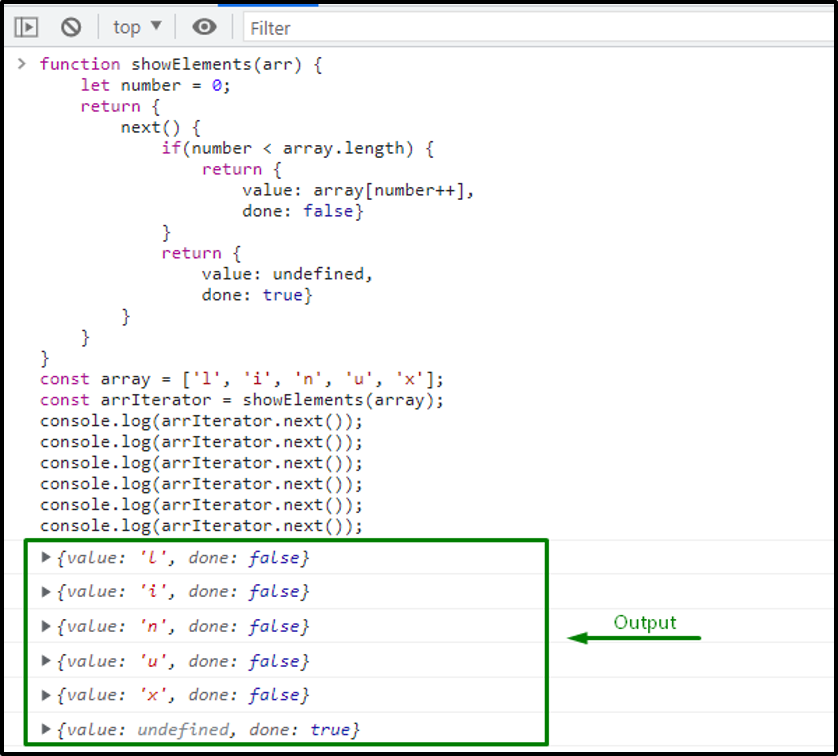 The above-given output signifies that we have successfully created and executed a user-defined iterator in our program using next() method.
Now, let’s understand the concept of iterables as well and have a clear and profound understanding of Symbol.iterator()
Example: Creating Iterators from iterables using Symbol.iterator() methodIn this example, firstly, we will declare an array with the following three values:
const arr1 = ['l', 'i', 'n', 'u', 'x'];
Then, we will invoke the “Symbol.iterator()” method which will return an iterable object and “arrIterator” will store its value:
const arrIterator = arr1[Symbol.iterator]();
console.log(arrIterator);
Execution of the above-given program will output the array iterators:
The above-given output signifies that we have successfully created and executed a user-defined iterator in our program using next() method.
Now, let’s understand the concept of iterables as well and have a clear and profound understanding of Symbol.iterator()
Example: Creating Iterators from iterables using Symbol.iterator() methodIn this example, firstly, we will declare an array with the following three values:
const arr1 = ['l', 'i', 'n', 'u', 'x'];
Then, we will invoke the “Symbol.iterator()” method which will return an iterable object and “arrIterator” will store its value:
const arrIterator = arr1[Symbol.iterator]();
console.log(arrIterator);
Execution of the above-given program will output the array iterators:
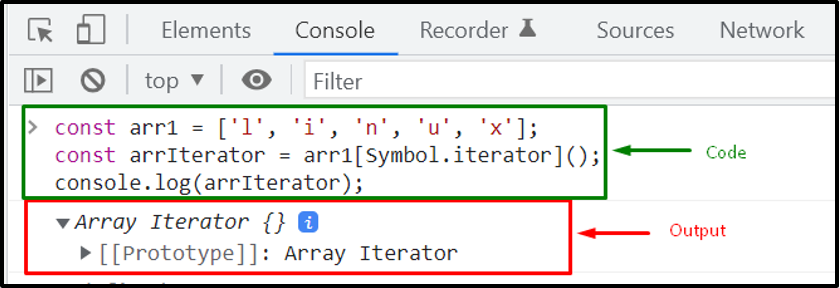 Example: Using next() method over an iterable objectThis example will demonstrate the usage of “next()” method for iterating over an iterable object.
To do so, firstly, we will create an “array” and then invoke the “Symbol.iterator()” method for returning an iterable object:
const array = ['l', 'i', 'n', 'u', 'x'];
let arrIterator = array[Symbol.iterator]();
Invoking the “next()” will also return an object having “value” and “done” property values:
console.log(arrIterator.next());
console.log(arrIterator.next());
console.log(arrIterator.next());
console.log(arrIterator.next());
console.log(arrIterator.next());
console.log(arrIterator.next());
At the end of the iteration sequence, the “done” property of the “next()” method is set to “false”:
Example: Using next() method over an iterable objectThis example will demonstrate the usage of “next()” method for iterating over an iterable object.
To do so, firstly, we will create an “array” and then invoke the “Symbol.iterator()” method for returning an iterable object:
const array = ['l', 'i', 'n', 'u', 'x'];
let arrIterator = array[Symbol.iterator]();
Invoking the “next()” will also return an object having “value” and “done” property values:
console.log(arrIterator.next());
console.log(arrIterator.next());
console.log(arrIterator.next());
console.log(arrIterator.next());
console.log(arrIterator.next());
console.log(arrIterator.next());
At the end of the iteration sequence, the “done” property of the “next()” method is set to “false”:
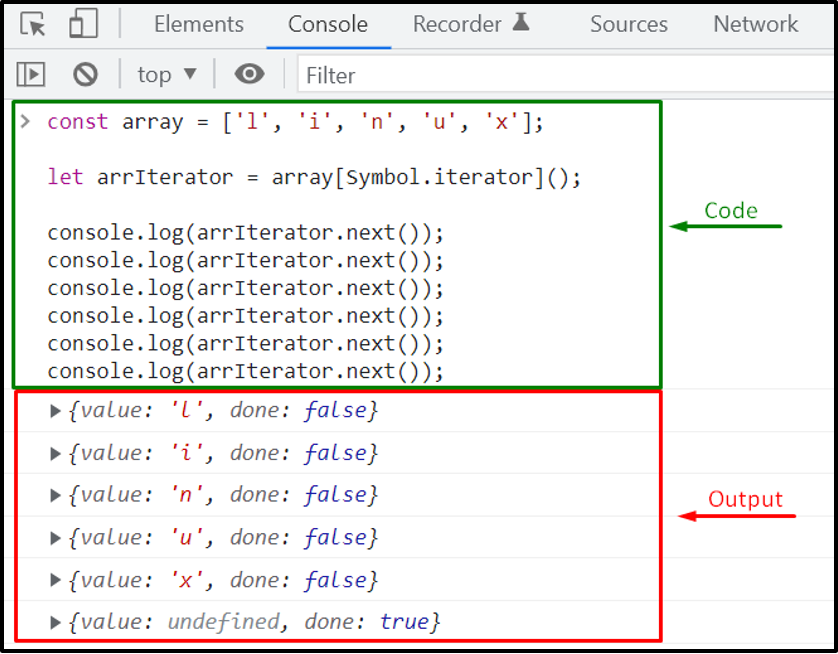 Example: Iterating through Iterables with while loopThe symbol.iterator() method is automatically called by the for..of loop.
If you want to invoke it manually, you can use the “while” loop for iterating over the specified iterable object.
For instance, in the below-given example, we will use the “while” loop for iterating over the iterable objects returned by the “Symbol.iterator()” method:
const array = ['l', 'i', 'n', 'u', 'x'];
let arrIterator = array[Symbol.iterator]();
let text = ""
while (true) {
const result = arrIterator.next();
if (result.done) break;
console.log("value: "+ result.value + " done: " + result.done);}
Here, the output shows the returned result with “value” and “done” iterator properties:
Example: Iterating through Iterables with while loopThe symbol.iterator() method is automatically called by the for..of loop.
If you want to invoke it manually, you can use the “while” loop for iterating over the specified iterable object.
For instance, in the below-given example, we will use the “while” loop for iterating over the iterable objects returned by the “Symbol.iterator()” method:
const array = ['l', 'i', 'n', 'u', 'x'];
let arrIterator = array[Symbol.iterator]();
let text = ""
while (true) {
const result = arrIterator.next();
if (result.done) break;
console.log("value: "+ result.value + " done: " + result.done);}
Here, the output shows the returned result with “value” and “done” iterator properties:
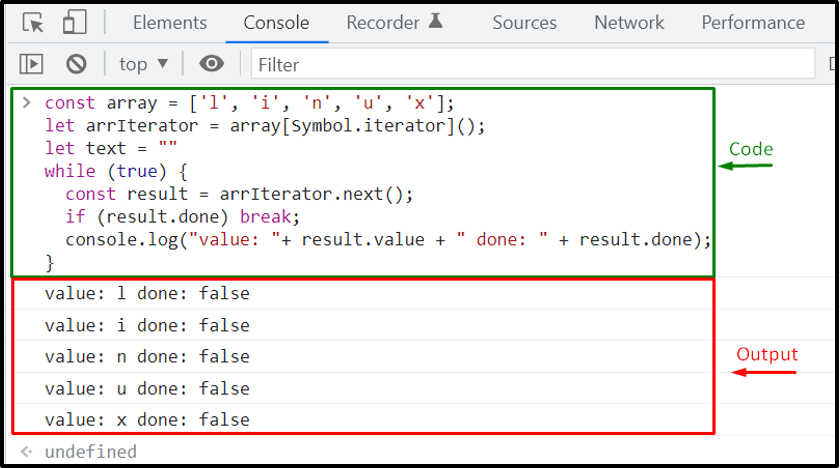 Look at the following diagram to understand the relationship between iterables, next() method, and iterators:
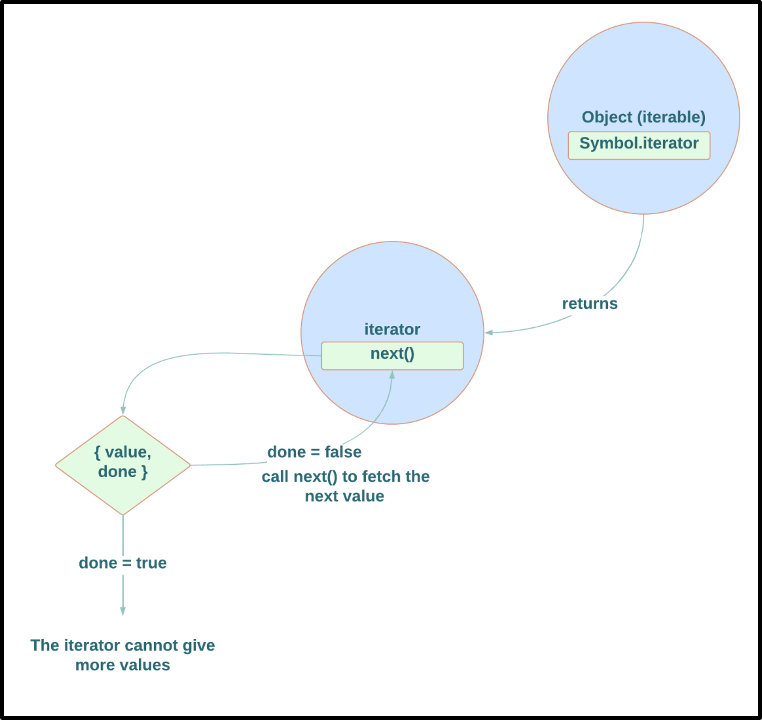 That was all about the basic usage of Iterators.
You can explore it further according to your preferences.
That was all about the basic usage of Iterators.
You can explore it further according to your preferences.
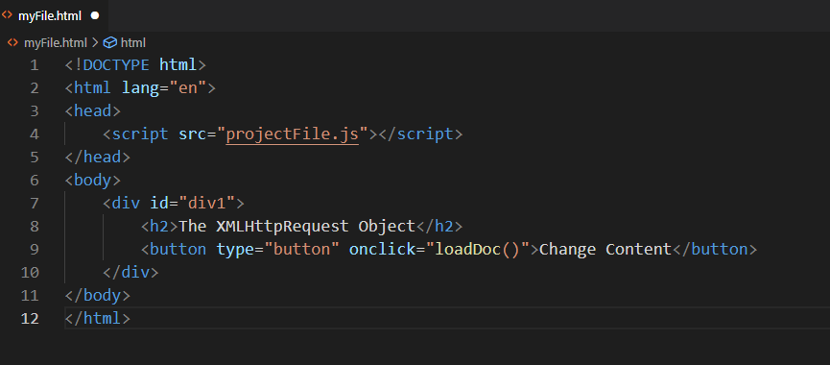 In the loadDoc() function definition, firstly, we will add a “xhttp” XMLHttpRequest object:
function loadDoc() {const xhttp = new XMLHttpRequest();
When the xhttp object will be loaded, it will write-out the response data in the <div> container:
xhttp.onload = function() {
document.getElementById("div1").innerHTML =
this.responseText;}
The “xhttp” XMLHttpRequest Object will get the “sample.txt” file from the server which comprises the response data:
xhttp.open("GET", "sample.txt");
xhttp.send();
}
In the loadDoc() function definition, firstly, we will add a “xhttp” XMLHttpRequest object:
function loadDoc() {const xhttp = new XMLHttpRequest();
When the xhttp object will be loaded, it will write-out the response data in the <div> container:
xhttp.onload = function() {
document.getElementById("div1").innerHTML =
this.responseText;}
The “xhttp” XMLHttpRequest Object will get the “sample.txt” file from the server which comprises the response data:
xhttp.open("GET", "sample.txt");
xhttp.send();
}
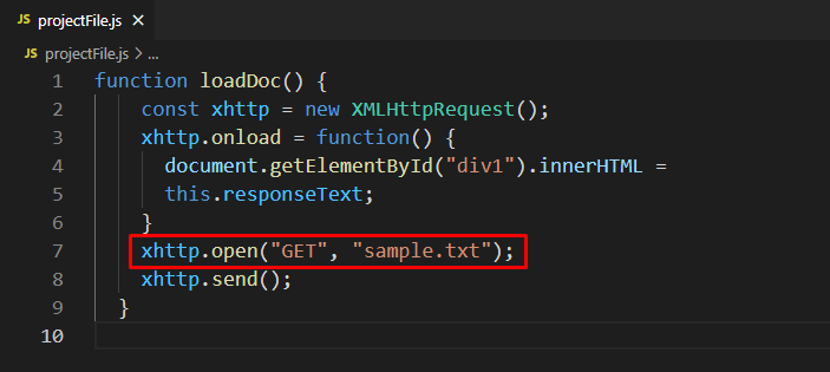 After saving the provided code, we will run our “myFile.html” with the help of the “Live Server” VS Code extension:
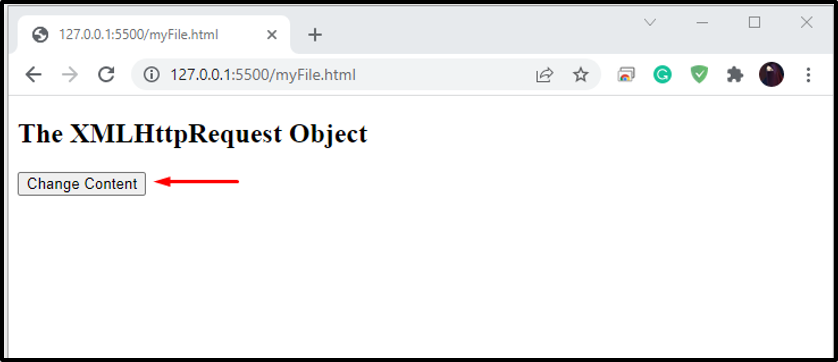 Clicking on the “Change Content” button will display the server response as follows:
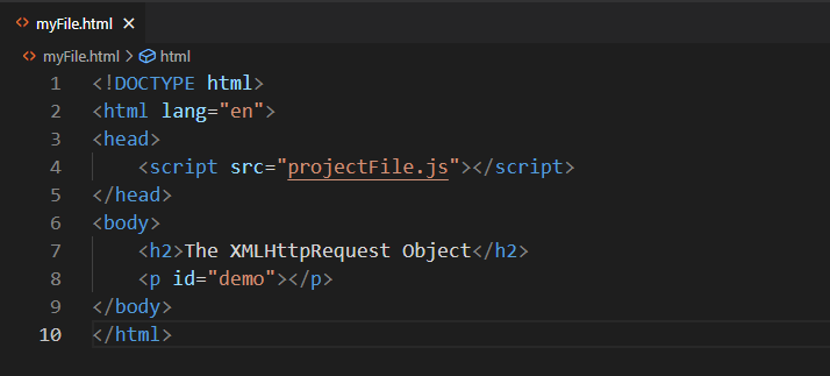 Next, we will add the below-given code in the “projectFile.js” for requesting the “cd.xml” file.
const xhttp = new XMLHttpRequest();
xhttp.onload = function() {
const xmlDoc = this.responseXML;
Our “cd.xml” file looks like this:
Next, we will add the below-given code in the “projectFile.js” for requesting the “cd.xml” file.
const xhttp = new XMLHttpRequest();
xhttp.onload = function() {
const xmlDoc = this.responseXML;
Our “cd.xml” file looks like this:
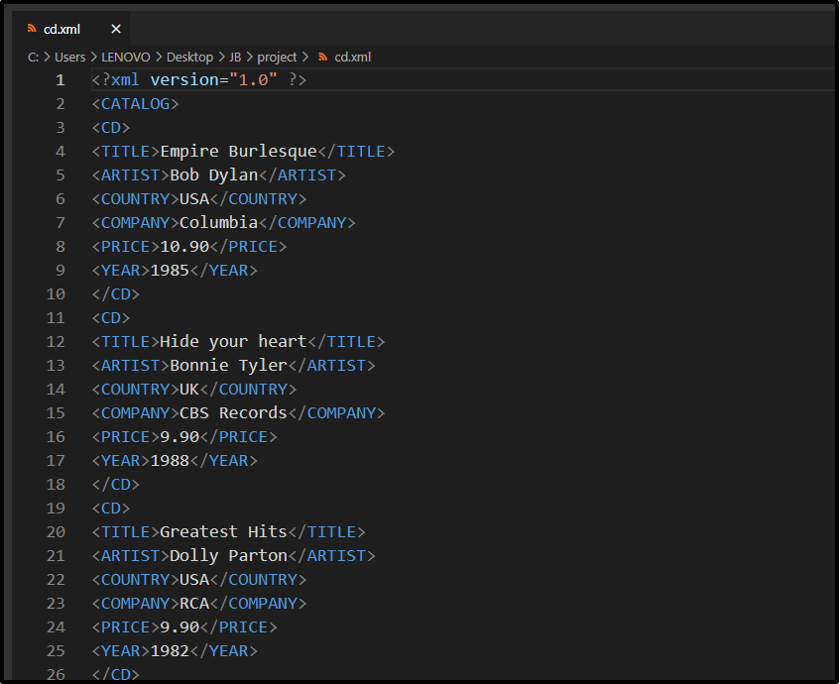 After retrieving the requested data by utilizing the “responseXML” property, the server response will be parsed and its child node values will be fetched using the code written below:
const x = xmlDoc.getElementsByTagName("ARTIST");
let txt = "";
for (let i = 0; i < x.length; i++) {
txt = txt + x[i].childNodes[0].nodeValue + "<br>";
}
Lastly, the parsed data will be displayed as content of the “paragraph” element:
document.getElementById("demo").innerHTML = txt;}
xhttp.open("GET", "cd.xml");
xhttp.send();
After retrieving the requested data by utilizing the “responseXML” property, the server response will be parsed and its child node values will be fetched using the code written below:
const x = xmlDoc.getElementsByTagName("ARTIST");
let txt = "";
for (let i = 0; i < x.length; i++) {
txt = txt + x[i].childNodes[0].nodeValue + "<br>";
}
Lastly, the parsed data will be displayed as content of the “paragraph” element:
document.getElementById("demo").innerHTML = txt;}
xhttp.open("GET", "cd.xml");
xhttp.send();
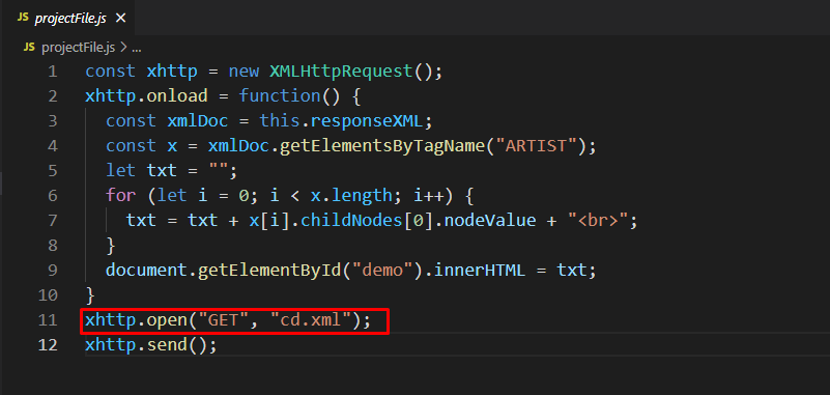 The above-given output signifies that we have successfully retrieved the server response by using the “responseXML” property.
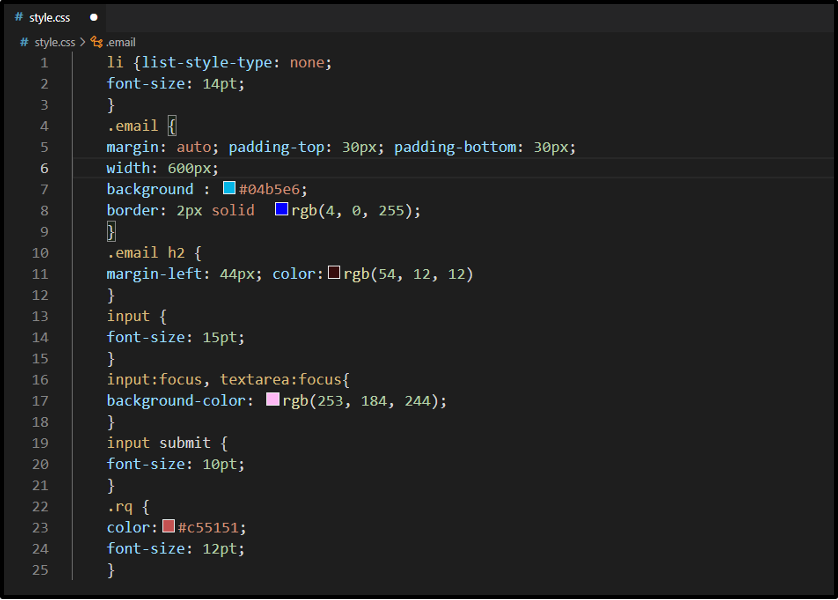 Now, we will open up our “index.html” file with the help of VS Code “Live Server” extension:
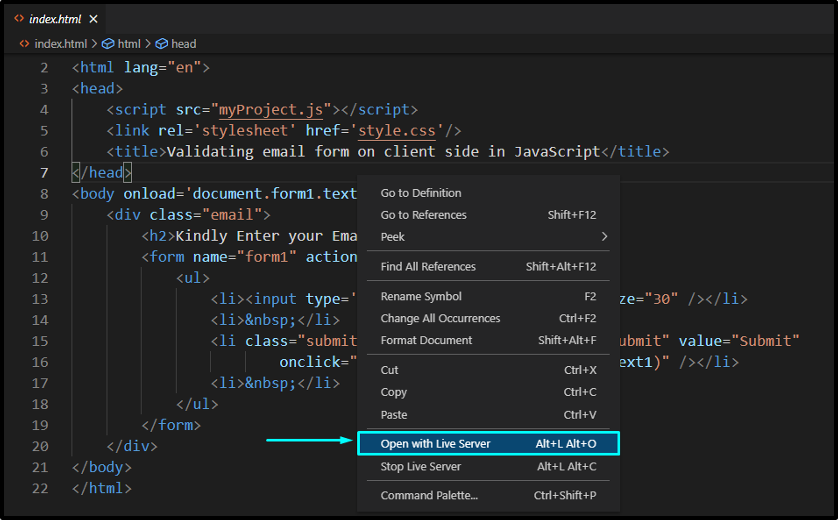 Here comes the email validation form with an input field and submit button:
 For the first time, we will enter a valid email id and:
 After clicking the “Submit” button, an alert box appears on our web page, which states that the entered email address is valid:
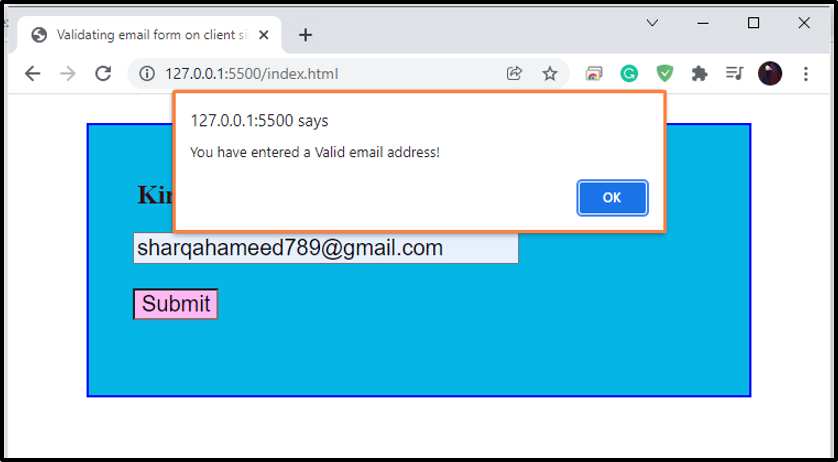 Now, to check for an invalid email, we will write out an email having an invalid format and then click on the submit button:
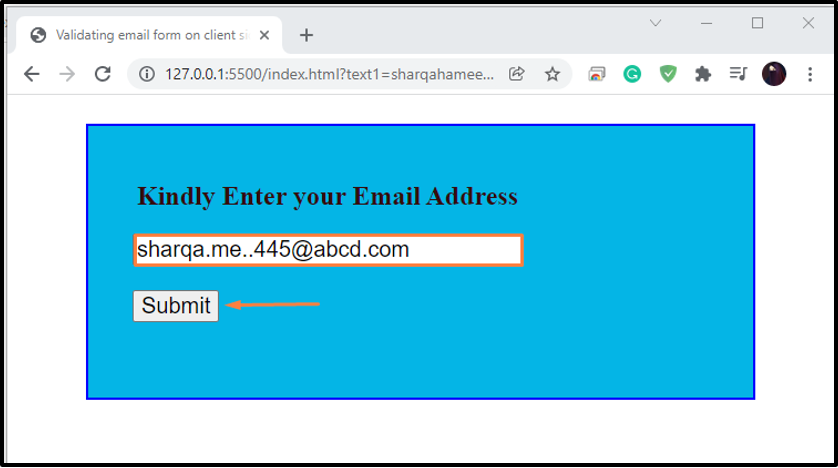 You can see that our Email validation form is working perfectly for validating the email id according to the specified format.
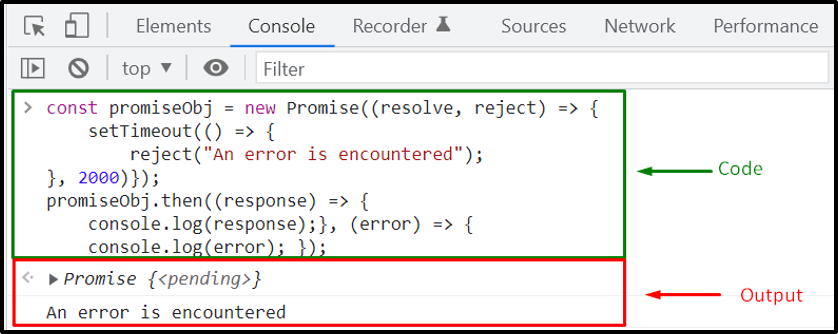 As you can see from the output, that specified handler of the “then()” method is working perfectly; however, it also has some drawbacks.
For instance, we may encounter any error in the success handler, but the added success handler cannot handle it.
Also, in the case of using the then() method, you have to write an error handler for each “then()” block.
In such situation, you can utilize “catch()” to overcome the mentioned drawbacks.
Example 1: JavaScript Promise Error Handling using catch() blockNow, we will add a catch() for handling the error or the rejection state of the promise:
const promiseObj = new Promise((resolve, reject) => {
setTimeout(() => {
reject("An error is encountered");}, 2000)});
promiseObj.then((response) => {
console.log(response);}).catch((error) => {
console.log(error); });
When one of the added Promises gets rejected, the remaining promise chain will be terminated.
That’s the reason only one console log is executed:
As you can see from the output, that specified handler of the “then()” method is working perfectly; however, it also has some drawbacks.
For instance, we may encounter any error in the success handler, but the added success handler cannot handle it.
Also, in the case of using the then() method, you have to write an error handler for each “then()” block.
In such situation, you can utilize “catch()” to overcome the mentioned drawbacks.
Example 1: JavaScript Promise Error Handling using catch() blockNow, we will add a catch() for handling the error or the rejection state of the promise:
const promiseObj = new Promise((resolve, reject) => {
setTimeout(() => {
reject("An error is encountered");}, 2000)});
promiseObj.then((response) => {
console.log(response);}).catch((error) => {
console.log(error); });
When one of the added Promises gets rejected, the remaining promise chain will be terminated.
That’s the reason only one console log is executed:
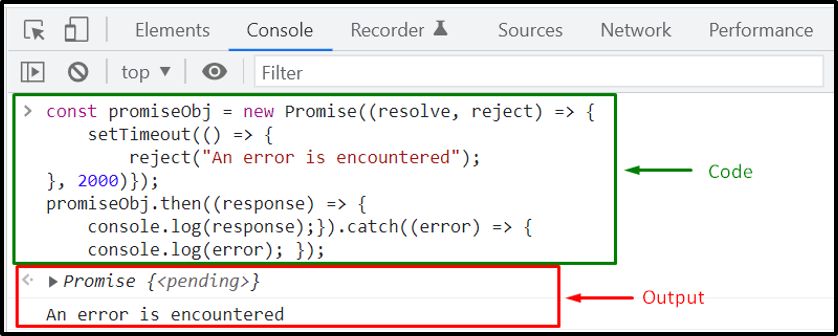 Example 2: JavaScript Promise Error Handling using catch() blockIn the following example, first of all, attendance promise object will accept “Taylor” as name argument and then display it to the console.
After that, the function will check if the promise function is fulfilled or rejected and execute the added code accordingly:
const attendance = function (name) {
return new Promise((resolve, reject) => {
if (name === "Louis") {
return reject("Louis is present");
} else {
setTimeout(() => {
return resolve(name);
}, 2000);
}
});}
attendance("Taylor")
.then((data) => {
console.log(data);
return attendance("Louis"); })
.then((data) => {
console.log(data);
return attendance("Stepheny"); })
.catch((error) => {
console.log(error); })
Example 2: JavaScript Promise Error Handling using catch() blockIn the following example, first of all, attendance promise object will accept “Taylor” as name argument and then display it to the console.
After that, the function will check if the promise function is fulfilled or rejected and execute the added code accordingly:
const attendance = function (name) {
return new Promise((resolve, reject) => {
if (name === "Louis") {
return reject("Louis is present");
} else {
setTimeout(() => {
return resolve(name);
}, 2000);
}
});}
attendance("Taylor")
.then((data) => {
console.log(data);
return attendance("Louis"); })
.then((data) => {
console.log(data);
return attendance("Stepheny"); })
.catch((error) => {
console.log(error); })
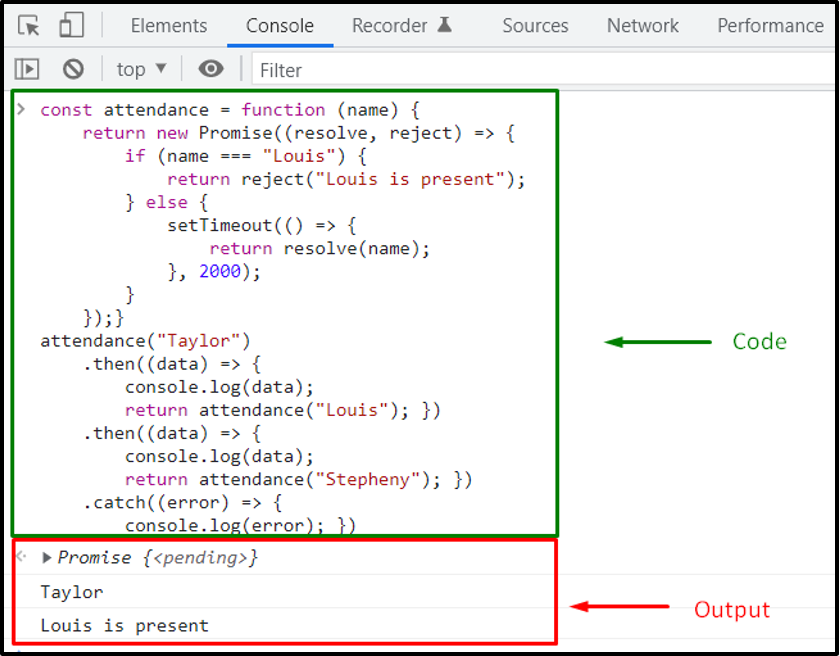
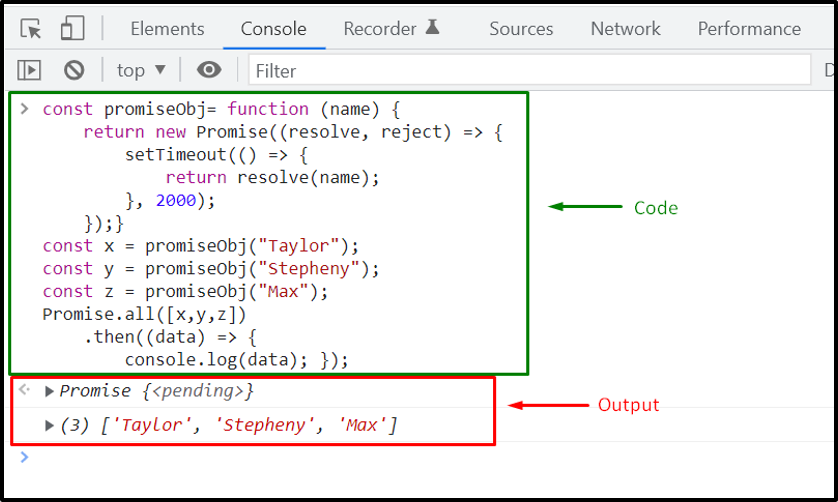
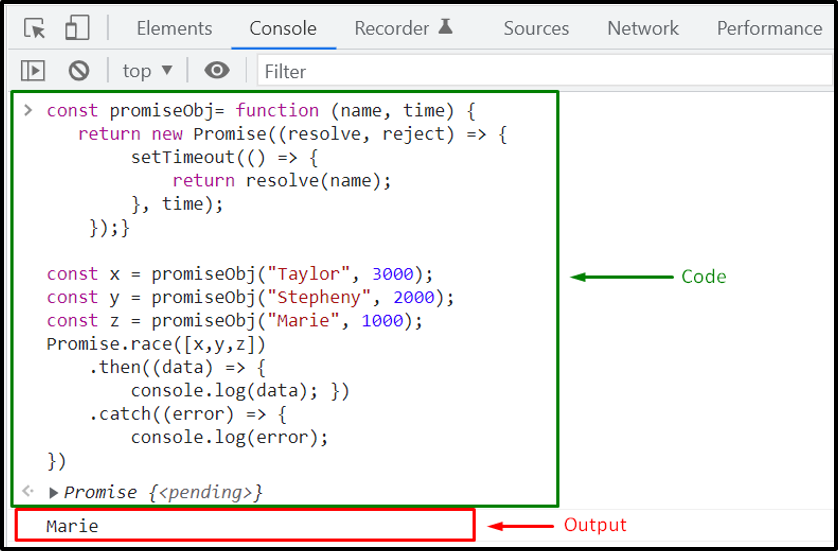 The above-given output signifies that we have successfully implemented the Promise.race() method for executing multiple operations simultaneously.
 In case, you want to check how the same program will work without a jQuery callback function, then add the below-given code in your JavaScript file:
$(document).ready(function(){
$("button").click(function(){
$("p").hide(1000);
alert("The paragraph is now hidden");
});});
Without adding a callback function, the JavaScript interpreter will operate as follows:
In case, you want to check how the same program will work without a jQuery callback function, then add the below-given code in your JavaScript file:
$(document).ready(function(){
$("button").click(function(){
$("p").hide(1000);
alert("The paragraph is now hidden");
});});
Without adding a callback function, the JavaScript interpreter will operate as follows:

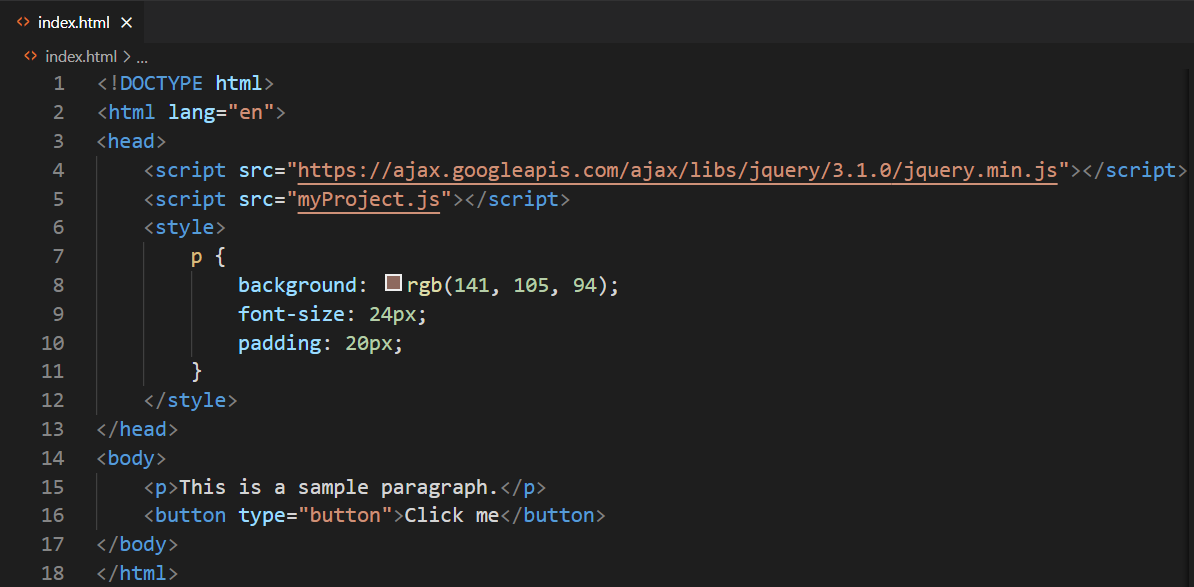 After that, we will write out the following code in our “myProject.js” file:
$(document).ready(function () {
$("button").click(function () {
$("p").slideToggle("slow", function () {
alert("The slide toggle effect is now completed.");
});
});});
The above-given code specifies that clicking the button will slowly slide down the “p” element.
When this “slideToggle()” effect finishes, the callback function will be executed, and an alert box will appear on the web page stating that “The slide toggle effect is now completed”:
Check out the output of the provided program:
After that, we will write out the following code in our “myProject.js” file:
$(document).ready(function () {
$("button").click(function () {
$("p").slideToggle("slow", function () {
alert("The slide toggle effect is now completed.");
});
});});
The above-given code specifies that clicking the button will slowly slide down the “p” element.
When this “slideToggle()” effect finishes, the callback function will be executed, and an alert box will appear on the web page stating that “The slide toggle effect is now completed”:
Check out the output of the provided program:
 Now, in the same “index.html” file, we will add a heading with the “<h1>” tag:
<h1>This is heading</h1>
Now, in the same “index.html” file, we will add a heading with the “<h1>” tag:
<h1>This is heading</h1>
 Next, the Element Name Selector $(“h1, p”) in the JavaScript file will find and get the h1 and p elements.
Then, the paragraph will be slide down with “slow” speed and heading will be shown in its position.
Lastly, the callback function will display the alert box on the browser:
$(document).ready(function () {
$("button").click(function () {
$("h1, p").slideToggle("slow", function () {
alert("The slide toggle effect has completed.");
});
});});
Now, the alert box will appear two times on the web page, one for the “h1” heading and the other for the “p” paragraph element:
Next, the Element Name Selector $(“h1, p”) in the JavaScript file will find and get the h1 and p elements.
Then, the paragraph will be slide down with “slow” speed and heading will be shown in its position.
Lastly, the callback function will display the alert box on the browser:
$(document).ready(function () {
$("button").click(function () {
$("h1, p").slideToggle("slow", function () {
alert("The slide toggle effect has completed.");
});
});});
Now, the alert box will appear two times on the web page, one for the “h1” heading and the other for the “p” paragraph element:
 As you can see from the above-given output we have successfully implemented Callback function in jQuery.
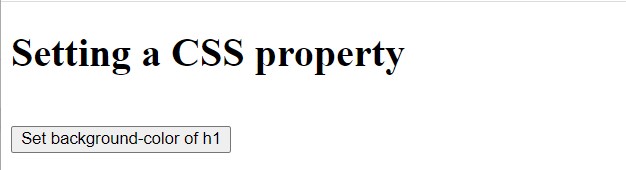 After clicking the button.
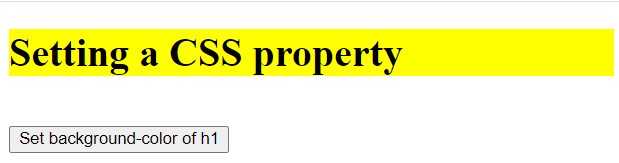 The background color of the heading has been set successfully.
 The background color of the div element has been fetched and displayed successfully.
 It can be verified from the above output that multiple styles are applied to the paragraph all at once.
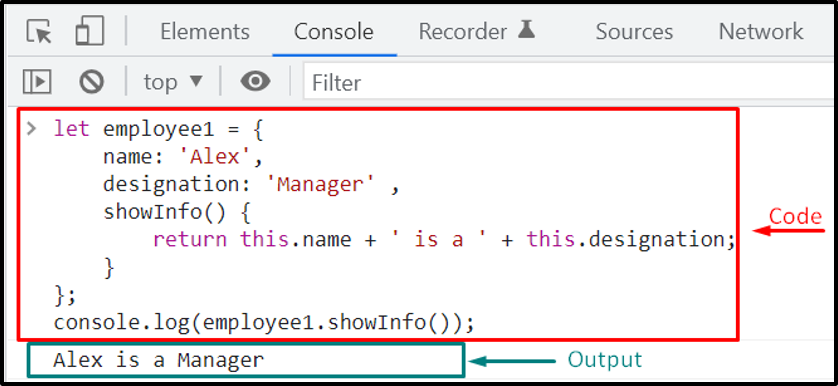 Now, let’s say you want to create another object “employee2” for a different employee.
For this purpose, you have to write out the same code while changing the values of properties according to your requirements:
let employee2 = {
name: 'Stepheny',
designation: 'Video Editor' ,
showInfo() {
return this.name + ' is a ' + this.designation;
}};
console.log(employee2.showInfo());
Now, let’s say you want to create another object “employee2” for a different employee.
For this purpose, you have to write out the same code while changing the values of properties according to your requirements:
let employee2 = {
name: 'Stepheny',
designation: 'Video Editor' ,
showInfo() {
return this.name + ' is a ' + this.designation;
}};
console.log(employee2.showInfo());
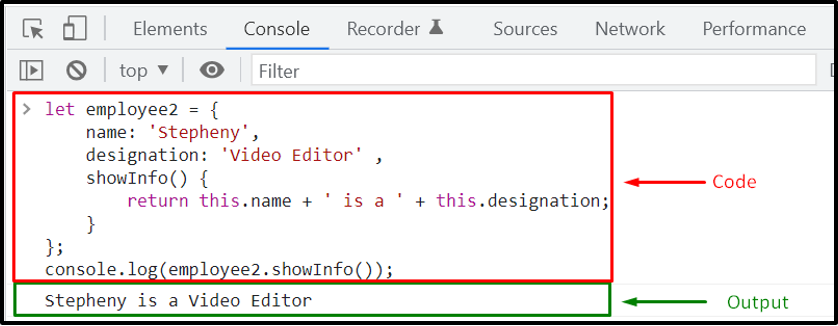 You can follow the above-given procedure for creating a few employee objects.
But what if you want to create 100 employee objects? In such a case, creating each object separately while writing the same code again and again will consume a lot of time, effort, and can make your code complex to handle.
You can utilize a factory function for assisting you to avoid code duplication.
It creates an object without diving into complex classes or using the “new” keyword.
Now, we will create a JavaScript factory function “createEmployee” for creating our employee objects:
function createEmployee(name, designation) {return {
name: name,
designation: designation,
showInfo() {return this.name + ' is a ' + this.designation;}}}
The above-given factory function will return an object comprising the property values passed as arguments.
In the next step, we will create three employee objects named as Alex, Smith, and Marie:
let Alex = createEmployee('Alex', 'Manager');
let Smith = createEmployee('Smith', 'Video Editor');
let Marie = createEmployee('Marie', 'Content Writer');
After doing so, we will invoke the showInfo() function for each of the employee object:
console.log(Alex.showInfo());
console.log(Smith.showInfo());
console.log(Marie.showInfo());
Execution of the given JavaScript program signifies that we have successfully created employee object with the help of factory functions:
You can follow the above-given procedure for creating a few employee objects.
But what if you want to create 100 employee objects? In such a case, creating each object separately while writing the same code again and again will consume a lot of time, effort, and can make your code complex to handle.
You can utilize a factory function for assisting you to avoid code duplication.
It creates an object without diving into complex classes or using the “new” keyword.
Now, we will create a JavaScript factory function “createEmployee” for creating our employee objects:
function createEmployee(name, designation) {return {
name: name,
designation: designation,
showInfo() {return this.name + ' is a ' + this.designation;}}}
The above-given factory function will return an object comprising the property values passed as arguments.
In the next step, we will create three employee objects named as Alex, Smith, and Marie:
let Alex = createEmployee('Alex', 'Manager');
let Smith = createEmployee('Smith', 'Video Editor');
let Marie = createEmployee('Marie', 'Content Writer');
After doing so, we will invoke the showInfo() function for each of the employee object:
console.log(Alex.showInfo());
console.log(Smith.showInfo());
console.log(Marie.showInfo());
Execution of the given JavaScript program signifies that we have successfully created employee object with the help of factory functions:
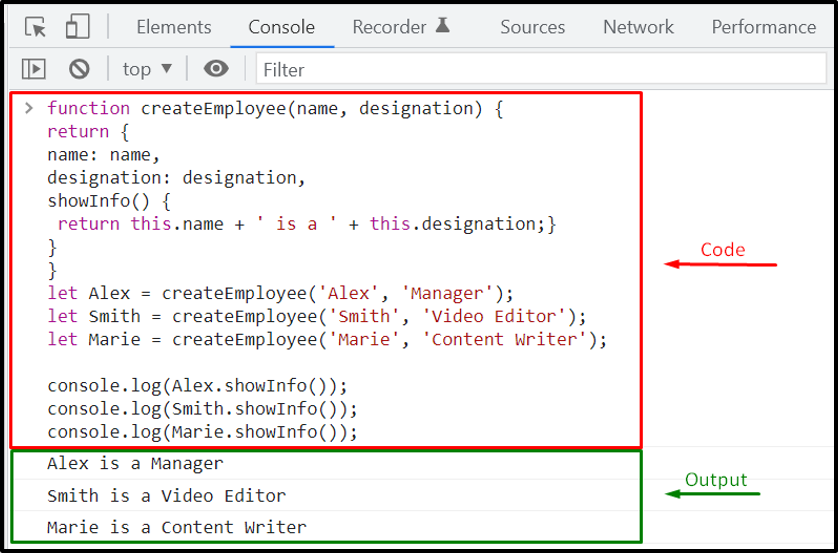
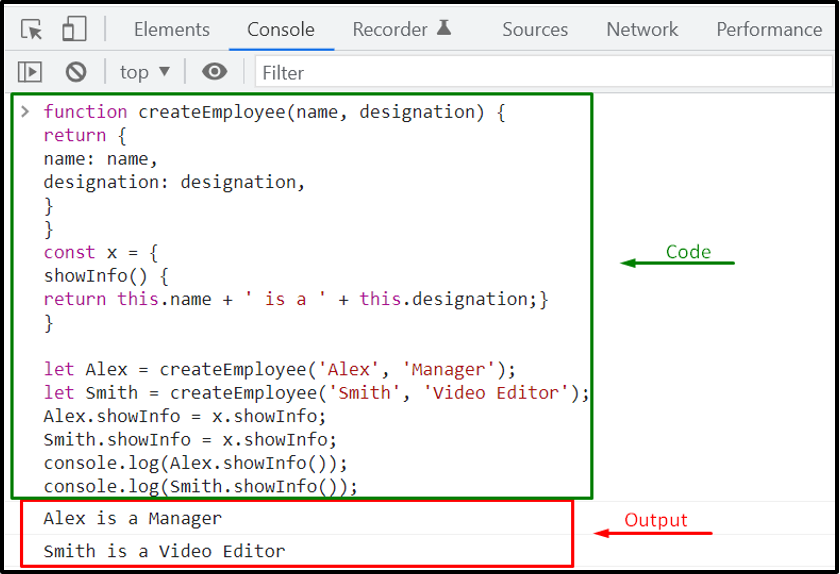 However, the provided approach is not scalable if you want to add multiple methods for an employee object because you have to assign them individually.
If that’s the case, you should utilize “Object.create()” method in your JavaScript program.
However, the provided approach is not scalable if you want to add multiple methods for an employee object because you have to assign them individually.
If that’s the case, you should utilize “Object.create()” method in your JavaScript program.
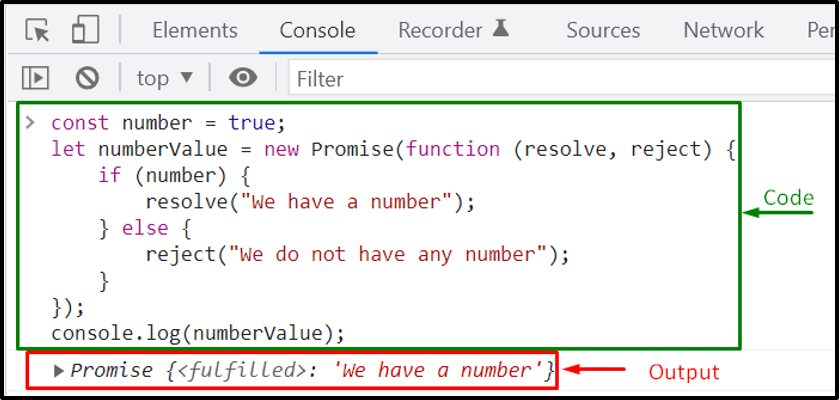
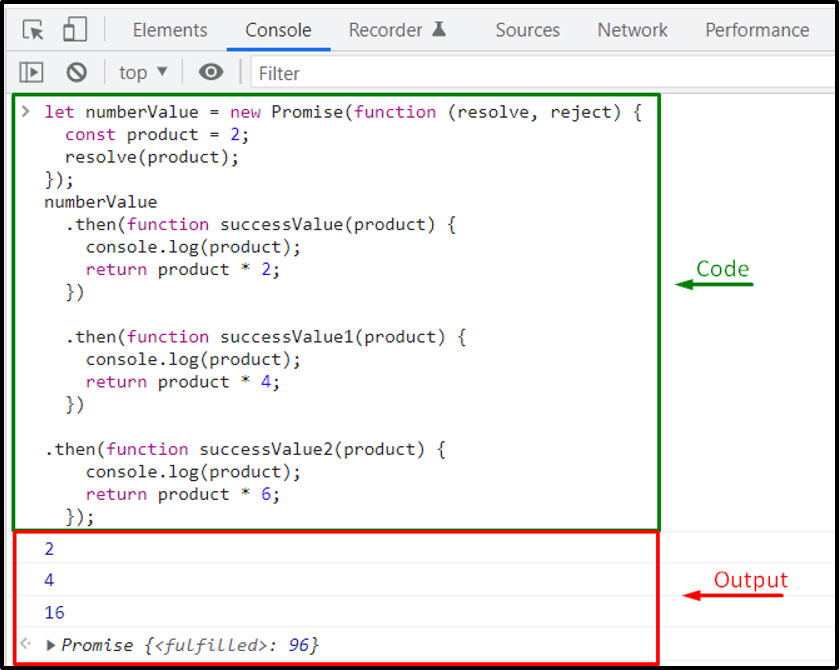

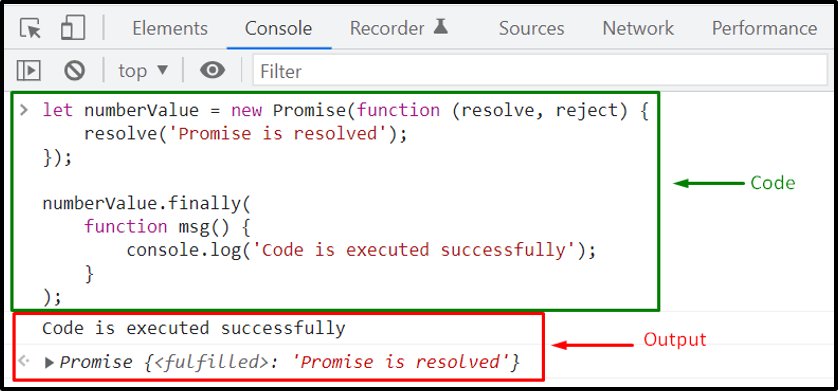 The above-given output signifies that the code added in the “finally()” method is executed successfully, and the promise is resolved.
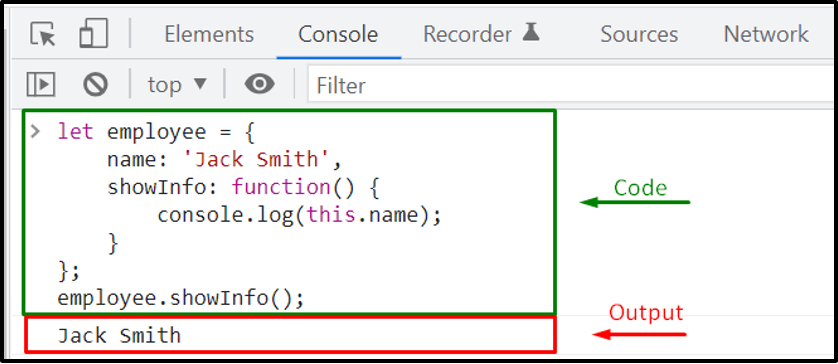 Now, we will create a new variable function, “showInfo2” that refers to the “showInfo()” function of the employee object.
In this case, the default binding will be lost, and the program will not show any output:
var showInfo2= employee.showInfo;
showInfo2();
So, when the callback “employee.showInfo” is invoked, the “name” property does not exist in the global object, and it is set to “undefined” as shown in output:
Now, we will create a new variable function, “showInfo2” that refers to the “showInfo()” function of the employee object.
In this case, the default binding will be lost, and the program will not show any output:
var showInfo2= employee.showInfo;
showInfo2();
So, when the callback “employee.showInfo” is invoked, the “name” property does not exist in the global object, and it is set to “undefined” as shown in output:
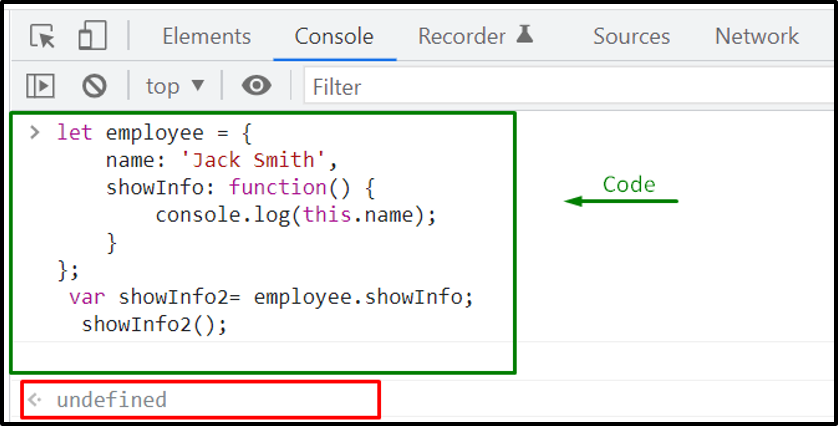 You can utilize the JavaScript bind() method to ensure that any binding related to “this” keyword is not lost.
The bind() method sets “this” context to the specified object:
let employee = {
name: 'Jack Smith',
showInfo: function() {
console.log(this.name);
}};
Here the JavaScript bind() method creates a new function with “this” keyword referring to the parameter in the parentheses.
It also permits us to invoke the “showInfo()” function while passing the “employee” object as an argument:
var showInfo2= employee.showInfo.bind(employee);
showInfo2();
The showInfo2() method will display the assigned “name” of “employee” object:
You can utilize the JavaScript bind() method to ensure that any binding related to “this” keyword is not lost.
The bind() method sets “this” context to the specified object:
let employee = {
name: 'Jack Smith',
showInfo: function() {
console.log(this.name);
}};
Here the JavaScript bind() method creates a new function with “this” keyword referring to the parameter in the parentheses.
It also permits us to invoke the “showInfo()” function while passing the “employee” object as an argument:
var showInfo2= employee.showInfo.bind(employee);
showInfo2();
The showInfo2() method will display the assigned “name” of “employee” object:
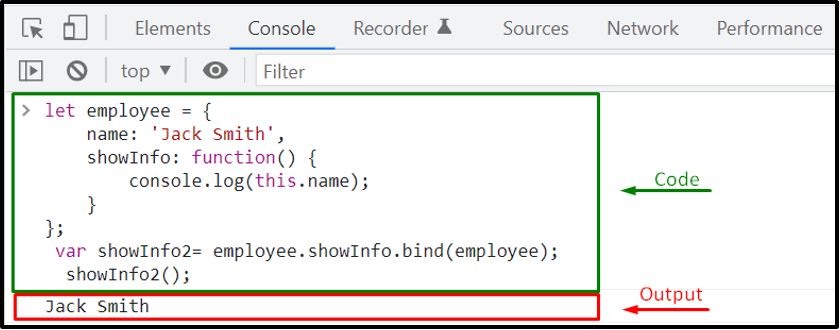 Example 2: Using JavaScript bind() method for Multiple functions bindingIn the following example, we will create three objects: “employee1”, “employee2”, and “employee3”:
let employee1 = {
name: 'Jack'};
let employee2 = {
name: 'Max'};
let employee3 = {
name: 'Paul'};function showInfo() {
console.log(this.name);}
For each of the above-given object, we will invoke the “showInfo()” method by utilizing the JavaScript “bind()” method:
var showInfo2= showInfo.bind(employee1);
showInfo2();var showInfo3= showInfo.bind(employee2);
showInfo3();var showInfo4= showInfo.bind(employee3);
showInfo4();
The output will display the name property values of the “employee1”, “employee2”, and “employee3” objects:
Example 2: Using JavaScript bind() method for Multiple functions bindingIn the following example, we will create three objects: “employee1”, “employee2”, and “employee3”:
let employee1 = {
name: 'Jack'};
let employee2 = {
name: 'Max'};
let employee3 = {
name: 'Paul'};function showInfo() {
console.log(this.name);}
For each of the above-given object, we will invoke the “showInfo()” method by utilizing the JavaScript “bind()” method:
var showInfo2= showInfo.bind(employee1);
showInfo2();var showInfo3= showInfo.bind(employee2);
showInfo3();var showInfo4= showInfo.bind(employee3);
showInfo4();
The output will display the name property values of the “employee1”, “employee2”, and “employee3” objects:
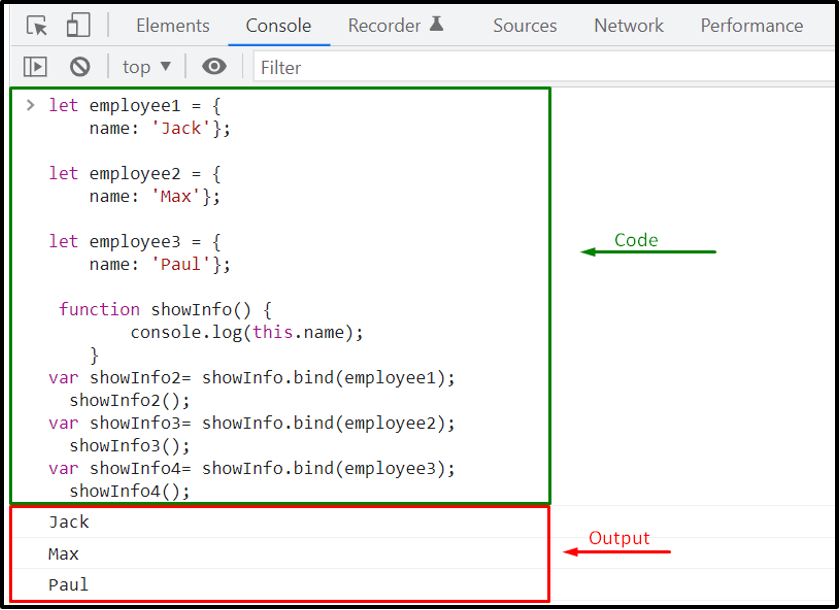 Example 3: Using JavaScript bind() method for function borrowingWith the help of the JavaScript bind() method, an object can borrow a function of another added object.
For the demonstration, we will create two objects “car” and “airplane” having “name” property, “run()” and “fly()” methods respectively:
let car = {
name: 'car',
run: function(speed) {
console.log(this.name + ' is moving at ' + speed + ' mph.');
}};
let airplane = {
name: 'airplane',
fly: function(speed) {
console.log(this.name + ' is flying at ' + speed + ' mph.');
}};
Now, if you want the “airplane” object to run, then utilize the JavaScript bind() method for creating a run() function with the “this” keyword, which sets it to “airplane” object:
let run= car.run.bind(airplane, 20);
run();
We have called the bind() with the car.run() method and passed “airplane” as “name” property value and its speed as “20”:
Example 3: Using JavaScript bind() method for function borrowingWith the help of the JavaScript bind() method, an object can borrow a function of another added object.
For the demonstration, we will create two objects “car” and “airplane” having “name” property, “run()” and “fly()” methods respectively:
let car = {
name: 'car',
run: function(speed) {
console.log(this.name + ' is moving at ' + speed + ' mph.');
}};
let airplane = {
name: 'airplane',
fly: function(speed) {
console.log(this.name + ' is flying at ' + speed + ' mph.');
}};
Now, if you want the “airplane” object to run, then utilize the JavaScript bind() method for creating a run() function with the “this” keyword, which sets it to “airplane” object:
let run= car.run.bind(airplane, 20);
run();
We have called the bind() with the car.run() method and passed “airplane” as “name” property value and its speed as “20”:
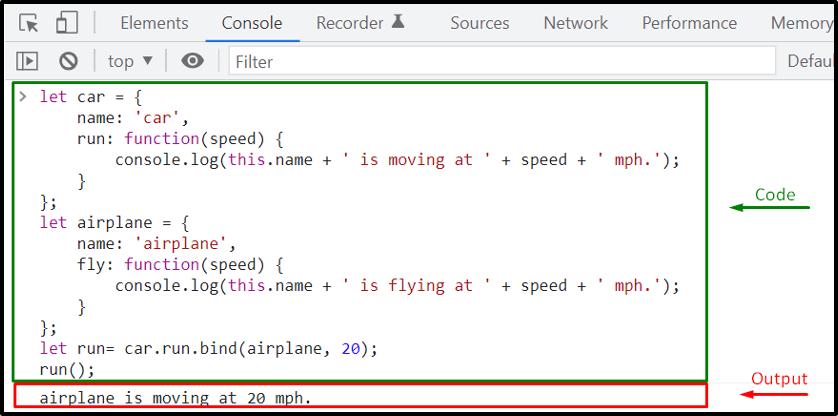 The above-given output signifies that by using the JavaScript bind() method, we have successfully borrowed the run() method from the car object, without making its copy.
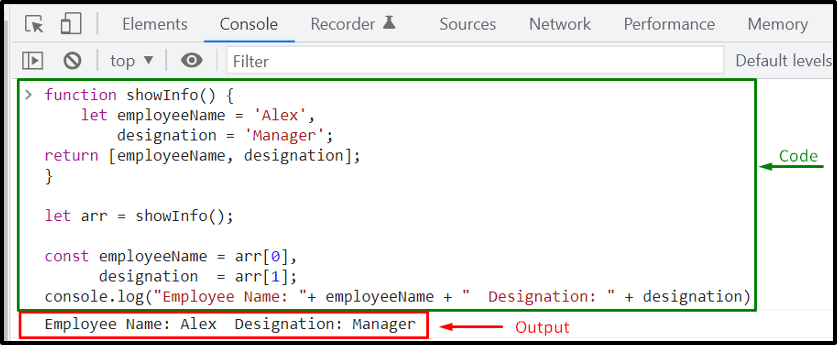 Unpacking Array using Destructing AssignmentThe method of declaring objects or variables for storing elements is straightforward.
But, in the case of large data, defining variables each time is considered a tedious task.
Loops are also used for accessing the values of an array.
Besides this, ES6 offers a new feature, “Destructing Assignment,” that can be used for unpacking array elements:
function showInfo() {
let employeeName = 'Alex',
designation = 'Manager';return [employeeName, designation];}
Using destructing assignment, the “employeeName” and “designation” will take the first and second element of the returned function values:
const [employeeName, designation] = showInfo();
console.log("Designation of "+ employeeName + " is " + designation);
Now, check out the below-given output:
Unpacking Array using Destructing AssignmentThe method of declaring objects or variables for storing elements is straightforward.
But, in the case of large data, defining variables each time is considered a tedious task.
Loops are also used for accessing the values of an array.
Besides this, ES6 offers a new feature, “Destructing Assignment,” that can be used for unpacking array elements:
function showInfo() {
let employeeName = 'Alex',
designation = 'Manager';return [employeeName, designation];}
Using destructing assignment, the “employeeName” and “designation” will take the first and second element of the returned function values:
const [employeeName, designation] = showInfo();
console.log("Designation of "+ employeeName + " is " + designation);
Now, check out the below-given output:
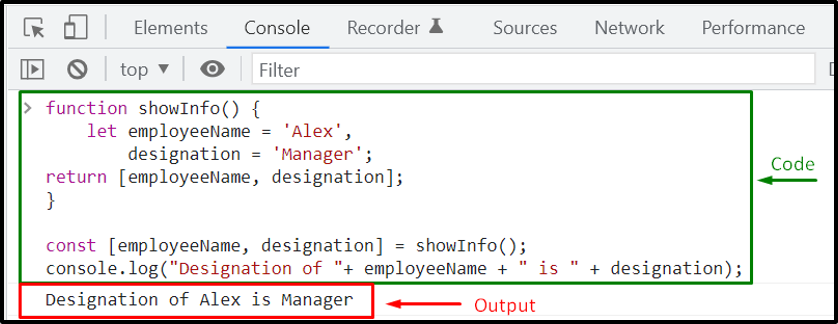
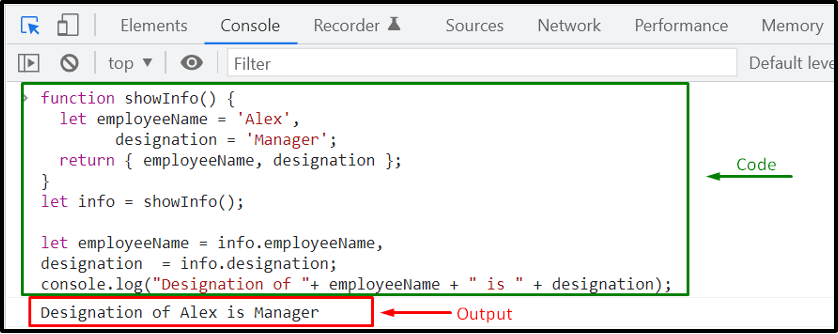 Unpacking Object using Destructing AssignmentIf a function returns an object comprising multiple values, the Destructing assignment can assist you in unpacking it.
The keys will be explicitly declared; however, it will immediately access the key-value pair from the “showInfo()” function:
let { employeeName, designation} = showInfo();
console.log("Designation of "+ employeeName + " is " + designation);
Unpacking Object using Destructing AssignmentIf a function returns an object comprising multiple values, the Destructing assignment can assist you in unpacking it.
The keys will be explicitly declared; however, it will immediately access the key-value pair from the “showInfo()” function:
let { employeeName, designation} = showInfo();
console.log("Designation of "+ employeeName + " is " + designation);
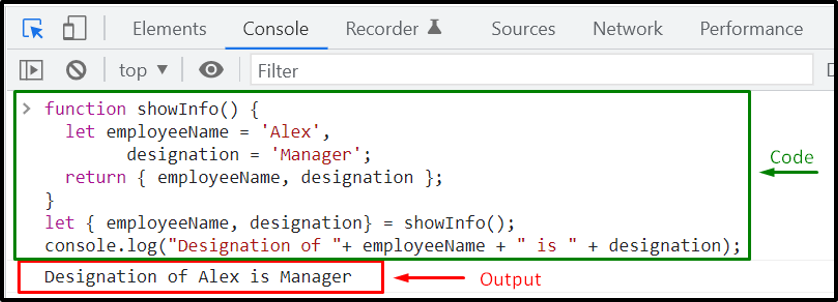 The above-given output signifies that we have successfully used the destructing assignment for unpacking the multiple values stored in the “info” object.
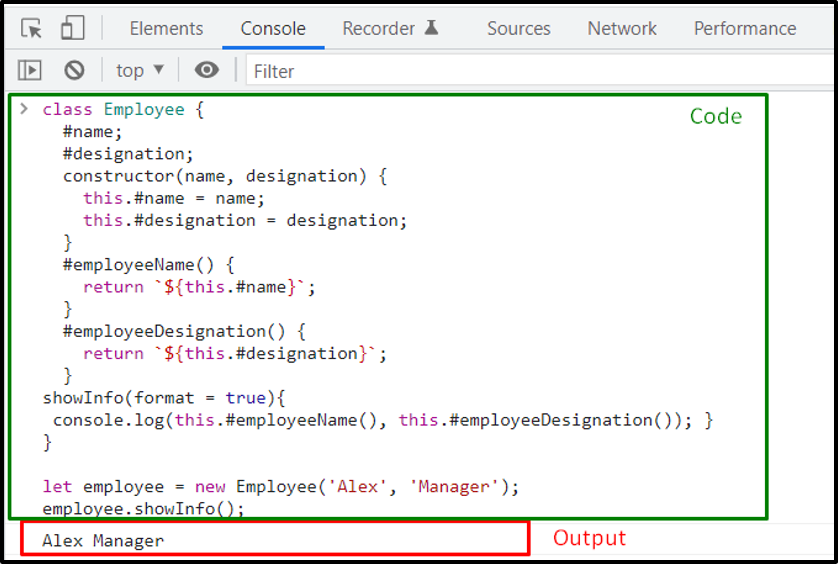 Example: How to define Private Static MethodsWe will add a “#verify()” private static method in the Employee with “name” parameter.
The “#verify()” method will check if the length of “name” is greater than or equal to “4“; otherwise, it will throw an exception stating that “The entered name must be a string having at least 4 characters”.
The mentioned static private method will be added in the Employee Class constructor so that it can validate the “name” argument before assigning it to the corresponding attribute:
class Employee {
#name;
#designation;
constructor(name, designation) {
this.#name = Employee.#verify(name);
this.#designation = designation;}
static #verify(name) {
if (typeof name === 'string') {
let str = name.trim();
if (str.length === 4) {
return str;
}
}
throw 'The entered name must be a string having at least 4 characters';
}
#employeeName() {
return `${this.#name}`;
}
#employeeDesignation() {
return `${this.#designation}`;
}
showInfo(format = true){
console.log(this.#employeeName(), this.#employeeDesignation()); }}
In the first case, we will create an “employee” object and pass a name which will meet the added condition in the #verify() static private method:
let employee = new Employee('Alex', 'Manager');
employee.showInfo();
After validating the #name field, it can be easily fetched by the showInfo() method:
Example: How to define Private Static MethodsWe will add a “#verify()” private static method in the Employee with “name” parameter.
The “#verify()” method will check if the length of “name” is greater than or equal to “4“; otherwise, it will throw an exception stating that “The entered name must be a string having at least 4 characters”.
The mentioned static private method will be added in the Employee Class constructor so that it can validate the “name” argument before assigning it to the corresponding attribute:
class Employee {
#name;
#designation;
constructor(name, designation) {
this.#name = Employee.#verify(name);
this.#designation = designation;}
static #verify(name) {
if (typeof name === 'string') {
let str = name.trim();
if (str.length === 4) {
return str;
}
}
throw 'The entered name must be a string having at least 4 characters';
}
#employeeName() {
return `${this.#name}`;
}
#employeeDesignation() {
return `${this.#designation}`;
}
showInfo(format = true){
console.log(this.#employeeName(), this.#employeeDesignation()); }}
In the first case, we will create an “employee” object and pass a name which will meet the added condition in the #verify() static private method:
let employee = new Employee('Alex', 'Manager');
employee.showInfo();
After validating the #name field, it can be easily fetched by the showInfo() method:
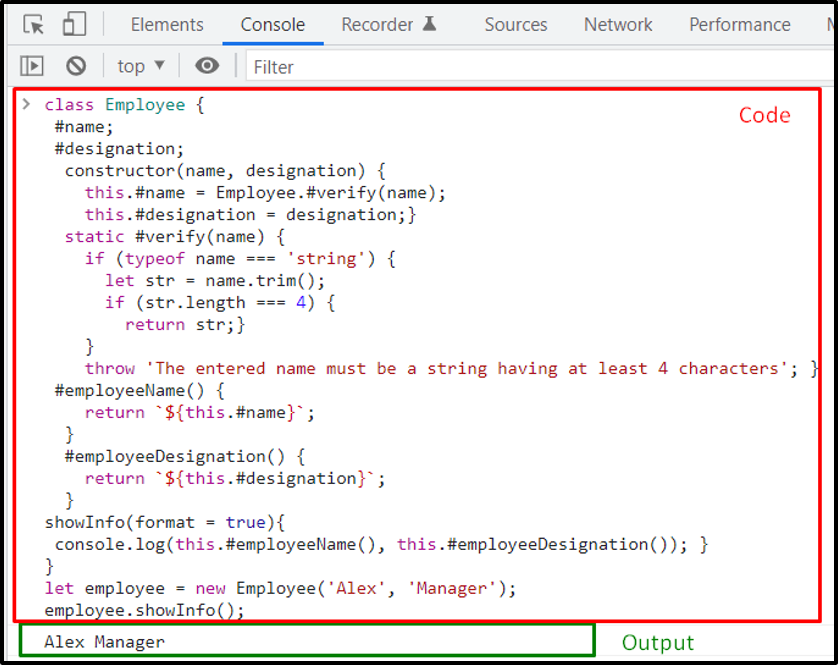 For the second time, we will specify a name which comprises three characters:
let employee = new Employee('Sia', 'Manager');
employee.showInfo();
You can see from the below-given output that the added static private method has thrown an exception for the employee name:
For the second time, we will specify a name which comprises three characters:
let employee = new Employee('Sia', 'Manager');
employee.showInfo();
You can see from the below-given output that the added static private method has thrown an exception for the employee name:
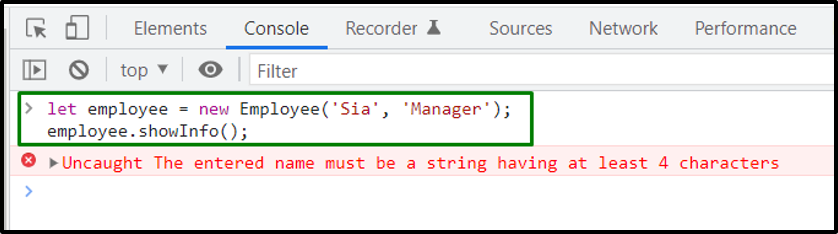 The name “Sia” which we have passed in the Employee Constructor is not according to the “if” statement specified in the static #verify() method.
That’s why the “employee” instance is not created.
The name “Sia” which we have passed in the Employee Constructor is not according to the “if” statement specified in the static #verify() method.
That’s why the “employee” instance is not created.
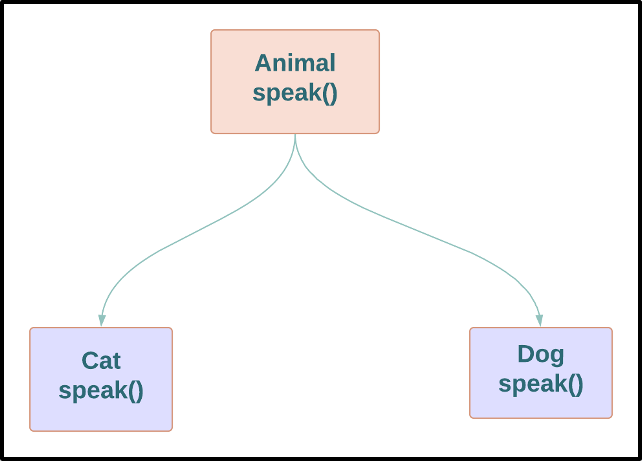 According to the above-given description, we have defined the parent Animal class and its two child classes, Cat and Dog, in our program.
Then we have added a “speak()” method in the Animal class.
In this example, we will not define the “speak()” method in the child classes.
As a result of it, the Cat and Dog class will utilize the Animal class “speak()” method:
class Animal
{
speak()
{
console.log("Animals have different sounds");
}
} class Cat extends Animal
{
} class Dog extends Animal
{
Next, we will create two objects; one for the “Cat” and other for the “Dog” class respectively and then invoke the “speak()” method of the parent class by the help of the created objects:
var cat = new Cat();
cat.speak();var dog = new Dog();
dog.speak();
You can see from the below-given output that the “speak()” method of the Animal class is executed two times:
According to the above-given description, we have defined the parent Animal class and its two child classes, Cat and Dog, in our program.
Then we have added a “speak()” method in the Animal class.
In this example, we will not define the “speak()” method in the child classes.
As a result of it, the Cat and Dog class will utilize the Animal class “speak()” method:
class Animal
{
speak()
{
console.log("Animals have different sounds");
}
} class Cat extends Animal
{
} class Dog extends Animal
{
Next, we will create two objects; one for the “Cat” and other for the “Dog” class respectively and then invoke the “speak()” method of the parent class by the help of the created objects:
var cat = new Cat();
cat.speak();var dog = new Dog();
dog.speak();
You can see from the below-given output that the “speak()” method of the Animal class is executed two times:
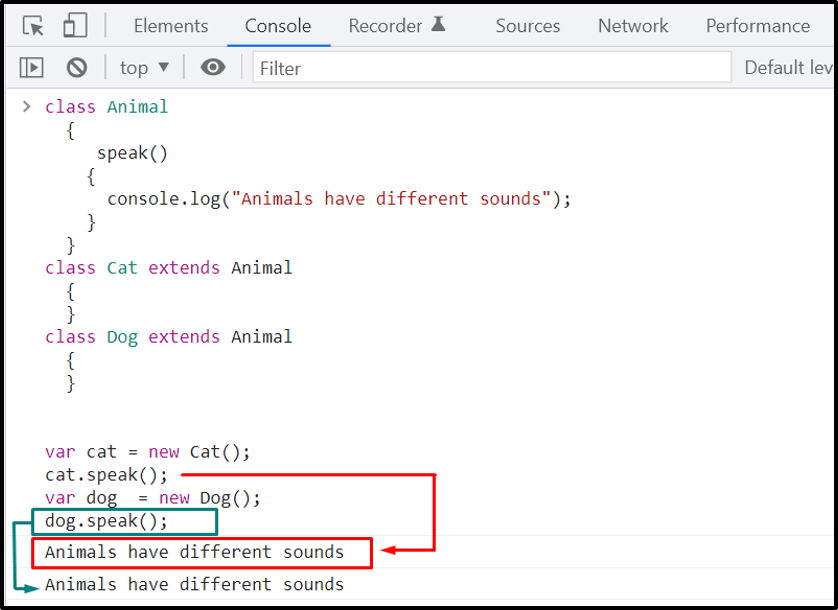
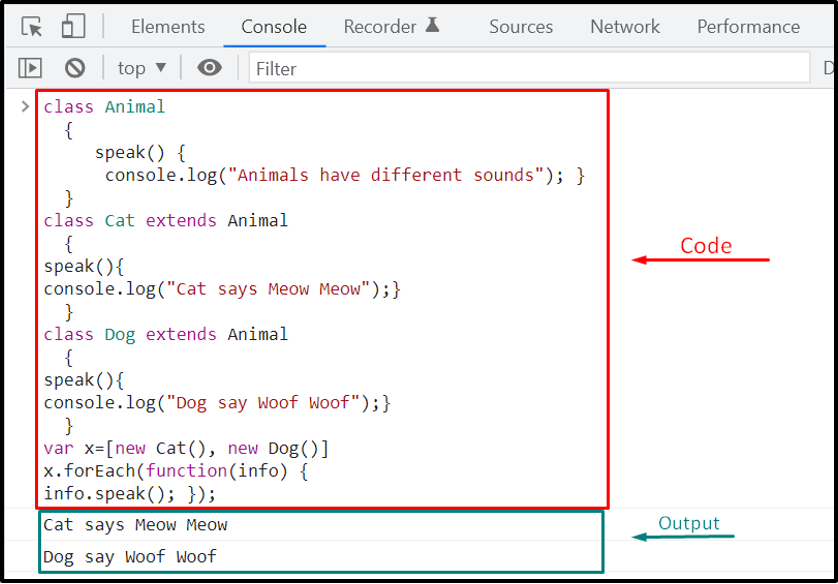 It can be clearly verified from the above output, the speak() method of Animal class is overridden by the child classes(Cat and Dog).
 For manipulating HTML elements in jQuery, we have to write the desired code within the body of the $(document).ready() method, in a JavaScript file.
Here, we will specify that on the “click” event of our “button”, the interpreter will select the all “p” elements and set their content to the string specified in the “html()” method:
$(document).ready(function(){
$("button").click(function(){
$("p").html("This is <b>linuxhint.com</b>");
});});
For manipulating HTML elements in jQuery, we have to write the desired code within the body of the $(document).ready() method, in a JavaScript file.
Here, we will specify that on the “click” event of our “button”, the interpreter will select the all “p” elements and set their content to the string specified in the “html()” method:
$(document).ready(function(){
$("button").click(function(){
$("p").html("This is <b>linuxhint.com</b>");
});});
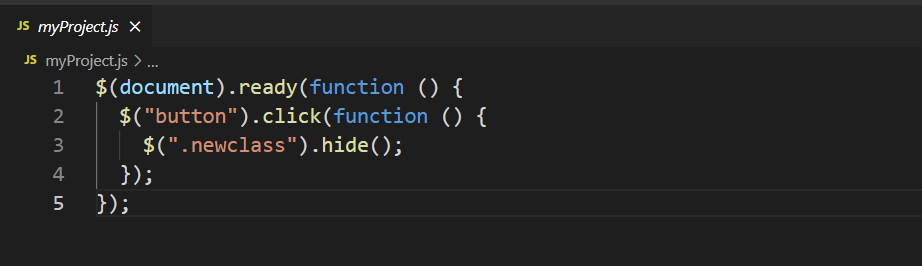 After saving the provided code in both files, we will open “index.html” with the help of VS Code “Liver Server”:
 Now, we will click on the “Change p elements content” button which is highlighted in the output:
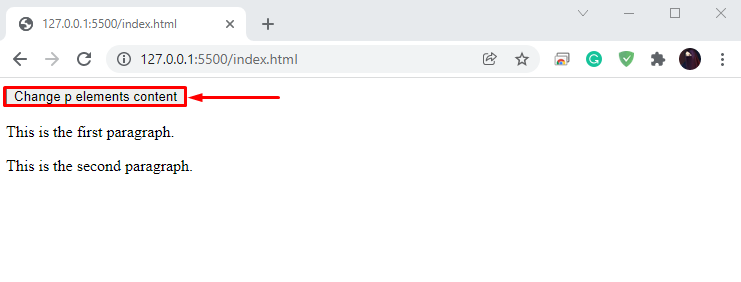 This action will get all of the HTML paragraph elements and set their inner text as follows:

 In our “myProject.js” file, we will invoke the “text()” method to set the inner text of all paragraph elements to “This is linuxhint.com”:
$(document).ready(function(){
$("button").click(function(){
$("p").text("This is linuxhint.com");});});
In our “myProject.js” file, we will invoke the “text()” method to set the inner text of all paragraph elements to “This is linuxhint.com”:
$(document).ready(function(){
$("button").click(function(){
$("p").text("This is linuxhint.com");});});
 Clicking on the “Set content” button will change the text of the added paragraph elements to “This is linuxhint.com”:
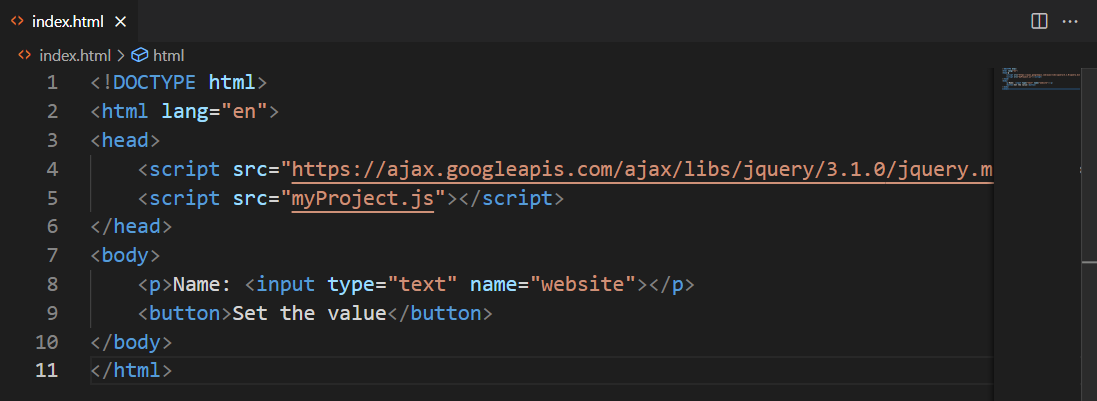 For this purpose, we will utilize the “myProject.js” file to sets its value to “This is linuxhint.com” by using the val() method:
$(document).ready(function(){
$("button").click(function(){
$("input:text").val("This is linuxhint.com");
});
});
For this purpose, we will utilize the “myProject.js” file to sets its value to “This is linuxhint.com” by using the val() method:
$(document).ready(function(){
$("button").click(function(){
$("input:text").val("This is linuxhint.com");
});
});
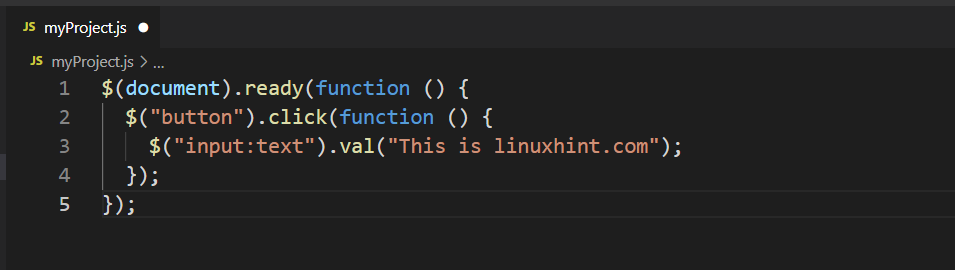 We will click on the “Set the value” button, and the string “This is linuxhint.com” will be set in the input field:
 The above-given output declares that we have successfully set the value of the added input field.
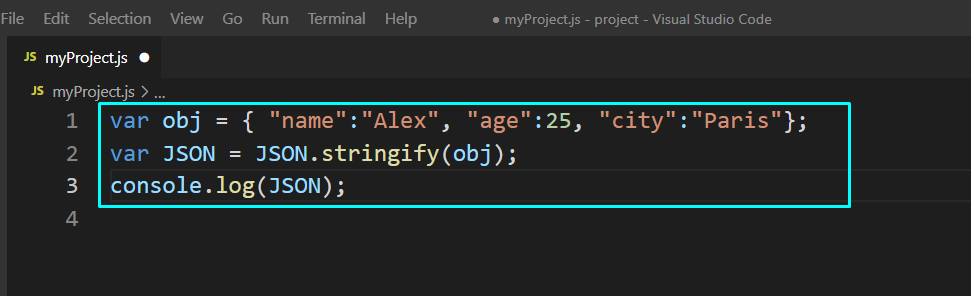 The output of the above program shows that the JSON.stringify() method has successfully converted the added object into a string:

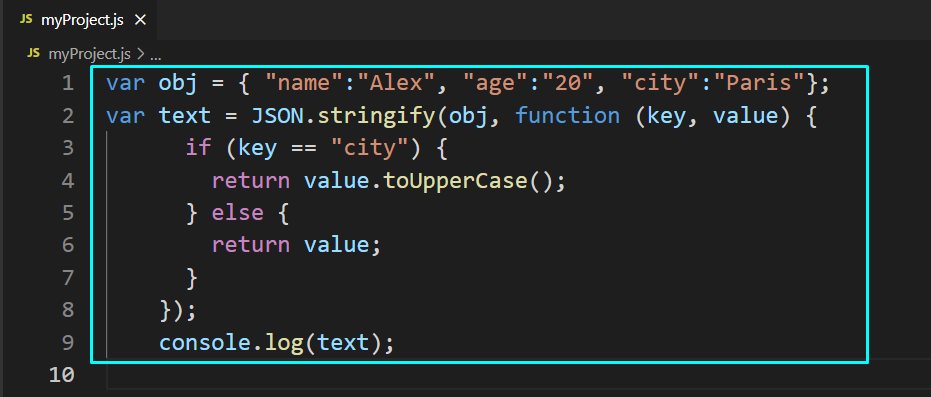 Check out the below-given output; the value of the “city” key is now in uppercase letters:

 Here is the output we got from by passing replacer array in our JSON.stringify() method:

 As you can see from the above-given output that four spaces are successfully added before each“key: value” pair.
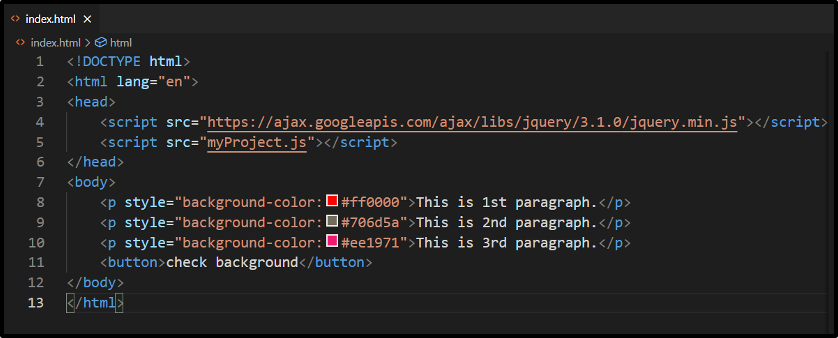 Next, in our JavaScript file which is named as “myProject.js”, we will write-out the following code:
$(document).ready(function(){
$("button").click(function(){
alert("Background color = " + $("p").css("background-color"));
});});
When the user clicks the “check background” button, jQuery will search for the “p” or paragraphs and get the “background-color” CSS property of the first matched element.
In the end, an alert box will be shown on the browser comprising the property value of “background-color”:
Next, in our JavaScript file which is named as “myProject.js”, we will write-out the following code:
$(document).ready(function(){
$("button").click(function(){
alert("Background color = " + $("p").css("background-color"));
});});
When the user clicks the “check background” button, jQuery will search for the “p” or paragraphs and get the “background-color” CSS property of the first matched element.
In the end, an alert box will be shown on the browser comprising the property value of “background-color”:
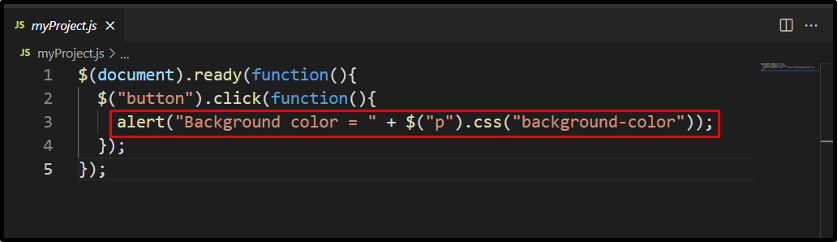 After adding the code in our “index.html”, we will execute it by using the “Liver Server” VS Code extension:
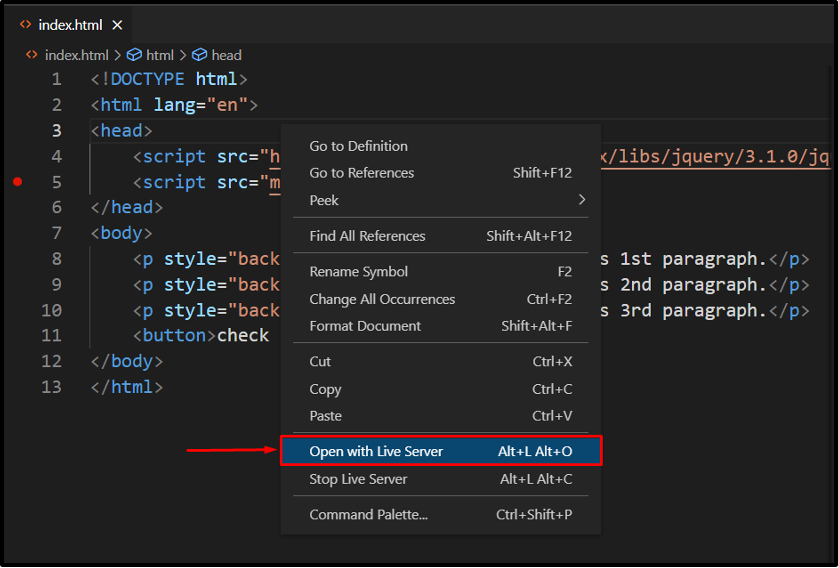 Clicking on the “check background” button will let you know about the background-color CSS property of the first paragraph in an alert box:
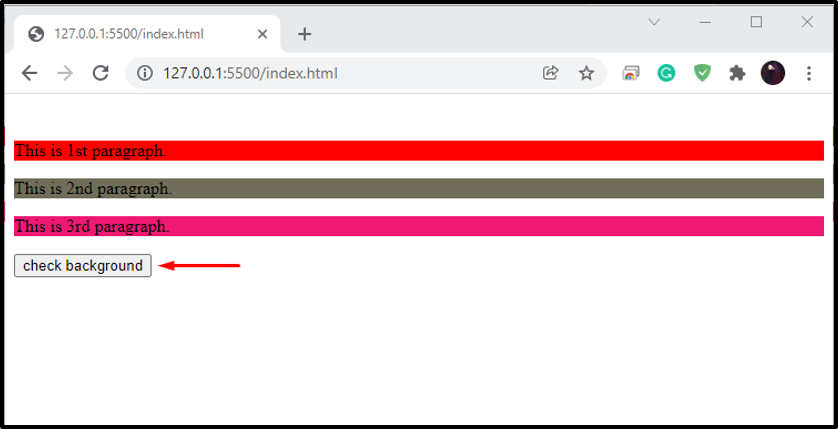
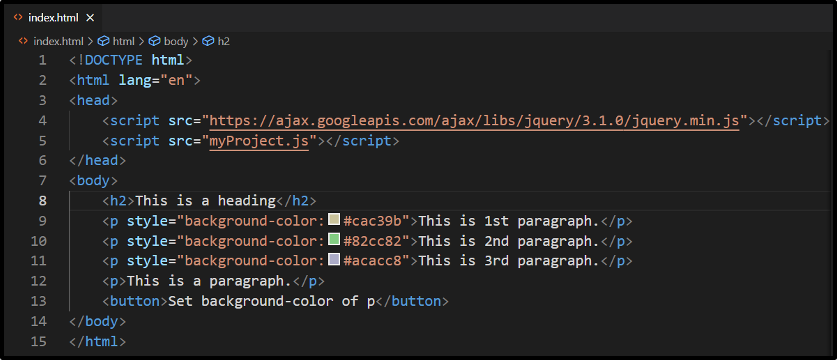 When the user will click the provided button, it will set the background-color of each paragraph element to “yellow”:
$(document).ready(function(){
$("button").click(function(){
$("p").css("background-color", "yellow");
});});
When the user will click the provided button, it will set the background-color of each paragraph element to “yellow”:
$(document).ready(function(){
$("button").click(function(){
$("p").css("background-color", "yellow");
});});
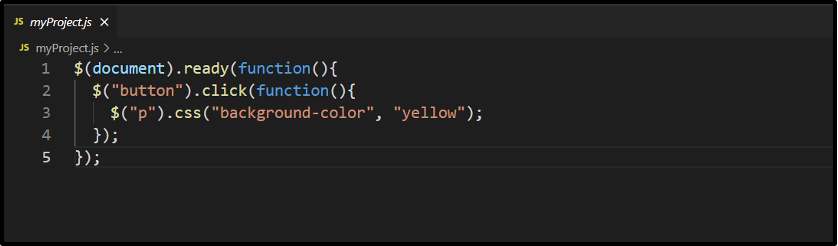 You can see from the below-given output that the “background-color” CSS property value of the paragraph elements is now changed to “yellow”:
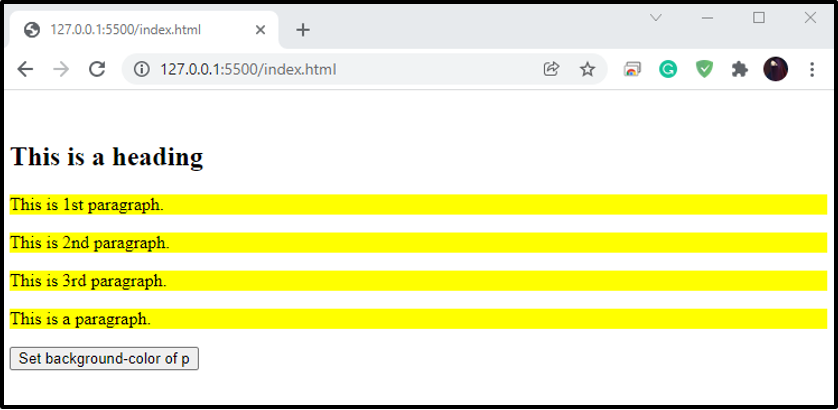
 On “button” click event, jQuery will select the paragraphs element and sets their background-color to “yellow” and font-size to “150%”:
$(document).ready(function(){
$("button").click(function(){
$("p").css({"background-color": "yellow", "font-size": "150%"});
});});
On “button” click event, jQuery will select the paragraphs element and sets their background-color to “yellow” and font-size to “150%”:
$(document).ready(function(){
$("button").click(function(){
$("p").css({"background-color": "yellow", "font-size": "150%"});
});});

 The above-given output signifies that we have successfully set the specified multiple CSS properties of the selected HTML Elements.
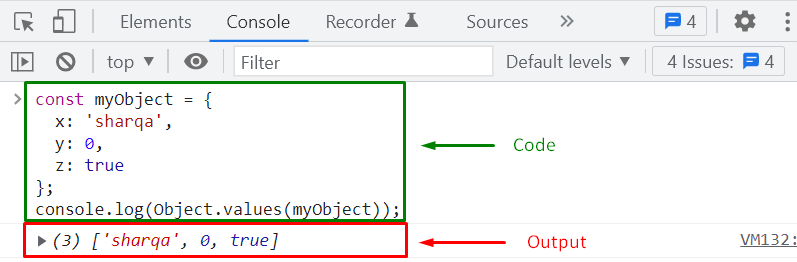

 The above-given output signifies that we have successfully implemented the functionality of the Object.values() method in our JavaScript program.
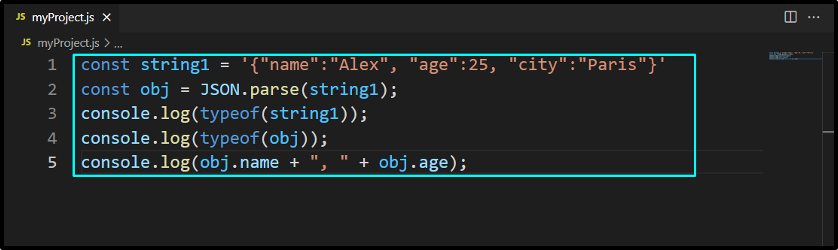 We will run the above-given program using the “Live Server” extension of VS Code.
It will display “Alex” as “name” and its age as “25” and also shows the type of “string1” and “obj” in the console window:
We will run the above-given program using the “Live Server” extension of VS Code.
It will display “Alex” as “name” and its age as “25” and also shows the type of “string1” and “obj” in the console window:
 The element present at the index “0” of “myArray” can be seen in the output:
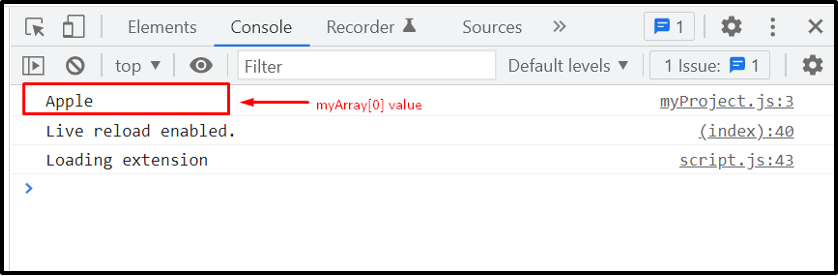
 Here is the output we got from executing the above-given code:

 The given output shows that added function is parsed successfully by utilizing the JSON.parse() method.
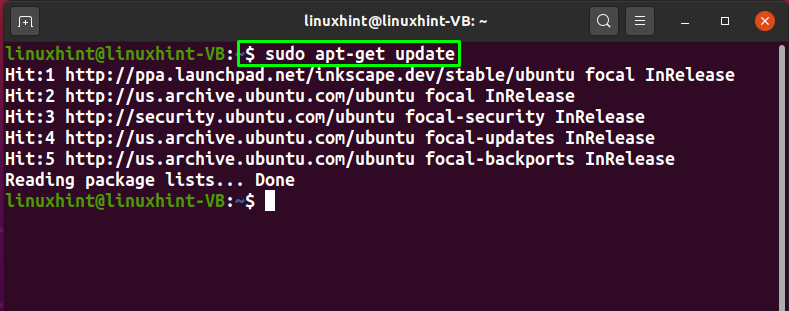 Now, write out the below-given command for installing Node.js on your Ubuntu system:
$ sudo apt install nodejs
Now, write out the below-given command for installing Node.js on your Ubuntu system:
$ sudo apt install nodejs
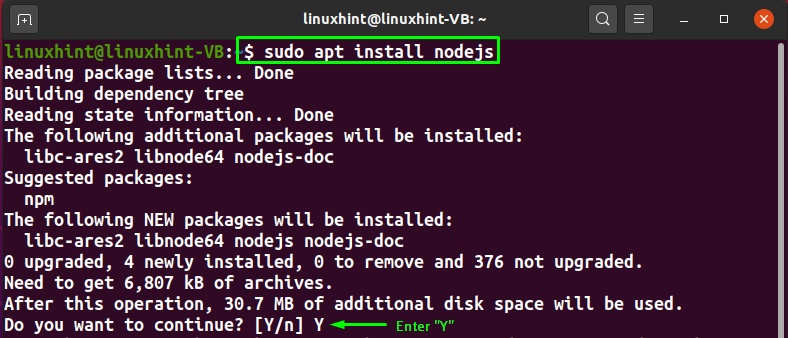 Enter “Y” to permit the Node.js installation procedure to continue:
 The above-given error-free output signifies that we have successfully installed Node.js on our system.
For the verification purpose, we will execute the “node” command with the “-v” option:
$ node -v
Here, “v10.19.0” represents the version number of our Node.js:
The above-given error-free output signifies that we have successfully installed Node.js on our system.
For the verification purpose, we will execute the “node” command with the “-v” option:
$ node -v
Here, “v10.19.0” represents the version number of our Node.js:
 Lastly, utilize the given command for installing “npm,” which is the package manager of the Node.js:
$ sudo apt install npm
Lastly, utilize the given command for installing “npm,” which is the package manager of the Node.js:
$ sudo apt install npm
 Wait for a few minutes, as “npm” will take some time to complete the installation process:
 Type “y” and press Enter to grant permission:
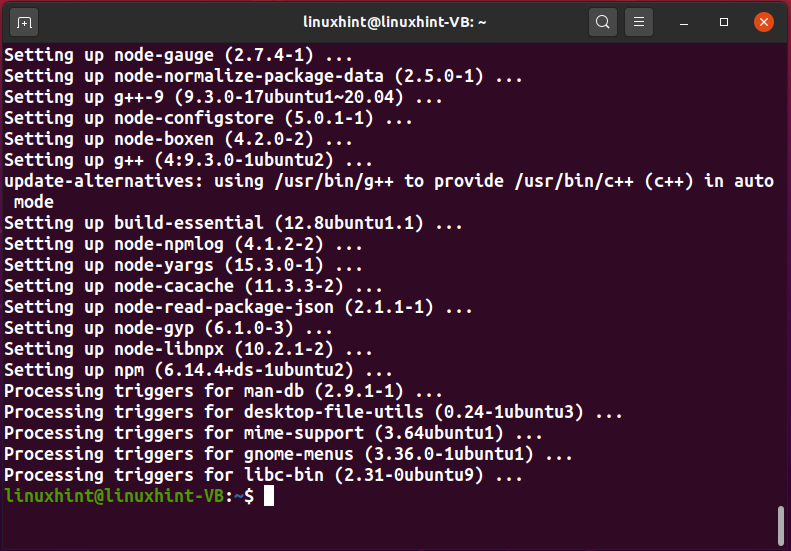 At this point, Node.js and npm are installed successfully, and we are all ready to write our first Node.js program on our Ubuntu system.
 The created “hello.js” JavaScript file will be opened in the nano text editor:
 As a beginner, you must step into Node.js programming slowly and gradually.
That’s why we will keep our first Node.js program simple.
Now, in the opened “hello.js” file, we will add the below-given statement and press “CTRL+S” to save it:
console.log("This is linuxhint.com");
In Node.js, the “console” is an object and the “log()” method with the “console” object will print out our added “This is linuxhint.com” string on the terminal:
As a beginner, you must step into Node.js programming slowly and gradually.
That’s why we will keep our first Node.js program simple.
Now, in the opened “hello.js” file, we will add the below-given statement and press “CTRL+S” to save it:
console.log("This is linuxhint.com");
In Node.js, the “console” is an object and the “log()” method with the “console” object will print out our added “This is linuxhint.com” string on the terminal:
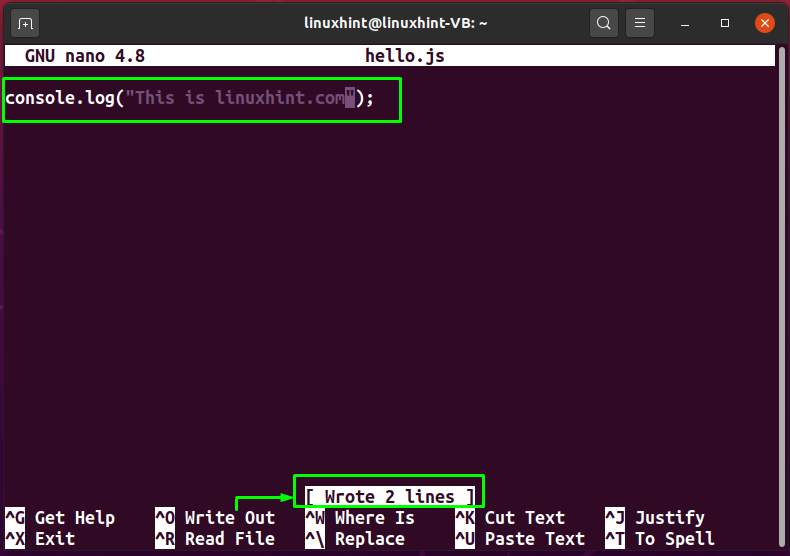 After saving the added code, press “CTRl+X” to exit from the opened nano text editor.
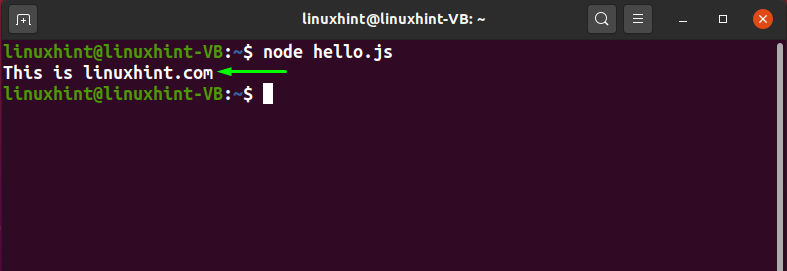 From the above-given image, you can see that the execution of our “hello.js” Node.js program outputs the string “This is linuxhint.com”, added in the “console.log()” method.
 Next, move towards your JavaScript file, which is “myProject.js” in our case and write out following code in it:
$(document).ready(function () {
$("button").click(function () {
$("h2").hide();
});});
The provided code specified that jQuery “$(document).ready()” method will hide the HTML element with the “h2” element name when the user clicks the button:
Next, move towards your JavaScript file, which is “myProject.js” in our case and write out following code in it:
$(document).ready(function () {
$("button").click(function () {
$("h2").hide();
});});
The provided code specified that jQuery “$(document).ready()” method will hide the HTML element with the “h2” element name when the user clicks the button:
 After saving both files, we will open “index.html” by using VS Code “Liver Server” extension:
 Now, we will click on the button highlighted in the below-given image:
 As you can see, we have successfully hide the “h2” HTML element by following the jQuery Syntax:
 That was all about the basic syntax of jQuery.
You can explore it further according to your preferences.
That was all about the basic syntax of jQuery.
You can explore it further according to your preferences.
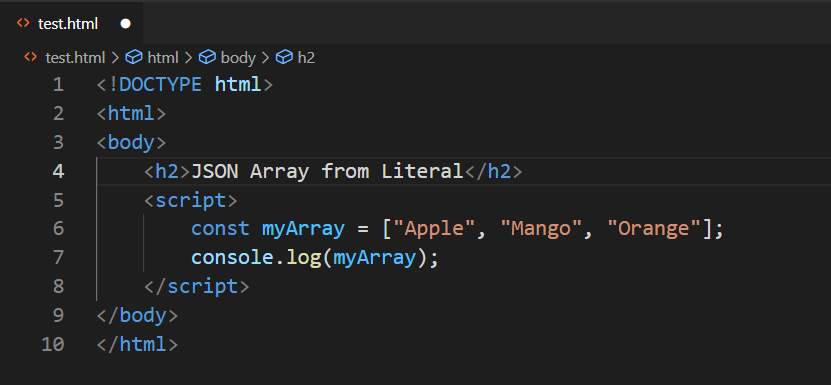 After adding the code in our “index.html”, we will execute it with the “Liver Server” VS Code extension:
 The output shows the elements of our JavaScript “myArray”:
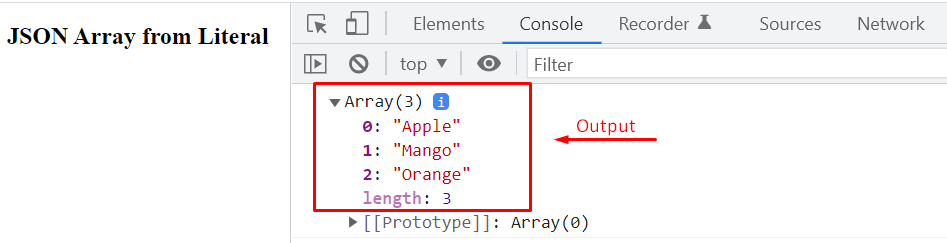 Now, to convert the array into the JSON string, JSON.stringify() method will be used as shown in the code snippet provided below:
let arrayLiteral = JSON.stringify(myArray);
Let’s show the “arrayLiteral” in the console along with its variable type using the typeof() method to verify whether the array is converted into string format or not.
console.log(arrayLiteral);
console.log(typeof(arrayLiteral));
The complete code snippet would go like this:
const myArray = ["Apple", "Mango", "Orange"];
console.log(myArray);
console.log(typeof(myArray));
let arrayLiteral = JSON.stringify(myArray);
console.log(arrayLiteral);
console.log(typeof(arrayLiteral));
The output of the above code snippet in the console will be:
Now, to convert the array into the JSON string, JSON.stringify() method will be used as shown in the code snippet provided below:
let arrayLiteral = JSON.stringify(myArray);
Let’s show the “arrayLiteral” in the console along with its variable type using the typeof() method to verify whether the array is converted into string format or not.
console.log(arrayLiteral);
console.log(typeof(arrayLiteral));
The complete code snippet would go like this:
const myArray = ["Apple", "Mango", "Orange"];
console.log(myArray);
console.log(typeof(myArray));
let arrayLiteral = JSON.stringify(myArray);
console.log(arrayLiteral);
console.log(typeof(arrayLiteral));
The output of the above code snippet in the console will be:
 The output verifies that the array is stringified successfully.
Note: The variable type of array is “Object”.
For further details, read our dedicated article’s section on arrays.
The output verifies that the array is stringified successfully.
Note: The variable type of array is “Object”.
For further details, read our dedicated article’s section on arrays.
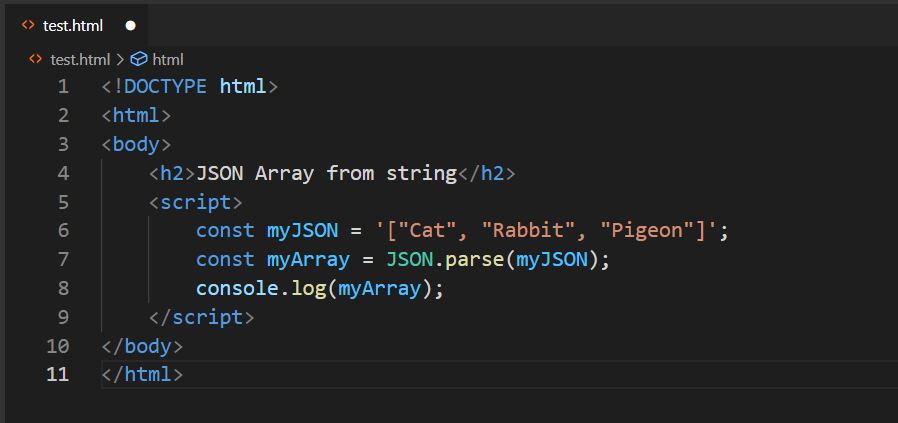 Execute the above-given program, and check out its output:
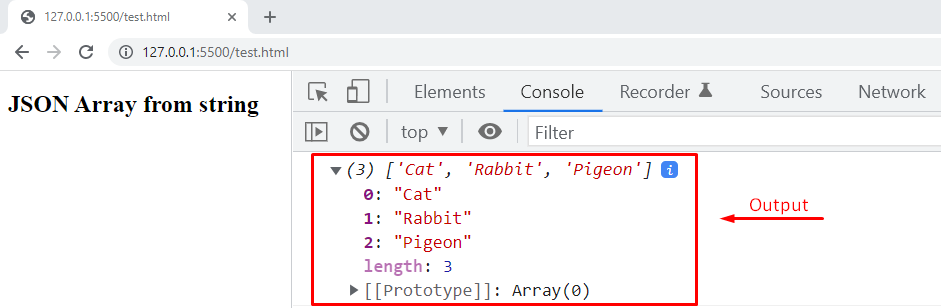 After parsing the JSON string into an array, you can also access an array element by using its index.
For instance, if we want to get the first Element of “myArray“, then we will add the following line in our JavaScript program:
console.log(myArray[1]);
After parsing the JSON string into an array, you can also access an array element by using its index.
For instance, if we want to get the first Element of “myArray“, then we will add the following line in our JavaScript program:
console.log(myArray[1]);
 The output will display “Rabbit” as it is the element that is present at the first index of “myArray”:

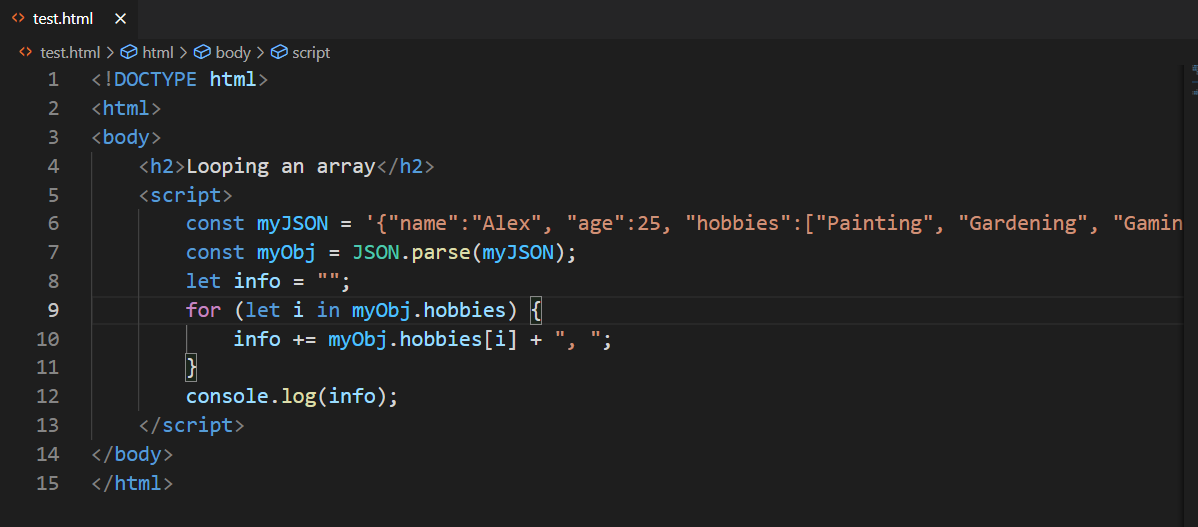 Example: Looping through the JSON array literal using for loop
In case of using “for” loop, you have to add the following code in your “index.html” file:
for (let i = 0; i < myObj.hobbies.length; i++) {
info += myObj.hobbies[i] + ", ";}
console.log(info);
Example: Looping through the JSON array literal using for loop
In case of using “for” loop, you have to add the following code in your “index.html” file:
for (let i = 0; i < myObj.hobbies.length; i++) {
info += myObj.hobbies[i] + ", ";}
console.log(info);
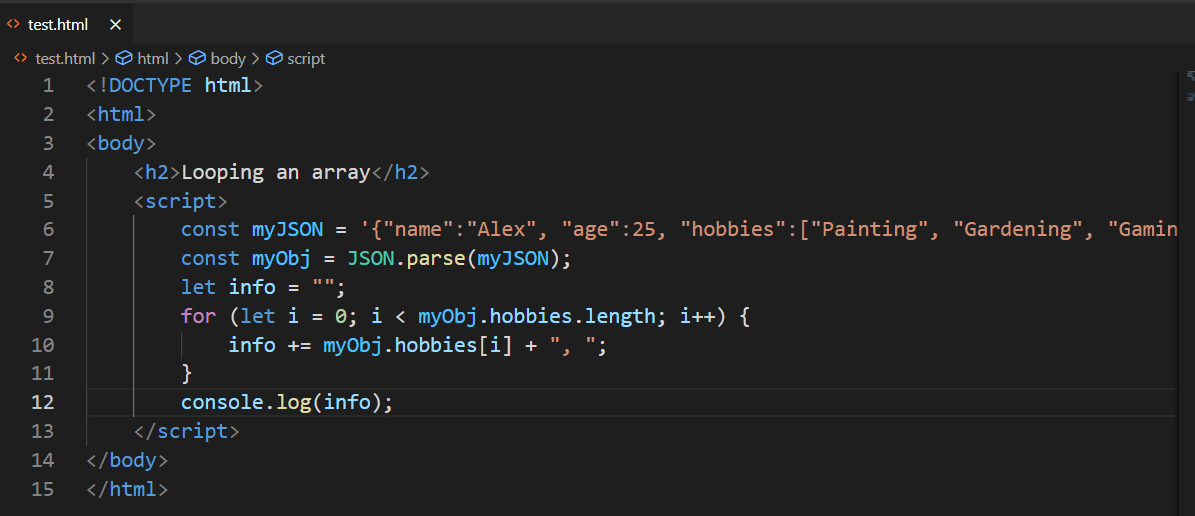 The above-given output signifies that we have successfully looped through the JSON array literal with the “for” loop.
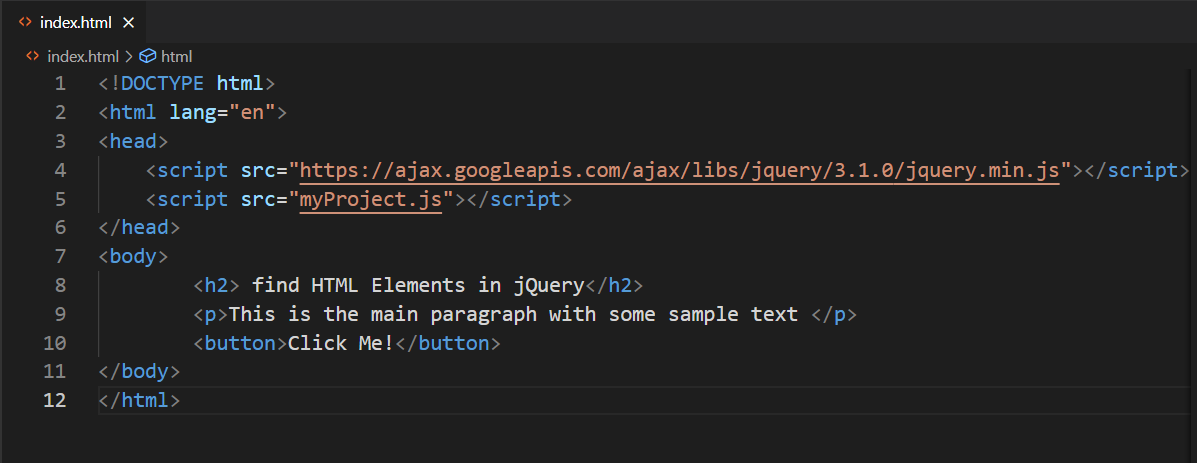 Next, move towards your JavaScript file, which is “myProject.js” in our case and write out following code in it:
$(document).ready(function () {
$("button").click(function () {
$("h2").hide();
});});
Using the $(“h2”) Element Name Selector, jQuery will search for the “h2” element and then hide it from the web page with the help of “hide()” method:
Next, move towards your JavaScript file, which is “myProject.js” in our case and write out following code in it:
$(document).ready(function () {
$("button").click(function () {
$("h2").hide();
});});
Using the $(“h2”) Element Name Selector, jQuery will search for the “h2” element and then hide it from the web page with the help of “hide()” method:
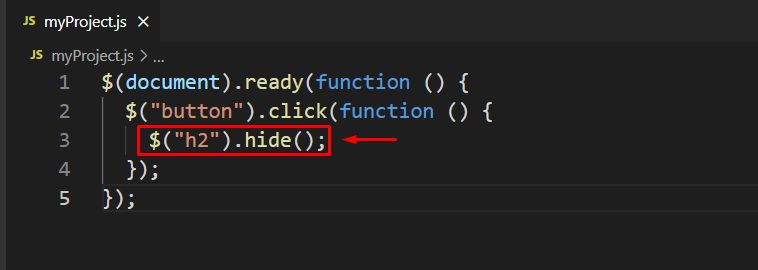 After saving both files, we will open “index.html” with the help of VS Code “Liver Server” extension:
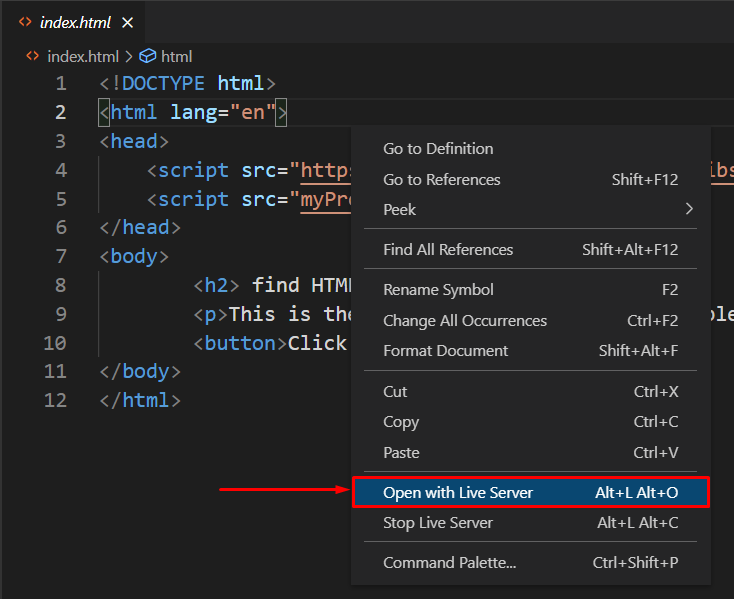 Clicking on the highlighted button will hide all of the <h2> heading elements of our web page.
Before clicking the button:
Clicking on the highlighted button will hide all of the <h2> heading elements of our web page.
Before clicking the button:
 After clicking the button:
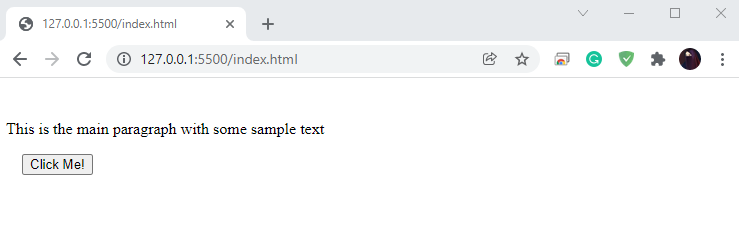 The Element Name Selector retrieves all HTML elements with the same name.
For instance, we have added $(“h2”) as the element name, so the Element Name Selector will select all <h2> heading elements of our web page and then apply the added settings to them.
However, if you want to find a specific HTML element, then you can utilize the Element #id Selector in jQuery().
The Element Name Selector retrieves all HTML elements with the same name.
For instance, we have added $(“h2”) as the element name, so the Element Name Selector will select all <h2> heading elements of our web page and then apply the added settings to them.
However, if you want to find a specific HTML element, then you can utilize the Element #id Selector in jQuery().
 To find the heading HTML element with the “h2id”, we will write out the following code in our “myProject.js” file:
$(document).ready(function () {
$("button").click(function () {
$("#h2id").hide();
});});
In this case, when we will click the button, the jQuery “$(“#h2id”)” method finds the HTML heading element with the “h2id” and hide it from the web page:
To find the heading HTML element with the “h2id”, we will write out the following code in our “myProject.js” file:
$(document).ready(function () {
$("button").click(function () {
$("#h2id").hide();
});});
In this case, when we will click the button, the jQuery “$(“#h2id”)” method finds the HTML heading element with the “h2id” and hide it from the web page:
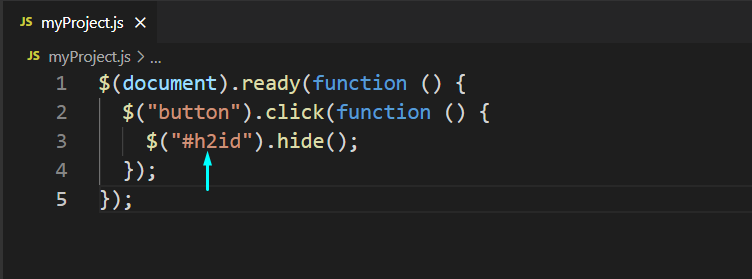 The added heading can be no longer seen after clicking the “Click Me” button:

 Now, firstly, we will find the HTML elements having class name “newclass”.
After that, we will hide them from our HTML page:
$(document).ready(function () {
$("button").click(function () {
$(".newclass").hide();
});});
Now, firstly, we will find the HTML elements having class name “newclass”.
After that, we will hide them from our HTML page:
$(document).ready(function () {
$("button").click(function () {
$(".newclass").hide();
});});
 Before clicking the button:
 After clicking the button:
 The above-given output shows that we have successfully found the specified HTML elements using Element .class Selector and hid them from the web page.
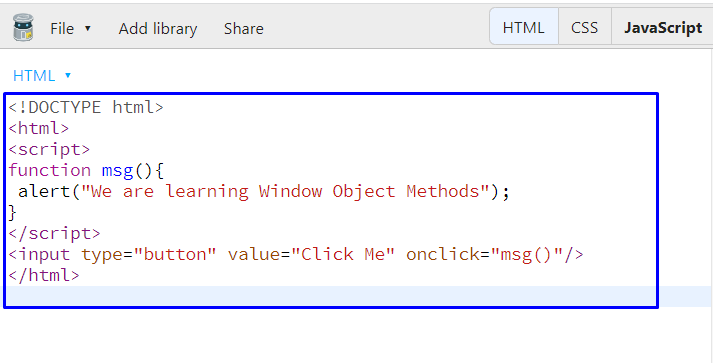 Now, when we click on the highlighted button, an alert box will be displayed with the message “We are learning Window Object Methods”:

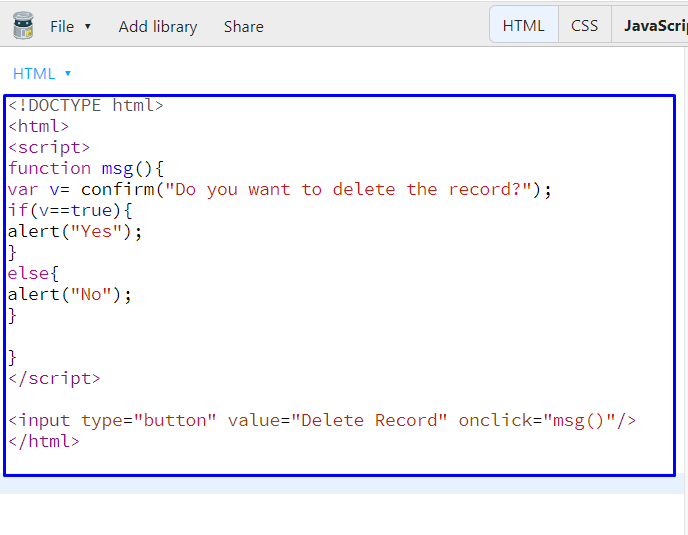 Here is the “Delete Record” button; clicking on it will show the below-given confirm dialog box:
 We have clicked on the “OK” button, and the following prompt is displayed on the browser:
 In case of clicking “Cancel”, our JavaScript program will show this prompt:

 Here, I have entered “sharqa” as name and then clicked on the “OK” button:
 As you can see, the entered name is displayed in another alert box:

 Clicking on the “linuxhint” button will open up our linuxhint website in the new window:

 Here is the alert box which we have got after five seconds:

 From the given output, we will click on the “Change paragraph” button:
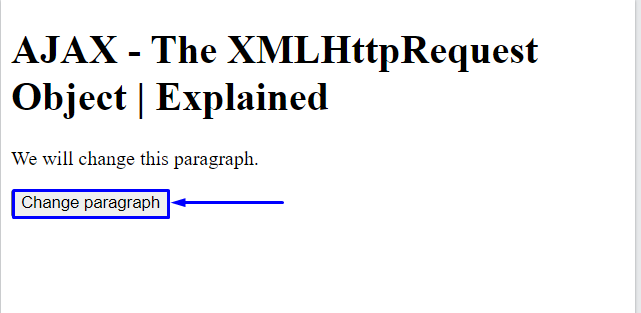 Clicking on the specified button will replace the current content of the paragraph with the text added in the “ajax_info.txt” server file:
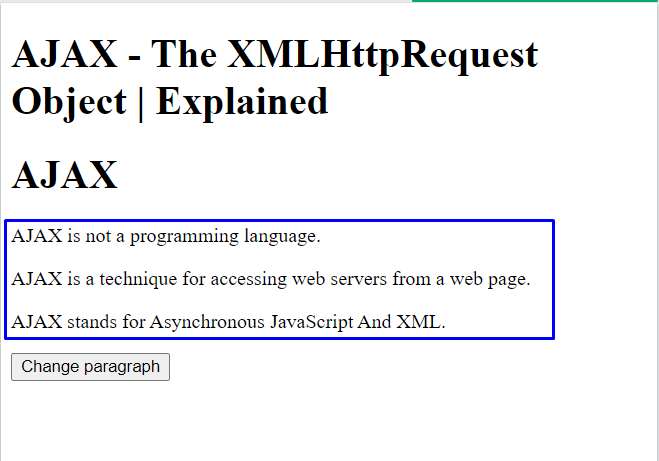 Now let’s have a look at some of the useful properties and methods of XMLHttpRequest Object.
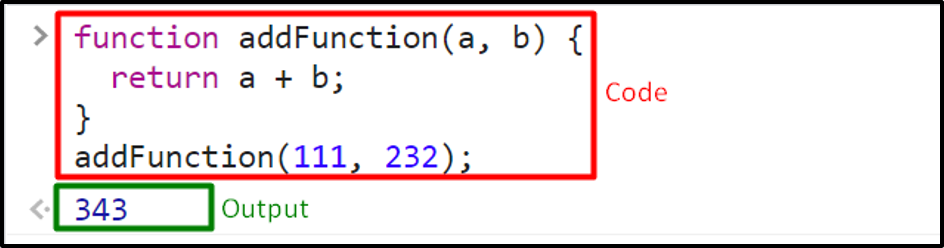
 When a function is stored in a variable, we can use these variables as the name of the function to invoke it.
Here, is an example of the given concept:
const a = function (x, y) {return x + y};
let b = a(4, 3);
When a function is stored in a variable, we can use these variables as the name of the function to invoke it.
Here, is an example of the given concept:
const a = function (x, y) {return x + y};
let b = a(4, 3);
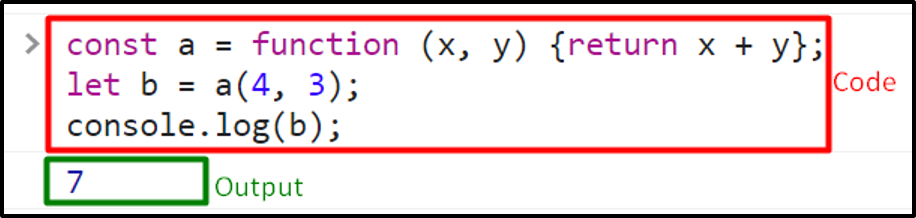
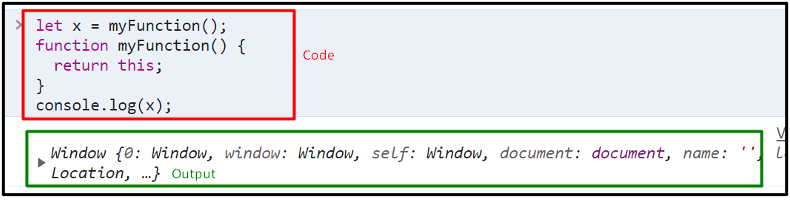
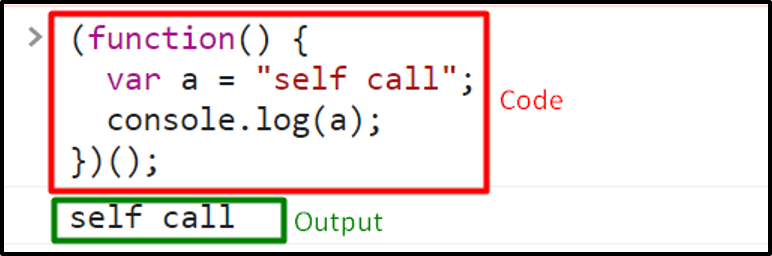
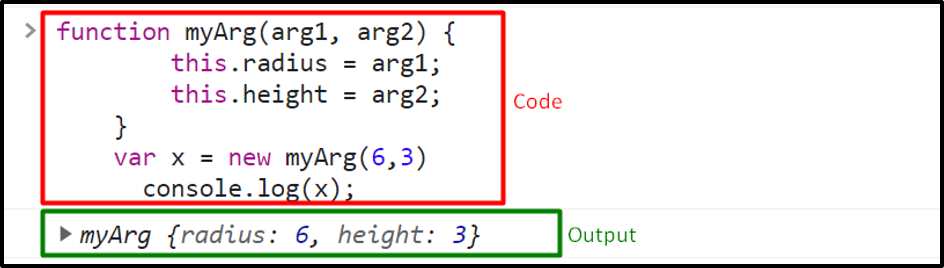
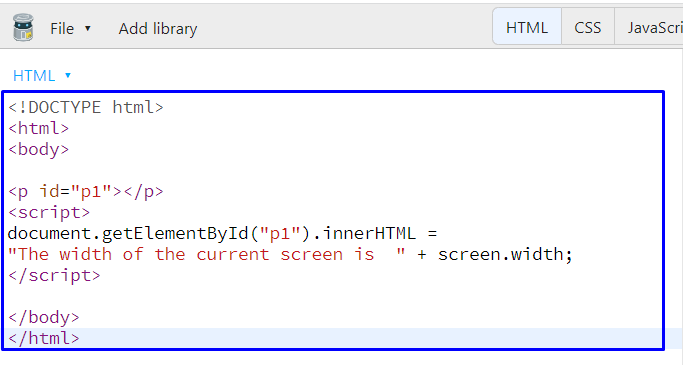 As you can see from the output, the width of the current screen object is “1366”:
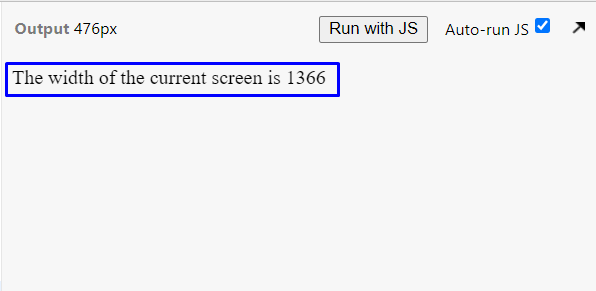
 Here is the height of our current window.screen object in pixels:

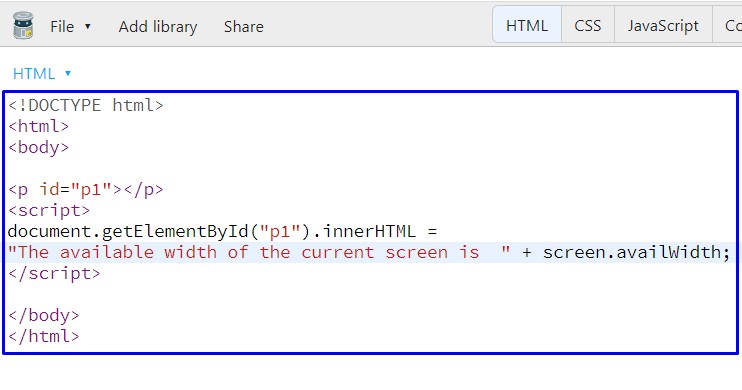 The available width of the current screen is “1366”:
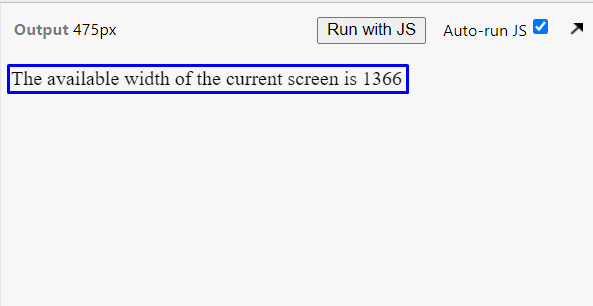


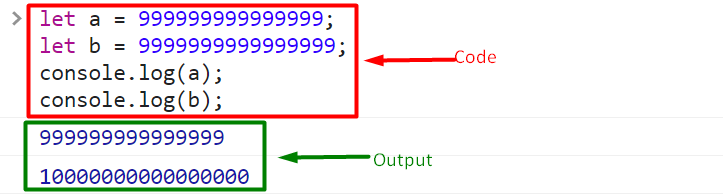
 This problem can be solved by applying the multiplication and division operations on it.
let c = (0.7*10 + 0.2*10) / 10
This problem can be solved by applying the multiplication and division operations on it.
let c = (0.7*10 + 0.2*10) / 10

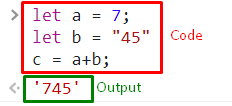 However, if we apply other arithmetic operations on two strings then in resultant we will get numbers instead of a string as shown in the following example.
let a = "70";
let b = "40";
let c = a / b;
let d = a * b;
let e = a -b;
console.log(c); // output will be 1.75
console.log(d); // output will be 2800
console.log(e); // output will be 30
However, if we apply other arithmetic operations on two strings then in resultant we will get numbers instead of a string as shown in the following example.
let a = "70";
let b = "40";
let c = a / b;
let d = a * b;
let e = a -b;
console.log(c); // output will be 1.75
console.log(d); // output will be 2800
console.log(e); // output will be 30
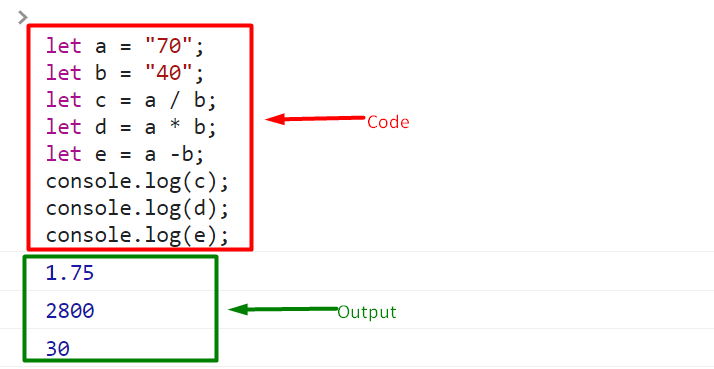
 Moreover, isNaN() is a global function available for checking if the value is a number or not, and by default its initial value is “Not-A-Number”.
The current browsers do not support this function because it is a non-writable and non-configured function.
The following program shows an example of isNaN().
Example
let x = 100 / "someString";
console.log(x);
isNaN(x);
Moreover, isNaN() is a global function available for checking if the value is a number or not, and by default its initial value is “Not-A-Number”.
The current browsers do not support this function because it is a non-writable and non-configured function.
The following program shows an example of isNaN().
Example
let x = 100 / "someString";
console.log(x);
isNaN(x);
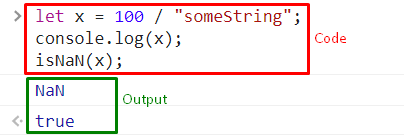
 In Javascript, the type of “infinity” is number:
typeof(x);
In Javascript, the type of “infinity” is number:
typeof(x);
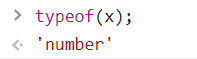
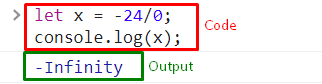
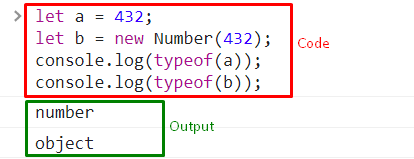
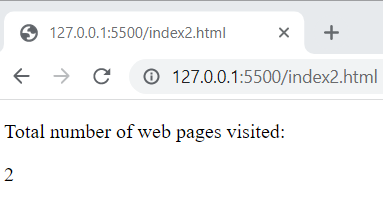 Using the length property, the total number of web pages visited are fetched.
Methods
The JavaScript history object consists of the following methods.
forward()
It is used for the purpose of loading the next page (if a next page exists).
The browser calls this method by default when the user clicks the forward button in the browser, however, we can also do it manually.
Syntax
It has the following syntax.
history.forward()
Example
Suppose, you want to visit the next page in the history list using the forward() method of the history object.
<button onclick="history.forward()">Next</button>
In the above example, a button with a click event is being created.
By clicking on it the next page in the browsing history will be loaded.
back()
It is used for the purpose of loading the previous page (if there is a previous page).
The browser calls this method by default when the user clicks the back button in the browser, however, we can also perform it manually.
Syntax
It has the following syntax.
history.back()
Example
Suppose you want to load the previous page in the browsing history list using the back() method of the history object.
<button onclick="history.back()">Back</button>
In the above example, a button with a click event is being created.
By clicking on it the previous page in the history list will be loaded.
go()
It is used for the purpose of loading a particular page in the browning history list using the page number.
Syntax
It has the following syntax.
Example
Suppose you want to load a page which is 3 pages back then use the following code.
<button onclick="history.go(-3)">Move 3 pages back</button>
In the above example, a button with a click event is being created, and clicking on the button will take you 3 pages back.
Using the length property, the total number of web pages visited are fetched.
Methods
The JavaScript history object consists of the following methods.
forward()
It is used for the purpose of loading the next page (if a next page exists).
The browser calls this method by default when the user clicks the forward button in the browser, however, we can also do it manually.
Syntax
It has the following syntax.
history.forward()
Example
Suppose, you want to visit the next page in the history list using the forward() method of the history object.
<button onclick="history.forward()">Next</button>
In the above example, a button with a click event is being created.
By clicking on it the next page in the browsing history will be loaded.
back()
It is used for the purpose of loading the previous page (if there is a previous page).
The browser calls this method by default when the user clicks the back button in the browser, however, we can also perform it manually.
Syntax
It has the following syntax.
history.back()
Example
Suppose you want to load the previous page in the browsing history list using the back() method of the history object.
<button onclick="history.back()">Back</button>
In the above example, a button with a click event is being created.
By clicking on it the previous page in the history list will be loaded.
go()
It is used for the purpose of loading a particular page in the browning history list using the page number.
Syntax
It has the following syntax.
Example
Suppose you want to load a page which is 3 pages back then use the following code.
<button onclick="history.go(-3)">Move 3 pages back</button>
In the above example, a button with a click event is being created, and clicking on the button will take you 3 pages back.
 Using the pathname property of the location object we have fetched the pathname of the existing URL.
Now that we have a basic understanding of the location object, let’s dive into the details of the properties of the location object.
Using the pathname property of the location object we have fetched the pathname of the existing URL.
Now that we have a basic understanding of the location object, let’s dive into the details of the properties of the location object.
 Using the hash property of the location object we extracted the anchor portion of the URL.
 Using the host property of the location object the hostname and port number of the existing URL has been fetched.
 Using the hostname property of the location object the hostname of the present URL has been fetched.
 The complete URL of the present web page has been extracted using the href property of the location object.
 The output displays the protocol, hostname, and port number of the available URL.
 Using the pathname property of the location object, the pathname of the existing URL has been fetched.
 The port number of the present web page has been fetched and shown in the output.
 The protocol of the present URL has been extracted.
 The query string of the URL has been extracted.
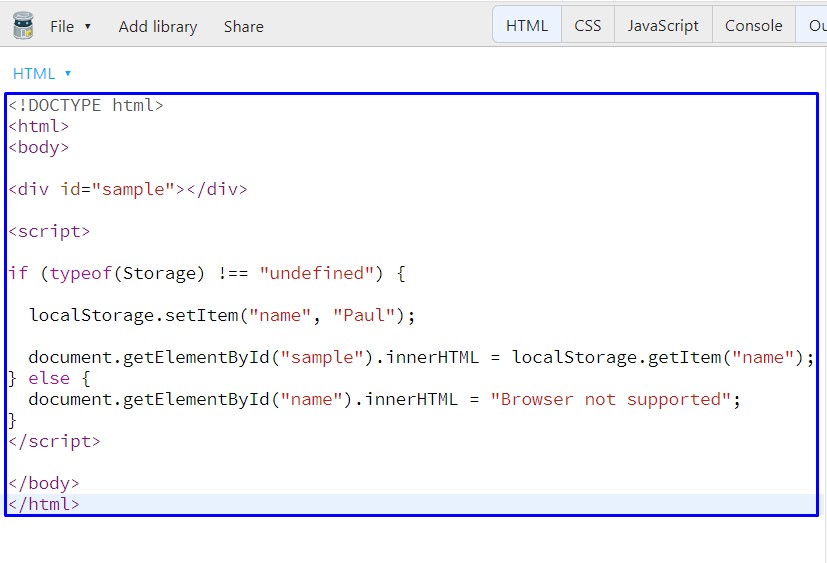 As you can see from the output, we have successfully stored and retrieved data using the “localStorage” HTML web object:
 You can also execute the following code for the same purpose:
<!DOCTYPE html>
<html>
<body>
<div id="sample"></div>
<script>
if (typeof(Storage) !== "undefined") {
localStorage.name = "Paul";
document.getElementById("sample").innerHTML = localStorage.name; } else {
document.getElementById("name").innerHTML = "Browser not supported";}
</script>
</body>
</h
You can also execute the following code for the same purpose:
<!DOCTYPE html>
<html>
<body>
<div id="sample"></div>
<script>
if (typeof(Storage) !== "undefined") {
localStorage.name = "Paul";
document.getElementById("sample").innerHTML = localStorage.name; } else {
document.getElementById("name").innerHTML = "Browser not supported";}
</script>
</body>
</h
 The provided example will also show you the same output:
 If you want to remove an item or entry from your localStorage object, then you have to call the “removeItem()” method and pass the “name” item as an argument:
localStorage.removeItem("name");
If you want to remove an item or entry from your localStorage object, then you have to call the “removeItem()” method and pass the “name” item as an argument:
localStorage.removeItem("name");
 Here, the output is showing a “Click” button; click on it to check the buttonClickCounter value:
 Initially, the value of buttonClickCounter was set to “0,” and it will be incremented whenever we will click the button:

 Hitting the highlighted button is retrieving the data stored in the “sessionStorage” button:

 As you can see from the below-given output, a new HTML element is added having the text content “This is new node”:

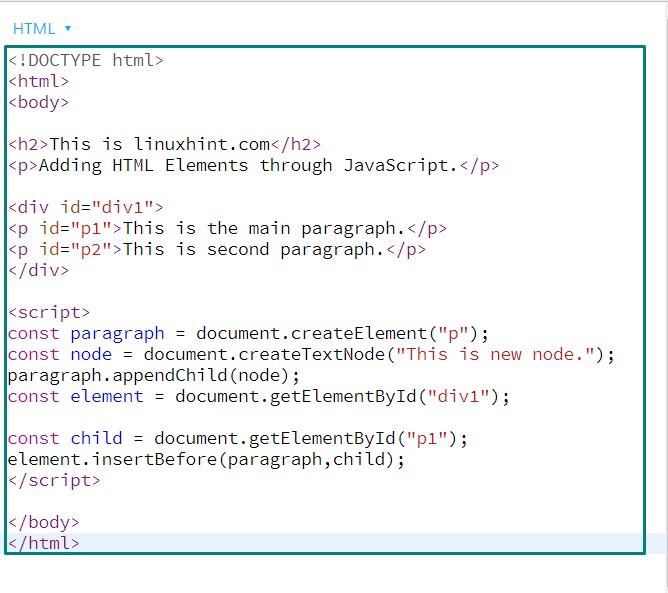 Execution of the above-given program will add the “paragraph” HTML before “p1”:

 Check out the below-given output, which we got from executing the above-given program:

 Here is the output which we got from executing the above-given JavaScript program:

 Check out the output of the JavaScript querySelectorAll() method:
 Execution of the above-given JavaScript program will show the following output:

 The below-given output signifies that “p1” HTML is deleted from our JavaScript program with the help of the “remove()” function:

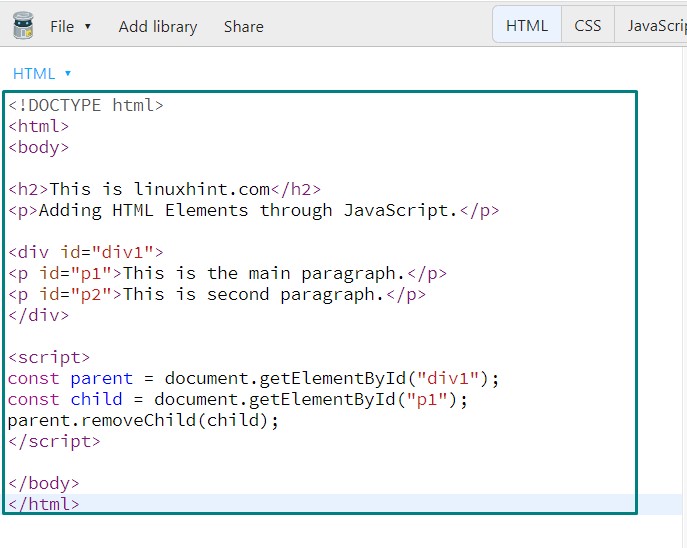 As you can see that the <p1> child element of the <div1> HTML element is deleted successfully:

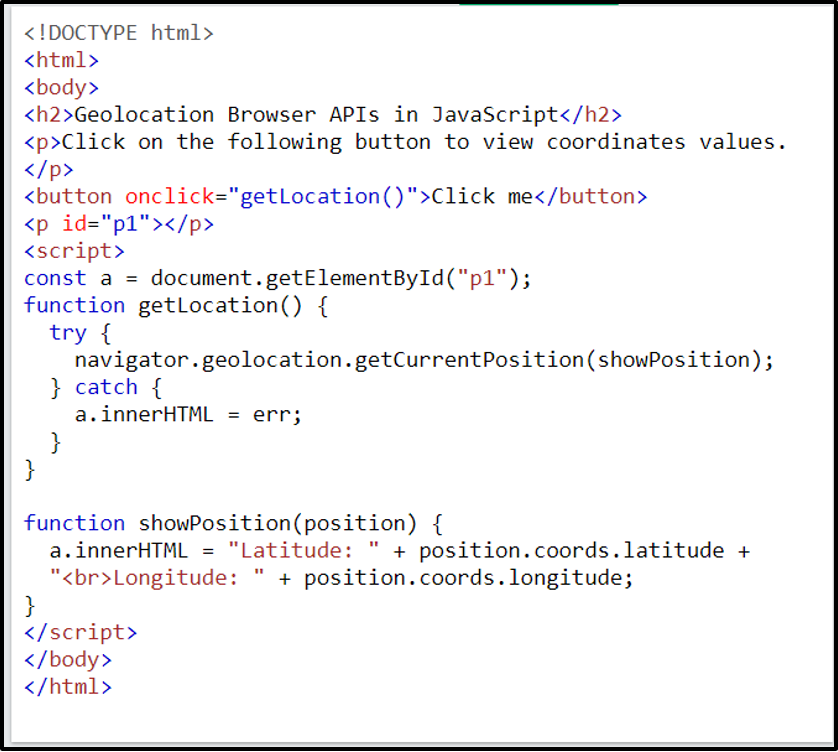

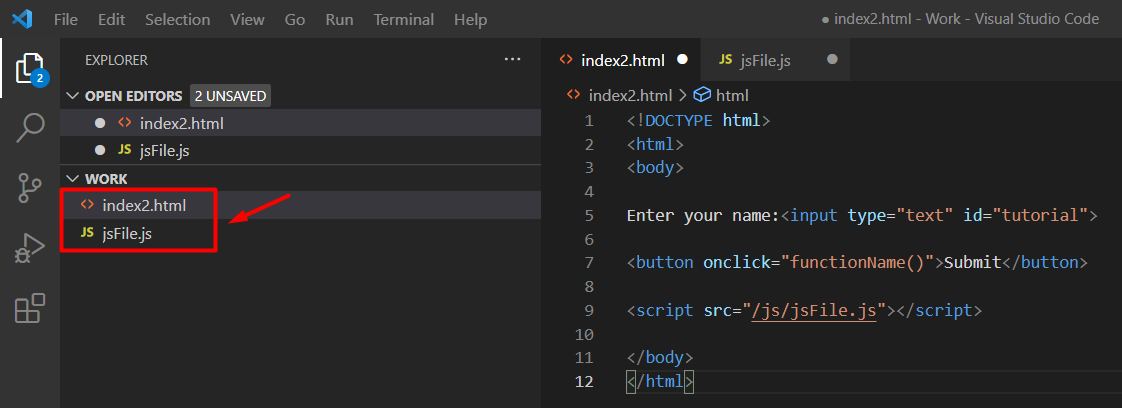
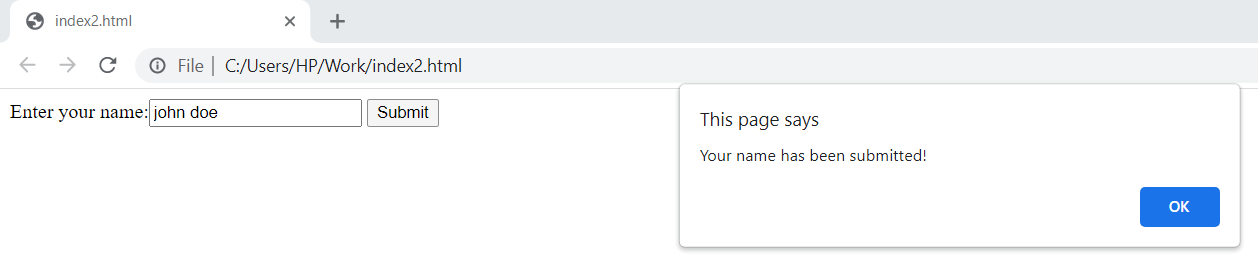 In another scenario, when your HTML file is placed in a separate folder and the JavaScript file in another folder as shown below.
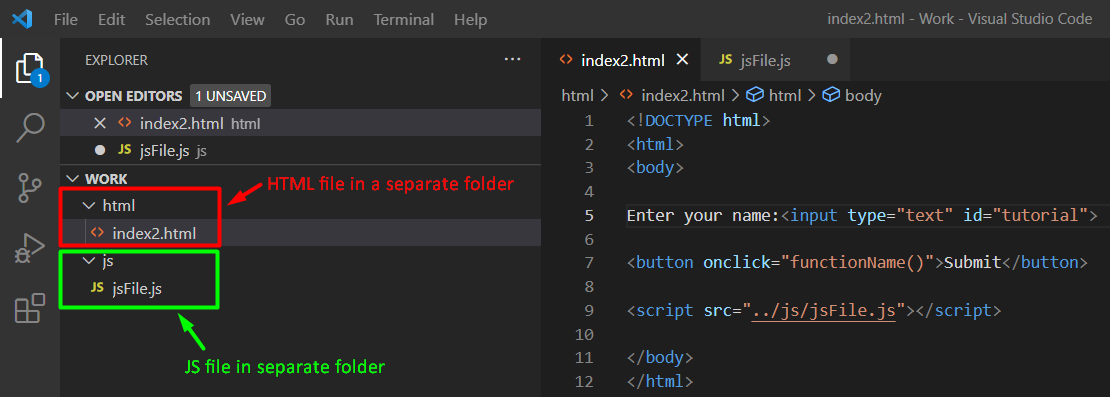 Use the following syntax, to add your file path to the src attribute in the <script> tag.
<script src="../js/jsFile.js"></script>
Use the following syntax, to add your file path to the src attribute in the <script> tag.
<script src="../js/jsFile.js"></script>
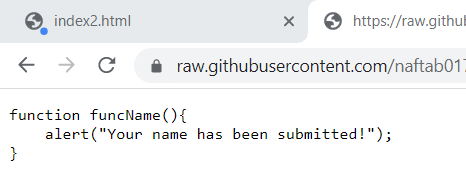 In the above file we have defined our function that is intended to display an alert message when the user presses the submit button.
 Following these steps, you can easily add your external JavaScript file to your HTML document.
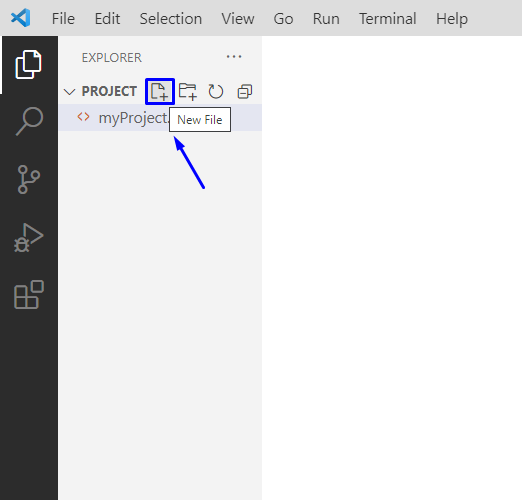 Next, we will specify the style we want to apply to the web page in the opened CSS file.
Here, we have assigned the values to the “background” and “font” properties for the HTML “body” and also added the “color” for the heading:
body {
background: pink;
font: 18px Arial, sans-serif;
}
h1 {
color: blue;
}
Press “Ctrl+S” to save the added code in the “style.css” file:
Next, we will specify the style we want to apply to the web page in the opened CSS file.
Here, we have assigned the values to the “background” and “font” properties for the HTML “body” and also added the “color” for the heading:
body {
background: pink;
font: 18px Arial, sans-serif;
}
h1 {
color: blue;
}
Press “Ctrl+S” to save the added code in the “style.css” file:
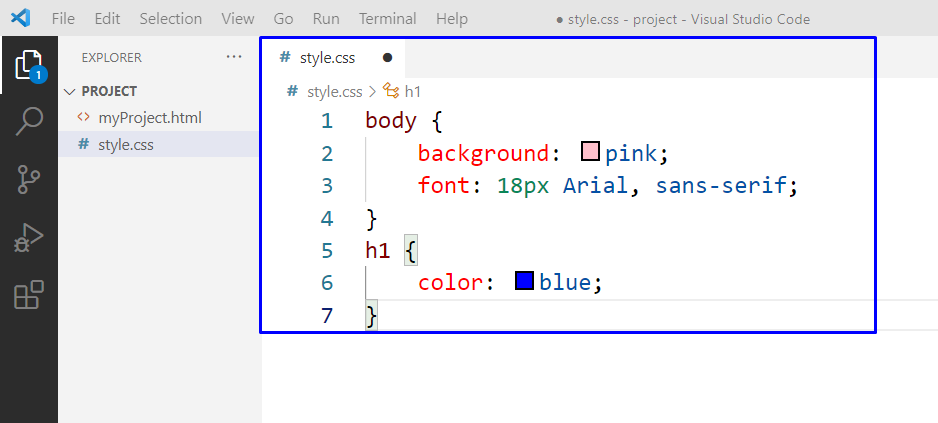 The “<link>” tag is utilized for linking an external CSS to an HTML file.
This tag is added in the “<head>” section of an HTML document.
We have linked our HTML file with “style.css” in the below-given program, using the <link> tag.
Then, we have added a heading with the <h1> tag and a paragraph with the <p> tag.
The specified style in the “style.css” file will be applied to these HTML elements:
<!DOCTYPE html>
<html lang="en">
<head>
<title>linuxhint</title>
<link rel="stylesheet" href="css/style.css">
</head>
<body>
<h1>This is linuxhint.com</h1>
<p>We are learing how to add a CSS file in HTML</p>
</body>
</html>
Save this JavaScript program and open your HTML file in the browser:
The “<link>” tag is utilized for linking an external CSS to an HTML file.
This tag is added in the “<head>” section of an HTML document.
We have linked our HTML file with “style.css” in the below-given program, using the <link> tag.
Then, we have added a heading with the <h1> tag and a paragraph with the <p> tag.
The specified style in the “style.css” file will be applied to these HTML elements:
<!DOCTYPE html>
<html lang="en">
<head>
<title>linuxhint</title>
<link rel="stylesheet" href="css/style.css">
</head>
<body>
<h1>This is linuxhint.com</h1>
<p>We are learing how to add a CSS file in HTML</p>
</body>
</html>
Save this JavaScript program and open your HTML file in the browser:
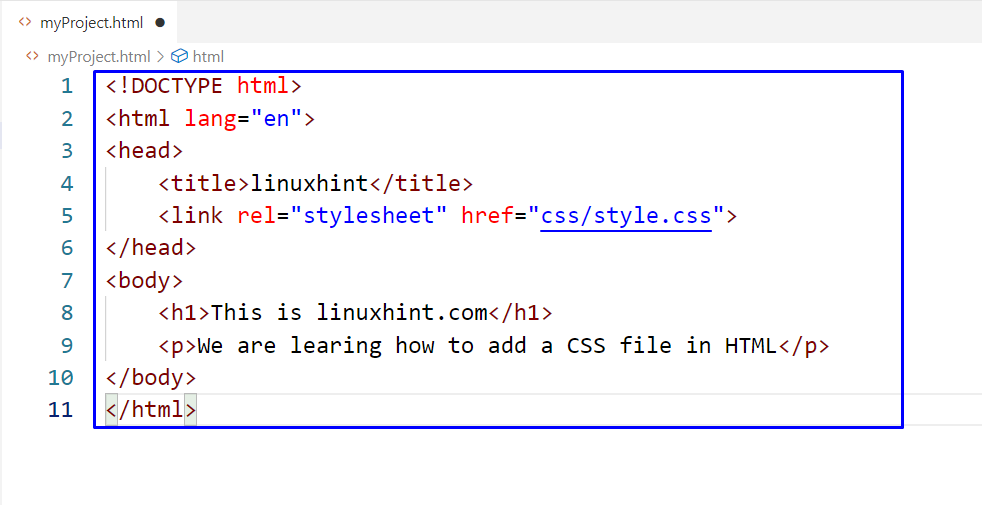 As you can see, we have successfully applied the specified style to our HTML elements by linking them with the external CSS file:
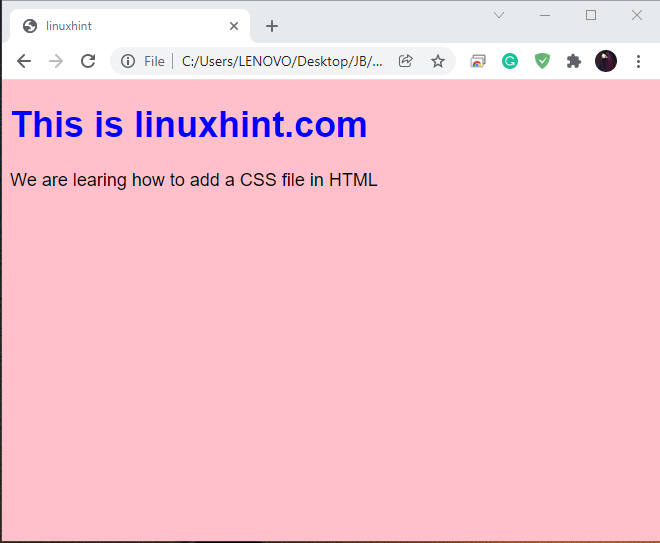
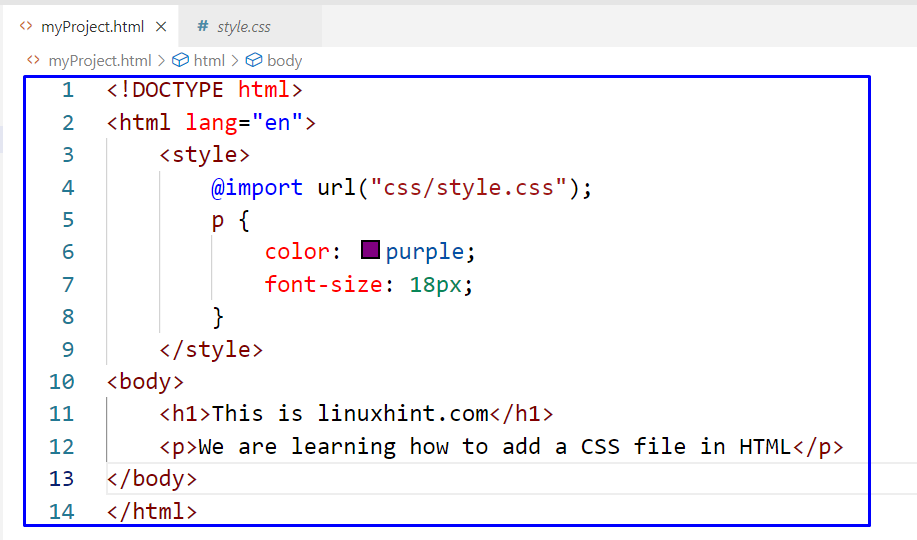 Our “myProject.html” file has the following HTML elements with the applied styles:
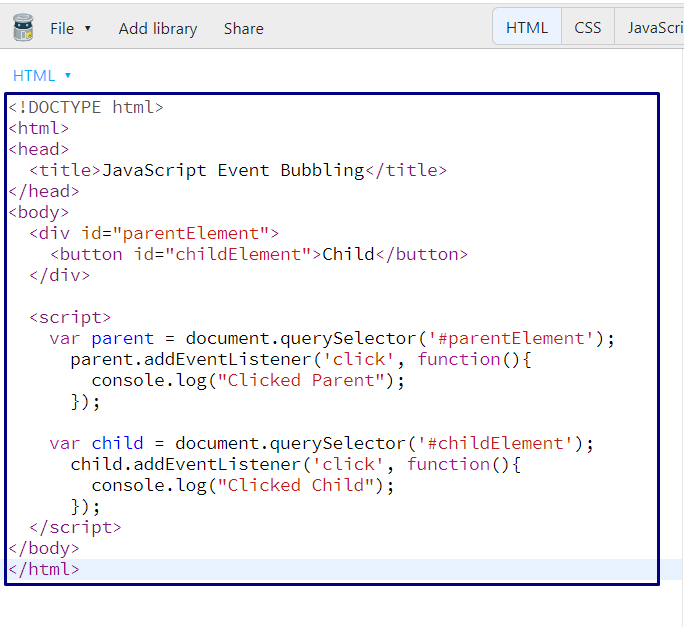 Now, we will click on the “Child” button which can be seen in the following output:
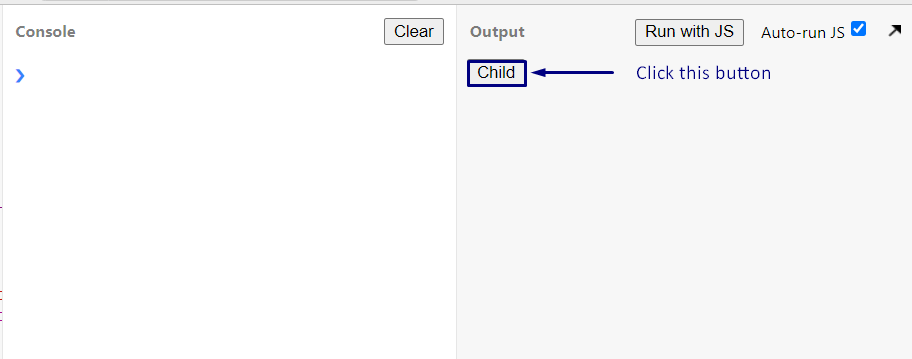 By clicking the “Child” button, the passed “function()” in the addEventListener() method will be executed.
Then, the “onclick()” method of the “div” element will be invoked.
It is happening because of the “Event Bubbling”:
By clicking the “Child” button, the passed “function()” in the addEventListener() method will be executed.
Then, the “onclick()” method of the “div” element will be invoked.
It is happening because of the “Event Bubbling”:
 In the above-given example, when we have clicked the “Child” button, the “click” event is passed from the button having id “childElement” and event flow control moves to the “document” in the following order:
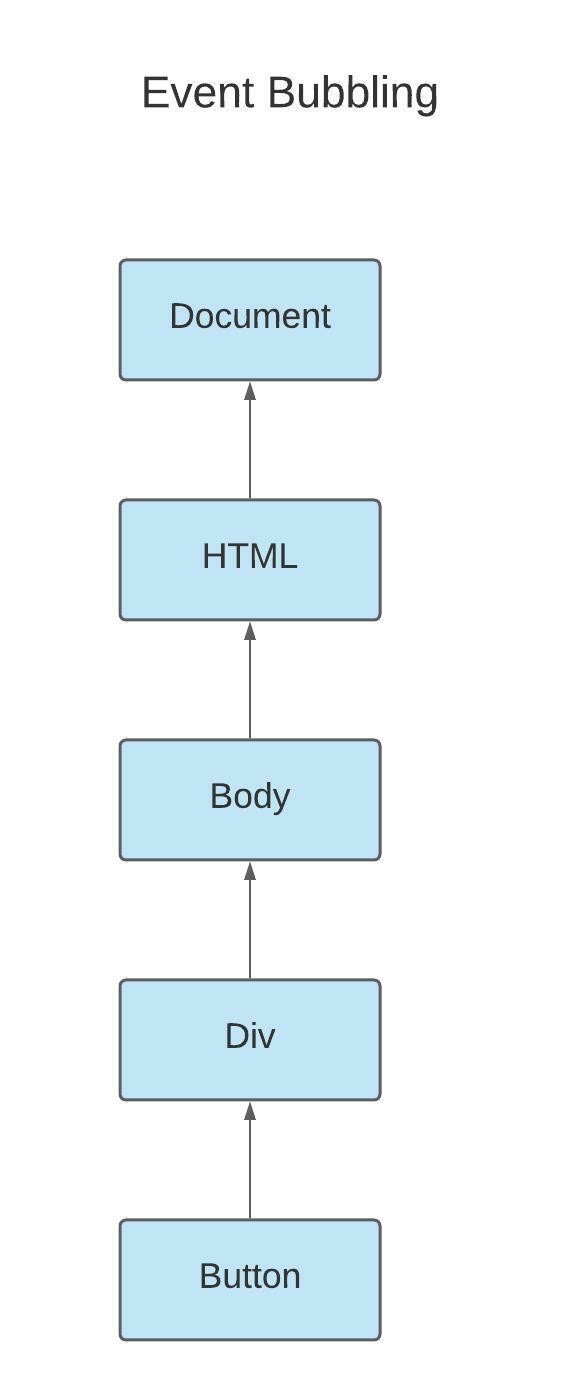
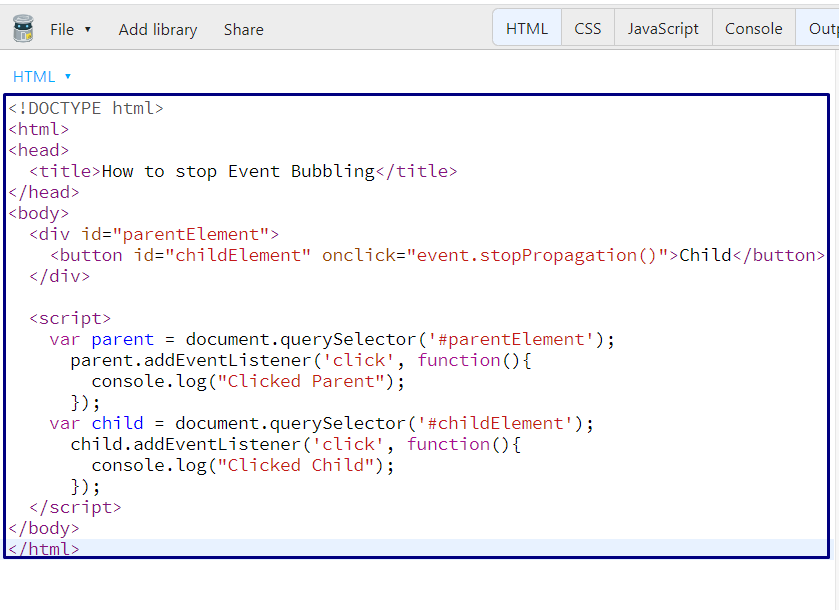 Clicking on the highlighted button will only print out “Clicked Child” and then it stops the event from bubbling:

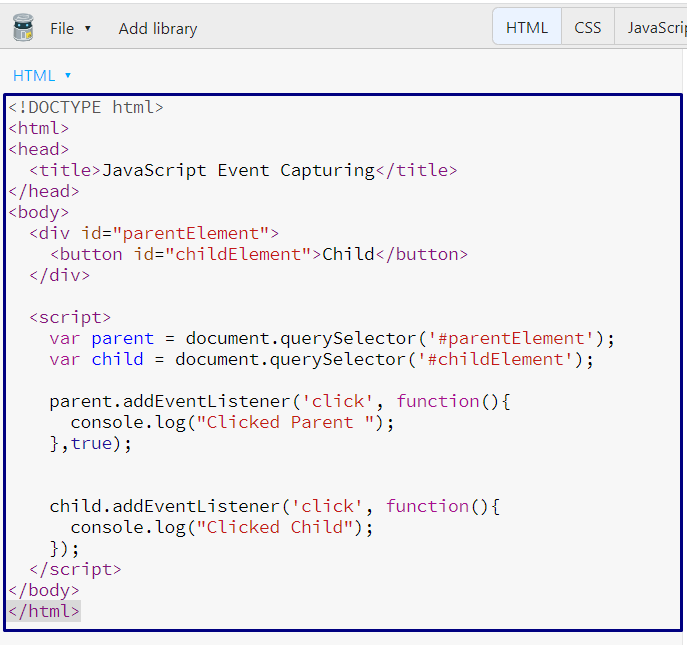 The following “Child” button will first invoke the event added to the parent element.
After that, it will execute the event attached to the target:
The following “Child” button will first invoke the event added to the parent element.
After that, it will execute the event attached to the target:
 In the above-given example, when we have clicked the “Child” button, the “click” event is passed from the parent element which is “document,” to the specified event target “childElement” button:

 The given output signifies that event capturing is stopped after executing the event associated with the parent element:
 Here is the full view of the event flow with the event capturing and event bubbling phases:
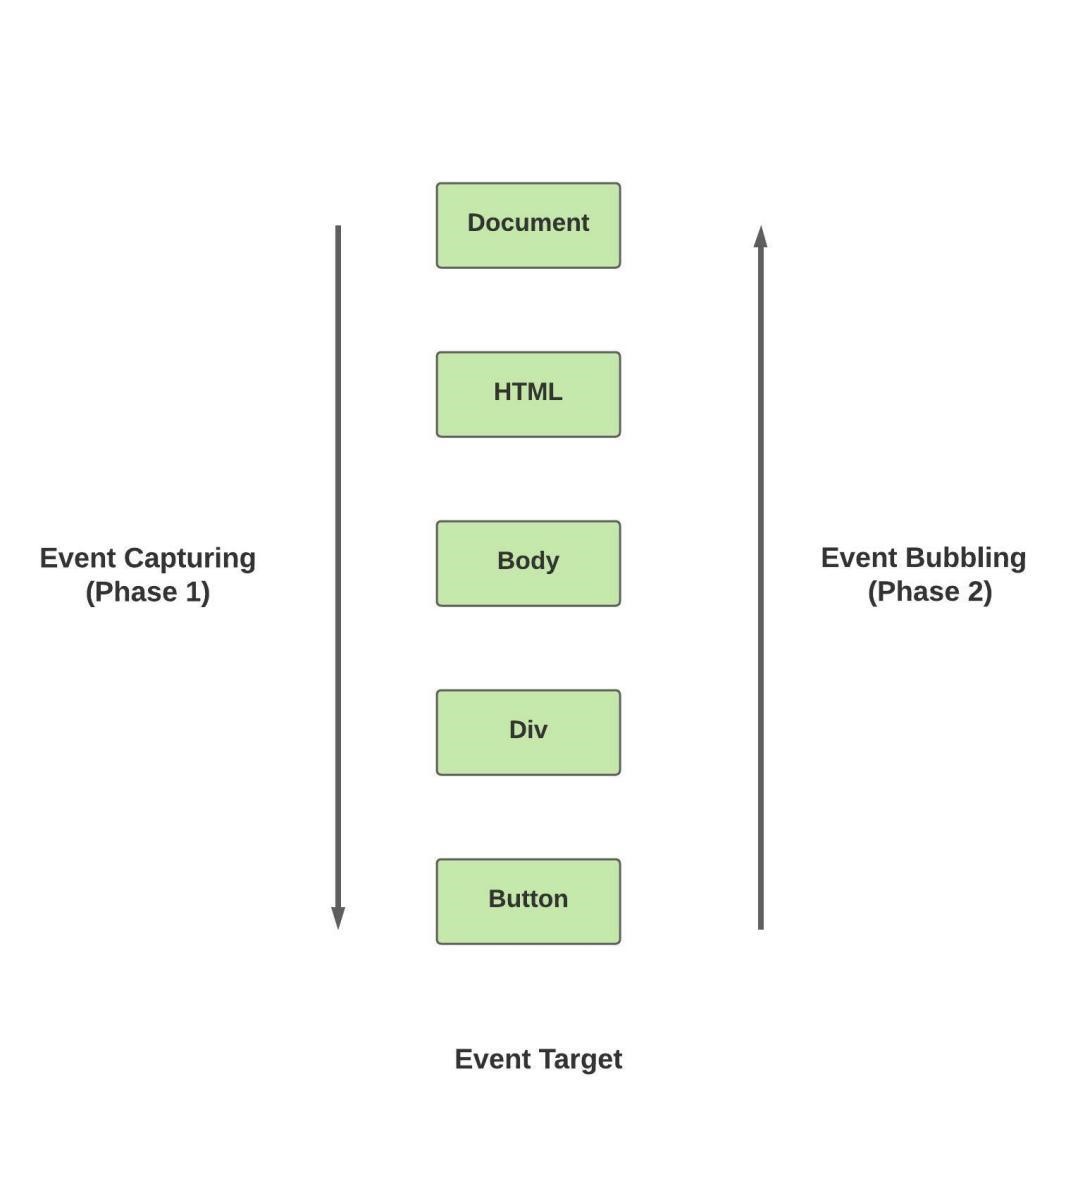
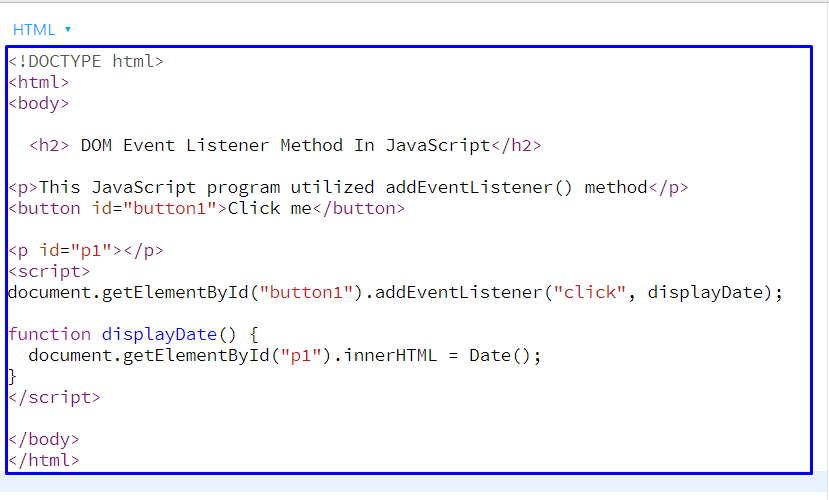 After getting the output, click on the “Click me” button to check out the current time and date:
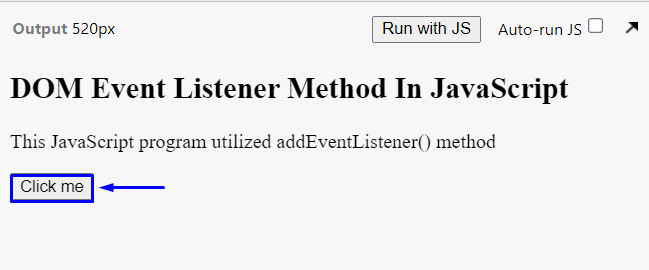
 Hit the “Click me” button, and you get two alerts on your browser, one after another:
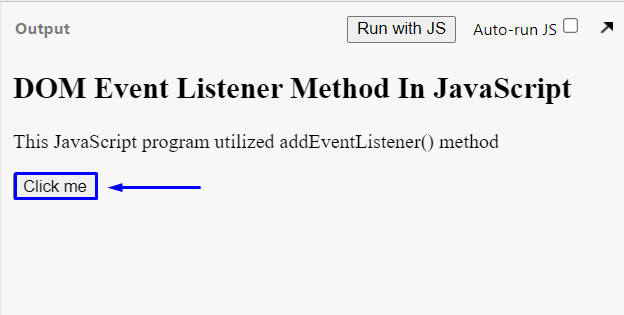
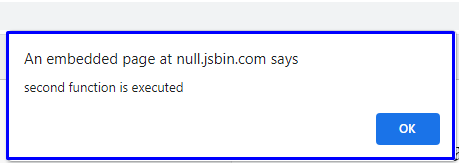
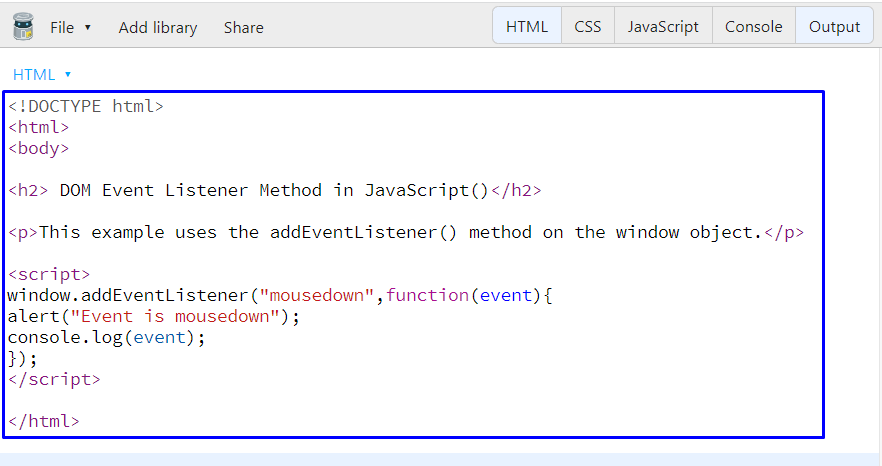 Execution of the above-given JavaScript program will show the following output:
 Now, press the “left” mouse button over the selected element, and you will see the following alert:
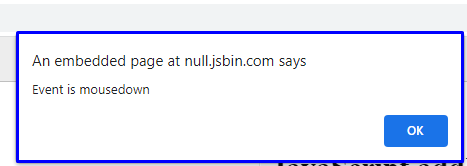
 Now, we will click on the “Child” button, which can be seen in the following output:
 By clicking the “Child” button, the passed “function()” in the addEventListener() method will be executed.
Then, the “onclick()” method of the “div” element will be invoked.
This all happens because of the “Event Bubbling”:
By clicking the “Child” button, the passed “function()” in the addEventListener() method will be executed.
Then, the “onclick()” method of the “div” element will be invoked.
This all happens because of the “Event Bubbling”:
 In the above-given example, when we have clicked the “Child” button, the “click” event is passed from the button having id “childElement” and event flow control moves to the “document” in the following order:

 The following “Child” button will first invoke the event added to the parent element.
After that, it will execute the event attached to the event target:
The following “Child” button will first invoke the event added to the parent element.
After that, it will execute the event attached to the event target:
 In the above-given example, when we have clicked the “Child” button, the “click” event is passed from the parent element which is “document,” to the specified event target “childElement” button:
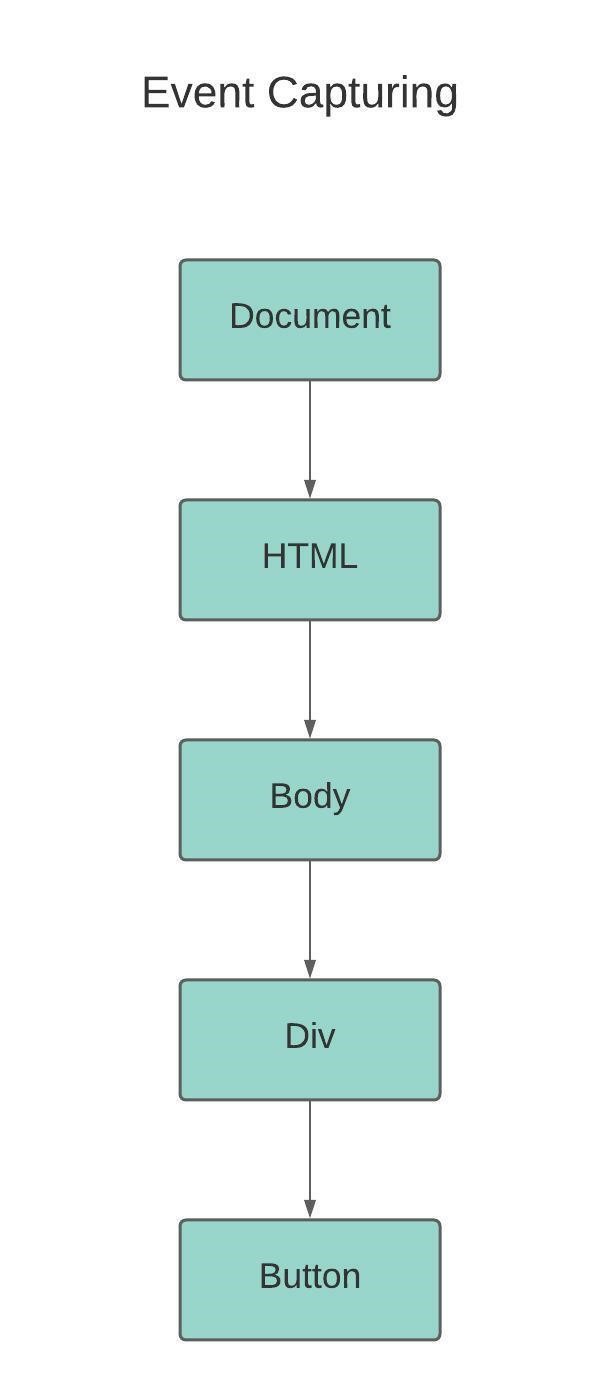
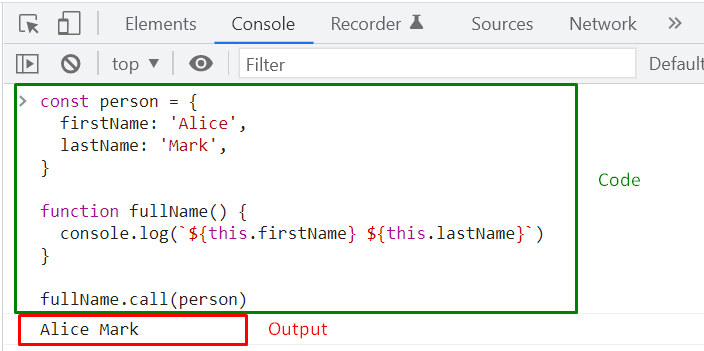


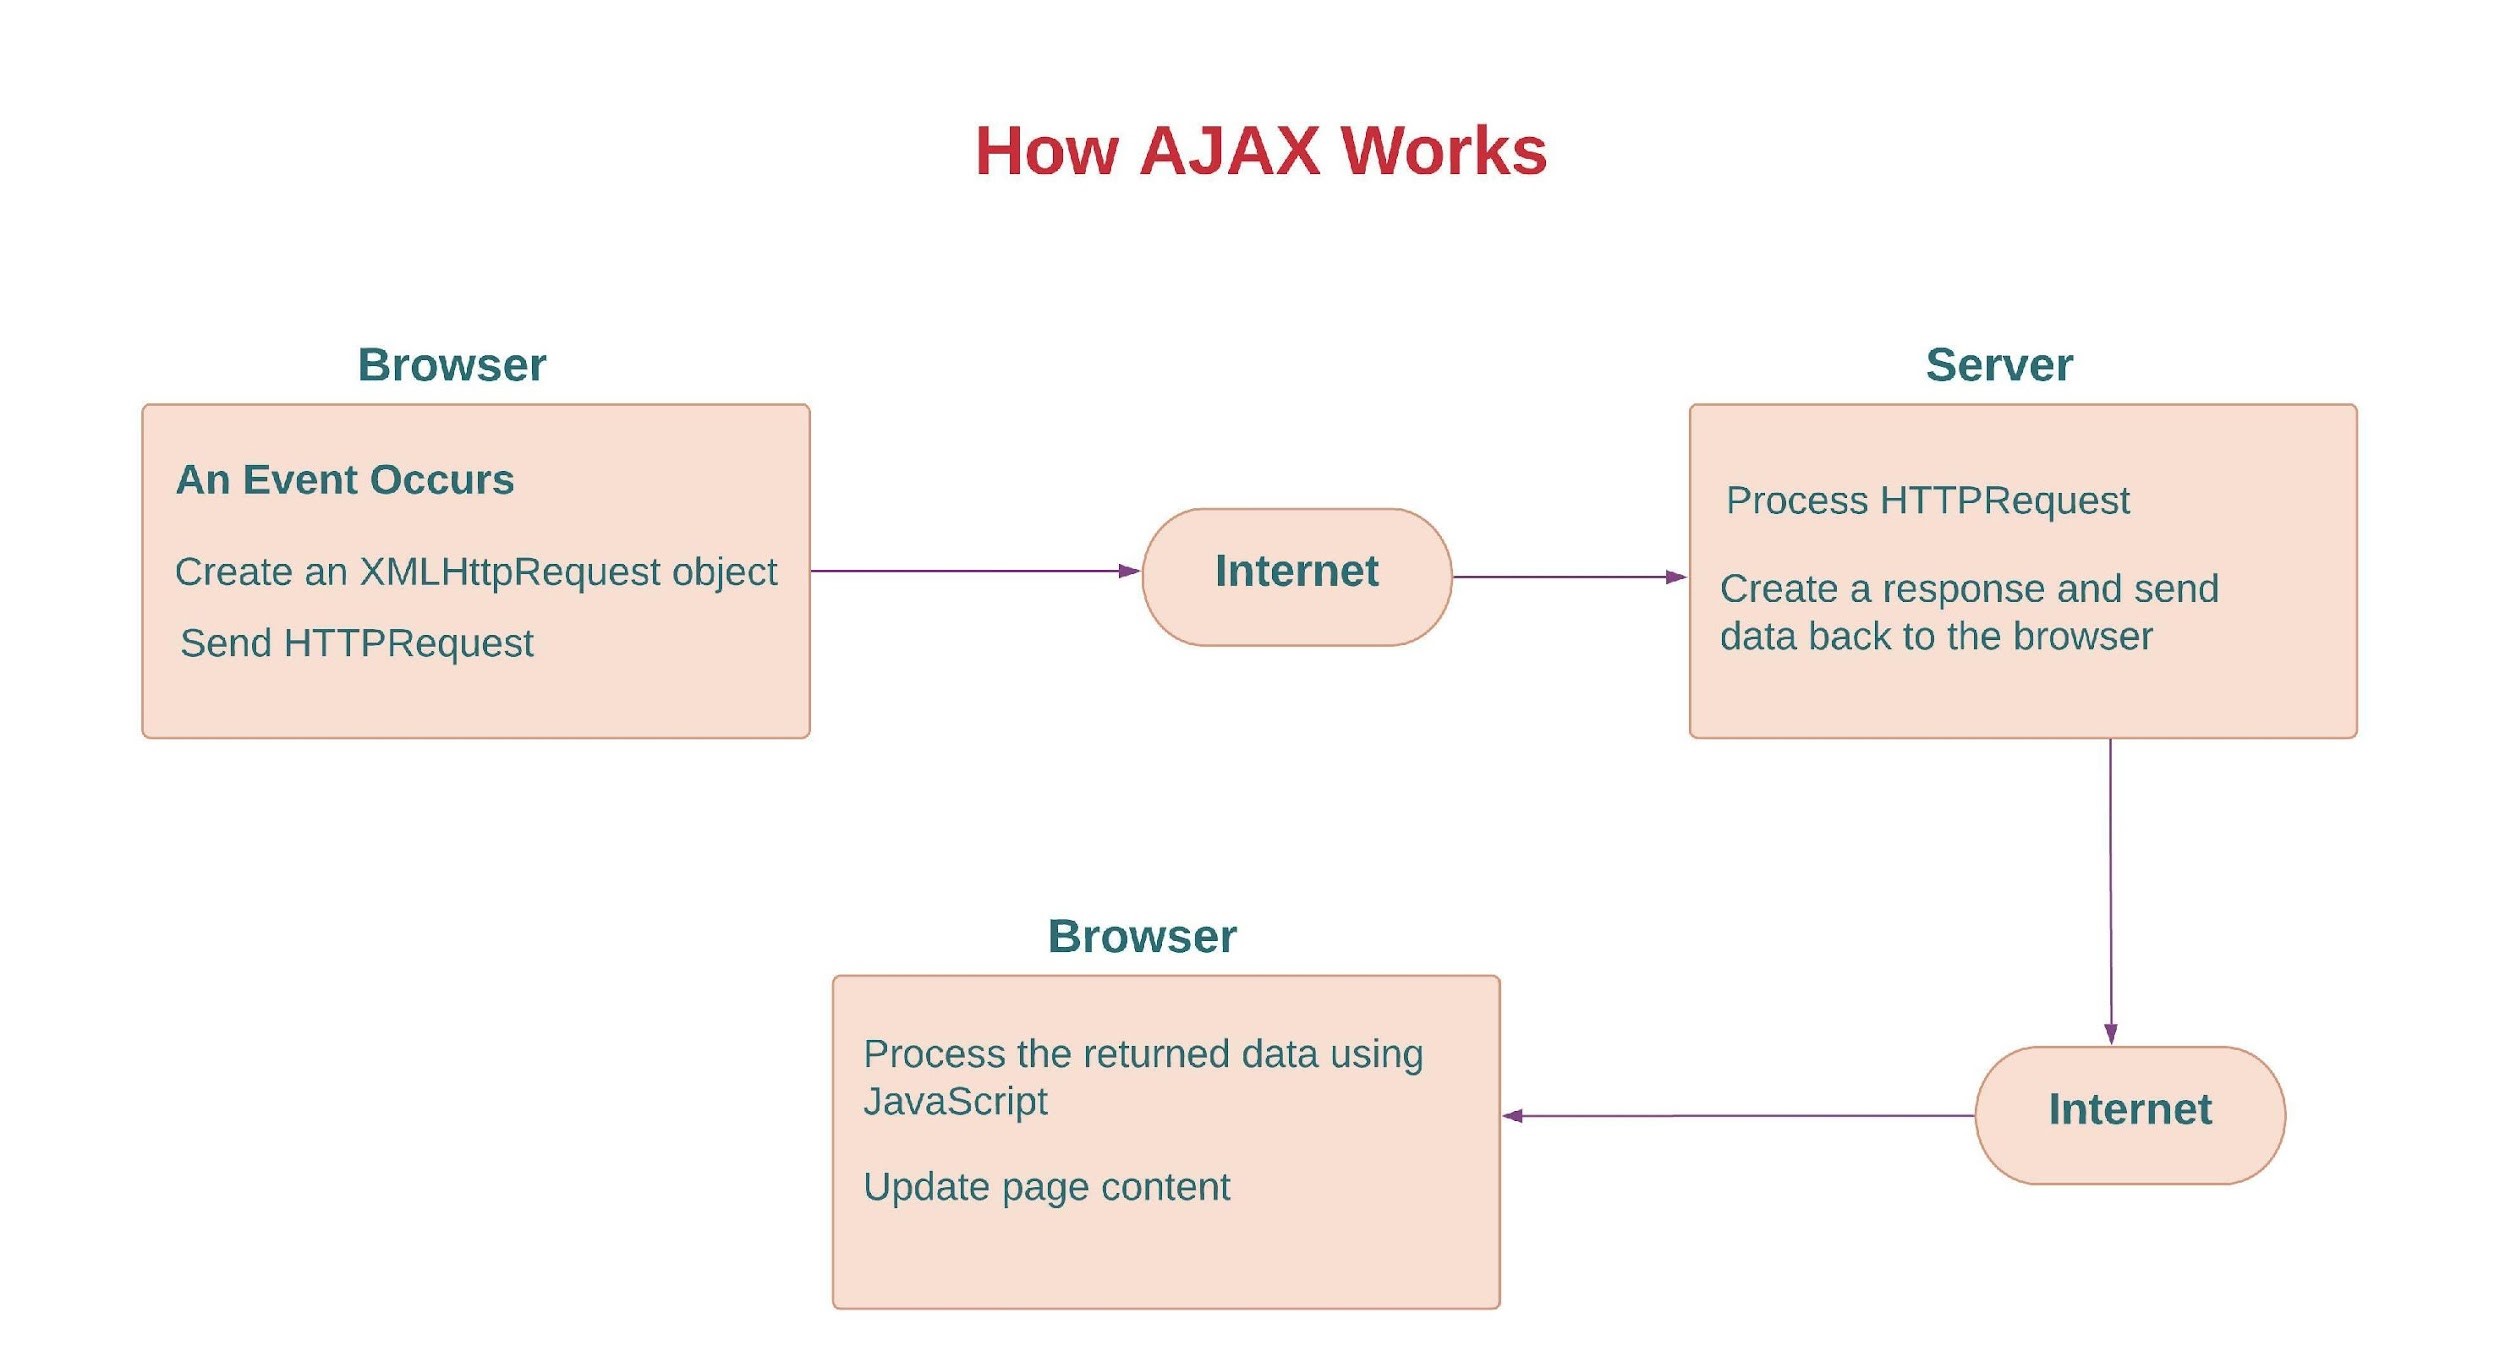
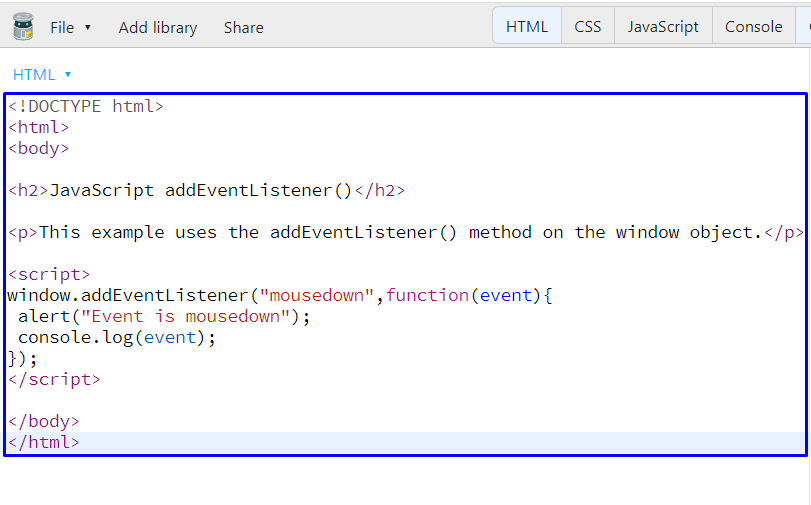 Execution of the above-given JavaScript program will show the following output:
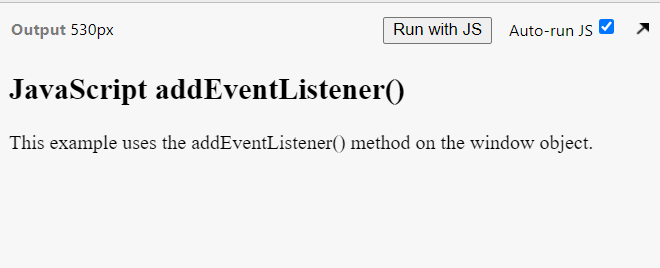 Now, left click on the screen and you will see the following alert:

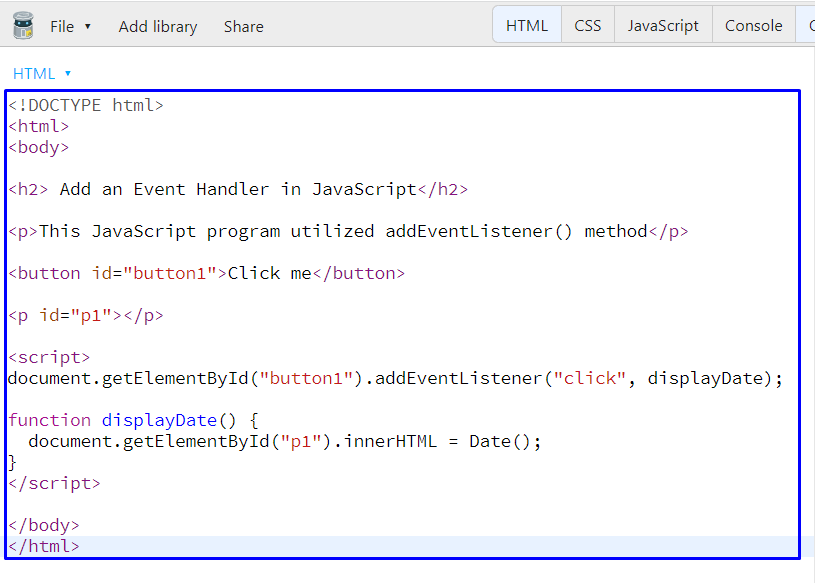 After getting the output, click on the “Click me” button to check out the current time and date:
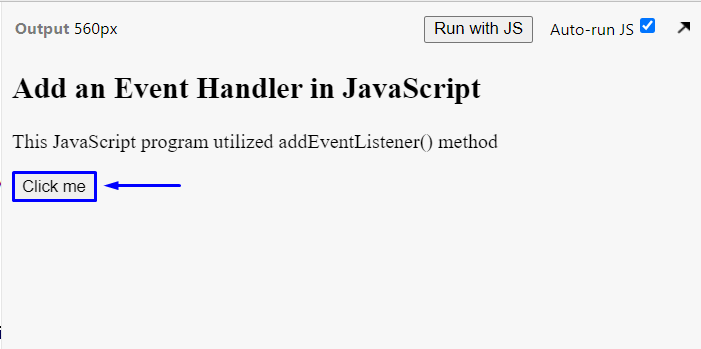
 Example
Let’s consider another example to understand when Boolean will return the false value:
var a= 0;
console.log("The original Number: ", a);
console.log("Number converted to Boolean", Boolean(a));
Now the above code converts a numeric value “0” to a Boolean data type, as a result, it will return false as shown in the following snippet:
Example
Let’s consider another example to understand when Boolean will return the false value:
var a= 0;
console.log("The original Number: ", a);
console.log("Number converted to Boolean", Boolean(a));
Now the above code converts a numeric value “0” to a Boolean data type, as a result, it will return false as shown in the following snippet:
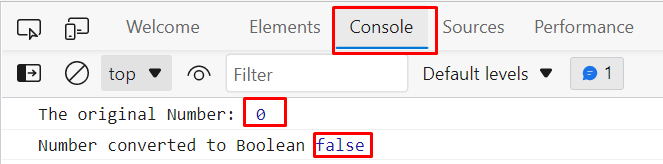 Use of “!” sign within the Boolean function provides a contradictory value i.e.
Boolean function will show true for 0 and false for all non-zero values.
Using two not signs “!!” will provide the actual results i.e.
0=false, 1=true.
Example
For better understanding consider the following piece of code:
var a= 0;var b=10;
console.log("The original Number: ", a);
console.log("Number converted to Boolean", Boolean(!a));
console.log("The original Number: ", b);
console.log("Number converted to Boolean", Boolean(!b));
The above-given code provides the following output:
Use of “!” sign within the Boolean function provides a contradictory value i.e.
Boolean function will show true for 0 and false for all non-zero values.
Using two not signs “!!” will provide the actual results i.e.
0=false, 1=true.
Example
For better understanding consider the following piece of code:
var a= 0;var b=10;
console.log("The original Number: ", a);
console.log("Number converted to Boolean", Boolean(!a));
console.log("The original Number: ", b);
console.log("Number converted to Boolean", Boolean(!b));
The above-given code provides the following output:
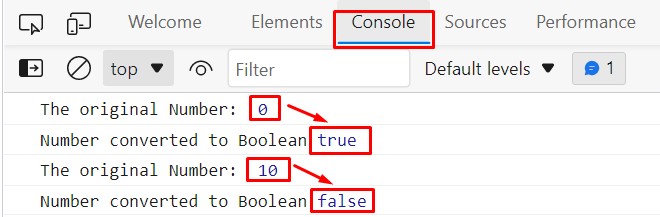 The above snippet verifies that use of “!” sign within the Boolean function shows the contrary results.
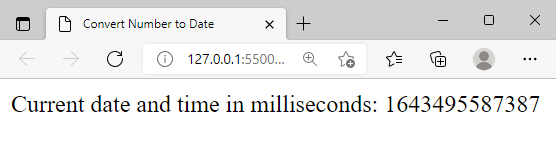 We were expecting a readable date format however we get a number instead of the current date and time.
Now, all we have to do is, convert the above number which is representing the number of milliseconds to a human-readable date format.
For this purpose we will pass the resultant value of Date.now() function into new Date() object:
<script>
var currentDate = Date.now();
document.write("Current date and time in milliseconds: ",currentDate);
var numDate= new Date(currentDate);
document.write("<br> Milliseconds converted to Date format: ",numDate);</script>
The above snippet will provide the following output:
We were expecting a readable date format however we get a number instead of the current date and time.
Now, all we have to do is, convert the above number which is representing the number of milliseconds to a human-readable date format.
For this purpose we will pass the resultant value of Date.now() function into new Date() object:
<script>
var currentDate = Date.now();
document.write("Current date and time in milliseconds: ",currentDate);
var numDate= new Date(currentDate);
document.write("<br> Milliseconds converted to Date format: ",numDate);</script>
The above snippet will provide the following output:
 Now the above output verifies that the use of the new Date object provides the results in human-readable date format.
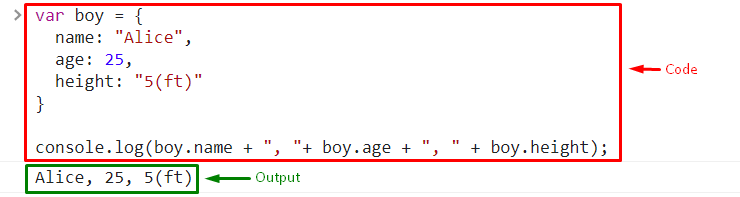 In the following example, an object is accessed by using the square brackets [].
var boy = {
name: "Alice",
age: 25,
height: "5(ft)"}
console.log(boy['name']);
In the following example, an object is accessed by using the square brackets [].
var boy = {
name: "Alice",
age: 25,
height: "5(ft)"}
console.log(boy['name']);
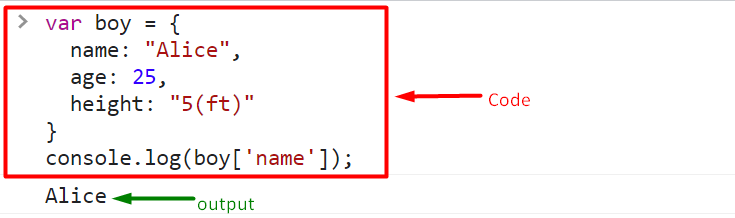
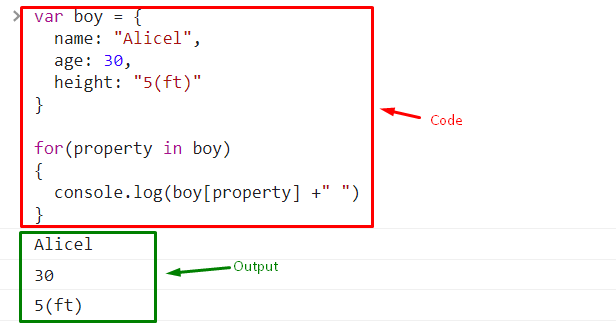

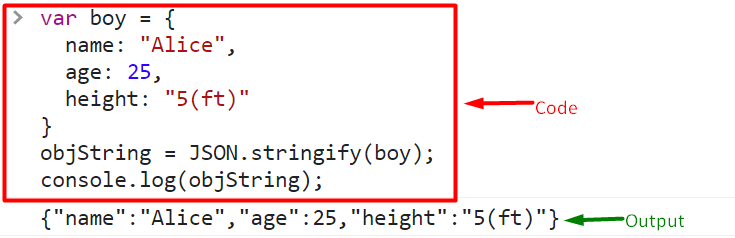
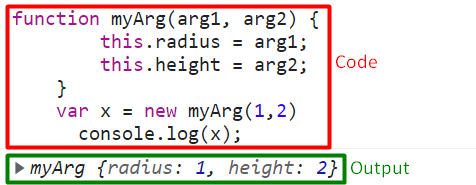 The above example first defined a function “myArg()”.
After that, we have created an “x” object by invoking the “myArg()” function as a function constructor.
The function constructor will then inherits the properties from the original function.
We can see that only the values were passed as arguments to the “myArg()” function, but the output also shows the properties associated with them.
Now, let’s check out the other methods for invoking a function.
The above example first defined a function “myArg()”.
After that, we have created an “x” object by invoking the “myArg()” function as a function constructor.
The function constructor will then inherits the properties from the original function.
We can see that only the values were passed as arguments to the “myArg()” function, but the output also shows the properties associated with them.
Now, let’s check out the other methods for invoking a function.


 The window object is a global object that consists of global JavaScript objects, variables (properties of the window object), and functions (methods of the window object).
Some of the window object methods are.
The window object is a global object that consists of global JavaScript objects, variables (properties of the window object), and functions (methods of the window object).
Some of the window object methods are.

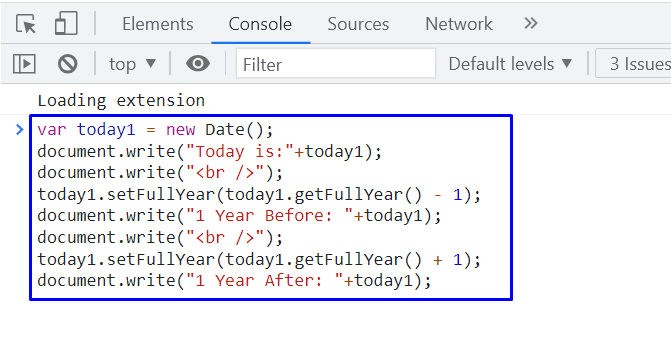 Execution of the above-given code will print out three lines.
You can see that the first line in the output shows the current date and time stored in the “today1” date object, and the other two lines display the values for the previous and next year with the same date and time:
Execution of the above-given code will print out three lines.
You can see that the first line in the output shows the current date and time stored in the “today1” date object, and the other two lines display the values for the previous and next year with the same date and time:

 As you can see, “March” is assigned as a month for the created date1 object:

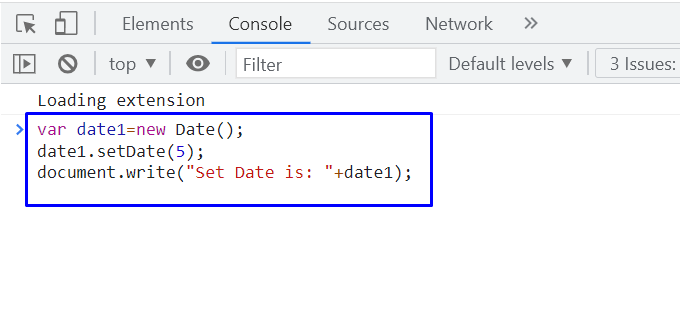 Adding “5” will set the date object value to the 5th of the current month:
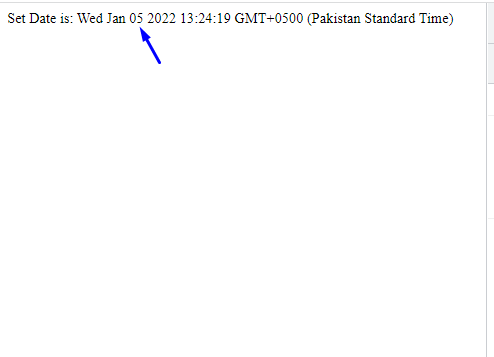
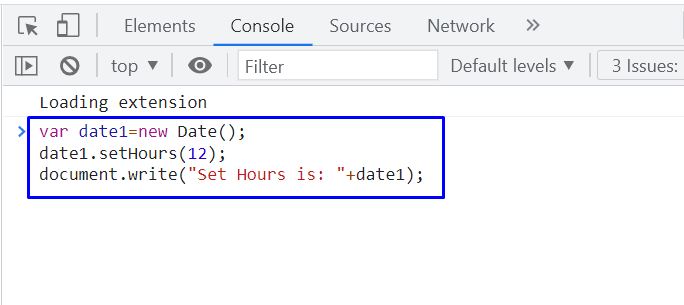 The below-given output declares that we have successfully set the specified hour value:
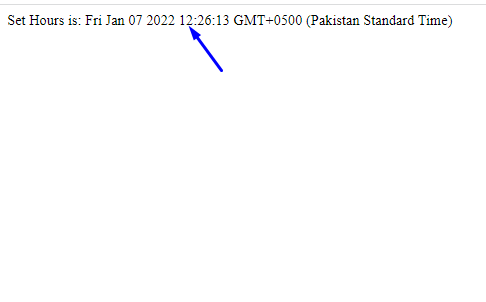
 The output of the above-given code will show the changes you have made into the “date1” object Minutes:

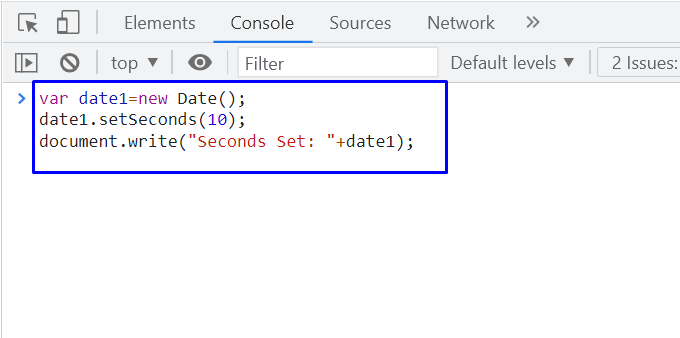 The execution of the provided code will print out the “date1” object data with specified changes in the “seconds” value:

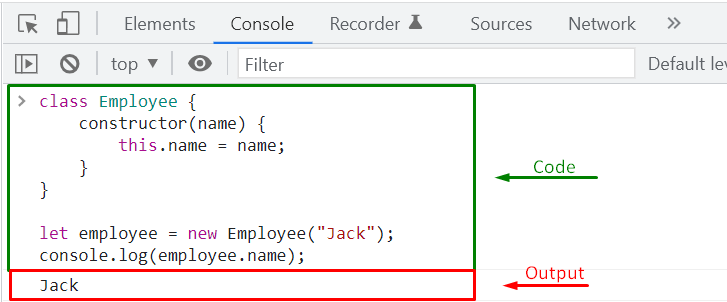 Sometimes, you might not want to access a property directly.
That’s where the getter and setter pair come to the play.
Sometimes, you might not want to access a property directly.
That’s where the getter and setter pair come to the play.
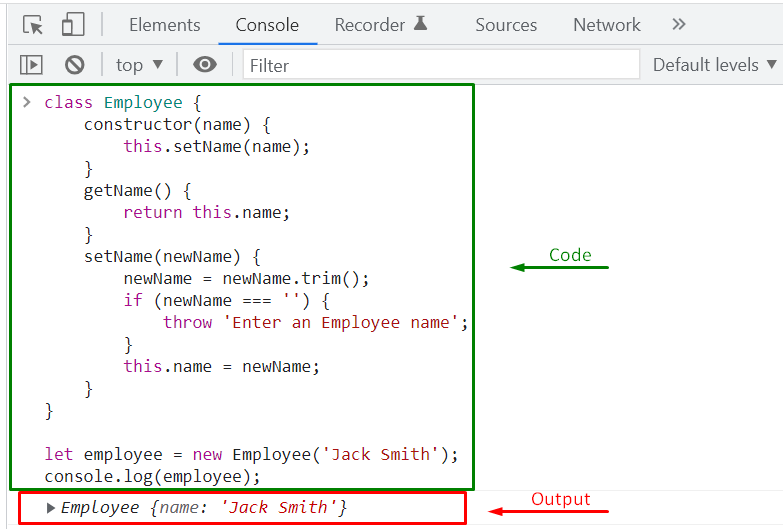 You can also invoke the created “setName()” and “getName()” methods in the following way:
employee.setName('William Smith');
console.log(employee.getName());
The above-given lines of code will set “William Smith” as the name of the “employee” object.
Then, the “getName()” method will let you know about the employee name property value:
You can also invoke the created “setName()” and “getName()” methods in the following way:
employee.setName('William Smith');
console.log(employee.getName());
The above-given lines of code will set “William Smith” as the name of the “employee” object.
Then, the “getName()” method will let you know about the employee name property value:
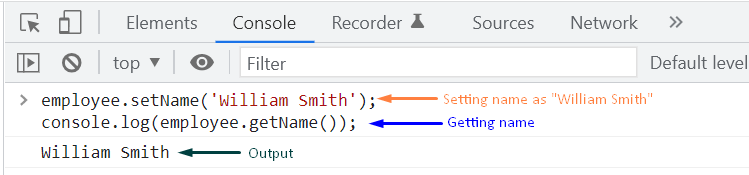 In the provided example, the setName() and getName() method are working as getter and setter .
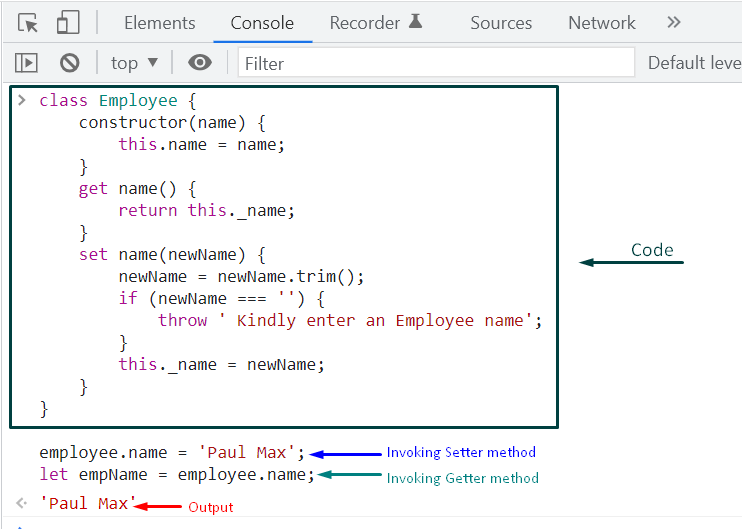 In case, if you have not defined a setter method in your JavaScript class, then you will get a TypeError which will state that you cannot set the property “name” of the “Employee” object, as the “Employee” class has only a getter function:
class Employee {
constructor(name) {
this.name = name;
}
get name() {
returnthis._name;}
//no setter method}
let employee = new Employee("Stephen Edward");
console.log(employee.name);
Here, we will try to change name of our “employee” object; however, we have not added any setter method in our class:
employee.name = 'Paul Smith';
console.log(employee.name);
As you can see, we have encountered a type error while trying to set the name property value:
In case, if you have not defined a setter method in your JavaScript class, then you will get a TypeError which will state that you cannot set the property “name” of the “Employee” object, as the “Employee” class has only a getter function:
class Employee {
constructor(name) {
this.name = name;
}
get name() {
returnthis._name;}
//no setter method}
let employee = new Employee("Stephen Edward");
console.log(employee.name);
Here, we will try to change name of our “employee” object; however, we have not added any setter method in our class:
employee.name = 'Paul Smith';
console.log(employee.name);
As you can see, we have encountered a type error while trying to set the name property value:
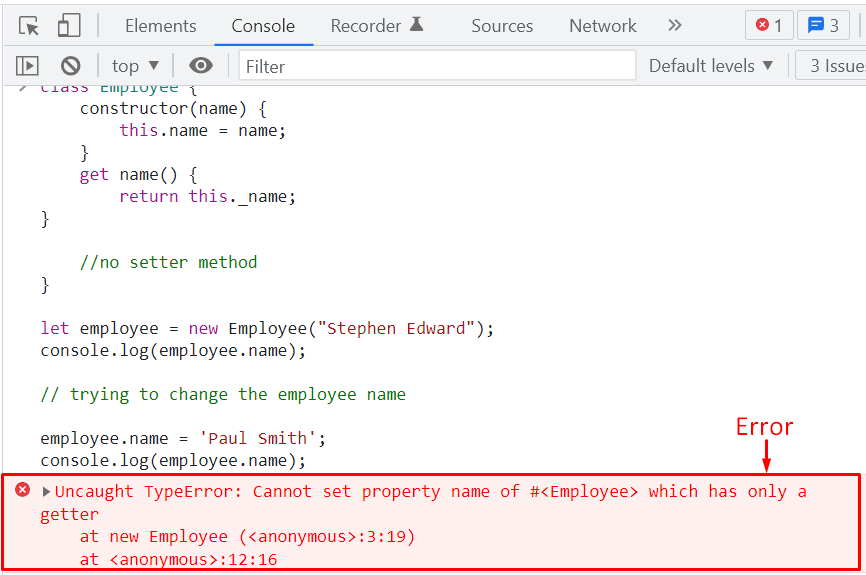
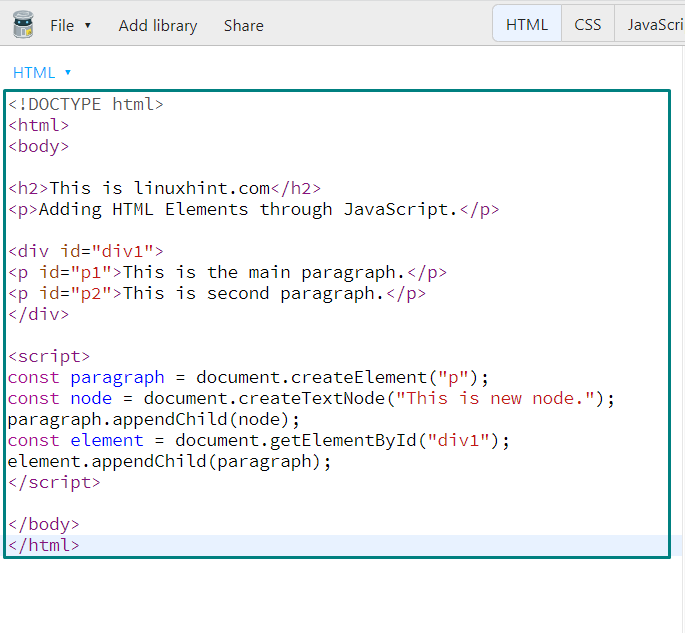 As you can see from the below-given output, a new HTML element is added having the text content “This is new node”:
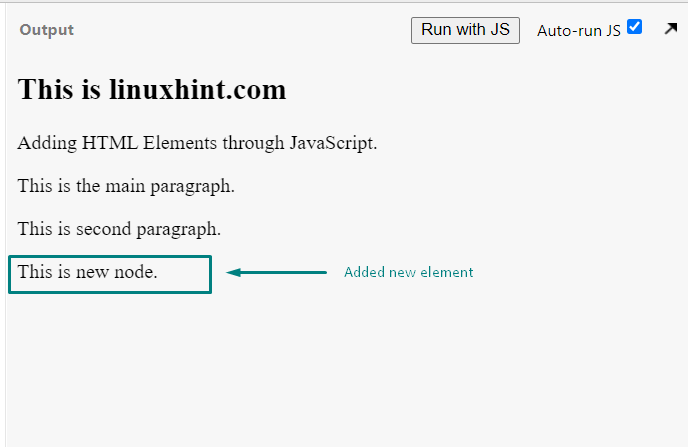
 Execution of the above-given program will add the “paragraph” HTML before “p1”:
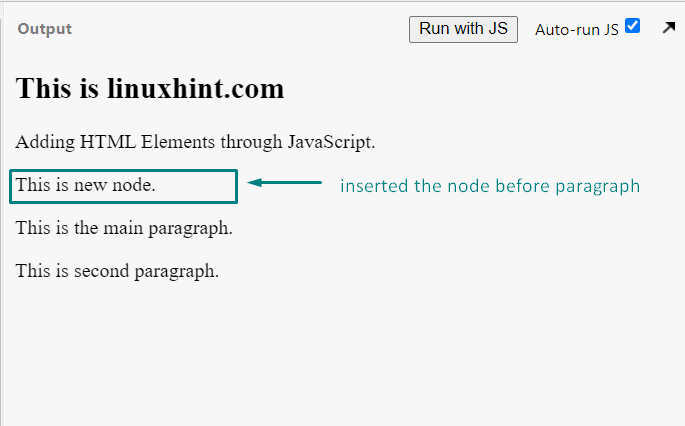
 The below-given output signifies that “p1” HTML is deleted from our JavaScript program with the help of the “remove()” function:
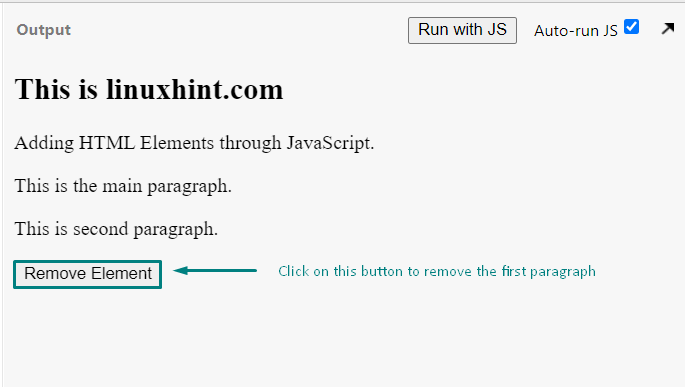
 As you can see that the <p1> child element of the <div1> HTML element is deleted successfully:
 Check out the below-given output, which we got from executing the above-given program:
 The below-given output signifies that the content of the heading HTML element is changed now:
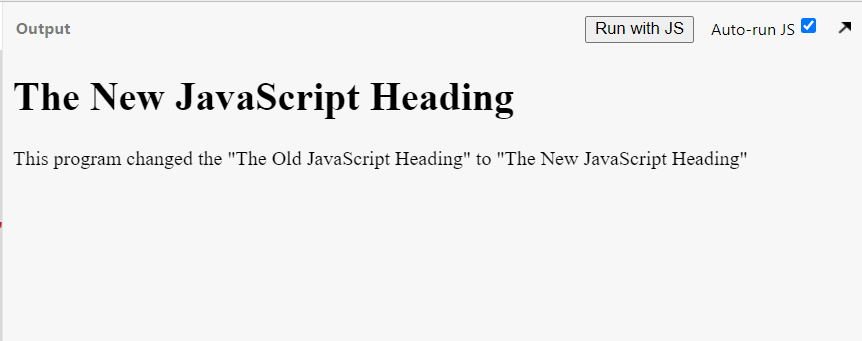
 Have a look at the output of our JavaScript program:
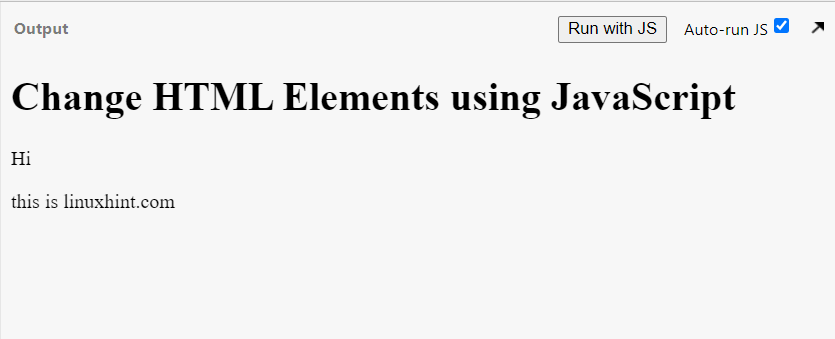
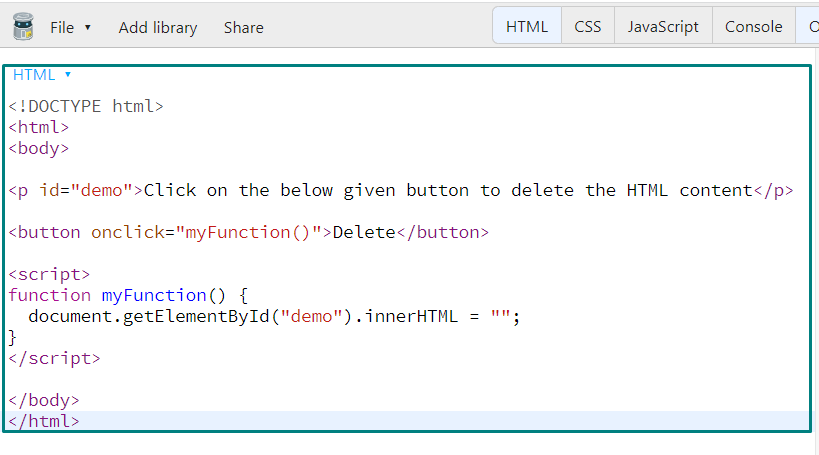 Execution of the above-given program will show you the following output.
Click on the “Delete” button to delete the content of the paragraph HTML element:
Execution of the above-given program will show you the following output.
Click on the “Delete” button to delete the content of the paragraph HTML element:
 As you can see, the “innerHTML” property of the <p> HTML element is now set to blank:
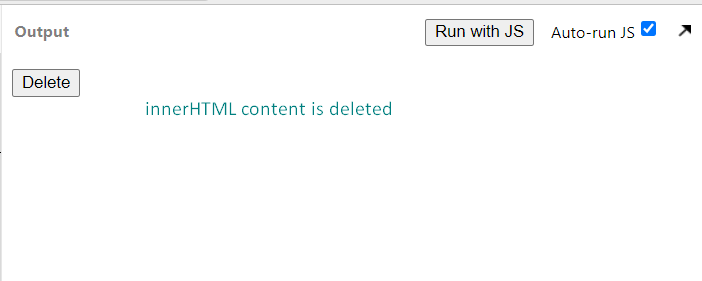
 Execution of the above-given JavaScript program will show the following output:

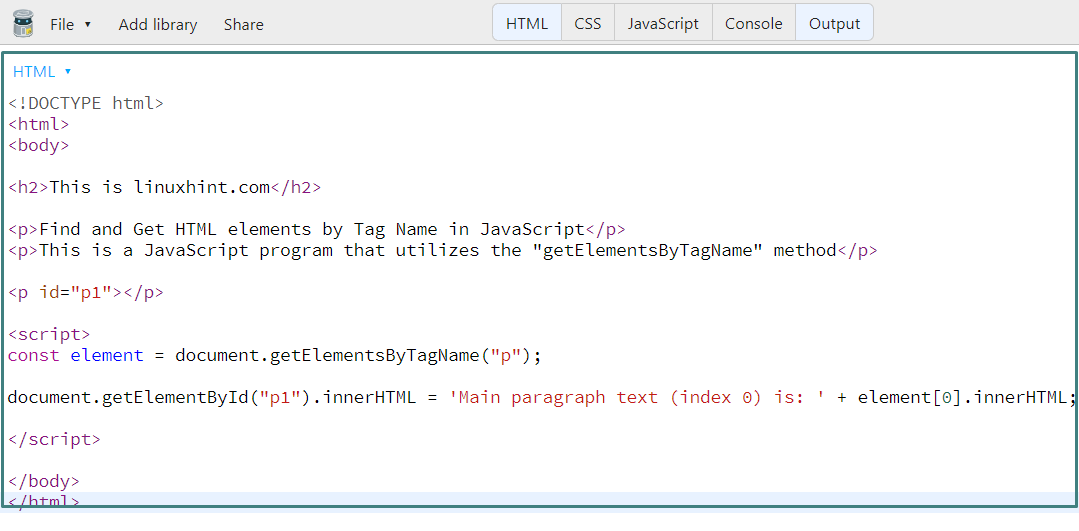 As you can see, the text of the first paragraph of our JavaScript program is displayed successfully:
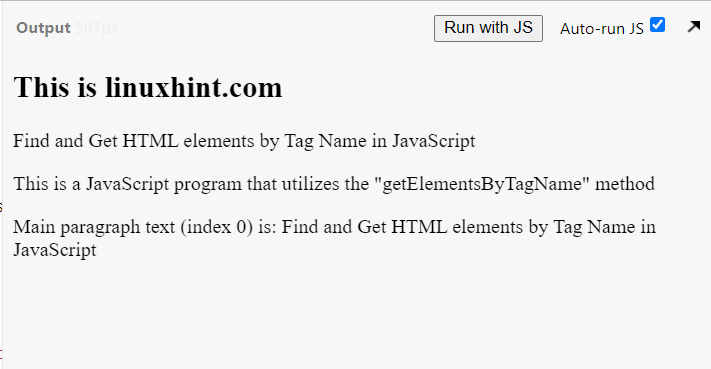
 Here is the output which we got from executing the above-given JavaScript program:

 Check out the output of the JavaScript querySelectorAll() method:

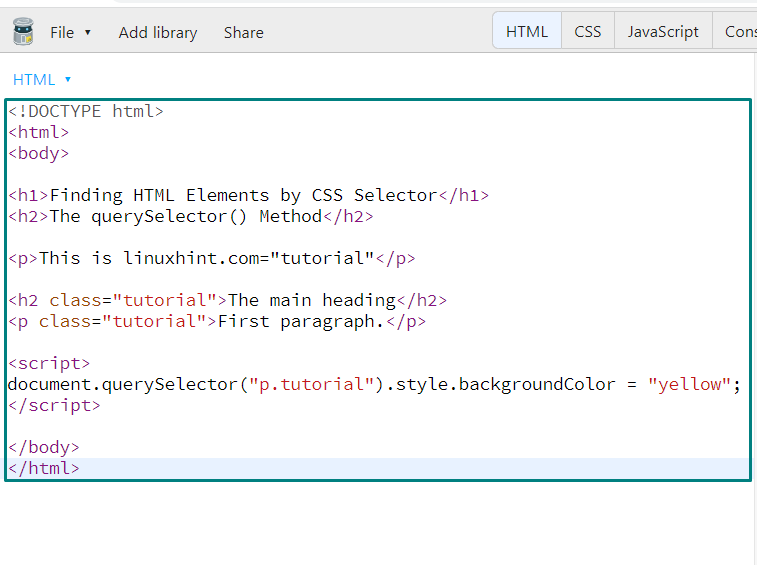 As you can see the background of the first “<p>” element is changed to “yellow”:

 Executing the above-given code will show you the following output:

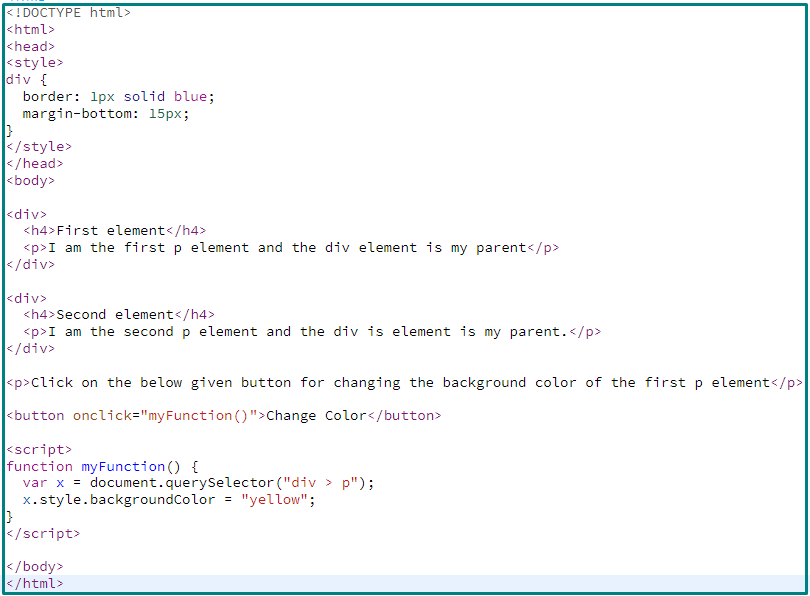 Click on the “Change Color” button to change the background color of the first <p> element:

 As you can see, the background of the first <p> element is changed to “pink”:

 Now, the output will show you a “Click me” button; click on it to check the number of elements with class=“tutorial”:

 Clicking on the highlighted button will change the background color of the h2, div, and span elements:


 After
After

 After clicking the input field, the background color of the input field will be changed to pink.


 After clicking OK, the context menu will open.

 After
After

 As soon as you change the input field value the alert message will appear.

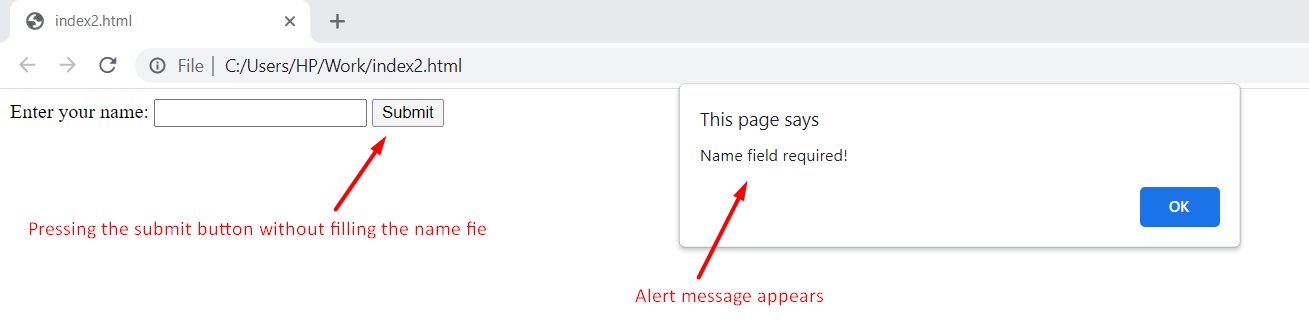
 After pressing the OK button, the form will reset.


 After selecting.

